1
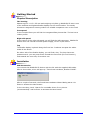
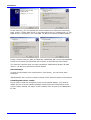
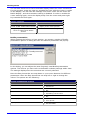
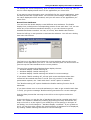
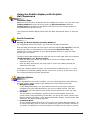
Papenmeier part n°: 0090.399.00
Rev. 2.0 / February 2008
®
BRAILLEX EL 40s
User’s Manual
Table of Contents
Introduction ............................................................................................I
The Easy Access Bar ........................................................................I
CE Medical Devices Directive .............................................................I
Symbols and Conventions ................................................................II
Getting Started ....................................................................................... 3
Physical Description ........................................................................ 3
Right side panel...................................................................... 3
Installation .................................................................................... 3
USB Connection...................................................................... 3
Installing the Screen reader ..................................................... 4
Service.......................................................................................... 5
Safety Advice ................................................................................. 5
Service and Maintenance ................................................................. 5
Using the Braille display with Jaws for Windows .................................... 7
Function Keys................................................................................. 7
Braille Functions ............................................................................. 7
Moving the Braille display (Reading Window) .............................. 7
Working Modes............................................................................... 7
Selecting the Working Modes .................................................... 8
Easy Access Bar Assignment in the Different Working Modes ......... 8
Cursor Tracking ...................................................................... 9
Braille presentation ............................................................... 10
Reveal Text Attributes ........................................................... 11
Mouse Functions ................................................................... 12
Using the Braille display with Dolphin Hal/Supernova.......................... 13
Function Keys............................................................................... 13
Braille Functions ........................................................................... 13
Moving the Braille display (Reading Window) ............................ 13
Working Modes............................................................................. 13
Selecting the Working Modes .................................................. 14
Easy Access Bar Assignment in the Three Working Modes ........... 14
Cursor Tracking .................................................................... 16
Braille presentation ............................................................... 16
Reveal Text Attributes ........................................................... 17
Mouse Functions ................................................................... 18
Important Advice.................................................................................. 19
Purpose of the Device.................................................................... 19
Safety Advice ............................................................................... 19
General Precautions ...................................................................... 19
CE-Marking .................................................................................. 20
Copyright .................................................................................... 20
Declarations of Conformity ............................................................. 20
Index .................................................................................................... 23
Introduction
BRAILLEX EL 40s is the smallest of Papenmeier's world-renowned Efficiency Line
Braille displays. It combines its small size with state-of-the-art access technology
and a particularly comfortable user interface. The highlight of the unit is the
patented Easy Access Bar.
This document will describe the installation and use of the device.
The Easy Access Bar
The Easy Access Bar integrated in the font of BRAILLEX EL 40s allows fast and
easy navigation across the screen.
You can push the Easy Access Bar in all four directions, in two steps each. When
you sit in front of the device and read the Braille display, your thumbs are
naturally located in front of the Easy Access Bar.
You push the bar with your thumb. When you release it after a movement, it will
jump back to the initial position. The profiled front of the bar gives your thumb
enough grip to activate these keys. You feel a light resistance and hear a click
when you have activated a key. Its function is generally executed only after you
have released the Easy Access Bar. Only the keys with repeat function make
exception.
In every direction you can access two functions. After you release it, the Easy
Access Bar returns to its home position. In its home position it has no function.
Jaws for Windows obviously allows more functions than the 8 described above.
Therefore, Papenmeier added two keys to the left and to the right of the Braille
display. You will learn below that using the keys, you can also alter the
assignment of the Easy Access Bar. You then get a selection dialog that modifies
the meaning of the Easy Access Bar until you change it again.
CE Medical Devices Directive
BRAILLEX EL 40s complies with the requirements of the European Union Medical
Devices Directive, as an active class I medical product intended to be used
for the purpose of compensation for a handicap.
This product may only be used in home or office environments. In medical
facilities, this product may only be used in office rooms.
Please read this manual and the information on medical devices carefully.
I
Symbols and Conventions
Symbols and Conventions
The following conventions and symbols shall help you to identify all the text
elements being used in this manual:
Comment and / or additional information.
Warnings of possible dangers and safety information referring to the medical devices regulation
All trademarks and proper names mentioned in this manual are properties of
their respective holders.
F.H. Papenmeier reserves the right to modify the devices described in this
manual without notice.
February 2008
F. H. Papenmeier GmbH & Co KG
Reha Division
P.O. Box 16 20
D-58211 Schwerte, Germany
Phone:
+49-2304-946 0
Fax:
+49-2304-946 246
Email:
[email protected]
II
Getting Started
Physical Description
The housing
Measuring 310 x 115 x 22 mm and weighing only 890 g, BRAILLEX EL 40s is one
of the smallest and lightest Braille displays on the world market. The sturdy
Aluminum-magnesium housing makes it a reliable companion even on the road.
Front panel
In the rounded front you will find the integrated Easy Access Bar. The bar has a
rubber profile.
Right side panel
In the center of the right side panel you will find the USB connector. BRAILLEX
EL 40s does not need an external power supply, nor an on/off switch.
Top
The Braille display is placed along the front line. It almost occupies the whole
width of the device.
On either side of the Braille display, you will find a key. The keys have two
positions each: you can press them towards the front side (for one function),
and towards the rear side, for another one.
Installation
USB Connection
You connect the BRAILLEX EL device with the PC with the supplied USB cable.
After a short while, a box will pop up: "Found new hardware, Braillex II USB".
After a couple of seconds, the Found New Hardware Wizard dialog starts. Hit
Enter to activate the Next button.
In the next box, check "Search for a suitable driver for my device
(recommended)" and hit Enter to activate the Next button.
3
Installation
In the next box, you can specify the search locations to reduce the searching
time. Check " Floppy disk drives" if you have the driver on a floppy disk, or "CD
ROM drives" if you have it on s CD-ROM. Hit Enter to activate the Next button.
Finally, confirm that you want to install the "BRAILLEX.INF" driver that Windows
found on the media you specified and hit Enter to activate the Next button.
The next box confirms that you have installed a "Papenmeier Braillex II USB
device". Hit Enter to activate the Finish button.
Start Message
As soon as the display unit is powered on (see above), you will see a start
message:
"BRAILLEX EL 40s" and the revision number of the actual firmware of the device.
Installing the Screen reader
If you want to read the computer screen on the Braille display, you need to
install and run a screen reader package. Please follow the instructions of the
screen reader manual. All major screen readers have drivers for the BRAILLEX
EL 40s.
4
Getting Started
Service
In case of any defect of the Braille display unit, please contact an authorized
Papenmeier service center. If you are in doubt about the service center
responsible for your area, please contact Papenmeier:
F. H. Papenmeier GmbH & Co. KG
Phone: +49-2304-9460
Fax: +49-2304-946 246
E-mail:
[email protected]
If possible give a short description of the kind of disturbance.
Safety Advice
Please read the information in this manual carefully, so you
will be able to avoid problems.
Use BRAILLEX EL 40s in a dry environment only. Even if the
device is not powered up, it must not get wet.
Never place any heavy objects on the Braille display.
Service and Maintenance
Avoid touching the device with dirty hands. You may clean the surface of the
device (NOT the Braille cells) with a soft, damp cloth. Do not use any aggressive
detergent or soap.
5
Using the Braille display with Jaws for Windows
Function Keys
BRAILLEX EL 40s offers 40 Braille cells for reading the screen. You can move this
reading window across the screen with the Easy Access Bar. With the
routing keys integrated into the Braille cells you move the mouse pointer to
any desired place on the screen.
You control the Braille display either with the Easy Access Bar alone, or with the
keys.
Braille Functions
Moving the Braille display (Reading Window)
For navigating across the screen, you just use the Easy Access Bar.
Push the Easy Access Bar one step up to move the display up one line. Push the
Easy Access Bar one step down to move the display down one line. You
maintain the column position of your Braille display when you push the Easy
Access Bar up or down.
The Easy Access Bar positions one step left and one step right have the meaning
"Read backward" and "Read forward".
• Push the Easy Access Bar one step left to move the reading window 40
columns to the left.
• Push the Easy Access Bar one step right to move the reading window 40
columns to the right.
Using the "Read forward" function, you continuously read the screen, i.e. once
the display has finished reading the the screen line, it will go to the next line if
you continue pushing the Easy Access Bar.
Working Modes
When navigating in the active window, you can choose between three different
working modes, which influence the assignment of the Easy Access Bar:
Navigation Mode
In the Navigation Mode, you just read across the screen when using the
navigation keys as described above; the cursor is NOT moved. This also
means that you can explore parts of the screen where the cursor can't go.
PC Mode
The PC mode is the opposite: Instead of moving the display across the
screen when pushing the Easy Access Bar, you move the cursor. Please note
that as long as the active cursor moves the Braille display, this obviously also
influences the Braille display position.
Combined Mode
The so-called Combined Mode is a mix of the two modes described above. It
is useful especially when it comes to reading long text documents. Whenever
you press a reading key and a line border is crossed, the PC cursor is moved
to the new line as well. This means that you can read a text without having
to bother about screen pages.
7
Working Modes
Selecting the Working Modes
In order to select the working modes, press the right key towards the rear. You
will get a dialog box that looks like follows:
The mode displayed is the one currently selected. Move the Easy Access Bar one
step left or right to change the values. Once you have reached the end of the
list, you will see the first value again. The options are the following:
Navigation mode
PC Mode
Combined Mode
For setting the value temporarily, push the Easy Access Bar 2 steps up. This will
set the value displayed and return to the application you came from.
If you want to save the setting as a new default for the current application, push
the Easy Access Bar 2 steps down. You will hear the message "settings saved",
the value displayed will be activated, and you will return to the application you
came from.
Easy Access Bar Assignment in the Different Working Modes
In the following you will see the assignment of the Easy Access Bar in the three
different working modes:
Navigation Mode
Used for normal screen navigation. The cursor position is not changed. Two
marker positions can be reached directly: the title bar (with 2 steps up) and the
last window line, which typically corresponds to a status line (with 2 steps
down). The main reading functions (read forwards and backwards) have a
double assignment: they can be reached with both the first step and the second
step right or left.
Navigation Mode Functions
Easy Access Bar
One step up
One step down
One step left
Two steps left
One step right
Two steps right
Two steps up
Two steps down
8
Function
Moves the display
Moves the display
Read backwards.
Same as one step
Read forwards.
Same as one step
Moves the display
Moves the display
one line up.
one line down.
left.
right.
to the title bar
to the last line of the window.
Using the Braille display with Jaws for Windows
PC Mode
In PC mode, the Easy Access Bar allows to navigate through an application. Easy
Access Bar keys will emulate PC keyboard functions:
PC Mode Functions
Easy Access Bar
One step left
One step up
One step right
One step down
Two steps left
Two steps up
Two steps right
Two steps down
Function
PC Left arrow key
PC Up arrow key
PC Right arrow key
PC Down arrow key
(Shift)+(Tab)
(Alt); within a dialog box or menu: (Esc)
(Tab)
(Enter)
Combined Mode
The combined mode includes both screen navigation and cursor movement
features. When you move the Easy Access Bar up or down, the cursor is moved
one line up or down as well (cf. PC mode). When you move the Easy Access Bar
to the right, the function is the same as in navigation mode if the text line is
longer than the display is. The cursor remains at the original position. Once all
the text of that line has been displayed, another “read forwards” command will
move both the cursor and the display to the next line. Pushing the Easy Access
Bar one step left corresponds to “read backwards” if you are within a long line of
text. Otherwise, both cursor and display are moved one line up.
In analogy to the navigation mode, two marker positions can be reached
directly: the title bar (with 2 steps up) and the last window line, which typically
corresponds to a status line (with 2 steps down). This will NOT move the cursor.
The main reading functions (read forwards and backwards) have a double
assignment: they can be reached with both the first step and the second step
right or left.
Combined Mode Functions
Easy Access Bar
One step left
Two steps left
One step up
One step right
Two steps right
One step down
Two steps up
Two steps down
Function
Read backwards (within a long line), or: move cursor
and display to previous line
Same as one step left
Move cursor and display to previous line
Read forwards (within a long line), or: move cursor
and display to next line
Same as one step right.
Move cursor and display to next line
Moves the display to the title bar
Moves the display to the last line of the window.
Cursor Tracking
When navigating across the screen with the Braille display, you do not always
take the cursor with you. You can return to the cursor position at any time. If the
cursor is not present within the Braille display and you want to move the display
back to the cursor position, press the right key towards the front. This will move
the display to the cursor location and make sure that when the cursor is moved,
the display will follow.
9
Working Modes
You can also decide not to have the Braille display follow the cursor movements.
For this purpose, press the right key towards the front while the cursor is visible
on the display. You will hear the message "the active cursor will not move the
Braille display", and the automatic tracking is disabled. In order to enable the
cursor tracking again, move the display away from the cursor and press right
key towards the front again.
Cursor Tracking
Key
Function
Right key in front position while
cursor is NOT within Braille window
Right key in front position while
cursor is visible within Braille
window
Enable cursor tracking and move
display to the cursor position
Disable cursor tracking
Braille presentation
When pressing the left key in front position, you access a number of Braille
presentation options. A dialog box with six different parameters will pop up:
In this dialog, you can adjust the most frequently used Braille presentation
options. The choices you have refer to the Braille verbosity settings within Jaws.
The settings displayed are the ones that are currently selected.
Move the Easy Access Bar one step down or up to move between the different
parameters. Move the Easy Access Bar one step left or right to change the
values. The options are the following:
Braille presentation options
Parameters
Braille mode
Grade two translation
Translate word under cursor
Mark with dots 7 and 8
Text display in Braille
Display in
10
Options
Line
Structured
On
Off
Translating whole line
Expanding current word
On
Off
As on screen
Line up text
Eight dot Braille
Six dot Braille
Using the Braille display with Jaws for Windows
For setting the values temporarily, push the Easy Access Bar 2 steps up. This will
set the value displayed and return to the application you came from.
If you want to save the setting as a new default for the current application, push
the Easy Access Bar 2 steps down. You will hear the message "settings saved",
the value displayed will be activated, and you will return to the application you
came from.
Reveal Text Attributes
You can have the Braille display reveal different text attributes. The Braille
display then underlines the corresponding portion of text with dots 7+8. You can
select any of the different attributes directly, or you can choose to get all
available attributes revealed. You can, of course, also disable this function.
Press the left key in rear position to activate the selection. You will see a dialog
that looks like follows:
The first line in the dialog box shows the current attribute value at the cursor
position of the application you are in. You can obviously also use this function to
just look up the exact attribute at the cursor position.
The next line contains the global attribute display choices:
Attribute display: Braille marking all
Attribute display: Braille marking off
Attribute display: Braille marking see below for current settings
If you select "Braille marking all", all text with screen attributes other than
normal will be marked with dots 7 and 8. This only works if in the Braille
presentation options, the "mark with dots 7 and 8" option is enabled.
The "Braille marking off" option disables the Braille marking function for all
attributes.
If you have chosen one or several attributes you want to get revealed with dots
7 and 8, you get the message "Braille marking see below for current settings".
Push the Easy Access Bar one step to the left or to the right to select the
settings.
In the next lines, you see the list of attributes that can be revealed with dots 7
and 8. You enable or disable the marking by pushing the Easy Access Bar one
step to the left or to the right. If you modify any of the settings in this part of
the dialog, line 2 will change to " Attribute display: modified". If you go back to
line 2 you can then also restore the initial selection of attributes to be displayed,
by chosing "Braille marking see below for current settings".
11
Working Modes
For setting the values temporarily, push the Easy Access Bar 2 steps up. This will
set the value displayed and return to the application you came from.
If you want to save the setting as a new default for the current application, push
the Easy Access Bar 2 steps down. You will hear the message "settings saved",
the value displayed will be activated, and you will return to the application you
came from.
Mouse Functions
You can activate mouse functions with all BRAILLEX EL devices, using the routing
keys.
In order to execute a mouse click, you first move the Braille display to the
relevant position. Then you press a routing key at the desired position. This
corresponds to a left mouse click.
You can also use the routing keys to select text, for example in a word
processing program. Move the display to the starting point of the marker. Hold
the left key in front position while you press the routing key at the start position.
Then move the display to the end point and repeat the key combination.
Mouse functions
Key
Routing key
Left key in front position + routing key
12
Function
Route mouse to the key position and
execute a left mouse click
Text selection
Using the Braille display with Dolphin
Hal/Supernova
Function Keys
BRAILLEX EL 40s offers 40 Braille cells for reading the screen. You can move this
reading window across the screen with the Easy Access Bar. With the
routing keys integrated into the Braille cells you move the mouse pointer to
any desired place on the screen.
You control the Braille display either with the Easy Access Bar alone, or with the
keys.
Braille Functions
Moving the Braille display (Reading Window)
For navigating across the screen, you just use the Easy Access Bar.
Push the Easy Access Bar one step up to move the display up one line. Push the
Easy Access Bar one step down to move the display down one line. You
maintain the column position of your Braille display when you push the Easy
Access Bar up or down.
The Easy Access Bar positions one step left and one step right have the meaning
"Read backward" and "Read forward".
• Push the Easy Access Bar one step left to move the reading window 40
columns to the left.
• Push the Easy Access Bar one step right to move the reading window 40
columns to the right.
Using the "Read forward" function, you continuously read the screen, i.e. once
the display has finished reading the the screen line, it will go to the next line if
you continue pushing the Easy Access Bar.
Working Modes
When navigating in the active window, you can choose between three different
working modes, which influence the assignment of the Easy Access Bar:
Navigation Mode
In the Navigation Mode, you just read across the screen when using the
navigation keys as described above; the cursor is NOT moved. This also
means that you can explore parts of the screen where the cursor can't go.
PC Mode
The PC mode is the opposite: Instead of moving the display across the
screen when pushing the Easy Access Bar, you move the cursor. Please note
that as long as the active cursor moves the Braille display, this obviously also
influences the Braille display position.
Combined Mode
The so-called Combined Mode is a mix of the two modes described above. It
is useful especially when it comes to reading long text documents. Whenever
you press a reading key and a line border is crossed, the PC cursor is moved
13
Working Modes
to the new line as well. This means that you can read a text without having
to bother about screen pages.
Selecting the Working Modes
In order to select the working modes, press the right key towards the rear. You
will get a dialog box that looks like follows:
The mode displayed is the one currently selected. Move the Easy Access Bar one
step left or right to change the values. Once you have reached the end of the
list, you will see the first value again. The options are the following:
Navigation mode
PC Mode
Combined Mode
If you want to save the setting, push the Easy Access Bar 2 steps down. The
value displayed will be activated, and you will return to the application you came
from.
If you want to exit without saving the changes, push the Easy Access Bar 2 steps
up. You will then return to the application you came from.
Easy Access Bar Assignment in the Three Working Modes
In the following you will see the assignment of the Easy Access Bar in the three
different working modes:
Navigation Mode
Used for normal screen navigation. The cursor position is not changed. Two
marker positions can be reached directly: the title bar (with 2 steps up) and the
last window line, which typically corresponds to a status line (with 2 steps
down). The main reading functions (read forwards and backwards) have a
double assignment: they can be reached with both the first step and the second
step right or left.
Navigation Mode Functions
Easy Access Bar
One step up
One step down
One step left
Two steps left
One step right
Two steps right
Two steps up
Two steps down
14
Moves the display
Moves the display
Read backwards.
Same as one step
Read forwards.
Same as one step
Moves the display
Moves the display
Function
one line up.
one line down.
left.
right.
to the title bar
to the last line of the window.
Using the Braille display with Dolphin Hal/Supernova
PC Mode
In PC mode, the Easy Access Bar allows to navigate through an application. Easy
Access Bar keys will emulate PC keyboard functions:
PC Mode Functions
Easy Access Bar
One step left
One step up
One step right
One step down
Two steps left
Two steps up
Two steps right
Two steps down
Function
PC Left arrow key
PC Up arrow key
PC Right arrow key
PC Down arrow key
(Shift)+(Tab)
(Esc)
(Tab)
(Enter)
Combined Mode
The combined mode includes both screen navigation and cursor movement
features. When you move the Easy Access Bar up or down, the cursor is moved
one line up or down as well (cf. PC mode). When you move the Easy Access Bar
to the right, the function is the same as in navigation mode if the text line is
longer than the display is. The cursor remains at the original position. Once all
the text of that line has been displayed, another “read forwards” command will
move both the cursor and the display to the next line. Pushing the Easy Access
Bar one step left corresponds to “read backwards” if you are within a long line of
text. Otherwise, both cursor and display are moved one line up.
In analogy to the navigation mode, two marker positions can be reached
directly: the title bar (with 2 steps up) and the last window line, which typically
corresponds to a status line (with 2 steps down). This will NOT move the cursor.
The main reading functions (read forwards and backwards) have a double
assignment: they can be reached with both the first step and the second step
right or left.
Combined Mode Functions
Easy Access Bar
One step left
Two steps left
One step up
One step right
Two
One
Two
Two
steps right
step down
steps up
steps down
Function
Read backwards (within a long line), or: move cursor
and display to previous line
Same as one step left
Move cursor and display to previous line
Read forwards (within a long line), or: move cursor and
display to next line
Same as one step right.
Move cursor and display to next line
Moves the display to the title bar
Moves the display to the last line of the window.
15
Working Modes
Cursor Tracking
When navigating across the screen with the Braille display, you do not always
take the cursor with you. You can return to the cursor position at any time. If
you want to move the display back to the cursor position, press the right key
towards the front. This will move the display to the cursor location.
Cursor Tracking
Key
Right key in front position
Function
Move display to the cursor position
Braille presentation
When pressing the left key in front position, you access a number of Braille
presentation options. A dialog box with six different parameters will pop up:
In this dialog, you can adjust the most frequently used Braille presentation
options. The choices you have refer to the Braille verbosity settings within Jaws.
The settings displayed are the ones that are currently selected.
Move the Easy Access Bar one step down or up to move between the different
parameters. Move the Easy Access Bar one step left or right to change the
values. The options are the following:
Braille presentation options
Parameters
Braille mode
Literary Braille
Cursor at word uncontracted
Enhanced characters
Expand gaps
Display in eight dot
Options
Logical
Physical
On
Off
On
Off
On
Off
On
Off
On
Off
If you want to save the setting, push the Easy Access Bar 2 steps down. The
value displayed will be activated, and you will return to the application you came
from.
16
Using the Braille display with Dolphin Hal/Supernova
If you want to exit without saving the changes, push the Easy Access Bar 2 steps
up. You will then return to the application you came from.
Reveal Text Attributes
You can have the Braille display reveal different text attributes. The Braille
display then underlines the corresponding portion of text with dots 7+8. You can
select any of the different attributes directly, or you can choose to get all
available attributes revealed. You can, of course, also disable this function.
Press the left key in rear position to activate the selection. You will see a dialog
that looks like follows:
The first line in the dialog box shows the current attribute value at the cursor
position of the application you are in. You can obviously also use this function to
just look up the exact attribute at the cursor position.
The next line contains the global attribute display choices:
Attribute display: Braille marking all
Attribute display: Braille marking off
Attribute display: See below for current settings
If you select "Braille marking all", all text with screen attributes other than
normal will be marked with dots 7 and 8. This only works if in the Braille
presentation options, the "mark with dots 7 and 8" option is enabled.
The "Braille marking off" option disables the Braille marking function for all
attributes.
If you have chosen one or several attributes you want to get revealed with dots
7 and 8, you get the message "Braille marking see below for current settings".
Push the Easy Access Bar one step to the left or to the right to select the
settings.
In the next lines, you see the list of attributes that can be revealed with dots 7
and 8. You enable or disable the marking by pushing the Easy Access Bar one
step to the left or to the right. If you modify any of the settings in this part of
the dialog, line 2 will change to " Attribute display: modified". If you go back to
line 2 you can then also restore the initial selection of attributes to be displayed,
by chosing "Braille marking see below for current settings".
If you want to save the setting, push the Easy Access Bar 2 steps down. The
value displayed will be activated, and you will return to the application you came
from.
17
Working Modes
If you want to exit without saving the changes, push the Easy Access Bar 2 steps
up. You will then return to the application you came from.
Mouse Functions
You can activate mouse functions with all BRAILLEX EL devices, using the routing
keys. In order to execute a mouse click, you first move the Braille display to the
relevant position. Then you press a routing key at the desired position. This
corresponds to a left mouse click.
Mouse functions
Key
Routing key
18
Function
Route mouse to the key position and
execute a left mouse click
Important Advice
Important Advice
Purpose of the Device
BRAILLEX EL 40s is intended to be used for the purpose of compensation for the
visual handicap of blind people.
According to the European Council directive 93/42/EEC (Medical Devices
Directive), they have therefor been classified as active class I medical devices.
These products may only be used in home or office environments. In medical
facilities, this product may only be used in office rooms.
The connected PC must comply with the standards regarding safety and EMC
(electro-magnetic compatibility) relevant for the area where it is used.
Safety Advice
Before starting to operate the BRAILLEX EL device, the user should read this
manual.
The device shall only be installed by a trained person.
The device may only be used with the original accessories and in combination
with the products foreseen for this purpose by F. H. Papenmeier. If a
combination with other devices is necessary, those devices must comply with the
relevant standards.
The device may only be used in closed and dry rooms. The ambient
temperature must not exceed 40° C (ca. 105° F). Do not expose the device
to direct sunlight or humidity (rain).
Repairs and maintenance work may only be undertaken by Papenmeier or by
authorized service centers.
There are no known risks for your health that might be caused by the use of this
product.
General Precautions
Our products guarantee optimum safety and reduce to a minimum the strain
caused through over-exertion. However, when respecting some precautions you
can contribute to avoid prejudice to your health or damage to the product.
If a cellular phone is used close to the product, a minimum distance of 30 cm (1
ft) shall be respected.
Do not expose the product to strong pressure, and do not drop any objects on
the product. This might damage the product or lead to misfunctions.
In order to avoid repetitive strain injury at your hands caused through long-time
use of the function elements and reading the Braille display, we suggest pauses
and relaxation exercise. In specialized bookshops you also find literature on how
to equip a workplace in an ergonomical way and on how to avoid strain through
an appropriate sitting position.
19
CE-Marking
CE-Marking
The BRAILLEX EL devices and their original accessories comply with the relevant
standards regarding the electro-magnetic compatibility (EMC) and the safety,
and are marked with the CE sign.
FHP cannot guarantee however that these products still comply with these EMC
standards if they are connected to cables or devices not produced by F. H.
Papenmeier. In this case, the person(s) who connected the cables or devices are
responsible for taking care that the combination complies with the required
standards. In order to avoid EMC problems, you should observe the following
advice:
Only connect accessories and devices marked with the CE mark.
Only use shielded connecting cables.
Copyright
© 2004-2008 by F. H. Papenmeier. All rights reserved.
Declarations of Conformity
20
EC Declaration of Conformity
acc. to Article 10.1 of the Directive 89/336/EEC (EMC-Directive)
We,
F. H. Papenmeier GmbH & Co KG
Talweg 2
D-58239 Schwerte, Germany
Name and address of the manufacturer or of the introducer
of the product on the market who is established in the EU
herewith take the sole responsibility to confirm that the products:
BRAILLEX EL 40s
which refers to this declaration, are medical devices class I, and are in accordance with
the following standards or standardized documents:
1.
2.
EN 55 022:1998 + Corr:2001 + A1:2000
Kl. B
EN 55 022
EN 55 022
EN 61 000-3-2:2001
EN 61 000-3-3:1995 +Corr:1997 +A1:2001
EN 55 024:1998
EN 61 000-4-6:1996 + A1:2001
EN 61 000-4-3:1996 + A1:1998 + A2:2001
EN
EN
EN
EN
61
61
61
61
000-4-4:1995 + A1:2001
000-4-5:1995 + A1:2001
000-4-11:1994 + A1:2000
000-4-2:1995 + A1:1998 + A2:2001
RF emission
conducted noise
radiated noise
harmonics
flicker]
immunity
injected HF currents
radiated HF fields incl.
”900MHz”
Burst
Surge
voltage variations
ESD
(Title and/or number and date of the standard(s) or other standardized documents)
According to the requirement(s) of the following directive(s):
93/42/EEC (Medical Devices Directive)
This confirmation is based on:
Test report n° 21108994_001 byTÜV Rheinland Product Safety GmbH, 51101
Köln, Germany
Jürgen Bornschein, Chief Engineer
F.H. Papenmeier GmbH & Co KG, Talweg 2, D-58239 Schwerte, Germany
Schwerte, August 22, 2003
Name, address, date and legally binding signature of the person responsible
21
Declarations of Conformity
Declaration
FCC
We,
47 CFR Ch. 1 §2.906 Declaration of Conformity
F. H. Papenmeier GmbH & Co KG
Talweg 2
58239 Schwerte, Germany
Name and address of the manufacturer or of the introducer of the product
who is established in the EU
herewith take the sole responsibility to confirm that the product:
Braille Terminal
BRAILLEX EL 40s
Type designation and, if applicable, article no.
is in accordance with the following standards or standardized documents
FCC 47 CFR Ch.1 Part 15
Section 15.107(a), limits as
IEC/CISPR 22:1007 Class B
(EN 55 022:1998 Class B)
RF emission
conducted noise, AC power input
Section 15.109(a) Class B
radiated el. noise
Per Sections 15.109(g), i.e.
IEC/CISPR 22:1007 Class B
(EN 55 022:1998 Class B)
radiated el. noise
(Title and/or number and date of the standard(s) or other standardized documents)
The following operating conditions and installation arrangements have to be presumed:
Cf. User's Manual, chapter Safety Advice
This confirmation is based on test report
21113467_001
TÜV Rheinland Safety GmbH, 51101 Köln, Germany
FCC Registration Number 91096, 2001-July-25
DAR Accreditation (DA Tech e.V.) DAT-P-009/91-12, 2002-Oct-28
Jürgen Bornschein, Chief Engineer
F.H. Papenmeier GmbH & Co KG, Talweg 2, 58239 Schwerte, Germany
Schwerte, August 4, 2004
Name, address, date and legally binding signature of the person responsible
Index
A
K
attributes .............................................11
Attributes (Dolphin) ...............................17
keys................................................... I, 3
B
M
misfunctions..........................................19
Braille presentation options .....................10
Braille presentation options (Dolphin) .......16
C
CE Medical Devices Directive ..................... I
CE sign.................................................20
clean..................................................... 5
compensation........................................19
conventions ........................................... II
cursor
active cursor .....................................10
disable cursor tracking ........................10
Cursor
move to cursor position (Dolphin).........16
D
Declaration of Conformity
Directive 89/336/EEC .........................21
FCC 47 CFR Ch.1 §2.906 .....................22
N
navigating......................................... 7, 13
R
Routing
Mouse routing....................................12
Mouse routing (Dolphin)......................18
Text selection ....................................12
S
safety...................................................19
service .................................................. 5
start message ........................................ 4
symbols.................................................II
U
E
USB connector........................................ 3
Easy Access Bar....................................... I
EMC.....................................................20
EU Medical Devices Directive ..................... I
W
I
Installation
USB connection................................... 3
Working Modes
Combined mode .................................. 9
Combined mode (Dolphin) ...................15
Navigation mode ................................. 8
Navigation mode (Dolphin) ..................14
PC mode ............................................ 9
PC mode (Dolphin) .............................15
23