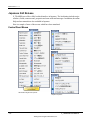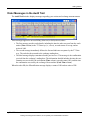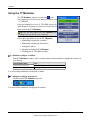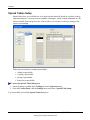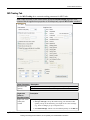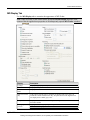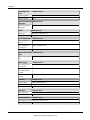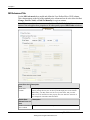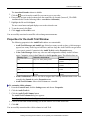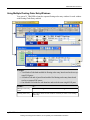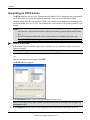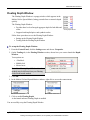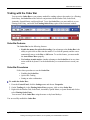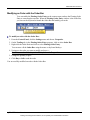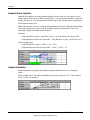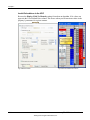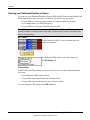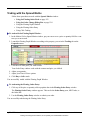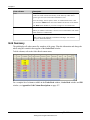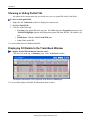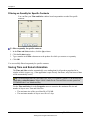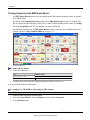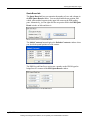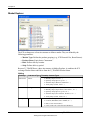
1
X_TRADER®
User Manual
Version 7.7.5
Document Version 7.7.5.X.DV1 3/24/2010
Trading Technologies International, Inc.
Legal Notices
This document and all related computer programs, example programs, and all source code are the
exclusive property of Trading Technologies International, Inc. (TT), and are protected by licensing
agreements, copyright law and international treaties. Unauthorized possession, reproduction, duplication,
or dissemination of this document, or any portion of it, is illegal and may result in severe civil and criminal
penalties.
Unauthorized reproduction of any TT software or proprietary information may result in severe civil and
criminal penalties, and will be prosecuted to the maximum extent possible under the law.
Information in this document is subject to change without notice. Companies, names, and data used in
examples herein are fictitious unless otherwise noted. No part of this document may be reproduced or
transmitted in any form or by any means, electronic or mechanical, for any purpose, without the express
written permission of TT.
All trademarks displayed in this document are subject to the trademark rights of TT, or are used under
agreement by TT. These trademarks include, but are not limited to, service brand names, slogans and logos
and emblems including but not limited to: Trading Technologies®, the Trading Technologies Logo, TT™,
X_TRADER®, X_RISK®, MD Trader®, Autospreader®, X_STUDY®, TT_TRADER®, TT CVD®,
Autotrader™, TT Trainer™, TTNET™. All other referenced companies, individuals and trademarks
retain their rights. All trademarks are the property of their respective owners. The unauthorized use of any
trademark displayed in this document is strictly prohibited.
Copyright © 2004-2010 Trading Technologies International, Inc. All rights reserved.
Trading Technologies International, Inc.
Table of Contents
W HAT'S N EW IN 7.7.5
J APANESE
15
GUI R ELEASE
16
16
17
18
18
19
20
20
22
22
24
C ONTROL P ANEL M ENUS
M ARKET W INDOW
MD T RADER
P ROPERTY T ABS
M ARKET E XPLORER
A UDIT T RAIL
O RDER B OOK, F ILL W INDOW AND T RADE B OOK
T IME AND S ALES AND C USTOMER D EFAULTS
Q UOTE B OARD AND S PREAD M ATRIX
A UTOSPREADER AND A UTOTRADER
25
A BOUT T HIS M ANUAL
INTRODUCTION TO
C ONVENTIONS
X_TRADER®
25
25
26
26
27
28
K EYBOARD F ORMATS
R ELATED D OCUMENTATION
X_TRADER T RADING S YSTEM
G LOBAL C USTOMER S UPPORT C ENTER
28
A UTOMATED P HONE M ENU
29
G ETTING S TARTED
30
34
37
L OGIN P ROCEDURES
U NIVERSAL L OGIN P ROCEDURES
R ECOGNIZING A CTIVE E XCHANGES
M ARKET E XPLORER
G UARDIAN
37
37
X_TRADER® P RO L ICENSE
38
39
40
40
C REATING A C USTOMER P ROFILE
U SING W ORKSPACES
E NTERING A M ARKET O RDER
40
N EW E LECTRONIC T RADERS
41
42
42
43
O RDER M ESSAGES IN THE A UDIT T RAIL
E XITING X_TRADER
A UTOMATIC S HUTDOWN OF X_TRADER
U SING C ONTEXT S ENSITIVE H ELP
45
C OMMON A DMINISTRATIVE T ASKS
46
48
50
P OPULATING W INDOWS WITH C ONTRACTS
U SING THE TT M INIMIZER
F ILTERING O VERVIEW
50
51
51
52
S ETTING A C OLUMN F ILTER
C LEARING A C OLUMN F ILTER
C LEARING A LL F ILTERS
S ETTING A UTO F ILTERS
X_TRADER® User Manual
Trading Technologies International, Inc. Proprietary and Confidential Information
- iii -
Table of Contents
53
E FFECTS OF F ILTERS
53
F ORMATTING F ONTS
54
54
55
C HANGING THE F ONT S TYLE
C HANGING G LOBAL C OLORS OF W INDOWS OR T EXT
C HANGING INDIVIDUAL C OLORS OF G RIDS OR T EXT
57
F ORMATTING G RIDS
57
58
58
59
60
S ETTING THE D EFAULT V ISIBLE C OLUMNS
M OVING R OWS OR C OLUMNS
H IDING R OWS OR C OLUMNS
R ESTORING H IDDEN R OWS OR C OLUMNS
C HANGING THE H EIGHTS OF R OWS OR THE W IDTHS OF C OLUMNS
61
F RAME C OMMAND B AR O VERVIEW
61
62
R ESIZING A W INDOW G RID
P RINTING
63
C ONTROL P ANEL O VERVIEW
64
O PENING A F UNCTIONAL W INDOW
64
66
67
W INDOW M ENU
T HE T OOLBAR
C HANGING THE S IZE OF THE T OOLBAR
68
W ORKSPACE S ETUP
68
69
70
71
72
73
73
M ULTIPLE W ORKSPACES
C REATING A W ORKSPACE
S AVING A W ORKSPACE
O PENING A W ORKSPACE
M ANAGING A S TARTUP W ORKSPACE
F IXING A W ORKSPACE
D ELETING A W ORKSPACE
74
P RODUCT G ROUP INFORMATION S ETUP
75
77
79
79
80
81
P RODUCT G ROUP INFORMATION F IELD/C OLUMN D ESCRIPTIONS
A DDING A P RODUCT G ROUP
C HANGING A P RODUCT G ROUP S ETTINGS
D ELETING A P RODUCT G ROUP
A SSOCIATING A P RODUCT TO A P RODUCT G ROUP
D ISASSOCIATING A P RODUCT FROM A P RODUCT G ROUP
82
S PREAD T ABLES S ETUP
83
84
84
84
A DDING A S PREAD T ABLE
C OPYING A S PREAD T ABLE
S AVING A S PREAD T ABLE
R EMOVING A S PREAD T ABLE
85
C USTOMER D EFAULTS S ETUP
86
86
87
89
90
90
91
92
93
93
94
C USTOMER D EFAULT F EATURES
TTUS INTEGRATION WITH C USTOMER D EFAULTS
C USTOMER D EFAULTS D IALOG B OX F IELD D ESCRIPTIONS
C REATING A C USTOMER D EFAULTS P ROFILE
C HANGING A C USTOMER D EFAULTS P ROFILE
D ELETING A C USTOMER D EFAULTS P ROFILE
S ETTING C USTOMER D EFAULTS TO R EAD-O NLY
S HARING YOUR C USTOMER D EFAULTS P ROFILE
U SING THE C USTOMER L IST
One Customer Name Entry
O RDER E NTRY C USTOMER S ELECTION O VERVIEW
- iv -
X_TRADER® User Manual
Trading Technologies International, Inc.
Table of Contents
95
P ROPERTIES M ENU O VERVIEW
95
96
101
102
106
109
111
113
114
114
115
115
116
119
121
123
124
125
129
130
131
135
138
142
143
144
145
P ROPERTY T AB N AMES
T RADING T AB
Admin Alert Messages
O RDER E NTRY T AB
F ILL T AB
O RDERS T AB
A UDIT T RAIL T AB
S OUNDS T AB
Suggestions
Contract High and Low Sounds
Adding an Event Sound
Changing or Removing an Event Sound
C OLOR T AB
C HANGING G LOBAL C OLORS OF W INDOWS OR T EXT
S PREAD M ATRIX T AB
Example: Spread Matrix Outright Price Display
T IME AND S ALES T AB
MD T RADING T AB
Managing TradeSounds
Hearing TradeSounds
MD D ISPLAY T AB
MD C OLOR T AB
MD A DVANCED T AB
Q UOTE B OARD T AB
H OTKEYS T AB
Hotkey Restrictions
P ROPERTIES A UTOSPREADER T AB
146
C ONTROL P ANEL ICON AND M ENU D ESCRIPTIONS
147
148
149
F ILE M ENU
S ETTINGS M ENU
H ELP M ENU
150
151
A DDING H IGH AND L OW A LERTS
S TARTING P LUG-INS
155
A UDIT T RAIL O VERVIEW
156
156
156
157
H ELD O RDERS
F ILTERS
A UDIT T RAIL H ISTORY
A UDIT T RAIL C OLUMN D ESCRIPTIONS
A UDIT T RAIL C ONTEXT M ENU
158
A UDIT T RAIL M ESSAGE T YPES
159
159
159
159
159
O RDER M ESSAGES
E XCHANGE A NNOUNCEMENTS
G ATEWAY A LERTS
E RROR M ESSAGES
160
161
162
C USTOMIZING E XCHANGE A NNOUNCEMENTS
P ROPERTIES FOR THE A UDIT T RAIL W INDOW
S TORING F ILES
162
C ONCISE A UDIT T RAIL
X_TRADER® User Manual
Trading Technologies International, Inc. Proprietary and Confidential Information
-v -
Table of Contents
163
M ARKET E XPLORER O VERVIEW
164
165
166
167
168
M ARKET E XPLORER F IELD D ESCRIPTIONS
M ARKET E XPLORER A DVANCED F IELD D ESCRIPTIONS
S EARCHING FOR A P RODUCT
R ENAMING C ONTRACTS
P OPULATING W INDOWS WITH C ONTRACTS
M ARKET W INDOW O VERVIEW
171
O RDER E NTRY P ANE O VERVIEW
172
172
176
178
179
180
181
182
182
183
184
184
185
185
O RDER E NTRY P ANE F IELD D ESCRIPTIONS
U SING F LOATING O RDER E NTRY
Floating Order Entry Notes
U SING M ULTIPLE F LOATING O RDER E NTRY W INDOWS
S UBMITTING AN O RDER USING THE O RDER E NTRY P ANE
S UBMITTING A M UTUAL O FFSET O RDER
U SING THE M OUSE TO C ONTROL O RDER Q UANTITY AND P RICE
C USTOMIZING THE Q UANTITY B UTTONS
S ETTING THE D EFAULT Q UANTITY
C LOSING THE O RDER E NTRY P ANE
C ONFIRMING THE S TATUS OF M ARKET O RDERS
E STABLISHING A VAILABLE C REDIT
S YNTHETIC D ISCLOSED Q UANTITY O RDERS
186
M ARKET G RID P ANE O VERVIEW
186
187
190
193
195
196
196
196
197
197
198
199
199
200
200
C USTOMIZING THE V IEWABLE M ARKET G RID C OLUMNS
M ARKET G RID P ANE F IELD D ESCRIPTIONS
U SING THE M ARKET G RID C ONTEXT M ENU
U SING T ABBED W INDOWS
A DDING S PACER R OWS
H IGHLIGHTING IN THE M ARKET G RID
Highlighting Your Orders
Best Price Highlighting
V IEWING P RICE T REND INDICATORS IN THE M ARKET G RID
O PENING W HOLESALE O RDERS
U SING THE M ARKET D EPTH F EATURE
Adding Price Averages and Accumulations to the Market Grid
Market Depth Color Coding
M ANAGING L INKS TO E XCEL
Creating Links
G ENERATING AN
RTD
202
F ORMULA
203
203
204
V IEWING YOUR E STIMATED P OSITION IN Q UEUE
Market Grid
V IEWING L IVE-O NLY C ONTRACTS
205
F LOATING D EPTH W INDOW
206
F LOATING D EPTH W INDOW E XAMPLES
207
T RADING WITH THE O RDER B AR
207
207
209
210
210
210
O RDER B AR F EATURES
O RDER B AR P ROCEDURES
M ODIFYING AN O RDER WITH THE O RDER B AR
Keyboard Trading with the Order Bar
TT Default Map
Description
- vi -
X_TRADER® User Manual
Trading Technologies International, Inc.
Table of Contents
Keyboard Trading Procedures
211
212
C ROSS T RADES O VERVIEW
213
214
C ROSS AND C ROSS W ITH T RADES
C ROSS O RDER E XECUTION AND CBOT
215
C LICK T RADING O VERVIEW
215
216
216
E NABLING/D ISABLING C LICK T RADING
S ETTING D EFAULT P ROPERTIES FOR C LICK T RADING
U SING C LICK T RADING IN THE M ARKET G RID
218
E UREX B LOCK O RDER O VERVIEW
219
219
220
221
S UBMITTING A E UREX B LOCK O RDER (B UY S IDE)
M ODIFYING A E UREX B LOCK O RDER T RADE
A CCEPTING A E UREX B LOCK OR V OLATILITY O RDER (S ELL S IDE)
M AKING A B LOCK OR V OLATILITY O RDER INQUIRY
222
E NTERING O RDERS U SING THE K EYBOARD
222
223
223
K EYBOARD E NTRY
B UY AND S ELL H OTKEYS
C ONTROLLING Q UANTITY OR P RICE U SING THE K EYBOARD
224
O RDER C HANGE D IALOG B OX O VERVIEW
224
225
226
227
227
228
228
U SING THE O RDER C HANGE D IALOG B OX
S ETTING IMPLIEDS
V IEWING IMPLIEDS
IMPLIED IN
IMPLIED O UT
IMPLIEDS F ROM IMPLIEDS
IMPLIED Q UANTITIES
229
Q UOTING O VERVIEW
229
231
233
234
234
235
235
236
236
237
237
237
238
Q UOTING A DDITIONS TO THE M ARKET G RID P ANE
E NABLING Q UOTING
E DITING, G ENERATING, AND S ENDING Q UOTES
T RACKING Q UOTES
A CTIVATING OR D EACTIVATING A S TRIKE OR AN E XPIRATION
A CTIVATING/D EACTIVATING M ULTIPLE S TRIKES OR E XPIRATIONS
D ELETING M ASS OR INDIVIDUAL Q UOTES
D ISABLING Q UOTING
S TATUS OF Q UOTES AT X_TRADER S HUTDOWN
T RADING E URODOLLAR O PTIONS
Market Grid Changes
Request For Quote (RFQ) Window
Sequence of Events
239
S TRATEGIES O VERVIEW
C REATED O UTRIGHTS AND X_TRADER
SFE C USTOM M ARKET S TRATEGIES
C REATING A N EW S TRATEGY
A DDING A S TRATEGY TO THE M ARKET W INDOW
T RADING A S PREAD OR S TRATEGY
240
240
241
242
242
242
243
243
244
244
Trading Strategies with a Maximum Limits
R ENAMING AN E XISTING S TRATEGY
R ECREATING A S PREAD S TRATEGY
A MENDING A S TRATEGY
D ELETING AN E XISTING S TRATEGY
MD T RADER®
245
O VERVIEW
X_TRADER® User Manual
Trading Technologies International, Inc. Proprietary and Confidential Information
- vii -
Table of Contents
MD
MD
246
249
250
252
253
T RADER F IELD D ESCRIPTIONS
T RADER F EATURES
P OPULATING MD T RADER
U SING THE MD T RADER C ONTEXT M ENU
U SING MD T RADER
253
253
254
255
255
256
256
257
257
258
259
R ECOGNIZING A VERAGE P RICE OF O PEN P OSITION
C ENTERING THE M ARKET
C HANGING O RDER Q UANTITY U SING A M OUSE
C HANGING W ORKING O RDERS
D ELETING O RDERS
R EADING THE N ET C HANGE INDICATOR IN MD T RADER
S ELECTING A C USTOMER P ROFILE IN MD T RADER
S ETTING THE D EFAULT Q UANTITY
S ETTING THE T RADE Q UANTITY
S ETTING T IME IN F ORCE
T EXT AND G RID C OLORS
S ETTING
MD
260
T RADER P ROPERTIES
A UTO C ENTERING IN MD T RADER
A VERAGE P RICE H IGHLIGHTING
C ONSOLIDATING P RICES
C REATING A U SER-D EFINED P RICE C OLUMN
261
261
262
263
264
265
265
266
266
267
268
270
270
272
272
272
Invalid Calculations in the UDP
MD T RADER
Titlebar Buttons
D ISPLAYING A S MALL
D ISPLAYING THE M ID-P OINT OF INSIDE M ARKET
K EEPING MD T RADER ON T OP
O NE-C LICK T RADING WITH MD T RADER
P LACING S TOP O RDERS
S ETTING THE M AXIMUM T RADE Q UANTITY
T RADING O UT OF A P OSITION
V IEWING YOUR E STIMATED P OSITION IN Q UEUE
MD Trader
Color Codes
C USTOMIZING
MD
273
T RADER
A DDING S OUND TO MD T RADER
A DDING T IME AND S ALES
C USTOMIZING THE D EFAULT Q UANTITY B UTTONS IN
M ANAGING L INKS IN MD T RADER
273
274
275
276
277
278
278
278
MD T RADER
Using the Laser Line
M OVING G RID C OLUMNS
R ESIZING THE MD T RADER W INDOW
U SING THE M OUSE TO C ONTROL THE Z OOM F EATURE
K EYBOARD T RADING IN
MD
279
T RADER
279
279
280
280
281
282
283
284
284
285
F UNCTION H OTKEYS
TT Default Map
M AIN H OTKEYS
TT Default Map
U NRESTRICTED K EYBOARD F UNCTIONS
E NABLING K EYBOARD T RADING IN MD T RADER
C HANGING H OTKEYS IN MD T RADER
K EYBOARD P ROCEDURES
Entering a Buy Order Using the Keyboard
Entering a Sell Order Using the Keyboard
- viii -
X_TRADER® User Manual
Trading Technologies International, Inc.
Table of Contents
Enter the Order Quantity Using the Keyboard
Deleting All Orders, Working Bids, or Working Offers Using the Keyboard
Loading the Net Position in the Order Entry Field Using the Keyboard
Sending a Market Order Using the Keyboard
Setting the Limit Price Using the Keyboard
Sweeping the Market Using the Keyboard
Hitting the Bid Using the Keyboard
Taking the Offer Using the Keyboard
Dime the Offer Using the Keyboard
Dime the Bid Using the Keyboard
Join the Bid Using the Keyboard
Join the Offer Using the Keyboard
Combo Dime the Bid or Offer Using the Keyboard
Combo Join the Bid and Offer Using the Keyboard
Game Pad Control in MD Trader
285
285
286
286
286
287
287
287
288
288
288
289
289
289
290
291
O RDER T YPES
292
292
E XCHANGES AND O RDER T YPES
O RDER R ESTRICTION D EFINITIONS
293
294
294
294
294
294
296
296
296
297
297
297
297
298
299
300
300
301
301
301
301
302
303
303
303
304
305
305
305
305
305
B EST L IMIT
ICEBERG
Characteristics
Deleting
Rounding
Procedure
IF T OUCHED
Market Grid
MD Trader
M ARKET
Market Grid
MD Trader
M ARKET O N O PEN (MOO)
M ARKET O N C LOSE (MOC)
M ARKET TO L IMIT
M INIMUM V OLUME
O RDER C ANCELS O RDER
Cursor Changes
Strategy Types
Order Book Additions
Invalid OCO Price Levels
Placing OCO Orders
S TOP O RDER
Stop Trigger Rules
Invalid Price Levels
Placing Stop Orders
T RAILING S TOPS
Trailing Stop Sell
Trailing Stop Buy
Trailing Stop Limit Orders
V OLATILITY
307
S PREAD M ATRIX O VERVIEW
X_TRADER® User Manual
Trading Technologies International, Inc. Proprietary and Confidential Information
- ix -
Table of Contents
308
309
310
311
G ENERATING A S PREAD M ATRIX
C USTOMIZING THE S PREAD M ATRIX
R EADING THE S PREAD M ATRIX
T RADING WITH THE S PREAD M ATRIX
C HANGING A W ORKING O RDER
C ANCELING O RDERS
– S PREAD AND B UTTERFLY C ONDOR M ATRICES
312
312
S ETTING O UTRIGHT OR S PREAD P RICES
S PREAD AND B UTTERFLY C ONDOR M ATRIX P ROPERTIES
S PREAD M ATRIX C ALCULATIONS
S PREAD M ATRIX C ONTEXT M ENU
B UTTERFLY C ONDOR M ATRIX O VERVIEW
313
313
314
315
316
G ENERATING A B UTTERFLY C ONDOR M ATRIX
B UTTERFLY M ATRIX C ALCULATIONS
317
318
319
Q UOTE B OARD O VERVIEW
Q UOTE B OARD F EATURES
P OPULATING Q UOTE B OARD
R EADING THE Q UOTE B OARD
M ANAGING THE Q UOTE B OARD P ROPERTIES
320
320
323
324
Q UOTE B OARD C OLOR P ROPERTIES
324
325
325
U SING A F LOATING O RDER E NTRY IN Q UOTE B OARD
U SING THE Q UOTE B OARD C ONTEXT M ENU
327
O RDER B OOK O VERVIEW
328
328
329
330
331
332
332
333
F ILTERS
T RADER IDENTIFICATION
T OP P ANE F IELD D ESCRIPTIONS
G RID S UMMARY
O RDER B OOK C ONTEXT M ENU
P ERFORMING O RDER S TATUS INQUIRIES
R EMOVING S TALE O RDERS
A LTERING O RDERS IN THE O RDER B OOK
334
335
336
337
337
339
340
341
C HANGE AN O RDER
C ANCELING/R EPLACING AN O RDER
M ODIFYING AN O RDER WITH THE O RDER B AR
C HANGING T RIGGER P RICE O RDERS
U SING THE H OLD F EATURE
U SING TIF O PTIONS
D ELETING AN O RDER
A FTER THE D ELETE R EQUEST IS S ENT
342
F LOATING O RDER B OOK O VERVIEW
343
345
345
345
U SING THE F LOATING O RDER B OOK
K EYBOARD T RADING IN THE F LOATING O RDER B OOK
TT Default Map
Description
347
F ILL W INDOW O VERVIEW
348
348
M ANUAL F ILLS
F ILTERS
-x -
X_TRADER® User Manual
Trading Technologies International, Inc.
Table of Contents
349
350
F ILLS A LERT D IALOG B OX
F ILLS P ANE O VERVIEW
351
F ILLS P ANE G RID S UMMARY
352
353
354
F ILLS P ANE C ONTEXT M ENU
S TART OF D AY F ILLS
P OSITION P ANE O VERVIEW
355
356
357
357
358
P OSITION P ANE G RID S UMMARY
P OSITION P ANE C ONTEXT M ENU
C ALCULATING P ROFIT AND L OSS
Open P/L Based On Formula
P/L Column Display
359
M ANAGING M ANUAL F ILLS
360
360
362
362
A DD M ANUAL F ILLS D IALOG B OX F IELD D ESCRIPTIONS
A DDING A M ANUAL F ILL
D ELETING A M ANUAL F ILL
S AVING A M ANUAL F ILL
363
F AST F ILLS P ANE O VERVIEW
363
364
364
364
F AST F ILL N OTES
E UREX F AST F ILLS INFORMATION
FFNet and NetQty Synchronization
F AST F ILLS P ANE C ONTEXT M ENU
365
T RADE B OOK O VERVIEW
366
367
368
368
369
T RADE B OOK G RID S UMMARY
T RADE B OOK C ONTEXT M ENU
S HOWING OR H IDING P ARTIAL F ILLS
D ISPLAYING F ILL D ETAILS IN THE T RADE B OOK W INDOW
S ORTING T RADE B OOK D ATA
371
T IME AND S ALES O VERVIEW
372
C OLUMN D ESCRIPTIONS
372
F ILTERS
373
375
375
376
377
377
P OPULATING THE T IME AND S ALES W INDOW
R EADING THE T IME AND S ALES W INDOW
R ECOGNIZING C OLOR C ODES
H IDING T IME AND S ALES C OLUMNS
T IME AND S ALES C ONTEXT M ENU
T IME AND S ALES F ILTERS O VERVIEW
378
F ILTERING ON Q UANTITY FOR S PECIFIC C ONTRACTS
378
379
S AVING T IME AND S ALES INFORMATION
T IME AND S ALES P ROPERTIES T AB
381
W HOLESALE T RADING O VERVIEW
381
382
W HOLESALE T RADING A UDIT T RAIL M ESSAGES
W HOLESALE T RADING T YPES
382
W HOLESALE T RADING T YPES AND S UPPORTING E XCHANGES
383
B LOCK T RADE O VERVIEW
384
385
B LOCK T RADE W INDOW
S UBMITTING A B LOCK T RADE
X_TRADER® User Manual
Trading Technologies International, Inc. Proprietary and Confidential Information
- xi -
Table of Contents
386
B ASIS T RADE O VERVIEW
B ASIS T RADE W INDOW
S UBMITTING A B ASIS T RADE
387
388
A GAINST A CTUALS T RADE O VERVIEW
389
390
391
A GAINST A CTUALS T RADE W INDOW
S UBMITTING AN A GAINST A CTUALS T RADE
392
E XCHANGE F OR S WAP O VERVIEW
393
394
E XCHANGE F OR S WAP W INDOW
S UBMITTING AN E XCHANGE F OR S WAP T RADE
395
F LEX O PTIONS O VERVIEW
395
396
F LEX O PTIONS W INDOW
S UBMITTING A F LEX O PTIONS T RADE
397
E NTERING P ROF T RADES
397
398
P ROF T RADE F IELDS
T RADABLE INSTRUMENTS
399
401
402
S TRATEGY W HOLESALE T RADES
E URONEXT AND G UARANTEED C ROSSING
A SSET A LLOCATION M ETHODS
403
403
404
E NTERING A SSET A LLOCATION O RDERS
Half Trades Example:
One Trader Example:
405
T RADING S PECIALTY E XCHANGES
406
T RADING B ROKERT EC
Placing Passive and Aggressive Orders
The Auto Aggressive Property
Working-Up Orders
Flashing Quantity and Price during Workup
Send Quote Order Property
Leave Checkbox
Hold In Timer
Autotrader Tick Formula
406
406
407
407
407
408
408
409
409
409
410
410
412
412
413
413
413
414
EBS
415
T RADABLE P RODUCTS
O RDER T YPES
P RICING N OTATIONS
P RICING F ORMAT
M ARKET G RID
MD T RADER
E XCEL L INKS
A UTOTRADER AND A UTOSPREADER
C LICK T RADING
U NIQUE F UNCTIONALITY IN B ROKERT EC
T RADING
415
415
416
418
419
420
421
422
422
F OREX
N D FS
EBS Q UOTE B OARD
Keyboard Configuration
Reading the EBS Quote Board
C USTOMIZING THE EBS Q UOTE B OARD
Quote Board tab
Hotkeys tab
MD Trading tab
T RADING C ONTRACTS IN THE
- xii -
X_TRADER® User Manual
Trading Technologies International, Inc.
Table of Contents
Color tab
T RADING EBS C ONTRACTS IN
EBS C ONTRACT N OTES
T RADING
423
424
426
MD T RADER
ICE
427
Further Examples
427
428
428
429
429
429
430
430
431
431
432
432
SFE
433
C LEARING
M ARKET E XPLORER
Listing
IMPLIED P RICING
T RADING
S WITCHING B ETWEEN C ONTRACTS AND F LOW
C ONTRACTS VS. F LOW E XAMPLES
O RDER T YPE AND R ESTRICTIONS
T RADING S TATES
F ILL W INDOW AND P&L
U NDERSTANDING D ELIVERY AND F LOW
T RADING
433
433
433
434
IMPLIED A STERISK
C USTOM M ARKET S TRATEGY
P OST-F ILL A CCOUNT N UMBERS
A DDING AN A CCOUNT N UMBER
T RADING
TOCOM
435
A PPENDIX: G RID C OLUMN D ESCRIPTIONS
437
INDEX
443
X_TRADER® User Manual
Trading Technologies International, Inc. Proprietary and Confidential Information
- xiii -
Table of Contents
[This page intentionally left blank]
- xiv -
X_TRADER® User Manual
Trading Technologies International, Inc. Proprietary and Confidential Information
What's New in 7.7.5
Trading Technologies continues its effort to provide you with the quickest, most efficient and versatile
trading software with the release of X_TRADER®.
New Features in X_TRADER include:
Japanese GUI Release
X_TRADER now offers a fully localized interface in Japanese.
X_TRADER® User Manual
Trading Technologies International, Inc. Proprietary and Confidential Information
- 15 -
What's New in 7.7.5
Japanese GUI Release
X_TRADER now offers a fully localized interface in Japanese. The localization includes major
windows, fields, context menus, properties and some audit trail messages. In addition, the online
Help and user manuals are also available in Japanese.
Here is a sample of some of the screens which have been translated:
Control Panel Menus
File Menu Japanese
Settings Menu Japanese
Window Menu English and Japanese
Help Menu Japanese
- 16 -
X_TRADER® User Manual
Trading Technologies International, Inc.
X_TRADER®
Market Window
Market Window English
Market Window Japanese
X_TRADER® User Manual
Trading Technologies International, Inc. Proprietary and Confidential Information
- 17 -
What's New in 7.7.5
MD Trader
MD Trader English
MD Trader Japanese
Property Tabs
Properties English
Properties Japanese
- 18 -
X_TRADER® User Manual
Trading Technologies International, Inc.
X_TRADER®
Market Explorer
Market Explorer English
Market Explorer Japanese
X_TRADER® User Manual
Trading Technologies International, Inc. Proprietary and Confidential Information
- 19 -
What's New in 7.7.5
Audit Trail
Audit Trail English
Audit Trail Japanese
Order Book, Fill Window and Trade Book
Order Book Japanese
- 20 -
X_TRADER® User Manual
Trading Technologies International, Inc.
X_TRADER®
Fill Window Japanese
Trade Book Japanese
X_TRADER® User Manual
Trading Technologies International, Inc. Proprietary and Confidential Information
- 21 -
What's New in 7.7.5
Time and Sales and Customer Defaults
Time and Sales Japanese
Customer Defaults Japanese
Quote Board and Spread Matrix
Quote Board Japanese
- 22 -
X_TRADER® User Manual
Trading Technologies International, Inc.
X_TRADER®
Spread Matrix Japanese
X_TRADER® User Manual
Trading Technologies International, Inc. Proprietary and Confidential Information
- 23 -
What's New in 7.7.5
Autospreader and Autotrader
Autospreader Japanese
Autotrader Japanese
- 24 -
X_TRADER® User Manual
Trading Technologies International, Inc.
About This Manual
Introduction to X_TRADER®
This documentation contains both general and specific information, including procedures designed
to aid you in getting started with the application. This is not intended as a tutorial of every function
and option available in X_TRADER, nor will it substitute for the training you receive from your
Trading Technologies representatives.
Warning! TT recommends you practice trading with TT products in a simulated environment
before actually performing live trades.
Conventions
This guide uses a set of terms, symbols, and typographic conventions to categorize specific
information. Familiarity with these conventions helps you use this guide more effectively.
This guide uses the following icon:
: A procedure that you should follow to complete a task.
This guide uses the following text conventions:
Convention Use
ALL
Indicates operating system commands, and acronyms
CAPITALS
Courier
Indicates examples and anything that you must type exactly as it appears. For example, if
you are asked to type show version, you would type all the characters shown in Courier
exactly as they are printed.
Bold
Indicates menu items, command buttons, folder/directory names, file names, window names,
dialog box names and field names. Procedures contain bolded items as well.
Italic
Indicates variables, including variable text. Variable text is used when dialog boxes or their
components are not labeled.
Variable text is also used for labels that change dynamically based on their current context.
The wording of variable text does not exactly match what you see on your screen.
X_TRADER® User Manual
Trading Technologies International, Inc. Proprietary and Confidential Information
- 25 -
About This Manual
Keyboard Formats
All key names are shown using small capital letters. For example, the Control key is shown as CTRL.
The UP ARROW, DOWN ARROW, LEFT ARROW, and RIGHT ARROW KEYS are collectively referred to as the
arrow keys.
Key combinations and key sequences appear in the following formats:
Format
Meaning
Key1+Key2 A plus sign (+) between key names means to press and hold down the first key, while pressing the second key. For example, “Press ALT+TAB” means to hold down the ALT key while
pressing the TAB key.
Key1, Key
2
A comma between key names means to press and release the keys one after another. For
example, “Press ALT, F, O means to press and release the ALT key, press and release the F
key, and then press and release the O key.
Related Documentation
This guide is part of comprehensive Trading Technologies documentation and online Help systems
that include:
l Guardian Help
l X_RISK 7.3 Help
l X_STUDY Feature Guide
l X_STUDY Online Help
l X_TRADER Autospreader Feature Guide
l X_TRADER Autotrader Feature Guide
l X_TRADER Online Help
- 26 -
X_TRADER® User Manual
Trading Technologies International, Inc.
About This Manual
X_TRADER Trading System
Trading Technologies X_TRADER Trading System gives you and your customers the best
technological edge in the business. X_TRADER is the fastest, most adaptable front-end trading
screen for futures trading. Combining universal exchange access, high performance, and full
customization, X_TRADER, with its sophisticated trading tools, enhances your presence in all the
world's open-access electronic markets.
X_TRADER is designed to meet the demands of institutional brokers and professional traders
globally. It facilitates easy order entry, order routing, and position management. Its customizable
windows allow you to execute and track the complete life cycle of a trade:
l Flexible market window for easy order entry and depth of market
l Extensive order book displaying working orders and editing functions
l Real-time position management window including fill details and real time P&L
l Comprehensive audit trail detailing transactions over a ten-day period
X_TRADER enables you to execute trades fast. Speed combined with flexibility gives X_
TRADER users a distinct advantage in today's fiercely competitive global market.
X_TRADER Pro is an add-on to the standard X_TRADER software package. This add-on
automatically installs with X_TRADER, but can only be activated by the purchase of an X_
TRADER Pro license. X_TRADER Pro consists of the Autotrader and Autospreader tools.
X_TRADER® User Manual
Trading Technologies International, Inc. Proprietary and Confidential Information
- 27 -
About This Manual
Global Customer Support Center
Trading Technologies Global Customer Support Center (CSC) has three primary locations:
Chicago, London and Singapore.
For a comprehensive list of phone numbers and our email address, please see our support Web site
at: http://www.tradingtechnologies.com/support.aspx.
Automated Phone Menu
To ensure your call is routed to the Customer Support Representative who can best answer
your question, TT uses an automated menu to route calls for the Client Support Center.
Upon calling the Customer Support Center, you hear the following prompts:
l For Non-Support related calls, press 0.
Example: Use to reach specific individuals or other departments such as Sales,
Account Management or Finance.
l
For front-end “how-to” questions, relating to applications such as X_TRADER or X_
RISK, press 1.
Example: Use for questions regarding functional, setup, or optimization.
l
To report front-end software issues, press 2.
Example: Use when reporting software issues relating to applications such as X_
TRADER, X_RISK.
l
To report gateway or server software issues, press 3.
Example: Use when reporting software issues relating to TT Gateways - including
TTSIM/Trainer, WAN Routers, Remote Host Servers and TTM.
l
To report FIX Adapter or FIX Gateway software issues, press 4.
Example: Use when reporting software issues specifically related to a TT FIX
Adapter or a TT FIX Gateway.
- 28 -
X_TRADER® User Manual
Trading Technologies International, Inc.
CHAPTER 1
Getting Started
This section lists the minimum steps necessary to begin using X_TRADER. In addition, your particular
trading environment (e.g., back office requirements or quoting) may require you to perform additional
steps.
Advanced features and functionality are described in their respective sections. For advanced customization
refer to Common Administrative Tasks on page 45.
Warning! This section is not intended to replace training provided by Trading Technologies, but
rather to supplement it. We strongly suggest that you perform these steps in a simulation
environment prior to submitting live trades.
Note: Simulation mode points to an exchange’s dedicated simulation environment. You must have
an appropriate multicast address and/or access to make it work.
To set X_TRADER to Simulation mode:
After installing X_TRADER, you may want to practice trading in a simulated environment.
1. From your desktop toolbar in the lower right corner of your screen, double-click the icon.
2. From the Guardian window, click the Mode menu.
3. Click to select Simulation.
4. Click the X in the upper right corner to close the Guardian window.
You successfully set X_TRADER to Simulation mode.
To set X_TRADER to Production Mode:
When you are comfortable using X_TRADER and want to begin live trading, you can set it back to
Production mode.
1. Exit X_TRADER.
2. From your desktop toolbar in the lower right corner of your screen, double-click the icon.
3. From the Guardian window, click the Mode menu.
4. Click to select Production.
5. Click the X in the upper right corner to close the Guardian window.
6. Restart X_TRADER.
You successfully set X_TRADER to Production mode.
X_TRADER® User Manual
Trading Technologies International, Inc. Proprietary and Confidential Information
- 29 -
Chapter 1
To begin working with X_TRADER:
1. Log into X_TRADER.
2. Create a Customer Profile.
3. Select a product from the Market Explorer and populate a functional window.
4. Enter a Market Order.
5. Track messages using the Audit Trail.
6. Track Orders using the Order Book.
7. Track fills using the Fill window.
8. Save your workspace.
You successfully begun working with X_TRADER.
Login Procedures
To begin trading you must first log into X_TRADER. You do this in the TT Exchange Login
dialog box. Your System Administrator supplies the login data.
After your first login, all data excluding the password is retained. Memorize or keep a record of your
login data. This data is not retained after a software upgrade.
Follow these procedures to log into an exchange:
l Logging into an exchange when starting X_TRADER
l Logging into an exchange during a session
l Logging into X_TRADER with a different trader ID
- 30 -
X_TRADER® User Manual
Trading Technologies International, Inc.
Getting Started
To log into X_TRADER:
1. On your Windows desktop, double click the
The TT Exchange Login dialog box appears.
icon.
2. Select the appropriate exchange tab or double-click the name from the Exchange List.
3. Enter the login data provided by your X_TRADER Administrator.
4. Click the Login button.
After your password is authenticated, a checkmark appears in the box to the left of the exchange
name.
5. Repeat Steps 2-4 for each exchange/marketplace on which you want to trade.
Note: The Change Password option is not functional at this time.
6. Click Close.
After a short delay, while your workstation establishes a connection to the server and loads any
undelivered fills, the X_TRADERControl Panel becomes fully enabled.
You successfully logged into X_TRADER.
X_TRADER® User Manual
Trading Technologies International, Inc. Proprietary and Confidential Information
- 31 -
Chapter 1
To log into another exchange during a session:
1. In the bottom right-hand corner of your desktop, in the system tray, double-click the
2. From the Guardian menu bar, click the File menu and choose Trader Login.
The TT Exchange Login dialog box appears.
icon.
3. Select the appropriate exchange tab or double-click the name from the Exchange List.
4. Enter the login data provided by your X_TRADER Administrator.
5. Click Login.
After your password is authenticated, a checkmark appears in the box to the left of the exchange
name.
6. Repeat Steps 3 and 4 for any additional exchanges.
7. Click Close.
8. From the Guardian menu bar, click the File menu and choose Exit to exit Guardian.
You successfully logged into another exchange during a session.
- 32 -
X_TRADER® User Manual
Trading Technologies International, Inc.
Getting Started
To log into X_TRADER with a different Trader ID:
1. Close X_TRADER.
Warning! If you attempt to log in via the Guardian Trader Login option without closing X_
TRADER, the login appears successful and the Guardian window Status column changes to
reflect the ‘new’ trader ID. However, all subsequent trades will still be attributed to the original
trader’s account. For example, all Audit Trail messages point to the original trader.
2. Restart X_TRADER.
The TT Exchange Login dialog box appears.
3. Select the appropriate exchange tab or double-click the name from the Exchange List.
4. Enter the login data provided by your X_TRADER Administrator.
5. Click the Login button.
After your password is authenticated, a checkmark appears in the box to the left of the exchange
name.
6. If you want to log in to another exchange, select the appropriate exchange tab and enter the login
information.
7. Click Close.
You successfully logged into an exchange with a different Trader ID.
X_TRADER® User Manual
Trading Technologies International, Inc. Proprietary and Confidential Information
- 33 -
Chapter 1
Universal Login Procedures
The universal login lets you login to many exchanges at once using one user name and password.
Your System Administrator supplies the login data.
Follow these procedures to log into an exchange:
l Logging in using the universal login
l Changing your universal login password
To login using the universal login:
1. If X_TRADER is started, go to step 2.
- or If X_TRADER is not started, double-click the
box, click Close.
icon. Then, at the TT Exchange Login dialog
2. Double-click the
icon in the system tray.
The Guardian application appears.
3. On the Guardian File menu, click Universal Login.
The TT Login dialog box appears.
4. Type your User Name and Password.
5. To choose the exchanges to which you want to log in, click the Options button.
- 34 -
X_TRADER® User Manual
Trading Technologies International, Inc.
Getting Started
The TT Login Options dialog box appears.
6. Click the green boxes to select an exchange.
Note: To unselect an exchange, click in a green box that already contains a checkmark.
7. Click OK.
8. On the TT Login dialog box, click OK.
You successfully logged in using the universal login.
To change your universal login password:
1. Double-click the
icon in the system tray.
The Guardian application appears.
2. On the Guardian File menu, click Universal Login.
The TT Login dialog box appears.
3. Type your User Name and Password.
4. To choose the exchanges to which you want to log in, click the Options button.
X_TRADER® User Manual
Trading Technologies International, Inc. Proprietary and Confidential Information
- 35 -
Chapter 1
The TT Login Options dialog box appears.
5.
6.
7.
8.
Click the Change Password tab.
In the New Password field, type any alphanumeric entry for your new password.
In the Confirm Password field, retype your new password.
Click OK.
You successfully changed your universal login password.
- 36 -
X_TRADER® User Manual
Trading Technologies International, Inc.
Getting Started
Recognizing Active Exchanges
A list of active exchanges appears in the following locations:
l The Market Explorer window
l The Guardian dialog box
Status lights appear next to each exchange, indicating its availability.
l A green [
] light indicates all services are running.
l
l
A red [ ] light indicates all services are down.
A yellow [ ] light indicates one or more services may be running but not active. This may be
normal for your trading network.
Market Explorer
Access Market Explorer through the Window menu or the toolbar
icon.
The left side of the screen lists the exchanges and color-codes
their availability.
Guardian
Access Guardian by double-clicking the
system tray at the bottom of your screen.
icon in your
The left side of the screen lists the exchanges and colorcodes their availability.
X_TRADER® User Manual
Trading Technologies International, Inc. Proprietary and Confidential Information
- 37 -
Chapter 1
X_TRADER® Pro License
Autospreader and Autotrader are only available with anX_TRADER Pro license. Although both
modules install during the regular X_TRADER installation process, they require a separate X_
TRADER Pro license to function. These tools are not available for use unless you purchase this
separate license. Contact a Trading Technologies representative or your System Administrator for
further details.
Once you obtain an X_TRADER Pro license, you must activate the license using the Control
Panel. Once activated, Autospreader and Autotrader work as long as the license remains current
and you continue to log into the host machine with the same user name. If you upgrade to a different
version of X_TRADER, you must re-activate the license.
To activate an X_TRADER Pro license:
1. Have your TT representative enable the X_TRADER Pro option.
2. Open X_TRADER from the desktop icon and log onto an exchange.
3. From the Control Panel, click the Settings menu and choose X_TRADER Pro.
A prompt appears telling you to close X_TRADER and restart it to access X_TRADER Pro.
4. Exit X_TRADER.
5. Open X_TRADER from the desktop icon and log into an exchange.
The X_TRADER Pro license is now activated, and you can access Autotrader and/or Autospreader.
You successfully activated an X_TRADER Pro license.
- 38 -
X_TRADER® User Manual
Trading Technologies International, Inc.
Getting Started
Creating a Customer Profile
Define a Customer Defaults profile to establish all of the most common order variables by customer
name.
Customer Defaults can be set by an administrator using TT User Setup. If you cannot change your
Customer Defaults an administrator may need to make changes for you. Refer to TTUS
Integration with Customer Defaults on page 86.
Note: You can immediately trade with the <Default> profile as long as you set up an account in its
row.
To define a Customer Defaults profile:
1. From the Control Panel, click the Settings menu and choose Customer Defaults.
2. Enter the customer profile information in the Customer Defaults window.
Note: The first profile has a customer name of <Default> which you cannot change.
3. Change data as needed and press TAB or ENTER to save your changes.
Note: If you enter your change without using the tab key to advance to the next field, or if you do
not press ENTER, your changes will not be saved.
4. Click to select the SEL box to add the name to the Customer List dialog box throughout X_
TRADER.
5. Close the Customer Defaults window.
The new customer name will be added to the Customer List dialog box.
You successfully defined a Customer Defaults profile.
X_TRADER® User Manual
Trading Technologies International, Inc. Proprietary and Confidential Information
- 39 -
Chapter 1
Using Workspaces
Your X_TRADER workspace holds a snapshot of your desktop. It records all your open and
minimized windows, their spatial relationships, color, font, column/row sizing, placement, selection
and saves them so that each time you launch X_TRADER, it looks the same way.
You can create one or more workspaces to fully customize X_TRADER to fit your trading style
and environmental requirements. For example, you may have morning and afternoon workspaces to
reflect the opening and closing of different exchanges. You may also have a report printing
workspace in order to avoid reformatting your windows to display needed data.
Refer to Workspace Setup on page 68 for a further discussion of this feature.
Entering a Market Order
You can enter orders in the Market window and MD Trader by using a mouse or a keyboard.
Refer to Market Window Overview and MD Trader® Overview for complete descriptions of
their functionality.
New Electronic Traders
TT recommends new electronic traders use the Lock safety feature until accustomed to using
X_TRADER. Every Order Entry pane and Order Book window has a Lock check box.
When enabled, this feature requires you to confirm your actions before sending an order to
market. For example, if you click the Sell button, the button title changes to Apply Sell. You
must then click the Apply Sell button to confirm your sell order and send it to market.
To enter a manual order:
1. Click the BidPrc or AskPrc cell to feed the Price field on the Order Entry pane.
2. Click the BidQty or AskQty cells to feed both Quantity and Price fields on the Order Entry pane.
3. Add or change the quantity, price and order type information as necessary.
4. Click Buy.
- or Click Sell.
If you have entered valid data, the order is sent to market. The Audit Trail window displays a
message with a status of OK and an Action of Add.
You successfully entered a manual order.
- 40 -
X_TRADER® User Manual
Trading Technologies International, Inc.
Getting Started
Order Messages in the Audit Trail
The Audit Trail window displays messages regarding your actions and exchange announcements.
Three messages appear for successful Buy (blue text) or Sell (red text) orders:
l The first message provides order details, including the time the order was sent from the workstation (Time column) to the TT Gateway (i.e., server), an order status of Accept, and an
action of Add.
l The second message immediately follows the first and indicates acceptance by the TT Gateway. The order has been routed to the exchange trading host.
l The third message displays sometime after the previous two. This message is the confirmation
received from the exchange’s trading host. The information detailed includes the time the confirmation was received by the workstation (Time column), an order status (OK), and the time
the confirmation was sent by the exchange’s host machine (Exch Time column).
When the order fills, the fill notification message displays a status of OK and an action of Fill.
X_TRADER® User Manual
Trading Technologies International, Inc. Proprietary and Confidential Information
- 41 -
Chapter 1
Exiting X_TRADER
Exit X_TRADER at the end of each trading session. Not doing so could adversely affect how you
see your position at the beginning of the next trading session.
To exit X_TRADER:
From the Control Panel, click the File menu and choose Exit.
- or In the top right-hand corner of the Control Panel, click the Windows Exit button.
If you have working orders in the market, you are prompted. At that time you can choose to
continue exiting, or return to X_TRADER and resolve them.
You successfully exited X_TRADER.
Automatic Shutdown of X_TRADER
X_TRADER automatically closes after eight hours of inactivity when there are no orders in the
Order Book and no new fills or price updates have been received.
X_TRADER displays a message informing you that it is closing. If you do not take any action, or if
you click OK, the X_TRADER application closes.
At this time this feature is not configurable.
- 42 -
X_TRADER® User Manual
Trading Technologies International, Inc.
Getting Started
Using Context Sensitive Help
From many X_TRADER windows, you can access online help pertinent to the task you are
performing.
To access context-sensitive help:
1. Click the X_TRADER window for which you want to view Help.
2. Press the F1 key.
You successfully accessed context-sensitive Help.
The X_TRADER windows that feature this context-sensitive help are:
l
l
l
l
l
l
l
l
l
l
l
l
l
l
l
l
Add Manual Fill
Alerts Manager
Autospreader Manager, Autospreader
Configuration, Advanced Settings,
Dynamic Settings
Autotrader, Autotrader Profile Setup
Page
Audit Trail
Available Credit
Butterfly Condor Matrix
Control Panel
Create New Strategy
Customer Defaults
Customer List
Fill window
Floating Order Entry windows
Keyboard Entry on the Order Entry
pane
Market Explorer
Market Window
l
l
l
l
l
l
l
l
l
l
l
l
l
l
l
l
MD Trader
Note: When Keyboard Trading is
enabled in MD Trader, the F1 key Lifts
the Offer and Shift+F1 enters a market
Buy order. Context sensitive help is
disabled.
Open Workspace
Order Block
Order Book, Floating Order Book
Order Change
Plug-Ins
Product Group Information
Property tabs (all)
Quote Audit Trail
Quote Board
RTD
Save Workspace
Spread Matrix
Spread Tables
Time and Sales
Trade Book
Note: The Help menu on the Control Panel still brings up the What's New and Introduction
topics in the online help.
X_TRADER® User Manual
Trading Technologies International, Inc. Proprietary and Confidential Information
- 43 -
Chapter 1 - Getting Started
[This page intentionally left blank]
- 44 -
X_TRADER® User Manual
Trading Technologies International, Inc. Proprietary and Confidential Information
CHAPTER 2
Common Administrative Tasks
Some functionality in X_TRADER is common among many different screens in the application.
Follow these procedures to perform common tasks:
l Populating Windows with Contracts: Put contracts into various X_TRADER windows.
l Using the TT Minimizer: Minimize or display an open X_TRADER window.
l Filtering Overview: Control the amount of data displayed in the various windows used in X_
TRADER.
l Formatting Fonts: Change the font, outline, and size of the typeface in your windows.
l Formatting Grids: Customize the visible columns or rows.
l Frame Command Bar Overview: Control printing functions and window sizing options.
X_TRADER® User Manual
Trading Technologies International, Inc. Proprietary and Confidential Information
- 45 -
Chapter 2
Populating Windows with Contracts
Follow these procedures to populate windows with contracts:
l Populating a window from Market Explorer
l Populating a window using drag-and-drop from Market Explorer
l Populating a window using drag-and-drop from the Market Grid
To populate a window from Market Explorer:
1. From the Control Panel, click the Window menu and choose Market Explorer.
- or -
2.
3.
4.
5.
6.
7.
8.
9.
From the Control Panel, click the
icon.
If you are logged into more than one exchange, in the Exchanges box, click the exchange whose
product you want to find.
In the Products section, click the down arrow and choose your search filter.
Type your search criteria in the available space.
The Instruments field updates as you type.
From the Instrument Type box, click to toggle between the displayed types.
Press and hold the CTRL key and click the products you want to open.
- or To open all products in the Instruments field, click the >> button and skip to step 8.
Click the > button to transfer the products from the Instruments box to the Selected Instruments
box.
Click the Function box in the upper right corner of the Market Explorer and choose the function
you want to populate with the contract.
Click Start.
You successfully populated a window from Market Explorer.
- 46 -
X_TRADER® User Manual
Trading Technologies International, Inc.
Common Administrative Tasks
To populate a window using drag-and-drop from Market Explorer:
1. If the window you want to populate with a contract is not open, use the Control Panel to open the
window.
2. From the Control Panel, click the Window menu and choose Market Explorer.
- or -
3.
4.
5.
6.
7.
8.
9.
10.
From the Control Panel, click the
icon.
If you are logged into more than one exchange, in the Exchanges box, click the exchange whose
product you want to find.
In the Products section, click the down arrow and choose your search filter.
Type your search criteria in the available space
The Instruments field updates as you type.
From the Instrument Type box, click to toggle between the displayed types.
From the Instruments box, press and hold the CTRL key and click the products you want to open.
With the cursor over one of the selected products in the Instruments box, click and hold the mouse
button.
Continue holding the mouse button and drag the cursor to the open window.
When the cursor leaves the window, it changes to a circle with a diagonal line through it. When the
cursor enters a window, it changes to include a plus [ + ] sign.
Release the mouse button.
You successfully populated a window using drag-and-drop from Market Explorer.
To populate a window using drag-and-drop from the Market Grid:
1. If the window you want to populate with a contract is not open, use the Control Panel to open the
window.
2. From an open Market Grid, click the product and hold the mouse button.
3. Continue holding the mouse button and drag the cursor to the open window.
When the cursor leaves the window, it changes to a circle with a diagonal line through it. When the
cursor enters a window, it changes to include a plus [ + ] sign.
4. Release the mouse button.
You successfully populated a window using drag-and-drop from the Market Grid.
X_TRADER® User Manual
Trading Technologies International, Inc. Proprietary and Confidential Information
- 47 -
Chapter 2
Using the TT Minimizer
The TT Minimizer appears as a tray icon
in the
lower right corner of your screen when you first log on to
X_TRADER.
It keeps a running list of every X_TRADER screen you
open during your session. As screens are closed, they are
removed from the TT Minimizer.
Tip: The size and position of the TT Minimizer can
be changed and saved with your workspace.
Follow these procedures to use the TT Minimizer:
l Minimizing or displaying a window
l Minimizing or displaying all windows
l Listing all windows
l Opening or closing the TT Minimizer
l Locking your X_TRADER windows
To minimize or display a window:
In the TT Minimizer window, click a window name to either minimize or display the window on
your desktop.
Screen Names with...
A dark blue background
Are...
Currently displayed on your desktop
A light blue background
Currently minimized on your desktop
You successfully minimized or displayed a window.
To minimize or display all windows:
Double-click the TT Minimizer tray icon.
You successfully minimized or displayed all windows.
- 48 -
X_TRADER® User Manual
Trading Technologies International, Inc.
Common Administrative Tasks
To list all windows:
Right-click the TT Minimizer and click List All Windows.
You successfully listed all windows.
To open or close the TT Minimizer:
Click the TT Minimizer tray icon.
The TT Minimizer appears or disappears from your desktop. When minimized, it also appears in
your taskbar.
You successfully opened or closed the TT Minimizer.
To lock your X_TRADER windows:
1. If it is not visible, open the TT Minimizer.
2. Click the Lock All button.
- or Right-click the TT Minimizer and click Lock All Windows.
Your X_TRADER windows cannot be altered.
3. To unlock your screen, click the Unlock All button.
You successfully locked your screen.
X_TRADER® User Manual
Trading Technologies International, Inc. Proprietary and Confidential Information
- 49 -
Chapter 2
Filtering Overview
Use filters to control the amount of data displayed in X_TRADER windows.
Example: Filtering on product (FGBL) and action (Sell) eliminates extraneous orders from the grid.
Any combination of filters can be set to make your workspace unique.
Any combination of filters can be set to make your workspace unique. Once you set filters the way
you want them, save your workspace. Refer to Workspace Setup on page 68.
Filters:
l
l
l
Can be set in one or more columns in most windows.
Generally only affect the window in which you set them.
Can be set globally using the Auto Filter option in a window’s context menu. This filters the
Order Book, Fill, Trade Book, and Audit Trail windows by a particular customer.
Refer to Effects of Filters on page 53 for more information.
Follow these procedures to manage filters:
l Setting a Column Filter
l Clearing a Column Filter
l Clearing All Filters
l Setting Auto Filters
Setting a Column Filter
To set a column filter:
1. Click the box immediately below any column heading.
A list of all currently referenced variables for the selected column displays.
2. Select one or more of the variables to set the filter.
3. Click OK to activate the filter.
When you set a filter, the box below the column heading turns red and displays the filter you
selected. If you selected multiple filter variables, a row of asterisks displays.
You successfully set a column filter.
- 50 -
X_TRADER® User Manual
Trading Technologies International, Inc.
Common Administrative Tasks
Clearing a Column Filter
To clear a column filter:
1. Click the red column box.
A list of all currently referenced variables for the selected column displays.
2. Select one or more of the variables to remove the filters.
3. Click Clear, followed by OK to remove the filter.
The filters box will change from red to gray.
You successfully cleared a column filter.
Clearing All Filters
Warning! Use of the Clear All Filters context options clears only the filters from the
particular window in which you enable it. If you enable AutoFilters (or individual column
filters) in other windows, they remain in effect.
To clear all filters:
1. Right-click any grid cell to access the context menu.
Note: If Click Trading is enabled, do not click in the Bid/Ask price
columns.
2. Click Clear All Filters.
You successfully cleared all filters.
X_TRADER® User Manual
Trading Technologies International, Inc. Proprietary and Confidential Information
- 51 -
Chapter 2
Setting Auto Filters
The Auto Filters option sets filters for a particular customer’s (trader) account number. If
there are numerous working orders for an account shared by a number of traders, it can be
difficult to sort and review the orders for a particular trader. Filtering by customer name, as it
appears in the Customer List window, displays all orders for that particular customer.
Follow these procedures to manage Auto Filters:
l Setting the Auto Filter
l Removing the Auto Filter
To set the Auto Filter by customer:
1. Right-click in the window grid to access the context menu.
Note: If Click Trading is enabled, do not click in the Bid/Ask price columns.
2. Click Auto Filters.
A check mark indicates that the filter is applied for this customer’s account
number.
3. From the Control Panel, click the Window menu and choose Customer List.
4. Select a customer from the list.
This provides the filter definition. The top heading on the list, <Default> is the
equivalent to no filter. The titlebar contains a Filters On message.
You successfully set the Auto Filter by customer.
To remove the customer Auto Filter, use one of these options:
1. Click on the red push button directly below the column whose Auto Filter you want to remove.
The following screen is taken from the Fill window:
2. Click <EMPTY> to remove the Auto Filter. (For any window except the Audit Trail.)
- or Right-click to display the context menu and click Autofilters.
You successfully removed the customer Auto Filter.
- 52 -
X_TRADER® User Manual
Trading Technologies International, Inc.
Common Administrative Tasks
Effects of Filters
Filters have the following noteworthy effects on certain windows in X_TRADER:
Window
All windows
Effect
A Filters On notice appears in the title bar of the widow when a filter has been
applied to one or more columns. If you hide a column using the context menu’s
Hide Column selection, this notice changes to Filters On (Hidden).
Audit Trail
window
If you select <EMPTY> as a column filter in the AuditTrail, the filter applies to
all cells that are empty. This is unique behavior to the Audit Trail window.
Fill window
Filters set in the Fills pane filters carry over to the Position pane. In addition, Fast
Fills are disabled when filters are on.
Order Book
window
The Order Book window does not support filters using multiple variables.
Formatting Fonts
X_TRADER includes a number of useful methods for customizing its look and feel. You can
customize your windows and save them in a workspace so that each time you launch X_TRADER,
you open the workspace and avoid having to customize each individual window’s appearance.
(Refer to Workspace Setup on page 68.)
Follow these procedures to format fonts:
l Changing the Font Style: Change the font, outline, and size of the typeface displayed in
your windows.
l Changing Individual Colors of Grids or Text: Change the color of text and window backgrounds. Change the color of rows, columns, or individual cells.
X_TRADER® User Manual
Trading Technologies International, Inc. Proprietary and Confidential Information
- 53 -
Chapter 2
Changing the Font Style
Change the font, outline, and size of the typeface displayed in your windows.
To change the font style:
1. Select the area you want to change or click the top left column heading to select the entire grid.
2. Right-click in the window to access the context menu.
Note: If Click Trading is enabled, do not click in the Bid/Ask price columns.
3. Click Formatting.
The Grid Styles dialog box appears.
4. Click the Font tab and make your changes.
The results display in the Preview box.
5. Click OK.
The new font options are applied to your workspace.
6. To retain these font style changes, save your workspace.
You successfully changed the typeface characteristics.
Changing Global Colors of Windows or Text
You can change many of the colors used in X_TRADER. The two property tabs that house
the color options are the Color tab and the MD Color tab.
Follow these procedures to change the color of a window or text:
l Use a standard color for a window or text
l Create and use a custom color for a window or text
To use a standard color for a window or text:
1. From the Control Panel, click the Settings menu and choose Properties.
2. Click the Color tab.
3. Click the name of the color setting you want to change.
4. Click a color from the palette.
The Preview section displays your chosen color.
5. Click Apply and then OK to exit.
You successfully changed the colors for X_TRADER display windows.
- 54 -
X_TRADER® User Manual
Trading Technologies International, Inc.
Common Administrative Tasks
To create and use a custom color for a window or text:
1. From the Control Panel, click the Settings menu and choose Properties.
2. Click the Color tab.
3. Click the name of the color setting you want to change.
4. From the Color section, click the Other button.
The Color dialog box appears.
5. Under the Custom Colors section, click the first available white box.
Note: This ensures you will not copy a new custom color over an existing custom color.
6. Under the Basic Colors section, click a base color to create your custom color from.
Note: This ensures you can see your custom color as you create it.
7. On the right side, select your custom color from the blended rainbow grid.
The cross hairs pin-point your selection and the color appears in the Color/Solid square.
8. Click and drag the triangle up or down the skinny luminosity grid to select the hue of your color.
The Color/Solid square changes as you drag the triangle.
9. Click the Add to Custom Colors button.
Your selection in the Color/Solid square appears in the Custom colors palette on the left side.
10. Click OK.
On the Color tab, the Preview section displays your chosen color.
11. Click Apply and then OK to exit.
You successfully created and used a custom color for X_TRADER windows or text.
Changing Individual Colors of Grids or Text
You can change the color of text and window backgrounds. Change the color of rows,
columns, or individual cells.
Notes:
l When you have LTP background coloring enabled on the Trading tab in the
Properties menu, the Last Prc column colors cannot be changed in the Market
Grid.
l Buy and Sell orders are colored blue and red by default. Selecting new colors using
the Formatting option does not change these colors. To change colors this way,
disable the Color Code Buy/Sell property from the appropriate tab on the Properties menu.
l All colors for the Spread Matrix are managed in the Color tab on the Properties
menu. They cannot be altered with the Formatting window.
X_TRADER® User Manual
Trading Technologies International, Inc. Proprietary and Confidential Information
- 55 -
Chapter 2
To change grid text and background colors:
1. If you want to apply the same text and background colors to the entire grid for all windows, select
the window area you want to change, or click the top left-hand column heading to select the entire
grid.
2. Right-click in the window to access the context menu
Note: If Click Trading is enabled, do not click in the Bid/Ask price columns.
3. Click Formatting.
The Grid Styles dialog box appears.
4. Click the Color tab.
Text colors display in the left palette. Background colors display in the right palette.
5. Click a color in the displayed palette or click Other to see additional colors. You can also create custom colors.
The color preview window displays the specified colors.
6. Click OK to exit.
7. To retain these changes, save your workspace.
You successfully changed grid text and background colors.
- 56 -
X_TRADER® User Manual
Trading Technologies International, Inc.
Common Administrative Tasks
Formatting Grids
X_TRADER includes a number of useful methods for customizing its look and feel. You can
customize your windows and save them in a workspace so that each time you launch X_TRADER,
you open the workspace and avoid having to customize each individual window’s appearance.
(Refer to Workspace Setup on page 68.)
Follow these procedures to format grids:
l Setting the Default Visible Columns
l Hiding Rows or Columns
l Restoring Hidden Rows or Columns
l Moving Rows or Columns
l Changing the Heights or Rows or the Widths of Columns
Setting the Default Visible Columns
Use the Properties menu to customize the default columns that display in a new Market
Grid, Fill pane, Position pane, Order Book, Trade Book, or Audit Trail.
Note: You do not have to save your workspace to save these settings.
To set the default column selection:
1. From the Control Panel, click the Settings menu and choose Properties.
2. Select the tab related to the window whose columns you want to set: Trading, Fill, Orders, or
Audit Trail.
3. Click the Columns button.
The Columns dialog box appears. All checked columns are visible in a new window.
4. Click the boxes to select or de-select the column.
5. Click OK to exit and save.
You successfully set the default column selections.
X_TRADER® User Manual
Trading Technologies International, Inc. Proprietary and Confidential Information
- 57 -
Chapter 2
Moving Rows or Columns
Some windows let you customize the order in which rows and columns are displayed. You
do this by dragging and dropping the appropriate rows or columns where you want them to
go.
To move rows or columns:
1. Click the row or column heading to select the entire row or column.
Note: Press and hold the CTRL key and continue clicking rows or columns to select multiple rows or
columns. Then release the CTRL key.
2. Click and hold the mouse button on the header and drag the row(s) or column(s) to its new position.
A red line appears to indicate where the column or row will be dropped.
3. Release the mouse button.
4. To retain these settings, save your workspace.
You successfully moved rows or columns.
Hiding Rows or Columns
Follow these procedures to hide rows or columns:
l Hiding selected rows or columns using the context menu
l Hiding unselected rows or columns using the context menu
l Hiding a row or column by manually sliding it closed
l
Hiding multiple rows or columns by sliding them closed
To hide selected rows or columns using the context menu:
1. Click the row or column heading to select the entire row or column.
2. Press and hold the CTRL key and continue clicking rows or columns to select multiple rows or columns. Then release the CTRL key.
3. Right-click a grid cell to access the context menu.
Note: If Click Trading is enabled, do not click in the Bid/Ask price columns.
4. Click Hide Row(s) or Hide Column(s).
5. To retain these settings, save your workspace.
You successfully hidden selected rows or columns.
To hide unselected rows or columns using the context menu:
1. Right-click a grid cell to access the context menu.
Note: If Click Trading is enabled, do not click in the Bid/Ask price columns.
- 58 -
X_TRADER® User Manual
Trading Technologies International, Inc.
Common Administrative Tasks
2. Click Hide/Show Row(s) or Hide/Show Column(s).
3. Click to de-select the rows or columns you want to hide.
4. To retain these settings, save your workspace.
You successfully hidden unselected rows or columns.
To hide a row or column by manually sliding it closed:
1. Move the cursor between two row or column headings until the cursor turns into a double-headed
arrow.
2. Click and hold the mouse button and slide the row or column closed.
3. Release the mouse button.
This automatically de-selects the row or column from the Hide/Show Columns/Rows options.
4. To retain these settings, save your workspace.
You successfully hidden a row or column.
To hide multiple rows or columns by manually sliding them closed:
1. Click the row or column heading to select the entire row or column.
2. Press and hold the CTRL key and continue clicking rows or columns to select multiple rows or columns. Then release the CTRL key.
3. Move the cursor to the end of the largest selected row or column heading until the cursor turns into a
double-headed arrow.
4. Click and hold the mouse button and slide the row or column closed.
5. Release the mouse button.
All highlighted rows or columns are hidden. This automatically de-selects the row or column from
the Hide/Show Columns/Rows options.
6. To retain these settings, save your workspace.
You successfully hidden multiple rows or columns.
Restoring Hidden Rows or Columns
Restore hidden rows or columns using the context menu, regardless of how they were
hidden.
To restore hidden rows or columns:
1. Right-click a grid cell to access the context menu.
Note: If Click Trading is enabled, do not click in the Bid/Ask price columns.
2. Click Hide/Show Rows or Hide/Show Columns.
3. Click to select the rows or columns you want to restore.
You successfully restored a hidden row or column.
X_TRADER® User Manual
Trading Technologies International, Inc. Proprietary and Confidential Information
- 59 -
Chapter 2
Changing the Heights of Rows or the Widths of Columns
The heights of rows and widths of columns can be changed one at time, or several rows or
columns can be changed at once.
Follow these procedures to change the heights of rows and widths of columns:
l Changing the height or width of one row or column
l Changing the height or width of multiple rows or columns
To change the height or width of one row or column:
1. Move the cursor between two row or column headings until the cursor turns into a double-headed
arrow.
2. Click and hold the mouse button and slide the row or column to the desired size.
3. Release the mouse button.
4. To retain these settings, save your workspace.
You successfully changed the width or height of a column or row.
To change the height or width of multiple rows or columns:
1. Click the row or column heading to select the entire row or column.
2. Press and hold the CTRL key and continue clicking rows or columns to select multiple rows or columns. Then release the CTRL key.
3. Move the cursor to the end of one selected row or column heading until the cursor turns into a double-headed arrow.
4. Click and hold the mouse button and slide the row or column to the desired size.
5. Release the mouse button.
All highlighted rows or columns change to the desired size.
6. To retain these settings, save your workspace.
You successfully changed the height or width of multiple rows or columns.
- 60 -
X_TRADER® User Manual
Trading Technologies International, Inc.
Common Administrative Tasks
Frame Command Bar Overview
Some windows have sizing and printing buttons in the titlebar. These buttons are located to the
immediate left of the standard Windows Close Window, Minimize, and Maximize buttons.
Button
Command
Print Preview
Action
Displays the standard Print Preview dialog box. Here you can preview
the information before printing it.
Print
Displays the Print dialog box. Here you can select your printer and
other options, as well as submitting the document to the print queue.
Reset
Resets the window view back to the original (default) size.
Zoom Out
Expands the contents of the active window, making less of the grid
visible in the window.
Zoom In
Contracts the contents of the active window, making more of the grid
visible in the window.
Market Explorer
Displays the Market Explorer window.
Follow these procedures to use the Frame Command Bar buttons:
l Resizing a Window Grid
l Printing in X_TRADER
Note: Not all X_TRADER windows contain Print or Print Preview buttons.
Resizing a Window Grid
Resize the window grid by using the
(Reset),
(Zoom in) and
(Zoom out)
buttons in the graphic above. The Reset button sets the window back to its default size.
Note: In certain instances, it is possible to also use the mouse wheel to perform a zoom
function. Refer to Using the Mouse to Control the Zoom Feature on page 278 for a
procedure.)
To resize a window grid:
1. Click a grid to make it active.
2. Click the Zoom Out or Zoom In button to shrink or enlarge the text.
You successfully resized the grid of a window.
To reset a window grid:
1. Click a grid to make it active.
2. Click the Reset button to return the window grid to the workspace settings.
You successfully reset the window grid.
X_TRADER® User Manual
Trading Technologies International, Inc. Proprietary and Confidential Information
- 61 -
Chapter 2
Printing
Most X_TRADER windows offer
(Print) and
located in the top right-hand corner of the window.
(Print Preview) frame buttons
Tip: If you regularly print data from X_TRADER, you may want to create a workspace
that is pre-formatted to display only the information you require. You will format the
window only once, save the workspace under a new name, and will not have to change the
workspace you use for trading.
Notes:
l You must have installed a printer (usually a shared network printer) on your workstation for you to print.
l The Print Setup dialog box does not save your printing preferences.
l Not all windows contain Print or Print Preview buttons.
Follow these procedures to print:
l Previewing a window grid
l Printing a window grid
To preview a window grid:
1. Click a grid to make it active.
2. Click the Print Preview button.
The print preview appears.
3. Review the screen as needed.
4. Click Print to print the screen.
- or Click Close to cancel the print.
You successfully print previewed a window grid.
To print a window grid:
1. Click a grid to make it active.
2. Click the Print button.
The Print dialog box displays if you have printer services installed through Windows. You can
click a printer, print range, and number of copies, or you can print to a file. Additional print settings
are available by choosing the Properties button, located to the right of the Printer Name list. The
additional print settings include such items as paper size, orientation, and reduction.
3. Select your print options and click OK to print.
You successfully printed a window grid.
- 62 -
X_TRADER® User Manual
Trading Technologies International, Inc.
CHAPTER 3
Control Panel Overview
The Control Panel appears after you start X_TRADER. It is your main hub for accessing functional
windows, and setting default properties within the application.
To quickly display the Control Panel on top of your other windows, most context menus offer a Find
Control Panel option.
Note: Establishing a connection to an exchange may result in a short delay before the Control Panel
buttons are enabled.
Follow these procedures to use the Control Panel:
l Opening a functional window
l Changing the size of the toolbar
l Workspace setup
l Product group setup
l
l
l
l
l
Spread tables setup
Customer Defaults setup
Properties setup
Adding high and low sound alerts
Starting plug-ins
To quickly display the Control Panel on top of your other windows, most context menus offer a Find
Control Panel option.
To find the Control Panel:
1. Right-click in one of the main X_TRADER windows to access the context menu.
Note: If Click Trading is enabled, do not click in the Bid/Ask price columns.
2. Click Find Control Panel.
Note: If the context menu does not include this option, right-click a different window to access the
context menu.
You successfully found the Control Panel.
X_TRADER® User Manual
Trading Technologies International, Inc. Proprietary and Confidential Information
- 63 -
Chapter 3
Opening a Functional Window
You use the Control Panel to open functional windows within X_TRADER.
You can open these windows using:
l The Window menu
l The Toolbar icons
Window Menu
The following options are available from the Window menu on the Control Panel:
l
l
l
l
l
l
l
l
l
l
l
Market Explorer: Lists products by exchange/marketplace. Open one
or more functional windows with one or more products.
Market Window: Opens a blank Market Grid with the Order Entry
pane on top. Used for watching the market and placing orders.
Order Book: Manages your open orders. Monitor, change, or delete
orders, or perform a status inquiry about any open order.
Fill Window: Lists the current day’s trades.
Trade Book: Displays an aggregate fill for a single order number on a
separate line.
Audit Trail: Displays data sent to the exchange and the responses
received from the exchange. Order add, delete, change, inquiry, trader,
and customer detail, as well as error messages and all exchange
announcements are detailed in this window.
Time and Sales: Provides the ability to track, record, and save time and
information for products traded through X_TRADER.
Customer List: Displays all accounts by customer name, based on information obtained from the Customer Defaults Settings window.
Create Strategy: Creates multiple-legged spreads, strips, packs, and bundles.
Quote Audit Trail: Monitors addition, deletion, and related error messages for both manual and autoquoting for Market Makers. You can also
monitor both inbound and outbound RFQs.
Spread Matrix: Opens the Spread Matrix window.
- 64 -
X_TRADER® User Manual
Trading Technologies International, Inc.
Control Panel Overview
Autospreader: Sets up two sided spreads that trade automatically in a threepane window.
Note: You need an X_TRADER Pro license to use Autospreader.
l
l
l
l
l
l
l
Autotrader: Creates and maintains a two-sided market for selected sets
of contracts and allows automatic bids and offers.
Note: You need an X_TRADER Pro license to use Autotrader.
Available Credit: Displays the amount of credit left in your trading
account. A green total indicates a positive balance; a red total indicates a
deficit.
MD Trader: Displays the market depth for a given product and allows
you to buy or sell products with one click.
Alerts Manager: Assigns alert sounds to contracts so X_TRADER
plays a sound whenever the contract trades above its high price or below
its low price for the day.
Quote Board: Displays the open, high, low, last, net change, trader position and P/L for several markets at once.
X_STUDY: Lets you start/stop X_STUDY and access its components.
Refer to the X_STUDY User Manual for an overview.
Plug-ins: Starts X_TRADER Plug-in applications.
Note: To use each individual Plug-in, you must obtain proper licensing
X_TRADER® User Manual
Trading Technologies International, Inc. Proprietary and Confidential Information
- 65 -
Chapter 3
The Toolbar
You can access most X_TRADER functions using the Toolbar.
Button
Description
Open Workspace: Displays a list of workspace names to open.
Save Workspace: Saves your current workspace under the workspace name that
appears in the Control Panel title bar. If no name appears in the Control Panel
title bar, you are prompted to enter a name.
Refer to Workspace Setup on page 68.
Market Explorer: Lists products by exchange/marketplace. Open one or more
functional windows with one or more products.
Market Window: Opens a blank Market Grid with the Order Entry pane on top.
Used for watching the market and placing orders.
Order Book: Manages your open orders. Monitor, change, or delete orders, or
perform a status inquiry about any open order.
Fill Window: Lists the current day’s trades, including your P/L.
Trade Book: Displays an aggregate fill for a single order number.
Audit Trail: Displays data sent to the exchange and the responses received from
the exchange. Details order add, delete, change, inquiry, trader, and customer
detail, as well as error messages and exchange announcements.
Time and Sales: Provides the ability to track, record, and save time and
information for products traded through X_TRADER.
Customer List: Displays all accounts by customer name, based on information
obtained from the Customer Defaults Settings window.
Create Strategy: Creates multiple-legged spreads, strips, packs, and bundles.
Spread Matrix: Opens the Spread Matrix window.
Autotrader : Creates and maintains a two-sided market for selected sets of
contracts, allowing automatic bids and offers.
Note: You need an X_TRADER Pro license to use Autotrader.
Autospreader: Sets up two sided spreads that trade automatically in a three-pane
window.
Note: You need an X_TRADER Pro license to use Autospreader.
Available Credit: Displays the amount of credit left in your trading account. A
green total indicates a positive balance; a red total indicates a deficit.
MD Trader: Displays the market depth for a given product and allows you to buy
or sell products with one click.
Alerts Manager: Assigns alert sounds to play whenever contracts trade above
their high price or below their low price for the day.
Quote Board: Displays the open, high, low, last, net change, trader position and
P/L for several markets at once.
- 66 -
X_TRADER® User Manual
Trading Technologies International, Inc.
Control Panel Overview
Button
Description
X_STUDY Chart: Opens a blank chart. Refer to the X_STUDY User Manual for
an overview.
Plug-ins: Starts X_TRADER Plug-in applications.
Note: You must obtain proper licensing to use each individual Plug-in.
Changing the Size of the Toolbar
You can increase or decrease the size of the icons on the toolbar.
To change the size of the icons on the toolbar:
1. From the Control Panel, click the Settings menu.
2. Highlight the Toolbar option.
Three options appear: Small, Medium, Large, or the Classic Look.
3. Click the size you wish to make the icons on the toolbar.
You successfully changed the size of the icons on the toolbar.
X_TRADER® User Manual
Trading Technologies International, Inc. Proprietary and Confidential Information
- 67 -
Chapter 3
Workspace Setup
Your X_TRADER workspace holds a snapshot of your desktop. It records all your open and
minimized windows, their spatial relationships, color, font, column/row sizing, placement, selection
and saves them so that each time you launch X_TRADER, it looks the same way.
Create one or more workspaces to customize X_TRADER to fit your trading style and
environmental requirements.
Follow these procedures to manage workspaces:
l Creating a workspace
l Opening a workspace
l Saving a workspace
l Managing a startup workspace
l Fixing a workspace
l Deleting a workspace
Multiple Workspaces
You can create as many workspaces as you want. Each workspace is saved on your
workstation’s hard drive and are retained after an upgrade. Workspace files save to:
<root drive>:\tt\datfiles\TTCONFIG\
The workspace folder is named the same as your workspace.
Use multiple workspaces to:
l Create separate workspaces for different markets
l Reflect your changing trading environment
l Create a workspace that has a preformatted Fill window set to print specific information
Note: If you open a workspace, change it and save it under a different name, the saved and
closed workspace retains its settings.
- 68 -
X_TRADER® User Manual
Trading Technologies International, Inc.
Control Panel Overview
Creating a Workspace
A workspace is just a snapshot of your X_TRADER desktop. The procedure below walks
you through steps used to customize your workspace. However, what is in your workspace
is completely up to you.
Warning! Close the Market Depth feature in the Market Grid before saving the
workspace. Leaving Market Depth open may render the feature temporarily inoperable when
you reopen the workspace.
To create a personalized workspace:
1. Set your default visible column preferences using Properties dialog box tabs.
Tip: If you plan to set up multiple workspaces with the same default columns, save time by
setting your default columns and saving them in a workspace (Skip to step 5). Then, continue with
step 2 and create your second workspace with your default columns set.
2. Open the products and windows you want open on your desktop.
3. Adjust the window sizes, filters, fonts, grids, sounds and colors to your liking.
4. Adjust the placement of the windows on your screen.
Note: Your saved workspace remembers the windows you minimize.
5. From the Control Panel, click the File menu and choose Save As.
- or From the Control Panel, click the
icon.
6. Type a name for the workspace and click OK.
Note: Your workspace name must adhere to your Operating System's naming conventions.
You successfully created a personalized workspace. You can reopen this workspace at any time.
X_TRADER® User Manual
Trading Technologies International, Inc. Proprietary and Confidential Information
- 69 -
Chapter 3
Saving a Workspace
If you have a workspace open, the workspace name appears in the Control Panel titlebar.
Any changes you make save under this name by default. However, if you opened an
existing workspace to create a new workspace, make sure you save the new workspace
under a new name to retain the settings in your original workspace.
Follow these procedures to save a workspace:
l Saving a workspace
l Saving a workspace under a new name
To save a workspace:
1. From the Control Panel, click the File menu and choose Save Workspace.
- or From the Control Panel, click the
button.
2. If this is a new workspace, you are prompted to enter a workspace name. If you have a workspace
open, changes are automatically saved under the same name.
3. If the Save Workspace dialog box appears, type a new name for the workspace or select a workspace name to overwrite from the list.
Note: Your workspace name must adhere to your Operating System's naming conventions.
4. Click OK.
If you choose to overwrite a workspace name from the list, you are prompted to confirm.
You successfully saved a workspace.
To save your current workspace under a new name:
1. From the Control Panel, click the File menu and choose Save As.
2. In the Save Workspace dialog box, type a new workspace name and click OK.
Note: Your workspace name must adhere to your Operating System's naming conventions.
You successfully saved your current workspace under a new name.
- 70 -
X_TRADER® User Manual
Trading Technologies International, Inc.
Control Panel Overview
Opening a Workspace
When you open a workspace your desktop appears as it was the last time you saved the
workspace.
Note: Increasing the resolution of your monitor provides more desktop space because
windows and fonts appear smaller. If you decrease the resolution of your monitor the
opposite is true.
To open a previously saved workspace:
Warning! Save changes in your open workspace before opening a previously saved workspace or all
changes will be lost.
1. From the Control Panel, click the File menu and choose Open Workspace.
- or From the Control Panel, click the
button.
2. Click the name of the workspace you want to open and click OK.
If the workspace you open contains a product from an exchange you did not log into, you are
prompted to log into that exchange.
If any part of a workspace is corrupt, an error message informs you not all windows could be
opened. This happens when the Market Grid contains an expired contract. The unopened window is
deleted from the workspace, and the message does not reappear.
You successfully opened a previously saved workspace.
X_TRADER® User Manual
Trading Technologies International, Inc. Proprietary and Confidential Information
- 71 -
Chapter 3
Managing a Startup Workspace
You can set a workspace to start automatically when you log into X_TRADER.
l Setting your startup workspace
l Clearing your startup workspace
To set your startup workspace:
1. From the Control Panel, click File and choose Save As.
Note: Alternatively, you can do this from the Open Workspace dialog box.
2. In the Save Workspace As dialog box, click the workspace you want to start every time you log in.
3. Click Set as Startup.
The workspace is marked as startup.
You successfully set your startup workspace.
To clear your startup workspace:
1. From the Control Panel, click File and choose Save As.
Note: Alternatively, this can be done from the Open Workspace dialog box.
2. In the Save Workspace As dialog box, click the workspace designated as your startup.
3. Click Clear Startup.
You successfully cleared your startup workspace.
- 72 -
X_TRADER® User Manual
Trading Technologies International, Inc.
Control Panel Overview
Fixing a Workspace
A workspace might appear broken if contracts do not appear correctly in a functional
window.
This can occur:
l After you upgrade from X_TRADER 6.X to X_
TRADER 7.X
l At the beginning of the month, after a saved contract expires
To fix a workspace:
1. Open Market Explorer.
2. Find the products you want to drag into the functional window.
3. Drag and drop contracts from Market Explorer to the appropriate functional window.
4. From the Control Panel, click File and click Save.
You successfully fixed a workspace.
Deleting a Workspace
To delete an existing workspace:
1. From the Control Panel, click the Open Workspace button.
2. In the Open Workspace dialog box, select the workspace you want to delete.
3. Click Delete.
The workspace is deleted from the list.
You successfully deleted an existing workspace.
X_TRADER® User Manual
Trading Technologies International, Inc. Proprietary and Confidential Information
- 73 -
Chapter 3
Product Group Information Setup
Product groups let you define how the bid/ask values are calculated. Enter product group
information in the top pane of the Product Group Information dialog box, specifying the quote
type, spread table, delete time, account, and other parameters. Once you add the group to the grid,
you can associate products to the product group.
Follow these procedures to manage product groups:
l Adding a product group
l Changing a product group
l Deleting a product group
l Associating a product to a product group
l Disassociating a product from a product group
To access the Product Group Information dialog box:
1. Ensure Quoting is enabled in the Trading tab on the Properties.
2. From the Control Panel, click the Settings menu and choose Product Group Information.
You successfully accessed the Product Group Information dialog box.
- 74 -
X_TRADER® User Manual
Trading Technologies International, Inc.
Control Panel Overview
Product Group Information Field/Column Descriptions
The fields in the Product Group Information dialog box are defined as follows:
Field
Product
Group Name
Description
Sets the name of the product group
Quote Type
Sets the type of quote received:
l
Dime: A tick better on both bid and ask.
l
Join: Current price of both bid and ask.
l
Mkt Ave: The average between bid and ask is the mid-point for calculating
the spread. The Maximum or Percent spread type is divided by 2. This figure is added and subtracted from the Market Average to define the upper
and lower limits.
l
Theo: Similar to the Mkt Ave except the theoretical price is used as the
mid-point for calculating the spread.
l
Theo Bid/Ask: Current theoretical bid and ask.
Spread Table Associates the product group with a pre-defined spread table for time, price, and
spread limits. Choose any spread table from theb list.
Restriction
Sets the time restriction:
l
Delete (delete the quote after a specified number of seconds)
l
GTC
Delete Time
(Secs)
Sets the number of seconds the quote remains in the market if you choose Delete
in the Restriction field. (The minimum time for EUREX is 20 seconds.)
Bid Qty
Sets the bid quantity to be quoted. (The minimum quantity for EUREX is 50.)
Ask Qty
Sets the ask quantity to be quoted. (The minimum quantity for EUREX is 50.)
Spread Type
Sets the spread type:
l
Maximum: The spread defined in the spread table is used to generate the
quote. If the center price used for the calculation is 50 and the spread is 4
ticks, the quote will be 48-52.
l
N/A: When you set the quote type to Dime, Join, or Theo Bid/Ask, the
spread type defaults to N/A (not applicable).
l
Percent: The chosen percentage of the price is used to calculate the spread.
The +/- % field is used to define the exact percentage.
The Percent Spread Type is subject to the spread table's defined
Maximum Spread and the product group's defined Minimum Spread.
If the calculated quote is greater than the Maximum Spread, the
Maximum Spread is quoted. For example, if the percent calculated is 6
ticks and the spread table max is 4 ticks, 4 ticks is used.
Minimum
Spread
Sets the smallest number of ticks allowed to generate a quote. If the calculated
quote is less than the minimum defined, this minimum is used to generate the
quote. For example, if the calculated spread is 1 tick and your minimum is 2 ticks,
the quote will have a 2-tick spread. Not applicable for Dime, Join, and Theo
Bid/Ask Quote types.
+/-%
Defines the percentage of the price on either side used to calculate the spread
when you select Percent Spread Type. Not applicable for Dime, Join, and Theo
Bid/Ask Quote Types.
X_TRADER® User Manual
Trading Technologies International, Inc. Proprietary and Confidential Information
- 75 -
Chapter 3
Field
Description
Auto Quote
Sends quotes in a time interval as defined with Auto Quote Delay.
Auto Quote
Delay (Secs)
Sets the number of seconds the quote is delayed before being sent to the market
after an RFQ is received.
Clearing
Member
Sets your clearing member ID.
Account Sec- Sets the account type as defined by the exchange:
tion
l A1: Agent 1.
l
A2: Agent 2.
l
A3: Agent 3.
l
G1: Pre-designated Giveup Trade 1.
l
G2: Designated Giveup Trade 2.
l
M1: Market Maker 1.
l
M2: Market Maker 2.
l
M3: Market Maker 3.
l
P1: Principal 1.
l
P2: Principal 2.
l
P3: Principal 3.
l
U1: Unallocated—for orders that have not been allocated to a customer
account or where allocation is a middle/back office function.
Quote ViaThe following checks are optional
bility Checks
Section
Cross Check
Prevents putting in quote that would immediately get hit.
The quote is not sent if the bid is greater than the current market ask price; or the
ask is less than the current market bid.
Inside Check
Prevents beating the market.
The quote is not sent if the bid is greater than the current bid; or the ask is less
than the current ask. This check does not apply when the Dime Quote Type is
selected.
At Mkt
Check
Prevents putting in quote that would join best bid or best ask.
Price Check
Prevents putting in quote with no market.
The quote is not sent when the bid and/or ask are equal to the current market
price.
The quote is not sent if there is no current bid or ask price.
- 76 -
X_TRADER® User Manual
Trading Technologies International, Inc.
Control Panel Overview
Adding a Product Group
To add a product group:
1. From the Control Panel, click the Settings menu and choose Product Group Setup.
The Product Group Information dialog box appears.
2. In the Product Group Name field, enter your product group name.
3. In the Quote Type field, click one of the following:
l Dime: A tick better on both bid and ask.
l Join: Current price of both bid and ask.
l Mkt Ave: The average between bid and ask is the mid-point for calculating the spread. The
Maximum or Percent spread is divided by 2. This figure is added and subtracted from the Market Average to define the upper and lower limits.
l Theo: Similar to the Mkt Ave except the theoretical price is used as the mid-point for calculating the spread.
l Theo Bid/Ask: Current theoretical bid and ask.
4. In the Spread Table field, associate the product group with a pre-defined Spread Table for time,
price, and spread limits.
5. In the Restriction field, set the quote to either be deleted after a specified number of seconds or
GTC.
6. In the Delete Time field, if you chose the Delete Restriction, set the number of seconds the quote
remains in the market before it is deleted. (The minimum time for EUREX is 20 seconds.)
7. In the Bid Qty field, specify the bid quantity to be quoted. (The minimum quantity for EUREX is
50.)
8. In the Ask Qty field, specify the ask quantity to be quoted. (The minimum quantity for EUREX is
50.)
9. In the Spread Type field, click one of the following:
Note: This field is not applicable for Dime, Join and Theo Bid/Ask quote types.
l Maximum: The spread defined in the spread table is used to generate the quote. If the
center price used for the calculation is 50 and the spread is 4 ticks, the quote is 48-52.
l N/A: When you set the quote type to Dime, Join and Theo Bid/Ask the spread type
defaults to N/A (not applicable).
l Percent: The chosen percentage of the price is used to calculate the spread. The +- %
field is used to define the exact percentage.
The Percent spread type is subject to the spread table's defined Maximum Spread and
the product group's defined Minimum Spread.
If the calculated quote is greater than the Maximum Spread, the Maximum Spread is
quoted. For example, if the percent calculated is 6 ticks and the spread table max is 4
ticks, 4 ticks is used.
X_TRADER® User Manual
Trading Technologies International, Inc. Proprietary and Confidential Information
- 77 -
Chapter 3
10. In the Minimum Spread field, set the minimum spread used to generate a quote.
Note: This is the smallest number of ticks allowed to generate a quote. If the calculated quote
is less than the minimum defined, then this minimum is used to generate the quote.
For example, if the calculated spread is 1 tick and your minimum is 2 ticks, the quote has a 2tick spread. Not applicable for Dime, Join and Theo Bid/Ask quote types.
11. In the +/-% field, if you chose the Percent Spread Type, define the percentage of the price that
will be used to calculate the spread.
Note: Not applicable for Dime, Join and Theo Bid/Ask quote types.
12. In the Auto Quote field, select On or Off to set up automatic quoting in response to an RFQ.
13. In the Auto Quote Delay (Secs) field, enter the number of seconds the quote is delayed before
being sent after an RFQ is received.
14. In the Clearing Member field, enter your clearing member ID.
15. In the Account field, enter the account type.
16. In the Quote Viability Checks field, you can select from the following checks:
l Cross Check: The quote is not sent if the bid is greater than the current market ask price, or
the ask is less than the current market bid.
l Inside Check: The quote is not sent if the bid is greater than the current bid, or the ask is less
than the current ask. This check does not apply when you select the Dime quote type.
l At Mkt Check: The quote is not sent when the bid and/or ask are equal to the current market
price.
l Price Check: The quote is not sent if there is no current bid or ask price.
17. Click Add Group before closing the window.
The new Product Group displays in the bottom portion of the window.
18. After adding, deleting, or changing product group information, click the appropriate button (Add,
Change, Delete).
19. Associate the products as needed.
20. Click OK to close the product window and save your changes.
You successfully added a product group.
- 78 -
X_TRADER® User Manual
Trading Technologies International, Inc.
Control Panel Overview
Changing a Product Group Settings
To change a product group’s settings:
1. From the Control Panel, click the Settings menu and choose Product Group Setup.
The Product Group Information dialog box appears.
2. Click the Product Group in any cell on the bottom half of the screen.
Note: If no product groups display, you have no product groups to change.
3. Make any desired changes in the entry section of the top half of the window.
4. Click the Change Group button.
Note: The changes are not saved until you close the Product Group Information dialog box.
5. Click OK to save and exit.
You successfully changed a product group’s settings.
Deleting a Product Group
To delete a product group:
1. From the Control Panel, click the Settings menu and choose Product Group Setup.
The Product Group Information dialog box appears.
2. Click the Product Group in any cell on the bottom half of the screen.
Note: If no product groups display, you have no product groups to delete.
3. Click the Delete Group button.
4. Click OK to save and exit.
You successfully deleted a product group.
X_TRADER® User Manual
Trading Technologies International, Inc. Proprietary and Confidential Information
- 79 -
Chapter 3
Associating a Product to a Product Group
Each quoted product must be associated to a product group that you have created. It is the
product group that determines how a quote is generated. Therefore, each product must be
associated with one (and only one) product group in order to generate quotes.
Note: Each product can be associated with only one product group at a time. If you require
quotes for the same product to be constructed using different parameters (for example, max
vs. percentage or a different clearing member), you must first disassociate the product and
then re-associate it with another product group.
To associate a product to a product group:
1. From the Control Panel, click the Settings menu and choose Product Group Setup.
The Product Group Information dialog box appears.
2. Click the Product Group in any cell on the bottom half of the screen.
All the product group settings display in the top half of the window.
Note: If no product group displays, you must create a custom product group before associating
products.
3. Click the Associate Products button.
Note: If this button is grayed out, you have not selected a product group.
The following screen appears.
4. From the Exchange field, click the appropriate exchange.
5. From the Product field, click the appropriate product.
6. Click the Add to List button.
The exchange and product now display on the product list.
7. Repeat steps 4-6 to associate more products.
8. Click OK to exit.
You successfully associated a product to a product group.
- 80 -
X_TRADER® User Manual
Trading Technologies International, Inc.
Control Panel Overview
Disassociating a Product from a Product Group
To disassociate a product from a product group:
1. From the Control Panel, click the Settings menu and choose Product Group Setup.
The Product Group Information dialog box appears.
2. Click the Product Group in any cell on the bottom half of the screen.
All the product group settings display in the top half of the window.
Note: If no product group display, you have no products to disassociate.
3. Click the Associate Products button.
Note: If this button is grayed out, you have not selected a product group.
The following screen appears.
4. Click the product to be removed.
5. Click the Remove button.
The exchange and product no longer appears on the product list.
6. Repeat steps 4-5 to disassociate more products.
7. Click OK to exit.
You successfully disassociated a product from a product group.
X_TRADER® User Manual
Trading Technologies International, Inc. Proprietary and Confidential Information
- 81 -
Chapter 3
Spread Tables Setup
Spread tables allow you to define how wide quote spreads should be based on a product’s time to
expiration and price. You may create any number of strategies, which are then maintained in a file
and are available from a drop-down list. After creation, you can then use the new strategy in the
course of your trading.
Follow these procedures to manage spread tables:
l Adding a spread table
l Copying a spread table
l Saving a spread table
l Removing a spread table
To access the Spread Tables dialog box:
1. Ensure Quoting is enabled in the Trading tab on the Properties menu.
2. From the Control Panel, click the Settings menu and choose Spread Table Setup.
You successfully accessed the Spread Tables dialog box.
- 82 -
X_TRADER® User Manual
Trading Technologies International, Inc.
Control Panel Overview
Adding a Spread Table
To add a spread table:
1. From the Control Panel, click the Settings menu and choose Spread Table Setup.
The Spread Tables dialog box appears.
2. In the Add/Remove Spread Tables section, type a name for your table.
3. Click Add.
The table name displays in the column to the right.
4. Click the table name you just created.
The fields in the Setup Spread Table section activate.
5. In the Days to Expiration column, click the first cell and type the maximum number of days the
first row of bids will be active for before expiring.
Note: Use the Days to Expiration column (A) to set the upper boundary for any given time
period. For example:
l Entering 30 in the top cell creates a 0 to 30-day time-to-expiration period for the Bid Up To
price and criteria you enter in the top row.
l Entering 90 in the cell below the 30 creates a 31 to 90-day time-to-expiration period for the
Bid Up To price and criteria you enter in the second row.
l Entering 99999 in the cell below the 90 creates the 91–99999 day time period for the Bid
Up To price and criteria you enter in the third row.
6. In the Bid Up To column, click in the first cell and type the maximum amount to bid for the number
of days you set in column A. (e.g., 30 days)
7. In the Maximum Spread column, click the first cell and type the largest spread to be used (in ticks
by default).
Note: Setting the Bid Up To price to 1000 and the Maximum Spread to 4 means for all prices up
to 1000, the Maximum Spread for any quote is 4 ticks wide.
8. In the Ticks/Percent column, click the down arrow and select Ticks or Percent to measure the
spread by.
9. To set further bidding parameters for this spread table, click the next available row in the Days of
Expiration column and repeat steps 5-8.
Notes:
l You must increase the size of the Days to Expiration and Bid Up to columns when you
add a new row.
l Use 99999 to indicate ‘or longer.’ A Days to Expiration last entry of 30 goes out to 30
days. If you set the next cell to 99999, you create a time period of 31 days or longer.
10. To verify your settings, click any cell in the Days to Expiration column.
The text above the Bid Up To cell confirms the exact time period for the bidding parameters.
11. Click the Close button to save.
X_TRADER® User Manual
Trading Technologies International, Inc. Proprietary and Confidential Information
- 83 -
Chapter 3
You successfully added a spread table.
Copying a Spread Table
To copy a spread table:
1. Click the name of an existing spread table.
2. Click the Copy button.
3. Enter a new table name and press ENTER.
All spread table data is copied to the new table.
4. Click the name of the new table and edit the bidding parameters as necessary.
5. Click the Close button to save your changes.
You successfully copied spread table data from one spread table to a new one.
Saving a Spread Table
To save a spread table:
After entering the information into the spread table in the Spread Tables dialog box, click the Close
button.
You successfully saved a spread table.
Removing a Spread Table
To remove a spread table:
1. Click the name of an existing spread table.
2. Click the Remove button.
You successfully removed a spread table.
- 84 -
X_TRADER® User Manual
Trading Technologies International, Inc.
Control Panel Overview
Customer Defaults Setup
You define profiles on the Customer Defaults dialog box to establish all of the most common order
variables by customer name. These variables include but are not limited to market vs. limit order,
and FOK/IOC.
Note: Customer Defaults can be set by an administrator using TT User Setup. If you cannot change
your Customer Defaults an administrator may need to make changes for you. Refer to TTUS
Integration with Customer Defaults on page 86.
Tip: Click the SEL box to add a customer to the Customer List and make them selectable from
the Order Entry pane. (Refer to Order Entry Customer Selection Overview on page 94)
Follow these procedures to manage your Customer Defaults profiles:
l Creating a profile
l Changing a profile
l Deleting a profile
l
l
Setting a profile to read-only
Sharing your profiles
To access the Customer Defaults dialog box:
From the Control Panel, click the Settings menu and choose Customer Defaults.
You successfully accessed the Customer Defaults dialog box.
X_TRADER® User Manual
Trading Technologies International, Inc. Proprietary and Confidential Information
- 85 -
Chapter 3
Customer Default Features
Features of the Customer Default profile include:
l Choose a customer account in an Order Entry pane and automatically see the associated account type.
l Use the same name in the Customer field to create multiple profiles for different
exchanges, product types and accounts.
When you select the customer name in an Order Entry pane, X_TRADER maps to
the proper account in order of the following criteria:
1. Customer name
2. Market
3. Product
4. Product Type
5. Account
Note: Refer to Setting Customer Defaults to Read-Only on page 91 for a
discussion on making your Customer Defaults market-based.
TTUS Integration with Customer Defaults
When using TT User Setup, X_TRADER receives Customer Defaults from TTUS. TTUS
administrators allow or restrict traders from editing their own local defaults.
You can create your own Customer Defaults locally in addition to the ones you get from
TTUS. The Customer Defaults set by your administrator and the Customer Defaults you
create locally are all seen together in the same Customer Defaults window.
In the example below, the dark gray area identifies view-only settings from TT User Setup.
The light gray identifies locally configurable settings
- 86 -
X_TRADER® User Manual
Trading Technologies International, Inc.
Control Panel Overview
Customer Defaults Dialog Box Field Descriptions
You define a profile on the Customer Defaults dialog box to establish all of the most
common order variables by customer name for each customer. You can add a new profile or
change the profile of a current customer at any time. By changing the Customer Defaults
profile, all subsequent orders for that customer are affected.
Note: An asterisk (*) represents all available options.
The fields in the Customer Defaults dialog box are defined as follows:
Field
Customer
Description
Sets the name of the profile.
Gateway
Appears when you are in Multi-Broker mode, this column lets you specify the TT
gateway and flavor (e.g., CME-A) or an asterisk (*), meaning apply the customer
default information to all available gateways for that market.
SEL
Adds the customer to the Customer List window so you can trade for them.
Market
Lists available markets or an asterisk (*), meaning apply the account and account
type to all markets you are logged into.
Product
Lets you type a specific product or an asterisk (*), meaning apply the account and
account type to all products in the exchange.
Product Type Lists product types, including: Future, Spread, Option, Strategy, Stock, Bond,
Swap, Warrant or an asterisk (*), meaning all product types.
Account #
Indicates the customer account code. This field can be used by the middle or back
office as a sub-account. The account number associates the trade with a specific
customer. This field might be required by the exchange (e.g., CME requires it).
X_TRADER uses the data specified in this column if no other risk management
parameters exist. If you are set up with risk management parameters, X_TRADER
uses the risk management account number and the relevant information from the
Customer Default profile.
X_TRADER® User Manual
Trading Technologies International, Inc. Proprietary and Confidential Information
- 87 -
Chapter 3
Field
Acct Type
Description
Indicates one of the following account types:
l
A1: First Agent Account (e.g., broker)
l
A2: Second Agent Account
l
A3: Third Agent Account
l
G1: Pre-Designated Giveup Trade
l
G2: Designated Giveup Trade
l
G3: Second Giveup Trade
l
M1: First Market Maker Account
l
M2: Second Market Maker Account
l
M3: Third Market Maker Account
l
P1: First Principal Account (e.g., proprietary trader)
l
P2: Second Principal Account
l
P3: Third Principal Account
l
U1: Unallocated—for orders that have not been allocated to a customer
Refer to Order Entry Pane Field Descriptions on page 172 for more information.
Give Up
Indicates the clearing member code. Used for Give-up trade accounts only.
FFT2 & FFT3 Used for annotation purposes by the trader or back office (sub-account). The back
office manager usually dictates the use of these free-form text fields.
TIF
Indicates the time the order is in force. The order choices are:
l
GTD (Good 'til Day): Order is valid only for the current trading day.
l
GTC (Good 'til Cancel): Order is valid until you cancel it, or the contract
expires.
l
GIS (Good in Session): Order is valid only for the current trading session.
This TIF is only applicable to the Euronext Liffe exchange.
Type
Indicates the type of order: Limit (default selection) or Mkt (Market).
Restrict
Lists order types and restrictions.
Refer to Order Types on page 291 for more information.
Note: Support and definitions for order restrictions are determined by each
exchange. If the order type is not supported, the Audit Trail displays an error
message from the exchange. Refer to each exchange’s market rules for additional
information.
O/C
Indicates whether a position is being opened or closed. This information is not
used by the exchange and can be used at your discretion.
Use Max
Indicates the maximum trade quantity restriction is applied. A blank box indicates
that there is no maximum order quantity, or none is applied. You can establish a
high quantity that does not restrict normal trading, yet still provides security
against an erroneous trade.
Max Order
Qty
Indicates the maximum quantity allowed per trade for the specified account. The
Maximum Order Qty field in Guardian overrides this one.
- 88 -
X_TRADER® User Manual
Trading Technologies International, Inc.
Control Panel Overview
Creating a Customer Defaults Profile
Define a profile on the Customer Defaults dialog box to establish all of the most common
order variables by customer name.
Note: Customer Defaults can be set by an administrator using TT User Setup. If you cannot
change your Customer Defaults an administrator may need to make changes for you. Refer
to TTUS Integration with Customer Defaults on page 86.
To create a Customer Defaults profile:
1. From the Control Panel, click the Settings menu and choose Customer Defaults.
The Customer Defaults dialog box appears.
2. In the next available row, in the Customer field, type the customer name.
Note: The first profile has a customer name of <Default> which you cannot change.
3. To add the customer to the Customer List and make them selectable on the Order Entry pane, click
to select the SEL box.
4. Fill in the rest of the customer profile information in the remaining fields.
Notes:
l In columns with multiple options, an asterisk (*) represents all products. (Refer to Customer Defaults Dialog Box Field Descriptions on page 87.)
l The Account # is the account number used for clearing. TT risk management systems
override this field. Always enter the same value here that exists in risk management.
l Some exchanges do not support the FFTEXT2 and FFTEXT3 fields.
5. When changing data on the Customer Defaults dialog box, make sure you press Tab or ENTER to
advance to the next field.
This saves your changes.
6. Close the Customer Defaults dialog box.
You successfully created a Customer Defaults profile.
X_TRADER® User Manual
Trading Technologies International, Inc. Proprietary and Confidential Information
- 89 -
Chapter 3
Changing a Customer Defaults Profile
Tip: Click the SEL box to add a customer to the Customer List so you can trade for them.
(Refer to Order Entry Customer Selection Overview on page 94)
Note: Customer Defaults can be set by an administrator using TT User Setup. If you cannot
change your Customer Defaults an administrator may need to make changes for you. Refer
to TTUS Integration with Customer Defaults on page 86.
To change a customer profile:
1. From the Control Panel, click the Settings menu and choose Customer Defaults.
The Customer Defaults dialog box appears.
2. Change the customer profile information in the Customer Defaults dialog box.
Note: The first profile has a customer name of <Default> and cannot be changed.
3. When changing data on the Customer Defaults dialog box, make sure you press TAB or ENTER to
advance to the next field.
This saves your changes.
4. Close the Customer Defaults dialog box.
You successfully changed the information in a Customer Defaults profile.
Deleting a Customer Defaults Profile
To delete a customer profile:
1. From the Control Panel, click the Settings menu and choose Customer Defaults.
The Customer Defaults dialog box appears.
2. Right-click a row to delete and click Delete Row(s).
You successfully deleted a Customer Defaults profile.
- 90 -
X_TRADER® User Manual
Trading Technologies International, Inc.
Control Panel Overview
Setting Customer Defaults to Read-Only
To avoid making changes to your Customer Defaults profile, make the Customer Defaults
file read-only.
While in read-only mode, the Customer Defaults file is intended to be market-based. When a
contract is seeded in the Market Grid, the customer whose name matches the market of the
seeded contract is returned.
Here is an example of a market-based Customer Defaults file:
1
Customer
<Default>
Market
*
Product
*
Product Type
*
2
CME
CME
*
*
3
CBOT
CBOT
*
*
4
Eurex
Eurex
*
*
5
LIFFE
LIFFE
*
*
Non-market-based Customer Default files can also take advantage of the read-only feature.
Though a name automatically appears in the Customer Selection field, you can change the
customer selection using the drop-down just as you would change a Customer Default file
you can write to.
To set the Customer Defaults file to read-only:
1. From your desktop, right-click My Computer and click Explore.
2. In Windows Explorer, navigate to: <root drive>:\tt\datfiles\TTCONFIG
Note: This location is configurable in the Order Entry tab on the Properties menu.
3. Click the ttconfig folder to list its contents in the right-side pane.
4. Right-click the Customer Defaults file, and click Properties.
5. In the Attributes box, click to select Read-only.
6. Click Apply.
7. To close the Properties dialog box, click OK.
You successfully set the Customer Defaults file to read-only.
X_TRADER® User Manual
Trading Technologies International, Inc. Proprietary and Confidential Information
- 91 -
Chapter 3
Sharing your Customer Defaults Profile
Using the Order Entry tab on the Properties menu, you can customize the name and
location of your Customer Defaults file. Save the file on a shared network if you want to
share it.
To save your Customer Defaults file to a network:
1. From the Control Panel, click the Settings menu and choose Properties.
2. Click the Order Entry tab.
3. In the Customer Defaults section, click Browse.
4. In the Look in field, click the down arrow and select the network drive to save the file.
5. In the File Name field, type the new name of your Customer Defaults profile.
6. Click Open.
7. Review the Location field on the Customer Defaults tab.
8. Click OK to save.
You successfully saved your Customer Defaults file to a network.
- 92 -
X_TRADER® User Manual
Trading Technologies International, Inc.
Control Panel Overview
Using the Customer List
The Customer List window contains all the customer profiles with
the SEL box marked in the Customer Defaults dialog box. It lets
you populate all open order entry windows with a customer by
selecting it once from this list.
Alternatively, you can select your customers in specific windows
before you trade.
You also use the Customer List to select the account number of a
customer for the AutoFilter option.
To use the Customer List:
1. From the Control Panel, click the Window menu and choose Customer List.
- or From the Control Panel, click the
icon.
The Customer List window appears.
2. From the Customer List window, click the customer you want to use.
The customer name populates all of your Order Entry panes.
3. Make your trades.
4. Select another customer, or revert back to the <Default>.
You successfully used the Customer List.
One Customer Name Entry
The Customer List displays unique customer names once. Even if the same customer name
has multiple profiles on the Customer Defaults dialog box.
When you select the customer name in an Order Entry pane, X_TRADER maps the proper
account based on the following criteria:
1. Customer name
2. Market
3. Product
4. Product Type
5. Account
X_TRADER® User Manual
Trading Technologies International, Inc. Proprietary and Confidential Information
- 93 -
Chapter 3
Order Entry Customer Selection Overview
The Order Entry Customer Selection list contains all the customer profiles with the SEL
box marked in the Customer Defaults dialog box.
Use the Order Entry Customer Selection list as an alternative to using the Customer List.
The Order Entry Customer Selection list is available to:
l Simplify switching from one customer profile to another when the Customer List is
not displayed.
l Switch to a different customer profile for just one Order Entry pane.
- 94 -
X_TRADER® User Manual
Trading Technologies International, Inc.
Control Panel Overview
Properties Menu Overview
The Properties menu contains tabs that allow you to activate, deactivate, and customize various X_
TRADER windows and options. Changes made to the Properties menu are specific to the user
logged in. This includes all workspace settings, sound events, and so forth.
Notes:
l
l
Settings become the defaults for all new windows. For your custom changes to take effect,
you must close and re-open trading windows.
If another user logs in on the same machine, the property settings must be reset for that user.
Property Tab Names
Tab
Trading
Description
Customize the trading screens to suit your trading style and environment.
Order Entry
Customize the Order Entry and Market Grid panes of the Market window.
Fill
Customize fast fill notification, enable or disable buy/sell color-coding, and select
default visible columns for the Fill window.
Orders
Customize which buttons display, buy/sell color-coding and select default visible
columns for the Order Book window.
Audit Trail
Select viewable records, enable or disable buy/sell color-coding, and default
visible columns for the Audit Trail window.
Sounds
Associate an X_TRADER event with an audio cue.
Color
Select text, background, and border colors.
Spread
Matrix
Customize the Spread Matrix window to suit your trading style and environment.
Time and
Sales
Set the maximum file size and number of days to save time and sales information.
MD Trading
Set trading parameters for MD Trader, including maximum order quantity.
MD Display
Set display options for MD Trader, including EPIQ and volume at price.
MD Color
Customize color specific options and features for MD Trader.
MD
Advanced
Enable and define the User-Defined Price (UDP) column in MD Trader which
allows you to trade in yield.
Quote Board
Hide or Show fields for all the Quote Board windows. Enable or disable
displaying the exchange name.
Hotkeys
Assign, reset and remove hot key designations for the Order Bar, MD Trader,
Quote Board, and the Delete All Orders command.
Autospreader Customize properties for Autospreader orders and the Hedge Manager window.
X_TRADER® User Manual
Trading Technologies International, Inc. Proprietary and Confidential Information
- 95 -
Chapter 3
Trading Tab
The Trading tab sets trading properties to suit your trading style and environment. The
properties affect order entry in the Market window.
Click Trading
Mouse type
Description
Identifies the type of mouse you use.
The 3 button mouse is selected by default. Itsupports dime trading with the
middle button, and click trading with the right button.
The 2-button mouse requires the manual selection of dime or click trading.
The right mouse button is used to trade.
Warning! Some versions of the Microsoft Intellimouse driver are incompatible with X_
TRADER . If the middle button of your Intellimouse cannot be used for click trading, launch
Add/Remove Programs and remove the Intellimouse driver. This disables the scrolling feature of
the mouse, but lets you click trade.
Order type
Sets the default order type for dime and click trading. Select GTD (Good
‘til Day) or IOC (Immediate or Cancel).
Enable on
Enables click trading on Fast Fill Net Position.
- 96 -
X_TRADER® User Manual
Trading Technologies International, Inc.
Control Panel Overview
Click Trading
FFNet/NetPos
Quantities
Energy
Description
Description
Determines how you view trading quantities when trading on the ICE
exchange.
Contracts: Represents entire delivery amount.
Flow: Represents the amount to be delivered in each delivery period.
Refer to Trading ICE on page 427.
EBS
Determines whether the outside quantity includes the viewable quantities at
the first two tradable prices:
Aggregate: Counts the total number sent by the exchange, including the first
two levels of depth.
Net: Subtracts the first two levels of depth from the total depth sent by the
exchange.
Refer to Trading EBS on page 415.
Implieds
Description
Include Implieds in Displays implied price and quantity data as calculated by the Exchange in
Market Columns
the same columns as direct price and quantity data.
and in Depth
Implied data displays in the Market Grid, MD Trader, Autospreader, and
Autotrader.
Calculate Implieds
instead of using
Exchange Implieds
Displays first level implied prices calculated by X_TRADER. When
disabled, implied prices display as published by the exchanges.
This property affects all windows that displays prices.
Note: Some exchanges do not match implied prices they do not publish.
General
Quoting
Description
Enables the Quoting option on the Market Grid context menu. (Refer to
Enabling Quoting on page 231)
RFQ volume
Indicates the default volume for the Request for Quote option on the Market
Grid context menu.
Hide new
contracts
Hides new contracts and strategies from the Market Grid when they are
released. This property keeps your saved Market Grids intact until you
change them.
Avoid orders that
cross
Sends delete requests when a new order is sent that would ordinarily cross
the working order. The radio buttons determine which order is removed:
l
Cancel resting: Sends a cancel request on the working order and
places the new order.
l
Reject new: Rejects the new order.
This property excludes Market, Stop, Held and Autospreader orders. It also
can be managed by TT User Setup administrators. If the property is enabled
in TT User Setup, it appears checked and grayed out in X_TRADER. If it is
not enabled in TT User Setup, you can set it as needed in X_TRADER.
Note: Due to timing issues outside of X_TRADER, an exchange may process
X_TRADER® User Manual
Trading Technologies International, Inc. Proprietary and Confidential Information
- 97 -
Chapter 3
General
Description
a new order prior to processing a delete request.
Show Admin
Alerts
Enables the Admin Alert Messages dialog box, which lets you receive
messages from your risk manager or an administrator.
Price reasonability Defines a maximum number of ticks from the last price acceptable by
supporting exchanges.
(Mandatory for
some Exchanges) A trade is rejected if it falls outside the range set by the exchange. Detailed
information must be obtained from the exchange.
Maximum Depth
Levels
Indicates the maximum number of depth levels, between 3 and 20, displayed
for Bids and Offers. This setting will not override the maximum depth each
gateway displays.
Example: If you set this value to 8 but the exchange limits maximum depth
to 5 bids and 5 offers, you will only see five levels.
Market Depth
increment
Indicates the number of rows of depth displayed in the Market Grid when
you choose the Depth layout from the context menu. Each time you click the
depth arrow, the same number of depth rows display. Default is 5 rows.
Note: The maximum amount of depth displayed depends on the Gateway.
Floating
Windows
Order
Book
Depth
Window
Description
Designates how you call the Floating Order Book:
l
<Disabled>: Disables the floating order book.
l
Middle click: When you click the middle mouse button.
l
Keyboard: Hotkey tab establishes launch button. Refer to Using the Floating
Order Book on page 343 for a procedure.
l
Mouse hover: When you hover the cursor over the product.
Designates how you call the Floating Depth Window:
l
<Disabled>: Disables the floating depth window.
l
Middle click: When you click the middle mouse button.
l
Keyboard: Hotkey tab establishes launch button. Refer to Using the Floating
Order Book on page 343 for a procedure.
l
Mouse hover: When you hover the cursor over the product.
Note: Launch methods for the Depth window and Floating Order Book must be
different.
Order
Entry
Designates how your floating order entry pane appears when called:
l
Order Pane: The Order Entry pane on the Market window.
l
MD Trader: An MD Trader with a yellow border.
l
Order Bar: A thin red or blue interface, which can be used in conjunction
with hotkeys.
Multiple order entry windows: Launches a separate floating order entry window for
each window with floating order entry enabled. For example:
l
Two separate Market Grid windows
l
A Market Grid and a Quote Board
Note: A Market Grid with two tabs launches the same floating order entry window.
- 98 -
X_TRADER® User Manual
Trading Technologies International, Inc.
Control Panel Overview
Floating
Windows
Description
Refer to Using Multiple Floating Order Entry Windows on page 179.
Join on Left Click: Joins the bid or ask, as opposed to aggressing against a bid or
ask. Enabled when Order Bar is your Floating Order Entry.
Product Name
Default name
Description
Labels the contracts using the product name used by TT.
Alias name
Uses the alias names from the Guardian product tables as the product name.
Use Exchange
contract names
(when applicable)
Labels the contracts using the exchange name.
Options Display
Call+Put
Description
Displays each strike on a single line of the Market Grid, with the calls on the
left side and the puts on the right.
Call/Put
Displays each strike on two lines of the Market Grid, with the calls placed
directly over the puts.
Price Rounding
Description
Options
This property lets you choose your ¼ 32nd rounding options. It applies to all orders you enter
except Autospreader and Autotrader orders, and Stop orders that always round away from the
market.
None
Sends order at your selected price. If the price is not tradable, the exchange
rejects the order.
Aggressively
Rounds ¼ tick prices towards the market.
Conservatively
Rounds ¼ tick prices away from the market.
Color
Description
Market Depth Color codes the Market Depth by price level For All Levels or From 2nd Level
by price level on.
You can customize your market depth colors on the Color tab.
Net change
Displays color coding of the Net Change column.
You can customize your net change colors on the Color tab.
Net position
Displays color coding of Net Position column.
You can customize your position colors on the Color tab.
LTP
background
Displays the Last Traded Price background coloring scheme.
Top of book
Displays the top of book price in a different size font and color. Used for the
Market Grid and Spread Matrix.
You can customize your top of book colors on the Color tab.
Highlight
Own orders
Description
Highlights your own orders to easily identify them. Used for the Market Grid and
Spread Matrix.
X_TRADER® User Manual
- 99 -
Trading Technologies International, Inc. Proprietary and Confidential Information
Chapter 3
Highlight
Minimum
highlighting
mode
Description
Highlights according to the following market characteristics:
l
When both the quantity and price change.
l
When the Last Traded Price (LTP) is on the bid or ask. If the Last Traded
Price was not on the bid or ask, the grid does not highlight.
Used for the Market Grid and Spread Matrix. Enabled by default.
Highlight
best price
Highlights the best price in the market.
Text on
change
Improves identification of affected cells when the market moves.
Cell on hover Displays a 3-D effect as the cursor moves over a cell to help track your cursor
position.
Border on
change
Market Grid
Columns
Market Grid
Columns
Improves identification of affected cells when the market moves.
Highlight Border Width: Set a border width using the arrows.
Description
Sets the default visible Market Grid columns.
- 100 -
X_TRADER® User Manual
Trading Technologies International, Inc.
Control Panel Overview
Admin Alert Messages
The Admin Alert window displays messages sent from your risk manager or other
administrator. When you enable the Show Admin Alerts in the Trading tab on the
Properties menu, the Admin Alerts window appears similar to the sample below:
To close, click the X in the upper right-hand corner.
Messages remain in the Admin Alerts window until you close the window or exit X_
TRADER. They also appear in the Audit Trail. Once you close the window, these messages
are not saved.
You can resize the window and save it with your workspace. When you reopen the
workspace, the Admin Alert Messages window appears, but past messages do not
reappear.
X_TRADER® User Manual
Trading Technologies International, Inc. Proprietary and Confidential Information
- 101 -
Chapter 3
Order Entry Tab
The Order Entry tab sets properties for the Order Entry pane on the Market window.
Enable Order
Types
BL
Description
Block
Enables Eurex Block Trades. (For Block trades on LIFFE, refer to Wholesale
Trading Overview on page 381.) Block trades are high-volume trades whose
price has been separately agreed to by both parties outside of the normal
exchange trading methods. When you select Block from the Order Type
field, the Counterparty Information field automatically displays.
FOK
Enables Fill or Kill. FOK immediately fills the entire order or immediately
cancels the entire order.
Iceberg
Enables Iceberg. Iceberg restricts your order with a disclosed quantity so you
can execute your total order by only sending portions of it to the market at a
time. Attributes of an Iceberg include:
IOC
Enables Best Limit. BL lets you join the best bid or offer without entering a
price. Available on TOCOM.
l
Each disclosed quantity is equal.
l
On the Order Entry pane, set the quantity as an order quantity or a
percentage of the total order quantity. In MD Trader, you can only set
the parameter as an order quantity.
Enables Immediate or Cancel. IOC immediately partial fills the order before
the balance cancels.
- 102 -
X_TRADER® User Manual
Trading Technologies International, Inc.
Control Panel Overview
Enable Order
Types
Description
IT
Enables If Touched. IT submits the order a set number of ticks away from the
inside market and is activated when the market touches the price level.
LOC
Enables Limit On Close. LOC sets a limit order that only executes at the
close. Any portion not filled at the close cancels. (For TSE and OSE only)
LOO
Enables Limit On Open. LOO sets limit order that only executes at the open.
Any portion not filled at the open cancels.
LTM
Enables Limit to Market. LTM sets a limit order where any unfilled portion
converts to a market order at the close. (For TSE and OSE only)
MLM
Enables Market Limit Market. MLM sets a buy order placed above the best
offer to fill by the best offer, and a sell order placed below the best bid to fill
by the best bid.
MOC
Enables Market On Close. MOC sets a market order that only executes at the
close.
MOO
Enables Market On Open. MOO sets a market order which is only valid
during the pre-opening period on all exchanges and are intended for
execution at the opening market price. This order type is not available in MD
Trader.
MTL
Enables Market to Limit. MTL send a Market order with the condition that
on a partial fill, the remaining quantity rests as a Limit order at the price that
was just hit or taken. Available on TOCOM and SGX.
MV
Enables Minimum Volume. MV sets the minimum order quantity that must be
available in the market. If the quantity is not met, the entire order cancels.
Stop
Enables Stop. Stop sets the stop price for limit or market orders. X_TRADER
supports Stop orders on all exchanges.
l
A Stop limit order to Buy becomes a market order when the futures
contract trades (or is bid) at or above the stop price.
l
A Stop limit order to Sell becomes a market order when the futures
contract trades (or is offered) at or below the stop price.
Trailing Stop
Enables Trailing Stop. Trailing Stop sets the price for a stop order a fixed
distance from the current market price and moves dynamically. Trailing Stops
can be limit or market orders.
Volatility
Enables Volatility. Volatility is an order separately agreed to by both parties
and approved by Eurex.
Cross Orders
Order crossing
Description
Lets you trade outside the market with a specified party using the Cross tab
on the Order Entry pane.
ITX (Countdown): Enables an intention to cross countdown in seconds.
Some exchanges require a countdown to cross trade.
Cross order type: Sets how cross orders are submitted.
l
Sequential fast: Default. Both orders (buy and sell) immediately submit, one after the other. On occasion, heavy market conditions can
lead to routing the orders through different routers. As a result, the
wrong leg might arrive at the exchange host first.
l
Sequential guaranteed: Waits for an acknowledgement of the first
X_TRADER® User Manual
Trading Technologies International, Inc. Proprietary and Confidential Information
- 103 -
Chapter 3
Cross Orders
Description
order from the exchange before sending the second order. Due to the
delay, it is possible for a third party to take the offer or bid before
both sides are matched.
Note: In both cases, if the first side fills (partially or completely), the second
side of the cross order still submits.
Refer to Cross Trades Overview on page 212 for more information.
General
Description
Set "Hold" for new Sets Order Entry panes to open with the Hold option checked.
windows
Enable
confirmation
Provides a confirmation step before submitting orders.
Auto mouse move
Increases the speed at which you can submit orders by moving the mouse to
the Buy or Sell button when you click the bid (sell) or ask (buy) side of a
contract. Works for the Order Entry pane and Order Bar.
Post trade qty
clean up
Clears the Quantity field after you submit an order.
Broker mode
Increases the size of the Buy or Sell button in the Order Entry pane when
you are about to submit a trade.
Auto aggressive
Sets Passive orders to automatically hit the bid or take the offer of a
competing Passive order and prevent the market from locking up.
To use this property for a single order, disable it here. Then, click the
Confirm checkbox in the pane. This box is located next to the Sell button.
Note: If you enable Use Default Qty and Post Trade Qty Clean Up, the
quantity does not clear after the order is submitted.
For the BrokerTec exchange.
Send quote order
Sets the orders you send to the market to replace previous orders for that
contract on the same side of the market. If this property is not enabled, the
default order type will be Leave, and the previous orders will not be
canceled.
Disabled by default.
For the BrokerTec exchange.
Use default qty
Sets a default quantity that displays for order entry.
Note: If you enable Use Default Qty and Post Trade Qty Clean Up, the
quantity does not clear after the order is submitted.
Persist edits to
account number
Keeps the account number you type in the Order Entry pane until you
submit an order.
Order Bar to seed
zero if market qty
exceeds max qty
Seeds a 0 in the quantity field if an aggressive action is taken to invoke the
Order Bar and the market quantity is greater than the maximum quantity
defined in Customer Defaults. Disabled by default.
Customer
Description
Defaults
Customer Defaults Lets you customize the name and location of your Customer Defaults file.
Save the file on a shared network if you want to share it.
- 104 -
X_TRADER® User Manual
Trading Technologies International, Inc.
Control Panel Overview
Customer
Defaults
Description
Refer to Sharing your Customer Defaults Profile on page 92 for more
information.
X_TRADER® User Manual
Trading Technologies International, Inc. Proprietary and Confidential Information
- 105 -
Chapter 3
Fill Tab
The Fill tab sets properties for the Fill window.
Enable Fast Fills Description
Enable Fast Fills
Lets supporting exchanges provide partial trade information prior to sending
a confirmed fill (e.g., Eurex supports).
Report stale Fast
Fills
Flashes a message reporting the existence of a stale fast fill until you refresh
your position. Enabled by default.
Properties include:
l
After: Sets the refresh rate for Fast Fills. Fast fills that do not receive a
matching confirmation from the exchange are considered stale after
the time specified.
l
Every: Sets how often stale fast fills are reported. Ten minutes is the
default.
- 106 -
X_TRADER® User Manual
Trading Technologies International, Inc.
Control Panel Overview
Color Code
Buy/Sell
Color code
buy/sell
Description
Lets supporting exchanges provide partial trade information prior to sending
a confirmed fill (e.g., Eurex supports).
Lets you quickly differentiate among orders. Default colors are:
l
Text color for Buy orders is blue.
l
Text color for Sell orders is red.
l
Confirmed fill text background is gray.
Enabled by default.
You can customize your fill colors on the Color tab.
Note: When you enable color-coding, color formatting of the individual grids
is disabled. Only the colors you select via the Color tab apply.
New fills color
Sets a visible indicator when a new fill appears in the Fill window.
Update time for new fills (seconds): Sets how often the indicator bar updates
and displays new fills.
Average Price Dis- Description
play
Nearest tick
Shows average price to nearest tick settings.
Decimal places
(1-7)
Shows average price display in decimals.
General
Fills alert
Description
Displays a dialog box when a fill arrives from an exchange.
Only alert on own
fills
Ignores all fills except your own.
Display strategy
positions
Displays the first and second leg along with the spread in the Fill pane and
the Position pane of the Fill window. When disabled, only the spread is
shown.
Save manual fills
Saves all manual fills to your hard drive. Enabled by default.
Note: If you place an order using an account # mapped to a TTORD ID you
are not logged in under, you will not receive the fill alert.
When enabled, you are prompted to log into all exchanges where you have
manual fills.
If disabled, you lose your manual fills when you log out.
Fills Pane ColDescription
umns
Fills Pane Columns Lets you select the default visible columns for the Fills pane in the Fill
window.
Position Pane
Columns
Position Pane
Columns
Description
Lets you select the default visible columns for the Position pane in the Fill
window.
X_TRADER® User Manual
Trading Technologies International, Inc. Proprietary and Confidential Information
- 107 -
Chapter 3
Trade Book Columns
Trade
BookColumns
Automatic Data
Export
Automatically
export data upon
shutdown
Description
Lets you select the default visible columns for the Trade Book window.
Description
Exports fill data to the folder of choice when you shutdown.
l
Your Fill window must be open when you shutdown for this to
work.
l
A file is created, matching each open Fill window and their filters.
- 108 -
X_TRADER® User Manual
Trading Technologies International, Inc.
Control Panel Overview
Orders Tab
The Orders tab sets properties for the Order Book window.
Order Book
Display routing
status
Description
Displays routing in the TT Status column in the Order Book when you send
an order to market. This identifies the order as sent.
Note: This does not apply to orders generated by automated tools
(Autotrader, Autospreader).
Display
confirmation on
Delete All
Displays a warning notification in the Order Book when you click Delete
All.
Color Code
buy/sell
Color code
buy/sell
Description
Lets you quickly differentiate among orders. Default colors are:
l
Text color for Buy orders is blue.
l
Text color for Sell orders is red.
l
Confirmed fill text background is gray.
Enabled by default.
You can customize your order colors on the Color tab.
Note: When you enable color-coding, color formatting of the individual
grids is disabled. Only the colors you select via the Color tab apply.
Use new order
color settings
Sets a visible indicator when a new order appears in the Order window.
Update time for new orders (seconds): Sets how often the indicator bar
updates and displays new orders.
X_TRADER® User Manual
Trading Technologies International, Inc. Proprietary and Confidential Information
- 109 -
Chapter 3
Order Book Buttons
Order Book
Buttons
Description
Places trading buttons on the Order Book.
Your options are:
l
Change: Changes an order without losing your place in the queue.
l
Cancel/Replace: Replaces an existing order.
l
Delete All/Bids/Asks: Deletes orders.
l
Go To Market: Sends orders for immediate fill.
Original
Description
Qty/Work Qty
Original Qty/Work When you highlight a row in the Order Book, the quantity field displays:
Qty
l Original Quantity: Just the order's original quantity regardless of partial fills.
l
Order Book Columns
Order Book
Columns
Work Quantity: The current working quantity of the order, taking partial fills into consideration.
Description
Lets you select the default visible columns for the Order Book window.
- 110 -
X_TRADER® User Manual
Trading Technologies International, Inc.
Control Panel Overview
Audit Trail Tab
The Audit Trail tab sets properties for the Audit Trail window.
View
All records
Description
Shows all recorded data in the Audit Trail.
Last # records
Shows a specific number of the most recent messages to display (100-2000).
AuditLogDB
Operator actions
Description
Logs some actions you execute via mouse clicks or keyboard strokes.
Example: Delete in the Order Book is always logged. MD Trader actions
are never logged.
Number of days to
save
Sets the number of days Audit Trail log files remain in a database. Files are
located in: <root drive>:\tt\logfiles\AuditLog
Note: If you use automated tools, like Autotrader or Autospreader, change
the days kept to the minimum of three (3).
Maximum Audit
Sets the amount of data the Audit Trail log file holds before creating a new
Trail file size (MB) one. The file size are configurable from 10MB - 200MB with a default of
50MB of data.
Messages
Description
Color code buy/sell Lets you quickly differentiate among orders. Default colors are:
l
Text color for Buy orders is blue.
l
Text color for Sell orders is red.
Enabled by default.
Show fill records
Shows fill records. Enabled by default.
Show fill download records
Downloads and displays all fills on startup. Disabled by default.
Note: You have to enable Process and display INFO messages for this
property to work.
Process and display Shows informational messages from exchanges like MARKET IS OPEN or
INFO messages
DONE RECEIVING FILLS FOR CBOT.
Disabled by default. The default colors are white text on a black
background.
Click the Exchanges button to select which exchanges from whom you want
X_TRADER® User Manual
Trading Technologies International, Inc. Proprietary and Confidential Information
- 111 -
Chapter 3
Messages
Description
to view INFO messages.
Show ERROR messages
Shows error messages like ORDER HAS BEEN REJECTED.
Enabled by default. The default colors for are white text on black
background.
Show ALERT mes- Shows alert messages like FILL SERVER IS DOWN.
sages
Enabled by default. When enabled, the default colors are black text on a
yellow background.
You can customize your Alert-Warning colors on the Color tab.
Audit Trail Columns
Audit Trail Columns
Description
Lets you select the default visible Audit Trail window columns.
- 112 -
X_TRADER® User Manual
Trading Technologies International, Inc.
Control Panel Overview
Sounds Tab
The Sounds tab sets audio notifications for specific events if your workstation is equipped
with a sound card and speakers and the appropriate drivers are installed.
General
Events
Description
List the actions for which you can assign a sound.
l
Buy/Sell: Plays when you place a Buy or Sell order
l
Full Fill Buy/Sell: Plays when your Buy or Sell order fully fills.
l
Partial Fill Buy/Sell: Plays when your Buy or Sell order partially
fills.
l
FFill: Plays when you get a fast fill.
l
Tradable RFQ: Plays when your request for quote receives a tradable price.
l
Indicative RFQ: Plays when your request for quote receives an
indicative price.
l
Reject: Plays when your order is rejected.
l
Error: Plays when X_TRADER receives an error.
l
LClick/RClick: Plays when you left or right click.
l
Alert-Warning: Plays when you get a system alert or warning.
l
Exch Announce: Plays when the Audit Trail receives an
exchange announcement.
l
Server Up/Down: Plays when the Fill or Order server comes up
or goes down.
l
Startup: Plays when you start X_TRADER.
l
Shutdown: Plays when you close X_TRADER.
l
Hedge Manager: Plays when the Autospreader Hedge Manager
detects a legged order.
X_TRADER® User Manual
Trading Technologies International, Inc. Proprietary and Confidential Information
- 113 -
Chapter 3
General
Associated Sounds
Description
List the sound files and their source directory.
Checkbox
Own Fill Only
Description
Indicates the sound will only play when the order filled is yours. If you
share an order book and this property is not checked, you will hear fill
sounds for traders who share your order book.
Button
Test
Description
Lets you listen to the highlighted sound.
To access the Sounds tab:
1. From the Control Panel, click the Settings menu and choose Properties.
2. Click the Sounds tab.
You successfully accessed the Sounds tab.
Suggestions
Keep these points in mind when managing your sound files:
l Copy sound files from another source (for example, WINNT\Media directory) to the
<root drive>:\tt\x_trader\Sounds directory.
l Keep sound files short in duration. Longer files cannot keep up with near simultaneous events.
For example, when performing a cross trade with sounds assigned to buy and sell events, the
first sound is either cut off or unheard because the buy and sell events are closely timed.
Contract High and Low Sounds
You can add sounds for a contract's high and low price threshold for the day. Whenever a
contract trades above the high price or below the lowest price, these sounds are played.
Assign different sounds for the high and low on the same contract, as well as different
sounds for different contracts.
Manage adding sounds for high and low prices in the Alerts Manager dialog box.
- 114 -
X_TRADER® User Manual
Trading Technologies International, Inc.
Control Panel Overview
Adding an Event Sound
To add an event sound to a given event:
1. From the Control Panel, click the Settings menu and choose Properties.
2. Click the Sounds tab.
The top list box displays the event and its associated sound. By default, no audio files (<None>) are
associated with the events.
3. Under the Events column, double-click the event to which you want to assign a sound.
The Associated Sounds column is editable.
4. Click the
icon to locate the sound file you want to use as your alert.
5. If necessary, navigate to the location where the sound files are located. (In most X_TRADER installations this is in the following folder: <root drive>:\tt\x_trader\Sounds)
6. When you have located the file, highlight it and click Open.
The new sound name and path displays next to the selected event.
7. To test the sound, click Test.
8. Click Apply and then OK to exit.
You successfully added an event sound.
Changing or Removing an Event Sound
To change or remove a sound from an event:
1. From the Control Panel, click the Settings menu and choose Properties.
2. Click the Sounds tab.
3. Under the Events column, double-click the event from which you want to remove a sound.
The Associated Sounds column is editable.
4. Press the Delete key.
5. Click Apply.
The event sound is removed from the event.
6. Click OK to exit.
You successfully changed or removed a sound from an event.
X_TRADER® User Manual
Trading Technologies International, Inc. Proprietary and Confidential Information
- 115 -
Chapter 3
Color Tab
The Color tab customizes color settings for specific windows and text in X_TRADER. To
change your color options, refer to Changing Global Colors of Windows or Text on page
119.
General
Buy
Default Colors
Gray with blue text
Sell
Gray with red text
Price/Qty Decrease
Red
Price/Qty Increase
Green
Price/Qty Neutral
White
Excel Link
Dark Gray
Held Order Status
Yellow with black text
OCO Orders Highlight
Light Yellow
OCO Orders Indicator
Dark Yellow
Order Deleting
Red
Position Pane P/L Negative
Red with white text
Position Pane P/L Positive
Dark Green with white text
- 116 -
X_TRADER® User Manual
Trading Technologies International, Inc.
Control Panel Overview
General
Recent Entry
Default Colors
White with black text
Audit Trail
Alert-Warning
Default Colors
Yellow with black text
Message
Black with white text
Market Grid
Best Ask Price Highlight
Default Colors
Blue border outline
Best Bid Price Highlight
Red border outline
Blank/Label Row
Tan with brown text
Grid Background/Text
Tan with brown text
Grid Line
Dark tan
Header Background/Text
Tan with brown text
Market Depth Level 1-7
Default color follows the NASDAQ Level II color
conventions
Net Change Down
Red with black text
Net Change Unchanged
Gray with black text
Net Change Up
Green with black text
Non-Tradable
Burgundy with white text
Position Flat
White with black text
Position Long
Light Purple with white text
Position Short
Red with white text
Top of Book Ask
Yellow with red text
Top of Book Bid
Yellow with blue text
Spread Matrix
Outright Price/Quantity
Default Colors
Direct Ask
Dark Gray with red text
Direct Bid
Dark Gray with blue text
Implied Ask
Pink with black text
Implied Bid
Light Blue with white text
Combination Ask
White with red text
Combination Bid
White with blue text
Spread Price/Quantity
Direct Ask
Red with black text
Direct Bid
Blue with white text
Implied Ask
Pink with black text
Implied Bid
Light Blue with white text
Combination Ask
White with red text
Combination Bid
White with blue text
Net Change Display Mode
Ask Text
Dark Red
Bid Text
Dark Blue
Down Background
Pink
X_TRADER® User Manual
Trading Technologies International, Inc. Proprietary and Confidential Information
- 117 -
Chapter 3
Spread Matrix
Unchanged Background
Default Colors
White
Up Background
Light Green
General
Missing Spread Series
Dark Gray
LTP/LTQ
White with black text
Position Long
Blue with white text
Position Short
Red with white text
Quote Board
Background
Default Colors
White
Barometer Bottom
Blue
Barometer LTP
Yellow
Barometer Top
Red
P/L Even
Black text
P/L Negative
Red text
P/L Positive
Green text
Position Flat
Black text
Position Long
Blue text
Position Short
Red text
Price Data Negative
Red text
Price Data Positive
Green text
Price Data Unchanged
Black text
Quote Board
Background - Non Selected Pane
Default Colors
Tan
Background - Selected Pane
Canary
Border - Selected Pane
Maroon
Dealable Best Ask
Red
Dealable Best Bid
Blue
EBS Best Ask
Red
EBS Best Bid
Blue
Grid
Gray
Position Long
Blue background
Position Short
Red background
Regular / Outside Ask
Red
Regular / Outside Bid
Blue
Threshold Exceeded Qty
Black text
Working Buys
Blue text on white background
Working Sells
Red text on white background
Time and Sales
Buy
Default Colors
Blue text, Tan background
Indeterminate
Black text, Tan background
OTC
Black text, Yellow background
- 118 -
X_TRADER® User Manual
Trading Technologies International, Inc.
Control Panel Overview
Time and Sales
Sell
Default Colors
Red text, Tan background
Trade Book
Partial Buy Background
Default Colors
Yellow
Partial Sell Background
Yellow
Changing Global Colors of Windows or Text
You can change many of the colors used in X_TRADER. The two property tabs that house
the color options are the Color tab and the MD Color tab.
Follow these procedures to change the color of a window or text:
l Use a standard color for a window or text
l Create and use a custom color for a window or text
To use a standard color for a window or text:
1. From the Control Panel, click the Settings menu and choose Properties.
2. Click the Color tab.
3. Click the name of the color setting you want to change.
4. Click a color from the palette.
The Preview section displays your chosen color.
5. Click Apply and then OK to exit.
You successfully changed the colors for X_TRADER display windows.
X_TRADER® User Manual
Trading Technologies International, Inc. Proprietary and Confidential Information
- 119 -
Chapter 3
To create and use a custom color for a window or text:
1. From the Control Panel, click the Settings menu and choose Properties.
2. Click the Color tab.
3. Click the name of the color setting you want to change.
4. From the Color section, click the Other button.
The Color dialog box appears.
5. Under the Custom Colors section, click the first available white box.
Note: This ensures you will not copy a new custom color over an existing custom color.
6. Under the Basic Colors section, click a base color to create your custom color from.
Note: This ensures you can see your custom color as you create it.
7. On the right side, select your custom color from the blended rainbow grid.
The cross hairs pin-point your selection and the color appears in the Color/Solid square.
8. Click and drag the triangle up or down the skinny luminosity grid to select the hue of your color.
The Color/Solid square changes as you drag the triangle.
9. Click the Add to Custom Colors button.
Your selection in the Color/Solid square appears in the Custom colors palette on the left side.
10. Click OK.
On the Color tab, the Preview section displays your chosen color.
11. Click Apply and then OK to exit.
You successfully created and used a custom color for X_TRADER windows or text.
- 120 -
X_TRADER® User Manual
Trading Technologies International, Inc.
Control Panel Overview
Spread Matrix Tab
The Spread Matrix tab sets properties for the Spread Matrix window.
General
Description
Spread Matrix auto Automatically creates a spread. This feature allows you to work with the
creation
LIFFE exchange to create spreads that may not exist.
Display
Tooltips
Description
Displays a popup tip when you hover the cursor over select fields.
Cancel order
buttons
Displays buttons letting you cancel working spread orders and working
outright orders.
LTP/Net Change
row
Displays a row labeled [ L ] at the top of your Spread Matrix. A Last Prc
column displays in your Butterfly Condor Matrix. Enabled by default.
Note: This row displays prices in the format you set up for the rest of the
matrix. (e.g., net change, LTP, etc.)
Qty when
hovering over
price
Hides the Quantity and only displays it when your mouse hovers over a
price.
LTP/LTQ
Displays last traded price and last traded quantity along with Ask price and
quantity and Bid price and quantity.
Refer to Reading the Spread Matrix on page 310.
X_TRADER® User Manual
Trading Technologies International, Inc. Proprietary and Confidential Information
- 121 -
Chapter 3
Color
Implied
prices/quantities
Description
When enabled:
l
Implied Ask prices and quantities display in dark pink.
l
Implied Bid prices and quantities display in light blue.
You can customize your net change colors on the Color tab.
Net Change color
scheme with actual
prices
When enabled:
l
Prices that decrease display in pink.
l
Prices that increase display in light green.
l
Prices with no change display in white.
You can customize your net change colors on the Color tab.
Layout
Layout
Spread Matrix
Show net position
Description
Displays quantity and price cells in the matrix as either:
l
Qty next to price
l
Qty below price
Description
Displays a vertical Net Pos column before the contract.Enabled by default.
Note: By default, your net position is color-coded. Blue is long, Red is short
and Gray is flat.
Display Outright
Prices
Displays outright prices:
l
Across the top: Displays a row designated by a [ P ] across the top.
l
Along diagonal: Displays a cell at the bottom of each contract.
l
Both: Displays both the [ P ] row and bottom cell.
Butterfly/Condor Description
Matrix
Show net position Displays a vertical Net Pos column before the contract.Enabled by default.
- 122 -
X_TRADER® User Manual
Trading Technologies International, Inc.
Control Panel Overview
Example: Spread Matrix Outright Price Display
The following screen displays the outright prices of a calendar spread along the top and the
diagonal of the matrix. To enable this option, go to the Spread Matrix tab on the
Properties menu. In the Display Outright Prices section, click Both.
X_TRADER® User Manual
Trading Technologies International, Inc. Proprietary and Confidential Information
- 123 -
Chapter 3
Time and Sales Tab
The Time and Sales tab sets properties for the Time and Sales window.
Display
Font
Description
Sets the font properties attributed to the Time and Sales window.
Grid Lines
Displays the grid lines in the Time and Sales window when enabled.
Highlight
quantities >=
Sets the quantity at which time and sales row data is highlighted.
History
Retain History
Description
Saves your time and sales data based on the following properties.
Maximum File Size Maximum file size allowed (before automatic purging). Default is 25MB.
(MB)
Number of Days to
Save Files (1-5)
Number of days to save files (before automatic purging). Default is 3 days.
Restore Defaults
Restore Defaults
Description
Sets all properties on the Time and Sales tab back to their default settings.
- 124 -
X_TRADER® User Manual
Trading Technologies International, Inc.
Control Panel Overview
MD Trading Tab
Use the MD Trading tab to customize trading parameters for MD Trader.
Note: When accessed via the context menu, the Set as Global Default checkbox at the
bottom of the tab applies these properties to all subsequently opened MD Trader windows.
Order Parameters Description
Maximum order
Displays the maximum order quantity permitted during trading.
quantity
Note: To use MD Trader, this field must be greater than zero (0).
Right-click
Description
action in
Buy/Sell column
Right-click action Enables your right-click in the Bid and Ask columns to either:
in Buy/Sell
l Sweep w/ max Qty: Sweep the market using your maximum order
column
quantity and up to the defined by price depth level at the exchange.
(e.g., Some exchanges go up to 5 depth levels.)
l
Use 2nd default Qty: Submit a second default quantity in the Bid and
X_TRADER® User Manual
Trading Technologies International, Inc. Proprietary and Confidential Information
- 125 -
Chapter 3
Right-click
Description
action in
Buy/Sell column
Ask column at the price where you right-click. When using this
option, you must type a quantity in the box to the right of the option.
Note: To use MD Trader, this field must be greater than zero (0).
l
Use EBS Regular Qty: Seed the regularly traded quantity as defined
for that contract by the EBS exchange.
General
Delete all when
LTQ column
clicked
Description
Lets you delete all your working orders by clicking in the Last Traded
Quantity column.
Button actions on
Mouse DOWN
Sets mouse button actions to immediately activate when the mouse is
clicked (not released).
Allow only one
order per side
Replaces an existing Buy or Sell order, when you add a new one.
Enable Qty change
on left/ right click
in edit fields
Changes quantity down with a left-click and up with a right-click.
Note: For Brokertec products, the Leave order type overrides this property.
Amount: Sets how much a quantity changes with one click.
Trade Out
Trade out
Description
Lets you flatten your position. Before MD Trader submits an offsetting order,
it sends delete requests for all working orders for that contract. You need to
send a second tradeout request if an existing working order fills.
Using LIMIT
order
Indicates the tradeout method is by Limit order.
# ticks to skew
Determines how many ticks you will trade out to flatten your position.
Note: This property does not guarantee your order will be executed because
the market may move before you enter the order.
Assigning a specific number of ticks to skew ensures your order, once
entered, (not necessarily executed) is only a pre-determined distance from the
inside market. When you click the TradeOut button, you enter a Limit order
based on the current price. If the market moves and the offsetting price is not
available, your limit order remains working at the price you entered it.
Using MARKET
order
Indicates the tradeout method is a Market order.
Order Buttons
Order Types
Description
Assigns buttons to order types enabled in the Enable Order Types section.
When enabled, # ticks to skew field grays. When you click the TradeOut
button, a market order seeks out the available offsetting order and executes
against it.
Note: The order types set up as buttons will no longer appear in the Order
Type Selection menu.
Sticky
Lets you continuously execute the same order type without having to click
the order type button again. The button and cursor highlight in yellow while
the order type is in effect.
To discontinue sending the same order type, click the selected button again
- 126 -
X_TRADER® User Manual
Trading Technologies International, Inc.
Control Panel Overview
Order Buttons
Description
or select another order type.
Enable Order
Types
MKT
Description
SM
Enables Stop Market. Stops set the stop price for limit or market orders. X_
TRADER supports Stop orders on all exchanges.
(Stop Market
Orders)
SL
(Stop Limit
Orders)
TS
(Trailing Stop
Orders)
Enables Market. Market orders cross the inside market to immediately fill.
l
A Stop Market order to buy becomes a market order when the futures
contract trades (or is bid) at or above the Stop Price.
l
A Stop Market order to sell becomes a market order when the futures
contract trades (or is offered) at or below the Stop Price.
Enables Stop Limit. Stops set the stop price for limit or market orders. X_
TRADER supports Stop orders on all exchanges.
# ticks from stop entry price: Sets the number of ticks the stop limit price is
from the stop entry price. (Range is 0-10000)
Enables Trailing Stop. Trailing Stop sets the price for a stop order a fixed
distance from the current market price and moves dynamically. Trailing Stops
can be limit or market orders.
# ticks from last traded price: Sets the number of ticks from the LTP your
order trails.
ICE
(Iceberg)
Enables Iceberg. Sends only a portion of the order quantity to the market at a
time. Each order quantity is equal. When one portion fills, the next portion is
sent until the entire order quantity fills.
Default Disclosed Qty: Pre-sets disclosed quantity.
IOC
(Immediate or
Cancel)
FOK
(Fill or Kill)
MLM
(Market Limit)
MV
(Minimum
Volume)
GTC
Enables Immediate or Cancel. IOC Immediately fills the order to the extent
possible and cancels the balance.
Enables Fill or Kill. FOK immediately fills the entire order or immediately
cancels the entire order.
Enables Market Limit Market. MLM sets a buy order placed above the best
offer to fill by the best offer, and a sell order placed below the best bid to fill
by the best bid.
Enables Minimum Volume. MV sets the minimum order quantity that must
be available in the market or the entire order cancels.
Keeps order in the market until you cancel it or the contract expires.
(Good 'til Cancel)
LOO
(Limit On Open)
LOC
(Limit On Close)
LIT
Enables Limit On Open. LOO sets limit orders that only execute at the open.
Any portion not filled at the open cancels.
Enables Limit On Close. LOC sends Limit orders during the closing auction
of the current business day. Any portion not filled at the close cancels. (For
TSE and OSE only)
Enables If Touched. LIT submits the Limit order a set number of ticks away
X_TRADER® User Manual
Trading Technologies International, Inc. Proprietary and Confidential Information
- 127 -
Chapter 3
Enable Order
Types
Description
from the inside market and is activated when the market touches the price
level.
# ticks from stop entry price: Sets the number of ticks the limit price is from
the entry price.
MIT
Enables If Touched. MIT submits the Market order a set number of ticks
away from the inside market and is activated when the market touches the
price level.
MTL
Enables Market to Limit. MTL send a Market order with the condition that
on a partial fill, the remaining quantity rests as a Limit order at the price that
was just hit or taken. Available on TOCOM and SGX.
LTM
Enables Limit to Market. LTM sets a limit order where any unfilled portion
converts to a market order at the close. (For TSE and OSE only)
(Limit To Market
On Close)
BL
Enables Best Limit. BL lets you join the best bid or offer without entering a
price. Available on TOCOM.
OCO
Bracket
Description
Indicates the OCO strategy in use. Strategies are designed to accomplish
specific goals. A Bracket applied to a current Long position is intended to
exit the position at either a profit or a protective stop. Hence both orders must
be Sell orders:
l
Bracket: First OCO order is Limit. Second OCO order is Stop Limit or
Stop Market. Both orders must be on same side of market. (i.e., 2 Buys
or 2 Sells)
l
Breakout: Both OCO orders can be Stop Limit or Stop Market. Both
orders must be on opposite sides of market. (i.e., 1 Buy and 1 Sell)
l
Custom: Both OCO orders can be Limit, Stop Limit or Stop Market.
No restrictions other than check for invalid price levels by order type.
Type of Order 1
Sets the order type the two orders in an OCO relationship follow.
Type of Order 2
When one of the orders executes, the other cancels.
Note: If your OCO gets partially filled, the second order is reduced by the
quantity the first order was filled.
BrokerTec
Passive
Description
Sends orders which can only be filled by an Aggressive order.
Leave
Sends orders without canceling and replacing previously sent orders on the
same side for the same product. Only needed when the Send Quote Order
property is enabled on the Order Entry tab.
Note: This property overrides the Allow only one order per side property.
TradeSounds
Description
Properties Button
TradeSounds
Opens the TradeSounds Properties dialog box.
Properties
Refer to Managing TradeSounds on page 129.
- 128 -
X_TRADER® User Manual
Trading Technologies International, Inc.
Control Panel Overview
Managing TradeSounds
TradeSounds beep when trade
updates come from an exchange.
Besides being exclusive to MD
Trader, TradeSounds are
different than the properties on
the Sounds tab in two ways:
l TradeSounds are simple
two-toned beeps. The properties on the Sounds tab
point to sound files housed
on your local hard drive or
network.
l TradeSounds are completely configurable via the
TradeSounds Properties
button at the bottom of the
MD Trading tab.
Column
Enable
Description
Plays a beep after a trade is made at the
adjacent trade quantity level when
TradeSounds are enabled.
Details
Enable TradeSounds via the MD Trader
context menu.
Trade Quantity
Sets the range a traded quantity must
fall between to signal the TradeSound.
Range: 0-9999 trade quantity
You can customize up to five levels of
sounds for both Buys and Sells.
Note: The subsequent Trade Quantity
changes based on the setting of the
previous one.
Starting
Pitch and
Duration
Sets the high or low tone and length of
the first beep.
Pitch Range: 0-9999Hz
Repeat
How many times the beep repeats.
Range: 1-5 repetitions
Play
Click to hear the two-tone beep as currently configured.
Duration Range: 1-9999ms
To disable the first beep, make the Pitch
(9999 ms is about 10 seconds)
and Duration zero (0).
Note: If the Pitch for either the Starting
Ending Pitch Sets the high or low tone and length of
or Ending column is 0, the Duration for
and Duration the second beep.
that column must also be 0.
To disable the second beep, make the
Pitch and Duration zero (0).
X_TRADER® User Manual
Trading Technologies International, Inc. Proprietary and Confidential Information
- 129 -
Chapter 3
Hearing TradeSounds
Follow these procedures in order to hear TradeSounds in MD Trader:
l Setting TradeSounds
l Enabling TradeSounds
To set TradeSounds:
1. Navigate to the MD Trading tab.
2. At the bottom of the page, click the TradeSounds Properties button.
The TradeSounds Properties dialog box appears.
3. Under Trade Quantity column, set the range at which you want the first level TradeSound to alert
you.
Note: You can set up to five levels of TradeSounds for both Buys and Sells.
4. Click the Play button to hear the default sound.
5. If you want to change the quality or length of the two-tone beeps, change the Starting and Ending
Pitch and Duration numbers as you desire.
Note: To disable either the start or end beep, make the Pitch and Duration zero (0).
6. Click the Play button to hear the beep as you change it.
7. If you want the beep to play more than once, under the Repeat column, indicate how many times
you want the beep to play when a trade occurs.
Note: You can repeat a sound up to 5 times.
8. Repeat Steps 3-7 for each of the five levels of Buys and five levels of Sells you want to set.
9. When you are finished setting TradeSounds, click OK.
You successfully set TradeSounds. Continue to the next procedure to enable TradeSounds.
To enable TradeSounds:
1. Right-click MD Trader to access the context menu.
2. Click to select TradeSounds.
You successfully enabled TradeSounds.
- 130 -
X_TRADER® User Manual
Trading Technologies International, Inc.
Control Panel Overview
MD Display Tab
Use the MD Display tab to customize the appearance of MD Trader.
Note: When accessed via the context menu, the Set as Global Default checkbox at the
bottom of the tab applies these properties to all subsequently opened MD Trader windows.
Display
Tooltips
Description
Displays a popup tip when you hover the cursor over select fields.
Clock
Displays the system clock.
Customer account
name
Displays the Customer List box.
High/Low for the
day
Adds yellow and red lines to designate the highest and lowest prices at
which the contract traded for the day. All prices between the high and low
are displayed in a darker gray color.
EPIQ Column
Displays the Estimated Position in Queue (EPIQ) columns to the left of the
bid order column.
Average price of
position
Highlights the average open price long and short in the Price column.
Note: Rounds longs up and shorts down.
X_TRADER® User Manual
Trading Technologies International, Inc. Proprietary and Confidential Information
- 131 -
Chapter 3
Display
Hide position on
right click
Description
Lets you hide your position with a right-click on the position field. Rightclick again to show your position. Disabled by default.
Highlight inside
market
Highlights the best bid and best ask. Grays out when the order server is
down. Disabled by default.
Gray out when
order server is
unavailable
Turns MD Trader gray when the order server is unavailable. Enabled by
default.
Mouse over highlighting
Highlights the cell as your cursor rolls over it so you can identify where it is.
You can customize the highlighting color in the MD Color tab.
Keep MD Trader
on top
Displays MD Trader on top of other applications.
Small MD Trader
Shrinks window to maximize your desktop space. Disabled by default.
Hide Titlebar Buttons: Hides the zoom buttons that normally display in the
titlebar. Enabled by default.
Hide titlebar buttons
Hides the zoom buttons in the titlebar so product names can be easily read.
Bid/Ask Display
Bid
Description
Aligns the text in the Buy column to the right or left.
Ask
Aligns the text in the Sell column to the right or left.
Bold text
Text in the bid and ask columns bolds.
Color code blank
spots
Keeps bid and ask column colors even if they have not traded.
Bid indicator column
Displays the Bid Indicator column, used for pasting Excel links
Ask indicator column
Displays the Ask Indicator column, used for pasting Excel links.
Volume at Price
Volume at Price
Description
Enables the view of traded contracts in the Last Traded Quantity column.
Text
Displays total volume at price in numbers. The slide bar to the right sets the
text alignment.
Bars
Displays total volume at price in bar chart format. The slider bar to the right
sets the bar alignment.
Bar Qty: Sets the number of contracts each bar represents:
l
A lower number increases the number of bars displayed when several
trades have occurred at that price.
l
A higher number decreases the number of bars displayed when several
trades have occurred at that price.
Change By: Sets the number that the Bar Qty changes when you press CTRL
and the ARROW RIGHT or ARROW LEFT keys.
l
The CTRL and ARROW RIGHT combination decreases the Bar Qty by
the value you type in this box.
l
The CTRL and ARROW LEFT combination increases the Bar Qty by
the value you type in this box.
- 132 -
X_TRADER® User Manual
Trading Technologies International, Inc.
Control Panel Overview
Volume at Price
Description
Using these shortcuts, you can adjust the bar size while trading without
reentering the MD Display tab.
Mouse tooltips
Displays total volume at price as text when you hover the mouse over the particular cell in the Last Traded Quantity column.
Volume at Price Notes:
l MD Trader generates and displays approximate values. They are not guaranteed
to be the exact trading volumes for any given trading period.
l Incorrect or under-reported actual volume may occur due to price consolidations
at the exchange or Gateway levels.
Format
Digits for working/exec
Description
Sets the number of spaces between the letters and numbers in the working
order quantity column.
Maximum number is 11.
Digits for price dis- Sets the number of digits displayed in the price column. Right side digits are
play
truncated.
Maximum number is 11.
Set row height
Sets the height of each row in pixels.
Price Consolidation
Prices per line
Description
Sets the number of rows to condense when consolidating prices. (Refer to
Consolidating Prices on page 262)
Note: You can also consolidate prices using the Price Consolidation slider.
See the Slider Control property.
Offset
Sets the offset to use when consolidating rows.
Example: A product ticks 10, 11, 12, 13, 14, 15, but you consolidate it to
show 10, 15, 20, 25, 30. If you then want to show 12, 17, 22, 27, 32, you
need an offset of 2.
Slider control
Shows a slider control that consolidate prices by the number of ticks set in
the Tick Increment property.
Tick increment
Sets the number of ticks the Price column consolidates for each movement of
the slider control.
Recentering
Description
Note: These properties work independently of the Automatic Grid Centering property on this
tab.
Recenter on price
column left double
click
Double-click the Price column to recenter the MD Trader grid.
Highlight midpoint Bolds dividing line between the best bid and best ask.
of last recenter
Global recenter
Note: This property enables by default. New and existing workspaces are
automatically affected by the property.
X_TRADER® User Manual
Trading Technologies International, Inc. Proprietary and Confidential Information
- 133 -
Chapter 3
Recentering
Description
Recenters all MD Trader windows when you recenter one. You can disable
this property for individual windows.
Automatic Grid
Description
Centering
Automatic grid cen- Enables MD Trader to automatically recenter itself based upon the paramtering
eters you set.
Every X seconds
Sets the number of seconds before MD Trader automatically recenters.
Last Traded Price
within X rows from
top/bottom
Recenters when the last traded price is a set number of rows from the top or
bottom of the grid.
Inside Market
Recenters when the inside market is a set number of rows from the top or
Within X rows from bottom of the grid.
top/bottom
Enable grid recenter Flashes MD Trader before it recenters.
warning
Automatic Grid Centering Notes:
l This feature works independently of the Recentering section on this tab.
l When MD Trader recenters, it recenters the window within the current view.
Delete Buttons
Bid/Ask
Description
Displays separate delete buttons for your working bids and offers.
Delete All
Displays a delete all button for clearing both your working bids and offers.
Implied Quantity Description
Display
This property lets you choose how the quantity of the ¼ 32nd price displays when it is available.
Total Qty
Displays entire quantity at the correct tradable price, rounding bids down
and offers up.
Implied Qty indicator (*)
Displays the entire quantity, rounding bids down and offers up, with an asterisk ( * ) next to the closest price. Enabled by default.
Implied Qty columns
Creates secondary bid and offer columns to display the quantity based on
implieds. These columns display in the same color as Bid and Ask columns,
but display the better quantity in a smaller font.
- 134 -
X_TRADER® User Manual
Trading Technologies International, Inc.
Control Panel Overview
MD Color Tab
Use the MD Color tab to customize your colors for MD Trader. To change your color
options, refer to Changing Global Colors of Windows or Text on page 119.
Note: When accessed via the context menu, the Set as Global Default checkbox at the
bottom of the tab applies these properties to all subsequently opened MD Trader windows.
Average Price
Average Price Long
Default Colors
Blue with black text
Average Price Short
Red with black text
Best Ask or Bid
Best Ask Price
Default Colors
Red with black text
Best Bid Price
Blue with black text
Buy Side
Buy Side Blank
Default Colors
Dark Blue
Buy Side Depth
Blue
X_TRADER® User Manual
Trading Technologies International, Inc. Proprietary and Confidential Information
- 135 -
Chapter 3
Daily High and
Low
Daily High Bar
Default Colors
Daily Low Bar
Red
Yellow
Disclosed Quantity Default Colors
Highlight
Disclosed Quantity
Black
Highlight
EPIQ
EPIQ Bid
Default Colors
Dark gray with black text
EPIQ Offer
Dark gray with black text
Last Traded Price
Last Traded Price
Down
Default Colors
Red with black text
Last Traded Price
Unchanged
White with black text
Last Traded Price Up Green with black text
Mouse Hover High- Default Colors
light
Mouse Hovering Bor- White
der
Net Change
Net Change Down
Background
Default Colors
Red with black text
Net Change
Unchanged Background
White with black text
Net Change Up Back- Green with black text
ground
Position
Position Flat
Default Colors
White with black text
Position Long
Blue with white text
Position Short
Red with black text
Sell Side
Sell Side Blank
Default Colors
Dark Red
Sell Side Depth
Red with black text
Working Orders
Default Colors
Working Buy Order Dark Gray with blue text
Working Sell Order
Dark Gray with red text
- 136 -
X_TRADER® User Manual
Trading Technologies International, Inc.
Control Panel Overview
Restore Defaults
Button
Restore Defaults
Description
Changes the color selections to what they were on first install
X_TRADER® User Manual
Trading Technologies International, Inc. Proprietary and Confidential Information
- 137 -
Chapter 3
MD Advanced Tab
Use the MD Advanced tab to enable and define the User-Defined Price (UDP) column.
This column appears to the left of the standard price column and can be set to show the Net
Change, Price As Yield, or Yield-To-Maturity for a given contract.
Note: When accessed via the context menu, the Set as Global Default checkbox at the
bottom of the tab applies these properties to all subsequently opened MD Trader windows.
Invert Price Col- Description
umn
Invert Price
The Invert price column checkbox lets you invert the entire MD Trader price
Column
column, placing the low price at the top and the high price on the bottom.
Additionally, your Buy orders will be on top of the chart, and your Sell
orders will be on the bottom. This property does not affect the direction of
prices displayed in attached Time and Sales.
Enable UserDescription
Defined Price Column
Enable User-Defined Lets you create and define a new price column.
Price Column
- 138 -
X_TRADER® User Manual
Trading Technologies International, Inc.
Control Panel Overview
Exchange Price
Exchange Price
Description
The Exchange Price radio button lets you further customize a user-defined
price column, which appears next to the normal MD Trader price column. A
user-defined price column lets you display the contract price in a way that
appeals to you.
l
Native (default selection): Creates a copy of the normal MD Trader
price column, which displays prices in their native format. You can
use this option in conjunction with other options, like the Price formatting section to differentiate the price.
l
Decimal: Displays the native prices formatted as their decimal equivalent.
l
Ticks: Displays each price as the equivalent number of ticks from the
inside market.
l
1 / Price: Displays the price as a decimal value 1 divided by the decimal equivalent of the price. The Price formatting section further customizes the price.
Note: This property will create a user-defined price column that is in
ascending order, rather than descending order. You can use the Invert Price
column setting to flip MD Trader so this column appears in descending order.
Net Change
Net Change
Description
Displays the price of the contract minus the settlement price.
Display Type: Defines how the price is formatted.
l
Native
l
Ticks
l
Decimals
Tick Offset: Adds value to the Net Change price. (-999 to 999 ticks)
Display Price As Description
Yield
Display Price As
Displays price as a percentage representing annual rate of return.
Yield
Yield Type:
l
No Conv: The instrument price is in yield. Conversion not necessary.
l
(100-Price): The yield is calculated by subtracting the instrument
price from 100. Calculation for the Euribor.
l
((10000-Price)/100): The yield is calculated by subtracting the instrument price from 10000 and dividing the result by 100. Calculation for
the Eurodollar.
l
(((10000-(Price+Strip Base))/100): Eurodollar Strip type yield, a base
(settlement) is added to the instrument price before the Eurodollar conversion. Calculation for the exchange traded Strip, Pack or Bundle.
l
((100000-Price)/1000): 30 Day Fed Fund. The yield is calculated by
subtracting the instrument price from 100000 and dividing the result
by 1000.
Convert to 365 day year: Converts 360 days to 365 days.
Strip base: Average settlement price of the contracts in an exchange traded
X_TRADER® User Manual
Trading Technologies International, Inc. Proprietary and Confidential Information
- 139 -
Chapter 3
Display Price As Description
Yield
Strip, Pack or Bundle. The Strip Base is added to the instrument price before
the conversion.
Display
Display
Description
Options for this field include:
l
Yield-To-Maturity: Displays price based on the rate of return if held
until the maturity date. An algorithm calculates the price accurate to
six decimal places.
l
Custom pricing model: A pricing model you created and activated.
All other fields are required unless otherwise noted.
l
Coupon rate: Annual interest rate (as a decimal). Must be greater than
0.1 and less than 100.00 and accurate to 4 digits.
l
Maturity date: The date of the bond. Must be greater than the settlement date and greater than today.
l
Conversion factor (Not required): The factor by which the futures
price will be multiplied if the specified bond is delivered against it.
Must be greater than 0.1 and less than 5.0 and accurate to 4 digits precision.
(Must be specified if yield is being calculated for a future)
l
Settlement date: The date the contract settles. Must be less than the
maturity date and greater than today.
l
Day count type: The convention used for counting the days between
two dates.
Where the values mean:
o
Actual: The real number of days between two dates. Leap year
counts for 366 days.
o
360: The year has 360 days.
o
365: The year has 365 days.
o
30: If the second date falls on the 31st of the month it is
changed to the 30th only if the first date falls on the 30th or
31st.
o
30E: If the second date falls on the 31st of the month it is
always changed to the 30th.
l
Coupon frequency: Number of coupons per year. (Annual, SemiAnnual, Quarterly, Monthly)
l
End of month convention: Determines whether coupon payments
always occur on the last day of the month if the settlement date falls
on the last day of the month.
l
Optional settings:
o
First coupon date: The first real coupon date. Must be less
than the maturity date and be a valid coupon date.
(Must be specified if the bond has an odd first coupon period
and the settlement date falls within this odd first coupon
period)
- 140 -
X_TRADER® User Manual
Trading Technologies International, Inc.
Control Panel Overview
Display
Description
o
Price formatting
Price formatting
Retain settings
when contract is
changed
Retain settings
when contract is
changed
Dated date: The date upon which interest accrual begins. Must
be less than the first coupon date.
(Must be specified if the bond has an odd first coupon period
and the settlement date falls within this odd first coupon
period)
Description
Customizes the price format. Watch the Converted price field to see how
your changes affect the price.
l
Decimal location: Moves the decimal place one spot to the left or
right, depending on the price.
l
Max digits: Determines the maximum number of digits to show.
l
Hide handle: Hides the whole number in front of the decimal.
Description
Retains new price column settings when you drag a new contract onto this
window.
Example price
Description
conversion
Example price con- Lets you view the converted price based on the parameters that you select
version
above. For this to work, you must first open MD Trader with a contract.
X_TRADER® User Manual
Trading Technologies International, Inc. Proprietary and Confidential Information
- 141 -
Chapter 3
Quote Board Tab
The Quote Board tab sets properties for the Quote Board window.
Property
Description
Show Exchange Name as part Displays the exchange name in the title bar of each contract in
of contract name when logged the Quote Board.
into multiple exchanges
Quote Board Rows
Quote Board Rows
Default Colors
Select the default visible fields in the Quote Board window.
EBS Quote Board
Display Net Position
Description
Number of rows (1-9)
Designates how many rows tall the entire window is.
Number of columns (1-9)
Designates how many columns wide the entire window is.
Initial Contracts
Lets you customize the spatial position of each currency pair on
the window.
EBS Keypad Panel keys
Sets the keypad key that brings focus to a contract in the window.
Restore Defaults
Restores the rows, columns, and keypad keys to the factory
defaults.
Displays your net position for each contract in the upper
left corner of the EBS Quote Board.
- 142 -
X_TRADER® User Manual
Trading Technologies International, Inc.
Control Panel Overview
Hotkeys Tab
The Hotkeys tab assigns, resets and removes hotkey designations for functional screens such
as MD Trader.
Note: To use the hotkeys associated on this tab, you have to enable hotkey components on
other property tabs.
To enable hotkeys
for...
Order Bar
Enable this property...
On this tab...
Order Bar under the Floating order
entry field
Trading tab
Floating Order Book
Order Book
Trading tab
Keyboard Layout
Keyboard Layout
Description
Sets TT Default hotkeys for all components, or lets you customize hotkeys for
the components of your choice. In addition, you can enable the default keys
for trading EBS.
The Reset All button changes customized hotkeys back to their default
settings.
Enable EBS
Keypad
This checkbox appears in the upper right corner of the tab when you select
EBS Default as the keyboard layout. It lets you use the ICAP distributed EBS
keypads.
X_TRADER® User Manual
- 143 -
Trading Technologies International, Inc. Proprietary and Confidential Information
Chapter 3
Component
Component
Description
Lists the functions for which hotkeys can be assigned. Click to select the
boxes next to the functions for which you want to use hotkeys.
l
Order Bar: Refer to Trading with the Order Bar on page 207.
l
MD Trader: Refer to Keyboard Trading in MD Trader on page
279.
l
Orders: Defines the key combination for deleting all orders.
l
Floating Order Book: Refer to Keyboard Trading in the Floating
Order Book on page 345.
l
Order Pane: Defines keys for submitting order an order in an attached
or floating Order Entry Pane.
l
EBS Quote Board: Defines the key that lets you change the contract
you are trading.
Command
Command
Description
Shows the available commands for the selected component.
Current Hotkey
Current Hotkey
Description
Shows the hotkeys currently tied to the selected command for the selected
component.
Press new short- Description
cut key
Press new shortcut Lets you input a new key or keys to represent the selected command for the
key
selected component.
Buttons
Remove
Default Colors
Deletes the current hotkey from the selected command for the selected component. You are prompted to confirm.
Reset All
Returns the hotkeys to their default settings for each command.
Assign
Ties the hotkey or keys you input in the Press new shortcut key field to the
selected command for the selected component. Grayed out when Keyboard
Layout is set to default.
Hotkey Restrictions
When assigning hotkeys, the following restrictions apply:
l Global hotkeys and hotkeys that launch components must be unique across X_
TRADER.
l Hotkeys must be unique within their own component.
l The global Delete All Orders hotkey must include Shift plus another key.
l You cannot assign hotkeys to hard-coded keystroke commands (e.g., in the Market
window: Page Up, Insert).
- 144 -
X_TRADER® User Manual
Trading Technologies International, Inc.
Control Panel Overview
Properties Autospreader Tab
The Autospreader tab sets properties for Autospreader orders and the Hedge Manager
window.
Autospreader
Display Held
Hedge in Order
Book and Audit
Trail
Hedge Manager
Display new
hedge order delay
(ms)
Description
Determines whether held hedge orders display in the Order Book and Audit
Trail. By default, they are not displayed.
In the Order Book, the held hedge row background color is orange.
Description
Lets you select a time in milliseconds to display new rows so hedge orders
that are filled before this interval has elapsed will not display in the Working
Orders pane.
The default is 250 milliseconds (range from 0 to 2000 milliseconds (2
seconds)). A setting of zero means new hedge orders will immediately appear
in the Working Orders pane regardless of how quickly they fill.
Display Filled and Leaves hedge order rows in the Working Pane even after the hedge orders fill
Deleted rows
or are deleted.
Use the Clear All button at the top of the Working Orders pane to
permanently remove all Filled or Deleted rows
Highlight price
change
Gives the Price column a dark gray background to alert you of a price
change to a hedge order.
Display price change (seconds): Sets a time threshold for the change to the
Price column.
X_TRADER® User Manual
Trading Technologies International, Inc. Proprietary and Confidential Information
- 145 -
Chapter 3
Control Panel Icon and Menu Descriptions
You can access X_TRADER functions from the Control Panel using either the icons on the
toolbar or the menu options.
The icons and menu options are defined here:
l File Menu on page 147
l Settings Menu on page 148
l Window Menu on page 64
l Help Menu on page 149
l The Toolbar on page 66
- 146 -
X_TRADER® User Manual
Trading Technologies International, Inc.
Control Panel Overview
File Menu
The following options are available from the File menu on the Control Panel:
l
l
l
l
l
l
Open Workspace: Opens a previously saved workspace.
Save: Saves the open workspace.
Save As: Saves the open workspace under a different name or with a new name.
Close All Windows: Closes all open X_TRADER
windows except the Control Panel.
Print Setup: Displays the Print Setup dialog box.
You can set up a printing format here, but it will not
be saved when you print out the form.
Exit: Exits X_TRADER.
X_TRADER® User Manual
Trading Technologies International, Inc. Proprietary and Confidential Information
- 147 -
Chapter 3
Settings Menu
The following options are available from the Settings menu on the Control Panel:
l
l
l
l
l
l
X_Trader Pro: Activates X_TRADER Pro features, including Autospreader and Autotrader.
Check this option. Then, close and restart X_
TRADER.
Note: You need an X_TRADER Pro license to
use this option.
Product Group Setup: Displays the Product
Group Information dialog box, which lets you
create a product group to use with the quoting tool.
Spread Table Setup: Displays the Spread
Tables dialog box, which lets you create a spread
table to use with the quoting tool.
Customer Defaults: Displays the Customer
Defaults dialog box, which lets you create or view
customer defaults and customer list information.
Toolbar: Allow you to change the size of the
icons on the toolbar.
Properties: Displays the Properties dialog box.
Allows you to customize X_TRADER features for
the Market window (Trading tab).
- 148 -
X_TRADER® User Manual
Trading Technologies International, Inc.
Control Panel Overview
Help Menu
The following options are available from the Help menu on the Control Panel:
l
l
l
l
l
l
What's New: Opens the What's New section
of the online Help.
Help Topics: Opens online Help user documentation.
Note: Alternatively press F1 to see Help
related to the screen you are on.
Software License Agreement: Displays
Software License Agreement.
TT Remote Help Center: Launches the
Remote Help Center home page.
TT on the Web: Opens TT's home page.
About X_TRADER: Displays X_
TRADER version and copyright information.
X_TRADER® User Manual
Trading Technologies International, Inc. Proprietary and Confidential Information
- 149 -
Chapter 3
Adding High and Low Alerts
You can add specific sounds to a contract's high and low price thresholds using the Alerts
Manager dialog box. Whenever a contract trades above the high price threshold, or below the low
price threshold, these sounds play.
Follow these procedures to use the Alerts Manager dialog box:
l Assigning sounds to a contract's high and low price threshold
l Deleting sounds from a contract's high and low threshold
To assign sounds to a contract's high and low price thresholds:
1. From the Control Panel, click the
icon.
The Alerts Manager dialog box appears.
2. Populate the Alerts Manager dialog box with the contracts to which you want to assign sounds for
price highs and lows.
3. In the Series column, locate the contract for which you want to assign sound alerts.
4. Double-click the appropriate cell under the Soundfile for New LOW column.
The Sound Explorer dialog box appears.
5. Locate the .wav file you want to use as your low price threshold.
l By default, the Sound Explorer opens to the location on your computer that stores your X_
TRADER sound files (<root drive>:\tt\sounds)
l Whenever this contract trades below the day's low price, the sound plays.
6. Double-click the sound file.
The file and its directory path appear in the cell.
7. Double-click the appropriate cell under the Soundfile for New HIGH column.
The Sound Explorer dialog box appears.
8. Locate the sound file you want to use as your high price threshold.
Whenever this contract trades below the day's high price, this sound is played.
9. Double-click the sound file.
The file and its directory path appear in the cell.
- 150 -
X_TRADER® User Manual
Trading Technologies International, Inc.
Control Panel Overview
10. To activate this setting so the sound is played when the threshold is crossed, click to select the activation box.
Note: This box is located directly to the left of the cell.
11. Click the X on the title bar to close the Alerts Manager dialog box.
You successfully assigned sounds to a contract’s high and low price thresholds.
To delete sound alerts:
1. From the Control Panel, click the
icon.
The Alerts Manager dialog box appears.
2. In the Series column, locate the contract for which you want to delete a sound association.
3. In that contract's row, click DEL.
The contract and its sound associations are removed from the Alerts Manager dialog box.
You successfully deleted sound alerts.
Starting Plug-ins
You can start and stop all installed X_TRADER and X_TRADER Pro plug-in applications from
the Control Panel. Proper licensing must be in place in order to access each plug-in.
Once started from X_TRADER, plug-ins perform normally. For instructions on using them, see the
online help provided with each plug-in.
When X_TRADER closes, all plug-ins started through X_TRADER also close.
You can start plug-ins in two different ways:
l Manually: You log into X_TRADER and start any number of instances of any licensed
plug-in application.
l Automatically: You log into X_TRADER and select each licensed plug-in you want to start
with X_TRADER. During subsequent logins, X_TRADER automatically starts one instance
of each selected plug-in.
X_TRADER® User Manual
Trading Technologies International, Inc. Proprietary and Confidential Information
- 151 -
Chapter 3
To manually start a plug-in:
1. From the Control Panel, click the Window menu and choose Plug-ins.
- or From the Control Panel, click the
icon.
The Plug-Ins dialog box appears, displaying all your installed X_TRADER plug-ins.
Note:
l
l
If the text is green, you have the proper licensing and access to the plug-in.
If the text is red, you do not have the proper licensing or access to the plug-in.
2. Click the plug-in name you want to start.
The plug-in starts.
3. Repeat step 2 to start another plug-in or another instance of the same plug-in.
You successfully started plug-ins from X_TRADER.
- 152 -
X_TRADER® User Manual
Trading Technologies International, Inc.
Control Panel Overview
To set plug-ins to start automatically:
1. From the Control Panel, click the Window menu and choose Plug-ins.
- or From the Control Panel, click the
icon.
The Plug-ins dialog box appears, displaying all your installed X_TRADER plug-ins.
Note:
l
l
If the text is green, you have the proper licensing and access to the plug-in.
If the text is red, you do not have the proper licensing or access to the plug-in.
2. Click to select the checkbox next to each of the plug-in icons you want to start automatically.
3. Click OK.
The next time you start X_TRADER, the selected plug-ins automatically start.
You successfully set plug-ins to start automatically from X_TRADER.
X_TRADER® User Manual
Trading Technologies International, Inc. Proprietary and Confidential Information
- 153 -
Chapter 3 - Control Panel Overview
[This page intentionally left blank]
- 154 -
X_TRADER® User Manual
Trading Technologies International, Inc. Proprietary and Confidential Information
CHAPTER 4
Audit Trail Overview
Use the Audit Trail window to track messages from X_TRADER, the TT Gateways, and exchanges to
which you are logged on.
Audit Trail messages save to the directory: <root drive>:\tt\logfiles\AuditLog. The naming convention
for the files is: YYYY-MM-DD_n.mdb. Where n represents the file number for the day.
The Audit Trail window displays the following information for the current day:
l Order messages: Messages regarding fills, partial fills, add/change/delete orders, inquiries, and messages related to your Group ID.
l Exchange Announcements: Announcements from an exchange regarding busted trades, and
pre/post, opening/closing product activity.
l Gateway Alerts: Information concerning the status of server/host processes.
l Error messages: Notifications of an invalid action.
For details regarding these messages, refer to Audit Trail Message Types on page 159.
For details regarding storage limits, refer to Storing Files on page 162.
To open the Audit Trail:
1. From the Control Panel, click the Window menu and choose Audit Trail.
- or 2. From the Control Panel, click the
button.
You successfully opened the Audit Trail.
X_TRADER® User Manual
Trading Technologies International, Inc. Proprietary and Confidential Information
- 155 -
Chapter 4
Held Orders
An appropriate Audit Trail message results from all normal order functions performed on held
orders: change, cancel, replace, delete, or submit.
Messages appear in the Audit Trail when an order is held, but the order is actually deleted from the
market and held only by the Gateway. If a submit fails for a held order, it remains in the hold state
and the Audit Trail indicates the submittal failed. The Audit Trail also gives you an explanation of
why the submission of the order failed.
Filters
Filters are used in the Audit Trail to quickly sort and display data. Refer to Filtering Overview on
page 50.
Tip: If you are using Audit Trail filters, open two Audit Trail windows to ensure receipt of all
exchange and gateway announcements. Use one Audit Trail window to display order-related data
with the desired filters. Set the Status column filter for the second Audit Trail window to capture
alerts (ALERT) and general information (INFO).
Audit Trail History
Audit Trail history data is saved on your workstation’s hard disk for ten calendar days in a Microsoft
Access file.
To view Audit Trail history:
1. From your desktop, click Start and choose Run.
2. From the Run menu, type: <root drive>:\tt\LogFiles\AuditLog.mdb
3. Click OK.
Microsoft Access opens and displays ten (10) days worth of Audit Trail history. The available dates
display by month and day (i.e., MMMDD—Dec 31).
You successfully viewed Audit Trail History.
- 156 -
X_TRADER® User Manual
Trading Technologies International, Inc.
Audit Trail Overview
Audit Trail Column Descriptions
Columns can be hidden and shown on the screen while you view the Audit Trail. You can also set
which columns are automatically visible every time you access the Audit Trail on the Audit Trail
tab on the Properties menu.
Column
Time
Descriptions
The time your workstation receives the message.
Exch
The Exchange sending the message.
Status
The description of the message sent by the Gateway.
Examples: OK, Err (error), Accept, Info, Alert, Warn (Warning)
Msg
The described event.
Action
The result of the event.
Examples: Add, Change, Delete, Fill, Partial Fill, Hold, Submit
B/S
Buy or Sell in reference to an order.
O/C
Open or Close in reference to a position.
C/P
Call or Put in reference to an order.
Qty
The quantity in an order.
Product
The traded product’s exchange symbol.
Examples: FGBL, ODAX
Contract
The month and year of expiration for the contract.
Strike
The exercise price of option.
Price
The limit price of a contract.
Stop Prc
The stop trigger price of contract.
Type
A Limit or Market type in reference to the order.
TIF
The time the order is in force.
Example: Good 'til Day (GTD)
Rstr (Restriction)
The strategic restriction put on the order.
RstrQty
The quantity of a restricted order which behaves differently depending on the restriction.
Examples: <None>, FOK, IOC, MOO, MV, Stop
Example: For Minimum Volume orders, it is the quantity that needs to be in the market
for the order to go to market.
Exec Qty
The executed quantity of the order.
Work Qty
The working quantity of the order.
X_TRADER® User Manual
Trading Technologies International, Inc. Proprietary and Confidential Information
- 157 -
Chapter 4
Column
Cxl Qty
Descriptions
The canceled quantity of an order when using the Cancel/Replace function.
Account #
The back office account number or name as indicated in the Customer Default profile.
Member ID
The Exchange Member ID assigned by the Exchange or TTORD ID information.
Group ID
The Group ID assigned by the Exchange or TTORD ID information.
Trd ID
The Trader ID assigned by the Exchange or TTORD ID information.
Acct
The account type as indicated in the Customer Default profile.
Examples: Agent, Market Maker, Principal, Give-up
Exch Time
The time the message is received/sent by the Exchange Trading Host. The time may be
shown in the time zone where the exchange is located.
Exch Date
The date the Trading Host received/sent the message.
Time Sent
The time the action was sent from the workstation to the Gateway.
Source
Where the order comes from.
Examples: 0: Normal OS, 1: Autospreader, 2: Autotrader, 3: API (XTAPI), 4: Ext Source
(Exchange), 8: TT_TRADER.
Time Processed
The time the action was processed by the Gateway.
P/A
Designates whether the order was filled passively or aggressively. This notation allows
for a correct P&L calculation.
Order No
The order number assigned by the Exchange.
TT Order Key
A TT generated unique number used to track orders in the Order Book.
IP
The IP Address of the workstation.
FFT2 & FFT3
Free Form Text Field 2 and 3. Values for annotation purposes by you or back office (subaccount).
Trans ID
The transaction ID for fills. Used to identify the order.
Session ID
Used for diagnosing Fill session rollovers, SOD's and settlements.
Audit Trail Context Menu
Right-click in the Audit Trail window to access the context menu.
The available menu options include:
l
l
l
l
l
l
l
l
Find Control Panel: Displays the Control Panel.
Scrolling: Sets the window to scroll as a new entry appears. Enabled by default.
Auto Filters: Lets you display audit trail data by customer.
Clear All Filters: Displays all available data by removing filters.
Export All Rows: Collects all the data in a file whose name, type
and location you configure.
Formatting: Lets you customize fonts and borders.
Hide: Hides the selected row(s) or column(s).
Show/Hide Columns: Lets you select which columns to show.
- 158 -
X_TRADER® User Manual
Trading Technologies International, Inc.
Audit Trail Context Menu
Audit Trail Message Types
Audit Trail messages break into the following categories:
l Order messages
l Exchange announcements
l Gateway alerts
l Error messages
Order Messages
Order messages include buy, sell, change, cancel/replace, delete, fills and partial fills.
The first line details the order information, including:
l The time the order was sent from the workstation to the TT Gateway (Time Sent column)
l An order status of Accept
l An action of Add, Change, or Delete.
The second line immediately follows the first and indicates acceptance by the TT Gateway. The
order has been routed to the exchange host.
The third line displays sometime after the previous two. This message confirms receipt from the
exchange and includes:
l The time the confirmation was received by the workstation (Time Processed column)
l A status of OK
l The time the confirmation was sent by the exchange’s host machine (Exch Time column).
A status of OK and an action of Partial displays when an order partially fills. A status of OK and an
action of Fill displays when an order fills. When you cancel and replace an order, the confirmation
from the exchange host reflects a new order number.
Exchange Announcements
Exchange announcements display a status of Alert, Info, or Warning and reflect general information
sent by the exchange host or the TT Gateway. For details on filtering these announcements, refer to
Customizing Exchange Announcements on page 160.
Gateway Alerts
Gateway alerts display information concerning the status of server/host processes.
Error Messages
Error messages display when the TT Gateway rejects a buy, sell, change, cancel/replace, or delete
order.
X_TRADER® User Manual
Trading Technologies International, Inc. Proprietary and Confidential Information
- 159 -
Chapter 4
l
l
The first line details the order information, including a status of ERR to indicate that the order
was rejected and not sent to the exchange host.
The second line immediately follows the first and reflects a status of ERRS. A message (Msg
column) explains the error.
Customizing Exchange Announcements
The Audit Trail window displays all announcements released by the exchanges, including host
activity, busted trades, and pre/post, opening/closing product activity.
Each announcement details the:
l Time issued (exchange time)
l Time received (local time)
l Exchange name
l Severity
l Announcement text
Tip: If you are using Audit Trail filters, open two Audit Trail windows to ensure receipt of all
exchange and gateway announcements. Use one Audit Trail window to display order-related data
with the desired filters. Set the Status column filter for the second Audit Trail window to capture
alerts (ALERT) and general information (INFO).
Follow these procedures to customize how you receive exchange announcements:
l Displaying INFO messages by exchange
l Associating a sound file with exchange announcements
To display INFO messages by exchange:
1. From the Control Panel, click the Settings menu and choose Properties.
2. Click the Audit Trail tab.
3. Click to select the Process and display INFO messages property.
4. Click the Exchanges button.
5. Click to select the checkbox next to the exchanges for which you want to view INFO messages.
6. Click OK.
You successfully displayed INFO messages by exchange.
To associate a sound file with exchange announcements:
1. From the Control Panel, click the Settings menu and choose Properties.
2. Click theSounds tab.
3. Under the Events column, double-click the Exchange Announce event.
4. In the Associated Sounds column, double-click <None>.
- 160 -
X_TRADER® User Manual
Trading Technologies International, Inc.
Audit Trail Context Menu
The Associated Sounds column is editable.
5. Click the
icon to locate the sound file you want to use as your alert.
6. If necessary, navigate to the location where the sound files are located. (In most X_TRADER
installations this is in the following folder: <root drive>:\tt\Sounds)
7. Highlight the file and click Open.
The new sound name and path displays next to the selected event.
8. To test the sound, click Test.
9. Click Apply and then OK to exit.
You successfully associated a sound file with exchange announcements.
Properties for the Audit Trail Window
The following properties in the Audit Trail window are customizable:
l Audit Trail Messages and Audit Logs: Select how many records to show, which messages
appear, how many Audit Logs to hold on to, and how large the Audit Trail file can get before
a new one is created. Customize in the Audit Trail tab on the Properties menu.
l Color Code Messages: Select any color text and background to identify Audit Trail messages. Customize colors in the Color tab on the Properties menu. The default colors are:
l
l
Message Type
Buy
Defined in Color tab as
Buy Text & Buy Background
Default
blue text with a gray background
Sell
Sell Text & Sell Background
red text with a gray background
Exchange Announcement
Message Text & Message Background
white text with a gray backround
Gateway Alerts
Alert-Warn Text & Aler-Warn Background
black text with a yellow background
Audio Notifications: Select a .wav file to assign to the Exchange Announcement event. Add
sounds in the Sounds tab on the Properties menu.
Audit Trail Columns: Select which columns are viewable.
To customize visible columns:
1. From the Control Panel, click the Settings menu and choose Properties.
2. Click the Audit Trail tab.
3. Click the Audit Trail Columns button.
The Audit Trail Columns dialog box appears.
Note: By default, all column headings are selected.
4. Click to de-select the column headings you do not want to view in the Audit Trail.
5. Click OK.
You successfully customized the visible columns in Audit Trail.
X_TRADER® User Manual
Trading Technologies International, Inc. Proprietary and Confidential Information
- 161 -
Chapter 4
Storing Files
The Audit Trail log file generates at midnight or the first time you open X_TRADER for the day.
The file holds a finite amount of data before generating a new one. The size of these database files
are configurable from 10MB - 200MB with a default of 50MB of data.
l Access the Audit Trail log files here: <root drive>:\tt\logfiles\AuditLog
l The naming convention for the Audit Trail log files is: YYYY-MM-DD_n.mdb. Where n represents the file number for the day.
Example:
A light trading day in October, followed by a heavy trading day might result in the following Audit
Trail files:
l AuditLog_2009-10-23_1.mdb
l AuditLog_2009-10-23_2.mdb
l AuditLog_2009-10-23_3.mdb
l AuditLog_2009-10-22_1.mdb
With a maximum database file of 50MB, you can see at a glance your Audit Logs for October 23
exceed 100MB. Whereas, your Audit Log for October 22 was under 50MB.
Concise Audit Trail
Parsing the Audit Trail into smaller log files helps X_TRADER run efficiently. In addition,
when you open your Audit Trail, only the data captured in the current Audit Trail log file
displays.
This means, if you close the Audit Trail in the morning, and reopen it later in the day, the
Audit Trail may appear smaller. However, data from earlier in the day is still viewable in
previous Audit Trail log files.
Example:
In the example above, the Audit Trail was closed in the morning and reopened in the
afternoon. The Audit Trail had just started a new Audit Trail log file after reaching 50MB.
The rest of the day's data can be accessed from here: <root drive>:\tt\logfiles
Tip: If you leave the Audit Trail open all day, you can see the entire day's events.
- 162 -
X_TRADER® User Manual
Trading Technologies International, Inc.
CHAPTER 5
Market Explorer Overview
Use the Market Explorer window to select markets and products you wish to trade from one or more
available exchanges. By selecting an Exchange and Product Type, you may then select individual
products or contracts in the Products box and move them into a functional window for trading.
Follow these procedures to use the Market Explorer window:
l Searching for a product
l Renaming Contracts
l Opening and populating a functional window
To open the Market Explorer:
From the Control Panel, click the Window menu and choose Market Explorer.
- or From the Control Panel, click the
icon.
You successfully opened the Market Explorer.
X_TRADER® User Manual
Trading Technologies International, Inc. Proprietary and Confidential Information
- 163 -
Chapter 5
Market Explorer Field Descriptions
The fields in the Market Explorer window include:
Field
Products
Descriptions
Offers a choice of filter criteria. You then enter a product name, description, or alias
to search for.
Search Descriptions
Searches the alias and description fields for each product in addition to the product’s
name from the gateway. This lets you query based on the popular names of products
in addition to their more cryptic gateway versions.
Exchanges
Lists all exchanges you are logged into. Each exchange has three servers: price, fill
and order. The color indicator tells you the status of the servers.
l
Green indicates all servers for that exchange are up.
l
Yellow indicates, some servers for that exchange are up.
l
Red indicates all servers for that exchange are down.
Products Type Box
List of product types for the selected exchange.
Products Box
List of all products for the selected exchange and Product Types after any filters
have been applied.
Transfer Buttons (>, >>,
<, <<)
Transfers selected items to and from the Products and Selected Instruments boxes.
Selected Instruments Box Shows all products that have been transferred from the Products box.
Function Box
Displays functional windows to which you can open contracts.
Note: You must have an X_TRADER Pro license to select Autotrader or
Autospreader.
Start button
Opens the selected function with contracts listed in the Selected Instruments box.
Advanced button
Displays contracts for Spread, Option and Strategy Product Types.
- 164 -
X_TRADER® User Manual
Trading Technologies International, Inc.
Market Explorer Overview
Market Explorer Advanced Field Descriptions
The advanced fields in the Market Explorer window include:
Field
Contracts
Descriptions
Lists the expiration of the first leg (for spreads/strategies) or the expiration of the contract (for
options). The format matches the format of the leg contract.
Example: Jun08, Q1 09, Summer 08
Types
Lists the exchange predefined types for the selected product.
Example: Call, Calendar, Strangle, Straddle...etc.
Strikes
Lists all available strikes if the product has strike levels (Options, Warrants, etc).
Filtered Contracts
Lists instruments you can add to the Selected Instruments box based on the criteria you
selected.
Clear button
Removes contracts from the Filtered Contracts box.
Transfer Buttons (>, >>)
Transfers selected items to the Selected Instruments box.
Basic button
Removes the Advanced fields from view.
X_TRADER® User Manual
Trading Technologies International, Inc. Proprietary and Confidential Information
- 165 -
Chapter 5
Searching for a Product
To search for a product:
1. From the Control Panel, click the Window menu and choose Market Explorer.
- or From the Control Panel, click the
icon.
2. In the Exchange section, click the exchange that hosts the product you want to find.
3. In the top left corner of the window, click to select a filter category from the list.
Option
All
Filter Characteristics
Selects all available products for this exchange.
Is
The product name or alias entered in the text box is identical with
exchange name/symbol.
Starts
With
The product name or alias entered in the text box starts with the first
letter of the exchange name/symbol.
Contains The product name or alias entered in the text box is contained in the
exchange name/symbol.
4. If you want to search an alias (common name) for the product, click to select the Search Descriptions checkbox.
5. Type your search criteria in the available space.
The matching products appear in the Products box as you type.
You successfully searched for a product.
- 166 -
X_TRADER® User Manual
Trading Technologies International, Inc.
Market Explorer Overview
Renaming Contracts
You can create custom names for any contract using the context menu in Market Explorer, Market
Grid, Quote Board and Order Book. The custom names display in all other X_TRADER windows
for every flavor of the gateway.
Example: If you rename a contract in CME-A, the contract name persists for CME-B and all other
CME flavored gateways.
l
Renaming contracts
l
Restoring contract names
To rename contracts:
1. From the Control Panel, click the Window menu and choose Market Explorer.
- or From the Control Panel, click the
icon.
2. If you are logged into more than one exchange, in the Exchanges box, click the exchange whose
product you want to find .
3. From the Product Types box, click to toggle between the displayed types.
4. In the Products box, click the + next to the product whose contract you want to rename.
5. Right-click the contract and click Rename.
6. Type the new contract name and press Enter.
You successfully renamed contracts.
To restore contract names:
1. From the Control Panel, click the Window menu and choose Market Explorer.
- or -
2.
3.
4.
5.
From the Control Panel, click the
icon.
If you are logged into more than one exchange, in the Exchanges box, click the exchange whose
product you want to find.
From the Product Types box, click to toggle between the displayed types.
In the Products box, click the + next to the product whose contract name you want to restore.
Right-click the contract and click Restore.
You successfully restored contract names.
X_TRADER® User Manual
Trading Technologies International, Inc. Proprietary and Confidential Information
- 167 -
Chapter 5
Populating Windows with Contracts
From Market Explorer you select which functional window to open and populate with the products
you wish to trade.
These functional windows include:
l Market Grid
l MD Trader
l Quote Board
l Spread Matrix
l Time and Sales
l Alerts Manager
l Autospreader: For X_TRADER Pro users.
l Autotrader: For X_TRADER Pro users
l Default Chart: Opens in X_STUDY™.
Follow these procedures to open a functional window with Market Explorer:
l Populating a functional window using drag-and-drop
l Populating a functional window for one product
l Populating a functional window for multiple products
To populate a functional window using drag-and-drop:
1. If a functional window is not open, use the Control Panel to open one.
2. From the Control Panel, click the Window menu and choose Market Explorer.
- or -
3.
4.
5.
6.
7.
8.
From the Control Panel, click the
icon.
Find the products you want to drag into the functional window.
From the Product Types box, click to toggle between the displayed types.
Press and hold the CTRL key and, from the Products box, click the products you want to open.
With the cursor over one of the selected products in the Products box, click and hold the mouse button. Continue holding the mouse button and move the mouse.
The cursor changes to a circle with a diagonal line through it.
Continue holding the mouse button and drag the cursor to the open functional window.
When the cursor turns into an arrow with a + sign under it, release the mouse button.
You successfully populated a functional window.
- 168 -
X_TRADER® User Manual
Trading Technologies International, Inc.
Market Explorer Overview
To open a functional window for a single product:
1. From the Control Panel, click the Window menu and choose Market Explorer.
- or -
2.
3.
4.
5.
6.
7.
8.
9.
From the Control Panel, click the
icon.
If you are logged into more than one exchange, in the Exchanges box, click the exchange whose
product you want to find.
In the top left corner of the window, click the down arrow and choose your search filter.
Type your search criteria in the available space.
The Products field updates as you type.
From the Product Types box, click to toggle between the displayed types.
Click to select the product you want to open.
Click > to transfer the products from the Products box to the Selected Instruments box.
In the Function box at the top of the window, click to select the functional window in which you
want to open the product.
Click Start to open the functional window and populate it with the product.
You successfully opened a functional window for a single product.
To open a functional window with multiple products:
1. From the Control Panel, click the Window menu and choose Market Explorer.
- or -
2.
3.
4.
5.
6.
7.
8.
9.
From the Control Panel, click the
icon.
If you are logged into more than one exchange, in the Exchanges box, click the exchange whose
product you want to find.
In the top left corner of the window, click the down arrow and choose your search filter.
Type your search criteria in the available space.
The Products field updates as you type.
From the Product Types box, click to toggle between the displayed types.
Press and hold the CTRL key and, from the Products box, click the products you want to open.
- or To open all products in the Products box, click the >> button and skip to Step 8.
Click > to transfer the products from the Products box to the Selected Instruments box.
In the Function box, click to select the functional window in which you want to open the product.
Click Start to open the functional window and populate it with the selected products.
You successfully opened a functional window with multiple products.
X_TRADER® User Manual
Trading Technologies International, Inc. Proprietary and Confidential Information
- 169 -
Chapter 5 - Market Explorer Overview
[This page intentionally left blank]
- 170 -
X_TRADER® User Manual
Trading Technologies International, Inc. Proprietary and Confidential Information
CHAPTER 6
Market Window Overview
The Market window lets you monitor the current market and place orders for multiple instruments. The
following panes compose the Market window:
l Order Entry pane: The top half of the window. This is where you place your order. It contains the
price, quantity, customer, and many order type fields.
l Market Grid: The bottom half of the window. This is where you monitor and select real-time contract information for trading. Use tabbed Market Grids to display multiple grid panes in a single window.
Note: Some functionality in the Market Grid is protected by U.S. Patent Number 6,938,011.
Features of the Market window include:
l Send orders using just one click of the mouse. Refer to Click Trading Overview on page 215.
l Use tabs to organize multiple markets. Refer to Using Tabbed Windows on page 193.
l Include Implieds for spreads in columns and in depth. Displays Implied price and quantity data in
the same columns as direct price and quantity data. Refer to Setting Implieds on page 225.
l Use customer profiles to trade. Refer to Customer Defaults Setup on page 85.
l Highlight orders in the Market Grid.
X_TRADER® User Manual
Trading Technologies International, Inc. Proprietary and Confidential Information
- 171 -
Chapter 6
Order Entry Pane Overview
The Order Entry pane is the top half of the Market window. Use it to place orders for instruments
displayed in the Market Grid. It contains the price, quantity, customer, and many order type fields.
Follow these procedures to use the Order Entry pane:
l Submitting an Order In the Order Entry Pane
l Submitting a Mutual Offset Order
l Using the Floating Order Entry Window
l Using the Mouse to Control Order Quantity and Price
l Confirming the Status of an Order
l Closing the Order Entry Pane
l Using the Keyboard to Enter Orders
Order Entry Pane Field Descriptions
The Order Entry pane field descriptions include:
Button
Description
These pre-set quantity buttons increase the Quantity field by their numeric
value. The quantity defaults are 1, 5, 10, 100, and 500. Refer to Customizing
the Quantity Buttons on page 182.
The Clear button deletes numbers from the Quantity field. To clear the entire
Order Entry pane, click Clear below the account type field.
Field
Button
Buy and Sell
Description
The Order Quantity field is on the left; the Price field is on the
right. To change these fields:
l
Right-click to increase the value. Left-click to decrease the
value.
l
Click the up and down arrows.
l
Manually type a value using the keyboard.
Description
Click these buttons to send an order to market.
- 172 -
X_TRADER® User Manual
Trading Technologies International, Inc.
Market Window Overview
Field
Description
Order Summary: This field displays your order
information when you click a row in the Market Grid
(quantity, price, product, month/year, time in force, order
type, and order restriction).
When you click a row with an option, this field displays a
C for call or a P for put along with the strike price.
Button
Description
Time in Force (TIF) is the first button. It determines how long your order
works in the market. In all cases, your orders work until they trade, you
cancel them, or the time in force is met. Click the TIF button to toggle
between your choices.
l
GTD (Good 'Til Day): Works until the current trading session ends.
Enabled by default.
l
GTC (Good 'Til Cancel): Works until the contract expires.
l
GIS (Good In Session): Works until the contract expires within the session, or the trading session ends. (Some exchanges, like Euronext,
have products with different trading sessions in one day.)
l
Date: Works until the expiration date.
Click the second button (Limit) to toggle between Limit and Market order
types.
Field
l
Limit: Works at a specific price.
l
Market: Works the inside market.
Description
Customer Selection List: This field lists the customer profile for which
the SEL box is selected in the Customer Defaults window.
Note: You can immediately trade with the <Default> profile as long as
you set up an account in its row.
X_TRADER® User Manual
Trading Technologies International, Inc. Proprietary and Confidential Information
- 173 -
Chapter 6
Field
Order Type list
Description
Sets available restriction types, including:
l
None: No additional restrictions on the order.
l
Block: Eurex Block Trades. (For Block trades on LIFFE, refer to
Wholesale Trading Overview on page 381.) Block trades are high-volume trades whose price has been separately agreed to by both parties
outside of the normal exchange trading methods. When you select
Block from the Order Type field, the Counterparty Information field
automatically displays.
l
Fill or Kill (FOK): Fill or Kill. FOK immediately fills the entire order
or immediately cancels the entire order.
l
Iceberg: Iceberg. An order where only a portion of the order quantity
is sent to the market at a time. Each order quantity is equal.
l
Immediate or Cancel (IOC): Immediate or Cancel. IOC immediately
fills the order to the extent possible and cancels the balance.
l
Market On Close (MOC): Market on Close. Sends Market orders during the closing auction of the current business day
l
Market On Open Order (MOO): Market On Open. MOO sends Market orders during the pre-opening period, intended for execution at the
opening market price.
l
Minimum Volume (MV): Minimum Volume. MV sets the minimum
order quantity that must be available in the market. If the quantity is
not met, the entire order cancels. You cannot send MV orders with a
minimum volume quantity greater than the order quantity to market.
l
Stop: Stop order. The Stop Prc fields appear, letting you set the price
that triggers the order. Stop orders can be Limit or Market orders. X_
TRADER supports Stop orders on all exchanges. A stop order displays
in the Order Book with a Pending Trigger status, indicating it is not
actually in the market. When the stop triggers, the order becomes the
native order type and remains in the Order Book until it fills.
l
TStop: Trailing Stop. TStop sets the Stop Price a fixed distance from
the current market price and moves dynamically.
Note: Each exchange determines their support of order restrictions. The
definition and use of the restriction may differ between exchanges and
marketplaces. If the order type is not supported, the Audit Trail window
displays an error message from the exchange. Refer to each exchange's market
rules for additional information.
Field
Description
Indicates the order is opening or closing a position, or that the orders will be
handled in a first-in first-out manner.
- 174 -
X_TRADER® User Manual
Trading Technologies International, Inc.
Market Window Overview
Field
Account Type
menu
Description
Sets your account types.
l
A1: First Agent Account (e.g., broker)
l
A2: Euronext Products: Customer/Automatic Allocation
l
A3: Euronext Products: Customer/Give-up or System Allocation
l
G1: Pre-Designated Give-up Trade
l
G2: Designated Give-up Trade/Automatic Allocation
l
G3: Give-up System Allocation
l
M1: First Market Maker Account
l
M2: Second Market Maker Account
l
M3: Market Maker/Give-up or System Allocation
l
P1: First Principal Account (e.g., proprietary trader)
l
P2: Second Principal Account
l
P3: Euronext Products: House/Give-up or System Allocation
l
U1: Unallocated. For orders that have not been allocated to a customer account or where allocation is a middle/back office function.
l
U2: Unallocated/Automatic
l
U3: Unallocated/System
Field
Account Number
Description
Indicates a back office account number to include with your order.
Field
Clearing Member
Code
Description
Indicates the clearing member code you set up in the Customer Defaults
window. Used for Give-up trade accounts only.
Field
Free Form Text 2
field
Description
When you select your customer, this field seeds with the FFT2 field set up
on the Customer Defaults window.
Alternatively, you can type up to 15 alphanumeric characters in the FFT2
field in the Order Entry pane prior to sending an order.
Field
Description
Clear: Clears all contract, price, and quantity data without sending the order
to market.
Note: The quantity Clear button is below the quantity buttons. This button
changes the quantity to zero without impacting the other fields.
Hold: When checked, the order goes to the Order Book but is not sent to
market.
The Order Book acts as a location to hold the order until you send it on to
market or delete it. The change to the order reflects in the TTStatus column
in the Order Book.
Confirm: Lets you confirm an order before it is sent to market. The Buy and
Sell buttons become Apply Buy or Apply Sell. Use the Order Entry tab on
the Properties menu to enable this feature for every order entry window.
X_TRADER® User Manual
Trading Technologies International, Inc. Proprietary and Confidential Information
- 175 -
Chapter 6
Field
Description
Cross: Enable Order Crossing from the Order
Entry tab on the Properties menu.
l
Cross w/: Trades with a specific counter
party. Enter the counter party’s Trader ID
where indicated. Support of this feature
is exchange specific. The Buy and Sell
buttons become Crs Buy and Crs Sell
buttons.
l
Cross: Enables the Buyer and Seller lists
so you can set up a cross trade. The Buy
and Sell buttons become Buy First and
Sell First buttons.
l
ITX: Sends an Intention to Cross notification as is required by some
exchanges. A 15 second countdown
appears on the face of the ITX button.
This timer is only informational and does
not trigger a cross order when it reaches
zero.
Set the number of seconds in the Order
Entry tab on the Properties menu. X_
TRADER does not time orders for
markets that require a time interval
between sides of the cross being
submitted. You must manage this
manually.
Note: Do not confuse Intention to Cross
with a cross order, or with the LIFFE
ITX function. Intention to Cross is an
announcement of the desired intention to
cross. The LIFFE ITX is a cross order,
not an announcement.
Equities:
Short Sell Exempt: Indicates, when
checked, you are exempt from short-sell
notifications for some trading types.
Using Floating Order Entry
The Floating Order Entry is a detached window used to place orders that you can place
anywhere on your screen. You can use one or multiple Floating Order Entry windows to
place orders for the Market Grid, Order Book, Autotrader, Spread Matrix, and Quote Board.
- 176 -
X_TRADER® User Manual
Trading Technologies International, Inc.
Market Window Overview
Your Floating Order Entry can be one of the following:
l The Market window Order Entry pane
l
An MD Trader window
l
The Order Bar
The Buy Order Bar
The Sell Order Bar
Follow these procedures to enable or disable the Floating Order Entry:
l Enabling Floating Order Entry
l Enabling Multiple Floating Order Entry windows
l Enabling MD Trader as your Floating Order Entry
l Disabling Floating Order Entry
X_TRADER® User Manual
Trading Technologies International, Inc. Proprietary and Confidential Information
- 177 -
Chapter 6
To enable Floating Order Entry :
1. Right-click anywhere in the Market Grid, Order Book, Autotrader, Spread Matrix, or Quote Board
to access the context menu.
Note: If Click Trading is enabled, do not click in the Bid/Ask price columns.
2. Click Floating Order Entry.
You successfully enabled Floating Order Entry.
To enable MD Trader as your Floating Order Entry:
Note: The first time you launch an MD Trader Floating Order Entry, you must put a value in the
Maximum Order Quantity field.
1.
2.
3.
4.
5.
From the Control Panel, click the Settings menu and choose Properties.
From the Trading tab, in the Floating Order Entry field, click to select the MD Trader option.
Click the MD Trading tab.
At the top of the screen, type a maximum order quantity.
Click OK.
You successfully enabled MD Trader as your Floating Order Entry.
To disable Floating Order Entry:
1. Right-click anywhere in the Market Grid, Order Book, Autotrader, Spread Matrix, or Quote Board
to access the context menu.
Note: If Click Trading is enabled, do not click in the Bid/Ask price columns.
2. Click Floating Order Entry to disable the feature.
You successfully disabled Floating Order Entry.
Floating Order Entry Notes
You can use the Market window Order Entry pane, the Floating Order Entry, or a
combination of both.
The Floating Order Entry populates with data from any and all active windows. For
example, if you have both the Market window Order Entry pane and a Floating Order
Entry open, when you click a contract bid price, both Order Entry panes reflect the contract
information. However, entering a quantity in one pane does not populate the Quantity field
of the other.
To populate multiple Order Entry panes with the same customer default trade information,
use the Customer List. This is especially useful when you are monitoring multiple products
and markets and placing orders for the same customer.
Note: Clicking (X) in the top right corner of a Floating Order Entry does not disable the
feature.
- 178 -
X_TRADER® User Manual
Trading Technologies International, Inc.
Market Window Overview
Using Multiple Floating Order Entry Windows
You can set X_TRADER to launch a separate floating order entry window for each window
with Floating Order Entry enabled.
Example:
l Two Market Grids both enabled for floating order entry launch and seed two separate FOE panes.
l
l
A Market Grid and a Quote Board enabled for floating order entry launch and
seed two separate FOE panes.
One Market Grid with two tabs launches and seeds the same single FOE pane.
Enable...
Multiple order entry
panes
In...
The new Floating Windows section on the Trading tab
Floating order entry
The context menus for each window in which you want to use floating
order entry.
X_TRADER® User Manual
Trading Technologies International, Inc. Proprietary and Confidential Information
- 179 -
Chapter 6
To setup multiple Floating Order Entry windows:
1. From the Control Panel, click the Settings menu and choose Properties.
2. On the Trading tab, in the Floating Windows section, click to select Multiple order entry windows.
3. Click OK.
4. Enable floating order entry from the context menu of the windows of your choice.
You successfully setup multiple Floating Order Entry windows.
Submitting an Order using the Order Entry Pane
To submit an order using the Order Entry pane:
1. Choose a customer account. This assumes you set up one or more Customer Default profiles.
Note: You can immediately trade with the <Default> profile. This profile assumes a GTD Limit
order for an agent account. You can change the parameters. To create customized profiles so manual
changes are not necessary, refer to Customer Defaults Setup on page 85.
2. Click a bid or ask cell in the appropriate instrument row.
The price seeds in the Order Entry pane and the contract information immediately appears in the
Order Summary field. The default options Market window displays the Calls on the left and the
Puts on the right.
3. Add or change any necessary information (e.g., quantity, price, order type, time in force).
Note: By default you are placing a Limit order. To place a Market order, click the Limit button
under the Order Summary field. This grays the Price field.
4. To execute, click Buy or Sell.
You successfully submitted an order in the Order Entry pane.
- 180 -
X_TRADER® User Manual
Trading Technologies International, Inc.
Market Window Overview
Submitting a Mutual Offset Order
X_TRADER lets you submit Mutual Offset System (MOS) orders. The MOS agreement
between the Chicago Mercantile Exchange (CME) and the Singapore Exchange (SGX) lets
you open a futures position on one exchange and liquidate it on the other. This is one way to
manage your overnight risk.
The agreement includes the following instruments:
l Eurodollars
l Euroyen TIBOR
l Nikkei - Yen
l Nikkei - Dollar
You must designate a trade as an MOS trade prior to submitting.
To submit a Mutual Offset order:
1. From the Control Panel, click the Settings menu and choose Customer Defaults.
2. Find the Customer Default row you want to designate as Mutual Offset trades and set the Acct
field to G2.
3. In the Give Up column, you must specify the account by completing the following two steps:
l Type SX as the first two letters.
l Type the clearing firm number. (This is a number between 1 and 3 digits.)
Example: You set the Give Up column to SX123, where 123 is the mutual offset for Eurodollars.
4.
5.
6.
7.
8.
Close the Customer Defaults dialog box.
Open a Market window with the instrument you want to trade.
In the <Default> field, select the MOS customer from the list.
Add or change any necessary information (e.g., quantity, price, order type, time in force)
To execute, click Buy or Sell.
You successfully submitted a Mutual Offset order.
X_TRADER® User Manual
Trading Technologies International, Inc. Proprietary and Confidential Information
- 181 -
Chapter 6
Using the Mouse to Control Order Quantity and Price
Most users will use the keyboard or the spin buttons to enter order quantity and price.
However, you may also use the mouse to increase or decrease order quantity.
To change the order quantity or price using the mouse:
1. Click to select a Market Grid cell to populate the Order Entry pane.
2. Click in either the Order Quantity or Price fields. (shown above)
3. Right-click to increase the numeric value.
- or Left-click to decrease the numeric value.
You successfully changed the order quantity or price using the mouse.
Customizing the Quantity Buttons
You can customize the quantity buttons on the Order Entry pane to numbers that better suit
your trading style. The customized buttons save with your workspace.
To customize the quantity buttons:
1. Press the Ctrl key and right-click the button you want to customize.
2. Type the number you want the button to represent.
3. Press Enter.
4. Repeat Steps 1-3 for each button you want to customize.
You successfully customized the quantity buttons.
- 182 -
X_TRADER® User Manual
Trading Technologies International, Inc.
Market Window Overview
Setting the Default Quantity
In MD Trader setting the Default Quantity field is not required, but once you send an initial
order, the Order Quantity field continually resets itself to the default quantity.
Alternatively, you can clear the Default Quantity field and make the Order Quantity
persistent.
Default Qty field populates Order Qty field
Order Qty field persists
You set the maximum quantity for trades with the Maximum order quantity property.
However, the restrictions established by Guardian take precedence over this property.
To set the default quantity:
1. Click in the Default Quantity field under the CLR button.
2. Use the Delete key on the keyboard to clear the contents of the field.
3. Enter a default quantity.
- or Leave the Default Quantity field blank to have the Order Quantity field persist.
4. Press Enter to set the default quantity.
You successfully set the default quantity.
X_TRADER® User Manual
Trading Technologies International, Inc. Proprietary and Confidential Information
- 183 -
Chapter 6
Closing the Order Entry Pane
To close the Order Entry pane:
1. Right-click the Market Grid to access the context menu.
Note: If Click Trading is enabled, do not click in the Bid/Ask price columns.
2. Highlight Order Entry and click to de-select Attached.
You successfully closed the Order Entry pane.
Confirming the Status of Market Orders
Confirm the status of your orders using the following windows:
l Audit Trail: The Audit Trail window confirms the status of your submitted order.
Comprehensive trade information is provided to confirm receipt of order requests by
the exchange and all details about the order itself. ERR indicates that an error has
occurred.
l Order Book: A working order displays in the Order Book. When the guaranteed fill
information is received from the exchange, the order is removed from the Order Book
and moved to the Fill window. Partially filled orders remain in the Order Book until
they are completely filled.
l Fill window: Filled and partially filled orders display in the Fill window. The Position
pane updates your P/L.
- 184 -
X_TRADER® User Manual
Trading Technologies International, Inc.
Market Window Overview
Establishing Available Credit
If your trading environment uses the Guardian Risk Management tool, the Available Credit
dialog box displays available credit information in the primary currency and the margin
account currency, including Credit Limits, Profit/Loss, and Contract Margin. The X_
TRADER Administrator uses Guardian to select both currencies. The primary currency is
selected from the Currency Table Setup, and the margin account currency is selected via the
Guardian Trader Setup window.
Totals in green indicate a positive available balance; totals in red indicate a deficit. When the
risk controls are enabled, a zero or negative credit limit disallows trading.
To access the Available Credit dialog box:
1. From the Control Panel, click the Window menu and choose Available Credit.
2. Click Recalculate.
You must click Recalculate in order to display the current total. This lets X_TRADER reserve
processing power for high priority actions such as order processing.
You successfully accessed the Available Credit dialog box.
Synthetic Disclosed Quantity Orders
Iceberg orders are disclosed quantity orders, allowing the execution of a large order by
splitting the order into smaller disclosed quantities. When one disclosed quantity order is
filled, the next disclosed quantity order is sent until the entire order quantity is filled.
Characteristics of an Iceberg order include:
l Each disclosed order quantity is equal.
l You can set the disclosed quantity as a number or as a percentage of the order.
The exception is MD Trader. You may only set the disclosed quantity as a number, not as a
percentage.
Using the disclosed quantity order type on an exchange that does not support them, can
result in a time lag that may cause your disclosed quantity trade to be traded through. This is
because each order is sent to the exchange for just the disclosed quantity. As soon as it fills,
another order submits. The time between these actions could cause a delay and a missed
opportunity.
Note: Synthetic orders are not supported by all exchanges. For a list of supported order
types, refer to the SAM specific to the TT Gateway on which you trade.
X_TRADER® User Manual
Trading Technologies International, Inc. Proprietary and Confidential Information
- 185 -
Chapter 6
Market Grid Pane Overview
Note: Some functionality in the Market Grid is protected by U.S. Patent Number 6,938,011.
The Market Grid is the bottom half of the Market window. This is where you monitor and select
real-time contract information for trading. You complete trades using the Order Entry pane on the
top half of the Market window.
Use the Market Grid to perform these procedures:
l Customizing the Market Grid columns
l Displaying contract and real-time price information for the products you select. Refer to Market Explorer Overview on page 163.
l Using Tabbed Windows
l Highlighting in the Market Grid
l Viewing Price Trend Indicators
l Opening Wholesale Orders
l
l
l
l
Using the Market Depth feature
Using Excel for Theoretical and Implied Pricing
Generating an RTD Formula
Viewing your Estimated Position In Queue
Customizing the Viewable Market Grid Columns
You can customize the viewable Market Grid columns in the following ways:
l Define default visible columns via the Trading tab on the Properties menu. This
ensures every new Market Grid displays only the default columns of information.
l Use a pre-defined Layout option on the context menu.
l Use the Show/Hide option on the context menu to include the columns you want.
Note: The Eurex exchange displays only four (4) digits in inside market. Therefore, the
maximum Bid/Ask Quantity is 9999. This is a limitation of the Eurex API for UserDevices
and MISSes. If the inside market is greater than 9999 and you wish to view that data, open
Market Depth feature in the Market Grid.
- 186 -
X_TRADER® User Manual
Trading Technologies International, Inc.
Market Window Overview
Market Grid Pane Field Descriptions
The Market Grid columns are defined as follows:
Column
Contract
Description
The traded product’s exchange symbol and the month and year of expiration.
Del Srs
A button used to delete all delete all orders for the row.
Note: This feature behaves differently for an exchange trader versus a proxy
(TTORD) trader:
l
If an exchange trader uses this feature, all working orders for all sponsored proxy (TTORD) traders delete.
l
If a TTORD uses this feature, it converts one message into to multiple
individual delete requests to prevent them from deleting the exchange
trader’s working orders.
RFQ
A button used to send Request For Quotes.
Depth
An icon used to display Market Depth.
Note: The available market depth shown depends on the gateway, but cannot
exceed 20 levels.
Bid Mbr
The bid Member ID (If supplied by the exchange).
EPIQ Buys
Your estimated position in queue for working buy orders.
WrkBuys
The Group ID’s total number of working buy contracts.
Group ID = MemberIDGroupID
BidQty
The total quantity working at the bid.
Note: The Eurex exchange displays only four (4) digits in inside market.
Therefore, the maximum Bid/Ask Quantity is 9999. This is a limitation of the
Eurex API for UserDevices and MISSes. If the inside market is greater than
9999 and you wish to view that data, open Market Depth feature in the
Market Grid.
ThrshBid
The Threshold bid price as established by the exchange.
Exchanges set a trading range for the day based upon the previous session’s
settlement price. The exchange halts trading of the product when one of these
limits is reached. A frozen market requires manual release by the exchange.
BidPrc
The best market bid price.
BidQty Accum
The accumulated bid quantity. Use only when you enable Market Depth.
BidPrc Avg
The average bid price. Use only when you enable Market Depth.
IndBidQty
The best indicative bid quantity.
Note: Market Markers can provide indicative quotes when quoting certain
products. These indicative quotes are displayed in these fields. These are not
tradable quotes but an estimation of the market.
X_TRADER® User Manual
Trading Technologies International, Inc. Proprietary and Confidential Information
- 187 -
Chapter 6
Column
IndAskQty
Description
The best indicative ask quantity.
IndBidPric
The best indicative bid price.
IndAskPric
The best indicative ask price.
AskPrc Avg
The average ask price. Use only when you enable Market Depth.
AskQty Accum
The accumulated ask quantity. Use only when you enable Market Depth.
AskPrc
The best market ask price.
ThrshAsk
The Threshold bid price as established by the exchange.
Exchanges set a trading range for the day based upon the previous session’s
settlement price. The exchange halts trading of the product when one of these
limits is reached. A frozen market requires manual release by the exchange.
AskQty
The total quantity working at the ask.
Note: The Eurex exchange displays only four (4) digits in inside market.
Therefore, the maximum Bid/Ask Quantity is 9999. This is a limitation of the
Eurex API for UserDevices and MISSes. If the inside market is greater than
9999 and you wish to view that data, open Market Depth feature in the
Market Grid.
WrkSells
The Group ID’s total number of working sell contracts.
Group ID = MemberIDGroupID
EPIQ Sells
Your estimated position in queue for working sell orders.
Ask Mbr
The ask Member ID (If supplied by the exchange).
NetPos
Your net position.
FFNetPos
Your net position, accounting for fast fills.
LastPrc
The last traded price.
LastQty
The last quantity. Behaves differently for each Gateway.
l
For some (e.g., CME and Euronext), it is a cumulative total of all
trades at that particular price. It sums the last quantity, while it
remains at the current trading price. Once the trade price changes, the
last quantity resets.
l
For others (e.g., LIFFE, Eurex and Xetra), it is the last traded quantity.
Volume
The total traded quantity for the session.
High
The high price for the session.
Low
The low price for the session.
Open
The opening price for the session.
Close
The closing price. Can be used to seed the Order Entry pane.
Settle
The settlement price. Can be used to seed the Order Entry pane.
Chng
The difference between the last traded price and the previous session’s
settlement price.
l
If there is no LTP, this field is blank.
l
If there is no Settlement, the Close price is used instead.
l
If there is no Settlement or Close price, this field is blank.
TheoPrc
The theoretical price.
TheoBid
The theoretical bid price.
TheoAsk
The theoretical ask price.
- 188 -
X_TRADER® User Manual
Trading Technologies International, Inc.
Market Window Overview
Column
QAct
Description
Quote action (Sends individual quotes).
BQQ
The test bid quote quantity.
BQP
The test bid quote price.
Mkt BQQ
The market bid quote quantity.
Mkt BQP
The market bid quote price.
Quote
A checkbox used to activate and deactivate a contract for quoting.
Market AQQ
The market ask quote quantity.
Market AQP
The market ask quote price.
AQP
The ask quote price.
AQQ
The ask quote quantity.
Imp BidQty
The implied bid quantity.
Note: If the trader is displaying calls and puts with the same strike price on a
single line, then there will be two sets of these columns.
Imp BidPrc
The implied bid price.
Imp AskQty
The implied ask quantity.
Imp AskPrc
The implied ask price.
EBSRegBid
The Dealable Regular Bid for a contract on the EBS gateway. This indicates
the worst price you will fill at if you trade the normal quantity. The normal
quantity is decided per contract by EBS.
EBSBestBid
The best Bid for a contract as reported by EBS. Whether you can trade the
best Bid/Offer is restricted by EBS based on your bi-lateral credit agreements.
EBSBestAsk
The best Ask for a contract as reported by EBS. Whether you can trade the
best Bid/Offer is restricted by EBS based on your bi-lateral credit agreements.
EBSRegAsk
The Dealable Regular Ask for a contract on the EBS gateway. This indicates
the worst price you will fill at if you trade the normal quantity. The normal
quantity is decided per contract by EBS.
IndPrc
The indicative open price for the session.
Note: When the indicative close price appears, the IndQty field blanks out.
IndQty
The indicative open quantity for the session.
Vola
Options theoretical pricing model (Theo Server) data categories:
The percent volatility.
Click Trd
A checkbox used to activate and deactivate click trading by contract.
S (Status)
The status of the contract (e.g., Pre-Open, Open, Clsd)
Exp Date
The expiration month and year formatted as DDMMMYY.
Example: 31Dec09
X_TRADER® User Manual
Trading Technologies International, Inc. Proprietary and Confidential Information
- 189 -
Chapter 6
Using the Market Grid Context Menu
Right-click in the Market Grid to access the context menu.
Note: If Click Trading is enabled, do not click in the Bid/Ask price columns.
The available menu options include:
l
l
l
l
l
Find Control Panel: Displays the Control Panel.
Click Trade: Enables Click Trading. Refer to Click
Trading Overview on page 215.
Floating Depth: Enables the Floating Depth Window.
Order Entry: Set whether the Order Entry pane is
attached to the Market Grid, or the floating window you
set in the Trading tab.
Layouts: Select a pre-formatted column layout that suits
your trading style. You can select more than one of the
following:
o
o
o
o
o
o
o
l
l
l
Market: Default layout. Displays BidQty, BidPrc,
AskPrc, AskQty, LastPrc, LastQty, Volume, and
Chng (Change).
Range: Adds High, Low, Open, Close, and Settle
market information.
Depth: Adds the Market Depth feature to list the
next best prices.
Implieds: Adds Imp BidQty, Imp BidPrc, Imp
AskPrc, and Imp AskQty.
Theos: Only available if you are using a theoretical server.
Indicative: Adds IndBidQty, IndBidPrc,
IndAskPrc, IndAskQty.
EPIQ: Adds EPIQ Buys and EPIQ Sells for Estimated Position in Queue.
Refer to Market Grid Pane Field Descriptions on
page 187 for column definitions.
Live-Only Mode: Lets you show only contracts that currently have an active bid, active offer or last price. In
addition, you can Pin Rows, which always leaves contracts shown even if they are not live.
MD Trader: Opens anMD Trader for every row
selected in the Market Grid.
Spread Matrix: Opens Spread Matrix, which simplifies
the tasks of monitoring exchange-traded calendar
- 190 -
X_TRADER® User Manual
Trading Technologies International, Inc.
Market Window Overview
l
l
l
l
l
l
l
l
l
spreads.
Autospreader: Opens the Autospreader® Configuration window with legs assigned for every row
selected in the Market Grid.
Autotrader : Opens one Autotrader™ window with
rows for every row selected in the Market Grid.
Create Strategy: Opens the Create Strategy window.
Refer to Strategies Overview on page 239 section.
Quote Board: Opens Quote Board with panes for every
row selected in the Market Grid.
Chart: Opens an X_STUDY chart for the selected contract.
Copy: Places selected data on a clipboard for pasting
into another program (e.g., Excel).
Insert: Creates a spacer row above the row you clicked
on.
Delete: Deletes a row.
Links: Lets you control links manage your paste, delete
and manage your links:
Paste Link: Creates a dynamic link between the
two programs so that data from one program automatically updates the data in the other.
o Delete Link: Removes an established link.
o Manage Links: Lists all applications with links to
the Market Grid.
o RTD: Opens the RTD dialog box, letting you
copy formulas from the Market Grid and paste
them for use in Microsoft Excel.
Send RFQ: Opens the Request For Quote dialog box
for a specific contract and quantity.
o
l
X_TRADER® User Manual
Trading Technologies International, Inc. Proprietary and Confidential Information
- 191 -
Chapter 6
l
l
l
l
l
l
l
l
l
l
l
Quoting: This option is available when you enable quoting in the Trading tab on the Properties menu. Refer to
Quoting Overview on page 229.
Show: Displays and disables the quoting bar
when quoting parameters are defined.
l Select: Highlights the Quote column in the Market Grid based on:
o All: All orders
o Calls: Just calls (for Option Markets)
o Puts: Just puts (for Option Markets)
o 2-sided Mkts: Just two-sided markets
o Last Prc: Orders with an LTP
l Activate: Marks the Quote column for the
selected contract to indicate it will be quoted.
l Deactivate: Unmarks the Quote column for the
selected contract to indicate it will not be quoted.
Wholesale Orders: Provides options for submitting
wholesale orders on the LIFFE exchange. This option
opens an additional Wholesale Order window.
Rename Contract: Rename a contract or add text to a
spacer row.
Price Format: Provides price display options:
l
Native: Keeps the native format of the product.
l Ticks: Changes the price format to ticks, excluding decimals.
l Decimal: Changes the price format to include two
decimal places.
Formatting: Lets you customize fonts and borders.
Clear All Formatting: Returns formatting to the default.
Hide: Hides the selected row(s) or column(s).
Show/Hide Rows: Lets you select which rows to show.
Show/Hide Columns: Lets you select which columns to
show.
l
- 192 -
X_TRADER® User Manual
Trading Technologies International, Inc.
Market Window Overview
Using Tabbed Windows
To make trading on the Market Grid and Spread Matrix windows easier, you can add tabs
to them. Rather than open several instances of these windows, tabbed grids let you preserve
screen space and embed up to twenty tabs on a single window.
Each tab appears sequentially but, for better recognition, they can be rearranged, renamed
and color-coded.
Follow these procedures to use tabs on the Market Grid or Spread Matrix windows:
l Adding a tab
l Populating a tab
l Rearranging a tab
l Renaming a tab
l Color-coding a tab
l Navigating between tabs
To add a tab:
1. Right-click the tab after which you want to add a new tab.
2. Click Insert.
A new tab appears.
You successfully added a tab.
To populate a tab:
1. Navigate to a populated Market Grid or Market Explorer to find the instruments you want to place in
the new tab.
2. Click to select the instrument(s) you want to move to the new tab.
Note: Hold the CTRL key and continue clicking to select multiple instruments.
X_TRADER® User Manual
Trading Technologies International, Inc. Proprietary and Confidential Information
- 193 -
Chapter 6
3. With the cursor over one of the selected instruments, click and hold the mouse button.
4. Continue holding the mouse button and drag the cursor off the window to the new tab.
When the cursor leaves the window, it changes to a circle with a diagonal line through it. When the
cursor enters the new tab, it changes to include a plus [ + ] sign.
5. When the cursor enters the new tab, release the mouse button.
You successfully populated a tab.
To rearrange a tab:
1. Click and hold the tab you want to move.
2. Move your mouse where you want to place the tab.
3. Release the mouse button.
You successfully rearranged a tab.
To rename a tab:
1. Right-click the tab you want to rename.
2. Click Rename.
The current name of the tab is highlighted.
3. Type the new name you want to give the tab and press ENTER.
You successfully renamed a tab.
To color-code a tab:
1. Right-click the tab you want to color-code.
2. Click Tab Color.
3. Click to select the color you want to code the tab.
- or Click Define Custom Color to choose a different color.
4. Once you choose the tab color you want to use, click OK.
You successfully color-coded a tab.
To navigate between tabs:
Press Ctrl+PageUp or Ctrl+PageDown to navigate between tabs.
You successfully navigated between tabs.
- 194 -
X_TRADER® User Manual
Trading Technologies International, Inc.
Market Window Overview
Adding Spacer Rows
You can add spacer rows to the Market Grid for the purpose of separating contracts. In
addition, you can add text and color to the spacer rows to label groups of contracts.
To add a spacer row:
1. Right-click the Market Grid.
2. Click Insert.
You successfully added a spacer row.
To add text to a spacer row:
1. Right-click the spacer row.
2. Click Rename.
3. Type the text you want to add to the spacer row.
4. Click OK.
You successfully added text to a spacer row.
X_TRADER® User Manual
Trading Technologies International, Inc. Proprietary and Confidential Information
- 195 -
Chapter 6
Highlighting in the Market Grid
Highlighting is an available feature in the Market Grid and Spread Matrix windows. You
can:
l Highlight your own orders
l Use best price highlighting
Highlighting Your Orders
Highlight your orders by enabling specific properties in the Trading tab on the Properties
menu.
Property
Highlight Own Orders
Description
Lightens the background color behind your working orders.
Use Top of Book Coloring
Highlights the background color when your order is the best bid or
offer.
Use Minimum Highlighting
Mode
Highlights the cell border of the Bid or Ask when the LTP
updates. Does not highlight when only the quantity changes.
Best Price Highlighting
Highlight the best Bid/Ask Quantity and best Bid/Ask Price columns. As the market
changes and the bid or ask prices change, the highlighting moves to the row with the new
best price.
It is possible for more than one exchange to display the best price at any one time. In this
case, more than one best price is highlighted. Do not assume any one market is showing as
both the best bid and ask (assuming you trade more than one exchange).
Note: You can change the colors used with this feature in the Color tab on the Properties
menu.
To enable Best Price Highlighting:
1. From the Control Panel, click the Settings menu and choose Properties.
Note: If Click Trading is enabled, do not click in the Bid/Ask price columns.
2. On the Trading tab, click to select the Highlight best price option.
You successfully enabled Best Price Highlighting.
- 196 -
X_TRADER® User Manual
Trading Technologies International, Inc.
Market Window Overview
Viewing Price Trend Indicators in the Market Grid
The LastPrc (Last Price) column in the Market Grid, indicates if the last trade for a given
product occurred on an uptick, downtick, or with no change in the price.
The cell border highlights in green to indicate an uptick, and red to indicate a downtick. If
there is no change in the last traded price, the cell is white.
Opening Wholesale Orders
The Wholesale Orders option offers different ways to submit Wholesale Orders on the
LIFFE exchange:
l
l
l
l
l
Block: Block trades are high volume trades in any outright or strategy product.
Basis: Basis trades are strategies for long-term bond markets that incorporate a futures
leg and an underlying (or cash) leg.
Against Actual: Against Actuals trades are strategies for commodities markets that
incorporate a futures leg and an underlying commodity leg.
Exchange for Swap: Exchange for Swaps trade a position in the underlying for a
futures position.
Flex Options: Flex Options are only available on LIFFE. FLEX orders are essentially
FTSE 100 options. However, an expiration day and exercise price can be specified.
The trade submission and authorization is semi automated, requiring manual intervention by an exchange official.
X_TRADER® User Manual
Trading Technologies International, Inc. Proprietary and Confidential Information
- 197 -
Chapter 6
Using the Market Depth Feature
The Depth layout option in the Market Grid context menu shows the aggregate market depth
data for all orders at the same price level. You can configure the number of additional rows
the Depth layout provides using the Market Depth Increment field in the Trading tab on
the Properties menu. Not all exchanges provide market depth data.
This layout can be used in tandem with the Implieds pricing feature. Refer to Setting
Implieds on page 225.
Follow these procedures to use the Market Depth feature:
l Enabling the Market Depth feature
l Viewing the Market Depth information
To enable the Market Depth feature:
1. In the Market Grid, right-click a cell to access the context menu and click Layouts.
2. Click Depth to enable the feature.
The
icon displays in the Market Grid.
You successfully enabled the Market Depth feature.
To view the Market Depth information:
1. Click the
icon after each contract identifier to display the Depth feature.
Notes: When open, the aggregate best prices display. Also:
l Working buy and sell quantities at each level reflect activity for all traders with the same
Group ID.
l You can customize the color-coded depth rows in the Color tab on the Properties
menu.
l Click-trading quantity and offset settings apply.
2. Click the
icon to hide the Depth feature.
You successfully viewed the Market Depth information.
- 198 -
X_TRADER® User Manual
Trading Technologies International, Inc.
Market Window Overview
Adding Price Averages and Accumulations to the Market Grid
Use the Accumulation columns to take all the outstanding bids/offers at the specified price
or better.
To add Bid and Ask Price Averages and Accumulations to the Market Grid:
1. Right-click on the Market Grid to access the context menu.
Note: If Click Trading is enabled, do not click in the Bid/Ask price columns.
2. Click Show/Hide columns, and select the BidQty Accum, BidPrc Avg,
AskPrc Avg, and AskQty Accum columns to display these columns.
3. Save your workspace with Depth hidden to retain customized settings.
You successfully added Bid and Ask price averages and accumulations to the Market
Grid.
Market Depth Color Coding
For exchanges that support market depth, X_TRADER provides a coloring scheme that
follows NASDAQ Level II coloring conventions. All orders with the same price level are
grouped with the same background color.
This feature contains the following characteristics:
l Columns that display color when market depth is enabled include the Bid Mbr/Ask
Mbr, Bid/Ask Quantity, and Bid/Ask Price columns.
l
l
Colors can be displayed for the aggregate market depth views.
Display colors for the background and foreground text can be set using the Color tab
on the Properties menu.
To enable the Market Depth color scheme:
1. From the Control Panel, click the Settings menu and choose Properties.
2. Click the Trading tab.
3. Click to select the Use Market Depth Coloring box to enable market depth color coding.
You successfully enabled the Market Depth color scheme.
X_TRADER® User Manual
Trading Technologies International, Inc. Proprietary and Confidential Information
- 199 -
Chapter 6
Managing Links to Excel
You can create one or more links between the Market Grid and Excel spreadsheet. You can
l Link the X_TRADER quoting tool to an Excel worksheet to calculate quotes using
proprietary pricing models.
l Use Excel to calculate implied prices and quantities.
The response time from Excel is affected by several variables, Including workstation
memory, CPU speed, and other applications running on the workstation.
Example: If you meet the minimum hardware requirements for X_TRADER, but are
running a complex theoretical quote-generating program for multiple products/strikes, this
creates a significant load on your microprocessor(s), which can slow the response time.
Consult your System Administrator for assistance.
Creating Links
Follow these procedures to establish links to Excel. You must have X_TRADER and Excel
open to perform these actions:
l Creating a link from X_TRADER to an Excel worksheet
l Creating a link from an Excel worksheet to X_TRADER
l Changing the default colors for Excel links in the Market Grid
Note: When you open a workspace that includes links into X_TRADER from a saved Excel
file, X_TRADER automatically opens the Excel file. If your workspace contains links from
X_TRADER to Excel, the Excel file will not automatically open with the workspace. Once
you manually open the Excel file, the links re-establish themselves to the open X_TRADER
workspace.
To create a link from X_TRADER to an Excel worksheet:
1. To copy and paste link one block of data, make sure your Market Grid and Excel pricing model columns are in the same order, or repeat the steps below to copy and paste links for each column of
data.
2. In the Market Grid, click the top left cell of the desired data and hold the mouse button down while
dragging the mouse to the bottom right cell of the desired data.
3. Right-click within the selected area to access the context menu, and click Copy.
4. Open your Excel model.
5. Right-click in the cell you want to paste the data and click Paste Special.
6. From the Paste Special dialog box, select the Paste Link option button.
By default, the data pastes as Unicode Text.
7. Click OK to close the dialog box.
8. Run your Excel model.
You successfully created a link from X_TRADER to Excel.
- 200 -
X_TRADER® User Manual
Trading Technologies International, Inc.
Market Window Overview
To create a link from an Excel worksheet to X_TRADER:
1. Make sure the Market Grid Imp or Theo columns are in the same order as your Excel model. Or,
you can repeat the steps below to copy and paste links for each column of data.
2. To display these columns, right-click anywhere on the Market Grid to access the context menu.
Note: If Click Trading is enabled, do not click in the Bid/Ask price columns.
3. Click Show/Hide columns.
4. Click to select the ImpBidPrc, ImpBidQty, ImpAskPrc, ImpAskQty, TheoPrc, TheoBid, and
TheoAsk columns
5. Make sure your Market Grid Imp or Theo columns are in the same order as your Excel worksheet
columns.
6. Select the Excel cells to be copied to X_TRADER.
7. Right-click within the selected area to access the Excel context menu, and click Copy.
8. In the Market Grid, right-click the cell to paste the Excel data, and click Paste Link from the Market
Grid context menu.
Your Excel data appears in your Market window.
You successfully created a link from an Excel worksheet to X_TRADER. By default the Market Grid
cells fed from the Excel model are light blue with black text.
To change the default colors for Excel Links in the Market Grid:
1.
2.
3.
4.
5.
From the Control Panel, click the Settings menu and choose Properties.
Click the Color tab.
Scroll to the General section and click Excel Link.
In the Color section, click a color from the palette.
Click OK to apply the color and exit the Properties dialog box.
You successfully changed the default colors for Excel Links in the Market Grid. Since this is the default
setting all new links are identified by this background color.
X_TRADER® User Manual
Trading Technologies International, Inc. Proprietary and Confidential Information
- 201 -
Chapter 6
Generating an RTD Formula
The RTD dialog box lets you copy formulas from the Market Grid or Autotrader and paste them for
use in Microsoft Excel where they update dynamically. There are several hundred available
formulas ranging from the Best Ask Price (ASK) of a contract to accumulated traded contracts at the
current last traded price (ACCLTQ). The formulas also exist in Native ($) Decimal (#) and Tick (&)
formats.
Notes:
l
l
You must have Microsoft Excel 2002 or later to use formulas generated from the RTD interface.
The RTD Generator includes the correct contract names for contracts with expiry days.
Example: BAX Mar09 now appears as BAX 16Mar09.
To establish an RTD link:
1. In the Market Grid or Autotrader, right-click a cell in the row of a contract for which you want to
generate a formula.
Note: If Click Trading is enabled, do not click in the Bid/Ask price columns.
2. From the Market Grid context menu, highlight Links and click RTD.
- or From the Autotrader context menu, click RTD.
The RTD dialog box appears.
3. In the Instrument section, click to select the contract you want to use.
Note: You can drag or drop other contracts from the Market Grid or Autotrader into the upper left
Instrument section.
4. In the Properties section, click to select a property whose formula you want to paste in Excel.
- 202 -
X_TRADER® User Manual
Trading Technologies International, Inc.
Market Window Overview
Note: Press and hold the Ctrl key to select multiple properties
5. Click Generate.
In the Results box, the formula(s) appears. If multiple properties were selected, the formulas are in
the same order as the properties.
6. Click Copy.
7. Navigate to Excel and paste the formula(s).
8. In the RTD dialog box, click Exit.
You successfully used the RTD interface.
Viewing your Estimated Position In Queue
You can view your Estimated Position in Queue (EPIQ) in MD Trader and the Market Grid.
EPIQ estimates how many contracts are in front of your order at any given price.
l If your EPIQ is 10, there are approximately 10 contracts ahead of your order.
l If 3 contracts trade, your EPIQ changes to 7.
l If your EPIQ is 0, your order should be the next to fill.
Note: EPIQ is not sent from the exchanges. X_TRADER calculates an estimated EPIQ
based on quantity of trades occurring in front of the order, and does not account for canceled
orders or pro-rata allocations.
Market Grid
In the Market Grid, the EPIQ columns are hidden by default. When shown, EPIQ Buys
appears next to BidQty, and EPIQ Sells appears next to AskQty.
To display the EPIQ columns:
1. Right-click the Market Grid.
Note: If Click Trading is enabled, do not
click in the Bid/Ask price columns.
2. From the context menu, click Show/Hide
columns and select them.
- or Hover over Layouts and click EPIQ.
You successfully displayed the EPIQ columns
in the Market Grid.
X_TRADER® User Manual
Trading Technologies International, Inc. Proprietary and Confidential Information
- 203 -
Chapter 6
Viewing Live-Only Contracts
The Live-Only Mode option on the Market Grid context menu lets you show only contracts
that currently have an active bid, active offer or last price.
In addition, you can Pin Rows, which always leaves specified contracts showing even if
they do not have an active bid, active offer or last price.
To view Live-Only contracts:
1. Right-click the Market Grid.
2. Highlight Live-Only Mode and click Live Only.
You successfully viewed Live-Only contracts.
- 204 -
X_TRADER® User Manual
Trading Technologies International, Inc.
Market Window Overview
Floating Depth Window
The Floating Depth Window is a popup window which appears in the
Market Grid or Spread Matrix, letting you trade from a contract's depth
quickly.
The Floating Depth Window:
l Provides three levels of merged aggregate depth for both bids and
offers.
l Supports both implied prices and synthetic orders.
Floating Depth Window
Follow these procedures to use the Floating Depth Window:
l Setting up the Floating Depth Window
l Trading with the Floating Depth Window
To set up the Floating Depth Window:
1. From the Control Panel, click the Settings menu and choose Properties.
2. On the Trading tab, in the Floating Windows section, choose how you want to launch the Depth
Window.
Your options are:
l <Disabled>
l Middle click
l Mouse hover
Note: Your Floating Depth Window launch
method must be different from your Floating
Order Book launch method.
3. Click OK.
4. In the Market Grid and Spread Matrix windows, right-click to access the context menu.
Market Grid context menu
Spread Matrix context menu
5. Click to enable Floating Depth.
A checkmark indicates Floating Depth is enabled.
You successfully set up the Floating Depth Window.
X_TRADER® User Manual
Trading Technologies International, Inc. Proprietary and Confidential Information
- 205 -
Chapter 6
To trade with the Floating Depth Window:
1. In the Market Grid or Spread Matrix window, put your cursor over a price or quantity field for a contract you want to trade.
Note: These cells include: BidQty, BidPrc, AskPrc, AskQty, LastPrc, LastQty, ImpBidQty,
ImpBidPrc, ImpAskPrc, ImpAskQty.
2. Launch the Floating Depth Window according to the property you set in the Trading tab on the
Properties menu.
3. Click the row at the price you want to trade.
Your Order Entry window seeds with the contract and price you clicked.
4. Adjust your quantity.
5. Adjust your Time in Force options.
6. Click Buy or Sell to trade.
You successfully traded with the Floating Depth Window.
Floating Depth Window Examples
The Floating Depth Window will not launch if:
l There is no depth available.
l You try to launch it from a non-tradable contract.
The Floating Depth Window consolidates price rows to display the
three best available bids and offers.
FDW 3 best bids and
offers
Blank lines only appear if there are less than three levels of depth
available to trade.
Note: The Floating Depth Window is not compatible with BrokerTec.
FDW blank lines
- 206 -
X_TRADER® User Manual
Trading Technologies International, Inc.
Market Window Overview
Trading with the Order Bar
You can set the Order Bar as your primary method for sending orders to the market. As a Floating
Order Entry, the Order Bar works in direct conjunction with the Market Grid, Order Book,
Autotrader, Spread Matrix, and Quote Board. To use the Order Bar, you must enable it as your
Floating Order Entry, and enable the Floating Order Entry option in the functional window.
The Buy Order Bar
The Sell Order Bar
Order Bar Features
The Order Bar has the following features:
l Enable the mouse for quick-click trading: One advantage to the Order Bar is the
ability to quick click an order into the market. You click the quantity and the cursor
automatically moves to the Buy or Sell button. To use this feature, you must enable
the Auto Mouse Move property.
l Use hotkeys to make trades: Another advantage to the Order Bar is its easy interaction with the keyboard. Use the default hotkeys or customize them to create your
own.
Order Bar Procedures
Follow these procedures to use the Order Bar:
l Enabling the Order Bar
l Quick-click Trading
l Setting an order confirmation
To enable the Order Bar:
1. From the Control Panel, click the Settings menu and choose Properties.
2. On the Trading tab, in the Floating Order Entry property, click to select Order Bar.
3. Right-click the Market Grid, Order Book, Autotrader, Spread Matrix, or Quote Board and click to
select Floating Order Entry.
You can now call the Order Bar using the mouse or keyboard hotkeys.
You successfully enabled the Order Bar.
X_TRADER® User Manual
Trading Technologies International, Inc. Proprietary and Confidential Information
- 207 -
Chapter 6
To quick-click trade:
1. From the Control Panel, click the Settings menu and choose Properties.
2. Click the Order Entry tab.
3. Click to select the Auto Mouse Move property.
4. Click OK.
5. From the Market Grid, call the Buy Order Bar or Sell Order Bar using the following:
Note: If click-trading is also enabled, the click-trading right mouse actions take precedence. (Disable
click-trading using the Market Grid context menu.)
When enabled
Left-click
To Buy
Bid Prc or BidQty
To Sell
AskPrc or AskQty
Right-click
AskPrc or AskQty
Bid Prc or BidQty
The mouse immediately moves to the Buy or Sell button and, depending on what you click, either the
price or the quantity is highlighted.
6. Click the Buy or Sell button to place an order at the given price with the given quantity.
- or Type over the highlighted values, and adjust the parameters of the order before clicking the Buy or
Sell button.
You successfully quick-click traded.
To set an order confirmation:
Click the Lock checkbox at the end of the Order Bar to enable a confirmation screen before orders
are sent to the market.
You successfully set an order confirmation.
- 208 -
X_TRADER® User Manual
Trading Technologies International, Inc.
Market Window Overview
Modifying an Order with the Order Bar
You can enable the Floating Order Entry on the context menu, and use the Floating Order
Entry to cancel/replace an order. When the Floating Order Entry window is the Order Bar,
you can use the keyboard to launch the Order Bar and modify your order.
To modify an order with the Order Bar:
1. From the Control Panel, click the Settings menu and choose Properties.
2. On the Trading tab, in the Floating Order Entry property, click to select Order Bar.
3. Right-click the Order Book and click to select Floating Order Entry.
You can now call the Order Bar using the mouse or keyboard hotkeys.
4. Navigate to the order you want to modify and press F5.
Note: You can alter the hotkey in the Hotkey tab on the Properties menu.
5. Change the quantity or price.
6. Click Buy or Sell to send the order.
You successfully modified an order with the Order Bar.
X_TRADER® User Manual
Trading Technologies International, Inc. Proprietary and Confidential Information
- 209 -
Chapter 6
Keyboard Trading with the Order Bar
You can use the keyboard to interact easily with the Order Bar. Use the default hotkeys or
customize them to create your own.
TT Default Map
Description
Hotkey
G
Command
Launch to join bid
Description
Launch Order Bar as a Buy seeded with and focused on
the Bid price.
F2
Launch to take offer
Launch Order Bar as a Buy seeded with and focused on
the Ask price.
Home
Focus on quantity
Lets you edit the quantity field.
End
Focus on price
Lets you edit the price field.
Tab
Advance fields
Advance the cursor to the next field for editing.
Enter
Submit order
Submit the order as defined and close the Order Bar.
Esc
Close Order Bar
Close the Order Bar window.
Num Lock
Keep on
Lets you use the keypad to type numbers.
-
Decrease value
Decreases the numeric value of the field you are editing.
+
Increase value
Increases the numeric value of the field you are editing.
H
Launch to join ask
Launch the Order Bar as a Sell seeded with and focused
on the Ask price.
F11
Launch to hit bid
Launch Order Bar as a Sell seeded with and focused on
the Bid price.
- 210 -
X_TRADER® User Manual
Trading Technologies International, Inc.
Market Window Overview
Keyboard Trading Procedures
Follow these procedures to manage keyboard trading with the Order Bar:
l Trading using hotkeys
l Assigning hotkeys to the Order Bar
To trade using hotkeys:
1. Call the Buy Order Bar or Sell Order Bar using your specified keys.
2. Input the quantity and price.
3. Press TAB to advance fields, SHIFT+TAB to go back a field.
4. Press ENTER to submit the order.
You successfully traded using hotkeys.
To assign hotkeys to the Order Bar:
1. From the Control Panel, click the Settings menu and choose Properties.
2. Click the Hotkeys tab.
3. In the Keyboard Layout field, click to select Custom.
4. In the Component column, click Order Bar.
5. In the Command column, click the command for which you want to assign a hotkey.
6. Click in the Press new shortcut key field.
7. Press the key or keys you want to represent that command.
Note: Some keys cannot be used as hotkeys. (E.g., Delete, Backspace, Tab...and others.)
8. Click the Assign button.
You successfully assigned hotkeys to the Order Bar.
X_TRADER® User Manual
Trading Technologies International, Inc. Proprietary and Confidential Information
- 211 -
Chapter 6
Cross Trades Overview
The cross trading feature lets you cross a prearranged order either with a party within the trading
firm itself or with a specified party outside the firm.
Follow these procedures to cross trade:
l Enabling Cross Trading
l Executing a Cross/Cross With order
To enable Cross Trading:
1. From the Control Panel, click the Settings menu and choose Properties.
2. Click the Order Entry tab.
3. In the Cross Orders section, click Order Crossing.
4. If you want to send (or are required to send by the exchange) an Intention to Cross notification, click
the ITX (Countdown) field so it is marked and set the number of seconds to countdown.
Note: This timer is informational and does not trigger a cross order. Exchanges that do not support
this announcement reject the ITX when it is sent.
5. In the Cross Order Type field, click one of these options:
l Sequential Fast: Default. Both orders (buy and sell) immediately submit, one after the other.
On occasion, heavy market conditions can lead to routing the orders through different routers.
As a result, the wrong leg might arrive at the exchange host first.
l Sequential Guaranteed: Waits for an acknowledgement of the first order from the exchange
before sending the second order. Due to the delay, it is possible for a third party to take the
offer or bid before both sides are matched.
In both cases, if the first side fills (partially or completely), the second side of the cross order still
submits.
6. Click OK.
You successfully enabled Cross Trading.
- 212 -
X_TRADER® User Manual
Trading Technologies International, Inc.
Market Window Overview
To execute a cross or cross with trade:
Note: Remember that you must have previously set up customer profiles for each client you wish to
conduct cross trades with.
1. In the Order Entry pane, click the Cross tab.
Note: If your Order Entry pane does not display the Cross tab, see the preceding procedure.
2. Click Cross or Cross w/.
3. If you selected Cross, click the buyer or seller from the list boxes.
If you selected Cross w/, click to select your Opp. Side.
4. In the Market Grid, select a contract.
5. Enter the quantity and price in the appropriate fields.
6. If you want to send (or are required to send by the exchange) an Intention to Cross notification, click
the ITX button.
The timer counts down.
7. To execute a cross trade, click Buy First or Sell First.
- or To execute a cross-with trade, click Crs Buy or Crs Sell.
You successfully executed a cross or cross with trade.
Cross and Cross With Trades
Use Cross trades in exchanges other than LIFFE CONNECT to indicate a specific party to
trade with. Cross trades are always GTD orders. The following controls are added or deleted
after you click Cross in the Order Entry pane.
Use Cross With trades for LIFFE CONNECT cross trades to indicate a specific counter
party by entering the Trader ID. Support of this feature is exchange-specific. If the exchange
does not support it, the message Order Format Invalid appears in the Audit Trail window.
Note: Remember that you must have previously set up customer profiles for each client you
wish to conduct cross trades with.
X_TRADER® User Manual
Trading Technologies International, Inc. Proprietary and Confidential Information
- 213 -
Chapter 6
Cross Order Execution and CBOT
Because of a rule implemented by CBOT, cross orders experience a time delay. The X_
TRADER system complies with the time delay rule and manages your cross orders so
exchanges accepted them.
When you execute your cross trade, you send both orders at the same time. However, the X_
TRADER gateway system holds the second leg of your cross order and adheres to the
following rules so your order is not rejected:
l 5 seconds between the legs for futures contracts and their associated spread contracts.
l 15 seconds between the legs for options contracts and their associated spread contracts.
Notes:
l If the first leg only partially fills, the second leg submits with the original quantity. No adjustments are made to the second leg.
l If the first leg completely fills, the second leg still goes to the exchange.
l The X_TRADER Gateway rejects sequential fast cross orders.
- 214 -
X_TRADER® User Manual
Trading Technologies International, Inc.
Market Window Overview
Click Trading Overview
Click Trading lets you right-click the bid price to send a limit sell order or right-click the ask price to
send a limit buy order.
Follow these procedures to use Click Trading:
l Enabling/Disabling Click Trading
l Setting Default Properties in Click Trading
l Using Click Trading
Notes:
l When you enable Click Trading, all safety measures are removed.
l The Lock and Hold features are not available when Click Trading.
Enabling/Disabling Click Trading
To enable or disable click trading:
1. Right-click anywhere in the Market Grid to access the context menu.
Note: If Click Trading is enabled, do not click in the Bid/Ask price columns.
2. Click the Click Trade On option to enable or disable click trading.
A checkmark indicates you enabled the feature and the Click Trading pane opens above the
Market Grid.
You successfully turned click trading on or off.
X_TRADER® User Manual
Trading Technologies International, Inc. Proprietary and Confidential Information
- 215 -
Chapter 6
Setting Default Properties for Click Trading
Default properties control the mouse settings and other restrictions while Click Trading.
Maintain these features in the Trading tab on the Properties menu.
To set the properties for click trading:
1. From the Control Panel, click the Settings menu and choose Properties.
2. In the Properties dialog box, click the Trading tab.
3. In the Mouse Type section, click the kind of mouse you use.
Note: A three-button mouse is the default setting and is ideal for sending all types of Click Trading
orders to market in the quickest manner possible.
4. In the Dime field, click GTD or IOC.
Note: Any GTD orders still working at the end of your trading session are automatically deleted.
IOC orders allow a partial fill before the balance is canceled.
5. In the Click field, click GTC or IOC.
6. To enable click trading on FFNet/NetPos, click to select the Enable on FFNet/NetPos checkbox.
7. Click OK to exit the Properties dialog box and save the selected options.
You successfully set the properties for click trading.
Using Click Trading in the Market Grid
To use click trading in the Market Grid:
Note: When you enable Click Trading, all safety measures are removed.
1. Enable Click Trading.
2. Enter the required quantities and information from the table below:
Field
Qty
Description
Enter your click trading order quantity.
Click Offset
Field, based on the Last Traded Price, protects you from sending an order too
far away from the last traded price
Enter the maximum number of ticks the price can move from the last traded
price.
Note: Click Offset and Click +/- are mutually exclusive.
Click +/- (Plus/Minus)
Field, based on the current inside market, lets you chase a fast moving market.
Enter the maximum number of ticks the price can move from the inside market
price.
Example: If the Click +/- value is two ticks where the tick value for the
product is .01 and bid price is 115.99, the worst price accepted is 115.97. If a
better price is available, the order fills (e.g., 115.98 or 115.99).
Note: This example assumes theoretical prices are not used.
- 216 -
X_TRADER® User Manual
Trading Technologies International, Inc.
Market Window Overview
Field
Dime +/-
Description
When you dime the market, the action implies order entry, not necessarily
order execution. This feature lets you enter orders off the market without using
the Price and Quantity fields in the Order Entry pane.
The value you enter defines at what price, based on the current inside market,
the order is entered. The feature is limited to values up to 99.
Example: If you enter 1 and middle-click the mouse with the cursor on the
current market bid, an order 1 tick better than the prevailing prices is entered.
Conversely, if you enter a –1, an order 1 tick worse is entered.
Click vs. Dime options
Toggle between Click and Dime to define what occurs when you right-click:
l
Execute a trade (Click)
l
Enter an order (Dime)
The Click and Dime buttons enable when you select a two-button mouse from
the Trading tab on the Properties menu.
Theo &
Lets you evaluate opportunities in the market.
B/A (Bid/Ask)
l
Enable Theo to use theoreticals pasted in the TheoPrc column.
l
Enable B/A to use theoreticals pasted in the TheoBid or TheoAsk columns.
Account (Default)
Refers to the accounts set up in the Customer Defaults dialog box.
A1
Displays account code.
3. To send a trade to market using Click Trading:
l Right-click the bid price to send a limit sell order.
l
Right-click the ask price to send a limit buy order.
You successfully used the click trading feature in the Market Grid.
X_TRADER® User Manual
Trading Technologies International, Inc. Proprietary and Confidential Information
- 217 -
Chapter 6
Eurex Block Order Overview
The Eurex Block Order feature in X_TRADER provides a method to enter a buy and acknowledge
a purchase of a large block trade into the Eurex exchange. Block orders are defined as those product
trades which involve high-volume and whose traded price are separately agreed to by both parties
outside of the normal exchange trading methods.
Block trade limits (minimum threshold that defines what constitutes a block trade for any given
product) are defined by the exchange and vary depending on the product. In all cases, a private
agreement on price and number of products to be traded exists, and must be reported to the
exchange.
Buyers and Sellers have distinct roles in Eurex block trading:
l Buyers: Buyers initiate a block trade. They can also add, modify, or delete the trade.
l Sellers: Sellers can only receive and accept a block trade.
Follow these procedures to manage Eurex Block Orders:
l Submitting a Eurex block order (buy side)
l Modifying a Eurex block order trade
l Accepting a Eurex block order (sell side)
l Making a Block or Volatility Order Inquiry
- 218 -
X_TRADER® User Manual
Trading Technologies International, Inc.
Market Window Overview
Submitting a Eurex Block Order (Buy Side)
This procedure assumes both parties involved in a block trade are in communication with
each other. Only the buyer can enter a block trade using the following procedure.
Note: Although block trading is defined as a trade between two parties outside of the normal
exchange market, the Eurex exchange is the third party involved. Eurex checks the trade’s
quantity, price, and other information, before determining approval. After the exchange
reviews the trade the Seller can complete their side of the transaction.
To enter a block trade into the Eurex exchange (Buyer initiated):
1. In the Market Grid, select the product you want to buy.
2. In the Restriction field, click Block.
The Sell button grays out.
3. Type the five-letter member ID of the counterparty in the Counterparty Information field.
4. Click to select an account from the drop down list.
You cannot use the default account.
5. Ensure your position is Open.
6. Type the amount to be traded and price for the whole trade.
Note: The minimum volume for block trades varies according to product.
7. Click Buy to initiate the trade.
The above procedure results in the following actions:
l The block trade moves to the Order Book and gets a unique identifying number. The status is
Waiting for Approval.
l A message appears in the Audit Trail indicating the trade was sent to the exchange.
You successfully entered a block trade into the Eurex exchange.
Modifying a Eurex Block Order Trade
Only the Buyer can modify a block trade order on the Eurex exchange. A modification to a
block trade (change or price or quantity, new counterparty, etc.) is identical to any other
order modification and is done from the Order Book window.
Notes:
l Block trades becomes inactive if the seller does not approve it within 30 minutes of
entry (or its last modification).
l The buyer can reactivate the transaction during the current trading day by retrieving
and resubmitting it.
l Once the seller has accepted the transaction, the buyer cannot modify or cancel the
transaction without contacting the exchange.
X_TRADER® User Manual
Trading Technologies International, Inc. Proprietary and Confidential Information
- 219 -
Chapter 6
Accepting a Eurex Block or Volatility Order (Sell Side)
Sellers should be in communication with the Buyers of the block trade and know when the
trade initiates. Information only available to the buy side of the trade is required to complete
the block trading process.
Note: Although block trading is defined as a trade between two parties outside of the normal
exchange market, the Eurex exchange is the third party involved. Eurex checks the trade’s
quantity, price, and other information, before determining approval. After the exchange
reviews the trade the Seller can complete their side of the transaction.
To accept a block trade on Eurex (Seller acceptance):
1. With X_TRADER open and logged into the Eurex exchange, open the Order Book.
2. Right-click in the Order Book to access the context menu and click Inquire Block and Vola
Order.
The Inquire Block and Vola Order dialog box appears.
3. In the Restriction field, click whether the order is a Block order or a Volatility order.
4. In the Order Number field, type the exchange generated order number of the trade initiated by the
buyer.
Note: This information must be obtained from the Buyer.
5. In the Exchange field, click the Eurex exchange on which the order was submitted.
6. In the Product Type field, click the order type.
7. Click Inquire.
In the Order Book, the Submit button becomes the Accept button.
8. Click to select the sell side of the order in the bottom of the Order Book, and re-select your customer
account in the top of the Order Book.
9. Click Accept.
The Order Book and Fill window indicate the accepted trade information.
You successfully accepted a block trade entered into the Eurex exchange.
- 220 -
X_TRADER® User Manual
Trading Technologies International, Inc.
Market Window Overview
Making a Block or Volatility Order Inquiry
Use the Inquire Block Order dialog box to receive and validate orders for the sell side of a
Eurex block trade.
To make a block or volatility order inquiry:
1. With X_TRADER open and logged into the Eurex exchange, open the Order Book.
2. Right-click in the Order Book to access the context menu and click Inquire Block and Vola
Order.
The Inquire Block and Vola Order dialog box appears.
3. In the Restriction field, click whether the order is a Block order or a Volatility order.
4. In the Order Number field, type the exchange generated order number of the trade initiated by the
buyer.
Note: This information must be obtained from the Buyer.
5. In the Exchange field, click the Eurex exchange on which the order was submitted.
6. In the Product Type field, click whether the order type.
7. Click Inquire.
You successfully made a block or volatility order inquiry.
X_TRADER® User Manual
Trading Technologies International, Inc. Proprietary and Confidential Information
- 221 -
Chapter 6
Entering Orders Using the Keyboard
If you prefer, you can trade with the keyboard using either the Keyboard Entry or the Buy and Sell
hotkeys.
Keyboard Entry
Keyboard entry adds onto the top of the Market window when called.
To open the Keyboard Entry and send an order to market:
1. Click any Market Grid cell of the product you wish to trade.
2. Press the Insert (Buy order) or PageUp (Sell order) key.
The Keyboard Entry window appears at the top of the Order Entry pane.
3. In the first field, type the quantity to buy or sell.
Note: Tab moves the cursor left to right. Shift+Tab moves the cursor right to left.
4. In the second field, type the price to buy or sell at.
5. Click the down arrow and select Open or Close.
6. Complete the appropriate order data in the remaining fields.
7. After entering the order data, press ENTER to review the order.
8. Press ENTER a second time to send the order to market.
Note: To cancel the order, prior to sending the order to market, press ESC to close the Keyboard
Entry window.
You successfully opened the Keyboard Entry window.
- 222 -
X_TRADER® User Manual
Trading Technologies International, Inc.
Market Window Overview
Buy and Sell Hotkeys
Enable and configure hotkeys on the Properties menu.
To enable and configure Buy and Sell hotkeys:
1. From the Control Panel, click the Settings menu and choose Properties.
2. Click the Hotkeys tab.
3. In the Keyboard Layout field, click to select Custom.
4. In the Component column, click Order Pane.
5. In the Command column, click the command for which you want to assign a hotkey.
6. Click in the Press new shortcut key field.
7. Press the key or keys you want to represent that command.
Note: Some keys cannot be used as hotkeys. (E.g., Delete, Backspace, Tab...and others.)
8. Click the Assign button.
You successfully assigned hotkeys to the Order Bar.
Controlling Quantity or Price Using the Keyboard
The mouse or the spin buttons may be used to adjust the quantity or price. However, you
may also use the keyboard to manually enter a quantity or price.
To enter a quantity or price using the keyboard:
1. Click to select a Market Grid cell and press the Insert (Buy order) or PageUp (Sell order) key.
- or If the Floating Order Entry window is enabled, click to select a Market Grid row and press the
Insert (Buy order) or PageUp (Sell order) key.
2. Press TAB or SHIFT+TAB to move to the quantity or price text box.(Shown above)
3. Use the keyboard to enter a value.
4. Press F2 to send a Buy order.
- or Press F11 to submit a Sell order.
Note: Enable and configure the hotkeys in the HotKeys tab on the Properties menu.
You successfully entered a quantity using the keyboard.
X_TRADER® User Manual
Trading Technologies International, Inc. Proprietary and Confidential Information
- 223 -
Chapter 6
Order Change Dialog Box Overview
Hold down the CTRL key and click in a cell where a working order exists to access the Order
Change dialog box from the following X_TRADER windows:
l Market Grid
l Spread Matrix
l Butterfly Condor Matrix
You can perform other transactions while keeping the Order Change dialog box open. When you
open an Order Change dialog box, it displays on top of the parent window and can be moved. The
dialog box and its order save with your workspace.
Note: You may have only one Order Change dialog box open at a time.
Using the Order Change Dialog Box
The Order Change dialog box lets you delete, cancel/replace or change a working order
without accessing the Order Book.
To use the Order Change dialog box:
1. Hold down the Ctrl key and click in a cell where a working order exists.
The Order Change dialog box appears, showing the order closest to the market.
2. Use the Page Up or Page
want to change.
Down
arrows to scroll through the orders and select the working order you
3. Make any changes to the order and click the appropriate button: Delete, Cancel/ Replace, Change,
or Cancel.
Note: You cannot change the Limit/Market or order type (i.e., GTD) fields.
You successfully used the Order Change dialog box.
- 224 -
X_TRADER® User Manual
Trading Technologies International, Inc.
Market Window Overview
Setting Implieds
Implied prices and quantities derive from direct orders in a combination of outright contracts
and spreads/strategies. Implied pricing evolved at exchanges that trade contracts, spreads and
strategies involving different combinations of the contract months.
Example: A bid in one contract month and an offer in a second contract month combine to
imply a bid in the spread between the two months.
By calculating and displaying implied prices and quantities, exchanges found they could
improve the best Bid/Ask price or add liquidity to certain contracts or strategies.
Note: Implied data does not display for Condor Matrices because LIFFE does not match
implieds from Condor Matrices.
To set implieds:
1. From the Control Panel, click the Settings menu and choose Properties.
2. On the Trading tab, click to select the options you want:
l Include Implieds in Market columns and in Depth: Exchange calculated implieds.
l Calculate Implieds instead of Exchange Implieds: X_TRADER calculated implieds.
3. Click OK.
You successfully set implieds.
X_TRADER® User Manual
Trading Technologies International, Inc. Proprietary and Confidential Information
- 225 -
Chapter 6
Viewing Implieds
The Include Implieds in Market columns and in Depth property on the Trading tab, lets
you determine whether or not implied prices and quantities appear in the same columns as
outright prices and quantities.
Example 1: When this property is enabled, the Imp AskPrc and Imp AskQty columns
reflect the same data in the AskPrc and AskQty columns.
Example 2: When this property is disabled, the prices and quantities report separately in
their respective columns. Assuming two of the total ask quantities are implieds, separating
implieds from outrights appear like this.
Note: Implied prices only appear in the market when they are equal to or better than the
outright prices.
- 226 -
X_TRADER® User Manual
Trading Technologies International, Inc.
Market Window Overview
Implied In
An Implied in is a spread price generated by the differential of two contracts. The natural
curve of futures contracts dictates deferred contracts will be priced higher than near
contracts. Therefore, spread prices are often negative prices.
Formula:
l Bid spread price for Spread AB = (Bid Price Leg A) – (Ask Price Leg B)
l Ask spread price for Spread AB = (Ask Price Leg A) – (Bid Price Leg B)
In the examples below, the spread prices are as follows:
l
Bid spread price for Spread AB = (6450) - (6475) = -25.
l Ask spread price for Spread AB =(6451) - (6474) = -23.
Implied Out
An implied out is a leg price generated by the spread price and one of the legs of the spread.
You can imply out a price in the first or second leg.
Formulas:
l Bid Price Leg A = (Bid price Spread AB) + (Bid price of leg B)
l Ask Price Leg A = (Ask price Spread AB) + (Ask price of leg B)
In the examples below:
l Bid Price Leg A = (-25) + (6474) = 6449
l Ask Price Leg A = (-23) + (6475) = 6452
X_TRADER® User Manual
Trading Technologies International, Inc. Proprietary and Confidential Information
- 227 -
Chapter 6
Implieds From Implieds
Implieds from implieds (second generation implieds) occur when one of the prices you are
using to imply another price is itself an implied price. A first generation implied is composed
of only direct prices. A second generation implied requires one first generation implied price
and at least one direct price.
Implied functionality varies by exchange, dissemination rules may be different than matching
rules and exchanges may give priority in matching to different generations. These rules
continually change based upon market demand.
Formulas:
l Implied Bid Price Leg B = (Bid Price Leg A) - (Ask spread price for Spread AB)
l Implied Bid spread Price for Spread BC = (Imp Bid price Leg B) – (Ask Price Leg C)
In the example below:
l Implied Bid Price Leg B = (5900) - (-10) = 5910
l Implied Bid spread Price for Spread BC = (5910) - (5925) = -15
Implied Quantities
Implied quantities are typically the minimum quantity shared between two outright leg
orders.
In the example below, the implied April/May bid price has a quantity of 75. This is limited
by the 75 May Ask quantity.
- 228 -
X_TRADER® User Manual
Trading Technologies International, Inc.
Market Window Overview
Quoting Overview
You can generate quotes in X_TRADER through a proprietary theoretical pricing model using
spread table(s) and product group(s). You can respond to RFQs manually or enable autoquoting to
automatically send a response.
Before you can use the quoting features within X_TRADER, you must perform the three step
process to enable quoting.
Follow these procedures to manage quoting:
l Enabling Quoting
l Editing, Generating and Sending Quotes
l Tracking Quotes
l Activating or Deactivating a Strike or an Expiration
l Activating or Deactivating multiple Strikes or Expirations
l Deleting Mass or Individual Quotes
l Disabling Quoting
Tip: If a pair of orders working in quoting mode are close enough and the price adjusts down, the
orders change without problem in a normal market. If the price adjusts up, the orders can fill against
one another. To help prevent this enable the Avoid orders that cross with each other property in
the Trading tab on the Properties menu. This should delete one of the orders before they cross.
Quoting Additions to the Market Grid Pane
When you turn on the context menu’s Quoting option, the quoting bar appears and quoting
columns add to your Market Grid.
The quoting bar has the following functions:
Field
Send
Description
Sends mass quotes to market for all activated strikes/expirations. You can edit
the test quote columns. Manually edit a quote and click Send and the
information goes in the test quote columns.
If you choose not to edit these columns, click Send to generate a new
quote—that you need to confirm—based on current market conditions.
Delete
Deletes mass quotes sent to market. Test quotes are still retained. Use this button to pull all live quotes. If any unusual occurrence causes your workstation
or X_TRADER to unexpectedly shutdown, immediately after restarting click
Delete.
Test Quotes
Generates test quotes wherever possible.
Pull All Quotes
Pulls all live quotes from the market.
Tick Up
Moves the bid offer up or down by one tick.
Test
Sends test quotes to the market.
X_TRADER® User Manual
Trading Technologies International, Inc. Proprietary and Confidential Information
- 229 -
Chapter 6
Field
Market
Description
Sends market quotes to the market.
If the quoting bar is in Test mode (the default) the additional columns are:
Field
QAct
Description
Sends a quote for a single strike/expiration. If the strike/expiration is
activated, a confirmation dialog box appears, and you can edit the quote
information or accept the generated quote. Click Add to send the quote,
Delete to delete the quote, or Cancel to cancel the action.
BQQ
Bid Quote Quantity (test quote).
BQP
Bid Quote Price (test quote).
Quote
Pulls all live quotes from the market.
Indicates the active (checked) or inactive (unchecked) status of the
strike/expiration. Check this box to send a quote to market. An unchecked
box denotes an inactive strike/expiration and no quote is sent.
Deselecting this box deletes a quote from the market if one exists.
To select and activate/deactivate strikes/expirations, right-click anywhere in
the Quote column to access the context menu. From this menu, click Select
All, Calls, Puts, 2-Sided Mkts, or Last Prc. Then click Activate or
Deactivate. All checked boxes in the Quote column are active
strikes/expirations; all others are deactivated. Refer to Activating or
Deactivating a Strike or an Expiration on page 234 for more information.
AQP
Ask Quote Price (test quote).
AQQ
Ask Quote Quantity (test quote) The above test quote columns display when
you click Test Quotes or Market Quotes.
Market quotes display when you click Market Quotes or Send. If the Market
Quote columns currently display, click Test Quotes to automatically change
to the Test Quotes environment.
When these column headings display, only the test quote environment
appears. The quantities always match those set in the product group dialog
box after quote generation, although they may change if you manually edit
them.
When you send mass quotes, the market quote columns (defined below)
display. However, sending a single market quote maintains the test quote
display, provided that the test quote environment was active when the
individual market quote was sent. The cells for the currently sent market
quote are blue to let you know that the quote hit the market.
- 230 -
X_TRADER® User Manual
Trading Technologies International, Inc.
Market Window Overview
If the quoting bar is in Market mode the additional columns are:
Field
Mkt BQQ
Description
Market Bid Quote Quantity.
Mkt BQP
Market Bid Quote Price.
Mkt AQP
Market Ask Quote Price.
Mkt AQQ
Market Ask Quote Quantity. These columns display all active quotes in the
market and update according to price and quantity.
Enabling Quoting
Follow all these procedures to enable quoting:
1. Creating quoting preferences: In order to use the quoting feature, you indicate your
quoting preferences.
2. Enabling quoting as a feature: You enable quoting as a feature from the Properties
menu. By default it is disabled.
3. Turning on quoting for a single window:You turn quoting on for each individual
Market window.
Procedure 1: To create quoting preferences:
X_TRADER quoting requires all of the following:
l One or more spread tables: Spread tables let you define how wide quote spreads should be, based
on a product’s time to expiration and price. Multiple spread tables provide flexibility within the quoting system. Refer to Spread Tables Setup on page 82 for more information.
l One or more product groups: Product groups let you define how the bid/ask values are calculated.
You can specify the quote type, spread table, delete time, account, as well as other parameters. You
can enable or disable Autoquoting via your product groups. Refer to Product Group Information
Setup on page 74 for more information.
l Each quoted product must be associated to a product group: Product groups determine how a
quote is generated. Therefore, to generate quotes, each product must be associated with one (and
only one) product group. Refer to Associating a Product to a Product Group on page 80 for more
information.
You successfully set up the quoting features.
X_TRADER® User Manual
Trading Technologies International, Inc. Proprietary and Confidential Information
- 231 -
Chapter 6
Procedure 2: To enable quoting as a feature:
Quoting preferences must first be created. (See Procedure 1 above)
1. From the Control Panel, click the Settings menu and choose Properties.
The Properties dialog box opens with the Trading tab displayed by default.
2. Click to select the Quoting box to enable quoting.
A checkmark indicates that quoting is enabled for all Market windows.
You successfully enabled quoting as a feature. Continue to the next procedure to turn quoting on.
Procedure 3: To turn on quoting for a single window:
Quoting must first be enabled. (See Procedure 2 above.)
1. Right-click anywhere in the Market Grid to access the context menu.
Note: If Click Trading is enabled, do not click in the Bid/Ask price columns.
2. Highlight Quoting and click Show.
The quoting bar is added between the Order Entry pane and the Market Grid, and new columns
appear in the Market Grid.
Alternatively, click Show/Hide columns and click RFQ.
An RFQ button displays after the Del Srs column for every contract.
Click the RFQ button to send a request for quote on any contract. By default, clicking on the button
sends a generic, two-sided indicative RFQ with no size.
You successfully turned quoting on for a single window.
- 232 -
X_TRADER® User Manual
Trading Technologies International, Inc.
Market Window Overview
Editing, Generating, and Sending Quotes
Follow these procedures to edit, generate and send quotes:
l Generating quotes
l Editing a quote (change pricing or other information)
l Sending a single quote
l Sending mass quotes
To generate quotes:
Make sure quoting is enabled and click Test Quotes.
- or Click the RFQ button to send a request for quote on any contract. By default, clicking on the button
sends a generic, two-sided indicative RFQ with no size.
You successfully generated quotes.
To edit a quote: (change pricing or other information):
1. Directly from the Market Grid, double-click the BQP (Bid Quote Price) or AQP (Ask Quote Price).
2. Edit the price in the Send Quote dialog box.
You successfully edited a quote.
To send a single quote:
1. Click QAct to send an individual quote to market.
The Send Quote dialog box opens so that you can edit and confirm the quote.
2. Click Add to send the quote to market.
The test quote columns continue to display, but the cell for the sent quote is displayed in blue to
indicate that the quote hit the market.
You successfully sent a single quote.
To send mass quotes:
1. Click Send in the Order Entry pane to send the test quotes to market.
2. Click Send to regenerate unedited quotes based on current market conditions.
The new quotes are sent to market. When you send mass quotes the market quote columns
automatically display.
You successfully sent mass quotes.
X_TRADER® User Manual
Trading Technologies International, Inc. Proprietary and Confidential Information
- 233 -
Chapter 6
Tracking Quotes
All exchange messages relating to quoting display in the Quote Audit Trail. Use this
window to confirm outbound quoting events and monitor inbound quoting events (i.e.,
RFQs).
X_TRADER uses the Quote Audit Trail to monitor quoting activity. The Quote Audit Trail
displays messages related to quoting from the exchanges. You can also use this message
window to monitor incoming and outgoing RFQs, as well as manual and autoquoting
responses to RFQs.
To open the Quote Audit Trail:
From the Control Panel, click the Window menu and choose Quote Audit Trail.
- or From the Control Panel, click the
icon.
You successfully opened the Quote Audit Trail.
Activating or Deactivating a Strike or an Expiration
You must activate the strike/expiration before sending the quotes to market. If a quote is not
activated, test quotes are generated, but are not sent to market.
In the Market Grid, the Quote column indicates the status of the strike/expiration:
l A checked box in the Quote column indicates an activated strike/expiration. Generated or manually entered quotes are sent to market.
l An unchecked box in the Quote column indicates a deactivated strike/expiration. Generated and manually entered quotes are NOT sent to market.
To manually activate or deactivate an individual strike or expiration:
Click to select (activate) or deselect (deactivate) the box in the Quote column.
Note: Deselecting (deactivating) a strike/expiration deletes a quote from the market, if one exists.
You successfully activated or deactivated an individual strike or expiration.
- 234 -
X_TRADER® User Manual
Trading Technologies International, Inc.
Market Window Overview
Activating/Deactivating Multiple Strikes or Expirations
When viewing quotes from multiple windows, a second quoting Market window with the
same contract does not display all existing quotes. The second window only sees data about
live quotes after the workstation receives an update.
Additionally, if you send a new quote with only a single changed parameter, the first
window displays the entire quote, but the second window only receives an update of
changed information. Therefore, the second window only receives the changed parameters.
This information also applies to a trader who is logged onto more than one workstation.
To activate or deactivate multiple Strikes or Expirations:
1. Right-click anywhere in one of the Quote columns (BQQ, BQP, Quote, AQQ, or AQP) to access
the context menu.
2. Click Select to choose which strikes/expirations to activate/deactivate. These are your selections:
l All: All strikes/expirations are selected.
l Calls: Only calls are selected.
l Puts: Only puts are selected.
l 2-Sided Mkts: Only 2-sided markets are selected.
l Last Prc: Only strikes/expirations with a last price are selected.
3. From the context menu, click Activate or Deactivate.
4. Click outside the context menu to exit.
You successfully activated or deactivated multiple Strikes or Expirations.
Deleting Mass or Individual Quotes
Follow these procedures to delete quotes:
l Deleting all quotes in the market
l Deleting a single quote
To delete all quotes in the market:
Click Delete to delete all quotes from the market.
You successfully deleted all quotes from the market.
To delete a single quote:
Uncheck the Quote column box of the strike/expiration.
This deactivates the strike/expiration and deletes the quote.
You successfully deleted a single quote. Click to select the Quote column box to re-activate the
strike/expiration.
X_TRADER® User Manual
Trading Technologies International, Inc. Proprietary and Confidential Information
- 235 -
Chapter 6
Disabling Quoting
Follow these procedures to disable quoting:
l Disabling quoting for a single window
l Disabling quoting as a feature
To disable quoting for a single window:
1. Right-click anywhere in the Market Grid to access the context menu.
Note: If Click Trading is enabled, do not click in the Bid/Ask price columns.
If quoting is on, a check mark appears next to Show in the Quoting submenu.
2. Click Show.
The quoting bar and additional columns disappear from the Market Grid.
You have successfully disabled quoting for a single window.
To disable quoting as a feature:
1. From the Control Panel, click the Settings menu and choose Properties.
The Properties dialog box opens with the Trading tab displayed by default.
2. Click to uncheck the Quoting box to disable quoting.
You successfully disabled quoting as a feature in X_TRADER.
Status of Quotes at X_TRADER Shutdown
The status of working orders at shutdown depends on how X_TRADER is shutdown.
l Normal Shutdown: If you exit X_TRADER normally, working orders remain working. The exception is Autospreader and Autotrader. Their working orders delete when
you shutdown X_TRADER.
l
Abnormal Shutdown: When X_TRADER experiences an abnormal shutdown, live
quotes cannot be pulled from the market. Since quoting data is tracked on the local
workstation, there is no record of active quotes. Since the quotes remain active in the
market, they may unknowingly fill.
Tip: If this occurs, restart X_TRADER as soon as possible and click Delete from the
quoting Market window. This pulls all live quotes from the market.
- 236 -
X_TRADER® User Manual
Trading Technologies International, Inc.
Market Window Overview
Trading Eurodollar Options
The following changes were made to X_TRADER to support Eurodollar options:
l Market Grid changes
l Request For Quote changes
Market Grid Changes
Four new columns were added in the Market Grid. They are hidden by default:
l IndBidQty: Best indicative Bid Quantity
l IndAskQty: Best indicative Ask Quantity
l IndBidPrc: Best indicative Bid Price
l IndAskPrc: Best indicative Ask Price
Note: The prices in these columns are not directly tradable. They show an approximation of
the tradable prices.
Request For Quote (RFQ) Window
Two new fields appear in the RFQ window:
l Side: Determines what kind of trade you are requesting the quote for. Options are:
Buy, Sell, Both
l
Ind/Tradable: States whether the quote being sent is indicative or tradable.
X_TRADER® User Manual
Trading Technologies International, Inc. Proprietary and Confidential Information
- 237 -
Chapter 6
Sequence of Events
Trading Eurodollar Options follows this sequence of events:
l Market Makers supply indicative bids and indicative offers whose prices display in
new indicative columns in the Market Grid. These prices are not tradable, rather, they
show an approximation of the tradable price.
Note: If you want an indicative price not shown, send an RFQ for an indicative
price.
l
l
l
You send out an RFQ for a tradable price on any commodity.
Note: Commodities do not have to already have an indicative price to request a
tradable price.
Market Maker supplies a tradable price that appears in the Bid Price and Ask Price columns like any other contract in X_TRADER.
You decide whether to make the trade.
To trade Eurodollar Options:
1. Log on to CME.
2. Enter Eurodollar Options contracts into the Market Grid.
3. Right-click the Market Grid and click Select Columns.
4. Click to select: IndBidQty, IndBidPrc, IndAskPrc, IndAskQty
Indicative prices and quantities appear in the Market Grid.
5.
6.
7.
8.
9.
10.
Right-click the contract you want to get a tradable price on.
Click Send RFQ.
In the Qty field, enter a quantity you want to get a tradable price on.
In the Side field, click the kind of trade you want tradable prices on: Buy, Sell or Both Sides
In the Ind/Tradable field, click Tradable.
Click Send.
A tradable price will be appear in the Bid Price or Ask Price columns on the Market Grid.
11. Execute the trade using the Market Grid.
You successfully traded Eurodollar Options.
- 238 -
X_TRADER® User Manual
Trading Technologies International, Inc.
Market Window Overview
Strategies Overview
Strategies are synthetic spread instruments where the legs are options, futures, or spreads. Strategies
are created on the exchange and are exchange-traded instruments. The price differential between the
legs is guaranteed.
Notes:
l When enabled, the Hide New Contracts property blocks new strategies from automatically appearing in the Market Grid when they are released. Enable via the Trading
tab on the Properties menu.
l When creating volatility strategies, do not assume a sign on the delta. You must include
the sign when creating this strategy.
The sign of the delta indicates whether you are buying or selling the underlying. +
Buying / - Selling. Delta in this context acts as a hedge ratio and declares the number of
futures that must be bought (or sold) to offset the risk of the options position.
Follow these procedures to manage Spread Strategies:
l Creating a New Strategy
l Setting Outright or Spread Prices
l Trading with a Strategy
l Adding a Strategy to the Market Window
l Renaming an Existing Strategy
l Recreating a Strategy
l Amending Strategies
l Deleting a Created Spread or Strategy
X_TRADER® User Manual
Trading Technologies International, Inc. Proprietary and Confidential Information
- 239 -
Chapter 6
Created Outrights and X_TRADER
The LIFFE exchange lets you create new outrights. In other words, you can create a new
strike/expiration. Although X_TRADER supports spontaneous display of newly created
outrights as they occur in real time, you cannot create outrights in X_TRADER.
SFE Custom Market Strategies
When creating a strategy for the Sydney Futures (SFE), a new strategy called Custom
Market appears on the Create Strategy window. As you add SFE contracts to the legs in
your strategy, a Price column appears. You must add prices to each leg in the strategy prior
to creating the strategy.
- 240 -
X_TRADER® User Manual
Trading Technologies International, Inc.
Market Window Overview
Creating a New Strategy
To create a new spread:
1. Right-click the Market Grid to access the context menu, and click Create Strategy.
- or From the Control Panel, click the Window menu and choose Create Strategy.
- or -
2.
3.
4.
5.
From the Control Panel, click the
icon.
The Create Strategy dialog box opens.
Click the down arrow in the middle of the window and select a strategy type.
Refer to the exchange specific System Admin Manual for strategy definitions.
In the top left section, click the + sign to open the exchange folders and select an instrument.
The instrument marks with a check and the available contract months display to the right.
Double-click a contract month to add contracts one leg at a time.
- or Click the Add or Add All to add the contract months.
Edit the spread data as appropriate.
l Click B/S to toggle between Buy and Sell.
l Change the Qty field per leg where permitted.
l To remove a leg, click the number under the Leg column and click Remove.
Note: If you are creating a strategy for SFE, you must add a price to each leg in the Price column.
6. Repeat steps 2-5 adding as many legs as you want.
7. In the Strategy Name field, type an alias.
Note: If you leave this box blank, the name will be the spread type followed by the ratio and leg
expirations.
8. Click Create.
If the exchange accepts the strategy, the spread appears in the Existing Strategies section, as well
as, Market Explorer.
The Audit Trail window also displays confirmation messages. If the strategy creation fails, the
Audit Trail window displays an error message. A Successful message means the strategy is
validated by the TT Gateway.
You successfully created a new strategy.
X_TRADER® User Manual
Trading Technologies International, Inc. Proprietary and Confidential Information
- 241 -
Chapter 6
Adding a Strategy to the Market Window
Once the exchange accepts a strategy you created, the spread appears in the Existing
Strategies section, as well as, Market Explorer. You add the strategy to the Market window
just like you add any other instrument.
Refer to Populating Windows with Contracts on page 168.
Note: Strategies highlight in yellow for three seconds when they appear in the Market
window.
Trading a Spread or Strategy
There is no difference to trading the strategies you create and those published by the
exchange. You select the Spread product type from Market Explorer and open it in the same
Market window.
The strategy name you entered appears in the Product column. If you did not enter a
personalized name, the default name is the spread type, spread ratio, expiration.
Note: As always, refer to the exchange’s market rules for trading information specific to that
exchange.
Trading Strategies with a Maximum Limits
If your trading environment uses Guardian Pre-execution Risk Management (Credit
Controls), the Maximum Order Quantity limit, Maximum Position limit, and Trade Out
fields impact trading in the following manner:
l Each leg of the strategy is subject to your quantity and position limits.
Example 1: You place a buy order for 15 GE Mar08 – Jun08 Calendar spread.
According to Spread Risk controls, you would be long 15 Mar08 GE and short 15
Jun08 GE. If your Maximum Position is 20, you could only buy 5 more Mar08 GE,
or sell 5 more Jun08 GE.
l
You can only exceed your quantity limit if your Trade Out designation is set to yes.
Example 2: Assuming your position is long 20 Mar08 GE and short -20 Jun08 GE, you place
an order for 20 GE Jun08 – Mar08.
l
l
If your Maximum Order Quantity is 15 and Trade Out is set to no, this
order is rejected.
If your Maximum Order Quantity is 15 and Trade Out is set to yes, this
order is accepted.
- 242 -
X_TRADER® User Manual
Trading Technologies International, Inc.
Market Window Overview
Renaming an Existing Strategy
In addition to the procedure below, you can rename a strategy in the Create Strategy
window, or create a new strategy based upon the existing one. Refer to Amending a
Strategy on page 244.
To rename an existing strategy:
1. In the Market Grid Product column double-click the spread name.
- or Right-click a cell in the spread row to access the context menu and click Name Product.
2. Enter the new spread name, and click OK.
To revert to the original name (spread type, ratio, legs expirations) click Restore.
You successfully renamed an existing strategy.
Recreating a Spread Strategy
You can use the Create Strategy window to recreate strategies saved in a workspace.
To recreate a strategy:
1. Open a workspace with a previously created strategy.
2. From the Control Panel, click the
icon.
The Create Strategy dialog box opens.
3. In the Strategy Name list, at the bottom of the screen, click the strategy you want to recreate.
Note: To select multiple spread strategies, press and hold the CTRL key and continue clicking spread
strategies. Then, release the CTRL key.
4. Click the Re-Create button.
You successfully recreated a strategy.
X_TRADER® User Manual
Trading Technologies International, Inc. Proprietary and Confidential Information
- 243 -
Chapter 6
Amending a Strategy
You can change your existing strategies and either replace them or create a new strategy
based on an existing one.
To change an existing strategy:
1. From the Control Panel, click the
icon.
2. In the Existing Strategies section, click the name of an existing strategy.
The attributes of the strategy appear and are editable.
3. Change the attributes, including the designated legs, as needed.
4. If you want to preserve the old strategy, change the Strategy Name field.
- or If you want to replace the existing strategy, do not change the Strategy Name field.
5. Click Create.
You successfully changed an existing strategy.
Deleting an Existing Strategy
To delete an existing strategy:
1. Right-click the Market Grid to access the context menu, and click Create Strategy.
- or From the Control Panel, click the Window menu and choose Create Strategy.
- or From the Control Panel, click the
icon.
The Create Strategy dialog box opens.
2. From the Existing Strategies section, click the name of strategy.
The legs of the selected spread name display.
3. Click Delete.
You successfully deleted an existing strategy.
- 244 -
X_TRADER® User Manual
Trading Technologies International, Inc.
CHAPTER 7
MD Trader® Overview
Note: MD Trader is protected by U.S. Patents Numbers 6,766,304 and 6,772,132.
MD Traderdynamically displays the market depth for a product. It lets you quickly buy or sell products
across the depth using one click of the mouse.
This section breaks into the following
categories:
l Populating MD Trader on page
250
l Using the MD Trader Context
Menu on page 252
l Using MD Trader on page 253
l Setting MD Trader Properties on
page 260
l Customizing MD Trader on page
273
l Keyboard Trading in MD
Trader on page 279
To open MD Trader from the
Control Panel:
From the Control Panel, click the
Window menu and choose MD
Trader.
- or From the Control Panel, click the
icon.
You successfully opened MD Trader.
X_TRADER® User Manual
Trading Technologies International, Inc. Proprietary and Confidential Information
- 245 -
Chapter 7
MD Trader Field Descriptions
The MD Trader window maintains default settings that can be modified in its Properties menu.
Enable the Show Tooltips property to see a small text description of certain fields when you hover
the cursor over them.
Tip: Although certain columns
and options boxes do not appear in
the MD Trader window by
default, for illustration purposes, this
diagram displays all available
options and columns.
Note: MD Trader is protected by
U.S. Patents Numbers 6,766,304
and 6,772,132.
Property
System Clock
Description
Displays the current time according to your workstation.
Net Change
Displays the net changes. Net change is the difference between the last traded price and
- 246 -
X_TRADER® User Manual
Trading Technologies International, Inc.
MD Trader® Overview
Property
Description
the settlement price.
Customer List
Let you select any customer to trade for from the customer list.
Total Contract Displays the total volume traded for that contract.
Volume
Net Position
Displays your net position.
Click the Net Position field to trade out your position. This automatically populates the
Order Entry field with your net position.
Order Quantity Indicates the order quantity sent to market. After you submit the first trade of the day,
this field populates with the value you place in the Default Quantity field.
1 / 10 / 50 / 5
/ 20 / 100
Preset order quantity buttons. To customize a pre-set order quantity, right-click a button.
Enter a value using the keyboard, and press Enter.
CLR
Clears the Order Quantity field.
Default Order
Quantity
Populates the Order Quantity field after each trade with the value entered in this field.
SL & SM
Flags your next order as a Stop Limit or Stop Market order.
Access the MD Trader Properties menu from the context menu to add more order type
buttons.
Del All
Deletes all working, held and stop orders for this series of contracts.
This feature behaves differently for an exchange trader versus a proxy (TTORD) trader:
Delete n (red)
l
If an exchange trader uses this feature, all working for that contract for all sponsored proxy traders are deleted.
l
If a TTORD trader attempts to use this feature, it converts one message into to
multiple individual delete requests by the client application to prevent a trader
from deleting the exchange trader’s working orders (for that contract).
Deletes working sells (indicating the number of working sells).
Delete n (blue) Deletes working buys (indicating the number of working buys)
Price Consolidation
Slider
Consolidates price depth in the Price column. Slide it to the right to consolidate price
levels. Slide it to the left to flatten your price depth.
Trade Out
Flattens your position.
Refer to Trading Out of a Position on page 270.
When you use the Trade Out button, MD Trader deletes all working orders on both
sides of the market and sends an order that removes you from your position, long or
short, regardless of your credit limit.
Column 2
Description
Working Quan- Displays all working quantities (W) and executions (S or B) for an order.
tity Column
Column 3
Estimated Position In Queue
(EPIQ)
Description
Indicates how many contracts are in front of your order at any given price.
Refer to Viewing your Estimated Position in Queue on page 272.
X_TRADER® User Manual
Trading Technologies International, Inc. Proprietary and Confidential Information
- 247 -
Chapter 7
Column 4
Bid Indicator
Column
Description
Indicates price settings when you enable the Bid indicator column property.
Column 5
Buy Column
Description
Displays current market bids, implied bid outright prices, implied bid spread prices and
implieds from implieds bid values.
You may paste a value in the column from a spreadsheet. The value of the spreadsheet
appears in a white box.
When you enable Keyboard Trading, a colored cursor appears in the Buy column,
indicating the current price level for an order. Refer to Enabling Keyboard Trading in
MD Trader on page 282.
Column 6
Price Column
Description
Indicates market price and depth. Arrows appear at the top and bottom of this column,
letting you page up or page down to view more prices:
l
To move the market view upwards, click the up arrow:
l
To move the market view downwards, click the down arrow:
A yellow line indicates the highest price of the day. A red line indicates the lowest price
of the day. A darkened background indicates the prices fall between the high and low.
Note: If no other price is available, but you still want to scroll up and down, use the
arrow keys on your keyboard.
Column 7
Sell Column
Description
Displays current market offers, implied offer outright prices, implied offer spread prices
and implied from implied offer values.
When you enable Keyboard Trading, a colored cursor appears in the Sell
column,indicating the current price level for an order. Refer to Enabling Keyboard
Trading in MD Trader on page 282.
Column 8
Ask Indicator
Column
Description
Indicates price settings when you enable the Ask indicator column property.
Column 9
Last Traded
Quantity Column
Description
Indicates the last traded quantity at that price. Also, you can configure this column to
display Volume by Price in bar, text, or tool tip format. Refer to MD Display Tab on
page 131.
Additional
Fields
Scroll Bar
Description
Market MidPoint Bar
Designates the midpoint of the inside market with a bold black line. Refer to Displaying
the Mid-Point of Inside Market on page 266.
You may paste a value in the column from a spreadsheet. The value of the spreadsheet
appears in a white box.
Indicates orders exist above or below what is visible in the window. Use a mouse to
scroll up or down MD Trader.
- 248 -
X_TRADER® User Manual
Trading Technologies International, Inc.
MD Trader® Overview
MD Trader Features
Some MD Trader features include:
l View in small mode. Keep all the functionality but take up less space on your desktop. Refer
to Displaying a Small MD Trader on page 265.
l Set so all floating order entry windows launched in the Market Grid, Spread Matrix, Butterfly
Condor Matrix, Autotrader, or Quote Board are MD Trader windows. Refer to Using Floating Order Entry on page 176 to enable.
l Rename the window using the titlebar context menu.
l Continually send Good to Cancel orders by enabling the GTC checkbox. Refer to MD
Trader Field Descriptions on page 246.
l Globally recenter all windows using the Recentering properties. When you recenter one MD
Trader window, all open MD Trader windows recenter as well. Refer to MD Display Tab
on page 131.
l Customize color coding, mouse wheel behavior, and sound notifications.
l Designate a second default quantity for your right-click trading.
Other options MD Trader displays include:
l Implied prices and quantities.
l Daily high and low trades.
l Contract's price range.
l Volume by price bar chart or text.
l Your customer profiles.
l Time and sales for quick view of recent price, quantity and time transaction details. Refer to
Adding Time and Sales on page 274.
X_TRADER® User Manual
Trading Technologies International, Inc. Proprietary and Confidential Information
- 249 -
Chapter 7
Populating MD Trader
Follow these procedures to populate MD Trader with contracts:
l Populating MD Trader from Market Explorer
l Populating MD Trader using drag-and-drop from Market Explorer
l Populating MD Trader using drag-and-drop from the Market Grid
l Populating MD Trader using the Market Grid context menu
To populate MD Trader from Market Explorer:
1. From the Control Panel, click the Window menu and choose Market Explorer.
- or -
2.
3.
4.
5.
6.
7.
8.
9.
From the Control Panel, click the
icon.
If you are logged into more than one exchange, in the Exchanges box, click the exchange whose
product you want to find.
In the Products section, click the down arrow and choose your search filter.
Type your search criteria in the available space.
The Instruments field updates as you type.
From the Instrument Type box, click to toggle between the displayed types.
Press and hold the CTRL key and click the products you want to open.
- or To open all products in the Instruments field, click the >> button and skip to step 7.
Click the > button to transfer the products from the Instruments box to the Selected Instruments
box.
Click the Function box in the upper right corner of the Market Explorer and choose MD Trader.
Click Start.
You successfully populated MD Trader from Market Explorer.
- 250 -
X_TRADER® User Manual
Trading Technologies International, Inc.
MD Trader® Overview
To populate MD Trader using drag-and-drop from Market Explorer:
1. If MD Trader is not open, use the Control Panel to open it.
2. From the Control Panel, click the Window menu and choose Market Explorer.
- or -
3.
4.
5.
6.
7.
8.
9.
10.
From the Control Panel, click the
icon.
If you are logged into more than one exchange, in the Exchanges box, click the exchange whose
product you want to find.
In the Products section, click the down arrow and choose your search filter.
Type your search criteria in the available space.
The Instruments field updates as you type.
From the Instrument Type box, click to toggle between the displayed types.
From the Instruments box, press and hold the CTRL key and click the products you want to open.
With the cursor over one of the selected products in the Instruments box, click and hold the mouse
button.
Continue holding the mouse button and drag the cursor to the open MD Trader.
When the cursor leaves the window, it changes to a circle with a diagonal line through it. When the
cursor enters a window, it changes to include a plus [ + ] sign.
Release the mouse button.
You successfully populated MD Trader using drag-and-drop from the Market Explorer.
To populate MD Trader using drag-and-drop from the Market Grid:
1. If MD Trader is not open, use the Control Panel to open it.
2. From an open Market Grid, click the product and hold the mouse button.
3. Continue holding the mouse button and drag the cursor to the open MD Trader.
When the cursor leaves the window, it changes to a circle with a diagonal line through it. When the
cursor enters a window, it changes to include a plus [ + ] sign.
4. When the cursor enters MD Trader, release the mouse button.
You successfully populated MD Trader using drag-and-drop from the Market Grid.
To populate MD Trader using the Market Grid context menu:
1. In the Market Grid, right-click the row of the product you want to open in MD Trader.
2. Click MD Trader.
You successfully populated MD Trader using the Market Grid context menu.
X_TRADER® User Manual
Trading Technologies International, Inc. Proprietary and Confidential Information
- 251 -
Chapter 7
Using the MD Trader Context Menu
Right-click MD Trader to access the context menu.
The available menu options include:
l
l
l
l
l
Find Control Panel: Displays the Control Panel.
Time & Sales: Adds the time and sales pane, showing price,
quantity and time columns.
TradeSounds: Enables sounds you associate with your trades
based on quantity.
Chart: Opens an X_STUDY chart for the selected contract.
Clone: Creates a duplicate MD Trader window.
Note: You cannot clone a Floating Order Entry window
displayed as MD Trader (has a yellow border).
l
l
l
l
l
Size to Fit: Resizes to show all viewable data.
Small Mode: Makes a smaller version of the window. When
enabled, this context menu changes to Standard Mode.
Properties: Opens the MD Properties menu.
Paste Link: Inserts a copied link from Excel into the Bid or
Ask indicator columns. Only available when data is copied.
Delete Link: Removes pasted link from the Bid or Ask indicator columns. Only available when a formula has been pasted.
Note: You cannot access the context menu from the following locations:
l Last Traded Quantity column
l Working order, bid or ask columns
l Delete Bids or Delete Offers quantity buttons
l
Numerical quantity buttons
- 252 -
X_TRADER® User Manual
Trading Technologies International, Inc.
MD Trader® Overview
Using MD Trader
Follow these procedures to use MD Trader:
l Recognizing the Average Price of Open Position
l Centering the Market
l Changing order quantity
l Changing working orders
l Deleting trades from the market
l Reading the net change indicator
l Selecting a customer profile
l Setting the default quantity
l Setting the trade quantity
l Setting Time In Force
l Reading the text and grid colors
Recognizing Average Price of Open Position
The average price of your open position is the average price of all your fills at different price
levels. You can use this price point to gauge whether trading out of your position will
provide you with a realized gain, loss, or scratch.
The value of the open position begins at the current open position for the product. If no open
position exists, then the average price equals zero.
The price of the open position calculates on the First In First Out (FIFO) method used for
filled orders. The first fills received are the first fills discarded when determining the average
price.
Note: When calculating average price, MD Trader rounds longs up and shorts down.
Centering the Market
Note: You can change the hotkeys associated with this command.
To center the market:
Press the Spacebar.
This centers the market in MD Trader, but does not affect the position or location of the buy or sell
side cursors, which are adjusted using a different set of mapped key strokes.
You successfully centered the market.
X_TRADER® User Manual
Trading Technologies International, Inc. Proprietary and Confidential Information
- 253 -
Chapter 7
Changing Order Quantity Using a Mouse
In MD Trader most users use the keyboard to enter order quantity amounts in the Order
Quantity field. However, you can also use the mouse wheel to change order quantity.
Using the mouse wheel to change the order quantity is subject to the following constraints:
l The restrictions established by Guardian firstly, and the maximum trade quantity
defined on the MD Trading tab secondarily.
l Orders increase or decreases by a quantity of ten.
Follow these procedures to change the order quantity using the mouse:
l Setting quantity change property
l Changing the order quantity using the mouse wheel
To set the quantity change property:
1. Open MD Trader.
2. Right-click anywhere in MD Trader and click Properties.
3. Click to select the Enable qty change on left/right click in edit fields option.
4. To set this property for all subsequently opened MD Trader windows, click to select Set as Global
default.
5. Click OK.
You successfully set the quantity change property.
To change order quantity using the mouse wheel:
1. Set the quantity change property.
2. Click in the Order Quantity box.
3. Move the mouse wheel to increase or decrease the order quantity.
You successfully changed order quantity using the mouse wheel.
- 254 -
X_TRADER® User Manual
Trading Technologies International, Inc.
MD Trader® Overview
Changing Working Orders
You can drag-and-drop working orders from one location to another in MD Trader.
To drag-and-drop a working order:
1. Right-click and continue holding down any price and working cell information in the Working
Quantity column.
Warning! Be very careful. A right-click and release deletes the order!
2. Drag and drop the price/quantity to the cell where you want to place the order and release the button.
You successfully dragged and dropped a working order.
Deleting Orders
Follow these procedures to delete your orders in MD Trader:
l Deleting all your orders
l Deleting a single order
l Deleting all bids or all offers
l Deleting orders using the working quantity column
To delete all your orders:
If you have the Delete all when LTQ column clicked property enabled, left or right-click on any
grid cell in the Last Traded Quantity column to delete all of your working bids and offers.
- or Click the Delete All button.
You successfully deleted all your orders.
To delete a single order:
To delete a single order, click its cell in the Working Quantity column.
You successfully deleted a single order.
To delete all Bids or all Offers:
If you have the Delete Bid/Ask property enabled:
l Click the blue Delete n to delete all workig bids.
l Click the red Delete n to delete all working offers.
You successfully deleted all Bids or all Offers.
X_TRADER® User Manual
Trading Technologies International, Inc. Proprietary and Confidential Information
- 255 -
Chapter 7
To delete the working quantity of all orders at a given price level:
Left or right click on any cell in the Working Quantity column.
If the working quantity is for 50 orders, for example, in five separate 10-lot orders, all five orders
delete. If there is only a single 50-lot order, this single order deletes.
You successfully deleted the working quantity of all orders at a given price level.
Reading the Net Change Indicator in MD Trader
In MD Trader the Net Change indicator is a small box immediately below the system
clock. It displays a net change in price for a traded product in the current day measured
against the previous day’s settlement price. If there is no settlement price, the closing price is
used.
The net change is color coded:
l
red for a negative change
l green for a positive change.
The unit of measure is in tick increments for the product.
Selecting a Customer Profile in MD Trader
Certain markets require a customer name be selected before any trades enter the market.
Example: CME requires it.
The customer profile is one of any in the Customer List. To manage the Customer List,
from the Control Panel, point to the Settings menu and click Customer Defaults.
To select a customer profile in MD Trader:
1. Click on the down arrow two cells beneath the clock ticker.
2. Click a customer name from the list.
You successfully selected a customer profile in MD Trader.
- 256 -
X_TRADER® User Manual
Trading Technologies International, Inc.
MD Trader® Overview
Setting the Default Quantity
In MD Trader setting the Default Quantity field is not required, but once you send an initial
order, the Order Quantity field continually resets itself to the default quantity.
Alternatively, you can clear the Default Quantity field and make the Order Quantity
persistent.
Default Qty field populates Order Qty field
Order Qty field persists
You set the maximum quantity for trades with the Maximum order quantity property.
However, the restrictions established by Guardian take precedence over this property.
To set the default quantity:
1. Click in the Default Quantity field under the CLR button.
2. Use the Delete key on the keyboard to clear the contents of the field.
3. Enter a default quantity.
- or Leave the Default Quantity field blank to have the Order Quantity field persist.
4. Press Enter to set the default quantity.
You successfully set the default quantity.
Setting the Trade Quantity
In MD Trader you must set a value in the Order Quantity field to trade. Once you send an
initial order, this field resets itself with the value in the Default Quantity field.
X_TRADER® User Manual
Trading Technologies International, Inc. Proprietary and Confidential Information
- 257 -
Chapter 7
Setting Time In Force
By default all orders sent in MD Trader are GTD (good until the end of the day). However,
you can override this setting in multiple ways.
l First, you can set each customer's default TIF using the Customer Defaults window.
This setting overrides the default MD Trader setting.
Set your Time in Force on the Customer Defaults window.
l
Second, you can set GTC as an Order Button in the MD Trading tab on the Properties menu. Then, you can select the button prior to placing your order in MD
Trader.
Click GTC before placing an order
Set GTC as an Order Button
- 258 -
X_TRADER® User Manual
Trading Technologies International, Inc.
MD Trader® Overview
Text and Grid Colors
Many of the grids, text boxes, and indicators in MD Trader are color coded to give you a
visual indication of market position and other information. The grid below summarizes the
default colors:
Column or Text Box
Working Quantity Column
Associated Colors
Foreground color: Gray
Working Sell Text: Red Font
Working Buy: Blue Font
Executed Sell: Blue Font
Executed Buy: Red Font
Net Position Box
Background color: Red or Green depending on
position.
Short Position: Red Font
Long Position: Green Font
Bid Column
Foreground color: Blue
Font Color: White
Sell Column
Foreground color: Red
Font Color: Black
Last Traded Quantity Column
Foreground color: Gray
Trade at decreased price: Red Font
Trade at increased price: Green Font
Trade at same price: White Font
You can customize many colors using the MD Color tab on the Properties menu. Among
the colors you can customize include:
l LTP Up, Down, or Unchanged
l Net Change Up, Down or Unchanged
l Net Position Flat, Long or Short
l Buy and Sell side columns
l Working Buys or Sells
l Best Bid and/or Ask
l Average Price of Long and/or Short Position
X_TRADER® User Manual
Trading Technologies International, Inc. Proprietary and Confidential Information
- 259 -
Chapter 7
Setting MD Trader Properties
You set properties for your local MD Trader window from the MD Properties menu, accessed
from the context menu.
Note: The Set as Global Default checkbox at the bottom of each tab applies properties to all
subsequently opened MD Trader windows. Alternatively, you can set global properties via the
Settings menu on the Control Panel.
Tab Name
MD Trading
Description
Set trading parameters for MD Trader, including maximum order quantity.
MD Display
Set display options for MD Trader, including EPIQ and volume at price.
MD Color
Customize color specific options and features for MD Trader.
MD Advanced Enable and define the User-Defined Price (UDP) column in MD Trader which, among
other things, allows you to trade in yield.
Use the properties menu to set these properties:
l Auto Centering
l Average Price Highlighting
l Recognizing the Average Price of Open Position
l
l
l
l
l
l
l
l
l
l
l
Consolidating Prices
Creating a User-Defined Price (UDP) Column
Displaying a Small MD Trader Window
Displaying the Mid-Point of Inside Market
Keeping MD Trader on Top
One-Click Trading
Placing Stop Orders
Setting the Maximum Trade Quantity
Trading Out a Position Using One-Click
Trading in Yield
Viewing your EPIQ
- 260 -
X_TRADER® User Manual
Trading Technologies International, Inc.
MD Trader® Overview
Auto Centering in MD Trader
When enabled, the auto-centering feature available in MD Trader automatically centers the
grid display.
Note: This feature works independently of the Participate in Global Recentering property.
Refer to MD Display Tab on page 131 for more information.
To set automatic grid centering:
1. Open MD Trader.
2.
3.
4.
5.
Right-click anywhere in MD Trader and click Properties.
Click the MD Display tab.
Click to select the Automatic Grid Centering option.
Choose the option that determines when MD Trader recenters:
l Every _ seconds
l Last Traded Price Within _ rows from top/bottom
l Inside Market Within _ rows from the top/bottom
6. If you want MD Trader to flash prior to recentering, click to select the Enable Grid Recenter
Warning.
7. To set this property for all subsequently opened MD Trader windows, click to select Set as Global
Default.
8. Click OK.
You successfully set Auto Grid Centering.
Average Price Highlighting
When enabled, the average price highlighting feature automatically displays the average
open price short and long. Enabled by default.
The average open price short highlights bold blue, while average open price long highlights
bold red.
Note: MD Trader average price rounds longs up and shorts down.
To set average price highlighting:
1. Open MD Trader.
2. Right-click anywhere in MD Trader and click Properties.
3. Click the MD Display tab.
4. Click to select the Display Average Price of Position option.
5. To set this property for all subsequently opened MD Trader windows, click to select Set as Global
Default.
6. Click OK.
You successfully set Average Price Highlighting.
X_TRADER® User Manual
Trading Technologies International, Inc. Proprietary and Confidential Information
- 261 -
Chapter 7
Consolidating Prices
Price consolidation condenses the display of price information in the static price column.
This lets you view a greater range of prices without clouding the total quantity available.
You can configure price consolidation to select an offset and an order distribution method
(join the bid or offer) that enters orders for the consolidated price rows.
To consolidate your prices:
1. Open MD Trader.
2. Right-click anywhere in MD Trader and click Properties.
3. Click the MD Display tab.
4. In the Price Consolidation section, type in the # Prices per line and Offset.
5. If you want to see the slider, click the Show Slider Control Increment and type in how many ticks
each increment stands for.
6. To set for all subsequently opened MD Trader windows, click to select Set as default.
7. Click OK.
You successfully consolidated your prices.
Example:
The right MD Trader window in the following screen shot displays a consolidated
price with the increment moved to 3.
Note: MD Trader is protected by U.S. Patents Numbers 6,766,304 and 6,772,132.
- 262 -
X_TRADER® User Manual
Trading Technologies International, Inc.
MD Trader® Overview
Creating a User-Defined Price Column
You can create a User-Defined Price (UDP) column in MD Trader using the MD
Advanced tab. This column appears to the left of the standard price column and can be set
to show the Net Change, Price As Yield, Yield-To-Maturity, or a custom pricing model
for a given contract.
In the following example, the Net Change is shown in decimals.
For help creating the User-Defined Price
column, see the MD Advanced Tab on page
138.
Note: When you enable both Price
Consolidation (on the MD Display tab) and the
Enable User-Defined Price Column (on the
MD Advanced tab), the prices consolidate first.
The consolidated price is then used to perform
any calculations.
X_TRADER® User Manual
Trading Technologies International, Inc. Proprietary and Confidential Information
- 263 -
Chapter 7
Invalid Calculations in the UDP
Because the Display Yield-To-Maturity setting is based on an algorithm, N/A values can
appear in the User-Defined Price column. This occurs when you set inaccurate values in the
property’s parameters for a given contract.
Fig 1. MD Advanced tab
Fig. 2 New User-Defined Price Column
- 264 -
X_TRADER® User Manual
Trading Technologies International, Inc.
MD Trader® Overview
Displaying a Small MD Trader
Follow these procedures to display a smaller MD Trader.
l Displaying a small MD Trader using the Properties menu
l Displaying a small MD Trader using the context menu
To display a small MD Trader using the Properties menu:
1. Right-click MD Trader and click Properties.
2. Click the MD Display tab.
3. Click to select the Use Small MD Trader as Default option.
4. To set this property for all subsequently opened MD Trader windows, click to select Set as Global
Default.
5. Click OK.
You successfully displayed a small MD Trader.
To display a small MD Trader using the context menu:
1. Open MD Trader.
2. Right-click to access the context menu.
3. Click Small Mode.
You successfully displayed a small MD Trader.
Titlebar Buttons
The Zoom and Market Explorer buttons do not automatically display in this smaller
version of the window. This lets you view the product and contract in the MD Trader
titlebar. If you want to view the titlebar buttons, go to the MD Display tab on the Properties
menu and disable the Hide Titlebar Buttons property. Alternatively, you can use the
Show/Hide Titlebar Buttons option on the context menu to show or hide the titlebar
buttons for that particular MD Trader.
X_TRADER® User Manual
Trading Technologies International, Inc. Proprietary and Confidential Information
- 265 -
Chapter 7
Displaying the Mid-Point of Inside Market
To make it easier to identify the mid-point of the inside market, MD Trader places a bold line
across the width of its grid (see the cursor below).
Here are some rules for mid-point placement:
l The mid-point line appears midway between the best bid and best offer in the market.
l If there is a one-sided market the mid-point line appears directly above or below the
best bid or offer in the market, respectively.
l If there is no market, then the line appears at the last trade price.
l If the number of price rows (or ticks) between the best bid and best offer is an odd
number, then the mid-point line appears in the upper cell of the middle value.
l If the number of price rows is an even value (or zero), then the mid-point appears
between the middle values.
To display the mid-point of the inside market:
1. Open MD Trader.
2. Right-click anywhere in MD Trader and click Properties.
3. Click the MD Display tab.
4. Click to select the Highlight Midpoint of Last Recenter option.
5. To set for all subsequently opened MD Trader windows, click to select Set as Global Default.
6. Click OK.
You successfully displayed the mid-point of the inside market.
Keeping MD Trader on Top
MD Trader has a property in the MD Display tab that serves to keep the MD Trader always
on top of other X_TRADER windows on the desktop.
To enable the on top feature:
1. Open MD Trader.
2. Right-click anywhere in MD Trader and click Properties.
3. Click the MD Display tab.
4. Click to select the Keep MD Trader on Top option.
5. To set for all subsequently opened MD Trader windows, click to select Set as Global Default.
6. Click OK.
You successfully enabled the on top feature.
- 266 -
X_TRADER® User Manual
Trading Technologies International, Inc.
MD Trader® Overview
One-Click Trading with MD Trader
MD Trader lets you buy or sell products using one click of the mouse. It offers a trader the
ability to one-click trade across the depth of a market for either a buy or sell order. The grid
format dynamically displays the market depth for a given product, and lets you enter orders
quickly by simply clicking in specific cells of the grid.
Follow these procedures to use one-click trading with MD Trader:
l Setting one-click trading
l Using one-click trading with MD Trader
To set one-click trading:
1. Open MD Trader.
2. Right-click anywhere in MD Trader and click Properties.
3. In the Order Parameter section, enter a Maximum Order Quantity.
4. To set this property for all subsequently opened MD Trader windows, click to select Set as Global
Default.
5. Click OK.
You successfully set one-click trading.
To use one-click trading with MD Trader:
1. Set one-click trading.
2. Open MD Trader.
3. Select a customer profile.
4. Enter an order quantity.
5. Refer to the tables below to perform one-click trading:
Left-click in the Buy or Ask columns
Immediately sends a buy or sell order to the market. The quantity field dictates the quantity for the
order. The row you click dictates the price.
To...
Buy
Left-click...
The Buy column.
Market Result...
If the cell does not have bid quantities and the adjacent
Sell column has offer quantities, you are lifting the ask.
If the cell has bid quantities, you are joining the bid.
Sell
The Sell column.
If the cell does not have offer quantities and the adjacent
Buy column has bid quantities, you are hitting the bid.
If the cell has offer quantities, you are joining offer.
X_TRADER® User Manual
Trading Technologies International, Inc. Proprietary and Confidential Information
- 267 -
Chapter 7
Right-click in the Buy or Ask columns
Immediately sends a sweeping buy or sell order to the market. The row you click dictates the price.
To...
Buy
Right-click...
The Buy column.
Market Result...
Sends in a buy for as many contracts as exist from the
best ask price up to that price level.
Sell
The Sell column.
Sends in a sell for as many contracts as exist from the best
bid price down to that price level.
If you right-click a cell populated with either a bid or offer, no orders are placed.
You successfully used one-click trading with MD Trader.
Placing Stop Orders
MD Trader supports the Stop Market and Limit order types. In the case of the Stop Limit
order, you also set the number of ticks from the stop entry price. Enable Stop orders in the
MD Trading tab.
Follow these procedures to place Stop orders in MD Trader:
l Enabling the Stop Market feature
l Enabling the Stop Limit feature
l Setting a Stop Market Order
l Setting a Stop Limit Order
To enable the Stop Market feature:
1. Right-click in the MD Trader window to open the context menu and click Properties.
2. Click the MD Trading tab.
3. In the Enable Order Types section, click to select the Stop Market Orders option.
4. To set for all subsequently opened MD Trader windows, click to select Set as Global Default.
5. Click OK to return to MD Trader.
A button labeled SM appears in MD Trader.
You successfully enabled the Stop Market feature.
- 268 -
X_TRADER® User Manual
Trading Technologies International, Inc.
MD Trader® Overview
To enable the Stop Limit feature:
1. To enable the Stop Limit feature locally, right-click in the MD Trader window to open the context
menu and click Properties.
2. Click the MD Trading tab.
3. In the Enable Order Types section, click to select the Stop Limit Orders option.
4. If you want to set the stop limit price a set number of ticks from the stop entry price, type the number
of ticks in the Set Stop Limit Price field.
5. To set for all subsequently opened MD Trader window, click to select Set as Global Default.
6. Click OK to return to MD Trader.
A button labeled SL appears on MD Trader.
You successfully enabled the Stop Limit feature.
To set a stop market order:
1. Select a quantity to go into the market.
2. Click the SM button in MD Trader.
The cursor and SL button turns yellow.
3. Move the yellow cursor to the price Buy or Sell column opposite the tick value where you want to
put the stop.
4. Click the mouse button.
The stop is placed and indicated in the Working Quantity column as a stop.
You successfully set a stop market order.
To set a stop limit order:
1. Select a quantity to go into the market.
2. Click the SL button in MD Trader.
The cursor and SL button turns yellow.
3. Move the yellow cursor to the price Buy or Sell column opposite the tick value where you want to
put the stop.
4. Click the mouse button.
The stop is placed and indicated in the Working Quantity column as a stop.
You successfully set a stop limit order.
X_TRADER® User Manual
Trading Technologies International, Inc. Proprietary and Confidential Information
- 269 -
Chapter 7
Setting the Maximum Trade Quantity
In MD Trader you must set a value in the Maximum order quantity property on the MD
Trading tab before you trade. This quantity prevents you from entering an order larger than
your limit. For example, if the maximum trade quantity is 50, you are not permitted to sweep
the market with an order quantity of 300.
Note: The following are exceptions to the maximum trade quantity setting:
l Enabling TradeOut
l
Restrictions established by Guardian
To set the maximum trade quantity:
1. Open MD Trader.
2. Right-click anywhere in MD Trader and click Properties.
3. In the Order Parameter section, type a maximum order quantity.
4. To set this property for all subsequently opened MD Trader windows, click to select Set as
Global Default.
5. Click OK.
You successfully set the maximum trade quantity.
Trading Out of a Position
The Trade Out feature lets you flatten your position. Before MD Trader submits an offsetting
order, it sends delete requests for all working orders for that contract. You need to send a
second tradeout request if an existing working order fills. You can trade out of a position
using a Limit order or a Market order.
If you choose to trade out using a Limit order, MD Trader determines your position (long or
short) and calculates the ticks to skew off the inside market price at which your position is
flattened. If long, it evaluates the bid price. If short, it evaluates the ask price.
Assigning a specific number of ticks to skew ensures your order, once entered, (not
necessarily executed) is only a pre-determined distance from the inside market. When you
click the TradeOut button, you enter a Limit order based on the current price. If the market
moves and the offsetting price is not available, your limit order remains working at the price
you entered it.
Follow these procedures to trade out of a position:
l Setting the Tradeout method locally
l Trading out of a position using the mouse
l Trading out of a position using the keyboard
- 270 -
X_TRADER® User Manual
Trading Technologies International, Inc.
MD Trader® Overview
To set the Tradeout method:
1. Open MD Trader.
2. Right-click anywhere in MD Trader and click Properties.
3. In the TradeOut Method section, choose your trade out method:
l Using LIMIT Order <n#> of ticks to skew
l Using MARKET Order
4. Click the MD Display tab.
5. Click to select the Show TradeOut button.
The TradeOut button automatically displays in MD Trader.
6. To set this property for all subsequently opened MD Trader windows, click to select Set as Global
Default.
7. Click OK.
You successfully set the Tradeout method.
To trade out of a position using your mouse:
1. Set your Tradeout method locally or globally.
2. Click the TradeOut button in MD Trader.
Before sending the offsetting order, MD Trader sends delete requests for all working orders for that
contract. MD Trader then sends an order that allows you to exit from your position regardless of
your credit limit.
You successfully traded out of a position using the mouse.
To trade out of a position using the keyboard:
1. Set your tradeout method locally or globally.
2. Press the Shift+T key.
Before sending the offsetting order, MD Trader sends delete requests for all working orders for that
contract. MD Trader then sends an order that allows you to exit from your position regardless of
your credit limit.
You successfully traded out of a position using the keyboard.
X_TRADER® User Manual
Trading Technologies International, Inc. Proprietary and Confidential Information
- 271 -
Chapter 7
Viewing your Estimated Position in Queue
You can view your Estimated Position in Queue (EPIQ) in MD Trader and the Market Grid.
EPIQ estimates how many contracts are in front of your order at any given price.
l If your EPIQ is 10, there are approximately 10 contracts ahead of your order.
l If 3 contracts trade, your EPIQ changes to 7.
l If your EPIQ is 0, your order should be the next to fill.
Note: EPIQ is not sent from the exchanges. X_TRADER calculates an EPIQ based on
quantity of trades occurring in front of the order, and does not account for cancelled orders
nor pro-rata allocations.
MD Trader
In MD Trader the EPIQ is a set of columns to the left
of the buy quantities.
To display the EPIQ, click to select the property on
the MD Display tab.
Color Codes
In MD Trader, the EPIQ number is color-coded to give you even more information about
your order.
l
l
l
By default your EPIQ number is black.
If your order is the inside market, the color turns white.
If your order is the first in the queue, the color turns yellow.
You can configure EPIQ colors on the MD Color tab.
- 272 -
X_TRADER® User Manual
Trading Technologies International, Inc.
MD Trader® Overview
Customizing MD Trader
To customize MD Trader, perform these procedures:
l Adding Sound
l Adding Time and Sales
l Customizing the Default Quantity Buttons
l Managing Links
l Moving Grid Columns
l Resizing the MD Trader Grid
l Zooming In and Out
Adding Sound to MD Trader
If your computer is equipped with a sound card and speakers, you can set MD Trader to
make sounds. There are two property windows that control the sounds you can use:
l The Sounds tab
l The TradeSounds dialog box
The Sounds tab controls what you hear when you left or right-click. These sounds are heard
when you click on the following columns:
l Buy Side
l Sell Side
l Working Quantity
l Last Traded Quantity
Other sounds associated with X_TRADER are also set on the Sounds tab.
The TradeSounds dialog box controls what you hear when trade updates come from an
exchange. They are completely configurable and can be set for up to five quantity levels.
X_TRADER® User Manual
Trading Technologies International, Inc. Proprietary and Confidential Information
- 273 -
Chapter 7
Adding Time and Sales
You can add a time and sales pane to MD Trader to show the price, quantity and time of the
latest trades. Initially, when you add time and sales, the pane is blank. However, as trades
occur, the pane begins to scroll like the Time and Sales window, with the most recent trades
at the top.
Note: The time and sales pane is not available for display in Autospreader.
Follow these procedures to use time and sales in MD Trader:
l
l
l
l
Adding time and sales to MD Trader
Showing the time column
Removing time and sales from MD Trader
Moving the time and sales columns
1. To show time and sales, select Time
& Sales from the context menu.
2. The time and sales pane shows: price,
quantity and time in that order.
3. The time column is initially hidden.
(Right-click to Show/Hide columns.)
4. Time is to the millisecond.
(hh:mm:ss.mmm)
5. Blue text means the ask was lifted.
6. Red text means the bid was hit.
To add time and sales to MD Trader:
1. Right-click an open MD Trader window.
2. Click Time & Sales.
You successfully added time and sales to MD Trader.
- 274 -
X_TRADER® User Manual
Trading Technologies International, Inc.
MD Trader® Overview
To show the Time column:
1. Right-click the time and sales pane and click Select Columns.
2. Click to select the Time column.
3. Click OK.
You successfully shown the Time column.
To remove time and sales from MD Trader:
Right-click an open MD Trader window and deselect Time & Sales.
- or Right-click the Time and Sales pane and click Close.
You successfully removed time and sales from MD Trader.
To move the time and sales column:
Note: You cannot rearrange the order of the time and sales columns (price, quantity, time).
1. Click and hold a time and sales column header.
2. Drag the column header to either the left or right side of the MD Trader window.
3. Release the mouse button.
You successfully moved the time and sales column.
Customizing the Default Quantity Buttons in MD Trader
You can customize the preset order quantity buttons in MD Trader. These buttons are stored
as part of a workspace.
To define a custom preset order quantity:
1. Right-click the Preset Order Quantity button.
2. Type a value using the keyboard.
3. Press Enter.
You successfully defined a custom preset order quantity.
X_TRADER® User Manual
Trading Technologies International, Inc. Proprietary and Confidential Information
- 275 -
Chapter 7
Managing Links in MD Trader
You can paste data from an Excel spreadsheet into the indicator columns in MD Trader. When a
price matches the pasted value in an indicator column, a marker appears next to this price value.
Using this method, you can indicate price points based on a proprietary algorithm. For example, you
can paste the Last Traded Price for a product from X_TRADER to a spreadsheet with a proprietary
formula. After the formula produces a new price value, you can paste that value into the indicator
columns in MD Trader. This can help you make buy and sell decisions.
Links are retained if you hide the indicator columns. They also save with your workspaces.
Tip: Shade your cell in Excel so you can better see the results in MD Trader. This is very useful
when using the laser line feature.
Follow these procedures to manage links in MD Trader:
l Displaying the indicator columns
l Pasting a link from Excel into MD Trader
l Deleting a link from MD Trader
To display the indicator columns:
1. Right-click MD Trader to open the context menu and click Properties.
2. Click the MD Display tab.
3. In the Bid/Ask display section, click to select Bid indicator column and Ask indicator column.
4. To set for all subsequently opened MD Trader windows, click to select Set as Global Default.
5. Click OK.
You successfully displayed the indicator columns.
To paste a link from Excel into MD Trader:
1. In Excel, right-click the cell you wish to copy.
2. Click Copy.
3. Right-click in MD Trader to access the context menu.
The context menu appears.
4. Click Paste Link.
An indicator appears opposite the price level of the pasted value.
You successfully pasted a link from Excel into MD Trader.
To delete a link from MD Trader:
1. Right-click in MD Trader to access the context menu.
2. Click Delete Link.
The indicator is removed.
You successfully deleted a link from MD Trader.
- 276 -
X_TRADER® User Manual
Trading Technologies International, Inc.
MD Trader® Overview
Using the Laser Line
When you paste a link from Excel into MD Trader, the indicator columns shade the color of
the cell in Excel. This shade indicates the approximate value of the link in relation to the MD
Trader Price column.
This functionality still exists, however it has been enhanced.
Now, when you have the indicator columns hidden, and you paste a link from Excel, a laser
line appears over the number in the Price column to indicate a realistic approximation of the
value of the link created in Excel.
Example:
In Excel we have two formulas saved. The values of which have the following attributes:
l A green shaded cell has a value of 112007
l An orange shaded cell has a value of 112003
With the indicator columns shown, you paste the respective
links in MD Trader, and get a green and orange shaded cell
indicating values in Excel rounding down closest to 112000
in the MD Trader Price column.
- or You hide the indicator columns, paste the respective links in
MD Trader, and the laser lines give direct indications of
where the values in Excel are in relation to the MD Trader
Price column.
To use the laser line indicator:
1. Create your formula or value in Excel.
2. In Excel, click the Format menu and choose Cells.
3. Click the Pattern tab.
4. Click the color you want to shade the cell and click OK.
5. Right-click the shaded cell and click Copy.
6. In MD Trader, if the indicator columns are shown, go to the next step.
- or In MD Trader, if the indicator columns are not shown, go Step 11.
7. Right-click MD Trader and click Properties.
8. Click the MD Display tab.
9. Click to de-select Bid indicator column and Ask indicator column.
10. Click OK.
11. Right-click MD Trader and click Paste Link.
You successfully used the laser line indicator.
X_TRADER® User Manual
Trading Technologies International, Inc. Proprietary and Confidential Information
- 277 -
Chapter 7
Moving Grid Columns
You can drag-and-drop the columns in MD Trader to a different locations in the grid.
To drag and drop columns to a different location in MD Trader:
1. Click the top of the column you want to move.
A box outline appears beneath the mouse pointer.
2. Click a second time and hold the mouse button on the column you want to move.
3. Move the column left or right to the desired position.
A red line indicates where the column is moving.
4. Release the mouse button.
The column moves to its new location.
You successfully moved columns to a different location in MD Trader.
Resizing the MD Trader Window
If you make MD Trader a smaller size using the mouse, it does not display a horizontal scroll
bar and your view of the depth is cut off on the right side.
Follow these procedures to resize MD Trader and maintain full view of the depth:
l Resizing MD Trader to fit the window
l Resizing the window to fit MD Trader
To resize the window to fit MD Trader:
Right-click MD Trader to access the context menu and click Size to Fit.
MD Trader expands to the proper size and removes the scroll bars.
You successfully resized the grid in MD Trader.
Using the Mouse to Control the Zoom Feature
To control the zoom using the mouse wheel:
1. Hold down the Ctrl key on the keyboard.
2. Depress and use the mouse wheel to zoom MD Trader in or out.
3. Release the Ctrl key to freeze the view in its current position.
You successfully controlled the zoom.
- 278 -
X_TRADER® User Manual
Trading Technologies International, Inc.
MD Trader® Overview
Keyboard Trading in MD Trader
In addition to click-trading in MD Trader using a mouse, you can use the keyboard to make trades.
Enabling keyboard trading provides an alternative for entering orders and does not disable the
mouse.
Follow these procedures to manage keyboard trading:
l Enabling Keyboard Trading
l Changing Hotkeys for MD Trader
The keyboard hotkeys in MD Trader break into two categories:
l Function Hotkeys
l Main Hotkeys
Function Hotkeys
The function hotkeys consist of the Esc and F keys at the top of your keyboard.
TT Default Map
Hotkey
F1
Command
Buy at the Offer
Description
Enter buy order at best offer
Shift+F1
Market Buy
Enter market buy order
F3
Better the Bid
Enter buy order one tick above the best bid
F4
Join the Bid
Enter buy order at best bid
Esc
Delete All
Delete all working orders
F5
Delete All Bids
Delete all bids
F6
Combo Join Bid and Offer
Enter both a buy order at best bid and a sell order at best offer
F7
Better the Bid and Offer
Enter a buy order one tick above the best bid and a sell order one
tick below the best offer
F8
Delete All Offers
Delete all offers
F9
Join the Offer
Enter sell order at best offer
F10
Better the Offer
Enter sell order one tick below the best offer
F12
Sell at the Bid
Enter sell order at best bid
Shift+F12 Market Sell
Enter market sell order
X_TRADER® User Manual
Trading Technologies International, Inc. Proprietary and Confidential Information
- 279 -
Chapter 7
Main Hotkeys
The main hotkeys are in the body of your keyboard.
TT Default Map
Hotkey
A
Command
Buy at Buy-Side Cursor
Description
Enter buy order at price of buy-side cursor
S
Delete Bid(s) at Buy-Side Cursor
Delete the working order(s) at price of buy-side cursor
Ctrl+A
Sweep Offers up to Buy-Side Cursor
Enter buy order(s) to sweep the market from inside market
up to price of buy-side cursor
D
Increase Buy-Side Cursor
Increase cursor one price level
C
Decrease Buy-Side Cursor
Decrease cursor one price level
E
Center Buy-Side Cursor
Move buy-side cursor to best bid price; if no bids, move
cursor to center of grid
Q
Bring Focus to Order Quantity Field
Apply focus to the Order Quantity field
P
Load Net Position in Order Quantity Field
Load the current net position into the Order Quantity
field
Spacebar
Center the Market
Center the grid on the inside market
Shift+T
Trade Out
Delete all working bids and offers and enter orders to offset position
- 280 -
X_TRADER® User Manual
Trading Technologies International, Inc.
MD Trader® Overview
Hotkey
;
Command
Sell at Sell-Side Cursor
Description
Enter sell order at price of sell-side cursor
L
Delete Sell(s) at Sell-Side Cursor
Delete the working order(s) at price of sell-side cursor
Ctrl+;
Sweep Bids Down to Sell-Side Cursor
Enter sell order(s) to sweep the market from inside market
down to price of sell-side cursor
K
Increase Sell-Side Cursor
Increase cursor one price level
M
Decrease Sell-Side Cursor
Decrease cursor one price level
I
Center Sell-Side Cursor
Move sell-side cursor to best offer price; if no offers,
move cursor to center of grid
Unrestricted Keyboard Functions
Certain keyboard functions can be used with or without enabling keyboard trading.
If you press a key specified below, MD Trader performs the related function:
If you press...
A numeral key
Then MD Trader...
Enters the order quantity in the Order Quantity field.
Note: This does not refer to the
number keypad.
The P key
Loads your current position in the Order Quantity field.
The Spacebar
Centers the grid.
The up arrow
Scrolls the grid up.
The down arrow
Scrolls the grid down.
The Page Up key
Pages up. You may no longer see available prices because it
paged up too far.
The Page Down key
Pages down. You may no longer see available prices because
it paged down too far.
X_TRADER® User Manual
Trading Technologies International, Inc. Proprietary and Confidential Information
- 281 -
Chapter 7
Enabling Keyboard Trading in MD Trader
Keyboard trading is disabled by default.
Notes:
l You do not need to enable the keyboard to perform some functions in MD
Trader. Refer to Unrestricted Keyboard Functions on page 281.
l For a map of MD Trader keyboard functions refer to Keyboard Trading in
MD Trader on page 279.
l
You can change the hotkey associated with mapped keys. Refer to Changing
Hotkeys in MD Trader on page 283.
Follow these procedures to enable keyboard trading:
l Enabling keyboard trading using the local context menu
l Enabling keyboard trading from the global Properties menu
To enable keyboard trading using the local context menu:
1. Open MD Trader.
2. Right-click anywhere in MD Trader and click Properties.
3. Click to select the Enable keyboard and function key trading option.
4. To set this property for all subsequently opened MD Trader windows, click to select Set as Global
Default.
5. Click OK.
You successfully enabled keyboard trading using the local context menu.
To enable keyboard trading from the global Properties menu:
1. From the Control Panel, click the Settings menu and choose Properties.
2. Click the Hotkeys tab.
3. In the Component section, click to select MD Trader.
4. Click OK.
You successfully enabled keyboard trading from the global Properties menu.
- 282 -
X_TRADER® User Manual
Trading Technologies International, Inc.
MD Trader® Overview
Changing Hotkeys in MD Trader
You can change the hotkeys associated with commands in MD Trader using the Hotkeys
tab on the Properties menu.
Note: You must enable keyboard trading to use the hotkey commands.
To change a hotkey:
1. From the Control Panel, click the Settings menu and choose Properties.
2. Click the Hotkeys tab.
3.
4.
5.
6.
7.
8.
In the Keyboard Layout field, click to select Custom.
In the Component section, click MD Trader.
In the Command section, click the command for which you would like to change the hotkey.
Click in the Press new shortcut key field.
Type your new hotkey.
Click Assign.
If the hotkey is already assigned to a different command, you are prompted.
You successfully changed a hotkey.
X_TRADER® User Manual
Trading Technologies International, Inc. Proprietary and Confidential Information
- 283 -
Chapter 7
Keyboard Procedures
Use the following procedures to trade using the keyboard in MD Trader:
l Entering a Buy Order
l Entering a Sell Order
l Entering the Order Quantity
l Deleting All Orders, Bids and Offers
l Centering the Market
l Loading the Net Position
l Sending a Market Order
l Setting the Limit Price
l Sweeping the Market
l Hitting the Bid
l Taking the Offer
l Dime the Offer
l Dime the Bid
l Join the Bid
l Join the Offer
l Combo Dime the Bid or Offer
l Combo Join the Bid and Offer
In addition, refer to Keyboard Trading in MD Trader on page 279 for a comprehensive
keyboard maps and descriptions.
Entering a Buy Order Using the Keyboard
In MD Trader once keyboard trading is enabled, you can enter a buy order using the
keyboard.
Note: You can change the hotkeys associated with these commands.
To enter a buy order:
1. Enable keyboard trading.
2. Press the D and C keys to select the desired limit price.
3. Press the Q key to focus keyboard entry on the Order Quantity field.
4. Type in the desired quantity of the buy order on the keypad.
5. Press the A key to send the buy order.
You successfully entered a buy order.
- 284 -
X_TRADER® User Manual
Trading Technologies International, Inc.
MD Trader® Overview
Entering a Sell Order Using the Keyboard
In MD Trader once keyboard trading is enabled, you can enter a sell order using the
keyboard.
Note: You can change the hotkeys associated with these commands.
To enter a sell order:
1. Enable keyboard trading.
2. Press the K and M keys to select the desired limit price.
3. Press the Q key to focus keyboard entry on the Order Quantity field.
4. Type in the desired quantity of the sell order on the keypad.
5. Press the ; key to send the sell order.
You successfully entered a sell order.
Enter the Order Quantity Using the Keyboard
In MD Trader once keyboard trading is enabled, you can enter the order quantity using the
keyboard.
To enter an order quantity into the Order Quantity field of MD Trader:
1. Enable keyboard trading.
2. Press a numeric key on the keyboard.
A cursor appears in the Order Quantity field.
3. Type the desired quantity.
4. Press Enter.
You successfully entered the order quantity using the keyboard.
Deleting All Orders, Working Bids, or Working Offers Using the Keyboard
In MD Trader once keyboard trading is enabled, you can delete all orders, working bids, or
working offers using the keyboard.
Note: You can change the hotkeys associated with these commands.
To Delete
All orders
Press
All working bids
Shift+V
All working offers
Shift+N
Shift+Esc
X_TRADER® User Manual
Trading Technologies International, Inc. Proprietary and Confidential Information
- 285 -
Chapter 7
Loading the Net Position in the Order Entry Field Using the Keyboard
In MD Trader once keyboard trading is enabled, you can load the net position in the Order
Entry field using the keyboard.
Note: You can change the hotkeys associated with these commands.
To load the Net Position in the Order Entry field:
1. Enable keyboard trading.
2. Press the P key.
The Order Entry field is populated with the net position (in order to go flat in the market).
You successfully loaded the net position in the Order Entry field.
Sending a Market Order Using the Keyboard
In MD Trader once keyboard trading is enabled, you can enter a market order using the
keyboard.
Note: You can change the hotkeys associated with these commands.
To send a market order:
1. Enable keyboard trading.
2. Press the Shift+F1 key.
The only time in force supported is a Good Till Day (GTD) order, and the only order restriction you
can use is Immediate or Cancel (IOC), available from the button in MD Trader. The quantity sold
would be based on the amount in the order quantity field or on the preset default order quantity.
You successfully sent a market order.
Setting the Limit Price Using the Keyboard
In MD Trader once keyboard trading is enabled, you can set the limit price (position of the
cursor) for either the buy or sell side with the following keys.
Note: You can change the hotkeys associated with these commands.
Key Action
E
Center buy side cursor
D
Increase buy side cursor
C
Decrease buy side cursor
I
Center sell side cursor
K
Increase sell side cursor
M
Decrease sell side cursor
- 286 -
X_TRADER® User Manual
Trading Technologies International, Inc.
MD Trader® Overview
Sweeping the Market Using the Keyboard
In MD Trader once keyboard trading is enabled, you can sweep all the buys or sells up to a
point set by the buy or sell side cursor using the keys listed below. How deep you can sweep
the market depends on the level of price depth set by the exchange.
Note: You can change the hotkeys associated with these commands.
To sweep the market up to a specified price point on the Buy side:
1. Use a combination of the D and C keys to set the position of the buy side cursor.
2. Use the combination of the Ctrl and A keys to sweep the offers up to the price level indicated by the
buy side cursor.
You successfully swept the sells in the market up to a specified price point.
To sweep the market up to a specified price point on the Sell side:
1. Use a combination of the K and M keys to set the position of the sell side cursor.
2. Use the combination of the Ctrl and :/; keys to sweep the bids up to the price level indicated by
the sell side cursor.
You successfully swept the sells in the market up to a specified price point.
Hitting the Bid Using the Keyboard
In MD Trader once keyboard trading is enabled, you can "hit the bid" using the keyboard.
Note: You can change the hotkeys associated with these commands.
To hit the Bid:
1. Enable keyboard trading.
2. Press the F12 key.
MD Trader enters a sell order at the current best bid in the market. The quantity sold is based on the
amount in the order quantity field or on the preset default order quantity.
You successfully hit the bid.
Taking the Offer Using the Keyboard
In MD Trader once keyboard trading is enabled, you can take the offer using the following
actions:
Note: You can change the hotkeys associated with these commands.
To take the offer:
Press the F1 key.
MD Trader enters a buy order at the current best offer in the market. The quantity sold is based on
the amount in the order quantity field or on the preset default order quantity.
You successfully took the offer.
X_TRADER® User Manual
Trading Technologies International, Inc. Proprietary and Confidential Information
- 287 -
Chapter 7
Dime the Offer Using the Keyboard
In MD Trader once keyboard trading is enabled, you can dime the offer using the keyboard.
Note: You can change the hotkeys associated with these commands.
To dime the offer:
1. Enable keyboard trading.
2. Press the F10 key.
MD Trader enters a sell order one tick below the current best offers in the market.
You successfully dimed the offer.
Dime the Bid Using the Keyboard
In MD Trader once keyboard trading is enabled, you can dime the bid using the keyboard.
Note: You can change the hotkeys associated with these commands.
To dime the bid:
1. Enable keyboard trading.
2. Press the F3 key.
MD Trader enters a buy order one tick above the current best bid in the market.
You successfully dimed the bid.
Join the Bid Using the Keyboard
In MD Trader once keyboard trading is enabled, you can join the bid using the keyboard.
Note: You can change the hotkeys associated with these commands.
To join the bid:
1. Enable keyboard trading.
2. Press the F4 key.
MD Trader enters a buy order at the current best bid in the market. The quantity sold is based on the
amount in the order quantity field or on the preset default order quantity.
You successfully joined the bid.
- 288 -
X_TRADER® User Manual
Trading Technologies International, Inc.
MD Trader® Overview
Join the Offer Using the Keyboard
In MD Trader once keyboard trading is enabled, you can join the offer using the keyboard.
Note: You can change the hotkeys associated with these commands.
To join the offer:
1. Enable keyboard trading locally or globally.
2. Press the F9 key.
MD Trader enters a sell order at the current best offer in the market. The quantity sold is based on
the traders current position or on the preset default order quantity.
You successfully joined the offer.
Combo Dime the Bid or Offer Using the Keyboard
In MD Trader once keyboard trading is enabled, you can combo dime the bid and offer.
Note: You can change the hotkeys associated with these commands.
Combo dime the bid or offer:
1. Enable keyboard trading.
2. Press the F7 key.
MD Trader enters a sell order one tick better than the current best offer in the market and a buy
order is sent one tick better than the current best bid price in the market. The quantity sold is based
on the amount in the order quantity field or on the preset default order quantity.
You successfully combo dimed the bid or offer.
Combo Join the Bid and Offer Using the Keyboard
In MD Trader once keyboard trading is enabled, you can combo join the bid and offer using
the keyboard.
Note: You can change the hotkeys associated with these commands.
Combo join the bid and offer:
1. Enable keyboard trading.
2. Press the F6 key.
MD Trader enters a sell order at the current best offer in the market and a buy order is sent at the
current best bid price in the market. The quantity sold is based on the amount in the order quantity
field or on the preset default order quantity.
You successfully combo joined the bid and offer.
X_TRADER® User Manual
Trading Technologies International, Inc. Proprietary and Confidential Information
- 289 -
Chapter 7
Game Pad Control in MD Trader
It is possible with keyboard functionality enabled to use a game pad control, which emulates
keyboard key presses. In effect, using a gamepad maps the buttons on the gamepad to
specific key strokes on the keyboard which, in turn, are mapped to specific MD Trader
functionality. The gamepad plugs into the keyboard port on the workstation.
Warning! Trading Technologies has tested gamepad functionality in connection with
keyboard mapping using a product by Suncom. Trading Technologies will not provide
instructions on how to set up the gamepad with a keyboard nor does the company support
users who do attempt to use this add-on in their trading. Traders wanting to use this
functionality are encouraged to contact the gamepad manufacturer for specific instructions on
how to connect this add-on to their system.
- 290 -
X_TRADER® User Manual
Trading Technologies International, Inc.
CHAPTER 8
Order Types
Order types are different ways of telling X_TRADER how you want your order to interact with the
market. Depending on your trading background, you might refer to order types as order restrictions or even
time in force. For clarity, we categorize order types as follows:
Order Type
Time in force
Market and Limit
Stops
Restrictions
Liffe Wholesale
Description
Length of time your order works in the market.
Types
Standard order designations.
Orders with a stop price.
Nearly all other order types.
Order types used to place wholesale orders.
l
Good til Day (GTD)
l
Good til Cancel (GTC)
l
Good til Date (Date)
l
Good in Session (GIS)
l
Market
l
Limit
l
Stop
l
Trailing Stop
l
BLO
l
IOC
l
IT
l
FOK
l
OCO
l
MOO
l
MOC
l
MLM
l
MTL
l
LOO
l
LOC
l
Eurex Block Orders
l
Vola Orders
l
Block
l
Basis
l
Against Actuals
l
Exchange For Swap
l
Flex Options
This chapter discusses order restrictions and stop orders. You manage their availability on the Order
Entry tab and MD Trading tab on the Properties menu.
Refer to Wholesale Trading Types on page 382 for more information on them.
Refer to Order Entry Pane Field Descriptions on page 172 for more information on time in force and
the difference between Market and Limit orders.
X_TRADER® User Manual
Trading Technologies International, Inc. Proprietary and Confidential Information
- 291 -
Chapter 8
Exchanges and Order Types
Each exchange determines how they support order types. The definition and use of the type may
differ between exchanges and marketplaces.
If the exchange does not support the order type, the Audit Trail window displays an error message
from the exchange. If the exchange does support the order type, the exchange handles the order
execution. Letting the exchange execute the order type optimizes your order's speed to the market.
Refer to the TT Gateway System Administration Manuals for each exchange to find a list of
supported order types.
Order Restriction Definitions
You can execute the following order type restrictions using the Market Grid or MD Trader:
l Best Limit (BL): Joins the best bid or offer without the requirement of a price being entered.
Available on TOCOM.
l Block: Trades a high-volume with a price agreed to by both parties outside of the normal
exchange trading methods. Available on Eurex (Refer to Eurex Block Order Overview on
page 218) and LIFFE (Refer to Wholesale Trading Overview on page 381).
l Fill or Kill (FOK): Immediately fills the entire order or immediately cancels the entire order.
l Iceberg: Sends only a portion of the order quantity to the market at a time. Each order quantity is equal. When one portion fills, the next portion is sent until the entire order quantity fills.
l If Touched (IT): If Touched (IT) orders enter the market a set number of ticks away from the
inside market and are activated only after the market touches its price level.
l Immediate or Cancel (IOC): Immediately fills the order to the extent possible and cancels
the balance.
l Limit on Close (LOC): Sends Limit orders during the closing auction of the current business
day. Any portion not filled at the close cancels. (Currently available on TSE and OSE)
l Limit on Open (LOO): Sets limit orders that only execute at the open. Any portion not filled
at the open cancels. (Currently available on TSE and OSE)
l Limit to Market (LTM): Sends Limit orders where any unfilled portion converts to a market
order at the close. (Currently available on TSE and OSE)
l Market Limit Market (MLM): MLM sets a buy order placed above the best offer to fill by
the best offer, and a sell order placed below the best bid to fill by the best bid.
l Market On Close (MOC): Sends Market orders during the closing auction of the current
business day. Orders can be entered at any time during the trading day.
l Market on Open (MOO): Sends Market orders during the pre-opening period, intended for
execution at the opening market price.
l Market To Limit (MTL): Sends a Market order with the condition that on a partial fill, the
remaining quantity rests as a Limit order at the price that was just hit or taken. Available on
TOCOM and SGX.
- 292 -
X_TRADER® User Manual
Trading Technologies International, Inc.
Order Types
l
l
l
l
l
l
Minimum Volume (MV): Sets the minimum order quantity that must be available in the market or the entire order cancels.
Order Cancels Order (OCO): Sets two orders of the same quantity for the same contract at
different price levels. When one order executes the other order cancels.
Note: OCO's are only available in MD Trader and the Order Book.
Stop: Sets the Stop Price for both Market and Limit orders. X_TRADER supports both Stop
Limit and Stop Market orders on all exchanges.
Trailing Stop (TStop): Sets the Stop Price a fixed distance from the current market price and
moves dynamically.
Volatility: Volatility orders are separately agreed to by both parties and approved by Eurex.
Equity orders: Indicates an exemption from short-sell notifications for some trading types.
They are not supported by all markets.
Best Limit
Best Limit (BL) orders are similar to Market orders in that you enter them without a price.
But, while Market orders aim to hit the bid or take the offer, a BL order lets you join the best
bid or offer. BL order types are only available on TOCOM.
Example: Given the following market...
l
l
If a 10 lot BL is entered on the Buy side, it enters the market at 613.44 (A 10 lot buy
Market order would trade at 613.45).
If a 10 lot BL entered on the Sell side, it enters the market at 613.45 (A 10 lot sell
Market order would trade at 613.44).
You can submit BL orders through the Market Grid or MD Trader. In addition, BL orders
can be sent in combination with the following Stop orders and with a specific Time in Force
(TIF):
l BL-GTD
l BL-GTC
l BL-GTDate
l Stop-BL
l Stop-BL-GTD
l Stop-BL-GTC
l Stop BL-GTDate
X_TRADER® User Manual
Trading Technologies International, Inc. Proprietary and Confidential Information
- 293 -
Chapter 8
Iceberg
An Iceberg order executes a large order by splitting the order into smaller disclosed quantity
orders. When one disclosed quantity order is filled, the next disclosed quantity order is sent
until the entire order quantity fills.
Characteristics
Characteristics of an Iceberg order include:
l They are Limit orders.
l Each disclosed quantity is equal.
l You set the disclosed quantity as a number or as a percentage of the order.
Note: In MD Trader, you set the disclosed quantity as a number.
l
Iceberg orders can only be Limit orders.
Deleting
If you delete an Iceberg order, working disclosed quantity orders also delete. If a working
disclosed quantity order deletes, any partially filled order deletes as well.
Rounding
For products that trade in round lots, if the calculated disclosed quantity results in an odd lot,
it rounds up to the closest round lot. Also, when using a percentage of the total order, an
Iceberg order may result in fractional lots. If this occurs, X_TRADER executes your order
according to the following rules:
l If the order is n<1, it rounds up to 1.
l If the order is <n.5, it rounds down.
l If the order is >n.5, it rounds up.
Procedure
Follow this procedure to place Iceberg orders:
- 294 -
X_TRADER® User Manual
Trading Technologies International, Inc.
Order Types
To place an Iceberg order:
1. If you have a specific customer account you want to trade for, select it now.
Note: You can setup customer profiles, or use the <Default> profile to trade with.
2. From the Market Grid, click in the appropriate expiration/strike row on the bid or ask side of the
screen.
If you click the BidQty or AskQty cells, the Quantity and Price fields display the current quantity
and price information. The contract information appears in the Order Summary field.
- or -
3.
4.
5.
6.
7.
If you click the BidPrc or AskPrc, or LastPrc cells, the Price field displays the current price, but
the Quantity field remains zero (0). The contract information appears in the Order Summary field.
Modify order information if necessary.
Click the Order Restriction menu and select Iceberg.
The Disclose field appears.
Click Disclose.
Click Qty or Percentage.
Set the quantity as a number or as a percentage of total order.
Note: If you select a percentage to disclose and then modify the order quantity, the disclosed
percentage remains the same while the disclosed quantity adjusts to reflect the percentage of the new
order quantity.
Example:You enter an Iceberg order with quantity of 10. The disclosed quantity is 10% of the total
order. Therefore, the disclosed quantity calculates as 1. If you change the order quantity to 20, the
percentages stay at 10% and the disclosed quantity adjusts to 2.
8. To execute, click Buy or Sell.
You successfully placed an Iceberg order.
X_TRADER® User Manual
Trading Technologies International, Inc. Proprietary and Confidential Information
- 295 -
Chapter 8
If Touched
If Touched (IT) orders enter the market at a certain price or a set number of ticks away from
the inside market. If the market touches the price level on the order (it does not have to trade
through the price), the order is activated. If Touched can be:
l Limit IT (LIT)
l Market IT (MIT)
l Market to Limit IT (MTL-IT; Available on TOCOM and SGX)
Notes:
l Since IT orders are synthetic, their use is restricted to exchanges that natively support them.
l Since TOCOM does not send a last traded price for spreads, you can not enter
IT orders in spreads when trading TOCOM.
Market Grid
In the Market Grid, you set IT orders on the Order Pane and designate a price the market
must touch in order to send your order. You can also set further restrictions (such as Limit,
Market, or Market to Limit), and Time in Force (such as GTD).
Note: If you are sending a Limit IT order, you must enter a price.
MD Trader
In MD Trader, you set LIT or MIT orders from the MD Trading tab on the Properties
menu and designate a set number of ticks away from the inside market that your order will
rest until touched.
In MD Trader you must enter Buy IT orders below the current inside market and Sell IT
orders above the current inside market. If you try to enter an IT order incorrectly, a red a
circle with a slash through it appears.
- 296 -
X_TRADER® User Manual
Trading Technologies International, Inc.
Order Types
Market
A Market order is an order placed without a price with the intention of hitting the best Bid or
taking the best Offer currently available in the market.
Note: Support of Market orders varies by exchange.
Market Grid
In the Market Grid, you set Market orders on the Order Pane. Once selected, the price field
grays out.
MD Trader
In MD Trader, you set Market from the MD Trading tab on the Properties menu. Like all
order types in MD Trader, you can set MKT as an order button. Clicking anywhere in the
Buy or Sell column sends an order to immediately fill.
Market On Open (MOO)
An MOO order sends Market orders during the pre-opening period, intended for execution
at the opening market price. This order type is not available through MD Trader.
Because the order is intended to execute at opening market prices:
l MOO orders must be Market orders and cannot be Limit orders.
l
You can only specify a quantity, not a price.
To place a Market On Open order:
1. From the Market Grid, click the contract you wish to trade.
2. In the Order Type field, click to select MOO.
The Price field becomes unavailable.
3. Specify the quantity.
4. Click Buy or Sell.
You successfully placed a Market On Open order.
X_TRADER® User Manual
Trading Technologies International, Inc. Proprietary and Confidential Information
- 297 -
Chapter 8
Market On Close (MOC)
A Market On Close order sends Market orders during the closing auction of the current
business day. Orders can be entered at any time during the trading day.
Because the order is intended to execute at the closing for the day:
l MOC orders must be Market orders and cannot be Limit orders.
l You can only specify a quantity, not a price.
To place a Market On Close order:
1. From the Market Grid, click the contract you wish to trade.
2. In the Order Type field, click to select MOC.
The Price field becomes unavailable.
3. Specify the quantity.
4. Click Buy or Sell.
You successfully placed a Market On Close order.
- 298 -
X_TRADER® User Manual
Trading Technologies International, Inc.
Order Types
Market to Limit
Market to Limit (MTL) orders send a Market order with the condition that on a partial fill,
the remaining quantity rests as a Limit order at the price that was just hit or taken. Available
on TOCOM and SGX.
Example: Given the following market...
l
l
If a 15 lot MTL is entered on the Buy side, it fills 13 @ 613.45. The remaining 2 lot
rests as a Limit order @ 613.45.
If a 15 lot MTL is entered on the Sell side, it fills 11 @ 613.44. The remaining 4 lot
rests as a Limit order @ 613.44.
You can submit MTL orders through the Market Grid or MD Trader. In addition, MTL
orders can be sent in combination with the following order types and with a specific Time in
Force:
Order Type combination
MTL-GTD
MD Trader
x
Market Grid
x
MTL-GTC
x
x
MTL-GTDate
x
x
MTL-FOK
x
x
MTL-IOC
x
x
MTL-IT-GTC
x
MTL-IT-GTD
x
MTL-IT-GTDate
x
Stop-MTL-GTD
x
Stop-MTL-GTC
x
Stop-MTL-GTDate
x
Note: SGX also includes: MTL-MOO and MTL-MOC
X_TRADER® User Manual
Trading Technologies International, Inc. Proprietary and Confidential Information
- 299 -
Chapter 8
Minimum Volume
A Minimum Volume (MV) order sets the minimum acceptable order quantity to be met or
the entire order cancels.
Example:You want to trade 100 lots with a minimum volume of 25 lots. If at least 25 lots
cannot be executed, the entire order is canceled.
The Minimum Volume order type is not supported by all exchanges. (e.g., EUREX does not
support.)
To place a Minimum Volume order:
1. From the Market Grid, click the contract you wish to trade.
2. In the Order Type field, click to select MV.
The Min Vol field appears.
3. Type the minimum volume.
Note: You cannot send an order with a minimum volume greater than the order quantity.
4. Click Buy or Sell.
You successfully placed a Minimum Volume order.
Order Cancels Order
An Order Cancels Order (OCO) order sets two orders of the same quantity for the same
contract at different price levels. When one order executes the other order cancels. You can
use the OCO order type in MD Trader and the Order Book.
Notes:
l You cannot use OCO's in the Market Grid.
l If your OCO gets partially filled, the second order reduces by the quantity filled
in the first order.
l OCO orders need X_TRADER open to work. They are removed from the market if you shutdown.
- 300 -
X_TRADER® User Manual
Trading Technologies International, Inc.
Order Types
Cursor Changes
When connecting two orders in an OCO relationship,
your cursor turns orange to match the OCO button. In
addition, the initials of the order type appear under your
cursor: LIM (Limit), SL (Stop Limit), SM (Stop
Market).
Strategy Types
When you select OCO from the MD Trading tab, you
select the strategy your OCO orders follow. Strategies
are designed to accomplish specific goals. A Bracket
applied to a current Long position is intended to exit the
position at either a profit or a protective stop. Hence
both orders must be Sell orders.
l Bracket: First OCO order is Limit. Second
OCO order is Stop Limit or Stop Market. Both
orders must be on same side of market. (i.e., 2
Buys or 2 Sells)
l Breakout: Both OCO orders can be Stop Limit
or Stop Market. Both orders must be on opposite
sides of market. (i.e., 1 Buy and 1 Sell)
l Custom: Both OCO orders can be Limit, Stop
Limit or Stop Market. No restrictions other than
check for invalid price levels by order type.
Order Book Additions
To support OCOs, Link Type and Link ID columns exist in the Order Book.
l Link Type shows all orders that are OCOs.
l Link ID gives the OCO a unique identifier. So you can tell which two orders are
linked together.
Note: When you create an OCO on a contract that matches the native OCO parameters
(Limit and Stop Market), X_TRADER will send one order as the native OCO. Native
OCOs appear in the Order Book as a single order with the Limit price, the Stop price, and
the OCO tag in the Rstr column.
Invalid OCO Price Levels
When you position the cursor over an invalid price level, a circle with a slash through it
appears. This occurrence depends on the order type you are using.
Example: Placing a Limit order at any price level which results in an immediate fill (like
buying above the inside offer or selling below the inside bid) is invalid.
X_TRADER® User Manual
Trading Technologies International, Inc. Proprietary and Confidential Information
- 301 -
Chapter 8
Placing OCO Orders
Follow these procedures to place OCO Orders:
l Creating OCO orders in MD Trader
l Creating OCO orders in the Order Book
To create OCO orders in the Order Book:
1. Click to select the first order.
2. Hold the Ctrl key and click to select the second order.
3. Right-click and click Link As OCO.
The orders are given an OCO Link Type and a Link ID. The orders are also color-coded to
indicate their OCO relationship.
You successfully created OCO orders in the Order Book.
To create OCO orders in MD Trader:
1. In the Properties menu, click the MD Trading tab.
2. In the Enable Order Types section, click to select OCO.
3. In the adjacent field, select the strategy for your order types when placing OCO orders: Bracket,
Breakout or Custom.
4. In the Default Type for Order fields, change the default selections as needed.
5. In the Assign Buttons section, click to select OCO.
6. Click Apply.
7. Click OK.
8. In MD Trader, click the OCO button.
The button and cursor turn orange and the text, “LIM” appears below the cursor, indicating a Limit
order.
9. If you want to assign a different order type, click "SL" or "SM" for Stop Limit and Stop Market
order types.
10. Set your quantity.
11. Click the buy or sell price level you want to place the first order at.
The cursor stays orange until both the next order is placed.
Note: To cancel, click the OCO button again before placing the second order.
12. Click the buy or sell price level you want to place the second order at
You successfully created OCO orders in MD Trader.
- 302 -
X_TRADER® User Manual
Trading Technologies International, Inc.
Order Types
Stop Order
Stop orders let you set the price that triggers the order. Stop orders can be Limit or Market
orders. X_TRADER supports Stop orders on all exchanges. A stop order displays in the
Order Book with a Working status, and negative order number (-###), indicating it is not
actually in the market. When the stop triggers, the order becomes the native order type and
remains in the Order Book until it fills.
Note: Since TOCOM does not send a last traded price for spreads, you can not enter Stop
orders in spreads when trading TOCOM.
Stop Trigger Rules
If the order server goes down, or the trader who originates the Stop order is not logged in
when the order triggers, the order is sent to market with the Trader ID of another trader with
the same Group ID. If another trader in the same group is not available, the order status
changes from Working to Hold. Held Stop orders do not trigger until the original trader or a
trader with the same Group ID resubmits it.
A stop limit order is accepted when the limit price meets these criteria:
l Trigger price<= Best Ask price, for a Sell Stop Limit
l Trigger price>=Best Bid price, for a Buy Stop Limit
l Trigger price<= Limit price, for a Buy Stop Limit
l Trigger price>= Limit price, for a Sell Stop Limit
A stop limit or market order is triggered only if the last traded price is within the trigger
range. The trigger conditions are:
l Last Traded price<= Trigger price, for a Sell Stop order
l Last Traded price>= Trigger price, for a Buy Stop order
Stop orders in place for the same product at the same trigger price (for the same trader or
multiple traders), process in a FIFO (first in, first out) order.
Invalid Price Levels
When you position the cursor over an invalid price level, a circle with a slash through it
appears.
Invalid price levels are as follows:
l Buy Stop: Attempt to buy below the inside Bid.
l Sell Stop: Attempt to sell above the inside Offer.
X_TRADER® User Manual
Trading Technologies International, Inc. Proprietary and Confidential Information
- 303 -
Chapter 8
Placing Stop Orders
Follow this procedures to place Stop orders:
To place a Stop order:
1. If you have a specific customer account you want to trade for, select it now.
Note: You can setup customer profiles, or use the <Default> profile to trade with.
2. From the Market Grid, click in the appropriate expiration/strike row on the bid or ask side of the
screen.
3.
4.
5.
6.
If you click the BidQty or AskQty cells, the Quantity and Price fields display the current quantity
and price information. The contract information appears in the Order Summary field.
- or If you click the BidPrc or AskPrc, or LastPrc cells, the Price field displays the current price, but
the Quantity field remains zero (0). The contract information appears in the Order Summary field.
Modify order information if necessary.
Click the Order Restriction menu and select Stop.
The Stop Price field appears.
To toggle the order type, click the Limit button.
The Order Type button toggles between Limit and Mkt when clicked.
To set a stop price, in the Stop Price field, use the arrows or type the stop price.
7. Click Buy or Sell.
You successfully placed a Stop order.
- 304 -
X_TRADER® User Manual
Trading Technologies International, Inc.
Order Types
Trailing Stops
A Trailing Stop (TStop) order sets the Stop Price a fixed distance from the current market
price and moves dynamically. Trailing Stops can be limit or market orders.
Note:
l
l
Trailing Stop orders cannot be entered via click-trading, nor the keyboard entry
mode.
Trailing Stop orders need X_TRADER to remain open to continue working.
They are removed from the market if you shutdown.
Trailing Stop Sell
A trailing stop market for a sell order sets the stop price at a fixed amount below the market
price.
l If the market price rises, the stop loss price rises by this amount.
l If the market price falls, the stop loss price remains the same.
Trailing Stop Buy
A trailing stop market for a buy order sets the stop price at a fixed amount above the market
price.
l If the market price falls, the stop loss price falls by this amount.
l
If the market price rises, the stop loss price remains the same.
Trailing Stop Limit Orders
Trailing Stop Limit orders work the same way but you define a limit price. When the order
triggers, a limit order is submitted at the price you defined.
Volatility
On the Eurex exchange, the following distinction exists for Vola and Volatility trades:
l A Vola trade is an OTC trade separately agreed to by both parties and approved by
Eurex. This trade requires you to perform an options trade and hedge it with a futures
trade. This Vola trade is the order type available in the Market Grid.
l A Volatility strategy is an Options strategy you can create. These strategies consist of
Options spread and Futures and are referred to as Vola for short. X_TRADER does
not support entering Block orders for these strategies. X_TRADER does support
Block orders for Futures and Options.
X_TRADER® User Manual
Trading Technologies International, Inc. Proprietary and Confidential Information
- 305 -
Chapter 8 - Order Types
[This page intentionally left blank]
- 306 -
X_TRADER® User Manual
Trading Technologies International, Inc. Proprietary and Confidential Information
CHAPTER 9
Spread Matrix Overview
The Spread Matrix window lets you view market data and enter orders for outright contracts and
exchange-traded calendar spreads. Ideally, the Spread Matrix view helps lower your risk when trading
spreads.
Notes:
l You can have up to twenty tabs in one Spread Matrix window. (Refer to Using Tabbed
Windows on page 193)
l
You can trade using the Floating Depth popup window. (Refer to Floating Depth Window
on page 205)
Follow these procedures to use the Spread Matrix:
l Generating a Spread Matrix
l Reading the Spread Matrix
l Customizing the Spread Matrix
l Trading with the Spread Matrix
l Changing a Working Order in the Spread Matrix
l Canceling Orders
l Setting Outright or Spread Prices
l Viewing the Butterfly Condor Matrix
X_TRADER® User Manual
Trading Technologies International, Inc. Proprietary and Confidential Information
- 307 -
Chapter 9
Generating a Spread Matrix
Follow these procedures to generate a Spread Matrix. If you select multiple products when you
generate a Spread Matrix, the Spread Matrix window generates a tab for each product:
l Generating a Spread Matrix from the Control Panel
l Generating a Spread Matrix from Market Explorer
l Generating a Spread Matrix using the Market Grid context menu
To generate a Spread Matrix from the Control Panel:
1. From the Control Panel, click the Window menu and choose Spread Matrix.
- or From the Control Panel, click the
icon.
2. From either Market Explorer or the Market Grid window, click the product for which you want
to generate a Spread Matrix.
3. Drag the contract into the blank Spread Matrix window.
You successfully generated a Spread Matrix from the Control Panel.
To generate a Spread Matrix from Market Explorer:
1. From the Control Panel, click the Window menu and choose Market Explorer.
- or -
2.
3.
4.
5.
6.
7.
8.
9.
From the Control Panel, click the
icon.
In the Exchange section, click the exchange that hosts the product you want to find.
From the Instrument Type box, click Futures.
In the Products section, click the down arrow and choose your search filter.
Type your search criteria in the available space.
The Instruments field updates as you type.
Press and hold the CTRL key and click the products you want to open.
Click the > button to transfer the products from the Instruments box to the Selected Instruments
box.
Click the Function box in the upper right corner of the Market Explorer and choose Spread
Matrix.
Click Start.
You successfully generated a Spread Matrix from Market Explorer.
- 308 -
X_TRADER® User Manual
Trading Technologies International, Inc.
Spread Matrix Overview
To generate a Spread Matrix using the Market Grid context menu:
1. In the Market Grid, click the Contract column of the product for which you want to generate a
Spread Matrix.
Note: To select multiple contracts, press and hold the CTRL key and continue clicking
contracts.
- or To select any successive contracts in a row, click and drag the cursor over the contracts to
highlight them
2. Right-click to access the context menu and click Spread Matrix.
The Spread Matrix appears. The month selected from the Market Grid displays as the first month in
the Spread Matrix.
3. Right-click the Spread Matrix, highlight Spread Display and click Butterfly to view the Butterfly
Condor Matrix.
You successfully generated a Spread Matrix using the Market Grid context menu.
Customizing the Spread Matrix
The Spread Matrix window is customizable so you can easily identify trade data. Customize and
format Spread Matrices using the:
l
l
l
l
l
Window tabs: Replace many spread matrix windows in your workspace with one tabbed
window.
Context menu: Choose how to display prices, price type, and format your fonts.
Spread Matrix tab: Customize how Spread Matrix looks and acts using the Spread Matrix
tab on the Properties menu.
Trading tab: Set the following properties:
l Color Top of Book
l Highlight Own Orders
l Minimum Highlighting Mode
Color tab: Customize under the Spread Matrix section.
X_TRADER® User Manual
Trading Technologies International, Inc. Proprietary and Confidential Information
- 309 -
Chapter 9
Reading the Spread Matrix
The graphic below identifies some of the parts of the Spread Matrix window. Much of the window
can be customized to suit your trading style.
Notes:
l LTP and LTQ must be enabled from the Spread Matrix tab on the Properties menu.
l The Spread Matrix displays:
l
l
l
Calculated implied data even when it is not at the best price. Implied functionality
varies by exchange. They determine how the implieds settings function in X_
TRADER. Enable this feature in the Trading tab on the Properties menu.
Outright prices along the top, diagonally along the bottom or both. Select how
outright prices display in your Spread Matrix in the Spread Matrix tab on the
Properties menu.
The Spread Matrix lets you:
l Trade the best three bids or offers with the Floating Depth Window.
l Change your working orders on the Spread Matrix using the Order Change
dialog box and a Floating Order Book.
l Click-trade to submit an order.
- 310 -
X_TRADER® User Manual
Trading Technologies International, Inc.
Spread Matrix Overview
Trading with the Spread Matrix
Follow these procedures to trade with the Spread Matrix window:
l Using the Floating Order Book on page 343
l Using the Order Change Dialog Box on page 224
l Using the Floating Depth Window
l Using the Floating Order Entry
l Using Click Trading
To trade with the Floating Depth Window:
1. In the Market Grid or Spread Matrix window, put your cursor over a price or quantity field for a contract you want to trade.
2. Launch the Floating Depth Window according to the property you set in the Trading tab on the
Properties menu.
3. Click the row at the price you want to trade.
Your Order Entry window seeds with the contract and price you clicked.
4. Adjust your quantity.
5. Adjust your Time in Force options.
6. Click Buy or Sell to trade.
You successfully traded with the Floating Depth Window.
To trade using the Floating Order Entry:
1. Click any of the price or quantity cells to populate data in the Floating Order Entry window.
The Floating Order Entry window appears. This can be the Order Entry pane, MD Trader, or
the Order Bar.
2. Use the Floating Order Entry window to submit your order.
You successfully traded using the Floating Order Entry.
X_TRADER® User Manual
Trading Technologies International, Inc. Proprietary and Confidential Information
- 311 -
Chapter 9
To Click Trade in the Spread Matrix:
1. Right-click in the Spread Matrix window to access the context menu and click Click Trade.
The Click Trade bar appears above the Spread Matrix.
2. Set the order parameters as needed.
3. To submit orders:
l Right-click in a Bid Price cell to seed a sell order.
l Right-click in an Ask Price to cell seed a buy order.
Note: If you right-click in a Quantity cell, the context menu appears and no orders submit.
You successfully click traded in Spread Matrix.
Changing a Working Order – Spread and Butterfly Condor Matrices
To save you time, you can now change a working order without having to access your
Order Book. This is done using one of two methods:
l Using the Order Change Dialog Box
l Using the Floating Order Book
Canceling Orders
The buttons at the top of the Spread Matrix let you cancel your working orders for the
displayed contract(s). If you have orders for different contracts on separate tabs, they will not
be canceled. If your orders are hidden using the Show/Hide Series context menu option,
they will not be canceled.
You have three options:
l Cancel All: Cancels all your spread and outright orders for the displayed contract(s).
l Cancel Spreads: Cancels all your spread orders for the displayed contract(s). If you
have outright orders for the displayed contract, they will not be canceled.
l Cancel Outrights: Cancels all your outright orders for the displayed contract(s). If
you have spread orders for the displayed contract, they will not be canceled.
- 312 -
X_TRADER® User Manual
Trading Technologies International, Inc.
Spread Matrix Overview
Setting Outright or Spread Prices
To set the Outright Price or Spread Price:
1. Right-click to show the context menu.
2. Scroll to Price Type and choose: Best, Implied or Direct.
You successfully set the outright price or spread price.
Spread and Butterfly Condor Matrix Properties
The Spread Matrix tab on the Properties menu houses most properties for the Spread and
Butterfly Condor Matrices. However, the Trading tab on the Properties has the following
properties which affect the matrices:
l Color Top of Book
l Highlight Own Orders
l Minimum Highlighting Mode
l Butterfly Condor Matrix only highlights when both the quantity and price change.
l Highlighting depends on whether the last traded price is on the bid or ask.
l If the last traded price was not on the bid or ask, the matrix does not highlight.
X_TRADER® User Manual
Trading Technologies International, Inc. Proprietary and Confidential Information
- 313 -
Chapter 9
Spread Matrix Calculations
The calculations made for a Spread Matrix follow:
Outright Prices:
l Spread ask = (Front Month Ask) – (Back Month Bid)
l Spread bid = (Front Month Bid) – (Back Month Ask)
Note: This formula applies to calculating a commodity spread price. The formula reverses when
calculating financial spd prcs (ES, Russell) and currency (6E, Dollar Index). When buying those
spreads, you buy the deferred and sell the near.
Outright Quantities:
l Best price outright quantity = Lesser of the front month quantity and back month quantity
l Best price spread quantity = Spread quantity
l Outright price and spread price are equal = Lesser of the front month quantity and the back
month quantity + the spread quantity.
Implied Pricing and Implied from Implied Pricing:
Refer to Setting Implieds on page 225.
- 314 -
X_TRADER® User Manual
Trading Technologies International, Inc.
Spread Matrix Overview
Spread Matrix Context Menu
Right-click the Spread Matrix window to access the context menu.
The available menu options include:
Note: Only the LIFFE exchange supports the trading of Butterfly and Condor Matrices as a product.
l
l
l
l
l
l
l
l
l
Find Control Panel: Displays the Control Panel.
Click Trade: Enables click trading from the Spread
Matrix window and displays the Click Trade dialog box.
Floating Depth: Enables the Floating Depth Window.
MD Trader: Opens an MD Trader window.
Chart: Opens an X_STUDY chart for the selected contract.
Create Spread: Creates a spread.
Show/Hide Series: Lets you select which contracts to
show.
Price Type: Displays prices as Best (default), Implied, or
Direct.
Display Prices: Displays Spread Matrix prices as Net
Change (versus actual prices), and institutes a new color
scheme.
l Negative prices display in pink.
l Positive prices display in light green.
l Prices with no change display in white
l
Formatting: Lets you customize fonts and borders.
l
Undo Formatting: Returns formatting to the default.
X_TRADER® User Manual
Trading Technologies International, Inc. Proprietary and Confidential Information
- 315 -
Chapter 9
Butterfly Condor Matrix Overview
A Butterfly is a trading strategy that involves the following trades:
l Buy (or Sell) of one contract in near Calendar month;
l Sell (or Buy) of 2 contracts in a far month;
l Buy (or Sell) of one contract in an even later month.
The combined price of the two contracts being sold (bought) subtracts from the combined price of
the two contracts being bought (sold).
A Condor is a trading strategy that involves the following trades:
l Buy (or Sell) of one contract month in the first month of the strategy;
l Sell (or Buy) of one contract in a far month;
l Sell (or Buy) of one contract in a further month;
l Buy (or Sell) of one contract in an even later month.
The pricing of the Condor Matrix =
(Month 1 – Month 2) – (Month 3 – Month 4)
Note: Implied data does not display for Condor Matrices because LIFFE does not match implieds
from Condor Matrices.
- 316 -
X_TRADER® User Manual
Trading Technologies International, Inc.
Spread Matrix Overview
Most of the procedures and features for the Butterfly Condor Matrix are the same as the Spread
Matrix. Follow these procedures to use the Butterfly Condor Matrix:
l Generating the Butterfly Condor Matrix
l Customizing the Spread Matrix
l Trading with the Spread Matrix
l Changing a Working Order Spread Matrix
l Canceling Orders
l Setting Outright or Spread Prices
Generating a Butterfly Condor Matrix
You generate a Butterfly Condor Matrix using an existing Spread Matrix.
Note: Implied data does not display for Condor Matrices because LIFFE does not match
implieds from Condor Matrices.
Follow these procedures to generate a Butterfly Condor Matrix:
l Generating a Butterfly Condor Matrix
l Viewing a Butterfly Condor Matrix in the same window as a Spread Matrix
To generate a Butterfly Condor Matrix:
1. Generate a Spread Matrix.
2. At the top of the Spread Matrix click the Butterfly button.
You successfully generated a Butterfly Condor Matrix.
To view a Butterfly Condor Matrix in the same window:
1. Generate a Spread Matrix.
2. Add a tab to the Spread Matrix.
3. Generate a Spread Matrix in the new tab.
4. At the top of the Spread Matrix click the Butterfly button.
You successfully generated a Butterfly Condor Matrix.
X_TRADER® User Manual
Trading Technologies International, Inc. Proprietary and Confidential Information
- 317 -
Chapter 9
Butterfly Matrix Calculations
The calculations made for a Butterfly Matrix follow:
Implied Bid Price =
1st Leg (Front Month) BidPrice
(2) x [ 2nd Leg (Middle Month) AskPrice ]
+
3rd Leg (Back Month) BidPrice
Implied Ask Price =
1st Leg (Front Month) AskPrice
(2) x [ 2nd Leg (Middle Month) Bid Price ]
+
3rd Leg (Back Month) AskPrice
Implied Bid Quantity =
Lesser of 1st Leg (Front Month) Bid Quantity
and
[ 2nd Leg(Middle Month) Ask quantity ] / 2
and
3rd Leg (Back Month) Bid Quantity
Implied Ask Quantity =
Lesser of 1st Leg (Front Month) Ask Quantity
and
[ 2nd Leg (Middle Month) Bid quantity ] / 2
and
3rd Leg (Back Month) Ask Quantity
- 318 -
X_TRADER® User Manual
Trading Technologies International, Inc.
CHAPTER 10
Quote Board Overview
Quote Board displays the open, high, low, last, and net change prices for several products at once. It also
displays your position and P/L. The screen can be launched with pre-selected contracts, or contracts can be
dragged in. The number of quotes you can add is only limited by the size of the window on your screen.
The first time launched, Quote Board displays three rows of eight quote panes. Drag and drop contracts
from Market Explorer or the Market Grid to populate it.
To access Quote Board:
From the Control Panel, click the Window menu and choose Quote Board.
- or From the Control Panel, click the
icon.
You successfully accessed Quote Board.
X_TRADER® User Manual
Trading Technologies International, Inc. Proprietary and Confidential Information
- 319 -
Chapter 10
Quote Board Features
Quote Board features include:
l Place multiple quote panes for the same contract on the Quote Board.
l Move the panes within the Quote Board and between multiple Quote Board windows.
l Enable the Floating Order Entry option in the context menu. Then, click a Quote Board
pane to seed a Floating Order Entry window.
l Drag and drop a Quote Board pane into MD Trader.
Populating Quote Board
Follow these procedures to populate Quote Board with contracts:
l Populating Quote Board from Market Explorer
l Populate Quote Board using drag-and-drop from Market Explorer
l Populating Quote Board using drag-and-drop from the Market Grid
l Populating Quote Board using the Market Grid context menu
To populate Quote Board from Market Explorer:
1. From the Control Panel, click the Window menu and choose Market Explorer.
- or -
2.
3.
4.
5.
6.
7.
8.
9.
From the Control Panel, click the
icon.
If you are logged into more than one exchange, in the Exchanges box, click the exchange whose
product you want to find.
In the Productssection, click the down arrow and choose your search filter.
Type your search criteria in the available space.
The Instruments field updates as you type.
From the Instrument Type box, click to toggle between the displayed types.
Press and hold the CTRL key and click the products you want to open.
- or To open all products in the Instruments field, click the >> button and skip to step 8.
Click the > button to transfer the products from the Instruments box to the Selected Instruments
box.
Click the Function box in the upper right corner of the Market Explorer and choose Quote Board.
Click Start.
You successfully populated Quote Board from Market Explorer.
- 320 -
X_TRADER® User Manual
Trading Technologies International, Inc.
Quote Board Overview
To populate Quote Board using drag-and-drop from Market Explorer:
1. If Quote Board is not open, use the Control Panel to open it.
2. From the Control Panel, click the Window menu and choose Market Explorer.
- or -
3.
4.
5.
6.
7.
8.
9.
10.
From the Control Panel, click the
icon.
If you are logged into more than one exchange, in the Exchanges box, click the exchange whose
product you want to find.
In the Productssection, click the down arrow and choose your search filter.
Type your search criteria in the available space.
The Instruments field updates as you type.
From the Instrument Type box, click to toggle between the displayed types.
From the Instruments box, press and hold the CTRL key and click the products you want to open.
With the cursor over one of the selected products in the Instruments box, click and hold the mouse
button.
Continue holding the mouse button and drag the cursor to the open Quote Board.
When the cursor leaves the window, it changes to a circle with a diagonal line through it. When the
cursor enters a window, it changes to include a plus [ + ] sign.
Release the mouse button.
You successfully populated Quote Board using drag-and-drop from the Market Explorer.
To populate Quote Board using drag-and-drop from the Market Grid:
1. If Quote Board is not open, use the Control Panel to open it.
2. From an open Market Grid, click the product and hold the mouse button.
3. Continue holding the mouse button and drag the cursor to the Quote Board.
When the cursor leaves the window, it changes to a circle with a diagonal line through it. When the
cursor enters a window, it changes to include a plus [ + ] sign.
4. Release the mouse button.
You successfully populated Quote Board using drag-and-drop from the Market Grid.
X_TRADER® User Manual
Trading Technologies International, Inc. Proprietary and Confidential Information
- 321 -
Chapter 10
To populate Quote Board using the Market Grid context menu:
1. In the Market Grid, click the Contract column of the product for which you want to populate Quote
Board.
Note: To select multiple contracts, press and hold the CTRL key and continue clicking
contracts.
- or To select any successive contracts in a row, click and drag the cursor over the contracts to
highlight them.
2. Right-click to access the context menu and click Quote Board.
A Quote Board appears populated with the product you selected.
You successfully populated Quote Board using the Market Grid context menu.
- 322 -
X_TRADER® User Manual
Trading Technologies International, Inc.
Quote Board Overview
Reading the Quote Board
Each pane in Quote Board displays the following fields:
l
l
l
l
l
l
l
l
l
l
l
l
O: Opening price for the day.
H: High price for the day.
L: Low price for the day.
L: Last traded price for the day.
Delta (∆): Net change on the day.
V (Hidden by default): Current traded volume for the day.
AP (Hidden by default): Most recent ask price.
AQ (Hidden by default): Most recent ask quantity.
BP (Hidden by default): Most recent bid price.
BQ (Hidden by default): Most recent bid quantity.
$: Your P/L for that contract based on the last traded price.
P: Your net position for the contract.
Quote Board uses the following indicators:
1. Top of the bar: Indicates the highest price of the day.
2. Triangle: Indicates the opening price for the day relative to low and high
prices.
3. Middle of the bar: Indicates the last traded price.
4. Bottom of the bar: Indicates the lowest price of the day.
5. B: Indicates the current best bid is above the last traded price.
6. Checkmark:Indicates a new settlement price is received which belongs to
this session. The settlement value is shown. The checkmark is replaced by
another icon with the next trade.
7. Arrow: Indicates change between last two traded prices.
8. A: Indicates the current best ask is below the last traded price.
X_TRADER® User Manual
Trading Technologies International, Inc. Proprietary and Confidential Information
- 323 -
Chapter 10
Managing the Quote Board Properties
Manage properties for the Quote Board on the Quote Board tab on the Properties menu.
You can:
l Hide or show fields for all default Quote Board windows.
l Enable or disable the display of the exchange name with the contract. Disabled by default.
To access the Quote Board tab:
1. From the Control Panel, click the Settings menu and choose Properties.
2. Click the Quote Board tab.
You successfully accessed the Quote Board tab.
Quote Board Color Properties
Customize colors for the Quote Board in the Color tab on the Properties menu.
The color properties are:
Property
Background
Default Colors
Light Green
Barometer Bottom
Blue
Barometer LTP
Yellow
Barometer Top
Red
P/L Even
Black text
P/L Negative
Red text
P/L Positive
Dark Green text
Position Flat
Black text
Position Long
Blue text
Position Short
Red text
Price Data Negative
Red text
Price Data Positive
Dark Green text
Price Data Unchanged
Black text
- 324 -
X_TRADER® User Manual
Trading Technologies International, Inc.
Quote Board Overview
Using a Floating Order Entry in Quote Board
To use a Floating Order Entry pane in the Quote Board:
1. Populate Quote Board.
2. Right-click a contract on the Quote Board and choose Floating Order Entry.
The Floating Order Entry option is enabled and a Floating Order Entry pane appears.
3. Click any other contract on the Quote Board to populate the Floating Order Entry pane.
You successfully used the Floating Order Entry pane in the Quote Board.
Using the Quote Board Context Menu
Right-click the Quote Board to access the context menu.
The available menu options include:
l
l
l
l
l
l
l
l
l
l
l
l
Find Control Panel: Displays the Control Panel.
Floating Order Entry: Displays an Order Entry dialog box
for any contract you click.
MD Trader: Displays an MD Trader window for the contract
you click.
Market Grid: Displays a Market Grid for the contract you click.
Autospreader: Displays the Autospreader Configuration
dialog box with the contract you click as one leg.
Autotrader: Displays Autotrader for the contract you click.
Chart: Opens an X_STUDY chart for the selected contract.
Rename Contract: Lets you rename contracts in the Quote
Board pane.
P/L Display: Opens a sub-menu to determine how the P/L field
displays. Options include: Currency, Native Currency, Qty x
Prc, and Ticks.
Clear: Removes the contract from the Quote Board.
Formatting: Lets you customize fonts and borders.
Show/Hide Rows: Lets you select which columns to show.
X_TRADER® User Manual
Trading Technologies International, Inc. Proprietary and Confidential Information
- 325 -
Chapter 10 - Quote Board Overview
[This page intentionally left blank]
- 326 -
X_TRADER® User Manual
Trading Technologies International, Inc. Proprietary and Confidential Information
CHAPTER 11
Order Book Overview
The Order Book window provides information about your current open orders. Traders in the same group
share the Order Book and are able to view each other’s working orders.
Follow these procedures to use the Order Book:
l Performing Order Status Inquiries on page 332
l Change an Order on page 334
l Canceling/Replacing an Order on page 335
l Deleting an Order on page 340
l Removing Stale Orders on page 332
l Using the Floating Order Book on page 343
To open the Order Book window:
From the Control Panel, click the Window menu and choose Order Book.
- or From the Control Panel, click the
icon.
You successfully opened the Order Book window.
X_TRADER® User Manual
Trading Technologies International, Inc. Proprietary and Confidential Information
- 327 -
Chapter 11
Filters
You can use filters in the Order Book to quickly sort and display data. For example, if you are part
of a group and you want to view only your open orders, you can filter using your Trader ID.
Tip: To filter using your Trader ID, first record an open order far off the market. Filter using
your Trader ID. Then, delete the order.
Refer to Filtering Overview on page 50 for more information.
Trader Identification
The Trader ID is a combination of the Member ID, a Group ID, and a Trader ID.
Example: MemberIDGroupIDTraderID
l The exchange supplies the Member ID to their trading member.
l The administrators of your trading environment assign the Group ID. All traders sharing
the same Group ID share the Order Book, Fill, and Audit Trail windows.
l The administrators of your trading environment assign the Trader ID. It uniquely identifies a specific trader.
- 328 -
X_TRADER® User Manual
Trading Technologies International, Inc.
Order Book Overview
Top Pane Field Descriptions
Use the top pane in the Order Book window to make changes in existing orders that have been
submitted to an exchange. This process is done in conjunction with the bottom pane.
Field or Button
Change
Description
Changes an order. This action keeps your place in the queue unless you
increase the quantity or change the customer account number. The results
of using the Change button are dependent on the exchange.
Cancel/Replace
Deletes an order and sends a new order to market. This action loses your
place in the queue.
The Quantity field is on the left; the Price field is on the right. To
change, click an order and enter the price and/or quantity change with the
keyboard or use the spinners (up and down arrows).
Clear
Removes data from the Quantity, Price, and Customer fields. It also cancels any changes not sent.
Inq (Inquire)
Sends an inquiry to the exchange for the status of an order. A message in
the Audit Trail window confirms the order information.
TIF buttons
Displays Time In Force options when appropriate.
Example: GTD, GTC
Note: GTC orders on the same contract at the same price sort with the
most recent orders at the bottom of the price range.
Order Information
Displays a selected order’s data above the Cust field.
Cust
Customer Selection field. Displays the current customer profiles in use.
The list contains all customer accounts for which the SEL box is selected
in the Customer Defaults window.
Lock
Protects against inadvertent changes to working orders. When you click
the Change or Cancel/Replace buttons, a prompt appears to verify your
change.
Delete
Deletes selected orders. Confirmation messages appear in the Audit Trail.
Delete All
Deletes all visible orders, bids, or asks.
Delete All Bids
Orders hidden due to filters do not delete.
Delete All Asks
X_TRADER® User Manual
Trading Technologies International, Inc. Proprietary and Confidential Information
- 329 -
Chapter 11
Field or Button
Hold
Description
Removes an order from the market but stores it on the TT Gateway. Held
orders are stored in short-term memory. If the Gateway Order Server
process goes down, the held order information is lost.
You can change, cancel, replace, delete, or resubmit held orders. Until
you click the Submit button the order remains held and out of the market.
The Hold button disables if you select a single row for a held order.
Submit
Submits held orders to the exchange.
When you submit a held order, it receives a new order number. The Audit
Trail indicates if a submit fails.
Go To Market
Sends selected orders to the market for an immediate fill.
Market orders work differently on different exchanges. You will not
always be filled immediately.
Grid Summary
The grid displays all orders entered by members of the group. Filter this information and change the
orders using the controls in the top pane of the Order Book window.
To hide columns, refer to the Order Book context menu.
For a complete list of columns available in the Trade Book window, Order Book window and Fill
window, see Appendix: Grid Column Descriptions on page 437.
- 330 -
X_TRADER® User Manual
Trading Technologies International, Inc.
Order Book Overview
Order Book Context Menu
Right-click the Order Book window to access the context menu.
The available menu options include:
l
l
l
l
l
l
l
l
l
l
l
l
l
l
l
Find Control Panel: Displays the Control Panel.
Floating Order Entry: Displays an Order Entry dialog
box for any contract you click.
Link As OCO: Applies the order cancels order relationship
to the selected orders.
Unlink AS OCO: Removes the order cancels order relationship from the selected order and its pair.
Rename Contract: Lets you change the name of the
selected product.
Inquire Block & Vola: Displays the Inquire Order Block
dialog box for accepting Eurex block trades.
Auto Filters: Enables Auto Filters, which filter the data by
selecting a customer from the Customer List window.
Clear Filter: Removes the filter from the selected cell.
Clear All Filters: Displays all available data.
Copy: Places selected data on a clipboard for pasting into
another program (e.g., Excel).
Export All Rows: Collects all the data in a file whose name,
type, and location you configure.
Export Selected Rows: Collects the data in highlighted
rows into file whose name, type, and location you configure.
Formatting: Lets you customize fonts and borders.
Hide Column(s): Hides the selected row(s) or column(s).
Show/Hide Columns: Lets you select which columns to
show.
X_TRADER® User Manual
Trading Technologies International, Inc. Proprietary and Confidential Information
- 331 -
Chapter 11
Performing Order Status Inquiries
To inquire about the status of an order:
1. Select the order by clicking a cell in the appropriate row.
2. Click the Inq button.
The Audit Trail window displays two messages. The first confirms the exchange received an
inquiry request. The second confirms that the order status information has been provided.
You successfully inquired about the status of an order.
Removing Stale Orders
It is possible for stale (filled) orders to remain in the Order Book if:
l A confirmed fill arrives at the same time you use the Inquire button to request status for an
order.
l You click the Change button to modify the order.
To remove a stale order from the Order Book:
Perform the order status inquiry procedure.
This confirms and updates the status of an order and removes stale orders.
You successfully removed a stale order from the Order Book.
- 332 -
X_TRADER® User Manual
Trading Technologies International, Inc.
Order Book Overview
Altering Orders in the Order Book
Use the following procedures to alter orders in the Order Book:
l Change an Order on page 334
l Canceling/Replacing an Order on page 335
l Modifying an Order with the Order Bar on page 336
l Changing Trigger Price Orders on page 337
l Using the Hold Feature on page 337
l Using TIF Options on page 339
l Deleting an Order on page 340
X_TRADER® User Manual
Trading Technologies International, Inc. Proprietary and Confidential Information
- 333 -
Chapter 11
Change an Order
In theory, the Change button changes a working order and keeps its exchange-generated
order number, as well as your place in the queue. However, in the following instances, your
order will be treated as a cancel/replace and sent to the back of the queue:
l You increase the quantity of the order.
l You change the price.
l You change the customer account number.
l Your request violates the exchange’s rules.
When a change request violates an exchange’s rules, it is treated as a cancel/replace order or
rejected. The new order returns to the back of the queue and a new order number is usually–
but not always–assigned.
Notes:
l If a change, cancel/replace, or delete request results in an Order Deleted or
Filled message in the Audit Trail, the exchange rejected the order because it was
already deleted or filled. This happens when the receipt of a confirmed fill is
delayed, or a request to change or delete happens at the same time a confirmed
fill is received.
l In some cases, if a partial fill goes through just before a change order, the change
order seeds with the original quantity.
To change the order quantity:
1. Click any cell in the appropriate row to select the order to be changed.
2. Click the up or down arrow at the top of the screen to change the order quantity—not the working
quantity.
Note: If you have been filled on 6 of 10 and now want a total of 8 contracts, the change request
should be for a total of 8 contracts. This automatically changes the working order from 4 to 2
contracts. If you base your change request on the working quantity (requesting a change to 2
contracts), the request is rejected.
3. Click the Change button.
The order’s place in queue is retained and the order number does not change.
You successfully changed the order quantity.
- 334 -
X_TRADER® User Manual
Trading Technologies International, Inc.
Order Book Overview
Canceling/Replacing an Order
The Cancel/Replace button deletes the original order and sends a new order to market. The
original order loses its place in queue and receives a new order number.
Use the Cancel/Replace button to:
l Delete the original order and send a new order in its place. The new order moves to
the back of the queue and may—depending on the exchange—receive a new order
number.
l Increase the quantity of the order, adjust the price, and/or change the customer
account.
Notes:
l You can enable the Floating Order Entry on the context menu, and use the
Floating Order Entry to cancel/replace an order.
l If the second half of a cancel/replace order fails, it is no longer in the Order Book
or the market. However, if any part of that order fills before the cancel/replace
happens, you are responsible for the position incurred.
l If an Order Deleted or Filled message appears in the Audit Trail after a delete or
change request, the order was already deleted or filled by the exchange.
To cancel and replace an order:
Tip: If you are simply decreasing the order quantity, use the Change button. This ensures the order
does not lose its place in the queue.
1. Select the order to cancel/replace by clicking any cell in the appropriate row.
2. Change the order information as necessary.
3. Click the Cancel/Replace button.
The original order’s Status temporarily displays: Replaced.
The Audit Trail receives the first of two messages, reflecting the deleted order with a zero working
quantity. The second message details the new order information and the new order number.
You successfully canceled and replaced and order.
X_TRADER® User Manual
Trading Technologies International, Inc. Proprietary and Confidential Information
- 335 -
Chapter 11
Modifying an Order with the Order Bar
You can enable the Floating Order Entry on the context menu, and use the Floating Order
Entry to cancel/replace an order. When the Floating Order Entry window is the Order Bar,
you can use the keyboard to launch the Order Bar and modify your order.
To modify an order with the Order Bar:
1. From the Control Panel, click the Settings menu and choose Properties.
2. On the Trading tab, in the Floating Order Entry property, click to select Order Bar.
3. Right-click the Order Book and click to select Floating Order Entry.
You can now call the Order Bar using the mouse or keyboard hotkeys.
4. Navigate to the order you want to modify and press F5.
Note: You can alter the hotkey in the Hotkey tab on the Properties menu.
5. Change the quantity or price.
6. Click Buy or Sell to send the order.
You successfully modified an order with the Order Bar.
- 336 -
X_TRADER® User Manual
Trading Technologies International, Inc.
Order Book Overview
Changing Trigger Price Orders
You can use the Order Book window to change the price of trigger orders.
Trigger price orders include:
l Stop Market
l Stop Limit
To change the trigger price in the Order Book window:
1. From the Order Book window, click to select the trigger order from the Bottom Pane.
The trigger price edit field appears. If touched orders display: Trigger Prc, stop orders display:
Stop Prc.
2. Change the price.
Note: Once a stop order triggers, any remaining quantity enters the market as a Limit order. You can
no longer change the original stop price. The trigger price field disables when the order triggers.
3. Click the Change button.
You successfully changed the trigger price in the Order Book window.
Using the Hold Feature
You can place an order on hold using the Order Book window. When you place an order
on hold, you can change it as you would any other order. Held orders remain in the Order
Book until sent to the market or manually deleted.
Notes:
l Held orders are not deleted when you use the Del Series button in the Market Grid.
l If an order cannot be submitted because it has an error, review the Audit Trail to
identify order entry errors.
Tips:
l Change a working GTD (Good 'Til Day) order to a held order after the market
closes.
l Customize the Held Order Status property using the Color tab on the Properties
menu.
X_TRADER® User Manual
Trading Technologies International, Inc. Proprietary and Confidential Information
- 337 -
Chapter 11
Follow these procedures to manage held orders:
l Holding an order
l Sending a held order to market
To hold an order:
1. Click to select the order you want to put on hold.
Note: Hold the CTRL key and continue clicking orders to select more than one order to put on hold.
2. Click the Hold button.
The order is removed from the market. The TTStatus column identifies orders placed on hold.
You successfully held an order.
To send a held order to market:
1. Click to select the held order you want to send to market.
Note: Hold the CTRL key and continue clicking orders to select more than one held order to send to
market.
2. Click the Submit button.
You successfully sent a held order to market.
- 338 -
X_TRADER® User Manual
Trading Technologies International, Inc.
Order Book Overview
Using TIF Options
In the screenshot below, the button labeled GTC displays different Time In Force (TIF)
options. The Order Book window allows you to change the order's time in force.
TIF determines how long your order works in the market. In all cases, your orders work until
they trade, you cancel them, or the time in force is met. Click the TIF button to toggle
between your choices.
l GTD (Good 'Til Day): Works until the current trading session ends. Enabled by
default.
l GTC (Good 'Til Cancel): Works until the contract expires.
l GIS (Good In Session): Works until the contract expires within the session, or the
trading session ends. (Some exchanges, like Euronext, have products with different
trading sessions in one day.)
l Date: Works until the expiration date.
Note: You can enter Iceberg orders with TIF options: GTC and GIS.
To change the TIF option:
1. Click to select the order from the bottom pane in the Order Book.
2. Click the TIF button (GTC in the picture) until you get the option you want to use.
You successfully changed the TIF option.
X_TRADER® User Manual
Trading Technologies International, Inc. Proprietary and Confidential Information
- 339 -
Chapter 11
Deleting an Order
You can delete any unfilled order. Because there is a short delay before you receive notice of
a filled order, you might inadvertently try to delete a filled order. If this occurs, the Audit
Trail sends you an error message.
Note: If an order enters an unknown state, the TTStatus column is appended with a
question mark (?) and the colors are inverted. Refer to Recognizing Orders in an Unknown
State.
Follow these procedures to delete orders in the Order Book:
l Enable and disable the Delete All button
l Delete a single order
l Delete multiple orders
l Delete all visible orders
l Delete all visible orders and orders hidden by filters
To enable or disable the Delete All button:
1. From the Control Panel, click the Settings menu and choose Properties.
2. Click the Orders tab.
3. In the Button Selection section, click to select Delete All/Bids/Asks.
A checkmark indicates the feature is enabled.
You successfully enabled or disabled the Delete All button.
To delete a single order:
1. Select the order to be deleted by clicking any cell in the appropriate row to highlight it.
2. Select the Delete button in the top pane.
- or Click on the Delete button in the appropriate row.
The Audit Trail message specifies the action taken (Delete).
You successfully deleted an order.
- 340 -
X_TRADER® User Manual
Trading Technologies International, Inc.
Order Book Overview
To delete multiple orders:
1. Click the first order you want to delete and hold the button down while you move the mouse across
the order rows.
- or Hold the CTRL button down and click each order you want to delete.
2. Select the Delete button in the top pane.
The Audit Trail message specifies the action taken (Delete).
You successfully deleted multiple orders.
To delete all visible working orders:
Click the Delete All button to cancel all visible working orders.
Warning! Using the Delete All button to empty your Order Book does not delete any orders that
have been hidden by filters.
You successfully deleted all visible orders.
To delete all visible orders and orders hidden by filters:
1. Right-click on any cell in the bottom pane of the Order Book window.
2. Click Clear All Filters from the menu.
Note: This is the only way to ensure that all the filters have been removed.
You successfully deleted all visible orders and orders hidden by filters.
After the Delete Request is Sent
After the delete request is sent:
l The original order’s status temporarily changes to Deleting before the Order Book
removes it.
l The Audit Trail displays two messages. The first confirms the exchange received the
request. The second confirms the request is processing.
Note: If an Order Deleted or Filled message appears in the Audit Trail after a delete
or change request, the order was already deleted or filled by the exchange.
X_TRADER® User Manual
Trading Technologies International, Inc. Proprietary and Confidential Information
- 341 -
Chapter 11
Floating Order Book Overview
The Floating Order Book is visible in MD Trader, Market Grid and the Order Book. It displays an
interactive list of your working orders when you hover over or click on a product for which you
have orders.
Set the Floating Order Book property in the Trading tab on the Properties menu.
The Floating Order Book appears under the conditions you specify:
l
l
l
Middle click: When you click the middle
mouse button.
Keyboard: The Hotkey tab establishes
launch button. (See procedure under Keyboard Trading in the Floating Order
Book on page 345)
Mouse hover: When you hover the cursor
over the product.
When the Floating Order Book appears, it looks like this:
Notes:
l You cannot choose which columns appear in the Floating Order Book. However, columns with no data hide automatically. By default, orders sort in descending order by the
Time Stamp column.
l If more than ten orders exist, a scroll bar appears in the Floating Order Book.
l The Time Stamp column displays the exchange time.
l
If an order enters an unknown state, the entire order color is inverted and the Chg column is appended with a question mark (?). Refer to Recognizing Orders in an
Unknown State.
- 342 -
X_TRADER® User Manual
Trading Technologies International, Inc.
Order Book Overview
Using the Floating Order Book
Note: If you make a change in the floating order book, the order is resubmitted.
To use the floating order book, you must set the Enable Floating Order Book property in
the Orders tab on the Properties menu. Once enabled, hover over or click on a product for
which you have orders to display the Floating Order Book. Alternatively, you can display
the Floating Order Book using the keyboard.
Follow these procedures to use the Floating Order Book:
l
l
l
Displaying the floating order book using the keyboard
Making a change to an order using the Floating Order Book
Sorting orders in the Floating Order Book
To display the Floating Order Book using the keyboard:
Note: The keyboard shortcut to launch the Floating Order Book only works in the Market Grid.
1. Ensure the Enable Floating Order Book option is selected in the Orders tab on the Properties
menu.
2. In the Market Grid, click the BidQty or AskQty for the product for which you have working orders.
3. Right-click to open the context menu.
4. Press Esc.
5. Press F7.
Note: You can change the launch key using the Hotkeys tab on the Properties menu.
You successfully displayed the Floating Order Book using the keyboard.
X_TRADER® User Manual
Trading Technologies International, Inc. Proprietary and Confidential Information
- 343 -
Chapter 11
To make a change to an order using the Floating Order Book:
1. Ensure the Enable Floating Order Book option is selected in the Orders tab on the Properties
menu.
2. Depending on your property setting, hover over or click a cell with a working order.
The Floating Order Book appears.
3. In the Qty and Price fields, left-click to lower the value by one or right-click to raise the value by
one.
- or In the Qty and Price fields, type new values.
Note: The Floating Order Book cancels your changes and closes if you click on another window
(i.e., remove focus).
4. Click OK to submit the changed order.
You successfully made a change to an order using the Floating Order Book.
To sort orders using the Floating Order Book:
Note: By default, the orders are sorted in descending order by the Time Stamp column.
1. Double-click the column heading you want to sort the orders by.
The orders sort in ascending order based on the column you clicked.
2. Double-click the column heading again to sort in descending order.
You successfully sorted using the Floating Order Book.
- 344 -
X_TRADER® User Manual
Trading Technologies International, Inc.
Order Book Overview
Keyboard Trading in the Floating Order Book
You can use the keyboard to interact easily with the Floating Order Book. Use the default
hotkeys or customize them to create your own.
l TT Default map
l Description
l Assigning hotkeys to the Floating Order Book
TT Default Map
Description
Hotkey Command
Z
Launch FOB
Description
Launch the Floating Order Book.
Home
Focus on quantity
Edit the quantity field.
End
Focus on Price
Edit the price field.
-
Decrease value
Decrease the price or quantity fields.
+
Increase value
Increase the price or quantity fields.
Enter
Submit order
Submit the order as defined and close the Floating Order Book.
Delete
Delete order
Delete the highlighted order.
Esc
Close
Close the window.
X_TRADER® User Manual
Trading Technologies International, Inc. Proprietary and Confidential Information
- 345 -
Chapter 11
To assign hotkeys to the Floating Order Book:
1. From the Control Panel, click the Settings menu and choose Properties.
2. Click the Hotkeys tab.
3. In the Keyboard Layout field, click to select Custom.
4. In the Component column, click Floating Order Book.
5. In the Command column, click the command for which you want to assign a hotkey.
6. Click in the Press new shortcut key field.
7. Press the key or keys you want to represent that command.
Note: Some keys cannot be used as hotkeys. (E.g., Delete, Backspace, Tab...and others.)
8. Click the Assign button.
You successfully assigned hotkeys to the Floating Order Book.
- 346 -
X_TRADER® User Manual
Trading Technologies International, Inc.
CHAPTER 12
Fill Window Overview
The Fill window provides detailed information about the current day’s trades. X_TRADER displays fill
information immediately upon receipt from the exchange. However, each exchange implements the
dissemination of fill information differently. Some exchanges provide the information faster than other
exchanges.
To open the Fill window:
From the Control Panel, click the Window menu and choose Fill Window.
- or From the Control Panel, click the
icon.
You successfully opened the Fill window.
X_TRADER® User Manual
Trading Technologies International, Inc. Proprietary and Confidential Information
- 347 -
Chapter 12
The following panes compose the Fill window:
l Fills pane: Displays the exchange-confirmed data about a trade.
l Position pane: Provides net position information by product and contract. Profit/Loss (P/L) calculates using confirmed fills.
Unless set up to do so on the gateway, Eurex fast fills do not figure into net position calculations.
Ask your TT representative for information on converting fast fills into confirmed fills. Also, refer to
Eurex Fast Fills Information on page 364.
l Fast Fills pane: Displays limited trade information until the exchange confirms the fill. Some
exchanges provide guaranteed fill information via the back office feed. This can result in delayed
fills if the trade information is not received from the exchange. The Fast Fills pane mitigates the
delays that can occur while waiting for a guaranteed fill. The fast fill net quantity displays in the
FFNet column of the Position pane.
Manual Fills
If you execute trades outside of X_TRADER, you can manage those trade using the Add Manual
Fill dialog box. Adding trades in this manner lets X_TRADER calculate your true position and P/L
(profit/loss).
Refer to Managing Manual Fills on page 359 for more information.
Filters
You can use filters in the Fill Window to quickly sort and display data. However, if you use filters,
you are not able to receive Fast Fills from supporting exchanges. X_TRADER reminds you fast fills
are disabled with a message in the Fast Fills pane.
Tip: Remove filters to return hidden fill records to the Fill window.
Refer to Filtering Overview on page 50 for more information.
- 348 -
X_TRADER® User Manual
Trading Technologies International, Inc.
Fill Window Overview
Fills Alert Dialog Box
When enabled, the Fills Alert dialog box displays on the desktop as a fill arrives from an exchange.
To enable the Fills Alert dialog box:
1. From the Control Panel, click the Settings menu and choose Properties.
2. Click the Fill tab.
3. Click to select the Fills Alert checkbox.
4. If you want to only be alerted on your own fills, click to select the Only Alert on Own Fills box.
Note: Using this feature, you do not have to enter a Trader ID to display your fills. However,if you
place an order using an account # mapped to a TTORD ID you are not logged in under, you will
not receive the fill alert.
5. Click OK.
You successfully enabled the Fills Alert dialog box.
X_TRADER® User Manual
Trading Technologies International, Inc. Proprietary and Confidential Information
- 349 -
Chapter 12
Fills Pane Overview
The Fills pane reflects the exchange-confirmed data about a trade. The Fills pane includes the Fill
Type and Type columns to allow you to filter on your spread positions and view your spread legs
separately from outright trades.
Refer to the following for more information:
l Fills Pane Grid Summary on page 351
l Position Pane Grid Summary on page 355
X_TRADER delivers fill information immediately upon receipt from the exchange. Exchanges
provide the information in different ways. For example, some exchanges send fill information via
their back office feed. Therefore, problems may arise due to the following:
l Trade confirmations may not be sent immediately or may not be received from the exchange.
l Guaranteed fills provided by back office feeds, which are typically delayed ten seconds, can
be delayed a few minutes. The length of the delay varies due to exchange trading volume fluctuations and product state changes (e.g., the closing of a market).
Trading Technologies recommends you use regular exchange screens to complement X_TRADER
windows during periods of such delay.
- 350 -
X_TRADER® User Manual
Trading Technologies International, Inc.
Fill Window Overview
Fills Pane Grid Summary
The Fills pane displays the exchange-confirmed data about a trade. To hide columns, refer to
the Fills Pane Context Menu on page 352.
For a complete list of columns available in the Trade Book window, Order Book window
and Fill window, see Appendix: Grid Column Descriptions on page 437.
Note: If logging is enabled, LIFFE fill records write to the directory: <root>:\tt\logFiles on
the TT™ LIFFE Gateway. The file records all fills for each LIFFE trader everyday. The file
follows this format: day.month.year.Ttfill_trader mnemonic. X_TRADER Administrators
must manually delete these files in order to manage hard disk space.
X_TRADER® User Manual
Trading Technologies International, Inc. Proprietary and Confidential Information
- 351 -
Chapter 12
Fills Pane Context Menu
Right-click the Fills pane to access the context menu.
The available menu options include:
l
l
l
l
l
l
l
l
l
l
l
l
l
l
l
l
Find Control Panel: Displays the Control Panel.
Add Manual Fill: Lets you manually enter a fill. Information
displays in the Fills pane and updates your P/L.
Delete Manual Fill: Deletes fills you manually added.
Confirm a fill: Confirms a fill. Click a single fill or select multiple fills and choose this option. The C column displays a
hyphen (-) for trades confirmed by you, and an equal sign (=)
for fills confirmed by another trader.
Show Fast Fills: Displays partial information about the order.
Fast Fills are enabled by default but only offered by some
exchanges.
Scrolling: Causes the window to jump to a new entry. Enabled by default.
Auto Filters: Enables Auto Filters, which filter the data by
selecting a customer from the Customer List window.
Clear Filter: Removes the filter from the selected cell.
Clear All Filters: Displays all available data.
Copy: Places selected data on a clipboard for pasting into
another program (e.g., Excel).
Paste: Inserts copied data into a selected cell.
Export All Rows: Collects all the data in a file whose name,
type, and location you configure.
Export Selected Rows: Collects the data in highlighted rows
into file whose name, type, and location you configure.
Formatting: Lets you customize fonts and borders.
Hide: Hides the selected row(s) or column(s).
Show/Hide Columns: Lets you select which columns to
show.
- 352 -
X_TRADER® User Manual
Trading Technologies International, Inc.
Fill Window Overview
Start of Day Fills
X_TRADER notifies you if you carry over a position from the previous session. This option must
be enabled by your Risk Manager. If you carry over a position, the Fill window displays an S in the
Open/Close column of the Fills pane.
The Fills pane may display an S to identify a carry over position for each contract.
If you have any questions, contact your Risk Manager.
X_TRADER® User Manual
Trading Technologies International, Inc. Proprietary and Confidential Information
- 353 -
Chapter 12
Position Pane Overview
The Position pane is the middle pane of the Fill window and displays all contracts for which you
have a position.
1.
2.
3.
4.
5.
6.
7.
8.
One summation line for all positions. Can be expanded to view...
...a summation line for all positions per exchange. Can be expanded to view...
...a summation line for each product. Can be expanded to view...
...a detailed line for each contract.
Displays your open Profit and Loss. Refer to Calculating Profit and Loss on page 357.
Displays total transactions on a series/product basis.
Displays number of fill lines on a contract and product basis.
Displays ratio of transactions to fills on per contract and product basis
Note: The Position pane may contain the letter o in the Contract column when the position
represents an option. This distinguishes between futures and options positions for the same products
that have identical expiration dates. This can occur on the LIFFE exchange. For example, a futures
and options position for product B Jun09 expiration on LIFFE displays Jun09 (futures position) and
oJun09 (options position).
- 354 -
X_TRADER® User Manual
Trading Technologies International, Inc.
Fill Window Overview
Position Pane Grid Summary
The Position pane provides net position information by product and contract. Profit/Loss
(P/L) calculates using confirmed fills. To hide columns, refer to the Position Pane Context
Menu on page 356.
For a complete list of columns available in the Trade Book window, Order Book window
and Fill window, see Appendix: Grid Column Descriptions on page 437.
X_TRADER® User Manual
Trading Technologies International, Inc. Proprietary and Confidential Information
- 355 -
Chapter 12
Position Pane Context Menu
Right-click the Position pane to access the context menu.
The available menu options include:
l
l
l
l
l
l
l
l
l
l
l
l
l
l
l
l
l
Find Control Panel: Displays the Control
Panel.
Add Manual Fill: Lets you manually enter a fill.
Information displays in the Fill pane and updates
your P/L.
Remove Fast Fills From Position: Removes fast
fills from the position and recalculates your P/L.
P/L Display: Displays position using the native
currency, or the quantity multiplied by the price
(default). The primary currency is annotated next
to the Currency option (for example, Currency –
USD).
P/L Based On: Recalculates your Profit and
Loss based on your selection.
Open P/L Based On: Recalculates your open
Profit and Loss based on your selection.
Ignore Manual Position: Removes manual fills
and recalculates your P/L.
Show Fast Fills: Displays partial information
about the order. Fast Fills are enabled by default
but only offered by some exchanges.
Auto Expand: Automatically opens the position
tree.
Expand: Expands the current branch.
Collapse: Contracts only the selected product.
Expand All: Expands the position tree to view
all branches.
Collapse All: Contracts the position tree.
Copy: Places selected data on a clipboard for pasting into another program (e.g., Excel).
Formatting: Lets you customize fonts and borders.
Hide: Hides the selected row(s) or column(s).
Show/Hide Columns: Lets you select which columns to show.
- 356 -
X_TRADER® User Manual
Trading Technologies International, Inc.
Fill Window Overview
Calculating Profit and Loss
You can calculate Profit and Loss (P/L) for open positions based on any of the following:
l Risk
l Last price
l Bid/ask price
l Opening price
l Closing price
l High price
l Low price
l Settlement price
Open P/L Based On Formula
Open P/L can be based on the same prices as P/L. You can also calculate open P/L using
one of two formulas:
l Average Price: Open Position multiplied by (The price your open P/L is based on –
Average Buy or Sell Price).
l Match Price: Open Position multiplied by (The price your open P/L is based on –
Average Buy or Sell Price of the trades comprising your Open Position).
Note: The average price used (Buy or Sell) depends on whether you are long or short.
Example:
You buy:
l 2 @ 100
l 3 @ 125
l 20 @ 150
You sell:
l 10 @ 120
Your open P/L is based on the last traded price (LTP).
LTP = 160 Your current Open Position = 15
Average Price = 15 * (160 - 143 ) = 255
Match Price = 15 * (160 - average price of the last 15 trades) = 15 * (160 - 150) = 150
X_TRADER® User Manual
Trading Technologies International, Inc. Proprietary and Confidential Information
- 357 -
Chapter 12
P/L Column Display
X_TRADER lets you select the P/L (Profit/Loss) column display type. The position’s P/L
column displays in one of the following:
l Selected primary currency (The Primary Currency designation in the Guardian Currency Table determines the default currency. The default primary currency is USD. To
change the primary currency via Guardian, speak to your X_TRADER System
Administrator.)
l Product’s native currency
l Quantity multiplied by the price
l Ticks
To select the P/L method:
1. Right-click any cell in the Position pane to access the context menu.
2. Click P/L based on and select a calculating method.
3. Click Open P/L based on and choose Average Price or Match Price.
4. Click Display and choose a display type.
Note: You can only obtain a total position P/L if you have selected Currency – USD.
You successfully selected the P/L method.
- 358 -
X_TRADER® User Manual
Trading Technologies International, Inc.
Fill Window Overview
Managing Manual Fills
If you execute trades outside of X_TRADER, you can manage those trade using the Add Manual
Fill dialog box. Adding trades in this manner lets X_TRADER calculate your true position and P/L
(profit/loss).
Note: Manual fills affect only the position and P/L data. X_TRADER does not provide manual fill
information to the middle or back office.
Follow these procedures to manage manual fills:
l
l
l
Adding a Manual Fill
Deleting a Manual Fill
Saving a Manual Fill
To access the Add Manual Fill dialog box:
Right-click the Fills window and click Add Manual Fill.
You successfully accessed the Add Manual Fill dialog box.
X_TRADER® User Manual
Trading Technologies International, Inc. Proprietary and Confidential Information
- 359 -
Chapter 12
Add Manual Fills Dialog Box Field Descriptions
The fields in the Market Explorer window include:
Field
Exchange
Description
The exchange on which the order was filled.
Note: You must be logged onto the exchange before you can select an
exchange here.
Product
The traded product’s exchange symbol.
Example: FGBL, ODAX
Product Type
The type of product in the order.
Example: Future, Future Spread, Option
Expiration
The instruments of the selected product type and product supported by the
exchange.
Currency
The currency used in the trade.
Example: USD = United States Dollar
Action
Buy or Sell in reference to an order.
Quantity
The quantity filled in the order.
Price
The price at which the quantity fills.
Account
The back office account number or name as indicated in the Customer
Default profile.
Add Fill
Sends the manual trade to the Fills pane.
Note: This button enables after you complete all mandatory fields.
Confirm
Lets you ensure the fill is correct before adding it to the Fills pane.
OK
Closes the Add Manual Fill dialog box.
Status Bar
Shows the state of the dialog box, including when the manual fill is added to
the Fills pane.
Adding a Manual Fill
To add a manual fill to the Fills pane:
Note: In order to save a manual fill, you must enable the Save Manual Fills option on the Fill tab in the
Properties menu.
1. From the Control Panel, click the Window menu and choose Fill Window.
- or From the Control Panel, click the
icon.
2. In the Fills pane, right-click an open area and choose Add Manual Fill.
- 360 -
X_TRADER® User Manual
Trading Technologies International, Inc.
Fill Window Overview
The Add Manual Fill dialog box appears.
Notes:
l Place your cursor on a specific fill in the Fills pane to pre-populate the Add Manual
Fill dialog box with information.
l Open the Add Manual Fill dialog box via the Position pane to have all fields appear
blank.
3. From the Exchange field, click the exchange.
4.
5.
6.
7.
8.
9.
10.
11.
12.
13.
From the Product field, click the product.
From the Product Type field, click the product type.
From the Expiration field, click the contract expiration.
In the Action field, click Buy or Sell.
In the Quantity field, type the appropriate value.
In the Price field, type the appropriate value.
After you complete all mandatory fields, Add Fill enables.
In the Account field, type any applicable account information. (optional)
If you want to see the formatted fill before you add it, click the Confirm checkbox.
Click the Add Fill button.
The manual fill is added to the Fill window. If you clicked the Confirm checkbox, you must
confirm the manual fill.
Click OK to exit.
You successfully added a manual fill to the Fills pane.
X_TRADER® User Manual
Trading Technologies International, Inc. Proprietary and Confidential Information
- 361 -
Chapter 12
Deleting a Manual Fill
The only way to remove a manual fill is to delete it. They persist even in case of an
emergency or automatic shutdown when you lose connectivity to X_TRADER.
To delete a manual fill from the Fills pane:
1. From the Control Panel, click the Window menu and choose Fill Window.
- or From the Control Panel, click the
icon.
2. From the Fills pane, click to select the manual fill trade you want to delete.
Note: Manual fills are identified by the m in the Open/Closed (O/C)column.
3. In the Fills pane, right-click an open area and choose Delete Manual Fill.
The Fills and Position panes update to reflect the fill deletion.
You successfully deleted manual fill from the Fills pane.
Saving a Manual Fill
In order to save a manual fill, you must enable the Save Manual Fills option on the Fill tab
in the Properties menu.
If you have manual fills on multiple exchanges and you close X_TRADER, when you
reopen it, you are prompted to log into all exchanges where you have manual fills.
Notes:
l You can add manual fills for future spreads and options strategies as well as outright futures and options.
l If you have an Add Manual Fill dialog box open and try to open a second, you
are asked whether you want to override the current settings with the new specified fill. If you click OK, the Add Manual Fill dialog box populates with data
from the new fill.
- 362 -
X_TRADER® User Manual
Trading Technologies International, Inc.
Fill Window Overview
Fast Fills Pane Overview
Fast fills are orders in which only partial information about the order is supplied. Only some
exchanges offer fast fills.
Note: The Fast Fills pane is turned off by default.
X_TRADER provides fast fill information to mitigate the potentially significant delays that may
occur while waiting for a guaranteed fill. For example, fast fills for Eurex are composed of two
items:
l
l
Immediate executed quantities resulting from an order entered via X_TRADER.
Eurex trade confirmations sent to X_TRADER for resting orders (which are typically sent
immediately after a match occurs).
To access the Fast Fills Pane:
1. Right-click either the Fills pane or the Position pane to access the context menu.
2. Click Show Fast Fills.
The Fast Fills pane opens on the bottom of the Fill window.
You successfully accessed the Fast Fills pane.
To remove Fast Fills from a position:
1. Right-click a cell in the Position pane to access the context menu.
2. Click Remove Fast Fills from Position.
You successfully removed Fast Fills from a position.
Fast Fill Notes
Inherent issues exist with the use of Fast Fills:
l Exchanges do not typically guarantee Fast Fills.
l
Fast Fills transmit to all traders with the same Group ID.
Example: With a Trader ID = MemberIDGroupIDTraderID
l
l
l
Fast Fills move from the Fast Fills pane to the Fills pane upon receipt of the guaranteed fill from the exchange.
Fast Fills do NOT reflect in the position calculations.
Fast Fills do NOT update the Order Book because a given order cannot be tied to the
limited information they contain.
When all filters clear, the Fast Fills pane and FFNet column enable. All fast fills that arrived
while the filters were in use now display, and the FFNet column automatically updates.
X_TRADER® User Manual
Trading Technologies International, Inc. Proprietary and Confidential Information
- 363 -
Chapter 12
Eurex Fast Fills Information
P/L calculates using only confirmed fills. Eurex Fast Fills are not included anymore in net
position calculations. However, we can configure the TT™ Eurex Gateway to automatically
convert Fast Fills into confirmed fills.
Using the following two columns, a Eurex trader can monitor position updates:
l FFNet (Fast Fills Net Quantity) column: Displays the fast fill net quantity. As fast fills
are received, the FFNet column updates and reflects the new fast fill position.
l NetQty (Net Quantity) column: Reflects the position based only on confirmed fills.
The NetQty column updates and reflects the new confirmed position.
When the Fill window opens, the FFNet column synchronizes with NetQty. Under normal
trading situations, the FFNet column updates slightly ahead of the NetQty column because
Fast Fills appear before confirmed fills.
FFNet and NetQty Synchronization
When you trade Eurex, you can easily identify when NetQty and FFNet are out of
synchronization (do not match) for an extended period. The following can result:
l Errant or erroneous Fast Fills.
l Changing a working order that gets filled immediately.
l If a Fast Fill has been received, clearing all filters results in reinitializing the NetQty
and FFNet fields, so they are the same. Receipt of the confirmed fill causes an out-ofsynch occurrence.
If you think that the fast fill position reflects errant or erroneous fast fills, use the Remove
Fast Fills From Position option on the Position pane context menu to resynchronize the fast
fill position with the confirm fill position.
Fast Fills Pane Context Menu
Right-click the Fast Fill pane to access the context menu.
The available menu options include:
l
l
l
Find Control Panel: Displays the Control Panel.
Scrolling: Causes the window to jump to a new entry. Enabled by default.
Close: Closes the Fast Fill pane.
- 364 -
X_TRADER® User Manual
Trading Technologies International, Inc.
CHAPTER 13
Trade Book Overview
The Trade Book window presents summary and detailed aggregate fill information for your orders.
The following panes compose the Trade Book window:
l The Summary pane is the top part of the window.
l The Partial Fill pane, when displayed, is the middle part of the window.
l The Detail pane is the bottom part of the window.
Follow these procedures to use the Trade Book window:
l Displaying Fill Details In the Trade Book Window on page 368
l Showing or Hiding Partial Fills on page 368
l Sorting Trade Book Data on page 369
l Filtering Overview on page 50
To open the Trade Book window:
From the Control Panel, click the Window menu and choose Trade Book.
- or From the Control Panel, click the
icon.
You successfully opened the Trade Book window.
X_TRADER® User Manual
Trading Technologies International, Inc. Proprietary and Confidential Information
- 365 -
Chapter 13
Trade Book Grid Summary
The following panes compose the Trade Book window:
l The Summary pane is the top part of the window. It displays a single line of information for
each filled order in the top half of the window. It is possible, when multiple fills are received
for a spread, they appear as separate legs.
l The Partial Fill pane, when displayed, is the middle part of the window. It displays partially
filled orders. Once an order is filled completely or deleted, the summary information moves to
the Summary pane.
l The Detail pane is the bottom part of the window. It displays the history and detailed information for any item selected in either the Summary or Partial Fill pane.
The available columns in the Trade Book are nearly identical for each pane.
For a complete list of columns available in the Trade Book window, Order Book window and Fill
window, see Appendix: Grid Column Descriptions on page 437.
- 366 -
X_TRADER® User Manual
Trading Technologies International, Inc.
Trade Book Overview
Trade Book Context Menu
Right-click the Trade Book window to access the context menu.
The available menu options include:
l
l
l
l
l
l
l
l
l
l
l
l
l
l
l
Find Control Panel: Displays the Control Panel.
Confirm Fill(s): Confirms a fill. Click a single fill or
select multiple fills and choose this option. The C column
displays a hyphen (-) for trades confirmed by you, and an
equal sign (=) for fills confirmed by another trader.
Sort: Defines the sort order by column and up to three
levels. By default, the Trade Book window sorts by last
fill time with the most recent fill at the bottom of the pane.
Save sort order as part of a workspace. Refer to Saving a
Workspace on page 70.
Aggregate Detail Fills by Price: Displays all fills that
occur at a single price level on one aggregated line. When
disabled, every partial detail fill displays on its own line.
Partial Fill Pane: Shows three options: Top Pane,
Middle Pane, None.
Scrolling: Causes the window to jump to a new entry.
Enabled by default.
Auto Filters: Enables Auto Filters, which filter the data
by selecting a customer from the Customer List window.
Clear Filter: Removes the filter from the selected cell.
Clear All Filters: Displays all available data.
Copy: Places selected data on a clipboard for pasting into
another program (e.g., Excel).
Export All Rows: Collects all the data in a file whose
name, type and location you configure.
Export Selected Rows: Collects the data in highlighted
rows into a file whose name, type and location you configure.
Formatting: Lets you customize fonts and borders.
Hide: Hides the selected row(s) or column(s).
Show/Hide Columns: Lets you select which columns to
show.
X_TRADER® User Manual
Trading Technologies International, Inc. Proprietary and Confidential Information
- 367 -
Chapter 13
Showing or Hiding Partial Fills
An option on the context menu lets you decide how you view partial fills in the Trade Book.
To show or hide partial fills:
1. Right-click the Trade Book window to display the context menu.
2. Highlight Partial Fills.
3. Click one of the following:
l Top Pane: Puts partial fills in the top pane. The Color tab on the Properties menu has a new
Partial Fill Highlight property that distinguishes partial fills from full fills. The default is yellow.
l Middle Pane: Adds the middle Partial Fills pane.
l None: Hides partial fills.
You successfully shown or hidden partial fills.
Displaying Fill Details In the Trade Book Window
To display detailed fill information about an order:
Click on a row in the top, or Summary pane, of the Trade Book window.
The detailed information will be displayed in the bottom or Detail pane.
You successfully displayed detailed fill information about an order.
- 368 -
X_TRADER® User Manual
Trading Technologies International, Inc.
Trade Book Overview
Sorting Trade Book Data
By default, the Trade Book window sorts by last fill time with the most recent fill at the bottom of
the pane. Define the sort order by column and up to three levels in ascending or descending order.
To define the sorting parameters of your Trade Book:
1. Right-click inside the Trade Book window to display the context menu.
2. Click Sort.
The Sort dialog box displays.
3. In the Sort by field, click the first field to sort by.
4. Click whether to sort this field in Ascending or Descending order.
5. If you want to use another field to further sort the Trade Book window, in the Then by field, click
the second field to sort by.
- or Skip to step 9.
6. Click whether to sort this field in Ascending or Descending order.
7. If you want to use another field to further sort the Trade Book window, in the Then by field, click
the third field to sort by.
8. Click whether to sort this field in Ascending or Descendingorder.
9. Click OK.
You successfully defined the sorting parameters of your Trade Book.
X_TRADER® User Manual
Trading Technologies International, Inc. Proprietary and Confidential Information
- 369 -
Chapter 13 - Trade Book Overview
[This page intentionally left blank]
- 370 -
X_TRADER® User Manual
Trading Technologies International, Inc. Proprietary and Confidential Information
CHAPTER 14
Time and Sales Overview
The Time and Sales window provides you with the ability to track, record, and save time and sales
information for products traded through X_TRADER. You populate a Time and Sales window with one
or more products using the drag-and-drop method from the Market Grid.
Follow these procedures to use the Time and Sales window:
l Populating the Time and Sales Window: Use the drag-and-drop method to display market activity.
l Saving Time and Sales Information: Save data to a file you can open and customize in Microsoft
Excel.
Notes:
l Time and Sales does not track the inside market.
l Time and Sales uses the price feed to show and record sales information. Because some markets do not include every trade in their real time price feeds, this information can be incomplete. For additional information, please refer to exchange specific documentation.
l You can drag-and drop a spread product into the Time and Sales window to display and time
stamp their market activity. However, only the generic spread names based on the products
and expirations appear. Customized names of spreads do not appear.
To open Time and Sales:
From the Control Panel, click the Window menu and choose Time and Sales.
- or From the Control Panel, click the
icon.
You successfully logged into Time and Sales.
X_TRADER® User Manual
Trading Technologies International, Inc. Proprietary and Confidential Information
- 371 -
Chapter 14
Column Descriptions
The Time and Sales window has the following column names:
Column Head- Description
ing
Time
Time the event took place (drawn from the workstation, not the exchange).
Exchange
Name of the exchange where the event occurred.
Product
Name of the product as drawn from the Market Grid.
Contract
Name of the contract as drawn from the Market Grid.
Price
Buy/Sell price of the product.
Qty
Quantity of the product that was bought/sold.
Filters
Use filters in the Time and Sales window to quickly sort and display data. You can select
an OTC filter from the Type, Price, and Qty columns in the window. Refer to Filtering
Overview on page 50.
- 372 -
X_TRADER® User Manual
Trading Technologies International, Inc.
Time and Sales Overview
Populating the Time and Sales Window
After you open a Time and Sales window on the desktop, you must populate it.
Follow the procedures below:
l Populating the Time and Sales window from Market Explorer
l Populating the Time and Sales window using drag-and-drop from Market Explorer
l Populating the Time and Sales window using drag-and-drop from the Market Grid
To populate the Time and Sales window from Market Explorer:
1. From the Control Panel, click the Window menu and choose Market Explorer.
- or -
2.
3.
4.
5.
6.
7.
8.
9.
From the Control Panel, click the
icon.
If you are logged into more than one exchange, in the Exchanges box, click the exchange whose
product you want to find.
In the Products section, click the down arrow and choose your search filter.
Type your search criteria in the available space.
The Instruments field updates as you type.
From the Instrument Type box, click to toggle between the displayed types.
Press and hold the CTRL key and click the products you want to open.
- or To open all products in the Instruments field, click the >> button and skip to step 7.
Click the > button to transfer the products from the Instruments box to the Selected Instruments
box.
Click the Function box in the upper right corner of the Market Explorer and choose Time and
Sales.
Click Start.
The name of the product appears, displaying its associated information (Exchange, Price,
Quantity, and Time). In addition, the lower left corner of the Time and Sales window describes
the status of the drag-and-drop: Added (contract information).
You successfully populated the Time and Sales window from Market Explorer.
X_TRADER® User Manual
Trading Technologies International, Inc. Proprietary and Confidential Information
- 373 -
Chapter 14
To populate a window using drag-and-drop from Market Explorer:
1. If the Time and Sales window is not open, use the Control Panel to open it.
2. From the Control Panel, click the Window menu and choose Market Explorer.
- or -
3.
4.
5.
6.
7.
8.
9.
10.
From the Control Panel, click the
icon.
If you are logged into more than one exchange, in the Exchanges box, click the exchange whose
product you want to find.
In the Products section, click the down arrow and choose your search filter.
Type your search criteria in the available space.
The Instruments field updates as you type.
From the Instrument Type box, click to toggle between the displayed types.
From the Instruments box, press and hold the CTRL key and click the products you want to open.
With the cursor over one of the selected products in the Instruments box, click and hold the mouse
button.
Continue holding the mouse button and drag the cursor to the open Time and Sales window.
When the cursor leaves the window, it changes to a circle with a diagonal line through it. When the
cursor enters a window, it changes to include a plus [ + ] sign.
Release the mouse button.
The name of the product appears, displaying its associated information (Exchange, Price,
Quantity, and Time). In addition, the lower left corner of the Time and Sales window describes
the status of the drag-and-drop: Added (contract information).
You successfully populated the Time and Sales window using drag-and-drop from the Market Explorer.
To populate the Time and Sales window using drag-and-drop from the Market Grid:
1. If the Time and Sales window is not open, use the Control Panel to open it.
2. From an open Market Grid, click the selected product and hold the mouse button.
3. Continue holding the mouse button and drag the cursor to the open Time and Sales window.
When the cursor leaves the window, it changes to a circle with a diagonal line through it. When the
cursor enters a window, it changes to include a plus [ + ] sign.
4. Release the mouse button.
The name of the product appears, displaying its associated information (Exchange, Price,
Quantity, and Time). In addition, the lower left corner of the Time and Sales window describes
the status of the drag-and-drop: Added (contract information).
You successfully populated the Time and Sales window using drag-and-drop from the Market Grid.
- 374 -
X_TRADER® User Manual
Trading Technologies International, Inc.
Time and Sales Overview
Reading the Time and Sales Window
The Time and Sales window keeps a running record of sales for each product added in the
chronological order it is received. Use the scroll bar to view all received information.
l
l
l
l
Each new entry is added to
the top of the list, causing
the window to auto-scroll
downward.
If you manually scroll
through the list to review
older data, auto-scroll turns
off.
A red line at the top of the
window indicates you can
scroll up to view additional
information.
To return to auto-scrolling,
scroll to the top of the window.
Note: Each row is subject to filters applied to the Time and Sales window. All information is stored
in a file called TAS_Data_YYYYMMDD_000001.csv in the directory: <root
drive>:tt\datfiles\tsdata
Recognizing Color Codes
Each row in the Time and Sales window displays information about a single trade for a contract.
The row information is color-coded so you can easily identify the trade activity. These colors can be
changed in the Color tab on the Properties menu.
Set the trade quantity you want to highlight on the Time and Sales tab on the Properties menu.
X_TRADER® User Manual
Trading Technologies International, Inc. Proprietary and Confidential Information
- 375 -
Chapter 14
Hiding Time and Sales Columns
Using the context menu, you can choose which columns you show in the Time and Sales window.
To choose which columns you show:
1. Right-click the Time and Sales window.
2. From the context menu, click Show/Hide Columns.
The Show/Hide Columns dialog box appears.
3. In the Show/Hide Columns dialog, click to select the columns you want to see.
4. Click OK.
You successfully chose which columns you show.
- 376 -
X_TRADER® User Manual
Trading Technologies International, Inc.
Time and Sales Overview
Time and Sales Context Menu
Right-click the Time and Sales window to access the context menu.
The available menu options include:
l
l
l
l
l
Find Control Panel: Displays the Control Panel.
Clear Filter: Removes the filter from the selected cell.
Clear All Filters: Displays all available data.
Show/Hide Columns: Lets you select which columns to show.
Properties: Opens the local Properties menu.
Time and Sales Filters Overview
All the columns in the Time and Sales window can be filtered using a selection of criteria from a
drop-down list. The presence of an applied filter is indicated by a red color code in the cell
immediately below the column heading.
Use these filtering procedures in the Time and Sales window:
l Refer to Setting a Column Filter on page 50
l Refer to Clearing a Column Filter on page 51
Each row is subject to filters applied to the Time and Sales window. If filters are applied, only
product information that fits the filter criteria appears. Information that does not meet the filtering
constraints is not shown.
All information is stored in a file called TAS_Data_YYYYMMDD_000001.csv in the directory:
<root drive>:tt\datfiles\tsdata
X_TRADER® User Manual
Trading Technologies International, Inc. Proprietary and Confidential Information
- 377 -
Chapter 14
Filtering on Quantity for Specific Contracts
You can filter your Time and Sales window based on quantities recorded for specific
contracts.
To filter on quantity for specific contracts:
1. In the Time and Sales window, click the Qty column.
2. Click the Product option.
3. Type a number in the Min column next to the product for which you want to set a quantity.
4. Click OK.
You successfully filtered on quantity for specific contracts.
Saving Time and Sales Information
The Time and Sales window automatically saves trading data for all products populated in its
window while it is open. (e.g., if the application is open for only four hours, only four hours of data
will be automatically saved.)
Tip: All information stores in a file called TAS_Data_YYYYMMDD_000001.csv in the directory:
<root drive>:tt\datfiles\tsdata. Where 000001 stands for the Time and Sales session opened on
YYYYMMDD the Year, Month and Day.
Use the Time and Sales tab in the Properties menu to customize the maximum file size and
number of days to save Time and Sales files.
l The maximum size of the saved data file is 250 MB.
l The maximum number of days to save files is 5 days.
- 378 -
X_TRADER® User Manual
Trading Technologies International, Inc.
Time and Sales Overview
Time and Sales Properties Tab
The Time and Sales tab in the Properties menu is used to set the following file saving
characteristics:
l Maximum File Size: If the amount of data exceeds the configured limit during any time
period, the Time and Sales window continues to update, but the data will not be saved to the
file. The maximum size for the data file is 250 MB.
l Number of days to save file: Historical data files are saved once per day. The maximum
number of days to save files is 5 days.
Note: Time and Sales files older than the configured/default limit are deleted at startup. If you want
to archive these files, save them to another directory before they are deleted.
Use the Time and Sales tab on the Properties menu to perform these procedures:
l Setting how Time and Sales data files are saved
l Archiving the .csv file before it is deleted
To set how Time and Sales data files are saved:
1. From the Control Panel, click the Settings menu and choose Properties.
2. Click the Time and Sales tab.
3. Enter a value in the Maximum File Size box (maximum is 250 MB).
4. Enter the number of days to automatically save the files (maximum is 5 days).
5. Click on OK to close the Properties menu and activate the settings.
You successfully configured saved Time and Sales data files.
To archive the .csv file before it is deleted:
1. From your desktop, right-click the Start Menu and choose Explore.
2.
3.
4.
5.
Under your C:\ drive, double click the tt folder.
Double-click the datfiles folder.
Double-click the tsdata folder.
Right click the TAS_Data_YYYYMMDD_000001.csv file and click Copy.
Note: Where 000001 stands for the session opened on YYYYMMDD the Year, Month and Day.
6. Navigate to the folder you want to save the file in.
7. Right-click an open space in the new folder and click Paste.
You successfully archived the .csv file.
X_TRADER® User Manual
Trading Technologies International, Inc. Proprietary and Confidential Information
- 379 -
Chapter 14 - Time and Sales Overview
[This page intentionally left blank]
- 380 -
X_TRADER® User Manual
Trading Technologies International, Inc. Proprietary and Confidential Information
CHAPTER 15
Wholesale Trading Overview
The LIFFE Wholesale system is a reporting mechanism for transactions negotiated outside the wholesale
trade markets.
They must also decide which firm executes the order. The executing member submits the order on both the
buy and sell side. Because the counter member does not submit an order, no counter member information
exists in the order. The counter member does not receive order acknowledgment or fills. Once a wholesale
order has been submitted, it cannot be canceled, revised, or handed off to a different trader.
Note: Wholesale orders appear in the Audit Trail window, and the Total Traded Quantity column in
the Market and Fill windows. Wholesale orders do not appear in the Order Book window.
To open a Wholesale Trade window:
1. Log onto one of the exchanges that support wholesale trades.
2. Open the Market Explorer and select a product.
3. Open a Market window for the selected product.
4. In the Market window, click the row containing the product.
5. To access the Market Grid context menu, right-click in the specified product row.
6. Highlight Wholesale and click the type of wholesale window you want to open.
The wholesale window displays.
You successfully opened a Wholesale Trade window.
Wholesale Trading Audit Trail Messages
The two firms negotiate the terms of the transaction outside the market. They must decide which
firm executes the order. The executing member submits the order. Because the counter member does
not submit an order, no counter member information exists in the order. The counter member does
not receive order acknowledgement or fills. Once a wholesale order is submitted, it cannot be
canceled, revised, or handed to a different trader.
Note: TTORD Traders are permitted to send Block trades
The following wholesale trading events cause a message to appear in the Audit Trail:
Event
Order Submission
Message Indicates
Wholesale order has been submitted to the exchange
Order Receipt
Wholesale order has been received by the exchange
Fill Message
One fill message is sent for the buy side of the order
Fill Message
One fill message is sent for the sell side of the order
Order Reject
Order is rejected by the exchange
X_TRADER® User Manual
Trading Technologies International, Inc. Proprietary and Confidential Information
- 381 -
Chapter 15
Wholesale Trading Types
Wholesale trades are defined as follows:
l Block Trades: High volume trades in any outright or strategy product.
l Basis Trades: Strategies for long-term bond markets that incorporate a futures leg and an
underlying (or cash) leg.
Only the future leg is traded at the LIFFE exchange. The cash leg is traded on a separate
exchange, which can be executed through X_TRADER or another method.
l Against Actuals Trades: Strategies for commodities markets that incorporate a futures leg
and an underlying commodity leg.
Only the future leg is traded at the LIFFE exchange. The cash leg is traded on a separate
exchange, which can be executed through X_TRADER or another method.
Against Actual trades are only valid for commodities contracts.
l Exchange for Swap Trades: A strategy whereby a position in the underlying is traded for a
futures position in two separate transactions.
l Flex Options Trades: FTSE 100 options, except that any expiration day and exercise price
can be specified.
Flex Option trades are only valid for the ESX contract at LIFFE.
Wholesale Trading Types and Supporting Exchanges
The following table shows the order types each exchange supports, as well as other
requirements.
Exchange Wholesale Trades Supported
Against
Actuals
Basis
Block
LIFFE
X
X
X
Account CTI
Posting
Codes
Codes
Codes
Flex
Guaranteed Market
Required
Required
Required
Options Cross
Maker
Cross
X
X
Euronext
(Paris)
X
X
X
X
X
X
X
Euronext
(Brussels)
X
X
X
X
X
X
X
- 382 -
X_TRADER® User Manual
Trading Technologies International, Inc.
Wholesale Trading Overview
Block Trade Overview
Block trades are high volume trades in any outright or strategy product. Use the Block Trade
window to submit a block trade.
X_TRADER® User Manual
Trading Technologies International, Inc. Proprietary and Confidential Information
- 383 -
Chapter 15
Block Trade Window
The fields in a Block Trade window vary depending on the type of product or strategy you
trade. If the product is a strategy, the associated legs for that strategy are listed in a set of
fields in the lower half of the Block Trade window. The Quantity and Price fields must be
filled for each leg of the strategy in order for the trade to be accepted.
General
Fields
Series
Descriptions
Month
Maturity month of the contract. This fills with the product information in the Market window.
AMR
Auto Market Reference—unique exchange-specific product identifier. This fills
with the product information in the Market window.
Price
Price of the product.
Quantity
Quantity of the product to be traded.
Transaction
Code
A code uniquely identifying the trade.
Name and identification of the contract series. This fills with the product information in the Market window.
Buyer /
Descriptions
Seller Fields
Trader
An exchange mnemonic uniquely identifying the trader.
Acc Code
Account code for this trade. Can be one of the following: H (House), L (Local), S
(Segregated), or N (Non-segregated)
Open/Close
Indicates whether this trade opens or closes a position.
CTI
Clearing code. Valid entries include: 1, 2, 3, 4, U for unassigned and A for allocation
Posting Code
Account posting code.
Account #
Optional field used for account numbers up to eight digits.
Leg
Name of the strategy leg (optional with Strategies).
Quantity
Quantity of the strategy leg to be traded (optional with Strategies).
Price
Price of the strategy leg to be traded (optional with Strategies).
Optional But- Descriptions
tons
Block
Designates a block trade.
Market Maker Designates a cross order.
Cross
Guaranteed
Crossing
Designates a guaranteed cross order. Refer to Euronext and Guaranteed Crossing
on page 401.
Asset Allocation
Designates an asset allocation. Refer to Asset Allocation Methods on page 402.
Prof Trade
Designates a Prof Trade. Refer to Entering Prof Trades on page 397.
- 384 -
X_TRADER® User Manual
Trading Technologies International, Inc.
Wholesale Trading Overview
Submitting a Block Trade
Block trades are high volume trades in any outright or strategy product. Block trading is not
subject to normal X_TRADER credit risk limitations. The trader submitting the order will be
notified by the exchange if it is approved.
Note: Wholesale orders appear in the Audit Trail window, and the Total Traded Quantity
column in the Market and Fill windows. Wholesale orders do not appear in the Order
Book window.
To submit a block trade:
1.
2.
3.
4.
5.
6.
Log into the appropriate exchange.
Open the Market Explorer and select a product.
Open a Market window for the selected product.
In the Market window, click in the row containing the product.
Right-click in the row to access the context menu.
Highlight Wholesale and click Block.
The Block Trade window displays. The Series, Month, and AMR fields display data from the
Market Grid.
7. In the Price and Quantity fields, type the appropriate values.
8. Complete steps 9-13 in both the Buyer and Seller sections.
9. In both Acc Code fields, type the account code for this trade.
Note: Valid entries include: H (House), L (Local), S (Segregated), or N (Non-segregated).
10. In both Open/Close fields, type O or C to indicate whether this trade opens or closes a position.
11. In both CTI fields, type the appropriate clearing code.
Note: Valid entries include: 1, 2, 3, 4, U for unassigned and A for allocation.
12. In both Posting Code fields, only enter a value if the trade is for the Euronext exchange.
13. In both Account# fields, type the account numbers if applicable.
14. If you are sending this as a cross order, click to select Market Maker Cross or Guaranteed Crossing. If not, click to select Block.
15. Click Send to submit the order.
You successfully submitted a block trade.
X_TRADER® User Manual
Trading Technologies International, Inc. Proprietary and Confidential Information
- 385 -
Chapter 15
Basis Trade Overview
Basis trades are strategies that incorporate a futures leg and underlying (or cash) leg. Use the Basis
Trade window to submit a basis trade
For basis trades, only the future leg is traded at the exchange. The cash leg is traded on a separate
exchange, which may trade through X_TRADER or another method. Therefore, the exchange
sends trade/fill information for both the buy and sell side of the futures leg. A fill is not sent for the
cash leg.
- 386 -
X_TRADER® User Manual
Trading Technologies International, Inc.
Wholesale Trading Overview
Basis Trade Window
The fields in a Basis Trade window vary depending on the type of product or strategy you
trade. If the product is a strategy, the associated legs for that strategy are listed in a set of
fields in the lower half of the Basis Trade window. The Quantity and Price fields must be
filled for each leg of the strategy in order for the trade to be accepted.
General
Fields
Series
Descriptions
Month
Maturity month of the contract. This fills with the product information in the Market window.
AMR
Auto Market Reference—unique exchange-specific product identifier. This fills
with the product information in the Market window.
Price
Price of the product.
Quantity
Quantity of the product to be traded.
Transaction
Code
A code uniquely identifying the trade.
Name and identification of the contract series. This fills with the product information in the Market window.
Buyer /
Descriptions
Seller Fields
Trader
An exchange mnemonic uniquely identifying the trader.
Account
Account code for this trade. Can be one of the following: H (House), L (Local), S
(Segregated), or N (Non-segregated)
Open/Close
Indicates whether this trade opens or closes a position.
ISIN
International Security Identification Number. Uniquely identifies a product.
Cash Prc
Price for the underlying that is agreed to by buyer and seller.
HR
Hedge Ratio. One character that identifies the methodology used to determine the
price for the underlying component.
Hedge Ratio Codes include:
l
P: Price factor or duration method
l
M: (Modified) Duration method
l
S: Sensitivity spread ratio
l
D: Delta neutral ratio
Reference
Identifies the underlying product (order number, selling/buying code, etc., from
the other exchange).
CTI
Clearing code. Valid entries include: 1, 2, 3, 4, U for unassigned and A for allocation
Posting Code
Account posting code.
Account #
Optional field used for account numbers up to eight digits.
Leg
Name of the strategy leg (optional with Strategies).
Quantity
Quantity of the strategy leg to be traded (optional with Strategies).
Price
Price of the strategy leg to be traded (optional with Strategies).
X_TRADER® User Manual
Trading Technologies International, Inc. Proprietary and Confidential Information
- 387 -
Chapter 15
Submitting a Basis Trade
Basis trades are strategies that incorporate a futures leg and an underlying (cash) leg. Basis
trading is not subject to normal X_TRADER credit risk limitations. The trader submitting the
order will be notified by the exchange if it is approved.
Note: Wholesale orders appear in the Audit Trail window, and the Total Traded Quantity
column in the Market and Fill windows. Wholesale orders do not appear in the Order
Book window.
To submit a basis trade:
1.
2.
3.
4.
5.
6.
Log into the appropriate exchange.
Open the Market Explorer and select a product.
Open a Market window for the selected product.
In the Market window, click in the row containing the product.
Right-click in the row to access the context menu.
Highlight Wholesale and click Basis.
The Basis Trade window displays. The Series, Month, and AMR fields display data from the
Market Grid.
7. In the Price and Quantity fields, type the appropriate values.
8. Complete steps 9-17 in both the Buyer and Seller sections.
9. In both Acc Code fields, type the account code for this trade.
Note: Valid entries include: H (House), L (Local), S (Segregated), or N (Non-segregated).
10.
11.
12.
13.
In both Open/Close fields, type O or C to indicate whether this trade opens or closes a position.
In both ISIN fields, type the International Security Identification Number.
In both Cash Prc fields, type the price for the underlying agreed to by buyer and seller.
In both HR fields, identify the methodology used to determine the price for the underlying component.
Note: Valid entries include: P (Price factor or duration method), M (Modified duration method), S
(Sensitivity spread ratio) and D (Delta neutral ratio).
14. In both Reference fields, identify the underlying product.
15. In both CTI fields, type the appropriate clearing code.
Note: Valid entries include: 1, 2, 3, 4, U for unassigned and A for allocation.
16. In both Posting Code fields, only enter a value if the trade is for the Euronext exchange.
17. In both Account# fields, type the account numbers if applicable.
18. Click Send to submit the order.
You successfully submitted a basis trade.
- 388 -
X_TRADER® User Manual
Trading Technologies International, Inc.
Wholesale Trading Overview
Against Actuals Trade Overview
Against Actual strategies are for commodities markets that incorporate a futures leg and an
underlying commodity leg. Use the Against Actuals window to submit an against actuals trade.
For Against Actual trades, only the future leg is traded at the exchange. The cash leg is traded on a
separate exchange, which may be executed through X_TRADER or another method. Therefore, the
exchange sends trade/fill information for both the buy and sell side of the futures leg. A fill is not
sent for the cash leg. The details of the actual buyer and seller are resolved between the exchange
and the executing member via a phone call.
X_TRADER® User Manual
Trading Technologies International, Inc. Proprietary and Confidential Information
- 389 -
Chapter 15
Against Actuals Trade Window
The fields in an Against Actuals Trade window vary depending on the type of product or
strategy you trade. If the product is a strategy, the associated legs for that strategy are listed in
a set of fields in the lower half of the Against Actuals Trade window. The Quantity and
Price fields must be filled for each leg of the strategy in order for the trade to be accepted.
General
Fields
Series
Descriptions
Month
Maturity month of the contract. This fills with the product information in the Market window.
AMR
Auto Market Reference—unique exchange-specific product identifier. This fills
with the product information in the Market window.
Price
Price of the product.
Quantity
Quantity of the product to be traded.
Transaction
Code
A code uniquely identifying the trade.
Name and identification of the contract series. This fills with the product information in the Market window.
Buyer /
Descriptions
Seller Fields
Trader
An exchange mnemonic uniquely identifying the trader.
Account
Account code for this trade. Can be one of the following: H (House), L (Local), S
(Segregated), or N (Non-segregated)
Open/Close
Indicates whether this trade opens or closes a position.
ISIN
International Security Identification Number. Uniquely identifies a given product.
Cash Prc
Price for the underlying that is agreed to by buyer and seller.
HR
Hedge Ratio. One character that identifies the methodology used to determine the
price for the underlying component.
Hedge Ratio Codes include:
l
P: Price factor or duration method
l
M: (Modified) Duration method
l
S: Sensitivity spread ratio
l
D: Delta neutral ratio
Reference
Identifies the underlying product (order number, selling/buying code, etc., from
the other exchange).
CTI
Clearing code. Valid entries include: 1, 2, 3, 4, U for unassigned and A for allocation
Posting Code
Account posting code.
Account #
Optional field used for account numbers up to eight digits.
Leg
Name of the strategy leg (optional with Strategies).
Quantity
Quantity of the strategy leg to be traded (optional with Strategies).
Price
Price of the strategy leg to be traded (optional with Strategies).
- 390 -
X_TRADER® User Manual
Trading Technologies International, Inc.
Wholesale Trading Overview
Submitting an Against Actuals Trade
Against Actuals are strategies for commodities markets that incorporate a futures leg and an
underlying commodity leg. For Against Actual trades, only the future leg is traded at the
exchange. The cash leg is traded on a separate exchange, which may be executed through
X_TRADER or another method.
Against Actual trading is not subject to normal X_TRADER credit risk limitations. The
trader submitting the order will be notified by the exchange if it is approved.
Note: Wholesale orders appear in the Audit Trail window, and the Total Traded Quantity
column in the Market and Fill windows. Wholesale orders do not appear in the Order
Book window.
To submit an Against Actual trade:
1. Log into the appropriate exchange.
2. Open the Market Explorer and select a product.
3. Open a Market window for the selected product.
4. In the Market window, click in the row containing the product.
5. Right-click in the row to access the context menu.
6. Highlight Wholesale and click Against Actual.
The Against Actual window displays. The Series, Month, and AMR fields display data from the
Market Grid.
7. In the Price and Quantity fields, type the appropriate values.
8. Complete steps 9-17 in both the Buyer and Seller sections.
9. In both Acc Code fields, type the account code for this trade.
Note: Valid entries include: H (House), L (Local), S (Segregated), or N (Non-segregated).
10.
11.
12.
13.
In both Open/Close fields, type O or C to indicate whether this trade opens or closes a position.
In both ISIN fields, type the International Security Identification Number.
In both Cash Prc fields, type the price for the underlying agreed to by buyer and seller.
In both HR fields, identify the methodology used to determine the price for the underlying component.
Note: Valid entries include: P (Price factor or duration method), M (Modified duration method), S
(Sensitivity spread ratio) and D (Delta neutral ratio).
14. In both Reference fields, identify the underlying product.
15. In both CTI fields, type the appropriate clearing code.
Note: Valid entries include: 1, 2, 3, 4, U for unassigned and A for allocation.
16. In both Posting Code fields, only enter a value if the trade is for the Euronext exchange.
17. In both Account# fields, type the account numbers if applicable.
18. Click Send to submit the order.
You successfully submitted an against actual trade.
X_TRADER® User Manual
Trading Technologies International, Inc. Proprietary and Confidential Information
- 391 -
Chapter 15
Exchange For Swap Overview
Exchange for Swap is a strategy whereby a position in the underlying is traded for a futures
position. For example a trader with a long OTC swap position and a short Future position might
wish to swap out against another trader with a short OTC swap position and a long Future position.
The trade records as two separate transactions provided the swap leg of the transaction has to do
with a cleared swap. If it is a bilateral uncleared OTC trade, X_TRADER records only one
transaction.
Use the Exchange For Swap window to submit an exchange for swap trade.
- 392 -
X_TRADER® User Manual
Trading Technologies International, Inc.
Wholesale Trading Overview
Exchange For Swap Window
The fields in an Exchange For Swap window vary depending on the type of product or
strategy you trade. If the product is a strategy, the associated legs for that strategy are listed in
a set of fields in the lower half of the Exchange For Swap window. The Quantity and
Price fields must be filled for each leg of the strategy in order for the trade to be accepted.
General
Fields
Series
Descriptions
Month
Maturity month of the contract. This fills with the product information in the Market window
AMR
Auto Market Reference—unique exchange-specific product identifier. This fills
with the product information in the Market window.
Price
Price of the product.
Quantity
Quantity of the product to be traded.
Transaction
Code
A code uniquely identifying the trade.
Name and identification of the contract series. This fills with the product information in the Market window.
Buyer /
Descriptions
Seller Fields
Trader
An exchange mnemonic uniquely identifying the trader.
Account
Account code for this trade. Can be one of the following: H (House), L (Local), S
(Segregated), or N (Non-segregated)
Open/Close
Indicates whether this trade opens or closes a position.
ISIN
International Security Identification Number. Uniquely identifies a given product.
Cash Prc
Price for the underlying that is agreed to by buyer and seller.
HR
Hedge Ratio. One character that identifies the methodology used to determine the
price for the underlying component.
Hedge Ratio Codes include:
l
P: Price factor or duration method
l
M: (Modified) Duration method
l
S: Sensitivity spread ratio
l
D: Delta neutral ratio
Reference
Identifies the underlying product (order number, selling/buying code, etc., from
the other exchange).
CTI
Clearing code. Valid entries include: 1, 2, 3, 4, U for unassigned and A for allocation
Posting Code
Account posting code.
Account #
Optional field used for account numbers up to eight digits.
Leg
Name of the strategy leg (optional with Strategies).
Quantity
Quantity of the strategy leg to be traded (optional with Strategies).
Price
Price of the strategy leg to be traded (optional with Strategies).
X_TRADER® User Manual
Trading Technologies International, Inc. Proprietary and Confidential Information
- 393 -
Chapter 15
Submitting an Exchange For Swap Trade
Exchange for Swap is a strategy whereby a position in the underlying is traded for a futures
position.
Exchange For Swap trading is not subject to normal X_TRADER credit risk limitations. The
trader submitting the order will be notified by the exchange if it is approved.
Note: Wholesale orders appear in the Audit Trail window, and the Total Traded Quantity
column in the Market and Fill windows. Wholesale orders do not appear in the Order
Book window.
To submit an Exchange for Swap trade:
1. Log into the appropriate exchange.
2. Open the Market Explorer and select a product.
3. Open a Market window for the selected product.
4. In the Market window, click in the row containing the product.
5. Right-click in the row to access the context menu.
6. Highlight Wholesale and click Exchange for Swap.
The Exchange for Swap window displays. The Series, Month, and AMR fields display data from
the Market Grid.
7. In the Price and Quantity fields, type the appropriate values.
8. Complete steps 9-17 in both the Buyer and Seller sections.
9. In both Acc Code fields, type the account code for this trade.
Note: Valid entries include: H (House), L (Local), S (Segregated), or N (Non-segregated).
10.
11.
12.
13.
In both Open/Close fields, type O or C to indicate whether this trade opens or closes a position.
In both ISIN fields, type the International Security Identification Number.
In both Cash Prc fields, type the price for the underlying agreed to by buyer and seller.
In both HR fields, identify the methodology used to determine the price for the underlying component.
Note: Valid entries include: P (Price factor or duration method), M (Modified duration method), S
(Sensitivity spread ratio) and D (Delta neutral ratio).
14. In both Reference fields, identify the underlying product.
15. In both CTI fields, type the appropriate clearing code.
Note: Valid entries include: 1, 2, 3, 4, U for unassigned and A for allocation.
16. In both Posting Code fields, only enter a value if the trade is for the Euronext exchange.
17. In both Account# fields, type the account numbers if applicable.
18. Click Send to submit the order.
You successfully submitted an Exchange for Swap trade.
- 394 -
X_TRADER® User Manual
Trading Technologies International, Inc.
Wholesale Trading Overview
Flex Options Overview
FLEX® orders are essentially FTSE 100 options, except that any expiration day and exercise price
can be specified. The trade submission and authorization process is only semi-automated. Therefore,
completing a flex options trade requires manual intervention by an exchange official.
Use the Flex Options window to submit a flex options trade.
Flex Options Window
General
Fields
Strategy
Code
Descriptions
Delta
Delta of the option. If the trade contains the underlying component LFZ (FLX), its
value should be 1-100. If not, its value should be zero.
Legs
Up to 5 components can be defined in a FLEX trade. For each, the following
parameters exist:
Any LIFFE recognized strategy code.
l
Commodity: The commodity code. Z for FTSE 100; FLX for the underlying.
l
Exercise Price: The price the contract can be exercised.
l
Contract Type: Call, Put or Future.
l
Expiration Date: Date of expiration for the particular leg.
l
Buy/Sell: Whether it is being bought or sold.
l
Qty: Quantity traded.
l
Price: Price of the component.
X_TRADER® User Manual
Trading Technologies International, Inc. Proprietary and Confidential Information
- 395 -
Chapter 15
Submitting a Flex Options Trade
Note: Wholesale orders appear in the Audit Trail window, and the Total Traded Quantity
column in the Market and Fill windows. Wholesale orders do not appear in the Order
Book window.
To submit a FLEX Options trade:
1. Log into the appropriate exchange.
2. Open the Market Explorer and select a product.
3.
4.
5.
6.
Open a Market window for the selected product.
In the Market window, click in the row containing the product.
Right-click in the row to access the context menu.
Highlight Wholesale and click Flex Options.
The Flex Options window displays.
7. In the Strategy Code list, select the strategy you want to use.
8. In the Delta field, type the appropriate value.
Note: If the trade contains the underlying component LFZ (FLX), its value should be 1-100. If not,
its value should be zero.
9.
10.
11.
12.
13.
14.
15.
For the first leg, in the Commodity list, select FLX or Z.
In the Exercise Prc field, type the exercise price.
In the Contract Type field, click the down arrow and select C (call), P (put), or F (future).
In the Expiry Date field, type the expiration date for the contract.
In the Buy/Sell field, click the down arrow and select B or S.
In the Qty field, type the quantity of the trade.
In the Price field, type the price of the contract.
You successfully submitted a FLEX options trade.
- 396 -
X_TRADER® User Manual
Trading Technologies International, Inc.
Wholesale Trading Overview
Entering Prof Trades
Prof Trades are pre-negotiated trades between two parties that take place outside the central order
book. The Prof Trade is only a valid ex-pit trade on the Amsterdam Market. As of August 2008, no
other exchange TT supports permits Prof Trades.
A single Prof Trade consists of two intentions:
l Initiator intention
l Reactor intention
Each party in the Prof Trade enters their intention separately. The Prof Trade occurs when both
counterparties enter matching intentions using the same password.
l Prof Trade Fields
l Tradable Instruments
Prof Trade Fields
Type
Package ID
Instruments
The unique number that identifies your Prof Trade.
Initiator or Reactor
Identifies you as an initiator or a reactor in this trade.
Prof trade intentions submitted by Initiators can match with
intentions submitted by Reactors or Initiators. Prof trade intentions
submitted by Reactors can only match with intentions submitted by
Initiators.
Buy or Sell
Identifies this half trade as a Buy or Sell.
Password
Identifies a match with the other half trade that is submitted
separately.
X_TRADER® User Manual
Trading Technologies International, Inc. Proprietary and Confidential Information
- 397 -
Chapter 15
Tradable Instruments
Type
Financials
Instruments
Euro/Dollar Currency Future & Options
Financials
Dollar/Euro Currency Future & Options
Index and Equities
AEX® Futures
Index and Equities
Individual Equity Options
Notes:
Prof Trades...
l When confirmed, receive a fill only for the side of the trade that was entered via
that Order Server.
l Must represent a size of at least 250 contracts, all legs added together.
l With a single counterparty at a single price must be submitted separately but can
be bundled together using a Package Identifier.
l Cannot be entered in Strategy markets, but can be created by linking trades in
several outright markets together using a Package Identifier.
Tip Using the same Package Identifier lets brokers submit multiple Prof Trades, but be
assessed a clearing fee for a single Prof Trade.
- 398 -
X_TRADER® User Manual
Trading Technologies International, Inc.
Wholesale Trading Overview
Strategy Wholesale Trades
You can trade strategies using the Wholesale Trading windows.
The following exchanges support wholesale trades for strategies:
l LIFFE exchange
l Euronext (Paris) exchange
l Euronext (Brussels) exchange
X_TRADER® User Manual
Trading Technologies International, Inc. Proprietary and Confidential Information
- 399 -
Chapter 15
To trade using the Strategy window:
1. Log into the appropriate exchange.
2. Open the Market Explorer and select a product.
3. Create or drag and drop a strategy into the Market Grid.
4. Open a Market window for the selected product.
5. In the Market window, click the row containing the product.
6. Right-click in the row to access the context menu.
7. Highlight Wholesale and click the type of wholesale window you want to open.
The Strategy Trade window displays. The Series, Month, and AMR fields display data from the
Market Grid. The legs of the strategy display in the grid on the bottom of the screen.
8. Complete steps 9-13 in both the Buyer and Seller sections.
9. In both Acc Code fields, type the account code for this trade.
Note: Valid entries include: H (House), L (Local), S (Segregated), or N (Non-segregated).
10. In both Open/Close fields, type O or C to indicate whether this trade opens or closes a position.
11. In both CTI fields, type the appropriate clearing code.
Note: Valid entries include: 1, 2, 3, 4, U for unassigned and A for allocation.
12. In both Posting Code fields, only enter a value if the trade is for the Euronext exchange.
13. In both Account# fields, type the account numbers.
14. If you are sending this as a cross order, click to select Market Maker Cross or Guaranteed Crossing. If not, click to select Block.
15. In the Qty and Price columns, enter the appropriate value for each strategy leg.
16. Click Send to submit the order.
You successfully traded using the Strategy window.
- 400 -
X_TRADER® User Manual
Trading Technologies International, Inc.
Wholesale Trading Overview
Euronext and Guaranteed Crossing
Note: Refer to Wholesale Trading Types on page 382 for more information on the exchanges that
support wholesale trades.
Euronext products execute on the Paris and Brussels exchanges. If you trade products on the
Euronext (Paris) exchange, the Guaranteed Crossing feature is available.
When you use this feature, the order is sent as a cross order. When the exchange accepts the order,
the two sides are guaranteed to match with one another and not a different order in the market.
Guaranteed Cross orders validate automatically.
To submitted a Guaranteed Crossing trade:
1. Log into the Euronext exchange.
2. Open the Market Explorer and select a product.
3. Open a Market window for the selected product.
4. In the Market window, click the row containing the product.
5. Right-click in the row to access the context menu.
6. Highlight Wholesale Orders and click the appropriate wholesale trading type.
Note: The following example applies to the Block Trade dialog box.
The Block Trade window displays. The Series, Month, and AMR fields display data from the
Market Grid.
7. In the Price and Quantity fields, type the appropriate values.
8. Complete steps 9-13 in both the Buyer and Seller sections.
9. In both Acc Code fields, type the account code for this trade.
Warning! Each exchange maintains a different set of Account codes. Valid account codes
for Euronext include:
l C = Customer
l H = House
l M = Market Maker
10. In both Open/Close fields, type O or C to indicate whether this trade opens or closes a position.
11. Leave the CTI fields blank.
12. In both Posting Code fields, type a value.
Note: Valid values include M = Manual Posting, A = Automatic Posting,G = Give-up Posting.
13. In both Account# fields, type the account numbers if applicable.
14. Click to select the Guaranteed Crossing checkbox.
15. Click Send to submit the order.
You successfully submitted a Guaranteed Crossing trade.
X_TRADER® User Manual
Trading Technologies International, Inc. Proprietary and Confidential Information
- 401 -
Chapter 15
Asset Allocation Methods
The Asset Allocation option is available in the Block Trade window. When enabled, it allows you
to enter one side (buy or sell) of a wholesale order. Alternatively, one trader can enter the entire
Asset Allocation.
When you enable the Asset Allocation option, the following fields appear:
Field
Trade Seq#
Description
The sequence numbers of component legs that make up the Asset Allocation.
Matching Con- The commodity code of the contract. This does not include the month or the year.
tract
Counter Party
ITM of the trader for the matching half trade.
Password
Identifies a match with the other half trade that is submitted separately.
For more information, see the examples starting on the next page.
- 402 -
X_TRADER® User Manual
Trading Technologies International, Inc.
Wholesale Trading Overview
Entering Asset Allocation Orders
Two to three traders can enter four half trades that make up the Asset Allocation.
Alternatively, one Trader can enter two orders to complete the Asset Allocations.
Half Trades Example:
Trader 1 enters a half trade to Buy Product A.
l Trader 1 fills in the Buyer section.
l The Seller section is left blank.
l The Matching Contract is <Product A> (No month or year)
l The Trade Seq # is 1
l The Counter Party is Trader 2’s ITM.
l The Password is numeric.
Trader 1 enters a half trade to Buy Product B.
l Trader 1 fills in the Buyer section.
l The Seller section is left blank.
l The Matching Contract is <Product B> (No month or year)
l The Trade Seq # is 2
l The Counter Party is Trader 3’s ITM.
l The Password is the same as above.
Trader 2 enters a half trade to Sell Product A.
l Trader 2 fills in the Seller section.
l The Buyer section is left blank.
l The Matching Contract is <Product A> (No month or year)
l The Trade Seq # is 3
l The Counter Party is Trader 1’s ITM.
l The Password is the same as above.
Trader 3 enters a half trade to Sell Product B.
l Trader 3 fills in the Seller section.
l The Buyer section is left blank.
l The Matching Contract is <Product B> (No month or year)
l The Trade Seq # is 4
l The Counter Party is Trader 1’s ITM.
l The Password is the same as above.
X_TRADER® User Manual
Trading Technologies International, Inc. Proprietary and Confidential Information
- 403 -
Chapter 15
One Trader Example:
Trader 1 enters a half trade to Buy Product A.
l The Seller section is completed along with the Buyer section.
l The Matching Contract is <Product A> (No month or year)
l The Trade Seq # is 1
l The Counter Party is Trader 2’s ITM.
l The Password is numeric.
Trader 1 enters a half trade to Buy Product B.
l The Seller section is completed along with the Buyer section.
l The Matching Contract is <Product A> (No month or year)
l The Trade Seq # is 2
l The Counter Party is Trader 3’s ITM.
l The Password is the same as above.
- 404 -
X_TRADER® User Manual
Trading Technologies International, Inc.
CHAPTER 16
Trading Specialty Exchanges
X_TRADER lets you connect to and trade on many different exchanges. Depending on which exchanges
you trade, certain screens in X_TRADER may appear differently and offer unique options.
This section covers the unique options available when trading the following exchanges:
l Brokertec
l EBS
l Intercontinental Exchange (ICE)
l Sydney Futures Exchange (SFE)
l TOCOM
X_TRADER® User Manual
Trading Technologies International, Inc. Proprietary and Confidential Information
- 405 -
Chapter 16
Trading BrokerTec
Because of the unique nature of the BrokerTec market, X_TRADER changes when it interacts with
BrokerTec products.
These changes affect the following:
l Tradable Products
l Order Types
l Pricing Notations
l Pricing Format
l Market Grid
l MD Trader
l Excel Links
l Autotrader
l
Autospreader
l Click Trading
In addition, the BrokerTec exchange adds functionality to X_TRADER that does not exist for other
exchanges. Refer to Unique Functionality in BrokerTec on page 409.
Tradable Products
BrokerTec supports the following products:
l 2 year Actives (On-the-runs) and When Issued
l 3 year Actives (On-the-runs) and When Issued
l 5 year Actives (On-the-runs) and When Issued
l 10 year Actives (On-the-runs) and When Issued
l 30 year Actives (On-the-runs) and When Issued
Order Types
The following order types are available when trading BrokerTec. Orders sent with any other
order type are rejected:
Brokertec Order Type
Description
FAS (Fill and Save)
Associated TT
Order Type
Limit Order
FOK (Fill or Kill)
FOK
Fills order completely, or cancels the order immediately. Partial fill is not accepted.
FAK (Fill and Kill)
IOC
Fills as much as possible. The remaining quantity
is canceled immediately.
Order with hidden size
Iceberg
The remaining order quantity becomes Passive.
Fills as much as possible. The remaining order
quantity becomes Passive.
- 406 -
X_TRADER® User Manual
Trading Technologies International, Inc.
Trading Specialty Exchanges
Pricing Notations
BrokerTec uses the following notation:
l 0 => 0/8 = 0
l 2 => 2/8 = 0.25
l + => 4/8 = 0.5
l 6 => 6/8 = 0.75
CBOT uses the following notation for futures:
l 0 => 0.00
l 2 => 0.25
l 5 => 0.5
l 7 => 0.75
The two notations are equivalent.
Pricing Format
Prices for BrokerTec products display in the following manner:
l 2, 3, and 5 year Actives trade at a quarter of 1/32.
Example: 100.02, 100.022, 100.02+, 100.026, 100.03...etc.
l
10 and 30 year Actives trade at half of 1/32.
Example: 101.00, 101.00+, 101.01, 101.01+...etc.
l
2, 3, 5, 10 and 30 year When Issued contracts trade in yield.
Note: No trailing zeroes display for Actives pricing formats.
Market Grid
When you display depth in the Market Grid, When Issued products sort with the prices in
ascending order (i.e., lower numbers at the top and the higher numbers on the bottom).
When Issued products sort this way because they trade in yield which is inversely related to
price.
X_TRADER® User Manual
Trading Technologies International, Inc. Proprietary and Confidential Information
- 407 -
Chapter 16
MD Trader
BrokerTec affects MD Trader in the following ways:
l Passive and Leave checkboxes are added to the Enable Order Types section on the
MD Trading tab.
You can assign buttons to these order types and make them sticky.
Note: The Leave order type overrides the Allow only one order per side of market
option on the MD Trading tab.
l
l
When Issued products display with the prices in ascending order in MD Trader (i.e.,
lower numbers at the top and the higher numbers on the bottom). When Issued products sort this way because they trade in yield which is inversely related to price.
In regards to workup, the gateway handles LTQ in one of two ways:
l Accumulates LTQ from workup to workup at the same price level.
Example: If LTQ at 100.01+ is 5 at the end of workup, it begins at 5 during
the next workup at 100.01+.
l
Resets LTQ to zero at the beginning of workup at the same price level.
Example: If LTQ at 100.01+ is 5 at the end of workup, it resets to 0 during
the next workup at 100.01+.
Note: Refer to Working-Up Orders on page 412 for more information.
Excel Links
You can add links to the Market Grid, Autotrader, MD Trader, and the Fill windows.
l For prices imported from Excel to a BrokerTec product, X_TRADER interprets the
final digit "4" as a "+".
l For prices exported to Excel from a BrokerTec product, X_TRADER converts the
"+" for the final digit to a "4".
Warning! Be careful when using BrokerTec prices in Excel calculations. Excel does not
interpret the digits "4" and "6" as 1/2 and 3/4 respectively.
- 408 -
X_TRADER® User Manual
Trading Technologies International, Inc.
Trading Specialty Exchanges
Autotrader and Autospreader
All orders sent to the market from either Autotrader or Autospreader are:
l Aggressive orders (i.e., will Hit or Take Passive orders)
l Leave orders (i.e., will not cancel previously sent orders on same side of market)
Note: Refer to Working-Up Orders on page 412 to see how Autotrader and Autospreader
are affected during this unique time. Also, refer to Autotrader Tick Formula on page 414.
Click Trading
When you click up in the Click Offset, +/-, or Dime fields, the values for all products
(including When Issued) increment. When you click down in the same fields, the values for
all products (including When Issued) decrement.
Unique Functionality in BrokerTec
BrokerTec adds functionality to X_TRADER that does not exist for other exchanges. This
includes:
l Placing Passive and Aggressive Orders
l Working-Up Orders
l Send Quote Order Property
l
l
l
Leave checkbox
Hold In Timer
Autotrader Tick Formula
X_TRADER® User Manual
Trading Technologies International, Inc. Proprietary and Confidential Information
- 409 -
Chapter 16
Placing Passive and Aggressive Orders
There are two ways to send orders to the BrokerTec market: Passive and Aggressive.
Passive orders rest in the market waiting for an Aggressive order to Hit or Take them.
Aggressive orders Hit or Take Passive orders resting in the market.
In...
Market Window
To send a Passive Order...
Click the Bid or Offer buttons
To send an Aggressive Order...
Click the Hit or Take buttons
MD Trader
Click the Passive order type from the MD
Trading tab on the Properties menu
All orders are sent Aggressive by
default
Autotrader
Not Applicable
All orders are sent Aggressive
Autospreader
Not Applicable
All orders are sent Aggressive
Since two Passive orders on opposite sides of the market can not fill each other, those two
orders lock the market until an order is placed to either hit the bid or take the offer. The
BrokerTec market, therefore, will display crossed markets when Passive bids and offers are
resting at the same price.
When trading BrokerTec, the P/A column in the Fill Window, Trade Book and Audit Trail
indicates whether the order was filled as A (Aggressive) or P (Passive). If a Passive order
has the Auto Aggressive property enabled and fills by becoming Aggressive, the P/A
column displays: PA
The Auto Aggressive Property
To counteract your Passive order getting locked up by a competing Passive order, you can
set the Auto aggressive property. When enabled, a Passive order automatically becomes
Aggressive whenever a Passive order competes at the same price on the opposite side of the
market.
Follow these procedures to set Passive orders to Auto Aggress:
l Setting Passive orders to Auto Aggress
l Verifying fills
- 410 -
X_TRADER® User Manual
Trading Technologies International, Inc.
Trading Specialty Exchanges
To set Passive orders to Auto Aggress:
1. From the Control Panel, click the Settings menu and choose Properties.
2. Click the Order Entry tab.
3. Click to select the Auto Aggressive property.
4. Click OK.
You successfully set Passive orders to Auto Aggress.
To verify your fills:
In the Fill, Trade Book or Audit Trail windows, verify the P/A column is visible.
When your order is filled, the P/A column indicates how it was filled:
P/A column displays...
P
Order was filled...
A
Aggressive
PA
Passive order that Auto-Aggressed and
filled
Passive
You successfully verified your fills.
X_TRADER® User Manual
Trading Technologies International, Inc. Proprietary and Confidential Information
- 411 -
Chapter 16
Working-Up Orders
BrokerTec uses a matching algorithm known as “workup.” In a workup market, you (or
another trader) initiate a trade at a set price. The X_TRADER screen flashes and only that
price can be traded. Once all available size at that price is traded, the screen stops flashing,
indicating the market is idle. You (or another trader) can then initiate another trade at a set
price.
Note: The amount of time a workup price flashes is controlled by Brokertec and based on
their current workup parameters.
Flashing Quantity and Price during Workup
During workup, the Price and Quantity fields change color and flash in MD Trader, the
Market Grid, Quote Board, and Autotrader.
Flashing characteristics change depending on which functional window you are in:
MD Trader
Price column
Description
H appears to the left of the price for a sell workup
Price column
T appears to the left of the price for a buy workup
MD Trader Border
Highlights and flashes green for a buy workup
Entire MD Trader Border
Highlights and flashes red for a sell workup
Market Grid Column
Bid Price
Description
Flashes red when a sell initiates the workup.
The letters TAK replace the price when being bought.
Ask Price
Flashes green when a buy initiates the workup.
The letters HIT replace the price when being sold.
WrkBuys
Flashes purple when you are the workup owner and take the
offer using the WrkBuys quantity.
WrkSells
Flashes purple when you are the workup owner and hit the offer
using the WrkSells quantity.
Title Bar
Labels [Owner] to the right of the product name when you are
the workup owner.
Quote Board Field
BQ and BP
Description
Shades and flashes red during a sell.
AQ and AP
Shades and flashes green during a buy.
Autotrader Field
mBidPrc
Description
Flashes red when a sell initiates the workup.
mAskPrc
Flashes green when a buy initiates the workup.
- 412 -
X_TRADER® User Manual
Trading Technologies International, Inc.
Trading Specialty Exchanges
Send Quote Order Property
In the Order Entry tab on the Properties menu, a property called Send Quote Order
exists.
When enabled, a new order sent to the market replaces the
previous order for that contract on the same side of the
market.
If you do not enable this property, the default order type is
Leave, and previous orders will not be canceled.
Leave Checkbox
The Leave checkbox appears near the Hit and Take buttons on the Order Entry pane.
When selected, new orders for that contract on the same side do not cancel previous orders.
Use this checkbox to override the global Send Quote Order property
Notes:
l If the global Send Quote Order property is not enabled, you do not need to
check the Leave box, as all orders are sent as Leave by default.
l You can also add a Leave button to MD Trader using the MD Trading tab on
the Properties menu.
l All orders sent by Autotrader and Autospreader are Leave orders regardless of
the Send Quote Order property setting
Hold In Timer
Warning! When your bid or offer is the best in the market, it is locked into the market for
two seconds.
The Hold In Timer is a BrokerTec restriction that holds your order in the market when it is
the best in the market. You do not see the Hold In Timer in X_TRADER, but during this
period:
l Cancel and price change requests are rejected and logged in the Audit Trail.
l You can decrease the quantity to 1.
l Orders joining your best bid or offer are not subject to the Hold In Timer.
l For orders automatically sent via Autotrader and Autospreader, when the reject message is received, the order is deleted or requoted automatically.
X_TRADER® User Manual
Trading Technologies International, Inc. Proprietary and Confidential Information
- 413 -
Chapter 16
Autotrader Tick Formula
Because BrokerTec uses the + to designate half ticks, a new function was developed to
allow you to continue using offsets in Autotrader.
Formula: =TICK(<row>,<price>,<n>)
Example: =TICK(3, mBidPrc, 2)
Where:
l <row>= The row # (from the top of the grid including headers, 1 based) - meaning 3
is the first Autotrader row, 4 is the second...etc.
l <price>= The base price: a string, number, or column name (ex: 110.01, "110.01+",
mBidPrice). If this parameter contains a literal price with a plus in it, the parameter
must be wrapped in quotes.
l <n>= The number and direction of ticks to move the base price contained in the second parameter. Positive numbers indicate ticking up; negative values, ticking down.
- 414 -
X_TRADER® User Manual
Trading Technologies International, Inc.
Trading Specialty Exchanges
Trading EBS
EBS is an electronic marketplace specializing in the trading of precious metals and spot foreign
exchange currency pairs, including Non-Deliverable Forwards (NDFs). X_TRADER supports the
trading of all these products.
EBS groups foreign exchange currency into two product types:
l Forex
l NDFs
Forex
Forex contracts include precious metals and commonly traded currency pairs, like Euro to
U.S. Dollar (EUR/USD) and U.S. Dollar to Japanese Yen (USD/JPY). EBS offers depth of
book on the most popular currency pairs:
Currency Pairs
Australian Dollar/U.S. Dollar
Contract
AUD/USD
Currency Pairs
Pound Sterling/U.S. Dollar
Contract
GBP/USD
Euro/Swiss Franc
EUR/CHF
U.S. Dollar/Canadian Dollar
USD/CAD
Euro/Pound Sterling
EUR/GBP
U.S. Dollar/Swiss Franc
USD/CHF
Euro/ Japanese Yen
EUR/JPY
U.S. Dollar/Japanese Yen
USD/JPY
Euro/U.S. Dollar
EUR/USD
EBS Depth of Book Currency Pairs
For a list of currency pairs available with no viewable depth, see the EBS Gatway SAM.
NDFs
NDFs contracts allow trading of currencies with restricted convertiblity. Normally
established as short term contracts (typically up to two years), NDFs represent the difference
between an agreed upon exchange rate and the prevailing market exchange rate at the
settlement date.
NDFs normally quote and settle in United States Dollars (USD).
EBS offers the following currencies as Non-Deliverable Forwards (NDFs):
Currency
Argentine Peso
Contract
ARS
Currency
South Korean Won
Contract
KRW
Chilean Peso
CLP
Malaysian Ringgit
MYR
Renminbi (China)
CNY
Nuevo Sol (Peru)
PEN
Colombian Peso
COP
Philippine Peso
PHP
Rupiah (Indonesia)
IDR
Russian Ruble
RUB
Indian Rupee
INR
New Taiwan Dollar
TWD
EBS Non-Deliverable Forwards
X_TRADER® User Manual
Trading Technologies International, Inc. Proprietary and Confidential Information
- 415 -
Chapter 16
Trading Contracts in the EBS Quote Board
The EBS Quote Board window lets you quickly trade EBS contracts using the mouse, keyboard,
or an EBS keypad.
By default, the Floating Order Entry option on the EBS Quote Board window is enabled. This
lets you trade using the Order Bar, Order Pane, or MD Trader depending on the setting in Trading
tab on the Properties menu. We recommend you use the Order Bar.
In addition to opening up to ten EBS Quote Board windows, you can create multiple tabs on one
window. (Refer to Using Tabbed Windows on page 193.)
The EBS Quote Board
To trade with the mouse:
1. Follow the table below...
To...
Join the Bid or Offer
Mouse click...
Right-click a price or quantity.
Take the Bid or Offer
Left-click a price or quantity.
2. Complete your order using the floating order entry window you have set.
You successfully traded with the mouse.
To configure X_TRADER to trade using an EBS keypad:
Note: EBS keypads and instructions are only available through ICAP.
1. Install the EBS keypad per its instructions.
2. From the Control Panel, click the Settings menu and choose Properties.
3. Click the Hotkeys tab.
- 416 -
X_TRADER® User Manual
Trading Technologies International, Inc.
Trading Specialty Exchanges
4. Under Keyboard Layout, click EBS Default (Read Only).
5. Click to select the Enable EBS Keypad checkbox.
6. Click OK.
You successfully configured X_TRADER to trade using an EBS keypad.
To trade using the keyboard:
1. In the Trading tab on the Properties menu, ensure your Floating Order Entry window is set to
the Order Bar.
2. In the EBS Quote Board window, use the arrow keys to navigate to the contract you want to trade.
Note: Alternatively, You can type a row and column combination, like 32 to jump to the 3rd row
and 2nd column.
3. Press Ctrl+F2 to Buy, or Ctrl+F11 to Sell.
The Order Bar appears.
4. Press Tab to change quantity, big figure, or PIPs.
Note: Use the up and down arrows to change the quantity and PIPs one number at a time.
5. Press Enter to submit the trade.
You successfully traded with the keyboard.
X_TRADER® User Manual
Trading Technologies International, Inc. Proprietary and Confidential Information
- 417 -
Chapter 16
Keyboard Configuration
To use the following keyboard configuration, navigate to the Hotkeys tab on the Properties
menu and set your Keyboard Layout to EBS Default (Read Only).
#
1
Key
Arrows
Function
Move to the next EBS contract pane.
Normal keyboard behavior in the Order Bar.
2
End
Set Focus on Price in the Order Bar.
3
Page Up, Page Down
Page Up: Move to top of current column.
4
Esc
Close Order Bar.
5
F5
Launch to Hit Bid, seed with Best Dealable Bid.
6
F6
Launch to Join Bid, seed with Best Dealable Bid.
7
F7
Launch to Join Ask, seed with Best Dealable Offer.
8
F8
Launch to Take Offer, seed with Best Dealable Offer.
9
F9
Submit order (same as click Buy/Sell on the Order Bar).
10
Numeric
Jump to set EBS contract pane. (Refer to Quote Board Tab on
page 142)
Page Down: Move to bottom of current column.
Otherwise normal numeric key behavior.
11
- (Minus), Delete, Backspace
Normal keyboard behavior.
12
Ctrl
Ctrl+F5: Launch to Sell Regular.
Ctrl+F8: Launch to Buy Regular.
13
C
Set focus on Contract.
14
, (Comma)
Set focus on Big Figure in Order Bar.
- 418 -
X_TRADER® User Manual
Trading Technologies International, Inc.
Trading Specialty Exchanges
Reading the EBS Quote Board
EBS Quote Board breakdown
The EBS Quote Board window field descriptions include:
1. Net Position
Description
Your net position for that contract. Blue background is a long position. Red
background is short position.
You can hide the net position in the Quote Board tab on the Properties
menu or by right-clicking the net position field.
2. Currency Pair
3. Depth checkbox
Description
The abbreviation for the traded currency pairs.
Description
Checked means you are viewing depth.
l
Field 5 is the Outside Price in PIPs.
l
Field 6 is the Outside amount.
Unchecked means you are viewing the basics.
l
Field 5 is Dealable Regular Price in PIPs.
l
Field 6 and the Dealable Best +/-1 in Field 7 do not appear.
Note: If the checkbox does not appear the contract does not display depth.
4. Big Figure
Description
Big figure. EBS product prices display as PIPs with a Big Figure.
Example: A EUR/USD price of 1.4502 has a Big Figure of 1.45 and PIP of
02.
5. Outside/Dealable
Regular
Description
The Depth checkbox in the upper right corner determines what appears
in field 5.
l
If the Depth checkbox is checked, you are viewing depth and
field 5 contains the Outside Price in PIPs.
l
If the Depth checkbox is not checked, you are viewing the basics
and field 5 is the Dealable Regular Price in PIPs.
X_TRADER® User Manual
Trading Technologies International, Inc. Proprietary and Confidential Information
- 419 -
Chapter 16
6. Outside
Amount
Description
The Depth checkbox in the upper right corner determines what appears in
field 6.
7. Best Dealable
Quantities
l
If the Depth checkbox is checked, you are viewing depth and field 6
is the Outside amount.
l
If the Depth checkbox is not checked, you are viewing the basics and
field 6 does not appear.
Description
Dealable Best amount is the top number.
Dealable Best +/-1 is the bottom number.
Note: If the Depth checkbox is not checked, you are viewing the basics and
the Dealable Best +/-1 does not appear.
8. EBS Best
Description
EBS Best Bid and Best Offer in PIPs.
9. Dealable Best
Description
Dealable Best in PIPs.
10. Working Orders
Description
The total quantity of your working bids and offers.
Customizing the EBS Quote Board
Properties for customizing the EBS Quote Board can be found in the following tabs on the
Properties menu:
l Quote Board tab
l
l
l
Hotkeys tab
MD Trading tab
Color tab
- 420 -
X_TRADER® User Manual
Trading Technologies International, Inc.
Trading Specialty Exchanges
Quote Board tab
The Quote Board tab lets you customize the number of rows and columns in
the EBS Quote Board window. You can also disable the net position field
which, when enabled, appears in the upper left corner on the EBS trading
pane. Alternatively, you can right-click the net postion field in the EBS Quote
Board window to hide and show it.
EBS Quote Board section on the Quote Board tab
The Initial Contracts button displays the Defaults Contracts window where
you decide the spatial position of each contract.
Default Contracts set to 4 rows and 3 columns
The EBS Keypad Panel keys section sets a number on the EBS Keypad to
bringsfocus to a contract in the EBS Quote Board window.
EBS Keypad Panel keys on the Quote Board tab
X_TRADER® User Manual
Trading Technologies International, Inc. Proprietary and Confidential Information
- 421 -
Chapter 16
Hotkeys tab
The Hotkeys tab lets you customize the keyboard shortcuts used for trading on
the EBS Quote Board window.
Under the Order Bar component, set the keys used to launch Buy and Sell
windows.
EBS commands in the Order Bar component
Under the EBS Quote Board component, set the key used to change the
contract.
EBS Quote Board component on the Hotkeys tab
MD Trading tab
The MD Trading tab lets you set your mouse to seed the regularly traded
quantity as designated by the EBS exchange when you right-click a price.
Use EBS Regular quantity field on the MD Trading tab
- 422 -
X_TRADER® User Manual
Trading Technologies International, Inc.
Trading Specialty Exchanges
Color tab
The Color tab lets you customize all the colors on the EBS Quote Board
window.
The Quote Board-EBS section on the Color tab
X_TRADER® User Manual
Trading Technologies International, Inc. Proprietary and Confidential Information
- 423 -
Chapter 16
Trading EBS Contracts in MD Trader
You trade EBS products using X_TRADER in the same manner you trade other futures.
However, only the most commonly traded EBS products show depth.
l
l
Prices for EBS product prices display in MD Trader as PIPs within a Big Figure.
The Big Figure appears at the top and bottom of the ladder.
Example: A EUR/USD price of 1.4502 has a Big Figure of 1.45 and PIP of 02.
l
l
The best Bid and Offer in the market has a black PIP. Whether you can see and trade
the best Bid/Offer is restricted by EBS based on your available credit.
The Dealable Regular Bid and Offer indicates the worst price you will fill at if you
trade the normal quantity. The normal quantity is decided per contract by EBS.
Example: In the screenshot above, if the EBS defined quantity was 25, you would
need to trade at 97.
- 424 -
X_TRADER® User Manual
Trading Technologies International, Inc.
Trading Specialty Exchanges
l
l
l
The Dealable Best is the best price at which you can trade. The next tick away from
the market (plus 1 for Sells, minus 1 for Buys) can show a zero (0). For some products
EBS reports this quantity, even if it is zero.
The outside Bid and Offer is the net or aggregate of the preceding Bids and Offers.
l The EBS property on the Trading tab determines whether the outside quantity
includes the viewable quantities at the first two tradable prices (Aggregate
includes, Net does not include).
l The plus (+) means the quantity is greater than or equal to the threshold for the
product. The threshold is determined by EBS.
When local orders placed by other members of your trading firm are included in a
working quantity, the quantity is identified with swapped text and background colors.
X_TRADER® User Manual
Trading Technologies International, Inc. Proprietary and Confidential Information
- 425 -
Chapter 16
EBS Contract Notes
The following notes are specific to EBS:
l Spot FX settles two days in the future. Precious Metals are physically settled.
l EBS contracts persist from day-to-day as the same contract. However, in reality, each
day is a new contract.
Example: If you go long 1 USD/EUR on Monday and, on Tuesday, go short 1
USD/EUR--you are not considered flat. On Wednesday you settle your long
position. On Thursday you settle the short position. Similarly the USD/CNY M1
settles one Month in the future.
l
l
l
Markets may cross on the EBS platform. In FX terms, EBS is a ‘choice’ market as
you may ‘choose’ to buy or sell at that same price. Choice markets occur when participants who do not have bilateral clearing arrangements have bids and offers at the
same price.
Depth is only supported for the nine most liquid pairs and displays three levels on
those contracts.
The minimum order size for currencies is the equivalent of 1,000,000 U.S. dollars of
the base currency.
EUR/USD : EUR = Base Currency, USD = Counter Currency
Example: Buy 1 USD/CHF @ 1.4655 – buy 1,000,000 USD at a cost of 1,465,500
CHF. Sell 1 EUR/USD @ .9878 – sell 1,000,000 EUR for 987,800 USD.
The following notes are specific to trading EBS on X_TRADER:
l EBS orders are only live while you are connected to the exchange. Your orders are
deleted from the exchange on logout or disconnect but they are held by the Gateway.
All unsolicited deletes result in the order being put on hold.
l EBS only accepts GTC and IOC orders. We suggest you:
l Set the Time In Force (TIF) for the EBS market to GTC in Customer
Defaults window.
- or l Add a Sticky GTC button to MD Trader on the MD Trading tab in the Properties menu.
l If you are trading EBS through Autospreader and Autotrader, you can set your TIF
for customers in the Customer Defaults window. All other order restrictions are
ignored for Autospreader and Autotrader.
l EBS does not publish traded volume and price reporting is timesliced. In the Time
and Sales window, EBS trades are provided without quantity and not all trades will
display.
l The Estimated Position in Queue (EPIQ) column is disabled for EBS contracts.
- 426 -
X_TRADER® User Manual
Trading Technologies International, Inc.
Trading Specialty Exchanges
Trading ICE
The Intercontinental Exchange (ICE) is an internet-based marketplace for the trading of OTC
energy, metals, and other commodity products. ICE Futures (formerly known as IPE-the
International Petroleum Exchange) electronically lists energy futures and options contracts as well.
X_TRADER supports the trading of the following products:
l ICE Futures
l ICE Cleared OTC products
Note: Contact TT Support for questions regarding the specific list of supported products.
This release does not support ICE or ICE Futures Exchange Options or ICE Bilateral Deals. Bids
and offers entered into WebICE as ICE bilateral orders do not display in X_TRADER.
Clearing
The ICE Futures exchange is a standard futures exchange, which clears their own contracts.
The following options for clearing exist on the ICE exchange:
l Cleared: Standard clearing through a clearing firm.
l Clearable: Either cleared or bilateral, depending on the counter-party.
l Bilateral: Clearing negotiated directly between two counter-parties.
All orders entered via X_TRADER will be entered as cleared orders. The software does not
support bilateral orders or bilateral fills.
All cleared contracts clear through the London Clearing House (LCH).
X_TRADER® User Manual
Trading Technologies International, Inc. Proprietary and Confidential Information
- 427 -
Chapter 16
Market Explorer
The ICE exchanges use a four-tier structure to define a market. They are defined by the
following parameters:
l Market Type: Defines the product grouping (e.g., ICE Financial Gas, Brent Futures).
l Product Name: Equivalent to "instrument."
l Hub: Defines delivery location.
l Strip: Defines delivery period.
Because X_TRADER uses a three-tier structure in Market Explorer, it combines the ICE
exchange Product Name and Hub to form the X_TRADER Product Name.
Listing
Exchange
ICE Futures
ICE
ICE Spreads
Instrument Type
Future
Energy
Spread
Time-strip Contract Types
l Monthly (Sep10, Nov10…)
l
Quarterly Strips (Q2-10, Q1-10…)
l
Seasonal Strips (Winter10, Summer10…)
l
Yearly Strips (Cal09, Cal10…)
l
Monthly (Sep10, Nov10, etc…)
l
Monthly Strips (Sep10-Oct10, Jan11-Feb11, etc…)
l
Quarterly Strips (Q2-10, Q1-10, etc…)
l
Seasonal Strips (Nov10-Mar11, Winter11, etc…)
l
Yearly Strips (Cal08, Cal09, etc…)
l
Time (Mar08/Apr08, Cal08/Cal09, etc…)
l
Location (WTI/Brent, Zone A/PJM, etc…)
l
Basis (Cash versus Futures)
l
Crack (Crude Oil versus Processed Products)
- 428 -
X_TRADER® User Manual
Trading Technologies International, Inc.
Trading Specialty Exchanges
Implied Pricing
TT supports limited implied pricing for executing trades on ICE.
Trading
Trade products on ICE using X_TRADER in the same manner you trade other futures.
Using X_TRADER, you can view and manipulate all cleared and clearable orders that you
submit via WebICE. You can likewise utilize WebICE to view and manipulate orders you
submit through X_TRADER.
X_TRADER does not display orders entered in WebIce as Bilateral. If you submit an order
on WebICE as Bilateral or as Clearable, and it executes bilaterally, X_TRADER does not
process the fill.
For multi-period delivery products, you can choose to display quantities in Contracts or
Flow, using the Trading tab on the Properties menu. When this property changes, all
filters clear in the Order Book, Trade Book, Time and Sales and Fill windows.
Notes:
l The Show Quantity as property has no impact on displayed quantities for products with one delivery period.
l Maximum Order Qty and Use Default Qty options always refer to contracts.
For example, if you want your default quantity for Henry Hub Natural Gas to be
7500 MMBtus, you set your Use Default Qty to 3.
l If you enter an invalid energy quantity in most windows, the order is not sent
and you receive an invalid order quantity message in the Audit Trail. If you enter
an invalid energy quantity in MD Trader, the order quantity is truncated to a
valid order quantity and the order is sent to the exchange.
Switching Between Contracts and Flow
You can use Autotrader to trade energy products on the ICE exchange. If you use
Autotrader or Excel links, switching between Flow and Contracts may cause equations to
be incorrect. If you try to switch between Flow and Contracts while Autotrader is active, a
dialog box displays that states:
Warning! Changing this property may impact Excel & Autotrader formulas! Are you sure
you want to continue?
If you click Yes, X_TRADER deactivates Autotrader and pulls its orders from the market.
However, Excel links remain active.
X_TRADER® User Manual
Trading Technologies International, Inc. Proprietary and Confidential Information
- 429 -
Chapter 16
Contracts vs. Flow Examples
The following screens display products with multiple delivery periods first as Contracts, and
then as Flow.
Quantities as Contracts
Quantities as Flow
Note: When quantities display in Flow for products with multiple delivery periods, the letter
"K" displays in the Quantity buttons to represent 1000.
Order Type and Restrictions
You can submit orders to the ICE exchange using the following order types:
l Market (ICE Futures only)
l Limit (both ICE and ICE Futures)
l Iceberg
l Fill or Kill (FOK)
l Immediate or Cancel (IOC)
You can also set the Good til Day (GTD) Time in Force restriction.
- 430 -
X_TRADER® User Manual
Trading Technologies International, Inc.
Trading Specialty Exchanges
Trading States
Trading states for ICE Futures products include:
l Pre-open
l Open
l Pre-close
l Close
Trading states for ICE products include:
l Open
l Close
All changes in trading states are reflected in X_TRADER.
Fill Window and P&L
To accurately express your position and P&L for all products that have multiple delivery
periods, a new column called Lots is available in the Position Pane of the Fill window. The
column is hidden by default and can be shown using the Position Pane context menu.
Notes:
l Contract size and number of lots may affect your P&L in ticks versus your P&L
in currency. Your P&L in ticks may display positively or negatively when your
P&L in currency may actually be flat.
l For all ICE Futures products that have only one delivery period, P&L is displayed in the same manner as all other futures.
l For contracts with different delivery units, X_TRADER does not sum positions
above the contract level.
X_TRADER® User Manual
Trading Technologies International, Inc. Proprietary and Confidential Information
- 431 -
Chapter 16
Understanding Delivery and Flow
Like standard futures, some energy contracts specify delivery of a given amount on a given
day. For example, the delivery of crude oil against IPE Brent Crude futures is done in one
lump sum on a single day (i.e., one delivery period). However, some energy contracts
specify delivery of a given amount of energy over a specified period of time (i.e., multiple
delivery periods). This is referred to as delivering flow.
Example: Power contracts specify delivery of a particular amount of electricity to be
delivered onto a power grid for a given period of time. Some natural gas contracts specify
delivery of a particular amount (and quality) of natural gas to be delivered into a nationwide
pipeline for a given period of time.
The actual deliverable quantity of products that specify delivery in flow can vary from
contract to contract. This is due to the variation in the number of days in a given month.
Example: A power product that specifies the delivery of a given amount of electricity per
day for the entire delivery month will have different deliverable quantities for Sep08 (30
days) and Dec08 (31 days).
In general, the conversion between contracts, lots, and flow can be expressed as follows:
l Contracts: Represents entire delivery amount.
l Lots: Represents number of delivery periods in a contract.
l Flow: Represents the amount to be delivered in each delivery period.
Further Examples
All monthly IPE Brent futures contracts specify 1 delivery period consisting of 1000 barrels
of crude oil. So:
l 1 contract = 1 lot = 1000 barrels per month
l 5 contracts = 5 lots = 5000 barrels per month
Example: The ICE US Henry Hub Natural Gas Jan05 contract specifies 31
delivery periods of 2500MMbtu per day. So:
l 1 contract = 31 lots = 2500MMbtu per day = 77,500 MMBtu/Contract
l 3 contracts = 93 lots = 7500MMbtu per day = 232,500 MMBtu/Contract
Example: The ICE US PJM Power Jan08 contract specifies 21 delivery periods
(weekdays only) of 800MWh per day (50MW hours for 16 hours). So:
l 1 contract = 21 lots = 800 MWh per day = 16,800 MWh/Contract
l 2 contracts = 42 lots = 100MW for 16 hours per day = 1600 MWh per
day = 33, 600 MWh
- 432 -
X_TRADER® User Manual
Trading Technologies International, Inc.
Trading Specialty Exchanges
Trading SFE
The Sydney Futures Exchange Limited (SFE) is one of the second largest financial futures and
options exchange in the Asia Pacific region. SFE provides futures and options on: interest rates,
equities, currencies and commodities, with a number of its flagship products ranked in the world's
top ten most actively traded products in their market sector.
The following changes were made to support trading on the SFE:
Implied Asterisk
If the first best bid or ask order is based on an implied price, an asterisk appears next to the
price in the BidPrc or AskPrc columns.
Also, when viewing market depth, asterisks appear next to implied prices. The asterisk
appears on both the Market Grid, Floating Depth, and Spread Matrix windows.
Custom Market Strategy
When trading SFE, a new strategy called Custom Market appears on the Create Strategy
window. As you add SFE contracts to the legs in your strategy, a price column appears. You
must add prices to each leg in the strategy prior to creating the strategy.
Post-Fill Account Numbers
SFE lets you add account numbers for a finite amount of time after your order is filled.
X_TRADER® User Manual
Trading Technologies International, Inc. Proprietary and Confidential Information
- 433 -
Chapter 16
Adding an Account Number
SFE lets you add account numbers for a finite amount of time after your order is filled. This
information goes back to the SFE exchange provided you add the account number in the
amount of time allotted by SFE.
You can add account numbers to filled orders on the Fill window.
To add an account number:
1. From the Control Panel, click the Window menu and choose Fill Window.
- or From the Control Panel, click the
icon.
2. Click in the Account# column next to the fill whose account number you want to change.
3. Type the account number.
4. Press Enter.
You successfully added an account number.
- 434 -
X_TRADER® User Manual
Trading Technologies International, Inc.
Trading Specialty Exchanges
Trading TOCOM
The Tokyo Commodity Exchange was established in 1984 by a merger of the Tokyo Textile,
Rubber and Gold Exchanges. It is Japan's largest commodity futures exchange, specializing in
precious metals, oil, rubber and aluminum.
To support trading on TOCOM, X_TRADER introduces several new order types and restrictions as
well as the First In First Out (FIFO) order tag. All of these settings can be set for specific customers
on the Customer Defaults window.
See the order types below for explanations on their proper use on TOCOM:
l Best Limit on page 293
l If Touched on page 296
l Market on page 297
l Market to Limit on page 299
X_TRADER® User Manual
Trading Technologies International, Inc. Proprietary and Confidential Information
- 435 -
Chapter 16 - Trading Specialty Exchanges
[This page intentionally left blank]
- 436 -
X_TRADER® User Manual
Trading Technologies International, Inc. Proprietary and Confidential Information
Appendix: Grid Column Descriptions
This appendix contains the grid column descriptions for many windows in X_TRADER, including the
Order Book window, the Trade Book window, and the Fill window.
You can set the default columns that appear for each window using the Properties menu.
Window
Order Book
Property tab that sets default columns
Orders tab
Fills Pane (Fill Window)
Fill tab
Position Pane (Fill Window)
Fill tab
Trade Book
Fill tab
Column
Account #
Description
Window
The back office account number or name as indicated in the Customer Default Order Book,
profile.
Trade Book,
Fills Pane
Acct
The account type.
Example: Agent, Market Maker, Principal, Give-up, Unallocated.
Order Book,
Trade Book,
Fills Pane
Action
Possible actions include Add (A), Change (C), Delete (D), Delete all your
orders (E), Hold (H), Inquire (I), Update (U), Replace/Cancel button (R),
Resubmit to remove from hold (S).
Order Book
Ask
The ask price.
Position Pane
AvgBuy
The average Buy price.
Position Pane
AvgPrice
The average price of the fill.
Trade Book
AvgSell
The average Sell price.
Position Pane
B/S
Buy or Sell in reference to an order.
Order Book,
Trade Book,
Fills Pane
Bid
The bid price.
Position Pane
Buy
The Buy totals.
Position Pane
BuyQty
The total Buy quantity.
Position Pane
C
Indicates confirmation of a fill by an operator.
Trade Book,
Fills Pane
C/P
Call or Put in reference to the order. This designates your right to buy (call) or Order Book,
sell (put) a contract at a specified price and up to a specified date.
Trade Book,
Fills Pane
Close
The closing price.
Position Pane
Clr Mbr
Clearing member. Designates a member firm of a clearing house through
which trades settle.
Order Book,
Trade Book,
Fills Pane
Cntr Party
Your counter party on the trade.
Trade Book,
Fills Pane
X_TRADER® User Manual
Trading Technologies International, Inc. Proprietary and Confidential Information
- 437 -
Appendix: Grid Column Descriptions
Column
Conf GroupID
Description
The confirmed group ID.
Window
Trade Book,
Fills Pane
Conf IP
The confirmed IP address.
Trade Book,
Fills Pane
Conf MbrID
The confirmed member ID.
Trade Book,
Fills Pane
Conf Time
The time at which you confirmed your order filled, as recorded by the Fill
server, using the Confirm Fill(s) option on the context menu.
Trade Book,
Fills Pane
Conf TraderID
The confirmed trader ID.
Trade Book,
Fills Pane
Contract
The month and year of expiration for the contract or spread.
Order Book,
Trade Book,
Fills Pane
In the Fill Window Position pane, the spread positions are for display
purposes and do NOT affect risk calculations. Risk calculates using the
spread’s legs.
Cur
The currency used in the trade.
Example: USD = United States Dollar
Trade Book,
Fills Pane
Delete
Deletes a single line order.
Order Book
Exch /
Exchange
The exchange on which the order was placed or filled.
Order Book,
Trade Book,
Fill Window
Exch Date
The date the trading host received/sent the message.
Order Book,
Trade Book,
Fill Window
Exch Grp
Risk manager direct user’s trader ID.
Order Book,
Trade Book,
Fills Pane
Example: Broker's Group ID = PROD
Exch Mbr
Exchange member ID.
Order Book,
Trade Book,
Fills Pane
Exch Time
The time at which a fill is received by the exchange host or exchange
gateway depending on the practice of the exchange. The time may be shown
in the time zone where the exchange is located.
Order Book,
Trade Book,
Fills Pane
Exch Trd
Risk manager direct user’s trader ID.
Example: Broker's Trade ID = 001
Order Book,
Trade Book,
Fills Pane
Exec Qty
The executed quantity of the order.
Order Book
Exp Date
The expiration month and year formatted as DDMMMYY.
Order Book
Example: 31Dec09
Fee
Associated fee.
Trade Book,
Fills Pane
FFNet
The fast fills net quantity (FF Buys-FF Sells).
Position Pane
Refer to the Fast Fills Pane Overview on page 363 for details.
FFT2 & FFT3
Free Form Text Field 2 and 3. Values for annotation purposes by you or back
office (sub-account).
- 438 -
Order Book,
Trade Book,
Fills Pane
X_TRADER® User Manual
Trading Technologies International, Inc.
Appendix: Grid Column Descriptions
Column
Fill Type
Description
Window
The type of trade made, either from an outright fill or a spread order. Use this Fills Pane
column to filter on your spread positions and view spread legs separately from
the outright trades. If the outright fill is coming from a spread fill, the cell
displays Spread Fill Leg. If not, the cell corresponds to the Type column.
Fill/Trans
The ratio of fills to transactions on a per contract and product basis.
Position Pane
Filled Qty
The quantity filled in the order.
Trade Book
Fills
The number of fill lines on a contract and product basis.
Position Pane
GU
The member for whom a separate party completes a transaction. Used for give- Trade Book,
up trade accounts.
Fills Pane
High
The high price for the day.
Position Pane
IP Address
The IP Address of the workstation the order was placed on.
Order Book
Last
The last traded price.
Position Pane
Link ID
A unique number indicating two orders are linked.
Order Book
Link Type
The kind of link identifying the relationship between orders.
Order Book
Example: OCO
Lots
The total number of Lots for the given position. Used for Energy products
(traded on the ICE exchange).
Position Pane
Low
The low price for the day.
Position Pane
NetPos
Indicates the position at the start of the day plus the difference between what
you bought and sold.
Position Pane
O/C
Open or Close in reference to your position.
Order Book,
Trade Book,
Fills Pane
In the Fill window:
l
S = A Start of Day fill. (Refer to Start of Day Fills on page 353)
l
M = Manual Fill from your workstation.
l
A = Manual Fill from X_RISK.
Open
The opening price.
Position Pane
Open P/L
Your open profit and loss. (Refer to Calculating Profit and Loss on page
357)
Position Pane
Ord Date
The date the order was placed at your workstation.
Trade Book,
Fills Pane
Ord Time
The time the order was processed according to your workstation.
Trade Book,
Fills Pane
Order No
The order number assigned by the exchange.
Order Book,
Trade Book,
Fills Pane
P/A
Designates whether the order was filled passively or aggressively. This
notation allows for a correct P/L calculation.
Trade Book,
Fills Pane
P/L
Your Profit and Loss. (Refer to Calculating Profit and Loss on page 357)
Position Pane
PF
The order partially filled.
Trade Book,
Fills Pane
Example: 5 contracts from a 10-lot order filled.
Not all exchanges provide partial fill indicators.
Example: Xetra does not provide partial fill indicators.
X_TRADER® User Manual
Trading Technologies International, Inc. Proprietary and Confidential Information
- 439 -
Appendix: Grid Column Descriptions
Column
Price
Description
The Limit price in the Order Book.
The price at which the quantity fills in the Fill Window. For spreads, displays
the fill prices on the corresponding legs of the spread, followed by the actual
fill for the spread.
Window
Order Book,
Fills Pane
Spread positions and leg positions display in the Position pane in the Fill
Window. The spread positions appear for information purposes only and do
not affect risk calculations. (Risk is calculated using legs.)
You can enable or disable spread fills in the Fill tab on the Properties menu.
The property is disabled by default.
Product
The traded product’s exchange symbol.
Order Book,
Trade Book,
Fills Pane
Example: FGBL, ODAX
Product Type
The type of product in the order.
Order Book,
Fills Pane
Example: Future, Future Spread, Option
Qty
The order quantity in the Order Book. The quantity filled in the Fill Window. Order Book,
Fills Pane
Row Numbers
Far left column displays row numbers.
Order Book,
Trade Book,
Fill Window
Rstr
The strategic restriction put on the order.
Order Book,
Trade Book,
Fills Pane
Example: <None>, FOK, IOC
RstrQty
The quantity of a restricted order which behaves differently depending on the
restriction.
Order Book
Example: For Minimum Volume orders, it is the quantity that needs to be in
the market for the order to go to market.
Sell
The Sell totals.
Position Pane
SellQty
The total Sell quantity.
Position Pane
Source
Where the order comes from.
Order Book
Examples: 0: Normal OS, 1: Autospreader, 2: Autotrader, 3: API (XTAPI), 4:
Ext Source (Exchange), 8: TT_TRADER.
Stlmnt
The settlement price.
Position Pane
Stop Prc
The Stop trigger price.
Order Book
Strike
The exercise price of an option.
Order Book,
Trade Book,
Fill Window
Submit Date
The date the order was submitted from your workstation.
Order Book
Submit Time
The time the order was submitted from your workstation.
Order Book
These fields may be blank after re-establishing connectivity to LIFFE
CONNECT. The trading host or TT Gateway does not retain this information.
Synth
Identifies the order as synthetic.
Order Book
TIF
The Time In Force for the order.
Order Book
Time
The time your workstation receives the fill.
Fills Pane
Time Procsd
The time the action processed by the TT Gateway.
Order Book
- 440 -
X_TRADER® User Manual
Trading Technologies International, Inc.
Appendix: Grid Column Descriptions
Column
Time Recvd
Description
The time the TT Gateway received the order.
Window
Order Book
These fields may be blank after re-establishing connectivity to LIFFE
CONNECT. The trading host or TT Gateway does not retain this information.
Time Sent
The time the action was sent from the workstation to the Gateway.
Order Book
Trader ID
Appears when you are running in a Multi-Broker environment and shows you
P&L by each broker’s MGT. The Trader ID column displays the MGT as a
single string.
Position Pane
Trans
The total transactions on a series and product basis.
Position Pane
Trans ID
The transaction ID for fills. Used to identify the order.
Trade Book,
Fills Pane
Trans/Fill
The ratio of transactions to fills on a per contract and product basis.
Position Pane
Trd Grp
Trader’s or risk manager’s proxy group ID.
Order Book,
Trade Book,
Fills Pane
Example: Broker’s client = SIM
Trd ID
Trader’s or risk manager’s proxy trader ID.
Example: Broker’s client = 123
Trd Mbr
Trader’s or risk manager’s proxy member ID.
Example: Broker’s client = TTORD
Order Book,
Trade Book,
Fills Pane
Order Book,
Trade Book,
Fills Pane
TT Order Key
A TT generated unique number used to track orders.
Order Book,
Trade Book,
Fills Pane
TTStatus
The status of the order (e.g., Working, Change, Deleting, Inquiry).
Order Book
Note: If the order is in an unknown state, it is appended with a question mark
(?) and the colors are inverted.
Type
A Limit or Market type in reference to the order.
Order Book,
Trade Book,
Fills Pane
Version
Version number.
Order Book,
Trade Book,
Fills Pane
Work Qty
The working quantity of the order.
Order Book
X_TRADER® User Manual
Trading Technologies International, Inc. Proprietary and Confidential Information
- 441 -
Appendix: Grid Column Descriptions
[This page intentionally left blank]
- 442 -
X_TRADER® User Manual
Trading Technologies International, Inc. Proprietary and Confidential Information
Index
A
About this manual
25
Accepting a Eurex Block or Volatility Order
220
Accessing
a functional window
64
a functional window from market explorer
168
context sensitve help
43
fast fills pane
363
fill window
347
keyboard entry window
222
md trader
245
order book
327
order change dialog box
224
quote audit trail
234
screen minimizer
48
time and sales
371
trade book
365
wholesale orders
197
wholesale trade window
381
workspaces
71
Account number
adding
434
Activating a Strike or Expiration
234
multiple
235
Adding
account number
434
contracts to windows
46
event sounds
115
high and low sound alerts
150
manual fills
361
price averages and accumulations to the market grid 199
product groups
77
spacer rows to market grid
195
spread tables
83
tabs to market grid or spread matrix
193
workspaces
69
Admin Alert Messages
101
Against Actuals Trade
389
field descriptions
390
submitting
391
Aggregate vs Net
424
Aggressive orders
410
Alerts Manager
150
Altering Orders in the Order Book
333
Amending strategies
244
Asset allocations
402
Associating a product to a product group
80
X_TRADER® User Manual
Trading Technologies International, Inc. Proprietary and Confidential Information
- 443 -
Index: Audit Trail – Changing
Audit Trail
column descriptions
context menu
customize columns
exchange announcements
held orders
history
message types
order messages
properties
quote audit trail
storing files
wholesale trading messages
Audit Trail tab
AuditLog
Auto Centering
Automatic Shutdown
status of quotes
Autospreader
properties
Autospreader tab
Autotrader
formulas
tick for brokertec
generating an rtd formula
tick formula for brokertec
Average Price
Average Price Highlighting
Average Price of Open Position
155
157
158
58, 161
160
156
156
159
41
111
234
162
381
111
162
261
42
236
145
145
414
202
414
357
261
253
B
Basis Trade
field descriptions
submitting
Begin Trading
Best Limit Order
Best Price Highlighting
Big figure
BL
Block Order Type
Block Trade
field descriptions
submitting
Block Trading
accepting a sell side
inquiry
modifying
submitting a buy side
Broken Workspace
BrokerTec
hold in timer
386
387
388
29
292-293
196
419, 424
292-293
291
383
384
385
218
220
221
219
219
73
406, 409
413
leave checkbox
placing passive and aggressive orders
tick formula
working-up orders
Butterfly Condor Matrix
calculations
canceling working orders
click trading
customizing
features
generating
properties
trading
Buy Side Keys in MD Trader
413
410
414
412
316
318
312
312
309
310
317
313
311
279
C
Calculating Profit and Loss in Fill Window
357
Canceling Working Orders
spread matrix
312
Canceling/Replacing an order in the Order Book 335
CBOT
cross order execution
214
Centering the Market in MD Trader
253
using the keyboard
253
Changing
an order with the order bar
209, 336
block trades
219
butterfly condor matrix
309
button size on control panel
67
column widths
60
customer defaults profile
90
default colors for Excel links
200
event sounds
115
fonts
54
grid text or colors
55
hotkeys
143, 283
order change dialog box
224
order quantity in md trader
254
orders in the order book
334
product group settings
79
quantity buttons in market window
182
quantity buttons in md trader
275
quantity or price using the keyboard
223
quantity or price using the mouse
182
quotes
233
row heights
60
spread matrix
309
strategies
244
text colors
54, 119
text style
54
toolbar size
67
- 444 -
X_TRADER® User Manual
Trading Technologies International, Inc.
Index: Click Trading – Creating
trigger price orders in the order book
viewable market grid columns
window color
working order spread matrix
working orders in md trader
Click Trading
butterfly condor matrix
disable
enable
set default properties
spread matrix
trading
Cloning
md trader
Closing the Order Entry Pane
Color tab
changing colors of windows or text
Colors
coding market depth
creating custom
creating custom md trader
quote board
recognizing in time and sales
Column descriptions
fill window
order book
trade book
Command Bar
Common Administrative Tasks
changing the height or rows
changing the width of columns
filtering
formatting fonts
formatting grids
hiding rows or columns
moving rows or columns
populating windows with contracts
printing in X_TRADER
resizing a window grid
restoring hidden rows or columns
setting the default visible columns
using the frame command bar
Confirming the status of market orders
Consolidating Prices
Context-Sensitive Help
Context Menus
audit trail
fast fills pane
fills pane
market grid
md trader
order book
position pane
337
186
54, 119
312
255
215
311
215
215
216
311
216
252
184
116
54, 119
199
54, 119
135
324
375
437
437
437
61
45
60
60
50
53
57
58
58
46
62
61
59
57
61
184
262
43
158
364
352
190
252
331
356
quote board
325
spread matrix
315
time and sales
377
trade book
367
Contracts Disappeared
73
Contracts vs Flow
432
Control Panel
63
adding a product group
77
adding a spread table
83
alerts manager
150
associating a product to a product group
80
changing the size of the toolbar
67
copying a spread table
84
creating a workspace
69
customer defaults setup
85
deleting a product group
79
deleting a workspace
73
disassociating a product from a product group
81
finding
63
icon and menu descriptions
146
opening a functional window
64
plug-ins
151
product group setup
74
properties setup
95
removing a spread table
84
saving a spread table
84
saving a workspace
70
spread tabes setup
82
toolbar
66
window menu
64
workspace setup
68, 72
Conventions
bold
25
italics
25
keyboard
25
keyboard formats
26
Copying
md trader screen
252
spread tables
84
Copyrights
2
Created Outrights and X_TRADER
240
Creating
a link from Excel
200
asset allocation
402
butterfly condor matrix
317
custom colors
55, 120
custom colors md trader
135
customer default profiles
89
customer profile
39
prof trades
397
quotes
233
rtd formula
202
spacer rows in market grid
195
X_TRADER® User Manual
Trading Technologies International, Inc. Proprietary and Confidential Information
- 445 -
Index: Credit – Equity orders
spread matrix
spread strategies
tabbed market grid or spread matrix
user-defined price column
workspaces
Credit
establishing
Cross Orders
cbot
Cross Trading
enabling
Custom Market strategies
Customer Defaults
changing profiles
creating profiles
customer list
deleting profiles
displaying in customer list
features
field descriptions
market-based
order entry pane
properties
read-only
setup
sharing
ttus integration
uneditable
Customer List
displaying customer names
order entry pane
Customizing EBSQuote Board
Customizing MD Trader
adding sound to
controlling the zoom feature
default quantity buttons
moving columns
resizing
Customizing the Quantity buttons
market window
md trader
308
241
193
138, 263
69
185
212
214
212
212
240
85
90
89
93
90
93
86
87
91
94
102
91
85
92
86
86
93
93
94
420
273
273
278
275
278
278
182
275
D
Data
filtering
formatting
sorting in the trade book
Deactivating a Strike or Expiration
multiple
Dealable best
Default hotkeys
50, 53
53
369
234
235
419, 424
143
Default quantity
setting in md trader
183, 257
Deleting
customer defaults profile
90
manual fills
362
orders in md trader
255
using the keyboard
285
orders in the order book
340
after the delete request is sent
341
product groups
79
quotes
235
spread or strategy
244
working orders in spread matrix
312
workspaces
73
Disable
quoting
236
Disassociating a product from a product group
81
Displaying
fill details in the trade book
368
inside market mid-point
266
screen minimizer
48
small md trader
265
E
EBS
Big figure
contracts with depth
local bids
notes
quote board
customizing
reading
rules
Enabling
click trading
hotkeys
keyboard trading in md trader
market depth
order bar
quoting
user-defined price column in md trader
Entering
asset allocations
order into the market
orders using the keyboard
buy order in md trader
sell order in md trader
prof trades
EPIQ
Equity orders
- 446 -
415
419, 424
424
424
426
416
420
419
426
215
143
282
198
207
231
138
402
40
222, 285
284
285
397
203, 272
293
X_TRADER® User Manual
Trading Technologies International, Inc.
Index: Establishing – Fills Alert dialog box
Establishing
available credit
185
link for theoretical pricing
200
Estimated Position In Queue (EPIQ)
203, 272
Eurex
block
218, 292
fast fills information
364
quantity display
187
Eurodollar Options
237
Euronext and Guaranteed Crossing
401
Example
floating depth window
206
spread matrix
310
Examples
consolidating prices
262
implied and outright combination
226
implied in
227
implied on implieds
228
implied out
227
implied quantities
228
laser line
277
mixing implied with direct markets
226
profit and loss
357
spread matrix outright price display
123
Excel
change default colors in market grid
200
creating a link from
200
timing of updates
200
using for theoretical and implied pricing
200
Excel Links
laser line in md trader
277
using in md trader
276
Exchange for swap
392
field descriptions
393
submitting
394
Exchanges
BrokerTec
406
EBS
415
ICE
427
order types
292
recognizing active
37
SFE
433
TOCOM
435
Executing
an order
180
Exiting
42
Expiration
(de)activating
234
(de)activating multiple
235
Export Data
158, 331, 352, 367
F
Fast Fills Pane
context menu
eurex information
notes
Field descriptions
fill window
order book
trade book
Field Descriptions
against actuals trade window
audit trail
audit trail tab
autospreader tab
basis trade window
block trade window
color tab
fill tab
flex options trade window
manual fills
market explorer
market explorer advanced
market grid
md advanced tab
md color tab
md display tab
md trader
md trading tab
order book top
order entry pane
order entry tab
orders tab
quote board tab
sounds tab
spread matrix tab
time and sales
time and sales tab
trading tab
File menu
Fill or Kill
Fill tab
Fill window
column descriptions
Fill Window
adding accont number
fast fills pane
fills alert dialog box
fills pane overview
manual fills
position pane
Fills Alert dialog box
X_TRADER® User Manual
Trading Technologies International, Inc. Proprietary and Confidential Information
363
364
364
363
437
437
437
390
157
111
145
387
384
116
106
395
360
164
165
187
138
135
131
246
125
329
172
102
109
142
113
121
372
124
96
147
292
106
437
347
434
363
349
350
359
354
349
- 447 -
Index: Fills pane – ICE
Fills pane
column descriptions
Fills Pane
context menu
grid summary
start of day fills
Filtering
clearing
clearing all
effects on X_TRADER
on quantity for specific contracts
procedures
removing auto filters
saving
setting
setting auto filters
time and sales
Fixing a Workspace
Flex Options Trade
field descriptions
submitting
Floating Depth Window
examples
Floating Order Book
keyboard
using
Floating order entry
quote board
Floating Order Entry
quote board
using multiple
Flow
FOK
Font
formatting
Forex
Formatting
fonts
grid text or colors
grids
quantity buttons
quantity buttons md trader
Formulas
rtd generating
Frame Command Bar
Frequently asked questions
437
350
352
351
353
50
51
51
53
378
50
52
50
50
52
377
73
395
395
396
205
206
342
345
343
325
176
325
179
432
292
53
415
53
55
57
182
275
202
61
27
rtd formula
spread matrix
Getting Started
audit trail messages
automatic shutdown
begin trading
context sensitive help
creating a customer profile
entering a market order
exiting
logging in
exchange
exchange without logging out
with different ID
production mode
simulation mode
status colors
support
universal log in
X_TRADER Pro
GIS
Global Client Support Center
Grid
changing
formatting
Grid column descriptions
GTC
GTD
30
30, 34
30
29
29
37
28
34
38
173, 339
28
60
57
437
173, 339
173, 339
H
Held Orders
audit trail messages
Help
context sensitivity
getting support
menu
Hiding
partial fills in the trade book
rows or columns
windows
Highlighting in the Market Grid
Hold in timer
Holding Orders in the Order Book
Hotkeys
G
Game Pad Control in MD Trader
Generating
butterfly condor matrix
202
308
29
41
42
29
43
39
40
42
337
156
43
28
149
368
58, 376
48
196
413
337
143, 279, 283
I
290
317
ICE
understanding flow
- 448 -
X_TRADER® User Manual
Trading Technologies International, Inc.
427
432
Index: Iceberg – Manual Fills
Iceberg
characteristics
deleting
rounding
If Touched
Immediate or Cancel
Implied Prices or Quantities
Implied In
Implied on Implieds
Implied Out
in X_TRADER
Implied Pricing
establishing a link for
using excel for
Implieds
quantities
Index
Indicator Columns in MD Trade
Invert price column
IOC
IT
294
294
294
294
292, 296
291
225
227
228
227
225
200
200
228
443
276
138
292
292, 296
K
Keep MD Trader on top
Keyboard
centering the market in md trader
controlling quantity or price
EBS default keys
entering orders in the market grid
floating order book
md trader
procedures
unrestricted
order bar
procedures in md trader
combo dime
combo join
deleting orders
dime the bid
dime the offer
enabling keys
entering a buy
entering a sell
entering order quantity
hitting the bid
join the bid
join the offer
loading the net position
sending a market order
setting the limit price
sweeping the market
266
253
223
416
222
345
279
284
281
210
279
289
289
285
288
288
282
284
285
285
287
288
289
286
286
286
287
taking the offer
trading in the market grid
287
222
L
Laser Line
example
Leave checkbox
Legal notices
License
LIFFE Wholesale Trading
against actuals
audit trail messages
basis
block
euronext and guaranteed crossing
exchange for swaps
flex options
strategy trades
trading types
Limit If Touched
Limit on Close
Limit on Open
Limit to Market
LIT
Live-only contracts
Live only
LOC
Local bids in EBS
Local MD Trader Properties
Locking windows
Logging in
exchange
exchange without logging out
with different ID
LOO
LTM
277
277
413
2
38
381
389
381
386
383
401
392
395
399
382
292, 296
291
291
291
292, 296
204
204
292
424
260
48
30, 34
30, 34
30
292
292
M
Making a Block or Volatility Order Inquiry
Making a trade
Managing a Startup Workspace
Managing Quote Board Properties
Managing TradeSounds
Manual conventions
Manual Fills
adding
deleting
field descriptions
saving
X_TRADER® User Manual
Trading Technologies International, Inc. Proprietary and Confidential Information
- 449 -
221
180
72
324
129
25
359
360
362
360
362
Index: Market-based customer defaults – MD Trader
Market-based customer defaults
91
Market Depth
198
color coding
199
enable
198
Market Explorer
163
advanced field descriptions
165
field descriptions
164
opening a window
168
populating a window
168
renaming contracts
167
searching for a product
166
Market Grid
186
adding price averages and accumulations to
199
context menu
190
customize columns
186
establishing a link for theoretical and implied pricing200
field descriptions
187
floating depth window
205
generating an rtd formula
202
highlighting in
196
opening wholesale orders
197
price trend indicators
197
quoting additions to the market grid pane
229
spacer rows
195
tabbed grids
193
using excel for theoretical and implied pricing 200
using the market depth feature
198
Market If Touched
292, 296
Market Limit Market
103, 127, 291
Market On Close
292, 298
Market On Open
292, 297
Market order
297
Market to Limit
292, 299
Market Window
171
butterfly condor matrix
316
click trading
215
cross trading
212
eurex block trading
218
implied prices and quantities
225
market grid
186
order change dialog box
224
order entry pane
172
order types and restrictions
291
quoting overview
229
spread matrix
307
spread strategies
239
Match Price
358
MD Advanced tab
138, 264
MD Color tab
135
MD Display tab
131
MD Trader
245
adding sound
273
adding time and sales
274
auto centering
average price highlighting
average price of open position
changing order quantity
changing working orders
consolidating prices
context menu
control the zoom
creating user-defined price column
customer profile
customizing
quantity buttons
default quantity
deleting orders
excel links in
features
field descriptions
game pad control
indicator columns
inside market mid-point
keep on top
keyboard maps in
buy side
functions
sell side
unrestricted
keyboard procedures in
centering the market
combo dime
combo join
deleting orders
dime the bid
dime the offer
enabling keys
entering a buy
entering a sell
entering order quantity
hitting the bid
join the bid
join the offer
loading the net position
sending a market order
setting the limit price
sweeping the market
taking the offer
laser line
limit price
maximum trade quantity
moving columns
net change indicator
one-click trading
order types and restrictions
populating
- 450 -
261
261
253
254
255
262
252
278
138, 263
256
273
275
183, 257
285
276
249
246
290
276
266
266
279
279
279
279
281
279
253
289
289
285
288
288
282
284
285
285
287
288
289
286
286
286
287
287
277
286
270
278
256
267
291
250
X_TRADER® User Manual
Trading Technologies International, Inc.
Index: MD Trading tab – Order Types and Restrictions
properties
local
resizing
sending an order
setting time in force
small md trader
stop orders
sweeping the market
text and grid colors
trade quantity
trading out a position
using
MD Trading tab
Mid-point in MD Trader
Minimizer
Minimum Volume
MIT
MKT
MLM
MOC
Modifying a Eurex Block Order
MOO
Moving
md trader columns
rows or columns
MTL
MTL-IT
Mutual Offset order
MV
260
260
278
286
258
265
268
287
259
257
270
253
125
266
48
293, 300
292, 296
297
103, 127, 292
292, 298
219
292, 297
278
58
292, 299
292, 296
181
293, 300
N
NDFs
Net change
Non-deliverable forwards
415
256
415
O
OCO
One-click Trading in MD Trader
Opening
a functional window
a functional window from market explorer
context sensitve help
fast fills pane
fill window
keyboard entry window
md trader
order book
order change dialog box
quote audit trail
300
267
64
168
43
363
347
222
245
327
224
234
time and sales
trade book
wholesale orders
wholesale trade window
workspaces
Order bar
keyboard trading
modifying an order
Order book
column descriptions
Order Book
altering orders
canceling and replacing orders
changing trigger price orders
context menus
deleting orders
field descriptions top
floating order book
grid summary
holding orders
remove stale orders
status inquiries
time in force (tif)
trader identification
Order cancels order
Order Change dialog box
using
Order Entry Pane
available credit
closing
control quantity and price with keyboard
control quantity and price with mouse
executing an order
field descriptions
floating order entry
multiple
mutual offset order
order status
quantity buttons
synthetic disclosed quantity orders
Order Entry tab
Order Types and Restrictions
best limit order (BL)
cross
iceberg
if touched
market
market on open
market to limit
minimum volume
order cancels order
stop
trailing stops
X_TRADER® User Manual
Trading Technologies International, Inc. Proprietary and Confidential Information
371
365
197
381
71
143, 207
210
209, 336
437
327
333
335
337
331
340
329
342
330
337
332
332
339
328
300
224
224
172
185
184
223
182
180
172
176
179
181
184
182
185
102
291-292
293
212
294
296
297
297
299
300
300
303
305
- 451 -
Index: Orders – Read-only customer defaults
Orders
altering in the order book
canceling/replacing in the order book
confirming status
deleting in order book
holding in the order book
quoting
remove stale from order book
status inquiries
Orders tab
333
335
184
340
337
229
332
332
109
P
P and L
P&L
Passive orders
Pinning rows
Placing passive and aggressive orders
Plug-ins
Populating
a functional window
market grid
md trader
quote board
time and sales
windows with contracts
Position pane
column descriptions
Position Pane
calculating profit and loss
context menu
grid summary
properties
Price Changing
Price Trend Indicators
Printing
Product Group
adding
associating a product
changing settings
deleting
disassociating a product
field descriptions
setup
Production Mode
Prof trades
Profit and Loss
Properties
audit trail tab
autospreader tab
color tab
EBSQuote Board
357
357
410
204
410
151
168
168
250
320
373
46
437
354
357
356
355
106
182
197
62
77
80
79
79
81
75
74
29
397
357
95
111
145
116
420
fill tab
hotkeys tab
md advanced
md color tab
md display tab
md trading tab
order entry tab
orders tab
quote board tab
sounds tab
spread matrix tab
time and sales tab
trading tab
106
143
138, 263
135
131
125
102
109
142
113
121
124
96
Q
Quantity or Price
controlling with keyboard
controlling with mouse
Questions
Quote Audit Trail
Quote board
property
Quote Board
color properties
context menu
features
floating order entry
managing properties
populating
reading
using floating order entry with
Quote Board tab
Quoting
activating a strike or expiration
additions to the market grid
deactivating a strike or expiration
deleting quotes
disabling
editing
enabling
generating
market mode
sending
status at shutdown
test mode
tracking quotes
223
182
28
234
413
319
324
325
320
325
324
320
323
325
142
229
234
229
234
235
236
233
231
233
229
233
236
229
234
R
Read-only customer defaults
- 452 -
X_TRADER® User Manual
Trading Technologies International, Inc.
91
Index: Reading – Startup Workspaces
Reading
md trader net change indicator
md trader text and grid colors
quote board
spread matrix
time and sales window
Recognizing
active exchanges
Recognizing Color Codes in Time and Sales
Recreating a Spread Strategy
Related documentation
Removing
event sounds
fast fills
spread tables
stale orders
Renaming an Existing Strategy
Renaming contracts
Resizing
md trader
toolbar
window grid
Restoring contract names
Restoring Hidden Rows or Columns
Restrictions
RTD Formulas
256
259
323
310
375
37
375
243
26
115
363
84
332
243
167
265
67
61
167
59
291
202
S
Saving
manual fills
time and sales information
workspaces
Screen minimizer
Searching for a Product
Selecting a Customer Profile in MD Trader
Sell Side Keys in MD Trader
Send quote order property
Setting
auto filters
default quantity in md trader
default visible columns
filters
maximum trade quantity in md trader
md trader properties
outright or spread price
time in force in md trader
trade quantity in md trader
Settings menu
SFE
SFEcustom market strategies
362
378
70
48
166
256
279
413
52
183, 257
57
50
270
260
313
258
257
148
433
240
SGX
market to limit
MTL
Sharing
customer defaults
Simulation Mode
Sorting the Trade Book
Sound tab
adding an event sound
adding to md trader
Sounds
adding high and low alerts
adding to md trader
tradesounds
Spacer rows
Spread Matrix
butterfly condor
calculations
canceling working orders
click trading
context menu
customizing
example
features
floating depth window
generating
implied quantites
outright price example
properties
reading
set outright or spread price
tabbed
trading
Spread Matrix tab
Spread Strategies
adding
created outrights and X_TRADER
creating
deleting
recreating
renaming an existing
SFE custom market
trading with
Spread Table
adding
copying
removing
saving
setup
Start of Day Fills
Starting Plug-ins
Startup Workspaces
X_TRADER® User Manual
Trading Technologies International, Inc. Proprietary and Confidential Information
292, 299
292, 299
92
29
369
113
115
273
150
273
129
195
307
316
314
312
312
315
309
310
310
205
308
228
123
313
310
313
193
311
121
239
242
240
241
244
243
243
240
242
83
84
84
84
82
353
151
72
- 453 -
Index: Status – Trading tab
Status
confirming market orders
inquiries
of exchanges
of quotes at shutdown
Stop Order
in md trader
Stop trigger
Storing audit trail
Strategies
adding
amending
creating
deleting
recreating
renaming
trading with
Strategy Wholesale Orders
Strike
(de)activating
(de)activating multiple
Submitting
a mutual offset order
against actuals trade
basis trade
block trade
eurex block order
flex options trade
Support
Synthetic Disclosed Quantity Orders
184
332
37
236
291, 303
268
268, 303
162
239
242
244
241
244
243
243
242
399
234
235
181
391
388
385
219
396
28
185
T
Tabbed windows
Table of contents
Theoretical Pricing
establishing a link for
using excel
Tick Formula
TIF
Time and Sales
color codes
context menu
field descriptions
filtering on quantity of rspecific contracts
filters
hiding columns
in md trader
overview
populating
properties
reading
193
iii
200
200
414
173, 339
377
375
377
372
378
377
376
274
371
373
379
375
saving information
Time and Sales tab
Time In Force
md trader
Timed Orders
Timing of Excel Updates
TOCOM
best limit order
BL
if touched
IT
market order
market to limit
MKT
MTL
Tokyo Commodities Exchange
Toolbar
changing size
Tracking Quotes
Trade book
column descriptions
grid summary
Trade Book
context menu
detail pane
display fill details
partial fill pane
partial fills
sorting data
summary pane
TradeList
Trader Identification in Order Book
TradeSounds
Trading
BrokerTec
EBS
EBSQuote Board
eurodollar options
ICE
in yield
out a position in md trader
SFE
specialty exchanges
TOCOM
with a spread or strategy
with the butterfly condor matrix
with the keyboard in md trader
with the order bar
with the spread matrix
Trading tab
admin alert messages
implied and outright combination example
implied with direct markets example
- 454 -
378
124
173, 339
258
291
200
435
292-293
292-293
292, 296
292, 296
297
292, 299
297
292, 299
435
66
67
234
437
366
365
367
366
368
366
366, 368
369
366
274
327
129
406
415
416
237
427
138
270
433
405
435
242
311
279
144, 207
311
96
101
226
226
X_TRADER® User Manual
Trading Technologies International, Inc.
Index: Trailing stops – X_TRADER Pro
implieds in X_TRADER
Trailing stops
TStop
TT Minimizer
TT User Setup
TT_TRADER
exiting
TTUS
225
305
305
48
86
42
86
market depth
profit and loss
time and sales
your estimated position in queue
Vola
Volatility Order
accept
inquiry
Volatility orders
U
220
221
293, 305
W
Unrestricted Keyboard Functions in MD Trader 281
User-Defined Price column
138, 263
Using
click trading in market grid
216
excel for theoretical and implied pricing
200
excel links in md trader
276
floating depth window
205
floating order book
343
floating order entry
176
multiple
179
frame command bar
61
laser line in md trader
277
market depth
198
mouse to control zoom
278
order bar
143, 207
order change dialog box
224
screen minimizer
48
tabbed market grid
193
tradesounds
129
Using MD Trader
253
average price of open position
253
centering the market
253
changing the order quantity
254
changing working orders
255
customer profile
256
deleting orders
285
local md trader properties
260
net change indicator
256
setting the default quantity
183, 257
setting the maximum trade quantity
270
setting the time in force
258
setting the trade quantity
257
text and grid colors
259
V
Viewing
audit trail history
EBS contracts with depth
live-only contracts
198
357
377
203, 272
293, 305
Wholesale Trading
against actuals
asset allocations
audit trail messages
basis
block
euronext and guaranteed crossing
exchange for swaps
flex options
prof trades
strategy trades
trading types
Window menu
Working-up orders
Workspace
creating
deleting
fixing
introduction
multiple
opening
saving
setup
startup
381
389
402
381
386
383
401
392
395
397
399
382
64
412
68
69
73
73
40, 68
68
71
70
68
72
X
X_TRADER
automatic shutdown
exiting
introduction
login
printing
trading system
universal login
X_TRADER Pro
42
42
25
30
62
27
34
27, 38
156
419, 424
204
X_TRADER® User Manual
Trading Technologies International, Inc. Proprietary and Confidential Information
- 455 -
Index: Yield – Yield
Y
Yield
138
- 456 -
X_TRADER® User Manual
Trading Technologies International, Inc.