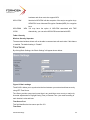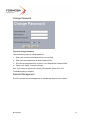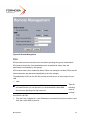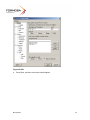
1
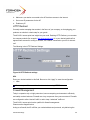
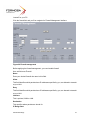
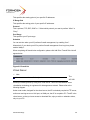
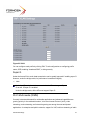
802.11a/b/g BWA
Wireless Access Point
Introduction
PageI
Content
CHAPTER 1.
INTRODUCTION................................................................................................... 1
OVERVIEW ..................................................................................................................................... 1
KEY FEATURES .............................................................................................................................. 1
TYPICAL INFRASTRUCTURE ............................................................................................................. 3
TYPICAL CASE ............................................................................................................................... 5
CHAPTER 2.
BASIC INSTALLATION ........................................................................................ 6
SYSTEM REQUIREMENTS ................................................................................................................ 6
HARDWARE DESCRIPTION ............................................................................................................... 6
INSTALLING AG-3621 ACCESS POINT .............................................................................................. 6
Hardware Installation ............................................................................................................... 6
Configuring the TCP/IP Settings of Your PC............................................................................ 8
Checking Your LAN Connections............................................................................................. 9
Installing Your AG-3621 AP with a Web Management........................................................... 10
OPERATING DISTANCE TIPS ...........................................................................................................11
CHAPTER 3.
BASIC CONFIGURATION.................................................................................. 13
DEFAULT FACTORY SETTINGS ....................................................................................................... 13
HOW TO ENTER YOUR AG-3621 MANAGEMENT WEB ..................................................................... 13
BASIC INFORMATION ABOUT THE AG-3621..................................................................................... 14
WIRELESS INFORMATION ABOUT THE AG-3621 .............................................................................. 16
CHAPTER 4.
ADVANCED SETTINGS..................................................................................... 18
UNDERSTANDING RADIUS SETTINGS ........................................................................................... 18
GETTING TO KNOW AG-3621 WIRELESS SECURITY OPTIONS ........................................................ 19
Security Precautions .............................................................................................................. 19
Wireless Security Options...................................................................................................... 19
TIME SERVER............................................................................................................................... 22
BRIDGE/ROUTER MODE ................................................................................................................ 23
ANY IP ........................................................................................................................................ 25
HTTP REDIRECT.......................................................................................................................... 26
FIREWALL MANAGEMENT .............................................................................................................. 26
VIRTUAL SERVER ......................................................................................................................... 28
VAP / VLAN ................................................................................................................................ 30
Introduction
PageII
SUPER G ..................................................................................................................................... 31
WI-FI MULTI-MEDIA (WMM).......................................................................................................... 31
SMART WDS ............................................................................................................................... 32
BUILD YOUR WIRELESS INFRASTRUCTURE VIA AG-3621 ................................................................ 32
Wireless Access Point Mode.................................................................................................. 32
Station Adapter Mode............................................................................................................. 33
Wireless Bridging Mode ......................................................................................................... 34
Wireless Repeater Mode ....................................................................................................... 36
Wireless Inter-building Mode ................................................................................................. 37
CHAPTER 5.
MANAGEMENT .................................................................................................. 38
SITE SURVEY ............................................................................................................................... 38
VIEW STATISTICS INFORMATION..................................................................................................... 39
VIEW STATION INFORMATION ......................................................................................................... 40
CHANGE PASSWORD .................................................................................................................... 41
REMOTE MANAGEMENT ................................................................................................................ 41
SSH............................................................................................................................................ 42
SNMP......................................................................................................................................... 44
UPGRADE FIRMWARE ................................................................................................................... 47
BACKUP / RESTORE SETTINGS ...................................................................................................... 48
EVENT LOG .................................................................................................................................. 49
REBOOT AP ................................................................................................................................. 49
CHAPTER 6.
TROUBLESHOOTING ....................................................................................... 51
CHAPTER 7.
WARRANTY INFORMATION ............................................................................. 52
CHAPTER 8.
REGULATORY INFORMATION ......................................................................... 54
FCC STATEMENT ......................................................................................................................... 54
CHAPTER 9.
Introduction
CONTACT INFORMATION................................................................................. 55
PageIII
Content of Figure
Figure 1 Wireless Point-to-multi-point ..................................................................................... 3
Figure 2 Wireless Point-to-Point ............................................................................................. 4
Figure 3 Wireless Repeater .................................................................................................... 4
Figure 4 Wireless Access Point............................................................................................... 5
Figure 5 AG-3621 Wireless network Connection properties.................................................... 8
Figure 6 AG-3621 Internet Protocol (TCP/IP) Properties ........................................................ 9
Figure 7 AG-3621 Ping Reply ............................................................................................... 10
Figure 8 AG-3621 log in window ........................................................................................... 10
Figure 9 AG-3621 General Information ................................................................................. 11
Figure 10 Safety Alert............................................................................................................ 14
Figure 11 Radius settings...................................................................................................... 18
Figure 12 AG-3621 access control ........................................................................................ 20
Figure 13 Basic settings........................................................................................................ 22
Figure 14 WAN/LAN settings ................................................................................................ 23
Figure 15 Router Mode—WAN at Ethernet Port ................................................................... 24
Figure 16 Router Mode—WAN at Wireless Port ................................................................... 24
Figure 17 Router Mode-WAN at Ethernet Port...................................................................... 25
Figure 18 Router Mode-WAN at Ethernet Port...................................................................... 25
Figure 19 HTTP Redirect settings ......................................................................................... 26
Figure 20 Firewall management............................................................................................ 27
Figure 21 Firewall list ............................................................................................................ 28
Figure 22 Virtual server management ................................................................................... 29
Figure 23 VLAN .................................................................................................................... 31
Figure 24 Wireless Access Point........................................................................................... 33
Figure 25 Wireless Station Adapter ....................................................................................... 34
Figure 26 WDS Mode............................................................................................................ 35
Figure 27 Wireless Point to Multi-Point Bridge...................................................................... 36
Figure 28 Wireless Point-to-Point Mode................................................................................ 36
Figure 29 Wireless Repeater Mode....................................................................................... 37
Figure 30 Site Survey............................................................................................................ 38
Figure 31 Link Test................................................................................................................ 38
Figure 32 Statistics Information ............................................................................................. 40
Figure 33 Connection status ................................................................................................. 40
Introduction
PageIV
Figure 34 Change Password................................................................................................. 41
Figure 35 Remote Management ........................................................................................... 42
Figure 36 SSH ...................................................................................................................... 43
Figure 37 Command ............................................................................................................. 44
Figure 38 Get Mib File........................................................................................................... 45
Figure 39 MIB Compiler ........................................................................................................ 46
Figure 40 MIB File................................................................................................................. 47
Figure 41 Backup .................................................................................................................. 48
Figure 42 Event log ............................................................................................................... 49
Figure 43 Reboot AP............................................................................................................. 50
Content of Table
Table 1 AG-3621 LEDs Information......................................................................................... 6
Table 2 AG-3621 Default Settings ......................................................................................... 13
Table 3 Wireless Advanced Settings ..................................................................................... 17
Table 4 Security .................................................................................................................... 22
Introduction
PageV
Copyright
This user’s manual and the software described in it are copyrighted with all rights reserved.
No part of this publication may be reproduced, transmitted, transcribed, stored in a retrieval
system, or translated into any language in any form by any means without the written
permission of FWS Corporation.
Preface
About This Manual
This manual explains FWS enterprise-class AG-3621 access point.
Document Conventions
AP refers to an access point.
STA refers to a station
ETH refers to a PC
The following special notations are used:
Note
This indicates an important Note.
Bold: Indicates the function, important words, and so on.
Introduction
PageVI
Chapter 1.
Introduction
Thank you for choosing the FWS’s AG-3621 Access Point (hereafter called access point).
This Access Point provides a secure, affordable, and easy-to-use wireless LAN solution that
combines mobility and flexibility with the enterprise-class features required by networking
professionals.
Overview
802.11a/b/g-compliant, this access point distinguishes herself by one built-in mini-PCI card,
providing wired and wireless two ports in a bigger infrastructure. Typically, VAP functionality
allows a single network AP to behave as “8” number of virtual network APs. This does away
with the limitation by the sheer number of Ethernet connections that need APs acting as a
proxy. WMM prioritizes traffic demands from different applications and extends Wi-Fi’s high
quality end-user experience from data connectivity to voice, music, and video applications
under a wide variety of environment.
This Access points serves as the connection point between wireless and wired networks or as
the center point of a stand-alone wireless network. In large installations, wireless users within
radio range of an access point can roam throughout a facility while maintaining seamless,
uninterrupted access to the network.
You can configure and monitor the access point using the command-line interface (CLI), the
browser-based management system, or Simple Network Management Protocol (SNMP).
This Access Point currently can support data rate up to 108Mbps. Users are encouraged to
update their latest firmware through http://www.tw-wireless.com
Networks are useful tools for sharing computer resources. You can access one printer from
different computers and access data located on another computer's hard drive. Networks are
even used for playing multiplayer video games. So, networks are not only useful in homes
and offices, they can also be fun. Use the instructions in this Guide to help you connect the
Access Point, set it up, and configure it to bridge your different networks. These instructions
should be all you need to get the most out of the Access point.
Key Features
The AG-3621 Access Point is use-friendly and provides solid wireless and networking support.
The following standards and conventions are supported:
Standards Compliant
The Wireless Access Point complies with the IEEE 802.11a/b/g for Wireless LANs.
Introduction
Page1
WEP support
Support for WEP including 64-bit, 128-bit, and 152-bit keys.
DHCP Client Support
DHCP Server provides a dynamic IP address to PCs and other devices upon request. The
AG-3621 can act as a client and obtain information from your DHPC server.
SNMP Support
Support for Simple Network Management Protocol (SNMP) Management Information Base
(MIB) management.
Multiple operating modes
Access point
Station Adapter
Point-to-Point Bridge.
Wireless Repeater
Inter-building
Repeater mode
Configure the access point as a wireless repeater to extend the coverage area of your
wireless network.
VAP
Assign Multi-SSIDs on your access point (one SSID per VAP) to differentiate policies and
services among users forming a wide variety of VLANs.
QoS
Use this feature to support quality of service for prioritizing traffic from the Ethernet to the
access point. The access point also supports the voice-prioritization schemes used by
802.11a/b/g wireless phones.
Transmit Power Control
Supports settable transmit power levels to adjust coverage cell size, ranging from full,
half(50%), quarter(25%) eighth(12.5%0 and min
Atheros Super G Mode
Super G mode enables the transmission up to 108Mbps
Multiple security settings per VLAN with up to 8 VLANs
Security settings for multiple groups – so employees, guests and contractors now easily and
securely share the same infrastructure
Access Control.
Introduction
Page2
The Access Control MAC address filtering feature can ensure that only trusted wireless
stations can use the AG-3621 to gain access to your LAN.
Hidden Mode
The SSID is not broadcast, assuring only clients configured with the correct SSID can
connect.
Typical Infrastructure
The AG-3621 Access Point proves to be a highly competent device, undertaking various tasks
for your different environments. We’ll spell out the applicability below.
Wireless Point-to-Point
The wireless Point-to-Point mode features connecting two sub-networks far away, allowing ou
to quickly and cost-effectively have access to the internet in a matter of minutes.
Figure 1 Wireless Point-to-multi-point
Under this mode, the AG-3621 plays the leading role in the infrastructure, connecting devices
apart.
Introduction
Page3
Figure 2 Wireless Point-to-Point
Wireless Repeater
When the other AP is several thousands miles away form the AG-3621, the repeater mode is
strongly recommended.
Figure 3 Wireless Repeater
Wireless Access Point
This mode is typically for mobile environments.
Introduction
Page4
Figure 4 Wireless Access Point
Typical Case
The high-quality performance enables the AG-3621 to gain widespread acknowledgements. It
is able to undertake tasks in various situations.
Create or expand well-created network via the AG-3621 in enterprises or residential quarters
Provide an access to Metropolitan Area Network via WLAN
Act as a media connecting Base Station and sub-stations in mobile communicating network
Provide an access to hard-to-reach areas, like historical sites
Build a makeshift network for a meeting
Link Backup or Emergency Communication
Introduction
Page5
Chapter 2.
Basic Installation
System Requirements
Before installing the AG-3621 access point, make sure your system meets these
requirements.
The Category 5 UTP straight through Ethernet cable with RJ-45 connector included in the
package, or one like it.
A 230 V, 50 HZ AC power source.
A Web browser for configuration such as Microsoft Internet Explorer 6.0 or above, or Netscape
Navigator 4.78 or above.
At least one computer with the TCP/IP protocol installed
What’s In the Box?
FWS Wireless Access Point 802.11a/b/g AG-3621
Power adapter and cord
Two Dual-Band Omni-directional antennas
AG-3621 11a/b/g Wireless Access Point Installation Guide
Resource CD for the FWS AG-3621 Wireless Access Point
Support Registration card
Hardware Description
We’ll discuss the AG-3621 front and rear functions.
The LEDs
The Access Point's LEDs, where information about network activity is displayed, are located
on the front panel.
LED
PWR
DESCRIPTION
Off
No power. If this LED does not come on with the power adapter
and cord correctly installed
TEST
On
Power is on.
Off
Indicates that leaving boot-code mode
On
Indicates that entering boot-code mode
Blink
Reset button is pressed around 3 seconds (slow blinking).
Reset button is pressed after 3 seconds(fast blinking)
Whlie you upgrade firmware or reset to factory default,the TEST
6
LED is blinking.After firmware is upgraded or reset to factory
default, the Access Point will reboot automatically.
LAN(100)
Off
10 Mbps Ethernet link is detected but no activity.
On
100Mbps Fast Ethernet link is detected but no activity.
LAN(LINK/ACT)
Blinking
Indicates that Data processing(Frequency depends on traffic)
WLAN
Off
Indicates no wireless links
On
Wireless LAN is in service but no activity.
Blinking
Indicates the device is linking or active data through wireless
links.
Table 1 AG-3621 LEDs Information
Installing AG-3621 Access Point
Before installing, you should make sure that Ethernet network is perfectly working. You will be
connecting the AG-3621 to the Ethernet network so that computers with 10/100 Fast Ethernet
adapters will communicate computers on the Ethernet.
Set Up the AG-3621 Access Point Tip:
1.
Before mounting the AG-3621 in a high location, first set up and test the AG-3621 to
verify wired network connectivity.
2.
Prepare a computer with an Ethernet adapter. If this computer is already part of your
network, record its TCP/IP configuration settings.
3.
Configure the computer with a static IP address of 192.168.1.x (x cannot be 1)and
255.255.255.0 for the Subnet Mask.
Please follow the steps below to complete installing of your AG-3621.
Hardware Installation
1.
Combine the AG-3621 antennas into the antenna connector.
Note
Make sure that you connect tightly the External dipole antenna on the
antenna
connector of your AG-3621 AP. A loosen antenna will reduce the
radiant energy or even lose it. In order to improve the RF signal
radiation of your antenna, proper antenna placement is necessary. Try
to place the antenna as high as possible to increase the coverage
7
area.
2.
Connect one end of an Ether cable to the AG-3621 AP and connect the other end to the
Ethernet LAN port located on your PC.
3.
Turn on your computer, connect the power adapter to the AG-3621 and verify the
following:
The PWR power light goes on.
The LAN light of the wireless access point is lit when connected to a powered on computer.
Configuring the TCP/IP Settings of Your PC
Make sure the TCP/IP protocol has been installed in your PC. Please take the following steps
to set a static IP address in Windows XP/2000.
1.
Go to StartÆClick control PanelÆDouble-click Network ConnectionsÆRight-click Local
Area ConnectionÆClick Properties
2.
Highlight Internet Protocol (TCP/IP) and click Properties.
Figure 5 AG-3621 Wireless network Connection properties
3.
Select Use the following IP address in the Internet Protocol (TCP/IP) Properties window.
Set your IP address and subnet mask. Configure a static IP address of 192.168.1.x (x
cannot be 1) and 255.255.255.0 for the Subnet Mask. Then click OK button.
8
Figure 6 AG-3621 Internet Protocol (TCP/IP) Properties
Checking Your LAN Connections
Please follow the steps below to check whether your LAN connection is OK, by using “Ping”
command.
1.
Click Start.ÆProgramsÆAccessoriesÆCommand Prompt
2.
Under MS-DOS, you can use “ping” to check whether your computer has been
successfully associated to your AG-3621.
3.
Execute the ping command: ping 192.168.1.1
4.
If the connections between your AP and PC is OK, the reply will appear below.
9
Figure 7 AG-3621 Ping Reply
Installing Your AG-3621 AP with a Web Management
1.
Connect to the AG-3621 by opening your browser and entering http://192.168.1.1 in the
address field. A login window like the one shown below opens:
Figure 8 AG-3621 log in window
2.
When prompted, please enter admin for Name and password for password, both in low
10
cases.
3.
Clicking Login now, it will navigate you into AG-3621’s homepage-----General Information
will be shown
below.
Figure 9 AG-3621 General Information
Operating Distance Tips
The range of your wireless connection is significantly determined by the physical placement
of the access point.
To optimize the results, place your wireless access point:
Near the center of the area in which your PCs will operate.
In an elevated location such as a high shelf where the wirelessly connected PCs have
line-of-sight access (even if through walls).
Away from sources of interference, such as PCs, microwaves, and 2.4 GHz cordless
phones. • Away from large metal surfaces.
Putting the antenna in a vertical position provides best side-to-side coverage. Putting the
11
antenna in a horizontal position provides best up-and-down coverage.
If using multiple access points, it is better if adjacent access points use different radio
frequency Channels to reduce interference. The recommended Channel spacing between
adjacent access points is 5 Channels (for example, use Channels 1 and 6, or 6 and 11).
12
Chapter 3.
Basic Configuration
Default Factory Settings
We’ll elaborate the AG-3621 default factory settings. You can re-acquire these parameters by
resort button. If necessary, please refer to the “the way to restore default factory settings.
FEATURE
FACTORY DEFAULT SETTINGS
User Name (case sensitive)
admin
Password (case sensitive)
password
Access Point Name
APxxxxxx(xxxxxx represents the last 6 digits of
MAC address)
Country / Region
United States
Router Mode
Bridge
IP Type
static IP
IP Address
192.168.1.1
IP Subnet Mask
255.255.255.0
Default Gateway
0.0.0.0
Operating Mode
Access Point
Wireless Mode
802.11a
Channel / Frequency
52 / 5.260GHz
Table 2 AG-3621 Default Settings
How to Enter Your AG-3621 Management Web
AG -3621 provides you with user-friendly web-based management. Take the following steps
1.
Enter the AG-3621via IE. When entering the IP address: http://192.168.1.1, you’ll see a
popup menu below:
13
Figure 10 Safety Alert
2.
Clicking “Yes” ushers you into the login.
Note:
Make sure the PC IP address need to be matched the AP. For instance, the
AG-3621 is 192.168.1.1, and your PC IP should be 192.168.1. X.
3.
Enter the default name “admin” in the username field and “password” in the password
field。Clicking “Login now”will usher you into the AG-3621 management interface.
Basic Information about the AG-3621
We’ll elaborate the information from the AG-3621 homepage.
Access Point Name
You may assign any device name to the Access Point. This name is only used by the Access
Point administrator for identification purposes. Unique, memorable names are helpful,
especially if you are employing multiple access points on the same network. The default
name is APxxxxxx.
MAC Address
MAC Address is short for Media Access Control address, a hardware address that uniquely
identifies each node of a network.
Country/Region
This field identifies the region where the AG-3621 can be used. It may not be legal to operate
14
the wireless features of the wireless access point in a region other than one of those identified
in this field. The default country is the United States.
Firmware Version
Firmware is stored in a flash memory and can be upgraded easily, using your Web browser,
and can be upgraded via ftp server or ftp server. The currently available version of AG-3621 is
1.1.3.0.
IP Type
By default, the AG-3621 is configured as static IP Address.
IP Address: The IP address must be unique to your network. The default IP address is
192.168.1.1.
Note
To associate the access point to your PC, make sure the PC IP address
need to be matched the AP. For instance, the AG-3621 is 192.168.1.1, and
your PC IP should be 192.168.1. X.
Subnet Mask
The Subnet Mask must be the same as that set on the LAN that your Access Point is
connected to. The default is 255.255.255.0.
Operating Mode
AG-3621 provides five modes, Access Point, Station, bridge, repeater and inter-building.
Access Point: Act as a standard 802.11a/b/g. The default mode is Access Point.
Station: Perform as a client station associated to other APs. Be sure that they share the same
SSID when connected.
Bridge
The AG-3621 acts as a bridge connecting APs. Two bridge modes are available below.
Point-to-Multi-Point Bridge
Select this only if this AG-3621 is the “Master” for a group of bridges. The other bridge must
use this AG-3621 MAC address. They then send all traffic to this “Master”, rather than
communicate directly with each other. WEP should be used to protect this traffic.
Wireless Repeater
In this mode, the AG-3621 can communicate with another wireless station or wireless bridge.
You can enter the MAC address of both adjacent repeaters in the fields provided to
communicate with other wireless bridge or use SSID to communicate with other wireless
15
station. WEP should be used to protect this communication.
Wireless Mode: Select the desired wireless operating mode. The default mode is 802.11a.
Channel
This field identifies which operating frequency will be used.
Security Profiles
This provides a list of virtual APs derived from AG-3621 Virtual AP, spelling out profile name,
SSID, MAC, security, and status.
Build Wireless Point-to-Point Bridge Mode
Under this mode, two separate networks located apart can be connected to carry out
data-transmission about several thousand miles away
Create a connection between AP and wireless station separately.
Open the AG-3621 management web through entering the default factory IP Address
192.168.1.1, user name—admin and password—password. Enter the other AP’s name on the
MAC address field, respectively,
Wireless Information about the AG-3621
The following describes the advanced wireless parameters.
Field
Description
RTS Threshold
The packet size used to determine whether it
should use the CSMA/CD (Carrier Sense
Multiple Access with Collision Detection) or
the CSMA/CA (Carrier Sense Multiple Access
with Collision Avoidance) mechanism for
packet transmission.
Fragmentation Length
This is the maximum packet size used for
fragmentation. Packets larger than the size
programmed in this field will be fragmented.
The Fragment Threshold value must be
larger than the RTS Threshold value.
Beacon Interval
Specifies the data beacon rate between 20
and 1000.
DTIM Interval
The Delivery Traffic Indication Message
specifies the data beacon rate between 1 and
255.
16
Preamble Type
A long transmit preamble may provide a more
reliable connection or slightly longer range. A
short
transmit
preamble
gives
better
performance. Long is the default
Antenna
Select the desired antenna for transmitting
and receiving. Auto is the default.
Table 3 Wireless Advanced Settings
17
Chapter 4.
Advanced Settings
The AG-3621 access point is a highly competent device, providing applicable functions.
Understanding RADIUS Settings
RADIUS is a server for remote user authentication and accounting. It can be used on any
network that needs a centralized authentication and/or accounting service for its workstations.
From the system Setup, click Radius Settings, the RADIUS Settings will display as below.
Figure 11 Radius settings
You will also have to fill in the following Radius server settings:
Primary Radius Server IP Address
This field is required. Enter the IP address of the Radius Server on your LAN or WAN..
Secondary Radius Server IP Address
This field is optional. Enter the IP address of the Secondary Radius Server on your LAN.
Radius Port
Enter the port number used for connections to the Radius Server.
Radius Shared Key
Enter the desired value for the Radius shared key. This key enables the AG-3621 to log in to
Advanced Settings
18
the Radius server and must match the value used on the Radius server.
Radius Accounting Option
The Radius Accounting option can be enabled so that you can track various information like
who connected to the network, when they connected, how long they were connected, how
much network traffic they generated, and so on.
Getting To Know AG-3621 Wireless Security Options
FWS wants to make wireless networking as safe and easy for you as possible. The current
generation of FWS products provides several network security features, but they require
specific action on your part for implementation. So, keep the following in mind whenever you
are setting up or using your wireless network.
Security Precautions
The following is a complete list of security precautions to take as shown in this User’s Manual.
(at least steps 1 through 5 should be followed):
1. Change the default SSID.
2. Disable SSID Broadcast.
3. Change the default password for the Administrator account.
4. Enable MAC Address Filtering.
5. Change the SSID periodically.
Use the highest encryption algorithm possible. Use WPA if it is available. Please note that this
may reduce your network performance. Change the WEP encryption keys periodically.
To ensure network security, steps one through four should be followed, at least. Wireless
networks are easy to find. Hackers know that in order to join a wireless network, wireless
networking products first listen for “beacon messages”. These messages can be easily
decrypted and contain much of the network’s information, such as the network’s SSID
(Service Set Identifier).
Wireless Security Options
There are several ways you can enhance the security of your wireless network:
Access Control
You can restrict access to only trusted clients so that unknown clients cannot wirelessly
connect to the AG-3621. MAC address filtering adds an obstacle against unwanted access to
your network, but the data broadcast over the wireless link is fully exposed.
Restricting access based on something other than the identity of the user is generally referred
Advanced Settings
19
to as Access Control.
Figure 12 AG-3621 access control
You can restrict access to only trusted stations so that unknown stations cannot wirelessly
connect to the AG-3621 by turning Access Control on.
By entering MAC Address of new stations, you can manually add the stations, allowing them
to be connected to the AG-3621
Take notes of the steps below to activate “access control”.
Turn Access Control On.
Enter MAC Address in the “Add New Station Manually” field. Click trust and then the address
will appear in the “trusted Wireless Stations” field.
Click Apply to save the configuration.
Use WEP
Wired Equivalent Privacy (WEP) data encryption provides data security. WEP Shared Key
authentication and WEP data encryption will block all but the most determined eavesdropper.
Use WPA or WPA-PSK
Wi-Fi Protected Access (WPA) data encryption provides data security. The very strong
Advanced Settings
20
authentication along with dynamic per frame re-keying of WPA makes it virtually impossible to
compromise.
The following elaborate WEP/WPA security options.
Field
Description
Network
You have two authentication options.
Authentication
• Open System:
No authentication is imposed to the AG-3621. However, if the 802.1x
option is configured, authentication of connections can be performed
by a RADIUS server.
• Shared: this is for shared key authentication. Data is encrypted.
Encryption Strength
You can select the following data encryption options: Disabled
64- 128- or 152-bit WEP With Open System Authentication and 64128- or 152-bit WEP Data Encryption with Shared Key authentication
Security Encryption
WEP enabled, you can manually enter the four data encryption keys or
(WEP) Keys
enable Passphrase to generate the keys automatically. These values
must be matched between all Clients and access points at your LAN
(key 1 must be the same for all, key 2 must be the same for all, etc.)
Two ways to create WEP encryption keys:
• Passphrase.
Passphrase functions as automatically case-sensitive characters.
However not all wireless adapters support passphrase key generation.
• Manual. These values are not case sensitive. 64-bit WEP: enter 10
hexadecimal digits (any combination of 0-9, a-f, or A-F). 128-bit WEP:
enter 26 hexadecimal digits (any combination of 0-9, a-f, or A-F).
152-bit WEP: enter 32 hexadecimal digits (any combination of 0-9, a-f,
or A-F).
WPA-PSK
(Wi-Fi
WPA Pre-Shared-Key uses a pre-shared key to perform the
Protected
Access
authentication and generate the initial data encryption keys. Then, it
Pre-Shared Key)
dynamically varies the encryption key. It uses Temporal Key Integrity
Protocol (TKIP) for encryption keys. However not all wireless adapters
support WPA. Furthermore, client software is required on the client.
Windows XP and Windows 2000 with Service Pack 3 do include the
client software that supports WPA. Nevertheless, the wireless adapter
Advanced Settings
21
hardware and driver must also support WPA.
WPA 2-PSK
Identical to WPA-PSK with the exception of the way to encryption keys.
WPA2-PSK uses Advanced Encryption Standard(AES) for encryption
keys.
WPA-PSK&
WPA You may have the option of WPA-PSK associated with TKIP.
2-PSK
Alternatively, you can select WPA2-PSK associated with AES.
Table 4 Security
Wireless Security Seperator
The associated wireless clients will not be able to communicate with each other if this feature
is enabled. The default setting is “Disable”.
Time Server
By clicking Basic Settings, the “Basic Settings” will appear shown below.
Figure 13 Basic settings
The AG-3621 allows you to synchronize the time between your network and time server by
using NTP Time Server.
Time Sever provides correct and current time in any world time zone, country or major city.
Accurate adjustments for Daylight Saving Time (or Summer Time ) are made according to
each location's rules and laws.
Time Server Port
This field identifies the time server port like 123.
Time Zone
Advanced Settings
22
Select the time zone location for your setting.
Current Time
This field identifies the current time in your specific time Zone.
Bridge/Router Mode
From the system setup, click IP Settings, you’ll be navigated into the WAN/LAN Settings.
Figure 14 WAN/LAN settings
AG-3621 can be figured as bridge mode and router mode.
Bridge Mode
Under Bridge Mode, the AG-3621 will act as a pass-through bridging your network, by
associating with various devices. This can extend your radius of your network.
Spanning Tree: Enabling spanning tree can prevent undesirable loops in the network,
ensuring a smooth running network. By default, the function is enabled.
Router Mode
The AG-3621 can functions as router, connecting two distinct networks.
Under the bridging mode, two modes are available, WAN at Ethernet Port and WAN at
Wireless Port. Surely, you may choose either of them as you desire. Take the following modes
as the two examples.
Advanced Settings
23
Figure 15 Router Mode—WAN at Ethernet Port
Figure 16 Router Mode—WAN at Wireless Port
Under the AP mode, the AG-3621 acts as Router. In general, WAN is designed at the
Ethernet port and LAN at wireless port.
Advanced Settings
24
Figure 17 Router Mode-WAN at Ethernet Port
Under the Repeater mode, the AG-3621 acts as Router. In general, WAN is designed at the
Ethernet port and LAN at wireless port.
Figure 18 Router Mode-WAN at Ethernet Port
Any IP
If IP address has slipped your mind, any IP functionality can relieve your anxiety.
Enabling any IP, you’ll feel free to enter IP Address, IP Subnet Mask and Gateway, enjoying
internet surf.
Please refer to the diagram below.
Take the steps to activate the functionality.
1.
Configure the AG-3621 as router mode.
Advanced Settings
25
2.
Make sure your station connected to the AP that have access to the internet.
3.
Set correct IP parameters for the AP.
4.
Enable any IP.
HTTP Redirect
Currently market campaign has a stake in the future of your company, so that plugging your
products on website is a basic step for your goods.
The AG-3621 access point has insight into your need. Enabling HTTP Redircet, you can enter
the company website (for example, http://www.google.com). It is your desired web that first
appear when someone is surfing on internet, via a station connected to your AP for internet
surf.
The following is the HTTP Redirect Settings.
STA1
STA2
Figure 19 HTTP Redirect settings
URL
Enter your desired website in this field. Be sure to click “Apply” to save the configuration.
Note
Be sure to your AP connected to the internet when using HTTP Redirect.
Firewall Management
Today’s companies rely on highly networked, secure computing environments to efficiently
and safely conduct business. Firewalls are a key component of any secure network. Firewalls
are configured to allow “desired” traffic in and to keep “undesired” traffic out.
The AG-3621 access point is also qualified for firewall management.
Please see the diagram below.
Acting as a firewall, the AP will filter your undesired data and protocols, only delivering the
Advanced Settings
26
“wanted” for your PC.
Click the firewall link and you’ll be navigated to Firewall Management interface.
Figure 20 Firewall management
Before applying the firewall management, you need enable firewall.
Here we’ll discuss Firewall.
Name
Enter your desired firewall rule name in this field.
Allow
This field identifies which packets have IP addresses specified by you, are allowed to transmit
at your LAN.
Deny
This field identifies which packets have IP addresses specified by you, are banned to transmit
at your LAN.
Interface
This is optional, WAN or LAN.
Destination
This specifies where packets are bound for.
IP Range Start
Advanced Settings
27
This specifies the starting-point of your specific IP addresses.
IP Range End
This specifies the ending-point of your specific IP addresses.
Protocol
This is optional, TCP, DCP, ICMP or *. Select which protocol you want to perform “Allow” or
“Deny”.
Port Range
This specifies your IP port range.
Schedule
You can set time when your AP performs firewall management, by enabling “from”.
Alternatively, if you desire your AP to perform firewall management for a long time, please
enable “always”.
When completing all firewall rules configuration, please click Add Rule. Firewall Rule List will
appear below.
Figure 21 Firewall list
Virtual Server
Note
Virtual server can be enabled only under router mode.
The
AG-3621
access point distinguishes by acting as a virtual server. This most cost-effective server
virtualization technology is engineered for heterogeneous network. Please refer to the
following diagram.
Under router mode, designed for the virtual server, the AP is wirelessly coupled to FTP server,
mail server and log server on LAN port; on WAN port, the AP is coupled to PC. The AP is the
virtual server, so that you have access to download files, enjoy e-mails or undertake others,
only via your PC.
Advanced Settings
28
Figure 22 Virtual server management
We’ll discuss virtual elements below.
Name
Enter the virtual server’s name in this field.
Private IP
This specifies the IP Address at your LAN.
Protocol Type
This field is optional. TCP or UDP.
Private Port
This specifies your LAN port.
Public Port
This specifies your WAN port.
Schedule
You can set time-limit when your AP acts as a virtual server, by enabling “from”.
Alternatively, if you desire your AP to act as a virtual server for a long time, please enable
“always”.
When completing configuration of your virtual server, please click “Add Rule” to save the
setting.
Virtual Server List
This provides you with the detailed list of virtual servers.
Advanced Settings
29
VAP / VLAN
As the number of data-based systems increase, it becomes more and more difficult to provide
the network infrastructure (due to the sheer number of Ethernet connections that need to be
provided) from the perspective of cost, space, and wire management. Luckily, the advent
technology called VLAN (Virtual Local Area Network) can achieve her mission. Now it is
possible for these multi devices to be multi devices in function without the need for multiple
physical network APs.
Under this mode, the Access point can behave as 8 virtual Wireless LAN infrastructures.You
can specify unique SSID for these different infrastructures. For example, VLAN1 contains
ETH1 and STA1, VLAN2 contains ETH2 and STA2, and so on. However, they all share the
same AG-3621 and undertake different tasks. Some VLANs can be used for guest Internet
access, others for enterprise users, and administrators can be put on a high security VLAN
with enhanced firewall permissions. All this can be achieved using a single infrastructure to
emulate up to 8 infrastructures. The AG-3621 AP does this by assigning each of the 8 VLANs
it’s own SSID, so you will think you are looking at up to 8different wireless networks.
Advanced Settings
30
Figure 23 VLAN
You can configure each profile by clicking “Edit”. Such configuration as configuring profile
name, SSID, enabling “broadcast SSID”, or doing security.
Super G
Under the Access Point mode, data transmission can be greatly improved if enabling super G.
However, under the bridge mode, its’ performance is weakened slightly.
Note
Under the AP mode, the stations connected to the AP must support Super
G as well. If Super G is enabled.
Under the bridge mode, all the APs must support Super G.
Wi-Fi Multi-media (WMM)
Currently interest and demand for multimedia applications and advanced capabilities are
growing quickly. In the residential market, Voice over Internet Protocol (VoIP), video
streaming, music streaming, and interactive gaming are among the most anticipated
applications. In enterprise and public networks, support for VoIP, real time streaming of audio
Advanced Settings
31
and video content, as well as traffic management, allows network owners to invent advanced
methods to offer a richer and more diverse set of services. WMM prioritizes traffic demands
from different applications and extends Wi-Fi’s high quality end-user experience from data
connectivity to voice, music, and video applications under a wide variety of environment and
traffic conditions. WMM defines four access categories (voice, video, best effort, and
background) that are used to prioritize traffic so that these applications have access to the
necessary network resources.
When your STA connect to the AG-3621, you can enjoy high-quality multimedia function at
your LAN, by enabling WMM.
Note
Before enabling WMM, make sure your stations must also support WMM.
Further, your operating system must be Windows XP with Service Pack 2.
Smart WDS
Under bridge mode, enabling smart WDS, the AG-3621 access point can sniff other AG3621
around him and automatically connect those that work in the same channel, instead of
manually entering MAC Address.
WDS Service Group ID
If two APs share the same group ID, they will be automatically connected.
Build Your Wireless Infrastructure via AG-3621
Wireless Access Point Mode
Under this mode, the AG-3621 servers as a proxy, wirelessly connecting stations and
Ethernet PCs that are linked to the Internet via a switch, or router, so that you have access to
enjoy emails, scan news and so on.
Please refer to the following basic infrastructure.
Advanced Settings
32
Figure 24 Wireless Access Point
1.
Configure the AP mode as access point.
2.
Configure the basic information like profile name and SSID.
3.
4.
Wirelessly connect station1 and station2 to the AP.
If the communication has been establish between the APs and stations, the LEDs will
light up. How many LEDs will light up depends on the amounts of the stations connected
to the AP.
Note
Securities are required to ensure safe communication. Further, wireless
client isolation is needed to protect the clients against illegal invasion.
Station Adapter Mode
Acting as a station adapter, the AG-3621 is linked to other access points.
Advanced Settings
33
Figure 25 Wireless Station Adapter
Take the following steps to build your station adapter.
Configure the Ag-3621 mode as a station adapter.
establish a tie between station1 and station2 and the AP..
Wirelessly connect the AG-3621 to the AP via BSSID.
Wireless Bridging Mode
It provides the two bridging modes. Wireless Point-to-Point Bridge and Wireless Point to
Multi-Point Bridge.
From the WDS Mode, enter the MAC Address of the AP you desire to connect as below.
Local MAC Address
This field provides the AG-4621 MAC address.
Remote MAC Address
Enter the MAC Address of your desired devices connected to the AG-3621 in WDS Mode.
Uplink Speed Limit
You can specify the transmission rate between the AG-3621 and other devices by entering
the value in uplink speed limit. The most speed available is 1687 ×64Kbps=105.4375Mbps.
Advanced Settings
34
Figure 26 WDS Mode
Wireless Point-to-Point Bridge
Under this mode, two separate networks apart can be connected to carry out
data-transmission.
Create a connection between AP and wireless station separately.
Open the AG-3621 management web through entering the default factory IP Address
192.168.1.1, user name—admin and password—password. Enter the other AP’s name on the
MAC address field, respectively,
Advanced Settings
35
Figure 27 Wireless Point to Multi-Point Bridge
Under this mode, this AG-3621 is responsible for a pivot AP, connecting other APs and
devices apart.
Figure 28 Wireless Point-to-Point Mode
The building steps are identical to the Wireless Point-to-Point Bridge.
Wireless Repeater Mode
Under this hybrid mode, the AG-3621 is capable of establishing the connections between
wireless stations and other APs, reaching as far as thousands of miles.
Follow the steps to build the wireless repeater infrastructure.
1.
Set the working mode as wireless bridging mode.
2.
Set the station1 IP address as 192.168.1.140; the station as 192.168.1.150.
3.
Wirelessly connect the station1 to the AG-3621, so does the station2 to the AP2.
4.
From the WDS web configuration, select “Repeater with Wireless Client Association”,
Advanced Settings
36
enter the AP2 MAC address in the remote MAC address field. Likewise, enter the AP1
MAC address in AP2 remote MAC address field.
Figure 29 Wireless Repeater Mode
Wireless Inter-building Mode
Under bridge mode, enabling smart WDS, the AG-3621 access point can sniff other AG3621
around him and automatically connect those that work in the same channel.
Advanced Settings
37
Chapter 5.
Management
Site Survey provides you with a table of adjacent APs connected to your AG-3621. In terms of
each connected AP, Site Survey offers you their personal information, including SSID, BSSID,
RSSI, channel mode, connection status and encryption.
Site Survey
Figure 30 Site Survey Link Test
To optimize the communication between your LAN, link test is designed to test the parameters
that indicates communication quality.
Figure 31 Link Test
We’ll discuss parameters in link test.
Management
38
RF Cable Loss(0-10)
This indicates RF loss in cables, ranging from 0 to 10.
Local Antenna Gain(0-99)
This indicates extended coverage provided by the local AG-3621, for an existing 802.11a/b/g
wireless local area network (WLAN), ranging from o to 99.
Remote Antenna Gain((0-99)
This indicates extended coverage provided by the remote AG-3621, for an existing
802.11a/b/g wireless local area network (WLAN).ranging from o to 99.
Test Interval (1-60000)
This provides testing time.
Test Packet Size (64-1514)
This tests the size of packet transmitted between the two AG-3621 access points, ranging
from 64 to 1514.
Test Time (60-86400)
This specifies how long the link test will last ranging from 60 to86400.
View Statistics Information
From the“Statistics”,the AG-3621 provides information about sending or receiving packets
out of both the Ethernet and wireless ports. Clicking “Refresh” allows you to view the real-time
information linked to the AG-3621. All is read-only.
Management
39
Figure 32 Statistics Information
View Station Information
Under the Information heading, click the connection link to view the station information
connected the AG-3621 shown below.
Figure 33 Connection status
Note
If the wireless access point is rebooted, the table data is lost until the
wireless access point rediscovers the devices.
Management
40
Change Password
Figure 34 Change Password
Take the following steps to change password.
1.
Enter your currently-used password in the current field.
2.
Enter your new password in the New Password field.
3.
Re-enter the new password to confirm it in the Repeat New Password field.
4.
Finally, click “Apply” to save the change.
Also, if you desire to restore to the factory-set password, please click “Yes”.
The default setting is disabled.
Remote Management
AG-3621 provides remote management to manage and diagnose your network.
Management
41
Figure 35 Remote Management
SSH
SSH provides a secure connection over the Internet providing strong user authentication.
SSH protects the privacy of transmitted data (such as passwords, binary data, and
administrative commands) by encrypting it.
SSH on the access point is enabled by default. When user manager is enabled, SSH uses the
same usernames and passwords established by the user manager.
The applicability of SSH for the AG-3621 access point allows you to have insight into your
LAN.
Note
If your computer does not have the SSH client installed, you must procure
and install it before you can proceed. You can download the latest SSH
client from the following site: http://ssh.com/.
Take the
following
steps to
manage
the AG-3621 via SSH.
1.
From the Putty Configuration, enter IP address in host name field and port number in port
field. Also, select SSH as protocol.
Management
42
Figure 36 SSH
2.
Press Open, and the screen below should appear.
Management
43
Figure 37 Command
The login name is admin and password is the default password. After successful login, the
screen should show the APdcb325>. In this example, the APdcb325 is the AG-3621 access
point name.. Enter help to display the SSH command help.
SNMP
SNMP (simple network management protocol) is a distributed-management protocol. Via
SNMP, you have access to administrate your AG-3621 remotely.
Take the steps below to manage your AG-3621 via SNMP.
1.
Enter ftp 192.168.1.1 , then in turn enter admin and password, and finally enter get
Jupiter.mib to get Jupiter.MIB. (The AG-3621 software is called Jupiter.).
Management
44
Figure 38 Get Mib File
2.
From MIB Compiler interface, open jupter.mib and compile the file by enabling compile
Jupiter mib on tools menu. Save the compiled files to your disk.
Management
45
Figure 39 MIB Compiler
3.
Load the file to SNMP station. Your screen will appear.
Management
46
Figure 40 MIB File
4.
Changing settings with the database query page
Follow these steps to change an access point setting from the Database Query page:
Click Get. The current value for the setting appears in the Value field.
Modify the value in the Value field.
Click Set. The new value is set on the access point.
Upgrade Firmware
Note
When uploading software to the AG-3621 Access Point, it is important not
to interrupt the Web browser by closing the window, clicking a link, or
loading a new page. If the browser is interrupted, the upload may fail,
corrupt the software, and render the AG-3621 completely inoperable.
The
software of
the
AG-3621
Access
Point is stored in FLASH memory, and can be upgraded as new software is released by FWS.
Upgrade files can be downloaded from FWS's Web site. If the upgrade file is compressed
Management
47
(.ZIP file), you must first extract the image (.RMG) file before sending it to the wireless access
point. The upgrade file can be sent using your browser.
Note
The Web browser used to upload new firmware into the AG-3621 must
support HTTP uploads, such as Microsoft Internet Explorer 6.0 or above, or
Netscape Navigator 4.78 or above.
1.
Downl
oad
the
new
software file from FWS, save it to your hard disk, and unzip it.
2.
From the main menu Management section, click the Upgrade Firmware link to display the
screen above.
3.
In the Upgrade Firmware menu, click the Browse button and browse to the location of the
image (.RMG) upgrade file.
4.
Click Upload. When the upload completes, your wireless access point will automatically
restart. The upgrade process typically takes about one minute. In some cases, you may
need to reconfigure the wireless access point after upgrading.
Backup / Restore Settings
AG-3621 access point provides backup and restore for file management.
Figure 41 Backup
You have access to back up the currently settings by enabling AG-3621‘s Backup function.
Retrieve
Retrieve button allows you to retrieve your backup files.
Management
48
Restore
This button can be used to clear ALL data and restore ALL settings to the factory default
values.
Event Log
If you have a SysLog server on your LAN, enable the SysLog option. Event Log offers you
activity log information.
Figure 42 Event log
SysLog Server IP address
The access point will send all the SysLog to the specified IP address if SysLog option is
enabled. Default: 0.0.0.0
Port
The port number configured in the SysLog server on your network. By default, it is514
Reboot AP
In some cases, if you want to reboot AG-3621, click “Yes” and then apply. AG-3621 will
reboot.
Management
49
Figure 43 Reboot AP
Management
50
Chapter 6.
Troubleshooting
In this article we will look at how to tackle some common wireless network problems that people
come across. This document will outline the steps you should take if you encounter one of the
mentioned issues.
1.
I do not know if my IP Address from my ISP is Static or Dynamic.
Possible Solution:
If you have cable or DSL service, you most likely have a Dynamic IP address. You should always
check with your service provider to verify this information, since some providers will assign Static IP
addresses. If you have a Dynamic IP address, select Obtain IP Automatically in the WAN Setup
area of the HTML Web User Interface, and the Wireless AG-3621 Access Point will automatically
obtain the information it needs from your service provider. If you have a Static IP address, select
Specify IP in the WAN Setup area of the HTML Web User Interface. If you are using PPoE, you
must specify PPPoE and select either static or dynamic IP addressing.
2.
My Web User Interface is not responding, but I can still access the Internet.
Possible Solution:
If your Web User Interface stops responding, ping your AP IP address to check whether “reply” is
obtained, or unplug and then plug back in the power supply of the Wireless AG-3621 Access Point.
This will reboot the Wireless AG-3621 Access Point. If you are still unable to communicate with the
Web User Interface, press in and hold the RESET button for between five and ten seconds. This
will reset the Wireless AG-3621 Access Point to the factory default settings. If you applied any
personal configuration settings, you will need to make the changes again.
3.
The LAN light is not lit.
Possible Solution
There is a hardware connection problem. heck these items:
Make sure the cable connectors are securely plugged in at the access point and the network
device (hub, switch, or router). A switch, hub, or router must be installed between the access point
and the Ethernet LAN or broadband modem.
Make sure the connected device is turned on.
Be sure the correct cable is used. Use a standard Category 5 Ethernet patch cable. If the network
device has Auto Uplink™ (MDI/MDIX) ports, you can use either a crossover cable or a normal
patch cable.
Troubleshooting
51
Chapter 7.
Warranty Information
LIMITED WARRANTY
FWS warrants to You that, for a period of three years (the “Warranty Period”), your FWS’s Product
will be substantially free of defects in materials and workmanship under normal use. Your exclusive
remedy and FWS' entire liability under this warranty will be for FWS at its option to repair or replace
the Product or refund Your purchase price less any rebates. This limited warranty extends only to
the original purchaser.
If the Product proves defective during the Warranty Period call FWS Technical Support in order to
obtain a Return
Authorization Number, if applicable. BE SURE TO HAVE YOUR PROOF OF PURCHASE ON
HAND WHEN CALLING. If You are requested to return the Product, mark the Return Authorization
Number clearly on the outside of the package and include a
copy of your original proof of purchase. RETURN REQUESTS CANNOT BE PROCESSED
WITHOUT PROOF OF PURCHASE. You are responsible for shipping defective Products to FWS.
FWS pays for UPS Ground shipping from FWS back to You only.
ALL IMPLIED WARRANTIES AND CONDITIONS OF MERCHANTABILITY OR FITNESS FOR A
PARTICULAR PURPOSE ARE LIMITED
TO THE DURATION OF THE WARRANTY PERIOD. ALL OTHER EXPRESS OR IMPLIED
CONDITIONS, REPRESENTATIONS ANDWARRANTIES, INCLUDING ANY IMPLIED
WARRANTY OF NON-INFRINGEMENT, ARE DISCLAIMED.
Some jurisdictions do not allow limitations on how long an implied warranty lasts, so the above
limitation may not apply to You. This warranty gives you specific legal rights, and You may also
have other rights which vary by jurisdiction.
This warranty does not apply if the Product (a) has been altered, except by FWS, (b) has not been
installed, operated, repaired, or maintained in accordance with instructions supplied by FWS, or (c)
has been subjected to abnormal physical or electrical stress, misuse, negligence, or accident. In
addition, due to the continual development of new techniques for intruding upon and attacking
networks, FWS does not warrant that the Product will be free of vulnerability to intrusion or attack.
TO THE EXTENT NOT PROHIBITED BY LAW, IN NO EVENT WILL FWS BE LIABLE FOR ANY
LOST DATA, REVENUE OR
PROFIT, OR FOR SPECIAL, INDIRECT, CONSEQUENTIAL, INCIDENTAL OR PUNITIVE
DAMAGES, REGARDLESS OF THE THEORY
OF LIABILITY (INCLUDING NEGLIGENCE), ARISING OUT OF OR RELATED TO THE USE OF
Warranty Information
52
OR INABILITY TO USE THE PRODUCT
(INCLUDING ANY SOFTWARE), EVEN IF FWS HAS BEEN ADVISED OF THE POSSIBILITY OF
SUCH DAMAGES. IN NO EVENT
WILL FWS’ LIABILITY EXCEED THE AMOUNT PAID BY YOU FOR THE PRODUCT. The
foregoing limitations will apply even if any warranty or remedy provided under this Agreement fails
of its essential purpose. Some jurisdictions do not allow the exclusion or limitation of incidental or
consequential damages, so the above limitation or exclusion may not apply to you.
Please direct all inquiries to: [email protected]
Warranty Information
53
Chapter 8.
Regulatory Information
FCC Statement
This product has been tested and complies with the specifications for a Class B digital device,
pursuant to Part 15 of the FCC Rules. These limits are designed to provide reasonable protection
against harmful interference in a residential installation. This equipment generates, uses, and can
radiate radio frequency energy and, if not installed and used according to the instructions, may
cause harmful interference to radio communications. However, there is no guarantee that
interference will not occur in a particular installation. If this equipment does cause harmful
interference to radio or television reception, which is found by turning the equipment off and on, the
user is encouraged to try to correct the interference by one or more of the following measures:
• Reorient or relocate the receiving antenna
• Increase the separation between the equipment or devices
• Connect the equipment to an outlet other than the receiver's
• Consult a dealer or an experienced radio/TV technician for assistance
FCC Radiation Exposure Statement
This equipment complies with FCC radiation exposure limits set forth for an uncontrolled
environment. This equipment should be installed and operated with minimum distance 20cm
between the radiator and your body. This transmitter must not be co-located or operating in
conjuction with any other antenna or transmitter.
To maintain compliance with FCC RF exposure compliance requirements, please follow operation
instruction as documented in this manual.
Safety Notices
Do not use this product near water, for example, in a wet basement or near a swimming pool.
Avoid using this product during an electrical storm. There may be a remote risk of electric shock
from lightning.
Operation is subject to the following two conditions:
1. This device may not cause interference and
2. This device must accept any interference, including interference that may cause undesired
operation of the device.
Regulatory Information
54
Chapter 9.
Contact Information
Need to contact FWS?
Visit us online for information on the latest products and updates
to your existing products at: http://www.tw-wireless.com
Can't find information about a product you want to buy
on the web? Do you want to know more about networking
with FWS products? Give our advice line a call at: (FWS)
Or fax your request in to:
If you experience problems with any FWS product,
you can call us at:
Don't wish to call? You can e-mail us at: [email protected]
If any FWS product proves defective during its warranty period,
you can call the FWS Return Merchandise Authorization
Department for obtaining a Return Authorization Number at:
Tel: +886-3-5616277
Fax:+886-3-5616275
Sales Contact
[email protected]
FAE Support
[email protected]
Contact Information
55