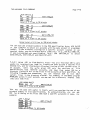
1
AMOS
user's guide
This document reflects AMOS versions 4.1 end later
Jaipha
1tamacro
'AMOS', 'ALphaBASIC', and 'AM—lOD'
are trademarks of products
and software of
ALPHA MICROSYSTEMS
Irvine, CA
92714
©1979 — ALPHA MICROSYSTEMS
ALPHA MICROSYSTEMS
17881 Sky Park North
Irvine, CA
92714
15 October 1979
DWM—O01 00—57
CHANGE PAGE PACKET #1
1.0
FOR THE AMOS USER'S GUIDE
INTRODUCTION
effort to keep our users' documentation up—to—date, we have begun to
issue ALpha Micro software manual update packages. Each change page packet
contains:
In
an
1.
Update instructions.
2.
A new title page for the manual you are updating.
3.
A new table of contents for the updated manual (if needed).
4.
The manual pages we have changed.
5.
A new index for the updated manual.
This
change page packet
Guide, (DWM—00100—35).
2.0
is
the
first
such
packet for the AMOS User's
UPDATE INSTRUCTIONS
To make the update process easier, we recommend that you put your AMOS
User's Guide into a three—ring binder notebook. If the pages are attached
to one another, separate them.
First, remove the title page from this change page packet
for the title page in the AMOS User's Guide.
and
exchange
it
have not
issued a new table of contents with this change page packet,
because the new pages do not change your current table of contents.)
(We
Now, remove the change pages from the packet and
original pages listed below.
Finally, replace the index.
substitute
them
for
the
CHANGE PAGE PACKET #1 FOR THE AMOS USERtS GUIDE
3.0
Page 2
LIST OF CHANGE PAGES
is a list of the change pages in this packet. Remove the original
Note that we
pages listed beLow and replace them with the revised pages.
have marked aLl changed portions of the text with change bars (vertical
bLack Lines in the Left margin) on each page. ALL change pages aLso bear
the date of this change page packet.
Below
Original Page
TitLe page
Page 5—1/5—2
Page 8—3/8—4
Page 8—11/8—12
Pages 9—39 through 9—44
Pages 10—7 through 10—9
Pages 11—1 through 11—6
Page 12—3/12—4
Pages 13—1 through 13—4
Appendix A
Index
Revised Pages
with
with
with
with
with
with
with
with
with
with
with
TitLe page
Page 5—1/5—2
Page 8—3/8—4
Page 8—11/8—12
Pages 9—39 through 9—45
Pages 10—7 through 10—9
Pages 11—1 through 11—6
Page 12—3/12—4
Pages 13—1 through 13—4
Appendix A
Index
Page iii
AMOS USER'S GUIDE
IMPORTANT NOTICE
There are some simple software instaLlation procedures that must be followed
to gt AMOS up and running for the first time on your particuLar hardware.
DO NOT attempt to start up your system untiL a System Operator has done this
necessary initialization of the system software.
manual
the
to
frequentLy refer
we
This
manual
is
in
the
process
of
being
written,
and
"Introduction to AMOS."
print
and
distribute
it.
we ask for your patience until we are able to
NOTE:
Throughout
this
document
created using
Alpha Micro text formatter TXTFMT.
This
document
was
the Alpha Micro text editor VUE and the
* NOTE TO THE SYSTEM OPERATOR:
If you are to be the System Operator (the person in charge of
system management, adding user accounts, adding terminals to
the system, etc.), you MUST read the documents "The System
Initialization Command File" and "Setting Up the Line Printer
Spooler" in the "System Operator's Information" section of
the AM—100 documentation packet before you try to use the
system.
The information in this manual reflects AMOS versions 4.1 and later.
Page v
AMOS USER'S GUIDE
PREFACE
This. manual is aimed at the generaL user of the system. We do not assume
that you have had any great prior experience with computers. However, we do
assume that you are farni Liar with such common computer concepts as "files"
(known
to IBM users as "data sets"), "disks," "jobs," 'text
editors,"
and
"commands."
This manual contains very Little theory or discussion of the inner workings
of the operating system; instead, it is a practical guide to system
If you are interested in a broader system view than this manuaL
operation.
provides (e.g., discussions on fiLes, the operating system structure, the
programs avai Lable on the system, organization of files on the disk, jobs,
memory partitions, etc.), refer to the manual "Introduction to AMOS." If you
are new to computers, you will probably want to read "Introduction to AMOS"
before beginning to use the AMOS system; in it you wilt find definitions for
many of the terms we use in the "AMOS User's Guide."
If
you are an experienced AMOS user, you will want to just skim the "AMOS
User's Guide," and refer to the "AMOS System Commands Reference Sheets" for
answers to your questions about specific commands.
We would also Like to draw your attention to the document titled "A Guide to
the AMOS Software Documentation Library" which lists aLL of the software
documentation currentLy offered by Alpha Micro; it telLs
you
what
information each manual contains, and also indicates the kind of reader at
which each manual is aimed. If you want information on a spebific facet of
operation (such as using the macro—assembler, BASIC or one of the
text editors), see "A Guide to the AMOS Software Documentation Library" to
find out what manuals cover those topics.
system
Page vii
AMOS USER'S GUIDE
Table of Contents
V
PREFACE
TABLE OF CONTENTS
CHAPTER 1
INTRODUCTION TO THE MANUAL
1.1
MANUAL CONTENTS
1.2
CONVENTIONS USED IN THIS MANUAL
PART I
GETTING STARTED
CHAPTER 2
TURNING THE SYSTEM ON AND OFF
2.1
2.2
2.3
2.4
CHAPTER 3
TURNING ON THE SYSTEM
GETTING THE OPERATING SYSTEM'S ATTENTION
1—2
1—2
2—1
2—3
CHANGING DISK CARTRIDGES AND FLOPPY DISKS .... 2—3
2.3.1 The MOUNT Command
TURNING OFF THE SYSTEM
2—3
2—4
COMMUNICATING WITH AMOS
3.1
3.2
3.3
3.4
3.5
CHAPTER 4
Vii
PROMPT AND CURSOR SYMBOLS
THE KEYBOARD
3—2
3—2
CONTROL—CHARACTERS
3—3
3—4
TYPING COMMANDS
THE HELP COMMAND
3—6
A QUICK DEMO OF SYSTEM USE
4.1
LOGGING IN
4—1
4.2
CREATING A TEXT FILE WITH VUE
4—3
4.2.1
4.2.2
4.2.3
Erasing Characters
Inserting Characters
43
44
4.3
4.4
4.5
4.6
4.7
4—4
Leaving VUE
FINDING OUT WHAT FILES ARE IN YOUR ACCOUNT ... 4—5
4—5
DISPLAYING A FILE
4—6
COPYING A FILE
4—6
RENAMING A FILE
4—7
GETTING INTO BASIC
4.8
4.9
ERASING A FILE FROM YOUR ACCOUNT
LOGGING OFF THE SYSTEM
4.7.1
Saving a BASIC Program
48
4—8
4—9
Page viii
AMOS USER'S GUIDE
CHAPTER 5
IDENTIFYING YOURSELF TO AMOS
5.1
5.2
5.3
PROJECT—PROGRAMMER NUMBERS
PASSWORDS
5—1
LOGGING INTO THE SYSTEM
5—2
5.3.1
Finding Out What Account You Are
Logged into
5.4
CHAPTER 6
The START Command File
54
54
54
55
System Mail
S_S
Transferring to Another Account
5.3.2
5.3.3
5.3.4
5.3.5
LOG and the Ersatz Devices
LOGGING OFF THE SYSTEM
FILE SPECIFICATIONS
Device Name
6.1.1
6.2
6.3
6.1.1.1
Special Devices
6.1.2 Filename
6.1.3 Extension
6.1.4 Project—programmer Number
WILDCARD SYMBOLS
FILE SPECIFICATION DEFAULTS
PART II
THE SYSTEM COMMANDS
CHAPTER 7
INTRODUCTION TO AMOS COMMANDS
7.1
7.2
COMMAND SYNTAX
7.1.1
Command DefauLts
COMMAND SWITCHES
6—1
61
6—2
6—3
6—3
6—5
6—5
6—6
7—2
7—3
7—3
COMMAND FILES AND DO FILES
8.1
THE CONTENTS OF A COMMAND FILE
8.1.1
8.2
Special Symbols in Command Files
DO FILES
8.2.1
8.2.2
8.2.3
CHAPTER 9
5—5
IDENTIFYING FILES TO AMOS
6.1
CHAPTER 8
5—2
8—2
8—3
Building and Invoking DO FiLes
8—5
8—6
Special Parameter Symbols
88
SAMPLE DO FILES
8—9
8.2.3.1
8.2.3.2
8.2.3.3
8.2.3.4
8.2.3.5
TFORM.DO
PRINTE.DO
8—9
8—9
BACKUP.DO
WRITE.DO
ASSMBL.DO
8—11
8—11
8—12
THE WILDcARD FILE COMMANDS
9.1
INTRODUCTION TO WILDCARD FILE COMMANDS
9.1.1
9.1.2
Wildcard Symbols
Input File Specifications
9—1
9—2
93
Page ix
AMOS USER'S GUIDE
9.1.3
9.1.4
9.1.5
9.2
Output FiLe Specifications
Command Switches
Ersatz Devices
FINDING OUT WHAT FILES ARE ON THE
9—7
DISK (DIR)
9.2.1
9.2.2
Finding Out What FiLes Are in
Your Account
9.2.3
Account Other Than Your Own
DIR and Wildcard Symbols
9.2.4
Creating a FiLe That Contains a
9.2.3.1
Specific Files
Directory Listing
RENAMING FILES (RENAME)
Renaming a File in Your Account
9.3.2 Renaming a FiLe in an Account Other
9.3.1
Than Your Own
9.3.6
9.4.3
9.4.4
9.4.5
9.4.6
9.4.7
9.5
9.5.1
9.5.2
9.5.4
9.5.5
9.5.6
9.5.7
9.5.8
9.6.4
9—10
9—11
9—12
9—12
9—16
9—17
9—18
9—19
9—19
9—20
9—21
9—22
9—23
9—24
924
Than Your Own
ERASE and Wildcard Symbols
9—25
9—25
9—26
9—27
Using an Outfilespec
Selecting ERASE Options
ERASE and Special and Ersatz Devices .. 9—27
ERASE Error Messages
9—28
9—28
Copying a File in Your Own Account .... 9—30
Copying a FiLe into Your Own
9—30
Account from Another Account
Copying a File into An Account
Other Than Your Own
COPY and Wildcard Symbols
COPY and the System Operator
Selecting COPY Options
9—30
9—30
9—31
9—32
COPY and SpeciaL and Ersatz Devices ... 9—34
COPY Error Messages
PRINTING FILES (PRINT)
9.6.1
9.6.2
9.6.3
99
Erasing Files From Your Account
Erasing Files From Accounts Other
COPYING FILES (COPY)
9.5.3
9.6
Devices
RENAME Error Messages
ERASING FILES (ERASE)
9.4.1
9.4.2
9_S
Using DIR to Find
9.3.3 RENAME and Wildcard SymboLs
9.3.4 SeLecting RENAME Options
9.3.5 RENAME and Special and Ersatz
9.4
98
Finding Out What FiLes Are in an
9.2.5 Printing a Directory Listing
9.2.6 SeLecting DIR Options
9.2.7 DIR and Special and Ersatz Devices ....
9.2.8 DIR Error Messages
9.3
94
95
97
935
Sending a File to a Printer
9—37
9—38
9—38
Finding Out Information About
the Printer Queues
Setting Printer Forms
9—38
PRINT and Wildcard Symbols
939
Page x
AMOS USER'S GUIDE
9.6.5 Selecting PRINT Options
9.6.6 PRINT and Ersatz Devices
9.6.7 PRINT Error Messages
CHAPTER 10
MORE FILE COMMANDS
10.1
DISPLAYING THE CONTENTS OF A FILE (TYPE)
10.1.1
10.1.2
10.2
Hints and Restrictions
TYPE Error Messages
APPENDING FILES (APPEND)
10.2.1
10.3
APPEND Error Messages
SORTING A FILE (SORT)
10.3.1
10.3.2
10.3.3
10.3.4
CHAPTER 11
SORT Statistics
Hints and Restrictions
Example
SORT Error Messages
... 10—1
10—2
10—2
10—3
10—4
10—4
10—6
10—7
10—7
10—8
MEMORY COMMANDS
11.1
11.2
LOADING FILES INTO YOUR MEMORY
PARTITION (LOAD)
11—1
11.1.1
11—2
Hints and Restrictions
FINDING OUT WHAT MODULES ARE IN
MEMORY (MAP)
11.2.1
11.2.2
11.2.3
11—2
Finding Out What Modules Are in
Your Memory Partition
Displaying Information About
Specific Memory Modules
Selecting MAP Options
11.2.3.1 Limiting the MAP
11.2.3.2
DispLay
11—3
11—3
11—4
11—5
FINDING OUT WHAT MODULES ARE IN SYSTEM
MEMORY (SYSTEM)
11.4
11.5
11—3
Using MAP to Find Out
What Modules Are in
System Memory
11.3
SAVING MEMORY MODULES AS FILES (SAVE)
11—5
11—6
DELETING MEMORY MODULES FROM YOUR MEMORY
PARTITION (DEL)
CHAPTER 12
9—40
943
943
11—7
SYSTEM INFORMATION COMMANDS
12.1
SYSTEM STATUS COMMAND (SYSTAT)
12.1.1
Job Status Symbols
12.2
12.3
THE SET COMMAND
12.4
12.5
FINDING OUT THE NAME OF YOUR JOB (JOBS)
SENDING MESSAGES TO OTHER JOBS (SEND)
FINDING OUT WHAT DEVICES ARE ON THE
SYSTEM (DEVTBL)
12.5.1
SEND Error Messages
12—1
12—2
12—3
12—4
.... 12—5
12—5
12—6
Page xi
AMOS USER'S GUIDE
CHAPTER 13
DISK BACKUP PROCEDURES
13.1
BACKING UP THE FILES IN YOUR ACCOUNT
(USING COPY)
13.1.1
The System Operator and the
COPY Command
13.2
•
BACKING UP ENTIRE DISKS (DSKCPY)
APPENDIX A
AMOS SYSTEM ERROR MESSAGES
APPENDIX B
AMOS COMMAND PROCESSING
INDEX
13—2
13—3
13—3
CHAPTER 1
INTRODUCTION TO THE MANUAL
If
you have been a user on a large, timesharing main—frame system before,
you will notice a remarkable kinship between these sophisticated systems and
the
ALpha
Micro microcomputer.
minicomputers and
In
fact,
the
distinction
between
increasingLy
blurred during the Last few years. In many ways, your Alpha Micro computer
is closer in philosophy of operation to a large—scale timesharing system
than it is to the microcomputers in the personal computer field; yet it
retains the cost advantage of a small system. Take a look at some of the
features of the ALpha Micro Operating System (AMOS), most of which are new
to microcomputers:
main—frames,
microcomputers
has
become
TIMESHARING
supports several users on the system at the same time, aLL
running the same or different programs.
AMOS
USER ACCOUNTS
All users are assigned an account and (optionally) a password. A
user must present his or her account number and password to get
onto the system—— this protects your system from unauthorized
use.
MULTITASKING
The system can handle more than one task per user at the same
For example, you are able to print one file at the same
time.
moment that you are editing another file.
MULTIPROGRAMMING
Unlike some timesharing sytems, AMOS oversees multiple users at
Every user has
the same time who are running DIFFERENT programs.
a fixed partition of memory in which to run his own task, so that
all of the tasks of multiple users reside in memory at the same
time.
Page 1—2
INTRODUCTION TO THE MANUAL
COMMAND LANGUAGE
You can create a file which contains a sequence of AMOS commands,
command options and special symbols. Every time you invoke that
file (called a command fiLe), AMOS reads and processes the
commands in it. A special type of command file (called a DO
fiLe) allows you to pass arguments to the file. You can also
create your own AMOS commands by writing assembly language
programs.
1.1
MANUAL CONTENTS
To make it easier to access the information in this manual, we've divided it
into two general areas:
PART I — GETTING STARTED
The
chapters
in Part I will get you started using the system.
learn about turning on your machine, using the keyboard,
and
out
of
the
system,
mounting
logging
disks and specifying files.
You'll
into
section also contains a brief system demonstration that walks
through some of the major system programs in just a few minutes.
This
you
PART II — THE AMOS SYSTEM COMMANDS
II is meant to be much more of a reference guide than is Part I;
this section contains comprehensive discussions of many of the major
system commands, along with information on command files, DO files and
disk backup procedures.
Part
1.2
CONVENTIONS USED IN THIS MANUAL
To make our examples concise and easy to understand, we've adopted
of graphics conventions throughout our manuals:
a
number
PPN
A Project—programmer number; that is, the number that
identifies a user's account (e.g., E100,2J). Also
shown as Ep,pnj.
devn:
Specifies a physical device type and a logicaL unit
of that device.
Such devices are almost always
disks. For example, in a two—drive floppy disk
system, the device DSKO: indicates the first drive of
that physical device.
Page 1—3
INTRODUCTION TO THE MANUAL
filespec
A
file specification. A filespec identifies a fiLe,
and usually has these four elements:
devn:fi lename.extensionEp,pn]
defauLt
Information assumed by
necessary information.
the
system
when
you
omit
For example, if you do not
specify the account in which a file is located, the
system usually looks for the tile in your own
account; in this case, the default is your own
account.
OptionaL element of a command line.
For example:
.DIR C/switch)
teLLs
you
that the element "/switch" is an optional.
element on the DIR command line.
Underlined characters indicate those characters that
AMOS
prints on your terminal display. For exampLe,
most
throughout this manual you will see that
examples begin with an underlined dot (s); the dot is
the AMOS prompt symbol that it dispLays when it is
ready for you to type a command. The characters in
the examples in this manual that YOU are supposed to
type are not underlined.
A carriage return symboL. The curly arrow indicates
the place in your keyboard entry to type a RETURN
(hit the RETURN key).
".LOGOFF
For example:
tells
you
"After an AMOS prompt, type LOGOFF and a
RETURN."
A
Indicates a control character.
enter
As
you
characters from the keyboard directly to AMOS, the
system usually displays those characters on your
terminal display—— if you type a Control—C, you see a
on
your
terminal.
(For a discussion of
3.3,
Section
ControL—characters,
refer
to
Control—characters.)
AMOS USER'S GUIDE
PART I
GETTING STARTED
Even before we begin to discuss the major system commands, you will- want to
get started using the system so that you can develop a feeling for how the
system works.
I, Getting Started, is a practical, how—to—do—it guide to turning the
system on and off, logging into the system, communicating with AMOS and
We'lL aLso waLk through a quick, brief demonstration of
specifying files,
Part
system use.
Unless you have the chance to put what you learn into practice, reading
manuals can be dry work. So, if you have the opportunity, sit down in front
of the machine with this manual and try out the examples in Part I; by the
time you start learning about the system commands, you'll already have a
good feeling for how to use the system.
CHAPTER 2
TURNING THE SYSTEM ON AND OFF
computer system consists of the computer itself, one or more
terminals, mass storage devices and a printer. A terminal is the device you
use for communicating with AMOS, and it has a keyboard and a display of some
kind. If the terminal displays data on a video screen, we calL it a CRT
terminaL (e.g., a SOROC terminaL or a HAZELTINE). If the terminaL displays
data by printing it on paper, we caLl, it a hard—copy terminal (e.g., a
The mass storage devices can be one or more floppy—disk drives
TELETYPE).
or hard—disk drives.
The, usual
NOTE: Check with your System Operator, or refer to the instructions incLuded
with your hardware for information on turning on and off the terminaLs and
disk drives. This procedure varies between different brands of devices, as
does the procedure for changing disk cartridges and floppy disks.
Before you begin to use your system, make sure that the System Operator has
installed the system software so that it works with your system's specific
hardware configuration. Also ask the System Operator to assign you an
account on the system; that will be the account you will use from now on
when logging into the system and when creating files.
2.1
TURNING ON THE SYSTEM
Turn on whatever terminals you are going to be using.
If your terminal
has
a REMOTE/LOCAL switch, turn the switch toward REMOTE.
If you are going to be using a printer, turn it on.
REMOTE/LOCAL switch, turn the switch toward REMOTE. If it has
If it has a
an
ONLINE
button or switch, turn it to ONLINE. (You may turn the terminals or printer
on and off at any time before or after system start—up.)
As
a
general rule, remember that disk drives are the last
component of the system to be powered up, and the first item to be
* NOTE:
shut off.
Page 2—2
TURNING THE SYSTEM ON AND OFF
Now——
If you have a hard—disk based system (that is, the
AMOS reside on a hard—disk drive):
1.
Holding
(In
2.
most
programs
that
comprise
down the RESET button, turn on the power to your computer.
cases, the RESET button is on the computer's front panel.)
Turn on the power to the disk drives. If your disk hasa removable
cartridge, make sure that the cartridge in the drive is the one
that you want to use; if it is not, you may change it at this time
following the instructions supplied with your drive.
(Also, see
Section 2.3, Changing Disk Cartridges and Floppy Disks.)
perform the steps needed to get the drives up and ready;
follow the instructions provided by the manufacturer of your disk
drive.
For example, in the case of the CDC Hawk Drive (the disk
used with the AM—500 Hard Disk Controller) you must push the
Now,
START/STOP
button.
When the light behind the READY button comes
This procedure usually takes
on, the disk is up and ready to use.
a minute or so.
3.
system now brings itself up by transferring into memory copies
The
from the System Disk of those programs that comprise the operating
system.
4.
If
are going to be using floppy—disk drives in addition to your
drives, turn them on now. Insert the floppy disks you
are going to be using.
you
hard—disk
If you have a floppy—disk based system (i.e., your system software is
floppy disk):
1.
on
a
Holding down the RESET button, turn on the power to your computer.
(On most systems, the RESET button is on the computer's front
panel.)
2.
on the floppy—disk drive. Insert your System Disk into drive
zero (the System Drive) and close the drive door. (The System Disk
Turn
is the disk that contains the programs that comprise AMOS.) If you
more than one drive in your disk unit, you can go ahead and
insert the floppy disks that you are going to use.
(Refer to
have
Section 2.3, Changing Disk Cartridges and Floppy Disks.)
Page 2—3
TURNING THE SYSTEM ON AND OFF
2.2
GETTING THE OPERATING SYSTEM'S ATTENTION
as you have performed the procedure above, the system should be up
and running. To let you know that it is ready and eager to respond to your
instructions, AMOS displays its prompt symboL, a dot, at the left side of
your terminal display. It you do not see such a symbol on your terminaL,
type a Control—C; that is, hoLd down the CONTROL key on your keyboard
(sometimes labeled CTRL) while you type a C. You should see this on your
As
soon
terminal:
is the system's way of repeating back to you the Control—C that you
A Control—C is the system interrupt command; in this case, it
serves to get AMOS' attention.
(The
C
just typed.)
If
you still do not see the AMOS prompt, check to see that your terminal is
on, and that the cables running between the computer and the terminaL are
firmly in place. If you still see no prompt after typing a ControL—C, check
with the System Operator.
If all is well (i.e., you see the AMOS prompt), try typing a few characters
on the keyboard. As you type, the system displays the characters on your
terminal display.
(We will talk more about using the terminal keyboard in
Chapter 3, Communicating with AMOS .) From this point you can begin to
communicate with the computer.
(If you see each character displayed twice
on the screen as you type, check your terminal for a switch labled FULL/HALF
or FULL DUPLEX/HALF DUPLEX; turn the switch to FULL DUPLEX.)
2.3
CHANGING DISK CARTRIDGES AND FLOPPY DISKS
To change disk cartridges or floppy disks, follow the instructions that
accompanied your disk drives. When changing disks, you do not need to reset
the computer. Also, DO NOT turn off the drives or the computer.
After changing a disk cartridge or floppy disk, you must aLways "mount" that
new
disk
by
using the MOUNT command.
(AMOS always mounts the System Disk
for you when you first turn on or reset the system.)
2.3.1
The MOUNT Command
Type MOUNT and
(Remember
keyboard.
to
the
name
of
the
include the colon.)
For example:
which contains the new disk.
Thenhit the RETURN key on your terminal
device
SMOUNT AMS1:
the command above mounts the fLoppy disk you have
placed
in
drive
AMS1:.
Page 2—4
TURNING THE SYSTEM ON AND OFF
command is the onLy way you have of Letting the system know
when you change a disk. You MUST use MOUNT every time you change a disk; if
Using
a
MOUNT
do not, it is quite probable that you will Lose files on that new disk,
since the system may write over data on the disk (being confused about which
areas on the disk are free, and which are already being used by fiLes).
you
If
you incorrectLy enter the name
the NONEXISTENT DEVICE message:
of the device you want to mount, you see
.MOUNT ASM1:
NONEXISTENT DEVICE
Check your speLling and retype the command.
2.4
TURNING OFF THE SYSTEM
Before you turn off your computer or disk drives, make sure that you are
at
the AMOS command level (that is, that you see the AMOS prompt symbol on your
terminal dispLay, which indicates that you are talking to the operating
system), and that AMOS is not in the process of transferring data
the computer and the disk. Turn off your terminals and printer.
between
If you have a hard—disk based system:
1.
If your disk drive has a removable cartridge and you want to remove
and store the
cartridge, do so now. (FoLlow the instructions
suppLied by the manufacturer of your drive.)
2.
Power down the hard—disk drive.
Usually this procedure consists of
more than just turning the device off. For example, on the Control
Data Hawk drive, you must first release the START/STOP button; when
•the Light behind that button goes off, you may then turn off the
power to the drive.
This takes 60 seconds.
Refer to the
instructions shipped with your drive for the exact power—down
procedure for your disk drive.
3.
Holding down the RESET button, turn off the power to your computer.
If you have a fLoppy—disk based system:
1.
Remove and store the floppy disks that are in the drives.
2.
Turn off the power to your fLoppy—disk drives.
3.
Turn off the power to your computer.
___________
CHAPTER 3
COMMUNICATING WITH AMOS
Alpha Micro Operating System (AMOS) is a coLlection of programs that
serve as the system monitor. AMOS is the interface between you and the
computer; it handles and schedules the many requests for system resources
(CPU time, data transfer to and from the disks, etc.) that occur on a
multiuser, multiprogramming system. Even when you are running programs on
the system that are independent of AMOS (e.g., a BASIC program that you have
created or the text formatting program, TXTFMT), AMOS supervises the
execution of those programs.
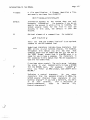
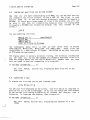
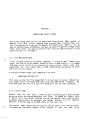
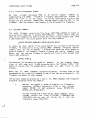
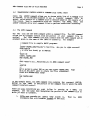
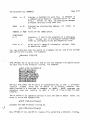
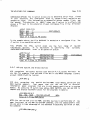
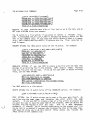
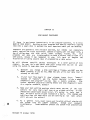
The
give you some idea of the hierarchy of the software components of your
system, take a Look at the rough diagram below. (If you want more
information on the structure of AMOS, refer to the "System Operator's
To
Information" section of the AM—lOU documentation packet
titled "Introduction to AMOS.")
AMOS
(Collection
— (Operating System)
handle:
of pr ograms that
the
and
manual
allocation of
system resources, disk read and write operations, data
transfer between your terminal and the system, etc.)
Oversees the xecution of:
r
I
I
Text Processors
(VUE, TXTFMT,
EDIT, etc.)
I
j
Language
Processorsi
[(e.g., BASIC, Pascal)
Oversees the execution of:
The program you create
(BASIC program, Pascal
program, etc.)
System Programs
(COPY, RENAME
DIR, etc.)
Page 3—2
COMMUNICATING WITH AMOS
3.1
PROMPT AND CURSOR SYMBOLS
you see the AMOS prompt (a dot) on the left—hand side of your terminal
display, you know that the system is up and running; you may now begin to
enter instructions to AMOS.
At this point •we say that you are ':at AMOS
command level"; that is, that you are communicating directly with the
operating system.
At other times you may see other prompt symbols that
indicate that you are communicating with a program that AMOS is executing.
For example, when you use the text editing program, EDIT, you see the EDIT
prompt symbol: *.
At that point you must enter commands that EDIT
When
understands.
When you
exit that program, you are again at AMOS command
level (you see the AMOS prompt again). The various prompt symbols serve to
remind you of the program with whom you are communicating. Remember: to
enter AMOS commands, you must be at AMOS command level.
If you are using a CRT terminal, alongside of the prompt you also see a
symbol calLed the cursor.
The cursor may be a small white rectangle, a
triangle, a blinking line, etc., depending on the type of terminal you have.
The cursor always marks your current screen position. Any characters that
you type appear at that position on the screen.
As you type, the cursor
moves as the new characters appear on the screen.
3.2
THE KEYBOARD
The first step in communicating with AMOS is to be able to type your
instructions on the terminal keyboard. The keyboard is very similar to that
of a standard typewriter, but you will find a few extra keys that have
special functions. Take a moment to look at the keyboard of your terminal
so that you can easily locate these keys Later:
1.
RETURN (sometimes labeled RET) — RETURN is the carriage return key.
Just as you type a carriage return on a typewriter to begin a new
line on the page, a RETURN tells the system that you are ending a
line of input and that you want to begin a new line. AMOS wiLl not
process an instruction from you until you type a RETURN to let it
know that you are finished with that line.
2.
RUB (sometimes labeled DEL, DELETE, or RUBOUT) — RUB is the
deletion key; it backspaces AND deletes. If you make a mistake
while typing an instruction to AMOS, you can erase errors by using
the RUB key. Hit the RUB key; if you are using a CRT terminal, you
see the cursor move to the Left, erasing the character in its new
position. Keep typing RUB until the incorrect characters are gone;
now type the correct characters. (If you are using a hard—copy
terminal, rubouts usually appear as a backslash (\) followed by the
characters you've deleted and another
deLeting the word THE appears as: \EHT\.)
backslash.
For example,
Page 33
COMMUNICATING WITH AMOS
3.
SHIFT — The shift key acts much as the shift key on a typewriter.
holding down the shift key you can type upper case letters and
By
the symbols that occur on the upper halt of the keys that bear two
symbols.
4.
ALPHA (sometimes labeled CAPS LOCK) — WhiLe the ALPHA key is Locked
5.
ESC (sometimes Labeled ESCAPE or ALT MODE) — The Escape key is used
or
with severaL programs on the system to signaL the end of input
However,
you
do
not
use
Escape
at
to switch between command modes.
the AMOS command Level.
6.
CONTROL
in pLace, all letters appear as upper case; however, the keys that
That is, to
bear two symbols are not aftected by the ALPHA key.
7.,
you
must
hoLd
down
the
shift
key
while
you
type
a 5, even
type a
if the ALPHA key is down. (NOTE: Not all terminals have ALPHA
keys.)
(sometimes
CTRL) — The Control key gives you the
labeled
opportunity to enter a different kind of character to the system—
list of the important
Control—character.
(See beLow for a
a
ControL—characters
Control—Character,
appropriate letter.
that
hoLd
a
To
type
CONTROL key while you type the
recognizes.)
AMOS
down
the
For example, to type a
Control—C,
hoLd
the CONTROL key while you type a C.
3.3
CONTROL—CHARACTERS
ControL—C
The Control—C is the system interrupt command. Use
it to interrupt whatever program is in progress,
and return to the AMOS command Level. After typing
a Control—C to interrupt a program, you cannot
resume execution of that program; you must start it
over from the beginning.
may
usually interrupt programs even when they
are displaying data. For example, if you ask the
DIR
command
for a list of all the files in your
account, you may interrupt it by typing a Control—C
You
while it is listing your account directory.
Some programs,
recognize
such
as
VUE
and
BASIC,
do
not
a
Control—C as an exit command; instead
you must use the exit command for that particuLar
program if you want to return to AMOS command
level. Other programs do recognize Control—Cs, but
if an exit command exists for a program, it is
usually a good idea to use that command to leave
the program instead of typing a ControL—C. Several
programs perform various cleanup functions when you
down
Page 34
COMMUNICATING WITH AMOS
use their exit commands; if you circumvent their
procedures
for an orderLy exit by using a
Control—C, the programs do not
perform those steps.
Control—U
have
chance
a
to
at AMOS command level, you may erase the
characters from the left of the cursor to the Left
Whi Le
of
edge
your
terminal
dispLay
by
typing
a
of
(On CRT Terminals, the erased
simply disappears, and the cursor moves
Control—U.
characters
Line
to the Left edge of the display; on a hard—copy
terminaL, you see a U, and the terminal readies
itself for a new line of input.)
ControHl
(Many terminals
is a tab character.
key that you can hit instead of typing
Control—I.) A tab mo yes the cursor to the next tab
A Control—I
have
a
TAB
stop on your terminaL display.
Control—S
If you have a CRT Terminal, it often happens that a
program or command displays more data on your
terminal than will fit on one screen—page. To stop
a
screen
dispLay, type a Control—S.
You may then
read the data on the screen at your leisure. Not
only does the dispLay freeze, but AMOS actually
stops sending data to your terminal until you type
a Control—Q (see below); at that point AMOS resumes
sending information where it Left off. While a
Control—S is in effect, AMOS stores (but does not
act upon) anything that you type except for a
Cont rol—Q.
Cont ro L—Q
Control—S to freeze the screen
display (see above), you must type a Control—Q to
resume screen display. If you have typed anything
while the Control—S was in effect, a ControL—Q
tells AMOS that it can now go ahead and act upon
that input. Try this out by typing a Control—S, a
When you type a
couple of commands (ending each with a RETURN); now
type a ControL—Q, and you wiLl see all of the
commands appear on the screen in quick succession.
3.4
TYPING COMMANDS
you type an instruction to AMOS, you are typing an AMOS command. ALL
valid AMOS commands either tell AMOS to perform some function for you (e.g.,
show you what files are in your account, erase certain files from the disk,
etc.), or they tell AMOS to bring in and execute a program that is
independent from AMOS (e.g., the command BASIC tells AMOS to bring in and
execute the language processor BASIC). It is important to recognize those
programs that are independent from AMOS, so that you remember with whom you
When
Page 35
COMMUNICATING WITH AMOS
whiLe
communicating. For example, the BASIC command PRINT 3+3 is validBASIC);
"inside"
are
you are communicating with BASIC (that is, while you
communicating
directly with
is
not
a
command
that
you
can
use
when
it
but
that the
When
in
doubt,
remember
AMOS (i.e., whiLe at AMOS command Level).
are
AMOS prompt indicates that you are at AMOS command Level.
of specific
In later sections we'll taLk in great detail about the form
commands; for now, though, here are some basics:
'1.
ENTERING COMMANDS — Although other programs on the
system
make
a
distinction between upper and lower case (e.g., BASIC), AMOS itself
does not. Therefore, you may enter alt commands in either upper or
lower case, or a combination of both.
For example, you may enter the directory
command as:
.DIR?
or, as:
.diR
also enter the names of files as upper or lower case or a
combination of both. (NOTE: After you type them, AMOS converts all
other
Remember that
filenames and command names to upper case.)
You
may
entities
the
case fiLenames.
2.
on
system
(for example, BASIC) do not accept lower
COMMAND LENGTH — All AMOS commands and filenames are six characters
or fewer.
3.
that you specify files,
This group of characters that
arguments or other parameters.
consists of the command itself and the additional information you
supply with it, is called the command line. For example, the
entire line below is a RENAME command line:
COMMAND LINE —
Some
commands
require
.RENAME VAL.BASEVAL.BAS
4.
ENDING A COMMAND LINE — When you are at
AMOS
command
level,
you
hit RETURN after typing a complete command line; this
must
AMOS
ignores
lets AMOS know that you are finished with the line.
ALWAYS
any command line that does not end with a RETURN.
you will usualLy use the RETURN key, you may also
line by typing a Line Feed.)
(NOTE: Although
end
a
command
Page 3—6
COMMUNICATING WITH AMOS
5.
COMMENTS
—
line
Any
at
AMOS
command
level that begins with a
semicolon C;) is a comment line, and is ignored by AMOS.
also append a comment to the end of a command Line:
.DIR [100,*J
This feature
command files.
6.
You
may
; Display directories for Project #100 .
will
be
of more use to you when you begin to build
mistake while typing a command
you may always correct any mistakes in that line if you have
not yet typed a RETURN.
Use
the RUB key to erase single
characters, or type a Control—U to erase the entire current line.
(See the paragraphs above for an explanation of the RUB key and
Control—U.) A Control—C tells AMOS to ignore the current line.
TYPING MISTAKES — If you make a
Line,
If
you hit RETURN before correcting your mistake, and the command
you entered was not a valid AMOS command, AMOS tells you that it
did not recognize the command:
.PRIMT
?PRIMT 7
You
meant
to say PRINT. After letting you know that it does not
understand PRIMT, AMOS displays its prompt symbol.
You are now
free to try again.
3.5
THE HELP COMMAND
The
purpose of the HELP command is to give information about the system and
the system commands to the user new to AMOS. You do not have to be Logged
into the system to use HELP. To find out what topics the HELP command knows
about, type HELP followed by a RETURN:
.HELP
The screen clears and you see something like this:
Help is available for:
APPEND
BAUD
CPPY
DEL
ERASE
LOAD
To see information about one of the topics listed, type HELP followed by the
name of the topic:
.HELP COPY
Page 3—7
COMMUNICATING WITH AMOS
clears and the terminaL displays information on that topic.
you ask for information on a topic that HELP doesn't know about, you see:
The
screen
If
I'm sorry I can't help you
Help is availabLe for:
APPEND
BAUD
COPY
DEL
ERASE
LOAD
system editors to
(See
Section
6.1.3,
Extension, for
create text tiLes with .HLP extensions.
specification
account
omit
the
If
you
a discussion of file extensions.)
You may create your own HELP topics by using one of the
when you ask for a topic, the HELP command searches for the appropriate .HLP
Library
file in these accounts (in this order): 1. the System Help Filecurrently
(DSKO:E7,1J); 2. the Library account for the project you are
logged into (see Section 5.1, Project—programmer Numbers, for a discussion
of libi'ary accounts); and, 3. the account you are currently logged into.
The HELP command automaticalLy includes the .HLP files that
its list of topics, and displays your HELP files on command.
you
create
in
CHAPTER 4
A QUICK DEMO OF SYSTEM USE
all of the detaiLs about the AMOS system commands,
we're going to take you through a brief, quick demonstration of the use of
is this chapter meant to be a comprehensive
By
no means
your machine.
demonstration of alL of the things you can do with the system; instead itis
meant to introduce you to some of the major system commands. As we mention
each command in this demonstration, we also tell you what manuaL to turn to
if you want more information on using that portion of the system.
Even
before
you
Learn
This chapter waLks you through some simple procedures, but does not really
tell you all of the details about how things work. Remember that the
commands and programs we taLk about in this section are alL capable of
performing a much greater variety of tasks than we attempt here. Turn to
the appropriate documentation to find out what your system realLy can do.
This chapter wiLL make much more sense (and will be of greater benefit) if
you are abLe to sit down in front of an AMOS system and try the examples.
If you have the opportunity, then, ask the System Operator for a few minutes
of machine time and an account number that you can use.
to use the system if the initial system
procedures have not been performed by the System Operator.
Do NOT attempt
4.1
instalLation
LOGGING IN
assume that the system is up and running, and that you are sitting down
in front of a terminaL (probably a terminaL with a video display). If you
see a dot at the left hand of the screen, you are ready to go:
We
If
not, type a Control—C (hold down the CONTROL key on the keyboard, and
type a C). You should now see the AMOS prompt on the screen; if not,
consuLt the System Operator for advice and go no further.
Page 4—2
A QUICK DEMO OF SYSTEM USE
Once you see the AMOS prompt, you are ready to Log into the system.
Type LOG, the number at the account you are going to use, and hit the RETURN
key (the square brackets are optional):
.LOG [200,5]
or
.LOG 200,5?
NOTE:
We
assume that you are using an account on the System Disk (DSKO:).
If this is not the case, type MOUNT, the name of the device you are using
and a RETURN.
For exampLe:
.MOUNT DSK1:
makes sure that
the device is mounted and ready for use.
device has already been mounted, using the MOUNT command again
This
harm.)
by
(It that
does
no
After you have mounted the disk, log into the account on that device
using
the LOG command with the name of the device preceding the account
number:
.LOG DSK1:E200,5J
It the system requires a password for your account, you see:
.LOG E200,SJ
Password:
Enter the password that you received from the System Operator.
Hit
RETURN.
You'll notice that the system does not show your password on the screen as
you type it; this heLps you to keep the password secret. Now you should
see:
.LOG [200,5] .2
Password:
.2
Logged into DSKO:[200,5J
which tells you that you are Logged into the system under account E200,5J
device DSK0:.
You can now begin to use the system.
** FOR MORE INFORMATION .... **
See this manual, Section 5.3, Logging into the System, and Section
2.3.1, The MOUNT Command.
on
Page 43
A QUICK DEMO OF SYSTEM USE
4.2
CREATING A TEXT FILE WITH VUE
we will create a text tile using the text editor, VUE. (NOTE: VUE is a
screen—oriented text editor; that means that to use it you MUST use a CRT
Check with the VUE manual to see the kinds of CRT terminals with
terminal.
which you can use VUE.) The file we'Ll create wiLL be named MYFILE.TXT.
Now
Type:
.VUE MYFILE.1XT
VUE Looks for a file named MYFILE.TXT.
If there is such a fiLe, VUE says:
AlphaVue Version 2.0
Loading MYFILE.TXT
a copy of the file from the disk into memory so that you can
work on that text file. Since there is not as yet a file named MYFILE.TXT,
and
transfers
VUE Thstead asks you:
AlphaVue Version 2.0
MYFILE.TXT DOES NOT EXIST — CREATE IT?
Now the screen clears and you are in
no Longer talking directly to the operating
You are
editing mode.
system; instead you are communicating with the text editing program, VUE.
Answer yes by typing a Y and a RETURN.
VUE
The commands you give to VUE are not the same kinds of commands that you can
give to AMOS.
You
see
a
screenful of asterisks, which indicates an empty text file.
place text into the file, just start typing.
When you reach the end of
To
the
screen line, or when you want to start a new tine, hit the RETURN key. Type
lines of text; anything at all—— comments on the weather, an office
a
few
memo, whatever you like.
4.2.1
Erasing Characters
To back up in the file and change things, you must move the cursor back to
the point in your text that you want to change. Pick a word several Lines
back; we're going to erase it.
keys (four keys labeled with
them
to move the cursor around on the
use
able
to
you may
screen. (However, some terminals with cursor control keys transmit the
wrong information to VUE. Experiment and see.)
If you have a terminal with cursor control
arrows),
be
Try moving the cursor by hitting the key labeled with an up—arrow.
(If your terminal does not have cursor control keys, or they are not active,
type a Control—H to move backward, a Control—L to move forward, a Control—K
to move up, and a Control—J to move down.)
Page 4—4
A QUICK DEMO OF SYSTEM USE
When you reach the line containing the word you want
erase,
to
move
the
until it is on the left—most character of the
word you are going to erase. Type a ControND. The first letter of the
cursor
forward
or
backward
word disappears. You can type more Control—Ds to delete one character at a
time, you can type a ControL—V to remove alL characters to the right of the
cursor up to the next space, or you can type a ControL—V to remove all
characters to the right of the cursor up to the end of the line.
4.2.2
Inserting Characters
You can now add a new word by just typing; however, this writes over the
words aLready on the line.
You can insert a word by typing a group of
Control—Fs (which inserts spaces), and then typing the word over the spaces.
Or, you can insert a word by typing a Control—Q (which teLLs VUE NOT to
overwrite characters aLready on the Line), and then typing the word you want
to insert.
When
you finish typing the word, type a Control—Q again;
otherwise, you will remain in this mode and will not be able to overwrite
characters.
(A ControL—Q places you into character—insert mode if you are
not already in it, or removes you from that mode if you are.)
4.2.3
Leaving VUE
When you are done experimenting, type an Escape to enter command mode. (You
can re—enter editing mode by typing another Escape.) You see a line of text
at the top of the screen that tells you
what
file
you
are
editing,
and
other items of information that will become important to you when
you begin to use VUE regularly.
various
Below this header line is the VUE prompt symbol: >. The cursor waits at
that position for you to type a command (or an Escape to return to editing
mode).
When you become practiced at using VUE, you will learn •about the commands
can use in command mode that allow you to do such things as replace
every occurrence in your file of a particular word or phrase, format blocks
of text, center lines, etc. For now, type an F and a RETURN; this tells VUE
you
to
F(inish).
VUE
now
writes your text file to the disk. After a brief
moment you are back at AMOS command level.
** FOR MORE INFORMATION
.... **
See the manual titled "VUE: Screen—Oriented Text Editor
2.0.'
—
Version
Page 4—5
A QUICK DEMO OF SYSTEM USE
4.3
FINDING OUT WHAT FILES ARE IN YOUR ACCOUNT
that you are again communicating with AMOS, you can see that the file
you created is now in your account. To see a list of the files in your
account (that is, to see your account directory), type DIR followed by a
Now
(It there are a large number of files in the account, you will not
to see them aLl listed on the screen at once. Try typing DIR/W
foLLowed by a RETURN; this formats the display into four coLumns on the
RETURN.
able
be
screen.)
.DIR
You see something Like this:
MYFILE TXT
MYFILE BAK
UNBILL BAS
DSKO:E200,53
2
1
6
TotaL of 3 files in 9 blocks
The
above telLs us that we have three
MYFILE.TXT, MYFILE.BAK and UNBILL.BAS.
information
DSKO:200,5J:
and 6 bLocks in Length.
respectively 2,
of 512 bytes calLed blocks.)
1
fiLes
in account
These
are
files
(We divide up the disk into units
The directory Ii sting that
use the DIR command will probably have more f iles in it
than the exampLe above, and the size of MYFILE wiLl depend upon how much
text you typed in when you created the fiLe using VUE.
The display above is called a directory listing.
you
see
when
you
.. **
** FOR MORE INFORMATION .
See
this
Disk (DIR).
4.4
manuaL,
Section 9.2, Finding Out What FiLes Are on the
DISPLAYING A FILE
To display the file that you've just created, type:
TYPE MYFILE.TXT
You see your file displayed on the screen.
Your file may be so long that
it
does not fit all on one scre en—page. If so, you can freeze the text display
so you can see it by typing a Control—S; to release the display, type a
Control—IL. To interrupt the display, type a Control—C.
** FOR MORE INFORMATION
See
....
this manual, Section 10.1,
(TYPE)
Displaying
the Contents of a File
A QUICK DEMO OF SYSTEM USE
4.5
Page 4—6
COPYING A FILE
You can make a copy of your t xt file by using the COPY command.
Pick a
name
from one to six characters in length. We'll use the name of NEW.TXT.
Type:
.COPY NEW.TXT=MYFILEI.TXT
MYFILE.TXT to NEW.TXT
Total of
1
file transferred
If you now look at your file directory (using the DIR command), you see that
you have a copy of your original file:
.DIR
MYFILE TXT
MYFILE BAK
UNBILL GAS
TXT
NEW
DSKO:E200,5J
2
1
6
2
TotaL of 4 fiLes in 11 blocks
You can use the TYPE command to assure yourself that you do indeed
exact copy.
** FOR MORE INFORMATION
have
an
.... **
See this manuaL, Section 5.5, Copying Files (COPY).
4.6
RENAMING A FILE
You can use the RENAME command to change the name of your file:
.RENAME DEMO.FX1=NEWTXT?
NEW.TXT to DEMO..FX1
Total of.1 fiLe renamed
If
you
use
the
DIR
command
DEMO . F Xl
** FOR MORE INFORMATION
-
again,
you
see
that NEW.TXT is now named
.... **
See this manual, Section 9.3, Renaming FiLes (RENAME).
Page 47
A QUICK DEMO OF SYSTEM USE
4.7
GETTING INTO BASIC
Now, leave AMOS command Level by
Type BASIC and a RETURN:
invoking
the
BASIC
Language
processor.
.BASIC
READY
You have told AMOS to run the program that understands the computer language
that we call BASIC. The BASIC language consists of simple, almost—English
phrases that you can combine to form a BASIC program.
When you see the word "READY," you are communicating with the program that
understands the computer language BASIC. We say that you are "in BASIC."
You cannot use the AMOS commands here; instead you must use commands phrased
in the BASIC language. To get used to communicating with the BASIC Language
Type the example below,
processor, we'll enter a small BASIC program.
entering all spaces and punctuation EXACTLY as shown. If you make a mistake
while you are still on a Line, you can back up and erase mistakes by using
the RUB key. If you make a mistake after you have typed a RETURN, you can
correct a Line by simply retyping it; the LATEST version of a line will be
the one that winds up in the program.
10 FOR 1=1 TO 10
20 PRINT TAB(5*I),"WELCOME TO AMOS"
30 NEXT
To run your program, type RUN and a RETURN.
You see this on the screen:
READY
10 FOR 1=1 TO 10
20 PRINT TAB (5*I),"WELCOME TO AMOS"
30 NEXT
RUN
COMPILE
COMPILE TIME WAS 0.10 SECONDS
WELCOME TO AMOS
WELCOME TO AMOS
WELCOME TO AMOS
WELCOME TO AMOS
WELCOME TO AMOS
WELCOME TO AMOS
WELCOME TO AMOS
WELCOME TO AMOS
WELCOME TO AMOS
WELCOME TO AMOS
RUNTIME WAS 0.78 SECONDS
READY
A QUICK DEMO OF SYSTEM USE
4.7.1
Page 4—8
Saving a BASIC Program
To save your program, type SAVE WELCOM.BAS:
SAVE WELCOM.BAS
READY
Now type BYE to leave BASIC and return to AMOS command level.
BYE
The next thing you see is the AMOS prompt C.) telling you that you are now
at AMOS command leveL. If you use the DIR command, you see that the
BASIC program you saved is a file in your account:
back
.DIR?
MYFILE TXT
MYFILE BAK
UNBILL GAS
DEMO
2
DSKO:E200,5J
1
6
2
FX1
WELCOM GAS
1
Total of 5 files in 13 blocks
** FOR MORE INFORMATION .... **
See the manual titled"AIphaBASIC User's Manual."
4.8
ERASING A FILE FROM YOUR ACCOUNT
To erase the files that you have created, type ERASE, the name of
(with extension) and a RETURN:
the
file
.ERASE DEMO.FX1
DEMO. FX1
TotaL of
1
fiLe deleted, 2 disk blocks freed
of the AMOS commands recognize the wildcard symbol: *. (A wiLdcard is
a symboL that matches any characters.) Let's use a wildcard to erase all of
the BASIC programs in the account:
Many
.ERASE *.BAS
UNBILL . GAS
WELCOM.BAS
Total of 2 files deleted, 8 disk blocks freed
The command above tells the ERASE command to erase
from
your
files that have a .BAS extension, regardless of their names.
account
all
Page 4—9
A QUICK DEMO OF SYSTEM USE
** FOR MORE INFORMATION .... **
See this manuaL, Section 9.4, Erasing Files
(ERASE).
4.9
LOGGING OFF THE SYSTEM
Now
that you are done experimenting with the system, sign off the system by
using the LOGOFF command:
.LOGOFF
User 200,5 logged off
You are now off the system.
above, you see:
If you try to perform the
[LOGIN PLEASE]
To get back on the system, use the LOG command again.
commands
you
used
CHAPTER 5
IDENTIFYING YOURSELF TO AMOS
the
Once
system is turned on, and you have famiLiarized yourself with your
equipment, you can begin to
identify yourself to AMOS
use
as
the
a
First, however,
system.
user of the system; this
identification is calLed "logging into the system."
you
must
process of
Every user of the system has one or more accounts. When you create files on
a disk, the system marks those files as beLonging to your account.
No
one
(aside
Operator) can create files in your account except
within
your
own
(see
Section
5.1,
project
Project—programmer Numbers, beLow).
Since AMOS maintains a list on each
disk of the users who can create fiLes on that disk, you must have an
yourself
from
and
the
System
others
on
each disk, floppy disk or disk cartridge that you are going to
use for storing files.
account
Each account has a directory (a kind of cataLog) that lists all of the fiLes
in that account. You can use the DIR (Directory) command to see a display
of your account directory.
5.1
PROJECT—PROGRAMMER NUMBERS
System Operator assigns aLl user accounts. When you are assigned an
account, you receive a project—programmer number (often called a PPN) and
(optionally) a password.
(NOTE: If you are using more than one disk, you
will have an account on each disk. If you have only one account on each
disk, they can all have the same PPN.)
The
PPN is a unique, two—part number that distinguishes you from all other
users on the system. The first number is caLled the project number.
If
several users' PPN5 have the same project number, those users are said to be
in the same project. Users in the same project have certain privileges when
Your
it
comes
to transferring files between each others' accounts.
The second number is caLled the programmer number, and is separated from the
project number by a comma. You will usuaLly see PPNs enclosed within square
(changed 15 October 1979)
IDENTIFYING YOURSELF TO AMOS
Page 5—2
brackets.
Here are a number of examples of project—programmer numbers with
the brackets:
[110,5]
Both
the
(For
a
[334,7J
[250,12]
[200,1]
[100,100]
project and the programmer number may range from 0 to 377, octaL.
discussion of the octal numbering system,
see
the
manuaL
Introduction to AMOS; for now, the fact that the numbers are octal just
means that no digit may be greater than 7.) A programmer number of zero
usuaLly indicates a Library account for that project (e.g., the account
[311,0] contains files of interest to aLl of the users in project 311).
Project numbers 1—77 are reserved by ALpha Micro for system software and the
ALphaAccounting business package. Some of the special accounts set aside by
Alpha Micro on your System Disk are:
[1,2]
[1,4]
[1,6]
[2,2]
[7,0]
[7,1]
Reserved for System Operator
System Program Library
Device Driver Library
Command File Library
Miscellaneous System Library
$
Help File Library
MaiLbox Data File Library
[7,2J
[7,4J
LISP Language Library
Pascal Language Library
BASIC Language Library
[7,5]
[7,6]
[7,7]
5.2
MACRO Language Library
PASSWORDS
The System Operator may assign you an account password.
The password is for
your protection; if you maintain its secrecy, other users cannot access the
system by using your project—programmer number to Log into your account. If
a
password for an account exists, you don't need to enter it
if you are
transferring into that account from another account within the same project.
5.3
LOGGING INTO THE SYSTEM
There are very few commands that you can perform without being logged into
the system; if you try to use the system without being logged in,
you see
the following message:
?Login please
To log into the system, use the LOG command followed by your PPN (the square
brackets are optional):
SLOG [120,34]
?
(Changed 15 October 1979)
Page 5—3
IDENTIFYING YOURSELF TO AMOS
If you have onLy one account with that PPN, LOG will search the availabLe
disks on the system (starting with the System Disk, DSKO:), and Log you into
the account on the proper device. If you have more than one account on
different disks with that same PPN number, you must specify the device that
contains the specific account you wish to work under:
.LOG DSK1:L35O,6J
command above teLLs AMOS that you want to access account L35O,6J on the
Logical unit DSK1:. (See Section 6.1.1, Device Name, for an explanation of
The
how to specify devices.)
If you have a password associated with your account, LOG asks for it:
.LOG AMS1:E100,3J ?
Password:
you type your password, the system does not dispLay it on your terminal.
Remember that the purpose of the password is to keep unauthorized users from
gaining access to the computer through your account; keep your password a
secret.
As
If
have typed your PPN and password correctly, you will be logged into
you
the system:
.LOG L321,1OJ )
Password:
Logged into DSKO:E321,1O3
If you have not typed your PPN or password correctly, you
see
one
of
the
messages:
?Account number invalid
?Bad password
?Command format error
If you have
check with
the System Operator to make sure that your PPN and password are correct.
and you wiLl have to begin the login procedure alL over again.
been unsuccessful in logging in (and have tried several times),
If you log into an account where another user is already logged in, you see:
.LOG [211,56].
Logged into DSKO:[211,56J
Caution —. other lobs same PPN
It
is
generally a bad idea for two users to be sharing the same account at
the same time. For example, if one user erases some files while another
user is accessing one of those files, or if both users try to access the
same file at the same time, you will have serious problems.
Page 5—4
IDENTIFYING YOURSELF TO AMOS
Besides logging you into the system, the LOG
other functions which we discuss below.
5.3.1
command
can
perform
several
Finding Out What Account You Are Logged into
If you cannot remember which account you are logged in under, type LOG and a
RETURN:
SLOG
Current login is DSKO:E321,1OJ
If you are not Logged in, you see the message:
Not logged in
5.3.2
Transferring to Another Account
you are Logged into the system, you can transfer to another account by
account to which you wish to
t ranter:
Once
using the LOG command with the PPN of the
LLOG AMS1 :C100,3J
Password:
Transferred from DSKO:E321,1OJ to AMS1:E100,3J
5.3.3
LOG and the Ersatz Devices
Aside
from the usual kinds of devices (e.g,, DSK1:, AMS1:, etc.), the LOG
command also recognizes another type of device calLed an ersatz device. The
ersatz devices provide a shorthand way of specifying accounts that you use
frequently. The ersatz devices that LOG understands are:
5(5:
DVR:
CMD:
HLP:
BOX:
LSP:
PAS:
GAS:
MAC:
To
specifies
DSKO:[1,4J
DSKO:E1,6J
DSKO:C2,2J
DSKO:C7,1J
DSKO:E7,2]
DSKO:E7,4J
DSKO:C7,53
DSKO:[7,6J
DSKO:[7,7J
System Program Library
Device Driver Library
Command File Library
Help File Library
Mailbox Data File Library
LISP Language Library
Pascal Language Library
BASIC Language Library
MACRO Language Library
log into one of the accounts above, enter LOG and the appropriate ersatz
devi ce:
Page 5—5
IDENTIFYING YOURSELF TO AMOS
.LOG SYS:
User logged into DSKO:[1,4J
LOG and several special commands (see Chapter 9, The WiLdcard File Commands)
are the only commands that recognize the ersatz devices.
5.3.4
The START Command File
Whenever you log into an account, LOG looks for a file in that account named
START.CMD. If such a file is found, the system assumes that it is a command
file, and begins executing it as such. This aLlows you to perform certain
procedures automatically every time you log into an account (e.g., erase alL
tiles, create a directory listing for that account, etc.).
backup
to be executed when you Log into the account, the command fiLe
START.CMD.
We discuss command tiles in great detai1 what they are, how to
build them and what kinds of system commands may be incLuded
Chapter 8, Command Files and DO FiLes.
5.3.5
If it is
MUST be named
in
them——
in
System Mail
When you
first log into the system (but NOT when you use LOG to transfer
If
between accounts), LOG checks the file in DSKCJ:[7,23 named MAIL.JNK.
2
such a file exists, the system prints the first line of the file on your
terminal display. This is one way that information of interest to all users
of the system can be made available to each user as he or she logs into the
system:
.LOG [200,56]
Check
with Mr. Smith for info on changes in state tax tables.
You can use one of the system text editors to create and change the MAIL.JNK
file.
5.4
When
LOGGING OFF THE SYSTEM
you
are
through
using
the system, tell AMOS so by using the LOGOFF
command:
.LOGOFF ;i
User 140,3 lo9ged off
Whenever you Leave your terminal for an extended period, it is a wise idea
to log off; this prevents unauthorized users from sitting down at your
terminal and using the files that your account can access.
CHAPTER 6
IDENTIFYING FILES TO AMOS
One of the things that you will be doing most often on the AMOS system is
dealing with disk files: copying them, erasing them, creating them, etc.
(For a discussion of files see the manual "Introduction to AMOS.") To be
able to perform these procedures, you must be able to identify to AMOS those
files with which you want to work; we call such an identification a "file
specification," or "filespec."
6.1
FILE SPECIFICATIONS
A fuLl filespec consists of severaL elements: 1. a device name (identifying
the file is to be found—— usually a disk of some type); 2. a filename
(the name of the fiLe); 3. an extension (a zero to three letter code that
identifies the file type); and 4. a PPN (identifying the account in which
where
the file is to be found).
A typical filespec might look something like this:
AMSO: INFO.1XTE234,1 2J
This tells us that the file named INFO is to be found in account C234,12J on
floppies.
We
unit number zero of a floppy—disk drive that uses AMS—format
also know that the file is a text file because it has the .TXT extension.
6.1.1
Device Name
Usually when we talk about a device, we're talking about a data storage
device on which the system maintains your files. In almost all cases, such
a
device will be a disk; although you can use special units (such as your
terminal, memory, etc.) as devices—— see below, Section 6.1.1.1, Special
Devices. A device name tells AMOS where to find your file.
J
The
device
name
identifies the logical unit on which a file may be found.
units instead of just the disk drive
The reason we talk about logical
IDENTIFYING FILES TO AMOS
Page 6—2
itseLf, is that one physical device may contain several logical units (e.g.,
a
single Control Data Hawk drive contains two logical units that you access
separately—— a five—megabyte fixed disk and a five—megabyte removable disk
cartridge.
One
Calcomp Trident 300—megabyte drive can contain 19 Logical
units—— DSKO:—DSK1B: !).
A device name consists of three Letters that identity the type of physicaL
device being used (e.g., STD identifies a floppy—disk drive that handles
IBM—format disks), and a number followed by a colon that identifies which
logical unit is being used. So, for example, if you have two Control Data
Hawk drives, the first physical device might contain logical units DSKO: and
DSK1:, and the second physical device might contain logical units DSK2: and
DSK3:.
(Regardless of its type, the physical device that holds the programs
that make up AMOS itself is always named DSK; and the logical unit that
holds those programs—— called the System Disk—— is always named DSKO:.) Ask
the System Operator for a list of the devices available on your system.
Some common physical device types are:
HWK
The Control Data Hawk hard—disk drive (Model 9427H), used with
the AM—500 Hard—Disk Controller board.
AMS
Alpha Micro—format floppy—disk drive, used with the AM—200
Floppy—Disk Controller board.
STD
IBM—format floppy—disk drive, used with the AM—200.
TRI
Calcomp Trident hard—disk system.
1MG
128—byte sector, non—AMOS structured disk.
6.1.1.1 Special Devices — Several special devices may be defined on your
system that allow you to treat memory and your terminal as just another
physical device. These special devices are:
MEM:
Your memory partition (that is, the area of memory that you
are using in which to run your job.) If MEM: has been
defined as a device, you can use COPY to copy files to
memory from the disk and vice versa; you can use DIR with
MEM: to find out what modules are in your memory area.
TRM:
Your terminal. You can use COPY to write files to that
terminal as if it were a disk. This performs the same
function as the TYPE command.
TRM:XX
Terminal named XX; that is, you can refer to a specific
terminal by supplying the name of that terminal. (Type
TRMDEF and a RETURN to see the names of the terminals
defined on the system.)
Page 6—3
IDENTIFYING FILES TO AMOS
6.1.2
FiLename
Every fiLe on the disk has a name associated with it. Filenames may be from
one to six characters in length. Although you may ent er a filename as upper
Lower case, or both, AMOS converts all, fiLenames that you enter at AMOS
command level to upper case. That is:
or
TRIDNT
is the same as:
Tn dnt
or:
t ri dnt
(Proärams independent from AMOS—— such as BASIC" may distinguish between
upper and lower case in filenames; check the manuals belonging to those
programs for information on how they treat filenames.)
Filenames can only contain Letters and numbers (e.g., FILE"2 is NOT
filename).
6.1.3
a
valid
Extension
Following the filename (and separated from it by a dot) is the zero— to
three—character extension. The purpose of the extension is to identify the
type of file with which you are dealing. For example, a file with a .BAS
extension is a BASIC program. The extension may be any letters or numbers
that you want to assign to a tile, but usually the extension is one of
several extensions that AMOS recognizes:
A V RAGE . BAS
A BASIC source program produced by saving a program
created inside BASIC, or by using one of the system
text editors, VUE or EDIT.
AVRAGE.RUN
A compi led BASIC program; created by using the
system command COMPIL on the source program (e.g.,
COMPIL
AVRAGE.BAS), or by saving the program
within BASIC (e.g., SAVE AVRAGE.RUN).
CHANGE.SBR
BASIC
subroutine; an assembly language program
that can be called by a BASIC program to perform
A
commonly
CUSTNM. DAT
while
needed functions.
data file; that is, a text file created by a
BASIC program that contains data that other BASIC
programs can access (e.g., a list of customer
A
names).
IDENTIFYING FILES TO AMOS
Page 6—4
WORDS.TXT
A text file created
editors, EDIT or VUE.
WORDS.BAK
A
by
using
system
the
text
backup text file created when you use EDIT or
VUE, so that you always have on hand an earlier
version of the text file you are currently working
on (in c.ase of problems during your current editing
session).
WORDS.LST
A text file created by using TXTFMT to format a
.TXT fiLe, by using DIR to create a file containing
directory Listing, or by using MACRO to generate
a Listing of an assembly Language program.
a
SYSTEM.HLP
A text file that
contains
system (i.e., a HELP file).
information
about the
Type HELP and a RETURN
to see the list of files that you can ask for.
ERASBK.CMD
A
command file is a text file that contains system
commands.
the
fiLe.
DIRFIX.DO
You can invoke aLl of
command
the
commands
in
file by simply typing the name of the
A DO file is a special kind of command fiLe that
aLLows you to specify text items to be substituted
for parameter symboLs in the DO file.
DEBUG.MAC
An assembly
language
source
program
using one of the system text editors.
DEBUG.OBJ
created
by
created by
using the system Macro—assembler, MACRO, on a .MAC
An
assembLy
Language
object
program
program.
DEBUG.PRG
An
assembLed program produced by using the linkage
editor, LINK, on an .OBJ file to create
a
machine
language program.
DEBIJG.SYM
fiLe that contains the symbol table for a .PRG
file; created by using the program SYMBOL on a .OBJ
A
fiLe.
OPTIMZ.LSP
A program written in LISP.
TOPDWN.PAS
A program written in Pascal.
Remember: you can assign any extension to a
file;
even
a
null extension
(e.g., FILEA. ); the extensions above are often assigned to files by various
programs
on the system, and are the extensions that many programs use as
defaults.. For example, unless you specify otherwise, BASIC saves a program
file with the extension .BAS; if you do not specify the extension when
loading a program file into BASIC, BASIC assumes the default extension of
.BAS.
Page 6—5
IDENTIFYING FILES TO AMOS
6.1.4
Project—programmer Number
already discussed PPNs
have
Communi cati ng with AMOS). The PPN
We
in an earlier chapter (Chapter 3,
in a filespec identifies the account in
If you are referring to a tile in the
the tile is to be found.
account you are currently logged into, you may usually omit the PPN in the
fi lespec. (But not always—— see Chapter 9, The Wildcard File Commands.)
which
6.2
WILDCARD SYMBOLS
usual tilespec selects one fiLe (e.g., DSK1:POOL.LSPE344,1J refers to
only one file—— POOL.LSP in accoun t DSK1:C344,1J). Usually that's fine, but
The
what if, for example, you want to erase ALL files in your account that
have
You could speci fy each file individualLy:
a .BAS extension?
SERASE SEED.BAS,RNDM.BAS,TRMCRV.BAS,SOS.BAS 4)
It
would
much
be
easier if you could specify all of those files with one
To allow you to do so, various AMOS commands recognize special
A wildcard can match any other symbol or
symboLs that we call wildcards.
group of symbols. For example, instead of typing the entire command line
filespec.
above,
you
can
use one filespec to specify alL files in your account that
have a .BAS extension:
.ERASE *.BAS
The asterisk (*) can match any group of
In the example above,
symbols.
a .BAS extension match the filespec *.BAS. That
means, of course, that the command above erases ALL .BAS files in your
files
of
ANY
name
with
account.
NOTE:
Not
a
IL
AMOS
commands
recognize wildcards.
You must refer to the
documentation for a specific command to see if you can use wildcards in
the
filespecs you supply to that command.
The two most common wildcards are ? and *.
wildcards recognize these two symbols.
*
All AMOS commands that recognize
any symbol or group of symbols in a filename or
extension. BOTANY.* selects all files in your account
Matches
named
BOTANY
of
ANY
extension
(e.g.,
BOTANY .TXT,
BOTANY.LST, BOTANY.BAS).
You may precede the * with one or more symbols (e.g.,
F1*.MA* selects the files F1TST.MAC, F1NEW.MAX, and
F1OLD.MAX), but you may not follow the * with any
characters (e.g., *DSK.TXT).
IDENTIFYING FILES TO AMOS
Matches
Page 6—6
any
???DSK.MAC
AR1 DSK.MAC.
You
may
M???1.TXT
appear
one
symbol
seLects
in
fiLename or extension.
a
PACDSK.MAC,
DIRDSK.MAC,
and
characters before or after ?s (e.g.,
selects MARY1.TXT and MTST1.TXT).
If ?s
place
at the end of a filename or extension (e.g.,
FR???.MAC or ACCNT.T??), that many or FEWER characters
may
match.
For exampLe, Pfl??.RUN may match the files
PINVT.RUN, PTST.RUN, and P1.RUN); otherwise, the number
of matching characters exactly matches the number of ?s.
(NOTE:
Several of the commands that you can use when handling files have
even more advanced wildcarding abiLities—— see Chapter 9, The WiLdcard File
Commands.)
6.3
FILE SPECIFICATION DEFAULTS
Under certain conditions, various portions of the system are smart enough to
be able to fill in information that you have left out.
For example, if you
omit the device name and the PPN from a fiLespec, many of the AMOS
commands
will assume that you are referring to a file that appears in the account and
on the device that you are currently logged into.
Those commands fill in
the "default" account and device specifications.
For example, if you are logged into account [100,5]
AMOS commands that read this filespec:
on
device
DSK1:
Most
BIOPAK.BAS
for the file on DSK1: in account [100,5]. In the case above, then,
the default device and PPN specifications are the account and device you are
currently logged into.
search
The defaults assumed by the system depend on what command you are using, but
we can make some generalizations:
1.
The default account specification
logged in under.
2.
3.
is
the
PPN
you
are
The default device name is the name of the device you are
logged into.
The default device unit is zero (e.g., the system assumes
that AMS: refers to AMSO:).
(NOTE: These
generalizations do not apply to ALL commands on the system; the
as the wildcard file commands maintain their own set of
defaults. For example, if you do not supply
a
device unit number
wildcard file command, that command performs a wildcard search fortothea
commands
known
IDENTIFYING FILES TO AMOS
Page 6—7
specified fiLe on ALL units of the device specified, not just on logical
unit zero.
Refer to Chapter 9, The Wildcard File Commands, for more
information on the defaults used by these commands.)
For example,
Many programs on the system use specific default extensions.
TXTFMT,
uses
the
default
extension
of .TXT.
formatting
program,
the text
That is, if you omit a tile extension from a fiLespec that you give to
TXTFMT,
TXTFMT assumes that the file is a .TXT file. The point to remember
here is that you may omit extensions from a filespec that you give to a
command, as
Long as that extension is the defauLt extension being used by
the command. In other words, since the TXTFMT default extension is .TXT,
may omit the extension from a filespec for a .TXT file. If you want to
use TXTFMT on a file that is NOT a .TXT file, you must include that file's
you
extension in the filespec.
Remember
that
the
defaults used by the system depend upon the command to
look at the documentation for a
so
which you are specifying the file,
specific command to see what defaults that command uses.
AMOS USER'S GUIDE
PART II
THE SYSTEM COMMANDS
introduced you to some of the system commands in Part I, Getting
in
Now
we're going to discuss the major system commands
comprehensive detai L. If at any time you are confused by a term or concept,
refer to the Index for other references to the topic or to the manual
"Introduction to AMOS."
We
have
Started.
The following chapters group the commands by function and type. If you are
already familiar with the AMOS commands, you wiLL probabLy want to just skim
these chapters, and turn directly to the "AMOS System Commands Reference
Sheets" for concise, aLphabetically—ordered summaries of command operation.
Those commands that
Not every system command is covered by this manual.
(e.g., BASIC, VUE, TXTFMT), those commands of
have manuals of their own
interest primariLy to the assembly Language programmer and System Operator
and those commands not of common interest to the general user of the system
are discussed in the "AMOS System Commands Reference Sheets" and in other
appropriate manuals.
CHAPTER 7
INTRODUCTION TO AMOS COMMANDS
Before we get into specifics on the AMOS system commands, we would Like to
provide a general overview on what an AMOS command is, what form it takes
and how AMOS responds when you enter a command.
Until
now
we
have
taLked
about
the commands that you enter at the AMOS
command level as if they were grouped into two categories: 1. instructions
that tell AMOS to run a program independent of itself (e.g., the BASIC
command tells AMOS to run the language processor program, BASIC); and 2.
instructions that tell AMOS to perform system functions (e.g., the DIR
command tells AMOS to display a list of the files in your account).
It was convenient to make this distinction in our earlier
discussions, but
is the time to cLarify just what an AMOS command is—— actually, every
command that you enter at AMOS command Level is just the specification of a
disk file or a disk file that has been loaded into memory (a memory module).
AMOS
responds to the command by trying to locate the memory module and
executing it, or by finding the file on the disk, loading a copy of it into
now
and executing it.
Every AMOS Level, command specifies an assembly
Language program (a .PRG fiLe) or a command file.
memory
In other words, when you instruct AMOS to perform a system function (e.g.,
DIR), you are asking it to Load into memory the DIR program and execute it.
What this means is that since programs that perform system functions are not
actually part of the operating system itself but are
simply
files
on
the
disk, you can add to the commands that AMOS recognizes by just writing your
own .PRG files or command files.
When you enter a command at AMOS command Level, AMOS goes through several
search procedures looking for the program or command file specified by the
command.
For example (unless you specify an extension and an account
number), AMOS first looks for the file as a .PRG file in the System Program
Library Account, DSKO:E1,4).
INTRODUCTION TO AMOS COMMANDS
Page 7—2
You will not usually have to worry about this process, but you may want to
refer to Appendix B, AMOS Command Processing, if you find yourself in a
situation where you have more than one .PRG, .CMD or .DO file of the same
name in different accounts, and you want to know which fiLe AMOS is going to
find first if you enter just the filename.
If
AMOS cannot find the program or command file specified by a command, you
see your input repeated back to you enclosed in question marks:
?CREATE?
?VUEW
?
Enter the command again,
correct.
7.1
COMMAND SYNTAX
The
syntax
of
checking
to
make
that
sure
a command is its proper form.
your
spelling
is
At the front of each command
description in the chapters that follow, you will see a line that says
COMMAND
SYNTAX.
Beneath this is a line that illustrates the syntax to
follow when you enter a command line containing that command.
For example:
COMMAND SYNTAX:
DIR
?
Below is a discussion of some of the symbols that you may
example:
1.
see
in
such
an
start of every command Line you see the AMOS prompt C.);
this indicates that you must enter every AMOS command while at AMOS
At
the
command level.
2.
"filespec" indicates a file specification (e.g.,
"Filespeci" indicates the first file
specification; "fiLespecN" means the "Nth" file specification. For
The
phrase
DSKO:CHNG.BAS[100,2J).
example:
.filespecN
.COMMAND filespeci
tells you that the command expects a list of fiLespecs,
N.
3.
1
through
The 0 symbols indicate the optional elements of the command line.
For example:
.COMMAND {fi Lespec) ?
means that you do not
command.
have
to
specify
a
file
when
using
the
Page 7—3
INTRODUCTION TO AMOS COMMANDS
You may sometimes see embedded optional eLements.
For example:
.COMMAND {/switch{/switch}} ,
tells
you that you may optionalLy specify a switch (a code that
selects a command option) which may in turn optionally be followed
by another switch.
curly arrow
command line.
4.
The
symbol C?) indicates a RETURN at the end of the
The exact syntax that a command follows depends on the particular command;
for specific information, refer to the documentation for that command.
However, all of the commands that you can use at AMOS command level have
certain things in common:
1.
Commands are six characters or fewer in Length.
2.
You
3.
All command Lines must end with a RETURN or a line—feed,
both.
may enter commands in upper or lower case, or a combination of
and
commands require that the command line fit on one screen line.
4.
7.1.1
most
ALL file specifications that you enter on a command line follow the
conventions we discussed in Chapter 6, Identifying a File to AMOS.
Command Defaults
command
description in the following chapters includes a section
titLed COMMAND DEFAULTS which lists all of the. file specification defaults
used by that command. The set of defaults used by a command depends upon
the command. For example, DIR assumes a default extension of ..*, but ERASE
assumes an empty extension as the default (e.g., INVCON. ).
Every
Refer
to
defaults.
7.2
the
documentation
for a specific command for information on its
COMMAND SWITCHES
Many of the AMOS commands allow you to select among severaL command options
by including one or more "switches" on the command line.
The switch is
either a one character code or a short word (e.g., /R or /QUERY) that
tells
the command which command options to put into effect. For example: the
ERASE command usually does not ask you to confirm deletions;
you would
like it to do so, you may include the QUERY switch on the ERASE command
if
line:
INTRODUCTION TO AMOS COMMANDS
Page 7—4
.ERASE/QUERY *.BAK
(Separate the switch from the rest of the command line by preceding it
with
command line above tells ERASE to ask for confirmation
before deleting each .BAK file from your account.
a
slash——
I.)
The
Command options available vary depending upon the specific command, as does
the form that the command switches take. For example, some commands assume
that
each
new
switch
starts
with
a
slash
(e.g., aCOPY
OLD.*=NEW.*/QUERY/NODELETE),
and that switches may appear anywhere on a
command line (e.g., .ERASE *.BAK/QUERY,*.TXT); other commands assume that
EVERY
single character after a sLash to the end of the command line is a
separate switch (e.g., .MAP/FSR). Check the documentation in this and other
manuals to see how a specific command handles switches.
CHAPTER 8
COMMAND FILES AND DO FILES
There are many times when you find yourself entering the
same
sequence
of
commands over and over. For example, let's say that every time you log into
your account you erase all backup tiles; then you look at the directory of
your account:
.LOG E100,4J
Logged into DSKO:E100,43
LERASE *.BAK
MEMDOC.BAK
COMF UBAK
Total of 2 files deleted, 3 disk blocks freed
.DIR
XT
MEMDOC
DSKO:E100,43
12
COMF
TXT
5
VAR
BAS
10
VAR
RUN
7
Total of 4 files in 34 blocks
The example above is a simple one; sometimes a-frequently used sequence of
commands nay be quite long and tedious to type.
An extremely powerful tool
for dealing with this problem is the command file. A command file is a text
file that contains the same kinds of input that you might enter from the
keyboard.
You can tell AMOS to read its instructions from a command file
instead of having to enter those commands and data yourself.
Let's say that
functions
text:
you
in the
create the
example above.
command
; Do Login clean—up functions
LOG [100,4J
ERASE *.BAI(
; Get rid of the
DIR
file
LOGIN.CMD
to
perform
the
The file contains the following lines of
backup files.
COMMAND FILES AND DO FILES
Page 8—2
(If you do not include the :1 at the front of your command fiLes,
you
will
the Lines of text on your terminal display as AMOS processes them.
See Section 8.1.1, Special Symbols in Command Files, for an explanation of
this and other special symbols.)
not
see
At AMOS command level, enter the name of your command file:
ILOGIN
AMOS
now
reads
its instructions from the file LOGIN.CMD and performs the
functions asked for.
If the extension of a command tile is .CMD or .DO (denoting a speciaL kind
of command file called a DO file), you do not have to include the extension
when entering the name of the command file; otherwise, you must specify the
tile
extension.
(That
is,
if
your
command file is DOIT.TXT, you must
include the .TXT when specifying the tile.)
To create a command file, use one of the text editor programs to make a text
file (usually with the .CMD extension). Fill the tile with the commands you
would ordinarily enter from the keyboard. You may include comments within
your fiLe by preceding them with a semicolon (;). AMOS does not process the
comments.
It does display comments on the terminal display as it processes
the command file if a :T symbol is at the front of the file. It is a good
idea to liberally comment your command files so that you remember exactly
what tunct ions the tile performs.
* IMPORTANT NOTE:
Although you may type commands in either upper or Lower case
when entering them directly from the keyboard, the commands
in your command tiLe MUST be in upper case.
messages may be in either upper or lower case.
Comments
or
[Of
special interest to the System Operator is a unique command file called
the system initialization command file (SYSTEM.INI), that the system uses
every time you turn on or reset the computer. This command file has special
properties and commands that heLp AMOS to tailor the system software for
your particular hardware system. The System Operator can find intormation
on the SYSTEM.INI in the section titled "System Operator's Information" •in
the AM—100 documentation packet.J
8.1
THE CONTENTS OF A COMMAND FILE
A command file can contain any commands or data that you
might
enter
from
the keyboard; the file can even contain the name of another command file.
AMOS
continues to read lines of text from the command tile untiL the end of
the tile.
You may run and exit programs, supply data to programs or perform
system functions, all under the control of a single command file.
COMMAND FILES AND DO FILES
As
example,
an
let's
say
Page 8—3
that you have a BASIC program that you want to
edit, compile and then test. Suppose that you also want to delete the
backup file created by the editor. You might want to create a small command
file to perform these functions:
VUE AVRAGE.BAS
COMPIL AVRAGE
RUN AVRAGE
3
12
7
ERASE *.BAK
tirst line of the command tile (:1) ensures that you see the lines of
text in the command tile as AMOS processes them.
The
next line (VUE
AVRAGE.BAS)
invokes the text editor, VUE, and tells VUE that you want to
The
edit the BASIC source program named AVRAGE. After you make some changes to
the program, you leave VUE by using the VUE exit command. Now AMOS again
begins to read its instructions from your command file.
You are again at AMOS command Level, and the next line of the command file
tells AMOS to bring in the BASIC compiler and compile the BASIC program.
The compiler produces a new tiLe named AVRAGE.RUN (the compiled version of
your original source program).
Line 4 of the command file tells AMOS to
execute AVRAGE.RUN.
The next three Lines provide test data for the program, which asks for three
numbers.
Level.
The
final
When the BASIC program finishes, you
are
back
at
AMOS
command
command in the command fiLe telLs AMOS to erase all backup files
in your account.
8.1.1
Special Symbols in Command Files
Any command or data that you can enter from the keyboard is a Legal
eLement
of a command file. In addition to these elements, there are several special
symbols that appear only in command files (e.g., the :T symbol mentioned
above), and that are never seen or processed by programs other than AMOS.
If you use these symboLs, they MUST appear at the very beginning of a
command tile line.
:1
TRACE — To see the command tile Lines on your terminaL
screen as AMOS processes them, you must have a :T at the
top at your command file. (Sometimes itts useful to NOT
able to see the commands and data in a command file
as the tile is processed; in that case, Leave the :T out
be
of your file.)
A
:T
takes
precedence
symboLs that tollow it in the tiLe.
(Changed 15 October 1979)
over
any
:8
COMMAND FILES AND DO FILES
:5
SILENCE
—
Page 8—4
Use
a
:S symbol to suppress the display of
command file Lines as AMOS processes them.
:S
will have no effect if
(However,
a
:1 appears before it in the
command file.) Any program output generated while the
command
fiLe is in control also does not appear on your
a
terminal.
:R symbol to counteract a :S symbol. You
can use multiple :5 and :R symbols within one command
fiLe to aLlow the user of your command file to see some
program output and command file lines, but not others.
REVIVE — Use a
:<...>
MESSAGE — These symbols allow you
and
comments
to
include
within your command files.
messages
AMOS displays
your terminal
all characters within the <> symbols on
display when it reaches that point in the command file.
A command file message is not acted upon by AMOS or any
other program; AMOS displays command file messages
regardless of whether :S or :R symbols appear in the
command
file.
A message may be more than one line in
length; the end of the message is indicated by the >
symbol
and
not
a
RETURN.
characters on the line that
(NOTE:
AMOS ignores any
follow the end—of—message
that is, AMOS skips over any characters between
symbol;
a > and a RETURN.)
:1< symbol allows the user of your
to enter one Line of data or commands to
either AMOS or the program currently being executed.
When
it finds a :K symbol in your command file, AMOS
KEYBOARD INPUT — The
file
command
halts processing of the file until the user of your fiLe
enters a line of characters that end with
a RETURN.
CHARACTER — the semicolon symbol marks a comment
Line which is not processed, but is displayed with the
rest of the command file if a :T is present at the top
of
COMMENT
the file.
(Changed 15 October 1979)
COMMAND FILES AND DO FILES
Page 8—5
The
Below is a small command tile that uses some of these special symbols.
command
file BACKUP.CMD transfers copies of the .MAC files in account
DSKO:E300,1J to account DSK1:E300,5J, changes the extensions of the files in
DSKO:[300,5J to .OLD (to indicate inactive, archive fiLes), and then erases
all backup fiLes in DSKU:L300,1J:
:<THIS FILE TRANSFERS ACTIVE .MAC FILES FROM DSK1:[300,1J TO DSKO:E300,53
>
COPY DSK1:C300,5JDSKO:*.MACE300,1J
RENAME *.OLDDSK1:*.MAC[300,SJ
ANSWER Y OR N TO CONFIRM OR ABORT EACH ERASURE OF A .BAK FILE
>
ERASE DSKO:*.BAK[300,1J/QUERY
C
IF YOU WISH TO SEE THE DIRECTORY FOR ACCOUNT DSK1 :E300,5], TYPE A 'RETURN';
OTHERWISE, TYPE A CONTROL—C.
>
DIR DSK1:E300,5J
Unlike
our
previous exampLes, the command fiLe above does NOT start with a
:T; that means that the user of the file sees dnly the command file messages
(those characters encLosed with
until the point in the command fiLe
(The :R a Ilows the user to see the output of the
where the :R appears.
ERASE and DIR programs.) The :K near the end of the file aLlows the user of
your command fiLe to abort the use of the command fiLe by typing a
ControL—C.
8.2
A
DO FILES
very
special
type
of command tile that a'Llows you to pass arguments to
that file is called a DO file (and has a .DO extension).
A DO file contains exactly the same type of elements as a reguLar command
file (including the special symbols mentioned above), but also incLudes some
additional symbols that allow you to specify items of text to be substituted
into the command file at the time that you invoke the file. (These
additional parameter symbols are: $O,$1,$2
$9.) Because you can pass
text items to a DO fiLe, you can use DO files in many different situations
in which a regular command file would be too specific.
You may
For example, suppose you are working on a set of BASIC programs.
enter the same commands every time you test a new program. Still, you can't
use a standard command file because you do not know beforehand what the name
of your BASIC program is going to be. Create a command fiLe with the .DO
extension, and place one of the parameter symbols (SO) in the file where you
want to be able to substitute in the BASIC program name:
COMMAND FILES AND DO FILES
Page 8—6
:1
:< DO FILE TO COMPILE AND RUN BASIC PROGRAMS.
>
I
;
Erase whatever's in my memory partition.
DEL *.*
F
; Load in BASIC subroutines
LOAD DSKO:XLOCK.SBR[7,6J
LOAD DSKO:BASORT.SBRC7,6J
LOAD DSKO:XMOUNT.SBRC7,6J
we'll need.
; Compile and run the BASIC program
COMPIL $O.BAS
RUN $O.RUN
; Get rid of any backup fiLes in the account.
ERASE *.BAK
; Clean up memory partition again.
DEL *.*
If the DO file above is named TEST.DO, then we can invoke it by entering the
name of the file at AMOS command level aLong with the item of text we want
to substitute into the fiLe for the $0 symbol:
JEST CANCEL
As AMOS processes the file above, you see the DO file on the screen.
The
tines in the file that contain the parameter symbol $0, now contain the
argument you specified when invoking the DO file:
; Compi le and run the BASIC program
COMPIL CANCEL.BAS
RUN CANCEL.RLJN
8.2.1
Building and Invoking DO FiLes
Create a DO file by using one of the text editors to build a text file with
the .DO extension.
The file may contain up to ten different user—defined
parameters (indicated by the parameter symboLs $O—$9).
When you enter the name of the DO file at AMOS command level, you also
include an argument list, the items of which wilL be substituted for the
parameter symbols in the DO file. The items in the argument list are
separated by blanks. (To include a blank within an argument, enclose the
argument within <> symbols—— e.g., <argument #2>.)
COMMAND FILES AND DO FILES
Page 8—7
Each parameter symbol becomes associated with one of the argument list items
(the first item with parameter $0, the second item with parameter $1, and so
on).
For example:
TXTMFT $0
PRINT $1
DIR $2
If we invoke this DO file in the folLowing way:
.DOC PSTINV.TXT PSTINV.LST PSTINV.*
the $0 becomes associated with PSTINV.TXT, the $1 becomes associated with
PSTINV.LST and $2 becomes associated with PSTINV.*. the DO file above
becomes transformed into:
TXTFMT PSTINV.TXT
PRINT PSTINV.LST
DIR PSTINV.*
You can use a parameter symbol to represent an entire fitespec, a portion of
a filespec, a command or any other piece of text inside a DO command file.
For example:
:T
$0
TXTFMT AMS$1 :$2.,TXT
PRINT AMS$1:$2.LST
DIR AMS$1:$2.*
when invoked with:
.FORM <FILE IS PSTINV> 2 PSTINV
is transformed into:
:1
;FILE IS PSTINV
TXTFMT AMSZ:PSTINV.TXT
PRINT AMS2:PSTINV.LST
DIR AMS2:PSTINV.,*
If
in your argument list than there are parameter
symbols in the DO file, the extra items are ignored. If you have fewer
items in your argument list than there are parameter symbols, the extra
parameters are ignored. Argument list items are associated with parameter
symbols NOT in the order that the parameter symbols appear in the file, but
in the order in which the parameter symbols are numbered.
(That is, the
first item in the argument list is associated with parameter $0, even if
parameter $2 appears before $0 in the DO file.)
you
have
more
items
Page 88
COMMAND FILES AND DO FILES
8.2.2
Special Parameter SymboLs
In addition to the usuaL DO file parameter symbols, four special parameter
symbols allow you to use DO files in a more flexible way and for a greater
range of applications.
that the
currentLy logged into. For
example, if the user of your DO file is logged into an
account on DSKU: at the time that he or she uses your DO
CURRENT DEVICE SYMBOL — Represents the device
user
of
the
DO
file
is
file, the Line in the DO file:
LOG $:E1,4J
is transformed into:
LOG DSKO: £1,4J
can use this symbol in combination with the Current
PPN Symbol (below) to keep track of the current account
You
device of the user of your DO file; the DO file can
log the user into another account to perform special
functions, and then return him to his own account and
and
devi ce.
the account that the
is currently logged into. For
example, if the user of your DO file is logged into
account £230,5J, the DO file statement:
CURRENT PPN SYMBOL — Represents
user
of
the
file
DO
DIR DSKO:[$pJ
is transformed into:
DIR DSKO:[230,5J
$
NULL
PARAMETER
SYMBOL
—
A
single $ indicates a null
in a default parameter list
or a null
argument in an argument list. This symbol allows you to
designate which parameter will be associated with which
argument. Take a look at the example below for an idea
of how to use the $ symbol.
parameter
SD
PARAMETER
LIST — It you specify fewer items in
the argument list than there are parameter symbols in
DEFAULT
the DO
symbols.
file,
AMOS usually ignores the extra parameter
You can, however, supply a default argument
list that AMOS will use if you omit an argument list on
the DO tile command line, or if you do not supply a
complete
argument
list.
For
example,
the
ERASE
command's default extension is an empty extension.
You
can create your own ERASE command (in this case named
REMOVE) in which the default extension is *.
Page 8—9
COMMAND FILES AND DO FILES
SD $ .*
ERASE $O$i
So, if you invoke the DO file with an argument list
containing just a fiLename, you see something like this:
.REMOVE PSTINV
ERASE PSTINV.*
NOTE:
If
a $D line appears in your DO fiLe, it MUST be
the first Line of the file (even before a :T symboL).
8.2.3
SAMPLE DO FILES
Below are some examples of the kinds of DO files you can create to heLp you
perform frequently used sequences of commands. If you want aLL users on the
system to be abLe to share your command files and DO fiLes, have the System
Operator copy them over to the System Command File Library (DSKO:[2,2J).
TFORM.DO — You can use the text formatting program, TXTFMT, to
a
group of text files so that they form one document. If you aLways
format
begin the filespec list with the same file or files, a DO file can be
8.2.3.1
convenient:
:T
TXTFMT HEADER,PRPNOT,PRFACE,$O
For example, the DO file above tells TXTFMT to format a header file (HEADER)
that contains standard formatting information (page size, line size, etc.),
a file that contains an official proprietary notice (PRPNOT), and a fiLe
containing a standard preface (PRFACE). Let's say that these three fiLes
are always formatted in front of a document. You can call TFORM.DO with a
filespec that specifies the main body of the document:
.TFORM YEARLY
TXTFMT HEADER,PRPNOT,PRFACE,YEARLY
8.2.3.2
PRINTE.DO — When you are printing a long list of files (e.g., BASIC
it is often convenient to separate those files by sending a
programs),
form—feed character to the printer after each file that you print; then each
file begins at the top of a page.
COMMAND FILES AND DO FILES
Page 8—10
When you call PRINTE.DO, give it the filespec of the tile you want to print.
PRINTE prints the file, and then sends a form—feed character (FF.TXT) to the
pH nter.
PRINT $0
; FF.TXT is in System Command File Library
PRINT DSKO:FF.TXTC2,2J
FF.TXT is a text file that contains only one symbol—— a form—feed character.
To create FF.TXT, follow these steps:
1.
Type MAKE FF.TXT followed by a RETURN:
MAKE FF.TXT,
2.
Type EDIT FF.TXT followed by
a RETURN:
.EDIT FF.TXT
3.
Now you see the EDIT prompt: *. Type 121 followed by two Escapes.
(The two Escapes show up on the screen as two dollar signs):
S121$$
4.
Type an E followed by two Escapes (the EDIT exit command):
SE $$
5.
You
are
at
AMOS
command level again and you have just created
a
text file that contains a form—feed character. (The EDIT command
"121" told EDIT to I(nsert) the numerical data 12 into your file——
this happens to be the ASCII code for a form—feed.)
COMMAND FILES AND DO FILES
Page 8—11
8.2.3.3
BACKUP.DO —
This DO fiLe transfers backup copies of the specified
fiLes in account [200,13 from one disk cartridge (or fLoppy disk) to the
same account on another disk cartridge (or fLoppy disk):
$D *.*
; Check write operations and report disk errors
SET VERIFY
SET DSKERR
:<Backup Account [200,1J of Working Cartridge onto Archives Cartridge
>
LOG
DSK1:[200,1J
COPY DSKO:$O
; Copy specified fiLes in DSK1:[200,1] onto DSKO:
:<Change cartridge to Archives Cartridge; when ready, MOUNT——
MOUNT DSK1:
COPY
DSKO:$O
;
Copy specified files in DSKO:[200,1J to DSK1:[200,1J
:<Change cartridge back to Working Cartridge; when ready, MOUNT——
>
MOUNT DSK1:
:<Clear DSKO:
>
DSKO:*.*[200,1J
LOG $:[$pJ
; Return to previous account.
ERASE
8.2.3.4 WRITE.DO — Uses the COPY command to send a file to any printer
without using the PRINT command (i.e., without going through the Line
printer spooLer program).
WRITE.DO allows
you to send a file to any
terminal (including a printer) as long as that device has been defined on
the system as a terminal. The format with which you calL WRITE.DO is:
.WRITE FiLespec TO terminal—name
Argument #0 = Filespec, argument #1 = tTOIP
$D$ $ TRM6
; Send file
and
argument #2 = terminaL—name.
; The default terminal is TRM6
to designated terminal (or printer)
:T
COPY TRM:$2$0
NOTE:
Because
we
do not specify a parameter $1 in the DO file, the second
defined a default argument for
argument ("TO") is ignored.
We
have
parameter $2—— a terminal named TRM6:
(Changed 15 October 1979)
COMMAND FILES AND DO FILES
Page 8—12
.WRITE DSTRIB.BAS TO QUME
.COPY TRM:QUMEDSTRIB.BAS
DSTRIB.BAS to TRM:DSTRIB.BAS
Total of
1
file transferred
.WRITE CMPTX.RUN
.COPY TRM:TRM6=COMTX.RUN
COMTX.RUN to TRM:COMTX.RUN
Total of
1
file transferred
8.2.3.5 ASSMBL.DO —
three .MAC files:
Assemble, link and test a .PRG file whose source is in
:T
; AssembLe it.
MACRO SUIT
MACRO $1/I
MACRO $2/T
;
Link the three .OBJ files that result
LINK $O,$1,$2
;
Create symbol table file for the three .OBJ files
SYMBOL $O,$1,$2
;
Run the assembled and linked .PRG file
I
$0. PRG
To calL the DO file, supply an argument List containing the names
.MAC files:
.ASSMBL DCOPY1 DCOPY2 DCOPY3
(Changed 15 October 1979)
of
three
May 1980
a%lM-Oo1oo63
NEW CCI4MAND FILE AND DO FILE FEATURES
Command and DO files play an important part in extending the power and range
of the AMOS command language. This document describes several new features
and programs that greatly increase the flexibility of your
command
files.
Among other things, these new command file features allow you to: change the
command file
trace flag as many times as you wish within a command file;
conditionally transfer control to various portions of a command file based
on stether a specific file exists; and, exit a command file, perform various
AMOS commands, and then resume execution of that command file.
We also
describe several new AMOS level commands that are particularly
useful
as
command file elements.
For detailed information on the concepts of command files and DO files,
refer to Chapter 8, "Command Files and DO Files,"
in the AMOS
User's
Guide,
(DWM—OO100—35).
In brief, a command file is a special kind of text
file which can contain a series of AMOS commands, specifications of other
command files, test data, etc. Th execute all of the commands and data in a
DO file or a command file, just enter the name of the file
at AMOS command
level.
Command files are extremely useful for performing entire sequences
of commands that you use frequently (e.g., commands
that do disk backup or
that compile a series of BASIC programs).
DO files are a type of command file that allow you to specify arguments that
are substituted into the DO file where special parameter symbols appear.
This allows you to use one DO file with a wide range of files
or programs.
Since DO files are just one type of command file, when we mention "command
files"
in the rest of this document, we will be talking about both standard
command files and DO files.
Special symbols may appear in command files that allow you to ask the user
of the file for input and to display messages to that user.
In addition,
you may use the :T, :S and :R symbols to choose whether or not users of the
comand file see program output that result from the actions of your command
file.
Except for these special symbols, when AMOS processes a command file,
it treats most of the elements of the file as if you were entering each
command file line from a terminal, line by line.
For more information on any command discussed below,
refer to the reference
sheet for that command in the ujx]ate package Change Page Packet #1 for
the
"AMDS System Commands Reference Manual", (DWM—OOlOO—62).
(NOTE: Check your
copy of the AMOS System Commands Reference Manual,
title
the
page of that manual
says "Revision
contents of Change Page Packet #1.)
(DWM—OOlOO—49);
if the
AOl," your manual already contains
wa caitic FILE
1.0
AND IY) FILE FEATURES
Page 2
THE CGIMAND FILE TRACE FLAG (:T AND TRACE)
Command files have always allowed you to choose whether or not the
your
user of
command file sees the contents of the file while it is being processed
by AMOS. AMOS checks the status of the command file "trace
flag"
to
determine whether or not to display the contents of the command file. Until
the advent of the TRACE command, the only way to affect the trace flag was
by including the :T symbol at the place in the command file where you wanted
users to see command file contents. The main disadvantage to this was
that
you could only use the
:T symbol
once to turn the trace flag on in a
command file, and then could not turn it off again.
(Of
course,
if you
wanted the trace flag off, you could simply omit the :T from the
command
file.)
NOTE: When the trace flag is off, you can still allow users to see program
output and messages by use of the special :5, :R, and :<> symbols; however,
they will not see coimtents or command lines in the command file.
For
example, if the line:
ERASE *BA}(
appears in the command file when the trace flag is off, if no :R precedes
the command line, the user of the file does not see the command line OR the
information output by the ERASE program.
If a :R precedes the command line
and trace flag is off, the user does not see the command line, but does see
the output produced by ERASE.
1.1
The TRACE Command
The TRACE command allows you to turn the
trace flag on or off at any point
within the command file as many times as you wish. You may also use TRACE
to switch the current state of the trace flag,
regardless of whether it is
on or off. You may only use TRACE in a command file.
lb use TRACE, enter it in your command file in one of
formats:
TRACE
ON
the
following
three
Turns
the command file trace flag CE. Users see all of
contents of your command file, including comments and
all program command lines. :5 and :R are ignored when
the
TRACE ON is
TRACE OFF
in effect.
the command file trace flag OFF. Users see only
messages enclosed with the :<> symbols. If you include
the :R symbol, users also see program output. (The :S
symbol turns off the :R symbol.) (NOTE: :5 and :R work
with TRACE OFF as if no TRACE or no :T were in the
Turns
command file.)
TRACE S41'ICH
Switches
flag.
vice
the current status of the command file trace
If the flag is OFF, this command turns it CE and
versa.
NEW CCMMAND FILE AND CO FILE FEATURES
Page 3
If
you do not include an argument on the TRACE command
the command.
As an example of the
that does disk backup:
use
line,
AMOS
ignores
of the TRACE command, let's create a command file
Command file to backup }ThWK System Disk onto another disk.
TRACE OFF
LOG DSKO:l,2
:C
Make sure nobody else is running on CS}CO: or your backup disk.>
ERASE *BAK[]
DIRSEQ
TRACE ON
DSKCPY
DSKO:
LSKl:
:C
All done.
Remove cartridge and label it.>
The TRACE OFF makes sure that
the user won't have to see the cleanup
functions we perform.
(The user still sees those messages bracketed by the
:C> symbols.) The TRACE ON ensures that the user will see that we are
running the CSKCPY program.
2.0
LOOKING UP FILES FRQ'1 WITHIN A CQ.IMAND FILE (LOOKUP)
are many occasions when a command line in a command file causes AMOS
to search for a file.
If AMOS fails to find the specified file, execution
of the command file does not abort, but continues even though the necessary
There
file was not found. Sometimes this can be a severe inconvenience if several
subsequent
command lines assume that the nonexistent file exists.
2.1
The LOOKIJP Command
allows you to search for a file from within a command
then to perform several actions based on the results of that
The LOCKUP command
file,
search.
and
If a file is not found,
you may resume execution of the command
file at the command line following the lookup, or you may cause the command
file to terminate execution.
You may also choose whether to display your
own error message or a standard AMOS error message if the file is not found.
By
using LOOKUP in combination with the GO'O command, you can choose which
of the command file to execute based on the
of the
lookup.
This allows you to perform conditional branching within a command
portions
results
file
file.
You may only use the LOCKUP command within a command file. 'lb use
enter
into your command file in one of the following.formats:
it
LOOKUP,
NEW CCIIMAND FILE AND W FILE FEATURES
where
LOOKUP Fspec
for.
Fspec
the
Page 4
specifies the file you want to search
file is found, LOOKUP
continues
execution of the command file; if it is not found,
LOOKUP displays the appropriate N4c6 error message
(e.g.,
?Cannot OPEN STDMDD.BAD —
not found),
and returns the user of the command file to AMOS
command level.
If
file
LOCKUP Fspec Msg
where Fspec specifies the file you want to search
for, and Msg is a message supplied by you.
If
the
file is found,
LOCKUP just continues execution of
the command file.
If the file is not found, LOOKUP
displays your message (instead of the appropriate
AMOS error message) and returns the user of the
command file to AMOS command level.
LOOKUP Fspec/
where Fspec specifies the file you want to search
for, and the "/" symbol tells LUOKUP not to abort
command file execution if the file is not found.
If
the file is found, LOOKUP skips over the next line
in the command file and resunes execution at the
line past it.
If the file is not found, LOOKUP
continues execution at the next line after the
LOOKUP command, and displays the appropriate AMOS
error message.
LOOKTJP Fspec/Msg
where Fspec specifies the file you want to search
for,
LOOKUP not to abort command file
"/"
execution
paragraph
tells
if
the
file is
not found
(see
the
above), and Msg is a message supplied by
you. If the file is found, LOCKUP skips over the
next line in the command file and resumes execution
at the line past it.
If
the file is not found,
LOOKUP resumes execution at the next line in the
command
and displays the specified message.
(If
you include both the "/" symbol and a message,
the message must follow the slash on the LOOKUP
file,
command line.)
If
you omit
portions of the file specification, LOOKUP assumes the device
command file is logged into and a .PRG
and account the user of the
extension.
The
LOCKUP
ti/n
option becomes especially useful when
you use the GOTO and
EXIT statanents to select certain portions of the command
file to be
executed as a result of the LOCKUP operation.
(See Section 4.0,
"Transferring Control Within a Command File (GOTO, EXIT)," for an example of
conditional branching within a command file.)
an example of the use of the LOCKUP command, let's create a DO file that
installs a BASIC program into an account.
(The user of the IX) file provides
the name of the program to install as an argument
he or she invokes the
DO file. This argument gets substituted into thewhen
DO
file
for the $0 symbol,
which is a special DO file parameter symbol.)
As
Nfl COIMAND FILE AND DO FILE FEATURES
Page 5
Command file to install $O.BAS from project library account
into the account user is logged into.
LOOKUP $O.BAS[300,O] ?That BASIC program doesn't exist. Try again.
COPY =[300,O]$O.BAS
I
TRACE ON
C4PIL $O.BAS
RUN $0.RUN
If
the user of the DO file doesn't specify an argument, or gives an
incorrect file specification, the LOOKUP ccatimand above catches it and ends
command file execution.
The
NOTE:
command file above provides a good example of why you
often need
check to see if a proper file specification has been given. If the
example above did not use the LOOKUP command, and if the user of the command
file supplied no argument at all (thus causing a space to be substituted for
the $0 symbol), the COPY command would copy PILL .RAS files from [300,0)
over to the account the user is logged into.
to
3.0
TEMPORARILY INTERRUPTING C4MAND FILE EXECIYION (PAUSE, CONT)
It would often be convenient to temporarily exit a command file, perform
various cleanup or housekeeping functions, and then resume use of the file.
The PAUSE and C4T commands allow you to do so.
The PAUSE command causes the temporary interruption in the execution of the
command file in which it appears.
You may then execute AMOS commands,
invoke other command files, use a text editor, etc. Th resume execution of
the command file, use the C4T command.
3.1
The PAUSE Command
You may only use PAUSE within a command file. Enter the PAUSE command in
your command file where you want to temporarily interrupt execution of the
file.
You may optionally include a message on the PAUSE
is displayed when the command file pauses. For example:
PAUSE
This
you
Type a
K; COPY old .BAS files to [40,1); type
is what happens
are using:
command line which
CT to resume backup
when a PAUSE statement is processed in a
command
file
1.
If a message has been included on the PAUSE command line,
PAUSE displays that message to you.
2.
Whether or not it has displayed a message, PAUSE now stops
and waits for you to type a character.
If you type a RETURN,
PAUSE
resumes execution of
the command file.
If yoU type
NEW CGIMAND FILE AND DC) FILE FEATURES
anything but a RETURN,
level.
3.
PAUSE
Page 6
returns
you
to
AMOS
command
Cnce PAUSE returns you to AMOS command level, you can now run
any programs or command files you want. 'lb resume execution
of the command file (at the int after the PAUSE command),
just type CONT at AMOS command level. (The CONT command may
also appear within a command file.)
When PAUSE interrupts execution of a comitand file, it saves the elements of
the command file past the PAUSE command line in a special disk file named
CNT.CMD.
(This file appears in the device and account the user of the
command file is logged into.) When you use the CCUT command, it loads into
your memory partition the CYP.CMD file that is in your account and resumes
executing that command file.
(This means,
of course, that to resume
execution of a PAUSE'd command file, the user of the file must be logged
into
the device and account where the comittand
was originally
interrupted.) The OJT.CMD file always contains the most current
command file
that has been PAWE'd in that account. For example, if you use a command
file that is interrupted because of a PAUSE command, the
is stored as CNT.G4D in your account. If, after performing various
commands, you do not use a CONT command before invoking another command file
that also uses PAUSE to interrupt execution, the contents ofcNT.cMD (the
first command file) are replaced by the contents of the second command file.
If you use the CaNT command now, you resume execution of the second
command
not the first.
When a second PAUSE causes the current contents of
GJT.O4D to be written over (because a CaNT has not been used to resume
execution of the previous command file), you see the following message:
file
rest of that file
file,
%Supersedes existing file
No harm is done if you do not resline command file execution by using a CONT
command before another PAUSE command occurs, but you do lose the previous
contents of CNT.CMD when the new command file replaces them.
NEW CCt4MND FILE AND W FILE FEATURES
Page 7
As an example of the use of PAUSE, let's create a command file that performs
"housekeeping" functions on a disk:
This
command file cleans up the disk and performs a backup.
If disk labeled BACKUPA is in drive, type a RETURN; otherwise,
type anything else, go put pack in drive, and then type CONT
when you are ready to resune backup.>
I
PAUSE
Proper backup pack (DSR5:) is now in drive.
MOUNT CSK5:
:(
If you want to save everything on the disk, type a RETURN.
If there are any scratch files you don't want to save, type
anything but a RETURN.
Then erase your old, sirking files
from all accounts on the disk. Th restsne backup, type CCt4T.
>
PAUSE Enter a character:
Disk is ready to back up.
that does actual backup.
BACKUP
All done.
3.2
chain to another command file
You may remove BAUCUPA from drive.>
The CONT Command
If a command file has been tnporarily interrupted
as the result of a PAUSE
command (that is, if a CNT.CMD file appears in the account you are logged
into),
you may resune execution of that command file by using the CONT
command.
For example:
.CONT &E
If
there is a CNT.CMD file, CONT tells AMOS to process it. When the entire
command file has been processed, CONT erases the CNT.CMD file from the disk.
If no cNT.c74D file exists in the account, CONT displays,the message:
?Can't continue
and you are returned to N4C6 command level.
N CC4MAND FILE AND W FILE FEATURES
4.0
Page 8
TRANSFERRING CONTROL WITHIN A CCtIMAND FILE (GOTO, EXIT)
Since the LOCKUP command allows you to choose which line of a command file
to execute, it now becomes possible to use a transfer command, GOTO, to
select which portion of a command file to execute based on the results of a
file lookup. Used in combination with one another, the GOTO, EXIT, and
LOOKUP commands allow your command files to perform conditional branching.
4.1
The GOTO Command
You may only use the GCTO command within a command file.
allows you to transfer control from one portion of your
The GOTO command
command
to
file
another.
The GOTO command line must contain both the GOTO command and an
argument which is the name of the label to branch to. For example:
Command file to compile BASIC programs.
LOCKUP TAXTBL.BAS/?Couldn't find file.
caro NOFILE
Are you in right account?
If file not found, go to NOFILE.
I
TRACE ON
CQIPIL TAXTBL.BAS
RUN TAXTBL.RUN
EXIT That's all...Peturning
you to AMCS command level*
I
;NOFILE
We're going to enter WE so you can create TAXTBL.BAS.
an X if you don't want to create the file; otherwise,>
Type
PAUSE Hit RETURN when ready:
WE
TAXTBL.BAS
Y
In the example above, the GOTO command line contains the argument NOFILE.
is the label of the portion of the command file to which the GOTO
NOFILE
command transfers control.
There are some conventions you must follow in setting up a
argument,
the label that designates the portion of the command fileits
to
which you want to transfer.
and
1.
GOTOS must precede the labels
they branch to.
statanents may only transfer forward in the file.
That
GOTO,
is,
GOTO
NEW CaIMAND FILE ANt) DO FILE FEATURES
2.
Page 9
argument may not contain trailing spaces. That is, the end of
argument must be either a RETURN or a semicolon (which
An
an
identifies the start of a comment). That means that if you include
comment
a
the
3.
on
argument.
the GO'TO command line, it
must begin directly after
The command file label may either be a comment (that is, begin with
a semicolon) or a valid, executable command file element.
a.
If a label is a comment, the argument in the GOTO
that
refers to the label must riot begin
(See the sample command file above.)
command
line
a semicolon.
If a label is not a comment, it must be a valid command file
element
(e.g., a
program name, a command file specification,
etc.).
b.
If
with
the GOtO statement directs you to a label that is not
a
comment
or a valid command file element, the command file resumes execution
after the label.
4.
You may begin
by a semicolon.
a label with spaces, a semicolon, or
(There may be no spaces between
a
spaces followed
semicolon and
the rest of the label.) These are ignored when Gait compares an
argument to the label it selects.
5.
Labels may be of any length (as long as they fit on one line),
must be the only thing on the line.
and
If GOit cannot find the specified label, the user of the command file sees:
?Label not found
and is returned to N4CE command level.
4.2
The EXIT Command
Whenever you create conditional branches within a command file, you face the
problem of separating portions of the command file so that users not
transferred to a labeled portion, do not "fall into" that section of the
command
as they proceed through the file. The EXIT statement allows
file
you to create one or more points in the file which cause
gracefully
the
user
to
be returned to AMOS command level. You may only use EXIT
a command file. The sample command file above demonstrates the use ofwithin
the
EXIT
statement. As another example, consider the DO file below, which does
different things with a file, based on the extension of that file:
N4 CavIMAND FILE AND DO FILE FEATIJRES
Page
10
Command file that handles text files.
If file .TXT file, format it.
LOOKUP $0.TXT/?ncjt .TXT file
GUIt NOTTXT
TRACE ON
TXTFMT $0.TXT
TRACE OFF
;
;NOTTXT
Is it .LST file?
LOOKUP $0. LST/?not . LIST
GOTO NOTLST
file
PRINT $O.LST
EXIT *Your file is formatted and the .LST version is printed.*
I
;NOTLST
EXIT ?Couldn't find a .TXT or .LST file of that name.
5.0
ADDITIONAL USEFUL CCMMANE (BATCH, CCt4)
In addition to the commands
discussed above, t* other new commands exist
that are particularly helpfulwewhen
used within command files. You may also
use these commands at NICS command level.
5.1
The BATCH Command
command file executes faster if the programs it accesses
are already
loaded into memory when that command file needs than. The BATCH
command
loads into your memory partition programs that are frequently used
making use of the new command file features (GOlD, LOOKUP, EXIT, when
A
PAISE,
and
LaZe).
(NOTE:
GDTO,
LOOKUP,
EXIT,
TRACE,
TRACE,
and
PAI.SE are
re—entrant, and may be placed into system memory by the System Operator.) If
level,
you will want to put BATCH at the front of the command file. BATCH takes
up
about 1K of your memory partition. 'lb use BATCH, enter the command followed
you use BATCH from within a command file rather than at AMCS command
by a RETURN:
.BATCH@D
5.2 The CCtI Command
cas coir,nand processes a file based on its extension.
'lb use the
command, enter CGI followed by the name of the file you want to affect.
You may not include the extension of the file. In addition, the
file must
appear within the account you are logged into,
but
you
may
specify a
different device. Fbr example:
The
.Ca4 STD1: P*14fl,JU E
NEW CCtVIMP,ND
FILE AND DO FILE FEATURES
Page
11
Ca.! begins looking for the disk file in this order:
1.
.MAC file? Then assemble with MACRO.
2.
.BAS file? Then compile with BASIC.
3.
.PAS file? Then compile with PRUN CC?4PILR.
4.
.TXT file? Then format with TXTFMT.
If you omit portions of the file specification, CQI assunes the account and
device you are logged into.
(Of course, if CG4 is used within a command
file, cai uses the account and device of the user of the command file as the
defaults.)
CHAPTER 9
THE WILDCARD FILE COMMANDS
This
chapter
and
the
next
describe
the commands that you wiLl use most
frequentLy in handling files. There are other file commands that we do not
discuss in this manual; you will find a list of ALL of the commands you can
use on files in the "AMOS System Commands Reference Sheets." For now, just
remember that there are several programs not discussed in this manual that
help you to create and access files; for an introduction to those programs,
see the manual titled "Introduction to AMOS."
9.1
INTRODUCTION TO WILDCARD FILE COMMANDS
This chapter describes five of the commands that you can use on tiles: COPY,
DIR, ERASE, PRINT and RENAME.
We have grouped these commands apart from the
of the file commands because of the special abilities they share; even
though these five commands perform very different functions, they have in
rest
common
an advanced ability to recognize wiidcard file specifications that
allows them to process file specifications differently than do the rest of
the commands on the system.
In honor of their special talent for using
wildcards, we have named these commands "wiLdcard file commands."
In addition to their own functions, several of these commands also allow you
to perform the same functions as other system commands (with the added
benefit of sophisticated file specification wildcarding). Refer to the
sections in the documentation for each command that discuss theuse of that
command and ersatz and special devices for more information on these special
functions.
We
have
already
discussed
the
wildcard
symbols * and ? (see Chapter 6,
Identifying a File to AMOS). A specification that contains a wildcard
symbol can represent more than one file (e.g., *.TXT may represent the files
FEB.TXT and MARCH.TXT).
Wildcard file commands process the
wildcard symbols * and ? somewhat differently than do other commands, and
they have other wildcarding abilities that the other commands lack. As the
JAN.TXT,
system evolves in the future, you will probably begin to see more commands
file specifications in the same way as the current wildcard file
processing
commands.
THE WILDCARD FILE COMMANDS
Page 9—2
Before discussing each of the commands in detail, we'd like to present a
few of the basic rules that
all wildcard file commands follow when
processing a command line.
9.1.1
Wildcard Symbols
The wildcard file commands recognize the following wildcard symbols in
specifications (see HINTS AND RESTRICTIONS, below):
*
Matches
any
symbol
file
or symbols in a filename, extension or
PPN (e.g., GL*.TXT matches the files GLDGR.TXT, 6L2.TXT, and
GLOW1 .TXT, because it selects all .TXT files whose names
begin with GL).
7
Matches
any one symbol
in a filename, extension or PPN
PAY?LL.ENX matches PAYRLL.FNX,
PAY2LL.FNX,
and
PAYTLL.FNX, because it selects all files whose names begin
(e.g.,
with the three letters "PAY," and that have the
sixth letters "LL").
ALL:
dev:
Matches
any
fiLe—structured,
mounted
ALL:PRE$R.BAS
matches
the
files
AMS1:PRESR.BAS, and STD1:PRESR.BAS).
Matches
you omit
fifth
device
and
(e.g.,
DSKU:PRESR.BAS,
unit of a file—structured, mounted device. If
unit number from a device specification,
file commands look for the specified
files on aLL
any
wildcard
the
logical units of that device.
[3
Matches any PPN
WRK1.BA5E23,4J,
(e.g., WRK1.BAS[J matches the
WRK1 .BAS[11O,4J
and
WRK1 .BAS[100,3J).
files
Equivalent to [*,*J
Throughout this chapter we'll be showing examples\ of the use of these
wildcard symbols in the discussions of the specific wildcard file commands.
HINTS AND RESTRICTIONS:
addition to the restrictions mentioned in Section 6.2, Witdcard Symbols,
there are some minor restrictions on the use of the above wildcard symbols:
In
1.
When you use the * symbol in a PPN, you may either use the symbol
to represent the entire project or programmer number (e.g., E*,21J,
[100,*J), or you may folLow the symbol with one or more numbers
(e.g., C*2O,34J,[15O,*5])_ You may NOT place numbers before the
symbol (e.g., [34*,5J) Examples of wildcard PPNs:
Page 9—3
THE WILDCARD FILE COMMANDS
2.
21J
matches
WATCH.LSPC100,21J, WATCH.LSPL23O,21J
WLDCRD.TXTE22O,*J
matches
WLDCRD.TXTL22O,4J, WLDCRD.IXTE22O,57J
SYSTM1 .FD[*1,5J
matches
SYSTM1.FD[1,5J, SYSTM1.FDE3O1,5J
WA IC H . LSP
If
?s
appear
at
number, that many or
the
beginning
of
a PPN project or programmer
will
(For example,
match.
any tiles named PROJCT.CMD in accounts
whose project numbers end with 1 and are one two or three digits
PROJCT.CMDE??1,??J
FEWER
numbers
matches
long, and whose programmer numbers are one or two digits long.) If
appear at the end or •in the middLe of a PPN project or
?s
programmer number (e.g., E1?O,2??J), EXACTLY that many numbers
match the 7 symbols.
9.1.2
may
Input File Specifications
filespecs (or infilespecs) are tile specifications that seLect the
tiles on which you want a command to take action. For example, let's say
Input
that you want to erase several files:
.ERASE DSKO:MCSAM.RUN,DSK1 :MCELI.RUN
fiLespecs DSKO:MCSAM.RlJN and DSK1:MCELI.RUN are the infilespecs in the
command Line above. When you use wildcard symbols in an infilespec, you are
The
asking one filespec to select a group of
above, we might have said:
files.
Instead
of
the
example
.ERASE DSK:MC*..RUN
command above selects aLL files whose names begin with MC, that have an
extension of .RUN and which exist in the account you are currently logged
into on ALL units of device DSK:.
The
INFILESPEC DEVICE AND ACCOUNT DEFAULTS:
If
you
compLetely
omit
account and device specifications from a group of
infilespecs, wiLdcard file commands use as their initial default the account
and device you are current Ly logged into. Unlike other AMOS commands, these
commands also allow you to set those defaults. That is, you can set the
account and device defauLts for a specific group of infilespecs. If you
omit those specifications, the command will use the defaults that you have
set.
1.
you include a device specification in an infilespec, you
set the default device for the rest of that command line. For
Whenever
example, let's assume that you are Logged into an account on DSKO:.
SPIR RESRCH.DAT,AMS1:CURVES.RUN,MAXWLL.RUN
THE WILDCARD FILE COMMANDS
Page 9—4
The example above looks for RESRCH.DAT on DSKCJ: (the initial device
default), and then looks for CURVES.RUN on device AMS1:. The
default device now becomes AMS1:, so DIR looks
AMS1:
well.
as
for MAXWLL.RUN on
To return the device default to DSKO:, you must
explicitly tell DIR to Look for a file on that device (i.e., in the
example above, to reset the default device
to the initial default,
you must change MAXWLL.RUN to DSKO:MAXWLL.RUN).
2.
To
set
the
infilespec.
default account,
For example:
place
the
PPN at the front of an
.DIR LAWYER.LSP,E120,34JOFFICE.BAS,LAWDOC.TXTOFFICERUNE23O1J
The initial default is the account you are logged into. We reset
the default account to [120,34J by placing that PPN in front of a
filespec ([120,34JOFFICE.BAS).
for
any
Now DIR searches
in
that
account
of the tiles on the rest of the command line for which
we
have omitted a PPN (in this case, LAWDOC.TXT). You can reset the
account default to ALL accounts by using the wildcard PPN symbol,
0.
3.
If an infilespec does not specify a PPN project or programmer
(e.g., L,12J, E300,J), the wiLdcard file commands use the
number
current default project or programmer number.
This exampLe:
.ERASE [12,34JMTST.MAC,MTST.OBJE,35J,E11O,2JTNK.BAS,TNK.R2[,SJQ
evaluates to:
.ERASE MTST.MACE12,34J,MTST.OBJC1Z,353,TNK.BASE11O,2J,TNK R2L110 5J
That is, since we have omitted-the project number for MTST.OBJ and
TNK.R2, the ERASE command substitutes in the current default
project number at those places in the command line.
4.
The wildcard file commands aLl have one or more switches that you
can use to select command options. For example, when you use the
/QUERY switch with the ERASE command (e.g., .ERASE/QUERY *.TXT),
that command- asks you to confirm its action before it erases each
file. See Section 9.1.4, Command Switches, for information on
switches and on setting the default switch for a command line.
9.1.3
-
Output File Specifications
Several of the wildcard file commands require that you supply an output file
specification (an outfilespec) as well as one or more infilespecs. While an
infilespec specifies a file on which a command is to act, an outfilespec
gives information to the command on HOW to act. For example, the RENAME
command
below renames the file ORDERS.DAT (the infilespec) to ARCVBL.DAT
(the outfilespec):
Page 9-5
THE WILDCARD FILE COMMANDS
.RENAME ARC VBL.DAT=ORDERS.DAT
The infilespec selects the file
tells
on
which
to
act
(ORDERS..DAT),
and
the
new name to give to the file. Outfilespecs
modify selected portions of infilespecs. In the case of the RENAME command
above, we replace the filename and extension of the infilespec with the
filename and extension of the outfiLespec.
outfiLespec
RENAME
the
When an outfilespec contains wildcard symbols, it only partialLy modifies
the infilespec; those portions of the infilespec that correspond to the
wildcard portions of the outfilespec are Left alone.
For example:
RENAME *.OLD=MACROS.NEW,WRKFIL.NEW
MACROS.NEW TO MACROS.OLD
WRKFIL.NEW TO WRKFIL.OLD
Total of 2 files renamed
In the example above, the filename portion of the outfilespec (*.OLD) is a
symbol.
The filenames of the infilespecs are left unchanged, and
only the extension is modified. We might have achieved the same effect by
using a wildcard infilespec to select the two input files MACROS.NEW and
witdcard
WRKFIL.NEW:
.RENAME *.OLD*.NEW
MACROS.NEW TO MACROS.OLD
WRKFIL.NEW TO WRKFIL.OLD
Total of 2 files renamed
Another exampLe of wildcard use in outfilespecs:
.RENAME GL*=*.AR
AR1FIL.AR TO GL1FIL.AR
AR2DAT.AR TO GL2DAT.AR
UNBILL.AR TO GLBILL.AR
Total of 3 files renamed
The example bove takes the files
seLected by the infilespec
replaces the first two Letters of the filename with GL.
9.1.4
*.AR,
and
Command Switches
witdcard file commands recognize a switch by the fact that it begins
with a slash (e.g., /14); switches may appear anywhere on the command line.
The
typical command switch might be /QUERY or /14, which tells the command to
ask for confirmation before it acts on each input file. You may include
A
more
than
one
with a slash:
switch on a command tine as tong as you precede each switch
.RENAME/QUERY/DELETE *.BAS*.B$1,*.352?
You may usually abbreviate switch names to just the
letters that
uniquely
THE WILDCARD FILE COMMANDS
Page 9—6
identify that switch.
For examp le, you may enter the /QUERY switch by
typing either /QUERY or IQ. For each switch there often exists another
switch of opposite action, identified by the prefix "NO": e.g., /DELETE and
/NODELETE, /QUERY and /NOQUERY.
Wildcard file commands
SWITCHES
and
FILE
use
two
SWITCHES.
different kinds of switches: OPERATION
An OPERATION SWITCH has the same effect no
matter where it appears on the command line, and it affects all filespecs on
that command Line:
.DIR/DATA *.TXT[,75J,SYNCH[,373 ;
has the same effect as:
.DIR *.TXTE,75J/DATA,SYNCHE,37J
A FILE SWITCH can appLy to only specific fiLespecs, depending on where it
appears on the command line. If a FILE SWITCH appears directly after the
command (e.g., .RENAME/Q *.MAC=*.TXT,*.MC1) then the switch applies to all
filespecs.
For example, the command below asks for confirmation before it
erases each of the files selected by the filespecs:
.ERASE/Q TYPSET.MAC,TYPSET.OBJ,*.SYM
If a FILE SWITCH appears directly after an infilespec, then it applies only
to the fiLes selected by that specification:
.ERASE WLDCRD.TXT,*.LST/Q,DATA.MAC ç)
only asks for confirmation before erasing files that match the specification
*.LST.
Refer to the documentation for the specific command
a switch is an OPERATION or a FILE SWITCH.
you are using to see if
To set the default switch for a command line, place the new default switch
in front of a fiLespec; that switch will become the default for the command
line until you reset the default by placing another switch in front of a
filespec.
(Placing a switch at the end of a filespec DOES NOT reset the
default switch.) For example, the ERASE command does not initially ask for
confirmation of erasures; that is, the default switch is /NOQUERY. The
command below begins with a default switch of /NOQUERY, resets the default
switch to /QIJERY, and then sets it back again
to /NOQUERY:
JfiRASE REDWNG.DAT,BLKBRD.*,/QUERY BLUBRD.*,ROBINI.*,/NOQUERY CANARY.RT,GNAT.*
4
THE WILDCARD FILE COMMANDS
9.1.5
Page 9—7
Ersatz Devices
Wildcard fiLe commands recognize both the standard system storage devices
(e.g., DSKO: and AMS1:) and the system special devices TRM: and MEM:.
(Check with your System Operator if you are unable to use TRM: or MEM:; he
or she wilL check to make sure that the programs TRM.DVR and MEM.DVR are in
account E1,oJ of the System Disk, and that TRM: and MEM: are defined system
devices.)
Aside from
the
special
devices
(which
many
components
of
the
system
recognize), there exists another class of device that only the wildcard file
commands and the LOG command rebognize—— the ersatz devices. The purpose of
the ersatz devices is to make it easier for you to specify the accounts you
use most frequently.
RES:
SYS:
specifies
specifies
DVR:
CMD:
HLP:
BOX:
LSP:
PAS:
BAS:
These devices are:
System Memory
DSKO:E1,43
DSKO:L1,oJ
DSKO:[2,2J
DSKO:C7,1J
DSKO: E7,2J
DSKO:E7,4J
DSKO:E7,5J
DSKO:E7,6J
DSKO:E7,7J
MAC:
System Program Library
Device Driver Library
Command File Library
Help FiLe Library
Mai Ibox Data File Library
LISP Language Library
Pascal Language Library
BASIC Language Library
MACRO Language Library
For example, .DIR SYS: is equivalent to .DIR DSKO:C1,4J. That is, by typing
.DIR SYS: you can see a directory display for account DSKO:E1,4J. .DIR RES:
gives a directory listing of the memory modules in system memory.
9.2
FINDING OUT WHAT FILES ARE ON THE DISK (DIR)
Every account has a directory which lists all of the files in that account.
will
probably use the DIR (Directory) command most often to find out
what fiLes are in your own account; you can also use the DIR command in
several different ways to gain information about accounts other than your
You
own, and to locate specific tiles by account.
COMMAND SYNTAX:
.DIR Clistfilespec=}{filespec1{,...fiLespecN}}{/switch{/switch}})
COMMAND DEFAULTS:
default listfiLespec is a filename and
extension
DIRECT.LST, and the account and device you are logged into.
The
The
default
of
tiLespec is a fiLename and extension of *.*, and the
device and account you are logged into.
The default switches are /WIDE:1/NOBASE.
THE WILDCARD FILE COMMANDS
Page 9—8
SPECIAL FUNCTIONS:
You can use DIR to perform the
SYSTEM
commands
(see Section
Devices).
9.2.1
functions as the MAP and
9.2.7, DIR and Special and Ersatz
same
Finding Out What Files Are in Your Account
(For the purposes of this example, let's say that you are
account [100,1] on DSK1:.) Type DIR followed by a RETURN:
logged
into
.DIRQ
SCHED
SCHED
SAK 14
PARINO
PARINO
TEST
BAS 8
DSK1:[100,1J
lxi 15
RUN 6
MAC 12
Total of 5 files in 55 blocks
(Remember that
you can use Control—S to freeze the screen display if you
have so many files in your account that DIR cannot list them all on one
screen—page. Use a Control—Q to release the screen display.)
directory you see is the directory of the account into which you are
currently logged. In this case, you see a list of all of the files in your
The
account.
right
of the display tells you which account directory you are
seeing (DSK1:[100,1J). The left hand of the display lists all of the files
The
hand
in the account by name, extension and size in blocks.
(Files are written to
One block is 512 bytes.) ihe last line of
the display tells you how many files are shown in the directory display, and
the
disk in units called blocks.
how many blocks on the disk are used by those files.
9.2.2
Finding Out What Files Are in an Account Other Than Your Own
To find out what files are in an account other than the one you are
currently logged into, you must tell DIR which account directory to display.
Type
DIR
followed
the
by
directory you want to see:
specification of the account or accounts whose
.DIR DSK0:E2OO,5J
TABLE
MAC
6
TREE
VECTR
LSP
10
MAC
8
DSKO:E200,5]
Total of 3 files in 24 blocks
If you specify just a PPN (that is, if you just type DIR [200,5]), DIR looks
for that account on the device you are currently logged into. If you
Page 99
THE WILDCARD FILE COMMANDS
specify
just the device (e.g.,DIR AMS1:), DIR searches that device for the
account you are currently logged into.
You may see directory listings for more than one account by foLlowing
DIR command with several account specifications, separated by commas:
the
.DIR AMS1: C56,1J, [1 20,5 3
FORMS
TXT
23
CLASS
BAS
10
AMS1:L5o,1J
Total of 2 files in
CHPTR1 TXT
33
blocks
AMS1:C120,5J
47
Grand total of 3 files in 80 disk blocks
If
more
than
one file is listed for each account, a message telLs you how
many files are in the directory listing for that account, and how many
disk
blocks ar e use d by those files. The last line of the display tells you the
number of files listed in the entire display, and how many blocks are used
by all of the files.
Since we left off filenames and extensions in the example above, DIR assumed
that we wanted directory displays for ALL files on disk AMS1: that belong to
the accounts E56,1J and E120,5J.
careful here. Remember that DIR is a wildcard fiLe command.
* Be
specifying
we have set the default device for the
By
device
AMS1:,
rest of the command line. That means that even if you are Logged
into DSKO:, the DIR command above looks for account E56,1J AND
account [120,5) on AMS1
If what you meant to say was, "Show me
all files in account E56,1J on AMS1:, and all files in account
C120,5J on the device I am currently Logged into," you must say:
.DIR AMS1:C56,1J,DSKO:[120,5J ?
where you explicitLy specify the
account E120,5J; or:
device
on
which
to
look
for
.DIR E120,5J,AMS1:[56,1Jt)
the default is set to AMS1: after DIR Looks for account
E120,5J on the device you are logged into.
where
9.2.3
DIR and WiLdcard Symbols
You can use the various wildcard device and account specification symbols to
For example, to
teLL DIR to dispLay directories for a group of accounts.
see displays of all accounts on a device, use the wildcard PPN symbol C]:
THE WILDCARD FILE COMMANDS
.DIR
DO
VUE
LOG
DSK1
HLP
HLP
HLP
Total of 3
PAGE
PAGE
HEADR
StAT
It4IT
[J
12
23
14
MAC
20
MAC
DSK1 : [100,2J
3
files in
PRG
Total of 3
Page 9—10
38
blocks
DSK1:[200,5J
7
files in
lxi
lxi
41
57
blocks
DSK1:[2b0,1OJ
2
Total of 2 files in 59 blocks
Grand total of 8 files in 138 disk blocks
You can also use wildcard symbols in the PPN speci fication (e.g., DIR E*,1OJ
or DIR [100,*J) to select all accounts with the same project or programmer
number. To see directory listings for a specific account located on all
disks, use the wildcard device symbol ALL: (e.g., DIR ALL:[300,1J),
or use a wildcarded unit specification (e.g., DIR DSK:[101,2J to select
mounted
DSKO: [101,2], DSK1 : E101,2J and DSK2: [101 ,2J).
9.2.3.1 Using DIR to Find Specific Files — You wi II find that DIR is very
usefuL for locating f iles (that is, finding out what account a specific file
belongs to), and for displaying a directory listing of only certain files in
an account.
Until now we've given DIR only the portions of file
specifications that identify accounts, and have thus asked DIR for a
directory Listing of ALL of the files in the a ccounts we have specified. By
including filenames and extensions, you can instruct DIR to list ONLY
certain files in the directory display. For example, if the BASIC program
APSBR.BAS exists in your account, you may ask f or a directory display that
lists only that file:
.DIR APSBR.BAS )
APSBR
BAS
23
AMS1:E156,3J
Total of 1 file in 23 blocks
This
may
not seem very useful in itself, until you consider the use of the
wildcard symbols in file specifications. By using wildcards, you can ask
DIR
for a listing of all files that have a specific extension or name. For
example:
.DIR *.BAS?
APSBR
ARSBR
GLSBR
BAS
BAS
BAS
DATAEN BAS
23
14
12
AMS1:[156,3J
7
Total of 4 files in 66
blocks
THE WILDCARD FILE COMMANDS
Page 9—11
In the example above, you have asked for a directory listing
tiles in your account.
all files that
have
of
alt
BASIC
You could just as easily have asked for a display of
a
five—character name that ends with SBR (e.g.,.DIR
??SBR), or all files that have names that begin with an A (e.g, .DIR A*).
(NOTE:
The defauLt
tilespec for DIR is *.* and the device and account you
are currently Logged into. Therefore, omitting a tile extension causes DIR
to use the default extension, *. In other words—— specifying .DIR A* is
equivalent to specifying .DIR A*.*.)
You can use the device wiLdcard symboLs when you want DIR to locate fiLes
for you.
For example, suppose you know that several accounts on DSK2:
contain some special text files; use the wildcard PPN symbol to find the
accounts where the tiles appear:
.L.DIR [ JDSK2 :OPSER
OPSER1 TXT 12
*. TXT, OPDOC*.TXT?
DSK2: [110.43
OPZER3 TXT 23
TotaL
of 2 fiLes in
OPSER2 TXT
S
TXT 25
OPDOC4 TXT 17
OPDOC1
35
blocks
DSK2:[11O,7J
DSK2:E100,353
Total of 2 fiLes in 42 bLocks
Grand total of 5 fiLes in 85 disk blocks
In the exampLe above, we set the default account to ALL accounts on DSK2: by
using the wildcard PPN symbol [J.
9.2.4
Creating a FiLe That Contains a Directory Listing
DIR, the name of the file you want to create, an equaL sign and the
specifications of the accounts for which you want a directory listing:
Type
SOIR MYFILS.LST=DSK1 : [255,12J
The example above creates a file named MYFILS.LST in the account you are
logged
into; this fiLe contains a listing of the directory for
DSK1:E255,12J. If you leave the command tine after the equaL sign blank
(e.g., LDIR MYFILS.L$1= ), DIR assumes you want a listing for the directory
of the account you are currently logged into. If you leave the area between
the DIR command and the equal sign blank, DIR creates a tistfile named
DIRECT.LST for you in your account.
(By implication, then, a command of
"DIR = " creates a file named DIRECT.LST that contains the directory listing
for the account and device you are currently logged into.)
THE WILDCARD FILE COMMANDS
Page 9—12
Experiment with using DIR to create a directory fiLe, and you will find that
you can create a file in any account within your own project (i.e., the PPN
of the account in which you are creating the fiLe and the PPN of the account
you
are logged into have the same project number).
The file you create may
contain a directory listing for ANY account, even those outside of your
project.
9.2.5
own
Printing a Directory Listing
To print a copy ofa directory Listing you can either: 1. create a file that
contains the directory Listing (see Section 9.2.4, above), and then print
that file using the PRINT command (see Section 9.6, Printing a File——
PRINT); or, 2. use the DIR command to directly send a directory Listing to a
pri nt.er.
To send a directory listing to a printer (or to any other kind of terminal),
enter:
.DIR TRM:printer—name={fi lespec}
where
"printer—name"
the Listing.
system
as
is the name of the terminal to which you wish to send
(If you specify a printer, the printer must be defined on the
terminal).
To see the names of the terminals defined on the
You will probably need to ask the
System Operator which of these terminaLs are printers.
a
system, type TRMDEF followed by a RETURN.
Let's say that the printer you want to use has been defined on the system as
To send to that printer a directory listing of all of the
terminal TERM6.
BASIC files in account [300,5], type:
.DIR TRM:TERM6=*.BASC300,5] ?
9.2.6
Selecting DIR Options
including one or more switches on the DIR command line, you may seLect
several of the DIR options. The switches are:
By
/DATA
or ID
Just Lists complete fiLespecs, one per Line.
IKILL
or 1K
Deletes and replaces existing listfiLe if
same specifications as your Listfilespec.
IWIDE
or 1W
Arranges directory Listing in four columns.
IWIDE:n or IW:n
Arranges directory Listing in n columns.
it
has
Page 9—13
THE WILDCARD FILE COMMANDS
/HASH
or
/H
Displays a hashmark for each file. (Ahashmark is
a computed value based on characteristics of the
tile.) Serves to help you distinguish between
different versions at the same file.
/BASE
or lB
/NOBASE or /NOB
/CONTIGUOUS
or /C
Displays the starting disk address
the tile.
(in octal)
of
Turns off the /BASE option.
DispLays a C next to the extension of a contiguous
Allows you to distinguish between random
tile.
(that is, contiguous) files and sequential files.
/FULL or IF
You
Gives you full range of information
as specifying /H/B/C.
options.
Same
may place more than one switch on a command line as long as you precede
each switch with a slash.
For example:
.DIR/H/W:2 E11O,2J
DATA OPTION: The ID switch tells DIR to list the complete file specification
for each file in the directory listing.
For example:
.DIR/D C130,1J,E130,5J ?
ANSi :COM.BASE13O,1J
AMSI:FF.CMDCI3O,13
AMS1 :INTRO.TXT[130,iJ
AMS1:AUGMNT.LSPE13O,1J
AMS1:START.EIAS[13O 5]
i1:COM.BAS[13O,5l
ANSI :COM.RUNE13O,5]
One fact that makes the ID switch of considerable use, is that a directory
listfile created while the ID switch is in effect, contains file
specifications in a form that is readable by BASIC. BASIC programs can
therefore read the listtile to gain a list of files to open for data
transfer.
The ID switch is an operation switch; it acts the same no matter
place it on the DIR command line.
where
you
.DIR/D C100,2],c11O,6J ?
produces the same directory listing as:
.DIR C100,2J/D,C1iO,6J?
KILL OPTION: If you use DIR to create a file containing a directory listing,
__________________________
Page 9—14
THE WILDCARD FILE COMMANDS
DIR
will not create the new file if a tile with the same specifications
already exists on the disk. Use the 1K switch to tell DIR to destroy any
existing file whose specifications match those of your new file.
.DIR/K ADIRCT.LST=[11O,4J?
The 1K switch is an operation switch.
OPTION:
As you increase the number of files in your account, you wilL
often find that a directory display overflows your screen. So that you can
inspect the listing at your leisure, you may either use ControLS and
WIDE
Control—Q, or you can use the 1W option.
The
1w: n
arrange your directory listing in several columns.
the number that follows the colon.) For example:
option tells DIR to
(The number of columns =
.DIR E100,1]Iw:2
AMSO:
c11J
MENU
BA
MDOC
TXT
15
43
FF
DO
1
S
ALOAD
SACCNT
BAS
BAS
20
14
Total of 5 files in 93 blocks
a
two—column directory display. If you omit the colon and number
after the 1W, DIR assumes that you want a directory listing of four coLumns.
(Four columns is the default because it makes for a nice screen display.)
produces
.DIR/W *.TXT?
DSK1: C11O,3J
HEADER
START
TXT
TXT
13
4
MINE
TEST
TXT
TXT
Total of S files in 73 blocks
12
2
INTRO
TURNI
TXT
TXT
8
OUTLIN
6
AFILE
TXT
TXT
23
5
The 1W switch is an operation switch.
HASH OPTION: It often happens that as you develop a program or a document,
have several different versions of the tile in various accounts. If
they are all named the same, how do you find a specific version (e.g., the
latest) of the file? One way is to keep track of the fiLes' hashmarks so
you
that you can tell them apart. A fiLe hashrnark is a value that is computed
based on characteristics of that file. No two files have the same hashmarks
unless those two files are identicaL; even a difference of one character
results in different hashmarks.
The /H option tells DIR to compute and display hashmarks for the files you
specify.
/H is a file switch, which means that where you place the switch
on the command line determines which files are affected by it.
To affect all of the files specified, place the /H switch directly after the
DIR command itself on the command line.
For example, the command line below
tells DIR to compute and display hashmarks for all of the files specified:
I
Page 9—15
THE WILDCARD FILE COMMANDS
£DIR/H SCAN.PRGL100,3J,SCAN.PRGE11O,5J,AMSQ:SCAN.PRGE12O,SJ
AMS1:E100,3J
604—027—223—636
PRG
12
SCAN
SCAN
PRG
13
650—353—035—656
AMS1:E110,5]
SCAN
PRG
21
355—642—671—471
AMSO: E120,53
Grand total of 3 files in 46 disk bLocks
for specific files, place the /14 switch after the
specifications of the tiLes for which you want hashmarks. For example, this
command
tells DIR to compute and display hashmarks for only the second of
To get
hashmarks
the fiLes specified:
.DIR SCAN.PRGE100,3],SCAN.PRGE11O,5J/H,AMSO:SCAN.PRG[120,53?
AMS1:E100,3J
12
PRG
SCAN
StAN
PRG
13
SCAN
PRG
21
650—353—035—656
AMS1:E110,5J
AMSO:E120,5J
Grand total of 3 fiLes in 46 disk bLocks
BASE OPTION: The /8 switch tells DIR to dispLay the base (starting) disk
If you use DIR to see information about
address of the selected files.
moduLes in memory (see Section 9.2.7, DIR and Special and Ersatz Devices),
the lB switch tells DIR to display the base memory addresses of the modules.
/8 switch is a file switch: its placement on the command line affects
which files it acts upon:
The
.DIR *.CMD,*.,PRG/B )
C
CMD
1
P1
CMD
1
LISP
PRG
33
DSKO:E102,1J
Total of 2 files in 2 blocks
4405
DSKO:E102,1J
Grand totaL of 3 files in 35 disk blocks
In the example above, the lB switch affects only
those
files selected
by
*.PRG
OPTION:
/NOB switch allows you to turn off the /8 switch. For
The
example, suppose that you want base disk addresses for every file specified
on the command
line but the last; follow the last filespec with a /NO8
NOBASE
switch (e.g., .DIRIB *.PRG,*.CMD,FREE.MAC/NOB).
Page 9—16
THE WILDCARD FILE COMMANDS
CONTIGUOUS OPTION: The IC switch allows you to determine which files listed
in your directory are contiguous (that is, random files), and which are
sequential tiles. (For information on sequential versus random tiles, see
the manual "Introduction to AMOS.") When the IC switch is in effect, DIR
places a "C" next to the extension ot each contiguous fiLe in the directory
display:
LR'C [255,13
DSK1:[255,1J
NORTH
PAGE
BAS
7
MAC
21
BDIR
DAT C 12
Total of 3 files in 40 blocks
In the exampLe above, the file BDIR.DAT is marked as a contiguous file.
IC switch is an operation switch.
FULL
OPTION:
information
full
/FULL switch gives you the
range
IF is equivalent to specifying
the
The
options.
/HASHIBASE/CONTIGUOUS.
/FULL is an operation switch:
of
The
the DIR
switches:
.DIR/FULL ?
MILAGE
MILAGE
BAS
RUN
7
3
01 5—41 0—51 4—370
DATA
WRK C
13
533—501—341—776
2320
2330
13624
250—240—447—745
Total at 3 fiLes in 33 bLocks
9.2.7
DSK3:C200,4J
DIR and Special and Ersatz Devices
recognizes the ersatz devices (see Section 9.1.5, Ersatz Devices). So
you can, for example, find out what files are in the BASIC Language Library
account (DSKO:[7,6J) by typing:
DIR
.DIR BAS:
DIR
also recognizes the special devices MEM: (user memory partition) and
RES: (system memory).
That means that you can use DIR to discover
information about programs that are in your memory partition or in system
memory.
By using the /H switch (see above, HASH SWITCH), you can ask DIR to
compute and display hashmark totals for the programs in memory:
.DIR MEM:LOG/H
PRG
1026
LOG
Total of
1
512—123—435—601
file, 1026 bytes
MEM:
NOTE: You can use DIR with the MEM: and RES: devices to perform many of
the
functions as the MAP and SYSTEM commands, with the added benefit that
you are able to take advantage of the advanced wildcarding abilities of DIR.
same
The command:
LDIR MEM:CRM*.ptjN
______
Page 9—17
THE WILDCARD FILE COMMANDS
gives a Listing of all of
the compiLed BASIC programs whose name begins with
CRM that are currently in your memory partition.
The cpmmand:
.DIR RES:*.DVR.
lists all Driver programs currently in system memory.
compute and display hashmark totaLs for the modules.
Use the /H switch
You may specify both special and regular devices within the same
to
command:
.DIR/B ASE [200,1],ME M: )
F2DSK
PRG 4
PREDOC TXT
Total of 2
HASH
QDT
INDEX
NULL
DSKO:C200,1J
2156
20 4405
files in
24
blocks
36640
40642
41366
42466
PRG 1016
PRG 330
PRG 566
PRG 1276
MEM:
Total of 4 fiLes in 3188 bytes
Grand total of 6 fiLes in 24 blocks and in 3188 bytes
The
example
above
gives a directory display for the account DSKO:[200,1J,
and for the modules in your memory partition (MEMÜ.
9.2.8
DIR Error Messages
Below is
DIR.
If
list of some of the error messages that you can see when using
you encounter an error message that is not mentioned here, refer to
a
Appendix A, AMOS System Error Messages.
1.
%No such files
couldn't find any files that matched your filespecs. Are
you sure that you are searching the correct account? Check your
DIR
spe I Li ng.
2.
ZAccount does not exist — [p,pnJ
The
indicated account does
3.
?Specification error
Are you sure that
not exist.
youtve specified the correct device? Remember that an explicit
device specification sets the default for the rest of the command
line.
The command line was not
to the location in
understand:
points
£DIR AMSO::?
?
in
proper
the
Specification error
command
format.
The
-
symbol
line that DIR does not
Page 9—18
THE WILDCARD FILE COMMANDS
4.
?More than one output specification
You may onLy specify one listfile; that is, only one file
specification may appear on the Left of the equal sign when you use
DIR to create a file that contains your directory listing:
.DIR LSTFIL.LST,DIRLST.LST=[11U,233
?More than one output specification
5.
%No file—oriented device corresponding to dev: is mounted
You
specified a device but did not i nclude a unit number
(e.g., AMS:). DIR tried to match all possible device units with
your specification, but was unable to find any that were mounted.
.DIR AMS:
ZNo fife—oriented device corresponding to AMS: is mounted
Check your spelling. If that's OK, try mounting the disk. If that
doesn't work, check with your System Operator to make sure that the
device has been defined in the system initialization comma nd file,
that the device has a driver program in area [1,6] of the System
Disk, and that the device is file—structured.
6.
?Cannot find DSKO:SCNWLD.SYS[1,4J or MEM:SCNWLD.SYS
All wildcard file commands need the SCNWLD program to process
wildcard symbols in filespecs.
If you see this message, check with
your System Operator who will make sure that a valid copy of SCNWLD
is installed on your system in the System Program Library Account
(DSKO: [1,4]).
7.
[CANNOT OPEN MEM:filespec — DEVICE DOES NOT EXIST]
[CANNOT OPEN RES:filespec — DEVICE DOES NOT EXIST]
You
told
DIR
to compute hashmarks on modules in your memory
partition or in system memory (e.g., .DIR/H RES: or .DIR/H MEM:),
but the special devices MEN: and RES have not been defined in the
device table of the system initialization command file.
your System Operator.
Check with
.DIR/H RES:TRM.DVR ?
TRM
9.3
DVR 262 [CANNOT OPEN MEM:TRM.DVR — DEVICE DOES NOT EXIST]
RENAMING FILES (RENAME)
You can change the names and extensions of disk files by using RENAME—— what
is more interesting, is that you can change the names and extensions of
whole groups of files at one time by using RENAME. Because RENAME is so
powerful, be cautious while you are getting used to it;
will do what you think it is going to do.
make
sure
that
it
Page 9—19
THE WILDCARD FILE COMMANDS
COMMAND SYNTAX:
.RENAME
CouttiLespecY={infileSPec1{...,1nfiLeSPest{I5tc>
COMMAND DEFAULTS:
The
initial
default
the account and device into
is
infilespec
which you are Logged and a fiLename and
The initial default outfiLespec
extension of *.*.
is
extension of *..
ALL:EJ
and
a
filename
and
InitiaL defauLt switch settings are /NODELETE and /NOQUERY.
SPECIAL FUNCTIONS:
You can use RENAME to rename memory modules by specifying the MEM:
device (see Section 9.3.5, RENAME and Special and Ersatz Devices).
9.3.1
Renaming a File in Your Account
name of a file in your account from
Now specify the new name of the
and type an equaL sign; then specify the file you want to rename. Hit
say that you want to change the
Type RENAME.
WRKFIL.TXT to SUBRTN.BAS.
Let's
file
RETURN:
.RENAME SUBRTN.BASWRKFIL.TXT
WRKFIL.TXT TO SUBRTN.BAS
TotaL of
9.3.2
1
fiLe renamed
Renaming a File in an Account Other Than Your Own
You are allowed to rename fiLes in accounts
other
than
the
one
you
are
Logged into:
.RENAME DOd .TXTFRED.TXTE11O,4J
FRED.TXTE11O,4 TO DOC1.TXT
Total of ifiLe renamed
The
example
above
renames file FRED..TXT (in account E110,4J) to
DOC1.TXT.
The files
Note that the new file, DOC1.TXT, is stiLL in account [110,4].
that you rename must be either in your own account or in an account that
shares the project number of the account you are Logged into. If you try to
rename a file in an account that is not in your own project, you see:
Page 9—20
THE WILDCARD FILE COMMANDS
.RENAME DCLARE=wRKPRG[1O0,1J
WRKPRG.LSP[100,1J to DCLARE.LSP
[CANNOT RENAME WRKPRG.LSP[100,1] — PROTECTION VIOLATIONJ
%No files renamed
Thc exception to this rule is that the System Operator may (when logged into
the System Operator's Account,
DSKO:E1,2])
rename
regardless of its project number.
files in
any
account
Since you cannot change the location of a file by using the RENAME command,
you are not aLlowed to incLude an account specification in the RENAME
outfi lespec:
.RENAME ME[200,3J=TITLEC100,5J?
RENAME TITLE.TXT[100,5J to ME.TXTE200,3J
?Device or [P,Pn specifications on output are illegal
9.3.3
RENAME and Wildcard Symbols
RENAME
is a wildcard tile command, you can use it to perform some
very sophisticated renaming functions.
Wildcard symbols in infilespecs
allow you to specify a group of files with one filespec (e.g., *.BAS
specifies all BASIC programs in an account). A wiLdcarded infilespec, then,
tells RENAME to rename ALL files selected by the filespec. Wildcard symbols
Because
in the outfilespec are treated a little differently.
As we saw in Section 9.1.3, Output
modifies the seLected infiLespecs:
File Specifications,
the
outfilespec
.RENAME *.TXF=JIM.TXT,GUIDE.TXT?
JIM.TXT TO JIM.TXF
GtJIDE.TXT TO GUIDE.TxF
Total of 2 files renamed
outfilespec
in the command above Leaves the filename unfixed, and
RENAME leaves the names of the infilespecs unchanged.
The
so
If we were to use wildcard symbols in both the outfiLespec
we would be saying:
those portions of
example:
and infilespec,
"For all the files selected by the infilespecs, replace
the infilespec that are fixed by the outfilespec." For
.RENAME OVTPAY.*=WRKPRG.*,WRKFIL.*
WRKPRG.BAS TO OVTPAY.BAS
4
WRKPRG.RUN. TO OVTPAY.RLJN
WRKFIL.TXT TO OVTPAY.TXT
WRKFIL.DAT TO OVTPAYI.DAT
Total of 4 files renamed
In the example above, our filespecs included extensions of .* just
so
that
Page 9—21
THE WILDCARD FILE COMMANDS
it would be easier to understand what was happening. However, remember that
if you omit an extension, or both a filename and an extension from a
filespec, RENAME uses the defauLt of *. Therefore, the command:
RENAME OVTPAYWRKPRG,WRKFIL ?
is exactly equivaLent to the command in the example above.
9.3.4
Selecting RENAME Options
By including one or more of the following switches on the command line,
you
can seLect several RENAME options:
[QUERY
or
/0
Requests confirmation to rename.
/NOQUERY
or
/NOQ
Renames without asking for confirmation.
/DELETE
or
ID
It fiLe with new name already exists, deLetes
it before performing rename.
If fiLe
/NODELETE or /NOD
with new name already exists, does not
perform rename.
You
may
place
more
switch with a slash.
than one switch on a command line if you precede each
For example:
.RENAMEIQ/D *.OLD*.NEW
QUERY OPTION: The /0 switch teLls RENAME to ask for confirmation before
renaming a file. You can see where this might be convenient, if you're not
compLetely sure of which files your RENAME command is going to affect.
The /0 switch is a fiLe switch. To tell RENAME to ask for confirmation of
alL renamings, place the /Q switch directLy after the command; to ask for
confirmation of the renaming of specific fiLes, follow those fiLespecs with
the /0.
RENAME
requests confirmation of a renaming, it teLLs you what it
intends to do and displays a question mark. To telL RENAME to go ahead with
the renaming, repLy with an upper or Lower case Y; to tell it not to perform
that particuLar renaming, reply with an upper or Lower case N. DO NOT hit a
When
RETURN after your answer.
After RENAME responds to each answer, it goes
to the next renaming operation:
JRENAME *.OLD=BOOK.TXT,*.NEW/Q
800K.TXT TO BOOK.OLD
SICPAY.NEW TO SICPAY.OLD?Y
VACPXY.NEw TO VACPAY.OLD?N
OVTPAY.NEW TO OVTPAY.OLD?Ye
total of 3 files renamed
on
Page 9—22
THE WILDCARD FILE COMMANDS
(The exampLe above asks for confirmation of the renaming of the tiles that
match the *.NEW specification, since /Q follows that specification. If you
should want to interrupt the RENAME command and return to AMOS command
Level, type a Control—C:
.RENAME LNDST*MAP*/Q
MAP1.TXT TO LNDST1.TXT?Y?
MAP1.BAK TO LNDST1.BAK?N
MAP2.TXT TO LNDST2.TXT?Y?
MAP2..BAK TO LNDST2.BAK?N?
MAP3.TXT TO LNDST3.TXT?C
For exampLe,
NOQUERY OPTION: The INOQ switch turns off the /Q switch.
suppose you want RENAME to confirm every renaming except the last—— pLace a
INOQ at the end of the last file specification:
.RENAME/Q MUSIC=MNOTE,MDOC/NOQ?
MNOTE.MAC TO MUSIC.MAC?Y
MNOTE.OBJ TO MUSIC.OBJ?Y?
MNOTE.TXT TO MUSIC.TXT?N?
MDOC.TXT TO MUSIC.ITXT
MDOC.LST TO MUSIC.LST
TotaL of 4 files renamed
DELETE OPTION: RENAME cannot rename a file if a file of that name already
in the account; to instruct RENAME to deLete any existing,
exists
conflicting file before renaming a file, use the ID switch.
The ID switch is a file switch; it can affect either ALL infilespecs or only
specific infilespecs, depending on where you place it on the command tine.
NODELETE OPTION: The /NODELETE switch turns off the /DELETE switch.
a file switch.
9.3.5
/NOD is
RENAME and Special and Ersatz Devices
You may rename memory modules (copies of disk files that
into your area of memory) by specifying the MEM: device:
have
been
Loaded
.LRENAME UNBILLr4EM:CUSID?
MEM:CUSID.PRG TO UNBILL.PRG
total
The
example
'1
fiLe renamed
above
area to UNBILL.PRG.
changes the name of the module cusID.PRG in your memory
RENAME also understands the ersatz devices.
Page 9—23
THE WILDCARD FILE COMMANDS
.RENAME INQUIRBAS:WRKFIL
DSKO:WRKFIL.TXT[7,6] TO INQUIR.TXT
Total of 1 fiLe renamed
The example above tells RENAME to rename the tile WRKFIL.* in the BASIC
(In the example above, you must be logged
Program Library (DSKO:C7,6J).
into an account in Project 7 to avoid a Protection Violation error.)
9.3.6
RENAME Error Messages
Below are some common error messages you are likely to see when you use
Refer to Appendix A, AMOS System Error Messages, if you encounter
RENAME.
an error not discussed here.
1.
ZNo files renamed
Because of one reason or
rename
tiles.
any
another,
RENAME
was
not
able
to
Perhaps it wasn't able to find any files that
matched your wildcard filespecs. Make sure that you entered the
filespecs on the command line in the proper order (i.e.,
outfiLespec to the left of the equal sign; infilespec to the
right).
2.
%No file—oriented device corresponding to dev: is mounted
device, but did not include a unit number
You specified a
(e.g., AMS:). RENAME tried to match all possible units with your
specification, but did not find any that were mounted. Check your
spelling; if that looks OK, try mounting the disk
If
command).
you
still
have
no
success,
(use the MOUNT
check with System
Operator, who will make sure that the device referred to by the
error message is a valid system device and that a device driver
program for that device exists.
3.
ZAccount does not exist — Ep,pnJ
The indicated account does not exist. Check your typing; if
that's OK, try using the DIR command to see a directory for that
account. If you still have no luck, check with the System
Operator.
4.
?Specification error
RENAME
does not understand the format of your command line;
Retype
the * symbol points to the confusing element of the Line.
the command.
5.
?More than one output specification
You
cannot
outfilespec.
6.
rename
a
file
to
two
names;
use
only
one
?Device or Ep,pn] specifications on output are illegal
You cannot change the location of a file by using RENAME; do
not include an account or device specification in a RENAME
outfi lespec.
Page 9—24
THE WILDCARD FILE COMMANDS
?Cannot find DSKO:SCNWLD.SYS[1,4] or
7.
MEM:SCNWLD.SYS
need the SCNWLD.SYS
program to
Check with your System
is
copy of SCNWLD.SYS
instaLLed on your system in account DSKO:[1,4].
ALL wiLdcard file commands
process wildcard symbols in filespecs.
Operator, who wiLl make sure that a valid
?Missing output specification
8.
You
must
give
an
output specification so that RENAME knows
what to use as the new names for your input files.
9.
[CANNOT RENAME infilespec — FILE ALREADY EXISTS]
No two files within an account can share the same name and
extension; it you want RENAME to delete existing files when it sees
a renaming conflict, use the ID switch.
9.4
ERASING FILES (ERASE)
You
can
erase files on the disk by using the ERASE command.
Because ERASE
is a wildcard file command, you can erase entire groups of files aU a time
with one wiLdcard file specification. You may erase files from your own
account or from accounts within your project.
COMMAND SYNTAX:
.ERASE {outfiLespec=}infiLespecl{
infilespecNH/switch{/switch}}
COMMAND DEFAULTS:
The initial outfiLespec default is *.* and the account and device
you are currently logged into.
initial infilespec defauLt is the jccount and device you are
currently Logged into and a filename of *. The default extension
The
is an empty extension.
The default switch is /NOQUERY.
SPECIAL FUNCTIONS:
You
can use the ERASE command to delete memory modules (see
Section 9.4.6, ERASE and Special and Ersatz Devices).
9.4.1
Erasing Files Ftom Your Account
Type ERASE followed by the specification for the file
then hit RETURN:
you
want
to
erase;
Page 9—25
THE WILDCARD FILE COMMANDS
.ERASE SEED.MAC
SEED. MAC
TotaL of
1
tiLe deLeted, 6 disk blocks freed
specify more than one fiLe to be erased by incLuding more than one
may
infiLespec on the command line separated by commas:
You
.ERASE CONTRL.LSP,REMOTE.PRG
CONTRL. LSP
REMOTE. PRG
TotaL of 2 files deLeted, 23 disk bLocks treed
9.4.2
Erasing Files From Accounts Other Than Your
Own
You can erase tiLes from your own account or from other accounts within your
own project. To erase tiles from other accounts, incLude the device and
account specification for those accounts as part of your intilespecs:
.ERASE
DSKO:VUE.HLP[23O,OJ,BASIC.HLP[23O,5J,SWIT.23O'4)
5SKO:VUE.HLP[230,OJ
DSKO:BASIC.HLP[230,5J
DSKC:'biITCH.HLP[230,1 OJ
Total of 3.fiLes deleted, 134 disk blocks treed
Remember that ERASE is a wiLdcard file command;
(NOTE:
the first infilespec
in the command Line above sets the default device to DSKO:
for the
entire
List of intilespecs.)
If
try to erase a file from an account that does not share the project
you
number of your own PF'N, you see:
[CANNOT DELETE ti lespec — PROTECTION VIOLATIONJ
where filespec is the input file you tried to erase. The exception to this
rule is that the System Operator may (if Logged into the System Operator
Account, DSKO:[1,2J) erase tiles from aLL accounts regardless of project
numbers.
9.4.3
ERASE and Wildcard SymboLs
By using wildcard symbols you can select a group of files to be erased:
.ERASE *.BAK
OEITEM.BAK
(INGS .BAK
BRYCE.BAK
C AN C EL BAK
Total of 4 files deLeted, 23 disk blocks freed
Page 9—26
THE WILDCARD FILE COMMANDS
Remember that you can use wildcard PPN and device symbols:
.ERASE DSK:E2O0,*JA*.TXT
AUINTR.TXT[200,3fl
APRIL , lxi
DSK1 :APPA.TXTE200,6J
DSK1:APPB.,TXTE200 6J
DSK2:AUINTR.TXTI26O,6J
Total of 5 fiLes deleted, 33 disk blocks freed
example
The
above
erases
every
.TXT file whose name begins with A which
exists in an account in Project 200 on all units of device DSK:.
9.4.4
Using an Outfilespec
ERASE offers a unique feature that allows you to further
input
select among the
When you use an outfilespec, you
selected by the infilespecs, if
a
files specified by the infilespecs.
tell ERASE: "For all the files
corresponding file selected by the outfilespec ALSO exists, erase the output
file." For example:
.ERASE *.BAK*.MAC?
EIGHT.BAK
HEADER .BAK
RE LEA S . BAK
Total of 3 files deleted, 123 disk blocks freed
tells
ERASE
"Erase alt .BAK files in my account if a .MAC file of the same
name also exists in the account."
.ERASE
*.TXT[l1O,6J?
!PROD.TXT
UNIV.TXT
SOL.TXT
Total of 3 files deleted, 54 disk blocks freed
Because the outfilespec default is the device and account you are currently
logged into (and a filename and extension of *•*), the command above tells
ERASE "Erase all .TXT files in the account I am currently logged into if
those files ALSO exist in account [110,6]." (If an equal sign appears in an
ERASE command line, ERASE realizes that you are specifying an outfilespec.
If
nothing
appears to the left of the equal sign but the ERASE command,
ERASE uses the default outfilespec.)
Page 9—27
THE WILDCARD FILE COMMANDS
Selecting ERASE Options
9.4.5
You may select among the foLLowing ERASE options by including the
switch on the ERASE command line (both switches are file switches):
/QUERY or /Q
Asks for confirmation before erasing each file.
/NOQUERY or /NOQ
Performs erasures without asking for confirmation.
initial
switch is /NOQUERY.
switches on a command line. For example:
The
proper
default
You
may combine /Q and
/NOQ
.ERASE/QUERY *.BAK, *.TXT,/NOQUERY TITLE.*,TECH.DOC,TETRA.BAS
IMAGE..BAK?Y?
C GM F . BAK?N
S TAT . T XI
INIT.TXT?Y
TITLE.BAS
TITLE. RUN
TECH.DOC
TETRA.BAS
Total of 6 files deleted, 120 disk blocks freed
9.4.6
ERASE and Special and Ersatz Devices
You may use ERASE to delete memory modules by specifying the MEM: device:
LERASE MEM:LOG.*,QDT.*?
LOG. PRG
QDT. PRG
Total of 2 files deleted, 1406 bytes of memory freed
for exampLe, erase
You can,
ERASE aLso understands the ersatz devices.
Library,
DSKO:E7,6],
by
specifying the BAS:
files in the BASIC Language
devi ce:
SERASE BAS:DRILL.*?
DSKO: E7,6JDRILL.SBR
DSKO: E7,6JDRILL.BAS
DSKO: E7,6]DRILL.RUN
TotaL of 3 fiLes deleted, 123 disk blocks freed
(NOTE: In the example above, you must be logged into an account in Project 7
to avoid a Protection Violation error.)
Page 9—28
THE WILDCARD FILE COMMANDS
9.4.7
ERASE Error Messages
Below are some of the more common error messages you might see when using
For a list of other system error messages, see Appendix A, AMOS
ERASE.
System Error Messages.
1.
%No files deleted
ERASE was not able to find the tiles you specified.
that you included account and device specifications if
Make sure
they are
needed.
2.
ZAccount does not exist — Ep,pnJ
The account
indicated does not exist. Remember to include a
device specification if needed. Try using the DIR command for that
account, using the ALL: device specification to locate it.
Check
with your System Operator if you still have no success.
3.
%No file—oriented device corresponding to dev: is mounted
You
specified a device, but did not incLude a unit
specification (e.g., Sib:). ERASE was not able to find a mounted
unit matching that specification. Use the MOUNT command to make
sure that the device is mounted. Check with your System Operator
to see if the device you specified is a valid system device.
4.
?Specificatiort error -
ERASE did not understand the format of your command line. The
points to the confusing element of the line. Retype the
symbol
command line.
5.
?More than one output specification
You may not specify more than one output file.
ERASE *.BAK,*.TXT=*.MAC, is an illegal command.
6.
For
example,
?Cannot find DSKO:SCNWLD.5Y5[1,4J or MEM:SCNWLD..SYS
All wildcard file commands need SCNWLD.SYS to be able to
process wi ldcard fi lespecs; check with your System Operator who
will make sure that your system has a valid copy of SCNWLD.SYS in
account DSKO:E1,4J.
9.5
COPYING FILES (COPY)
To transfer files from one account to another, use the COPY command to make
a copy of the original file in the new account. You may also make a copy of
file within its own account if you assign a unique name to that copy.
files within an account can have the same name.
a
No
Page 9—29
THE WILDCARD FILE COMMANDS
only transfer
may
whose PPNs have the same project number (e.g., you
may copy tiles between accounts [300,13 and [300,23, but not between [120,5J
and [100,43). You may copy files into the account you are currently Logged
into from any account on the system.
Unless you are creating a tile in your own account, you
tiles
between
accounts
COMMAND SYNTAX:
.COPY (outfilespecj-={infilespeclC
infilespecNfl{/switch{/switch}}
COMMAND DEFAULTS:
The initial defauLt infilespec is a filename and extension of
and the current default account and device.
The initiaL default outfilespec is a filename and extension of *.*
(If the System
default account and device.
and the current
Operator uses COPY from the System Operator's Account, DSKO:[1,22,
the default outfilespec is a fiLename and extension of *.*, the
device you are logged into and the witdcard account, [3.)
The initial default switches are: /DELETE/NOQLJERY/NOPACK.
-m
SPECIAL FUNCTIONS:
may
use COPY to send fiLes to a terminal or printer by
specifying the TRM:device. You may use COPY to load fiLes into
(See Section
memory, and to save memory modules as disk files.
9.5.7, COPY and Special and Ersatz Devices.)
You
The System Operator (if logged into the System Operator's Account,
DSKO:[1,23) may use COPY to backup all accounts (or selected
accounts) from one device onto another.
Because of the default infilespecs and outfilespecs, almost every
combination of filespecs that you give COPY causes something to happen. For
NOTE:
example:
.COPY/PACK =
tells COPY to make copies of all files in the account you are logged into,
This example replaces all files
and to place those copies in the account.
in your account with copies of themselves—— not usually a very useful thing
to do and VERY dangerous if other users are running on the system at the
time of the command.
So, be careful when you use COPY.
-
Page 9—30
THE WILDCARD FILE COMMANDS
9.5.1
Copying a FiLe in Your Own Account
To make a copy of a fiLe within your own account, type COPY, the name you
want to assign to the new copy, an equaL sign and the name of the file you
want to copy:
.COPY ARCHVE.BAS=WRKFIL.BAS
WRKFIL.BAS to ARCHVE.BAS
Total of
1
file transferred
Your account now contains the original file and a copy of that file.
9.5.2
Copying a File into Your Own Account from Another Account
To copy a fiLe into your own account from another account, type COPY, the
name you want to assign to the copy, an equaL sign and the specification of
the fiLe you want to copy (including the specification of the account in
which the file is to be found); then type a RETURN:
.COPY NEWLSP.LSPDSK1:RESET.LSPE200,33 ?
FSK1:RESET.LSPE200,3J to NEWLSP.LSP
Total of
In
(NOTE:
account,
both
and
outfi lespec.)
9.5.3
so
1
file transferred
examples
did
not
above,
we
include
an
created a copy of a file in our own
specification in the
account
Copying a File into An Account Other Than Your Own
create a file in an account that is not' your own, the account you are
logged into and the account you are transferring to MUST be within the same
project (that is, their PPNs must share the same project number):
To
.COPY DSK1:ALPHA.MACE300,5J=DSKO:SCRTCH.MACC300,7J j
DSKO:SCRTCH.MACE300,7J to ALPHA.MAC[300,5J
Total of 1 file transferred
9.5.4
Because
COPY and Wildcard Symbols
COPY
is a wildcard fiLe command, you can use it to transfer copies
of entire sets of files at one time.
For exampLe:
.çopy DSK1 : C103,4]=*.PRG
READ.PRG to DSK1:READ..PRG[103,41
SYNTX.PRG to DSK1 :SYNTX.PRG[103,4]
DSKWRT.PRG to D$K1 :DSKWRT.PRG[103,43
Total of 3 files transferred
Page 9—31
THE WILDCARD FILE COMMANDS
The example above tells COPY to transfer copies of all
.PRS
files in
the
into over to account
device you are currently
and
account
contain a filename or
DSK1:[103,4]. NOTE: Because the outfilespec does not
infilespec
(*.PRG) to the
extension, COPY assigns the names selected by the
new files.
You can modify the names selected by the infilespec by including a filename
and/or extension in the outfilespec.
logged
SCOPY *.TXF*.TXT)
CHPTR1 .TXT to CHPTR1.TXF
PRFACE.TXT to PRFACE.TXF
INDEX.TXT to INDEX.TXF
Total, of 3 fiLes transferred
Because no two fiLes in an account may have the same name and extension, you
However, if your
may
not usually supply more than one infiLespec.
outfilespec is wildcarded, you CAN specify more than one input file:
.COPY *.BAS=*.BS1,CREATE.BS2,*.BS3
WDANGL..BS1 to WDANGL.BAS
SCANNR.BS1 to SCANNR.BAS
CREATE.BS2 to CREATE.BAS
FACTOR.BS3 to FACTOR.BAS
Total of 4 files transferred
By including wildcard symboLs in device and account specifications, you
transfer copies of files from more than one account:
can
.COPY DSK1:EJ=DSKO:*.OBJ[100,*J?
DSK0:QUAD.OBJE100 13 to DSK1:QUAD.OB.J[100.1J
DSKO:FILE1.OBJ[1Oô,1J to DSK1:FILE1.OBJ[100 13
USKD:GEOM.OBJ [100.53 to DSK1 :GEOM.OBJ[100,53
DSKO:EUCLID.OBJC100,1O3 to DSK1:EUCLID.OBJC100.1OJ
Total of 4 fiLes transferred
careful to include the wiLdcard PPN symbol C], when copying files
from a set of accounts into the corresponding accounts on another device.
the example
If we had not included the C] symbol in the outfilespec offiles
in the
above, COPY would have transferred the copies of all the
accounts in Project 100 over to the single account we are currently logged
NOTE:
Be
into.
9.5.5
COPY and the System Operator
Operator (when logged into the System Operator's
DSKO:C1,2]) has special privileges when using the COPY command:
The System
1.
The
System
Operator
may
copy
regardless of project number.
Account,
files—from one account to another
Page 9—32
THE WILDCARD FILE COMMANDS
is
fiLename and extension of *.*, the device the System Operator is
This
currently logged into and an account specification of 0.
allows the System Operator to backup groups of accounts from one
device to another without having to worry about alL the files being
The outfilespec defauLt for a COPY command used from DSKO:[1,23
2.
a
copied into DSKO;E1,2J:
.COPY
DSK1: 0
The command above tells COPY to copy files from all accounts on
DSK1:
over to the corresponding accounts on the device the System
Operator is logged into.
If the System Operator tries to copy files over to a nonexistent
account, COPY creates the account and then copies the fiLes over.
3.
The new account has the same password (if any) that beLonged to the
original, source account (regardless of whether the new account has
the same PPN as the source account).
9.5.6
SeLecting COPY Options
By including one or more of the following switches on the command Line,
can select several COPY options:
You
you
/QUERY or /Q
Requests confirmation to transfer.
/NOQUERY or /NOQ
Does not ask for confirmation for transfers.
/DELETE or ID
Copies to existing fiLes.
/NODELETE or /NOD
Does not copy to existing files.
IPACK or /P
Allows user to copy file over to itself.
/NOPACK or /NOP
Prevents user from copying file over to itseLf.
may
place
more
switch with a slash:
than one switch on a command line if you precede each
COPY/NODELETE/QUERY =*.BAS[100,2J ?
tells COPY to ask for confirmation before
transferring each file copy. Until you get used to using COPY, it might be
a good idea to always include the /Q switch after the COPY command on the
QUERY OPTION: The /Q switch
COPY command line:
Page 933
THE WILDCARD FILE COMMANDS
.COPY/Q CRIDXE200,1JCUSTMR?
CUSTMR.BAK to CRIDX.BAKE2UO,1]?N
CUSTMR.AS to CRIDX.BAS[200,1J?Y?
CUSTMR.RUN to CRIDX.RUNE2OO,13?Y
CUSTMR.TXT to CRIDX.TXT[200,1J?Y4)
Total of 3 fiLes transferred
to each question mark with a V (for Yes) or an N (for No), and do
NOT type a RETURN after your answer.
Respond
fiLespec (e.g.,
a
*.TXTCALNDR.TXF,/Q *.LST,*.TNX) it becomes the defauLt switch for the
rest of the command line. If you place the switch directLy after a filespec
(e.g., COPY *.BAS*.BAS1/Q,*.BAS2), it affects only the files selected by
The /Q switch is a fiLe switch; if you place it before
COPY
that filespec.
NOQUERY OPTION: The /NOQ switch turns off the /Q switch.
For example:
COPY/Q *.MAC*.MC1,*.MC2,/NOQ *.MC3,*.MCR?
HYDRA.MC1 to HYDRA.MAC?Y?
DUAL.MC1 to DUAL.MAC?Y?
FILE2.MC2 to FILE2.MAC?N?
STRESS.MC3 to STRESS.MAC
STRS2.MC3 to STRS2.MAC
BRIDGE.MCR to BRIDGE.MAC
Total of 5 fi1es transferred
NODELETE
OPTION:
If
you
ask COPY to create a new file with the name that
belongs to an existing file in the account, COPY usually simply replaces
that old file with the new copy. If you do not want COPY to delete existing
files, use the /NOD OPTION:
.COPY/NODELETE AMS1:*.RUNL11O,33?
AMS1:ICE.RUNE11O 3J to ICE.RUN
AMS1:CHEM.RUNE11Ô,3J to CHEM.RUN
%Not copied — bestination file already exists.
%No files transferred
The /NOD switch is a file switch.
DELETE OPTION: The /D switch turns off the /NODELETE switch.
For example:
COPY *.TXT=/NOD *.LST,*.TXF,/D *.TNF
PACK
OPTION:
The /P switch allows you to copy a file over onto itself.
No
two files with the same name and extension may exist within the same
account.
If you ask COPY to create a copy of a file within an account and
you want the copy to have the same name as the original, COPY can delete the
original file and replace it with the copy. This is a VERY dangerous
procedure if another job is running concurrently on the system; your file
can be lost or scrambled if another user accesses the disk at the same time.
COPY does not allow you to do this kind of thing unless you include the
/PACK switch on the command line:
THE WILDCARD FILE COMMANDS
Page 9—34
.COPY/PACK =*.TXT
VALLEY.TXT to VALLEY.TXT
DEVICE.TXT to DEVICE.TXT
RANDOM.TXT to RANDOM.TXT
Total of 3 files transferred
why would you want to copy a file over onto itself? Copying files over
onto themselves compresses those files on the disk (that is, it "packs" the
area of the disk taken up by those fiLes); this uses the space on the disk
more efficiently, and allows you to have more contiguous records free on the
disk. (The System Operator can pack the disk more thoroughly by Logging
Now,
into the System Operator's Account and entering: SCOPY/PACK
Operator may also use the DSKPAK command
OPTION:
NOPACK
switch.
9.5.7
The
/NOP
switch
EJ.
The System
to pack contiguous files.)
turns off the /P switch.
/NOP is a file
COPY and Special and Ersatz Devices
Using the ersatz and special devices, you can
system functions with COPY.
For example:
perform
wide
a
variety of
.LCOPY TRM:Cinfi lespecC,. . . infi lespecN}} .
performs
much
the same function as the TYPE command, but it allows you to
specify more than one infiLespec and to use wildcard symbols.
It sends a
copy of the files selected to your terminal display.
.COPY TRM:*.BAS
a
copy of all BASIC files in your account to your terminal display.
(To display the contents of files on a particUlar terminal or printer other
than your own terminal, specify the name of the terminal after the TRM:
sends
specification: .COPY TRM;QUME=EILEA.)
.COPY MEM:={infi lespecC,. . . infi lespecN))
performs the same function as the LOAD command; it loads a copy of the files
selected into your memory partition area.
.COPY
MEM:{infi lespecC,...infi lespecN}}
performs the same function as the SAVE command;
it
a
copy of the
(See Section 11.4,
Saving Memory Modules as Files—— SAVE, for information on memory modules.)
memory
modules
You can also use the ersatz devices as a
accounts:
saves
selected as disk files in your account.
shorthand
way
to
identify disk
Page 935
THE WILDCARD FILE COMMANDS
.COPY =BOX:CATLOG?
rATLOG.BAKET,1J to CATLOG.BAK
CATLOG.HLPC7,'1J to CATLOG.HLP
Total of 2 fiLes transferred
(In
avoid
the
example
above,
we must be logged into an account in Project 7 to
a Protection Violation error.)
9.5.8 COPY Error Messages
BeLow are many of the error messages you may see when using COPY. If you
encounter an error not discussed here, refer to Appendix A, AMOS System
Error Messages, for a more complete Listing of system error messages.
1.
%No files transferred
COPY could not find any fiLes that matched your infilespecs,
or some other problem prevented COPY from making file copies.
2.
%Attempt to copy file to self——
Make sure no other jobs are running
Z
Include the switch /PACK in your copy command
You tried to create a copy of a file with the same name as the
if COPY were to alLow you to do so, it wouLd delete the
original file and replace it with the copy—— an extremely dangerous
procedure if another job is running on the system at the time of
The purpose of this message is to prevent you from
the command.
original;
accidentalLy copying a file to itseLf; if you want to
do
so,
use
the /PACK switch, and make sure that no other job is running on the
system.
3.
%No fiLe—oriented device corresponding to dev: is mounted
did not include a unit number.
You specified a device but
After searching for all possibLe units of that device, COPY failed
to find a mounted unit matching your specification:
.COPY
AMS:SCAN.PRG
ZNo file—oriented device corresponding to
AMS:
is mounted
After you've checked your spelling, try mounting the disk you want
to use. If you still have no success, check with the System
Operator for help; he or she wilL make sure that the device is a
legal, defined system device.
4.
ZNot copied — Destination file already exists
You tried to create a new fiLe with the name beLonging to an
existing file while the /NODELETE switch was in effect. If you
want to replace existing files with new copies, do not use the
/NODELETE switch.
THE WILDCARD FILE COMMANDS
5.
Page 9—36
ZAccount does not exist — [p,pnJ
You tried to access an account that does not exist:
.COPY =*.BAS[23O,1J.
ZAccount does not exist — [230_1J
your typing; if that Looks OK, try using DIR to see if the
account does indeed exist.
Check
6.
?Specification error
-
Your command line is not in proper
points to the confusing item on the
command syntax and retype the Line.
7.
format.
The
symboL
command line.
Check the
?More than one output specification
You may only specify one outfilespec.
input file to more than one output file.)
(You
cannot
8.
?Missing output specification
You forgot to type the equal sign on the command Line.
9.
[CANNOT OPEN fi lespec — PROTECTION VIOLATION]
You
10.
copy
an
tried to create a fiLe in an account that does not share
the same project number as the file you are currently Logged into.
?Device full
There is no more room on the disk.
Try copying to another
devi ce.
11.
?You are not logged in under [1,2], can't create [p,pnJ
Only if you are logged into the System Operator's Account,
[1,2J, can you use COPY to create a nonexistent account.
12.
?Output MFD is full
You tried to create a new account by using the COPY command
while logged into [1,2]. The Master File Directory on the device
was full, so COPY wasn't able to create the account. (Each device
has a limit of 64 accounts.) Create the account on another device.
13.
%Random files can not be transferred to MEM:
14.
You may only copy sequential files into your memory partition.
?Files may not be transferred to RES:
You
may not add programs to system memory after the system is
(The System Operator may add programs to system
memory by modifying the system initialization procedure.)
up and 1-unning.
15.
?Cannot find DSKO:SCNWLD.SYS[1,4] or MEM:SCNWLD.SYS
The
filespecs.
COPY command needs the SCNWLD
program to process wildcard
Check with
System Operator for help; he or she
will make sure that ayour
valid copy of SCNWLD.SYS exists in account
DSKO: [1,4J.
THE WILDCARD FILE COMMANDS
Page 9—37
PRINTING A FILE (PRINT)
9.6
have already mentioned the use of the COPY command for sending a copy of
and Special
and Ersatz Devices).
However, a more sophisticated mechanism exists for
performing the same kind of function: the PRINT command.
Before beginning
to discuss the actual syntax and use of the PRINT command, we'd like to
introduce you to spoolers and queues.
We
a file to a printer or other terminal (see Section 9.5.7, Copy
A printer is not a sharable output device; that is, only one user may access
the device at a time.
allow
(Obviously, chaos would result if the system were to
two users to print their files at the same time on the same printer.)
A special kind of program (called a spooler) allows you to put in a request
for the use of an occupied system resource so that when the resource (in
this case, a printer) again becomes free, it will attend to your task. The
PRINT ommand is a line printer spooler; it stacks up (or "spools") requests
for the use of the system printers until such time as a printer becomes
availabLe for use.
You may use the PRINT command to enter your request for the use of a printer
into the waiting line (called a queue); you may either select the queue of a
specific printer, or you may aLlow the system to choose a printer for you
(in which case it will place your request into the queue of the printer that
has the fewest number of disk blocks waiting to be printed). When a printer
becomes available,
the request at the head of the queue is acted upon, and
the spooler prints the file specified by that request.
The
queue
operates
on a "fl rst—come—fi rst—served" basis; that is, files are pH nted in the same
order as their corresponding requests in the queue.
COMMAND SYNTAX:
.PRINT Cprinterspec=}{infi lespeciC,.. . infi lespecN}{/switch{/switchfl?
COMMAND DEFAULTS:
default infitespec is the account and device you are logged
into, an extension of .LST and a null filename.
The
The default printspec is that printer with the
blocks currentLy in the printer queue.
Least
number
of
The defauLt switches are set by the System Operator when he or she
initially sets up the line printer spooLer to run on your
particular system; check with the System Operator for a list of
the switch defaults.
Page 938
THE wILDCARD FILE COMMANDS
9.6.1
To
Sending a File to a Printer
send
a file to a printer, type PRINT, the specification of the file you
want to print, and a RETURN:
.PRINT ARCTGT.TXT
If only one printer has been set up for spooler use, the print request will
enter that printer's queue; if you have more than one printer defined on the
system, your request will enter the queue of the printer that has the fewest
number of file blocks waiting to be printed.
If
you want to send a file to a particular printer, type PRINT, the name of
the printer, an equal sign and the name of the file:
.PRINT QUME=TEACHR.BAS
TEACHR .SAS
Total of
1
file (23 blocks) in printer request
(See Section 9.6.3, below, to see how to find out the names of the
that have been defined on the system.)
printers
9.6.2 PRINT and Wildcard Symbols
may
use the standard wildcard file command filespec wildcards when
specifying input files to the PRINT command. For example:
You
SPRINT *.BAS?
RENWRT.BAS
RANDM.BAS
NUMGEN.BAS
Total of 3 files (127 blocks) in printer
request
The command above prints all BASIC files in your account.
9.6.3
Finding Out Information About the Printer
Queues
You may use the PRINT command to see what printers have been defined for use
with the printer spooler, and to find out information about the printer
requests waiting in the queues. Type PRINT followed by a RETURN:
.PRINT ,
You see something like this:
THE WILDCARD FILE COMMAND
Page 9—39
HYTYPE
Form: NORMAL
TotaL of 11 bLocks
LEASE.LST
Copies: 2
RENTER.TXT
Copies:
Form: NORMAL
Form: NORMAL
QUME
1
*
2 blocks remaining
9 blocks
The queue is empty
The display above gives us information on the two printers (named HYTYPE and
QUME) that have been set up by the System Operator for use with the spooler.
First we see information about the queue of the printer HYTYPE: 1. HYTYPE
(the name of the printer); 2. Form: NORMAL (the type of form mounted on the
printer); and, 3. TotaL of 11 blocks (the number of disk blocks in the queue
waiting to be printed).
next two lines of the display tell, us what fiLes are waiting to be
printed, how many copies of each wiLL be printed and the kinds of forms on
which they are supposed to be printed. You also see the number of disk
blocks per file to be printed.
An
asterisk marks that fiLe which is
currently being printed.
The
The Last line of the display above begins the information about the queue of
the printer QUME.
In this case, the queue has no files waiting to be
printed:
The queue is empty
If the queue did contain any print requests, you would see a dispLay simiLar
to the one above for the HYTYPE queue.
9.6.4
Setting Printer Forms
Every printer used by the spooler has a type of form that is associated with
it. (This assignment is done by the System Operator at the time of system
initialization.)
For exampLe, if you usually print checks on one printer,
the type of form that shouLd be mounted on that printer might be named
CHECKS.
When you type PRINT and a RETURN (as in the section above), you see
the kind of form associated with each printer.
You may specify the kind of form on which you want your listing printed (see
the
FORMS
OPTION,
below).
NOT named NORMAL, you MUST
request.
In fact, if the form mounted on the printer is
a
form specification in your print
include
that you don't accidentally print a report on an invoice form or vice
versa, PRINT checks the form—type you specify against the type of form that
supposed to be mounted on the printer. If the two do not match, PRINT
informs the spooLer Operator job (who is selected by the System Operator at
the time of system initialization) that the forms need to be changed on the
So
specified printer. For example, suppose that a user on the system specifies
that a list of customer names be printed on two—part forms on printer
PRNTR6,
but only regular paper is mounted on that printer. The spooler
(Changed 15 October 1979)
THE WILDCARD FILE COMMAND
Page 9—40
Operator sees this message on his or her terminal display:
; LPTSPL — P Lease mount 2PART on PRNTR6
The message specifies both the printer on which the forms must be changed
and the type of forms that must be mounted.
This message appears once a
minute on the spooler Operator's terminal until the Operator changes the
forms; then the print requests waiting in the queue can be attended to.
When you change the forms on a printer, tell the PRINT command that you have
done so by using the SET command:
.SET FORMS printer—name form—name
you specify the printer on which you have changed the forms and the
name of the form you have mounted. For exampLe:
where
.SET FORMS PRNTR6 2PART
The form—name may be any name you choose from one
to six characters.
To
contusion, however, everyone on the system should use a standard set
of form names (e.g., CHECKS, NORMAL, 2PART, INVCE, etc.)
avoid
9.6.5
SeLecting PRINT Options
You may choose one or more of the options below by including
the appropriate
switches on the PRINT command line. The default switch settings are chosen
by
the System Operator at the time of system initialization; check with the
System Operator for those defaults.
ICOPIES:n
or IC:n
Prints the number of copies requested.
IKILL
or 1K
Removes the specified fiLes from either the queue
of a specific printer or from the queue of any
printer.
IDELETE
or /D
Deletes the specified files after printing them.
INODELETE
or /NOD
Does not delete the specified tiles after
them; the initial default setting.
printing
/BANNER
or /8
Prints a banner page preceding each listing.
/NOBANNER
or /NOB
Does
/FORMS:
or /FO:
not
listing.
print
a
banner
Checks to make sure that the
page
specified
mounted on the printer. (If
PRINT assumes /FORMS:NORMAL.)
(Changed 15 October 1979)
preceding
forms
each
are
you don't use /FO:,
THE WILDCARD FILE COMMAND
Page 9—41
/HEADER
or /H
Print a page header at the top of every page of the
Listing.
INOHEADER
or /NOH
Don't print page headers.
/FORMFEED
or 1FF
Print a final form feed at the end of each Listing.
/NOFORMFEED or INOF
Don't print a final form feed at the
/LPP:n
Maximum number of lines to print on each page.
listing.
or /WI:n
IWIDTH:n
The
page
only.
TelLs PRINT to reinsert print
queue
as
PRINT
finishes
or /WA
/WAIT
width (in characters).
end
of
Used for headers
requests into the
processing earLier
requests, rather than to discard them if the
is full.
may
specify more than one
precede each switch with a slash:
You
each
queue
switch on a command line, as tong as you
.PRINT TETRA.*/COpIES:2/FORMS:NORMAL/BANNER
COPIES OPTION: To tell PRINT to make more than one
?
copy
of
your
listing,
include the /C:n switch on your command line. /C:n is a file switch; it can
affect all files specified on the command line or only specific files,
depending on where you place it on the command line:
SPRINT STEPPR.MAC/C:2,*.BAS
tells PRINT to make two copies of STEPPR.MAC, but only one copy each of
The command line:
BASIC files in your account.
the
.PRINT/C:2 STEPPR.MAC,*.BAS ?
tells
PRINT
your account.
to make two copies of STEPPR.MAC and all of the BASIC files in
KILL OPTION: Use the 1K switch to remove a print request from a printer
You may remove the request from the queue of a specific printer by
queue.
specifying the name of that printer.
.PRINT TERM6=NEWFIL.TXT/K
NEWFIL.TXT
Total of 1
file killed
or by not specifying a printer, you may tell PRINT to search the queues of
all printers, and to remove the specified file from the queue in which it is
found.
(Changed 15 October 1979)
THE WILDCARD FILE COMMAND
Page 9—42
.PRINT NEWFIL.TXT,CRESR.LST
NEW F IL.TX T
?
CRESR.LST
Total of 2 fiLes killed
The
FiLespecs
wildcards.
that
you
specify
You
may
ask
when using the 1K switch may NOT contain
IKILL is an operation switch; it kilLs ALL fiLes selected by the
FiLespecs on the command Line. You must enter one 1K switch for each print
request in the queue, even if two requests are for the same file.
DELETE
OPTION:
PRINT
to erase a file after it prints it by
including the ID switch on your command line.
NODELETE OPTION: The /NODELETE switch
IDELETE is a file switch.
turns off the /DELETE switch.
/NOD is
the default switch settin and is a file switch.
BANNER OPTION: By including the /BANNER switch on your command line, you may
ask PRINT to print a special identification page preceding each listing.
The banner page gives the following information:
1.
The
banner
page
identifies
the
listing by displaying in large,
block letters the name and extension of the file printed.
2.
At the bottom of the banner page, PRINT tells you the version
number of the
line printer spooler program and the name of the
printer on which the listing
was made:
LPTSPL Version 3.0 running on LPTO
3.
The next line of data gives the full specification of the file that
was printed and the date on which it was printed.
command to set the system date.)
(Use
the
DATE
File DSKO:SYSLPT.INI[1,4J printed on 4/1/79
4.
The
third line tells you the name of the form on which the listing
was printed:
Forms: NORMAL
5.
If the /DELETE option is in effect, the banner page
this message:
also
displays
File will be deleted after printing
if you are printing more than one copy of a file, you see a
message that tells you which copy this listing is:
and
Copy 1 of3
The /BANNER switch is
a file switch.
(Changed 15 October 1979)
THE WILDCARD FILE COMMAND
Page 9—43
NOBANNER OPTION: The /NOBANNER switch turns off the /BANNER switch.
Check
with the System Operator to see which switch is the initial defauLt. /NOB
is a file switch.
FORMS OPTION:
The /FORMS:n switch alLows you to specify the type of form on
which you want your Listing printed. The defauLt form is NORMAL (the name
usuaLLy assigned to the most regularly mounted form on a printer). PRINT
checks to make sure that the form you specify is the form associated with
the printer you want to use; if it is not, the spooler Operator sees a
message on his or her terminal requesting that the form you specified be
mounted on the printer.
Since the default form is NORMAL, not using the /FO:n switch is the same as
specifying /FORMS:NORMAL. If the printer you are using does not have the
form NORMAL mounted, you MUST use the /FO:n switch to specify the type of
form that is mounted on that particular printer.
The /HEADER switch allows you to print a header at the top
Page headers give the name of the file being
printed, the date, and the current page number. /HEADER is a file switch.
HEADER OPTION:
of
every page of the listing.
The /NOHEADER switch turns off the /HEADER switch.
Check
with the System Operator to see which option is the initial default.
/NOHEADER is a file switch.
NOHEADER OPTION:
FORMFEED OPTION:
The /FORMFEED switch prints
bottom of each listing.
NOFORMFEED
OPTION:
It is a file switch.
a
final
form
feed
at
the
THE /NOFORMFEED switch does not print a final form feed
at the end if each Listing.
It is a file switch.
The /LPP switch indicates the number of lines to print on each
If /HEADER is set, PRINT prints a form feed when it
outputs a full page and then it prints a page header.
/LPP:n is a file
LPP OPTION:
page
(Lines
Per Page).
switch.
OPTION:
The /WIDTH switch determines the page width (in characters).
PRINT only uses this value in printing page headers. The /WIDTH value must
be between SO and 132, inclusive. /WIDTH:n is a file switch.
WIDTH
WAIT OPTION:
The /WAIT switch determines the operation of the PRINT command
when
you try to enter more print requests into a printer queue than PRINT
can handle.
Normally, PRINT discards the extra print requests. /WAIT tells
PRINT not to discard the extra print requests, but to reinsert them into the
queue as PRINT finishes processing earlier requests. This option ties up
your terminal while it waits for room to be made in the queue. /WAIT is •an
operation switch.
(Changed 15 October 1979)
THE WILDCARD FILE COMMAND
9.6.6
Page 9—44
PRINT and Ersatz Devices
You may include the ersatz device specifications in your PRINT command tine.
For example:
.PRINT BAS:*,,TXT
DSKO: SBRDOC .TXT [7,63
DSKO :BASHLp .TXTE7,6J
Total of 2 fiLes (34 blocks) in printer request
The example above prints aLl
account, DSKO: [7,6J.
9.6.7
text
files
in
the
BASIC
Language
Library
PRINT Error Messages
Below
are some of the common error messages you may see when using PRINT.
Refer to Appendix A, AMOS System Error Messages, if you encounter a message
not discussed below.
1.
%No files in printer request
PRINT
was
not
able
to find the files you specified.
your spelling again, and make sure that
account and device specifications.
2.
included
the
Check
proper
?Specification error
-
3.
you
PRINT did not understand the format of your command line.
symbol points to the item on the line that confused PRINT.
The
?More than one printer specified
You may not include more than one printerspec. Make sure that
the equal sign in your command line was in the proper place:
.PRINT LPT1,OLDFIL.TXT=OLDEIL.TXT
?More than one printer specified
4.
?Device or EP,PNJ specifications on output are illegaL
PRINT
thought
that
you
were trying to include
file
specification elements in your printer specification.
Make
sure
that you did not accidentally enter an equal sign as part of a file
specification.
5.
?Output printer not found
PRINT
was
not able to find the printer you specified.
Check
with the System Operator for a list of the names of the printers
set up for use with the spooler, or use the PRINT command followed
by a RETURN to see information about the printers whose queues
contain print requests.
6.
?Invalid argument for COPIES
You
tried to give a non—numeric argument to the /COPIES:n
switch; retype the command line.
(Changed 15 October 1979)
THE WILDCARD FILE COMMAND
7.
Page 9—45
?InvaLid argument for FORMS
PRINT did not understand the symboLs you entered after the
/FORMS:
switch.
For example, you will see this message if you
forget to enter the colon after the /FORMS: switch.
;Jobname — Please mount form form—name on Printer—name
a.
The Spooler Operator job sees this message if you specify
form—type that is not defined as being mounted on the printer.
9.
?Cannot find DSKO:SCNWLD.SYSC1,4J or MEM:SCNWLD.SYS
a
ALL wiLdcard file commands require the SCNWLD program to be in
System Program Library account
(DSKO:E1,4J) or in memory.
Check with the System Operator, who will make sure that a valid
copy of SCNWLD is installed in DSKO:[1,4J.
the
10.
?Invalid argument for LPP
You
gave a non—numeric argument to the Lines per page switch
or the format of your command was incorrect. Check your typing.
11.
?Invalid argument for WIDTH
You gave a non—numeric argument to the page width switch or
the format of your command was incorrect. Again, check your typing
first.
(Changed 15 October 1979)
CHAPTER 10
MORE FILE COMMANDS
wi ldcard file commands, there are three other major
None of these commands
commands you can use when working on files.
For information on the other fiLe commands
understand wildcard symbols.
availabLe, see the "AMOS System Commands Reference Sheets."
In
addition
10.1
to
the
DISPLAYING THE CONTENTS OF A FILE (TYPE)
To display a copy of a text file on your terminal display, use the TYPE
command.
If you want to display specific disk records, or dispLay the
contents of a fiLe as both ASCII characters and as octal or hexadecimal
data, refer to the documentation on the DUMP command in the "AMOS System
Commands Reference Sheets." We assume that the fiLe you want to see is an
ASCII text file.
NOTE: ASCII is the name of the numerical code which the
computer uses to represent text symbols. ALL files on the system are ASCII
files except for .RtJN, .OBJ, .PRG and .SBR files. (For information on ASCII
code and the form in which the computer represents and stores data, see the
manual "Introduction to AMOS.")
COMMAND SYNTAX:
•TYPE fi lespec ?
COMMAND DEFAULTS:
The tYPE command assumes an extension of .LST and the account
and
device you are currentLy Logged into.
To
use
TYPE,
enter the word TYPE followed by the fiLespec of the file you
want to see; then hit RETURN:
STYPE PSTCRM.TXT?
If the extension of your file is .LST,
extension in your filespec.
and *.
you do not need to include the
TYPE does not understand the wildcard symbols ?
MORE FILE COMMANDS
10.1.1
Page 10—2
Hints and Restrictions
If
the file display covers more than one screen—page, use Control—S to
freeze the screen display and a Control—Q to release it.
TYPE works only on sequential files.
(See the manual "Introduction to AMOS"
for an explanation of sequential and random files.) Most fiLes that you will
be using on the AMOS system are sequential tiles (e.g., all text files that
you create with EDIT and VUE). If you try to use TYPE on a random file, you
see:
[CANNOT OPEN fi lespec — FILE TYPE MISMATCHJ
where filespec is the filespec you gave to TYPE.
You can use TYPE on any kind of sequential tile; however, if you use TYPE on
non—ASCII file, the system wiLl still try to display the data in the file
as if it were ASCII. Therefore, although you can use TYPE on a file
containing machine language (a .PRG or .OBJ file), you will see the data
interpreted as if it were text—— a confusing and meaningless display.
a
10.1.2
TYPE Error Messages
If
BeLow are some common error messages you can see when using TYPE.
you
encounter an error not mentioned beLow, refer to Appendix A, AMOS System
Error Messages.
1.
[CANNOT OPEN tilespec — FILE NOT FOUND]
TYPE wasn't able to find the file you specified.
Check your
spelling; if that's OK, try using the DIR command (e.g., DIR
ALL: [Jti lespec) to see if you can locate the account in which the
file appears.
2.
[CANNOT INIT fiLespec — DEVICE DOES NOT EXIST]
You tried to specify a file on a device that TYPE cannot find.
your spelling; if that's OK, check with the System Operator
to see if the device is a valid system device:
Check
JYPE DKS1 :CRLF.MAC
?
[CANNOT INIT DKS1: — DEVICE DOES NOT EXIST]
3.
[CANNOT OPEN fi lespec — DISK NOT MOUNTED]
The system can't access the device specified by your filespec.
Use the MOUNT command to mount the disk.
4.
[CANNOT OPEN fiLespec — FILE TYPE MISMATCH]
You tried to display the contents of a random file:
£.TYPE REGINS.DAT,1)
[CANNOT OPEN REGINS.DAT — FILE TYPE MISMATCH]
Page 10—3
MORE FILE COMMANDS
You will have to use another method to look at
file.
5.
the
in the
data
[FILE SPECIFICATION ERROR]
TYPE
doesn't understand the form of your command line.
Check
your spelling, and retype.
.JYPE?
[FILE SPECIFICATION ERROR]
6.
10.2
[CANNOT OPEN filespec — ILLEGAL USER CODE]
Check your
You've specified an account that does not exist.
If
you
still
get
this
message,
make sure
again.
and
try
typing
that you are accessing the correct device.
APPENDING FILES (APPEND)
It's often convenient to keep a large project divided into sub—projects
while you are working on the task. For exampLe, this manuaL was written as
a Large number of smalL files. To combine several files together into one
fiLe, use the APPEND command.
COMMAND SYNTAX:
.APPEND outfi Lespecinfi Lespecl{,.. .infi lespecN},
COMMAND DEFAULTS:
The
defauLt extension for outfilespec and infilespecs is an empty
extensi on.
The default account and device is the atcount and device
currentLy Logged into.
you
are
creates a new file (specified by the outfilespec) that
APPEND
command
contains the contents of all of the fiLes specified by the infilespecs. You
The
MUST specify an outfiLespec:
.APPEND ASMBLR.MAC=PARSE.MAC,SCAN.MAC,TABLE.MAC,CNVRT.MAC?
The example above creates a new fiLe named ASMBLR.MAC that contains the
contents of the fiLes PARSE.MAC, SCAN.MAC, TABLE.MAC and CNVRT.MAC (in that
order). APPEND does not change the contents of any of the input files,
does not delete them from the disk.
If
and
the new fiLe to have the same name as one of the input files,
(and
as one of the infilespecs
APPEND wilL deLete that infilespec when the file concatenation is finished).
you
want
your outfiLespec may have the same name
LAPPEND CTALOG.BAS=CTALOG..BAS,INVOIC.BAS?
MORE FILE COMMANDS
The example
CTALOG .BAS.
10.2.1
Page 10—4
above adds the contents of INVOIC.BAS onto the end of the file
APPEND Error Messages
If
Below are some common error messages that you may see when using APPEND.
you encounter an error not discussed below, refer to Appendix A, AMOS System
Error Messages.
1.
[CANNOT OPEN filespec — FILE NOT FOUNDJ
You've specified a file that the system cannot find.
Check
spelling and retype. If you stilt have no luck, use the DIR
command (.DIR ALL:[J filespec) to try and find the account and
device in which the file resides.
your
2.
[CANNOT INIT devn: — DEVICE DOES NOT EXISTJ
the spelling of your device specifications; the system
doesn't recognize the device you've specified.
If your spelling
looks OK, check with the System Operator for help.
Check
.LAPPEND DKS3:TOTAL.TXT=DSK3:pART1 .TXT,DSK3:PART2.TXT?
[CANNOT INIT DKS3: — DEVICE DOES NOT EXISTJ
3.
[CANNOT OPEN filespec — DEVICE NOT MOUNTEDJ
The
device
is not mounted.
4.
you've specified is a legal system device, but it
Use the MOUNT command.
Now try appending again.
[CANNOT OPEN filespec — FILE TYPE MISMATCHJ
You can only use APPEND on sequential
files.
You
this message if you try to use APPEND on random files.
5.
will
see
[FILE SPECIFICATION ERRORJ
APPEND didn't understand the form of your command line:
SAPPEND ,
[FILE SPECIFICATION ERRORJ
Retype the command line.
10.3
Use
SORTING A FILE (SORT)
the
command to alphabetically and numerically sort the data in a
For example, suppose you have a file that contains a list of
customer names, addresses, phone numbers and dates of last
Each
line in your file contains this information for one customer. purchase.
(A line—— the
group of characters between two carriage returns—— is called a logical
text file.
record.)
SORT
Page 10—5
MORE FILE COMMANDS
You may want to rearrange the file so that the records are ordered by state,
with the record containing information about Smith's Pharmaceuticals of
Alabama appearing first in the file, and the record containing information
about A&B Food Services of Rhode Island appearing last.
allows you to choose the item (called the key) in the record on which
to base the sort, and it allows you to sort on three different keys. For
example, you can tell SORT to sort the records alphabetically by state; then
SORT
for the customers within each state, sort alphabetically by customer name.
may only sort sequential files.
large to fit into memory all at one time.
You
NOTE:
You may sort files that are too
COMMAND SYNTAX:
.SORT fi lespec
COMMAND DEFAULTS:
SORT assumes an extension of .DAT (for data file), and the account
and device you are currently logged into.
To sort a sequential file, type SORT, the specification of the file you want
to sort and a RETURN:
.SORT INVITM.DAT1
Now SORT begins to ask you questions about your data file and about how you
want to sort the data in the file. SORT actually replaces your file with
another file in which the data are arranged in the proper order.
(See
10.3.3, Example, for a sample use of SORT.)
These are the questions that SORT asks:
1.
Record
size:
—
Although SORT knows that each logical record ends
size of the
with a carriage return symbol, it needs to know the
largest logical record that it is going to be dealing with. Enter
the maximum size (in bytes) of the logical data records in the
file. For example, if every customer has a logical record in which
her name, address and phone number appears, enter the size
(Every character in the logical
record is one byte of data, including spaces and punctuation.
Exclude carriage return and line—feed symbol bytes.)
his
or
of the largest of these records.
2.
Key size: — The key is the field in the logical record on which you
wish to sort (e.g., customer name, state or store name). Because
you can choose up to three different keys, SORT asks this question
once for each key that you define. If you want SORT to use less
three keys, answer this question with a RETURN after you have
the size of
each key in bytes.
than
defined all of the keys that you want to use. Enter
MORE FILE COMMANDS
3.
Page 10—6
position:
Key
you define.
— SORT asks this question for each of the keys that
Enter the column number in the data record where the
first byte of the sort key occurs.
position #1.)
4.
(The first byte of a record is
Key Order: — SORT asks this question once for each of the keys that
Enter an A if you want that key sorted in ascending
order or enter a 0 if you want the key sorted in descending order.
you define.
sorts
data based on the values of the ASCII codes for
a
different ASCII value,
upper case Letters are NOT the same as lower case letters.
(That
is, an "A" is not the same as an "a.") For that reason, all keys
that begin with a capital letter wilL come before all keys that
NOTE:
SORT
that data.
Because each character has
begin with a lower case Letter (or vice versa, depending on whether
you are sorting in ascending or descending order).
10.3.1
SORT Statistics
After SORT has sorted your file, it displays a number of statistics so
you can get an idea of how much your file was in need of being sorted:
that
1.
This line tells you how many logical records
this number differs from the number of records
you know to be in the input file, check your data file again and
make sure that it is the correct one.
2.
n Run — SORT tells you how many passes it made through the data to
sort the file. If the entire file fits into memory, SORT performs
Sorted
Records
SORT processed. If
n
—
the sort in memory, and you see "1 Run"; if your file was too large
to fit into memory, SORT performs the sort on the disk (a modified
poly—phase merge sort), and you see that SORT performed its sort in
more than one Run.
3.
n
Key
comparisions,
per record — This line telLs you how many
a fair indication of
out of order the file was to begin with. In general, the more
in
comparisons SORT made white doing the sort——
how
out of order a file is, the larger the number of comparisons needed
to sort it. (This is not always the case, since files that are
already
very
close to being in order sometimes take more
comparisons than files that are in more random order.)
4.
hh:mm:ss Elapsed time, n ms per record — Note that eLapsed time is
given rather than compute time; this value will be affected by the
number of other users on the system, and on the type of processing
that they are doing.
MORE FILE COMMANDS
10.3.2
Page 10—7
Hints and Restrictions
SORT can sort files that are much larger than available memory, so you can
sort files in a very smaLl amount of memory (as Little as 6K bytes in many
cases). However, bear in mind that (in general) the more memory availabLe,
the faster the sort.
You may only sort sequential files
SORT does not understand wiLdcard symboLs in Filespecs
If the file that you are sorting is too Large to fit into memory all at one
time (that is, if SORT is unabLe to perform the entire sort in memory), SORT
performs the sort on the disk.
IF THE SORT IS PERFORMED ON THE DISK:
The condition of the disk on which you are performing the sort affects
SORT's speed.
A disk that has been used a great deal has much of its free
space distributed randomly across the disk surface; this slows down the
sort.
If you use a freshly initialized di sk, the temporary sort files tend
to be allocated contiguously, which speeds up the sorting process somewhat.
(The System Operator can initialize a disk for you. WARNING: Init ializing a
disk removes all data on that disk.)
If
you
faster
are
if
sorting
performed
files
on
standard—format disks.
on floppy disks,
AMS—format
floppy
you will find that sorts are
disks
rather
than
IBM
must make sure that each record is greater in length than the key sizes
you speáify; otherwise you will end up with a null file.
You
1
10.3.3
Example
Below is a small, unordered data file:
Hinchey, Edsel
7701 Wanda Dr
Dion, F.
27819 Glen Anne
Kinslayer, E.
5678 Calle Rio
Clayton, Alfred 8523 Delta Rd
Vine, Irv
Swenson, John
We'll assume that you want
state by customer name.
243 Princeton
120 Halstead
Santa Ana
CA
Anaheim
Tucson
Orange
AZ
Lowell
MA
Chicago
IL
to sort the file first
CA
CA
by state;
then within
The number of characters in each logical record
(i.e., on each line) is 45 (including spaces and punctuation, but excluding
the carriage return at the end of each record). So, the maximum record
size
is 45 bytes.
Customer names begin in position #1, and states begin in
position #44:
(Changed 15 October 1979)
MORE FILE COMMANDS
Page 10—8
.SORT DATA ç)
Record size: 45 ç)
Key size: 2 3
Key position: 44
Key order: A
Key size: 16 ç)
Key position:
Key order: A
1
ç)
Key size: ç)
Sorted 6 records
1
Run
20 Key comparisions,
Elapsed time 00:00:05,
3.33 per record
920 ins per record
If we Look at the data file, it now Looks Like this:
KinsLayer, E.
5678 Calle Rio Tucson
AZ
Clayton, Alfred 8523 Delta Rd Orange
CA
Dion, F.
27819 Glen Anne Anaheim
CA
Hinchey, Edsel 7701 Wanda Dr
Santa Ana CA
Swenson, John
120 I-$aLstead
Chicago
IL
Vine, try
243 Princeton
LoweLL
MA
10.3.4
SORT Error Messages
Below are some common error messages that you may see while using SORT.
If
you encounter an error not mentioned below, refer to Appendix A, AMOS System
Error Messages.
1.
?Enter A or D
SORT
wants to know whether you want to sort the key in
ascending (A) or descending CD) order; you must enter an A or a D.
2.
?Insufficient memory for sort
SORT must be able to fit at Least five of
data records
into memory to perform a sort; if it cannot,your
you
will
see this
message.
(Changed 15 October 1979)
MORE FILE COMMANDS
3.
Page 10—9
?Record size must be >0
?Key size must be >0
?Key size must be less than record size
are giving it reasonabLe
If you see any of these messages, it probably means that you
have made a typing mistake.
Key and record size must be at Least
byte in length, and (since the key is an element of the record)
the
one key must be smalLer than the record.
4. ?Entjre key must be within record
If the [(start—position in the record of the key + the length
of the key)—1J is beyond the end of the record, you see
this
message. (The minus one comes from the fact
that the first
position in the record is a one and not a zero.) SORT thinks that
the record size you gave it was too small or that the key size
you
data.
SORT checks to make sure that you
gave was too big; check your numbers.
5.
?Cannot DELETE Filespec — write protected
You have tried to sort a file on a write—protected disk.
cannot replace your
because
it
try again.
cannot
(Changed 15 October 1979)
unsorted
file
with
write on the disk.
SORT
the new, sorted file,
Write—enabLe your disk and
CHAPTER 11
MEMORY COMMANDS
run a program, AMOS must find that program on the disk as a file, load a
copy of the file into memory and execute it. The copy of a disk file that
To
is loaded into memory is calLed a memory module.
many
users may be on the system at the same time, all users have
their own portion of memory in which to run their own programs; this portion
of memory is caLled a user memory partition. When you enter a command at
Because
AMOS
command level, AMOS Loads a copy of the appropriate program or command
fiLe into your own memory partition and executes it. In the case of system
programs (e.g., DIR) or command files, AMOS automaticaLly deletes the
program or command file from your memory partition after it finishes
it. Check with your System Operator if you have questions about
the amount of memory allocated to you. To find out what moduLes are in your
memory partition, you can use the MAP command. (See Section 11.2, Finding
executing
Out What Modules Are in Memory—— MAP.)
a
particular program is often used by severaL users at the same time,
the System Operator may arrange to place the program in system memory (the
area of memory used by AMOS itself, and not, by any individual user). When a
program is in system memory, all users may use it at the same time, and that
program does not have to be Loaded into your own memory partition for you to
use
it (which gives you more free memory space). To find out what programs
are in system memory, you can use the SYSTEM command (see Section 11.3,
When
Finding Out What ModuLes Are in System Memory—— SYSTEM).
11.1
Use
LOADING FILES INTO YOUR MEMORY PARTITION (LOAD)
the
LOAD
command to Load a copy of a file into your memory partition.
NOTE: You can load and execute assembly language programs
command
fiLes
(.CMD
(.PRG
files)
or
or .DO files) by simply entering the specification of
the fiLe at AMOS command level. There are times, however, when you might
want to load a group of files into memory without executing them (e.g., a
BASIC program may require that a group of subroutines be loaded into memory
before you can execute that program).
(Changed 15 October 1979)
MEMORY COMMANDS
Page 11—2
COMMAND SYNTAX:
.LOAD FiLespec ?
COMMAND DEFAULTS:
LOAD
assumes
an extension of .PRG and the account and device you
are currently logged into.
11.1.1
•
Hints and Restrictions
LOAD can be used to load the LOAD program itself (DSKO:LOAD PRGE1,4J).
If the file you are loading into memory is already in memory,
and repLaces it with a fresh copy.
LOAD
LOAD does not understand witdcard symbols.
deLetes
/
does NOT tell you what files it has Loaded into memory; you will know
it was unsuccessful if it displays this message:
LOAD
?Filespec NOT FOUND
11.2
FINDING OUT WHAT MODULES ARE IN MEMORY (MAP)
Use the MAP command to see a List of the modules in your memory partition or
in system memory. Modules retain the same name and extension as their
corresponding disk files (e.g., when a copy of DSKO:LOG.PRc3[1,4J is loaded
into memory, AMOS is able to Locate it in memory by
named LOG.PRG).
COMMAND SYNTAX:
.MAP {Filespec}{/5wjcsj.
COMMAND DEFAULTS:
The default Filespec is *.*.
The default Switches are: /FSBHMU
(Changed 15 October 1979)
-
looking
for
a
module
MEMORY COMMANDS
11.2.1
Page 11—3
Finding Out What Modules Are in Your Memory Partition
Type MAP followed by a RETURN:
.MAP
You see a list of the memory modules currently in your memory partition with
the folLowing information on each line: 1. module name; 2. extension; 3.
size in bytes (in decimal); 4. octal base address (the memory address where
the module begins); and, 5. hashmark (see Section 9.2.6, SeLecting DIR
Options, for a discussion of hashmarks). The last Line of the dispLay telLs
you how many bytes are free in your memory partition, and gives the octal
memory address of
the first available memory location in the memory
partition.
SYSTAT
PRG
LMG
PRG
QDT
PRG
566
1016
330
48416
FREE
033722
035022
037024
040736
167—536—542—221
512—123—435—601
435—713—462—175
We can telL from the example above that the SYSTAT moduLe is a
copy
of
an
language program (a .PRG fiLe), is 566 bytes in length, and begins
at the memory address 033722. The module's hashmark is 167—536—542—221.
(The hashmark of a memory module is identical to the hashmark of the
disk—tile version of that module; that fact gives you the abiLity to compare
moduLes and files, making sure that the proper version has been loaded into
memory.)
The
Last Line of the display tells us that we have 48,416 bytes
free in our memory partition, and that the first free memory Location is
assembly
040736.
11.2.2
Displaying Information About Specific Memory Modules
If you want to discover the size of a particular memory module in your
memory partition or its base memory address or hashmark, supply a Filespec
to the MAP command:
.MAP LOG
LOG
PRE
FREE
11.2.3
You
may
1016
48416
035022
040736
512—123—435—601
Selecting MAP Options
choose
among
several MAP options by including one or more of the
one—character MAP Switches at the end of the command Line following a single
slash (I). Each character after the slash up to the RETURN at the end of
the command line is considered to be a separate Switch, so MAP Switches MUST
appear at the end of the command line.
The
MAP
Switches
allow
(Changed 15 October 1979)
you
to
limit the MAP display by requesting only
MEMORY COMMANDS
Page 11—4
specific items of information.
memory.
(Also,
System Memory—— SYSTEM.)
system
They also allow you to see the modules in
see Section 11.3, Finding Out What Modules Are in
The MAP Switches are:
IF
FREE — DispLay amount of free memory bytes
decimal).
available
(You must use with the /5 Switch.)
(in
IS
SIZE
lB
BASE ADDRESS — Display base memory address for each module
/M
MODULES — Display information about modules.
/U
USER MEMORY — Display information about modules
Display
decimal number.
—
size
(in
bytes) of each module Listed;
(in octal).
in your memory partition.
/R
RESIDENT
/H
HASHMARK — Display hashmarks for
that
are
MEMORY
— Display information about modules that
are in system memory.
display.
each
memory
module
in
The default Switches are: /FSBHMIj
11.2.3.1
Limiting the MAP Display — If you omit the MAP Switches from
command line, MAP gives you as much information as it can. If you are nota
interested or do not need quite that much information, you may use the MAP
Switches to restrict the MAP display. For example, if you merely want to
know the
size of the modules in your memory partition or their names,
only one or two of the Switches discussed above:
To see just the names of the modules in your memory partition:
•
.MAP/UM
tOG
PRG
QDT
PRG
SYSTAT PRG
To see just the sizes and names of the modules in your memory partition:
.MAP/UMS ,
tOG
PRG
QDT
PRG
SYSTAT PRG
1016
330
566
(Changed 15 October 1979)
use
MEMORY COMMANDS
Page 11—5
To see just the names and hashmarks of the modules in your memory partition:
.MAP/UMH :)
LOG
PRG
QDT
PRG
512—123—435—601
435—713—462—175
167—536—542—221
SYSTAT PRG
To find out how much free memory is left in your memory partition:
.MAP/FS
FREE
a416
And, so on.
11.2.3.2
Using MAP to Find Out What Modules Are in System Memory — The
in the section above are concerned with dispLaying information
about the modules in your memory partition. You may aLso use MAP on the
exampLes
system area of memory by repLacing the /U Switch with the /R (resident area)
Switch:
.MAP/RSHMF
YRM
11.3
To
DVR
252
552—107—745—717
FINDING OUT WHAT MODULES ARE IN SYSTEM MEMORY (SYSTEM)
find
out
what
moduLes
followed by a RETURN:
are
in the system area of memory, type SYSTEM
THE FOLLOWING PROGRAMS ARE ALLOCATED IN SYSTEM MEMORY
TRM
DVR
TOTAL RESIDENT MONITOR SIZE IS 1326 BYTES
The totaL resident monitor size is the number of bytes taken
memory.
up
by
system
The contents of system memory consist of those programs that make
up the operating system and those programs shared by alL users on the
system.
Use the DIR command with the RES: device to see what programs are
in system memory, or the MAP command (see Section 11.2.3.2, Using MAP to
Find Out What Modules Are in System Memory).
NOTE:
running
RETURN.
On a hard—disk system you can use SYSTEM to find out if the system is
off the cartridge or a fixed disk. Type SYSTEM foLlowed by a
If the SYSTEM display says:
*** SYSTEM IS RUNNING FROM CARTRIDGE DISK ***
the system has booted off the cartridge, not a fixed disk.
(Changed 15 October 1979)
MEMORY COMMANDS
11.4
Page 11—6
SAVING MEMORY MODULES AS FILES (SAVE)
You can save memory moduLes in your memory partition as disk tiles by
using
the SAVE command.
COMMAND SYNTAX:
.SAVE
extension}
COMMAND DEFAULTS:
SAVE
uses a default extension of *;
filename, SAVE saves all memory modules of
their extension.
To
save
it
you
that
specify just a
name,
whatever
a copy of a module as a disk tile, type SAVE followed by a list of
Filespecs selecting the modules you want to save.
SAVE
understands the
wildcard symbols ? and *•
The memory modules bear the same name and
extension as their corresponding files on the disk; use the MAP command or
DIR MEM: to find out what modules are in your memory partition.
.SAVE *.PRG,*.SYS
LOG.PRG
QDT.PRG
SYSTAT.PRG
SCNWLD.SYS
If you ask SAVE to transfer a copy of a module to your account and a disk
tile of that name and extension already exists, SAVE erases the original
disk file and replaces it with a copy of the memory module:
.SAVE LOG
IRASE LOG.PRG, SAVE LOG.PRG
In
the
example above, a file named LOG.PRG already existed in the account;
SAVE erased it, and replaced it with a new copy of the memory module
LOG. PRG
If you do not want SAVE to delete existing files, use the rename option: end
the SAVE command line with a slash and an extension; if SAVE finds
in
the account with the same name and extension as the module you wantatofile
save,
SAVE
renames the file in the account with the new extension.
For example,
let's' say that
a file EXIT.SBR exists in your account. If you want to
a module in your memory partition named EXIT.SBR, you can
either say:
.SAVE EXIT.SBR
ERASE EXIT.SBR,
SAVE EXIT.SBR
which deletes and replaces the tile already on the disk, or:
(Changed 15 October 1979)
save
Page 11—7
MEMORY COMMANDS
.SAVE EXIT.SBR/OLD
ENAME EXIT.SBR,
SAVE EXIT.SBR
which renames the disk file EXIT.SBR to EXIT.OLD and saves the memory module
as
disk file EXIT.SBR. If the account contains a file with the same name
and extension as the file being renamed, SAVE deLetes that original file.
example, if a file EXIT.OLD already exists in the accdunt, the example
above would look like this:
For
.SAVE EXIT.SBR/OLD
ERASE EXIT.OLD, RENAME EXIT.SBR,
SAVE EXIT.SBR
SAVE Lists all modules that it saves; if you do not
see
such
a
list, it
means that SAVE was not able to save the moduLes you specified.
11.5
DELETING MEMORY MODULES FROM YOUR MEMORY PARTITION (DEL)
To delete memory modules from your memory partition, use the DEL command.
COMMAND SYNTAX:
.DEL filespeciC
filespecN)?
COMMAND DEFAULTS:
DEL assumes an extension of *.
DEL
understands the wildcard symbols ? and *. To delete modules, type DEL
followed by a List of specifications; then type a RETURN.
.LL *.PRG,*.RUN?
REMOVE.PRG
MENU. R UN
XOR.RUN
DEL dispLays no error messages; you wiLl know that it was unable to perform
its function if it does not report back with a list of the modules deleted.
deletes modules from your memory partition, it shifts the remaining
modules down in memory (i.e., toward location zero) if they have addresses
greater than those of the deleted modules.
As
DEL
CHAPTER 12
SYSTEM INFORMATION COMMANDS
last group of commands that we document in this manuaL are those
commands that provide you with information about the system. There exist on
the system many other programs that reveal detaiLs about how the system is
functioning. These programs include: diagnostic programs for testing memory
and disks; display programs that help you examine and modify memory and the
disk; and job commands that allow you to attach jobs and terminals and
affect job status. These commands are not within the scope of this manual;
for more information on system operation, see the "AMOS System Operator's
Information" section of the AM—100 documentation packet and the "Assembly
The
Language Programmer's Manual."
SYSTEM STATUS COMMAND (SYSTAT)
12.1
The
-
System Status command give you a quick summary of what jobs are running
on the system, what terminals are attached to what jobs and what each job is
doing.
COMMAND SYNTAX:
.SYSTAT
Each
line
The SYSTAT program prints one line for each job on the system.
1.
job
name;
2.
name
of
the
terminaL
that
gives the following information:
the job is using; 3. account the job is logged into; 4. the octal base
address in system memory where the system maintains information about the
job; 5. status of the job (see Section 12.1.1, Job Status Symbols, below);
the last program run by the job; and 7. the number of bytes
name of
(decimal) in the memory partition being used by the job, and its base
6.
address in memory (octaL).
Below
the
job information lines is a List of all storage devices currentLy
mounted on the system and the number of blocks free on those devices.
A typicaL dispLay for a smaLl system might look Like this:
SYSTEM INFORMATION COMMANDS
Page 12—2
JOBi
TRM1
110,4
SPOOL
NULL
1,2
DSKO
DSK1
5321
FREE BLOCKS
FREE BLOCKS
5134
22276
22742
RN
LW
51000 BYTES AT LOC 33710
854 BYTES AT LOC 32162
SYSTAT
LPTSPL
On this particular system there is only one user (JOB1) who is using
terminal TRM1. JOB1 is logged into E110,4J, and is running SYSTAT. JOB1's
memory partition begins at memory address 33710, and is 51000 bytes large.
The second job on the system (SPOOL) is a job being used by the sole user of
the system to run the line printer spooler program (LPTSPL) so that when the
user wants to print a file, he or she can have SPOOL do it without
interrupting the user's other activities.
(See Section 9.6, Printing a
File—— PRINT, for information on line printer spoolers.)
The Last two lines of the display show that the devices OSKO: and DSK1: are
mounted, and that they have 5321 and 5134 free disk blocks, respeotively.
12.1.1
Job Status Symbols
job status symbols in the SYSTAT dispLay tell you what the jobs on the
system are doing:
The
TI
TERMINAL INPUT WAIT STATE — The
receive data from a terminal,
entered from the keyboard.
TO
to
terminal,
storage areas) are full.
data
a
PROGRAM LOAD STATE — The job is
loading a program.
SL
is waiting to
but the buffers (data
TERMINAL OUTPUT WAIT STATE — The job
output
LD
job is waiting to
but nothing's been
SLEEP
in
the
process
of
— The job has been put into hibernation
STATE
by using the SLEEP command.
DS
DISK ACCESS IN PROGRESS
— Job waiting for the
to finish reading or writing data on the disk.
10
I/O
ACCESS
OTHER
THAN
TERMINAL
OR
DISK — Job is
waiting for data transfer to finish between
and a device other than a terminal or disk.
EW
EXTERNAL
WAIT
—
Job
something to wake it up.
RN
is waiting
RUNNING — Job is running a program.
for
system
system
someone
or
SYSTEM INFORMATION COMMANDS
SP
Page 12—3
SUSPENDED STATE — After a SUSPND command, the job is
in suspension; must be revived by a REVIVE command.
CONTROL—C — Job is at AMOS command level, waiting for
a new command.
12.2
THE SET COMMAND
The SET command aLlows you to select various options that affect how AMOS
communicates with your terminaL. For example, you can use the SET command
to choose the number base (octal or hexadecimal) AMOS uses when dispLaying
non—decimaL numeric data on your screen.
You can aLso choose various
error—reporting options. The options you select affect only your job.
COMMAND SYNTAX:
.SET Coption) !)
COMMAND DEFAULTS:
The default options are: OCTAL, ECHO, NOVERIFY, NOGUARD, NODSKERR, CTRLC.
To see what options are in effect for your job, type SET and a RETURN:
.SET
Current settings are:
OCTAL
ECHO
DSKERR
NOVERIFY
NOGUARD CTRLC
To set an option, type SET and the option name (see below); then hit RETURN:
.SET DSKERR ,3
The SET options are:
CTRLC
Tells AMOS to recognize Control—Cs (the user—interrupt
command).
NOCTRLC
Disables Control—C recognition by AMOS.
OCTAL
Uses base—8 for non—decimal numeric displays.
HEX
Uses base—b
ECHO
Displays terminal input.
NOECHO
Silences terminal input.
DSKERR
NODSKERR
for non—decimal numeric displays.
•Reports all soft disk—errors and I/O retries.
Silences reports of soft disk—errors and retries.
(Changed 15 October 1979)
SYSTEM INFORMATION COMMANDS
Page 12—4
VERIFY
Verities aid write operations by reading the data
time written, comparing it to the data in memory.
NOVERIFY
Does not verify write operations.
GUARD
Does not alLow other terminals to send
your own terminal via the SEND command.
NOGUARD
Allows other terminals to send messages via SEND.
Sets
the
magnetic
tape
to
messages
-
unit bits per inch rate for
data reading or recording on tape.
DPI
Specify
and a DPI value (e.g., SET BPI MTUO:800).
FORMS
Allows
you
each
device
a
to set the name of the form to be mounted
PRINT
command
for
on a specified printer. (See the
information on using this option.)
If SET doesn't understand an option name, you see:
?InvaLid function
Try entering the command line again.
If
give
you
an invalid device specification or incorrect DPI value to the
SET DPI command, you see:
The format for the command is:
SET DPI MTU*:XXXX
Where * = a tape drive in the range 0 thru 7 and
XXXX is either 800 or 1600.
Check your device specification.
of either 800 or 1600.
ALso, make sure that you have specified
The system comes up with a value of 1600.
DPI vaLue
a
If you use SET to set the form mounted on a specific printer, and SET does
not recognize the printer's name, you see: ?Printer not found. For exampLe:
.SET FORMS PRNTR4 TAXTBL
?Printer not found
The command above tried to associate the form—type TAXTBL with
PRNTR4; SET was not able to find
PRNTR4.
the
printer
Check with the System Operator for
a list of printers set up for line printer spooler use.
12.3
FINDING OUT WHAT DEVICES ARE ON THE SYSTEM (DEVTBL)
To see what devices your system is set up to use, type DEVTBL and
(Changed 15 October 1979)
a RETURN:
SYSTEM INFORMATION COMMANDS
Page 12—5
.DEVTBL?
DSKO (SHARABLE)
DSK1 (SHARABLE)
STDO (SHARABLE)
STD1 (SHARABLE)
RESO (SHARABLE)
MEMO (SHARABLE)
TRMO (SHARABLE)
MTMO
The devices marked as (SHARABLE) are those which more than one user can
access at a time (e.g., a disk or memory); nonsharable devices are those
devices that cannot be shared (e.g., a paper—tape punch or a printer).
ready to use, use
command (see Section 12.1, The System Status Command—— SYSTAT).
To find out which devices are mounted and
12.4
the
SYSTAT
FINDING OUT THE NAME OF YOUR JOB (JOBS)
If you wish to use the SEND command (see Section 12.5, Sending Messages to
Other Jobs—— SEND), each user on the system will need to know the name of
his job. You will also want to know your job name if you want to interpret
the SYSTAT display mentioned above.
To find out your job name, type JOBS and a RETURN:
.JOBS
YOUR JOB NAME IS JOB1
12.5
SENDING MESSAGES TO OTHER JOBS (SEND)
The SEND command allows you to exchange messages between several terminals
To exchange messages, the communicating terminaLs must be
on the system.
connected to the same system and turned on.
COMMAND SYNTAX:
eSEND jobriame Message
where jobname selects the job to whom you are sending a message.
Type SEND followed by name of the job with whom you want to communicate;
then enter the message and a RETURN. To find out the names of the jobs on
the system, use the SYSTAT command (see Section 12.1, The System Status
Command——
SYSTAT).
find out your job name, use the JOBS command (see
To
Section 12.4, Finding Out Your Job Name—— JOBS).
SYSTEM INFORMATION COMMANDS
Page 12—6
As an example, assume that you are JOB1, and that you want to send a message
to the user whose job name is ROBIN:
.SEND ROBIN HOW LONG IS THAT LISTING YOU ARE PRINTING? ,)
The message appears on the terminal attached to job ROBIN prefaced
job name:
;
JOB1
by
your
— HOW LONG IS THAT LISTING YOU ARE PRINTING?
That user may now send a message back to you:
.SEND Joel ABOUT 17 PAGES
You can guard your job from receiving messages by using the SET GUARD option
(see Section 12.2, The SET Command).
12.5.1
SEND Error Messages
Below are the error messages you may see when using SEND:
1.
?Job not found
tried to send a message to a nonexistent job; make sure
that you spelled the job name correctly, and that the job does
indeed exist.
Use
the SYSTAT command to see what jobs are
currently running on the system.
You
2.
?Job specification error
You did not supply a job name (i.e., you typed
by
a
RETURN).
sent.
3.
SEND
followed
You must specify a job to whom the message may be
?Busy
SEND cannot send the message to the job you specified
that job is not in terminal input mode.
4.
because
?Job has no terminal attached
The
job with which you wish to communicate has no terminal
attached; there is no device to receive your message.
5.
?Guarded
from
You are trying to send a message to a job
that
is
protected
messages by the SET command's GUARD option (see Section 12.2,
The SET Command).
CHAPTER 13
DISK BACKUP PROCEDURES
If
is one lesson learned early in the computer business, it is this:
Backing up your programs and data by regularLy copying
them onto a spare disk is perhaps the most important habit you can develop.
there
BACK UP YOUR DATA!!!
Computers are generally very reLiable machines, but nobody can completely
guard against the freak occurrence: someone tripping over the power cord, a
cup of coffee down the disk drive, power outages, floods, etc.
Your
programs and data are irreplaceable, so keep a current copy of them in a
safe place. Unless it has happened to you, it's hard to imagine the
frustration of losing severaL days of programming or data entry.
will
discuss
1.
Whenever
specific backup techniques in a later section of this
For now, Let's taLk about some other things that you can do when
using the system to keep data loss to a minimum.
We
chapter.
you
change
a disk cartridge or floppy, you MUST use the
MOUNT command; if you do not, AMOS may well write over data that is
already on the disk.
2.
If your text files begin to
show
strange typos
of "memory") ask the System Operator
diagnostic test program—— you may have a memory
instead
System
(e.g.,
"mempry"
to run a memory
problem.
(The
Operator should be running memory and disk diagnostic tests
on a reguLar scheduLe, anyway.)
3.
Keep your text editing sessions short; never use one of the text
editors for more than a half hour or so without exiting. If that
unexpected catastrophe should occur, it's better to have lost a
half an hour's worth of work instead of a day's. (The changes and
additions that you make while you are editing do not take affect
until you exit the editor.)
4.
As
the
a
general
system
occasionally.
use.
(Changed
rule, never leave your terminaL without signing off
(use
15 October 1979)
the
LOGOFF
command).
Change
your
password
These measures protect the system from unauthorized
DISK BACKUP PROCEDURES
5.
Page 13—2
Treat your backup disks with respect. Whether your backup disks
are disk cartridges or floppy disks, handLe them carefulLy and
gently. Do NOT stack cartridges in talL piles on top of the disk
drives, and do NOT Leave them lying about where they can be knocked
off counters or desks.
If at aLL possible, you shouLd have several spare disks that you can use as
backup disks. You should never have just one backup disk (what happens if
something should really go wrong while you are in the process of backing up,
and you lose both your backup and original disks?)
usual procedure is to follow the "grand-father—father—son" philosophy of
disk backup. That is, you always have several backups of varying age.
The
The
next
time you back up, use the disk with the oldest version of your data
(the "grandfather" disk). By rotating your backup disks, you can ensure
that you always have several fairly recent backups of your data.
13.1
You
BACKING UP THE FILES IN YOUR ACCOUNT (USING COPY)
can use the COPY command to make backup copies of
all the files in your
account, all of your accounts, and even of all accounts on the disk.
The
first step to take is to use the SET command to tell AMOS to verify every
write operation:
.SET VERIFY
After you've told AMOS to SET VERIFY, every time it writes data to the disk,
AMOS compares the data to the corresponding data in memory to make sure that
they are the same.
Use the SET command to tell. AMOS to
notify
encountered during the backup procedure:
you
of
any
soft
disk—errors
.SET DSKERR
Now, decide what files you want to back up.
For example, let's say that
logged into DSKO:E300,4J, and want to copy all files in that account you
to
the same account on DSK1:.
are
.COPY DSK1:
?RMINV.BAS to DSK1:CRMINV.BAS
RESET.BAS to DSK1:RESET.BAS
CRITEM.$AS to DSK1:CRITEM.BAS
PRINT.TXT to DSK1:PRINT.TXT
Total of 4 -files transferred
The fact that nothing appears on the right side of the
equal sign in the
command line above tells COPY that we want to copy ALL files from the device
and account we are
logged into. The DSK1: on the left hand side of the
equal sign tells COPY to transfer copies of those files under their own
names to the same account on DSK1:.
(Changed 15 October 1979)
DISK BACKUP PROCEDURES
Page 13—3
.COPY DSK1:EJC300,*] .
TUNC.BASC300,1] to DSK1 : FUNC.BASE300,1J
PRTYP.PRGE300,2J to DSK1 :PRTYP.PRGE300,2J
IBUF.MACC300,23 to DSK1 :IBUF.MACE300,2J
IBUF.PRGE300,ZJ to DSK1 :IBUF.PRGE300,2J
PARSERI.PRGE300,10J to DSK1 :PARSER.PRGE300,1OJ
Total of 5 files transferred
command above tells COPY to copy all fiLes from all accounts in project
300 on the device you are logged into over to the same accounts on DSK1:.
The
(You must remember to include the wiLdcard PPN symbol C] on the left side of
the equal sign—— if you do not, COPY wilL copy every fiLe in aLl accounts on
the device into which you are Logged into just the single account that you
are using on DSK1:. (In the exampLe above, you must be logged into an
account in Project 300 to avoid a Protection Violation error.)
13.1.1
The
The System Operator and the COPY Command
System Operator (if logged into DSKO:C1,2J) can use COPY to back up all
of the accounts on a disk regardLess of their project numbers.
For example:
.COPY CJDSK1 C]
copies all files in all
accounts
on
the
device
accounts on
the System
over to their corresponding
Operator is logged into. (NOTE: The
DSK1:
System Operator may omit the wildcard PPN symbol in the outfilespec—— when
used from account DSKO:C1,2J, COPY assumes a default outfiLespec of *.*, the
device you are logged into, and an account specification of C].)
perform file backup frequently if you create and change files
Perhaps at the end of every working day you should copy those files
onto a backup disk. Creating a command or DO file to perform this function
for you can make your life simpler; see Section 8.2.3.3, BACKUP.DO, for an
example of a DO file that backs up files from one disk cartridge to another.
You
should
often.
13.2
BACKING UP ENTIRE DISKS (DSKCPY)
Rather than copying over individual files from one device to another, DSKCPY
makes a
literal image copy of an entire disk. We will assume for the
purposes of this discussion that you want to back up the System Disk.
IMPORTANT NOTE:
You must not use DSKCPY on
any
kind
contains the file BADBLK.SYSE1,2].
of
disk
device
that
Making a literal image of
such a device onto another disk might result in bad blocks
being written into and the BADBLK.SYS file on the new disk
being overwritten. Use the COPY command instead.
(Changed 15 October 1979)
DISK BACKUP PROCEDURES
You
contain the
devices
of
Page 13—4
can •use
DSKCPY
BADBLK.SYSC1,2J
on any kind of disk device that does not
file,
but you can only copy between
the same type (e.g., AMS1: to AMS2:, DSK2: to DSK3:, DDS1:
to
DDS2:, etc.).
NOTE:
Get the system up and running.
If you are using a floppy—disk based system,
place the backup disk in a drive other than the System Drive.
If you are
using a hard—disk based system, place the backup disk cartridge in any of
the drives not containing the System Disk. The backup disk must have been
formatted at some time in the past. (Check with the System Operator for
information on what formatting program to run to format a brand new disk.)
Note that DSKCPY compLetely obliterates any data previously on the backup
disk. Mount the backup disk. Enter:
.DSKCPY
the DSKCPY command asks you for the INPUT DRIVE.
Enter
the
specification of the device you are going to back up. Now DSKCPY
asks you
for the OUTPUT DRIVE. Enter the specification of the disk you are going to
copy onto (the backup device).
For exampLe, if you want to copy DSKO: onto
Now
DSK1:, use the DSKCPY command in this way:
.DSKCPY
Tnput drive: DSKO:
Output drive: DSK1:
DSKCPY begins to make a literal image of DSKO: onto DSK1:. It tells you how
many blocks it is copying. After it has finished the backup, DSKCPY tells
you that
it has finished copying the disk; then it proceeds to verify the
duplication by checking the data on the backup disk against the data on the
source disk.
After this verification is complete, DSKCPY returns you to
AMOS command Level.
The entire process looks like this:
.DSKCPY
Input drive: DSKO: ?
Output drive: DSK1:
[Copying 9696 recordsJ
-
[Duplication completedJ
[Verification completedJ
•
NOTE FOR HAWK HARD—DISK SYSTEM
USERS: if you have been working
off
a
disk
cartridge, and want to back up the entire disk, you can use DSKCPY. However,
you must first save
the contents of the System Disk, copy the cartridge
contents over the contents of the System Disk, then copy the new contents of
the System Disk to another disk cartridge. You must restore the contents of
the System Disk by copying the System Disk backup cartridge to the System
Disk. This process is tricky, since it temporarily destroys the contents
of
the System Disk, and must not be undertaken
Lightly. We advise that the
Operator be in charge of this kind of operation. (Of course, if you
have more than one Hawk drive on
your system, you can simply copy •the
cartridge from one drive onto a backup cartridge on the other Hawk drive.)
System
(Changed 15 October 1979)
APPENDIX A
AMOS SYSTEM ERROR MESSAGES
Below is a List of most of the error messages that you can see when
operating at AMOS command Level.
For information on the specific error
messages
might
you
see
when
documentation for that command.
The
most
common
kind
consists of two parts.
using
a
particular
command,
see
the
of error message that you will see on the system
The message begins with:
?Cannot UNIT, OPEN, CLOSE, READ, WRITE, INPUT, OUTPUT, WAIT,
DELETE, RENAME, ASSIGN, DEASSIGN, or ACCESS) Filespec or Devn: —
and ends with one of the messages below (e.g., ?Cannot READ AMS3: — disk not
mounted):
1.
— bitmap kaput
Every time the system writes data to a fiLe—structured
device
(e.g., DSKO:, AMSI:), it checks that device's bitmap to determine
where on the disk to write the data. (A bitmap is a map of the
device——
it tells
the
system what records on the device already
contain data, and which are free for use.) Every time the system
checks the bitmap, it sums the data in that bitmap and checks it
against the value it has previously computed; if there is a
discrepancy, it means that something in the bitmap has changed, and
you see the
bitmap kaput message. MOUNT the disk. If you
still get this message, check with the System Operator for help——
he
or she can run a disk analysis program that will reset the
—
bitmap.
2.
— buffer not INITed
Before your assembly language program can perform an open,
read or write operation, the program must assign a buffer to the
file DDB. (Because you can use the monitor call INIT to do this,
we
say that the buffer has been INITed.)
If you fail to do this
procedure, you will see this message. If
message
from within BASIC, the message
problems; check with the System Operator.
(Changed 15 October 1979)
you
may
should
see
indicate
this
memory
AMOS SYSTEM ERROR MESSAGES
3.
Page A—2
— device does not exist
You've tried to access a
recognize. For example:
device
that
the
system
does
not
.TYPE ASM1:FILE.TXT çJ
INH ASM1:FILE.TXT — device does not exist
4.
— device error
?Cannot
A
hard disk—error
has occurred; that is, the system was not
able to read data from a disk. Try to perform the operation again.
If you still have no success, check with the System Operator for
help; this message may indicate a hardware problem.
•
5.
— device full
There is not enough room on the disk to complete the data
transfer. Start over again with another device, or make room on
the first device by erasing unnecessary files.
6.
— device in use
Another user is using the non—sharable device that you wish to
access (e.g., a paper tape punch).
7.
— device not mounted
tried
have
You
.
Wait and try again later.
device is not mounted.
to access a valid system device, but that
Use the MOUNT command and try again.
— device not ready
You are trying to access a device
example,
will
you
see
this
message
that
is
not
ready.
For
if you try to mount a disk
before that device is powered up and ready.
9.
— file already exists
You've tried to create
a
file that already exists. For
example, if the file NEWCPY.MAC already exists in your account, and
you try to rename another file to thaf name:
URENAME NEWCPYWRKFIL
WRKFIL.MAC to NEWCPY.MAC
RENAME WRKFIL.MAC — file already exists
10.
— file already
open
?Cannot
Your
assembly
already open.
file twice.
language
program tried to open a file that is
Check your program to see if
(Changed 15 October 1979)
you
are
opening
the
AMOS SYSTEM ERROR MESSAGES
11.
Page A—3
— file not found
AMOS cannot find the file you've specified.
.TYPE LABDAT
?Cannot OPEN D5KQ:LABDAT.LST
•
Check
your
spelling,
and
correct device and account.
12.
make
For example:
— file not found
that
sure
you've specified the
— file not open
Your assembLy Language program has tried to access a file that
your program to see if you are
is not open for input. Check
accessing the correct file.
•
13.
— fiLe type mismatch
You've tried to use a program designed for sequential files on
a random file (or vice versa).
only on
you see:
sequential
For example, the TYPE program works
files; if you try to use it on a random file,
STYPE PRTIDX.DAT
OPEN DSKO:PRTIDX.DAT — fiLe type mismatch
14.
— illegal block
number
?Cannot
Your program has tried to access
a
disk
block
that
doesn't
exist, or that is beyond the range of the file you are using.
•
15.
— illegal user code
You've tried to access a user account that does not exist.
For example, if there is no account C100,2J on DSK1:
.TYPE DSK1:MYFILE.TXT[100,2J ç)
OPEN DSK1:MYFILE.TXTE100,2J
16.
— illegal uSer code
— insufficient
free core
?Cannot
There is not enough room in memory to compLete the operation
are attempting. Make sure that no unnecessary modules are in
your memory partition.
you
17.
— invalid filename
You've specified
understand.
a
For example:
.TXT
?Cannot OPEN
filename
that
.MAKE
— invalid filename
where the filename is a space.
(Changed 15 October 1979)
the
system
does
not
AMOS SYSTEM ERROR MESSAGES
18.
Page A—4
— protection violation
You've tried to create a file in an account other than your
own that is outside of your project. For example:
.COPY E210,33=ELIpSE.BASC100,5J
ELIPSE.BASC100,5J to ELIPSE.BASE21O,3J
OPEN ELIPSE.BASE100,5J
19.
— write protected
?Cannot
trying
— protection violation
write data to
a
device
Write—enable the disk and try again.
that you were writing to the correct disk.
You
are
to
write—protected.
that
is
Make sure
In addition to the error messages above, you can also see:
AM5OO ERROR n FOR DRIVE n RECORD n (CYLINDER n HEAD n SECTOR n)
You wilL see this message if you have SET DSKERR, and a
hard error
on a system that uses the AM500 Disk Controller Hard Disk Subsystem.
This message indicates a hardware problem—— the Disk ControLLer wasn't able
to successfully read data from the disk. The message tells you what kind of
error occurred (refer to the information
supplied with the disk drive to
find out what error conditions corresponds to that error code), and
where on
the device the data transfer operation failed (the drive, record,
cylinder,
head and sector). Check with the System Operator for help.
occurs
Buss error — PC ##
buss error indicates that an iLLegal condition was recognized on the
The numberfolLowing the letters "PC" tell you the memory
address the Program Counter was set to when the buss error occurred.
This
error can be caused by either software or hardware problems.
If
you are
aLone on the system, or other users are at a convenient stopping pLace,
your
best course is probably to reset the computer; if it
is not convenient to
A
data buss.
reset the machine, go ahead and continue runnihg.
?Command terminated — insufficient memory
You tried to execute a program from inside a command file,
there
was not enough room to Load the program into your memory partition.but Use
the
MAP
command
to see what modules are in your memory partition; delete those
you do •not need. If you stilL cannot use the command file,
talk
System Operator about getting more memory area allocated to your job.to your
ERRORn
You
see this message if you SET DSKERR and a soft disk—error occurs on
a system using an AM—200 or AM—210 Floppy Disk Subsystem.
Frequent soft
errors can indicate hardware problems with the drives; check with the System
(The number following ERROR indicates the type of soft
that
refer to the instruction supplied with the disk drive toerror
see
what
error condition corresponds to that error code.)
Because
Operator.
occurred;
this
(Changed 15 October 1979)
message
AMOS SYSTEM ERROR MESSAGES
Page A—5
soft
error (the system had to retry a data read) and not a hard
error (the data could not be read at all), you do not necessarily have •to
reports
a
unless
worry
hard error.
you see a DEVICE ERROR message (see above), which indicates a
ERROR n CMD n,, STS n, RECORD n (TRACK n, SECTOR n)
You see this message if you have SET DSKERR and a soft
on a system that is using an AM—400 Hard Disk Subsystem.
occurs
disk—error
The number
following ERROR indicates the type of soft error that occurred; refer to the
instructions supplied with the disk drive to find out what error condition
corresponds to that error code. The message teLls you where on the disk the
error occurred. Check with the System Operator.
?FiLe specification error
The format of your command line was confusing.
For example:
.APPEND ,D
?FiLe specification error
Retype
the command Line, making sure that the syntax you use is the correct
form for that particular command.
?Insufficient memory for program load
You do not have enough memory in your partition to load the program you
want to execute. Use the MAP command to make sure that no unnecessary
moduLes are
in your memory partition. If you stilL receive this message,
check with the System Operator to see if he or she can allocate your job
more memory.
?Login please
You've
tried
into the system.
System).
If you
to enter an instruction to AMOS, but you are not logged
Use the LOG command (see Section 5.3, Logging into the
need help in figuring out what to do, you •can use the HELP
command even if you are not Logged in (see Section 3.5, The HELP Command).
?Memory allocation failed
You used a monitor call (GETMEM) from within an assembly language
program to allocate space for a memory module within a memory partition——
there wasn't enough room in the partition to perform the allocation.
Make
sure that no unnecessary modules are in the memory partition.
(Changed 15 October 1979)
AMOS SYSTEM ERROR MESSAGES
Page A—6
?Memory map destroyed
Each module in your memory partition maintains a pointer to the address
of the next module in memory; if these connecting links become confused or
broken, AMOS is not sure where your memory moduLes are in your partition.
may
not need to reset the computer, but you may want to delete the
You
modules from memory and reload them just to be sure that your memory map
intact.
is
?No memory available
There is no more free memory available on the system. Consult with the
Operator who may change the amounts of memory allocated to each job
on the system.
System
(Changed 15 October 1979)
APPENDIX B
AMOS COMMAND PROCESSING
AMOS folLows a specific search procedure when Looking for a fiLe in response
Although you usuaLly don't have
to think about this search sequence, we provide the information below in
case you ever have several files of the same name in different accounts
to a command entered at AMOS command Level.
(e.g., DSKO:BACKUP.DOE2,2J, DSKO:BACKUP.PRGE1,4J and BACKUP.CMDE100,43), and
want to know which fiLe AMOS will encounter first if you enter just the name
of the file without specifying device, account or extension:
.BACKUP
For example, let's say that you enter the Directory command:
.DIR
1.
AMOS first looks at system memory (the area of memory used
by
the
operating system), to see if the disk file DIR.PRG has already been
loaded into system memory; if so, AMOS executes it.
2.
If
the
memory
module DIR.PRG is not in system memory, AMOS looks
for it in your own
executes it.
3.
partitition.
If it
is there,
AMOS
If the memory module DIR.PRG is not in system memory or in your
memory partition, AMOS looks for a disk file named DIR.PRG on the
System Disk in the System Account (DSKO:E1,4J). If it is there,
AMOS Loads a copy of
executes it.
4.
memory
If
the
file
into your
memory
partition
and
DIR.PRG does not exist in the System Account, AMOS looks for it
in the account and de'iice you are currently logged into.
5.
j
By this time, if AMOS has not found DIR.PRG, it decides that
perhaps the file is not a .PRG file (an assembly language program).
Now
AMOS
assumes that the file is a command file. First it looks
in your memory partition for a memory module named DIR.CMD;
is there, it processes the module as a command file.
if it
AMOS COMMAND PROCESSING
6.
Next
AMOS
Page 5—2
searches for DIR.CMD in the System Command File Library
Account (DSKO:E2,2J).
7.
If DIR.CMD is not in DSKO:E2,2J, AMOS Looks for it in
and device you are currently logged into.
8.
If the search for DIR.CMD has failed, AMOS decides that the file
must be a DO file. (A DO file is a special kind of command file.)
AMOS now begins to look for DIR.DO in your memory partition.
9.
10.
next searches
(DSKO: [2,23).
AMOS
the
account
for DIR.DO in the System Command File Library
The last place that AMOS searches is the device and account you are
currently logged into for DIR.DO.
If AMOS goes through the entire search procedure above without finding
DIR,
it will tell you that it can't find the file or memory module by repeating
the command back to you enclosed in question marks:
?DIR
?
You can prevent AMOS from going througtj this compl.icated search procedure by
giving more information about the file.
For example, if you say:
DSKO:DIR.CMDE12O,3J
AMOS immediately looks for the file on the System Disk in account C120,3J,
and processes the file as a command file. If AMOS can't find that file, it
repeats the entire specification back to you enclosed in question marks:
?DSKO: DIR. CMD [1 20,33?
AMOS USER'S GUIDE — INDEX
Page Index—i
Index
* symboL
6—5, 9—2
? symboL
6—5, 9—2
Account directory
Account libraries
4—5, 5—1, 9—7
Accounts
1—1, 5—1
5—2
ALL
Alpha Micro Operating System
9—2
.
.
i—i, 3—1
AM—500
2—2
AMOS command Level
2—4, 3—4
3—4, 7—1
AMOS commands
APPEND
10—3
COPY
4—6, 9—28, 13—2
DEL
11—7
12—4
DEVTBL
DIR
DSKCPY
ERASE
HELP
JOBS
LOAD
4—5, 9—7
13—3
4—8, 9—24
LOG
3—6
12—5
11—1
5—2
LOGOFF
4—9, 5—5, 13—1
MAP
11—2
MOUNT
2—3, 13—1
PRINT
9—37
RENAME
SAVE
SEND
SET
SORT
11—6
12—5
SYSTAT
SYSTEM
12—1
TRMDEF
TYPE
AMOS prompt
APPEND
ASCII
BADBLK.SYSE1,2J
Banner page
BASIC
(Changed 15 October 1979)
4—6, 9—18
12—3, 13—2
10—4
11—5
6—2
4—5, 10—1
2—2, 3—2, 7—2
10—3
10—1, 10—6
13—3
9—42
4—7
AMOS USER'S GUIDE — INDEX
Page Index—2
Block
4—5, 9—8
Cartridge
2—2
Changing disks
Command delimiters
2—3
Command file
1—2, 6—4, 8—1
7—3
Comments
8—2
8—2
8—3
Extensions
Symbols
Command file symbols
8—4
8—4
8—4
8—3
8—3
8—4
:5
:1
Command language
Command length
Command line
Command switch
1—1
3—5
3—5
9—5
6—3
Common file extensions
Control key
3—3
Control—C
2—3
Control—characters
3—3
Control—C
3—3, 3—6
Control—I
3—4
3—4
3—4
Control—Q
Control—s
Control—U
Control—Q
Control—s
3—4
9—8
9—8
COPY
4—6, 9—28, 13—2
Copying a file
Correcting typing mistakes
4—6
3—2, 3—6
Control—U
RUB key
3—4
3—2
8—2
3—7
Creating command files
Creating HELP files
Creating system commands
CR1 terminal
Curly arrow
.
7—1
2—1
1—3
Cursor
Default
Default extensions
.
3—2
1—3, 6—6
.
DEL
.
64,
Device names
Devn
6—1
DEVIBL
DIR
12—4
Directory listing file
Disk backup
Disks
(Changed 15 October 1979)
6—7
11—7
1—2
45
9—11
13—2 to 13—3
61
AMOS USER'S GUIDE — INDEX
Page Index—3
Displaying a file
4—5
DispLaying tiles
DO file
10—i
1—2, 6—4, 8—5
Argument 1.1st
Parameter symboLs
8—6
8—5
Special symbols
8—8
DSKCPY
13—3
EDIT
ERASE
9—24
Erasing a tile
Error messages
APPEND
COPY
.
.
.
DIR
ERASE
LOG
.
MOUNT
.
PRINT .
RENAME
SEND
.
SET
SORT
.
System
TYPE
.
.
.
A—i
.
Ersatz devices
Exiting programs
9—7
Exiting system commands
Extensions
File search procedures
FiLe specification
File specification defau Its
File switch
Filename
6—6, 9—3
9—6
6—1
Filespec
.
.
Floppy—disk system
Formatting disks
6—i
.
6—3
Files
Finding a file
6—1
.
.
.
Forms
Freezing screen display
FULL DUPLEX/HALF DUPLEX
Hard—copy terminal
Hard—disk system .
Hashmark
Hawk drive
HELP
HELP files
Input file
(Changed 15 October 1979)
1—3, 6—i, 7—2
9—10
2—2
13—4
9—39
3—4
2—3
2—i
2—2
9—14
2—2, 6—i
3—6
3—7
AMOS USER'S GUIDE — INDEX
Job status symboLs
JOBS
Keyboard . .
ALPHA key
Page Index—4
12—2
12—5
3—2
ESC key .
3—3
3—3
3—3
RETURN key
3—2, 3—5
CONTROL key
RUB key
.
3—2
Shift key
.
.
-
Line printer queue
Line printer spooler
3—3
9—37
9—37, 12—2
LOAD
11—1
LOG
4—1, 5—2
Logging in
Ersatz devices
5—1
Mail
5—4
s—s
START.CMD
5—5
Transferring accounts
Logging off
Logical records
to 5—2
5—4
4—9, 5—5
10—4
Logical unit
6—1
LOGOFF
4—9, 5—5, 13—1
MAIL.JNK
.
5—5
MAP
11—2
11—3
MAP Switches
MEM
6—2
Memory module
Memory partition
7—1, 9—22, 11—1
1—1, 11—1
Merging files
10—3
MOUNT
2—3, 4—2, 13—1
Mounting disks
Multiprogramming
Multitasking
-
NonsharabLe devices
Operation switch
Optional elements
Output file
.
Password
Physical device
PPN
PRINT
Printing a directory Listing
Printing a file
Programmer number
Project number
Proj ect—programmer number
(Changed 15 October 1979)
2—3
1—1
1—1
12—5
9—6
7—2
9—4
5—2 to 5—3
6—1 to 6—2
1—2, 5—1
9—37
9—12
9—37
5—1
5—1
5—1, 6—5
AMOS USER'S GUIDE — INDEX
Page Index—5
Queue
9—37
Random files
Releasing screen dispLay
3—4
REMOTE/LOCAL
RENAME
9—18
Renaming a file
Reserved PPNs
RESET button
RETURN
7—3
SAVE
SEND
11—6
1 2—5
Sequential files
10—2
SET
12—3, 13—2
SETBPI
12—4
13—2
9—40
13—2
9—39
12—5
SET DSKERR
SET FORMS
SET VERIFY
Setting forms
Sharable devices
Sharing accounts
SORT
5—3
1 0—4
Special devices
6—2
Spooler Operator
9—37
9—39
Sorting files
10—4
Spooler
START.CMD
5—5
Syntax
7—2
SYSTAT
12—1
SYSTEM
11—5
System demonstration
System Disk
System Drive
System error messages
System interrupt command
System memory
System Operator
4—1
2—2
2—2
A—i
.
.
.
3—3
11—1
111
SYSTEM.INI
8—2
Tabs
3...4
Terminals
Text editing
Timesharing
Trident drive
2—1
4—3
1—1
6—1
TRM
6—2, 9—12
TRMDEF
6—2
Turning off the system
Turning on the system
TYPE
Typing commands
Underlines
(Changed 15 October 1979)
2—4
2—1
4—5, 10—1
3—4
1—3
AMOS USER'S GUIDE — INDEX
Page Index—a
VUE
Wildcard file commands
6—3
6—6, 9—1
Wildcard symboLs
WiLdcards
9—2
0 symbol
9—2, 9—9
(Changed 15 October 1979)
4—8, 6—5