1
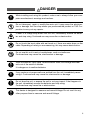
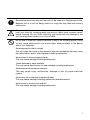
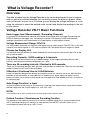
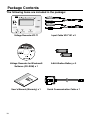
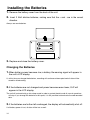
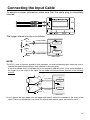
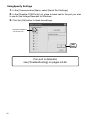
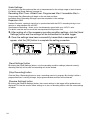
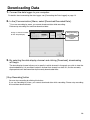
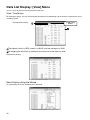
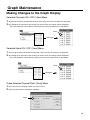
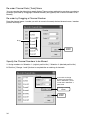
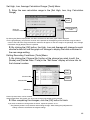
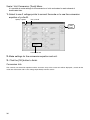
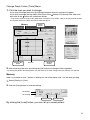
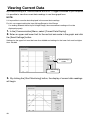
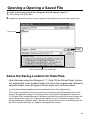
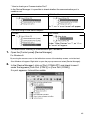
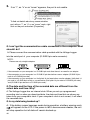
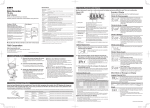
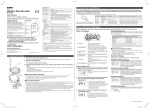
User’s Manual
Thank you for purchasing our product.
Carefully read this instruction manual
before using this unit.
Distributed by MicroDAQ.com, Ltd.
www.MicroDAQ.com
(603) 746-5524
© Copyright T&D Corporation. All rights reserved.
2013.04 16504220004 4th Edition
Distributed by MicroDAQ.com, Ltd.
www.MicroDAQ.com
(603) 746-5524
Contents
Notices about this User’s Manual -------- 2
Viewing Current Data --------------------- 40
Software User’s Agreement --------------- 3
Saving Recorded Data-------------------- 41
Safety Precautions and Instructions ---- 4
Creating Text File --------------------------- 42
What is Voltage Recorder? ---------------- 8
Opening a Opening a Saved File ------ 43
Package Contents ------------------------- 10
Part Names and Functions -------------- 11
Troubleshooting ----------------------------- 44
Specifications-------------------------------- 47
Installing the Batteries -------------------- 14
Options ---------------------------------------- 48
Connecting the Input Cable ------------- 15
Turning the Power On --------------------- 16
Installation ------------------------------------ 17
Software Operation ------------------------ 18
Connecting the Data Logger ----------- 20
Setting up the COM Port ----------------- 21
Recording Start ----------------------------- 23
How to Start Recording via Computer --- 23
How to Start Recording via Buttons on
Logger -------------------------------------------- 25
Scale Settings ------------------------------- 26
Scale Settings ---------------------------------- 26
Creating Measuring Unit Patterns for
Logger Display---------------------------------- 27
Downloading Data ------------------------- 29
Graph Display Names and Functions 30
Graph Maintenance ----------------------- 33
Making Changes to the Graph Display -- 33
Graph Graph Graph Operations: [Graph] Menu39
Distributed by MicroDAQ.com, Ltd.
www.MicroDAQ.com
(603) 746-5524
Notices about this User’s Manual
In order to properly use this product, please carefully read this manual before using.
T&D Corporation accepts no responsibility for any malfunction of and/or trouble with this
product or with your computer that is caused by the improper handling of this product and will
deem such trouble or malfunction as falling outside the conditions for free repair outlined in the
attached warranty.
-
All rights of this User’s Manual belong to T&D Corporation. It is prohibited to use, duplicate and/or
arrange a part or whole of this User’s Manual without the permission of T&D Corporation.
-
Microsoft and Windows are registered trademarks of Microsoft Corporation in the United States
and/or other countries.
-
Windows Vista is either a registered trademark or trademark of Microsoft Corporation in the United
States and/or other countries.
-
Company names and product names are trademarks or registered trademarks of each company.
-
Specifications, design and other contents outlined in this manual are subject to change without
notice.
-
On screen messages in this manual may vary slightly from the actual messages.
-
Please notify the shop where you purchased this product or T&D Corporation of any mistakes,
errors or unclear explanations in this manual.T&D Corporation accepts no responsibility for any
damage or loss of income caused by the use of our product.
-
This product has been designed for private or industrial use only.It is not for use in situations where
strict safety precautions are necessary such as in connection with medical equipment, whether
directly or indirectly.
-
We are not responsible for any malfunction or trouble caused by the use of our product or by any
problem caused by the use of measurement results of our unit. Please be fully aware of this before
using our product.
-
Some of our products, which come under the category of strategic goods in foreign trade law, need
the permission of the Japanese government to be exported outside of Japan.
-
Please read the warranty and provisions for free repair carefully.
-
The warranty that is included in this user’s Manual cannot be reissued, so please keep it in a safe
place.
-
The User’s Manual for this and all T&D products can be downloaded free of charge from our web
site.
*FCC Compliance Statement for American Users
This device complies with Part 15 of the FCC Rules.
Operation is subject to following two conditions: (1) this device may not cause harmful interference. and (2) this device must accept any interference
received, including interference that may cause undesired operation.
NOTE: This equipment has been tested and found to comply with the limits for a Class A Digital Device, pursuant to Part 15 of the FCC Rules.
These limits are designed to provide reasonable protection against harmful interference in a residential installation. This equipment generates, uses
and can radiate radio frequency energy and, if not installed and used in accordance with the instructions, may cause harmful interference to radio
communications.
However, there is no guarantee that interference will not occur in a particular installation. If this equipment does cause harmful interference to radio
or television reception, which can be determined by turning the equipment off and on, the user is encouraged to try to correct the interference by
one or more of the following measures:
-- Reorient or relocate the receiving antenna.
-- Increase the separation between the equipment and receiver.
-- Connect the equipment into an outlet on a circuit different from that to which the receiver is connected.
-- Consult the dealer or an experienced radio/TV technician for help.
Warning:
2
This equipment has been verified to comply with the limits for a Class A personal digital device, pursuant to Subpart B of Part 15 of
FCC Rules. Only peripherals (computer input/output devices, terminals, printers, etc.) certified or verified to comply with the Class A or
B limits may be attached to this equipment. Operation with non-certified or non-verified personal computer and/or peripherals is likely to
result in interference to radio and TV reception. The connection of a non-shielded equipment interface cable to this equipment will
invalidate the FCC Certification of this device and may cause interference levels which exceed the limits established by the FCC for this
equipment.You are cautioned that changes or modifications not expressly approved by party responsible for compliance could void your
authority to operate the equipment.
Distributed by MicroDAQ.com, Ltd.
www.MicroDAQ.com
(603) 746-5524
Software User’s Agreement
Escape Clauses
-
T&D Corporation does not guarantee the operation of "Voltage Recorder for Windows".
T&D Corporation shall not accept any responsibility for any damage, whether direct or indirect, that
results from the usage of "Voltage Recorder for Windows".
-
Specifications of "Voltage Recorder for Windows" may be subject to change and service may be
terminated without advance notice to the user.In such a case, T&D Corporation shall not be
responsible for any damages, whether direct or indirect, from the inability to use "Voltage Recorder
for Windows".
-
T&D Corporation has no obligation to correct any defects found in "Voltage Recorder for Windows".
Copyright
-
The Copyright for "Voltage Recorder for Windows", including the program and relevant documents,
belongs solely to T&D Corporation.
-
The reprinting or redistribution for commercial purposes whether in part or in whole, in magazines
or as a part of any product is strictly forbidden without the expressed consent of T&D Corporation.
Any inquires concerning commercial redistribution should be directed to the Sales Department of
T&D Corporation.
- Please do not attempt to make any changes or modifications to "Voltage Recorder for
Windows".
3
Distributed by MicroDAQ.com, Ltd.
www.MicroDAQ.com
(603) 746-5524
Safety Precautions and Instructions
Please carefully observe the following safety measures
when using our product.
To prevent any loss or damage to our customers, other people and / or property, and to
ensure the proper use of our products we ask that before using our product you carefully
read, understand and follow the safety rules and precautions for our products as outlined
below.
Explanation of Symbols
Explanation of Warning Symbols
DANGER
CAUTION
These entries are actions that absolutely under no
circumstance should be taken. The taking of such an action
may cause serious personal physical damage or death.
These entries are actions that if taken may lead to physical
injury or damage to parsons or things.
Explanation of Picture Symbols
Denotes an important warning or caution. Near the symbol will
appear another symbol giving details. (EX : stands for
CAUTION AGAINST ELECTRIC SHOCK)
Denotes a forbidden action. Inside or near the symbol will appear
another symbol giving details. (EX : stands for DO NOT TAKE
APART)
Denotes an action that you must take. Near the symbol will
appear another symbol giving details. (EX : stands for PULL
POWER PLUG OUT FROM OUTLET)
4
Distributed by MicroDAQ.com, Ltd.
www.MicroDAQ.com
(603) 746-5524
DANGER
While installing and using this product, make sure to always follow your computer manufacturer's warnings and cautions.
Do not take apart, repair or modify the main unit. It may cause fire, electrocution or damage. Ask the shop where you purchased the product or T&D Corporation to carry out any repairs.
If water or a foreign body enters into this unit, immediately remove the batteries and stop using. Continued use may cause fire or electrocution.
Do not touch the input cable with wet hands or if there are water drops on the
cable. Depending on what you are measuring, this may cause electrocution.
Do not use this unit in wet or humid places, such as a bathroom.
Continued use may cause fire, electrocution or damage.
Store all batteries, input cable, communication cable, and Voltage Recorder
units out of the reach of children.
It is dangerous to swallow batteries.
If any smoke or strange smells are emitted from the unit, immediately cease
using it. Continued use may cause fire, electrocution or damage.
Do not drop the unit, or expose the unit to a strong impact. If that happens to
the unit, immediately remove the batteries and stop using.
Continued use may cause fire or electrocution.
This device is designed to measure and record Voltage. Do not use it for any
other purpose than to measure and record Voltage.
5
Distributed by MicroDAQ.com, Ltd.
www.MicroDAQ.com
(603) 746-5524
CAUTION
This unit is not water-resistant.
If the unit gets dirty, wipe it with a clean cloth and a mild detergent.
The VR-71 uses a common ground for both channels, so when connecting
input cables be sure to connect the ground (black wire) for each channel to the
same.
The possible measuring range for this data logger is: ±15V with a maximum
input of ±20V. Connecting it to high voltage (AC 100V, etc...) may cause
damage to the logger and / or to the signal origin.
Do not remove the input cable from the logger and leave it while still connected
to the origin of the signal. There is a chance that it will come into contact with
another signal and cause a short.
Do not expose the unit to harmful gases or chemicals. It may cause corrosion
and / or other danger to the unit and to people handling the unit.
Do not use any batteries other than AAA Alkaline batteries.
It may cause fire or damage.
Condensation may occur if the unit is moved from one environment to another
where the difference in temperature is great. Use the unit in an environment
where the ambient temperature is from 0 to 50°C and the humidity is from
90%RH (no condensation) or less.
Battery terminals may provide insufficient contact due to age or vibration.
Please be careful not to lose data due to insufficient contact.
Battery life depends on the measurement environment, communication
frequency, recording interval and battery quality.
If water or a foreign object enters the case, immediately cease using it.
6
Distributed by MicroDAQ.com, Ltd.
www.MicroDAQ.com
(603) 746-5524
Remove batteries from any unit that will not be used for a long period of time.
Batteries left in a unit not being used for a long time may leak and cause a
malfunction.
To prevent damage to the unit from static electricity, remove static electricity
from your body by touching metal around you (door knob, window frame)
before touching the unit. Static electricity may cause not only damage to the
unit, but may cause breaks in or a loss of data.
Do not use or store the Thermo Recorder in any of the following places. Doing
so may cause electrocution, fire and/or other adverse effects to the device
and/or your computer.
Areas exposed to direct sunlight
This will cause the inside of the device to become overheated and may cause
fire, deformation, and/or other damage including malfunction.
Areas prone to strong magnetic fields
This may cause damage including malfunction.
Areas exposed to water leakage
This may cause electrocution or other damage including malfunction.
Areas exposed to excessive vibration
This may cause injury, malfunction, damage or loss of proper electrical
contact.
Areas near fire or exposed to excessive heat
This may cause damage including malfunction and deformation.
Areas prone to smoke, dust and dirt
This may cause damage including malfunction.
7
Distributed by MicroDAQ.com, Ltd.
www.MicroDAQ.com
(603) 746-5524
What is Voltage Recorder?
Overview
The data recorded into the Voltage Recorder units can be downloaded to your computer
with our exclusive software whereby you can easily process the data into graphs, tables,
save to files and / or print it out. Of course you can display the voltage reading as is, or by
using the software to select the desired scale, convert and display the readings in the unit
of your choice
Voltage Recorder VR-71 Basic Functions
Each Logger has 2 Measurement / Recording Channels
It's possible to simultaneously measure and record at two places with one logger. By pressing the
DISPLAY button on the logger, you can choose to set the LCD display to show both channels’
readings alternatively, show one channel as a fixed display or show neither channel.
Voltage Measurement Range: DC±15V
Our input cables and probe can measure and record various output signals. The VR-7101 or VR-7102
(optional) can record signals of ±15V and our optional VR-7103 probe allows a range of 4 20mA.
Choose the Display Unit
It is possible using the software to create and edit dot matrix patterns to be used in the LCD as the
unit of measurement.
Recording Capacity : 8,000 readings x 2 channels
Each channel can record and store up to 8000 readings. At the longest recording interval of 60
minutes, recording can continue consecutively for 1 year.
There are 20 recording intervals / Shortest is 0.02 seconds.
There are 20 recording intervals (0.02 seconds to 60 minutes) to select from. There are two recording
modes to choose from: One Time and Endless.
9 Months of Continued Use on 2 AAA Batteries
Using our specially designed low energy consumption circuit this unit can run on two AAA alkaline
batteries for up to 9 months of continued use. No need to worry about where you place it as the
battery will allow you to measure and record over long periods of time whether the unit is in transit or
in a distant place.
Auto-Range Function / ± Input
You can manually set the range or you can set to have the auto-range function automatically select
the best range from the 4 input ranges ±1V, ±2V, ±6V, ±15V.
NOTE:
If the recording interval is 0.5 seconds or less the auto-range function cannot be used.
Preheat Function / Simultaneous Recording Function
The expansion unit (optional) allows you to transmit a preheat signal that is synchronized with the
VR-71 recording timing to turn sensors or other devices ON and OFF, and also allows you to
simultaneously record with up to 4 VR-71 units.
8
Distributed by MicroDAQ.com, Ltd.
www.MicroDAQ.com
(603) 746-5524
Basic Functions of Voltage Recorder for Windows
The easy-to-use software included with this product offers a variety of useful
functions at your fingertips including: control of data logger settings data
downloading, graph display, table creation, printing, and file output.
Recording Start Settings
All types of Recording Settings can be made here: Channel Name(s), Recording Mode, Recording
Interval, Input Voltage Range, and Scale Settings. By setting a date and time in the main unit you can
easily program to start recording on that date at the set time.
Scale Conversion / Unit of Display Selection Function
It is possible to set the scale and unit of display for the voltage range of each channel.
Scale Conversion: Specify whether to use 2 voltage points to convert the scale or to use the
conversion equation of y=Ax+B. (y stands for the value after conversion and x is the voltage input
directly from the sensor)
Choose the Display Unit: It is possible using the software to create and edit dot matrix patterns to be
used in the LCD as the unit of measurement.
Current Data Display
By communicating at a 1 second interval with a VR-71 logger connected to your computer it is
possible to view the current data readings in real time graph form.
View and Print Graphs
View 8 channels of data in 1 display
Downloaded data from the main unit is automatically displayed in graph form.
Up to 8 channels (4 units) of data can be represented in one graph.
The data scale and unit to be used in the display can be set with the Scale Settings.
Easy zoom in and out with mouse
By selecting a range with your mouse you can easily zoom in and out on data.
Calculate and view the highest, lowest and average readings for a desired range
In the Graph, for each channel it is possible to designate a desired range from which the
highest, lowest and average readings will be calculated and displayed.
Graph Printing
It is possible to easily print in color the Graph as it is being displayed.
View and Print Measured Data List
You can view the data displayed in the graph window as a list and then choose to print.
View in Easy to Distinguish Colors
In the data list, the highest value will appear in red, the lowest in blue, and the average in pink.
Printing the Data List
It is possible to print the entire list as displayed or to select pages for printing.
Creating Text File
It is possible to convert the data for a specified range (time period) to common text file format (CSV
type format), so that it can be exported to spreadsheet software such as Excel or Lotus.
9
Distributed by MicroDAQ.com, Ltd.
www.MicroDAQ.com
(603) 746-5524
Package Contents
The following items are included in the package:
Voltage Recorder VR-71
Input Cable VR-7101 x 2
Voltage Recorder for Windows®
Software (CD-ROM) x 1
AAA Alkaline Battery x 2
User’s Manual (Warranty) x 1
Serial Communication Cable x 1
10
Distributed by MicroDAQ.com, Ltd.
www.MicroDAQ.com
(603) 746-5524
Part Names and Functions
Appearance Diagram
Front
LCD Display
DISPLAY INTERVAL
Button
Button
REC/STOP
Button
Side
Channel 1
Input Cable Jack
Channel 2
Communication
Cable Jack
Power Switch
Back
Battery Case
Button Operations
DISPLAY Button
: Press to switch to View Ch 1 only / View Ch 2 only/ View both
channels alternately / View neither channel.
INTERVAL Button : Press to make changes to the Recording Interval Setting
REC/STOP Button : Press to start and stop recording.
11
Distributed by MicroDAQ.com, Ltd.
www.MicroDAQ.com
(603) 746-5524
LCD Display
...Channel Mark
The channel number of the measurement being displayed will appear.
...REC Mark
The recording status is displayed.
ON(
):Recording in progress, BLINKING(
):Waiting for programmed start.
...Recording Capacity
After every 2000 readings the scale will be marked from left to right.
Display Status
Recording will continue and display will not change.
If Endless...
If Onetime...The display will change to FULL and recording
will stop.
ENDLESS /ONETIME...Recording Mode
There are two recording modes to choose from, One Time and Endless. You can make changes to
recording mode with the software.
Default : ONETIME
...Battery Life Warning Display
When the battery power becomes low, a mark will appear on the LCD of the
main unit, if power goes even lower the unit will enter Sleep mode*1 and the
display will change. Please change the battery as soon as the Battery
[Main Unit LCD Display]
Warning Mark appears.
*1 If the battery is not changed and power becomes even lower, all normal operations will stop.
...Unit of Measurement
The unit of measurement of the reading being displayed will be shown in 3 letters. It is possible to
create letter patterns with the software.
...Measurements and Messages Area
Current measurements, recording intervals and so on will appear here.
12
Distributed by MicroDAQ.com, Ltd.
www.MicroDAQ.com
(603) 746-5524
Other Displays
COM
During the communication of settings or during the download
of data the (COM) mark will appear in the space where readings usually appear.
FULL
When recording under the One Time mode and upon reaching capacity of 8,000 readings, “FULL” will appear in the LCD
display and recording will automatically stop.
Non-Display
By selecting to not view the measurement readings, only the
readings themselves will be hidden and other messages will
still be in view.
LCD Display with Expansion Unit connected
Simultaneous Recording Settings (MST mark)
If during settings for Simultaneous Recording, the unit was
set as the Master, by pressing the REC / STOP button on the
unit the letters MST will appear in the unit’s LCD.
Simultaneous Recording Settings (SLV mark)
If during settings for Simultaneous Recording, the unit was
set as the Slave, by pressing the REC / STOP button on the
unit the letters SLV will appear in the unit’s LCD.
13
Distributed by MicroDAQ.com, Ltd.
www.MicroDAQ.com
(603) 746-5524
Installing the Batteries
1. Remove the battery cover form the back of the unit.
2.
Insert 2 AAA alkaline batteries, making sure that the + and - are in the correct
direction.
Always use new batteries.
3. Replace and close the battery cover.
Changing the Batteries
1.When battery power becomes low, a battery life warning signal will appear in
the unit’s LCD display.
If, at this time you change the batteries, recording will continue uninterrupted and all data will be
saved for downloading.
2.If the batteries are not changed and power becomes even lower, SLP will
appear in the LCD display.
The unit will automatically go into sleep mode in order to protect the data and all normal operations
will stop. If you change the batteries at this point, it is still possible to download all saved recorded
data.
3.If the batteries are further left unchanged, the display will automatically shut off.
If all battery power is lost, all data will be lost as well.
14
Distributed by MicroDAQ.com, Ltd.
www.MicroDAQ.com
(603) 746-5524
Connecting the Input Cable
To ensure a proper connection make sure that the cable plug is completely
inserted.
The logger internal circuitry is as follows
RED
Voltage Signal
<Input Cable>
Measurement
Circuit
BLACK
RED
Measurement
Circuit
BLACK
<Input Cable>
<Main Unit>
NOTE:
The VR-71 uses a common ground for both channels, so when connecting input cables be sure to
connect the ground (black wire) for each channel to the same point.
A circuit to prevent shorts is included, but if you connect to different points it may cause damage to
the logger or to the origin of the signal. Do not under any circumstances connect in the following
manner.
RED
<Input Cable>
BLACK
RED
ch.1
Measurement
Circuit
GND
<Input Cable>
Measurement
Circuit
ch.2
BLACK
<Main Unit>
Do not remove the input cable from the logger and leave it while still connected to the origin of the
signal. There is a chance that it will come into contact with another signal and cause a short.
15
Distributed by MicroDAQ.com, Ltd.
www.MicroDAQ.com
(603) 746-5524
Turning the Power On
1.Turn on the power by pushing up the power switch on the logger.
Due to the back-up function, even if the power is turned OFF, data will not be lost. If
you are in the process of measuring or recording, the measuring or recording will be
stopped.
16
Distributed by MicroDAQ.com, Ltd.
www.MicroDAQ.com
(603) 746-5524
Installation
Before installing, confirm the following
Is Windows operating properly?
If Windows is not operating properly, “ Voltage Recorder for Windows ” may not be installed correctly
or it may not operate properly.
Please quit all other applications
If other programs are open, please close and quit all of them, making sure to quit all Quick Start
programs such as a virus checker.
- To install [Voltage Recorder for Windows], it is necessary to have Administrator rights (Computer
Administrator) for the computer in which you wish to install it.
- If you are using Windows 8, carry out the rest of the installation process on the "desktop" which can
be accessed via a tile on the Start screen.
1. Open Windows
2. Place the acompanying CD-ROM into your CD-ROM drive. In a few seconds,
the "Install Program" window wil appear.
If the “Install Program” window does not automatically open, double-click on the [setup.exe] icon in
the [VRwin] folder in your CD/DVD drive.
The [User Account Control] dialog box will appear. Click [Yes].
3. Continue the installation by following the directions as they appear.
[Next]
button
4. After completing installation, click the [Finish] button; "Voltage Recorder for
Windows" will appear in the Windows Start Screen or Start Menu.
17
Distributed by MicroDAQ.com, Ltd.
www.MicroDAQ.com
(603) 746-5524
Software Operation
How to Open
Open "Voltage Recorder for Windows" from the Windows Start Menu or Start Screen.
For details about how to use the software, please see the explanations in the
Software Help Menu.
In the Menu Bar, click [Help] - [Search by Topic] , then click on one of the tabs
[Contents], [Index], or [Search] to search for the topic or term you are unsure
about or have questions about.
Contents
Contents]
By clicking
Index
Search
Mark, you can find detailed information for that subject.
[Index]
By selecting a Keyword in the Keyword list, and clicking the [Display] button at the bottom, a detailed
explanation will appear.
[Search]
Enter the keyword(s) you wish to search for and click the [List Topics] button. All topics that
contain the keyword will be displayed.
18
Distributed by MicroDAQ.com, Ltd.
www.MicroDAQ.com
(603) 746-5524
In the Menu Bar, click [Help] - [Data Display Format Settings], then select date
display format.
By clicking the help button in a dialog box, an explanation for that dialog box will appear.
In the Graph Window, by clicking on the
in the toolbar, you can have short
explanations appear the next time you click on a menu, an icon, or anything in
the main window.
19
Distributed by MicroDAQ.com, Ltd.
www.MicroDAQ.com
(603) 746-5524
Connecting the Data Logger
Connecting the Data Logger to your Computer
Connect the serial communication cable to your
computer
Connect the serial (RS-232C) communication cable to your computer
Make sure to connect it to the correct place to ensure communication. Make sure that the cable is
inserted fully, so as not to cause an improper connection.
Examples of serial port marks
The communication cable connector is a D-Sub 9 pin
female. Connect to a place with a mark as such.
Connect the serial cable to the data logger.
Connect the serial cable that is connected to your computer to the data
Serial cable that was connected
olgge.r
to your computer
20
Distributed by MicroDAQ.com, Ltd.
www.MicroDAQ.com
(603) 746-5524
Setting up the COM Port
Make necessary serial port settings to enable
communication via the serial communication cable.
With Voltage Recorder for Windows set the serial port you wish to use. There are
two ways to make the port settings: [Auto-Detect] or [Specify Settings].
Using [Auto-Detect]
* Make sure that the data logger is connected by the serial cable to the serial
port you wish to use.
1. In the [Communication] Menu, select [Serial Port Settings].
2. Click the [Auto Detect] button to start the search.
3. After the search has been completed, a message will appear showing
4. Click the [OK] button to finish the settings.
the results.
[Auto-Detect]
Button
Detection Results
[OK]
Button
If no port is detected,
see [Troubleshooting] on pages 44-46.
21
Distributed by MicroDAQ.com, Ltd.
www.MicroDAQ.com
(603) 746-5524
UsingSpecify Settings
1. In the [Communication] Menu, select [Serial Port Settings].
2. In the [Possible COM Ports] List, place a check next to the port you wish
to use for the Voltage Recorder for Windows.
3. Click the [OK] button to finish the settings.
Check the COM Port
you wish to use.
[OK]
Button
If no port is detected,
see [Troubleshooting] on pages 44-46
22
Distributed by MicroDAQ.com, Ltd.
www.MicroDAQ.com
(603) 746-5524
Recording Start
There are 2 ways to start recording
Start recording by using the computer software....Recording will start on the
specified date and time.
Start Recording via Buttons on Logger.... By pressing the REC button on the
logger recording will start immediately.
* When using the Expansion Unit, see the user’s manual that accompanies the Expansion Unit.
Receive
Settings
[Send Settings] button
[Start Recording] button
[Stop Recording] button
How to Start Recording via Computer
1. Connect the data logger to your computer.
For details about connecting the data logger, see [Connecting the
Data Logger ] on page12.
2. From the [Communication] Menu, select [Start Recording].
Channel Name
It is possible to make channel name settings for each channel.
Recording Mode: <Select from: Endless / One Time>
One Time: Upon reaching capacity of 8,000 readings,“FULL” will appear on the LCD display and
recording will automatically stop.
Endless: Upon reaching capacity of 8,000 readings,the oldest data is overwritten and recording
continues.
Recording Interval: <Select from: “Rec. in Seconds” (1,2,5,10,15,20,30 seconds
or 1,2,5,10,15,20,30,60 minutes) or “Rec. in Msec” (20,50,100,200,500 msec)>
Click the
button to select an interval from the list.
Input Voltage Range:< “Rec. in Seconds” (±1V,±2V,±6V,±15V,or Auto-Range) or
“Rec. in Msec” (±1V,±2V,±6V,±15V)>
Select by clicking the
and choosing the Input Range from the lists.
23
Distributed by MicroDAQ.com, Ltd.
www.MicroDAQ.com
(603) 746-5524
Scale Settings:
It is possible to set the scale and the unit of measurement for the voltage range of each channel.
For details, see [Scale Settings] on page 18.
Recording Start Time: <Select from: Programmed Start / Immediate Start >
Programmed Start:Recording will begin on the set date and time.
Immediate Start: Recording will begin upon the completion of the settings.
Expansion Unit
Preheat:Transmits a preheat signal that is synchronized with the VR-71 recording timing to turn
sensors or other devices ON and OFF.
Simultaneous Recording : allows you to simultaneously record with up to 4 VR-71 units.
For details, see the user’s manual that accompanies the Expansion Unit.
3. After making all of the necessary recording condition settings, click the [Send
Settings] button and the settings will be transmitted to the data logger.
4. Once the settings have been successfully transmitted a message will
appear, click the [OK] button to complete the setting procedure.
The logger display when using Immediate Start
The logger display when using Programmed Start
[Send Settings] button
By clicking the [Send Settings] button, only the recording condition settings (channel name(s),
recording interval) will be sent and recording will not be started.
[Stop Recording] button
Click the [Stop / Recording] button to stop a recording session in progress. By clicking it while a
programmed start is waiting to begin, the programmed date and time will be cleared.
[Receive Settings] button
By clicking the [Receive Settings] button, the current settings in the logger will be gathered and
displayed. This can be used to check settings or to start a recording session with the same settings
as before.
24
Distributed by MicroDAQ.com, Ltd.
www.MicroDAQ.com
(603) 746-5524
How to Start Recording via Buttons on Logger
If you wish to make settings to the Channel Name, Recording
Mode, Input Voltage Range, Scale Settings or any others, it must
be done first from the computer using the software.
1. Click the INTERVAL button to select the Recording Interval
2. By pressing in on the REC button for more than 2 seconds the REC mark will
appear in the LCD and recording will start.
NOTE:
By starting a new recording session, all data currently saved in the unit will be erased.
Even if the unit is waiting for a programmed start, by pressing the [REC/STOP] button until the REC
mark appears, you can start a new recording session immediately.
Recording Stop
You can stop a recording session by pressing the [REC/STOP] button until the REC mark disappears
from the display. When it has disappeared, recording has stopped.
Record interval is confirmed while recording
By pressing the [INTERVAL] button during recording or while waiting for a programmed recording to
start, the currently set recording interval will be displayed. Recording Interval settings will not be
changed during a recording in progress.
25
Distributed by MicroDAQ.com, Ltd.
www.MicroDAQ.com
(603) 746-5524
Scale Settings
Here is where you can make settings for the desired scale from the voltage
readings and the unit display pattern for the logger LCD.
Scale Settings
Logger LCD Display
Pattern Editing Area.
The unit for
display in the
Graph
Scale Settings
Specify how you wish the values for the recorded data for each channel’s input voltage range to
be displayed. Decide whether to use 2 voltage points to convert the scale or to use the conversion
equation of y=Ax+B. It is also possible to set in what unit you wish to view the data in the Graph.
Specify 2 points
Taking into account the voltage input range of each channel, specify 2 points at which voltage data
be taken and assign values to those points to reflect the scale you have chosen.
NOTE:
It is possible to enter decimals or minus values. However
do not enter values that would result in the slope being 0.
Make sure to make settings for the slope of the conversion
equation, such that the y-intercept is in a range of –9,999
to +9,999.
Use y=Ax+B
Do not specify 2 points, but enter a simple equation for conversion.
NOTE:
It is possible to enter decimals or minus values. However
do not enter values that would result in the slope being 0.
Make sure to enter values for A and B that are between
–9,999 and +9,999.
Graph Display Unit Settings
Click the button to select a previously registered unit or enter a new one directly.
* If you are make a new entry, you can enter up to 8 characters.
26
Distributed by MicroDAQ.com, Ltd.
www.MicroDAQ.com
(603) 746-5524
Creating Measuring Unit Patterns for Logger Display
Creating a Dot Pattern
There are 2 ways to create dot patterns.
1. Click the
and select, or enter a new
one directly.
2.
By clicking the [Display Pattern] button,
the dot pattern editing area will
appear.
You can create a new pattern by clicking
the mouse on the dots in the dot pattern
editing area.
Dot Pattern Editing Area.
Saving a Dot Pattern
1. Put a check on the Channel No. you wish to
save.
2. Enter the No. you wish to save.
3.
Click [Save] to complete the saving process.
Save No.
Channel No. Save No.
[Save]
Button
Reading a Dot Pattern
1. Click the Channel No. of the pattern you wish
to read (upload).
2. Click the
button and select the No. of the
saved pattern you wish to upload or enter that
number directly.
3. By clicking the [Load] button, the dot pattern
editing area will appear.
Save No.
Channel No. Save No.
[Load]
Button
27
Distributed by MicroDAQ.com, Ltd.
www.MicroDAQ.com
(603) 746-5524
[Read Settings]
Button
[Save Settings]
Button
Read Settings
Read the settings by calling up the scale settings file in which they have been saved.
Save Settings
It is possible to assign a name and save all scale settings, including logger LCD patterns, in the
Scale Settings File.
28
Distributed by MicroDAQ.com, Ltd.
www.MicroDAQ.com
(603) 746-5524
Downloading Data
1. Connect the data logger to your computer.
For details about connecting the data logger, see [Connecting the Data Logger] on page 12.
2. In the [Communication] Menu, select [Download Recorded Data].
*If you are recording by msec, you cannot download data while recording.
Please stop recording first and then download data.
[ Stop Recording ]
button
Assign a channel number
for the Graph display.
[ Download ]
button
3. By selecting the data display channel and clicking [Download], downloading
will begin.
The data display channel allows you to specify in which channel in the graph you wish to view the
downloaded data. It is possible to select a channel that already has data in it, but the currently
displayed data will be overwritten by the newly downloaded data.
[Stop Recording] button
You can stop recording by clicking this button.
If you are recording by msec, you cannot download data while recording. Please stop recording
first and then download data.
29
Distributed by MicroDAQ.com, Ltd.
www.MicroDAQ.com
(603) 746-5524
Graph Display Names and Functions
A and B Cursor Movement Buttons
By clicking the arrow buttons, you can simultaneously move the A/B cursors.
A and B Cursor Buttons
Click and drag the A or B button to move the cursor to the left or right.
The Vertical Axis Display ON/OFF
Shift the vertical axis scale display ON/OFF.
Open File
Overwrite Data
Data List Display
Return to Original Size
Step by Step to Original
Set High, Low, Avg. Calculation Range
Print Preview
Edit Recording Conditions
Re-order Channels
Help
Hide / View
Channels
Merge Channel Data
Erase Selected Channel Data
Toolbar
Buttons appear for frequently used commands.
Menu Bar
Click on the desired menu in the Menu Bar to set or display each function from which you can choose from an
array of commands.
Button for Moving Horizontal Axis
The time axis moves by clicking these arrow buttons.
Horizontal Gauge Bar
30
Distributed by MicroDAQ.com, Ltd.
www.MicroDAQ.com
(603) 746-5524
By dragging the gauge you can move left and right to the data you want to be displayed.
Vertical Axis of Each Channel
The vertical axis scale is displayed for each channel. By clicking
, the axis can be scrolled for each channel.
Button for Moving Vertical Axis
The vertical axis moves up or down by clicking these arrow buttons.
Vertical Gauge Bar
By dragging the gauge you can move up and down to the data you want to be displayed.
A and B Cursor Position Information
Channel Info List Display
Displays data information for Channels 1 to 8.
Zoom in Using the Mouse
With the left button drag the mouse to outline the area you want to zoom in on
Menu Display Using the Mouse
By right clicking on the graph, the Menu will be displayed.
31
Distributed by MicroDAQ.com, Ltd.
www.MicroDAQ.com
(603) 746-5524
Data List Display: [View] Menu
This is a list of the data that was displayed in graph form.
[Date / Time] Button
By clicking this button, you can shift the display between the recorded date and the amount of elapsed time since
recording started.
[Date/Time]
button
Recorded Date Display
The highest value is in RED, lowest is in BLUE, and the average is in PINK
By dragging the Scroll Bar up and down you can move to the data you want.
Elapsed Time Display
Menu Display Using the Mouse
By right clicking on the list, the Menu will be displayed.
32
Distributed by MicroDAQ.com, Ltd.
www.MicroDAQ.com
(603) 746-5524
Graph Maintenance
Making Changes to the Graph Display
Selected Channels ON / OFF: [View] Menu
1. By moving the mouse to [Selected Channels ON / OFF], the channel numbers are displayed.
2. By clicking the channel No. of the channel you wish to view, the settings will be completed.
* The same operation can be done by clicking on the channel number icons in the Toolbar.
Check
<Enlarged>
Selected Scale ON / OFF: [View] Menu
1. By moving the mouse to [Scale Channels ON / OFF], the channel numbers are displayed.
2. By clicking the channel No. of the channel you wish to view, the settings will be completed.
* The same operation can be done by clicking on the channel number icons in the Toolbar.
Check
<Enlarged>
Erase Selected Channel Data: [Tools] Menu
1. Put a check on the channel number you wish to erase.
2. Click the [OK] button to complete the deletion.
Check
33
Distributed by MicroDAQ.com, Ltd.
www.MicroDAQ.com
(603) 746-5524
Re-order Channel Data: [Tools] Menu
You can re-order the data during graph display. There are two methods to use when re-ordering
channels:[Re-order by Dragging a Channel Number] and [Specify the Channel Numbers to be
Moved].
Re-order by Dragging a Channel Number
Drag the channel name / number you wish to move to the newly desired channel name / number
position and drop it.
Drag
[Close]
Button
Specify the Channel Numbers to be Moved
1. Assign numbers to: Selection 1: (original position No.) / Selection 2: (desired position No.)
2.Click the [ Change 1 and 2] button to complete the re-ordering of channels.
If you wish to change
channel 3 to channel 6,
then in Selection 1 place
a Ch3 and in Selection 2
place Ch6.
[Change 1 and 2]
button
[Close]
button
34
Distributed by MicroDAQ.com, Ltd.
www.MicroDAQ.com
(603) 746-5524
Set High, Low, Average Calculation Range: [Tools] Menu
1. Enter the new calculation range in the [Set High, Low, Avg. Calculation
Range]
[OK]
button
[Entire Graph]
button
Enter the
numerical values
By clicking the [Entire Graph] button, the dates and times for the entire graph will be displayed.
If in the graph display, you place the A cursor at the position for the beginning of the calculation range and the B
cursor at the end of the range, those dates and times will appear as the new range in the [Set High, Low, Average
Calculation Range] Display when it is opened.
2. By clicking the [OK] button, the High, Low and Average will change for each
channel’s data list and the graph will change to display that data contained in
the new range setting.
Editing Recording Conditions: [Tools] Menu
1. By clicking the [Channel No.] button of the channel you wish to edit, the
[Name] and [Started Date / Time] in the "Edit Items" display will show info for
that channel number.
[OK]
button
Channnel No.
[Restore]
button
Selected No.
Edit Items
Name: Up to 32 letters can be entered
Starting Date/Time: The month, day, year, hour, minute and second can be changed.
2. After completing the changes, click the [OK] button to finish.
If you wish to continue to change other channels, repeat the process as in 1.
* The [Restore] button is only effective while making changes. After clicking the [OK] button the
settings cannot be restored to the original settings.
35
Distributed by MicroDAQ.com, Ltd.
www.MicroDAQ.com
(603) 746-5524
Scale / Unit Conversion: [Tools] Menu
It is possible to make settings for the conversion of units and scales for each channel of
downloaded data.
1. Select to use 2 voltage points to convert the scale or to use the conversion
equation of y=Ax+B.
Specify 2 points
Use y=Ax+B
[OK]
button
Conversion Info
2. Make settings for the conversion equation and unit.
3. Click the [OK] button to finish.
Conversion Info
The currently set conversion equation and the character array of the current unit will be displayed. y stands for the
value after conversion and x is the voltage input directly from the sensor.
36
Distributed by MicroDAQ.com, Ltd.
www.MicroDAQ.com
(603) 746-5524
Change Graph Colors: [Tools] Menu
1. Click the topic you wish to change.
If you wish to change the colors: By clicking the button the color samples will appear.
If you wish to change the line widths: Each click of the button will make the lines wider and
each click of the button will make them thinner.
* If you wish to make changes to the graph colors, line types, or line widths, click on the [Channel No.] button
first and then click on the topic you wish to make changes to.
Memory
[Close]
button
Color Sample
Line Settings
[Channel No.]
button
Preview
[Default]
button
2. After confirming the color, by clicking the [OK] button the change will be completed.
* By clicking the [Return to Default] button, you will return to the color settings when the software was opened.
Memory
Here it is possible to save 1 pattern of settings for use in the display and 1 for use when printing.
1. Select [Display] or [Print].
2. Click the [Save] button to save the settings.
For Display
For Printing
[Save] button
[Load] button
By clicking the [Load] button, you can call up a saved pattern.
37
Distributed by MicroDAQ.com, Ltd.
www.MicroDAQ.com
(603) 746-5524
Vertical Axis Range Display Settings: [Tools] Menu
You can set the upper and the lower limits of the graph's vertical axis scale for each channel.
NOTE:
If you have put a check on [Fixed], the lines in the graph may exceed the boundaries of the graph.Set
the lower limit at more than –40,000 and set the upper limit at less than 40,000.
1. Check [Fixed] of the channel you wish to set.
Select [Fixed] and enter numerical values.
[OK]
Button
2. Enter upper and lower limit values.
3.
By clicking the [OK] button, the setting will be completed.
38
Distributed by MicroDAQ.com, Ltd.
www.MicroDAQ.com
(603) 746-5524
Graph Operations: [Graph] Menu
Return to Original Size
Return from zooming in on one part of data to the original whole graph size.
Zoom out step by step
Return step-by step from zooming in on one part of data to show a larger range of data.
39
Distributed by MicroDAQ.com, Ltd.
www.MicroDAQ.com
(603) 746-5524
Viewing Current Data
By communicating at a 1 second interval with a VR-71 logger connected to your computer
it is possible to view the current data readings in real time graph form.
NOTE:
It is impossible to save the data displayed in the current data readings.
For this, we suggest setting the Input Voltage Range to Auto-Range.
If a reading exceeds the set Input Voltage Range, the measurement readings will not be
displayed properly.
1. In the [Communication] Menu, select [Current Data Display]
2. Enter an upper and lower limit for the vertical axis scale in the graph and click
the [Send Settings] button.
Settings for the upper limit must be lower than 40,000 and settings for the lower limit must be higher
than –40,000.
[Send Settings]
button
[Start Monitoring]
button
3.
By clicking the [Start Monitoring] button, the display of current data readings
will begin.
40
Distributed by MicroDAQ.com, Ltd.
www.MicroDAQ.com
(603) 746-5524
Saving Recorded Data
After downloading recorded data, please save any necessary data.
Three Ways to Save Files
In the [File] Menu, [Overwrite All Data]
Will save any changes to file without changing File Name and Saving Location.The same operation
can be carried out from [Save] in the Toolbar.
In the [File] Menu, select [Save All Data as...]
Save with a new File Name.
In the [File] Menu, select [Save Displayed Data as...]
Save only that data in the current display. This is handy when you wish to save only the desired
data.
EX: [Save All Data as...]
1. Click [Save All Data as...] in the [File] Menu.
2. Specify the [Save in: ] and enter a [File Name].
Specify a Location
[Save]
button
Enter a File Name
3. Click [Save] to complete the saving process.
41
Distributed by MicroDAQ.com, Ltd.
www.MicroDAQ.com
(603) 746-5524
Creating Text File
By saving the recorded data as text file, you can create a file type that can be
read by common spreadsheet software.
1. Click [Save Data in Text File] in the [File] Menu.
2. Select the [Text File Type] and [Range to be saved], and click [OK].
Comma, Tab, Space, and Semi-colon are codes used by common spreadsheet software, such as Excel and Lotus,
when reading Text File to divide cells.
[OK]
button
3. Designate the location to which the file should be saved and click [Save] to create and
save the data as a Text File document.
The extension for the created file will be [.txt].
Assign a
Location
[Save]
button
Enter a File Name
* Text File cannot be read into Voltage Recorder for Windows.
42
Distributed by MicroDAQ.com, Ltd.
www.MicroDAQ.com
(603) 746-5524
Opening a Opening a Saved File
To open a previously saved file, designate the file name to open it.
1. Click [Open] in the [File] Menu.
2. Select the name of the data you wish to open and click [Open] to view the data in graph form.
Select a File
[Open]
button
View the information of the selected file.
About the Saving Location for Data Files.
Note that when using the Windows 8 / 7 / Vista OS the [Virtual Store] function
will redirect files from the default folder into which the program was installed to
separate folders under [Program Files] for each user, as shown below:
[c:\User\(AccountName)\AppData\Local\VirtualStore\Program Files\(Application)].
(EX: If login was carried out using the account name [myname] and [Voltage Recorder for Windows] is the application being run, the saving location will appear in the application window as:
[C: \Program Files \Voltage Recorder for Windows \data] but due to the [Virtual store] function the
actual saving location will be [C: \User\myname \AppData \Local \VirtualStore \Program Files \
Voltage Recorder for Windows \data] If the login was carried out from [Run as Administrator], the
file will be saved to the folder as it appears in the application window.
43
Distributed by MicroDAQ.com, Ltd.
www.MicroDAQ.com
(603) 746-5524
Troubleshooting
Q:
I can not communicate with my computer using serial (RS-232C)
communication, what should I do?
A:
Please confirm the following items.
Check the Main Unit
• Check to make sure that there is enough battery power and that the power of the
main unit is ON.
• Check the connection between the computer and the Unit.
• Check to make sure that the Unit is connected to the Serial Port (RS-232C) and
not connected to a different type of communication port (printer or other).
• If you are using a USB-Serial Adaptor, check to make sure that it is a Operational
Guaranteed Product
Check your Computer
• Make sure that the serial port settings are correct and that the port has not been
rendered unusable by the settings.
• With some computers, especially all-in-one computers the serial port serves as
the modem jack.
• Use the Device Manager to check whether the COM port can be used or not.(see
p.45)
• If you are using a USB-Serial adaptor cable, use the Device Manager to check
that the driver has been properly installed. If the driver is not installed properly,
contact the manufacturer of the USB-Serial adaptor cable being used.
• Check to make sure that the serial port has not been rendered unusable by the
BIOS setting.
• Sometimes communication will not work if a switch has been added to the serial
port (RS-232C) or an extension cable has been added to the communication
cable.
• If you have a computer with energy saving function settings, make sure that the
serial port has not been turned off.
• If the PC has two serial ports, try connecting the communication cable to the other
port and try communicating again.
• Check to see if some other communication software is in use.
• If you have access to another computer, try seeing if communication works with
the other computer.
If none of the above is the cause, there may be a malfunction or product failure.
Please contact your local dealer.
44
Distributed by MicroDAQ.com, Ltd.
www.MicroDAQ.com
(603) 746-5524
* How to check your Communication Port?
In the Device Manager it is possible to check whether the communication port is
usable or not.
If Usable:
If Not Usable:
An "!", an "x" or an "arrow" will appear
If you are using a USB-Serial Adaptor:
If Usable:
If Not Usable:
Under "Other Devices" an "!", an "x" or
an "arrow" will appear.
For details about checking a communication port, see below.
1.
Open the [Control panel]-[Device Manager].
For Windows 8:
By moving the mouse cursor to the left bottom corner of the desktop screen, a miniaturized
Start Window will appear. Right click to open the pop-up menu and select [Device Manager].
2.
In the [Device Manager], click on [Port (COM&LPT)] and check to see if
under that appears [Com Port (COM1)] or [Com Port (COM2)].
If a port appears, it should be usable.
45
Distributed by MicroDAQ.com, Ltd.
www.MicroDAQ.com
(603) 746-5524
3.
If an "!", an "x" or an "arrow" appears, the port is not usable.
To find out details about any communication
port with an "!", an "x" or an "arrow" mark, right
click on the port and select [Properties].
Q:I can’t get the communication cable connected to the computer. What
should I do?
A: Please connect the communication cable provided with the Voltage Logger
into the serial port of your computer (D-SUB 9 pin male connector).
NOTE:
Please use only straight adapters.
, If the connector on your computer is a D-SUB 9 pin male then there is no need for an adapter.
, If the connector on your computer is a D-SUB 25 pin female then use an adapter (D-SUB 25 pin
male to a D-SUB 9 pin male).
, If the connector on your computer is a Half pitch 14 pin female then use the adapter (Half pitch 14
pin male to a D-SUB 9 pin male) or a combination (Half pitch 14 pin male to D-SUB 25 pin male)
and (D-SUB 25 pin female to a D-SUB 9 pin male).
Q:The date and the time of the recorded data are different from the
actual date and time. Why?
A: The Voltage Logger has no internal clock. When you set up a programmed
recording start or when you download data, the date and time that are shown are
taken form your computer’s clock. If your computer’s clock is not correct, it will affect
the recorded data.
Q:Is my data being backed up?
A: If the battery power becomes weak during operation a battery warning mark
will appear on the LCD. If the power is left to become even weaker, the unit
will stop operation but all data will remain backed up.
46
Distributed by MicroDAQ.com, Ltd.
www.MicroDAQ.com
(603) 746-5524
Specifications
Voltage Recorder VR-71
Measurement Item
Number of Channels
Measurement Range
Measurement Accuracy
Display Resolution
Recording Interval
Recording Capacity
Recording Mode
LCD Display Items
Voltage
2 (Common ground)
Range:±1,2,6,15V Auto Range:Fixed Range
±0.5%±5dgt [10°C~ 30°C]
Min 1mV
20 selections : 0.02sec - 60min (Default : 10seconds)
8000 readings x 2 channels
Endless / One-time (Default : One-time)
Measurement Reading / Recording Status / Time / Memory
Capacity / Battery Life Warning / Unit of Measurement
Power Source
AAA Alkaline Batteries(LR03) x 2
Battery Life
About 5-9 months*
Interface
Serial Communication (RS-232C)
Dimensions
H55mm × W88mm × D24mm
Weight
About 93g (including 2 batteries)
Temperature and Humidity Temp:0-50°C Humidity:90%RH or less (no condensation)
Durability of the Unit
Waterproof
None
Attached Sensor / Cable 2 Input Cables (VR-7101)
Included in Kit
Software Set / Serial Communication Cable x 1 / AAA
Alkaline Batteries x 2 / User’s manual and Warranty x 1
Other
It is possible to measure electrical current
*Note :
At recording interval of 1 sec: about 5 months / at rec. interval of more than 2 seconds: 9 months / at
a recording interval of 0.02 seconds: about 13 days.
Software Specifications (Voltage Recorder for Windows)
Compatible OS (*1)(*2) Microsoft Windows 8 32/64bit
Microsoft Windows 7 32/64bit
Microsoft Windows Vista 32bit (SP1 or later)
Microsoft Windows XP 32bit (SP2 or later)
Display Languages(*3) English
*1: For installation, it is necessary to have Administrator (Computer Administrator) rights.
*2: If you are using Windows 8, please note that our software is designed to be used in "Desktop"
mode only.
*3: We recommend using an operating system in the same language as the display language.
Operation in different languages is not guaranteed.
The specifications listed above are subject to change without notice.
*About problems downloading data with Voltage Recorder for Windows
On Computers where the Hyper-Threading function is activated, problems have been found to occur when
downloading data with a USB-Serial Cable conversion adaptor. There are two solutions to this problem. The first is
to turn off the Hyper-Threading function ( usually done in the BIOS settings). The second possible solution is to
download data on a computer that has a serial port. Contact your local authorized T&D sales representative about
USB-Serial conversion adaptors.
47
Distributed by MicroDAQ.com, Ltd.
www.MicroDAQ.com
(603) 746-5524
Options
Unit:mm
VR-7101 Input Cable
Cable Length : about 1m
VR-7102 Input Cable
Cable Length : about 1m
VR-7103 4-20mA Probe
Maximum Current Input : 40mA
Internal Resistance : 100
Output : 2V at 20mA / 0.4V at 4mA
Conversion Accuracy : 0.5%
Cable Length : about 1m
Clip M3.5 Crimp Terminal Vinyl Coated Electrical Wire Stereo Mini Jack ( 2.5)
VR-00P1 Expansion Unit
Dimensions:
H72mm×W95mm×D24mm
(Excluding Protrusions)
VR-1C10 Connection Cable
Cable Length: about1m
TR-00K2 Wall Attachment
Attachment: Screws x 2, Double Sided Adhesive Tape
48
Distributed by MicroDAQ.com, Ltd.
www.MicroDAQ.com
(603) 746-5524
For product information or questions contact us at
Shimadachi 817-1, Matsumoto, Nagano 390-0852 Japan
TEL: +81- 263-40-0131
FAX:+81- 263-40-3152
Office Hours : Monday to Friday 9:00 -12:00 / 13:00 -17:00
(GMT+ 9:00 Tokyo Time)
T&D Website
h t tp://www.tandd.com/
Voltage Recorder for Windows
User's Manual
Published by T&D CORPORATION
© Copyright T&D Corporation. All rights reserved.
Distributed by MicroDAQ.com, Ltd.
www.MicroDAQ.com
(603) 746-5524