1
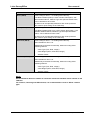
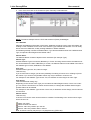
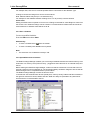
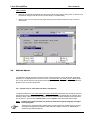
Leica SurveyOffice
Getting Started Manual
M AD E T O M E AS U R E
Contents
Contents ......................................................................................................................................................... 1
1
Introduction .................................................................................................................................... 2
2
Installation/Deinstallation of SurveyOffice ................................................................................. 2
3
Getting Started............................................................................................................................... 3
3.1
Register: ................................................................................................................................ 4
3.1.1 Register Instruments: .............................................................................................. 4
3.1.2 Register Tools........................................................................................................... 4
3.2
Settings ................................................................................................................................. 4
3.3
Codelist Manager ................................................................................................................. 5
3.3.1 Create a new codelist.................................................................................................. 5
3.3.2 Add a new Code to the Codelist ................................................................................ 7
3.3.3 Attribute ....................................................................................................................... 9
3.3.4 Save a Codelist .......................................................................................................... 10
3.3.5 Upload/Download a Codelist ................................................................................... 10
3.4
Software Upload ................................................................................................................ 11
3.4.1 Transfer Files to TPS 1000/1100 Series instruments.............................................. 11
3.4.2 Transfer Files to TPS 300/700 Series instruments.................................................. 13
Leica SurveyOffice
User manual
1 Introduction
This document gives you a short instruction about the first steps in Leica SurveyOffice within a description of
the components Codelist Manager and Software Upload with TPS instruments.
2 Installation/Deinstallation of SurveyOffice
Load the CDROM in the drive; the installation program starts automatically a choice list, where you can start
SurveyOffice. Follow the installation program instructions.
Should the CDROM installation program not start automatically, or if you are installing via a network, proceed
as follows:
The Leica SurveyOffice PC utility programs in all currently available languages can be found under the following directory: <drive> \Osw\SOffice\
Substitute <drive> with your CDROM drive letter, or the logical drive letter from wich you are
installing SurveyOffice.
To install Leica SurveyOffice in the desired language run the program setup.exe from ..\language\disk1\.
2 / 13
August 1999
Leica SurveyOffice
User manual
Deinstalling SurveyOffice
1. Select the Programs option from the Windows start menu.
2. In the Leica SurveyOffice program folder, select Uninstall Leica SurveyOffice
3. Respond to the instructions in the dialogue boxes.
If the Uninstall Leica SurveyOffice option is not present, proceed as follows:
4. In the Windows start menu, select Settings, then Control Panel.
5. Double-click Add/Remove Programs in the Control Panel window.
6. Select Leica SurveyOffice from the list of installed programs.
7. Click on the Add/Remove button, and respond to the instructions in the subsequent dialogue boxes.
3 Getting Started
Leica SurveyOffice offers a wide range of applications supporting your survey work with Leica instruments.
If you start Leica SurveyOffice for the first time register all instruments to be used and set the communication parameters.
The following applications are available:
3 / 13
August 1999
Leica SurveyOffice
3.1
User manual
Register:
3.1.1 Register Instruments:
To register Leica instruments:
Select an instrument from the list of all Leica instruments and select:
to add the selected instrument to the list of all installed instruments.
to register all available Leica instruments.
Select OK to save the changes you have made or Cancel to abort function.
3.1.2
Register Tools
Any application that has been registered in the Register menu can be executed directly as an External tools. In addition Leica SurveyOffice applications that do not work with all instrument series
can be registered as external tools within the installation.
The External tools menu contents are displayed in a list box.
3.2
Settings
In the Settings dialog the communication settings (port settings) can be set globally for all applications within Leica SurveyOffice. The settings then are available in all applications using the communication port such as Data Exchange Manager, Software Upload or TPS Setup. The communication
settings may still be changed within the applications.
The table shows the default settings of the instrument series.
Baudrate
9600
Parity
EVEN
Stopbits
1
Databits
7
Endmark
<CRLF>
TPS 300/700 Series
19200
NONE
1
8
<CRLF>
TPS 1000 Series
9600
NONE
1
8
<CRLF>
TPS 1100 Series
19200
NONE
1
8
<CRLF>
TC 600/800 Series
Note:
•
The settings of the serial port and the instrument must be the same.
4 / 13
August 1999
Leica SurveyOffice
3.3
User manual
Codelist Manager
The Codelist Manager enables you to create or modify Codelists that will work with Leica instruments. A Codelist may consist of Codes and Attributes.
3.3.1 Create a new codelist
TPS300/700
TPS1100
1. From the File menu select New.
2. Choose an Instrument class and a Codelist Type .
3. Choose OK to accept or Cancel to abort the function
Codelist Type:
TPS300
Basic
TPS700
Free Coding for WI 41 – 49.
Free Coding for WI 41 – 49.
The Basic-Codelist is a list of
Codes, Attribute Name (Info 1 –
Info 8) with optional Default Value
(= Attribute Value), can be defined
for each Code.
The Basic-Codelist is a list of
Codes, Attribute Name (Info 1 –
Info 8) with optional Default Value
(= Attribute Value), can be defined
for each Code.
A shortcut can be optionally defined
for each Code (shortcuts are used
for quick-coding on the TPS700).
Advanced
Additionally to the basic functionality, advanced coding offers following features:
Additionally to the basic functionality, advanced coding offers following features:
-
definition of a code description
-
definition of a code description
-
editable Attribute Names
-
editable Attribute Names
-
Attribute Type
-
Attribute Type
-
Value Type
-
Value Type.
Note: Maximum 200 Codes definable in a Codelist (TPS300/700)!
5 / 13
August 1999
Leica SurveyOffice
User manual
TPS1100
Basic (GSI 8)
Free Coding for WI 41 – 49. Coding with Code-Key.
The Basic-Codelist (GSI 8) is a list of Codes, Description, editable Attribute Names, Attribute Type with optional Default Value,
can be defined for each Code.
A shortcut can be optionally defined for each Code (shortcuts
are used for quick-coding on the TPS1100).
Basic (GSI 16)
Free Coding for WI 41 – 49. Coding with Code-Key.
The Basic-Codelist (GSI 16) is a list of Codes, Description, Type,
editable Attribute Names, Attribute Type with optional Default
Value, can be defined for each Code.
A shortcut can be optionally defined for each Code (shortcuts
are used for quick-coding on the TPS1100).
Advanced (GSI 8)
Free Coding for WI 41 – 49. Coding with Code-Key.
Point-Codelist for WI 71-79.
Additionally to the basic functionality, advanced coding offers
following features:
Advanced (GSI 16)
-
Value Type (Text, Real, Integer)
-
Value Region (None, Choicelist, Range)
-
Attribute Values
Free Coding for WI 41 – 49. Coding with Code-Key.
Point-Codelist for WI 71-79.
Additionally to the basic functionality, advanced coding offers
following features:
-
Value Type (Text, Real, Integer)
-
Value Region (None, Choicelist, Range)
-
Attribute Values
NOTE:
GSI 8 and GSI 16 define the number of characters allowed for attribute values entered on the
TPS1100.
For instance, if working with GSI 8 format, it is recommended to create a “GSI 8” codelist
type!
6 / 13
August 1999
Leica SurveyOffice
4.
User manual
Key in a Codelist Name (here: TEST)
5. Choose OK to accept or Cancel to abort the function
3.3.2 Add a new Code to the Codelist
1. In the Tree-View right-click on a Code and select New and New Code.
7 / 13
August 1999
Leica SurveyOffice
User manual
2. Enter a new Code (here: Tree).
3. The name of a Code may be up to 8 characters long and may consist of alphanumeric characters
4. Enter an optional Short Cut.
A Short Cut is a maximum two digit number.
5. Enter the optional Description.
A Description may consist of alphanumeric characters.
6. Choose OK to accept or Cancel to abort the function.
7.
In the Tree-View doubleclick on the Codelistname (here: TEST)
8 / 13
August 1999
Leica SurveyOffice
8.
User manual
In the Tree-View click on the Codename (here: Remark) to add attributes
NOTE: The above example uses the TPS1100 Advanced (GSI 8) Codelisttype!
3.3.3 Attribute
Attributes are additional information of the Code. Attributes prompt the user to enter information describing a Code. Attributes for the Code Tree could be Type, Diameter and Remark. You can easily
add or insert new Attributes, modify existing Attributes or delete Attributes.
An Attribute generally consists of Attribute Name, Type and the Attribute Value with a defined Value
Type, an optional Value Region and a Default Value.
Attribute Name:
The Attribute Name consists of alphanumeric characters (for example Type).
Attribute Type:
Possible Attribute Types are Normal, Mandatory or Fixed. Choosing Normal means the Attribute Value can be edited in the field. If Mandatory is chosen, the Attribute Value must be edited in the field. If
the Attribute type is Fixed, attributes are not editable.
Value Type:
Possible Value Types are Text, Real or Integer.
TPS1100 only:
If you choose Real or Integer you have the possibility of entering a Choice List or a Range of possible Values. If you choose Text possible Values may only be entered in a Choice List.
For example for the Attribute Type choose Text, for Diameter choose Integer as Value Type.
Value Region:
TPS1100 advanced coding only:
Depending on the chosen Value Type you can select the Value Regions None, Choice List or Range. In a Choice List maximum 16 Values can be entered, in a Range the smallest and the largest
possible Value can be entered.
For example for the Attribute Type choose Choice List, for Diameter choose Range, and for Remark
choose None.
Attribute Values:
TPS1100 only:
If Choice List is chosen a list can be entered or modified. The following icons can be used to organize the Choice List.
Add a new Value
Delete a Value from the list.
Move a Value one position up in the list.
Move a Value one position down in the list.
Note: A Choice List entry may be up to 10 characters long (TPS1100).
9 / 13
August 1999
Leica SurveyOffice
User manual
For example Oak, Pine and Fir could be possible Choice List entries for the Attribute Type.
If Range is chosen the Range from and to can be entered.
Note: Attribute Values may be up to 15 characters long.
For example for the Attribute Diameter a Range from 1 to 25 (meters) could be defined.
Default Value:
Setting a Default Value is optional. If Choice List or Range is selected for Value Region a Value from
the Choice List or within the Range can be entered. For Fixed Values a Default Value should be entered otherwise no Attribute Value will be set at all.
3.3.4 Save a Codelist
To save a modified Codelist:
From the File menu select Save.
Alternatively:
•
To save a Codelist select
•
To save a Codelist press Ctrl-S on the keyboard.
from the toolbar.
Note:
•
The extension of a Codelist file is always *.crf.
3.3.5 Upload/Download a Codelist
The Data Exchange Manager enables you to exchange Codelists between the internal memory of an
instrument or a memory card (TPS1100 only! - plugged into the instrument or an external drive) and
the PC.
Before starting the Data Exchange Manager, make sure that the instrument is connected to the PC
through a serial port and is switched off. The instrument battery should be charged to ensure that all
data exchanges can be completed without a power failure.
The Data Exchange Manager consists of two tree-views:
In the left tree-view all instrument devices (serial ports, memory cards), folders and files are listed, in
the right tree-view all PC drives, folders and files. Data can easily be uploaded to any detected instrument device or downloaded to the PC.
10 / 13
August 1999
Leica SurveyOffice
User manual
Tips & Tricks:
3.4
•
Data can be transferred between PC and instrument by using drag & drop. (Click on the file to be
transferred, drag it to the other tree-view and drop it in a folder there.)
•
Most functions can be carried out by right-clicking on the instrument devices view or the PC
drives view.
Software Upload
The Software Upload program is used to transfer system firmware, system language, application
programs or configuration files from the PC onto a TPS 300/700, TPS 1000 or TPS 1100 total station. It may also be used to view general information, the system environment and the installed applications of a connected instrument.
3.4.1 Transfer Files to TPS 1000/1100 Series instruments
To upload software on TPS 1000 Series and TPS 1100 Series instruments the instrument must be
switched off and be connected to the serial port. The instrument is automatically recognized, when
starting to load. If this is not the case, please check the communication settings on the instrument
and on the PC. Then choose Transfer Files from the Utilities menu and follow these steps:
Note: Loading the system firmware will delete the instrument system language and application programs!
Therefore it is recommended to load first the system firmware if needed, then the system
language and application programs (Note that new program versions or additional programs can be loaded anytime!).
11 / 13
August 1999
Leica SurveyOffice
User manual
1. Select one or more component types to be transferred to the connected instrument.
The following component types can be selected:
System Firmware
System Language
Application Programs
EDM Firmware
ATR Firmware
Configuration Files (TPS1100 only!)
2. Select the drive and directory of the software files.
3. If you upload system language or application programs select a language from the list of available languages.
4. Select one or more components to be uploaded from the list of all available components. The
version number of each component is specified in brackets.
5. Select Transfer to start the software upload or Cancel to abort function.
Note:
• Make sure that the instrument battery does not run out during the installation of the system firmware or EDM/ATR firmware.
Tip:
Sequence of application programs are definable by using the arrow keys right to the components
dialog box!
12 / 13
August 1999
Leica SurveyOffice
User manual
3.4.2 Transfer Files to TPS 300/700 Series instruments
To upload software on TPS 300/700 Series instruments the instrument must be switched off and be
connected to the serial port. The instrument is automatically recognized, when starting to load. If this
is not the case, please check the communication settings on the instrument and on the PC. Then
choose Transfer Files from the Utilities menu and follow these steps:
1. Select the drive of the software files to be uploaded.
2. Select the directory of the software files to be uploaded.
3. Select all components to be transferred to the instrument.
4. Select Transfer to start the software upload or Cancel to abort function.
Note:
•
Make sure that the instrument battery does not run out during the installation of the system
firmware or EDM/ATR Firmware. It is recommended that the battery is freshly charged before
starting the transfer.
•
Once the transfer of system firmware or EDM/ATR firmware has started, the transfer must not
be cancelled and the instrument must not be disconnected.
Alternatively:
•
To transfer files select
•
To transfer files press Ctrl-T.
from the toolbar.
13 / 13
August 1999