1
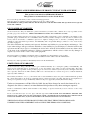
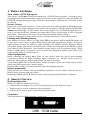
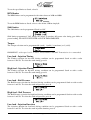
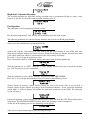
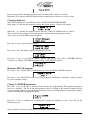
Micro Tuner model S06-SSR - Super Sport Race
Common Rail Dodge Ram
5.9L, 24 Valve, Cummins Diesel Engine
Instruction Manual
PLEASE READ THIS ENTIRE INSTRUCTION MANUAL BEFORE PROCEEDING
www.madselectronics.com
Rev. 4.05A
Page 1 of 16
THIS IS A HIGH PERFORMANCE PRODUCT USE AT YOUR OWN RISK
This product is intended for OFF ROAD USE ONLY
This product is not intended to be used to break the law
Do not use this product until you have read the following agreement.
This agreement sets forth the terms and conditions for the use of this product.
The installation of this product indicates that the buyer has read and understands this agreement and accepts the
terms and conditions.
DISCLAIMER OF LIABILITY
Smarty Performance King, its distributors, jobbers and dealers ( hereafter Seller ) shall be in no way responsible for the
product’s proper uses and service. THE BUYER HEREBY WAIVES ALL LIABILITY CLAIMS.
The buyer acknowledges that he is not relying on the Sellers skill or judgement to select of furnish goods suitable for any
particular purpose and that there are no liabilities which extend beyond the description on the face hereof, and the buyer
hereby waivers all remedies or liabilities expressed or implied, arising by law or otherwise ( including without any
obligation of the seller with respect fitness, merchantability and consequential damages ) whatever or not occasioned by
the sellers negligence.
The Seller disclaims any warranty and expressly disclaims any liability for personal injury and damages. The
buyer acknowledges and agrees that the disclaimer of any liability for personal injury is a material term for this
agreement and the buyer agrees to indemnify the Seller and to hold the Seller harmless from any claim related
to the item of the equipment purchased. Under no circumstances will the seller be liable for any damages or
expenses by reason of use or sale of any such equipment.
The Seller assumes no liability regarding the improper installation or misapplication of its products.
It is the installer's responsibility to check for proper installation and in doubt contact the manufacturer.
The buyer is solely responsible for all warranty issues from the manufacturer.
LIMITATION OF WARRANTY
Smarty Performance King ( Hereafter Seller ) gives Limited Warranty as to description, quality, merchantability, and
fitness for any particular purpose, productiveness, or any other matter of the Seller’s product sold herewith. The Seller
shall be in no way responsible for the products proper use and service and the buyer hereby waives all rights other than
those expressly written herein. This warranty shall not be extended, altered or varied except to be a written instrument
signed by Seller and Buyer.
The warranty is limited to one ( 1 ) year from the date of sale and limited solely to the parts contained within the products
kit. All products that are in question of warranty must be returned prepaid to the Seller and must be accompanied by a
dated proof of purchase receipt. All Warranty claims are subject to approval by Smarty Performance King.
Under no circumstances will the Seller be liable for any labor charged or travel time incurred by in
diagnosis for defects, removal, or reinstallation of this product or any other contingent expenses.
Under no circumstances will the Seller be liable for any damage or expenses incurred by reason of the use or sale of any
such equipment.
In the event that the buyer does not agree with this agreement: THE BUYER MAY PROMPTLY RETURN THIS
PRODUCT, IN A NEW AND UNUSED CONDITION, WITH A DATED PROOF OF PURCHASE TO THE PLACE OF
PURCHASE WITHIN TEN (10) DAYS FROM THE DATE OF PURCHASE FOR A FULL REFUND.
THE INSTALLATION OF THIS PRODUCT INDICATES THAT THE BUYER HAS READ AND
UNDERSTANDS THIS AGREEMENT AND ACCEPTS THE TERMS AND CONDITIONS.
Page 2 of 16
CAUTION
This Smarty Performance King product is intended for use on unmodified stock engines. Remove any
performance enhancing electronic devices and make sure the ECM has been returned to STOCK if
you have used another manufacturer’s programmer before the Smarty Micro Tuner.
The use of this product to change the performance characteristics of your vehicle could invalidate the
warranty provided by the vehicle manufacturer. Consult your vehicle warranty before using the
product on your vehicle.
NEVER CONNECT BOTH THE SMARTY CONNECTORS AT THE SAME TIME!
This could damage Smarty and the computer USB port.
NEVER UNPLUG SMARTY WHILE IT IS UPDATING YOUR ECM.
Smarty can recover without pulling fuses, or disconnecting batteries, BUT do not intentionally create
this situation. When Smarty is DONE with ECM updates, ABS changes, or clearing DTC codes, it
may be unplugged, even if Smarty does not display the typical “Unplug Smarty and Turn Key OFF”
screen.
It is recommended that you do not store your Smarty Micro Tuner in your vehicle if ambient
temperatures in your area fall below 32°F. Excessively low temperatures can cause malfunction or
damage to Smarty Micro Tuner that is not covered by the Smarty Performance King warranty.
In the case of ECM replacement, restore the ECM back to the STOCK software before the ECM
replacement. Smarty works only with one vehicle and one ECM at a time while it is VIN Locked.
Under no circumstances we will refund, repair, or warranty units that are send in and result VIN #
locked.
RESTORE ECM TO STOCK SOFTWARE BEFORE ANY SERVICE ASSISTANCE.
If you need to return your vehicle to a service center, restore the vehicle ECM to its STOCK program
by following the instruction in this manual. The service center might reprogram your vehicle with an
updated, STOCK, software ECM reflash without your knowledge. If your vehicle has not been
returned to its STOCK program prior to a service visit and the ECM is reflashed, the Smarty Micro
Tuner will no longer be able to program your vehicle. Such failure is not covered by the Smarty
Performance King warranty. Under no circumstances will we refund, repair, or warranty units that are
sent in that are locked.
Page 3 of 16
Index
1.Before You Begin.................................................................................................................................5
Your vehicle’s STOCK program..............................................................................................................5
Service Centers...........................................................................................................................................5
Locking and Unlocking Smarty................................................................................................................5
Vehicle preparation...................................................................................................................................5
Smarty preparation...................................................................................................................................5
2.Smarty Overview.................................................................................................................................5
Keyboard operation...................................................................................................................................5
Connectors..................................................................................................................................................5
3.Connecting Smarty to your vehicle....................................................................................................6
4.Updating the ECM..............................................................................................................................6
First time update........................................................................................................................................6
Speed limiter...............................................................................................................................................6
RPM limiter (only in Race software).......................................................................................................6
Shift limiter (only in Race software)........................................................................................................7
Torque.........................................................................................................................................................7
Low-load - Injection Timing.....................................................................................................................7
High-load - Injection Timing....................................................................................................................7
Low-load - Rail Pressure...........................................................................................................................7
High-load - Rail Pressure..........................................................................................................................7
Low-load - Injection Duration..................................................................................................................7
High-load - Injection Duration.................................................................................................................7
Pre-Injection...............................................................................................................................................8
Changing Software....................................................................................................................................9
Recovery of the ECM .............................................................................................................................10
5.Power on Demand.............................................................................................................................11
6.Reading Key-on counter...................................................................................................................11
7.Reading DTC’s..................................................................................................................................12
Reading Diagnostic Trouble Codes........................................................................................................12
Clearing DTC codes.................................................................................................................................13
8.ABS Update (tire height update)......................................................................................................13
9.Updating Smarty...............................................................................................................................14
10.Appendix A: Error messages description.....................................................................................15
11.Warranty..........................................................................................................................................16
12.Declaration of Conformity..............................................................................................................16
Page 4 of 16
1. Before You Begin
Your vehicle’s STOCK program
Your vehicle’s ECM must contain the manufacturer’s STOCK factory program. If you have used a
programmer from another aftermarket company you must use their product to return your ECM back
to STOCK condition before proceeding. If you have a performance-enhancing device installed, it must
be removed.
Service Centers
If you need to return your vehicle to a service center, restore the vehicle ECM to its STOCK program.
The service center might reprogram your vehicle with an updated, STOCK, software ECM reflash
without your knowledge. If your vehicle has not been returned to its STOCK program prior to a
service visit and the ECM is reflashed, the Smarty Micro Tuner will no longer be able to program
your vehicle. Such failure is not covered by the Smarty Performance King warranty.
Under no circumstances will we refund, repair, or warranty units that are sent in that are locked.
Locking and Unlocking Smarty.
Once Smarty is used on a vehicle, it is VIN # LOCKED to that vehicle AND to that ECM. Smarty can
be used only on that vehicle to update ECM software and ABS (speedometer) changes. In order to
unlock Smarty, you must use Smarty to return the ECM to the STOCK software, otherwise, Smarty
will remain locked. Only Smarty can unlock itself. Follow the instructions in this Manual to return
your vehicle to STOCK software. Once unlocked, Smarty may be used on a different vehicle. While
Smarty is VIN# Locked, it can still be used to read and clear Diagnostic Trouble Codes (DTCs) on a
vehicle and ECM that it is NOT locked to.
Vehicle preparation
Before connecting the Smarty Micro Tuner to your vehicle, make sure that all power-draining
accessories are turned off: Radio, headlights, lights, cell phones, etc. All those devices need to be
turned off. Please apply the parking brake before you begin a download.
As the Smarty Micro Tuner needs full battery voltage to program, ensure your vehicle battery is fully
charged and NOT connected to a battery charger.
Do not disturb or remove the connection cable during the updating operation.
Smarty preparation
During the first use, Smarty reads the identification parameters of your vehicle. After the first use,
Smarty can be used only with your vehicle.
Returning the ECM to STOCK software restores Smarty into the original, unlocked condition.
2. Smarty Overview
Keyboard operation
Smarty’s keyboard is composed of 12 keys:
• Numerical keys from 0 to 9, used to select menu options and enter numerical values
• Right arrow key, used to confirm the selected operation
• Left arrow key, used to go one step back in the operation flow
Connectors
Two connectors are available in Smarty’s upper edge:
Page 5 of 16
USB Connector: Used for connecting Smarty to a personal computer for updates. The update
softwares can be downloaded from Smarty Performance King internet site
(www.madselectronics.com).
A USB cable is not included. Standard USB 1.1 or USB 2.0 cables can be used to connect Smarty
to your personal computer.
• 15 pin Connector: Used to connect Smarty to the vehicle through the vehicle’s diagnostic port
with an OBD II cable.
The OBD II – J1926 diagnostic connector cable is included in Smarty’s box. Note: Connecting
any other cable to the 15 pin connector invalidates Smarty Performance King warranty, because it
could damage Smarty.
Smarty automatically switches on when one of the two connections described above is made.
NEVER CONNECT BOTH CABLES AT THE SAME TIME. This could damage Smarty and the
computer USB port. Such failure is not covered by the Smarty Performance King warranty
•
3. Connecting Smarty to your vehicle
•
•
•
Turn on the ignition key to the RUN position. DO NOT START THE ENGINE.
Plug the furnished OBD II cable into the 15 pin connector in the top edge of Smarty and
GENTLY tighten the screws by hand. Over tightening these two screws DOES NOT make a
tighter or better connection. The screws are provided to keep the plug held gently to Smarty.
Plug the Smarty cable into the diagnostic port on your vehicle. The diagnostic port is located
inside the cab, to the passenger side of the steering wheel, at the bottom of the dash panel near
the floor.
4. Updating the ECM
First time update
Turn on the ignition key to the RUN position. DO NOT START THE ENGINE.
Plug Smarty’s cable into the diagnostic connector of your vehicle. Smarty will display:
The second line of the display shows the firmware version and the tuning data version.
Both the internal firmware and the tuning data information can be updated connecting a personal
computer. (See Smarty Performance King internet site for more details.) Then the main menu
appears:
From the main menu, press ‘1’ to select ECM Update.
Before the programming, The optional parameters have to be adjusted. The list of optional parameter
varies according to the installed software.
For each parameter, the current option status is shown on the first line of the display. With Smarty
numeric keyboard, the optional parameters can be adjusted.
To maintain unchanged the current parameter, press the '>' key.
You can return back one step, in any moment with the ‘<’ key.
Speed limiter
The speed limiter can be adjusted anywhere from 25 to 250 MPH in one MPH steps.
IMPORTANT: Your tires might not be rated for increased speeds. Please check your tires rating!
Page 6 of 16
To set the speed limiter to Stock, select 0.
RPM limiter
The RPM limiter can be programmed with values between 3600 and 6000
To set the RPM limiter to Stock, select a value below 3500 or simply 0.
Shift limiter
The Shift limiter can be programmed 'Stock' or 'Off'
Shift limiter programmed "Off" allows the engine to produce full power also during gear shifts or
power braking. DO NOT USE IT WITH A STOCK TRANSMISSION.
Torque
The Torque selection can be programmed 0 (stock), 1 (mild), 2 (moderate) or 3 (wild).
IMPORTANT: with torque level 2 or above, an aftermarket clutch/AT Transmission is recommended.
Low-load - Injection Timing
The Timing selection for low-load driving condition can be programmed Stock or with a value
between 1 and 50. To select the stock timing, press 0.
High-load - Injection Timing
The Timing selection for hig-load driving condition can be programmed Stock or with a value
between 1 and 50. To select the stock timing, press 0.
Low-load - Rail Pressure
The Rail Pressure selection for low-load driving condition can be programmed Stock or with a value
between 1 and 50. To select the stock rail-pressure, press 0.
High-load - Rail Pressure
The Rail Pressure selection for high-load driving condition can be programmed Stock or with a value
between 1 and 50. To select the stock rail-pressure, press 0.
Low-load - Injection Duration
The injection duration for low-load driving condition can be programmed Stock or with a value
between 1 and 50. To select the stock injection duration, press 0.
Page 7 of 16
High-load - Injection Duration
The injection duration for high-load driving condition can be programmed Stock or with a value
between 1 and 50. To select the stock injection duration, press 0.
Pre-Injection
The Shift limiter can be programmed 'Stock' or 'Off'
Pre-Injection programmed "Off" disables the preliminary injection of the engine.
The adjusted parameters are stored in Smarty memory and used on next ECM programming.
Smarty asks the confirmation to program the ECM:
Smarty will read the serial number of your vehicle and the serial number of your ECM, then store
them into its onboard memory for future reference. From this moment on, Smarty will work only with
your vehicle until your vehicle is restored back to the stock settings by Smarty.
Press the ‘>’ key to begin the updating session.
If the connection cannot be established, Smarty asks you to switch off the ignition key:
Turn the ignition key to “OFF”. Press the ‘>’ key. Smarty will then ask you to switch the ignition
key “ON” in order to retry the connection:
Turn the ignition key to the “RUN” position. DO NOT START THE ENGINE.
Press the ‘>’ key to begin the updating session. You will see the following screen:
Smarty checks its memory content before sending the data to the truck. After a few seconds, a
numeric counter begins with the percentage of the transmitted software. At the end of the download
(when 100% is reached) Smarty will update the functional parameters of the ECM. The following
screen will appear:
During the updating session, Smarty can ask to Turn key OFF and Turn Key ON. Please follow these
instructions. DO NOT DISCONNECT Smarty before the updating session is completed.
At the end of the updating session, the following screen appears:
After a few seconds Smarty displays the following message:
Page 8 of 16
Please unplug Smarty from the diagnostic port and turn the Key off for 15 seconds.
Remember to restore the STOCK software before returning your vehicle to a service center.
Changing Software
Turn on the ignition key to the RUN position. DO NOT START THE ENGINE.
Plug Smarty’s cable into the diagnostic connector of your vehicle. Smarty will display:
When the “ # “ symbols are displayed on the first line, Smarty is VIN# locked to a vehicle.
The second line of the display shows the firmware version and the tuning data version.
After a few seconds the PoD menu will appear:
Press the ‘2’ key to select the main menu:
Press the ‘1’ key, and Smarty displays the following screen:
Press the ‘1’ key to select ECM Update. Smarty asks you to select either CaTCHER Software
Versions (see Change CaTCHER Programs below) or the STOCK software:
Return to STOCK program
Press the ‘2’ key. Smarty asks for confirmation to restore the ECM to STOCK software:
Press the ‘>’ key. The ECM is restored to STOCK software and Smarty is unlocked. Smarty can now
be used on another vehicle.
Change CaTCHER parameters
Press the ‘1’ key in the above described menu. Before the programming, The optional parameters
have to be adjusted. The list of optional parameter varies according to the installed software. Please
see the previous chapter for the parameter description. A the end of the parameters adjustment, Smarty
asks the confirmation to program the ECM:
Press the ‘>’ key to confirm your selection and to begin the updating session. You will see the
following screen:
Smarty checks its memory content before sending the data to the truck.
Page 9 of 16
After a few seconds, a numeric counter begins with the percentage of the transmitted software. At the
end of transmission (when 100% is reached), Smarty will update the functional parameters of the
ECM. The following screen will appear:
During the updating session, Smarty can ask to Turn key OFF and Turn Key ON. Please follow these
instructions. DO NOT DISCONNECT Smarty before the updating session is completed.
At the end of the updating session, the following screen will appear:
After a few seconds Smarty displays the following message:
Please unplug Smarty from the diagnostic port and turn the key of for 15 seconds.
Recovery of the ECM
If an interruption occurs during an Update or the Update operation is terminated before the normal end
for any reason the ECM will not be operational. You must recover the ECM using Smarty to resume
the update process.
Attention! The engine will not start before the ECM has been recovered properly!
(The Wait to Start Light will flash continuously)
DON’T PANIC!
Smarty Performance King has developed a special boot loader software that is used during all the
ECM Updates. Unlike the OEM DRBIII tool, there is no need to pull fuses or disconnect the batteries!
No tools are needed! At Smarty Performance King we’ve done our homework!
Just follow the directions on Smarty’s display.
Smarty will handle the situation for you in a few simple steps.
Unplug Smarty, then, plug it in again. After a few seconds the usual main menu will appear.
Press the ‘1’ key, and Smarty displays the following screen:
Press the ‘1’ key to select ECM Update. Smarty will try to establish the communication with the
ECM. The connection cannot be established because the last updating session has been interrupted.
Smarty knows that the last update has not been performed correctly, and will recognise the not
operational ECM condition. Smarty asks you to switch off the ignition key:
Turn the ignition key to “OFF”. Press the ‘>’ key. Smarty will then ask you then to turn ON the
ignition key in order to retry the communication:
Page 10 of 16
Turn the ignition key to the “RUN” position. DO NOT START THE ENGINE. Press the ‘>’ key.
The communication cannot start yet. Smarty shows the following message:
A previous update has been interrupted
Press ‘>’ to restore ECM to Stock
The message is longer than the display, so the message will repeatedly scroll across the screen.
Press the ‘>’ key. The recovery operation starts. You will see the following message:
After a few seconds, a numeric counter with the percentage of the transmitted software will appear.
At the end of the transmission (when 100% is reached), Smarty will update the functional parameters
of the ECM. The following screen will appear:
During the updating session, Smarty can ask to Turn key OFF and Turn Key ON. Please follow these
instruction. DO NOT DISCONNECT Smarty before the updating session is completed.
At the end of the recovery operation, the following screen appears:
After a few seconds Smarty displays the following message:
Please, unplug Smarty from the diagnostic port and turn the ignition key off for 15 seconds.
The job is done. The ECM has been returned to the STOCK software and Smarty is no longer VIN#
Locked. You’re ready to start from the beginning again.
5. Power on Demand
This function allows the user to select the preferred power level instantly, also during the driving!
At the PoD menu:
press '1' key to enter the Power on Demand function, the Power page will appear:
Power can be selected between 99 (full power) and 0 (lower power). Just type the preferred power.
The number will appear in the second line of the display, after a while it appears on the first line, this
confirms that the value has been correctly sent to the truck. You have just to release the throttle to
apply the new power.
Smarty waits for a new Power on Demand adjustment. To return to the PoD menu, press '<'.
Page 11 of 16
6. Reading Key-on counter
Smarty leaves no footprint, all the trip data stored inside the ECM remains unchanged. As an
example you can verify that the Key-on counter remains stored.
From the main menu, press the ‘2’ key to select the data read function.
From the data read menu, press the ‘1’ key to select this function.
Smarty will try to establish a communication with the ECM.
If the Key was not in the on position Smarty will display this message:
Pressing the ‘>’ key, Smarty asks you to turn on the ignition key to retry the connection:
When the connection has been established, Smarty shows the key-on counter:
Please remember that every time the key is switched off, as at the end of the programming, the key-on
counter increases.
7. Reading DTC’s
Reading Diagnostic Trouble Codes
The DTC (Diagnostic Trouble Code) reader function present in Smarty Micro Tuner is for
convenience purpose only.
Smarty Performance King makes no warranty to the accuracy of the interpretations. The description
of all the DTC is shown on Smarty’s display. Many logged codes are transitory, they are
automatically reset.
From the main menu, press the ‘2’ key to select the data read function.
From the data read menu, press the ‘2’ key to select this function.
Smarty will try to establish communication with the ECM.
If the Key was not turned into the on position Smarty will display this message:
Pressing the ‘>’ key, Smarty asks you to turn on the ignition key to retry the connection:
When the connection has been established, if no DTC codes are present, the following screen appears:
Page 12 of 16
If one or more DTC’s are stored, Smarty shows the number of DTC’s present with the following
screen:
With the keys ‘<’ and ‘>’ all the present DTC codes can be displayed, one code at a time with the
following screen:
The first line of display shows the DTC “P” code. The second line shows the DTC code description.
If the DTC code description is longer that the physical dimension of the display, the description will
scroll across the screen.
Clearing DTC codes
At the end of the DTC code list, Smarty can either clear all the stored DTC codes from the ECM
memory or exit:
Press the ‘1’ key, to clear all the DTC codes stored in the ECM.
Press the ‘2‘ key, the DTC codes will not be erased and Smarty will return to the main screen.
When the erasing operation has been completed, the following screen appears:
8. ABS Update (tire height update)
Once Smarty is VIN# Locked (i.e. a CaTCHER software has been loaded in the ECM) the
speedometer of the vehicle can be adjusted according to the tire height.
From the main menu, shown below, press the ‘1’ key.
To change the tire height, choose the ABS update function:
Press the ‘2’ key, in the second menu as shown below:
Smarty will try to establish the communication with the ABS.
If the ignition key was not turned to the “RUN” position Smarty will display this message:
Press the ‘>’ key, then Smarty will prompt you to turn on the ignition key to retry the connection:
When the connection has been established, Smarty shows the current tire height (Curr Tire:) in the top
line of the screen:
Page 13 of 16
Type in the correct tire height with the numerical keys, entering a decimal point is not required.
Any tire height from 25.00” to 45.00” can be chosen in 0.05” increments. If you enter an increment
other than 0.05”, Smarty will round it to the next correct increment. The ‘<’ key can be used to
change entries.
After you have entered the correct tire height, press the ‘>’ key. Smarty will prompt you for
confirmation to proceed:
The ‘<’ key can be used return to the previous screen to change the New Tire size.
Press the ‘>’ key, to start updating the ABS unit with the new tire height.
A typical ABS change will take only a couple of seconds.
When the operation has been successfully completed, the following screen appears:
The ABS unit does not always change, so Smarty will re-read the tire height from the ABS unit and
display the results as shown in the following screen:
If the ABS unit did not change to the new tire height, Press the ‘<’ key to return to the previous
screen, and re-enter the correct tire height.
When the tire height change is completed, press the ‘>’ key. Smarty will display the following screen:
Please, unplug Smarty from the diagnostic port and turn the ignition key off for 30 seconds.
Notes: To increase the speedometer reading, increase the tire size.
To decrease the speedometer reading, decrease the tire size.
The ABS accuracy is questionable. Verify the speedometer reading with a GPS or by pacing a
vehicle with a speedometer know to be accurate.
9. Updating Smarty
Both the internal firmware and the tuning data information can be updated through USB connector.
Please see Smarty Performance King internet site (www.madselectronics.com) for more details and
software download.
Page 14 of 16
10. Appendix A: Error messages description
This section contains all the possible error messages shown by Smarty:
Error message
CAN ERROR #
Cause
A problem in the CAN Bus
communication
Solution
Check connection cable or contact
Smarty Performance King if the
problem persists
CCD ERROR #
The communication with
Check connection cable or check ABS
ABS unit doesn’t work
unit
COMM. TIME OUT
The ECM of the vehicle
Turn the ignition key on (DO NOT
doesn’t answer to Smarty
START ENGINE) or Check the
connection cable
ECM Changed
The ECM unit of the vehicle Restore the original ECM back to
has been changed
STOCK before changing ECM
Empty Memory,
The last Update operation
Repeat the Update operation.
Please Update
(through USB port) has been The data files are available on the
unsuccessfully completed.
Smarty Performance King internet site.
Smarty memory has been
corrupted.
INTERNAL ERROR #
Smarty internal malfunction Call Smarty Performance King
assistance
Call Smarty Performance King
Memory Error
A malfunction in the
Smarty’s memory
assistance
Memory Written
The update file transmitted
Download again the update file from
Wrong Data File
to Smarty through USB port Smarty Performance King internet site
is corrupted
and update Smarty with the correct file
PROGRAM ABORTED
The ECM update function
Restore the ECM to STOCK with the
has been interrupted
recovery procedure.
S/N Verify Error
The serial number of your
Check connection cable
vehicle has not been verified
SW Version doesn’t
The ECM software version
Please contact Smarty Performance
Match S/N
doesn’t match with the serial King or the seller.
number
UNKNOWN SOFTWARE Your vehicle contains a
Please contact Smarty Performance
software version unknown to King or the seller.
Smarty
VIN# Locked
Smarty has been connected
Restore the original vehicle back to
to a different vehicle
STOCK before connecting Smarty to a
new vehicle
WRONG CAN BUS
The connection between
Please contact Smarty Performance
Smarty and the ECM is not King or the seller.
correct
WRONG COMMUNIC.
The communication between Check the connection cable or the
Smarty and the ECM unit is battery charge level
disturbed
WRONG VIN#
The serial number of your
Wait 30 seconds with the ignition key
vehicle is not valid
on and try again
Page 15 of 16
11. Warranty
How Do You Get Service?
If something goes wrong with your Product during the warranty period, use the following procedure to return
the Product to Smarty Performance King Company.
1. Restore the STOCK software to your vehicle ECM. DO NOT RETURN A VIN # LOCKED SMARTY.
2. Download and fill out the Assistance Request Module available from Smarty Performance King internet
site or send an e-mail to Smarty Performance King (e-mail information is available from Smarty
Performance King internet site) Include the following:
• Information from your sales receipt (electronic copy would be appreciated). The sales receipt must be
from the location where you purchased your Product and must include the name of the business where
you purchased the Product and the address of the business.
• Serial number of the product
• A brief written description of the problem
• Your address and other personal information to contact you
3. Contact Smarty Performance King distributors for immediate assistance
12. Declaration of Conformity
For customers in North America
Model number:
Trade Name:
Responsible Party:
Address:
e-mail:
Smarty S-06-SSR
Smarty Performance King
Smarty Performance King SA
Switzerland (CH)
[email protected]
Tested to Comply With FCC Standards
FOR HOME OR OFFICE USE
The device complies with Part 15 of the FCC rules.
Operation is subject to the following two conditions:
1. This device may not cause harmful interference
2. This device must accept any interference received, including interference that may cause undesired
operation
For customers in Europe
“CE” Mark indicates that this product complies with the European requirements for safety, health,
environment and customer protection.
Page 16 of 16