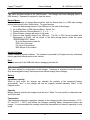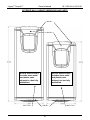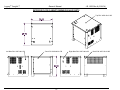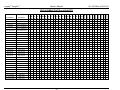
1
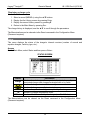
Model: Standard LI3 & LI3C (CEC) Legacy® Insight™ Battery Charger Owner’s Manual To automatically be connected to your closest Service Center, call us toll-free at 1-800-DOUGLAS (1-800-368-4527) Or, visit us at: http://www.douglasbattery.com/ I.B. 1620 Rev. A (6/10/14) Model: Installed by S/N: AC Input Voltage Date IMPORTANT Read and understand your user’s manual before installing, operating, or servicing this product. DO NOT DESTROY THIS BOOK Legacy® Insight™ Owner’s Manual I.B. 1620 Rev.A (6/10/14) TABLE OF CONTENTS USB .................................................. 15 AC Line Voltage Letter Codes ............. 2 Specialty Charger Option List ............. 2 Charger Cable Size ............................... 2 Important Safety Instructions .............. 3 Technical Information........................... 4 Record Memo ................................... 15 Update Software ............................... 15 Configuration .................................. 15 Battery............................................... 15 Auto/Manu Capacity ......................... 15 Capacity ............................................ 15 Temperature ..................................... 15 High Temperature ............................. 16 Charge .............................................. 16 Profile ................................................ 16 Delayed Start .................................... 16 Condition Charge .............................. 16 Float Charge ..................................... 16 Maximum Current ............................. 16 Equalization ...................................... 17 Manu Current .................................... 17 Time .................................................. 17 Delayed Start .................................... 17 Frequency ......................................... 17 Cable................................................. 17 Network ............................................. 17 Option ............................................... 17 Electrovalve Time ............................. 17 Rst Memo/Status .............................. 17 Part Number ............................................ 4 Serial Number ......................................... 4 Battery Type ............................................ 4 Ampere-Hours ......................................... 4 Cells ........................................................ 4 Input AC Volts ......................................... 4 Input AC Amps ........................................ 4 Hz ............................................................ 5 Phase ...................................................... 5 DC Volts .................................................. 5 Rated DC Amps ...................................... 5 CEC ......................................................... 5 Installation ............................................. 6 Location ................................................... 6 Mounting Wall Chargers ......................... 6 Placing Floor Cabinet Chargers .............. 6 Stacking Multiple Chargers ..................... 6 Electrical Connections ............................ 7 On three phase units ............................... 7 Connecting Input Power .......................... 7 AC Connection ........................................ 7 Plug Polarity ............................................ 7 Grounding the Charger ........................... 7 Parameters ...................................... 18 Date/Time ......................................... 18 Daylight Savings ............................... 18 Language .......................................... 18 Region............................................... 18 Contrast ............................................ 18 Change Password ............................ 18 Description of Operation ...................... 8 General ................................................... 8 Beginning the Charge ............................. 8 Charging .................................................. 8 AC Power Fail ......................................... 8 Series Charging ...................................... 8 Password ......................................... 18 Information ...................................... 18 Charging the Battery ...................... 19 Glossary................................................. 9 Charger Idle Display ......................... 19 Delayed Start .................................... 19 Starting a Charge Cycle.................... 20 Effective Charge ............................... 20 End of Charge w/o Equalize ............. 21 End of Charge with Equalize ............ 21 Charging Coefficient................................ 9 Compensation Charging ......................... 9 Charging Profile ...................................... 9 Cold Storage ........................................... 9 Equalization Charging ............................. 9 IGBT ........................................................ 9 Ionic Profile ............................................. 9 OPPOR Profile ........................................ 10 Power Diodes .......................................... 10 Refresh Charging .................................... 10 Power Diodes .......................................... 10 Rest Function .......................................... 10 CEC ......................................................... 10 Fault Codes ..................................... 22 Maintenance & Service ........................ 23 Wall Mounting Dimensions .................. 24 Exterior Wall Cabinet Dimension ........ 25 Floor Mounting Dimensions ................ 26 Exterior Floor Cabinet Dimensions..... 27 Technical Specifications ...................... 28 Replacement Parts ............................... 29 Component Locations .......................... 33 Schematic .............................................. 37 Maintenance Log .................................. 38 Operating Instructions ......................... 11 Charger Control Panel .................... 12 Menu Access ................................... 13 Main Menu ........................................ 13 Memorizations ................................. 13 Status ............................................... 14 1 Legacy® Insight™ Owner’s Manual I.B. 1620 Rev.A (6/10/14) AC LINE VOLTAGE LETTER CODES The following table describes the code letters to be used in new charger part numbers to indicate the AC line voltage(s) and AC line frequency at which the charger can be operated. Code Letters Voltage(s) (volts rms) C Y W T 600 480 240 208 Line Frequency (Hertz) 50 / 60 50 / 60 50 / 60 50 / 60 Comments 600 VAC only 480 VAC only 240 VAC only 208 VAC only SPECIALTY CHARGER OPTIONS LIST Suffix C6 C10 C12 C8 CF CF12 CR L10 L13 L15 L18 L20 L25 L30 NC PP S Description 6’ of #10AWG AC Cord with 30 AMP Plug. 10' of #10AWG AC Cord with 30 AMP Plug. 12' of #10AWG AC Cord with 30 AMP Plug. 8' of #10AWG AC Cord with 30 AMP Plug. 10’ of #8AWG AC Cord with 50 AMP Plug. 12’ of #8AWG AC Cord with 50 AMP Plug. 6’ of #10AWG AC Cord with 30 AMP Plug and 30AMP receptacle. 10’ of DC cable. 13' of DC cable. 15' of DC cable. 18' of DC cable. 20' of DC cable. 25' of DC cable. 30' of DC cable. No DC cables ( NOT UL APPROVED) Charger shipped on a Plastic Pallet Series DC Cables Reference page 28 “Technical Specs” for charger cable sizes. 2 Legacy® Insight™ Owner’s Manual I.B. 1620 Rev.A (6/10/14) IMPORTANT SAFETY INSTRUCTIONS 1. This manual contains important safety and operating instructions. Before using the battery charger, read all instructions, cautions, and warnings on the battery charger, the battery, and the product using the battery. 2. This charger has been designed to only charge flooded, lead-acid batteries. Read and understand all setup and operating instructions before using the battery charger to prevent damage to the battery and to the charger. 3. Do not touch non-insulated parts of the output connector or the battery terminals to prevent electrical shock. 4. During charge, batteries produce hydrogen gas which can explode if ignited. Never smoke, use an open flame, or create sparks in the vicinity of the battery. Ventilate well when the battery is in an enclosed space. 5. Do not connect or disconnect the battery plug while the charger is on. Doing so will cause arcing and burning of the connector resulting in charger damage or battery explosion. 6. Lead-acid batteries contain sulfuric acid which causes burns. Do not get in eyes, on skin, or on clothing. In cases of contact with eyes, flush immediately with clean water for 15 minutes. Seek medical attention immediately. 7. Only factory qualified personnel can service this equipment. De-energize all AC and DC power connections before servicing the charger. 8. The charger is not for outdoor use. 9. Do not expose the charger to moisture. Operating conditions should be 0º to 104º F; 0 to 70% relative humidity. 10. Do not operate the charger if it has been dropped, received a sharp hit, or otherwise damaged in any way. 11. For continued protection and to reduce the risk of fire, install chargers on a floor of non-combustible material such as stone, brick, or grounded metal. WARNING: The shipping pallet must be removed for proper and safe operation. INSTRUCTIONS DE SÉCURITÉ IMPORTANTES 1. Ce manuel contient des informations et des consignes importantes pour l’emploi et l’utilisation du chargeur de batteries industrielles. Avant tout emploi, il est fortement conseillé de lire l’ensemble des instructions, recommandations, et avertissements concernant le chargeur et la batterie. 2. Ce chargeur a été conçu pour la charge des batteries industrielles type plomb-acide dite « ouverte ». (Il ne peut pas être adapté pour les batteries étanches.) 3. Lisez toutes les condisnes d’installation et d’utilisation avant d’employer le chargeur de batterie pour empêcher des dommages à la batterie et / ou au chargeur. 4. Ne pas être en contact avec les pièces sous-tension non-isolées tels que la prise de charge ou des éléments de connexion de la batterie pour empêcher le choc électrique. 5. Pendant la charge, le dégagement d’hydrogène rend l’emploi de feu strictement interdit «risque d’explosion ». Ne jamais fumer, employer une flamme nue, ou créez les étincelles à proximité de la batterie. Ventiler suffisamment pour éviter toute condensation de gaz dans un espace restreint. 6. Ne brancher ou débrancher la batterie que si le chargeur est à l’arrêt. Faire ainsi risque d’endommager la prise de charge pouvant avoir pour conséquence des dommages du chargeur ou l’explosion de la batterie. 7. Les batteries d’acide au plomb contiennent l’acide sulfurique, qui cause des brûlures. Eviter le contact avec les yeux, la peau, ou sur l’habillement. Dans le cas de contact avec les yeux, et faut nettoyer immédiatement avec de l’eau propre pendant 15 minutes et consulter un médecin immédiatement. 8. Seul le personnel qualifié par l’usine peut entretenir cet équipement. Pour le service, veuillez contacter la société EnerSys ou l’un de ces représentant (1-800-251-6560) 9. Avant toute intervention d’entretien ou de réparation il faut s’assurer que le chargeur est hors tension et la batterie est déconnectée. 10. Le chargeur n’est pas pour un usage extérieur. 11. Ne pas exposer le chargeur à l’humidité. Les conditions de fonctionnement devraient être – 15° à 40°c; humidité relative de 0 à de 70%. 12. Ne pas mettre en fonctionnement le chargeur s’il a reçu un choc mécanique ou tout autre dommage di quel que façon. 13. Pour une protection permanente et pour réduire le risque du feu, installez les chargeurs sur un plancher ou un matériel non-combustible tel qu’un mur plein en béton, en brique, ou l’acier. 3 Legacy® Insight™ Owner’s Manual I.B. 1620 Rev.A (6/10/14) TECHNICAL INFORMATION The nameplate, located on the outside of the charger, should be used to check this application before installation. Part Number This number specifies in general the characteristics of this particular charger and for this reason it is required in any discussion or correspondence regarding this unit. L I 3 C– F 10 – 24 1Y O Model type Phase CEC Floor Cabinet (W = wall cabinet) Power Level Max Number of Cells Input Volt code Options Serial Number This number indicates complete information about the specific charger. It must be supplied with the part number on any correspondence or discussion regarding this charger. Battery Type The chemical content construction of the battery this unit is designed to charge is given in this part of the nameplate. (L-A = Lead-Acid) Ampere-Hours The information supplied here is the maximum ampere-hours capacity of this charger. Charging batteries of ampere-hour capacities not specified here might cause the charger to deviate from the specifications. Cells This portion of the nameplate gives the number of cells this unit will charge. This number must match exactly with any battery connected to the charger output. Input AC Volts The nameplate shows the input voltage accommodated by this charger. IMPORTANT: The charger will operate only on nominal line voltages stamped on the nameplate. Failure to select the correct voltage will result in damage to the charger and/or the battery. Input AC Amps The external fusing and/or the line disconnect circuit breaker should be as specified in the National Electrical Code or other local code agencies. (AC fuse values can be found on the decal inside the charger). 4 Legacy® Insight™ Owner’s Manual I.B. 1620 Rev.A (6/10/14) Hz This gives the frequency in cycles per second of the AC input voltage. Under no conditions operate charger at a different frequency or from a generator with unstable frequency. Phase Number "3" indicates a Three Phase Charger. DC Volts This gives the nominal DC output voltage of the system. Rated DC Amps This is the nominal DC value of current that this unit will deliver to a battery that is 100% discharged. CEC This logo is applied to chargers that are certified by California Energy Commission. 5 Legacy® Insight™ Owner’s Manual I.B. 1620 Rev.A (6/10/14) INSTALLATION WARNING: The shipping pallet must be removed for proper and safe operation. Location For maximum trouble-free service, choose a location which is free of excess moisture, dust, and corrosive fumes. Also, avoid locations where temperatures are high or where liquids will drip on the charger. Do not obstruct the ventilating openings or the space under the charger. Mounting Wall Cabinet Chargers The charger must be mounted on a wall or stand in a vertical position. The lower part of the charger must be at least 24” from the ground and/or the charger below and the upper part 36” from the ceiling. The minimum distance between two chargers must be12”. The charger will be installed with four 5/16” bolts or with the bracket supplied. See the Wall Mounting Dimensions section at the end of this manual for proper bolt pattern. Placing Floor Cabinet Chargers Allow at least six (6) inches of clearance at rear and sides of the charger for air circulation. Stacking Multiple Floor Cabinet Chargers These chargers can be stacked up to a maximum of 3 units high. Chargers are not designed to be stacked side by side due to ventilation requirements. 1. Position the first charger so that a minimum of 6 inches of space is between the charger and any wall, and 12 inches between the charger and any other chargers or equipment. 2. Place the second charger on top of the first. Align the bolt holes on each charger. 3. Fasten both charger cabinets together securely using 3/8” bolts and nuts. NOTE: the two bolts toward the back of the charger may be omitted if an after market metal strap (about 8 inches) is used to secure both chargers. Remove existing 1/4" screws of the chargers' sides and attach strap with screws. Refer to picture. Hardware kit # X225-99-0-2 can be ordered to attach two chargers. 4. Repeat steps 2 and 3 for the third charger. 5. Stacked chargers must be fastened to the wall using devices suitable for the wall construction and the bolt holes at the top of the highest charger. METAL STRAP TWO STACKED CHARGERS, RIGHT SIDE VIEW NOTE: Ambient temperature at all levels cannot exceed 104OF / 40OC. 6 Legacy® Insight™ Owner’s Manual I.B. 1620 Rev.A (6/10/14) Electrical Connections To prevent failure of the charger, be sure it is connected to the correct line voltage. On three phase units Connect all chargers as follows: Phase A to L1 (fuse block) Phase B to L2 (fuse block) Phase C to L3 (fuse block) Connecting Input Power WARNING: Make sure the power to the charger is OFF and the battery is disconnected before connecting the input power to the terminals of the charger. Connect the input power to the appropriate terminals, including ground. Follow your local electrical or National Electric Code in making these connections. AC Connection The user must provide suitable branch circuit protection and a disconnect method from the AC power supply to the charger to allow for safe servicing. Plug Polarity The charging cable is connected to the DC output of the charger with the positive lead marked RED. The output polarity of the charger must be strictly observed when connecting to the battery (read warning above). Improper connection will open the DC fuse. Grounding the Charger DANGER: FAILURE TO GROUND THE CHARGER COULD LEAD TO FATAL ELECTRIC SHOCK. Follow National Electric Code for ground wire sizing. Connect a grounding conductor to the lug provided on the horizontal support panel. This lug is marked as shown: 7 Legacy® Insight™ Owner’s Manual I.B. 1620 Rev.A (6/10/14) DESCRIPTION OF OPERATION General Legacy® Insight™ chargers are microprocessor-controlled. The processor calculates the battery’s capacity so that the charging profile can be automatically adapted to the battery’s actual state over a wide range of capacities. The charging coefficient is maintained absolutely on all types of batteries. Legacy® Insight™ chargers adapt to the battery’s capacity and its discharge level. Legacy® Insight™ chargers can easily be set to charge flooded batteries used in cold or freezer storage applications, ionic or opportunity profiles. This battery charger is also designed to charge flooded and sealed lead-acid storage batteries within the range of the cell and ampere-hour rating as marked on the nameplate. Beginning the Charge When a battery is connected to the charger, the control board senses voltage and after a 20 second delay, the charger energizes. Charging Charging current is determined by the battery voltage and interaction of the charger. Charging current declines automatically as battery voltage rises during the charge. As the battery charges, the LCD display will output various charge parameters including the percentage of battery capacity. AC Power Fail If the AC power fails with a battery connected to the charger during a charge cycle, the charger will reset and start a new charge cycle when power is restored. All charger settings as well as the time and date are preserved. Series Charging In series charging, the voltages of both batteries add up and must match charger’s nameplate rating. The charger’s ampere-hour rating must be equal to each of the batteries’ ampere-hour rating. Charge cycle will not start unless both batteries are connected. 8 Legacy® Insight™ Owner’s Manual I.B. 1620 Rev.A (6/10/14) GLOSSARY Charging Coefficient The ratio of the number of ampere-hours restored during charging to the number of amperehours consumed during discharge. Charging Profile The charging profile defines the rate of current charge over time. The charger adapts to the battery’s age and level of discharge. Controlling the overcharge coefficient, whatever the battery’s discharge level, reduces the amount of electricity consumed. Cold Storage This is a charging profile that allows the configuration of the charger for use with batteries in cold storage application. The profile is an IEI (constant current, constant voltage, constant current) type with a number of user configurable parameters. Equalization Charging Equalization charging, performed after normal charging, balances the electrolyte densities in the battery’s cells. IGBT The IGBT controls the charger output by rapidly switching the transformer primary at 20 to 30 kHz. Ionic Profile Also called “ionic mixing”. This type of charging profile consists of sending short pulses of current to stimulate gas formation in the active material, causing sulfuric acid to be distributed outside the plates. This system of mixing the electrolyte enables more rapid charging of flooded cell batteries subject to very high demands and balances out differences in density, homogenizing the electrolyte across the surface of the plates. 9 Legacy® Insight™ Owner’s Manual I.B. 1620 Rev.A (6/10/14) OPPOR Profile The OPPOR charge profile is used when opportunity charging is desired. It has a start rate of 25% of the batteries rated amp hour capacity, requires one opportunity recharge in every 24 hours of service and must have an equalize charge done once a week which is programmed to run automatically. Operation: During opportunity charging the user can plug the battery in and charge it during breaks, lunch or any work stoppage time. Sufficient time should be scheduled after the full charge to allow the battery to completely cool to ambient temperatures before use. Daily Charge: When Profile is set to Opp, the Value programmed will be the time of day for a Complete Ionic charge. Type is ignored when Profile is set to Opp. One complete Ionic charge per day is recommended. . Note: The user must configure the charger for the time of day that the full recharge is to take place, they must also configure the day of the week that the equalize charge will take place. Power Diodes The power diodes rectify the AC input and the output of the transformer. Refresh Charging Refresh or maintenance charging enables the battery to be maintained at maximum charge all the time that it is connected to the charger. Rest Function The Rest function prevents the battery from being disconnected for a pre-defined period to ensure a period of inactivity after charging. CEC Describes that the chargers are certified by the California Energy Commission. 10 Legacy® Insight™ Owner’s Manual I.B. 1620 Rev.A (6/10/14) OPERATING INSTRUCTIONS The Legacy® Insight™ series of chargers are compatible with batteries at 12, 24, 36, 48, 72 and 80 volts (depending on the version supplied). These chargers can automatically recharge batteries in the following ranges 12-24-36V, 24-36-48V, and 48-72V or 48-80V Battery recognition (voltage, capacity and state of charge) is accomplished automatically by the microprocessor. Several charging profiles are available (Cold Storage, IONIC, Opportunity, VRLA) based on the configuration chosen by the operator. Furthermore, equalization and compensation charges are integrated. 11 Legacy® Insight™ Owner’s Manual I.B. 1620 Rev.A (6/10/14) Control Panel 1 7 8 9 3 2 6 4 5 003 Ref. Function Description 1. Graphical LCD Display. Display charger operation info/Menus 2. Navigate UP button Navigate menus/Change values 3. ENTER/STOP&START button Select menu items/Enter values/Stop and restart battery charge 4. Navigate RIGHT/EQUALIZE button Scroll right/Start equalize or desulfation 5. Navigation DOWN button Navigate menus/Change values 6. 7. Navigation LEFT/ESC button RED fault indicator 8. YELLOW charging indicator 9. GREEN charge complete indicator Enter Main Menu/Scroll left/Exit menus OFF = no fault FLASHING = ongoing fault detected ON = fault OFF = charger output is off ON = charging in progress OFF = charger off or battery not available Flashing = cooling phase ON = battery ready and available 12 Legacy® Insight™ Owner’s Manual I.B. 1620 Rev.A (6/10/14) Menu Access When the charger is idle, press and hold <ESC>, the Main Menu is then displayed. The current menu is automatically exited after six minutes of inactivity or can be exited voluntarily by pressing the <ESC> button. The menus provide access to the following functions: Last 896 charging cycles (MEMORIZATIONS menu). Viewing of faults, alarms, etc. (STATUS menu). Download of data stored in the charger via the USB storage memory. Charger configuration (CONFIGURATION menu). Setting of date, language and others (PARAMETERS menu). Management of password (PASSWORD menu) Viewing basic charger information (INFORMATION menu) Main Menu All menus are accessed from Main Menu; a detailed description of each menu is included in the next sections of this manual. The menus that require a password are not displayed until the correct password has been entered. Memo Status USB (password) Configuration (password) Parameters Information Password Memorizations The charger can display the details of the last 896 charge cycles. Memorization Access On the Main Menu, select Memo and press <Enter>. Memorizations Display Screen The display shows here that 17 charges have been stored in memory (title line). MEMO 1 is the latest charge memorized. After memorizing the two-hundredth charge, the oldest record is deleted and replaced by the next oldest. 13 Legacy® Insight™ Owner’s Manual I.B. 1620 Rev.A (6/10/14) Displaying a charge cycle Proceed as follows: 1. Select a record (MEMO x) using the ▲/▼ buttons. 2. Display the first History screen by pressing Enter. 3. Display the second History screen by pressing▼. 4. Return to the Main Menu by pressing Esc. The charge history is displayed; use the ▲/▼ to scroll through the parameters. The Memorizations can be cleared via the Reset command in the Configuration Menu (Password required). Status This menu displays the status of the charger’s internal counters (number of normal and equalize charges, faults by type, etc.). Access On the Main Menu, select Status and then press <Enter>. STATUS SCREEN Status Charge EGAL TH DF1 etc. Information Total number of charges. Corresponds to the total of normally terminated charges and charges terminated with or by faults. Number of charges terminated abnormally. Number of charges normally terminated. Number of equalization charges completed by the charger. Number of charger temperature faults*. Number of faults recorded by the charger (see Fault Codes). The Memorizations can be cleared via the Reset command in the Configuration Menu (Password required). 14 Legacy® Insight™ Owner’s Manual I.B. 1620 Rev.A (6/10/14) USB This menu provides access to the USB function. The charger can store charging data in a USB memory. Password is required to view this menu. Record Memo Enables the storage of charge Memorizations and the Status data to a USB data storage device (aka memory stick, thumb drive). To record memos: 1. Insert the data storage device in the USB port on the side of the charger. 2. Go to Main Menu->USB->Record Memo. Select “On”. 3. Display will show “Record MemoX (1, 2, 3, 4…….). 4. When finished, charger will return to idle state. 5. Remove data storage device from USB port. The file, in CSV format (useable with Memoreport or Excel), will be stored in the data storage device under the name “MDDDHHMM.CSV” where: M: is for Memorization data file DDD: Day of the year HH: Hour of file creation MM: Minute of file creation Update Software Update chargers internal software. The software is provided by Douglas and only authorized service personnel should perform this function. Eject For safe removal of the USB stick without damaging the data file. Configuration This menu allows for configuration of the charger. Password is required to view this menu. Only knowledgeable factory trained personnel should change these settings. Battery Auto/Manu capacity When in Ionic mode, the charger can estimate the capacity of the connected battery automatically “Auto” or the charger will use the capacity entered manually “Manu” in the Capacity menu. Capacity Battery capacity used by the charger (must be set to “Manu” for Ionic profile) to determine start and finish rates. Temperature This parameter adjusts the regulation voltages on the charging profile (values between –15°C / 5°F and 65°C / 149°F) and defines the average operating battery temperature before the charge. It is recommended the average electrolyte temperature be entered, especially in cold areas. 15 Legacy® Insight™ Owner’s Manual I.B. 1620 Rev.A (6/10/14) Charge Profile For selecting the right charging profile for the application: COLD STORE, IONIC, OPP, VRLA The profile selected will be used. Values stored in the BATTERY menu, such as CAPACITY (except Ionic) and TEMPERATURE, are used to determine key charging parameters. Make sure these values match the battery to be charged or the battery may be over or under charged which will result in decreased battery life or performance. Charge Delay Under Type choices are either OFF, DELAY, or TIME OF DAY. VALUE is the amount or time day for the delay (00:00 to 24:00). Delay: Start of charge is delayed for the amount of time stored in VALUE (0 to 24 hours) Time of Day: Charge will not start until the time of day stored in VALUE (24 hour format). Daily Charge If charger profile is set to OPP, one complete Ionic charge per day is recommended. Enough down time should be allowed so the battery can remain plugged in to receive a full charge (Typically 4 to 5 hours depending on the state of discharge). As long as the battery is plugged in between the start time and the end time it will finish if allowed to do so. Daily Chg Start: Start time for complete charge. (24 hour format, factory default if not specified, 22:00) Daily Chg End: End time for complete charge. If charger is plugged in after this time it will revert back to opportunity charging. (24 hour format, factory default if not specified, 4:00) Daily Chg On/Off: Sets the complete daily charge on or off. Conditional charge The charger will only commence the charge if the battery has reached the limit of depth of discharge (DoD) of more than x%. For example if the user wants to charge the battery only if it is discharged more than 30%, the parameter 30 has to be entered in the conditional charge. The 0 value disables the function. Float Charge This feature can be turned ON or OFF depending on the application. A float charge at the end of standard charge is intended to compensate for consumption by the truck electronics that are left on when truck is not used (typically AGV). The parameter VOLTAGE is in mVpc (millivolts per cell) determines the maximum float voltage. The parameter CURRENT defines the current output during float, the current will automatically decrease to keep the battery voltage at the under the maximum defined by the VOLTAGE parameter. Maximum current This manually decreases the maximum output current of the charger. 16 Legacy® Insight™ Owner’s Manual I.B. 1620 Rev.A (6/10/14) Equalization Manu Current This defines the equalization or desulphation current for a manual start. Time Sets the equalization time from 1 to 48 hrs Delayed start (delay) Sets the delay between the normal charge and the equalization charge from 0 hr to 23 hrs. Frequency Selects one or several periods for carrying out the equalization charge. The user can select one or several days per week. Cable Length Select the length of DC cables from the charger to the battery terminals in 1 foot increments from 3 to 99 ft (1 to 30 m). Section Sets the DC cable gauge. Selections are 8, 6, 4, 2, 1/0, 2/0, 3/0, 4/0 AWG (10, 16, 25, 35, 50, 70, 95 or 120 mm²). Network (Option) Set a protocol and configure the charge for the connecting the charger to a network. JBUS: Used only by the factory. Ethernet: Settings include IP Address, DNS, Gateway, Subnet Mask, DHCP (OFF/ON), Speed. The values for these settings will depend on the specific application and should be obtained from a network administrator for the network being used. Option Options Test Turns on Battery Status (Red/Green) and Electrovalve output briefly to test operation. Rst Memo/Status Resets and clears all memorizations and status history. WARNING! ONCE THE MEMORIZATIONS AND STATUS HAVE BEEN CLEARED THEY CANNOT BE RECOVERED! 17 Legacy® Insight™ Owner’s Manual I.B. 1620 Rev.A (6/10/14) Parameters Date/Time Sets date and time of the charger. The clock has a battery backup which will preserve the time when power to the charger is off. Daylight Savings Enable or disable automatic clock adjustment for daylight savings time. When enabled, time will move ahead on hour at 02:00 on the second Sunday in March and will move back one hour at 02:00 on the first Sunday of November. The charger must be powered up at the time of the change for it to take effect. Language Selects the language displayed in the menus. Region Select the format for date, metric (EU) or imperial (US) units for temperature, length, and cable gauge. Contrast Modifies the display contrast level (40 to 49). Change Password (Password required to view this menu.) Change the password to any 4 digit code. Password This is where the password is entered to gain access to protected menus such as USB and Configuration. REGION Information View information about the charger such as firmware version and charger type. 18 Legacy® Insight™ Owner’s Manual I.B. 1620 Rev.A (6/10/14) Charging the Battery At this point, the charger should have been set up by a qualified service person. Charging can only begin with a battery of the proper type, capacity and voltage connected to the charger. Charger Idle Display With the charger in wait mode (No battery connected) and without pressing the Stop/Start button, the display will show the following information: 1 10kW-24a E3.37 2 CONNBATT 3 _______________________________________________ IONIC 4 625Ah 01apr11 6 5 Ref 1 2 3 4 5 6 Description Charger type Firmware version CONNect Battery Selected charge profile Programmed battery parameters (Cap, temp) System time and date S11 Delayed Start If the charger was programmed for delayed start (Configuration->Charge->Delay), charging will begin following that delay. When the battery is plugged in to the charger, the display shows the time remaining before the programmed charging starts. L2010 24-36-48V US11 19 Legacy® Insight™ Owner’s Manual I.B. 1620 Rev.A (6/10/14) Starting a Charge cycle The charger will start automatically when a battery is connected or push the Stop/Start button if the battery is already connected. Effective charging starts after a 20 second countdown. The charger uses Profile, Capacity, and Temperature settings programmed in the Configuration menu. Effective charge A few moments into the effective charge, the display will begin alternating between the following charging information: 1 10kW-24a 3 7 E3.37 CHARGE 210A 50.3V 2 8 _______________________________________________ IONIC 4 625Ah 01apr11 5 Ref 1 2 3 4 5 6 7 8 Description Charger type Firmware version Charger status (CHARGE, AVAIL, EQUAL, FAULT) Selected charge profile Programmed battery parameters (Cap, temp) System time and date (if set) Charger output current Alternating battery charge statistics (Batt V, Vpc, Ah returned, time on charge, estimated time remaining, % State of Charge) 20 6 Legacy® Insight™ Owner’s Manual I.B. 1620 Rev.A (6/10/14) End of charge without equalization The green complete LED comes on after proper end of charge. The green complete LED is on and the display shows AVAIL. The display alternates between: Total charging time. Amp/hrs restored to the battery. L2 0 1 0 24-3 6 -48V U S11 Any other lit LED indicates a problem during charging. Please refer to paragraph Control Panel for more information. If the battery remains plugged in and refresh charge has been enabled, refreshes will occur to maintain an optimal charge. The battery is now ready for use. Push the ON/OFF button before unplugging the battery. End of charge with equalization An Equalize charge can be started manually or automatically. Manual Start 1. At the end of charge (green LED on or flashing), press on the <EQUALIZE> button. The equalize button can also be pressed any time during the charge and an equalize charge will be started after charging is complete. NOTE: When an equalize is manually started, the output current will be set to the value saved in Configuration->Equalize->Manu Current. 2. The start of the equalization charge is indicated by the message EQUAL. During the equalization charge, the charger displays the output current and alternating, the battery voltage, voltage per cell, remaining time. L2010 24-36-48V US11 3. The battery will be available when the green LED comes back on and the display shows AVAIL. 4. The battery is now ready for use. If the battery remains plugged in and refresh charge has been enabled, refreshes will occur to maintain an optimal charge. Push the ON/OFF button before unplugging the battery. Automatic start If an equalization day has been programmed (Configuration->Equalization->Frequency) the equalization charge will start automatically on the programmed day of the week after charging is complete. The battery will be available when the green LED comes back on and the display shows AVAIL. The battery is now ready for use. If the battery remains plugged in and refresh charge has been enabled, refreshes will occur to maintain an optimal charge. Push the ON/OFF button before unplugging the battery. 21 Legacy® Insight™ Owner’s Manual I.B. 1620 Rev.A (6/10/14) Fault Codes In case of a fault, one of the corresponding fault codes listed below will appear on the display. If it is a critical fault, charging will stop and the red Fault LED will be illuminated. Fault Critical DF1 Yes DF2 Yes DF3 Yes DF4 No DF5 No DF7 No TH Yes STOP Yes TEMP Yes DEF CFG/ DEF EEP/ DEF MENU Yes Error in Configuration/ Memory/Charger menu Call for service. No Low battery electrolyte Check battery electrolyte level. No Battery balance fault Check battery cell voltages. No High battery temperature Allow battery to cool. Battery may need service. Tº Cause Solution Check input voltage and fuses. Call Low output current for service. Check for proper battery connection Output fault (reversed polarity). Check output fuse. Call for service Battery voltage too high (>2.3 Vpc) or Improper battery too low (<1.6 Vpc). Use proper charger for battery. The battery has been Prevent future over discharging of discharged more than 80% battery. Battery charge gauges and lift of its capacity interrupts may need calibration. Non critical fault. Check battery cables Battery requires inspection for condition and size, check for loose connections, check for defective cells. If current rises more than 10A in Current rise in Phase 2 of Phase 2 it will cause the charger to the charge cycle stop. Call for service. Check that fans are working. Verify that ambient temperature is not too Charger overheating high. Inspect to see if charger ventilation is obstructed or impaired. Critical battery electrolyte Make sure battery electrolyte is level brought up to the proper level. Allow battery to cool. Check max Battery temperature reached temperature setting in Configurationmaximum >Battery->High Temp 22 Legacy® Insight™ Owner’s Manual I.B. 1620 Rev.A (6/10/14) MAINTENANCE & SERVICE CAUTION: THERE ARE DANGEROUS VOLTAGES WITHIN THE BATTERY CHARGER CABINET. ONLY QUALIFIED PERSONNEL SHOULD ATTEMPT TO ADJUST OR SERVICE THIS BATTERY CHARGER The charger requires a minimum of maintenance. Connections and terminals should be kept clean and tight. The unit (especially the heatsink) should be periodically cleaned with an air hose to prevent any excessive dirt build up on components. Care should be taken not to bump or move any adjustments during cleaning. Make sure that both the AC lines and the battery are disconnected before cleaning. The frequency of this type of maintenance depends on the environment in which this unit is installed. For service, contact the closest Service Center at: 1-800-DOUGLAS (1-800-368-4527) Or, visit us at: http://www.douglasbattery.com/ 23 Legacy® Insight™ Owner’s Manual I.B. 1620 Rev.A (6/10/14) WALL MOUNTING DIMENSIONS WALL SUPPORT BRACKET (P/N: 159-6LA20319), SLOT CENTERS, 3/8" HARDWARE IS RECOMMENDED DIMENSIONS SHOWN IN THE DRAWING TO THE LEFT ARE FOR WALL MOUNTING THE CHARGER AND ARE ACCURATE FOR BOTH THE LARGE AND SMALL WALL MODELS AS LONG AS THE MEASUREMENTS ARE TAKEN FROM THE BOTTOM OF THE CABINET’S BASE 24 Legacy® Insight™ Owner’s Manual I.B. 1620 Rev.A (6/10/14) EXTERIOR WALL CABINET DIMENSIONS AND PARTS 009-IQ-1 009-IQ-4 Kit P/N: X225-019-IQ-5 Includes sheet metal and plastic parts shipped in a box fully assembled. X057-LTI3-1 Kit P/N: X225-019-IQ-6 Includes sheet metal and plastic parts shipped in a box fully assembled. 009-IQ-1 25 X057-LTI3-2 Legacy® Insight™ Owner’s Manual FLOOR MOUNTING DIMENSIONS FRONT BACK 26 I.B. 1620 Rev.A (6/10/14) Legacy® Insight™ Owner’s Manual I.B. 1620 Rev.A (6/10/14) EXTERIOR FLOOR CABINET DIMENSIONS AND PARTS Top P/N: X052-99-3-12B Left Side P/N: X057-99-0-7B Door P/N: X054-99-3-17B 27 Right Side P/N: X057-99-0-6B Back P/N: X057-99-3-16B Legacy® Insight™ Owner’s Manual I.B. 1620 Rev.A (6/10/14) TECHNICAL SPECIFICATIONS KW - Output Voltage Codes AC Input DC Output Voltage Max Phase Cells Max Current Amps (A) 4-1T 208 12.4 3 12/18/24 85/80/70 4-1W 240 11.4 3 12/18/24 85/80/70 4-1Y 480 5.7 3 12/18/24 85/80/70 4-1C 600 4.3 3 12/18/24 85/80/70 4-3T 208 12.6 3 6/12/18 100/100/95 4-3W 240 11.0 3 6/12/18 100/100/95 4-3Y 480 5.5 3 6/12/18 100/100/95 4-3C 600 4.4 3 6/12/18 100/100/95 6-1T 208 18.5 3 12/18/24 110/110/105 6-1W 240 17.0 3 12/18/24 110/110/105 6-1Y 480 8.5 3 12/18/24 110/110/105 6-1C 600 6.4 3 12/18/24 110/110/105 6-3T 208 18.5 3 6/12/18 140/140/140 6-3W 240 17.0 3 6/12/18 140/140/140 6-3Y 480 8.5 3 6/12/18 140/140/140 6-3C 600 6.4 3 6/12/18 140/140/140 8-1T 208 24.7 3 12/18/24 150/150/140 8-1W 240 22.8 3 12/18/24 150/150/140 8-1Y 480 11.4 3 12/18/24 150/150/140 8-1C 600 8.5 3 12/18/24 150/150/140 10-1W 240 27.5 3 12/18/24 200/200/180 10-1Y 480 15.0 3 12/18/24 240/240/180 10-1C 600 11.0 3 12/18/24 240/240/180 10-2Y 480 15.0 3 24/36/40 120/115/110 10-2C 600 11.2 3 24/36/40 120/120/110 15-1Y 480 20.5 3 12/18/24 260/260/250 15-1C 600 15.3 3 12/18/24 260/260/250 15-2Y 480 21.5 3 24/36/40 170/170/160 15-2C 600 16.3 3 24/36/40 170/170/160 *LTI3-W wall mount chargers have a maximum cable gauge of 3/0 AWG 28 Max 8 hour Capacity (Ah) 530/500/400 530/500/400 530/500/400 530/500/400 625/625/595 625/625/595 625/625/595 625/625/595 690/690/655 690/690/655 690/690/655 690/690/655 875/875/875 875/875/875 875/875/875 875/875/875 940/940/875 940/940/875 940/940/875 940/940/875 1250/1250/1125 1500/1500/1125 1500/1500/1125 750/720/690 750/750/685 1625/1625/1565 1625/1625/1565 1065/1065/1000 1050/1050/1000 Charger Cable AWG #2 #2 #2 #2 #2 #2 #2 #2 1/0 1/0 1/0 1/0 1/0 1/0 1/0 1/0 1/0 1/0 1/0 1/0 3/0 3/0 3/0 #2 #2 4/0* 4/0* 1/0 1/0 Legacy® Insight™ Owner’s Manual I.B. 1620 Rev.A (6/10/14) X1060-IQ4-1Y3 Control Board X1060-IQ4-1C3 Control Board X1060-IQ4-3T3 Control Board X1060-IQ4-3W3 Control Board X1060-IQ4-3Y3 Control Board X1060-IQ4-3C3 Control Board X1060-IQ6-1T3 Control Board X1060-IQ6-1W3 Control Board X1060-IQ6-1Y3 Control Board X1060-IQ6-1C3 Control Board X1060-IQ6-3T3 Control Board X1060-IQ6-3W3 Control Board X1060-IQ6-3Y3 Control Board X1060-IQ6-3C3 Control Board X1060-IQ8-1T3 Control Board X1060-IQ8-1W3 Control Board X1060-IQ8-1Y3 Control Board X1060-IQ8-1C3 Control Board X1060-IQ10-1W3 Control Board X1060-IQ10-1Y3 Control Board X1060-IQ10-2Y3 Control Board X1060-IQ10-1C3 Control Board X1060-IQ10-2C3 Control Board X1060-IQ15-1Y3 Control Board X1060-IQ15-1C3 Control Board X1060-IQ15-2Y3 Control Board X1060-IQ15-2C3 Control Board 15‐2C 15‐2Y 15‐1C 15‐1Y 10‐2C 10‐1C 10‐2Y 10‐1Y 10‐1W 8‐1C 8‐1Y 8‐1W 8‐1T 6‐3C 6‐3Y 6‐3W 6‐3T 6‐1C 6‐1Y 6‐1W 6‐1T 4‐3C 4‐3Y 4‐3W Control Board 4‐3T 1 X1060-IQ4-1W3 4‐1C Control Board 4‐1Y Description X1060-IQ4-1T3 4‐1W Part Number 4‐1T REPLACEMENT PARTS and QUANTITY 1 1 1 1 1 1 1 1 1 1 1 1 1 1 1 1 1 1 1 1 1 1 1 1 1 1 1 1 29 Legacy® Insight™ Owner’s Manual I.B. 1620 Rev.A (6/10/14) 6‐1T 6‐1W 6‐1Y 6‐1C 6‐3T 6‐3W 6‐3Y 6‐3C 8‐1T 8‐1W 8‐1Y 8‐1C 1 1 1 1 1 1 1 1 1 1 1 1 1 1 240V Power Board 1 480V Power Board 1 1 600V Power Board Power Transformer X127-6L10655 Power Transformer X127-6LA10678 Power Transformer X127-6L10643 Power Transformer X127-6L10644 Power Transformer X127-6L10648 Power Transformer X127-6L10649 Power Transformer X127-6LA15252 Power Transformer X127-6LA15262 Power Transformer X014-99-8 8A AC Fuse X014-99-10 10A AC Fuse X014-99-12 12A AC Fuse X014-99-15 15A AC Fuse X014-99-20 20A AC Fuse X014-99-25 25A AC Fuse X014-99-30 30A AC Fuse X014-99-35 35A AC Fuse X014-99-40 40A AC Fuse X014-99-50 50A AC Fuse X014-33-3 160A DC Fuse X014-6L10466 315A DC Fuse X117-150-50 150A Shunt X117-6L10326 250A Shunt X117-6LA18620 300A Shunt 1 1 1 1 1 1 1 1 1 1 1 1 1 1 1 1 1 1 1 1 1 1 1 1 1 1 1 15‐2C 4‐3C 1 1 15‐2Y 4‐3Y 1 15‐1C 4‐3W 1 15‐1Y 4‐3T 1 1 10‐2C 4‐1C 1 208V Power Board 10‐1C 4‐1Y 1 X1060-12-SB208 X10606LA11713 X10606LA11662 X10606LA11722 X127-6LA10659 10‐2Y 4‐1W Display Board 10‐1Y Description X026-EQ3-1 10‐1W Part Number 4‐1T REPLACEMENT PARTS and QUANTITY 1 1 1 1 1 1 1 1 1 1 1 1 1 1 1 1 1 1 1 1 1 1 1 1 1 1 1 1 3 1 1 1 1 1 1 1 3 3 3 3 3 3 3 3 3 3 3 3 3 3 3 3 3 3 3 3 3 3 3 3 3 3 3 1 1 1 1 1 1 1 1 1 1 1 1 1 1 1 1 1 1 1 1 1 1 1 1 1 1 1 1 1 1 1 1 3 1 1 1 1 1 1 1 1 1 1 1 1 1 1 1 1 1 1 1 1 1 30 1 1 1 1 1 Legacy® Insight™ Owner’s Manual I.B. 1620 Rev.A (6/10/14) 6‐1W 6‐1Y 6‐1C 6‐3T 6‐3W 6‐3Y 6‐3C 8‐1T 8‐1W 8‐1Y 2 2 2 2 2 2 2 2 2 4 4 4 R507-6L14022 Bridge Rectifier 1 X020-6L18616 Line Choke 1 X020-6L10310 Line Choke X020-6LA10334 Resonant Choke X020-6LA10323 Resonant Choke X020-6LA18621 Resonant Choke X020-6L10353 Resonant Choke X020-6LA18614 Resonant Choke X020-10-1 Resonant Choke X020-10-2 Resonant Choke X225-IQ-200-600 IGBT Kit X225-IQ-6L19610 IGBT Kit X225-IQ-200-1700 IGBT Kit X225-IQ-6LA19617 IGBT Kit 029-101 Snubber Capacitor (QTY) 029-6LA13170 Snubber Capacitor (QTY) 029-6LA13182 Snubber Capacitor (QTY) 029-6LA13183 Snubber Capacitor (QTY) X020-6LA18624 Output Choke 029-6LA13000 Res. Capacitor 1 (QTY) 029-6LA13001 Res. Capacitor 1 (QTY) 029-6L13099 Res. Capacitor 1 (QTY) 029-6LA13000 Res. Capacitor 2 (QTY) 029-6LA13001 Res. Capacitor 2 (QTY) 029-6L13099 Res. Capacitor 2 (QTY) 029-6L13104 10uF Capacitor (QTY) 4 4 4 1 1 1 1 1 1 1 1 1 1 1 1 1 1 1 1 1 1 1 1 1 1 1 1 1 1 1 1 1 1 1 1 1 1 1 1 1 2 4 4 4 1 1 1 1 1 1 1 1 1 1 1 1 1 1 1 1 1 1 1 1 1 1 1 1 1 1 1 1 1 1 1 1 1 2 4 4 1 1 1 4 4 15‐2C 6‐1T 2 15‐2Y 4‐3C 2 15‐1C 4‐3Y 2 15‐1Y 4‐3W 2 10‐2C 4‐3T 2 10‐1C 4‐1C 2 Output Diode 10‐2Y 4‐1Y 2 R507-6L14028 10‐1Y 4‐1W Output Diode 10‐1W Description R507-6LA14008 8‐1C Part Number 4‐1T REPLACEMENT PARTS and QUANTITY 1 2 1 2 1 2 2 2 1 1 1 1 1 1 1 1 1 1 1 1 1 1 1 1 1 1 1 1 1 1 1 1 1 1 1 1 1 1 4 4 1 2 2 2 2 2 2 2 2 2 2 2 2 2 2 2 2 2 4 2 1 2 2 2 2 1 2 2 2 2 2 2 2 1 1 4 2 1 2 2 2 2 2 1 2 1 2 2 2 1 1 4 3 3 1 2 4 3 3 3 1 3 1 2 3 1 1 2 1 4 2 1 2 2 1 4 2 2 2 4 2 31 2 2 1 4 2 2 2 4 4 4 4 1 4 4 4 4 4 1 4 4 4 4 Legacy® Insight™ Owner’s Manual I.B. 1620 Rev.A (6/10/14) 1 15‐2C 15‐2Y 15‐1C 1 1 AC Power Line Filter 1 1 1 1 1 1 1 1 1 1 1 1 1 1 1 1 1 1 1 1 1 1 1 1 1 1 1 1 1 1 1 X026-60-1 Control BD Ret. Clip 1 1 1 1 1 1 1 1 1 1 1 1 1 1 1 1 1 1 1 1 1 1 1 1 1 1 1 1 1 X1106-99-PT23 Current Sensor 1 1 1 1 1 1 1 1 1 1 1 1 1 1 1 1 1 1 1 1 1 1 1 1 1 1 1 1 1 438-326-2 Cooling Fan 3 2 2 2 3 2 2 2 3 2 2 2 3 2 2 2 3 3 3 3 3 3 3 3 3 3 3 3 3 X225-019-IQ-5 8kW to 15kW Cover 1 1 1 1 1 1 1 1 1 1 1 1 1 1 X225-019-IQ-6 4kW to 6kW Cover 1 1 1 1 1 1 1 1 1 1 1 1 X002-6L10721 85 Degree Thermostat 1 1 1 1 1 1 1 1 1 1 1 1 1 1 1 1 1 1 1 1 1 1 1 1 X015-50-2 30A Fuse Holder 1 1 1 1 1 1 1 1 1 1 1 1 1 1 1 1 1 1 X015-50-4 60A Fuse Holder X1106-99-3-7 Shunt MOV Assembly 1 1 1 X1106-99-3-8 X11066LA00840 X1106-99-3-9 X11066LA20608 006-201-11A IGBT MOV Assembly 2 2 2 1 1 1 IGBT MOV Assembly 1 1 1 1 2 2 2 1 1 1 2 Bridge MOV Assembly 2 1 1 2 2 2 1 1 1 2 2 2 1 1 1 2 2 2 1 1 1 2 1 2 1 2 2 2 1 1 1 1 2 2 2 1 1 1 2 2 2 1 1 1 1 1 1 1 1 2 2 2 1 1 1 2 2 2 2 2 3 1 1 2 1 1 3 3 1 2 2 1 1 2 1 2 1 1 1 1 1 2 2 1 2 1 1 1 1 2 1 2 1 1 1 2 1 2 1 1 1 1 1 3 1 Insulated Standoff M6x30mm Socket Set Screw for Insulated 2 2 2 2 2 2 2 2 2 2 2 2 2 2 2 2 2 2 2 2 2 2 2 3 3 3 2 3 3 3 X1060-06-HFR-1 Bleeder Resistor Board 2 2 2 2 2 2 2 2 2 2 2 2 2 2 2 2 2 2 2 2 2 2 2 2 2 2 2 2 2 X1106-99-3-13 Output Diode Suppressor 2 2 2 2 2 2 2 2 2 2 2 2 2 2 2 2 4 4 4 4 4 4 4 4 4 4 4 4 4 X002-LTI3-1 LTI3-W Wall Keypad 1 1 1 1 1 1 1 1 1 1 1 1 1 1 1 1 1 1 1 1 1 1 1 1 1 1 1 1 1 X002-LTI3-2 LTI3-F Floor Keypad 1 1 1 1 1 1 1 1 1 1 1 1 1 1 1 1 1 1 1 1 1 1 1 1 1 1 1 1 1 X039-IQ-11C USB Port Assembly 1 1 1 1 1 1 1 1 1 1 1 1 1 1 1 1 1 1 1 1 1 1 1 1 1 1 1 1 1 126-IQ-11 USB Patch Cable 1 1 1 1 1 1 1 1 1 1 1 1 1 1 1 1 1 1 1 1 1 1 1 1 1 1 1 1 1 X225-12-RC-3 Remote Control* * * * * * * * * * * * * * * * * * * * * * * * * * * * * * 033-406-30 2 1 2 1 2 1 1 1 15‐1Y 1 10‐2C 1 10‐1C 10‐2Y 1 Display Ribbon Cable 1 1 10‐1Y 1 10‐1W 1 8‐1C 8‐1Y 1 X020-6L-4 1 1 8‐1W 1 8‐1T 1 6‐3C 1 126-EQ3-1 Bridge MOV Assembly 1 6‐3Y 1 6‐3W 1 6‐3T 1 6‐1C 1 6‐1Y 1 6‐1W 1 6‐1T 1 4‐3C 1 4‐3Y 4‐1Y 1 4‐3W 4‐1W AC Power Line Filter 4‐3T Description X020-6L-3 4‐1C Part Number 4‐1T REPLACEMENT PARTS and QUANTITY *Remote control can only be used on remote control ready chargers. Retrofit kit P/N: X225-RCK-7 is used for chargers not factory equipped with the remote control ready option. 32 3 3 Legacy® Insight™ Owner’s Manual I.B. 1620 Rev.A (6/10/14) LARGE WALL CHARGER COMPONENT LOCATIONS AC Fuse Display Board Bridge Rectifier AC Power Line Filter Resonant Choke Filter Choke Resonant Capacitors Power Board Power Transformer Diodes Shunt Control Board DC Fuse IGBT Snubber Capacitor Cooling Fan 33 Legacy® Insight™ Owner’s Manual I.B. 1620 Rev.A (6/10/14) SMALL WALL CHARGER COMPONENT LOCATIONS AC Fuse Display Board AC Power Line Filter Resonant Choke Bridge Rectifier Filter Choke Resonant Capacitors Power Board Power Transformer Diodes Shunt Control Board DC Fuse IGBT Snubber Capacitor Cooling Fan 34 Legacy® Insight™ Owner’s Manual I.B. 1620 Rev.A (6/10/14) FLOOR CHARGER LARGE CONFIGURATION COMPONENT LOCATIONS Bridge Rectifier Filter Choke Resonant Capacitors AC Fuse Power Transformer Power Board Resonant Choke Diodes Control Board Shunt DC Fuse IGBT Cooling Fan Snubber Capacitor 35 Legacy® Insight™ Owner’s Manual I.B. 1620 Rev.A (6/10/14) FLOOR CHARGER SMALL CONFIGURATION COMPONENT LOCATIONS Bridge Rectifier Resonant Capacitors Filter Choke AC Fuse Power Transformer Power Board Resonant Choke Diodes Control Board Shunt DC Fuse IGBT Cooling Fan Snubber Capacitor 36 Legacy® Insight™ N/A FOR CEC CHARGERS Owner’s Manual SCHEMATIC 37 I.B. 1620 Rev.A (6/10/14) MAINTENANCE LOG 1. Modifications to Factory Settings Date Variable 2. Service Date Change Description Service Technician Service Technician 1255 Creekshire Way, Suite 221, Winston-Salem, NC 27103 1-800-DOUGLAS (1-800-368-4527) www.douglasbattery.com I.B. 1620 Rev.A 4/13 ©2013 EnerSys Delaware Inc. d/b/a Douglas Battery. All Rights Reserved. Trademarks and logos are the property of EnerSys and its affiliates unless otherwise noted.