1
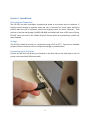
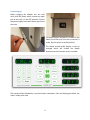
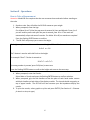
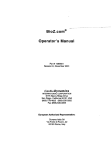
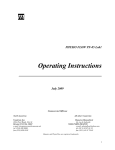
Valhalla Scientific Inc. G6 Duo User Manual Rev 2.41 Table of Contents Section I - Installation ..................................................................................................................... 3 Receiving and Inspection ............................................................................................................ 3 Storage ........................................................................................................................................ 3 Connecting Scale to Printer ........................................................................................................ 3 Powering up ................................................................................................................................ 4 Matching the Scale to a new HP6100 Printer ............................................................................. 5 How to Identify Firmware Revision and Serial Number ............................................................. 5 Section II - Operations .................................................................................................................... 6 How to Take a Measurement ..................................................................................................... 6 How to Recall the Last Measurement......................................................................................... 7 Section III - Printouts....................................................................................................................... 8 Plain Printouts ............................................................................................................................. 8 Programming Number of Copies ............................................................................................ 8 Graphic Printouts ........................................................................................................................ 8 Section IV - Special Modes ............................................................................................................ 10 Weight Only Mode .................................................................................................................... 10 Athletic Mode ........................................................................................................................... 10 Body Builder Mode ................................................................................................................... 10 Section V – Customizing ................................................................................................................ 11 Lock Option ............................................................................................................................... 11 Print Ohms Option .................................................................................................................... 11 Physician ID ............................................................................................................................... 11 Patient ID Option ...................................................................................................................... 12 Disabling/Enabling the Calorie Option...................................................................................... 12 Language Option ....................................................................................................................... 13 Section VI – Maintenance ............................................................................................................. 14 Calibration ................................................................................................................................. 14 Zero Calibration ........................................................................................................................ 14 Section I - Installation Receiving and Inspection The G6 DUO has been thoroughly inspected and tested at the factory prior to shipment. If shipping carton damage is apparent when the unit is received, the carrier agent should be present when the unit is unpacked. Retain the shipping carton for carrier inspection. Take pictures of the box and damage. Call 800.548.9806 and Valhalla will issue a UPS return Call tag. DO NOT return the unit to the Valhalla Scientific factory before an authorization number has been obtained. Storage The G6 DUO should be stored in a temperature range of 50 to 90o F. Exposure to extended periods of heat or cold may result in component damage or possible failure. Connecting Scale to Printer Connect the G6 DUO USB printer port (located on the back side on the scale base) to the HP printer via the provided USB printer cable. 3 Powering up Before plugging the adapter into the wall, verify that the power switch located on upper part of the neck is in the OFF position. Connect the power supply to the wall socket and then to the scale. The power supply receptacle is located on the lower part of the neck. Once the connection is made, flip the switch to the ON position. The display should briefly display a start up message which will include the Model Number and the Firmware version installed. The startup will be followed by a synchronization countdown. Once the display goes blank, the scale is ready to be used. 4 Matching the Scale to a new HP6100 Printer To match your new HP6100 printer to the scale, perform the following steps: 1. 2. 3. 4. Make sure the printer is ON and connected to the scale. Make sure the printer has finished its power up routine. Make sure the printer has paper loaded. Without stepping on the scale, Press # 9 to access Maintenance Menu – Menu Password (PW): 7538 5. When prompted [MENU ?], press # 7. The screen will go blank. 6. Press the RCL button on the display panel. The data will be displayed. 7. Press the Plain button followed by the Enter button. The display will flash “PRNT PLS WAIT” for approximately 30 seconds. At this point the default printer settings have been cleared. 8. Without stepping on the scale, Press # 9 to access Maintenance Menu – Menu Password (PW): 7538 9. When prompted [MENU ?], press # 7. The screen will go blank. 10. Press the RCL button on the display panel. Data will be displayed. 11. Press the Plain button followed by the Enter button. The display will flash “PRNT PLS WAIT” for approximately 30 seconds. At this point the new printer settings have been installed and the printer should have printed a test page with all zeros. How to Identify Firmware Revision and Serial Number To identify your G6 DUO, press #4. The BMI Percentile window will display the firmware version. The REE window will display the scale type. The serial number of the scale can be found on the serial tag sticker located under the head of the scale or on the display: 1. Press 9 to access Maintenance Menu – Menu Password (PW): 7538 2. When prompted [MENU ?], press # 8. The screen will display the serial number. 5 Section II - Operations How to Take a Measurement Attention: Model G6 Duo requires that the user removes shoes and socks before standing on the scale. 1. Stand on scale. Stay still while the G6 DUO measures your weight. 2. When prompted, enter the Age. For children (4 to 17y11m) the age must be entered in Years and Months. From 4 to 9 you will need to press enter after the year is entered, from 10 to 17 the scale will automatically skip to the month’s section. For Adults 18 to 99, no months are required. Press the flashing ENTER button to confirm. 3. The G6 DUO will prompt you to enter the Height. The height may be entered in several formats. A height of 6 feet 2 inches can be entered as: 6+0+2 or 6+2 The ½ button is used to add a half inch to the height. For example 5 feet 7.5 inches is entered as: 5+0+7+½ or 5+7+½ If a wrong number is pressed, press CLR (clear) to start over. Press the flashing ENTER button to confirm the height and move to the next step. 4. When prompted, enter the Gender. Select Male or Female and press the flashing ENTER button to confirm selection. 5. When prompted, grip the side handles so that the palm of each hand makes contact with both handles on both sides of the display module. The thumb should rest gently on top of upper handle. The G6 DUO will now measure your bio-impedance display the results. 6. To print the results, select graphic or plain and press ENTER. (See Section III - Printouts for details on the print types). 6 How to Recall the Last Measurement The G6 DUO models allow the user to recall the last measurement and reprint it. To recall the last results: 1. Press the RCL button on the display panel. The data will be displayed. The display clears after about 15 seconds or can be cleared by pressing the CLR button. 2. To print the results, select graphic or plain and press ENTER. The last results are erased if the scale is turned OFF. 7 Section III - Printouts When the results are displayed, the G6 allows you to select the print type, Plain or Graphic. Plain Printouts The Plain printout type is a single page containing all the results from the measurements and calculations. Programming Number of Copies The user can pre define the number of copies of this print-out to print. The default value is 1. To change the value: 1. Without stepping on the scale, Press # 3 to access Settings Menu – Menu Password (PW): 7538 2. When prompted [MENU ?], press Plain. 3. Enter the number of copies you wish to print. 4. Wait for the scale to return to standby. Graphic Printouts The Graphic printout type is a multi page printout designed for specific preprinted paper. The G6 Duo scale uses 2 types of Graphic printouts; a 5 page for adults and a 7 page for children. Make sure that the printer is loaded with the appropriate paper before printing. . 8 9 Section IV - Special Modes Weight Only Mode The G6 DUO allows you to take weight only measurements. To enable this measurement mode: Press Weight Only before stepping onto the scale. The scale will display WGT ON. Step on the scale and press Enter. The display will count down from 5 to 1 and display your weight. To clear the weight: Press CLR Athletic Mode To qualify as “athletic”, the subject must meet the following requirements: Work out 40 minutes in duration (20 min aerobic/20 min anaerobic), 3 days a week, for at least the last 6 months. In order to enable the Athletic Mode predictive equation: 1. Before stepping on the scale, Press 7. The screen will display: [ATH MODE Y/N?] 2. Press the YES key to enable the Athletic Mode equations, NO to cancel. These steps will enable the Athletic Mode for a single use. After the test is performed, the G6 DUO will automatically return to Standard Mode measurements. Body Builder Mode To qualify as a “bodybuilder” the subject must be at least 20% above their ideal weight (as defined in the Metropolitan Height/Weight chart), and that weight must be primarily muscle mass. In order to enable the Bodybuilder Mode predictive equation: 1. Before stepping on the scale, Press 8. The screen will display: [BB MODE Y/N?] 2. Press the YES key to enable the Body Builder Mode equations, NO to cancel. These steps will enable the Bodybuilder Mode for a single use. After the test is performed, the G6 DUO will automatically return to Standard Mode measurements. 10 Section V – Customizing Lock Option The Lock option allows you to “lock” the G6 DUO and prevent it from being used by unauthorized people. When the G6 DUO is locked, you will be required to enter an authorization ID before each test. To enable the Lock feature: 1. Press 3 to access Settings Menu – Menu Password (PW): 7538 2. When prompted [MENU ?], press # 9. The screen will display: [PIN? Y/N?] 3. Press the YES key to enable the Lock Pin Option, NO to cancel. The default authorization ID number is 1234. The ID can be changed at any time. To change the Authorization ID Number: 1. Press 9 to access Maintenance Menu – Menu Password (PW): 7538 2. When prompted [MENU ?], press # 1. - Enter (PW): 1973 The screen will display: [NEW PIN ----] 3. Enter the new 4 digit ID. Print Ohms Option The Print Ohms option gives you the choice of whether or not to print the measured bioimpedance value on the printouts. When you first receive the G6 DUO, the Print Ohms function is set to OFF. To enable the printing of the Ohms measurement: 1. Press 3 to access Settings Menu – Menu Password (PW): 7538 2. When prompted [MENU ?], press # 5. The screen will display: [OHMS MODE Y/N?] 3. Press the YES key to enable the Print Ohms Option, NO to cancel. Physician ID The G6 DUO allows the user to set a physician’s ID. The ID can be a number up to 8 digits and if set will be printed on the printouts under “Prepared By:” To set the Physician ID: 1. Press 5 before stepping on the scale. The screen will display: [ID 0000 0000] 2. Enter the preferred ID, up to 8 digits and press ENTER. The Physician ID can be changed or reset at anytime. 11 Patient ID Option The Patient ID option gives you the choice of using a Patient ID with every test. When you first receive the G6 DUO, the Patient ID function is set to OFF. To enable the Patient ID Option: 1. Press 2 to access Settings Menu – Menu Password (PW): 7538 2. When prompted [MENU ?], press # 4. The screen will display: [ID MODE Y/N?] 3. Press the YES key to enable the Patient ID Option, NO to cancel. Disabling/Enabling the Calorie Option Disabling the calorie option will prevent the scale from displaying and printing REE and activity level burn rates. To disable the Calorie Option: 1. Press 3 to access Settings Menu – Menu Password (PW): 7538 2. When prompted [MENU ?], press # 8. The screen will display: [CALS Y/N?] 3. Press the NO key to disable the Calorie Option, Yes to Enable. 12 Language Option The Language option gives you the choice of selecting the language of the printouts. To set the language: 1. 2. 3. 4. Press 3 to access Settings Menu – Menu Password (PW): 7538 When prompted [MENU ?], press # 3. The screen will display NEW LANG Enter the number associated with the language you wish to choose. # Language 0 English 1 Spanish (Español) 2 Portuguese (Português) 3 Italian (Italiano) 4 German (Deutsch) 5 French (Français) 13 Available Section VI – Maintenance Calibration Before calibrating your G6 DUO, you will need a reference weight between 200 and 350 Lbs. The scale can be calibrated using lower weights. However, to insure linearity of the measurements we recommend the above listed weight range as a calibration reference. 1. 2. 3. 4. 5. 6. 7. 8. Press 9 to access Menu – Menu Password (PW): 7538 When prompted [MENU ?], press the # 9. The screen will display: [CAL Y/N?] Press the YES key to start calibration, NO to cancel. When prompted [ZERO CAL], remove any weight from the scale and press ENTER. The scale will calibrate the zero reference as it counts down from 10 to 0. When prompted [WGT ON], place a weight on the scale and press ENTER. The scale will calibrate the weight reference as it counts down from 10 to 0. When prompted [CAL WGT?], type the value of the weight applied to the scale and press ENTER. Note: always enter the value in a 4 digit format. Example 200 Lbs enter 2000, or 309.2 Lbs enter 3092. The screen will display the cal factor. Press ENTER. [CAL DONE]. Zero Calibration Press 0 when scale is idle to reset any zero offset. For additional information, Call 1-800-548-9806 Visit our Website at www.bodycompscale.com 14