1
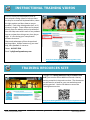
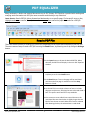
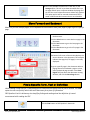
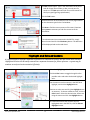
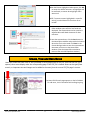
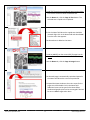
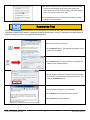
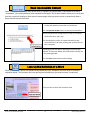
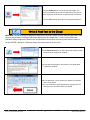
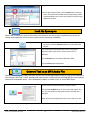
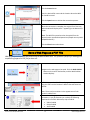
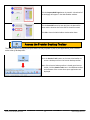
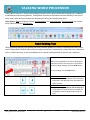
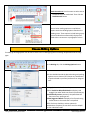
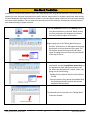
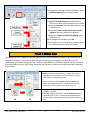
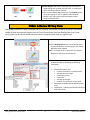
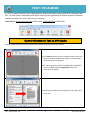
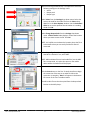
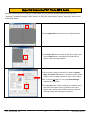
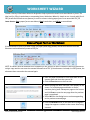
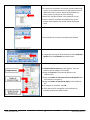
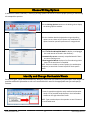
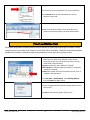
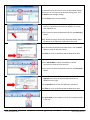
WELCOME – QuickStart Guides Premier Literacy QuickStart Guides provide you with an overview of key features and functions of our most popular tools to get you up and running quickly. There are many additional features and functions that you can explore after you become familiar with these key features. We suggest that you view the training videos included under the Help menu in each application. For detailed questions, you can also refer to the full user manual located under the Help menu. TABLE OF CONTENTS INSTRUCTIONAL TRAINING VIDEOS .............................................................................................................. 5 TRAINING RESOURCES SITE .......................................................................................................................... 5 ENGLISH TALKING DICTIONARY .................................................................................................................... 6 Look Up the Definition of a Word ...........................................................................................................................6 Find Synonyms & Related Words ............................................................................................................................7 Use Power Search ..................................................................................................................................................7 PDF EQUALIZER ........................................................................................................................................... 8 Read a PDF File ......................................................................................................................................................8 Move Forward and Backward .................................................................................................................................9 Find a Specific Term, Fact or Definition ...................................................................................................................9 Highlight and Extract Content ............................................................................................................................... 10 Create, View and Save Notes ................................................................................................................................ 11 Scan a Document & Save as a PDF File .................................................................................................................. 13 PREMIER LAUNCH PAD .............................................................................................................................. 14 Read Text Using Word Tracking ............................................................................................................................ 14 Read by Pointing to Text ...................................................................................................................................... 14 Summarize Text ................................................................................................................................................... 15 Read Inaccessible Content .................................................................................................................................... 16 Look Up the Definition of a Word ......................................................................................................................... 16 Write & Post Text to the Cloud ............................................................................................................................. 17 Convert Text to an MP3 Audio File........................................................................................................................ 18 Save a Web Page as a PDF File .............................................................................................................................. 19 Access the Premier Desktop Toolbar..................................................................................................................... 20 Premier Literacy QuickStart Guides 3 www.ReadingMadeEZ.com TALKING WORD PROCESSOR ...................................................................................................................... 21 Read Existing Text ................................................................................................................................................ 21 Choose Writing Options ....................................................................................................................................... 22 Use Word Prediction ............................................................................................................................................ 23 Proof & Refine Text .............................................................................................................................................. 24 Obtain & Review Writing Stats ............................................................................................................................. 25 TEXT-TO-AUDIO ......................................................................................................................................... 26 Convert Electronic Text to MP3 Audio .................................................................................................................. 26 Import & Convert a PDF File to MP3 Audio ........................................................................................................... 28 WORKSHEET WIZARD ................................................................................................................................ 29 Scan a Paper Form or Worksheet .......................................................................................................................... 29 Read Text on a Worksheet or Form....................................................................................................................... 30 Write on a Worksheet or Form ............................................................................................................................. 31 WRITE NOW .............................................................................................................................................. 33 Use Word Prediction ............................................................................................................................................ 33 Choose Writing Options ....................................................................................................................................... 35 Identify and Change Confusable Words ................................................................................................................ 35 Proof and Refine Text........................................................................................................................................... 36 Post Final Text ..................................................................................................................................................... 38 Premier Literacy QuickStart Guides 4 www.ReadingMadeEZ.com INSTRUCTIONAL TRAINING VIDEOS Premier Literacy has developed a series of instructional training videos to help you learn the keys for a successful implementation, select the right product and learn how to use our products. Each video is designed to be 5 to 10 minutes in length. These videos can be played directly from our website and can be accessed from the Help menu within each of our products. You can review the training at any time, day or night. It is like having your own personal software instructor. Please take advantage of these instructional training videos. Always contact us if you need help, have feedback or concerns: Phone: 815-927-7390 Email: [email protected] http://www.ReadingMadeEZ.com/Training/Videos.html TRAINING RESOURCES SITE Through our Training Resources site for teachers and staff, you can also access additional Premier Literacy training materials in electronic versions. The documents can be saved or printed for your own workshops and training sessions. Use the link below to access the Training Resources site. http://www.ReadingMadeEZ.com/Training/TrainingResources.html Premier Literacy QuickStart Guides 5 www.ReadingMadeEZ.com ENGLISH TALKING DICTIONARY The English Talking Dictionary allows the user to find the definition of a word and have it read aloud—even if the user doesn’t know the correct spelling. Learn how to: Look up a word’s definition, Find synonyms and related words, Use the Power Search Look Up the Definition of a Word Look Up Word Definition Type the word to look up in the Lookup Word field and click the Look up button. The definition appears in the Definition window and is read aloud. NOTE: To not have the definition automatically read aloud after looking up the word, click the Options button and uncheck “Automatically Read Definition”. Then click OK. If the word typed in the Lookup Word field is misspelled, a “Did You Mean?” window may appear containing a list of possible intended words. Single-click a word in the Did You Mean list to hear the word read aloud. Double-click a word to display its definition and hear it read aloud. English Talking Dictionary QuickStart Guide 6 www.ReadingMadeEZ.com Find Synonyms & Related Words Users’ vocabulary and writing can be enhanced by finding and using synonyms and other related words. Synonyms When the user looks up a word in the English Talking Dictionary, the definition displays in the Definition window. A list of synonyms for the word appears on the right side of the screen, and other related words appear in various tabs at the bottom. Related Words Single-click a word in either list to hear the word read aloud. Double-click a word to display and have its definition read aloud. Use Power Search Use Power Search when you only know how to spell part of a word, whether it’s the beginning, end or somewhere in between. Click the Power Search button. Enter the letters of the word that are known. Check the appropriate check box(es), depending on where the letter may occur in the word. If unsure, check all boxes. Click the Lookup button. A list of words in the dictionary that matches your entry and selections appears. Click a word in the list to hear the word read aloud. Use the Up and Down Arrow keys on the keyboard to hear additional words on the list. When the desired word is found, Double-click it to have its definition displayed in the Definition window. English Talking Dictionary QuickStart Guide 7 www.ReadingMadeEZ.com PDF EQUALIZER Many textbooks, e-books and scanned documents are in PDF format. PDF Equalizer is packed with reading and studying tools that make such PDF files more accessible and usable for any individual. Learn how to: Read a PDF file, Move forward and backward or to a specific page, Find a specific term or fact, Highlight and extract content, Create, view and save notes, Scan and save a paper document as a PDF file. Read a PDF File There are several options for reading PDF files aloud, depending on the layout and complexity of the PDF file. The most common ways to read a PDF file are using the Read button, by selecting text or by using the Arrange button. Click the Open button to locate the desired PDF file. When selected, the PDF file will display in the main PDF Equalizer window. To read documents like a novel, with one column of text, it’s simplest just to click the Read button. Click the Read button. Text on the page will be read aloud until the end of the page is reached or until the Stop button is clicked. When the PDF file has multiple columns of text or includes diagrams and pictures, selecting the text to be read aloud is best. This option works well for many textbooks. Use the mouse to create a black box around the text to be read aloud. Be sure that the box is slightly larger than the block of text chosen to read. When the mouse is released after drawing the box, the selected text is read aloud. PDF Equalizer QuickStart Guide 8 www.ReadingMadeEZ.com When it’s not possible to select text in a PDF file, try the Arrange option. This will try to determine what text is on the page and will open a separate window displaying all of the text into a one-column document without any graphics. This option works well for scanned documents that are saved in PDF format but have text that is not selectable. Move Forward and Backward Most PDF files are multiple pages, so it’s important to know how to move from page to page or go to a specific page. Click the Next button to move ahead one page in the document. Click the Prior button to move back one page in the document. Click the Last button to go to the last page in the document. Click the First button to go to the first page in the document. The bottom left corner of the window displays the current location in the document. This example indicates that page 8 (of 25 pages) is currently displayed. To go to a specific page in the document without paging forward or backward a page at a time, enter the desired page number in the Enter Page # field just above the document viewing window, and click the Go to Page button. Find a Specific Term, Fact or Definition When reading a large PDF file, it may be difficult to recall where a specific term or fact is located. The Find option lets the user quickly search the entire document for a piece of information. PDF Equalizer’s built-in dictionary also simplifies finding and reading aloud the definition of a word encountered while reading the PDF. Click the Find button on PDF Equalizer’s Home tab. PDF Equalizer QuickStart Guide 9 www.ReadingMadeEZ.com The Find window opens. Type in the information to be found. Look for things like a number, a date, a word, part of a word, etc. The Find option will look for an exact match for what you typed (ignoring capitalization). Click the Find button. The document will be searched from the current page forward for the characters typed in the Find window. Click Next to find the next occurrence of the word. Continue clicking Next as necessary to find all occurrences of the information. If an unknown word is encountered in the PDF file, simply select the word and click the Dictionary button. The definition will be displayed and can be read aloud. Highlight and Extract Content It is often helpful to highlight important information in a document to easily see and review those sections. Highlighted sections can be easily extracted to a separate document for future reference—a great way for students to study and review material efficiently. Select the Highlighting tab in PDF Equalizer. Click the Color button to toggle through the four possible colors and select the desired highlight color. Use the mouse to select content in the PDF file to highlight, and click the Highlight button. Continue to select text and click the Highlight button as necessary. To choose a different color, click the Color button. Select the desired color. Select text using the mouse and click the Highlight button. To create a document that contains only the highlighted text in the PDF file, click the Extract Highlights button. PDF Equalizer QuickStart Guide 10 www.ReadingMadeEZ.com When the Extract Highlights window opens, click OK to accept the default selections. All highlights will be extracted, no matter what highlight colors were used. NOTE: To extract content highlighted in a specific color(s), uncheck boxes for the colors not to include. When the extraction is complete, a separate Notes Editor window opens with the extracted text displayed. The extracted text can be saved as a separate Microsoft Word document for later reference. To save the extracted text, click the Save button in the Notes Editor window and provide the location where the file is to be saved. Click Save in the Save As dialog window to save the extracted text document and return to the Notes Editor window. (Close the Notes Editor window to return to the main PDF Equalizer window.) Create, View and Save Notes Users can create their own notes in the left sidebar on every page within a PDF file. Each time the PDF file is opened, those notes display when the corresponding page in the PDF file is viewed. Notes can be typed from scratch, or important text and images can be added to the notes from the current PDF file page’s content. The Notes field for each page appears on the left sidebar. To add notes, click in the Notes field and begin typing. PDF Equalizer QuickStart Guide 11 www.ReadingMadeEZ.com To add TEXT from the current PDF file page into the Notes, first use the mouse to select the desired text. From the Notes tab, click the Copy As Text button. The selected text is copied to the clipboard. Click in the Notes field where the copied text should be inserted. Right-click in the Notes field and select Paste from the menu that appears. The selected text is added to the Notes. To add an IMAGE from the current PDF file page into the Notes, first use the mouse to select the desired image. From the Notes tab, click the Copy As Image button. The selected image is automatically copied and pasted in the Notes field where the cursor was positioned. To expand the Notes window so the entire notes for the pages are visible double-click in the Notes field. Additional notes can be typed in the Notes Editor window and graphics/text can be rearranged if desired. Be sure to Save changes when done. PDF Equalizer QuickStart Guide 12 www.ReadingMadeEZ.com Scan a Document & Save as a PDF File For documents such as magazine articles that may only be in paper format, PDF Equalizer can scan the document and save it as a PDF file. Tools within PDF Equalizer can then be used to do such things as read the document aloud, highlight important information and add notes. (Note: A working scanner must be attached to the computer to successfully perform the steps below.) Place the paper document on the scanner. Click the Scan button on the PDF Equalizer interface. When the Scan Utility window opens, click Scan. Provide a name and location where the document should be saved. Click Save and the scan will begin. A progress indicator will appear. Follow the prompts if there are additional pages to scan. When the scan is complete, a thumbnail of the scanned document will appear on the right side in the Scan Utility window. Click the Open PDF button to have the scanned document appear in the main PDF Equalizer window. If the text is not selectable, click the Arrange button to place accessible text in a new window and read it aloud. PDF Equalizer QuickStart Guide 13 www.ReadingMadeEZ.com PREMIER LAUNCH PAD Quickly improve your ability to navigate through the universe of information encountered in the Cloud using the Premier Launch Pad. Since it’s browser-independent, it can be used with all popular browsers—Internet Explorer, Firefox, or Google Chrome. Launch Pad conveniently works seamlessly with both Cloud-based and Desktop content. Learn how to: Read text using word tracking, Read by pointing to text, Summarize content, Read inaccessible content, Look up a word’s definition, Write and post text to the Cloud, Look up synonyms, Convert text to an MP3 audio file, Save a web page as a PDF file, Access the Premier desktop toolbar. Read Text Using Word Tracking Many people benefit from displaying “word tracking” as text is being read aloud. With the Launch Pad Reader, selected text is displayed in a reading window with words being highlighted as they are read. Use the mouse to select the text within any Cloud-based or desktop application. Click the Launch Pad Reader button. A new window opens displaying the text that was selected. The Launch Pad Reader automatically begins highlighting and reading aloud each word. Click the Close button when done reading. Read by Pointing to Text Use the Talking Pointer to point to any accessible text and have it read aloud. Click the Talking Pointer button to activate the reading pointer. The Talking Pointer floating toolbar opens. Premier Launch Pad QuickStart Guide 14 www.ReadingMadeEZ.com Hover the mouse pointer over any accessible text in the Cloud or on the local computer and hear the text being read aloud. When the pointer finishes reading, move the pointer to the next section of text to be read. Click the Close button on the Talking Pointer toolbar to close Talking Pointer when done. Summarize Text Quickly read through massive amounts of text information encountered every day in the Cloud by performing intelligent summarization based on language modeling technologies. Summ IT automates the summarization process, letting the user be more efficient and productive. Select the text to be summarized. Click the Summ IT button. The selected text appears in the Summarize IT window. Click the Summ button on the Summarize IT window. The Summary Size window appears. Click and drag the slider bar on the Summary Size window to select the desired percentage of summarization. Then click the Summarize button. The summarized text appears in the window. Click the Read button to read the summary aloud. Click the Close button when finished. Premier Launch Pad QuickStart Guide 15 www.ReadingMadeEZ.com Read Inaccessible Content Some online content (including many online tests) is displayed in a format that is inaccessible (essentially “unreadable”) for reading aloud by other standard technologies. The Dynamic Reader allows you to easily and precisely control the reading of those special content pages using the mouse cursor to dynamically draw a frame around the text to be read. If text cannot be selected with the mouse, it is possible that the Dynamic Reader may be able to read the text. Click the Dynamic Reader button on the Launch Pad toolbar. The mouse pointer will change from an arrow to a crosshair, which looks like a “plus” sign. Click and drag the crosshair to created a dotted-line box around the text to be read, releasing the mouse when the box is complete. A reading window will appear displaying the text that was selected. The Dynamic Reader will automatically read the text in the reading window. Click the Close button when finished reading. Look Up the Definition of a Word Since content in the Cloud is not categorized by vocabulary level, individuals are more likely to encounter unfamiliar words. The Dictionary lets users quickly find the definition of a word and have it read aloud. Use the mouse to select the unfamiliar word. Premier Launch Pad QuickStart Guide 16 www.ReadingMadeEZ.com Click the EN Dict button on the Launch Pad toolbar. The Dictionary window opens with the definition of the chosen word displayed. The definition is automatically read aloud. Click the Close button when done reviewing the definition. Write & Post Text to the Cloud Write Now is a new writing tool designed to help writers of all skill levels. It works with any application that requires textual input, including Cloud-based applications like Google Docs™, email, online forms and Facebook. Many composition features are incorporated to assist users in ensuring that written content is correct BEFORE it becomes a permanent post into a document or in the Cloud. Click the Write Now button on the Launch Pad toolbar to open the Write Now composition window. Type the desired message or information in the Write Now composition window. Open the document, site or online form where the finalized text is to be posted. Click in the field where the finalized text is to be placed. The flashing cursor should be visible in that field. Premier Launch Pad QuickStart Guide 17 www.ReadingMadeEZ.com From the Write Now window, click the Post button. Finalized text in the Write Now window will be automatically copied and pasted where your cursor was placed in the other open application or form. Look Up Synonyms When used in conjunction with the Dictionary, the Thesaurus not only a great complementary tool for all writing and composition tasks, but also a great tool for improving vocabulary. Use the mouse to select the word for which to look up synonyms. Click the Thesaurus button on the Launch Pad toolbar. The Thesaurus window opens with the list of synonyms displayed. Select a word in the synonym list to see its definition. Click the Read button to read the definition aloud. Click the Close button when done. Convert Text to an MP3 Audio File Sometimes it’s helpful to listen to an audio version of a text passage without sitting in front of the computer to view the text. With Text To MP3, creating that audio version is simple and the resulting MP3 file can be played on any MP3 compatible device—like a Smartphone, tablet, or Premier’s Key To Access MP3 player. Use the mouse to select the text to convert to audio. Click the Text To MP3 button on the Launch Pad toolbar. The Turn Text Into Audio window opens and the selected text is displayed. Make any necessary adjustments to the voice and voice rate. Premier Launch Pad QuickStart Guide 18 www.ReadingMadeEZ.com Click the Create button. Enter the desired file name and the location where the MP3 file should be saved. Click the Open button to initiate the conversion process. When the conversion is complete, the original Turn Text Into Audio window will display with “” appearing in the bottom left corner. (Note: The MP3 file created can then be copied from the output location specified and pasted and played onto any MP3 compatible device.) Click the Close button when done. Save a Web Page as a PDF File Web pages can be captured and saved using the Web Grabber tool. This function is perfect for making quick snapshots of pages as a PDF file for later use. Navigate to the web page to be saved. Click the Web Grabber button on the Launch Pad toolbar, and the Web Grabber window displays. In field #1, enter the URL of the web page to be captured. Copy the URL from the browser’s address bar and Paste into field #1. Note: There may be variations in the appearance of each browser’s address bar. If the web site being captured contains moving ads or animations, it may be necessary to uncheck the following check boxes in field #2. Otherwise, skip to field #3. Video Enabled Script Enabled Java Enabled Premier Launch Pad QuickStart Guide 19 www.ReadingMadeEZ.com Click the Capture Web Page button by item #3. A thumbnail of the web page will appear in the Web Grabber window. Click the Save PDF button by item #4. Enter the desired file name and the location where the PDF file should be saved. Click OK to close the Web Grabber window when done. Access the Premier Desktop Toolbar The Premier Launch Pad gives you quick access to the full power of any of the applications from Premier’s entire suite of desktop tools. Click the Premier Tools button on the Launch Pad toolbar to access a desktop tool from the Premier Desktop toolbar. Note: If the Premier Desktop toolbar is already open but not visible, click the Premier Tools icon in the Windows taskbar at the bottom of the screen where open applications are displayed. Premier Launch Pad QuickStart Guide 20 www.ReadingMadeEZ.com TALKING WORD PROCESSOR Talking Word Processor is a writing and editing tool that is also a great reading and studying tool. In addition to standard word processing features, Talking Word Processor incorporates numerous options for the user to write, proof, refine and even analyze the document for writing and reading ease levels. Learn how to: Read existing text, Choose writing options, Use word prediction, Proof and refine your written work, Obtain and review writing stats. Read Existing Text Many individuals benefit from reading text aloud, whether reading an e-book or reviewing their own written work. Talking Word Processor offers numerous ways to read text—continuously, a letter at a time, a word at a time or selected text only. It can even display text in a special reading window to focus a user’s attention. When text is displayed in the main Talking Word Processor window, click the cursor in the chosen location to begin reading. Click the Read button. To stop reading, click the Stop button. Read a letter at a time: Press the right or left arrow key on the keyboard to move forward or backward in the document and read aloud one letter at a time. Read a word at a time: Hold down the CTRL key and press the right arrow (or left arrow) key on the keyboard to move forward or backward in the document and reading aloud a word at a time. Talking Word Processor QuickStart Guide 21 www.ReadingMadeEZ.com Read selected text: Use the mouse to select text in the document to be read aloud. Then click the Read Selected button. Several other reading options are available to explore under the Reading Options found on the Reading menu. These options include having a popup text window that automatically displays and reads either a sentence or a paragraph at a time. Choose Writing Options A variety of writing options can be set to assist users in identifying and correcting misspelled words as they type. On the Writing tab, click the Writing Options button. Click the checkbox beside the desired writing and spelling options to turn them on/off. Choose any combination of options based on personal preferences or assigned task. Writing Options window choices let you: Select Underline Misspelled Words to display a red squiggle line under words not found in the dictionary. Automatically correct commonly misspelled words if there are minor spelling errors. Show Suggested Words to display a list of words using similar letters to the word that is misspelled. NOTE: Each user should try various options (or combinations of options) to see which are most helpful for their individual needs. Talking Word Processor QuickStart Guide 22 www.ReadingMadeEZ.com Use Word Prediction In addition to using Writing Options, some users may benefit from using Word Prediction. This option provides support for users that may not know how to spell a word or may misspell or mistype a word even when seeing the word displayed. With Word Prediction turned on, the user begins typing a word and a list of words starting with those letters displays. The user may select a word from the list to have it automatically inserted into the text without having to retype the word. Click the Prediction button on the Writing tab to turn Word Prediction on and off. When clicked, the X on the button will disappear to indicate that the Prediction option is turned on. Begin typing text in the Talking Word Processor window. A Prediction List will appear and change dynamically as more characters are typed. The list displays words that begin with the letters typed, showing the most commonly used words at the top of the list. Click a word in the Prediction List to hear the word read aloud. Use the Up and Down Arrow keys on the keyboard to hear additional words on the list. When the desired word is found, select it by doing one of the following: · Double-click the desired word in the Prediction List OR · Press the numeric key (above the alphabet keys on the keyboard) that matches the number beside the desired word. The selected word is inserted in the Talking Word Processor window. Talking Word Processor QuickStart Guide 23 www.ReadingMadeEZ.com To change basic settings for Word Prediction, select Prediction Options from the Writing tab. The Word Prediction Options window appears. From this window, several changes can be made: · Change the font size of the text that displays in the Prediction List. · Change the number of characters that must be typed before the Prediction List appears. · Change the number of words that display in the Prediction List. When changes are complete, click OK. All of the above can be changed by each user based on individual preferences and skill levels. Proof & Refine Text Listening to text as it is typed provides the opportunity for iterative auditory feedback that allows users to catch many mistakes in their writing. Depending on the user’s personal preferences and skill level, any combination of the following may be used: Key Echo, Word Repeat, and Sentence Repeat. Used in conjunction with other features such as Spell Check, Dictionary and Thesaurus, individuals can effectively edit and perfect their writing. Key Echo reads each letter aloud as it’s typed. This option is appropriate for individuals learning to spell or for those with lower level keyboarding skills. To turn on Key Echo, select Key Echo from the Read dropdown menu. When turned on, a checkmark will appear beside the Key Echo option in the Read menu list. Word Repeat reads each word aloud after it is typed and the spacebar is pressed. To turn Word Repeat ON or OFF, click the W Repeat button on the Writing tab. A red “X” appears when Word Repeat is OFF and a green checkmark appears when Word Repeat is ON. Talking Word Processor QuickStart Guide 24 www.ReadingMadeEZ.com Sentence Repeat reads each word aloud after a sentence is typed ending with a period, question mark or exclamation mark, and the spacebar is pressed. To turn Sentence Repeat ON or OFF, click the S Repeat button on the Writing tab. A red “X” appears when Sentence Repeat is OFF and a green checkmark appears when Sentence Repeat is ON. Obtain & Review Writing Stats Talking Word Processor is able to evaluate the user’s writing and provide a summary of specific information related to word and sentence usage as well as Flesch-Kincaid Grade Level and Reading Ease Level. These Writing Stats can be used to follow and track a writer’s progress when used on a regular basis. Click the Writing Stats button on the Writing tab to analyze a document currently open in the Talking Word Processor window. NOTE: The length of time required for the analysis depends on the size of the document. Once the analysis is complete, the Writing Stats window will appear, displaying the following information. 1. Word and sentence stats: number of sentences in the document average sentence length total unique words total words average word length number of occurrences of each word 2. Flesch-Kincaid Grade Level and Reading Ease Level 3. Confusables – indicates words often confused with other words Talking Word Processor QuickStart Guide 25 www.ReadingMadeEZ.com TEXT-TO-AUDIO It’s easy to convert electronic text to MP3 audio files that can be played on any mobile device that plays MP3 files—an iPod, iPhone, iPad and any MP3 player. Audio files are a great way to make an electronic document portable and able to be “read” when not at a computer. Learn how to: Convert electronic text to MP3 audio, Convert PDF files to MP3 audio Convert Electronic Text to MP3 Audio Convert electronic text for most standard file formats using the instructions below. Click the Add button on the Text To Audio interface. From the Microsoft Explorer window that appears, locate and open the document to be converted. NOTE: When converting a PDF file to MP3 audio, the PDF file must be “added” using the Import PDF button. See instructions for details. A thumbnail of the document text appears on the right half of the screen. Text To Audio QuickStart Guide 26 www.ReadingMadeEZ.com Before converting the document, it is important to check the following settings on the Settings menu: Voices Output path Output type Select Voices from the Settings drop-down menu. Select the voice to be used for the audio file from the Voices dropdown list in the Voice Options window. Use the Voice Rate slider bar to set the speed of the voice when it is reading aloud. Click OK. Select Change Output Path from the Settings drop-down menu. A Select Path window displays. Choose the location where you want to save the file. Click OK. NOTE: It is helpful to write down the location where the file is to be saved so that you can easily find the file after it’s converted. Select Output Type from the Settings drop-down menu. Verify that MP3 is checked. If not, select MP3. NOTE: MP3 and Wave files are both audio files, but the MP3 file is compressed, so it takes less space on the mobile device where the audio file will be played. Click the Start button on the Text To Audio interface to begin the conversion of the text to an audio file. When the conversion is complete, “Done” will appear in the bottom left corner of the Text To Audio window. The MP3 audio file can then be copied from the Output Path location to the MP3 player. Text To Audio QuickStart Guide 27 www.ReadingMadeEZ.com Import & Convert a PDF File to MP3 Audio Steps for converting text in a PDF file to MP3 audio are the same as above except that the PDF file is “Imported” instead of using the “Add” button. For PDF files, follow these “Import” steps first, then use the instructions above. Click the Import PDF button on the Text To Audio interface. Click the Select PDF button, locate the PDF file to import and click the Open button. A thumbnail of the PDF file will appear in the Processing window. To convert specific pages of the PDF file, select the Specify Pages To Convert radio button. In the Select section of the window, enter the pages number to convert From and To. NOTE: To convert all pages, be sure the Convert All Pages radio button is selected. Click the Process button. When complete, a thumbnail of the document text appears on the right half of the Text To Audio screen. At that point, follow instructions above for verifying settings and starting the conversion. Text To Audio QuickStart Guide 28 www.ReadingMadeEZ.com WORKSHEET WIZARD Premier Literacy’s Worksheet Wizard is designed to help anyone who needs to use worksheets or forms. The ideal tool for filling in worksheets or annotating forms, Worksheet Wizard is simple to use. It works with files in PDF format and includes a scan feature for users to convert existing paper forms to an accessible PDF file. Learn how to: Scan a paper form or worksheet, Read a worksheet, and Write on a worksheet. Scan a Paper Form or Worksheet If the worksheet or form to be used is only in a paper (hard copy) format, use the Scan menu to scan the document and automatically create a PDF file. NOTE: A scanner must be attached to the computer for this function to work. Institutions that scan documents using a copy machine can save the scanned document as a PDF. If the document is already in a PDF format, the document does not need to be scanned again. Place the paper worksheet or form face down on the scanner glass and close the scanner lid. Click the Scan button on the Scan tab. When the page has been scanned, it will display on the screen. For multiple page worksheets or forms, continue placing each subsequent page on the scanner and click Scan to scan the new page after the previous page is completed. Select NO from the dialog box to continue appending to the previous scanned page. Click the Deskew button on the Scan tab to straighten a page that appears crooked on the screen after being scanned. Worksheet Wizard QuickStart Guide 29 www.ReadingMadeEZ.com Read Text on a Worksheet or Form Once the worksheet is a PDF file, users can read the worksheet. Select Open PDF from the File Menu. Locate and select the PDF file to be read. Select Fit To Width from the Zoom drop-down list on the formatting toolbar under the icons. This will display the worksheet in the entire width of the screen, making it easier to select text and read. Select the text on the worksheet to be read. Click and drag the mouse to create a red box around the text. (Be sure all the text is inside the red box.) Click the Read button. (The Read button can be found on the Home tab, the Worksheet tab and the Reading tab.) Worksheet Wizard QuickStart Guide 30 www.ReadingMadeEZ.com Write on a Worksheet or Form Users can write on a worksheet or form that’s been saved as a PDF file. Select Open PDF from the File Menu. Locate and select the PDF file to be read. Select Fit To Width from the Zoom drop-down list on the formatting toolbar under the icons. This will display the worksheet in the entire width of the screen, making it easier to select text and read. Select the Worksheet tab. Click the Write button on the Worksheet tab. When clicked, the X on the button will disappear to indicate that the Write option is turned on. Worksheet Wizard QuickStart Guide 31 www.ReadingMadeEZ.com Click on the worksheet wherever typing is desired and begin typing. Continue to click and type wherever text is required until the worksheet is completed. Select Save from the File menu to save the changes. Worksheet Wizard QuickStart Guide 32 www.ReadingMadeEZ.com WRITE NOW Write Now is a new writing tool designed to help writers of all skill levels. It works with any application that requires textual input, including Cloud-based applications like Google Docs™, email, online forms and Facebook. Many composition features are incorporated to assist users in ensuring that written content is correct BEFORE it becomes a permanent post into a document or in the Cloud. Learn how to: Use word prediction, Choose writing options, Identify and change confusable words, Proof and refine your written work, Post final text to an application or form. Use Word Prediction With Word Prediction turned on, the user begins typing a word and a list of words starting with those letters displays. The user may select a word from the list to have it inserted into the text being typed. This allows the user to be more efficient and provides support for users that may not know how to spell a word or may misspell or mistype a word even when seeing the word displayed. Click the Prediction button to turn Word Prediction on and off. When clicked, the X on the button will disappear to indicate that the Prediction option is turned on. Begin typing text in the Write Now window. A Prediction List will appear and change dynamically as more characters are typed. The list displays words that begin with the letters typed, showing the most commonly used words at the top of the list. Write Now QuickStart Guide 33 www.ReadingMadeEZ.com Click a word in the Prediction List to hear the word read aloud. Use the Up and Down Arrow keys on the keyboard to hear additional words on the list. When the desired word is found, select it by doing one of the following: Double-click the desired word in the Prediction List OR Press the numeric key above the alphabet keys on the keyboard that matches the number beside the desired word. The selected word is inserted in the Write Now window. To change basic settings for Word Prediction, select Prediction Options from the Prediction drop-down menu. The Word Prediction Options window appears. From this window, several changes can be made: Change the font size of the text that displays in the Prediction List. Change the number of characters that must be typed before the Prediction List appears. Change the number of words that display in the Prediction List. When changes are complete, click OK. All of the above can be changed by each user based on individual preferences and skill levels. Write Now QuickStart Guide 34 www.ReadingMadeEZ.com Choose Writing Options In addition to Word Prediction, a variety of writing options can be set to ensure proper spelling is used during the composition process. Click the Writing Options button on the Writing tab to display the Writing Options window. Click the checkbox beside the desired writing and spelling options to turn them on/off. Choose any combination of options based on personal preferences or assigned task. Writing Options window choices let you: Select Underline Misspelled Words to display a red squiggle line under words not found in the dictionary. Automatically correct commonly misspelled words if there are minor spelling errors. Show Suggested Words displays a list of words using similar letters to the word that is misspelled. NOTE: Each user should try various options (or combinations of options) to see which are most helpful for their specific needs. Identify and Change Confusable Words As the user types, Write Now automatically identifies words that are commonly confused with other words and provides additional information so the user can decide which word is the appropriate one for each specific instance. If a word is typed that might be easily confused with another word, a list of possible words displays in the Confusables window on the right side of the screen. NOTE: Type a word and press the spacebar to see if the word is a confusable word. Write Now QuickStart Guide 35 www.ReadingMadeEZ.com Click each word in the Confusables list to see its definition. Click the Read button by the Confusables to have the definition read aloud. Double-click the desired word in the Confusables list to replace the last word typed in the Write Now window. Proof and Refine Text Write Now incorporates numerous ways to ensure that text is correct before posting to an email, a social networking site or an online form. Features such as Spell Check, Dictionary, Thesaurus and iterative auditory feedback are valuable in preventing typos and grammatical errors while also refining the text. Listen to text as it is typed. Having iterative auditory feedback allows users to catch many mistakes in their writing. Depending on the user’s personal preferences, use any combination of the following: Key Echo (reads each letter aloud as it’s typed) Word Repeat (reads each word aloud after it is typed and spacebar is pressed) Read button (reads text aloud from wherever the cursor is located in the document) To use Key Echo or Word Repeat, select Reading Options from the Read drop-down menu. Click the checkbox beside the desired reading options to turn them on/off. Click OK and the selected options will be active. Write Now QuickStart Guide 36 www.ReadingMadeEZ.com To read aloud all or part of the text in the Write Now window, click the cursor in the text at the desired starting point. Click the Read button to begin reading. Click the Stop button to stop reading. Use the DICTIONARY to check the meaning of a word or confirm its appropriate use based on whether it’s a noun, verb, adjective, etc. Use the mouse to select the desired word. Click the Dictionary button. NOTE: Double-clicking a word in the text automatically opens the Dictionary and displays a definition of the word. When the Dictionary definition window opens, click the Read button to read the definition aloud. Click Close to return to the Write Now window when done. Use the THESAURUS to enhance vocabulary and find synonyms for words to refine the text. Use the mouse to select the desired word. Click the Thesaurus button. When the Thesaurus window opens, click a word in the Synonym list to hear the word read aloud and see its definition on the right. Click the Read button to hear the definition read aloud. Click Close to return to the Write Now window when done. Click Spell Check on the toolbar to search for misspelled words in the text. Write Now QuickStart Guide 37 www.ReadingMadeEZ.com When the Spell Check window opens, a Problem Word will appear if there are any issues. Click a word in the Suggestions list to hear the word read aloud and see its definition on the right. Click the Read button to hear the definition read aloud. When the proper word is found, click the Change button to replace the original word in the Write Now window with the text in the Spell Check “Replace With” field. Continue reviewing and changing misspelled words as necessary, and click Close to return to the Write Now window when done. Post Final Text When text written using Write Now has been proofed, refined and finalized, it is ready to be “posted” to another application, social networking site or to an online form. Open the document, site or online form where the finalized text is to be posted. Click in the field where the finalized text is to be placed. The flashing cursor should be visible in that field. From the Write Now window, click the Post button. Finalized text in the Write Now window will be automatically copied and pasted where your cursor was placed in the other open application or form. Write Now QuickStart Guide 38 www.ReadingMadeEZ.com