1
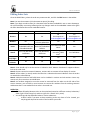
ProVation Order Sets Owner Manual Access & Edit an Order Set Modify order attributes Narratives/ Links/ Build Notes/ Modules Compare & Copy/ Print/ Save Review Process Duke University Health System Owner Handbook Table of Contents Help & Support ............................................................................................................................................. 4 Accessing User Manuals............................................................................................................................ 4 ProVation Customer Web Site .................................................................................................................. 4 Access Order Sets.......................................................................................................................................... 4 Logging On ................................................................................................................................................ 4 Logging Off versus Exiting the Application ............................................................................................... 4 Evidence Updates.......................................................................................................................................... 4 Printing Evidence Updates ........................................................................................................................ 4 Selecting a Document Type and Library ....................................................................................................... 5 Opening the Manage Library Window .......................................................................................................... 5 Locating an Order Set to start with........................................................................................................... 5 Advanced Filter ......................................................................................................................................... 5 Copying an Order Set to the DUHS Library ................................................................................................... 6 Updating the Properties of an Order Set ...................................................................................................... 6 Assigning/ Replacing Order Set Owners ....................................................................................................... 6 Editing Order Sets ......................................................................................................................................... 7 Modifying a section, sub-section, or attribute value selection ................................................................ 8 Creating and Modifying a Sequence of Optional Values for an Attribute ................................................ 8 Searching for orders.................................................................................................................................. 8 Inserting an Order ..................................................................................................................................... 9 Changing the Indent of an Order & Reordering Orders............................................................................ 9 Removing an Order ................................................................................................................................... 9 Inserting a New Sub-Section ..................................................................................................................... 9 Renaming a Sub-Section Label .................................................................................................................. 9 Removing a Sub-Section Label .................................................................................................................. 9 Creating a Module from a Document ..................................................................................................... 10 Creating a New Module from scratch ..................................................................................................... 10 Embedding a Module in a Document ..................................................................................................... 11 2|Page Owner Handbook Removing a Module from a Document................................................................................................... 11 Basic Narrative Functions ........................................................................................................................... 11 Adding an existing narrative from the database .................................................................................... 11 Creating a New Narrative........................................................................................................................ 12 Removing a Narrative from a Document ................................................................................................ 12 Modifying a Narrative in a Document..................................................................................................... 12 Build Notes .................................................................................................................................................. 13 Creating a new Build Note ...................................................................................................................... 13 Copying and Pasting a Build Note ........................................................................................................... 13 Modifying a Build Note ........................................................................................................................... 13 Deleting a Build Note .............................................................................................................................. 13 Comparing Two Document Versions in the Edit Window .......................................................................... 14 Compare and Copy Tool.......................................................................................................................... 14 Printing a Document ................................................................................................................................... 15 Generating a Document Print Preview ................................................................................................... 15 Saving the Order Set ................................................................................................................................... 15 Order Set Review Process ........................................................................................................................... 16 Creating a Review Process: Adding a Review Process Template ............................................................ 16 Modifying a Review Process ................................................................................................................... 16 Submitting a Document for Review ........................................................................................................ 17 Manually Sending Email Notifications to Reviewers .............................................................................. 17 Adding and removing process step Reviewers ....................................................................................... 17 Verifying Reviewer’s Status .................................................................................................................... 17 Processing Reviewer Comments in the Edit window.................................................................................. 18 Printing a Comments Report in the Edit Window................................................................................... 18 Advancing the Status of a Process Step .................................................................................................. 19 Ending the process cycle ......................................................................................................................... 19 The History Log ........................................................................................................................................... 19 Comparing Two Document Versions in the History Log ......................................................................... 19 The Document Reassessment Process........................................................................................................ 20 3|Page Owner Handbook Help & Support Accessing User Manuals Press the F1 key on your keyboard to access the PDF versions of the ProVation user manuals for help. 1. Log on to ProVation Order Sets. 2. Press the F1 key on your keyboard. 3. Select a user manual. 4. Click View. Adobe Acrobat launches. 5. Search the manual using one of the following methods: a. Click a link in the Bookmarks pane. b. Type a word in the Find text field and press the Enter key on your keyboard. ProVation Customer Web Site User manuals and training handouts are available at the ProVation Customer Web Site at https://peach.provationmedical.com (“Implementation Toolkit” under the ProVation Order Sets tab). Access Order Sets Logging On 1. Double-click the ProVation folder (ProVation Ordersets shortcut) on your desktop (if you have access to the VPIN), or go to awi.duhs.duke.edu if logging into the system remotely. 2. Type your Duke network ID and password. If you have problems logging into ProVation, contact [email protected]. 3. Click OK. The ProVation Order Sets main window is displayed. Note: If you change your Duke network password, it will automatically change in ProVation as well. Logging Off versus Exiting the Application From the main navigation bar, select Exit > Logoff. The session ends and the logon screen is displayed. From the main navigation bar, select Exit > Exit. The application closes and the data is secured. Evidence Updates The main view of ProVation Order Sets includes Evidence Updates, an update pane that displays a list of recent practice-changing topics from UpToDate, and other newly-published medical evidence. These updates may have implications for your documents. New items are posted generally twice a month. Alerts and updates are maintained for one year from the date they are added. The most recent alerts and updates are listed first. Printing Evidence Updates You can print the entire list of evidence updates by clicking the Print button in the upper-right corner of the Evidence Updates pane. Each item is automatically printed in its expanded form so you get both the summary and the description. The list prints as a whole; you cannot selectively print individual items. 4|Page Owner Handbook Selecting a Document Type and Library After logging on to ProVation Order Sets select the appropriate document type from the ProVation Order Sets main page. Examples of document types: • Inpatient/Admission • Emergency Evaluation • Outpatient • Discharge • Care Plans Clicking a document type button opens a submenu that may contain options to print, review, or perform management activities for the selected document type. Note: All options may not appear on your system, depending on the specific rights granted to you by your system administrator. Opening the Manage Library Window Most document owner tasks (such as creating and editing documents) are initiated from the Manage Library window. 1. Click [Document Type] > Manage Order Sets. 2. By default, the Manage Library window is displayed with the Filter set to the DUHS library. A list of the document categories or modules is displayed in the left pane. The layout of the left pane is determined by the settings of the Advanced filter. Locating an Order Set to start with 1. Click the filter drop down and select the ProVation Library (NOTE: If you wish to start with a DUHS order set, then you can continue in the DUHS library). 2. Browse through the tree of order sets or use the search function to find the order set. Note: This search field will only search the order set names. It does not search the content of the order sets. 3. Single left click on the order set you wish to preview and it will appear in the bottom right preview pane. Advanced Filter When looking for particular order sets, you may find it convenient to add filtering criteria to the library view. You can filter the contents of the library list by clicking the Advanced button and applying the following criteria: a) From the Group documents first by drop-down menu, select the top level grouping criterion b) From the Then by drop-down menu, select the second-level grouping criterion. Note: Available list options are: List All; Category; Reason/problem; Patient type; Approval status; Release status; Primary owner. c) In the Approval & Release Status checkbox list, select the statuses to be included in the display. Note: Selections made in Advanced Options are retained for each user per workstation. 5|Page Owner Handbook Copying an Order Set to the DUHS Library 1. Go to the ProVation library, highlight the order set you want to copy, and click Copy. To copy multiple order sets, click the name of each order set (a red check mark is displayed in the corresponding check box), and click Edit > Copy Multiple. 2. Name the order set according to the Build Standards (this option is not available if copying multiple order sets). Note: You can also rename the order set later from the Manage Library window by selecting File (menu bar) and Rename. You must be defined as an owner to modify or rename an order set. 3. To assign yourself (provider champion) as the primary owner, click the Ellipse button and find yourself in the list of users. 4. To assign Secondary owner(s), click the Plus button. Select a secondary owner or multiple owners by pressing the Ctrl key and making multiple selections. Note: Primary and secondary owners have same privileges but the system only allows one primary owner per order set. 5. Verify the Reassessment Rule is appropriate for the order set. Note: If you do not want to define additional properties at this time, clear the Show document properties after copying check box. 6. Click OK. The item is copied to the DUHS library. 7. An email notification is sent to the assigned owners. (It can be cancelled). 8. The Properties window is displayed. When multiple order sets are copied, you must set their additional properties individually. Updating the Properties of an Order Set The Order Set Properties window can be accessed from the Manage Library window to update the properties of the order set, i.e. change the Patient Type, the order set Category and the Reason/Problem associated with it. Follow these steps: In the Manage Library window, highlight the order set (do not open it up) Select File (menu bar) Properties. Note: In order to get the list of Reason/Problem to re-populate, you must select a new Category first. You can then pick a new Reason/Problem. If the Reason/Problem field is filled out and grayed out, that means that there is only one Reason/Problem for that Category. Assigning/ Replacing Order Set Owners The Assign Owners window can be accessed from the Manage Library window in order to replace the primary owner and/or assign additional secondary owner(s). Follow these steps: In the Manage Library window, highlight the order set (do not open it up) Select Edit (menu bar) Assign Owners. 6|Page Owner Handbook Editing Order Sets Go to the DUHS library, select the order set you want to edit, and click the Edit button in the toolbar. Note: You must be an owner of the document to open it for editing. Note: If you begin an edit session for a document that has been embedded in one or more documents, the system displays a warning indicating that any changes made to the embedded content also affect the other documents that use the embedded content. Edit Options Sections Subsections Rename No Yes Remove No2 Insert Yes- Item3/ Embedded Order Set/ Embedded Module Yes- Subsection label or Entire subsection Yes- Item/ Embedded Order Set/ Embedded Module Attach Yes- Link/ Narrative/ Build Note Move Indent Left/ Right Find Location in Menus Orders (Items) No Send request to [email protected] Attributes No Send request to [email protected] Yes Yes5 Yes- Subsection label above No Yes- Link/ Narrative/ Build Note Yes- Link1/ Narrative4/ Build Note4 Yes- Build Note No No Yes No No No Yes No Note 1: Links should only be at the section or subsection level. Maestro Care doesn’t support evidence links at the order level. Note 2: Sections cannot be removed. However, sections with no content will not display for review. Note 3: All the orders (or items) need to be linked to a subsection because in Maestro Care the orders are attached to a SmartGroup. Note 4: Multiple narratives and Build Notes can be included in sections and sub-sections. Items may contain only one narrative or one Build Note. Note 5: An attribute assigned to an order cannot be removed from the order on the left side of the screen. However, you can SKIP in most instances to remove this attribute from the ordering sentence and denote that it is not needed for that order in that order set. Helpful tips: UpToDate & Quality Measure Links can be copied and pasted at a different section/ subsection/ order (right-click and copy link, and then right-click attach link paste). You can drag and drop individual orders or entire subsections. It doesn’t work if you want to drop something to the very down of a list. Instead, you may drag and drop the last order in the list above your order. 7|Page Owner Handbook Modifying a section, sub-section, or attribute value selection 1. In the Manage Library window, click a document or module name to select it, and click Edit. 2. Expand the section you wish to modify by clicking the plus (+) sign. 3. Click a section, sub-section, or attribute to select data from the menus. Prompt for Value leaves a blank line in the order sentence. List optional values... provides a “pick-list” of attributes. Select optional values and click DONE. In order to select the default attribute, go to the main menu of the attribute (the default attribute is shown in bold on the right side of the Edit window when selected). SKIP/ DONE bypasses or removes the attribute from the order sentence. Skip values do not display on a printed copy of the document. Note: Perform your modifications on the left side of the Edit window. The right side of the Edit window shows the Reviewer Format view by default (only for visualization). You can change the view of the screen by clicking on the Task Pane button in the toolbar. Creating and Modifying a Sequence of Optional Values for an Attribute If you have chosen to provide a list of optional values for an order, you can control the order in which those values are displayed in the order sentence. To create a list of optional values for an attribute 1. Locate the attribute you want to modify, and click the attribute. The menu with the options for the attribute is displayed. 2. Click List optional values. A list of optional values is provided to select. 3. Click each value that you want to appear as an optional value in the order sentence. Each selection you make is marked with a black check mark. If the item you selected was found in a submenu, the black check mark is replaced by an ellipsis. The build standard is to only use this to denote options you want as quick-pick buttons in Maestro Care. Limit to 3 or 4 options only. 4. Click DONE when your selections are complete. In the order sentence, the selections are displayed in the default order defined by ProVation Order Sets. To change the order in which the optional values appear in the order sentence 1. Right-click the attribute to which the values belong. 2. Click Modify Sequence of Optional Values. Note: If there is a default value in the list, that value is shown in bold at the top of the list of values. 3. Click a value and the Move Up and Move Down buttons become available. Use the buttons to move the values into the order you want to have them displayed. You can also drag and drop the values instead of using the buttons. 4. Click Save. Notice that the optional values in the order sentence have changed to reflect the new order. Searching for orders Search Catalog accessed from the section or subsection content menu Search Catalog accessed from the Task Pane button in the toolbar Right-click order Find Location in Menus Once an order is located, it can be added to the order set. Auto-Navigation guides you through the necessary menus to select the attributes values for the order. 8|Page Owner Handbook Inserting an Order From the Edit window: Right-click the section or subsection where you want to add the item, and select Insert Item > Above or Below (Same level) or Below (Indented). Auto-Navigation guides you through the necessary menus to select the attributes values for the order. Changing the Indent of an Order & Reordering Orders From the Edit window: Right-click an order and select Move Indent Left or Move Indent Right. If one or the other of these options is not available, the movement is not allowed. Note: Do not indent orders under other orders as this is not available in Maestro Care. Orders may be reordered by dragging & dropping them up or down in the list. Removing an Order From the Edit window: 1. Expand the necessary section(s) by clicking the plus (+) sign. 2. Right-click the order and select Remove Item from the menu. Caution: Before selecting Remove Item, verify the data to be removed. There is no undo capability; so, if data is erroneously removed, it must be manually added again using menu selections. Note: Any attributes, links, Build Notes, or narratives included therein are removed along with the order. Inserting a New Sub-Section From the Edit window: 1. Right-click the order above which you want to place the sub-section label and select Insert Subsection Label Above. The Select Sub-Section Label dialog is displayed. Note: The order you select cannot already be in a sub-section (in other words, it cannot already have a sub-section label above) or the option will be grayed out. 2. You have the option to choose an existing sub-section label or create a new custom sub-section label by selecting the radio button at the bottom of the dialog box. Renaming a Sub-Section Label From the Edit window: 1. Expand the sections of the navigation tree, right-click the sub-section label you want to change, and click Rename Sub-section from the menu. The Sub-Section Label dialog is displayed. 2. You have the option to choose an existing sub-section label or create a new custom sub-section label. Removing a Sub-Section Label From the Edit window: 1. Right-click the sub-section label you want to remove and click Remove Sub-section Label. Note: Any links, narratives or build notes associated with the subsection label are also removed. The sub-section label is removed from the order set and any orders beneath the sub-section label are placed with the section or sub-section above. If Remove Entire Sub-section is selected, the sub-section label and all of the orders contained in the sub-section are removed from the document or module. Note: Once the action is confirmed it cannot be undone. If the sub-section was removed in error and no other changes were made, close out of the document without saving the changes. When you access the document again, the sub-section will be restored. If other changes were made or the document was saved, you must manually add the sub-section back. 9|Page Owner Handbook Creating a Module from a Document A module is a standard piece of documentation that can be reused to build different order sets. In Maestro Care, it is called SmartGroup. 1. Click [Document Type] > Manage Order Sets. The Manage Library window is displayed. 2. Select the DUHS library from the Filter drop-down menu. 3. Expand the appropriate category and Reason/Problem group on the library list. 4. Click a document or module name to select it. 5. Click Edit. The Edit window is displayed. 6. Complete one of the following: To save the entire document as a module: Click File > Save Entire Document As New Module. To save a section or sub-section of the document as a module: Select the section or sub-section you want to save as a module, and click File > Save Selected Content As New Module. Note: Even though you can select a section to be saved as a module, when you pull the saved module into a document, the section name is suppressed and you only see the subsection and order information. When modules are added to sections the sub-section and order information becomes part of the section to which it is added. A module cannot stand alone as its own section. Note: When building a module, do not select content that crosses over sections. 7. Type a name in the Module title field. 8. Click the ellipsis to assign yourself as a primary owner. 9. If necessary, select Secondary owner(s) by clicking the Add button. 10. Assign a Reassessment rule from the drop-down menu. 11. Click Save. Creating a New Module from scratch When you create a new module, you are automatically provided with the sections of the document type as defined by DUHS. Module sections are empty when you start building the module. Note: The Category, Reason for Admission, Reason for Visit, and Diagnosis sections are not applicable in modules. Follow these steps: 1. Go to the DUHS modules library in the Manage Library window. 2. Click New. The Edit window is displayed. 3. Select a Patient Type (required). 4. Make any other selections by selecting the applicable sections you want to modify. Auto-navigation will guide you through the creation of the module. Tip: The Search Catalog tool can help you locate and add items as you build the new module. To access the Search Catalog tool, click View > Search Catalog. 5. Click Save. 6. Type the module name in the Module title field. 7. Click the Ellipsis button to assign yourself as a primary owner. 8. To assign a Secondary owner, click the Add button. 9. Select an option from the Reassessment rule drop-down menu. 10. Click Save (and Close the module if you are finished). 10 | P a g e Owner Handbook Embedding a Module in a Document Once back in the DUHS library, select your order set to which you want to embed the module, and open it up for editing. From the Edit window: 1. Right-click the section or sub-section to which you want to add the module and click Insert Embedded Module > Below (or Above). The Select a Module to Embed dialog is displayed. 2. Enter a search string in the Search for titles that contain field and click the Search button. The search results are displayed. 3. Click a module and click Save. Note: The embedded module appears highlighted in grey because it can’t be modified from the order set. To edit a module, go to DUHS Modules library, highlight the module and click the Edit button. Removing a Module from a Document From the Edit window: Right-click the module you want to remove and click Remove Embedded Module. The embedded module is removed from the document. Basic Narrative Functions Narratives provide additional clinical information. There are three ways to add a narrative to a document in the Edit window: • Find and add an existing narrative from the database • Copy and paste a narrative • Create a new narrative while working in the document Re-use narratives whenever possible to avoid cluttering the database with duplicate data. The same narratives can be used across all document categories, sections, sub-sections, and items. Note: An unlimited number of narratives can be added to sections and sub-sections, but only one narrative or Build Note may be added to an item. Narratives cannot be added to attributes. Narratives cannot be added to the Patient Type and Category sections when generating a new document using menu selections. Adding an existing narrative from the database 1. With your order set opened in the Edit window, right-click the section/ subsection/ item to which you want to add the narrative. Note: The closest place to add a Narrative to the Order Set Level is the “Reason for Admission” section. 2. Select Attach Narrative > Find. 3. Search and select the narrative to review and add from the Results list. 4. (Optional) To review the details of the narrative, click Details. If necessary, you can change the content of the selected narrative for this document. 5. To add the narrative, click Add Now. The narrative is displayed in the document at the selected location. If a narrative already exists at the selected section or sub-section the new narrative is added below the existing narrative. 11 | P a g e Owner Handbook Creating a New Narrative A new narrative should only be added after it has been verified not to already exist in Find. 1. With your order set opened in the Edit window, right-click the section/ sub-section/ item to which you want to add the narrative. 2. Click Attach Narrative > New. 3. Type the full body text of the narrative in the Narrative Text field. 4. Type a brief synopsis of the content of the narrative in the Narrative Summary field; this text generates the tool tip that is displayed when the cursor is placed over the narrative. 5. (Optional) To verify spelling prior to saving, click Spell Check. If errors exist, the Windows spell check prompt is displayed. Resolve the errors and click OK. 6. When finished working in the New Narrative dialog, click Save. The narrative is placed in the document next to the section, sub-section, or order that was originally selected. If a narrative already exists at the selected section or sub-section, the new narrative is added below the existing narrative. Removing a Narrative from a Document 1. In the Edit window, locate and right-click the narrative you want to remove. 2. Select Remove Narrative. 3. A confirmation prompt is displayed. 4. Click OK. Note: Once the action is confirmed it cannot be undone. If the narrative was removed in error and no other changes were made, close out of the document without saving the changes. When you access the document again, the narrative will be restored. If other changes were made or the document was saved, you must manually add the narrative back to the document. Modifying a Narrative in a Document 1. In the Edit window, locate and right-click the narrative you want to modify. 2. Select Modify Narrative Text. 3. (Optional) Click Spell Check. If spelling errors exist, the Windows spell check prompt is displayed. Resolve the errors and click OK. 4. Click Save. To re-order the narrative 1. In the Edit window, expand a section to locate one that has multiple narratives associated with it. 2. Right-click the narrative. The right-click menu is displayed. 3. Select the Move Up or Move Down menu option to re-order the narrative. The narrative is displayed in the new position. 12 | P a g e Owner Handbook Build Notes Build Notes are used to give directions to the person building the content in Maestro Care (Epic). The system displays Build Notes within the document content in all the ProVation Order Set application windows where content can be edited or viewed, except in the Print Preview window and in the Web Print module. Build Notes are not included in printed documents (they are included in the snapshot, but they do not show in the printed version that would be used for provider ordering). Creating a new Build Note 1. With your order set opened in the Edit window, right-click a section, sub-section, item, attribute, link, or narrative. A menu is displayed. 2. Select Attach Build Note 3. The selected option’s dialog is displayed. Text Option: Type the instruction in the blank field, up to 2,000 characters. Omit From Export Option: The list of all Build Paths defined in Configuration Center are displayed. Select the export Build Path(s) from which the item, link, or narrative should be omitted. Mandatory Order Option Show Orders As Option: Define how the sections, sub-section, or items are displayed in the CPOE system. This selection is applied to all child items. Show Order Details As Option: Select the method by which the optional values are to be displayed. Optional Order Detail Option: Select whether the order detail is mandatory or optional. Copying and Pasting a Build Note 1. In the Edit window, right-click a section, sub-section, or item. 2. Select Copy Build Note from the menu that is displayed. 3. Click the name of the document to which the Build Note is to be pasted. 4. Right-click a section, sub-section, or item. The right-click menu is displayed. 5. Select Attach Build Note > Paste > [name of Build Note]. Modifying a Build Note 1. In the Edit window, right-click the Build Note you want to modify. 2. Select Modify Build Note from the menu that is displayed. The Build Note Details dialog is displayed. 3. Modify the Build Note as necessary. 4. When finished, click Save. The Build Note Details dialog closes and the Build Note in the navigation tree is updated. Deleting a Build Note 1. In the Edit window, right-click the Build Note you want to delete. 2. Select Delete Build Note from the menu that is displayed. The Build Note is removed from the navigation tree immediately. No confirmation prompt is displayed. Caution: Once the Build Note is deleted, it cannot be restored. 13 | P a g e Owner Handbook Comparing Two Document Versions in the Edit Window The Compare tool displays two document versions side-by-side and highlights changes in yellow to help owners quickly identify what was changed over the course of multiple process cycles. 1. In the Edit window, click a document or module name to select it. 2. Click Compare on the toolbar or click Tools > Compare To Prior Version. Note: If the Compare button is not available, only one version of the document exists. Note: By default the current document version is displayed on the left side of the window and the current edit session is displayed on the right side of the window. 3. As you edit the document, click Refresh on the Compare To Prior Version window to see the changes highlighted yellow. 4. If you want to compare a different version than those selected by default, use one or both Version drop-down menus to select different versions. Note: If the option Current Edit Session is not selected from one of the Version drop-down menus, the changes do not display when Refresh is clicked. 5. When finished working with the Compare To Prior Version window, click Close. Compare and Copy Tool The Compare and Copy tool allows you to display a similar document in the Task Pane. You can then copy content from the similar document to the working document. Note: Documents can be compared to documents and modules can be compared to modules, but mixed comparisons are not allowed. 1. From the View menu or Task Pane button in the Edit window, click Compare and Copy. 2. Choose one of the following options: Root document <name> <location>: Displays the document as it appeared when it was initially copied from the ProVation library. Note: You cannot compare an order set to the same order set (different version) other than the root version. Similar ProVation document: Select this option if you want to compare the document to another document in the ProVation library. Similar DUHS document: Select this option if you want to compare the document to another document in the DUHS library. 3. The document chosen for comparison displays in the right pane. 4. All content in the comparison document that is missing from the main document is highlighted yellow. To change the highlighting, click the Ellipsis button next to the with field. The Highlighting Options dialog is displayed. Choose one of the options in this window: Highlighting off Highlighting on for all content missing from main document Highlighting on for new content missing from main document: This option is only available if more than one version of the comparison document exists. Users can select a Find content added after date to further filter the highlighted content. 5. To copy information from the comparison document to the main document, select information in the comparison document pane and click Copy. 6. In the document tree in the left pane, right-click the section or sub-section where you want to insert the content copied from the comparison document. 7. From the displayed menu, click Insert Copied Content. Note: This functionality may be of help if you delete information from your order set by mistake. 14 | P a g e Owner Handbook Printing a Document A document can be printed from the Manage Library or Edit windows using the toolbar button or the Print option from the File menu. 1. Click a document or module to select it, and then click Print. The Print dialog is displayed. 2. Designate the printer and click OK. Note: If prompted, select “Always open with protected mode disabled”. Generating a Document Print Preview Print Preview opens the selected document or module as a PDF document. Use the Print Preview option to view a document prior to printing or to save to a different location. Generate a document print preview in the following places in the application: • The Comments window, by clicking File > Print Preview > Snapshot. • The Manage Library window, by clicking File > Print Preview. • The Edit window, by clicking File > Print Preview. Once generated, the document can be viewed or printed. Saving the Order Set Save your order set edits periodically by clicking the Save button in the toolbar, and choose if you want to continue working or store as a new version. When saved as a new version, let increment the last digit of the version as suggested. Note: A pdf file of the order set is created and saved in the History Log. 15 | P a g e Owner Handbook Order Set Review Process The order set review process is the mechanism for setting up and tracking document reviews, releasing Order Sets for use, and reassessing documents. Creating a Review Process: Adding a Review Process Template To add a review process template to a document, the document must be in draft or review status. 1. Click [Document Type] > Manage Order Sets. 2. Locate and select the order set for review in the tree or the Details Pane. 3. Either click Process from the toolbar, or Tools > View Steps for Current Process Cycle. The Process Management window is displayed. 4. Click Insert Process Template and select a process template that is applicable for this order set (based on specialty). If previous process steps exist, select the process step after which the additional step(s) should follow. The template is added after the selected process step. The Status Of Step field for each added process step is set to Not Submitted, because the Status Of Step field is updated during the document review. 5. When finished working in the Process Management window, click Close. Modifying a Review Process To add a process step 1. Click the Add button. 2. [Required] Type the description of the process step in the Process Step Name field (250 characters). 3. Select Not Submitted from Status of Step from the drop-down menu, if necessary. 4. Click the drop-down arrow in the Due Date field to select a deadline for the process step to be completed by reviewers (or type the date into the field in the form m/d/yyyy). 5. Click Add Reviewer... 6. Click Add Group... (to select reviewers by group) View the members of an added group by highlighting the group name in the Reviewers list and then clicking View Members. 7. Click Save to keep changes or click Cancel to abandon changes. To edit a process step 1. Select the process step to edit. 2. Click Edit button or double-click the step. The Process Management Step dialog is displayed. 3. Make changes, as necessary. 4. Click Save to keep changes or click Cancel to abandon changes. To reorder steps using drag and drop 1. Select the step to move. 2. Click-and-drag the step to the position in the process where you want it to appear. The process step is displayed in the new position. To delete a step 1. Select the step to delete. 2. Click the Remove button. A confirmation prompt is displayed. 3. Click Yes. 16 | P a g e Owner Handbook Submitting a Document for Review 1. In the Manage Library window, locate and select the document for review in the tree or the Details Pane. The Process button becomes available. 2. Either click Process from the toolbar, or Tools > View Steps for Current Process Cycle. The Process Management window is displayed. 3. Click the process step and then click the Edit button. The Process Management Step dialog is displayed. 4. Assign a Due Date. 5. From the Status of Step drop-down menu, click Submitted. 6. Click Save. When prompted if you want to change the order set status to In Review, select NO- if the order set should remain in Draft status, or select YES- if the order set is ready to be reviewed (and it will be added to the reviewers’ queues of documents). 7. The Email Reviewer dialog is displayed. Note: Clicking Cancel from the Email Reviewer dialog cancels the email message but does not cancel the change made to the status of the step. 8. Click Send. The Email Reviewer dialog closes and the Status of Step is Submitted. Today’s date is displayed in the Submitted column. Manually Sending Email Notifications to Reviewers During review, it may be necessary to email reviewers if, for example, a deadline has passed. 1. In the Manage Library window, select the document for review in the tree or the Details Pane. 2. Either click Process from the toolbar, or Tools > View Steps for Current Process Cycle. 3. Select the process step that requires the email (the recipients’ email addresses are populated from the Reviewer(s) column). 4. Click the Email button at the bottom of the screen. A default email message is displayed. 5. If necessary, add or remove recipients and/ or edit the email message. 6. When finished, click Send. Note: If you want someone added to Review Step, add to the Reviewer section (individual or group) NOT the email screen. The email does not give the ability to actually review an order set. Adding and removing process step Reviewers 1. In the Manage library window, click a document to select it. 2. Either click Process from the toolbar, or Tools > View Steps for Current Process Cycle. 3. Double-click the process step to update, or select the step and click the Edit button. To add a reviewer, click the Add button and select a user from the User Search window. Click Save. To remove a recipient, select the name and click the Delete button. Click Yes on the Confirm reviewer delete dialog. Note: Reviewer Groups may be added or removed from process steps in the same manner, but only before the step has been submitted. View the members of an added group by highlighting the group name in the Reviewers list and then clicking View Members. Verifying Reviewer’s Status 1. In the Manage Library window, click a document to select it. 2. Either click Process from the toolbar, or Tools > View Steps for Current Process Cycle. 3. Select the process step and click the Edit button. 4. Review the Process Status and Date Completed columns to verify the status of reviewers. Note: The statuses of reviewers in reviewer groups are tracked individually. 17 | P a g e Owner Handbook Processing Reviewer Comments in the Edit window 1. In the Manage Library window, select the document and click the Edit button. 3. In the Edit window, select the Reviewer Comments option from either the View menu or the Task Pane drop-down menu. The Reviewer Comments pane has two parts: The Comments List section of the Reviewer Comments Task Pane displays a list of reviewer comments as filtered by the Show Filter options: Pending comments only—displays all comments not marked as Done or Suppressed. All comments—displays all comments including those marked as Done or Suppressed. The Comment Details Window at the bottom of the Reviewer Comments Task Pane displays details of the comment currently selected in the Comments List. Available options to Process a Reviewer Comment The document owner selects this button to mark the comment as having been addressed. The comment is removed from the list in the Pending comments only filter in the owner’s Done Comments List. The comment is displayed labeled with a check mark in the Reviewers’ Comments and Events List. A comment marked as Done can be restored to Pending status at any time using the Restore button. The document owner selects this button to remove the comment from being seen by reviewers. Suppressed comments do not display in the comments report during the process Suppressed cycle, but do display in the comments report included in the History Log after the process cycle is complete. A comment marked as Suppressed can be restored to Pending status at any time using the Restore button. Restore The document owner selects this button to restore the comment to its original state. The document owner selects this button to respond to a comment selected in the Comments List. Alternatively, the Response dialog can be opened by right-clicking the comment and selecting the Respond option from the menu. Responses are visible to other owners and Respond reviewers. Note: When you (the owner) respond to a comment, the reviewer does not receive an email notification. Follow up with the reviewer if applicable and/or attach a note to yourself as a reminder by using the Owners’ Notes button. Document owners can select this button to attach a note to a comment or respond to notes Owners’ Notes entered by other owners. Owners’ Notes are visible to all primary and secondary owners only. Owners’ Notes are not visible to reviewers and are not retained in the system after the process cycle is closed. The document owner selects this button to enter a new comment in the Comments List. New Comment The New Comment dialog opens. Print Report The document owner selects this button to print a comments report. Printing a Comments Report in the Edit Window 1. From the View menu or the Task Pane button in the Edit window, select Reviewer Comments. 2. Click the Print Report button at the bottom of the Task pane. 3. Select the data to be included in the report and sort options. 4. Click OK. A print dialog is displayed. 5. Select a printer and click Print. The comments report prints. 18 | P a g e Owner Handbook Advancing the Status of a Process Step 1. In the Manage Library window, click a document to select it. 2. Either click Process from the toolbar, or Tools > View Steps for Current Process Cycle. 3. Double-click the process step to update, or select the step and click the Edit button. 4. Select the step status from the Status of Step drop-down menu. 5. Change the Status of Step to Submitted, Completed, or On Hold. If the status was changed to Submitted The email notification is displayed. If the status was changed to Completed The process step text displays green. If the status was changed to Completed, and it is the last process step to be completed The text displays green, and the End Process Cycle dialog is displayed. Ending the process cycle 1. In the Manage Library window, click a document to select it. 2. Either click Process from the toolbar, or Tools > View Steps for Current Process Cycle. 3. (Optional) Complete all process steps: a. Double-click a step in the process, or select the step and click the Edit button. b. Using the Status of Step drop-down menu, click Completed. c. Click Save. After the final process step is changed to Completed and the Save button is clicked, the End Process Cycle dialog is displayed. 4. From the Set approval status to drop-down menu, click Approved. 5. From the Set release status to drop-down menu, click Released. 6. Click OK to approve and release the order set. The History Log The History Log can be viewed by owners and reviewers and keeps track of activity that has occurred on a document by logging both automatic and manual events that take place during the review process. When using the Manage Library window, the History Log can be displayed from the toolbar or from the Tools menu. When using the Process Management window, you can display the History Log from the File menu. When using the Review Order Sets > Comments window, you can display the History Log from the Tools menu. Comparing Two Document Versions in the History Log 1. Select an event from the History Log. 2. Click Compare on the toolbar. The Compare To Prior Version window is displayed. The current document version is selected by default on the right side of the window. By default, unchanged sections display collapsed. 3. Select a version to compare to the current version from the Version drop-down menu on the left side of the window. If you don’t want to compare to the current version, select a different version number from the right side of the window. 4. The navigation trees on both sides of the window open to the sections where changes were made. The changes are highlighted in yellow. To view unchanged sections, go to View > Show Content For All Sections. 5. When finished reviewing changes, click Close. 19 | P a g e Owner Handbook The Document Reassessment Process After a document has been created and approved, the document is flagged for reassessment as specified by the Reassessment Rule. The owner receives email notification 60 days prior to the automatic reassessment date. The owner may also choose to start the next process cycle at any time. The steps involved with beginning the review process for a document are as follows: Start the next process cycle Update the version number according to the build standards Generate/verify correct process steps, reviewers, and schedule Send the document to the first reviewer(s) by changing the Status of Step to Submitted 20 | P a g e