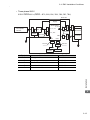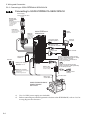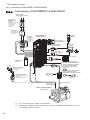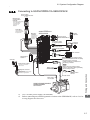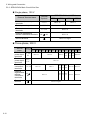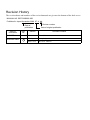
1
AC Servo Drives Σ -V Series USER'S MANUAL Setup Rotational Motor SGDV SERVOPACK SGMJV/SGMAV/SGMPS/SGMGV/SGMSV/SGMCS Servomotors 1 2 3 4 MANUAL NO. SIEP S800000 43B Overview of Setup 1 Installation 2 Wiring and Connection 3 Safety Function 4 Trial Operation (Checking Servomotor Operation) 5 Troubleshooting 6 Copyright © 2007 YASKAWA ELECTRIC CORPORATION All rights reserved. No part of this publication may be reproduced, stored in a retrieval system, or transmitted, in any form, or by any means, mechanical, electronic, photocopying, recording, or otherwise, without the prior written permission of Yaskawa. No patent liability is assumed with respect to the use of the information contained herein. Moreover, because Yaskawa is constantly striving to improve its high-quality products, the information contained in this manual is subject to change without notice. Every precaution has been taken in the preparation of this manual. Nevertheless, Yaskawa assumes no responsibility for errors or omissions. Neither is any liability assumed for damages resulting from the use of the information contained in this publication. About this Manual This manual describes procedures required for installation, wiring, and connecting Σ-V Series servo drives, including a JOG operation for servomotors not connected to machinery. Be sure to refer to this manual and perform setup operations correctly. Keep this manual in a location where it can be accessed for reference whenever required. Description of Technical Terms The following table shows the meanings of terms used in this manual. Term Meaning Servomotor Σ-V Series SGMJV, SGMAV, SGMPS, SGMGV, SGMSV, or SGMCS (Direct Drive) servomotor SERVOPACK Σ-V Series SGDV SERVOPACK Servo Drive A set including a servomotor and SERVOPACK (i.e., a servo amplifier) Servo System A servo control system that includes the combination of a servo drive with a host controller and peripheral devices Analog pulse model Analog voltage and pulse-train reference used for SERVOPACK interface. M-II model MECHATROLINK-II communications reference used for SERVOPACK interface. IMPORTANT Explanations The following icon is displayed for explanations requiring special attention. • Indicates important information that should be memorized, as well as precautions, such as alarm displays, that do not involve potential damage to equipment. Notation Used in this Manual In this manual, the names of reverse signals (ones that are valid when low) are written with a forward slash (/) before the signal name, as shown in the following example: Example S-ON = /S-ON iii Manuals Related to the Σ-V Series Refer to the following manuals as required. Name Σ-V Series Product Catalog (KAEP S800000 42) Selecting Ratings Models and System and Peripheral Specifi- Design cations Devices 9 Trial Panels Operation Maintenance Trial and and and Wiring Operation Inspection Servo Adjustment 9 Σ-V Series User's Manual Design and Maintenance Rotational Motor/ Analog Voltage and Pulse Train Reference (SIEP S800000 45) 9 9 9 9 9 Σ−V Series User's Manual Design and Maintenance Rotational Motor/ MECHATROLINK-II Communications Reference (SIEP S800000 46) 9 9 9 9 9 9 9 9 9 9 Σ-V Series User’s Manual Operation of Digital Operator (SIEP S800000 55) Σ-V Series User’s Manual MECHATROLINK-II Command (SIEP S800000 54) Σ-V Series AC SERVOPACK SGDV Safety Precautions (TOBP C710800 10) 9 9 9 Σ Series Digital Operator Safety Precautions (TOBP C730800 00) AC SERVOMOTOR Safety Precautions (TOBP C230200 00) iv 9 9 9 9 Safety Information The following conventions are used to indicate precautions in this manual. Failure to heed precautions provided in this manual can result in serious or possibly even fatal injury or damage to the products or to related equipment and systems. WARNING CAUTION PROHIBITED Indicates precautions that, if not heeded, could possibly result in loss of life or serious injury. Indicates precautions that, if not heeded, could result in relatively serious or minor injury, damage to the product, or faulty operation. In some situations, the precautions indicated could have serious consequences if not heeded. Indicates prohibited actions that must not be performed. For example, this symbol would be used to indicate that fire is prohibited as follows: MANDATORY Indicates compulsory actions that must be performed. For example, this symbol would be used as follows to indicate that grounding is compulsory: v Safety Precautions These safety precautions are very important. Read them before performing any procedures such as checking products on delivery, storage and transportation, installation, wiring, operation and inspection, or disposal. Be sure to always observe these precautions thoroughly. WARNING • Never touch any rotating motor parts while the motor is running. Failure to observe this warning may result in injury. • Before starting operation with a machine connected, make sure that an emergency stop can be applied at any time. Failure to observe this warning may result in injury or damage to the product. • Never touch the inside of the SERVOPACKs. Failure to observe this warning may result in electric shock. • Do not remove the cover of the power supply terminals while the power is ON. Failure to observe this warning may result in electric shock. • After the power is turned OFF or after a voltage resistance test, do not touch terminals while the CHARGE lamp is ON. Residual voltage may cause electric shock. • Follow the procedures and instructions provided in this manual for trial operation. Failure to do so may result not only in faulty operation and damage to equipment, but also in personal injury. • The multi-turn output range for the Σ-V Series absolute position detecting system is different from that of earlier systems (15-bit and 12-bit encoders). In particular, change the system to configure the Σ series infinite-length positioning system with the Σ-V Series. • The multi-turn limit value need not be changed except for special applications. Changing it inappropriately or unintentionally can be dangerous. • If the Multi-turn Limit Disagreement alarm occurs, check the setting of parameter Pn205 in the SERVOPACK to be sure that it is correct. If Fn013 is executed when an incorrect value is set in Pn205, an incorrect value will be set in the encoder. The alarm will disappear even if an incorrect value is set, but incorrect positions will be detected, resulting in a dangerous situation where the machine will move to unexpected positions. • Do not remove the front cover, cables, connectors, or optional items from the upper front of the SERVOPACK while the power is ON. Failure to observe this warning may result in electric shock. • Do not damage, press, exert excessive force on, or place heavy objects on the cables. Failure to observe this warning may result in electric shock, stopping operation of the product, or fire. • Do not modify the product. Failure to observe this warning may result in injury, fire, or damage to the product. vi WARNING • Provide an appropriate stopping device on the machine side to ensure safety. The holding brake on a servomotor with a brake is not a stopping device for ensuring safety. Failure to observe this warning may result in injury. • Do not come close to the machine immediately after resetting a momentary power loss. The machine may restart unexpectedly. Take appropriate measures to ensure safety against an unexpected restart. Failure to observe this warning may result in injury. • Connect the ground terminal according to local electrical codes (100 Ω or less for a SERVOPACK with a 100, 200 V power supply. 10 Ω or less for a SERVOPACK with a 400 V power supply.) Improper grounding may result in electric shock or fire. • Installation, disassembly, or repair must be performed only by authorized personnel. Failure to observe this warning may result in electric shock or injury. • The person who designs a system using the safety function (Hard Wire Baseblock function) must have full knowledge of the related safety standards and full understanding of the instructions in Σ-V Series User’s Manual Design and Maintenance (SIEP S800000 45/46). Failure to observe this warning may result in injury or damage to the product. Storage and Transportation CAUTION • Do not store or install the product in the following locations. Failure to observe this caution may result in fire, electric shock, or damage to the product. • Locations subject to direct sunlight • Locations subject to temperatures outside the range specified in the storage/ installation temperature conditions • Locations subject to humidity outside the range specified in the storage/installation humidity conditions • Locations subject to condensation as the result of extreme changes in temperature • Locations subject to corrosive or flammable gases • Locations subject to dust, salts, or iron dust • Locations subject to exposure to water, oil, or chemicals • Locations subject to shock or vibration • Do not hold the product by the cables, motor shaft or detector while transporting it. Failure to observe this caution may result in injury or malfunction. • Do not place any load exceeding the limit specified on the packing box. Failure to observe this caution may result in injury or malfunction. vii Storage and Transportation (cont’d) CAUTION • If disinfectants or insecticides must be used to treat packing materials such as wooden frames, pallets, or plywood, the packing materials must be treated before the product is packaged, and methods other than fumigation must be used. Example: Heat treatment, where materials are kiln-dried to a core temperature of 56°C for 30 minutes or more. If the electronic products, which include stand-alone products and products installed in machines, are packed with fumigated wooden materials, the electrical components may be greatly damaged by the gases or fumes resulting from the fumigation process. In particular, disinfectants containing halogen, which includes chlorine, fluorine, bromine, or iodine can contribute to the erosion of the capacitors. Installation CAUTION • Never use the product in an environment subject to water, corrosive gases, inflammable gases, or combustibles. Failure to observe this caution may result in electric shock or fire. • Do not step on or place a heavy object on the product. Failure to observe this caution may result in injury. • Do not cover the inlet or outlet ports and prevent any foreign objects from entering the product. Failure to observe this caution may cause internal elements to deteriorate resulting in malfunction or fire. • Be sure to install the product in the correct direction. Failure to observe this caution may result in malfunction. • Provide the specified clearances between the SERVOPACK and the control panel or with other devices. Failure to observe this caution may result in fire or malfunction. • Do not apply any strong impact. Failure to observe this caution may result in malfunction. viii Wiring CAUTION • Be sure to wire correctly and securely. Failure to observe this caution may result in motor overrun, injury, or malfunction. • Do not connect a commercial power supply to the U, V, or W terminals for the servomotor connection. Failure to observe this caution may result in injury or fire. • Securely connect the main circuit power supply terminals and servomotor connection terminals. Failure to observe this caution may result in fire. • Do not bundle or run the main circuit cables together with the I/O signal cables or the encoder cables in the same duct. Keep them separated by at least 30 cm. Failure to do so may result in malfunction. • Use shielded twisted-pair wires or multi-core shielded twisted-pair wires for I/O signal cables and the encoder cables. • I/O signal cables must be no longer than 3 m, encoder cables must be no longer than 50 m, and control power supply (+24 V, 0 V) cables for a 400 V input SERVOPACK must be no longer than 10 m. • Do not touch the power terminals while the CHARGE lamp is ON after turning power OFF because high voltage may still remain in the SERVOPACK. Make sure the charge indicator is off first before starting an inspection. • Observe the following precautions when wiring main circuit terminals. • Remove detachable main circuit terminals from the SERVOPACK prior to wiring. • Insert only one main circuit cable per opening in the main circuit terminals. • Make sure that no part of the core wire comes into contact with (i.e., short-circuit) adjacent wires. • Install a battery at either the host controller or the battery unit of the encoder, but not both. It is dangerous to install batteries at both ends simultaneously, because that sets up a loop circuit between the batteries. • Always use the specified power supply voltage. An incorrect voltage may result in fire or malfunction. • Take appropriate measures to ensure that the input power supply is supplied within the specified voltage fluctuation range. Be particularly careful in places where the power supply is unstable. An incorrect power supply may result in damage to the product. • Install external breakers or other safety devices against short-circuiting in external wiring. Failure to observe this caution may result in fire. • Take appropriate and sufficient countermeasures for each form of potential interference when installing systems in the following locations. • Locations subject to static electricity or other forms of noise • Locations subject to strong electromagnetic fields and magnetic fields • Locations subject to possible exposure to radioactivity • Locations close to power supplies Failure to observe this caution may result in damage to the product. ix Wiring (cont’d) CAUTION • Do not reverse the polarity of the battery when connecting it. Failure to observe this caution may result in damage to the battery, the SERVOPACK, or cause an explosion. • Wiring or inspection must be performed by a technical expert. • Use a 24 VDC power supply with double insulation or reinforced insulation. Operation CAUTION • Conduct trial operations on the servomotor alone, with the motor shaft disconnected from the machine to avoid accidents. Failure to observe this caution may result in injury. • Before starting operation with a machine connected, change the settings to match the parameters of the machine. Starting operation without matching the proper settings may cause the machine to run out of control or malfunction. • Do not frequently turn power ON and OFF. Since the SERVOPACK has a capacitor in the power supply, a high charging current flows when power is turned ON. Frequently turning power ON and OFF causes main power devices like capacitors and fuses to deteriorate, resulting in unexpected problems. • When using JOG operations (Fn002) origin search operations (Fn003), or EasyFFT operations (Fn206), the dynamic brake function does not work for reverse overtravel or forward overtravel. Take necessary precautions. Failure to observe this caution may result in damage to the product. • When using the servomotor for a vertical axis, install safety devices to prevent workpieces from falling due to alarms or overtravels. Set the servomotor so that it will stop in the zero clamp state when overtravel occurs. Failure to observe this caution may cause workpieces to fall due to overtravel. • When not using turning-less function, set to the correct moment of inertia ratio (Pn103). Setting to an incorrect moment of inertia ratio may cause vibration. • Do not touch the SERVOPACK heatsinks, regenerative resistor, or servomotor while power is ON or soon after the power is turned OFF. Failure to observe this caution may result in burns due to high temperatures. • Do not make any extreme adjustments or setting changes of parameters. Failure to observe this caution may result in injury or damage to the product due to unstable operation. • When an alarm occurs, remove the cause, reset the alarm after confirming safety, and then resume operation. Failure to observe this caution may result in damage to the product, fire, or injury. • Do not use the holding brake of the servomotor for braking. Failure to observe this caution may result in malfunction. x Operation (cont’d) CAUTION • Always use the servomotor and SERVOPACK in one of the specified combinations. Failure to observe this caution may result in fire or malfunction. • The servomotor stopping method of turning the main-circuit or control-circuit power OFF without turning the servo OFF during operation can not be set in Parameter Pn001. Use the following method to stop the servomotor. • When turning the main-circuit power OFF without turning the servo OFF: The servomotor will be stopped by dynamic braking (DB). • When turning the control-circuit power OFF without turning the servo OFF: The stopping method will vary depending on the SERVOPACK model. Refer to the Σ-V Series User's Manual Design and Maintenance for details. Maintenance and Inspection CAUTION • Do not disassemble the SERVOPACK. Failure to observe this caution may result in electric shock or injury. • Do not attempt to change wiring while the power is ON. Failure to observe this caution may result in electric shock or injury. • When replacing the SERVOPACK, resume operation only after copying the previous SERVOPACK parameters to the new SERVOPACK. Failure to observe this caution may result in damage to the product. xi Disposal CAUTION • When disposing of the products, treat them as ordinary industrial waste. General Precautions Observe the following general precautions to ensure safe application. • The products shown in illustrations in this manual are sometimes shown without covers or protective guards. Always replace the cover or protective guard as specified first, and then operate the products in accordance with the manual. • The drawings presented in this manual are typical examples and may not match the product you received. • This manual is subject to change due to product improvement, specification modification, and manual improvement. When this manual is revised, the manual code is updated and the new manual is published as a next edition. The edition number appears on the front and back covers. • If the manual must be ordered due to loss or damage, inform your nearest Yaskawa representative or one of the offices listed on the back of this manual. • Yaskawa will not take responsibility for the results of unauthorized modifications of this product. Yaskawa shall not be liable for any damages or troubles resulting from unauthorized modification. xii Applicable Standards North American Safety Standards (UL) UL∗ Standards (UL File No.) Model SERVOPACK • SGDV UL508C (E147823) Servomotor • • • • • UL1004 (E165827) SGMJV SGMAV SGMPS SGMGV SGMSV ∗ Underwriters Laboratories Inc. European Standards Model SERVOPACK • SGDV Servomotor • • • • • SGMJV SGMAV SGMPS SGMGV SGMSV Low Voltage Directive EMC Directive EMS Safety Standards EN55011/A2 EN50178 group 1 class A EN61800-5-1 EN61800-3 EN61800-3 EN61000-6-2 EN954-1 IEC61508-1 to 4 IEC60034-1 IEC60034-5 IEC60034-8 IEC60034-9 EN61800-3 EN61000-6-2 – EMI EN55011/A2 group 1 class A EN61800-3 Note: Because SERVOPACKs and servomotors are built into machines, certification is required after installation in the user’s product. xiii CONTENTS About this Manual . . . . . . . . . . . . . . . . . . . . . . . . . . . . . . . . . . . . . . . . . . . . . . . . . iii Safety Precautions . . . . . . . . . . . . . . . . . . . . . . . . . . . . . . . . . . . . . . . . . . . . . . . . vi Applicable Standards . . . . . . . . . . . . . . . . . . . . . . . . . . . . . . . . . . . . . . . . . . . . . xiii 1 Overview of Setup . . . . . . . . . . . . . . . . . . . . . . . . . . . . . . . . . . . . . . . . 1-1 2 Installation . . . . . . . . . . . . . . . . . . . . . . . . . . . . . . . . . . . . . . . . . . . . . . 2-1 2.1 Installation Environment and Applicable Standards . . . . . . . . . . . . . . . . . . . . . . . . . . . 2-2 2.1.1 Servomotor Installation Environment . . . . . . . . . . . . . . . . . . . . . . . . . . . . . . . . . 2-2 2.1.2 SERVOPACK Installation Environment . . . . . . . . . . . . . . . . . . . . . . . . . . . . . . . . 2-3 2.1.3 Installation Conditions for Applicable Standards . . . . . . . . . . . . . . . . . . . . . . . . . 2-4 2.2 Servomotor Installation . . . . . . . . . . . . . . . . . . . . . . . . . . . . . . . . . . . . . . . . . . . . . . . . . 2-5 2.2.1 Orientation . . . . . . . . . . . . . . . . . . . . . . . . . . . . . . . . . . . . . . . . . . . . . . . . . . . . . 2-5 2.2.2 Installation Standards . . . . . . . . . . . . . . . . . . . . . . . . . . . . . . . . . . . . . . . . . . . . . 2-5 2.2.3 Connecting Servomotor to Machine . . . . . . . . . . . . . . . . . . . . . . . . . . . . . . . . . . 2-6 2.2.4 Protective Structure . . . . . . . . . . . . . . . . . . . . . . . . . . . . . . . . . . . . . . . . . . . . . . . 2-7 2.2.5 Other Precautions . . . . . . . . . . . . . . . . . . . . . . . . . . . . . . . . . . . . . . . . . . . . . . . . 2-8 2.3 SERVOPACK Installation . . . . . . . . . . . . . . . . . . . . . . . . . . . . . . . . . . . . . . . . . . . . . . . 2-9 2.3.1 Orientation . . . . . . . . . . . . . . . . . . . . . . . . . . . . . . . . . . . . . . . . . . . . . . . . . . . . . 2-9 2.3.2 Installation Standards . . . . . . . . . . . . . . . . . . . . . . . . . . . . . . . . . . . . . . . . . . . . 2-10 2.4 EMC Installation Conditions . . . . . . . . . . . . . . . . . . . . . . . . . . . . . . . . . . . . . . . . . . . . 2-12 3 Wiring and Connection . . . . . . . . . . . . . . . . . . . . . . . . . . . . . . . . . . . . . 3-1 3.1 Precautions for Wiring . . . . . . . . . . . . . . . . . . . . . . . . . . . . . . . . . . . . . . . . . . . . . . . . . 3-2 3.2 System Configuration Diagram . . . . . . . . . . . . . . . . . . . . . . . . . . . . . . . . . . . . . . . . . . 3-3 3.2.1 Connecting to SGDV-F01A SERVOPACK . . . . . . . . . . . . . . . . . . . . . . . . 3-3 3.2.2 Connecting to SGDV-A01A SERVOPACK . . . . . . . . . . . . . . . . . . . . . . . . 3-4 3.2.3 Connecting to SGDV-D01A SERVOPACK . . . . . . . . . . . . . . . . . . . . . . . . 3-5 3.2.4 Connecting to SGDV-F11A SERVOPACK . . . . . . . . . . . . . . . . . . . . . . . . . 3-6 3.2.5 Connecting to SGDV-A11A SERVOPACK . . . . . . . . . . . . . . . . . . . . . . . . 3-7 3.2.6 Connecting to SGDV-D11A SERVOPACK . . . . . . . . . . . . . . . . . . . . . . . . 3-8 3.3 Main Circuit Wiring . . . . . . . . . . . . . . . . . . . . . . . . . . . . . . . . . . . . . . . . . . . . . . . . . . . . 3-9 3.3.1 Names and Functions of Main Circuit Terminals . . . . . . . . . . . . . . . . . . . . . . . . . 3-9 3.3.2 SERVOPACK Main Circuit Wire Size . . . . . . . . . . . . . . . . . . . . . . . . . . . . . . . . 3-10 3.3.3 Typical Main Circuit Wiring Examples . . . . . . . . . . . . . . . . . . . . . . . . . . . . . . . . 3-14 3.3.4 Wiring the Main Circuit Terminal Connector (Spring Type) . . . . . . . . . . . . . . . . 3-18 3.4 Connecting Regenerative Resistors . . . . . . . . . . . . . . . . . . . . . . . . . . . . . . . . . . . . . . 3-21 3.4.1 Connecting Regenerative Resistor . . . . . . . . . . . . . . . . . . . . . . . . . . . . . . . . . . 3-21 xiv 4 Safety Function . . . . . . . . . . . . . . . . . . . . . . . . . . . . . . . . . . . . . . . . . . 4-1 4.1 4.2 4.3 4.4 4.5 Outline . . . . . . . . . . . . . . . . . . . . . . . . . . . . . . . . . . . . . . . . . . . . . . . . . . . . . . . . . . . . . Hard Wire Base Block (HWBB) Function . . . . . . . . . . . . . . . . . . . . . . . . . . . . . . . . . . . Safety Function Signal (CN8) Names and Functions . . . . . . . . . . . . . . . . . . . . . . . . . Precautions When Not Using the Safety Function . . . . . . . . . . . . . . . . . . . . . . . . . . . . When Using the Safety Function . . . . . . . . . . . . . . . . . . . . . . . . . . . . . . . . . . . . . . . . . 4-2 4-3 4-4 4-4 4-5 5 Trial Operation (Checking Servomotor Operation) . . . . . . . . . . . . . . . 5-1 5.1 5.2 5.3 5.4 5.5 Outline . . . . . . . . . . . . . . . . . . . . . . . . . . . . . . . . . . . . . . . . . . . . . . . . . . . . . . . . . . . . . 5-2 Inspection and Checking before Trial Operation . . . . . . . . . . . . . . . . . . . . . . . . . . . . . 5-2 JOG Operation Using a Panel Operator . . . . . . . . . . . . . . . . . . . . . . . . . . . . . . . . . . . 5-5 JOG Operation Using a Digital Operator . . . . . . . . . . . . . . . . . . . . . . . . . . . . . . . . . . . 5-7 JOG Operation Using SigmaWin+ . . . . . . . . . . . . . . . . . . . . . . . . . . . . . . . . . . . . . . . 5-10 6 Troubleshooting . . . . . . . . . . . . . . . . . . . . . . . . . . . . . . . . . . . . . . . . . 6-1 6.1 Troubleshooting of Alarms . . . . . . . . . . . . . . . . . . . . . . . . . . . . . . . . . . . . . . . . . . . . . . 6-2 6.2 Troubleshooting of Warnings . . . . . . . . . . . . . . . . . . . . . . . . . . . . . . . . . . . . . . . . . . . 6-25 6.3 Troubleshooting Malfunction Based on Operation and Conditions of the Servomotor 6-30 Revision History xv 1 Overview of Setup Overview of Setup This chapter describes how to set up the Σ-V series of servo drives. 1 1-1 1 Overview of Setup This chapter describes the flow of the setup procedure from installation until a JOG operation. A panel operator, a digital operator, and SigmaWin+, (which is an engineering tool that can be used with a PC) are available to set up a servo drive. The panel operator is included with the SERVOPACK, and the digital operator and SigmaWin+ are sold separately. CAUTION • An alarm or warning may be generated if communications are executed with the host controller during operation using SigmaWin+ or the digital operator. If an alarm or warning is generated, the process currently being executed may be aborted and the system may stop. Be sure to read 5.2 Inspection and Checking before Trial Operation. Operation Install the servomotor and SERVOPACK. Reference (in this manual) Chapter 2 Installation ↓ Perform the required wiring and connections for a JOG operation. Chapter 3 Wiring and Connection ↓ Perform a JOG operation for the servomotor using • the panel operator • the digital operator, or • SigmaWin+ 1-2 Chapter 5 Trial Operation (Checking Servomotor Operation) zTrial Operation Using the Panel Operator →5.3 JOG Operation Using a Panel Operator zTrial Operation Using the Digital Operator →5.4 JOG Operation Using a Digital Operator zTrial Operation Using SigmaWin+. →5.5 JOG Operation Using SigmaWin+ 2 Installation This chapter describes how to install the servomotor and the SERVOPACK. 2.1 Installation Environment and Applicable Standards . . . . . . . . . 2-2 2.1.1 Servomotor Installation Environment . . . . . . . . . . . . . . . . . . . . . . 2-2 2.1.2 SERVOPACK Installation Environment . . . . . . . . . . . . . . . . . . . . 2-3 2.1.3 Installation Conditions for Applicable Standards . . . . . . . . . . . . . . 2-4 2.2 Servomotor Installation . . . . . . . . . . . . . . . . . . . . . . . . . . . . . . . 2-5 2.2.1 2.2.2 2.2.3 2.2.4 2.2.5 Orientation . . . . . . . . . . . . . . . . . . . . . . . . . . . . . . . . . . . . . . . . . . 2-5 Installation Standards . . . . . . . . . . . . . . . . . . . . . . . . . . . . . . . . . . 2-5 Connecting Servomotor to Machine . . . . . . . . . . . . . . . . . . . . . . . 2-6 Protective Structure . . . . . . . . . . . . . . . . . . . . . . . . . . . . . . . . . . . 2-7 Other Precautions . . . . . . . . . . . . . . . . . . . . . . . . . . . . . . . . . . . . . 2-8 2.3 SERVOPACK Installation . . . . . . . . . . . . . . . . . . . . . . . . . . . . . 2-9 2.3.1 Orientation . . . . . . . . . . . . . . . . . . . . . . . . . . . . . . . . . . . . . . . . . . 2-9 2.3.2 Installation Standards . . . . . . . . . . . . . . . . . . . . . . . . . . . . . . . . . 2-10 Installation 2.4 EMC Installation Conditions . . . . . . . . . . . . . . . . . . . . . . . . . . 2-12 2 2-1 2 Installation 2.1.1 Servomotor Installation Environment 2.1 Installation Environment and Applicable Standards The installation environment and the applicable standards for servomotors and SERVOPACKs are described in this section. 2.1.1 Servomotor Installation Environment Ambient temperature: 0 to 40°C Ambient humidity: 80% RH or less (with no condensation) Altitude: 1, 000 m or less Vibration resistance The servomotor will withstand the following vibration acceleration in three directions: vertical, side to side, and front to back. Front to Back Vertical Side to Side Horizontal Impact Applied to the Servomotor Servomotor Model Vibration Acceleration at Flange SGMJV, SGMAV, SGMPS, SGMCS-02 to -35 49 m/s2 SGMGV-03 to -44, SGMSV-10 to -55 49 m/s2 (Front to back direction: 24.5m/s2) SGMGV-55 to -1E, SGMCS-45 to -2Z 24.5 m/s2 SGMSV-70 14.7 m/s2 Shock resistance: 490 m/s2 at servomotor flange Installation site: An environment that satisfies the following conditions • Indoors and free of corrosive or explosive gases • Well-ventilated and free of dust and moisture • Facilitates inspection and cleaning • Free of high magnetic field 2-2 2.1 Installation Environment and Applicable Standards SERVOPACK Installation Environment Surrounding air temperature: 0 to 55°C Ambient humidity: 90% RH or less (with no condensation) Altitude: 1,000 m or less Vibration resistance: 4.9 m/s2 Shock resistance: 19.6 m/s2 Installation Precautions • Mounting in a Control Panel To prevent the temperature around the SERVOPACK from exceeding 55°C, take into account the size of the control panel, the layout of the SERVOPACK, and the cooling method. For details, refer to 2.3 SERVOPACK Installation. • Mounting Near a Heating Unit To prevent the temperature around the SERVOPACK from exceeding 55°C, suppress radiant heat from the heating unit and temperature rise due to convection. • Mounting Near a Vibration Source To prevent vibration from being transmitted to the SERVOPACK, install a vibration isolator underneath the SERVOPACK. • Mounting to a Location Exposed to Corrosive Gas Take measures to prevent exposure to corrosive gas. Corrosive gases will not immediately affect the SERVOPACK, but will eventually cause electronic components and contactor-related devices to malfunction. • Other Locations Do not mount the SERVOPACK in locations subject to high temperatures, high humidity, dripping water, cutting oil, dust, iron filings, or radiation. Installation 2.1.2 2 <Note> When storing the SERVOPACK with the power OFF, store it in an environment with the following temperature and humidity: • -20 to +85°C, 90% RH or less. (with no condensation) 2-3 2 Installation 2.1.3 Installation Conditions for Applicable Standards 2.1.3 2-4 Installation Conditions for Applicable Standards Applicable Standards UL508C EN50178, EN55011/A2 group1 classA, EN61000-6-2, EN61800-3, EN61800-5-1, EN954-1, IEC61508-1 to 4 Operating Conditions Overvoltage Category: III Pollution degree: 2 Protection class: IP10 Installation Conditions UL Standard and Low Voltage Directive: Satisfy the conditions outlined in Σ-V Series AC SERVOPACK SGDV Safety Precautions (TOBP C710800 10) EMC Directive: Certification is required after installation in the user’s machine under the conditions outlined in 2.4 EMC Installation Conditions of this manual. 2.2 Servomotor Installation 2.2 Servomotor Installation 2.2.1 Orientation Servomotors can be installed either horizontally or vertically. Servomotors with gears can be installed only horizontally, depending on gear lubrication conditions. Refer to Σ-V Series Product Catalog (KAEP S800000 42) for details. Installation Standards The motor rated specifications (rated output, rated torque, and rated speed) are the continuous allowable values at an ambient temperature of 40°C when servomotors are installed with heat sinks. For more information on heat sinks, refer to Σ-V Series Product Catalog (KAEP S800000 42) . When a motor is mounted on a small surface, the motor temperature may rise considerably because of the limited heat radiating abilities of the surface. To restrict the temperature rise, you should either mount a heat sink or limit the electrical, thermal, and mechanical stress on the motor (derating). Refer to Σ-V Series Product Catalog (KAEP S800000 42) for the relation between heat sink size and derating. The data in the catalog is given only for reference, as the actual temperature rise depends on how the heat sink (motor mounting section) is fixed on the installation surface and what material is used for the motor mounting section. Always check the actual motor temperature. If the servomotor is covered, or if a heating element is installed near the servomotor, the motor temperature may rise considerably. In this case, take following countermeasures. • Reduce the load ratio. • Reconsider the motor heating conditions. • Install a cooling fan to forcedly cool the motor. Installation 2.2.2 2 2-5 2 Installation 2.2.3 Connecting Servomotor to Machine 2.2.3 Connecting Servomotor to Machine The end of the motor shaft is coated with anticorrosive paint. Thoroughly remove the paint prior to installation. Align the shaft of the servomotor with the shaft of the machine, and then couple the shafts. Install the servomotor so that alignment accuracy falls within the following range. Vibration will damage the bearings or encoders if the shafts are not properly aligned. Do not allow direct impact to be applied to the shafts when installing the coupling as the encoder mounted on the opposite end of the shaft may be damaged. Alignment Accuracy Measure this distance at four different positions on the circumference. The difference between the maximum and minimum measurements must be 0.03 mm or less. (Turn together with coupling.) 2-6 2.2 Servomotor Installation Protective Structure The servomotor protective structure* is described below. Model Without Gears With Gears IP65 IP55 SGMPS IP55 IP67 (Optional) IP55 SGMGV IP67 − SGMSV IP67 (SGMSV-70 servomotor only: IP22) − SGMCS-02 to -35 IP42 (expect for gaps on the rotating section of the shaft) − SGMCS-45 to -2Z IP44 − SGMJV, SGMAV ∗ Except through shaft section. The protective structure specifications can be satisfied only when using a specified cable. When the through shaft section is subject to oil exposure, refer to 2.2.5 Other Precautions. For SGMJV and SGMAV servomotors, the protective structure specifications can be satisfied only when using a specified cable. Flange Through shaft section This refers to the gap where the shaft protrudes from the end of the motor. Shaft Installation 2.2.4 2 2-7 2 Installation 2.2.5 Other Precautions 2.2.5 Other Precautions Handling Oil and Water If the servomotor is used in a location that is subject to water or oil mist, use a servomotor with an oil seal to seal the through shaft section. Precautions on using a servomotor with an oil seal are described below. • Put the oil surface under the oil seal lip. • Use an oil seal in favorably lubricated condition. • When using a servomotor with its shaft upward direction, be sure that oil will not stay in the oil seal lips. Cable Stress Make sure there are no bends or tension on the motor main circuit cables and encoder cables. Be especially careful to wire encoder cables so that they are not subject to stress because the core wires are very thin at only 0.2 or 0.3 mm2. Connectors Observe the following precautions: • Make sure there is no foreign matters such as dust and metal chips in the connector before connecting. • When the connectors are connected to the motor, be sure to connect the end of motor main circuit cables before connecting the encoder cable’s end. If the encoder cable’s end is connected, the encoder may break because of the voltage differences between FG. • Make sure of the pin arrangement. • Do not apply shock to resin connectors. Otherwise, they may be damaged. • When handling a servomotor with its cables connected, hold the servomotor or the connectors and cables will be damaged. • Fix the connector to SGMJV, SGMAV, SGMPS-01/-02/-04 or SGMGV-03/-05 servomotors with screws. Make sure that the connector is securely fixed with screws. If not, the protective construction specifications may not be satisfied. • Be sure not to apply stress on the connector. The connector may be damaged by stress. Radial and Thrust loads Design the mechanical system so thrust and radial loads applied to the servomotor shaft end during operation fall within the allowable ranges of each motor. Refer to Σ-V Series Product Catalog (KAEP S800000 42) for the allowable ranges. 2-8 2.3 SERVOPACK Installation 2.3 SERVOPACK Installation 2.3.1 Orientation The SERVOPACK is available in models that are base-mounted, models that are rack-mounted, and models that are duct-ventilated. In any case, mount the SERVOPACK with a vertical orientation. Firmly secure the SERVOPACK to the mounting surface, using either two or four mounting holes depending on the SERVOPACK capacity. • Base-mounted Base Air Flow • Rack-mounted Installation Rack 2 Air Flow 2-9 2 Installation 2.3.2 Installation Standards • Duct-ventilated Duct Air Flow 2.3.2 Installation Standards Observe the standards for mounting SERVOPACKs in control panels, including those for the mounting SERVOPACKs side by side in one control panel as shown in the following illustration. • SERVOPACK Mounting Orientation Mount the SERVOPACK vertically to the wall, with the front panel (the side with the panel operator display) facing out. • Cooling Refer to the following diagram and leave sufficient space for cooling by fans and natural convection. 2-10 2.3 SERVOPACK Installation • Mounting SERVOPACKs Side by Side in a Control Panel Fan 30 mm or more Fan 40 mm or more Width varies with SERVOPACK model 40 mm or more Leave sufficient space on each side and at the top and the bottom of each SERVOPACK. The width on each side varies in accordance with the models of the SERVOPACKS used. Side Left Right R70F, R90F, 2R1F, R70A, R90A, 1R6A, 2R8A 1 mm or more 2R8F, 3R8A, 5R5A, 7R6A 1 mm or more 10 mm or more 120A, 180A, 200A, 330A, 470A, 550A, 590A, 780A, 1R9D, 3R5D, 5R4D, 8R4D, 120D, 170D, 210D, 260D, 280D, 370D Top and bottom 40 mm or more 10 mm or more Also install cooling fans above the SERVOPACKs to disperse local pockets of warmer air around the SERVOPACKs. • Inside the Control Panel The conditions inside the control panel should be the same as the environmental conditions of the SERVOPACK. Refer to 2.1.2 SERVOPACK Installation Environment. Installation SERVOPACK Model SGDV- 2 2-11 2 Installation 2.4 EMC Installation Conditions This section describes the recommended installation conditions that satisfy EMC guidelines for each model of the SGDV SERVOPACK. The conditions required for the standard type (base-mounted) of SERVOPACK are described. Refer to this section for other SERVOPACK models such as the rack-mounted types as well. This section describes the EMC installation conditions satisfied in test conditions prepared by Yaskawa. The actual EMC level may differ depending on the actual system’s configuration, wiring, and other conditions. However, because this product is built-in, check that the following conditions are still met after being installed in the user’s product. The applicable standards are EN55011/A2 group 1 class A, EN61800-3, and EN61000-6-2. SGDV-01A (Analog pulse model) • Single-phase 100 V SGDV-F01A ( = R70, R90, 2R1, 2R8) Shield box 3 Core Two turn Host controller Symbol 2-12 Cable Name Servomotor 4 Encoder CN8 Core Clamp 1 Clamp CN2 CN1 Brake One turn L1C, L2C Two turn PE Clamp L1, L2 Core SERVOPACK U, V, W Core Surge absorber Core 5 Noise filter Core Power supply: Single-phase 100 VAC Clamp One turn Clamp Brake Power Supply Two turn PE 2 Safety unit Specification c I/O signal cable d Safety signal cable Shield cable e Motor main circuit cable Shield cable f Encoder cable Shield cable g Main circuit cable Shield cable Shield cable 2.4 EMC Installation Conditions • Three-phase 200 V SGDV-A01A ( = R70, R90, 1R6, 2R8, 3R8, 5R5, 7R6) Shield box CN1 CN8 Core Core Host controller Cable Name Servomotor Clamp Clamp 4 Encoder Two turn PE 2 Safety unit Specification c I/O signal cable Shield cable d Safety signal cable Shield cable e Motor main circuit cable Shield cable f Encoder cable Shield cable g Main circuit cable Shield cable Installation Two turn Brake One turn CN2 1 Symbol Clamp 3 One turn PE Clamp L1C, L2C Core L1, L2, L3 Core Surge absorber SERVOPACK U, V, W Core 5 Noise filter Core Power supply: Three-phase 200 VAC Clamp Brake Power Supply 2 2-13 2 Installation • Three-phase 200 V SGDV-A01A ( = 120) Shield box CN2 PE CN1 CN8 Core Core Two turn Clamp 1 Host controller 2-14 Clamp Clamp 3 Cable Name Brake Servomotor One turn L1C, L2C Surge absorber Symbol Core L1, L2, L3 Clamp 5 SERVOPACK U, V, W Noise filter Core Power supply: Three-phase 200 VAC Clamp Brake Power Supply 4 Encoder Two turn PE 2 Safety unit Specification c I/O signal cable d Safety signal cable Shield cable e Motor main circuit cable Shield cable f Encoder cable Shield cable g Main circuit cable Shield cable Shield cable 2.4 EMC Installation Conditions • Three-phase 200 V SGDV-A01A ( = 180, 200, 330) Shield box CN2 CN1 CN8 Core Core Clamp Host controller Cable Name 4 Brake Servomotor Encoder Two turn PE 2 Safety unit Specification c I/O signal cable Shield cable d Safety signal cable Shield cable e Motor main circuit cable Shield cable f Encoder cable Shield cable g Main circuit cable Shield cable Installation Two turn 1 Symbol Clamp 3 One turn L1C, L2C Surge absorber PE Clamp L1, L2, L3 Clamp 5 SERVOPACK U, V, W Noise filter Core Power supply: Three-phase 200 VAC Clamp Brake Power Supply 2 2-15 2 Installation • Three-phase 200 V SGDV-A01A ( = 470, 550, 590, 780) 5 Clamp L1, L2, L3 Clamp SERVOPACK U, V, W Noise filter Cooling fan 3 Brake Servomotor L1C, L2C Surge absorber Clamp Power supply: Three-phase 200 VAC Clamp Brake Power Supply 7 Clamp Shield box CN2 Regenerative resistor unit 6 B1, B2 CN1 4 Encoder CN8 PE Clamp 1 Host controller Symbol 2-16 Cable Name Clamp PE 2 Safety unit Specification c I/O signal cable d Safety signal cable Shield cable e Motor main circuit cable Shield cable f Encoder cable Shield cable g Main circuit cable Shield cable h Regenerative resistor unit cable Non-shield cable i Cooling fan cable Shield cable Shield cable 2.4 EMC Installation Conditions • Three-phase 400 V SGDV-D01A ( = 1R9, 3R5, 5R4, 8R4, 120, 170) CN1 CN8 Core Core Clamp Clamp 1 2 Host controller Symbol ∗3. Cable Name Clamp Clamp 4 Encoder One turn Two turn PE Safety unit Specification c I/O signal cable Shield cable d Safety signal cable Shield cable e Motor main circuit cable Shield cable f Encoder cable Shield cable g Control power cable Shield cable h Main circuit cable Shield cable Products that have received CE marking are recommended for the 24 VDC power supply. Install the following noise filter on the power line between the single-phase 200 V power supply and the 24 VDC power supply. Model number: FN2070-6/07 (SCHAFFNER) For more information on this filter, refer to Σ-V Series Product Catalog. (KAEP S800000 42) Installation Two turn Servomotor Core L1, L2, L3 One turn PE 3 Brake One turn CN2 Surge absorber ∗1. ∗2. U, V, W Clamp Noise filter*3 24 V, 0 V Core SERVOPACK Core Control power supply 24 VDC*1 Core Clamp Surge absorber Power supply: 6 Three-phase 400 VAC Brake Power Supply Noise filter*2 Core Clamp Shield box Power supply: 5 Single-phase 200 VAC 2-17 2 2 Installation • Three-phase 400 V SGDV-D01A ( = 210, 260, 280, 370) Brake Power Supply Noise filter*2 Power supply: Three-phase 400 VAC 6 Clamp SERVOPACK Control power supply 24 VDC*1 24 V, 0 V Noise filter*3 U, V, W L1, L2, L3 CN2 Surge absorber Regenerative resistor unit cable PE ∗1. ∗2. ∗3. 2-18 Brake Servomotor Encoder 4 B1, B2 7 CN1 CN8 Clamp Clamp 1 2 Host controller Symbol 3 Clamp Surge absorber Clamp 5 Clamp Power supply: Single-phase 200 VAC Clamp Shield box Cable Name PE Safety unit Specification c I/O signal cable d Safety signal cable Shield cable e Motor main circuit cable Shield cable f Encoder cable Shield cable g Control power cable Shield cable h Main circuit cable Shield cable i Regenerative resistor unit cable Non-shield cable Shield cable Products that have received CE marking are recommended for the 24 VDC power supply. Install the following noise filter on the power line between the single-phase 200 V power supply and the 24 VDC power supply. Model number: FN2070-6/07 (SCHAFFNER) For more information on this filter, refer to Σ-V Series Product Catalog. (KAEP S800000 42) 2.4 EMC Installation Conditions SGDV-11A (M-II model) • Single-phase 100 V SGDV-F11A ( = R70, R90, 2R1, 2R8) Shield box Clamp L1C, L2C Clamp L1, L2 3 CN2 Clamp Two turn Brake Servomotor One turn Core Surge absorber SERVOPACK U, V, W Core 5 Noise filter Core Power supply: Single-phase 100 VAC Clamp One turn Core Brake Power Supply 4 Encoder CN6 CN1 Core Two turn 1 Host controller Symbol Cable Name PE CN8 Core Clamp 2 Two turn Safety unit Specification c I/O signal cable Shield cable d Safety signal cable Shield cable e Motor main circuit cable Shield cable f Encoder cable Shield cable g Main circuit cable Shield cable h MECHATROLINK-II communication cable Shield cable Installation 6 Clamp PE MECHATROLINK-II controller 2 2-19 2 Installation • Three-phase 200 V SGDV-A11A ( = R70, R90, 1R6, 2R8, 3R8, 5R5, 7R6) Shield box Clamp Clamp L1C, L2C Core L1, L2, L3 3 CN2 Clamp One turn Brake Servomotor One turn Core Surge absorber SERVOPACK U, V, W Core 5 Noise filter Core Power supply: Three-phase 200 VAC Clamp Brake Power Supply 4 Encoder MECHATROLINK-II controller 6 Clamp PE CN6 CN1 CN8 Core Core Two turn Two turn 1 Host controller Symbol 2-20 PE Clamp 2 Safety unit Cable Name Specification c I/O signal cable Shield cable d Safety signal cable Shield cable e Motor main circuit cable Shield cable f Encoder cable Shield cable g Main circuit cable Shield cable h MECHATROLINK-II communication cable Shield cable 2.4 EMC Installation Conditions • Three-phase 200 V SGDV-A11A ( = 120) Shield box Clamp L1, L2, L3 Core U, V, W Noise filter 3 Brake Servomotor CN2 Clamp One turn L1C, L2C Surge absorber Core 5 Clamp SERVOPACK Power supply: Three-phase 200 VAC Clamp Brake Power Supply 4 Encoder CN6 CN1 CN8 Core Core Two turn Clamp 1 Host controller Symbol PE Two turn 2 Safety unit Cable Name Specification c I/O signal cable Shield cable d Safety signal cable Shield cable e Motor main circuit cable Shield cable f Encoder cable Shield cable g Main circuit cable Shield cable h MECHATROLINK-II communication cable Shield cable Installation 6 Clamp PE MECHATROLINK-II controller 2 2-21 2 Installation • Three-phase 200 V SGDV-A11A ( = 180, 200, 330) Shield box Clamp L1, L2, L3 3 Brake Servomotor One turn L1C, L2C Surge absorber CN2 Clamp 5 U, V, W Noise filter Core Power supply: Three-phase 200 VAC Clamp SERVOPACK Clamp Brake Power Supply 4 Encoder 6 Clamp PE MECHATROLINK-II controller CN6 CN1 CN8 Core Core Two turn Clamp 1 Host controller Symbol 2-22 Cable Name PE Two turn 2 Safety unit Specification c I/O signal cable Shield cable d Safety signal cable Shield cable e Motor main circuit cable Shield cable f Encoder cable Shield cable g Main circuit cable Shield cable h MECHATROLINK-II communication cable Shield cable 2.4 EMC Installation Conditions • Three-phase 200 V SGDV-A11A ( = 470, 550, 590, 780) CN2 Regenerative resistor unit 8 6 Clamp MECHATROLINK-II controller Servomotor Encoder 4 B1, B2 CN6 CN1 CN8 Clamp Clamp 1 Host controller Symbol Clamp 3 Brake L1C, L2C Surge absorber PE Clamp L1, L2, L3 Cooling fan Cable Name PE 2 Safety unit Specification c I/O signal cable Shield cable d Safety signal cable Shield cable e Motor main circuit cable Shield cable f Encoder cable Shield cable g Main circuit cable Shield cable h Regenerative resistor unit cable Non-shield cable i Cooling fan cable Shield cable j MECHATROLINK-II communication cable Shield cable Installation 5 SERVOPACK U, V, W Noise filter Clamp Power supply: Three-phase 200 VAC Clamp Brake Power Supply 7 Clamp Shield box 2 2-23 2 Installation • Three-phase 400 V SGDV-D11A ( = 1R9, 3R5, 5R4, 8R4, 120, 170) Clamp Clamp Brake Servomotor One turn 4 Core L1, L2, L3 CN2 Surge absorber 3 One turn Clamp Noise filter*3 U, V, W 24 V, 0 V Core SERVOPACK Core Control power supply 24 VDC*1 Core Clamp Surge absorber Power supply: 6 Three-phase 400 VAC Brake Power Supply Noise filter*2 Core Clamp Shield box Power supply: 5 Single-phase 200 VAC Encoder One turn Clamp PE MECHATROLINK-II controller 7 CN6 Two turn CN1 CN8 Core Core Clamp Clamp 1 Host controller Symbol ∗1. ∗2. ∗3. 2-24 PE Two turn 2 Safety unit Cable Name Specification c I/O signal cable Shield cable d Safety signal cable Shield cable e Motor main circuit cable Shield cable f Encoder cable Shield cable g Control power cable Shield cable h Main circuit cable Shield cable i MECHATROLINK-II communication cable Shield cable Products that have received CE marking are recommended for the 24 VDC power supply. Install the following noise filter on the power line between the single-phase 200 V power supply and the 24 VDC power supply. Model number: FN2070-6/07 (SCHAFFNER) For more information on this filter, refer to Σ-V Series Product Catalog. (KAEP S800000 42) 2.4 EMC Installation Conditions • Three-phase 400 V SGDV-D11A ( = 210, 260, 280, 370) Noise filter*3 24 V, 0 V U, V, W 3 L1, L2, L3 CN2 Surge absorber 7 Regenerative resistor cable MECHATROLINK-II controller 8 Clamp PE Servomotor Encoder 4 CN6 Symbol ∗3. Brake B1, B2 CN1 CN8 Clamp Clamp 1 2 Host controller ∗1. ∗2. Clamp SERVOPACK Clamp Control power supply 24 VDC*1 Cable Name PE Safety unit Specification c I/O signal cable Shield cable d Safety signal cable Shield cable e Motor main circuit cable Shield cable f Encoder cable Shield cable g Control power cable Shield cable h Main circuit cable Shield cable i Regenerative resistor unit cable Non-shield cable j MECHATROLINK-II communication cable Shield cable Installation 6 Clamp Surge absorber Power supply: Three-phase 400 VAC Brake Power Supply Noise filter*2 Clamp 5 Clamp Shield box Power supply: Single-phase 200 VAC 2 Products that have received CE marking are recommended for the 24 VDC power supply. Install the following noise filter on the power line between the single-phase 200 V power supply and the 24 VDC power supply. Model number: FN2070-6/07 (SCHAFFNER) For more information on this filter, refer to Σ-V Series Product Catalog. (KAEP S800000 42) 2-25 2 Installation Attachment Methods of Ferrite Cores One turn Two turn Cable Cable Ferrite core Ferrite core Recommended Ferrite Core Cable Name Motor main circuit cable Ferrite Core Model Manufacturer ESD-SR-250 NEC TOKIN Corp. Recommended Noise Filter and Surge Absorber For more information on recommended noise filters and surge absorbers, refer to Σ-V Series Product Catalog. (KAEP S800000 42) Fixing the Cable Fix and ground the cable shield using a piece of conductive metal. • Example of Cable Clamp Cable Shield (cable sheath stripped) Host controller side Ground plate Cable clamp Fix and ground the cable shield using a piece of conductive metal. Remove paint on mounting surface. Shield Box A shield box, which is a closed metallic enclosure, is effective as reinforced shielding against electromagnetic interference (EMI) from SERVOPACKs. The structure of the box should allow the main body, door, and cooling unit to be attached to the ground. The box opening should be as small as possible. <Note> Do not connect the digital operator and the analog monitor cable to the SERVOPACK during operations. Connect them only when the machinery is stopped during maintenance. 2-26 3 Wiring and Connection This chapter describes how to set up the wiring and connections required for trial operation. For more information on the wiring and connection, refer to the following manuals. • Σ-V Series User's Manual Design and Maintenance Rotational Motor/Analog Voltage and Pulse Train Reference (SIEP S800000 45) • Σ-V Series User's Manual Design and Maintenance Rotational Motor/ MECHATROLINK-II Communications Reference (SIEP S800000 46) 3.2 System Configuration Diagram . . . . . . . . . . . . . . . . . . . . . . . . . 3.2.1 Connecting to SGDV-F01A SERVOPACK . . . . . . . 3.2.2 Connecting to SGDV-A01A SERVOPACK . . . . . . . 3.2.3 Connecting to SGDV-D01A SERVOPACK . . . . . . . 3.2.4 Connecting to SGDV-F11A SERVOPACK . . . . . . . 3.2.5 Connecting to SGDV-A11A SERVOPACK . . . . . . . 3.2.6 Connecting to SGDV-D11A SERVOPACK . . . . . . . 3-3 3-3 3-4 3-5 3-6 3-7 3-8 3.3 Main Circuit Wiring . . . . . . . . . . . . . . . . . . . . . . . . . . . . . . . . . . 3-9 3.3.1 Names and Functions of Main Circuit Terminals . . . . . . . 3-9 3.3.2 SERVOPACK Main Circuit Wire Size . . . . . . . . . . . . . . . 3-10 3.3.3 Typical Main Circuit Wiring Examples . . . . . . . . . . . . . . 3-14 3.3.4 Wiring the Main Circuit Terminal Connector (Spring Type) . . . . . . . . . . . . . . . . . . . . . . . . . . . . . . . . . 3-18 3.4 Connecting Regenerative Resistors . . . . . . . . . . . . . . . . . . . . 3-21 3.4.1 Connecting Regenerative Resistor . . . . . . . . . . . . . . . . 3-21 Wiring and Connection 3.1 Precautions for Wiring . . . . . . . . . . . . . . . . . . . . . . . . . . . . . . . . 3-2 3 3-1 3 Wiring and Connection 3.1 Precautions for Wiring CAUTION • Be sure to wire correctly and securely. Failure to observe this caution may result in motor overrun, injury, or malfunction. • Do not bundle or run the main circuit cables together with the I/O signal cables or the encoder cables in the same duct. Keep them separated by at least 30 cm. Failure to do so may result in malfunction. • Use shielded twisted-pair wires or multi-core shielded twisted-pair wires for I/O signal cables and the encoder cables. • I/O signal cables must be no longer than 3 m, encoder cables must be no longer than 50 m, and control power supply (+24 V, 0 V) cables for a 400 V input SERVOPACK must be no longer than 10 m. • Do not touch the power terminals while the CHARGE lamp is ON after turning power OFF because high voltage may still remain in the SERVOPACK. Make sure the charge indicator is off first before starting an inspection. 3-2 3.2 System Configuration Diagram 3.2 System Configuration Diagram 3.2.1 Connecting to SGDV-F01A SERVOPACK Power supply Single-phase 100 VAC R T Molded-case circuit breaker (MCCB) Protects the power supply line by shutting the circuit OFF when overcurrent is detected. Noise filter Digital operator SGDV-F01A SERVOPACK Used to eliminate external noise from the power line. Magnetic contactor Turns the servo ON and OFF. Install a surge absorber. 100 V Personal computer Connection cable for digital operator SGDV-2R1F01A Connection cable for personal computer I/O signal cable Regenerative resistor*2 Host controller When not using the safety function, use the SERVOPACK with the safety function jumper connector (JZSP-CVH05-E, provided as an accessory) inserted. 100 VAC Brake power supply*1 Battery case Magnetic contactor Turns the brake power supply ON and OFF. Install a surge absorber. (when an absolute encoder is used.) When using the safety function, insert a connection cable specifically for the safety function. Safety function devices Motor main circuit cable Encoder cable SGMJV/SGMAV/SGMPS Servomotor Wiring and Connection Used for a servomotor with a brake. 3 ∗1. ∗2. Use a 24 VDC power supply. (not included) Before connecting an external regenerative resistor to the SERVOPACK, refer to 3.4 Connecting Regenerative Resistors. 3-3 3 Wiring and Connection 3.2.2 Connecting to SGDV-A01A SERVOPACK 3.2.2 Connecting to SGDV-A01A SERVOPACK Power supply Three-phase 200 VAC R S T Molded-case circuit breaker (MCCB) Protects the power supply line by shutting the circuit OFF when overcurrent is detected. Noise filter Used to eliminate external noise from the power line. Magnetic contactor SGDV-A01A SERVOPACK Turns the servo ON and OFF. Install a surge absorber. Digital operator Connection cable for digital operator Personal computer Connection cable for personal computer I/O signal cable Host controller When not using the safety function, use the SERVOPACK with the safety function jumper connector (JZSP-CVH05-E, provided as an accessory) inserted. Regenerative resistor *2 200 VAC Brake power supply *1 Used for a servomotor with a brake. Battery case Magnetic contactor When using the safety function, insert a connection cable specifically for the safety function. (when an absolute encoder is used.) Turns the brake power supply ON and OFF. Install a surge absorber. Safety function devices Motor main circuit cable Encoder cable SGMJV/SGMAV/SGMPS/ SGMGV/SGMSV Servomotor ∗1. ∗2. 3-4 Use a 24 VDC power supply. (not included) Before connecting an external regenerative resistor to the SERVOPACK, refer to 3.4 Connecting Regenerative Resistors. 3.2 System Configuration Diagram 3.2.3 Connecting to SGDV-D01A SERVOPACK Power supply Three-phase 400 VAC R ST Molded-case circuit breaker (MCCB) Protects the power supply line by shutting the circuit OFF when overcurrent is detected. Noise filter Magnetic contactor Used to eliminate external noise from the power line. Digital operator SGDV-D01A SERVOPACK Turns the servo ON and OFF. Install a surge absorber. Personal computer Connection cable for digital operator Connection cable for personal computer 100/200 VAC I/O signal cable Host controller DC power *1 supply (24 V㧕 When not using the safety function, use the SERVOPACK with the safety function jumper connector (JZSP-CVH05-E, provided as an accessory) inserted. Regenerative resistor *2 When using the safety function, insert a connection cable specifically for the safety function. Brake power supply*3 Magnetic contactor Battery case (when an absolute encoder is used.) Turns the brake power supply ON and OFF. Install a surge absorber. Motor main circuit cable Safety function devices Encoder cable SGMGV/SGMSV Servomotor ∗1. ∗2. ∗3. Wiring and Connection Used for a servomotor with a 90 V brake. Use a 24 VDC power supply with double insulation or reinforced insulation. (The power supply is not included) Before connecting an external regenerative resistor to the SERVOPACK, refer to 3.4 Connecting Regenerative Resistors. Use a following power supply for 90 V brake. For details, refer to Σ-V series Product Catalog (KAEP S800000 42). • For 200 V input voltage: LPSE-2H01-E • For 100 V input voltage: LPDE-1H01-E 3 3-5 3 Wiring and Connection 3.2.4 Connecting to SGDV-F11A SERVOPACK 3.2.4 Connecting to SGDV-F11A SERVOPACK Power supply Single-phase 100 VAC R T Molded-case circuit breaker (MCCB) Protects the power supply line by shutting the circuit OFF when overcurrent is detected. Noise filter Used to eliminate external noise from the power line. Magnetic contactor SGDV-F11A SERVOPACK Digital operator Turns the servo ON and OFF. Install a surge absorber. Connect to the MECHATROLINK-II Personal computer Connection cable for digital operator Connection cable for personal computer I/O signal cable Regenerative resistor*2 When not using the safety function, use the SERVOPACK with the safety function jumper connector (JZSP-CVH05-E, provided as an accessory) inserted. 100 VAC Brake power supply*1 Used for a servomotor with a brake. Battery case Magnetic contactor Turns the brake power supply ON and OFF. Install a surge absorber. Host controller When using the safety function, insert a connection cable specifically for the safety function. (when an absolute encoder is used.) Safety function devices Motor main circuit cable Encoder cable SGMJV/SGMAV/SGMPS Servomotor ∗1. ∗2. 3-6 Use a 24 VDC power supply. (not included.) Before connecting an external regenerative resistor to the SERVOPACK, refer to 3.4 Connecting Regenerative Resistors. 3.2 System Configuration Diagram 3.2.5 Connecting to SGDV-A11A SERVOPACK Power supply Three-phase 200 VAC R S T Molded-case circuit breaker (MCCB) Protects the power supply line by shutting the circuit OFF when overcurrent is detected. Noise filter Used to eliminate external noise from the power line. Magnetic contactor SGDV-A11A SERVOPACK Digital operator Turns the servo ON and OFF. Install a surge absorber. Connect to the MECHATROLINK-II Connection cable for digital operator Personal computer Connection cable for personal computer I/O signal cable Regenerative resistor *2 When not using the safety function, use the SERVOPACK with the safety function jumper connector (JZSP-CVH05-E, provided as an accessory) inserted. Brake power supply *1 Used for a servomotor with a brake. Battery case (when an absolute encoder is used.) When using the safety function, insert a connection cable specifically for the safety function. Turns the brake power supply ON and OFF. Install a surge absorber. Safety function devices Motor main circuit cable Encoder cable SGMJV/SGMAV/SGMPS/ SGMGV/SGMSV Servomotor ∗1. ∗2. Wiring and Connection 200 VAC Magnetic contactor Host controller Use a 24 VDC power supply. (not included.) Before connecting an external regenerative resistor to the SERVOPACK, refer to 3.4 Connecting Regenerative Resistors. 3 3-7 3 Wiring and Connection 3.2.6 Connecting to SGDV-D11A SERVOPACK 3.2.6 Connecting to SGDV-D11A SERVOPACK Power supply Three-phase 400 VAC R ST Molded-case circuit breaker (MCCB) Protects the power supply line by shutting the circuit OFF when overcurrent is detected. Noise filter Used to eliminate external noise from the power line. Magnetic contactor SGDV-D11A SERVOPACK Digital operator Turns the servo ON and OFF. Install a surge absorber. Connect to the MECHATROLINK-II Personal computer Connection cable for digital operator Connection cable for personal computer 100/200 VAC I/O signal cable DC power *1 supply (24 V㧕 Host controller When not using the safety function, use the SERVOPACK with the safety function jumper connector (JZSP-CVH05-E, provided as an accessory) inserted. Regenerative resistor *2 Brake power supply*3 When using the safety function, insert a connection cable specifically for the safety function. Used for a servomotor with a 90 V brake. Battery case Magnetic contactor (when an absolute encoder is used.) Turns the brake power supply ON and OFF. Install a surge absorber. Motor main circuit cable Safety function devices Encoder cable SGMGV/SGMSV Servomotor ∗1. ∗2. ∗3. 3-8 Use a 24 VDC power supply with double insulation or reinforced insulation. (The power supply is not included) Before connecting an external regenerative resistor to the SERVOPACK, refer to 3.4 Connecting Regenerative Resistors. Use a following power supply for 90 V brake. For details, refer to Σ-V series Product Catalog (KAEP S800000 42). • For 200 V input voltage: LPSE-2H01-E • For 100 V input voltage: LPDE-1H01-E 3.3 Main Circuit Wiring 3.3 Main Circuit Wiring The names, specifications, and functions of the main circuit terminals required for trial operation are given below. Names and Functions of Main Circuit Terminals Analog Pulse Models Name Terminal Symbols L1, L2 Main circuit input terminals Control power input terminals Model SGDV- Description F Single-phase 100 to 115 V, +10% to -15% (50/60 Hz) A Three-phase 200 to 230 V, +10% to -15% (50/60 Hz) D Three-phase 380 to 480 V, +10% to -15% (50/60 Hz) F Single-phase 100 to 115 V, +10% to -15% (50/60 Hz) A Single-phase 200 to 230 V, +10% to -15% (50/60 Hz) D 24 VDC, ±15% L1, L2, L3 L1C, L2C 24V, 0V M-II Models Wiring and Connection 3.3.1 3 3-9 3 Wiring and Connection 3.3.2 SERVOPACK Main Circuit Wire Size (cont’d) Name Terminal Symbols Model SGDV- Description If the regenerative capacity is insufR70F, R90F, 2R1F, 2R8F, ficient, connect an external regenerR70A, R90A, 1R6A, ative resistor (option) between B1/ 2R8A and B2. External regenerative resistor terminals B1/ , B2, or B1, B2 DC reactor connection terminals for power supply harmonic suppression Main circuit plus terminals Main circuit minus terminals Servomotor connection terminals Ground terminals (× 2) 3.3.2 1, B1/ 2 or B1 2 or U, V, W 3R8A, 5R5A, 7R6A, 120A, 180A, 200A, 330A, 1R9D, 3R5D, 5R4D, 8R4D, 120D, 170D If the internal regenerative resistor is insufficient, remove the wire between B2 and B3 and connect an external regenerative resistor (option) between B1/ and B2, or B1 and B2. 470A, 550A, 590A, 780A, 210D, 260D, 280D, 370D Connect a regenerative resistor unit (option) between B1/ and B2, or B1 and B2. A D Normally short 1 and 2. If a countermeasure against power supply harmonic waves is needed, connect a DC reactor between 1 and 2. A D A D Use when DC power supply input is used. Use for connecting to the servomotor. Use for connecting the power supply ground terminal and servomotor ground terminal. SERVOPACK Main Circuit Wire Size This section describes the SERVOPACK Main Circuit Wire Size. 1. Wire sizes are selected for three cables per bundle at 40°C surrounding air temperature with the rated current. 2. Use a wire with a minimum withstand voltage of 600 V for the main circuit. 3. If cables are bundled in PVC or metal ducts, take into account the reduction of the allowable current. 4. Use a heat-resistant wire under high surrounding air or panel temperatures, where polyvinyl chloride insulated wires will rapidly deteriorate. 3-10 3.3 Main Circuit Wiring Wire Types Use the following type of wire for main circuit. Cable Type Symbol Allowable Conductor Temperature °C Name IV 600 V polyvinyl chloride insulated wire 60 HIV 600 V grade heat-resistant polyvinyl chloride insulated wire 75 The following table shows the wire sizes and allowable currents for three wires. Use wires with specifications equal to or less than those shown in the table. • 600 V grade heat-resistant polyvinyl chloride insulated wire (HIV) Nominal Cross Section Diameter (mm2) Configuration (Number of Wires/mm2) 20 0.5 19/0.18 39.5 6.6 5.6 4.5 19 0.75 30/0.18 26.0 8.8 7.0 5.5 18 0.9 37/0.18 24.4 9.0 7.7 6.0 16 1.25 50/0.18 15.6 12.0 11.0 8.5 14 2.0 7/0.6 9.53 23 20 16 12 3.5 7/0.8 5.41 33 29 24 10 5.5 7/1.0 3.47 43 38 31 8 8.0 7/1.2 2.41 55 49 40 6 14.0 7/1.6 1.35 79 70 57 4 22.0 7/2.0 0.85 91 81 66 Conductive Resistance (Ω/km) Note: The values in the table are for reference only. Allowable Current at Surrounding Air Temperature (A) 30°C 40°C 50°C Wiring and Connection AWG Size 3 3-11 3 Wiring and Connection 3.3.2 SERVOPACK Main Circuit Wire Size Single-phase, 100 V External Terminal Name Main circuit power input terminals SERVOPACK Model SGDV- Terminal Symbols R70 L1, L2 Control power input terminals Servomotor connection terminals External regenerative resistor connection terminals R90 2R1 HIV1.25 HIV2.0 L1C, L2C HIV1.25 U, V, W HIV1.25 B1/ 2R8 HIV1.25 , B2 Ground terminal HIV2.0 or higher Three-phase, 200 V External Terminal Name SERVOPACK Model SGDVTerminal Symbols R70 R90 1R6 2R8 3R8 5R5 7R6 120 180 200 330 470 550 590 780 Main circuit power input terminals L1, L2, L3 Control power input terminals L1C, L2C Servomotor connection U, V, W terminals External regenerative B1/ , resistor B2 connection terminals Ground terminal 3-12 HIV1.25 HIV2.0 HIV3.5 HIV HIV HIV HIV22.0 5.5 8.0 14.0 HIV1.25 HIV1.25 HIV2.0 HIV1.25 HIV HIV HIV HIV14.0 3.5 5.5 8.0 HIV22.0 HIV HIV HIV 2.0 3.5 5.5 HIV22.0 HIV2.0 or higher HIV8.0 3.3 Main Circuit Wiring Three-phase, 400 V Main circuit power input terminals Terminal Symbols L1, L2, L3 Control power input terminals 24V, 0V Servomotor connection terminals U, V, W External regenerative resistor connection terminals B1/ , B2 (B1, B2) Ground terminal SERVOPACK Model SGDV1R9 3R5 5R4 8R4 120 170 210 260 280 370 HIV1.25 HIV2.0 HIV3.5 HIV HIV HIV 5.5 8.0 14.0 HIV1.25 HIV1.25 HIV1.25 HIV2.0 HIV 3.5 HIV5.5 HIV HIV 8.0 14.0 HIV 2.0 HIV3.5 HIV HIV 5.5 8.0 HIV2.0 or higher Wiring and Connection External Terminal Name 3 3-13 3 Wiring and Connection 3.3.3 Typical Main Circuit Wiring Examples 3.3.3 Typical Main Circuit Wiring Examples Use a molded-case circuit breaker (1QF) or fuse to protect the main circuit. • The SERVOPACK connects directly to a commercial power supply; it is not isolated through a transformer or other device. Always use a molded-case circuit breaker (1QF) or fuse to protect the servo system from accidents involving different power system voltages or other accidents. Install a ground fault detector. • The SERVOPACK does not have a built-in protective circuit for grounding. To configure a safer system, install a ground fault detector against overloads and short-circuiting, or install a ground fault detector combined with a molded-case circuit breaker. Do not turn power ON and OFF frequently. • The power supply in the SERVOPACK contains a capacitor, which causes a high charging current to flow when power is turned ON. Frequently turning power ON and OFF will causes the main circuit elements in the SERVOPACK to deteriorate. The following wiring examples show the Σ-V Series SGDV SERVOPACK (Analog pulse model). Single-phase 100 V, SGDV-F (SGDV-R70F, R90F, 2R1F, 2R8F) R T SERVOPACK SGDV-F 1QF 3SA 1FIL 2KM L1 L2 1KM U V W M ENC L1C L2C 1Ry (For servo alarm display) B1/ ALM+ B2 1PL Servo power Servo power supply ON supply OFF 1KM 1KM 1KM 1Ry 1Ry 32 1D +24V 1SA 2KM 2SA 1QF: Molded-case circuit breaker 1FIL: Noise filter 1KM: Magnetic contactor (for control power supply) 2KM: Magnetic contactor (for main power supply) 1Ry: Relay 3-14 ALM− CN1 31 1PL: Indicator lamp 1SA: Surge absorber 2SA: Surge absorber 3SA: Surge absorber 1D: Flywheel diode 0V 3.3 Main Circuit Wiring Three-phase 200 V, SGDV-A • SGDV-R70A, R90A, 1R6A, 2R8A, 3R8A, 5R5A, 7R6A, 120A, 180A, 200A, 330A SERVOPACK SGDV-A R S T 1QF 3SA 1FIL 2KM L1 L2 L3 1KM 1Ry 1KM 1KM M L1C L2C (For servo alarm display) Servo power Servo power supply ON supply OFF U V W 1PL 1KM ∗ ENC CN1 B1/ B2 ALM+ 31 B3 1 ALM− 32 2 1Ry +24 V 1D 0V 1SA 2KM 1Ry 2SA 1QF: Molded-case circuit breaker 1FIL: Noise filter 1KM: Magnetic contactor (for control power supply) 2KM: Magnetic contactor (for main power supply) 1Ry: Relay 1PL: Indicator lamp 1SA: Surge absorber 2SA: Surge absorber 3SA: Surge absorber 1D: Flywheel diode ∗ For SGDV-R70A, -R90A, -1R6A, -2R8A, terminals B2 and B3 are not short-circuited. • SGDV-470A, 550A, 590A, 780A R S T SERVOPACK SGDV-A 1QF 1FIL 2KM L1 L2 L3 1KM 1Ry M L1C L2C (For servo alarm display) Servo power Servo power supply ON supply OFF U V W ENC CN1 B1/ B2 ALM+ 31 1Ry +24 V 1PL 1KM ALM− 32 1D 0V Wiring and Connection 3SA 3 1KM 1KM 1Ry 1SA 2KM Regenerative resistor unit 2SA 1QF: Molded-case circuit breaker 1FIL: Noise filter 1KM: Magnetic contactor (for control power supply) 2KM: Magnetic contactor (for main power supply) 1Ry: Relay 1PL: Indicator lamp 1SA: Surge absorber 2SA: Surge absorber 3SA: Surge absorber 1D: Flywheel diode 3-15 3 Wiring and Connection 3.3.3 Typical Main Circuit Wiring Examples Three-phase 400 V, SGDV-D • SGDV-1R9D, 3R5D, 5R4D, 8R4D, 120D, 170D R S T SERVOPACK SGDV-D 1QF 3SA 1FIL U V W 2KM DC power + supply − 24V 1Ry (For servo alarm display) Servo power Servo power supply ON supply OFF 1KM 1KM 1KM 1PL 1KM L1 L2 L3 M 24V 0V ENC B1/ CN1 B2 ALM+ 31 B3 1 ALM− 32 2 1Ry 1D +24 V 0V 1SA 2KM 1Ry 2SA 1QF: Molded-case circuit breaker 1FIL: Noise filter 1KM: Magnetic contactor (for control power supply) 2KM: Magnetic contactor (for main power supply) 1Ry: Relay 1PL: Indicator lamp 1SA: Surge absorber 2SA: Surge absorber 3SA: Surge absorber 1D: Flywheel diode • SGDV-210D, 260D, 280D, 370D R S T SERVOPACK SGDV-D 1QF 3SA 1FIL U V W 2KM 1KM DC power + supply − (24 V) 1Ry (For servo alarm display) Servo power Servo power supply ON supply OFF 1KM 1KM 1Ry 1PL 1KM 1SA 2KM L1 L2 L3 24V 0V ENC B1/ CN1 B2 ALM+ 31 1 2 ALM− 32 1Ry 1D +24 V 0V Regenerative resistor unit 2SA 1QF: Molded-case circuit breaker 1FIL: Noise filter 1KM: Magnetic contactor (for control power supply) 2KM: Magnetic contactor (for main power supply) 1Ry: Relay 3-16 M 1PL: Indicator lamp 1SA: Surge absorber 2SA: Surge absorber 3SA: Surge absorber 1D: Flywheel diode 3.3 Main Circuit Wiring Precautions When Using More Than One SERVOPACK This section shows an example of the wiring when more than one SERVOPACK is used and the precautions. • Wiring Example (Analog pulse model) Connect the alarm output (ALM) terminals for the three SERVOPACKs in series to enable alarm detection relay 1RY to operate. When the alarm occurs, the ALM output signal transistor is turned OFF. Power supply R S T 1QF 3SA 1FIL 1KM 2KM L1 L2 L3 1Ry Relay terminal (For servo alarm display) M L1C L2C Servo power Servo power supply ON supply OFF 1KM 1KM 1PL 1KM L1 L2 L3 2KM 2SA ALM+ ALM - 1SA 1Ry Relay terminal Relay terminal CN1 1Ry 31 32 +24V ID SERVOPACK Servomotor M L1C L2C 1QF: Molded-case circuit breaker 1FIL: Noise filter 1KM: Magnetic contactor (for control power supply) 2KM: Magnetic contactor (for main power supply) 1Ry: Relay 1PL: Indicator lamp 1SA: Surge absorber 2SA: Surge absorber 3SA: Surge absorber 1D: Flywheel diode Servomotor SERVOPACK ALM+ CN1 31 ALM- 32 L1 SERVOPACK L2 L3 Servomotor M L1C L2C ALM+ CN1 31 ALM - 32 Wiring and Connection Relay terminal 3 0V 3-17 3 Wiring and Connection 3.3.4 Wiring the Main Circuit Terminal Connector (Spring Type) • Precautions When using more than one SERVOPACK with a DC power supply, refer to these manuals here for the appropriate wiring, connections, and required settings. • Σ-V Series User's Manual Design and Maintenance Rotational Motor/Analog Voltage and Pulse Train Reference (SIEP S800000 45) • Σ-V Series User's Manual Design and Maintenance Rotational Motor/ MECHATROLINK-II Communications Reference (SIEP S800000 46) 3.3.4 Wiring the Main Circuit Terminal Connector (Spring Type) Two types of main circuit terminals are available: a connector type and a terminal screw type. • SERVOPACKs with terminal screws: SGDV-180A, 200A, 330A, 470A, 550A, 590A, 780A, 8R4D, 120D, 170D, 210D, 260D, 280D, 370D • SERVOPACKs with connectors: SGDV-R70F, R90F, 2R1F, 2R8F, R70A, R90A, 1R6A, 2R8A, 3R8A, 5R5A, 7R6A, 120A, 1R9D, 3R5D, 5R4D A spring connector is used for SERVOPACKs with connectors. The following section describes how to wire the main circuit terminal using a connector. CAUTION • Observe the following precautions when wiring main circuit terminal connectors. • Do not turn ON the power to the SERVOPACK until all wiring has been completed, including the main circuit terminal connectors. • Remove detachable main circuit terminal connectors from the SERVOPACK prior to wiring. • Insert only one main circuit cable per opening in the main circuit terminal connector. • Make sure that no part of the core wire comes into contact with (i.e., short-circuit) adjacent wires. 3-18 3.3 Main Circuit Wiring Wiring Procedure 1. Remove the main circuit terminal connector from the SERVOPACK. Enlarged View 1㧚Press the lock. Lock 2. 2. Remove the main circuit terminal connector while pressing the lock. Main circuit terminal connector Strip the end of the wires. Applicable wire sizes: Refer to 3.3.2 SERVOPACK Main Circuit Wire Size. 8 to 9 mm Open the wire terminal on the terminal connector housing with a tool, using the following methods. Either method can be used to open the wire terminal. Using a spring opener Use the spring opener provided with the SERVOPACK to open the wire terminal as shown in the diagram. Note: The spring opener (1981045-1) made by Tyco Electronics AMP K.K. can also be used. Wiring and Connection 3. Spring opener 3 Wire 3-19 3 Wiring and Connection 3.3.4 Wiring the Main Circuit Terminal Connector (Spring Type) Using a screwdriver Use a commercially available flat-blade screwdriver with a blade width of 3.0 to 3.5 mm. Insert the screwdriver into the slot and press down firmly to open the wire terminal. 4. 5. 6. 3-20 Insert the wire core into the opening, and then secure the wire into position by removing the opener or screwdriver to close the opening. Make all the required connections in the same way. Attach the connector to the SERVOPACK. 3.4 Connecting Regenerative Resistors 3.4 Connecting Regenerative Resistors This section describes how to connect regenerative resistors and set the regenerative resistor capacity. To learn how to select a regenerative resistor, and for detailed specifications, refer to Σ-V Series Product Catalog (KAEP S800000 42). For more information on how to set the capacity of regenerative resistors, refer to Σ-V Series User’s Manual Design and Maintenance (SIEP S800000 45/46). WARNING • Be sure to connect the regenerative resistor correctly. Failure to observe this warning may result in fire or damage to the product. Connecting Regenerative Resistor SERVOPACKs: Model SGDV-R70F, R90F, 2R1F, 2R8F, R70A, R90A, 1R6A, 2R8A Connect an external regenerative resistor between B1/ connecting a resistor, select the capacity. and B2 terminals. After Enlarged View Wiring and Connection 3.4.1 3 3-21 3 Wiring and Connection 3.4.1 Connecting Regenerative Resistor SERVOPACKs: Model SGDV-3R8A, 5R5A, 7R6A, 120A, 180A, 200A, 330A, 1R9D, 3R5D, 5R4D, 8R4D, 120D, 170D Disconnect the wiring between the SERVOPACK’s B2 and B3 terminals and connect an external regenerative resistor between the B1/ and B2 terminals or between the B1 and B2 terminals. Note: Be sure to take out the lead wire between the B2 and B3 terminals. Enlarged View 3-22 3.4 Connecting Regenerative Resistors SERVOPACKs: Model SGDV-470A, 550A, 590A, 780A, 210D, 260D, 280D, 370D No built-in regenerative resistor is provided, so the external regenerative resistor is required. The regenerative resistor units are as follow: Main Circuit Power Supply Threephase 200 V Threephase 400 V Applicable SERVOPACK Model SGDV Applicable Regenerative Resistor Unit Resistance (Ω) Specifications 470A JUSP-RA04-E 6.25 25 Ω (220 W); 4 resistors in parallel 550A, 590A, 780A JUSP-RA05-E 3.13 25 Ω (220 W); 8 resistors in parallel 210D, 260D JUSP-RA18-E 18 18 Ω (220 W); 2 resistors in series with 2 in parallel. 280D, 370D JUSP-RA19-E 14.25 Connect a regenerative resistor unit between B1/ 28.5 Ω (220 W); 2 resistors in series with 4 in parallel. and B2 terminals. When using a regenerative resistor unit, set Pn600 to 0W (factory setting). SERVOPACK Wiring and Connection Regenerative Resistor Unit JUSP-RA-E 3 3-23 4 Safety Function This chapter describes the safety functions. 4.1 Outline . . . . . . . . . . . . . . . . . . . . . . . . . . . . . . . . . . . . . . . . . . . . 4-2 4.2 Hard Wire Base Block (HWBB) Function . . . . . . . . . . . . . . . . . 4-3 4.3 Safety Function Signal (CN8) Names and Functions . . . . . . . . 4-4 4.4 Precautions When Not Using the Safety Function . . . . . . . . . . 4-4 Safety Function 4.5 When Using the Safety Function . . . . . . . . . . . . . . . . . . . . . . . 4-5 4 4-1 4 Safety Function 4.1 Outline The safety function is incorporated in the SERVOPACK to reduce the risk associated with the machine by protecting workers from injury and by securing safe machine operation. Especially when working in hazardous areas inside the safeguard, as for machine maintenance, it can be used to avoid adverse machine movement. The person who designs a system using the safety function (Hard Wire Baseblock function) must have full knowledge of the related safety standards and full understanding of the following manuals. Σ-V Series User's Manual Design and Maintenance Rotational Motor/Analog Voltage and Pulse Train Reference (SIEP S800000 45) • Σ-V Series User's Manual Design and Maintenance Rotational Motor/ MECHATROLINK-II Communications Reference (SIEP S800000 46) • 4-2 4.2 Hard Wire Base Block (HWBB) Function Hard Wire Base Block (HWBB) Function The Hard Wire Base Block function (hereinafter referred to as HWBB function) is a safety function designed to baseblock the motor (shut off the motor current) by using the hardwired circuits: Each circuit for two channel input signals blocks the run signal to turn off the power module, and the motor current is shut off. (Refer to the diagram below.) Power supply SERVOPACK 24-V power supply CN8 Switch /HWBB1+ 4 Control circuit Run signal Fuse Block /HWBB1- 3 /HWBB2+ 6 Block 0V /HWBB2- 5 Power module Motor Note: For safety function signal connections, the input signal is the 0V common and the output signal is the source output. This is opposite to other signals described in this manual. To avoid confusion, the ON and OFF status of signals for safety functions are defined as follows: ON: The state in which the relay contacts are closed or the transistor is ON and current flows into the signal line. OFF: The state in which the relay contacts are open or the transistor is OFF and no current flows into the signal line. WARNING • Perform risk assessment for the system and confirm that the safety requirements with the following standards are fulfilled before using the HWBB function. EN954-1 Category3 IEC61508-1 to 4 SIL2 Safety Function 4.2 4 4-3 4 Safety Function 4.3 Safety Function Signal (CN8) Names and Functions The following table shows the terminal layout of safety function signals (CN8). Signal Name Pin No. Function 1* − − − 2* − − − 3 /HWBB1- 4 /HWBB1+ 5 /HWBB2- 6 /HWBB2+ 7 EDM1- 8 EDM1+ Hard wire baseblock input 1 Hard wire baseblock input 2 Monitored circuit status output 1 Hard wire baseblock input Baseblock (motor current off) when OFF ON when the /HWBB1 and the /HWBB2 signals are input and the SERVOPACK enters a baseblock state. ∗ Do not use unused terminals. (connected to the internal circuits) 4.4 Precautions When Not Using the Safety Function When not using the safety function or when performing a JOG operation, use the SERVOPACK with the safety function jumper connector (JZSP-CVH05-E, provided as an accessory) inserted. If the SERVOPACK is used without the jumper connector inserted into CN8, no current will flow to the motor and no torque will be output. When Hbb is displayed on the panel operator and digital operator, the motor is baseblocked by the safety function. Check to see if the JZSP-CVH05-E jumper connector is correctly inserted into CN8. 4-4 4.5 When Using the Safety Function When Using the Safety Function When using the safety function, remove the jumper connector for the safety function and connect a safety device using the following procedure. 1. Remove the servomotor connection terminal connector while pressing the lock. Enlarged View 1. Press the lock. Lock 2. Servomotor connection terminal connector 2. Remove the servomotor connection terminal connector while pressing the lock. Slide the lock injector of the safety function jumper connector to the SERVOPACK side to unlock and remove the safety function jumper connector. Enlarged View Lock injector Safety function jumper connector 1. Slide the lock injector to the SERVOPACK side. 2. Remove the safety function jumper connector while the lock injector is slid to the SERVOPACK side. Safety Function 4.5 4 Note: The safety function jumper connector may be damaged if it is removed without being unlocking. 3. Connect a safety device to CN8. 4-5 5 Trial Operation (Checking Servomotor Operation) This chapter describes how to perform trial operation. 5.1 Outline . . . . . . . . . . . . . . . . . . . . . . . . . . . . . . . . . . . . . . . . . . . . 5-2 5.2 Inspection and Checking before Trial Operation . . . . . . . . . . . . 5-2 5.3 JOG Operation Using a Panel Operator . . . . . . . . . . . . . . . . . . 5-5 5.4 JOG Operation Using a Digital Operator . . . . . . . . . . . . . . . . . . 5-7 Trial Operation (Checking Servomotor Operation) 5.5 JOG Operation Using SigmaWin+ . . . . . . . . . . . . . . . . . . . . . 5-10 5 5-1 5 Trial Operation (Checking Servomotor Operation) 5.1 Outline The trial operation described here is a JOG operation for servomotors not connected to machinery (without a load). The purpose of this trial operation is to check whether the SERVOPACK and servomotor are properly connected and whether the servomotor is operating normally. To conduct trial operation executed from the host controller for the servomotor without load, or for the servomotor connected to the machine, refer to the following manuals. • Σ-V Series User's Manual Design and Maintenance Rotational Motor/Analog Voltage and Pulse Train Reference (SIEP S800000 45). • Σ-V Series User's Manual Design and Maintenance Rotational Motor/MECHATROLINK-II Communications Reference (SIEP S800000 46). CAUTION • Conduct trial operation on the servomotor alone with the motor shaft disconnected from the machine to avoid any unexpected accidents. If it is unavoidable to perform trial operation while connected to a machine, then always make sure that an emergency stop can be immediately executed. 5.2 Inspection and Checking before Trial Operation To ensure safe and correct trial operation, inspect and check the following items before starting trial operation. Servomotors Inspect and check the following items, and take appropriate measures before performing trial operation if any problem exists. • • • • 5-2 Are all wiring and connections correct? Are all nuts and bolts securely tightened? If the servomotor has an oil seal, is the seal undamaged and is the motor oiled? If the servomotor has a brake, is the brake released beforehand? To release the brake, apply the specified voltage (24 VDC or 90 VDC). The following diagram shows an example of the circuit wiring needed to release the holding brake before a trial operation. 5.2 Inspection and Checking before Trial Operation An example of the circuit wiring Servomotor with brake SERVOPACK Power supply L1 L2 L3 L1C U V W M L2C CN2 ENC BK 24 VDC power supply or Brake power supply AC DC 24 VDC or 90 VDC A 24 VDC power supply is not included. Brake power supply Input voltage of 200 V: LPSE-2H01-E Input voltage of 100 V: LPDE-1H01-E SERVOPACKs • Are all installation, wiring and connections correct? • Is the correct power supply voltage being supplied to the SERVOPACK? Installing the Servomotor and SERVOPACK Install the servomotor and SERVOPACK according to the installation conditions. Secure the mounting plate of the servomotor to the equipment. Do not connect any load to the shaft. <Note> • Be sure to secure the servomotor to the equipment, or the servomotor may turn over when it starts rotating. • Do not connect anything to the servomotor shaft. Trial Operation (Checking Servomotor Operation) Inspect and check the following items, and take appropriate measures before performing trial operation if any problem exists. 5 5-3 5 Trial Operation (Checking Servomotor Operation) Checking the Main Circuit Power Supply, Servomotor, and Encoder Wiring Once again, check the main circuit power supply, servomotor, and encoder wiring that was described in Chapter 3 Wiring and Connection. Perform a trial operation with the safety function jumper connector (JZSP-CVH05-E, provided as an accessory) inserted into the CN8 connector. Power supply Safety function jumper connector (JZSP-CVH05-E) Do not connect to CN1. Encoder cable 5-4 5.3 JOG Operation Using a Panel Operator 5.3 JOG Operation Using a Panel Operator This section describes the procedure for executing a JOG operation using a panel operator. The panel operator is located under the front cover of the SERVOPACK (analog pulse models only). View with front cover open Panel operator 1 Display after operation Keys Operation Turn ON the power to the SERVOPACK. The forward run prohibited (P-OT) or reverse run prohibited (N-OT) message is displayed. When the JOG operation is executed, POT and N-OT are automatically disabled. Alternate display Press the MODE/SET Key to select the utility function mode. 2 MODE/SET DATA/ MODE/SET DATA/ Press the Up ( ) or Down ( Key to select Fn002. 3 ) Cursor Press the DATA/SHIFT Key for approximately one second. 4 MODE/SET DATA/ Trial Operation (Checking Servomotor Operation) Step Press the MODE/SET Key. The servomotor power will turn ON. 5 MODE/SET 5 DATA/ 5-5 5 Trial Operation (Checking Servomotor Operation) Step Display after operation Keys Operation Press the Up Cursor Key to rotate the servomotor in the forward direction and press the Down Cursor Key to rotate it in reverse. The servomotor will operate while the key is being pressed. (The factory setting is 500 min-1.) Forward rotation 6 MODE/SET DATA/ Reverse rotation Confirm that the servomotor operation is correct. At the same time, carefully inspect the servomotor’s condition and check the following points in particular. If a problem is found, correct it. • Is there any unusual vibration? • Is there any unusual sound? • Is the temperature rising unusually high? 7 MODE/SET 8 / / MODE/SET / 9 5-6 DATA/ DATA/ Press the MODE/SET Key. The servomotor power will be OFF. Note: The servomotor can be turned OFF by pressing the DATA/SHIFT Key for approximately one second. Press the DATA/SHIFT Key for approximately one second. "Fn002" is displayed again. / Alternate display Press the MODE/SET Key to return to the initial display (step 1). MODE/SET DATA/ 5.4 JOG Operation Using a Digital Operator 5.4 JOG Operation Using a Digital Operator This section describes the procedure for executing a JOG operation using a digital operator. Connect the digital operator to the SERVOPACK CN3 connector. Σ-V series JUSP-OP05A-1-E Digital Operator Σ-III series JUSP-OP05A Digital Operator SGDV SERVOPACK Digital operator conversion conneotor Model: JZSP-CVS05-A3-E The digital operator can be connected or removed while the SERVOPACK power is ON. Step 1 2 Display after operation 㧮㧮ޓޓޓޓޓޓ㧙㧼㧾㧹㧛㧹㧻㧺㧙 㨁㨚㧜㧜㧜㧩㧜㧜㧜㧜㧜 㨁㨚㧜㧜㧞㧩㧜㧜㧜㧜㧜 㨁㨚㧜㧜㧤㧩㧜㧜㧜㧜㧜㧜㧜㧜㧜㧜 㨁㨚㧜㧜㧰㧩㧜㧜㧜㧜㧜㧜㧜㧜㧜㧜 B F F F F B n n n n 0 0 0 0 0 0 0 0 0 2 3 4 : : : : −FUNCTION− Alm History JOG Z−Search Program JOG Keys Operation Turn ON the power to the SERVOPACK. A message saying that the file list is being loaded will appear and then the parameter/monitor mode will appear. Press the Key to view the main menu of the Utility Function mode. Press the select Fn002. Key or Trial Operation (Checking Servomotor Operation) Insert securely into SERVOPACK CN3 connector. Key to 5 5-7 5 Trial Operation (Checking Servomotor Operation) Step Display after operation −JOG− 04=00500 00=000000 02=000000 0D=00000000000 3 B P U U U B n3 n0 n0 n0 4 R P U U U UN −JOG− n304=00500 n000=000000 n002=000000 n00D=00000000000 Keys Operation Press the Key. The display changes to the execution display of Fn002. Press the Key. "RUN" is displayed as the status, and the servomotor power turns ON. Press the Key to rotate the servomotor in the forward direction and press the Key to rotate it in reverse. The servomotor will operate while the key is being pressed. (The factory setting is 500 min-1.) 5 R P U U U UN n304= n000= n002= n00D= −JOG− 0 0 0 0 0 0 0 0 5 0 0 0 0 0 0 0 0 00 00 0000000 Forward rotation Reverse rotation Confirm that the servomotor operation is correct. At the same time, carefully inspect the servomotor’s condition and check the following points in particular. If a problem is found, correct it. • Is there any unusual vibration? • Are there any unusual sound? • Is the temperature rising unusually high? 5-8 −JOG− 0 00 00 0000000 6 B P U U U B n3 n0 n0 n0 04= 00= 02= 0D= 0 0 0 0 7 B F F F F B n n n n 0 0 0 0 −FUNCTION− Alm History JOG Z−Search Program JOG 0 0 0 0 0 2 3 4 : : : : 0 0 0 0 5 0 0 0 0 0 0 0 After confirming that the servomotor is running correctly, press the Key. "BB" is displayed as the status, and the servomotor power turns OFF. Press the Key to return to the main menu of the Utility Function mode. 5.4 JOG Operation Using a Digital Operator Step Display after operation 8 㧮㧮ޓޓޓޓޓޓ㧙㧼㧾㧹㧛㧹㧻㧺㧙 㨁㨚㧜㧜㧜㧩㧜㧜㧜㧜㧜 㨁㨚㧜㧜㧞㧩㧜㧜㧜㧜㧜 㨁㨚㧜㧜㧤㧩㧜㧜㧜㧜㧜㧜㧜㧜㧜㧜 㨁㨚㧜㧜㧰㧩㧜㧜㧜㧜㧜㧜㧜㧜㧜㧜 Keys Operation Press the Key twice to return to the initial display (step 1). Alarm Display An alarm is automatically displayed if a problem occurs for some reason. Refer to Chapter 6 Troubleshooting section and apply the appropriate measures. 㧭ޓ㧣㧝㧜ޓޓޓޓޓ㧙㧭㧸㧭㧾㧹㧙 㧭㧚㧣㧝㧜ޓ㧜㧜㧜㧜㧝㧞㧜㧣㧝㧥㧢 㧝㧦㧣㧞㧜ޓ㧜㧜㧜㧜㧜㧜㧟㧞㧢㧡㧝 㧞㧦㧡㧝㧝ޓ㧜㧜㧜㧜㧜㧜㧜㧥㧜㧠㧟 㧟㧦㧙㧙㧙 Error Display CPF00 C O M−E R R ( O P & S V ) CPF01 C O M−E R R ( O P & S V ) Trial Operation (Checking Servomotor Operation) The following messages will be displayed if a communications error occurs between the SERVOPACK and the digital operator due to a connection problem such as poor connector contact. Check the connections and turn the power ON again. If the problem still persists, the digital operator or SERVOPACK must be replaced. 5 5-9 5 Trial Operation (Checking Servomotor Operation) 5.5 JOG Operation Using SigmaWin+ This section describes the procedure for executing a JOG operation using SigmaWin+. In the following example, test-run procedures are explained using the JOG operation window of Test Run on the main menu of SigmaWin+. Step Operation Display • Connect a computer. Use a connection cable to connect a SERVOPACK to a computer which has SigmaWin+ installed. SERVOPACK CN7 1 PC Connection cable for personal computer JZSP-CVS06-02-E • Start SigmaWin+ and open the main window. (1) Turn ON the SERVOPACK. (2) Turn ON the computer. (3) Double click the YE_Applications folder on the desktop. YE_Applications (4) Double click the SigmaWin+ icon to display the SigmaWin+ startup screen. ψ 2 SigmaWin+ English Edition Startup Screen 5-10 5.5 JOG Operation Using SigmaWin+ (cont’d) Step Operation Display (5) Once SigmaWin+ is started, the connection window is displayed. Note: is used for operation with no SERVOPACK connected. Click to search for the connected SERVOPACK. Connection Window Select only Σ-V Search Condition Setting Window (7) Select the SERVOPACK to be connected. Click . (Place the cursor over the SERVOPACK to be connected, and then click on it.) The main window of SigmaWin+ will then open. Trial Operation (Checking Servomotor Operation) (6) Search Condition Setting window is open. Select Σ-V( ), and click . A dialog box will open first to tell you a search has started, and then the search result will be shown in the connection window. Note: If the message, “Servopack not found” is displayed, refer to 2.2 Selecting a SERVOPACK of Sig2 maWin+ English Edition Online (cont’d) Manual (YE_Applications -> Manual). 5 5-11 5 Trial Operation (Checking Servomotor Operation) (cont’d) Step Operation • Run test operation. (1) Select Test Run first, and then select Jog (J) from the menu on the main window. Display Test Run (R) → Jog (J) Main Window (2) Warnings for the JOG operation window will be displayed. Read them and click . 3 Warnings for the JOG Operation Window (3) The JOG operation window is open. JOG Operation Window 5-12 5.5 JOG Operation Using SigmaWin+ (cont’d) Step Operation Display • Set the JOG speed The motor speed is set to 500 [min-1]. Click if you need to change it. 4 • Servo ON Click . The display changes from 5 Trial Operation (Checking Servomotor Operation) Servo OFF to Servo ON and is lit in green. 5 5-13 5 Trial Operation (Checking Servomotor Operation) (cont’d) Step Operation Display • Start JOG operation. When you click the servomotor will rotate in the forward direction. When 6 you click it will rotate in reverse. Confirm that the servomotor operation is correct. At the same time, carefully inspect the servomotor’s condition and check the following points in particular. If a problem is found, correct it. • Is there any unusual vibration? • Is there any unusual sound? • Is the temperature rising unusually high? • Servo OFF Click . (Screen display will return to the display shown at step 4.) 7 8 • Terminate JOG operation. Click to end JOG operation. You will return to the main window. Refer to the online manual for SigmaWin+ for details. Follow the steps below to view the online manual. <How to view the online manual> 1. 2. 3. 4. 5-14 Turn ON the computer. Open the YE_Applications folder. Open the Manual folder. Open SigmaWin+ English Edition Online Manual. 6 Troubleshooting This chapter describes the problems that can occur during setup and suggests measures for correcting them. 6.1 Troubleshooting of Alarms . . . . . . . . . . . . . . . . . . . . . . . . . . . . 6-2 6.2 Troubleshooting of Warnings . . . . . . . . . . . . . . . . . . . . . . . . . 6-25 Troubleshooting 6.3 Troubleshooting Malfunction Based on Operation and Conditions of the Servomotor . . . . . . . . . . . . . . . . . . . . . . . . 6-30 6 6-1 6 Troubleshooting 6.1 Troubleshooting of Alarms When an error occurs in SERVOPACKs, an alarm display such as A. and CPF on the panel operator. Refer to the following table to identify the cause of an alarm and the action to be taken. For alarms not described here, refer to the following manuals. • Σ-V Series User's Manual Design and Maintenance Rotational Motor/Analog Voltage and Pulse Train Reference (SIEP S800000 45). • Σ-V Series User's Manual Design and Maintenance Rotational Motor/MECHATROLINK-II Communications Reference (SIEP S800000 46). Alarm: Alarm Name A.020: Parameter Checksum Error 1 (The parameter data in the SERVOPACK is incorrect.) A.021: Parameter Format Error 1 (The parameter data in the SERVOPACK is incorrect.) 6-2 Cause Investigative Actions Corrective Actions The power supply voltage Measure the power supply suddenly dropped. voltage. Set the power supply voltage within the specified range, and set Fn005 to initialize the parameter. The power supply went OFF while changing a parameter setting. Note the circumstances when the power supply went OFF. Set Fn005 to initialize the parameter and then set the parameter again. The number of times that parameters were written exceeded the limit. Were the parameters frequently changed through the host controller? The SERVOPACK may be faulty. Repair or replace the SERVOPACK. Reconsider the method of writing parameters. Malfunction caused by noise from the AC power supply or grounding line, static electricity noise, etc. Turn the power supply ON and OFF several times. If the alarm still occurs, there may be noise interference. Take countermeasures against noise. Gas, water drops, or cutting oil entered the SERVOPACK and caused failure of the internal components. Check the installation conditions. The SERVOPACK may be faulty. Replace the SERVOPACK. A SERVOPACK fault occurred. Turn the power supply ON and OFF several times. If the alarm still occurs, the SERVOPACK is faulty. The SERVOPACK may be faulty. Replace the SERVOPACK. The software version of SERVOPACK that caused the alarm is older than that of the written parameter. Check Fn012 to see if the set software version agrees with that of the SERVOPACK. If not, an alarm may occur. Write the parameter of another SERVOPACK of the same model with the same software version. Then turn the power OFF and then ON again. A SERVOPACK fault occurred. − The SERVOPACK may be faulty. Replace the SERVOPACK. 6.1 Troubleshooting of Alarms (cont’d) Cause Investigative Actions Corrective Actions A.022: System Checksum Error 1 (The parameter data in the SERVOPACK is incorrect.) The power supply voltage Measure the power supply suddenly dropped. voltage. The SERVOPACK may be faulty. Replace the SERVOPACK. The power supply went Note the circumstances OFF while setting an util- when the power supply ity function. went OFF. The SERVOPACK may be faulty. Replace the SERVOPACK. A SERVOPACK fault occurred. Turn the power supply ON and OFF several times. If the alarm still occurs, the SERVOPACK is faulty. The SERVOPACK may be faulty. Replace the SERVOPACK. A.030: Main Circuit Detector Error A SERVOPACK fault occurred. − The SERVOPACK may be faulty. Replace the SERVOPACK. The SERVOPACK and servomotor capacities do not match each other. Check the combination of SERVOPACK and servomotor capacities. Select the proper combination of SERVOPACK and servomotor capacities. A.040: Parameter Setting Error 1 (The parameter setting was out of the allowable setting range.) A SERVOPACK fault occurred. − The SERVOPACK may be faulty. Replace the SERVOPACK. A.041: Encoder Output Pulse Setting Error The encoder output pulse (Pn212) is out of the setting range and does not satisfy the setting conditions. A.042: Parameter Combination Error ∗1. Check the setting ranges of The parameter setting is the parameters that have out of the specified range. been changed. Set the parameter to a value within the specified range. Check the electronic gear The electronics gear ratio ratio. The ratio must satisfy: Set the electronic gear ratio in the range: 0.001< is out of the setting range. 0.001< (Pn20E/Pn210) (Pn20E/Pn210) < 4000. < 4000. Check the parameter Pn212. Set Pn212 to a correct value. The speed of program JOG operation (Fn004) is lower than the setting Check that the detection range after having conditions*1 is satisfied. changed the electronic gear ratio (Pn20E/Pn210) or the servomotor. Reduce the electronic gear ratio (Pn20E/Pn210). The speed of program JOG operation (Fn004) is lower than the setting Check that the detection range after having *1 changed the setting of the conditions is satisfied. program JOG movement speed (Pn533). Increase the setting for the program JOG movement speed (Pn533). Pn533 [min-1] × 2 (encoder resolution) 5 6 × 10 ≤ Pn20E Pn210 Troubleshooting Alarm: Alarm Name 6 6-3 6 Troubleshooting (cont’d) Alarm: Alarm Name Cause A.042: Parameter Combination Error (cont’d) The moving speed of advanced autotuning is lower than the setting range after having changed the electronic gear ratio (Pn20E/Pn210) or the servomotor. Check that the detection conditions*1 is satisfied. Reduce the electronic gear ratio (Pn20E/Pn210). A.044: Fully-closed Loop Control Parameter Setting Error The setting of the option module does not match with that of Pn002.3. Check the settings of Pn002.3. The setting of option module must be compatible with the setting of Pn002.3. For a 4-byte parameter bank, no registration in two consecutive bytes for two bank members. – Change the number of bytes for bank members to an appropriate value. The total amount of bank data exceeds 64. (Pn900 × Pn901 > 64) – Reduce the total amount of bank data to 64 or less. The SERVOPACK and servomotor capacities do not match each other. Check the capacities to see if they satisfy the following condition: Select the proper combina(Servomotor capacity)/ tion of SERVOPACK and (SERVOPACK capacity) ≤ 1/4, or (Servomotor capac- servomotor capacities. ity)/(SERVOPACK capacity) ≤ 4. An encoder fault occurred. Replace the servomotor and Replace the servomotor see if the alarm occurs (encoder). again. A SERVOPACK fault occurred. − The SERVOPACK may be faulty. Replace the SERVOPACK. A.051: Unsupported Device Alarm An unsupported serial converter unit, serial encoder, or external encoder is connected to the SERVOPACK. Check the product specifications, and select the correct model. Select the correct combination of units. A.0b0: Cancelled Servo ON Command Alarm After executing the utility function to turn ON the power to the motor, the Servo ON command was sent from the host controller. − Turn the SERVOPACK power supply OFF and then ON again. *2 A.04A : Parameter Setting Error 2 A.050: Combination Error (The SERVOPACK and servomotor capacities do not correspond.) ∗1. ∗2. 6-4 Investigative Actions 2 (encoder resolution) Corrective Actions Pn20E Pn210 6× These errors occur in SERVOPACKs using MECHATROLINK-II Pn533 [min-1] × 105 ≤ 6.1 Troubleshooting of Alarms (cont’d) Cause Incorrect wiring or contact fault of main circuit cable or motor main circuit cable. Investigative Actions Check the wiring. Refer to 3.1 Main Circuit Wiring (SIEP S800000 45/46). Corrective Actions Correct the wiring. Check for short-circuits across the servomotor terShort-circuit or ground minals, U, V, and W, or fault of main circuit cable between the grounding and or motor main circuit servomotor terminal U, V, cable. or W. Refer to 3.1 Main Circuit Wiring (SIEP S800000 45/46). Some cables may be damaged. Replace damaged cables. Check for short-circuits across the servomotor terminals, U, V, and W on the SERVOPACK, or between the grounding and servomotor terminal U, V, or W. Refer to 3.1 Main Circuit Wiring (SIEP S800000 45/ 46). The servomotor may be faulty. Replace the servomotor. Short-circuit or ground fault inside the servomotor. A.100: Overcurrent or Heat Sink Overheated Short-circuit or ground fault inside the SERVO(An overcurrent flowed through the PACK. IGBT or heat sink of SERVOPACK overheated.) Check for short-circuits across the servomotor connection terminals, U, V, and W on the SERVOPACK, or The SERVOPACK may be faulty. Replace the SERVObetween the grounding and PACK. terminal U, V, or W. Refer to 3.1 Main Circuit Wiring (SIEP S800000 45/46). Incorrect wiring or contact fault of the regenerative resistor. Check the wiring. Refer to 3.6 Connecting Regenerative Resistors (SIEP S800000 45) or 3.7 Connecting Regenerative Resistors (SIEP S800000 46). Correct the wiring. The dynamic brake (DB: Emergency stop executed from the SERVOPACK) was frequently activated, or the DB overload alarm occurred. Check the resistor power consumption monitor Un00B to see how many times the DB has been used. Or, check the alarm trace back monitor Fn000 to see if the DB overload alarm A.730 or A.731 was reported. Change the SERVOPACK model, operation conditions, or the mechanism so that the DB does not need to be used so frequently. The generated regenerative energy exceeded the SERVOPACK regenerative energy processing capacity. Check the regenerative load ratio monitor Un00A to see how many times the regenerative resistor has been used. Check the operation condition including overload, and reconsider the regenerative resistor value. Troubleshooting Alarm: Alarm Name 6 6-5 6 Troubleshooting (cont’d) Alarm: Alarm Name A.100: Overcurrent or Heat Sink Overheated (An overcurrent flowed through the IGBT or heat sink of SERVOPACK overheated.) (cont’d) Cause Investigative Actions Check the regenerative load The SERVOPACK regen- ratio monitor Un00A to see erative resistance is too how many times the regensmall. erative resistor has been used. Change the regenerative resistance value to a value larger than the SERVOPACK minimum allowable resistance value. A heavy load was applied Check to see if the operatwhile the servomotor was ing conditions are outside stopped or running at a servo drive specifications. low-speed. Reduce the load applied to the servomotor or increase the operation speed. Improve the wiring or installation environment, such as by reducing noise, and check to see if the alarm recurs. Take countermeasures for noise, such as correct wiring of the FG. Use an FG wire size equivalent to the SERVOPACK main circuit wire size. − Turn the power supply OFF and then ON again. If the alarm still occurs, the SERVOPACK may be faulty. Replace the SERVOPACK. Malfunction caused by noise interference. A SERVOPACK fault occurred. Regenerative resistor capacity (Pn600) is set to a value other than 0 for a Check the external regenerSGDV-R70, -R90, -1R6, or -2R8 SER- ative resistor connection and the value of the Pn600. VOPACK, and an external regenerative resistor is not connected. A.300: Regeneration Error Connect the external regenerative resistor, or set Pn600 to 0 if no regenerative resistor is required. The jumper between the power supply terminals B2 and B3 is removed. Confirm that a jumper is mounted between the power supply terminals B2 and B3. The external regenerative resistor is incorrectly wired, or is removed or disconnected. Check the external regener- Correctly connect the exterative resistor connection. nal regenerative resistor. A SERVOPACK fault occurred. 6-6 Corrective Actions − Correctly mount a jumper. While the main circuit power supply is OFF, turn the control power supply OFF and then turn ON again. If the alarm still occurs, the SERVOPACK may by faulty. Replace the SERVOPACK. 6.1 Troubleshooting of Alarms (cont’d) A.320: Regenerative Overload Cause Corrective Actions The power supply voltage Measure the power supply exceeds the specified voltage. limit. Set the power supply voltage within the specified range. Incorrect external regenerative resistance. Insufficient SERVOPACK capacity or regenerative resistor capacity. Or, regenerative power has been continuously flowing back. Change the regenerative resistance, regenerative resistor capacity, or SERVOPACK capacity. Reconsider the operation conditions using the capacity selection software SigmaJunmaSize+, etc. Check the operation condition or the capacity using the capacity selection Software SigmaJunmaSize+, etc. Regenerative power conReconsider the system tinuously flowed back Check the load to the servo- including servo, machine, because negative load motor during operation. and operation conditions. was continuously applied. The setting of parameter Pn600 is smaller than the external regenerative resistor's capacity. A.330: Main Circuit Power Supply Wiring Error (Detected when the power to the main circuit is turned ON.) Investigative Actions Check the external regenerSet the Pn600 to a correct ative resistor connection value. and the value of the Pn600. The external regenerative Check the regenerative resistance is too high. resistance. Change the regenerative resistance to a correct value or use an external regenerative resistor of appropriate capacity. A SERVOPACK fault occurred. − The SERVOPACK may be faulty. Replace the SERVOPACK. The regenerative resistor disconnected when the SERVOPACK power voltage was increased. Measure the resistance of the regenerative resistor. When using a regenerative resistor built in the SERVOPACK: Replace the SERVOPACK. When using an external regenerative resistor: Replace the external regenerative resistor. In the AC power input mode, DC power was supplied. Check the power supply to see if it is a DC power supply. Correct the settings to match the actual power supply specifications. In the DC power input mode, AC power was supplied. Check the power supply to see if it is a AC power supply. Correct the settings to match the actual power supply specifications. Regenerative resistor capacity (Pn600) is not set to 0 even though the regenerative resistor is disconnected. Is the regenerative resistor connected? If it is, check the regenerative resistor capacity. Set Pn600 to 0. A SERVOPACK fault occurred. − The SERVOPACK may be faulty. Replace the SERVOPACK. Troubleshooting Alarm: Alarm Name 6 6-7 6 Troubleshooting (cont’d) Alarm: Alarm Name A.400: Overvoltage (Detected in the SERVOPACK main circuit power supply section.) 6-8 Cause Investigative Actions Corrective Actions • For 100 VAC SERVOPACKs: The AC power supply voltage exceeded 145 V. • For 200 VAC SERVOPACKs: The AC power supply voltage exceeded 290 V. • For 400 VAC SERVOPACKs: Measure the power supply The AC power supply voltage. voltage exceeded 580 V. • For 200 VAC SERVOPACKs with DC power supply input: The power supply voltage exceeded 410 V. • For 400 VAC SERVOPACKs with DC power supply input: The power supply voltage exceeded 820 V. Set AC/DC power supply voltage within the specified range. The power supply is unstable, or was influenced by a lightning surge. Measure the power supply voltage. Improve the power supply conditions by installing a surge absorber, etc. Then, turn the power supply ON again. If the alarm still occurs, the SERVOPACK may be faulty. Replace the SERVOPACK. Acceleration/deceleration was executed under the following conditions. • The AC power supply voltage of 100 VAC SERVOPACK was in the range between 115 V and 135 V. • The AC power supply voltage of 200 VAC SERVOPACK was in the range between 230 V and 270 V. • The AC power supply voltage of 400 VAC SERVOPACK was in the range between 480 V and 560 V. Check the power supply voltage and the speed and torque during operation. Set AC power supply voltage within the specified range. The external regenerative resistance is too high for the actual operation conditions. Check the operation conditions and the regenerative resistance. Select a regenerative resistance value appropriate for the operation conditions and load. 6.1 Troubleshooting of Alarms (cont’d) Cause The moment of inertia ratio exceeded the allowA.400: able value. Overvoltage (Detected in the SERVOPACK main circuit power A SERVOPACK fault supply section.) occurred. (cont’d) Corrective Actions Confirm that the moment of Increase the deceleration inertia ratio is within the time, or reduce the load. allowable range. − Turn the control power OFF and then ON again while the main circuit power supply is OFF. If the alarm still occurs, the SERVOPACK may be faulty. Replace the SERVOPACK. • For 100 VAC SERVOPACKs: The power supply voltage is 49 V or less. • For 200 VAC SERVOPACKs: Measure the power supply The power supply volt- voltage. age is 120 V or less. • For 400 VAC SERVOPACKs: The power supply voltage is 240 V or less. Set the power supply voltage within the specified range. Measure the power supply voltage. Increase the power supply capacity. Measure the power supply voltage. When the instantaneous power cut hold time Pn509 is set, decrease the setting. A.410: Undervoltage (Detected in the The power supply voltage SERVOPACK dropped during operation. main circuit power supply section.) Occurrence of instantaneous power interruption. A.450: Main-Circuit Capacitor Overvoltage Investigative Actions The SERVOPACK fuse is − blown out. Repair or replace the SERVOPACK, connect an AC/ DC reactor, and run the SERVOPACK. A SERVOPACK fault occurred. − The SERVOPACK may be faulty. Replace the SERVOPACK. A SERVOPACK fault occurred. − Replace the SERVOPACK. Troubleshooting Alarm: Alarm Name 6 6-9 6 Troubleshooting (cont’d) Alarm: Alarm Name A.510: Overspeed (The servomotor speed exceeds the maximum.) A.511: Overspeed of Encoder Output Pulse Rate A.520: Vibration Alarm A.521: Autotuning Alarm (Vibration was detected while executing the advanced autotuning, one-parameter tuning, EasyFFT, or tuning-less function.) 6-10 Cause Investigative Actions Corrective Actions The order of phases U, V, and W in the servomotor wiring is incorrect. Check the servomotor wiring. Confirm that the servomotor is correctly wired. A reference value exceeding the overspeed detec- Check the input value. tion level was input. Reduce the reference value or adjust the gain. The motor speed exceeded the maximum. Check the servomotor speed waveform. Reduce the speed reference input gain, adjust the servo gain, or reconsider the operation conditions. A SERVOPACK fault occurred. − The SERVOPACK may be faulty. Replace the SERVOPACK. The encoder output pulse output frequency exceeded the limit. Check the encoder output pulse output setting. Decrease the setting of the encoder output pulse (Pn212). The encoder output pulse output frequency exceeded the limit because the servomotor speed was too high. Check the encoder output pulse output setting and ser- Decrease the servomotor speed. vomotor speed. Abnormal vibration was detected at the servomotor rotation speed. Check for abnormal noise Reduce the servomotor from the servomotor, and speed or reduce the speed check the speed and torque waveform during operation. loop gain (Pn100). The moment of inertia ratio (Pn103) value is greater than the actual value or is greatly changed. Check the moment of inertia ratio. Set the moment of inertia ratio (Pn103) to an appropriate value. The servomotor vibrated considerably while perCheck the servomotor forming tuning-less func- speed waveform. tion (factory setting). Reduce the load so that the moment of inertia ratio falls within the allowable value, or raise the tuning level or reduce the gain level using the tuning-less function (Fn200). The servomotor vibrated considerably during advanced autotuning, one-parameter tuning, or EasyFFT. Check the operation procedure of corresponding function and take a corrective action. Check the servomotor speed waveform. 6.1 Troubleshooting of Alarms (cont’d) Cause Check the wiring. Operation beyond the overload protection characteristics. Reconsider the load condiCheck the servomotor over- tions and operation condiload characteristics and tions. Or, increase the executed run command. servomotor capacity. A SERVOPACK fault occurred. A.740: Overload of Surge Current Limit Resistor (The main circuit power is turned ON/OFF too frequently.) Corrective Actions Incorrect wiring or contact fault of servomotor and encoder. A.710: A.720: Overload Excessive load was A.710: High Load applied during operation A.720: Low Load because the servomotor was not driven due to mechanical problems. A.730: A.731: Dynamic Brake Overload (An excessive power consumption of dynamic brake was detected.) Investigative Actions Confirm that the servomotor and encoder are correctly wired. Check the executed run command and servomotor speed. Remove the mechanical problems. − The SERVOPACK may be faulty. Replace the SERVOPACK. The servomotor rotates because of external force. Check the operation status. Take measures to ensure the servomotor will not rotate because of external force. The rotating energy at a DB stop exceeds the DB resistance capacity. Check the DB resistor power consumption monitor (Un00B) to see how many times the DB has been used. Reduce the servomotor reference speed. Reduce the moment of inertia ratio. Reduce the number of times of the DB stop operation. A SERVOPACK fault occurred. − The SERVOPACK may be faulty. Replace the SERVOPACK. The inrush current limit resistor operation frequency at the main circuit − power supply ON/OFF operation exceeds the allowable range. Reduce the frequency of turning the main circuit power supply ON/OFF. A SERVOPACK fault occurred. The SERVOPACK may be faulty. Replace the SERVOPACK. − Troubleshooting Alarm: Alarm Name 6 6-11 6 Troubleshooting (cont’d) Alarm: Alarm Name A.7A0: Heat Sink Overheated (Detected when the heat sink temperature exceeds 100°C.) A.7AB: Built-in Fan in SERVOPACK Stopped A.810: Encoder Backup Error (Detected on the encoder side) (Only when an absolute encoder is connected.) 6-12 Cause Investigative Actions Corrective Actions The surrounding air temperature is too high. Check the surrounding air temperature using a thermostat. Decrease the surrounding air temperature by improving the SERVOPACK installation conditions. The overload alarm has been reset by turning OFF the power too many times. Check the alarm trace back monitor (Fn000) to see if the overload alarm was reported. Change the method for resetting the alarm. Check the accumulated load ratio monitor Un009 to Excessive load or opera- see the load during operation beyond the regeneraReconsider the load and tion, and the regenerative tive energy processing operation conditions. load ratio monitor Un00A capacity. to see the regenerative energy processing capacity. Incorrect SERVOPACK installation orientation or/ Check the SERVOPACK and insufficient space installation conditions. around the SERVOPACK. Install the SERVOPACK correctly as specified. A SERVOPACK fault occurred. − The SERVOPACK may be faulty. Replace the SERVOPACK. The fan inside the SERVOPACK stopped. Remove foreign matter or debris from the SERVOCheck for foreign matter or PACK. If the alarm still debris inside the SERVOoccurs, the SERVOPACK PACK. may be faulty. Replace the SERVOPACK. Alarm occurred when the power to the absolute encoder was initially turned ON. Check to see if the power was turned ON initially. Set up the encoder (Fn008). The encoder cable disconCheck to see if the power nected, and connected was turned ON initially. again. Confirm the connection and set up the encoder (Fn008). The power from both the control power supply (+5 V) and the battery power supply from the SERVOPACK is not being supplied. Replace the battery or take similar measures to supply power to the encoder, and set up the encoder (Fn008). Check the encoder connector battery or the connector contact status. An absolute encoder fault − occurred. If the alarm cannot be reset by setting up the encoder again, replace the servomotor. A SERVOPACK fault occurred. The SERVOPACK may be faulty. Replace the SERVOPACK. − 6.1 Troubleshooting of Alarms (cont’d) A.820: Encoder Checksum Error (Detected on the encoder side.) A.830: Absolute Encoder Battery Error (The absolute encoder battery voltage is lower than the specified value.) A.840: Encoder Data Error (Detected on the encoder side.) A.850: Encoder Overspeed (Detected when the control power supply was turned OFF and then ON again.) (Detected on the encoder side.) Cause Investigative Actions Corrective Actions An encoder fault occurred. − Set up the encoder again using Fn008. If the alarm still occurs, the servomotor may be faulty. Replace the servomotor. A SERVOPACK fault occurred. − The SERVOPACK may be faulty. Replace the SERVOPACK. The battery connection is incorrect. Check the battery connection. Reconnect the battery. The battery voltage is lower than the specified value 2.7 V. Measure the battery voltage. Replace the battery. A SERVOPACK fault occurred. − The SERVOPACK may be faulty. Replace the SERVOPACK. − Turn the power supply OFF and then ON again. If the alarm still occurs, the servomotor may be faulty. Replace the servomotor. Malfunction of encoder because of noise interference, etc. − Correct the wiring around the encoder by separating the encoder cable from the servomotor main circuit cable or by checking the grounding and other wiring. The servomotor was running at 200 min-1 or higher when the control power supply was turned ON. Check the speed monitor (Un000) to confirm the servomotor speed when the power is turned ON. Reduce the servomotor speed to a value less than 200 min-1, and turn ON the control power supply. − Turn the power supply OFF and then ON again. If the alarm still occurs, the servomotor may be faulty. Replace the servomotor. − Turn the power supply OFF and then ON again. If the alarm still occurs, the SERVOPACK may be faulty. Replace the SERVOPACK. A malfunction occurred in the encoder. An encoder fault occurred. A SERVOPACK fault occurred. Troubleshooting Alarm: Alarm Name 6 6-13 6 Troubleshooting (cont’d) Alarm: Alarm Name A.860: Encoder Overheated (Only when an absolute encoder is connected.) (Detected on the encoder side.) Cause Corrective Actions The ambient temperature around the servomotor is too high. Measure the ambient temperature around the servomotor. The ambient temperature must be 40°C or less. The servomotor load is greater than the rated load. Check the accumulated load ratio monitor (Un009) to see the load. The servomotor load must be within the specified range. − Turn the power supply OFF and then ON again. If the alarm still occurs, the servomotor may be faulty. Replace the servomotor. − Turn the power supply OFF and then ON again. If the alarm still occurs, the SERVOPACK may be faulty. Replace the SERVOPACK. An encoder fault occurred. A SERVOPACK fault occurred. Setting of the zero point position of absolute exter*3: A.8A0 nal scale failed because External Encoder the servomotor rotated. Error of Scale Before setting the zero point position, use the fullyThe servomotor must be closed feedback counter stopped while setting the monitor (Un00E) to conzero point position. firm that the servomotor is not rotating. An external encoder fault occurred. − Replace the external encoder. An external encoder fault A.8A1*3: occurred. External Encoder A serial converter unit Error of Module fault occurred. − Replace the external encoder. − Replace the serial converter unit. − Replace the external encoder. A.8A3*3: External Encoder An absolute external Error of Position encoder fault occurred. (Absolute) − The absolute external encoder may be faulty. Refer to the encoder manufacture’s instruction manual for corrective actions. The overspeed from the A.8A5*3: External Encoder external encoder occurred. Overspeed − Repair or replace the external encoder. The overheat from the A.8A6*3: External Encoder external encoder occurred. Overheated − Repair or replace the external encoder. A.8A2*3: External Encoder An external encoder fault occurred. Error of Sensor (Incremental) ∗3. 6-14 Investigative Actions The alarm that may occur in a SERVOPACK with option module for fully-closed loop control. 6.1 Troubleshooting of Alarms (cont’d) Cause A malfunction occurred in the speed reference input section. A.b10: Speed Reference A/D Error (Detected when A SERVOPACK fault the servo is ON.) occurred. A malfunction occurred in the speed reference input section. A.b11: Speed Reference A/D Data Error A SERVOPACK fault occurred. A.b20: Reference Torque Input Read Error (Detected when the servo is ON.) A malfunction occurred in the reading section of the torque reference input. A SERVOPACK fault occurred. A.b31: Current The current detection cirDetection Error 1 cuit for phase U is faulty. (Phase-U) A.b32: Current The current detection cirDetection Error 2 cuit for phase V is faulty. (Phase-V) A.b33: Current Detection Error 3 (Current detector) The detection circuit for the current is faulty. Corrective Actions − Clear and reset the alarm and restart the operation. − Turn the power supply OFF and then ON again. If the alarm still occurs, the SERVOPACK may be faulty. Replace the SERVOPACK. − Clear and reset the alarm and restart the operation. − Turn the power supply OFF and then ON again. If the alarm still occurs, the SERVOPACK may be faulty. Replace the SERVOPACK. − Clear and reset the alarm and restart the operation. − Turn the power supply OFF and then ON again. If the alarm still occurs, the SERVOPACK may be faulty. Replace the SERVOPACK. − Turn the power supply OFF and then ON again. If the alarm still occurs, the SERVOPACK may be faulty. Replace the SERVOPACK. − Turn the power supply OFF and then ON again. If the alarm still occurs, the SERVOPACK may be faulty. Replace the SERVOPACK. − Turn the power supply OFF and then ON again. If the alarm still occurs, the SERVOPACK may be faulty. Replace the SERVOPACK. The servomotor main cir- Check for disconnection of the motor main circuit cuit cable is disconnected. cable. A.b6A*2: SERVOPACK MECHAMECHATROLINK TROLINK communicaCommunications tion section fault. ASIC Error 1 ∗2. Investigative Actions − Correct the servomotor wiring. Replace the SERVOPACK. Troubleshooting Alarm: Alarm Name These errors occur in SERVOPACKs using MECHATROLINK-II 6 6-15 6 Troubleshooting (cont’d) Alarm: Alarm Name Cause − − Turn the power supply OFF and then ON again. If the alarm still occurs, the SERVOPACK may be faulty. Replace the SERVOPACK. − Turn the power supply OFF and then ON again. If the alarm still occurs, the SERVOPACK may be faulty. Replace the SERVOPACK. − Turn the power supply OFF and then ON again. If the alarm still occurs, the SERVOPACK may be faulty. Replace the SERVOPACK. A SERVOPACK fault occurred. − Turn the power supply OFF and then ON again. If the alarm still occurs, the SERVOPACK may be faulty. Replace the SERVOPACK. The order of phases U, V, and W in the servomotor wiring is incorrect. Check the servomotor wiring. Confirm that the servomotor is correctly wired. − If the alarm still occurs after turning the power OFF and then ON again, even though the servomotor is correctly wired, the servomotor may be faulty. Replace the servomotor. − Turn the power supply OFF and then ON again. If the alarm still occurs, the SERVOPACK may be faulty. Replace the SERVOPACK. − Turn the power supply OFF and then ON again. If the alarm still occurs, the servomotor may be faulty. Replace the servomotor. − Turn the power supply OFF and then ON again. If the alarm still occurs, the SERVOPACK may be faulty. Replace the SERVOPACK. A SERVOPACK fault occurred. A.bF1: System Alarm 1 A SERVOPACK fault occurred. A.bF2: System Alarm 2 A SERVOPACK fault occurred. A.bF3: System Alarm 3 A SERVOPACK fault occurred. A.bF4: System Alarm 4 An encoder fault occurred. A SERVOPACK fault occurred. A.C80: Absolute Encoder Clear Error and Multiturn Limit Setting Error 6-16 Corrective Actions Turn the power supply OFF and then ON again. If the alarm still occurs, the SERVOPACK may be faulty. Replace the SERVOPACK. A.bF0: System Alarm 0 A.C10: Servo Overrun Detected (Detected when the servomotor power is ON.) Investigative Actions An encoder fault occurred. A SERVOPACK fault occurred. 6.1 Troubleshooting of Alarms Cause Contact fault of encoder connector or incorrect encoder wiring. A.C90: Encoder Communications Error Corrective Actions Check the encoder connector contact status. Re-insert the encoder connector and confirm that the encoder is correctly wired. Encoder cable disconnection or short-circuit. Check the encoder cable. Or, incorrect cable impedance. Use the encoder cable with the specified rating. Corrosion caused by improper temperature, humidity, or gas Short-circuit caused by intrusion of water drops or cutting oil Connector contact fault caused by vibration. Check the operating environment. Improve the operating environmental conditions, and replace the cable. If the alarm still occurs, replace the SERVOPACK. − Correct the wiring around the encoder to avoid noise interference (Separate the encoder cable from the servomotor main circuit cable, improve grounding, etc.) − Connect the servomotor to another SERVOPACK, and turn ON the control power. If no alarm occurs, the SERVOPACK may be faulty. Replace the SERVOPACK. Malfunction caused by noise interference. A SERVOPACK fault occurred. A.C91: Encoder Communications Position Data Error Investigative Actions The noise interference occurred on the input/output signal line because the Check the encoder cable and connector. encoder cable is bent and the sheath is damaged. Confirm that there is no problem with the encoder cable layout. The encoder cable is bundled with a high-current Check the encoder cable line or near a high-current layout. line. Confirm that there is no surge voltage on the encoder cable. The FG potential varies because of influence from machines on the servomo- Check the encoder cable layout. tor side, such as the welder. Properly ground the device to separate from the encoder FG. Troubleshooting (cont’d) Alarm: Alarm Name 6 6-17 6 Troubleshooting (cont’d) Alarm: Alarm Name A.C92: Encoder Communications Timer Error Cause Investigative Actions Noise interference occurred on the input/out− put signal line from the encoder. Take countermeasures against noise. Excessive vibration and shocks were applied to the encoder. Check the operating environment. Reduce the machine vibration or correctly install the servomotor. − Turn the power supply OFF and then ON again. If the alarm still occurs, the servomotor may be faulty. Replace the servomotor. − Turn the power supply OFF and then ON again. If the alarm still occurs, the SERVOPACK may be faulty. Replace the SERVOPACK. − Turn the power supply OFF and then ON again. If the alarm still occurs, the servomotor may be faulty. Replace the servomotor. A SERVOPACK fault occurred. − Turn the power supply OFF and then ON again. If the alarm still occurs, the SERVOPACK may be faulty. Replace the SERVOPACK. The encoder wiring and contact are incorrect. Check the encoder wiring. Correct the encoder wiring. Noise interference occurred due to incorrect encoder cable specifications. − Use tinned annealed copper twisted-pair or shielded twisted-pair cable with a core of at least 0.12 mm2. An encoder fault occurred. A SERVOPACK fault occurred. An encoder fault occurred. A.CA0: Encoder Parameter Error A.Cb0: Encoder Echoback Error 6-18 Corrective Actions Noise interference occurred because the wir− ing distance for the encoder cable is too long. The wiring distance must be 20 m max. The FG potential varies because of influence from Check the encoder cable machines on the servomoand connector. tor side, such as the welder. Make the grounding for the machine separately from encoder side FG. Excessive vibration and shocks were applied to the encoder. Reduce the machine vibration or correctly install the servomotor. Check the operating environment. 6.1 Troubleshooting of Alarms (cont’d) A.Cb0: Encoder Echoback Error (cont’d) A.CC0: Multi-turn Limit Disagreement A.CF1*3: Feedback Option Module Communications Error (Reception error) ∗3. Cause An encoder fault occurred. A SERVOPACK fault occurred. Investigative Actions Corrective Actions − Turn the power supply OFF and then ON again. If the alarm still occurs, the servomotor may be faulty. Replace the servomotor. − Turn the power supply OFF and then ON again. If the alarm still occurs, the SERVOPACK may be faulty. Replace the SERVOPACK. When using a direct-drive (DD) servomotor, the Check the value of the multi-turn limit value Pn205. (Pn205) is different from that of the encoder. Correct the setting of Pn205 (0 to 65535). The multi-turn limit value of the encoder is different from that of the SERVO- Check the value of the PACK. Or, the multi-turn Pn205 of the SERVOlimit value of the SERPACK. VOPACK has been changed. Execute Fn013 at the occurrence of alarm. A SERVOPACK fault occurred. Turn the power supply OFF and then ON again. If the alarm still occurs, the SERVOPACK may be faulty. Replace the SERVOPACK. − Wiring of cable between serial converter unit and Check the external encoder SERVOPACK is incorrect wiring. or contact is faulty. Correct the cable wiring. The specified cable is not Confirm the external used between serial conencoder wiring specificaverter unit and SERVOtions. PACK. Use the specified cable. Cable between serial conMeasure the external verter unit and SERVOencoder cable length. PACK is too long. Use 20 m cable max. Sheath of cable between serial converter unit and SERVOPACK is broken. Replace the cable. Check the external encoder cable. The alarm that may occur in a SERVOPACK with option module for fully-closed loop control. Troubleshooting Alarm: Alarm Name 6 6-19 6 Troubleshooting (cont’d) Alarm: Alarm Name Cause Noise interferes with the cable between serial con∗3 A.CF2 : verter unit and SERVOFeedback Option PACK. Module Communications A serial converter unit Error fault occurred. (Timer stop) A SERVOPACK fault occurred. The contact in the servomotor U, V, and W wirings is faulty. Investigative Actions − Correct the wiring around serial converter unit, e.g., separating input/output signal line from main circuit cable or grounding. − Replace the serial converter unit. − Replace the SERVOPACK. Check the motor main circuit cable connection. Confirm that there is no contact fault in the motor wiring of encoder wiring. The frequency of the Reduce the reference pulse position reference pulse is frequency, and operate the too high. SERVOPACK. A.d00: Position Error Pulse Overflow (Position error exceeded the value set in the excessive position error alarm level (Pn520)) A.d01: Position Error Pulse Overflow Alarm at Servo ON ∗3. 6-20 The position reference acceleration is too fast. Corrective Actions Reduce the position reference pulse frequency or reference acceleration. Or, reconsider the electronic gear ratio. Apply the smoothing funcReduce the reference accel- tion, such as using position eration, and operate the reference acceleration/ SERVOPACK. deceleration time constant (Pn216). Setting of the Pn520 (Excessive Position Error Check the alarm level Alarm Level) is low (Pn520) to see if it is set to against the operating con- an appropriate value. dition. Set the Pn520 to proper value. A SERVOPACK fault occurred. − Turn the power supply OFF and then ON again. If the alarm still occurs, the SERVOPACK may be faulty. Replace the SERVOPACK. The /S_ON signal is to be turned ON when the num- Check the error counter ber of position error monitor (Un008) while the / pulses is greater than the S_ON signal is OFF. set value of Pn526. Set position error pulses to be cleared while the /S_ON signal is OFF. Or, correct the excessive position error alarm level at servo ON (Pn526). The alarm that may occur in a SERVOPACK with option module for fully-closed loop control. 6.1 Troubleshooting of Alarms (cont’d) A.d02: Position Error Pulse Overflow Alarm by Speed Limit at Servo ON A.d10*3: Motor-load Position Error Pulse Overflow A.E02*2: MECHATROLINK-II Internal Synchronization Error 1 A.E40*2: MECHATROLINK-II Transmission Cycle Setting Error ∗2. ∗3. Cause Investigative Actions Corrective Actions After a position error pulse has been input, Pn529 limits the speed if the /S_ON signal is turned ON. If Pn529 limits the speed in such a state, this alarm occurs when reference pulses are − input and the number of position error pulses exceeds the value set for parameter Pn520 (Excessive Position Error Alarm Level). Set position error pulses to be cleared while the /S_ON signal is OFF. Or, correct the excessive position error alarm level (Pn520). Or, adjust the speed limit level at servo ON (Pn529). Motor rotation direction and external encoder installation direction are opposite. Check the servomotor rotation direction and the external encoder installation direction. Install the external encoder in the opposite direction, or reverse the setting of the external encoder usage method (Pn002.3). Mounting of the load (e.g., stage) and external encoder joint installation are incorrect. Check the external encoder mechanical connection. Check the mechanical joints. A parameter was changed by the digital operator or the personal computer Confirm the way the during MECHAparameters are edited. TROLINK-II communications. Stop changing parameters using digital operator or personal computer during MECHATROLINK-II communications. MECHATROLINK-II transmission cycle fluctu- − ated. Remove the cause of transmission cycle fluctuation at host controller. A SERVOPACK fault occurred. − Turn the power supply OFF and then ON again. If the alarm still occurs, the SERVOPACK may be faulty. Replace the SERVOPACK. Setting of MECHATROLINK-II transmission cycle is out of specifications range. Check the MECHATROLINK-II transmission cycle setting. Set the transmission cycle to the proper value. These errors occur in SERVOPACKs using MECHATROLINK-II. The alarm that may occur in a SERVOPACK with option module for fully-closed loop control. Troubleshooting Alarm: Alarm Name 6 6-21 6 Troubleshooting (cont’d) Alarm: Alarm Name Cause A.E50*2: WDT data of host controller was not updated correctly. MECHATROLINK-II Synchronization Error A SERVOPACK fault occurred. A.E51*2: MECHATROLINK-II Synchronization Failed A.E60*2: MECHATROLINK-II Communications error (Reception error) ∗2. 6-22 Corrective Actions Check the WDT data updat- Update the WDT data at the ing for the host controller. host controller correctly. − Turn the power supply OFF and then ON again. If the alarm still occurs, the SERVOPACK may be faulty. Replace the SERVOPACK. WDT data of host controller was not updated correctly at the synchroniCheck the WDT data updat- Update the WDT data at the zation communications ing for the host controller. host controller correctly. start, and synchronization communications could not start. A SERVOPACK fault occurred. − Turn the power supply OFF and then ON again. If the alarm still occurs, the SERVOPACK may be faulty. Replace the SERVOPACK. MECHATROLINK-II wiring is incorrect. Check the MECHATROLINK-II wirings. Correct the MECHATROLINK-II wiring. Connect the terminator correctly. − Take measures against noise. Check the MECHATROLINK-II communications cable and FG wiring and take measures such as adding ferrite core on the MECHATROLINK-II communications cable. − Turn the power supply OFF and then ON again. If the alarm still occurs, the SERVOPACK may be faulty. Replace the SERVOPACK. MECHATROLINK-II data reception error occurred due to noise interference. A SERVOPACK fault occurred. A.E61*2: MECHATROLINK-II Transmission Cycle Error (Synchronization interval error) Investigative Actions MECHATROLINK-II Check the MECHAtransmission cycle fluctu- TROLINK-II transmission ated. cycle setting. Remove the cause of transmission cycle fluctuation at host controller. A SERVOPACK fault occurred. Turn the power supply OFF and then ON again. If the alarm still occurs, the SERVOPACK may be faulty. Replace the SERVOPACK. − These errors occur in SERVOPACKs using MECHATROLINK-II. 6.1 Troubleshooting of Alarms (cont’d) A.EA2*2: DRV Alarm 2 (SERVOPACK WDC error) A.Eb1: Safety Function Signal Input Timing Error *2: A.ED1 Command Execution Timeout Cause ∗2. Corrective Actions A parameter was changed by the digital operator or the personal computer Confirm the way the during MECHAparameters are edited. TROLINK-II communications. Stop changing parameters using digital operator or personal computer during MECHATROLINK-II communications. MECHATROLINK-II Check the MECHAtransmission cycle fluctu- TROLINK-II transmission ated. cycle setting. Remove the cause of transmission cycle fluctuation at host controller. A SERVOPACK fault occurred. Turn the power supply OFF and then ON again. If the alarm still occurs, the SERVOPACK may be faulty. Replace the SERVOPACK. − The lag between activations of the input signals / Measure the time lag HWBB1 and between the /HWBB1 and /HWBB2 for the HWBB function is ten second or /HWBB2 signals. more. A timeout error occurred when using an MECHATROLINK command. A.F10: Main Circuit Cable Open Phase (With the main power supply ON, voltage was low for more than 1 second in an R, S, or T phase.) (Detected when the main power supply was turned ON.) Investigative Actions Check the motor status when the command is executed. The output signal circuits or devices for /HWBB1 and /HWBB2 or the SERVOPACK input signal circuits may be faulty. Alternatively, the input signal cables may be disconnected. Repair or replace them. Execute the SV_ON or SENS_ON command only when the motor is not running. Check the external encoder Execute the SENS_ON status when the command is command only when an executed. external scale is connected. The three-phase power Check the power supply supply wiring is incorrect. wiring. Confirm that the power supply is correctly wired. The three-phase power supply is unbalanced. Measure the voltage at each Balance the power supply phase of the three-phase by changing phases. power supply. A single-phase power is input without setting Pn00B.2 (power supply method for three-phase SERVOPACK) to 1 (single-phase power supply). Check the power supply and the parameter setting. Match the parameter setting to the power supply. − Turn the power supply OFF and then ON again. If the alarm still occurs, the SERVOPACK may be faulty. Replace the SERVOPACK. A SERVOPACK fault occurred. These errors occur in SERVOPACKs using MECHATROLINK-II. Troubleshooting Alarm: Alarm Name 6 6-23 6 Troubleshooting (cont’d) Alarm: Alarm Name CPF00: Digital Operator Transmission Error 1 CPF01: Digital Operator Transmission Error 2 Cause Corrective Actions The contact between the digital operator and the SERVOPACK is faulty. Check the connector contact. Insert securely the connector or replace the cable. Malfunction caused by noise interference − Keep the digital operator or the cable away from noise sources. − Disconnect the digital operator and then re-connect it. If the alarm still occurs, the digital operator may be faulty. Replace the digital operator. − Turn the power supply OFF and then ON again. If the alarm still occurs, the SERVOPACK may be faulty. Replace the SERVOPACK. A digital operator fault occurred. A SERVOPACK fault occurred. 6-24 Investigative Actions 6.2 Troubleshooting of Warnings Troubleshooting of Warnings Refer to the following table to identity the cause of a warning and the action to be taken. Contact your Yaskawa representative if the problem cannot be solved by the described corrective action. For warnings not described here, refer to the following manuals. • Σ-V Series User's Manual Design and Maintenance Rotational Motor/Analog Voltage and Pulse Train Reference (SIEP S800000 45). • Σ-V Series User's Manual Design and Maintenance Rotational Motor/MECHATROLINK-II Communications Reference (SIEP S800000 46). Warning: Warning Name Situation at Warning Occurrence Cause Corrective Actions Wiring of the servomo- Check the wiring of Check whether there is any tor U, V, or W line is the cable for motor loose connection in motor incorrect. main circuit. wiring or encoder wiring. A.900: Position Error Pulse Overflow A.901: Position Error Pulse Overflow Alarm at Servo ON The SERVOPACK gain is too low. Check the SERVOPACK gain. Increase the servo gain by using the function such as advanced autotuning. The position reference pulse frequency is too high. Lower the position reference pulse frequency. Lower the position reference pulse frequency or the position reference acceleration, or correct the electronic gear ratio. The position reference acceleration is too high. Lower the position reference acceleration. Apply a smoothing function, such as a position reference acceleration/deceleration time constant (Pn216). The excessive position error alarm level (Pn520) is too low for the operating conditions. Check the excessive Set an appropriate value for position error alarm the Pn520. level (Pn520). A SERVOPACK fault occurred. Turn the power supply OFF and then ON again. If the alarm still occurs, the SERVOPACK may be faulty. Replace the SERVOPACK. - When the /S_ON signal was OFF, the servomotor moved without cleaning the counter for position error pulses. The number of position error pulses exceeded the maximum number of pulses allowed. Set Pn200.2 to 0 to clear the number of position error pulses when the /S_ON signal is OFF. Or set an appropriate value for the excessive position error warning level at servo ON (Pn528) when the /S_ON signal is ON. Troubleshooting 6.2 6 6-25 6 Troubleshooting (cont’d) Warning: Warning Name A.910: Overload Warning before alarm A710 or A720 occurs Situation at Warning Occurrence Corrective Actions The servomotor or encoder wiring is incorrect or the connection is faulty. Check the wiring. Correct the servomotor and encoder wiring if they are wrong. The servomotor is in excess of the overload protective characteristics. Check the overload characteristics of the servomotor and reference input. Reconsider the load and operation conditions. Or, check the servomotor capacity. The servomotor is not driven due to a mechanical factor and the operating load has become excessive. Check the reference input and motor speed. Improve the mechanical factor. A SERVOPACK fault occurred. - The SERVOPACK may be faulty. Replace the SERVOPACK. Unusual vibration was detected while the motor was rotating. Check whether unusual sound is generated from the motor, and check the speed, and torque waveform of the motor. Lower the motor rotation speed or lower the servo gain by using the function such as one-parameter tuning. A.911: Vibration The moment of inertia ratio (Pn103) is larger Check the moment than the actual value or of inertia ratio. greatly changes. Set an appropriate value for the moment of inertia (Pn103). The power supply voltMeasure the power age is in excess of the supply voltage. specified range. Set the power supply voltage within the specified range. The external regenerative resistance, servo A.920: amplifier capacity, or Regenerative regenerative resistor Overload: capacity is insufficient Warning before the or a continuous regenalarm A320 occurs erative state occurs. Regenerative power continuously flowed back because negative load was continuously applied. 6-26 Cause Check the operating conditions or capacity using the capacity selection software SigmaJunmaSize+, etc. Change the regenerative resistance, regenerative resistor capacity, or SERVOPACK capacity. Reconsider the operating conditions using the capacity selection software SigmaJunmaSize+, etc. Check the load on Reconsider the system the servomotor dur- including the servo, machine, ing operation. and operation conditions. 6.2 Troubleshooting of Warnings (cont’d) Situation at Warning Occurrence The servomotor is driven by an external force. A.921: Dynamic Brake The rotating energy at Overload: a DB stop exceeds the Warning before the DB resistance capacity. alarm A.731 occurs A.930: Absolute Encoder Battery Error (The absolute encoder battery voltage is lower than the specified value.) (Only when an absolute encoder is connected.) Cause Check the operating conditions. Corrective Actions Do not drive the motor with external force. • Reduce the servomotor Check the operatreference speed. ing frequency of the • Reduce the moment of DB with power coninertia. sumed by DB resis• Reduce the number of tance monitor times of the DB stop oper(Un00B). ation. A SERVOPACK fault occurred. − The SERVOPACK may be faulty. Replace the SERVOPACK. The battery connection is incorrect. Check the battery connection. Reconnect the battery. The battery voltage is lower than the specified value 2.7 V. Measure the battery Replace the battery. voltage. A SERVOPACK fault occurred. − The SERVOPACK may be faulty. Replace the SERVOPACK. A.941: Parameters that require Change of the restart have been − Parameters changed. Requires Restart Turn OFF the power and ON again. A.94A*: Data Setting Warning 1 (Parameter Number Error) Disabled parameter number was used. Use the correct parameter number. A.94B*: Data Setting Warning 2 (Out of Range) Attempted to send values outside the range to – the command data. – Set the value of the parameter within the allowable range. A.94C*: Data Setting Calculation result of Warning 3 set value is incorrect. (Calculation Error) – Set the value of the parameter within the allowable range. A.94D*: Data Setting Warning 4 (Parameter Size) – Use the correct parameter size. Parameter size set in command is incorrect. Troubleshooting Warning: Warning Name ∗ These warnings occur in SERVOPACKs using MECHATROLINK-II. 6 6-27 6 Troubleshooting (cont’d) Warning: Warning Name Situation at Warning Occurrence Cause Corrective Actions A.94E*: Data Setting Warning 5 (Latch mode error) Latch mode error is detected. – Change the setting value of Pn850 or the LT_MOD data for the LTMOD_ON command sent by the host controller to the proper value. A.95A*: Command Warning 1 Command sending condition is not satisfied. – Send a command after command sending condition is satisfied. A.95B*: Command Warning 2 SERVOPACK received unsupported command. – Do not sent an unsupported command. A.95D*: Command Warning 4 Command sending condition for latch– related commands is not satisfied. Send a command after command sending condition is satisfied. A.95E*: Command Warning 5 Subcommand sending condition is not satisfied. – Send a command after command sending condition is satisfied. A.95F*: Command Warning 6 (Undefined Command) Undefined command was sent. – Do not use an undefined command. MECHATROLINK-II wiring is incorrect. Correct the MECHATROLINK-II wiring. Confirm the wiring. Or, connect a terminal to the terminal station. MECHATROLINK-II data reception error occurred due to noise interference. Confirm the installation conditions. Take measures against noise. Check the MECHATROLINK-II communications cable and FG wiring and take measures such as adding ferrite core on the MECHATROLINK-II communications cable. A SERVOPACK fault occurred. – A fault occurred in the SERVOPACK. Repair or replace the SERVOPACK. A.960*: MECHATROLINK Communications Warning ∗ These warnings occur in SERVOPACKs using MECHATROLINK-II. 6-28 6.2 Troubleshooting of Warnings (cont’d) A.971: Undervoltage Situation at Warning Occurrence Cause Corrective Actions • For 100 VAC SERVOPACKs: The AC power supply voltage is 60 V or below. • For 200 VAC SERVOPACKs: The AC power sup- Measure the power supply voltage. ply voltage is 140 V or below. • For 400 VAC SERVOPACKs: The AC power supply voltage is 280 V or below. Use a power supply voltage within the specified range. The power supply voltMeasure the power age dropped during supply voltage. operation. Increase the power supply capacity. An instantaneous Measure the power power failure occurred. supply voltage. Lower the instantaneous power cut hold time (Pn509). The fuse in the SERVOPACK is burned out. − Replace the SERVOPACK and connect an AC/DC reactor to the SERVOPACK. A SERVOPACK fault occurred. − The SERVOPACK may be faulty. Replace the SERVOPACK. Troubleshooting Warning: Warning Name 6 6-29 6 Troubleshooting 6.3 Troubleshooting Malfunction Based on Operation and Conditions of the Servomotor Troubleshooting for the malfunctions based on the operation and conditions of the servomotor is provided in this section. Be sure to turn OFF the servo system before troubleshooting items shown in bold lines in the table. For problems not described here, refer to the following manuals. • Σ-V Series User's Manual Design and Maintenance Rotational Motor/Analog Voltage and Pulse Train Reference (SIEP S800000 45). • Σ-V Series User's Manual Design and Maintenance Rotational Motor/MECHATROLINK-II Communications Reference (SIEP S800000 46). Problem Probable Cause Investigative Actions Corrective Actions The control power supply is Check voltage between not ON. power supply terminals. Correct the power circuit. The main circuit power sup- Check the voltage between ply is not ON. power supply terminals. Correct the power circuit. Wiring of I/O signal connec- Check if the connector CN1 tor CN1 faulty or disconis properly inserted and con- Correct the connector CN1 connection. nected. nected. Servomotor Does Not Start 6-30 Servomotor or encoder wiring disconnected. Check the wiring. Correct the wiring. Overloaded Run under no load and check the load status. Reduce load or replace with larger capacity servomotor. Speed/position references not input Check reference input pins. Input speed/position references correctly. Setting for Pn50A to Pn50D Check settings of parame"Input Signal Selection" is ters Pn50A to Pn50D. incorrect. Correct the settings for Pn50A to Pn50D "Input Signal Selection." Encoder type differs from Check setting of parameter parameter setting (Pn002.2). Pn002.2. Set parameter Pn002.2 to the encoder type being used. Servo ON (/S-ON) input signal stays OFF. Check settings of parameters Pn50A.0 and Pn50A.1. Set the parameters to turn the Servo ON (/S-ON) input signal ON. /P-CON input function setting is incorrect. Check parameter Pn000.1. Set parameters to match the application. 6.3 Troubleshooting Malfunction Based on Operation and Conditions of the Servomotor Probable Cause SEN input is OFF. Investigative Actions Check the ON/OFF status of If using an absolute encoder, turn the SEN input signal the SEN input. ON. Reference pulse mode selec- Check the Pn200.0 setting and the reference pulse station is incorrect. tus. Servomotor Does Not Start (cont’d) Match the Pn200.0 setting and the reference pulse status. Speed control: Speed reference input is incorrect. Check V-REF and SG to confirm if the control method and the input are agreed. Correct the control mode selection parameter, or the input. Torque control: Torque reference input is incorrect. Check T-REF and SG to confirm if the control method and the input are agreed. Correct the control mode selection parameter, or the input. Position control: Reference pulse input is incorrect. Check Pn200.0 reference pulse form or sign + pulse signal. Correct the control mode selection parameter, or the input. Position error pulse clear (/ CLR) input is turned ON. Check /CLR input pins (CN1-14 and -15). Turn /CLR input signal OFF. The forward run prohibited (P-OT) and reverse run pro- Check P-OT or N-OT input hibited (N-OT) input signals signal. are turned OFF. Turn P-OT or N-OT input signal ON. The safety input signal (/ HWBB1 or /HWBB2) remains OFF. Check the /HWBB1 or / HWBB2 input signal. Set the /HWBB1 or / HWBB2 input signal to ON. When not using the safety function, mount the safety function jumper connector (provided as an accessory) on the CN8. A SERVOPACK fault occurred. − Replace the SERVOPACK. Servomotor Servomotor wiring is incor- Check the servomotor wirMoves Instan- rect. ing. taneously, and then Encoder wiring is incorrect. Check the encoder wiring. Stops Servomotor Speed Unstable (cont’d) Corrective Actions Check connections of main Wiring connection to servo- circuit cable (phases-U, -V, motor is defective. and -W) and encoder connectors. Correct the wiring. Correct the wiring. Tighten any loose terminals or connectors. Troubleshooting Problem 6 6-31 6 Troubleshooting Problem Servomotor Rotates Without Reference Input Dynamic Brake Does Not Operate Probable Cause Investigative Actions (cont’d) Corrective Actions Speed control: Speed reference input is incorrect. Check V-REF and SG to confirm if the control method and the input are agreed. Correct the control mode selection parameter, or the input signal. Torque control: Torque reference input is incorrect. Check T-REF and SG to confirm if the control method and the input are agreed. Correct the control mode selection parameter, or the input signal. Speed reference offset is incorrect. The SERVOPACK offset is adjusted incorrectly. Adjust the SERVOPACK offset. Position control: Reference pulse input is incorrect. Check Pn200.0 reference pulse form or sign + pulse signal. Correct the control mode selection parameter, or the input signal. A SERVOPACK fault occurred. − Replace the SERVOPACK. Improper Pn001 setting Check the setting of parameter Pn001.0. Correct the parameter setting. DB resistor disconnected Check if excessive moment of inertia, motor overspeed, or DB frequently activated occurred. Replace the SERVOPACK, and lighten the load. DB drive circuit fault − There is a defective component in the DB circuit. Replace the SERVOPACK. Reduce the load so that the moment of inertia ratio The servomotor largely Check the servomotor speed becomes within the allowvibrated during execution of able value, or increase the waveform. tuning-less function. load level or lower the tuning level for the tuning-less level setting (Fn200). Abnormal Noise from Servomotor 6-32 Check if there are any loose mounting screws. Tighten the mounting screws. Check if there is misalignment of couplings. Align the couplings. Check if there are unbalanced couplings. Balance the couplings. Bearings are defective. Check for noise and vibration around the bearings. Replace the servomotor. Vibration source at the driven machine Check for any foreign matter, damage, or deformations Contact the machine manuon the machinery's movable facturer. parts. Mounting is not secured. 6.3 Troubleshooting Malfunction Based on Operation and Conditions of the Servomotor Probable Cause Noise interference due to incorrect input/output signal cable specifications Investigative Actions The input/output signal cables must be tinned annealed copper twistedUse the specified input sigpair or shielded twisted-pair nal wires. cables with a core of 0.12 mm2 min. Noise interference due to Check the length of the length of input/output signal input/output cable. cable. Noise interference due to incorrect encoder cable specifications. Abnormal Noise from Servomotor (cont’d) (cont’d) Corrective Actions The encoder cable must be tinned annealed copper twisted-pair or shielded twisted-pair cables with a core of 0.12 mm2 min. The input/output cable length must be no more than 3 m. Use the specified encoder cable. Noise interference due to Check the length of the length of encoder cable wirencoder cable. ing The encoder cable must be no more than 20 m. Noise interference due to damaged encoder cable Check if the encoder cable is damaged or bent. Replace the encoder cable and modify the encoder cable layout. Excessive noise to the encoder cable Check if the encoder cable Correct the encoder cable is bundled with high-current layout so that no surge is line or near a high-current applied. line. FG potential varies because of influence of machines Check if the machines are such as welders at the servo- correctly grounded. motor. Ground machines correctly, and prevent diversion to the FG at the PG side. SERVOPACK pulse counting error due to noise interference Check if there is noise interTake measures against noise ference on the input/output in the encoder wiring. signal line from the encoder. Excessive vibration and shock to the encoder Check if vibration from the machine occurred or servomotor installation is incorrect (mounting surface accuracy, fixing, alignment, etc.). Reduce vibration from the machine, or secure the servomotor installation. An encoder fault occurred. − Replace the servomotor. Troubleshooting Problem 6 6-33 6 Troubleshooting (cont’d) Problem Probable Cause Investigative Actions Unbalanced servo gains Check to see if the servo gains have been correctly adjusted. Execute the advanced autotuning. Speed loop gain value (Pn100) too high. Check the speed loop gain value (Pn100). Factory setting: Kv = 40.0 Hz Reduce the speed loop gain (Pn100). Servomotor Vibrates at Frequency of Position loop gain value Approx 200 to (Pn102) too high. 400 Hz Check the position loop gain Reduce the position loop value (Pn102). gain (Pn102). Factory setting: Kp = 40.0/s Check the speed loop inteIncorrect speed loop integral gral time constant (Pn101). time constant (Pn101) setFactory setting: Ti = 20.0 ting ms High Rotation Speed Overshoot on Starting and Stopping Correct the speed loop integral time constant (Pn101) setting. Incorrect moment of inertia ratio data (Pn103) Check the moment of inertia Correct the moment of inerratio setting (Pn103). tia ratio (Pn103) setting. Unbalanced servo gains Check to see if the servo gains have been correctly adjusted. Execute the advanced autotuning. Speed loop gain value (Pn100) too high Check the speed loop gain value (Pn100). Factory setting: Kv = 40.0 Hz Reduce the speed loop gain (Pn100). Position loop gain value (Pn102) too high Check the position loop gain Reduce the position loop value (Pn102). Factory setting: Kp = 40.0/s gain (Pn102). Incorrect speed loop integral Check the speed loop integral time constant (Pn101). time constant (Pn101) setFactory setting: Ti = 20.0 ting ms Incorrect moment of inertia ratio data (Pn103) Absolute Encoder Position Difference Error (The position saved in the host controller Noise interference due to when the improper encoder cable power was specifications turned OFF is different from the position when the power was next turned ON.) 6-34 Corrective Actions Correct the speed loop integral time constant setting (Pn101). Check the moment of inertia Correct the moment of inerratio setting (Pn103). tia ratio setting (Pn103). The encoder cable must be tinned annealed copper twisted-pair or shielded twisted-pair cables with a core of 0.12 mm2 min. Use encoder cable with the specified specifications. 6.3 Troubleshooting Malfunction Based on Operation and Conditions of the Servomotor Absolute Encoder Position Difference Error (The position saved in the host controller when the power was turned OFF is different from the position when the power was next turned ON.) (cont’d) Probable Cause Investigative Actions (cont’d) Corrective Actions Noise interference due to length of encoder cable. Check the encoder cable length. The encoder cable length must be no more than 20 m. Noise interference due to damaged encoder cable Check if the encoder cable is bent or if its sheath is damaged. Replace the encoder cable and correct the encoder cable layout. Check if the encoder cable Excessive noise interference is bundled with a high-curat the encoder cable rent line or near high-current line. Change the encoder cable layout so that no surge is applied. FG potential varies because of influence of machines Check if the machines are such as welders at the servo- correctly grounded. motor. Ground machines correctly, and prevent diversion to the FG at the PG side. SERVOPACK pulse counting error due to noise interference Check if there is noise interTake measures against noise ference on the input/output in the encoder wiring. signal line from the encoder. Excessive vibration and shock to the encoder Check if vibration from the machine occurred or servomotor installation is incorrect (mounting surface accuracy, fixing, alignment, etc.). Reduce vibration from the machine, or secure the servomotor installation. An encoder fault occurred. − Replace the servomotor. A SERVOPACK fault occurred. (The pulse count does not change.) − Replace the SERVOPACK. Check the error detection at the host controller. Correct the error detection section of the host controller. Check if the host controller is executing data parity checks. Execute a multi-turn data parity check. Check noise in the input/ output signal line between the SERVOPACK and the host controller. Take measures against noise, and again execute a multiturn data parity check. Host controller multi-turn data reading error Troubleshooting Problem 6 6-35 6 Troubleshooting (cont’d) Problem Probable Cause Investigative Actions Check the external power supply (+24 V) voltage for the input signal. Forward or reverse run prohibited signal is input. Corrective Actions Correct the external power supply (+24 V) voltage. Check if the overtravel limit Correct the overtravel limit switch operates properly. switch. Check if the overtravel limit Correct the overtravel limit switch is wired correctly. switch wiring. Check the fluctuation of the input signal external power supply (+24 V) voltage. Overtravel (OT) Forward or reverse run prohibited signal malfunctioning. Check if the overtravel limit Stabilize the operation of switch operates correctly. the overtravel limit switch. Incorrect forward or reverse run prohibited signal (P-OT/ N-OT) allocation (parameters Pn50A.3, Pn50B.0) Check if the P-OT signal is allocated in Pn50A.3. If another signal is allocated in Pn50A.3, select P-OT. Check if the N-OT signal is allocated in Pn50B.0. If another signal is allocated in Pn50B.0, select N-OT. Incorrect servomotor stop method selection Improper Position to Stop by Overtravel (OT) Signal Position Error (Without Alarm) 6-36 Stabilize the external power supply (+24 V) voltage. Check if the overtravel limit switch wiring is correct. Correct the overtravel limit (check for damaged cables switch wiring. or loose screws.) Check Pn001.0 and Pn001.1 Select a servo mode stop when the servomotor power method other than "coast to is OFF. stop." Check Pn001.0 and Pn001.1 Select a servo mode stop method other than "coast to when in torque control. stop." Improper limit switch position and dog length − Install the limit switch at the appropriate position. The overtravel limit switch position is too short for the coasting distance. − Install the overtravel limit switch at the appropriate position. Noise interference due to improper encoder cable specifications The encoder cable must be tinned annealed copper twisted-pair or shielded twisted-pair cable with a core of 0.12 mm2 min. Use encoder cable with the specified specifications. Noise interference due to length of encoder cable Check the encoder cable length. The encoder cable length must be no more than 20 m. Check if the encoder cable Noise influence due to damis bent or if its sheath is aged encoder cable damaged. Replace the encoder cable and correct the encoder cable layout. Check if the encoder cable Excessive noise interference is bundled with a high-curto encoder cable rent line or near a high-current line. Change the encoder cable layout so that no surge is applied. 6.3 Troubleshooting Malfunction Based on Operation and Conditions of the Servomotor (cont’d) Probable Cause Investigative Actions FG potential varies because of influence of machines Check if the machines are such as welders at the servo- correctly grounded. motor. Position Error (Without Alarm) (cont’d) Servomotor Overheated Corrective Actions Ground machines correctly, and prevent diversion to the FG at the PG side. SERVOPACK pulse count error due to noise Check if the input/output signal line from the encoder Take measures against noise in the encoder wiring. is influenced by noise. Excessive vibration and shock to the encoder Check if vibration from the machine occurred or servomotor installation is incorrect (mounting surface accuracy, fixing, alignment, etc.). Reduce the machine vibration or mount the servomotor securely. Check if a position error Unsecured coupling Secure the coupling between machine and servo- occurs at the coupling between the machine and between machine and servomotor servomotor. motor. Noise interference due to improper I/O signal cable specifications The I/O signal cable must be twisted-pair or shielded twisted-pair cable with a Use input signal cable with core of 0.12 mm2 min. and the specified specifications. tinned annealed copper twisted wire. Noise interference due to length of I/O signal cable Check the I/O signal cable length. The I/O signal cable length must be no more than 3 m. An encoder fault occurred. (The pulse count does not change.) − Replace the servomotor. A SERVOPACK fault occurred. − Replace the SERVOPACK. Ambient temperature too high Measure the servomotor ambient temperature. Reduce the ambient temperature to 40°C or less. Servomotor surface dirty Visually check the surface. Clean dust and oil from the surface. Servomotor overloaded Check the load status with monitor. If overloaded, reduce load or replace with larger capacity servomotor. Troubleshooting Problem 6 6-37 Revision History The revision dates and numbers of the revised manuals are given at the bottom of the back cover. MANUAL NO. SIEP S800000 43B Published in Japan November 2008 07- 4 1 Date of publication Date of Publication April 2007 November 2008 Rev. No. Section – 1 Revison number Date of original publication Revised Contents First edition All chapters Completely revised Back Cover Revision: Address AC Servo Drives Σ -V Series USER'S MANUAL Setup Rotational Motor IRUMA BUSINESS CENTER (SOLUTION CENTER) 480, Kamifujisawa, Iruma, Saitama 358-8555, Japan Phone 81-4-2962-5696 Fax 81-4-2962-6138 YASKAWA ELECTRIC AMERICA, INC. 2121 Norman Drive South, Waukegan, IL 60085, U.S.A. Phone 1-847-887-7000 Fax 1-847-887-7370 YASKAWA ELETRICO DO BRASIL LTDA. Avenida Fagundes Filho, 620 Sao Paulo-SP CEP 04304-000, Brazil Phone 55-11-3585-1100 Fax 55-11-5581-8795 YASKAWA ELECTRIC EUROPE GmbH Hauptstraβe 185, 65760 Eschborn, Germany Phone 49-6196-569-300 Fax 49-6196-569-398 YASKAWA ELECTRIC UK LTD. 1 Hunt Hill Orchardton Woods Cumbernauld, G68 9LF, United Kingdom Phone 44-1236-735000 Fax 44-1236-458182 YASKAWA ELECTRIC KOREA CORPORATION 7F, Doore Bldg. 24, Yeoido-dong, Youngdungpo-Ku, Seoul 150-877, Korea Phone 82-2-784-7844 Fax 82-2-784-8495 YASKAWA ELECTRIC (SINGAPORE) PTE. LTD. 151 Lorong Chuan, #04-01, New Tech Park 556741, Singapore Phone 65-6282-3003 Fax 65-6289-3003 YASKAWA ELECTRIC (SHANGHAI) CO., LTD. No.18 Xizang Zhong Road. Room 1702-1707, Harbour Ring Plaza Shanghai 200001, China Phone 86-21-5385-2200 Fax 86-21-5385-3299 YASKAWA ELECTRIC (SHANGHAI) CO., LTD. BEIJING OFFICE Room 1011A, Tower W3 Oriental Plaza, No.1 East Chang An Ave., Dong Cheng District, Beijing 100738, China Phone 86-10-8518-4086 Fax 86-10-8518-4082 YASKAWA ELECTRIC TAIWAN CORPORATION 9F, 16, Nanking E. Rd., Sec. 3, Taipei, Taiwan Phone 886-2-2502-5003 Fax 886-2-2505-1280 YASKAWA ELECTRIC CORPORATION YASKAWA In the event that the end user of this product is to be the military and said product is to be employed in any weapons systems or the manufacture thereof, the export will fall under the relevant regulations as stipulated in the Foreign Exchange and Foreign Trade Regulations. Therefore, be sure to follow all procedures and submit all relevant documentation according to any and all rules, regulations and laws that may apply. Specifications are subject to change without notice for ongoing product modifications and improvements. © 2007-2008 YASKAWA ELECTRIC CORPORATION. All rights reserved. MANUAL NO. SIEP S800000 43B Published in Japan November 2008 07-4 1 -0 08-5-3