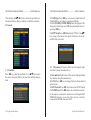
1
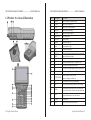
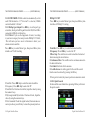
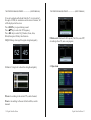
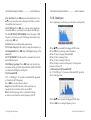
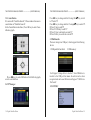
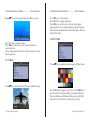
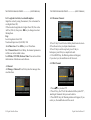
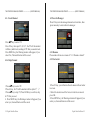
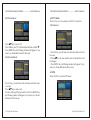
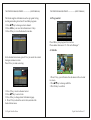
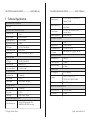
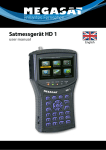
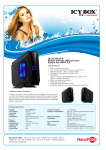
USER’S MANUAL
MDF - 9 0 09
USER’S MANUAL
THE PROFESSIONAL EQUIPMENT------------------|USER’S MANUAL|
Table of Contents
1.GUIDE....................................................................... 01
1.1 Important Safety Instructions............................ 01
1.2 PRODUCT OVERVIEW & ILLUSTRATION...... 02
1.3 INSTALLATION OF METER............................. 04
2.OUTLINE................................................................... 05
3.THE MENU OSD INSTRUCTION.............................. 05
3.1 Search............................................................... 06
3.1.1 Satellite..................................................... 06
3.1.2 LNB type.................................................. 07
3.1.3 LOW FREQ / HIGH FREQ....................... 07
3.1.4 TP Num.................................................... 07
3.1.5 Frequency................................................. 07
3.1.6 Symbrate.................................................. 07
3.1.7 Pol............................................................ 07
3.1.8 NIT Search............................................... 07
3.1.9 LNB Power............................................... 07
3.1.10 LNB 22KHZ............................................ 08
3.1.11 DisEqc type & Input................................ 08
3.1.12 Motor...................................................... 08
3.1.0.1 Quick Search......................................... 09
3.2 Spectrum........................................................... 11
3.2.1 Satellite..................................................... 12
3.2.2 LNB type................................................... 12
3.2.3 LOW FREQ / HIGH FREQt...................... 12
THE PROFESSIONAL EQUIPMENT------------------|USER’S MANUAL|
3.2.4 Pol..............................................................12
3.2.5 Center Freq................................................12
3.2.6 Bandwidth..................................................12
3.2.7 LNB 22KHZ................................................12
3.2.8 DisEqc type Input.......................................12
3.2.9 UnicableSCR............................................. 12
3.2.0.1 Analyzer.................................................. 13
3.2.0.2 Analyzer OF UnicableSCR..................... 13
3.3 Constellation......................................................14
3.4 TP Manager....................................................... 14
3.5 Multimedia..........................................................15
3.5.1 MUSIC....................................................... 15
3.5.2 VIDEO........................................................16
3.5.3 PICTURE...................................................17
3.5.4 Upgrade.....................................................18
3.6 System Setting...................................................19
3.6.1 Language...................................................19
3.6.2 Screen format............................................ 19
3.6.3 Light setting............................................... 19
3.6.4 Factory reset..............................................19
3.6.5 Longitude & Latitude;
Location &Hemisphere........................................20
3.6.6 Time Zone..................................................20
3.6.7 TV/Radio....................................................20
3.6.8 Mode, SW VER, Release Time..................20
4. Channel......................................................................20
4.1 Manager Channel.............................................. 20
THE PROFESSIONAL EQUIPMENT------------------|USER’S MANUAL|
THE PROFESSIONAL EQUIPMENT------------------|USER’S MANUAL|
4.1.1 Rename Channel...................................... 21
4.1.2 Del Channel.............................................. 21
4.1.3 Lock Channel............................................ 22
4.1.4 Skip Channel............................................. 23
4.2 Favorite Manager.............................................. 23
4.2.2 Sort order.................................................. 23
4.2.3 Favorite set............................................... 24
4.2.4 Favorite Sort............................................. 25
4.2.5 TV/Radio................................................... 25
4.2.6 Sat sort..................................................... 25
4.3 EPG.................................................................. 25
4.4 Program List..................................................... 27
4.5 Subtitle.............................................................. 27
5 Technical Specification........................................... 28
6 Trouble Shooting..................................................... 30
1
GUIDE
1.1 Important Safety Instructions
Thank you for choosing our product. Before installation, we
would like to remind you some notes, which is very important
for operating safely and properly, as follows:
Be sure to read this user manual before starting your operation.
You must install the dish with correct direction and angle. If
the dish is not working properly, contact your local dealer.
When the unit is suddenly moved to a hot area from a cold
area, it may cause some problems. In that case, turn off the
power, and turn on again after 1-2 hours.
Keep meter placed in clean space with sufficient ventilation.
Do not cover the meter with or place it on a unit that emits heat.
Clean the case by a soft cloth with a little washing liquid.
Do not remove the cover.
Do not let the unit exposed to extreme heat, cold or humid
conditions.
No liquids or any other materials to come inside of the unit.
Warning:All instructions are subject to the latest version
of software without prior notice if any new functions are
added to the equipment.
Digital Satellite Meter-01
THE PROFESSIONAL EQUIPMENT------------------|USER’S MANUAL|
1.2 Product Overview & Illustration
02-Digital Satellite Meter
THE PROFESSIONAL EQUIPMENT------------------|USER’S MANUAL|
NO
Description
1
2
LNB IN
FUNCTION
Connect to satellite antenna cable
AV OUT
Connect to AV port for TV
3
4
5
AV IN
USB Port
DC Slot
Connect to AV port for meter
Connect to USB memory
6
Power witch
Connect to Adaptor Input
Turn on/off meter
7
8
Torch LED
Speaker
Speaker Integrated
9
Power
Power indicator light
10
22K
22Khz indicator light
11
13V/18V
Vertical /Horizontal polarization voltage output light
12
13
LOCK
Signal lock indicator light
Charger (Note1) Charger indicator light
14
F1
Shows the Subtitle menu ;TV/Radio switch
15
F2
Shows the EPG menu; Audio select
16
17
F3
F4
Shows the Favorite Manager menu;lock beep alarm
Shows Manager Channel menu;TV system switch
18
Volume Control or move cursor,
NEVIGATION KEY channel or change, confirm etc
19
0-9
Select channels or enter programming
20
EXIT
Escape from present menu and save the settings
21
MENU
22
INFO
Show the main menu on the screen or jump back
to previous menu in sub-menu setting conditions
To display channel status or various
program information of current channel
23
24
M.INFO
MUTE
NO function
Enable or disable the audio output
Night lighting
Digital Satellite Meter-03
THE PROFESSIONAL EQUIPMENT------------------|USER’S MANUAL|
25
TV/R
26
SCAN
TV/Radio switch
'Quick Search' menu shortcut key
28
BEEP
Control the torch on/off;TV screen select
Lock alarm in quick search interface
29
LCD Screen
TV/Radio switch
27
30
When power on the meter ,displays the battery level
Note1: When the adapter insert dc slot, Charging indicator
scintillation three times, then the indicator is often
1.3 INSTALLATION OFMETER
THE PROFESSIONAL EQUIPMENT------------------|USER’S MANUAL|
2. OUTLINE
■
■
■
■
■
■
■
■
■
■
■
■
■
■
■
■
4.3 Inch High Definition TFT LCD Screen
Fully DVB-S/DVB-S2
H.264 Hardware decoding
Constellation analyzer
Spectrum analyzer
Digital meter for signal strength and quality
Supports scan of Auto ,Blind, Manual or NIT
Sound and Light Alarm for Locking Signal
Auto Calculate Angle of AZ ,EL
Supports DISEQC 1.0/1.1/1.2 ,22khz Tone
Speaker Integrated
Support both AV out and AV in
LNB short protect
8.4V/3000mAh Lion Battery Included
Software upgrade via USB port
Easy to carry
3. THE MENU OSD INSTRUCTION
If you have installed and connected the cables to the meter,
pressing MENU key to display the Main Menu.
■ Search
■ Spectrum
■ Constellation
■ SatManage
■ Multimedia
■ System
04-Digital Satellite Meter
Digital Satellite Meter-05
THE PROFESSIONAL EQUIPMENT------------------|USER’S MANUAL|
THE PROFESSIONAL EQUIPMENT------------------|USER’S MANUAL|
Press the keys of ▲▼◄► to move the cursor up or down in
the menu interface, then use OK key to confirm a selection.
3.1.2 LNB type: Press ◄► key, you can select single/Universal/
UnicableSCR etc, according to your physicalNB type.
3.1.3 LOW FREQ / HIGH FREQ:Enter the proper LNB
frequency referring to your LNB using the numeric keys or
pressing ◄► key.
3.1.4 TP Num:Press ◄► key into the TP list. Use ▲▼
key to move the cursor then press OK key to select the
satellite that you want.
3.1 Search
3.1.1 Satellite
Press ◄► key enter the satellite list. Use ▲▼ key to move
the cursor, then press OK key to select the satellite that you
want.
06-Digital Satellite Meter
3.1.5 Frequency:Frequency of the current transport, Input
the value by using the numeric keys.
3.1.6 Symbrate:Symbol rate of the current transport,Input
the value by using the numeric keys.
3.1.7 Pol:Press ◄► key to change Vertical or horizontal of
polarization.
3.1.8 NIT Search:Press ◄► key to turn on or off NIT Search
3.1.9 LNB Power:Press ◄► key to select the desired option.
If your meter is connected to another receiver through LOOP
THROUGH support, in case the other receiver is directly
connected to the LNB, then select OFF.
Digital Satellite Meter-07
THE PROFESSIONAL EQUIPMENT------------------|USER’S MANUAL|
THE PROFESSIONAL EQUIPMENT------------------|USER’S MANUAL|
3.1.10 LNB 22KHZ:22 KHz control is automatically set for
each LNB alternative. If “Universal” is selected, 22KHz
control should be “off state”.
3.1.11 DisEqc type & Input:Press ◄►key to set the port type
or number, which get the RF signal from the LNB, if the LNB is
connected to DiSEqC switching box.
3.1.12 Motor:If you use the equipment of motor, According
to your motor category, the meter provides DiSEqC1.2/USALS,
.This will make you have exact in formation to direct your
antenna toward a satellite.
Press ◄► key to select Motor type, then press OK key into
interface of USALS setting
DiSEqC1.2 SET
Press ◄► key to select Motor type, then press OK key into
interface of DiSEqC1.2 setting
■ Satellite: Press ◄►key to select the desired satellite.
■ Frequency: Press ◄►key to select the TP.
■ Move Step: The satellite can now be turned into the desired
direction using the arrow buttons
■ Continuous Move: The satellite can be continuous moved to
the desired direction.
■ Set Limit: Set limits for the antenna.
■ Go to Reference: A starting point for the satellite search
function can be selected by pressing the OK key.
If the signal is locked, the present position is automatic stored.
■ Satellite: Press ◄► key to select the desired satellite.
■ Frequency: Press ◄► key to select the TP.
■ Satellite Pos: Position of satellite, Input the value by using
the numeric keys.
■ My Longitude & My Latitude : Position of local, Input the
value by using the numeric keys.
■ Pos Command: Check the signal locked, the motor moves
correct position, press OK key to store the present position.
08-Digital Satellite Meter
3.1.0.1 Quick Search
In the satellite search interface, pressing OK key will enter
the quick search.
Digital Satellite Meter-09
THE PROFESSIONAL EQUIPMENT------------------|USER’S MANUAL|
If you set Longitude and Latitude Under the “3.6 system setting”,
the angle of LNB, the orientation and elevation of antenna, all
will be displayed on the screen.
Press BEEP key to open locking sound.
Press ▲▼ key to select the TP frequency.
Press ◄► key to select S/Q, Monitor, Scan, Auto,
Blind, then press OK key into function.
■ S/Q/#: Enlarge showingof the signal strength and quality
■ Monitor: Using level to show the strength and quality
THE PROFESSIONAL EQUIPMENT------------------|USER’S MANUAL|
■ Blind search :Blind search all frequency. The first, scan all TP,
According to these TPs, auto scan programs
3.2 Spectrum
■ Scan : According to the current TP, search channel,
■ Auto : According to the user db of satellite, search
channel
10-Digital Satellite Meter
Digital Satellite Meter-11
THE PROFESSIONAL EQUIPMENT------------------|USER’S MANUAL|
3.2.1 Satellite:Press ◄► key into the satellite list. Use
▲ ▼ key to move the cursor, then press OK key to select
the satellite that you want.
3.2.2 LNB type :Press ◄► key, you can select single/universal/unicable etc, according to your physical LNB type.
3.2.3 LOW FREQ / HIGH FREQ:Enter the proper LNB
fre quency referring to your LNB using the numeric keys
or pressing ◄► key
3.2.4 Pol:Vertical or Horizontal polarization
3.2.5 Center Freq:Input the value by using the numeric keys.
3.2.6 Bandwidth:Press ◄► key to change showing of the
bandwidth.
3.2.7 LNB 22KHZ:22 KHz control is automatically set for
each LNB alternative.
3.2.8 DisEqc type Input:Press ◄► key to set the port type
or number, which get the RF signal from the LNB, if the LNB
is connected to DiSEqC switching box.
3.2.9 UnicableSCR
In “3.2.2 LNB type”, if you select UnicableSCR, spectrum
will check the SCR frequency.
Press ◄►key to select keep or Reset.
Keep: Don't send SCR dictate. In the spectrum you
can check the work status of the current SCR
Reset: the SCR passage will re- establish. In the spectrum you can check the centre frequency of SCR.
THE PROFESSIONAL EQUIPMENT------------------|USER’S MANUAL|
3.2.0.1 Analyzer
After completing a constitution, press the ok key into Spectrum
■Press ▲▼ key to modify the biggest PWR value.
■Press ◄► key to change centre frequency.
■Press F1 key to change the bandwidth.
■Press F2 key to change Polar.
■Press F3 key to change 22K tone.
■Press F4 key to scan local frequency, if the signal is
locked, will scan TP.
3.2.0.2 Analyzer OF UnicableSCR
In “3.2.2 LNB type”, if you select UnicableSCR, press the
ok key into Spectrum
■ Press ▲▼ key to modify the biggest PWR value.
■ Press ◄► key to change frequency of scr.
12-Digital Satellite Meter
Digital Satellite Meter-13
THE PROFESSIONAL EQUIPMENT------------------|USER’S MANUAL|
THE PROFESSIONAL EQUIPMENT------------------|USER’S MANUAL|
3.3 Constellation
It's same with “Satellite Search”, Please make reference to
constitution of “Satellite Search”.
In the Constellation interface, Press OK key to enter Constellation graph.
Press ◄► key to change satellite .Pressing OK/▲▼ key, switch
to TP select TP
Press ◄► key to change satellite .Pressing▲▼ key to select TP.
■ Press F1key to add TP
■ Press F2 /OK key to edit TP
■ Press F3 key to deletethe current TP
■ Press F4 Key to search the current TP
3.5 Multimedia
The meter intergrates USB port, which support the following
device:
1.USB portable harddisk
2.USB memory
Press ◄►key to select Refresh or Exit.Refresh graph,
or exit constellation.
3.4 TP Manager
14-Digital Satellite Meter
It will appear “storage device is inserted ” when USBdevice is
inserted to the USB port that means the usb device has been
recognized and can be used.Otherwise will appear “USB Device
Not Found”.
3.5.1 MUSIC
Digital Satellite Meter-15
THE PROFESSIONAL EQUIPMENT------------------|USER’S MANUAL|
Press ▲▼ key to select song, then press OK key to play
THE PROFESSIONAL EQUIPMENT------------------|USER’S MANUAL|
Press ◄►key to control volume.
Press MENU key to appear playing bar.
Press ◄►key to move the cursor, then the tip will appear
on upper right of screen, then press OK key to operate function.
These functions are Backward, Forward, Play/Pause, Previous
file, Next file, Stop.
3.5.3 PICTURE
Press F1/F2 key to control volume.
Press ◄►key to move the cursor, then press OK key to
operate function.
There are functions of Play/Pause, Previous song, Next song
and stop and so on.
3.5.2 VIDEO
Press ▲▼ key to select picture, then press OK key to play.
Press ▲▼ key to select the video file, then press OK key to play.
Press MENU key to appear playing bar. Press ◄►key to
move the cursor, then press OK key to operate function.
There are functions of Rotating, Delay setting, ZOOM,
Play/Pause, Previous Picture, Next picture, Stop.
16-Digital Satellite Meter
Digital Satellite Meter-17
THE PROFESSIONAL EQUIPMENT------------------|USER’S MANUAL|
THE PROFESSIONAL EQUIPMENT------------------|USER’S MANUAL|
3.5.4 Upgrade
3.6 System Setting
Press F1 key to dump user database.
Press F2 key to dump default database.
Press F3 key to dump flash.
Press ▲▼ key to select update file, then press OK key to
select upgrade part: app code; user database;default database.
Example:
1.If you want to update main code, please select the main code
file like BT_CP09_V1_39_SA~N.img, the size of file is about
a few Mbytes, then select upgrade app code.
2.If you want to update user database, please select the user db
file like user db. img, the size of file is 256k bytes,then select
upgrade user db
3.If you want to update default database, please select the
default file like asia. img, the size of file is128k bytes,then
select upgrade default db.
Warning: while updating meter software data, should not
power off and must wait for finish write data.
18-Digital Satellite Meter
3.6.1 Language:Press ◄►key to select language.
3.6.2 Screen format:Press ◄► key to select Screenformat
: 4:3PS/4:3LB/16:9PS/16:9LB.
3.6.3 Light setting:Press ◄► key to control delay of key
light: off/5s/10s/20s.
3.6.4 Factory reset: The factory default allows user to restore
the factory-reset values, when you press OK key, the Warning
window will appear, if you select yes, the system setup will be
restored to the default values.
Warning: On selecting factory default you will lost all of
data and information, which was previous installed.
Digital Satellite Meter-19
THE PROFESSIONAL EQUIPMENT------------------|USER’S MANUAL|
THE PROFESSIONAL EQUIPMENT------------------|USER’S MANUAL|
3.6.5 Longitude & Latitude; Location &Hemisphere
Input the value by using the nu meric; the value must be
not higher than180;
If the location longitude A is higher than 180, the value
will be (360-A), then press ◄► key to change location/
Hemisphere
Exp:
Local longitude is East 200.
You should input west (360-200)=160
3.6.6 Time Zone :Press ◄►key to set Time Zone.
3.6.7 Channel Reset:Press OK key, the channel parameters
will be reset to the default values.
3.6.8 Mode, SW VER, Release Time:You can look into
information of hardware and software.
4.1.1 Rename Channel
1.Press F1 key. You will notice the Keyboard menu in screen.
2.Press the arrow keys to Input channel name.
3.Press F3 key to switch caps lock; press F1 key to
backspace; press F4 key to complete the edit.
4. Press MENU key ,the Warning window will appear,
if you select yes, the modification will be saved.
4.1.2 Del Channel
4. Channel
4.1 Manager Channel:Press F4 key into the manager channel interface
1. Press ▲▼ key to select TV.
2. Press F2 key, the TV will be marked with the symbol“X”,
marking all channels that you need to delete.
3. Press MENU key, the Warning window will appear,if you
select yes, the modification will be saved.
20-Digital Satellite Meter
Digital Satellite Meter-21
THE PROFESSIONAL EQUIPMENT------------------|USER’S MANUAL|
THE PROFESSIONAL EQUIPMENT------------------|USER’S MANUAL|
4.1.3 Lock Channel
4.2 Favorite Manager
Press F3 key into the manager channel sort interface, then
press menu key to return favorite manager.
Press ▲▼ key to select TV.
Press F3 key, then input “0, 0, 0, 0”, the TV will be marked
with the symbol lock, marking all TV that you need to lock.
Press MENU key, the Warning window will appear, if you
select Yes, The modification will be saved.
4.2.1 Rename
Please make reference to rename of “4.1.1 Rename channel”
4.1.4 Skip Channel
4.2.2 Sort order
1.Press ▲▼ key to select TV.
2.Press F4 key, the TV will be marked with the symbol “↑↓”.
3.Press ▲▼ key to skip TV, Press F4/OK key to confirm, skip
all TV that you need.
4. Press MENU key, the Warning window will appear,if you
select yes, the modification will be saved.
1.Press F2 key, you will notice the sub-menu with sort order
in screen.
2.Select the desired one of the four sort order in screen and
press OK.
3.Press MENU key, the Warning window will appear,if you
select yes, the modification will be saved.
22-Digital Satellite Meter
Digital Satellite Meter-23
THE PROFESSIONAL EQUIPMENT------------------|USER’S MANUAL|
THE PROFESSIONAL EQUIPMENT------------------|USER’S MANUAL|
4.2.3 Favorite set
4.2.5 TV/Radio
Press F1 key over 3 seconds to switch TV or radio list.
4.2.6 Sat sort
Press ▲▼ key to select TV.
Press OK key, the TV will be marked with the symbol '❤ '.
Press MENU key, the Warning window will appear, if you
select yes, the modification will be saved.
4.2.4 Favorite Sort
1. Press F4 key, you will notice the sub-menu with sort order
in screen.
2. Press ▲▼ key to select satellite sort, the channel list will
be changed.
3. Press MENU key, the Warning window will appear, if you
select yes, the modification will be saved.
4.3 EPG
Press the F2 key to show EPG menu
Press F3 key, you will notice the sub-menu with sort order
in screen.
Press ▲▼ key to select sort.
Favorite setting will be put into this sort.Press MENU key,
the Warning window will appear, if you select yes, the modification will be saved.
24-Digital Satellite Meter
Digital Satellite Meter-25
THE PROFESSIONAL EQUIPMENT------------------|USER’S MANUAL|
THE PROFESSIONAL EQUIPMENT------------------|USER’S MANUAL|
The Guide supplies information such as program listing,
starting and ending items for alll available programs.
4.4 Program List
1.Press ▲▼ key to change current channel.
2.Press ◄►keys to view the information in 7 days.
3.Press F2 key to view the booked items data.
Press OK key into program list interface.
Please make reference to “4.2 Favorite Manager”.
4.5 Subtitle
In the booked items menu, press F1 key to cancle the current
item,press menu to return.
Press F1 key to items setecting.
1.Press F1 key, you will notice the sub-menu with sort order
in screen.
2.Press▲▼ key to change subtiltle.
3.Prss OK key to confirm.
1.Press F1 key, return to channel select.
2.Press ▲▼ key to select item.
3.Press F4 key to change detail information page.
4. Press F2 key to book the current item,and enter the
booked items menu.
26-Digital Satellite Meter
Digital Satellite Meter-27
THE PROFESSIONAL EQUIPMENT------------------|USER’S MANUAL|
5 Technical Specification
THE PROFESSIONAL EQUIPMENT------------------|USER’S MANUAL|
Resolving rate
PAL-25 frame@720*576,NTSC-30
frame@720*480,
Signal compatibility
Support conversion for different
video formats
Video Format
4:3,16:9,By Pan & Scan and Letter
Box conversion
Audio output mode
Stereo, Mono,R/L
DATA SERVICE PORT
Connector
USB
Data protocol
File management system
USB2.0 interface
NTFS,FAT32,FAT16
file format
wma,mp3,mp4,avi,jpg,jpeg,bmp,img
TRANSMISSION STANDARDS
DVB-S2/S
SATELLITE INPUT/DEMODULATION
Connector Type
F Type
Input Frequency
Signal Input Level
950 to 2150 MHz
- 65 to -25 dBm
Band Switch Control
22KHz
LNB Supply
Demodulation Type
13V/18V, IMax 400mA
Symbol Rate
2<Rs<45 M band(SCPC/MCPC)
QPSK,8PSK
LCD FEATURES
LCD Type
TFT TRANSMISSIVE
Number of Dots
480(RGB) x272
Active area (WxH)
95.04x53.86 mm 2
AV output interface
Connector Type
3.5 mm Jack
Video Output
Audio output
CVBS,
Stereo Audio L/R output
AV input interface
MICROPROCESSOR
Microprocessor
Amlogic
Clock Frequency
180MHz
SDRAM Memory
512Mbit
Power SUPPLY
Li_Ion Battery
8.4V/3000mAh
Adapter
OUTPUT :DC12V/1.5A,
INTUPT :100-240VAC 50/60Hz
Power consumption
Max. 10W
PHYSICAL CHARACERSTICS
Connector Type
3.5 mm Jack
Video input
CVBS,
Audio input
Stereo Audio L/R input
Size (W x D x H)
Net Weight
205x125x45(mm 3)
0.66KG
AUDIO/VIDEO PROCESSING
Video decompression
28-Digital Satellite Meter
ASP@L5 HD resolution,H.264
MP&HP@L4,HW JPEG decoding
Digital Satellite Meter-29
THE PROFESSIONAL EQUIPMENT------------------|USER’S MANUAL|
6
THE PROFESSIONAL EQUIPMENT------------------|USER’S MANUAL|
Trouble Shooting
Problem
Possible Causes
What To Do
No display light up
Power switch is not on
Run out of batteries
Check to make sure power
on.Even on adapter.
No sound or picture,but
the front panel power
light is ON.
AV IN jack insert,
but no video input
Pull out AV IN cable
No sound or picture
The satellite dish is not
pointing at the satellite.
Adjust the dish. Check
the Signal Level in the
Antenna Setup Menu
Bad picture/Blocking Error
No signal or weak signal
Bad picture
/Blocking Error
The satellite dish in not
pointing at the satellite
Adjust the dish.
Signal is too strong
Connect a signal
attenuator to the
LNB input
Satellite dish is too small
AV out No picture
(Video)
Check the cable connections.
LNB and other equipment
connected between the LNB
and the meter and adjust the
dish.
Change to a larger dish
LNB noise factor too high.
Change to an LNB with
lower noise factor
The LNB is faulty.
Change the LNB
The system is connected by SCART cable and
TV is not in AV mode.
ChecktheUHFchannel,
fixed in your system and
turn the UHF properly.
Out of battery
Even on adapter
Key blocks
make sure no blocks
between the front panel
The key is not working
Note: If you still cannot resolve the problem with the above
references. Please contact the local dealer or their aftersales
service center.
30-Digital Satellite Meter
Digital Satellite Meter-31