1
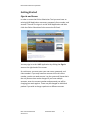
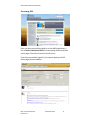
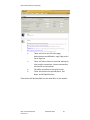
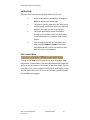
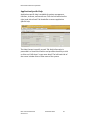
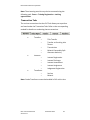
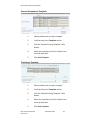
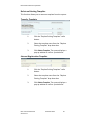
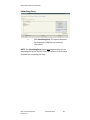
Online Submission Tool: Common Elements OLS: Common Elements Version 3.0 December 2012 Information Services Corporation Disclaimer The materials in this reference guide are for demonstration purposes only. The forms are subject to change at any time without notice. Use of outdated forms may result in transactions being rejected or delayed. Always go to the Information Services Corporation (ISC) of Saskatchewan website to download the most recent versions of the forms. Information Services Corporation (ISC) of Saskatchewan will not be responsible for loss resulting from the use of outdated forms. The characters and events depicted in this reference guide are fictional. Any similarity to real events or persons (whether living or deceased) is unintentional. Copyright 2012 by Information Services Corporation (ISC) of Saskatchewan. All rights reserved. No part of this publication may be copied, reproduced, translated or reduced to any electronic medium or machine-readable form, in whole or part, without prior written permission of Information Services Corporation (ISC) of Saskatchewan. While every reasonable precaution has been taken in the preparation of this reference guide, the authors and publishers assume no responsibility for errors or omissions or for uses made of the material contained herein and the decisions based on such use. Neither the authors nor the publishers make any images, warranties or guarantees of any kind, either expressed or implied. Neither the authors nor the publishers shall be liable for any indirect, special, incidental, or consequential damages arising out of the use or inability to use the contents of this book whether the publisher has been advised of the use of this publication or not. OLS: Common Elements Version 3.0 December 2012 Information Services Corporation Revision History Version # Revision Date OLS: Common Elements Version 3.0 Summary of Changes December 2012 Pages Changed Information Services Corporation Table of Contents Overview ........................................................................................... 1 Objectives ..................................................................................... 1 What Is OLS? ..................................................................................... 2 OLS ................................................................................................ 2 Benefits and Features of OLS........................................................ 2 Technical Workstation Requirements .......................................... 4 File Uploads .............................................................................. 6 Getting Started ................................................................................. 7 Sign-In and Access ........................................................................ 7 Accessing OLS ........................................................................... 8 Reference .......................................................................................... 9 OLS Home Page ................................................................................. 9 Home Page Links ......................................................................... 11 Alerts ........................................................................................... 12 OLS News .................................................................................... 12 OLS Notifications ........................................................................ 13 Email Notification System ....................................................... 14 Online Help ................................................................................. 15 OLS General Help .................................................................... 15 Application Specific Help ........................................................ 16 Field Level Help ....................................................................... 17 Error Messages Help ............................................................... 17 OLS: Common Elements Version 3.0 December 2012 Information Services Corporation e-Learning Tutorials ................................................................ 17 Transaction Tabs ......................................................................... 18 Search Section ............................................................................ 19 Search by Land Description .................................................... 19 Search by Owner Name .......................................................... 21 Search by Parcel Number ....................................................... 23 Search by Title Number .......................................................... 23 Title Search Results ................................................................. 24 Common Components .................................................................... 26 Templates ................................................................................... 26 Create a New Template .......................................................... 29 Apply an Existing Template to an Application ........................ 31 Replace an Existing Template ................................................. 33 Delete an Existing Template ................................................... 35 Client Entities .............................................................................. 37 Submitting Party ..................................................................... 38 Create New Client Entity ........................................................ 39 Select From Packet ................................................................. 40 Search for Client ..................................................................... 41 Existing Client.......................................................................... 42 Entering Packets Into the System ................................................... 43 Create A New Packet .................................................................. 43 Select an Existing Packet............................................................. 44 OLS: Common Elements Version 3.0 December 2012 Information Services Corporation Select Existing Packet ............................................................. 44 Search for Packet .................................................................... 45 Advanced Search for Packet ................................................... 46 Request Title Print .......................................................................... 47 Managing Authorizations and Attachments................................... 50 Authorizations vs. Attachments ................................................. 50 Managing Authorizations and Attachments – The Basics .......... 52 Step-By-Step Reference .................................................................. 53 Step 1: Add Authorizations or Attachments to Applications in the Packet ........................................................................... 53 Step 2: Identify Documents as Authorizations or Attachments ........................................................................... 63 Manage Authorization and Attachment Documents ..................... 66 View Uploaded Documents .................................................... 66 Rename Uploaded Documents ............................................... 67 Remove Uploaded Documents ............................................... 68 Validation, Errors, Create Summary Report and Submit Packet 69 Field Level Validations ............................................................ 69 Transaction Level Validations ................................................. 70 Packet Level Validations ......................................................... 72 Notables .......................................................................................... 80 OLS: Common Elements Version 3.0 December 2012 Information Services Corporation Overview This module will provide you with a basic understanding of the Online Submission (OLS) tool and provide specific information on elements common to all areas of the tool. Objectives As a result of this module you will: • • • • Understand the technology requirements to use the OLS tool. Understand how to sign-in to the OLS tool. Have a basic understanding of the Transaction types. Understand the elements that are common to all areas of the OLS tool including validation errors, templates, searching for titles, and creating and using client entities. OLS: Common Elements Version 3.0 December 2012 1 Information Services Corporation What Is OLS? Online Submission (OLS) is a highly efficient and interactive packet preparation alternative to the forms-based method of submitting applications to the Land Registry. OLS is available to anyone with a LAND System account and provides customers opportunities to reduce the amount of manual data entry, validate information prior to submission, and manage personal workflow. Note: Packets are still submitted for examination by a title processor, but OLS helps ensure that all the required information is included and valid before the packet is submitted. OLS Information that is commonly required is presented along with a link to the full details if that information is necessary. The above is an example of the results screen that the system will display. If you need more information, click on the hyperlink to reveal additional details as illustrated below. Benefits and Features of OLS • Reduced Packet Rejections o Real-time feedback on data entered into system. o Validation of packets before they are submitted which ensures that all required data (nine digit numbers, etc.) are OLS: Common Elements Version 3.0 December 2012 2 Information Services Corporation entered and authorizations and attachments are included in your packet. Note: This does not ensure that your authorizations and/or attachments are completed accurately. • Save Time o o o o o OLS: Common Elements Version 3.0 Create customized templates for re-use in common transactions. Real-time access to information to compile your transaction. Edit, organize, and store work already created within the OLS Tool. Upload, fax, or mail authorization and attachment documents which may be stored securely in your personal My OLS Documents area. Carries forward previously entered data so you don’t have to re-enter it. December 2012 3 Information Services Corporation Technical Workstation Requirements You will need the following regardless of your computer’s configuration: • Browser: Internet Explorer 5.5 or higher • Screen Resolution: 1024x768 or higher • Additional Software: Adobe Acrobat Reader The minimum requirements you will need: • • • • • Operating System: Windows 2000, Windows XP (Home or Professional), Windows Vista Processor or CPU o Intel: Pentium 2 o AMD: K5 RAM Memory o o o Windows 2000: 128 MB Windows XP: 256 MB Windows Vista: 512 MB Internet Download and Upload speed of 256 kb/s Fax machine to upload Authorizations and Attachments For optimal performance, you will have following or better: • • • Operating System: Windows XP (Home or Professional), Windows Vista Processor or CPU o Intel: Pentium 4, Celeron, Viiv, vPro, Centrino, T, M, Duo, Xeon o AMD: Athalon, K7, Athalon 64, Opteron RAM Memory o Windows 2000: 128 MB o Windows XP: 512 MB OLS: Common Elements Version 3.0 December 2012 4 Information Services Corporation Windows Vista: 1 GB Internet Download and Upload speed of 512 kb/s Scanner to upload Authorizations and Attachments o • • Note: Details to identify the properties on your system may be found in the OLS Technical Requirements Guide found by clicking the Help link at the top of the OLS Home page. OLS: Common Elements Version 3.0 December 2012 5 Information Services Corporation File Uploads When you submit most packets you also need to include additional documents that may be uploaded to a secure area on ISC's system that is only accessible with your client number and password. You may add your documents at different points in the process. For example, you may: • • • Upload a document from your PC or network any time after creating the packet (the packet must be created before you can add authorizations or attachments to it). Fax or Mail in documents using the Fax or MailIn cover page feature. Use the My OLS Documents area to store and retrieve documents that are regularly used across packets. The following guidelines exist for uploading documents to ISC: • • • Maximum file size for an uploaded file will be 8Mb Scanned files in black and white files at 200x200 are smaller files than color scanned files that will take longer to upload. Valid files that will be accepted: o Word (*.doc) – Office95, Office97, Office2000, OfficeXP, Office2003 o Acrobat PDF (*.PDF) – 1.0 to 1.4 o Tiff (*.TIFF) OLS: Common Elements Version 3.0 December 2012 6 Information Services Corporation Getting Started Sign-In and Access In order to access the Online Submission Tool you must have an existing LAND Application username, password, client number, and account. The user first signs-in to the LAND Application and then clicks the Online Submission link to access the OLS tool. You may sign-in to the LAND Application by clicking the Sign-in area on the right-hand of the screen. At a minimum, you must enter your user name, password, and client number. If you only have one account tied to this client number, you do not need to enter it as the system will know that is the only account that can be charged. If you have multiple accounts, enter the account number and password you will be charging your work against. These may be changed on individual packets if you wish to charge a packet to a different account. OLS: Common Elements Version 3.0 December 2012 7 Information Services Corporation Accessing OLS Once you have successfully signed-in to the LAND Application, a link to Online Submission (OLS) is located along the left-hand side of the page. Click this link to access the OLS tool. If you have successfully signed-in, the system displays the OLS Home page illustrated below. OLS: Common Elements Version 3.0 December 2012 8 Information Services Corporation Reference The Online Submission tool is broken down into several components that are accessed through navigational tabs located on each page. A list of the OLS Tabs is as follows: • • • • • OLS Home Packet Management Transfer Interests Transforms Detailed information on packet management and the different transactions is located in separate modules. This module focuses on a number of elements that are common to all areas of the OLS Tool. It also includes information on general components of the system. OLS Home Page The OLS Home page is the first page the system displays when you click on the Online Submission (OLS) link. Once you have opened the OLS application, you may also access the home page at any time by clicking the OLS Home tab. Note: If you are working on a transaction, be sure to save your work before clicking on the OLS Home tab to prevent loss of work. The OLS tool provides a number of functions and features on the Home page as described below. OLS: Common Elements Version 3.0 December 2012 9 Information Services Corporation • • • • There are links to the ISC Home page, Authorizations and Affidavits, Legal, Help, and a link to Sign Out. There are Tabs to create or continue working on title transfer transactions, interest transactions, and transform transactions. The ability to perform a title quick search. There are sections that provide Alerts, OLS News, and OLS Notifications. Each section will be described in more detail later in this module. OLS: Common Elements Version 3.0 December 2012 10 Information Services Corporation Home Page Links The top right-hard corner of the Home page contains five hyperlinks. These links are used to provide information. • • • • • The ISC Home link will take you to the ISC Signed-In Home page. The Authorizations and Affidavits links will take you to the page that houses all the necessary authorization and affidavit documentation you will require for your transactions. The Legal link will take you to the page that houses information as to the policies and practices ISC follows to manage your personal information. The Help link will take you to the page that houses Online Submission help. This is described in more detail later in this module. The Sign Out link will take you out of the OLS system and back to the Sign-In Home page. OLS: Common Elements Version 3.0 December 2012 11 Information Services Corporation Alerts This area provides information on system downtimes or upcoming system changes. The area will be blank if there are no alerts. OLS News This area provides News about software or functional changes to the OLS system. The area will be blank if there is no news. News items appear in this area as “briefs.” To see the detail on any News item, click the hyperlink and it will appear in a new window. OLS: Common Elements Version 3.0 December 2012 12 Information Services Corporation OLS Notifications This area provides information about work in progress. Certain functions in the OLS system are performed in the background. When the function has completed, the system notifies you in this area. The list of possible notification messages is as follows: • • • • • • Authorization and/or Attachment documents sent to ISC via Fax or Mail have been received and are ready to use. Authorization and/or Attachment documents sent to ISC via Fax or Mail that cannot be attached to the packet. An uploaded Authorization or Attachment document contained a virus. A Submitted packet passed or failed submit validation. A Draft packet will expire soon. The Summary Report or Packet Print Request that you created is ready to view. The notification can be opened to see more detail. In some cases, the detailed notification includes a hyperlink that opens the packet associated with the notification. To see more detail for a notification: 1. Click the check box to the left of the notification you want to view. 2. Click Details. The notification details display in a new window. OLS: Common Elements Version 3.0 December 2012 13 Information Services Corporation Notifications will automatically expire and be deleted after one month or you may delete them by clicking the check box to the left of the notification(s) and then clicking Delete. Note: If ISC has an email address on file for the client number you used to sign in, a copy of each notification will also be sent to that email address. Email Notification System You may also receive notification of changes to the OLS Tool using ISC’s Email Notification System (ENS). There are several options that allow you to tailor the emails so that you only receive information on your areas of interest. See the ISC website and sign up today. OLS: Common Elements Version 3.0 December 2012 14 Information Services Corporation Online Help There are four ways you can get help within the OLS tool: • • • • General Help which is available by clicking the Help link at the top of every page. Transaction Specific Help which will take you to a contextually specific area within the help files based on the page you are on at the time. Field Level Help which can be accessed by clicking on the question mark icon to find out more information on a particular field or task button. Error messages that will be returned to you after clicking Validate or Submit if you have provided data that is either inaccurate or that does not exist in the database. OLS General Help Clicking on the Help link will open the top level Help page. Help information is presented in a hierarchical fashion and provides the ability to click on links and “drill down” to get more detail. The lefthand side of the screen includes links for other Land Registry areas. The top right-hand corner of the screen includes a printer-friendly link to Print current pages. OLS: Common Elements Version 3.0 December 2012 15 Information Services Corporation Application Specific Help Application specific help is available for packet management, transfers, interests, and transforms. Click the link located on the right-hand side of each Tab Header Bar to access application specific help. The Help Content is specific to each Tab. Help information is presented in a hierarchical fashion and provides the ability to click on links and “drill down” to get more detail. The left-hand side of the screen includes links to other areas of the system. OLS: Common Elements Version 3.0 December 2012 16 Information Services Corporation Field Level Help Throughout the OLS tool you will see a question mark icon. This indicates there is help information available for that specific field. Select the question mark help icon to view instructions or descriptions that will assist you in completing your transaction. For example: Error Messages Help The OLS tool provides the ability to validate information once it has been entered into a transaction. When Validate is clicked, the system goes through a series of checks. If errors or warnings are encountered the system will provide a message that includes information on how to resolve the error. e-Learning Tutorials The e-Learning tutorials consist of 13 web-based modules that show you how to use the Online Submission (OLS) tool. When you are signed into the ISC website, these tutorials are located under the Training section of the Help tab. Click the Online Submission link (it is the last link found under the Online Submission Help heading. This site also provides you with a User’s Manual link that houses step-by-step learning modules in PDF format that you may view, print and save to your hard drive if you choose. You may want to print this module to use as a resource while taking the eLearning tutorials. OLS: Common Elements Version 3.0 December 2012 17 Information Services Corporation Note: The eLearning tutorials may also be accessed using the following path: Forms > Training Registration > training opportunities. Transaction Tabs The various transactions that the OLS Tool allows you to perform are found under the Transaction Tabs. Refer to the corresponding module for details on conducting these transactions. • Transfers o o o o o • • Title Transfer Transfer to Surviving Joint Tenant Transmission Mineral Commodity Split Alternate Authority Interests o o o o o Transforms o o Interest Registration Interest Discharge Interest Amendment Interest Assignment Judgement Registration Surface Mineral Note: Condo Transforms cannot be handled in OLS at this time. OLS: Common Elements Version 3.0 December 2012 18 Information Services Corporation Search Section The Search section is accessible from the OLS Home page, Transfers tab, Interests tab, and Transforms tab and allows you to locate current title information. Note: The Search criteria defaults to “Land Description,” however, you may also search by “Owner Name,” “Parcel Number” or “Title Number.” Search by Land Description The OLS tool provides the ability to search for titles by Land Description for Typical Rural, Typical Urban, or Other which is any combination of the fields. Note: When searching by Land Description “Typical Rural” or “Other,” you can retrieve all parcels related to the land description, such as Legal Subdivisions and Blocks/Parcels on Plan, by checking the “Return all titles” check box. Typical Rural 1. Select Land Description from the Search By drop down box. 2. Click the Typical Rural radio button. 3. Enter the relevant land description information into the appropriate fields. The required fields are indicated. 4. Click Search. The Search Results will be displayed. OLS: Common Elements Version 3.0 December 2012 19 Information Services Corporation Typical Urban 1. Select Land Description from the “Search By” drop down box. 2. Click the Typical Urban radio button. 3. Enter the relevant land description information into the appropriate fields. The required fields are indicated. 4. Click Search. The Search Results will be displayed. 1. Select Land Description from the “Search By” drop down box. 2. Click the Other radio button. 3. Enter the relevant land description information into the appropriate fields. The required fields are indicated. 4. Click Search. The Search Results will be displayed. Other OLS: Common Elements Version 3.0 December 2012 20 Information Services Corporation Search by Owner Name This search allows you to search for titles by the Owner Name. This could be a family name or a corporation name. You may also search for names that are similar in spelling. This search provides an intermediate step. The first results list returned is a listing of names that match the entered criteria. From this list you may select the correct individual or corporation and view all titles for that entity. 1. Select Owner Name from the “Search By” drop down box. 2. Click the radio button for the type of name you wish to search for. 3. Enter the name in the appropriate field. Select the “Include names that are similar in spelling” check box if applicable. 4. Click Search. 5. The name search results display. Use the scroll bar to see all the results. 6. Click the radio button beside the appropriate name. 7. Click View All Titles. The Search Results will be displayed. OLS: Common Elements Version 3.0 December 2012 21 Information Services Corporation NOTE: An advanced search option is also available when searching by Owner Name. Click on the link and the system displays the screen illustrated below. Entering information into the Advance Search fields further limits the search results. Enter information into any or all of the fields and click Search. You will need to make sure that the information that you are entering in the Advanced Search field is accurate; otherwise you may end up with no (or incorrect) results. OLS: Common Elements Version 3.0 December 2012 22 Information Services Corporation Search by Parcel Number 1. Select Parcel Number from the “Search By” drop down box. 2. Enter the Parcel Number. 3. Click Search. The Search Results will be displayed. Search by Title Number 1. Select Title Number from the “Search By” drop down box. 2. Enter the Title Number. 3. Click Search. The Search Results will be displayed. OLS: Common Elements Version 3.0 December 2012 23 Information Services Corporation Title Search Results 1. Click the check box next to the desired title. 2. Click one of the action buttons: o o o o The Use Selection in Transfer button moves you to the Transfers Transaction tab and populates the Titles to Transfer section with the selected search results. The Use Selection in Interest button moves you to the Interests Transaction tab and populates the Attach Interest to section of an interest registration with the selected search results. The Print button prints a copy of the search results on your printer. The Close button removes the search results from the screen. Note: If the count shows “0 Record(s) Found,” it indicates that there are no title results that match the entered search criteria. Note: It is important to ensure your browser print setting is set to “Print background colors and images.” If these settings are not selected, portions of the screen will not print correctly. To locate this setting in the Internet Explorer browser, select the Internet Options item under the Tools menu. When the Internet Options OLS: Common Elements Version 3.0 December 2012 24 Information Services Corporation screen appears, click the Advanced tab and scroll down to the Printing item, click the “Print background colors and images” check box, and then click OK. You will also need to ensure that your print settings are set to “Landscape” mode or else the report will not print properly. The Title No. field includes two icons that are hyperlinks. Click the document icon to view the title details. Standard fees apply to access title details. Click the dollar icon to see the fees for viewing title details. Note: When conducting a title search on the OLS Home page or on the Transfer, Interest, or Transform Tabs of the OLS Tool, you can print the search results grid. OLS: Common Elements Version 3.0 December 2012 25 Information Services Corporation Common Components Templates Templates are a convenient tool that assist in completing applications that contain the same or similar information. When you use a template you do not have to enter all of the information in the application each time. A template can include information from any or all the relevant fields. Once a template has been applied to an application, any of the information in that application (except Interest Type in an Interest Registration) may be changed or updated. The updated information can be saved back to the template by replacing the existing template or saving it as a new template. Templates can save time by allowing you to fill in the appropriate fields and use the information in multiple setups. If you need to setup the same or similar title setup information on multiple items you may use a template. Templates may also be used in other packets. Note: Each template you create is unique to the client number that you sign in with. Note: The list of templates displayed is specific to the transaction that you are currently performing. The system provides the ability to build templates for the following applications: • • • • Title Transfer setup details Interest Registration details Interest Assignment details Transform setup details The specific fields that form a template differ between each application type. Any or all of the fields can be included in the template. A description of the fields for each application type is as follows: OLS: Common Elements Version 3.0 December 2012 26 Information Services Corporation • • • Title Transfer and Transform Setup o Ownership Structure o Fractional Title Share o New Title Value o New Owner information (only if an existing ISC client number is used) o Conditions of Registration Interest Registration o Interest Type o Holder's Mortgage or Interest Reference Number o Interest Value o Feature Number o Scheduled Expiry Date o Description of Interest o Conditions o Interest Holder Setup information including: o Number of Shares o Fractional Share o Holder information (only if an existing ISC client number is used) Interest Assignment o Interest Holder Setup information including: o Number of Shares o Fractional Share o Holder information (only if an existing ISC OLS: Common Elements Version 3.0 December 2012 27 Information Services Corporation client number is used) The four functions that may be performed with templates are: • • • • Create a New Template Apply an Existing Template to an Application Replace an Existing Template Delete an Existing Template OLS: Common Elements Version 3.0 December 2012 28 Information Services Corporation Create a New Template This function allows you to save the application information entered into the OLS tool as a template. Transfer Template 1. Work through the setup and fill in the fields that will make up the template. 2. Scroll back up to the Template section. 3. Click the “Save as new template” radio button. 4. Enter a unique template name. 5. Click Save Template. Interest Registration Template 1. Work through the setup and fill in the fields that will make up the template. 2. Scroll back up to the Template section. 3. Click the “Save as new template” radio button. 4. Enter a unique template name. 5. Click Save Template. OLS: Common Elements Version 3.0 December 2012 29 Information Services Corporation Interest Assignment Template 1. Work through the setup and fill in the fields that will make up the template. 2. Scroll back up to the Template section. 3. Click the “Save as new template” radio button. 4. Enter a unique template name. 5. Click Save Template. Transform Template 1. Work through the setup and fill in the fields that will make up the template. 2. Scroll back up to the Template section. 3. Click the “Save as new template” radio button. 4. Enter a unique template name. 5. Click Save Template. OLS: Common Elements Version 3.0 December 2012 30 Information Services Corporation Apply an Existing Template to an Application This function allows you to use a previously saved template to populate the application setup fields. Once the template has been applied, any information in any application field (except interest type) can be changed or updated. Transfer Template 1. Select the template name from the “Apply Template” drop down box 2. Click Apply. 3. Update or modify any of the information populated from the template and enter any missing information. Interest Registration Template 1. Select the template name from the “Apply Template” drop down box 2. Click Apply. 3. Update or modify any of the information populated from the template and enter any missing information. OLS: Common Elements Version 3.0 December 2012 31 Information Services Corporation Interest Assignment Template 1. Select the template name from the “Apply Template” drop down box 2. Click Apply. 3. Update or modify any of the information populated from the template and enter any missing information. Transform Template 1. Select the template name from the “Apply Template” drop down box 2. Click Apply. 3. Update or modify any of the information populated from the template and enter any missing information. OLS: Common Elements Version 3.0 December 2012 32 Information Services Corporation Replace an Existing Template This function allows you to replace information previously saved in a template with updated information. Transfer Template 1. Edit any details that you want changed. 2. Scroll back up to the Template section. 3. Click the “Replace Existing Template” radio button. 4. Select the template you wish to replace from the drop down box. 5. Click Save Template. Interest Registration Template 1. Edit any details that you want changed. 2. Scroll back up to the Template section. 3. Click the “Replace Existing Template” radio button. 4. Select the template you wish to replace from the drop down box. 5. Click Save Template. OLS: Common Elements Version 3.0 December 2012 33 Information Services Corporation Interest Assignment Template 1. Edit any details that you want changed. 2. Scroll back up to the Template section. 3. Click the “Replace Existing Template” radio button. 4. Select the template you wish to replace from the drop down box. 5. Click Save Template. Transform Template 1. Edit any details that you want changed. 2. Scroll back up to the Template section. 3. Click the “Replace Existing Template” radio button. 4. Select the template you wish to replace from the drop down box. 5. Click Save Template. OLS: Common Elements Version 3.0 December 2012 34 Information Services Corporation Delete an Existing Template This function allows you to remove a template from the system. Transfer Template 1. Click the “Replace Existing Template” radio button. 2. Select the template name from the “Replace Existing Template” drop down box. 3. Click Delete Template. The system displays a pop-up window to confirm your deletion. Interest Registration Template 1. Click the “Replace Existing Template” radio button. 2. Select the template name from the “Replace Existing Template” drop down box. 3. Click Delete Template. The system displays a pop-up window to confirm your deletion. OLS: Common Elements Version 3.0 December 2012 35 Information Services Corporation Interest Assignment Template 1. Click the “Replace Existing Template” radio button. 2. Select the template name from the “Replace Existing Template” drop down box. 3. Click Delete Template. The system displays a pop-up window to confirm your deletion. Transform Template 1. Click the “Replace Existing Template” radio button. 2. Select the template name from the “Replace Existing Template” drop down box. 3. Click Delete Template. The system displays a pop-up window to confirm your deletion. OLS: Common Elements Version 3.0 December 2012 36 Information Services Corporation Client Entities Throughout the OLS tool you will need to specify new title owners, interest holders, or title print recipients. These are known as client entities in ISC’s systems. The OLS tool provides a number of options to specify these entities: • • • • Submitting Party is the client number used when you logged in to the system or entered as the submitting party when you created the packet. In most cases, this selection is only used for Title Print Requests. Create New Client Entity allows you to create a new Client Entity in the LAND System. For Title Transfers and Transforms, the entity MUST be a person rather than a corporation. For Interest Registrations or Title Print Requests, the entity can be either. Select from Packet allows you to select Clients previously used in this packet. Search for Client allows you to search for a corporation with a COBRA-related client number by either the Corporation Name or the Corporation Number. Note: You may also search for individual entities. • Quick Add allows you to enter the client number of an existing client entity. Note: Not all options are available for all transactions types. For example, you cannot create a new corporate entity as the owner of a title. The corporation must already exist and have an active Corporations Branch (COBRA) number and an ISC COBRA-related client number. OLS: Common Elements Version 3.0 December 2012 37 Information Services Corporation Submitting Party 1. Click Submitting Party. The system populates the Recipient(s) field with the necessary information. NOTE: The Submitting Party button only appears when you are requesting title prints. See the Title Prints section of this module for details on completing this step. OLS: Common Elements Version 3.0 December 2012 38 Information Services Corporation Create New Client Entity 1. Click Create New. The system displays the Create Client entry screen. 2. Select the Client Type by clicking the “Person” or “Non-Person” radio button. o OLS: Common Elements Version 3.0 If Person is selected, enter the Last Name and Given Name. You may also enter the Second Name, Third Name, and Generation, although these fields are not required. December 2012 39 Information Services Corporation o If “Non-Person” is selected, enter the Corporation Name. 3. Enter the Mailing Address information. The system indicates the required fields. 4. Optionally enter the Other Contact Information. Certain fields are required based on your selection of Preferred Delivery Method. 5. Select the Preferred Method of Delivery for notifications. 6. Click Save. The system returns to the Recipient(s) section which is now populated with the necessary information. Select From Packet 1. Click Select from Packet. The system displays the Select from Packet entry screen. 2. Click the radio button beside the Client you wish to select. 3. Click OK. The system returns to the Recipient(s) section which is now populated with the necessary information. OLS: Common Elements Version 3.0 December 2012 40 Information Services Corporation Search for Client 1. Click Search for Client. The system displays the Search for Client entry screen. 2. Select an option from the “Search By:” drop down box. 3. Enter the name or number. If you select name you may also click the check box to “Include names that are similar in spelling.” 4. Click Find. The system returns a list of entities that match the search criteria. 5. Click the radio button beside the correct entity. 6. Click OK. The system returns to the Recipient(s) section which is now populated with the necessary information. OLS: Common Elements Version 3.0 December 2012 41 Information Services Corporation Existing Client 1. Enter the Client Number and click Quick Add. The system returns to the Recipient(s) section which is now populated with the necessary information. OLS: Common Elements Version 3.0 December 2012 42 Information Services Corporation Entering Packets Into the System In order for ISC to process your work in OLS, you must enter a packet into the system. You have two options to do this: • • Create a new packet. Select an existing packet. Create A New Packet To create a new packet in the OLS system: 1. To create a new packet, select the "Create in a New Packet" radio button. The system will open the Select or Create Packet screen. 2. If the packet is to be submitted under a different client number, enter the new Client No: and click the Find link. The system will display the name and address of the new submitting party. 3. The account information can be changed if this packet is to be charged to a different account. Enter the Account Number and Account Password for that account. 4. Enter an optional Packet Description to help you identify the packet in the Packets List. OLS: Common Elements Version 3.0 December 2012 43 Information Services Corporation 5. Click Save or Continue. The system will generate a packet number and refresh the screen allowing you to carry on with the transaction. NOTE: If you entered a Client Reference during login, it is carried forward to this field. You can change or remove it if required. This number is for your information and is another way to distinguish this packet from others. The Client Ref. No. will appear on your ISC invoice for this packet. Select an Existing Packet To add to a packet that you have already entered into the OLS system: 1. Click the “Add to Existing Packet” radio button. The screen expands. There are several options to retrieve an existing packet in order to add additional applications. Select Existing Packet 1. Enter the Packet Number or select a Packet Description from the drop down. 2. Click Select. The system will open the packet and allow you to add additional applications. OLS: Common Elements Version 3.0 December 2012 44 Information Services Corporation Search for Packet 1. Enter the Packet Number or Client Ref. No. into the corresponding field. 2. Click Search. The system will display a list of packets that match the search criteria. 3. Select the check box for the appropriate Packet. 4. Click Select. The system will open the packet and allow you to add additional applications. OLS: Common Elements Version 3.0 December 2012 45 Information Services Corporation Advanced Search for Packet 1. Click the Advanced Search link. This will then give you the ability to search for an existing packet by packet description and/or the date range the packet was created or last modified. 2. Enter any or all of the Packet Description and/or select the date range criteria from the drop down and enter or select the From Date and To Date. 3. Click Search. The system will open the packet and allow you to add additional applications. OLS: Common Elements Version 3.0 December 2012 46 Information Services Corporation Request Title Print Note: Requesting a title print is optional. The title print request list is displayed by clicking the Twisty or the Show this section link. Title print requests must be added to the list before they will appear in the list. 1. Click Add. The Request Title Prints section opens with the submitting party receiving one copy by default. 2. If more than 1 copy is required, enter the number of copies in the Send field. 3. You may change the Title Print recipient in the Selection Change Options area on the right hand side. The options are: o OLS: Common Elements Version 3.0 Submitting Party – The Client Number used to sign in to the OLS application or entered as the submitting party in the Packet Header. December 2012 47 Information Services Corporation o o o o Create New – Allows you to create a new Client entity in the Land System. Select from Packet – Allows you to select a Client referenced in this packet. Search for Client – Allows you to search for a corporate client number (Cobra related client number) or an individual client number. Quick Add with Client Number – Allows you to enter an existing Client number. 4. Select the preferred delivery method(s) for the displayed client. 5. Click End Edit to save your selection. The system displays an updated list of the requested title prints that includes: o o o o The application to which the title print request applies. The name of the recipient with delivery information. The number of copies. The method of delivery. NOTE: To request additional title prints, click Add and repeat the above steps. OLS: Common Elements Version 3.0 December 2012 48 Information Services Corporation 6. To edit or remove a title print request, click the check box in front of the request and click Edit or Remove. 7. If the list of title print request(s) is correct, click Save at the bottom of the screen. OLS: Common Elements Version 3.0 December 2012 49 Information Services Corporation Managing Authorizations and Attachments Authorizations and attachments are documents that form part of the packet and are added to the packet prior to submission. The OLS Tool has the ability to upload documents as well as store and retrieve documents for future use. Many applications require authorization and/or attachment documents to confirm the signatory has authority to approve the transaction or to provide additional information about the transaction. These documents are kept on file at ISC. The same business rules and requirements for authorization and attachments continue to apply as in the past. Authorizations vs. Attachments Authorization(s) must accompany every application except an interest registration. Authorizations allow ISC examiners to confirm the signatory has the authority to approve the transaction. The Land Titles Act, 2000 prescribes the proper execution of certain Authorizations. Also, various other Acts have specific prescribed forms of Authorization or additional requirements that relate to the particular Act. In these cases, the specific Act should be consulted. Attachments are documents that provide additional disclosure to the application. ISC does not examine attachments for validity. In the context of an interest registration, an attachment constitutes notice to third parties. Customers should be aware that they are only protected against third parties for what they disclose. Within the Online Submission tool, documents must be in electronic format. The OLS system provides the ability to fax and mail paper based documents to ISC for users without a scanner to create an electronic copy of the file for use. Once the document is in the OLS system, its use must be indicated as either an authorization or attachment for the relevant application. A number of functions are available to manage documents. These include the ability to upload, rename, view, or remove documents. OLS: Common Elements Version 3.0 December 2012 50 Information Services Corporation Copies of documents can also be stored in the My OLS Documents area where they are accessible for use in other packets. OLS: Common Elements Version 3.0 December 2012 51 Information Services Corporation Managing Authorizations and Attachments – The Basics To manage authorizations and attachments: 1. Add Authorizations or Attachments to Applications in the Packet Upload, fax, or mail documents, or move documents from the My OLS Documents storage area to the packet within the OLS system. o Use DSL. Identify Documents as Authorizations or Attachments o Add the document(s) to the appropriate transaction(s) within the packet and identify as an Authorization or Attachment. o 2. OLS: Common Elements Version 3.0 December 2012 52 Information Services Corporation Step-By-Step Reference The following provides detailed instructions that will guide you through successfully managing your authorizations and attachments. Step 1: Add Authorizations or Attachments to Applications in the Packet These steps may be performed from within a transaction or from the Packet Content List screen. The Manage Authorizations & Attachments screen in the Packet Content List is similar to the screen in the transaction tabs except it also includes a drop down box to indicate the appropriate application in the packet. Locate the Manage Authorizations & Attachments header on the Packet Content List screen and expand the section by clicking the Twisty or Show this section link. The header is found near the bottom of the screen. You may need to scroll down to find it. Upload Documents to Packet 1. Click New Upload. The upload screen will appear. OLS: Common Elements Version 3.0 December 2012 53 Information Services Corporation 2. Click Browse to display the Choose File screen to access files saved on your PC or network. 3. Browse to locate the file. Double click on the file name or Single click on the file name and click Open. The system places the location and name of the file in the “Select Files to Upload” field. OLS: Common Elements Version 3.0 December 2012 54 Information Services Corporation 4. Click Upload. The system displays a progress metre with the estimated time remaining and uploads the file. Once the file has finished uploading it will appear in the list of uploaded documents. Continue to browse and upload files until all documents are uploaded. OLS: Common Elements Version 3.0 December 2012 55 Information Services Corporation 5. When all documents have been uploaded, click Done. The system returns to the Manage Authorization and Attachment screen. 6. The uploaded documents will appear in the list. Fax or Mail Documents to Packet If you do not have electronic copies of your documents or you prefer to submit paper copies, you will need to print a cover page for each set of documents. Do NOT photocopy the cover page since the bar codes may not be readable. 1. Click the radio button for Fax or Mail cover page. 2. Click Download Cover. OLS: Common Elements Version 3.0 December 2012 56 Information Services Corporation 3. A File Download dialog box opens and provides options to Open or Save the file. NOTE: If you select Open, the cover page opens in a new window. If you select Save, the file can be saved on your PC and opened later. Click Open unless you want to save a copy to your PC. OLS: Common Elements Version 3.0 December 2012 57 Information Services Corporation 4. The Fax Cover Page you download will look as illustrated above. Print a copy of the cover page for each document to be submitted. Do not photocopy the cover page as the bar code may not be readable. It is also important to set the “Printer Properties” on your PC to “Best Quality” or “High Quality.” This will help to ensure that the bar codes are readable. o OLS: Common Elements Version 3.0 The first bar code identifies this as a document that will be attached to an OLS packet. The second bar code is the unique packet number. December 2012 58 Information Services Corporation Note: You may receive two dialog boxes when you click Download Cover. If you receive the second dialog box, it is caused by a security setting in your browser and is normal. 5. Assemble the documents with a cover page in front of each set of documents. o If you are submitting by fax, the entire package of documents is faxed together. Fax the package to 306-7981525. Do NOT fax this package to any other ISC fax number. It is very important your fax is set to the highest resolution available. The setting may be “Very Fine” or “Extra Fine.” If you do not use this setting, the bar codes may not be readable. Note: If the documents are submitted by fax, they should be ready for use in 10 to 15 minutes. This time frame may be longer if there is a backlog on the fax server. If the documents are submitted by mail, it could take a couple of days before they are ready for use. Note: If the bar codes on the cover page are not readable, the documents will not be added for use in the packet. If this happens, you will receive a notification letter by fax indicating that the bar codes were unreadable. The letter will also provide details on the steps you should take to help ensure that the bar codes are readable. You will need to re-fax the documents. o OLS: Common Elements Version 3.0 If you are submitting by mail, only send copies of your original documents with each mail cover page, as ISC does not return these documents. Send the entire package to: December 2012 59 Information Services Corporation Information Services Corporation 1301 – 1st Avenue Regina, Saskatchewan S4P 3V7 6. When the document is ready for use, it will appear in the list of uploaded documents for the packet and you will receive a notification for each document on the OLS Home page in the OLS Notification area. NOTE: It is recommended that you view each document submitted by fax or mail to ensure that it is complete and that all pages included are submitted. To view the notification details, click the check box in the left column and then click Details. The notification details appear in a pop up window. Note: The system generates a unique name for each document submitted by fax or mail. You may want to rename each document to something that is easy to identify. OLS: Common Elements Version 3.0 December 2012 60 Information Services Corporation Add Documents to Packet from My OLS Documents The My OLS Documents storage area is used to store documents that can be accessed from any of your packets. Documents can be uploaded to this area, added from this area to a packet, and added from a packet to this area. 1. From the Manage Authorizations and Attachments screen, click Add From OLS Docs. The system opens the My OLS Documents screen. 2. Click the check box to the left of the document(s) you want to move. Note: More than one document may be selected at once. 3. Click Add to Packet List. 4. Click Done. OLS: Common Elements Version 3.0 December 2012 61 Information Services Corporation 5. The system closes the My OLS Documents screen and the document(s) is added to the uploaded document list. OLS: Common Elements Version 3.0 December 2012 62 Information Services Corporation Add Standard Mortgage Documents from Document Submission Library 1. If you know the DSL#, you may enter it. If you do not know the DSL#, you may search for it by clicking Search DSL. This will launch the DSL application and allow you to identify the number. 2. Click Add to Packet. The standard document will be added. Step 2: Identify Documents as Authorizations or Attachments Once documents have been uploaded to the OLS system, they must be identified as an Authorization or Attachment for the respective transaction. This step can be accomplished in the Manage Authorizations & Attachments screen in either the transaction tab or the Packet Content List. Note: There are also radio buttons to indicate if you want to view all documents in the packet or only those associated with the selected transaction. Click on the “Show Packet Docs” radio button to see a list of documents uploaded to the packet. Click on the “Show Application Docs” radio button to see documents that are only associated with the current application. OLS: Common Elements Version 3.0 December 2012 63 Information Services Corporation 1. Click the check box for the Uploaded Document. 2. Click either the “Authorization” or “Attachment” check box as appropriate. o 3. Repeat steps 1 and 2 for each uploaded document. Click Save. NOTE: The packet list displays all of the documents uploaded to the packet. The “Select Application to view uploaded documents:” drop down allows you to view the specific documents “Attached to Application As” associated with the selected application. If you have two applications listed under the drop down, for example, one application may only have an authorization while the second may have both an authorization and an attachment (see below for details). Details for Application #1 OLS: Common Elements Version 3.0 December 2012 64 Information Services Corporation Details for Application #2 OLS: Common Elements Version 3.0 December 2012 65 Information Services Corporation Manage Authorization and Attachment Documents The OLS system provides a number of functions to assist in managing authorization and attachment documents. Uploaded documents can be viewed, renamed, removed, and moved to the My OLS Documents storage area. These actions are performed from the Manage Authorizations and Attachments screen in either the transaction tab or the Packet Content List. These functions are also available for documents stored in the My OLS Documents area from the My OLS Documents screen. View Uploaded Documents The OLS system provides the ability to view documents uploaded to the packet. It is recommended that you view each document you upload to ensure the upload succeeded and the document is complete. 1. Click the check box to the left of the document you wish to view. 2. Click View Doc. A File Download dialog box opens and provides options to open or save the file. Select an option. Note: If you select Open, the document opens in the appropriate application. For example, if the document is a .DOC file, it opens in Microsoft Word. If you select Save, the file can be saved on your PC and opened later. Click Open unless you want to save a copy to your computer or network. OLS: Common Elements Version 3.0 December 2012 66 Information Services Corporation Rename Uploaded Documents The OLS system provides the ability to rename documents uploaded to the packet. This function is especially useful for documents sent in by fax or mail, as they are stored with unique system generated file names. 1. Click the check box to the left of the document you wish to rename. 2. Click Rename. 3. A Rename dialog box opens and provides a field to enter the New Document Name. 4. Enter the new name. 5. Click OK. OLS: Common Elements Version 3.0 December 2012 67 Information Services Corporation Remove Uploaded Documents The OLS system provides the ability to remove documents uploaded to the packet. Once documents are removed, they are no longer available for use. 1. Click the check box to the left of the document(s) you want to remove. NOTE: More than one document may be selected at once. 2. Click Remove. The document(s) is removed from the system and the list of uploaded documents is updated. Note: The system does not provide a dialog box to confirm the files are to be removed. The documents are removed as soon as Remove is clicked. OLS: Common Elements Version 3.0 December 2012 68 Information Services Corporation Validation, Errors, Create Summary Report and Submit Packet The OLS tool provides a function to validate the information entered into a transaction. Three levels of validation take place in the system. The levels are: • • • Field level Transaction level Packet level Field Level Validations Field level validations are performed on certain fields as information is entered into the system. For example, title numbers, interest numbers, client numbers, and transform approval certificate (TAC) numbers are validated as they are entered. If the number is invalid or does not exist, the system provides the appropriate error message. OLS: Common Elements Version 3.0 December 2012 69 Information Services Corporation Transaction Level Validations Transaction level validations are performed when Validate is clicked on one of the Transaction tabs. The system goes through a series of checks to ensure that all the information entered in the transaction is correct. When the validation is completed the system displays a message box indicating whether or not any errors or warnings were encountered during validation. All transaction screens have the following buttons at the bottom of the screen: • • • • The Save button saves the data, as entered, to the database without business rule validations. The Validate button saves the data to the database, as entered, and runs through a series of validations for the transaction. The Cancel Transaction button cancels changes made on the screen and reverts the data back to its last saved state. If the transaction is new and has not been saved, the transaction portion of the screen disappears. The Delete button deletes the current transaction. A message box displays to confirm you want to delete the transaction. If the transaction is new, the button behaves the same as the Cancel Transaction button. It is a good idea to save your work frequently throughout the packet building process. You should Validate your application when you are satisfied that all required elements are correct. If errors are encountered during the validation, a pop-up message box will be displayed and the screen will be repositioned to the Validation Errors section. NOTE: If you have multiple applications in your packet, validate each application prior to submitting the packet. OLS: Common Elements Version 3.0 December 2012 70 Information Services Corporation If the transaction validates successfully, the following message is displayed. If an error or warning is encountered during validation, the following message is displayed. If errors or warnings are encountered the system repositions the screen to the Error section when OK is clicked. The Error section provides a list of the errors or warnings. Errors appear in red and warnings appear in yellow. Informational messages appear in blue. The message also provides information on the action you need to take to resolve the error. An example of an error message is provided below. Correct the error(s) and click Validate again. Repeat this process until all errors are resolved. Warning messages are for informational purposes. An example of a warning message may pertain to Locks on Titles. You may need to take action before submitting the packet. OLS: Common Elements Version 3.0 December 2012 71 Information Services Corporation Packet Level Validations Packet level validations are performed when you Submit the packet. The system goes through a series of checks to ensure that the information entered in each transaction is correct and that transactions within the packet do not conflict with one another. For example, a packet cannot contain transactions for both a Transform and a Transfer. Results of the packet level validation are returned to the OLS Notification area. If the packet is successfully validated, the system provides a message indicating this and then places the packet into the queue for examination by a title processor. If errors are encountered, the OLS Notification indicates this and provides a hyperlink to view the packet in the Packet Content List. The Packet Content List includes an Error section that lists all the errors. The Error section also provides hyperlinks to open the appropriate transactions to fix the errors. An example of the Error section is included below. Validation All transaction screens have the following buttons at the bottom of the screen: • • • The Save button saves the data (as entered) to the database without business rule validations. The Validate button saves the data (as entered) to the database and runs a series of validations for the transactions. The Cancel Transaction button cancels changes made on the screen and reverts the data back to its last saved state. If the transaction is new and has not been saved, the transaction portion of the screen disappears. OLS: Common Elements Version 3.0 December 2012 72 Information Services Corporation • The Delete button deletes the current transaction. A message box displays to confirm if you want to delete the transaction. If the transaction is new, the button behaves the same as the Cancel Transaction button. Note: It is a good idea to save your work frequently throughout the packet building process. You should Validate your application when you are satisfied that all required elements are correct. If errors are encountered during the validation, a pop-up message box will be displayed and the screen will be repositioned to the Validation Errors section. Note: If you have multiple applications in your packet, validate each application prior to submitting the packet. The Validate button is used to validate each application. The process only validates the application that you are in or that is being worked on at the moment. The following buttons are found at the bottom of the screen: • • • • • The View Packet Content button allows you to see the contents of your “draft” packet. The Create Summary Report allows you to create a comprehensive packet report. The Add Transfer button allows you to add an additional transfer transaction to the packet while the Add Interest button allows you to add an additional interest transaction to the packet. The Submit Packet button allows you to submit the packet. The Cancel Packet button cancels changes made on the screen and reverts the data back to its last saved state. If the transaction is new and has not been saved, the transaction portion of the screen disappears. OLS: Common Elements Version 3.0 December 2012 73 Information Services Corporation Clicking the View Packet Content button allows you to see the contents of your “draft” packet. 1. Click Validate Packet. The system will display the following dialogue box: Note: The Validate Packet button will move your packet offline where the OLS system performs an automated check of the assembly of each application within your packet to ensure that all requirements of ISC’s business rules are met. Once the offline validation has been completed, notification of success or failure will be sent to your OLS Notifications section on the OLS Homepage and the packet will return to “Draft” status. The notification will indicate if any validation errors were found and OLS: Common Elements Version 3.0 December 2012 74 Information Services Corporation include a link to open the packet (which is in the Packet Content List page). Errors will be listed in the Validation Errors section of the packet. 2. Click OK to validate the packet or Cancel if you do not want to validate the packet at this time. Note: You will not be able to open or work on the packet until the validation has completed. Note: If you exceed the maximum number of applications within your packet or if your transaction contains more than the system allotted attached items, validation will take place off-line. The maximum number of items in an OLS application group before validation is done offline is: Application Type Title Transfer Transform Interest Registration Interest Discharge Transmission Surviving Joint Tenant Alternate Authority Commodity Split Interest Assignment Interest Amendment Judgment Registration 3. Maximum 15 100 100 15 15 15 15 100 100 100 101 Item Type Applications Applications Interests Interests Titles Titles Titles/Interests Applications New Shares New Interests Interests When the off-line validation is complete, the packet status will return to “Draft” and you will receive a notification in the OLS Notification area on the Home page. The notification will indicate if validation errors were encountered and include a link to open the packet in the Packet Content List page. Validation errors will be listed in the Validation Errors section of the page. OLS: Common Elements Version 3.0 December 2012 75 Information Services Corporation Create Summary Report Once you have saved and validated your application within your packet, you should create a summary report. Note: The summary report generated will be for the current application only. 1. Click Create Summary Report. 2. An informational message (in blue) will appear advising you that the report has been queued. The report will be created behind the scenes and when it is ready, you will be notified in the OLS Notifications area on the Home Page. 3. Click the check the box in front of the Packet Print Request that you need and click Details. 4. The View Notification – Webpage Dialog window will open. The OLS Notification will include a link to the report. View the Notification Details and click the report link. OLS: Common Elements Version 3.0 December 2012 76 Information Services Corporation 5. The system will open a dialog box with options to Save or Open the report. Select an option. If you select Open, the report will open in a new window. From this point you may Save or Print the report. If you have more than one (1) application within your packet and you wish to create a summary report for each application, you will need to create the report from the packet content list. This option allows you to select the Applications in the packet that should be included in the report. You may also specify if the Authorization and/or Attachments documents should be included on an Application by Application basis. 1. Select the applications from the drop down box. Note: If you choose “Select all Applications,” the list will include all applications in the packet. OLS: Common Elements Version 3.0 December 2012 77 Information Services Corporation 2. Click the check boxes to include the attachments and authorizations if required. 3. Click Add. The system adds the selected items to the list. NOTE: As items appear in the list, the Remove button is enabled. If you wish to remove items from the list, click the check box to the left of the item and then click Remove. 4. Click Create Summary Report. An informational message will appear advising you the report has been queued. The report will be created behind the scenes. When it is ready you will be notified in the OLS Notification area on the Home page. The report is also accessed from this section. OLS: Common Elements Version 3.0 December 2012 78 Information Services Corporation Submit Packet 1. Click Submit Packet. The system will display the following confirmation screen. This page contains information from the packet header, a packet confirmation date, and an estimate of the fees for this packet. 2. Once you have verified the accuracy of the information, click OK to submit the packet. The system takes you to the All Packets view of the Packet Management tab. The packet status will change from “Draft” to “Pending Submit.” Note: If you are unable to submit at this time or feel you would like to wait and review your application packet before submitting, you would click Cancel. This button will only cancel the submission of your packet (at this time) and leave your packet in draft status until you decide to submit. Your packet can be found in the Packet Management tab under either the Draft packet list or All packet list. Note: If you want a copy of this validation, print from here. OLS: Common Elements Version 3.0 December 2012 79 Information Services Corporation Notables • • It is important to ensure your browser print setting is set to “Print background colors and images.” If these settings are not selected, portions of the screen will not print correctly. To locate this setting in the Internet Explorer browser, select the Internet Options item under the Tools menu. When the Internet Options screen appears, click the Advanced tab and scroll down to the Printing item. Click the “Print background colors and images” check box and then click OK. Ensure that your print settings are set to landscape mode or the report will not print properly. Although the OLS Tool ensures that all required data (nine digit numbers, etc.) are entered and authorizations and attachments are included in your packet, it does not ensure that your authorizations and/or attachments are completed accurately. • • • • • • If you are working on a transaction, be sure to save your work before clicking on the OLS Home tab to prevent loss of work. If ISC has an email address on file for the client number you used to sign in, a copy of each notification will also be sent to that email address. Condo transforms cannot be handled in OLS at this time. When conducting a title search on the OLS Home page or on the Transfer, Interest, or Transform Tabs of the OLS Tool, you can print the search results grid. Each template you create is unique to the client number that you sign in with. The list of templates displayed is specific to the transaction that you are currently performing. OLS: Common Elements Version 3.0 December 2012 80 Information Services Corporation • • • • • • You may receive two dialog boxes when you click Download Cover. If you receive the second dialog box, it is caused by a security setting in your browser and is normal. If the documents are submitted by fax, they should be ready for use in 10 to 15 minutes. This time frame may be longer if there is a backlog on the fax server. If the documents are submitted by mail, it could take a couple of days before they are ready for use. If the bar codes on the fax cover page are not readable, the documents will not be added for use in the packet. If this happens, you will receive a notification letter by fax indicating that the bar codes were unreadable. The letter will also provide details on the steps you should take to help ensure that the bar codes are readable. You will need to re-fax the documents. It is recommended that you view each document submitted by fax or mail to ensure that it is complete and that all pages included are submitted. To view the notification details, click the check box in the left column and then click Details. The notification details appear in a pop up window. The system generates a unique name for each document submitted by fax or mail. You may want to “rename” each document to something that is easy to identify. The Packet List displays all of the documents uploaded to the packet. The “Select Application to view uploaded documents:” drop down allows you to view the specific documents “Attached to Application As” associated with the selected application. If you have two applications listed under the drop down, for example, one application may only have an OLS: Common Elements Version 3.0 December 2012 81 Information Services Corporation • • • • authorization while the second may have both an authorization and an attachment. The system does not provide a dialog box to confirm the files are to be removed. The documents are removed as soon as Remove is clicked. If you have multiple applications in your packet, validate each application prior to submitting the packet. You will not be able to open or work on the packet until the validation has completed. The summary report generated when you click Create Summary Report will be for the current application only. To create a summary report for the entire packet, ensure that you create the report from the Packet Content List. OLS: Common Elements Version 3.0 December 2012 82