1
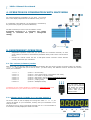
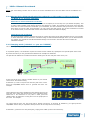
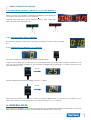
Manual
Scoreboards
Version: 2012v1
Table of Contents
PREFACE......................................................................................................2
1. POWER SUPPLY......................................................................................3
2. SCOREBOARD CONNECTIONS..................................................................3
3. SWITCHING THE SCOREBOARD ON AND OFF...........................................3
4. OPERATION IN COMBINATION WITH MACFINISH...................................4
5. INDEPENDENT OPERATION.....................................................................4
5.1. The various (software) modes.......................................................................................4
5.1.1 Chrono mode (= Mode 1 => you see '111111').............................................................4
5.1.2 Concentration clock mode (=mode 2 => you see '222222')........................................5
5.1.3 Day mode (=Mode 3 => you see '3333333').............................................................6
5.1.4 GPS mode for Electromechanical Scoreboards or LED mode for LED scoreboards...........7
(= Mode 4 => you see '444444').....................................................................................7
5.1.5 Jumping mode (=Mode 5 => you see '555555')........................................................7
5.1.6 Concentration Clock (3 Digits).................................................................................8
5.1.7 LapCounter (2 Digits or 3 x 2 Digits)........................................................................8
6. GENERAL NOTE........................................................................................9
www.timetronics.be
TimeTronics NV
Lammerdries-Oost 23B
B-2250, Belgium
Tel +32 (0)14 23 19 11
Fax +32 (0)14 23 20 24
VAT BE0440 224 404
HR Turnhout 64540
KBC Bank 414-4191871-52
SWIFT : KREDBE22
IBAN : BE64 4144 1918 7152
2012v1 Manual Scoreboard
PREFACE
Welcome to the "Scoreboard" user manual.
May we recommend you to gently leaf through the entire manual first, just to have an initial idea of how the book is
structured. As we cannot possibly explain all details simultaneously, this might help you a bit in understanding and tracing
things back. Of course, the table of contents will also help you in doing so.
Please note that all pictures are examples, the delivered version can be different than shown in this manual please inform
yourself before purchase.
If you, after reading this document, have any further question regarding the operation or service of this or any other
TimeTronics equipment, please contact your local distributor or TimeTronics directly, by email: [email protected], or call
us at +32 (0) 14 23 19 11
Please also contact us if you have any remarks or advise regarding this user manual: [email protected].
Good luck with the scoreboard and thank you for your confidence in the TimeTronics products and services.
The editors.
© Copyright 2012 TimeTronics. All rights reserved.
TimeTronics
Lammerdries 23b
B-2250 Olen
Belgium
Tel.: +32 (0) 14 23 19 11
Disclaimer
Under no circumstances shall TimeTronics be liable for any loss, damage or expense suffered or incurred with respect to
any defective product. In no event shall TimeTronics be liable for any incidental or consequential damages that you may
suffer directly or indirectly from use of any product. Windows, Windows XP and Windows VISTA are registered trademarks
of Microsoft Corporation.
2
2012v1 Manual Scoreboard
NOTE:
This manual is valid for scoreboards with software version 39 or higher! For both Electromechanical and LED
timing scoreboards. The operation is same for the electromechanical and the LED scoreboards unless
mentioned in this manual.
This manual is not
1. POWER SUPPLY
•
All electromechanical scoreboards and TTC408 LED Scoreboard are working on 12 VDC. These scoreboards are
delivered with a battery and charger
•
TTC453 LED Scoreboard is working on 12 VDC but delivered with a 100-240VAC to 12VDC converter. A battery and
charger can be ordered optional
Remark:
220VAC power supply and battery chargers are not intent to use in rain condition. The user has to use
appropriate water protection in case of wet conditions.
2. SCOREBOARD CONNECTIONS
Underneath the electromechanical scoreboard, you see 4 connectors; Two “male” 5pin on the
left and two “female” 5pin on the right.
LED timing scoreboards:
–
TTC 408: 3 connectors: power, serial in and Remote Control
–
TTC 453: same as electromechanical scoreboards
3. SWITCHING THE SCOREBOARD ON AND OFF
Switch ‘ON’ the scoreboard by plugging the battery into the 5 thick-piled male connector named ‘Battery’. By unplugging
the battery, the scoreboard is switched off. Take care that the battery is always charged sufficiently before use.
For TTC453 you have to plug-in the 220VAC power supply which is standard delivered with this scoreboard.
For electromechanical Scoreboards:
After you plug in the battery, the scoreboard digits will show the following items in chronological order:
•
•
•
•
•
•
6x ‘8’
6x ‘ ’
3 seconds
3 seconds
short
subsequently
:
:
:
:
:
:
888888
- - - - - - (blanc)
IE (stands for original development by IE=Intersoft Electronics)
XXX (e.g.: 039) (= software version)
YYYYYY (for example 111111 for scoreboard 'MODE'=1 ; explained later)
?????? (depending on scoreboard 'MODE' ; explained later)
Pay attention! First switch on the scoreboard (plug in the battery) before making other connections.
If not, the scoreboard may jump to a different mode (see later).
For LED Scoreboards:
After you plug in the battery, the scoreboard digits will show the following items in chronological order:
•
•
•
Scoreboard software version
Mode number
later)
Mode explanation
: example TT: 0.64
: YYYYYY (for example 111111 for scoreboard 'MODE'=1; explained
: ?????? (depending on scoreboard 'MODE' ; explained later)
3
2012v1 Manual Scoreboard
4. OPERATION IN COMBINATION WITH MACFINISH
For electromechanical scoreboards you can send
the running
time to the display independent of the software mode (see 4.1).
In combination with MacFinish, the scoreboard is controlled by
the photo-finish program (see manual MacFinish).
For LED scoreboard you have to set the software mode 4.
Scoreboard connected to a connection reel (mobile
cabling) or connection box (fixed = underground
cabling).
5. INDEPENDENT OPERATION
•
Independent operation means that you will operate the scoreboard manually. In other
words, without connection to the MacFinish photofinish but by means of the manual control
device:
•
Connect the manual control into the 5 thick-piled female connector named “Remote
control”, underneath your scoreboard.
5.1. The various (software) modes
After ‘Power ON’ you will notice that the scoreboard will display, after the version number, the mode number; for example;
‘1 1 1 1 1 1’. This means that you are now in mode 1 (or chrono mode). Five different modes or functions are covered
within your scoreboard:
1
2
3
4
4
5
6
1
2
3
4
4
5
6
1
2
3
4
4
5
6
1
2
3
4
4
5
6
1
2
3
4
4
5
6
1
2
3
4
4
5
6
(mode
(mode
(mode
(mode
(mode
(mode
(mode
1
2
3
4
4
5
6
=
=
=
=
=
=
=
chrono mode)
count-down mode or concentration clock mode)
hour mode or day time mode)
GPS mode in case of Electromechanical displays)
LED mode in case of LED displays)
jumping mode)
WindSpeed mode)
To switch from one mode to another, it is sufficient to simultaneously press
the three buttons on your manual control and to release them again.
You will notice that all
digits on your scoreboard
will display the selected
mode number for one
second. After mode 5
follows mode 1
5.1.1 Chrono mode (= Mode 1 => you see '111111')
The chrono mode is used to display the running time. After ‘1 1 1 1 1 1’, six
‘zeroes’ will appear on your scoreboard, meaning that your scoreboard is now
ready for a start.
The digits go from 0 (zero) to 59:59:99 and again turn to 0. The hundredths of
a second are normally displayed at ‘STOP’ and ‘LAP’.
4
2012v1 Manual Scoreboard
•
The Start
To start the running
time,
press
the
“Start”-button on your
Scoreboard
Remote
Control.
•
The scoreboard displays the running time
minutes and seconds.
Manual Split Time
If
you
wish
to
generate a manual
split time, press the
'LAP/RESET'-button:
The scoreboard will now display a split time up
to one hundredth of a second. For example:
This display is frozen for as long as you do not press any other buttons. Display the running time (internal clock) by
pressing the ‘LAP/RESET’-button or ‘START’-button again.
You will notice that the running time jumps to the real time of the race. The clock
continues to run and at the following split point you can again generate a split time.
•
Final Time
•
To reset your scoreboard for another race, press the
‘LAP/RESET’-button. The scoreboard returns to the
starting point:
5.1.2 Concentration clock mode (=mode 2 => you see '222222')
The concentration clock mode is primarily used for athletic FIELD-events such as high jump, long jump and pole vault,...
Be sure that the scoreboard is in mode 2. To go from mode 1 to mode 2, (see 4.1.: The Various Modes), simultaneously
press the three buttons on your manual control and release them again.
Default Setting
The scoreboard is set default to:
This setting means that the scoreboard starts to count down from
10 seconds to 0 as soon as you press the ‘START’-button on your
manual control:
5
2012v1 Manual Scoreboard
When the scoreboard is set to 00:00, you can again return to the ‘inital time’ setting by pressing the ‘RESET’-button.
Should you wish to return sooner to your default setting, press the ‘STOP’- button and subsequently the ‘RESET’-button.
How To Initialize This Countdown Time?
Obviously in reality these 10 seconds are usually not sufficient. Suppose we want to change this default setting and put it
on 1 minute. What is the procedure? As soon as you enter the ‘Countdown’ = ‘Concentration time’ mode 2 (2 2 2 2 2 2),
you can add 10 seconds each time you shortly press the ‘LAP/RESET’-button on your manual control. To change from 10
seconds to 1 minute, you need to press this button five times. To start the countdown, press the ‘START’-button.
In case you have already given a ‘START’ and a ‘RESET’, you can re-adjust the concentration time by keeping the
‘LAP/RESET’-button pressed for about two seconds (3 seconds for LED boards) until you see ‘2 2 2 2 2 2’ on your display.
Maintain pressed for about 2
seconds (3 seconds for LED
boards). Now you can readjust mode 2
5.1.3 Day mode (=Mode 3 => you see '3333333')
The Start
The day time mode is used for road races such as a marathons. Now hours, minutes and seconds are being displayed
instead of minutes, seconds and hundredths of a second. To start the running time, press the ‘START’-button:
Introducing a new starting time
In case the operation of the scoreboard is interrupted for whatever reason (e.g. broken battery or transportation of the
scoreboard from the start to the finish-line), you can still resume the thread by introducing a time at which you will again
start the timer (the marathon is still going on in the meantime).
What should you do?
•
Again you return to the mode 3. After displaying ‘333333’,
the scoreboard now displays six zeroes:
•
Suppose you want to start the time after exactly one hour
and five minutes. To add one hour, press the ‘STOP’-button
once. The display on your scoreboard will be:
•
Next you will enter the five minutes. To do so, press the
‘LAP/RESET’-button five times. The display on your
scoreboard will now be:
•
Exactly after one hour and five minutes after the starting shot (naturally you have kept a backup timing on a digital
watch), you start the running time of this race by pressing the ‘START’- button on your manual control. Now pull out
the manual control to avoid that you would accidentally press the ‘STOP’-button.
6
2012v1 Manual Scoreboard
NOTE: This ‘time-setting’ function can be used to re-set the scoreboard for a race time OR to set the scoreboard on a
daytime.
5.1.4 GPS mode for Electromechanical Scoreboards or LED mode for LED scoreboards
(= Mode 4 => you see '444444')
GPS mode for electromechanical scoreboards
Is meant to connect a GPS-clock to your scoreboard for the display of an exact day time (via satellite reception). This
is mainly used to display exact starting times for the athletes or cyclists. For example in time trials. Insert the GPSclock into the serial connection underneath your scoreboard, and the scoreboard will synchronize to the GPS-time
after about one minute. After synchronization, you may unplug the GPS receiver, and let the scoreboard run further
on its internal clock, or leave the GPS receiver connected for continuous GPS time display.
LED mode for LED scoreboards
Our latest MacFinish software programs can send the running time direct to the LED scoreboard once is it set in Mode
4. Other information can be send to the scoreboard using our LED Scoreboard Manager which you can download from
our website. The manual for this LED Scoreboard Manager can be found in the same file which contains the
installation software.
5.1.5 Jumping mode (=Mode 5 => you see '555555')
This mode is especially programmed for equestrian sport.
In equestrian sports, it is sometimes required to know the times realized by a participant over specific parts of the track.
By means of mode 5 you can generate times between for example two obstacles.
The split time at obstacle A is transformed into the starting time for the next part of the course, etc:
At the start of the race, press the ‘START’-button on your manual
control once! Time starts running.
At obstacle A, a time is required over the blue part of the course.
Press the ‘LAP/RESET’-button once to generate this time. For
example:
These split times are being considered as the starting times for the
next part of the track (the internal clock of the scoreboard again
starts from 0 and continues to run!) After a while, press the
‘START’-button to display the running time over the purple part of
the track. For example:
You notice that the time over the purple part is already running for 15 seconds. At obstacle B, you again press the
‘LAP/RESET’-button and you repeat the same procedure for as many times as necessary.
At obstacle C, (final time over the yellow part), simply press ‘STOP’ (as this is the finish-line).
7
2012v1 Manual Scoreboard
5.1.6 Wind Result Display (=Mode 6 => you see '666666')
When you connect your TTC408 to a TimeTronics WindSpeed you can display the
result of the wind measurement on your scoreboard.
Approved wind measurement will be displayed in green. Wind measurment
above +2.0 M/S will be displayed in red
5.1.6 Concentration Clock (3 Digits)
Its operation is similar to mode 2 of the running time scoreboard. For that, we refer to chapter
4.1.2.
5.1.7 LapCounter (2 Digits or 3 x 2 Digits)
The manual control of this scoreboard has a different labeling sticker:
Suppose we are dealing with a 10 Km race on a normal athletics track. This means that the athletes will need to run 25
laps. It is thus the intention to display 25. You can simply accomplish that by pressing the ‘+1’-button 25 times in a row,
each time adding one unit.
`
Result
`
When the leading athlete enters the straight, press the ‘-1’ button:
`
Result
`
Repeat the same procedure until reaching 0. When you press the ‘RESET’-button, you will return to 0 at all times. If you
have made a mistake, you can always correct it by either pressing the ‘+1’ or ‘-1’ buttons.
6. GENERAL NOTE
When you pull out the battery (=switch off your scoreboard), the scoreboard will memorize the mode which you last used.
When connecting the battery again, the scoreboard will automatically return to this mode.
8
2012v1 Manual Scoreboard
© Copyright 2012 TimeTronics. All rights reserved.
TimeTronics
Lammerdries 23b
B-2250 Olen
Belgium
Tel. : +32 (0) 14 23 19 11
Fax : +32 (0) 14 23 20 24
9


![English [2012v1]](http://vs1.manualzilla.com/store/data/005666127_1-015c2c1b906ab908850f1f1f8721a849-150x150.png)
![English [2012v1]](http://vs1.manualzilla.com/store/data/005770981_1-8c196de42073f8db3e58cd387e9490be-150x150.png)
![English [2012v1]](http://vs1.manualzilla.com/store/data/005857990_1-ba5aca9850e0a37c2eb2dd5a5d355973-150x150.png)
![English [2012v1]](http://vs1.manualzilla.com/store/data/005947215_1-83afe423bc1815c8427a220bc0eb1bc7-150x150.png)
![English [2014v1]](http://vs1.manualzilla.com/store/data/005775879_1-a83e57144a66539570f80a48a6e80397-150x150.png)