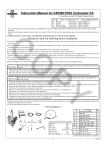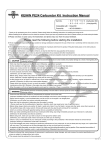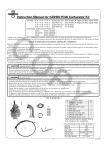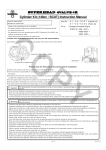
1
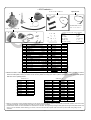
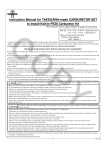
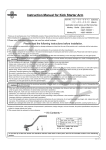
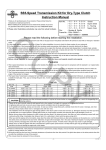
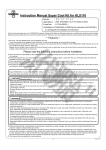
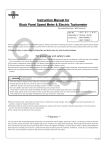
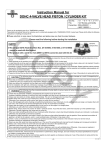
MIKUNI VM26 Carburetor Kit Instruction Manual
(For exclusive use in the Super Head 4VALVE+R-equipped motorcycle)
CO
Item No.:03―05―0031 (Carburetor set)
:03―02―2565 (Manifold kit)
Compatible Models and Frame No.:
Monkey & Gorilla :Z50J - 2000001∼2699999
:AB27-1000001∼ 1899999
:AB22-1000017 ∼
Monkey R
AKEGAWA-made products. Please strictly follow the following instructions in installing and using the kit.
・Before installing the kit, please be sure to check the kit contents. Should you have any questions about the kit, please contact your local motorcycle dealer.
◎ Please note that, in some cases, the illustrations and photos may vary from the actual hardware.
Read all instructions first before starting the installation
◎ We do not take any responsibility for any accident or damage whatsoever arising from the use of the kit not in conformity with the instructions in the
manual.
◎ We shall be held free from any kind of warranty whatsoever of products other than this product if the glitch takes place on the other products than
this one after the installation and use of this product.
◎ This carburetor kit is for exclusive use in a motorcycle equipped with a TAKEGAWA-made Super Head 4VALVE + R Bore Up Kit and Bore Stroke Up
Kit. This kit is compatible only with a stock engine and Super Head 4VALVE + R.
◎ Do the installation work correctly referring to the relative Honda’s genuine service manual for the above-mentioned compatible models.
◎Please note that this kit is designed for exclusive use in the above-mentioned compatible models and frame numbers only and that it cannot be mounted
on other models.
◎ You are kindly requested not to contact us about the combination of our products with other manufacturers'.
◎ Setting of a carburetor must be adjusted depending on the natural phenomena like the weather, temperatures and barometic pressure, and machine
and carburetor themselves. Arrange the setting to match the engine and other conditions. For your information, the carburetor is shipped out in a state
described on page 2.
◎ In installing this kit, a stock throttle housing is not used. Therefore, a brake lever and others need to be prepared by the user.
◎This kit is designed for exclusive use in the closed racing. So, do not drive your motorcycle on a public road after the installation of this kit. Drive your
motorcycle at a legal speed, abiding by the laws.
Caution
PY
The following show the envisioned possibility of injuries to human bodies and property damage as a result of disregarding the
following cautions.
・Make sure the engine and muffler are cool before starting the installation. (Otherwise, you will burn yourself.)
・Do the installation with right tools. (Otherwise, breakage of parts or injuries to yourself may take place.)
・Always use a torque wrench to screw bolts and nuts tight and securely to the specified torque.
(Otherwise, these parts may get damaged or fall off, resulting in accidents.)
・As some products and frames have sharp edges or protruding portions, please work with your hands protected.
(Otherwise, you will suffer injuries.)
・Before riding, always check every section for slack in parts like screws. If you find slack ones, screw them securely up to the specified torque. (Otherwise, improper tightening may cause parts to come off.)
・Always use new gaskets, and seals. And check those parts to be reused for wear and damage. If you find worn or damaged parts, replace
them with new ones.
The following show the envisioned possibility of human death or serious injuries to human bodies as a result of disregarding the
Warning following cautions.
・Always start the engine in a well-ventilated place, and do not turn on the engine in an airtight place.
(Otherwise, you will suffer from carbon monoxide poisoning.)
・When you notice something abnormal with your motorcycle while riding, immediately stop riding and park your motorcyle in a safe place to check what has gone wrong. (Otherwise, the abnormality could lead to accidents.) ・Before doing work, make sure your motorcycle is secure on level ground for safety's sake.
(Otherwise, your motorcycle could overturn and injure you while you are working.) ・Check or carry out maintenance of your motorcycle correctly according to the procedures in the instruction manual or service manual.
(Improper checking or maintenance could lead to accidents.) ・If you find damaged parts when checking and performing maintenance of your motorcycle, do not use these parts any longer, and replace them
with new ones. (The continued use of these damaged parts could lead to accidents.)
・As gasoline is highly flammable, never place it close to fire. Make sure that nothing flammable is near the gasoline. Since vaporized accumulation of gasoline is at high risk of explosion, work in a well-ventilated place. (Otherwise, it may cause a fire.)
◎ Please be informed that, mainly because of improvement in performance, design changes, and cost increase, the product specifications and prices are subject to change without prior notice.
◎ This manual should be retained for future reference.
-1-
Sep./30/’
11
∼ Kit Contents ∼
09―02―0221
1
Optional part
8
11
CO
9
12
13
Throttle cable, 710 mm
13
09―02―0071
03―02―2565
2
3
Factory preset mode of the carburetor
6
14 15
4
5
No.
1
2
3
4
5
6
7
8
9
10
11
12
13
14
15
16
17
18
18 16 17
7
Main jet
Pilot jet
Jet needle
Clip position
Throttle valve
Air screw opening
PY
Repair Part Item No.
Carburetor assembly
Inlet pipe
Insulator
Insulator band
Inlet pipe gasket
Cap screw, 6x15
Cap screw, 6x25
Fuel cock
Air filter
Throttle COMP.
Throttle Cable, 810 mm
Pair of throttle grips, for right- & left-hand
Fuel hose, 200 mm
Main jet, #180
Main jet, #185
Pilot jet, #17.5
Pilot jet, #20
Hex wrench, 5 mm
1
1
1
1
1
2
2
1
1
1
1
1
1
1
1
1
1
1
Part Name
03-03-0321
17112-4SM-T10
00-03-0210
00-00-0050
00-03-0007
00-00-0042
00-00-0089
03-03-001
03-01-1064
# 190
# 22.5
5E75
3rd from top
# 1.5
1±1/4 turns
in packs of
1
1
1
1
2
10
10
1
1
09-02-0081
09-02-0002
00-03-0203
00-03-0076
00-03-0077
00-03-0154
00-03-0155
1
1
1
1
1
1
1
※Please note that in ordering repair parts, be sure to quote the Repair Part Item No. Otherwise, we may not be able to accept your orders.
There are some parts, however, for which we are not in a position to accept your order in just the quantity to be used. In this case, please
take them in the quantity packed.
VM26 Pilot Jet
Item No.
00-03-0151
00-03-0152
00-03-0153
00-03-0154
00-03-0155
00-03-0156
00-03-0157
00-03-0158
00-03-0159
Product Name
#10
#12.5
#15
#17.5
#20
#22.5
#25
#27.5
#30
VM26 Main Jet
Item No.
00-03-0060
00-03-0061
00-03-0062
00-03-0063
00-03-0064
00-03-0065
00-03-0066
00-03-0067
00-03-0068
00-03-0069
00-03-0070
00-03-0071
00-03-0072
00-03-0073
Product Name
Item No.
#100
00-03-0074
#105
00-03-0075
#110
00-03-0076
#115
00-03-0077
#120
00-03-0078
#125
00-03-0079
#130
00-03-0080
#135
00-03-0081
#140
00-03-0082
#145
00-03-0083
#150
00-03-0084
#155
00-03-0085
#160
00-03-0086
#165
Product Name
#170
#175
#180
#185
#190
#195
#200
#210
#220
#230
#240
#250
#260
☆Setting of a carburetor must be adjusted depending on the natural phenomena like the weather, temperatures and barometic pressure, and machine and
carburetor themselves. Arrange the setting to match the engine and other conditions.
☆ A standard air cleaner cannot be installed to this carburetor kit. Therefore, the engine will go wrong if water gets into the engine and please refrain from
driving in the rain. Besides, before washing your vehicle, cover the carburetor with a plastic sheet or the like to prevent water from getting into the carburetor.
-2-
Sep./30/’
11
∼ Installation Procedures ∼
In the case of Monkey R :
Please check the kit contents.
In the case of Monkey R :
(Installation)
(Preparation for Installation)
○ Detach a seat, turn the fuel cock off, detach a fuel tube from the
carburetor,
○ Pass the supplied throttle cable through the frame.
○ Pass the supplied throttle cable through the lower throttle housing,
and connect the inner cable to the
throttle pipe. And attach the throttle
Caution:Check that the engine
and muffler are cool
CO
and that the
motorcycle is secure
on level ground!!
unfasten a fuel-cock-mounting bolt
and a tank nut, and remove the fuel
tank.
housing to the handle with two screws.
※ Apply grease to the rubbing
surface of the throttle pipe, the cable
end, and to the portion on the pipe to
take up the cable.
Fuel tube
In the case of Monkey and
Gorilla :
○ Making sure that the fuel cock is
closed, open a drain plug on the
carburetor, and drain the gasoline
from the float chamber to a tray.
○Unfasten the inlet-pipe-tightening
bolt and air-cleaner-mounting bolts. Remove a throttle valve from
a carburetor. Then remove the carburetor with the air cleaner box, the inlet pipe and all.
Caution: Apply the specified torque.
Torque: 5 N・m (0.5 kgf・m)
Bolt
○ Loosen a band screw on the
connecting tube of the carburetor,
unfasten two bolts, and remove the
air cleaner.
○ Attach a socket set screw, packed
in the Cylinder Head Kit, in the case
of the Moneky and Gorilla, to two taps A, and in the case of the
Monkey R, to two taps B, on the
cylinder head surface to which to
attach the inlet pipe, and tighten the
screws to the specified torque.
Air cleaner case
Inlet pipe
Screw, 6x25
Screw, 6x25
○ Fasten the insulator to the inlet
pipe with two socket cap screws.
Caution: Apply the specified torque.
Torque: 10 N・m
(1.0 kgf・m)
○ Remove a top cover of the
supplied carburetor, and pull out
the spring and the throttle valve.
Pass the inner cable of the throttle
cable through the carburetor top
cover and then through the spring.
And compressing the spring, fix
the top cover to the throttle valve.
PY
Caution: Apply the specified torque.
Torque: 5 N・m (0.5 kgf・m)
Screw
○ Remove a top cover from the
carburetor.
○ Unfasten two screws on the throttle cable holder, and remove the
throttle with the housing and all.
A
Fix the throttle valve to the
carburetor by aligning a notch on
the throttle valve with the throttle
stop screw.
B
Throttle cable holder
○Remove the throttle valve from the
carburetor, and separate the throttle valve from the throttle cable. Then pull out the top cover
from the throttle cable.
○ Unfasten a pan screw on the throttle housing to remove the throttle housing.
B
○ Place an inlet pipe gasket between
○ Referring to the service manual, demount the engine from the frame.
And with reference to the
installation procedures for the
Super Head 4VALVE + R, install the
Super Head 4VALVE + R to the
engine, and mount the engine onto
the frame.
Caution: Do follow the
instructions in the ○ Fix an ground wire to the frame
with an air-cleaner-mounting bolt.
A
the cylinder head and the inlet pipe,
and fix it by tightening 6x25 socket
cap screws to the specified torque.
Caution: Apply the specified torque.
Torque: 10 N・m (1.0 kgf・m)
○ Fit the carburetor into the insulator, and fasten the
carburetor with a clamp band.
In the case of Monkey :
Screw, 6x25
Inlet pipe
service manual.
Be sure to tighten to the
specified torque !!
Screw, 6x25
-3-
Sep./30/’
11
○ Attach an air filter, which please
fix by tightening a band.
○Adjust the free play at the throttle
grip to be about 5 mm by turning
the adjuster of the throttle cable.
○ Pull the choke lever to start the
engine. Gradually push the lever back and warm up the engine till the
revolution becomes smooth, and
finally push the lever back to its
original location. In case the engine
does not run idle after the warm-up
CO
Less free play
More free play
Adjuster
of the engine, or the engine idling speed is high, adjust the setting by
turning the throttle stop screw.
○ Jetting and other set up with your
engine specification, please do this
set up at safe and closed area such
as racetrack.
About 5 mm
Snap the throttle a few times to make sure that the throttle moves
smoothly without sticking and that
the throttle valve is fully open.
※ Also check that the throttle has
free play even when a steering
handle is turned all the way to the
right or to the left.
※ In some case, need to adjust the
fuel cock mount angle.
Warning:Care about torque when you tight fuel
cock nut. Over torque may damage
sealing.
○Insert a fuel tube and fasten it with
PY
a tube clip. Open the fuel cock and
chock for gas leaks. (Do not leave
the cock open for long time.)
○ Dispose of the blow-by gas from
the crankcase by yourself. (Some racing and regulations specify the blow-by gas
disposal.)
○ In sending back the blow-by gas
to the carburetor, connect the blow-by hose with the union on
the air-filter.
Co.,Ltd.
3-5-16 Nishikiorihigashi Tondabayashi Osaka Japan
TEL : 81-721-25-1357 FAX : 81-721-24-5059
URL : http://www.takegawa.co.jp
-4-
Sep./30/’
11
How to Set the Carburetor
・When the carburetor does not match the engine and the engine fails, the engine failures are caused by either too dense or too lean air-fuel mixture.
・The engine failure symptoms for the engine are as follows:
When the air-fuel mixture is too dense:
CO
When the air-fuel mixture is too lean:
・The explosion sound with a dull thud continues intermittently.
・The engine malfunctions further if you use the choke.
・The engine malfunctions when you warm it up.
・The engine overheats somewhat.
・The engine starts working well If you use the choke,.
・The engine does not accelerate well. (No smooth acceleration)
・The engine works well if the cleaner is detached.
・The motorcycle belches dense (or, black) exhaust gas.
・The plug smolders, getting blackened.
・Revolutions change, generating weak power.
・The plug burns white.
※ Set the carburetor only after warming up the engine, and then test-drive. And use a plug with the right heat value.
※ Do the setting in the following manner, studying at what throttle opening position the engine starts failing.
○Jet needle (Throttle position at 1/4 - 3/4)
Whether or not the engine revolution is in proportion to the throttle operation
・When the acceleration is not smooth or even, make the air-fuel mixture dense.
・Make the air-fuel mixture lean when the engine revolution goes up heavily and belches black gas.
The mixture ratio at this throttle position can be adjusted by the location of E-ring in the grooves. The air-fuel mixture becomes dense as the
location of the E-ring moves down from the 1st to the 5th groove.
2段目
2nd groove
3段目
3rd
groove
4段目
4th
groove
1段目
1st
groove
○Main jet (The throttle position at 3/4 - 4/4)
PY
5段目
5th
groove
The air-fuel mixture ratio at this throttle position can be adjusted by changing the number of the main jet. The larger the main jet numbers, the
denser the mixture ratio becomes.
In view of the engine and muffler specifications, select the most appropriate main jet to get the highest revolutions.
○Pilot jet (First of all, please adjust the air screw.)
・In case you have given more than three turns to the air screw to tighten it, use a pilot jet with a small number.
・ If you have tighten the air screw (clockwise) to the full, use a pilot jet with a larger number.
Check whether you have made a right choice of the pilot jet by seeing if the engine starts up revolving smoothly from the idling to running
at slow speed.
・When the engine revolves up unevenly, the pilot jet number is too small. (At idle)
・ When the motorcycle belches black exhaust gas and produces heavy exhaust sound, the pilot jet number is too big. (At idle)
・After replacing the pilot jet, you need to readjust the airscrew.
○ Air screw
The air screw adjusts the air mass flow at the time of engine’s revolving at slow speed. (At idling)
・Give the air screw a right turn → The air-fuel mixture gets dense.
・Give the air screw a left turn → The air-fuel mixture gets lean.
Loosen the tightened air screw back to the 1.5-turn position. And then from this position, give to the airscrew a right or left turn of 1/4 to 1/2
till the engine revolves at the highest speed.
Loosen the idle stop screw till you get the steady idling revolutions. And once again adjust the position of the airscrew to get the highest
revolutions.
●On how the barometric pressure, temperatures and humidity affect the setting:
・At highlands or at high altitudes, the barometric pressure and air density go down and the air gets into the carburetor in less amounts.
This makes the air-fuel mixture dense which was adjusted at low altitudes.
・Under the weather conditions with very low temperatures, the air density increases, which makes the air-fuel mixture lean.
・Under the rainy and humid weather conditions, the air density decreases, which makes the air-fuel mixture dense.
◎ Please be informed that, mainly because of improvement in performance, design changes, and cost increase, the product specifications and prices are subject to change without prior notice.
◎ This manual should be retained for future reference.
Co.,Ltd.
3-5-16 Nishikiorihigashi Tondabayashi Osaka Japan
TEL : 81-721-25-1357 FAX : 81-721-24-5059 URL : http://www.takegawa.co.jp
Aug./20/’
09