1
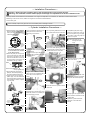
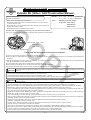
Cylinder Kit (148cc / SCUT) Instruction Manual
Ceramic-coated cylinder
Molybdenum coated piston
CO
・Thank you for purchasing one of our products.
・This product includes a piston and a cylinder(148cc/SCUT) for exclusive use with our super head 4valve +R.
By replacing with our new crankshaft and the SCUT Cylinder Kit (01-04-8307), the
cylinder will be bored to 148cc.
Please strictly follow the instruction to install this kit.
Item No. :01−04−8307 (Cylinder kit)
:01―02―6030 (Piston kit)
:Takegawa Complete Engine
Fit for
Engine No. 4SM -10001∼
4SMS-00001∼
4SMP-10001∼
◎ Please note: Illustrations and photos may vary from the actual hardware.
Caution)Can use with special crankcase only (please check engine serial number below)
Engine No. 4SM -10001∼10284
4SMS-00001 ∼
4SMP-10001 ∼
An engine No. is stamped here.
PY
4SS-00001 ∼
Please read the following instructions before installation.
◎ This kit is for exclusive use with our crankshaft (01-10-0092,01-10-0093).
◎ We do not take any responsibility for any accident or damage whatsoever arising from the use of the products not in conformity with the instructions in
the manual.
◎ We shall be held free from any kind of warranty whatsoever of products other than this product if any defect takes place on the other products than this
one after the installation and use of this product.
◎ In some cases noise coming from the cylinder may sound louder than stock.
◎ We recommend to install and use an oil cooler for riding at a high outdoor air temperature.
◎ As some products and frames have sharp edges or protruding portions, work with your hands protected to avoid injuries.
Caution
The following show the envisioned possibility of injuries to human bodies or property damage as a result of disregarding the following
cautions.
・Since this kit is designed and developed for driving in closed races, do not use the kit for running on public roads.
・Work only when the engine and the exhaust system are cool to avoid burns.
・Prepare appropriate tools and work properly to avoid the breakage of parts or injuries.
・As some products and frames have sharp-pointed or protruding portions, please work with greatest care to avoid injuries.
Warning
The following show the envisioned possibility of human death or serious injuries to human bodies as a result of disregarding the
following cautions.
・Those who are technically unskilled or inexperienced are required not to do the work.
(Improper installation due to unskilled technique or lack of knowledge could lead to parts breakage and consequently to accidents.) ・Always use new piston pin circlips, gaskets and sealings. (Wear and damage to these parts are likely to cause parts breakage and accidents.)
・Before working, place the motorcycle on level ground to stabilize its position for safety to avoid the motorcycle overturning.
・If you find damaged parts when inspecting or performing maintenance of your motorcycle, do not use these parts, and replace them with new ones.
(The continued use of these damaged parts could lead to accidents.)
・Always start the engine in a well-ventilated place, and do not start it in an airtight place. (Otherwise, you will suffer from carbon monoxide poisoning.)
・Before riding, always check such parts as screws for loose.
If you find loose ones, screw them securely up to the specified torque to avoid parts coming off, and accidents.
・When you notice something abnormal with your motorcycle while riding on the road, immediately stop riding and park your motorcycle in a safe place.
(Otherwise, the abnormality could lead to accidents.)
・As gasoline is highly flammable, never place it close to fire. Make sure that nothing flammable is near the gasoline.
(Otherwise, there will be a danger of causing fires.)
・Check or perform maintenance of parts correctly according to the procedures in the instruction manual or a service manual.
(Improper checking or maintenance could lead to an accident.)
・Never use any other part than the specified parts. (Otherwise, there is a possibility of parts breakage, leading to accidents.)
・Always use a torque wrench to tighten bolts and nuts securely to the specified torque to avoid these parts getting damaged, loose, and accidents.
・As the accumulation of vaporized gasoline is at the high risk of explosion, work in a well-ventilated place.
・Always use high-octane gasoline. (Otherwise, problems such as engine knocking may cause accidents.)
- A ’1 -
Nov./17/’
11
◎ Please be informed that the product specifications, design and prices are subject to change without prior notice.
◎ We shall be held free from any guarantee whatsoever of any trouble caused by the combined use of our products with parts not specified by us.
◎ This manual should be retained for future reference.
∼ Kit Contents ∼
CO
01―02―6022
3
5 Item No. stamped here.
7
1
6
10
9
5
PY
2
4
9
8
12
10
11
No.
1
2
3
4
5
6
7
8
9
10
11
12
Parts Name
Aluminum cylinder COMP.
Piston (Molybdenum coated)
Piston ring set (TOP, OIL)
Piston pin
Piston pin circlip
Cylinder head gasket
Cylinder gasket
Rubber sealing(black)
Dowel pin, 8x12
Dowel pin, 8x14
Oil plug bolt
Sealing washer, 10mm
Qty
1
1
1
1
2
1
1
1
2
2
1
1
Repair Parts Item No.
01-01-0224
13110-4SS-T00
13011-590-T00
00-01-0267 (with two circlips)
00-01-0052
00-01-0269
00-01-0090
00-07-0072
in packs of
1
1
1
1SET
6
1
1
1
2
2
1
1
※ When ordering a repair part of the piston alone, prepare the Item No. stamped on the piston top surface.
※ Please order repair parts with the Repair Part Item No.
Without the repair part item No., we may not be able to provide the correct parts.
Some parts are only available as a set. Please order them with the set number.
※ The Piston Kit (01-02-6030) contains the parts shown in the above enclosed square with the kit No.
Co.,Ltd.
3-5-16 Nishikiorihigashi Tondabayashi Osaka Japan
- A ’2 -
TEL : 81-721-25-1357 FAX : 81-721-24-5059 URL : http://www.takegawa.co.jp
Nov./17/’
11
∼ Installation Procedures ∼
Caution : Always be sure to tighten parts to the specified torque using a torque wrench.
Warning: The unskilled or those without proper knowledge are requested not to do the installation work.
○ Some products involve detachment and installation of an engine and separation of a crankcase, etc. Read service manual before install.
CO
○ Referring to the service manual, detach the engine from the frame and disassemble it.
о Check every part.
Caution: Infallibly inspect every part and check consumable parts for damage and wear.
∼ Cylinder Installation Procedures ∼
○Attach the piston circlip on the right
with the stamped arrow in the lower part when the piston is viewed from the above.
Circlip
○ Apply molybdenum solution to the
piston pin and the holes on the
connecting rod small end.
Stamped arrow
Piston
○ Compressing the piston rings,
install the cylinder with care not
to move the piston-ring end gaps
out of place. Their end gaps will
not be out of place.
NEW
MO-OIL
∴ Be sure to install the circlip
in the direction as shown
in the above figure.
○Attach the piston pin circlip so the
ring end gap does not meet with
the notch on the piston pin hole,
and it should be either on the top
or at the bottom of the piston as
illustrated in the fig. 1 below.
○ Fix a cylinder gasket of the kit into
the cylinder base of the crankcase.
Caution: Be careful not to
damage the piston rings.
PY
○ Install the piston to the connecting
rod so the IN mark on the piston faces
the intake side.
If you find it hard to put in the pin, put
it in slowly with a marking pen or the
like. Never hit it in.
○ Fix a new rubber packing (black) of
the kit onto the oil-return hole on the
cylinder base of the crankcase.
○ Place the cam chain guide roller
on the cam chains.
NEW
Notch in the piston hole
Circlip ring-end gap
○Air-blow the piston rings and the piston pin, and check for jamming of any foreign material by these parts.
○ Apply engine oil to grooves for
piston rings, and, with reference
to the figure below, fix piston rings
and arrange the location of piston
ring end gaps.
○ Apply engine oil to the entire inner
surface of the aluminum cylinder bore.
○Plug the sleeve hole and the cam chain hole on the crankcase with a
clean cloth, and fix a piston pin circlip.
○ Install the cam chain guide roller
with a sealing washer, and tighten
the guide roller bolt temporarily.
NEW
○Insert the aluminum cylinder into the
stud bolts.
○Remove the cloth used to plug holes.
○ Degrease the cylinder base of the
crankcase, and fix 8 x 12 dowel pins
onto the dowel pin holes.
180°
120°
120°
Side rail
Expander
○Loosely tighten an original hex bolt
which holds the crankcase on the
cylinder side.
○ Install the cylinder head with
reference to the instruction manual.
Side rail
120°
Oil ring
Piston
Exhaust
mark
- B ’1 -
Nov./17/’
11