1
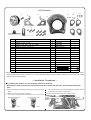
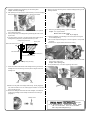
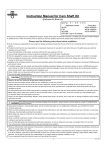
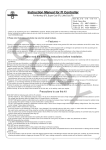
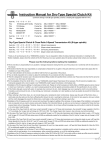
Instruction Manual for Headlight Fairing
CO
Item No.:09−11―0013
Applicable models and frame Nos:
Ape 50 : AC16-1000001∼
Ape100 : HC07-1000001∼
・Thank you for purchasing one of our TAKEGAWA’s products. You are requested to follow the below-mentioned instructions in installing this Kit.
・Before installation, please check the contents of this Kit. Should you have any questions about the product, please kindly contact your local dealer.
◎ Please note that the descriptions in this manual like illustrations and photos may differ from the actual hardware.
Please read the following instructions before installation.
◎ We do not take any responsibility for any accident or damage whatsoever arising from the use of the products not in conformity with the instructions
in the manual.
◎ You are kindly requested not to contact us about the combination of our products with other manufacturers’.
◎ This product is designed for exclusive use in the above-mentioned types of motorcycles and frame numbers only. Please take note that this product
cannot be mounted on other types of motorcycles.
PY
◎ NEVER apply gasoline or thinner to the fenders when performing maintenance of them. Otherwise, the applied portion may deform or discolor.
◎The white and black gel coating of the FRP products is treated in the preceding processes, not in the final process. As a matter of principle, we paint
all The FRP products.
As a result, when finishing treatment is given to the surface after treating the mottled portions or giving gel coating treatment, it sometimes happens
that the gel coat layers are peeled off, exposing the plastic surface partly, which please note.
◎ For installation of this product, M8x11 universal-type streamline turn signals are required. (chrome : 09-03-0925 / black : 09-03-0926)
◎A special meter bracket is required and the types of meters can be installed is either Super Multi DN or Super Multi LCD.
Please separately purchase the Meter Bracket Kit of 05-06-0006.
◎ The stock front fender cannot be installed together with this product. Either an optional front fender or lower fender bracket is required.
◎ This product can be installed with the stock stem or our aluminum stem.
CAUTION
The following show the envisioned possibility of injuries to human bodies or property damage as a result of disregarding the following cautions.
・Work only when the engine and the muffler are cool.
(Otherwise, you will burn yourself.)
・Prepare right tools for the work, and do the work in the proper and right way.
(Otherwise, improper work could cause breakage of parts or injuries to yourself.)
・As some products and frames have sharp-pointed or protruding portions, please work with your hands protected.
(Otherwise, you will suffer injuries.)
・Before riding, always check every section for slack in parts like screws. If you find slack ones, screw them securely up to the specified torque.
(Or improper torque may cause parts to come off.)
WARNING
The following show the envisioned possibility of human death or serious injuries to human bodies as a result of disregarding the
following cautions.
・When you notice something abnormal with your motorcycle while riding down a road, stop riding immediately and park your motorcyle in a safe place. (Otherwise, the abnormaility could lead to an accident.)
・Before doing work, place the motorcycle on level ground to stablize the position of your motorcycle for safety’s sake.
(Otherwise, your motorcycle could fall down and injure you while you are working.)
・Check or perform maintenance of parts correctly according to the procedures in the instruction manual or a service manual.
(Improper checking or maintence could lead to an accident.)
・If you find damaged parts when checking and performing maintenance, do not use these parts any longer, and replace them with new ones.
(The continued use of these damaged parts as they are could lead to an accident.)
◎ Please be informed that, mainly because of improvement in performance, design changes, and cost increase, the product specifications and prices
are subject to change without prior notice.
◎ This manual should be retained for future reference.
-1-
Feb./10/’
10
∼ Kit Contents ∼
1
3
12
5
4
CO
13
15
6
14―A
2
8
9
7
14―B
11
10
No.
1
2
3
4
5
6
7
8
9
10
11
12
13
14-A
14-B
15
Parts Name
Headlight unit ASSY.
Housing screw (5 mm)
Halogen bulb (TB7, 12V 30 / 30W)
Headlight fairing bracket (L)
Headlight fairing bracket (R)
Headlight fairing
Headlight fairing bracket (A)
Headlight fairing bracket (B)
Button head socket screw (6x12)
Plain washer (6mm)
Button head socket screw (8x20)
Flange nut (8mm)
Plain washer (8mm)
Front fork bracket (L)
Front fork bracket (R)
Flange button head socket screw (6x12)
Qty
1
2
1
1
1
1
1
1
3
3
6
2
2
2
2
3
Repair Part Item No.
33100-GBJ-T00
00-09-0020
09-03-0104
64502-GEY-T01
64504-GEY-T01
64110-GEY-T00
64501-GEY-T00
64503-GEY-T00
00-00-0127
00-00-0086
00-00-0142
00-00-0275
00-00-0076
PY
00-00-0293
in packs of
1
4
1
1
1
1
1
1
5
10
5
5
10
2
※Please note that in ordering repair parts, be sure to quote the Repair Part Item No. Otherwise, we may not be able to accept your orders.
There are some parts, however, for which we are not in a position to accept your order in just the quantity to be used. In this case, please
take them in the quantity packed.
∼ Installation Procedures ∼
● In installing this product, you are required to remove the front fork.
Securing your motorcycle firmly on a maintenance stand on the flat and safe place, work carefully with proper tools.
1.
Remove the headlight, the headlight bracket, the turn signals and the top
bridge.
※ Remove the stock front fender if necessary.
2.Two of the turn signal brackets are attached on each of the front fork.
Right
Rear
Front
Left
3.Hook up temporarily the right and left headlight fairing brackets with the
included button head socket screws (8x20).
※ Use an optional meter bracket when installing a meter.
Button head socket screw (8x20)
Rear
Button head socket screw (8x20)
Front
-2-
Feb./10/’
10
4.Install the headlight fairing bracket (A) on the steering stem.
Torque: 10 N・m (1.0 kgf・m)
5.With Ape50 (FI) and Ape100 (from 2008 onwards), mount the headlight
fairing bracket (A) and a horn together by bending the bracket.
CO
※Except for the specified models of the Ape as mentioned, our optional horn bracket is required.
6.Hook up temporarily the headlight fairing bracket (B) as shown in the figure below.
※ The initial location is shown in the figure below. After hooking up the headlight fairing temporarily, adjust the bracket as you like.
Headlight fairing bracket (A)
Steering stem
Button head socket screw (6x12)
Plain washer,6mm
9.With the mounting hole facing down, install the headlight housing on the
headlight bracket.
10.After fixing the headlight fairing, tighten the brackets.
Torque : Turn signal brackets
Button head socket screw
10 N・ m (1.0 kgf・m)
11.
After the installation of the headlight, mount the optional turn signals on the headlight fairing.
※ Do not over-torque the flange nut on the turn signals, or it may break
the fairing.
※ Place the turn-signal harness inside of the housing.
PY
Plain washer (6mm)
Button head socket screw (6x12)
Headlight fairing bracket (B)
12.Finished the installation, secure the headlight fairing with the included
flange button head screw.
Torque: 6 N・m (0.6 kgf・m)
※ The paintwork may crack when tightening the screws.
7.Loose two screws at the bottom of the headlight housing, remove the headlight lens unit and housing, and then place a halogen bulb in the headlight unit.
Screw
Screw
※Never touch the glass of the halogen bulb directly. The oily fingerprint may cause the bulb to burn out. If the fingerprint remains over the bulb,
wipe it off with alcohol.
8.Remove the headlight socket from the stock headlight, and install the socket on the headlight unit of already removed from the housing in paragraph 7.
Headlight socket
Co.,Ltd.
3-5-16 Nishikiorihigashi Tondabayashi Osaka Japan
TEL : 81-721-25-1357 FAX : 81-721-24-5059
URL : http://www.takegawa.co.jp
-3-
Feb./10/’
10