1
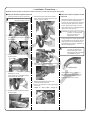
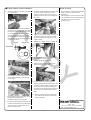
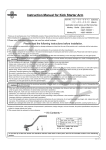
Z-Style Exhaust system (TYPE-2) Instruction Manual
CO
Item No.
:04−02−2308
Applicable to :Monkey ・Gorilla
Frame No. :Z50J -1300017∼
:AB27-1000001 ∼
Thank you for purchasing one of our products. Please strictly follow the instructions to install and use the kit.
Before installing the kit, please be sure to check the kit contents. If you have any questions about the kit, please contact your local TAKEGAWA dealer.
Before installation, please read this instruction manual carefully and understand the instructions fully.
Enjoy the sound and performance of this exhaust system distinct from a stock exhaust system.
◎ Please note: Illustrations and photos may vary from actual hardware.
∼ Features ∼
PY
○ This is a genuine-like up-exhaust system for the Monkey, to which a genuine exhaust system guard can be installed.
It improves the performance without altering the original look of the Monkey.
○ We have adopted a canister body and exhaust pipe, both made of stainless, to improve the appearance and durability.
○ This canister has a straight internal design, which features moderate sound volume and wide variety of use.
Please read the following instructions before installation.
◎ The following show the envisioned possibility of injuries and damages to human bodies, and physical loss or damage as a result of disregarding the
following cautions.
◎ We shall be held free from any kind of warranty whatsoever of products other than this product if the any defect takes place on the other products
than this one after the installation and use of this product.
◎ This product is designed for exclusive use in the above-mentioned types of motorcycles and frame numbers only. Please take note that this product
cannot be mounted on other types of motorcycles.
◎ Please refrain from combined use of this kit with any other part than the specified parts.
◎ Though a genuine exhaust system guard can be fixed as it is, processing is necessary as the guard-mounting portion is partially exposed.
◎ This product is designed for exclusive use with a stock kick starter arm. (In case of our kick starter, the arm will interfere with the genuine exhaust
system guard.)
◎ This product cannot be used together with a (wire-type) Dry-Type Clutch Kit of 02-02-0143. For the installation of the said Kit, the installation of a Hydraulic Clutch Kit of 02-02-0144 is necessary.
◎ Applicable rear shock is “stock” or our rear shock with chrome body. Other rear shocks may interfere the exhaust system.
NOTE: KYB MG/MGS, our rear shock with a cover and other manufacturer’s rear shocks may interfere depending on the mounting position or angles
of canister’s end pipe or rear shock absorber. Be sure to check the size by yourself before installation.
CAUTION
The following show the envisioned possibility of injuries and damages to human bodies, and property loss as a result of
disregarding the following cautions.
・Please drive safely and follow the local traffic law.
・Work only when the engine and the exhaust system are cool to avoid burns.
・Prepare appropriate tools and work properly to avoid the breakage of parts or injuries.
・Always use a torque wrench to tighten bolts and nuts securely to the specified torque to avoid these parts getting damaged or loose.
・As some products and frames have sharp edges or protruding portions, work with your hands protected to avoid injuries.
・Do water washing of an exhaust system only when it is cool. (Otherwise, the exhaust system may be cracked.)
・Park your motorcycle in a place where pedestrians will not touch the exhaust system accidentally. Besides, please always be considerate enough not to park it in the way of pedestrians or moving vehicles.
(If you park your motorcycle on the sidewalk with its exhaust system on the pedestrians’ side, the pedestrians may touch the exhaust system and get burned or suffer property loss.)
・Before riding, always check such parts as screws for loose.
If you find loose ones, screw them securely up to the specified torque to avoid parts coming off.
・This exhaust system is designed for exclusive use with a stock kick starter arm. TAKEGAWA’s kick starter arm will interfere with the genuine exhaust system guard.
-1-
Oct./25/’
10
WARNING
The following show the envisioned possibility of human death or serious injuries to human bodies as a result of disregarding the
following cautions.
・Always drive the engine in a well-ventilated place, and do not switch the engine on in an airtight place.
(Otherwise, you will suffer from carbon monoxide poisoning.)
・Never look into the outlet of exhaust system when the engine is revolving.
(Otherwise, you will suffer from carbon monoxide poisoning or lose your sight.)
・When you notice something abnormal with your motorcycle, stop riding immediately and park your motorcycle in a safe place to avoid an accident.
CO
・Before riding, be sure to always check the bank angle, and run with care not to bank the vehicle more steeply than the bank angle.
(Otherwise, there will be a danger of the motorcycle overturning.)
・The engine and the exhaust system are at high temperatures when the engine is revolving or for some time after the engine stopped. Therefore, never place flammable or hazardous materials such as gasoline near them. (Otherwise, there will be a danger of causing fires.)
・Before working, place the motorcycle on level ground to stabilize its position for safety to avoid the motorcycle overturning.
・Check or perform maintenance of parts correctly according to the procedures in the instruction manual or a service manual.
(Improper checking or maintenance could lead to an accident.)
・If you find damaged parts when inspecting or performing maintenance of your motorcycle, do not use these parts, and replace them with new ones.
(The continued use of these damaged parts could lead to accidents.)
・Keep plastic bags for packing products out of children’s reach, or discard them.
(If children get them on, there will be a danger of their suffocating. )
・Basically, you can install this exhaust system in almost the same way as installing a stock exhaust system. Although a genuine exhaust system can
be fixed, a guard for an exhaust pipe (right behind the engine exhaust) cannot be installed. So, please do be careful not to let your right leg touch
the exhaust pipe when pressing down on the rear brake pedal.
Besides, do not ride the vehicle in an exposed style, such as in sandals. (It could lead to burn or accidents.)
PY
◎ Please be informed that, mainly because of improvement in performance, design changes, and cost increase, the product specifications and prices
are subject to change without prior notice.
◎ Please be informed that we shall be held harmless against any claim against us whatsoever arising out of use of the products in racing and the like.
◎ We do not have any information or service data on the combination of our products and other manufacturer’s products.
◎ You are requested to keep this instruction manual until you discard this product.
∼ Kit Contents ∼
2
1
4
No.
1
2
3
4
5
Parts Name
Canister assembly
Exhaust pipe
Collar
Flange bolt, 8x30
Exhaust gasket
5
3
Qty
1
1
1
1
1
Repair parts item No.
00-04-0009
18200-AB9-T00
91139-AB9-T00
00-00-0181
00-01-0064
In packs of
1
1
1
4
2
※ Please order repair parts with the Repair Part Item No.
Without the repair part item No., we may not be able to provide the correct parts.
Some parts are only available as a set. Please order them with the set number.
-2-
Oct./25/’
10
∼ Installation Procedures ∼
Stabilize the vehicle with a maintenance stand or the like in a safe and level place during work.
● Genuine Exhaust System Removal
1.Unscrew the bolts on the air cleaner stay.
6.After removing two collars on the exhaust CO
CAUTION : Work only when the engine and
the exhaust system are cool.
flange, remove the exhaust system from the body by pulling it outward.
1.Remove the exhaust system guard from the
just-removed genuine exhaust system.
2.Unscrew all plus screws which are fixing
the exhaust system guard to the exhaust system. Keep those screws for re-use.
If the screws are worn or damaged severely,
replace them with new ones.
CAUTION: Plus screws may be very tightly
screwed, so unscrew them with enough care not to damage their heads.
2.Loosen the band which is clamping the
carburetor and the air cleaner, and remove
the air cleaner.
3.Unfasten the nut on the back side of the
exhaust system.
● Genuine Exhaust System Guard
Removal
3.Though the genuine exhaust system guard
can be installed as it is, the bracket, which is
fixing the guard on the exhaust pipe, gets exposed without processing. Therefore, cut
off the unnecessary part.
PY
CAUTION: Once the bracket is processed
or cut off, the guard on the
exhaust pipe of the normal
exhaust system will be rendered
not installable any more.
7.Remove the old exhaust pipe gasket remaining
in the exhaust port.
4.
Unfasten two nuts on the exhaust pipe flange.
Keep them for re-use.
If the nuts are worn or damaged severely, replace them with new ones.
Cut off this part
4.If the exposing portion is cut off, it is
advisable to give a touch-up to the cut
surface with a heat-resistant paint to
prevent the surface from rusting.
8.Reinstall the removed air cleaner in the
order opposite to its removal.
※ On to a 12V motorcycle, never forget installing
earth wires.
Torque : 8 ∼ 10 N・m (0.8 ∼ 1.0 kgf・m)
5.Unfasten the hex’ bolt which is fixing the
exhaust system.
-3-
Oct./25/’
10
●Z-Style Exhaust System Installation
1.Insert and install a kit’s exhaust pipe gasket
to the exhaust port.
5.Check the clearance between the exhaust pipe
of canister and the rear fender, and then
adjust the positions of the canister and the
exhaust pipe so that they do not interfere with
1.Start the engine in a safe and well-ventilated
place, and check for exhaust leak or interference.
2.After stopping the engine and after each part
each other.
has cooled down to the normal temperatures,
re-tighten all screws and nuts to the
specified torque.
CO
2.Temporarily install the canister assembly to
the vehicle in the following order. First, pass
the rear end of the canister pipe from behind
the upper part of the right-side rear shock absorber. Then put the flange bolt through the canister bracket. Finally, put the collar through it from behind and temporarily fix the
canister on the frame.
Collar
● Final Checking
6.Tighten the exhaust pipe flange nuts evenly to
the specified torque with care not to let the canister and the exhaust pipe get out of the adjusted places.
Torque : 10 ∼ 12 N・m (1.0 ∼ 1.2 kgf・m)
Flange bolt
To the frame
PY
7.Next, tighten the flange bolt on the canister bracket to the specified torque.
Torque : 23 N・m (2.3 kgf・m)
8.Install the genuine exhaust system guard.
Reuse the genuine plus screws.
3.After inserting the exhaust pipe into the joint
on the canister assembly, insert its flange into the engine.
Heat proof liquid gasket
※ It is advisable to apply heat-resistant liquid
gasket to the inserting portion.
(ThreeBond 1207B or the equivalent.)
9.Check for interference among the genuine exhaust system guard, the exhaust system, and
the frame. If need be, loosen the screws and n
uts on each section to adjust the positions to the extent that the adjusting does not place too
much strain on the exhaust system. Then fix them.
10.Peel the protecting film off the JMCA plate and clean the dirt sticking on the exhaust
system completely.
Co.,Ltd.
4.Put the exhaust pipe flange through the stud
bolt of the cylinder head, and fix it temporarily
with the nuts which were used to fix the 3-5-16 Nishikiorihigashi Tondabayashi
Osaka Japan
TEL : 81-721-25-1357 FAX : 81-721-24-5059
genuine exhaust system.
URL : http://www.takegawa.co.jp
-4-
Oct./25/’
10