1
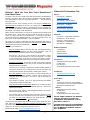
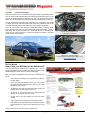
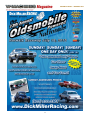
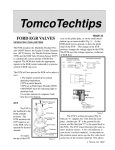
VOLUME 2 ISSUE 1 JANUARY 2010 The 1976 442:They said they would build one for you . . . so Ken Pilidis took their idea . . . and did. What's New We have partnered with Wild About Cars to bring you a host of different venues and to keep you thinking Oldsmobile and to give you a different ways to have fun with your car. You can go to www.oldsperformanceclub.com for up-to-date information 24-7. This segment of the Newsletter is about what we plan for the next few months and what is going on in Oldsmobile Land. Oldsmobile News: Breaking News - Tent Collapse at RussoSteele Auction Damages Rare Oldsmobiles Go to Wild About Cars for the entire story. Next Month’s Cover Story: Big Bad Iron - Willis Dennis and his 1958 J-2 Ken Pilidis customized his 455 engined 1976 442 and came away with a winner. Oldsmobile’s factory PR shot shows that they were thinking "loser". First there was the EPA and DOT . . . And then there was a "gas crisis". Detroit was struggling with the mandated crash and emissions regulations in the mid 70’s and they were not fairing well. They had designed big heavy cars with styling that did not meld well with 5 mph impact bumpers. They were working with engines brought to life before the thought of controlling hydrocarbon and nitros oxide output. And then along came the gas crunch! 400+ cubic inch V-8s suddenly seemed archaic; 3800 pound cars seemed slothful; performance began to slant toward gas mileage & smaller vehicles. Continued on page 3 1 Factory Hot Rods didn’t start with the 442s. Triple carbs were an option on 1957 and 1958 Oldsmobiles. Learn all about it in the February issue. VOLUME 2 ISSUE 1 - JANUARY 2010 Editorial - What Are Your New Year’s Resolutions? How About These! I’m hoping I can get you to make some Olds Performance Club Resolutions for 2010 - and stick to them. After all, this is a magazine about high performance Oldsmobiles and you are a hi-po kinda person so . . . How about trying these on for size. Since this is a club - and I’m hoping, as such, I can get you to RESOLVE to PARTICIPATE the activities of the club. I’m hoping you’ll resolve to move from watching what others are doing - like writing this column, collecting the dues, arranging for activities, and collecting information for the newsletter and the website - into helping us with all that stuff. Before you tell us that "there’s no way" let me say that there are things we all can resolve to do. I know that if we tell you that we are having a show, a cruise, or a drag meet, lots of you will take part - or if we tell you that there are pictures or tech info posted on the site - you will go and take a look - but that’s on the small end of participation - it’s kind of passive. We need you to resolve to make this new Olds Performance Club work by participating in another way. We need you to interact with the officers and the website (this is the Internet Age after all). Why don't you to resolve to: Oldsmobile Performance Club Officers: Paul Tortorici – President [email protected] Steve Minore – Vice President [email protected] Brian Tupper – Treasurer [email protected] Bob Gerometta - Secretary [email protected] OPC Staff: Paul Tester – Competition Coordinator Bob Maiocchi - Photo Archivist Kory Erico - Internet Content Jake Vitthuhn – Web Relations Steve Minore - Advertising W-Machines Editors: Send in materials. Many of you have tech info, old magazine articles, pictures, factory brochures, and other factory materials - stuff you know would be of interest to the rest of the membership. Don’t sit on it - get it to us. If you know how to use a scanner - scan it in at 300 dpi or better and put it on a CD if it’s a large file - or e-mail it in if it’s small enough. If you trust us, and you don’t have a scanner, mail it to us. We’ll treat it with loving care and get it imaged and back. Volunteer as an Expert. The minute I say this, I know everyone will run for cover, but I know there are many of you out there with particular expertise that you could share. Think how nice it would be to assist some newbie in getting started, or how good it would be if you could get some info out that would stop someone from messing up their project or wasting lots of money. Be a Web Detective. There is a lot going on in the Internet that is of interest to you and fellow members - whether it be at other forums, club sites, some vendor’s site, in the news, or just at some site you stumbled over. Don’t keep it to yourself - get it to us. We need to keep the website "fresh" and your input can really help. Help with the Website and Newsletter. Believe it or not, there are fewer than 3 people seeing to it that the newsletter goes out - and that the website gets updated. Do you have typing, editing or web management skills? Let us know, because we can sure use you. Get Involved with the interactive parts of the Site. We have forums that you can take part in and places to load your pictures. And now you have your own garage where you can upload pictures, blog and BS in you own personal forum. Take advantage! So before this Club withers away because the 4-5 people croak from overwork, help us out. Resolve to make 2010 a banner year for the OPC. Contact me at the e-mail address below and we’ll put you to work - but we won’t overwhelm you - we resolve to keep it easy and fun to help out. Bob Gerometta, Editor [email protected] 2 CJ Pleasants Bob Gerometta Submit Articles to: [email protected] Our Address: Oldsmobile Performance Chapter c/o S&P Tees P.O. Box 4012, South Hackensack, New Jersey 07606 Our Website: www.oldsperformanceclub.com Annual Dues: $9.95 You may sign up on line at the website, or send check or money order made payable to: Oldsmobile Performance Club Send to: Oldsmobile Performance Chapter c/o S&P Tees P.O. Box 4012, South Hackensack, New Jersey 07606 NOTICE: ITEMS LOADED ON THE WEBSITE ARE THE PROPERTY OF EITHER THE OLDSMOBILE PERFORMANCE CLUB OR WILD ABOUT CARS LLC. POSTING INAPPROPRIATE OR POROGRAHIC MATERIALS ON THESE WEBSITES WILL RESULT IN IMMEDIATE DISMISSAL AND YOU WILL BE BANNED VOLUME 2 ISSUE 1 - JANUARY 2010 1976 442 . . . . continued from page 1 Oldsmobile was caught up in this conundrum - as a luxury car maker, they wanted to put medium and large size vehicles in the hands of their buyers, but the bigwigs at GM were folding under the pressure to deliver cars to compete with the newly emerging Japanese manufacturers. What to do? Olds product planners pressed for the abolition of the B and C Body, with the A-Body being renamed as the 88 and 98, and the X Body taking on the Cutlass Moniker. The Omega nameplate would be dropped, and the new Starfire would slot in as the entry Oldsmobile. I shudder to think how close we came. Marketing was ready to go forward and Styling was on board too. In fact, the "SX" graphics had been replaced with the "442" (See the "SX" rebadged at right as a "442"). This is why the 76 Omega SX had such similar body paint and the "SX" logo added in as an afterthought). All was a "go" until the NOVA X-Body plant told Olds that there was no way they could meet the expected Cutlass production needs. Whew! It was at this point that the new B-C and G bodies were given the green light for 1978 and the 455 was slated to receive the axe. Meanwhile, the plans laid down in 1972 for the 1976 Olds line were dusted off and put into production. But the handwriting was on the wall; 1976 and 77 would be a holding battle while the new, smaller cars were finalized and made ready for production. Enter the 1976 442 Considering the pressure, it is a wonder that the 442 existed at all. Each year from 1971, the car had been dwindling in Oldsmobile's product line and in its advertising. The Cutlass/442 restyle actually came off quite well, with the 2door cars receiving the new sloped front fascia and quad headlights and a more racy rear deck and taillight housing. Styling scrambled around and the SX and 442 got to share similar graphics. Olds touted that you could "build one" the way you wanted, and that gave the buyer a chance to make a 442 we all could love. Initially the 442 was going to be nothing more than a graphics package, period (see the picture on page one). It was not exactly going to a hell-raiser and that photo does well to be in grayscale, because it was pretty bland. But something happened, and perhaps we’ll never even know why - Olds decided to let the buyer option a 442 anywhere from a putt-putt grocery getter to a real performance piece. And most interestingly, they let the buyer select from a quite extensive list of options. In fact, Olds even touted the buyer’s ability to have one "built for me". Most importantly, one could build one with some getup and go (1976 style). Grabbing the order form one could start out with the following: Note the SX paint scheme on the Omega and it’s similarity with that of the 442. See how nice "442" would have looked there - it almost happened! W-29. The 442 package was labeled an outside "appearance and handling package", and that was it, but then one could order the following: L-74. the venerable 455 4 barrel with an optional 3.08 "performance" gear, and G80 anti-spin was available (Californians were stuck with a 2.56 gear - sorry guys). Dealer installed ratios went up to 5.00:1. M-40. The T400 auto was mandatory - and that was a good thing, so at least you had a good base to work with. And like when the 442 was first offered back in the early 60s, everything else required a checkbox tick, but with a little judicious shopping (see the salesman’s spec book on page 5) one could end up with . . . a performance car! Now, let’s face it, the cat-conned single pipe 455 of 1976 was not the same 455 offered even in 1971-73, but with a bit of playing after you left the dealer it could deliver some grunt. Remember, most States didn’t have any sniffers so many cars were immediately converted to cat-less dual exhausts. Continued on page 6 3 AN-7 swivel buckets were good-looking pieces when sett off by the D-55 Console. (green would not be the best choice of interior trim, however) VOLUME 2 ISSUE 1 - JANUARY 2010 Exposed - GM Throws Away Its Oldsmobile History What’s New . . . Continued from page 1 We are publishing these pictures and telling this story - but we’re protecting the author, just in case GM lawyers wake up and smell the coffee. We know GM only cares about Chevy and Cadillac (Buick will soon be gone - you heard it here first). That’s bad enough but this story will make you sick. Back about 5 years ago, these NHRA awards to Oldsmobile surfaced, and how they came into a member’s possession is a sad and disgusting tale. Announces Regional DraG Meets There are 6 of them total. A woman in Michigan put them up, one at a time, on E-bay, except for the ’92 award that the member later bought from her directly. Curious, our member corresponded with her numerous times as to where she got them, wanting to get the history on them. She dodged the question at first, but finally said she was embarrassed to admit it, but she found them in the trash, so she really couldn’t tell him anything about them. Yup, she came up with these by dumpster diving. She had no idea they had any value to anyone, but put one on E-bay up to see if it would sell. One can guess how they got in the trash, but it is sad that people at GM didn’t think enough of them to save them. What else ended up there? We'll probably never know. Eastern Regional July 24, 2010 Lebanon Valley Dragway 1746 US Route 20, West Lebanon, NY 12195 Mid-West Regional July 18, 2010 13th Annual Oldsmobile Powered Nationals Norwalk Raceway Park 1300 State Route 18, Norwalk, OH 44857 Five of the six "Wally’s" that were found. Thank God for dumpster divers. Of course, this begs the question: What else has been trashed? Get Your Olds Performance Chapter T-shirt! Cash Prizes - Awards- Trophies Class Winners Get Free Entry at Next Race! Three Classes - Handicap racing - dial in and go! Super/Pro (0 to 12.99 - delay box OK) Pro (0 to 15.99 - no delay box) Stock (no electronics, no open headers, no slicks). Class Winners at each race in 2010 will race for a "King of Oldsmobile" Cash Prize in 2011 Shipping Included: $21 for on $37.50 for two. XXL and XXL slightly higher. Click to the Wild About Cars Storefront! Sign up now. e-mail Steve Minore at [email protected] 4 VOLUME 2 ISSUE 1 - JANUARY 2010 Quality Quadrajets - Part One "Quadrbog" "Quadraslob" "Quadraslow", all these names have been given to GM’s high performance carburetor over the years, but most were applied by people who had no idea what made them work - and no idea how to make them perform. The surprise is that a properly operating Quadrajet will perform with the best Holley and AFB AND it won’t leak all over the place AND it will give outstanding low speed performance for big cammed cars! Surprised? Don’t be. Rochester spent millions of dollars on research and development to come up with a carb that would literally out-perform the triple 2-barrel systems - and they succeeded! However, over the years, the tricks to make them perform and the ways to repair them have been lost. We are here to tell you that we have the means to bring them back to life and we’ll be covering them here. The Rochester 4MC carburetor 1966-1969 In Part One we will tell you how to rehab a Quadra-Jet AND in Part Two we’ll show you how to tune one for maximum performance. Please don’t skip Part One, because 90% of those Q-jets out there, even the rebuilt ones, NEED WORK. Please consider the listed vendors. Get the Doug Roe reference book shown at the right before you start as this article is an overview/guide. Part One - How to Rehab Your Q-jet First, get it out of your head that you are going to buy a gasket set and fix all the ills of your Q-jet. A simple rebuilding kit is an OK investment, but it is not going to turn your 40-year old carb into a performance king. In fact, that kit make result in less or no performance improvement! Like most mechanical devices, the Q-jet is subject to wear and component breakdown over the years. Let’s quickly discuss what is likely to be wrong with your QJet: Vacuum leaks in the bowl's bottom well plugs Worn primary and secondary throttle shafts (primary ids usually worse) Bent throttle shafts or misaligned throttle plates Warped base plate Bad float and/or Clogged in-carb fuel filter There are other adjustments and parts that should be replaced or modified for maximum performance which we will discuss in Part Two. In order to make the carb work and look like new, you are going to need to buy some components. Edelbrock has a host of new parts you will need in this segment and for Part Two. Eastwood’s Carb Renew is nothing more than the correct color lacquer paint for the outside, but it will really make your carb look dandy and after you spent all that time on it - what the heck, right? The items you will need right now are the Needle and Seat Assembly #1980 and Float Assembly #1985 (1974 & earlier) or 1984 (1975 or later). Completely disassemble your Q-jet following the Chassis Service or Quadrajet Service manual. Once disassembled, and all parts cleaned in carb cleaner (we suggest the "dip it" system). But before you do that, first check to see it the base plate is warped using a quality steel straight edge. Check on both sides! If it is warped, don’t think a thick gasket will fix it because it will likely mean your throttle shafts will stick. If it’s warped, it’s junk. The Quadra-Jet disassembled (a full-size image is available on the website) Eastwood Paint Company. Carb Renew Bronze Aerosol 5 oz (www.eastwoodco.com) Edelbrock Company. Edelbrock Quadra-Jet Accessories. (www.edelbrock.com) Rochester Carburetors (Paperback) by Doug Roe under $25 from Amazon (www.amazon.com) The Carburetor Shop - California. Repair and replacement Carburetors - gasket kits, et (www.thecarbshop.com) The Carburetor Shop - Missouri. Extensive repair kits for your EXACT carburetor (www.thecarburetorshop.com) TomCo Carburetor. Replacement and repair parts for Quadrajet Carburetors (www.tomco-inc.com) Vendor List Continued on page 7 5 VOLUME 2 ISSUE 1 - JANUARY 2010 1976 442 . . . . continued from page 3 What else could you get? Considering the time and the fact that this A-Body almost wasn’t a Cutlass, not to mention a 442, there was a lot available. In addition to the 455, M40, and FE2, you could get: AN-7 swivel buckets D-35 sport mirrors D-55 console and shifter G-80 anti-spin axle (dealer installed ratios up to 5.00) N-34 custom sport steering wheel N-71 & N-72 Super Stock II and III (argent or color-matched) wheels QCY GR-70 raised white letter radials U-21 gauge pack Y-72 heavy-duty cooling With the right choices and a little "aftermarket" and dealer-installed tweaking, you really could build a true 442. Ken Pilidis 1976 442 Right away we want to say that the L-74 442 was a rare bird in 1976, with only 143 built, period. When you couple that with the fact that Ken’s car was imported into Canada, that make’s it even more rare. Ken has information that his car is the only one left of 6 cars that were sent there in 1976. To his knowledge, only 13 of the original total 143 cars exist in the US today, making this car as rare as the 1966 W-30! Ken purchased the car second-hand in 1979 where it had only had one other owner. Ken says: "I bought this car in March of 1979. The car had 29,000 miles on her and a price tag of $5,000. It was fully loaded and was in great shape". The heart of any 442 is its big-block Olds. The 1976 still had the L-74 455, albeit strangled by a single pipe and cat-con. But throw in the 294/296 cam, a set of duals, and tweak the distributor and carb - and 1971 performance was available. (You can see this option list full-sized at www.wildaboutcars.com.). Whoever ordered Ken’s car likely saw this picture in the Brochure. He drove the car and kept it up, adding a piece here and there until 1987 when he decided that it needed a repaint. He went with the original color scheme, but the body shop used Standox paint and, Ken said that their code 35 was a darker color that the original. The picture at left shows the car after the repaint. Ken kept adding stuff and finally in 2008 he decided to take the car down to bare metal and add that neat-looking ram air hood and 70’s OAI adapter. Take a look a the pictures of the process on the website by checking out the feature article. He also added the NASCAR rear spoiler and to my mind this really makes the car when viewed from the rear. This time, Ken was able to get the color just right, and when coupled with the rally stripes on the hood, the car came off terrific. Ken’s car before the repaint and hood seen on page one. The color choice really works on a 1976. We tend to think of these cars as "new" compared to the earlier cars, but remember, this car was 32 years old when it was redone - and it faced Canada winters! Ken says: "I decided to have the old hood done as well in case I want to go back to original in the future. This time the paint match was exact. There was one spot where rust was found but that was nipped in the bud. The car still has all its original body panels." Simply amazing. Here are some vital statistics on Ken’s 1976 442: Built on March 1, 1976 in Lansing. Sold at Crowsnest Pass Motors, Blairmore, Alberta, Canada on March 26, 1976. 455 cubic inch V-8 with Quadrajet, T400 with console and swivel bucket seats. Outside, Sport mirrors and 15" x 7" Superstock II wheels. Exterior: Dark Blue Metallic with Silver Stripe Interior: White with TA3 compaticolour (blue) trim. Here’s Ken’s engine before the OAI hood. Boy, is there a lot going on in there or what! Continued on page 6 6 VOLUME 2 ISSUE 1 - JANUARY 2010 1976 442 . . . . continued from page 6 When Ken acquired the car it seems that the original buyer wouldn't take possession of it unless it was upgraded with some earlier high performance parts. To sell the car, the dealer added GU-6 anti-spin axle ratio 3.42, W-26 Hurst Dual Gate Shifter, & W-30 W455 aluminum intake and exhaust manifolds Code "X" and "Z". Ken has added options as well: engine rebuilt to 9.75:1 Compression with ported "C" heads; true 2..25" dual exhaust W-25 OAI hood; W-27 aluminum cover; W-35 rear deck lid spoiler; WW-8 Hurst digital tach; and Y-70 upper body stripe. Ken’s car was chosen to was chosen by Oldsmobile Division in Lansing, Michigan to represent the year 1976 in the Oldsmobile Centennial Parade - back in 2003 along with a 1976 Toronado and a 1976 Delta 88. It’s not surprising, because this car is one head turner. I guess Ken followed the advice in the 1976 ads and "had one built for him". Ken’s engine compartment now. Looks "factory" doesn’t it?. Ken’s interior - note the dual gate For more pictures and technical information, go to www.wildaboutcars.com Do You Know . . . How to Use your Wild About Cars Dashboard? Your Wild About Cars Dashboard is a powerful tool. You can access the dashboard from the Start Here page, by clicking on the dashboard picture (same as the one shown at the right). When you get to the dashboard, here are some of the things you can do: See and send messages to your buddies by clicking on the horn button. Go to your personal calendar where you can set date reminders and flag club dates with a click of your mouse (by clicking on the clock). Go directly to the clubs you have joined, like the OPC by clicking on the "my clubs" sign on the map. Go directly to any general forums you have joined (by clicking on "my forums" sign on the map. Hit the radio to see any articles you may have book- marked. Tap your license to go directly to your personal Profile. And whoever is on line will show up on the left, just above the Google Ads. You can even see where they are on the site! There’s tons more you can do from here; check it out! 7 VOLUME 2 ISSUE 1 - JANUARY 2010 Quality Quadrajets . . . . continued from page 5 If your base is not straight, we suggest you search for and use the proper year Oldsmobile carb (not necessarily the exact model) carb and find one that is not warped, because many different year bases are different and the Divisions used different bases as well. Just because your base plate is not warped does not mean it’s OK. The next check is for loose/warped throttle shafts. If there is any slop in the shaft, it is likely no good. Frankly, ASSUME it is not good and go through this step with the primary throttle plate at least. Even if the shaft is not sloppy, check to see if it is bent (you can actually bend the shafts by too much WOT). Do this by making sure they travel through their full arc without sticking. The shafts should open to 90 degrees (fully vertical) to the base. If the shaft or shafts are sloppy there is a kit to allow a bushing to be installed and we recommend you purchase it. (Tomco and The Carb Shop sell this kit. When you are finished, the shaft should turn smoothly but not wobble in the base. If the shaft is bent - it’s back to the junkyard, as it is almost impossible to straighten this piece. Carb base plate with severely misaligned throttle plates. Make sure they are right before using Loctite. When removing the throttle plates to remove the shaft, you will notice there is play built into the plate screw holes to allow alignment in the base plate bore. When you reassemble the shaft/plates, make sure they are properly aligned before fully tightening the screws (use Loctite and don’t over-tighten). Once you are finished with the base, it is now time to repair the bowl assembly. Like the base, there are two repairs that should be made regardless of the age or condition of the carb. When you turn the float bowl over, you will see the primary and secondary casting fuel well plugs stick up. (See picture at right). They always leak. There is a kit to drill out the pressed-in secondary plugs and replace them with self-tapping plugs, but I have known them to leak too. I suggest that you seal all 4 of the wells with epoxy, and don’t install the plugs because the plugs will require epoxy as well and you can ruin the float bowl with overzealous drilling. After you’ve drilled out the throttle shaft hole, gently tap in the new bushing. While the bowl is drying, pick up the float bowl cover, turn it over, and gently tap the vertical brass feed tubes with a plastic hammer to ensure they are fully seated, as they have a tendency to work free over time. Check to make sure that the top is not appreciably warped as well (some small amount of warping here is OK, unless it affects the movement of the Secondary Air Valve (flap). Check the Secondary Air Valve to make sure it does not bind. Do not loosen the secondary air valve spring at this time as you can damage it. There should be enough tension in the spring to allow you to push open the flap and let it snap closed. Like the throttle plates, make sure the air valve plates are properly aligned and if they are not, gently loosen the attachment screws and align them (use Loctite on the screws as before). Apply Epoxy to the wells. Be generous and make sure the plug seams are covered. Check the secondary metering rod hanger and ensure that it is not bent. The rods should hang evenly on each side, and the hanger arms should be vertical and not bent from perpendicular. Each carb has a hangar size set specifically for that carb, (it has a letter on it) so do not switch this out from another carb at this time if it is bent - we will discuss what to do in Part Two. Now it’s time to go back to the bowl. Use ultrafine (1000 grit) emery paper to clean out the accelerator pump and power piston bores. Obviously, make sure that there is no residue in these bores when you are done. If the power piston is scored from debris in the bore, it will have to be replaced. The needle and seat of a standard Q-jet is not capable of handling increased flow, so use the one in the Edelbrock #1980 high flow unit. Liberally coat the wells with epoxy as shown in the circled areas. Continued on page 8 8 VOLUME 2 ISSUE 1 - JANUARY 2010 Quality Quadrajets . . . . continued from page 8 1966 and early 1967 carbs come with a fuel inlet diaphragm in place of a needle and seat. They can be converted to needle and seat, but the change doesn't always work out well due to how the carb was originally calibrated. If your carb came with this setup and you cannot find a diaphragm and you want to keep the carb for authenticity, contact The Carburetor Shop. Throw away your old float and use Edelbrock's #1984 or 1985 as appropriate. You are now ready to reassemble the carburetor. BUT WAIT! Unlike a Holley or other carbs, we must make changes to increase performance before we assemble the carb. A Q-jet has a lot of places where you can tune it and this is the boon and bane of the carb. We suggest you increase the jet size by 2 points over stock (as shown in the Manual). For now, leave all else stock. Don't put these pieces in the carb cleaner as you will destroy them! Aside from the needle and seat, you should replace the paper or bronze fuel filter. Use the Marine filter #7029038 in place of these filters. This nylon filter is available through Mercury Marine dealers as P/N 35-53336Q. It is a lowrestriction nylon mesh that is 11/16" diameter and 1 1/8" long (see picture at right). You may also use Edelbrock's 1926 or 1927 filter (based on inlet size). Those of you with 1972 and later carb cannot run the Marine filter without replacing the nut with TOMCO nut, PN 491 as your filter nut size is 1". The PN 491 is self-tapping. (www.tomco-inc.com). You may also be able to find a brass reducer in a parts store, bring the old nut for fitment comparison. NEXT MONTH - Adjustments and tuning the Quadra-Jet. For more info, click here or go to Wild About Cars Tech Section, Oldsmobile Tech Tidbits Have you ever been to . . . . the Wild About Cars Vault? The Vault is where Wild About Cars stores all kinds of information, from highly technical to downright fun. The guys at WAC call it their "info treasure chest", and they might be right. They only started out this past Summer, but there is already tons of interesting stuff inside. Let’s give you the 40 thousand foot view of what you find inside; Technical information. Want to know specifications, his- tory of makes and models production figures and the like? Then head for the Tech. Section. Need to see factory journals, performance supplements and such? Click on the Tech Journals box. Like to go through old car magazines? Hit the Magazine Archive. Need to look at an old brochure? Punch on the Brochures picture. Are old advertisements your game? Then a trip through this section will be fun. It’s all downloadable in PDF format and it’s FREE to WAC members! What’s more significant, is that you can help by donating your favorite item. WAC will scan it and return it to you. Contact [email protected]. 9 Nylon mesh filter on left (arrow), paper and bronze filters shown for comparison. VOLUME 2 ISSUE 1 - JANUARY 2010 "Run to Rund" - the story of the 1966 Rund W-30 Recreation by Joseph Donnelly (The full story of the 1966 W-30 program and the Rund W-30 may be found at the Rund W-30 Project at Wild About Cars. Click here for the story) The "theme" of this car is not "factory showroom condition" but rather "historic race car in use by John Molnar and Vance Brady." The car is uniquely interesting not in "showroom" condition, but in race condition and age. Under- and overrestoration were minimized with the goal of presenting the way Olds built specialorder race cars, with fit and finish imperfections. The car was totally disassembled; all work was done by myself except for three items: engine machine work, upholstery stitching, and welding trim holes. The body shell and frame I used were desert southwest parts, as were most other parts that weren't NOS. I intentionally duplicated the wear and weathering the car would have after 1-4 years in Detroit, because the car wasn't interesting as a standard 442, but rather after it was converted to W30 just before the NHRA Nationals in 1966. The car’s appearance shows this level of weathering to match the 1966-1969 time period the car was raced by Molnar and Brady under the "Run to Rund" name in 1966, and "Molnar and Brady" afterwards. This appearance is possible because many NOS parts, and lightly used, long-stored parts from the desert Southwest were incorporated. OEM parts, bolts, etc. are used except where Molnar and Brady would change or upgrade them. Aftermarket bolts were deliberately selected in some instances to point out frequently disassembled components. Slightly "aged" parts were incorporated instead of NOS where weathering should occur in that time frame. The Rund W-30 coming and going. The top picture was taken in 1966 the bottom was taken 41 years later. Joe’s recreation Is true to the original. Best, in both shots, the driver is the original John Molnar Molnar & Brady were racers of their time, yet forward thinking. Some parts of the car remained as-produced. Others were modified and periodically updated, replaced, or repaired. As is typical of racers, factory originality was important only as related to racing rules. They were also concerned with competitive advantage, weight, parts availability and durability, cost, and safety requirements. Vance used any weight saving tricks he could, and took advantage of allowances in the NHRA and AHRA rules as they came out. The original Rund car has unparalleled documentation in the mass media for an Oldsmobile race car, with two full articles, December 1966 and February 1967 High- Performance Cars. The second article includes a color centerfold. The team’s continued developments were reported in March 1971 Speed and Supercar. Scrapbooks from John Molnar and Vance Brady added further details about the team’s thinking, as did conversations with John Molnar and John Butash, the Rund Oldsmobile Sales Manager in 1966. I used craftsmanship at the upper end of what a racer would do, when modifying parts. In selecting some restoration parts and procedures, I used my racing experience and observation of other racers’ workmanship to do things the way Vance and John would have done them. To allow drag strip runs today, safety updates were incorporated. Molnar and Brady kept their car up-to-date with NHRA and AHRA rule changes. In my opinion, the W30 cars are more effective tributes and tutorials when shown and raced. This "Rund" version shows "motion through time" or the spirit of the car, rather than a single "snapshot in time." Hence, it is not presented exactly as it was on a single date in 1966, nor as one would freshly build it today to take advantage of all current NHRA Stock Class allowances. Molnar and Brady later raced a 1970 F85, foretold here with a few items such as a 1970 Vertical Gate shifter and a headers with #7,8 tubes outside the frame. Movement to the present is signified with a few of today’s big racing improvements, like tires and electronic ignition. The Hoosier 9" x 30" drag slicks were bought from Curtis Coulter whose car took the D/S NHRA record away from Sam Murray’s 1967 W30 in November, 2006. To be continued 10 John Molnar declared that the Rund car was just as he remembered it. Joe reports that after a little cruise, John was snapping off speed shifts - just like old times. The interior is much like it was "back in the day" with any changes necessary for modern race safety. VOLUME 2 ISSUE 1 - JANUARY 2010 11 VOLUME 2 ISSUE 1 - JANUARY 2010 Business Card Advertising Space Get us your business card and we’ll post it here. 12 VOLUME 2 ISSUE 1 - JANUARY 2010 Business Card Advertising Space Get us your business card and we’ll post it here. 13