1
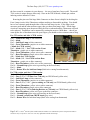
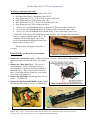
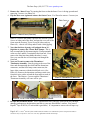
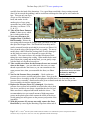
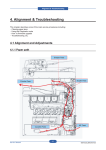
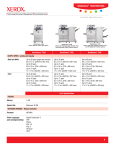
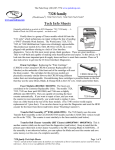
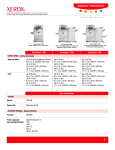
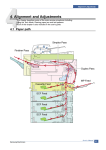
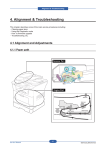
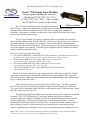
The Parts Drop: (201)387-7776 www.partsdrop.com
Xerox® 7328 Family Fuser Modules
www.partsdrop.com
Repairing and rebuilding the fusers for:
®
(WorkCentre ) WC-7328, 7335, 7345,
& 7346, 7228, 7235, 7245)… Also revisiting
the C32 & C2128 versions of these fusers
7328 Fuser Module
The 7328 family of machines is the final group of models in
the “C32 style”. Many of the machines have shown up in the past couple of years in the
aftermarket from off-lease machines and such. The fuser is a really good candidate for
rebuilding. Good parts are available, the procedure is not too difficult, and the fuser count is
easy to reset from the control console.
The C32 style included a few groups of models which were released over a period of
about a decade (spanning from 2002 through 2012). The fusers in all of them are very similar to
one another and the newest group is no exception. The Fuser Heat Rollers and the Pressure
Sleeves are the same for all of the models. These parts were never spared by the OEM except as
part of the complete fuser modules. Fortunately good compatible parts are available nowadays,
making rebuilding a profitable choice.
Here’s a list of the 4 versions of the fusers:
• C32 version: 008R12904 / 126K13940 (110 volts), (008R12905 / 126K14890 for 220 volt version)
For Models: C32/40, (DocuColor) DC1632, C2240, C3535, & (WorkCenre) M24, M32/40, Pro32/40
•
C2128 version: 008R12933 (110 volts), (008R12934 for 220 volt version)
•
7328 version: 008R13040 (110 volts), (008R13028 for 220 volt version)
•
For: (WorkCentre Pro or CopyCentre) C2128, C2636, C3545)
For: (WorkCentre) 7228, 7235, 7245, 7328, 7335, 7345
7346 version: 008R13055 (110 volts), (008R13056 for 220 volt version)
For: (WorkCentre) 7346 only.
The DC1632 Service Manual gives an estimated yield of 100K pages for the fuser. History
tells us this is not always true and machines which run a lot of heavy papers don’t even come
close to that number. Other literature including the Service Manuals for the other models neglect
to give a stated yield on the fusers.
Almost all of the fusers use the same pair of Fuser Heat Lamps. The only exception is
the 7346 fuser which has a double lamp (instead of a pair of separate lamps). For all but the
7346, you’ll find a “Main Heat Lamp” which has a red connector, and a “Sub Heat Lamp” which
has a blue connector at the rear end.
The only really significant changes have been in the way the main connector is wired and
in that the 7328/7335/7345 fusers have 3 pico-fuses on them, which allow a machine to
recognize when a new module is installed. The fuses were absent from the predecessor models’
versions of the fusers. The fuses are found on a tiny “CRUM Board” (CRUM = Customer
Replaceable Unit Monitor) inside the rear of the fuser. It seemed at first that soldering on new
fuses would be necessary, but as it turns out you can reset the fuser count from the control
console. Installing fuses would only be necessary if you needed the fuser to automatically reset
Page 1 of 6 * Xerox® and all of their model names & numbers are trademarks of Xerox Corporation and are
used here only as references. Xerox is in no way affiliated with The Parts Drop.
The Parts Drop: (201)387-7776 www.partsdrop.com
the fuser count for a customer in your absence… the way a brand new fuser would. The model
7346 version is unique because it has only 1 fuse on the CRUM board, a blank spot, and an
indexing resistor instead of 3 fuses.
Knowing the pin-out of the large Main Connector on these fusers is helpful in checking the
Fuser Lamp circuits, & the Thermistors without needing to disassemble anything. You should
have a low resistance path through either of the two heat lamp circuits. If one lamp circuit
measures good and the other measures open, then you know that lamp is bad… If both lamp
circuits are measuring open, then most likely the fuser overheated and the Thermostat will need
to be replaced. Thermistors can be measured by setting the meter to 100K ohms… then if you
warm up the face of the thermistor with your fingers, you should see the resistance start to drop.
For C32 version, and Also *C2128 version
Pin 1 = Main Heat Lamp (to red connector)
Pin 2 = blank
Pin 3 = Sub Heat Lamp (to blue connector)
Pin 4 = Front Thermistor (purple wire to white connector)
(*blank for C2128 version)
Pin 5 = blank (OR…* for C2128 version: Front
Thermistor - purple wire to white connector)
Pin 6 = Front Thermistor (yellow wire to wht. connector)
Pin 7 = Rear Thermistor (purple wire to blue connector)
(OR…*blank for C2128 version)
Pin 8 = blank (OR…*for C2128 version: Rear
Thermistor - purple wire to blue connector)
Pin-out - Main Connector (7328 shown)
Pin 9 = Rear Thermistor (yellow wire to blue connector)
Pin 10 = Ground Strap (green wire to ground lug on the fuser frame).
Pin 11 = blank
Pin 12 = Return Wire for both heat lamps (black wire coming from thermostat)
For 7328 version, and Also **7346 version
Pin 1 = Main Heat Lamp (to red connector)
Pin 2 = Fuse 3 (F3) (**OR Fuse 1 on 7346 only) on CRUM board (yellow wire)
Pin 3 = Sub Heat Lamp (to blue connector)
Pin 4 = Front Thermistor (purple wire to white connector)
Pin 5 = Fuse 2 (F2) (**OR… goes to nothing on 7346 only) on CRUM board (yellow wire)
Pin 6 = Front Thermistor (yellow wire to white connector)
Pin 7 = Rear Thermistor (purple wire to blue connector)
Pin 8 = Fuse 1 (F1) (**OR to Indexing Resistor on 7346 only) on CRUM board (yellow wire)
Pin 9 = Rear Thermistor (yellow wire) goes to the blue connector…
Pin 10 = Ground Strap (green wire to ground lug on the fuser frame).
Pin 11 = Ground / return from CRUM board (gray wire)
Pin 12 = Return Wire for both heat lamps (black wire coming from thermostat)
Page 2 of 6 * Xerox® and all of their model names & numbers are trademarks of Xerox Corporation and are
used here only as references. Xerox is in no way affiliated with The Parts Drop.
The Parts Drop: (201)387-7776 www.partsdrop.com
Measuring components (pin-outs):
• Main Fuser Heat Lamp (+ thermostat): pins 1 & 12
• Sub Fuser Heat Lamp (+ thermostat): pins 3 & 12
• Front Thermistor for C32, 7328, or 7346 versions: pins 4 & 6
• Front Thermistor for C2128 version: pins 5 & 6
• Rear Thermistor for C32, 7328 or 7346 versions: pins 7 & 9
• Rear Thermistor for C2128 version: pins 8 & 9
• **Fuse 1 (F1) on CRUM Board (blows at 50 prints) (7328 version only): pins 8 & 11
• **Fuse 2 (F2) on CRUM Board (blows at 50 days) (7328 version only): pins 5 & 11
• **Fuse 3 (F3) on CRUM Board (blows at end of life) (7328 version only): pins 3 & 11
**Note: The 7346 version’s CRUM board has only one fuse. For 7346 only, the Fuser Reset
Fuse (F1) can be measured at pins 3 & 11. No
continuity will be found at pins 5 & 11 and
you’d be measuring the indexing resistor if you
measure between pins 8 & 11.
This procedure will apply to any of the 4
versions.
PROCEDURE (see Photo #1 for orientation)
Photo#1: Orientation (which way is up?)
1. Remove the “Front End” cover… which is held on by 2 screws. One of them is hiding behind
the green pressure tension relief lever. (See photo
#2)
2. Remove the “Rear End Cover”. This cover is
also held on by 2 screws. When you remove it,
you’ll see there is quite a bit of wiring squished in
behind the cover. Take a note of how it all fits in
there. It will help you later when you go to put this
cover back on (See photo #3)
3. Remove the Exit Baffle from the top of the fuser (2
screws… see Photo #4)
4. Remove the Exit Pinch-Roll Baffle which is found
near the top of the fuser (2 screws…see Photo #4)
Photo #2: Removing the Front End Cover
Photo #3: Rear Wiring (7346 shown)
Photo #4: Removing Baffles
Page 3 of 6 * Xerox® and all of their model names & numbers are trademarks of Xerox Corporation and are
used here only as references. Xerox is in no way affiliated with The Parts Drop.
The Parts Drop: (201)387-7776 www.partsdrop.com
5. Remove the “Inner Cover” by turning the fuser so that the Inner Cover is facing upwards and
removing 2 screws. (see Photo #6).
6. Flip the fuser over again and remove the Outer Cover. You’ll need to remove 2 screws (see
Photo 7: Outer Cover (2 screws)
Photo #7), remove the rubber caps from the Pressure Tower
Screws at either end of the fuser, and pop the cover off of the
frame near the Pressure Tower Screws at either end (see
Photo #8)… then it will lift up and off with a little jiggling.
7. Now that the fuser is pretty well stripped down, it’s
high time to remove the 2 Fuser Heat Lamps. This is
best accomplished by disconnecting the 2 lamp terminals
Photo 8: Pop cover off of frame
at the rear end, and the 2 terminals at the front end. Next
remove the front heat lamp holder bracket (1 screw).
Now you can slide the two heat lamps out through the
front end.
8. Next you’ll want to remove the Thermistor /
Thermostat Assembly. Start by going to the rear of the
fuser and disconnecting the white and blue thermistor
connectors, and the fuser lamp return connector (the
large white connector with the thick black wire). (See
Photo #9) Remove the thermistor and lamp return wires
from their wire guides on both the front and rear ends of
the fuser. Then remove 2 screws and the Thermistor /
Photo 9: Thermistor Connectors
Thermostat Assembly will come off for you.
Photo 10, 11, & 12: Re-taping the Thermistors’ Heads
9. Re-tape the thermistor heads. This is important because if the tape wears all the way through,
damage can happen to the thermistor and also to your new Heat Roller’s surface. You can use
Kapton® Tape or K250 (1/2 inch width is good here). It’s important to remove the old tape very
Page 4 of 6 * Xerox® and all of their model names & numbers are trademarks of Xerox Corporation and are
used here only as references. Xerox is in no way affiliated with The Parts Drop.
The Parts Drop: (201)387-7776 www.partsdrop.com
carefully from the head of the thermistor. Use a good sharp razorblade, always cutting outward
(don’t cut in towards the padding), and be careful not to damage the foam pad or wires under the
tape. Then put only one layer
of tape over the thermistor’s
head, and anchor it with
another piece of tape going
around the base in the opposite
direction. (see Photo #’s 10,
11, & 12)
10. Take off the Fuser Entrance
Guide (2 short screws which
have washers under them)
11. Next you will remove the
Photo 13 & 14: Release springs & remove the Stripper Plate
Stripper Plate / Exit Pinch
Roll Assembly: Release the
two springs which tension the Stripper Plate (see Photo #13) and
then pivot the Stripper Plate / Exit Pinch Roll Assembly until it
can be extracted from the metal shaft it pivots on (see Photo #14).
Now clean the edge of the Stripper Plate very gently. The newer
models have a thin Teflon-like coating which is easily damaged…
on this kind you can use your fingernail to scrape the edge
carefully. You want to remove any residual fused toner while
taking care not to damage the coating. Older models had a metal
plate without the coating and on that kind, you can gently scrape
with the blade of a flat-head screwdriver.
12. Take careful note of how far the Pressure Screws are screwed
down to the frame… you can either mark the screws or count
threads exposed below the frame, so you can return them to the
Photo 15: Note how much of
same pressure later when you reassemble the fuser (see Photo
the Pressure Screws are below
#15).
the frame by marking or
13. Now for the Pressure Sleeve Assembly… Back out the two
counting threads.
pressure tower screws carefully and remove them. Next pivot the
Pressure Sleeve Assembly up and off (It might prove helpful later if you first study how the
pressure sleeve assembly’s metal tension arms pivot on metal studs and also how the pressure
sleeve assembly sits into the tension arms).
14. Replace the Pressure Sleeve if it’s damaged. Note that the
pressure sleeves often look wrinkled or twisted after only a short
time in use, and this is not always a signal that the sleeve is bad.
Make sure there is adequate lubrication inside the sleeve… The
recommendation is to put a small amount of high temperature
grease on the plastic parts which contact the inside of the sleeve
(avoid getting too much grease on the pressure pad portion of the
assembly).
15. With the pressure off, you can now easily remove the Fuser
Photo 15: 7328 CRUM Board
Heat Roller by removing the Retaining Clips from either end of
Page 5 of 6 * Xerox® and all of their model names & numbers are trademarks of Xerox Corporation and are
used here only as references. Xerox is in no way affiliated with The Parts Drop.
The Parts Drop: (201)387-7776 www.partsdrop.com
the Heat Roller. Check the Fuser Drive Gear for wear and the Heat Roll Bearings to make sure
they’re not seized up. Install a new Fuser Heat Roller.
16. Reassemble it all. Pay special attention to the pressure screws… return them to the same
position they were in before you removed them. Uneven or overly tight pressure can cause
wrinkled copies…while inadequate pressure can cause jams and poor fusing of the image.
Now let’s look at how to reset the Fuser Count for each of the models.
FUSER COUNT RESET PROCEDURES:
•
C32 version: 008R12904 / 126K13940 (110 volts), (008R12905 / 126K14890 for 220 volt version)
For Models: C32/40, (DocuColor) DC1632, C2240, C3535, & (WorkCenre) M24, M32/40, Pro32/40
•
Hold down the ‘9’ and the ‘AC’ buttons simultaneously. Select “Yes” when the
machine asks if you replaced the fuser.
C2128 version: 008R12933 (110 volts), (008R12934 for 220 volt version)
For: (WorkCentre Pro or CopyCentre) C2128, C2636, C3545)
•
To get into “User Tools” mode, Press the ‘Access’ button. Then use the default User
Password ‘1111’ (4 ones) and press ‘Login’. Press ‘More’, and then look for “Supply
Management”… Select the part who’s counter you want to reset and follow the prompts (it’ll
ask you if you replaced the part, touch ‘Yes’).
7328 version: 008R13040 (110 volts), (008R13028 for 220 volt version)
For: (WorkCentre) 7228, 7235, 7245, 7328, 7335, 7345
OR… 7346 version: 008R13055 (110 volts), (008R13056 for 220 volt version)
For: (WorkCentre) 7346 only.
First enter diagnostic mode (CE Mode): Hold ‘0’ for at least 10 seconds, then press ‘Start’…
at the password prompt, enter ‘6789’ followed by ‘Confirm’. Now press the ‘Machine
Status’ button. Choose the “Tools” tab and then choose the following from left to right:
“System Settings”, “Common Service Settings”, and then in the right column, scroll down
and touch “Maintenance / Diagnostics”. Scroll down and touch the button for “Adjustment /
Others”. Choose ‘HFSI Counters’ (High Frequency Service Items). You’ll be prompted for
a “Chain-link” number… Enter ‘954-804’ and press ‘Confirm’. The current fuser count will
show up. Touch “Reset Current Value” followed by ‘Reset’.
Congratulations! You’ve given your fuser new life.
Page 6 of 6 * Xerox® and all of their model names & numbers are trademarks of Xerox Corporation and are
used here only as references. Xerox is in no way affiliated with The Parts Drop.