1
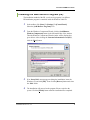
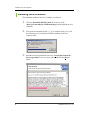
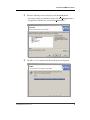
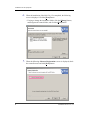
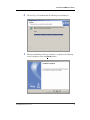
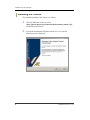
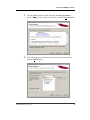
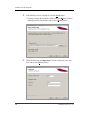
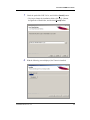
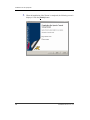
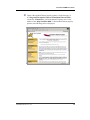
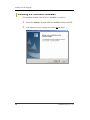
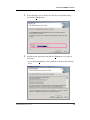
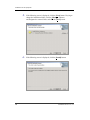
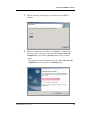
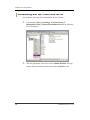
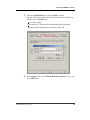
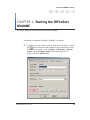
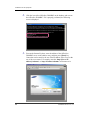
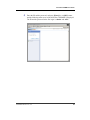
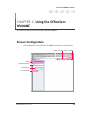
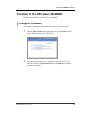
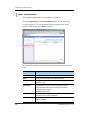
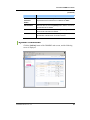
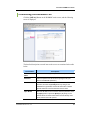
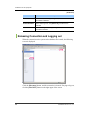
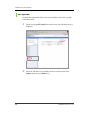
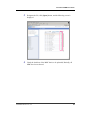
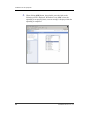
GABD-000153
Ed. 00
OfficeServ
WebMMC User Guide
COPYRIGHT
This guide is proprietary to SAMSUNG Electronics Co., Ltd. and is protected by copyright.
No part of this document may be copied, translated, transcribed or duplicated for any commercial
purposes or disclosed to a third party in any form without the prior written consent of SAMSUNG
Electronics Co., Ltd.
TRADEMARKS
Product names mentioned in this document may be trademarks and/or registered trademarks of
their respective companies.
This guide should be read before the installation and operation, and the operator should correctly
install and operate the product by using this guide.
This guide may be changed for the system improvement, standardization and other technical reasons
without prior notice.
For further information on the updated guide or have a question for the content of guide, contact the
address or homepage below.
Address: Document Center 18nd Floor IT Center. Dong-Suwon P.O. Box 105, 416, Maetan-3dong
Yeongtong-gu, Suwon-si, Gyeonggi-do, Korea 442-600
Homepage: http://www.samsungdocs.com
© 2005 SAMSUNG Electronics Co., Ltd.
All rights reserved.
OfficeServ WebMMC User Guide
INTRODUCTION
Purpose
OfficeServ WebMMC is a program to set or change the functions of the key
phone system. This document describes the main functions, the installation
method, and the method of setting each function.
Document Content and Organization
This guide is composed of three chapters and the abbreviations, which can be
summarized as follows:
CHAPTER 1. Installing the OfficeServ WebMMC describes:
The introduction to the OfficeServ WebMMC and the explanation on the
installation environment, the installation procedure, and the environment setup
method of the WebMMC.
CHAPTER 2. Starting the OfficeServ WebMMC describes:
The method of starting the OfficeServ WebMMC.
CHAPTER 3. Using the OfficeServ WebMMC describes:
The method of using the functions of the OfficeServ WebMMC.
ABBEVIATIONS provides:
The full names and the explanations to the abbreviations used in this
document.
© SAMSUNG Electronics Co., Ltd.
I
Ошибка! Стиль не определен.
Conventions
The following types of paragraphs contain special information that must be
carefully read and thoroughly understood. Such information may or may not
be enclosed in a rectangular box, separating it from the main text, but is
always preceded by an icon and/or a bold title.
CAUTION
Provides information or instructions that the reader should follow in
order to avoid a service failure or damage to the system.
CHECKPOINT
Provides the operator with checkpoints for stable system operation.
NOTE
Indicates additional information as a reference.
Console Screen Output
II
y
The lined box with ‘Courier New’ font will be used to distinguish
between the main content and console output screen text.
y
‘Bold Courier New’ font will indicate the value entered by the
operator on the console screen.
© SAMSUNG Electronics Co., Ltd.
OfficeServ WebMMC User Guide
References
OfficeServ 7400 System Manual
OfficeServ 7400 System Manual introduces OfficeServ 7400, and describes
the system information necessary for understanding the system.(such as the
hardware configuration, specification, and functions)
OfficeServ 7400 Installation Manual
OfficeServ 7400 Installation Manual describes the environment condition, the
system installation method, and the method of system checkup and operation
necessary for the installation of the OfficeServ 7400 system.
OfficeServ 7400 Service Manual
OfficeServ 7400 Service Manual describes the outline and the specification,
the configuration and the characteristics of each hardware, and the troubles
and their troubleshooting that may occur during its use, and the programming
method of the OfficeServ 7400 system.
Revision History
EDITION
DATE OF ISSUE
REMARKS
00
11. 2005.
First Edition
© SAMSUNG Electronics Co., Ltd.
III
Ошибка! Стиль не определен.
This page is intentionally left blank.
IV
© SAMSUNG Electronics Co., Ltd.
OfficeServ WebMMC User Guide
SAFETY CONCERNS
For product safety and correct operation, the following information must be given to the
operator/user and shall be read before the installation and operation.
Symbols
Caution
Indication of a general caution.
Restriction
Indication for prohibiting an action for a product.
Instruction
Indication for commanding a specifically required action.
© SAMSUNG Electronics Co., Ltd.
V
Ошибка! Стиль не определен.
CAUTION
Caution
When installing or deleting the OfficeServ WebMMC
When installing or deleting the OfficeServ WebMMC, the Operation
System(OS) is restarted. Before installating or deleting the OfficeServ
WebMMC, all programs should be terminated. When installing or
deleting the OfficeServ WebMMC, the existing data can be damaged.
Therefore, the existing data should be saved before the installing or
deleting the OfficeServ WebMMC.
VI
© SAMSUNG Electronics Co., Ltd.
OfficeServ WebMMC User Guide
TABLE OF CONTENTS
INTRODUCTION
I
Purpose .......................................................................................................................... I
Document Content and Organization ............................................................................. I
Conventions................................................................................................................... II
Console Screen Output ................................................................................................. II
References ................................................................................................................... III
Revision History............................................................................................................ III
SAFETY CONCERNS
V
Symbols.........................................................................................................................V
Caution .........................................................................................................................VI
CHAPTER 1. Installing the OfficeServ WebMMC
1
Outline of the OfficeServ WebMMC .................................................................................. 1
Installation Environment.................................................................................................... 2
Installing the OfficeServ WebMMC ................................................................................... 2
Installing the Web Service Program (IIS)....................................................................... 3
Installing Java Container ............................................................................................... 4
Installing the Tomcat ...................................................................................................... 8
Installing the OfficeServ WebMMC .............................................................................. 14
Interworking with the Tomcat and the IIS ..................................................................... 18
CHAPTER 2. Starting the OfficeServ WebMMC
© SAMSUNG Electronics Co., Ltd.
21
VII
TABLE OF CONTENTS
CHAPTER 3. Using the OfficeServ WebMMC
25
Screen Configuration ....................................................................................................... 25
Function of the OfficeServ WebMMC.............................................................................. 27
Change of Password.................................................................................................... 27
User Information .......................................................................................................... 28
System Connection...................................................................................................... 29
Connecting the Database File...................................................................................... 31
Releasing Connection and Logging out ....................................................................... 32
Screen of Number Selection ........................................................................................ 33
Screen of the MMC Selection ...................................................................................... 34
All Download................................................................................................................ 35
All Upload .................................................................................................................... 38
ABBREVIATION
41
I ~ T ............................................................................................................................. 41
VIII
© SAMSUNG Electronics Co., Ltd.
OfficeServ WebMMC User Guide
CHAPTER 1. Installing the OfficeServ
WebMMC
This chapter describes the introduction of the OfficeServ WebMMC, and explains the installation
environment, the installation procedure, and the environment setup method of the WebMMC.
Outline of the OfficeServ WebMMC
OfficeServ WebMMC is a program to set or change the functions of the key
phone system.
Generally, the functions of the key phone system can be set or changed by
Man-Machine Code(MMC) using the buttons of the key phone. But using the
OfficeServ WebMMC, the user can easily set or change the funtions of key
phone system through the Web Browser(Internet Explore).
OfficeServ WebMMC performs the Transmission Control Protocol/Internet
Protocol(TCP/IP) communication with the key phone system. In order to use
the OfficeServ WebMMC, install the Internet Information Server(IIS) Web
Service Program and set the environment.
The user connects to the OfficeServ WebMMC server and login by using
his/her own ID and password. Set or change the funtions of the key phone
system saved at the back up database in the OffLine Mode and perform the
upload of the database into the key phone system that is to be applied. Or set
or change the functions after connecting the database directly to the key phone
system in the Online Mode.
And the data on the functions of the key phone system can be made into the
back up database inside the web server to be managed.
© SAMSUNG Electronics Co., Ltd.
1
Ошибка! Стиль не определен.
Installation Environment
In order to properly install the OfficeServ WebMMC, check its installation
environment. OfficeServ WebMMC operates in the computer of more than
Microsoft Windows 2000 Professional, and the computer should have the IIS
web service program installed.
The minimum specification of the computer where the OfficeServ WebMMC
can operate is shown in the table below:
System Requirements
Items
Specifications
CPU
Intel Pentium IV 1 GHz
Main Memory
512 MB RAM
Operation
System(OS)
Microsoft Widows 2000 Professional or more
Network
TCP/IP Protocol, Fixed IP Address
Web Server
IIS(Internet Information Server)
Java Container
J2SE 5.0
JSP Server
Tomcat 5.5
Installing the OfficeServ WebMMC
The installation method of the OfficeServ WebMMC is as follows:
2
1.
Install the IIS, which is a service program.
2.
Install the Jave Container.
3.
Install the Tomcat.
4.
Install the OfficeServ WebMMC.
© SAMSUNG Electronics Co., Ltd.
OfficeServ WebMMC User Guide
Installing the Web Service Program (IIS)
The installation method of the IIS, a web service program, is as follows:
IIS installation program is contained inside the Windows 2000 CD.
1.
2.
3.
4.
In the taskbar, click [Start] Æ [Settings] Æ [Control Panel].
Select the [Add/Remove Programs] icon.
From the Windows Components Wizard, click the [Add/Remove
Windows Components] button in the left-hand frame of the window.
Then the Windows Components Wizard window will be displayed as
given below. After selecting the ‘Internet Information Server(IIS)’,
click the [Next] button.
If an ‘Insert Disk’ message appears during the installation, insert the
Windows CD and click [OK]. Then click the [Browse] button and select
the ‘i386’ folder.
The installation will proceed as the program files are copied to the
system. Click the [Finish] button when the installation has completed.
© SAMSUNG Electronics Co., Ltd.
3
Ошибка! Стиль не определен.
Installing Java Container
The installation method of the Java Container is as follows:
1.
2.
3.
4
Click the ‘Download JDK 5.0 Update 5’ on the site of the
‘http://java.sun.com/j2se/1.5.0/download.jsp’ and downloads the Java
Container.
Execute the downloaded file(jdk-1_5_0_05-windows-i586-p.exe), and
the following screen is displayed, and the installation of the Java
Container starts.
Read the license agreement and select the ‘I accept the terms in the
license agreement’ item if you agree with it, and click the [Next>]
button.
© SAMSUNG Electronics Co., Ltd.
OfficeServ WebMMC User Guide
4.
When the following screen is displayed, click the [Next] button.
y
5.
If trying to change the installation folder, click the [Change] button to
designate the wanted folder, and click the [Next] button.
The Jdk1.5.0_03 is installed with the following screen displayed.
© SAMSUNG Electronics Co., Ltd.
5
Ошибка! Стиль не определен.
6.
When the installation of the Jdk1.5.0_03 is completed, the following
screen is displayed. Click the [Next] button.
y
7.
6
If trying to change the installation folder, click the [Change] button,
and designate the wanted folder, and click the [Next] button.
When the following <Browser Registration> screen is displayed, check
the wanted browser and click [Next] button.
© SAMSUNG Electronics Co., Ltd.
OfficeServ WebMMC User Guide
8.
9.
The Jre1.5.0_03 is installed with the following screen displayed.
When the installation of the Java Container is completed, the following
screen is displayed. Click the [Finish] button.
© SAMSUNG Electronics Co., Ltd.
7
Ошибка! Стиль не определен.
Installing the Tomcat
The installation method of the Tomcat is as follows:
1.
2.
8
Click the ‘5.5.9 exe’ on the site of the
‘http://jakarta.apache.org/site/downloads/downloads_tomcat-5.cgi’,
and download the Tomcat.
Execute the downloaded file(jakarta-tomcat-5.5.9.exe), and the
following screen is displayed.
© SAMSUNG Electronics Co., Ltd.
OfficeServ WebMMC User Guide
3.
4.
Click the [Next>] button, and the following <License Agreement>
screen is displayed. If you agree to the license, click the [I Agree] button.
If the following screen is displayed, select the type of the install, and
click the [Next>] button.
© SAMSUNG Electronics Co., Ltd.
9
Ошибка! Стиль не определен.
5.
If the following screen is displayed, click the [Next] button,
y
6.
10
If trying to change the installation folder, click the [Browse...] button,
and designate the wanted folder, and click the [Next>] button.
When the following <Configuration> Screen is displayed, enter each
item, and click the [Next>] button.
© SAMSUNG Electronics Co., Ltd.
OfficeServ WebMMC User Guide
7.
Check the path of the J2SE 5.0 Jre, and click the [Install] button.
y
8.
If trying to change the installation folder, click the [...] button,
designate the wanted folder, and click the [Install] button.
With the following screen displayed, the Tomcat is installed.
© SAMSUNG Electronics Co., Ltd.
11
Ошибка! Стиль не определен.
9.
12
When the installation of the Tomcat is completed, the following screen is
displayed. Click the [Finish] button.
© SAMSUNG Electronics Co., Ltd.
OfficeServ WebMMC User Guide
10. Check if the installed Tomcat properly operates. On the directory of
‘C:\Program Files\Apache Software Foundation\Tomcat5.5\bin’,
execute the ‘Tomcat5.exe’, and in the Internet Explorer move to the
address of the ‘http://localhost:8080’. If the installed Tomcat properly
operates, the following screen is displayed.
© SAMSUNG Electronics Co., Ltd.
13
Ошибка! Стиль не определен.
Installing the OfficeServ WebMMC
The installation method of the OfficeServ WebMMC is as follows:
14
1.
Execute the ‘Setup.exe’ file of the OfficeServ WebMMC on the provided CD.
2.
If the following screen is displayed, click the [Next] button.
© SAMSUNG Electronics Co., Ltd.
OfficeServ WebMMC User Guide
3.
4.
If the following screen is displayed, select the corresponded country,
and click the [Next] button.
Read the license agreement, and click the [Yes] button if you agree to
the license.
y
If you click the [No] button, the installation is not proceeded with any
more.
© SAMSUNG Electronics Co., Ltd.
15
Ошибка! Стиль не определен.
5.
6.
16
If the following screen is displayed, click the [Next] button. If trying to
change the installation folder, click the [Change…] button,
and designate the wanted folder, and click the [Next] button.
If the following screen is displayed, click the [Install] button.
© SAMSUNG Electronics Co., Ltd.
OfficeServ WebMMC User Guide
7.
8.
With the following screen displayed, the OfficeServ WebMMC is
installed.
When the installation of the OfficeServ WebMMC is completed, the
following screen is displayed. Select the ‘Yes, I want to restart my
computer now.’ item, click the [Finish] button, and the computer
restarts.
y
If trying not to restart the computer, select the ‘No, I will restart my
computer later.’ item, and click the [Finish] button.
© SAMSUNG Electronics Co., Ltd.
17
Ошибка! Стиль не определен.
Interworking with the Tomcat and the IIS
The method of connecting the Tomcat and the IIS is as follows:
1.
2.
18
If executing the [Start] Æ [Settings] Æ [Control Panel] Æ
[Management Tools] Æ [Internet Information Service], the following
screen is displayed.
Click the right button of the mouse on the ‘Default Web Site’ directory,
and the click the left button of the mouse on the ‘Properties’ item.
© SAMSUNG Electronics Co., Ltd.
OfficeServ WebMMC User Guide
3.
4.
Select the [ISAPI Filters] tab, and click [Add…] button.
Enter the information on the related filter registration like the following
and then press the [OK] button.
y
Filter Name: jakarta
y
Execution File: C\Program Files\Samsung Electronics\OfficeServ
Webmmc\Jakarta Isapi Redirector\bin\isapi_redirect.dll
Press [Apply] button on the <Default Web Site Properties> screen, and
press [OK] button.
© SAMSUNG Electronics Co., Ltd.
19
Ошибка! Стиль не определен.
This page is intentionally left blank.
20
© SAMSUNG Electronics Co., Ltd.
OfficeServ WebMMC User Guide
CHAPTER 2. Starting the OfficeServ
WebMMC
This chapter describe the method of starting the OfficeServ WebMMC.
The method of starting the OfficeServ WebMMC is as follows:
1.
Check if the Tomcat is under execution. If the Tomcat is under execution,
the [
] icon is displayed on the right below side of the desktop. If the
Tomcat is not executed, execute the [Start] Æ [Program] Æ [Apache
Tomcat x.x] Æ [Configure Tomcat]. If the following screen is
displayed, click the [Start] button.
© SAMSUNG Electronics Co., Ltd.
21
Ошибка! Стиль не определен.
2.
3.
22
Click the icon of the OfficeServ WebMMC on the desktop, and execute
the OfficeServ WebMMC. If it is properly performed, the following
screen is displayed.
Execute the Internet Explorer, enter the address of the OfficeServ
WebMMC server on the address entry, and then press [Enter] key.
Connection can be made by the use of the IP address of the server or the
use of the server name. For example, enter the ‘http://[Server IP
address]/webmmc’ or ‘http://localhost/webmmc’ and connect to it.
© SAMSUNG Electronics Co., Ltd.
OfficeServ WebMMC User Guide
4.
Enter the ID and the password, and press [Enter] key or [OK] button,
and the following main screen of the OfficeServ WebMMC is displayed.
The ID and the password in the first login is ‘admin’ and ‘4321’.
© SAMSUNG Electronics Co., Ltd.
23
Ошибка! Стиль не определен.
This page is intentionally left blank.
24
© SAMSUNG Electronics Co., Ltd.
OfficeServ WebMMC User Guide
CHAPTER 3. Using the OfficeServ
WebMMC
The chapter describes the method of using the OfficeServ WebMMC.
Screen Configuration
The configuration of the OfficeServ WebMMC main screen is shown below:
HOME
MY INFO HELP
LOGOUT
User ID
Program Information
OnLine/OffLine
User Information
© SAMSUNG Electronics Co., Ltd.
25
Ошибка! Стиль не определен.
The detailed description on the items of each screen is contained in the table
below;
Screen Items
26
Descriptions
HOME
Moves to the main screen page.
MY INFO
Changes the password of the log-in user.
HELP
Displays the HELP screen.
LOGOUT
Log-out.
User ID
Displays the ID of the currently log-in user.
Program
Information
- Version: Displays the version of the current WebMMC.
- Connection Status: Displays the current connection status.
x Idle: No systems connected or no files open.
x OffLine: Opens or generates the database file.
x OnLine: Connects to the system.
- File Name: Displays the name of the file that is opened
currently when the connection status is in the Off-line mode.
- System: Displays the IP address of the system or the modem
number. That is connected currently when the connection
status is in the On-Line mode. When the connection status is
in the Off-Line mode, it displays the currently operating
system and the country.
OnLine/OffLine
- OnLine: Displays the list of the system that has been
registered. The addition of the system list or the selection and
the connection of the system can be performed.
- OffLine: Displays the list of the database files that has been
registered. A file can be generated or the contents of the file
can be checked.
User Information
The user information can be inquired.
© SAMSUNG Electronics Co., Ltd.
OfficeServ WebMMC User Guide
Function of the OfficeServ WebMMC
Describes the functions of the OfficeServ WebMMC.
Change of Password
The method of changing the password of the log-in user is as follows:
1.
2.
Click the [MY INFO] on the right upper side of the WebMMC main
screen, the following screen is displayed:
Enter the password that is to be changed on the items of the ‘New
Password’ and the ‘Confirm Password’, click [OK] button, and the
password is changed.
© SAMSUNG Electronics Co., Ltd.
27
Ошибка! Стиль не определен.
User Information
The method of inquiring the user information is as follows:
Select [Configuration] Æ [User Information] menu, and the following
screen is displayed. The user information menu is displayed only when
logged-in with the manager(‘admin’ account).
The detailed description on each item of the screen is contained in the table
below:
Screen Items
28
Descriptions
User ID
Displays the user account.
State
Displays the log-in status of the specific account.
IP Address
Displays the recent IP address of the user logged-in by the
specific account.
Connection
Displays the connection status of the specific account.
- Not connected to the system or the files not opened
- Connected to the system
- Database files opened
Connect URL
Displays the IP address of the currently connected system or
the name of the currently working file.
Add Button
Enter the User ID, and then click the [Add] button. The user
account is added.
© SAMSUNG Electronics Co., Ltd.
OfficeServ WebMMC User Guide
(Continued)
Screen Items
Descriptions
Initialize
Password
Button
Select the User ID, click the [Initialize Password] button, and
the password of the selected user is initialized as ‘4321’.
Delete Button
Select the User ID, click the [Delete] button, and the account of
the selected user is deleted.
Select All Button
In the selection of the User ID, click the [Select All] button, and
the accounts of all users are deleted.
Cancel Button
In the selection of the User ID, click the [Cancel] button, and
the selection of the all users’ accounts is cleared.
System Connection
Click the [OnLine] button of the WebMMC main screen, and the following
screen is displayed.
© SAMSUNG Electronics Co., Ltd.
29
Ошибка! Стиль не определен.
The detailed descriptions on each item on the screen are contained in the table
below:
Screen Items
30
Descriptions
Site Name
Enters the name of the site.
Site Number
IP address of the system or the modem connection no.
Link Type
Connection type(LAN IPv4/ LAN IPv6/ MODEM)
Tenant
Selects the tenant number when connecting.
Password
Enters the connection password when connecting.(the same as
the MMC800 password)
Add Button
Enters the site name, connection type, IP address or the
modem connection number, and click the [Add] button.
By doing so, the site information is added.
Connect Button
Select the site that is to be connected, the tenant number and
the password, and then click the [Connect] button or press the
[Enter] key, and the connection to the selected site is made.
If other user has already been connected to the site, a warning
message is displayed. If re-trying the connection, the user’s
connection that has been used in the previous is terminated,
and the user that has tried to currently make the connection is
connected to the system.
Delete Button
Select the site and click the [Delete] Button, the information of
the selected is deleted.
Select All Button
In selecting the site, click the [Select All] button, all sites are
selected.
Cancel Button
In selecting the site, click the [Cancel] button, the selection of
all sites is cleared.
© SAMSUNG Electronics Co., Ltd.
OfficeServ WebMMC User Guide
Connecting the Database File
Click the [OffLine] Button on the WebMMC main screen, and the following
screen is displayed.
The detailed descriptions on each item on the screen are contained in the table
below:
Screen Items
Descriptions
Database File
Name
Enters the file name.(Input of special characters)
Password
Enters the password of the file when opening the file.(The
same as the MMC800 password.)
Create Button
Enter the file name the country, the tenant number, and the
password, and click the [Create] button. By doing so, the
database file is generated, and the site information is added.
Special characters cannot be entered in the file name.
Open Button
Select the file that is to be connected, enter the password, click
the [Open] button or press the [Enter] key. By doing so, the
selected file is connected. When other user has already used
the file, the file cannot be opened.
© SAMSUNG Electronics Co., Ltd.
31
Ошибка! Стиль не определен.
(Continued)
Screen Items
Descriptions
Delete Button
Select the file, click the [Delete] button, and the selected file
information is deleted.
Select All Button
When selecting a file, click [Select All], and all files are
selected.
Cancel Button
When selecting a file, click [Cancel] button, and the selection
of all files is cleared.
Releasing Connection and Logging out
When the connection to the system or the database file is made, the following
screen is displayed.
Click the [Disconect] button, and the connection is cleared. If trying to log out,
click the [LOGOUT] button on the right upper of the screen.
32
© SAMSUNG Electronics Co., Ltd.
OfficeServ WebMMC User Guide
Screen of Number Selection
In case of some specific MMC, when selecting the MMC, the screen of the
number selection is displayed as follows:
The detailed descriptions on each item of the screen are contained in the table
below:
Screen Items
Descriptions
OK Button
Select the number, click [OK] button, and the specific menu
page is displayed.
Select Button
When selecting numbers, several successive numbers can be
selected in one time. Firstly, check the checkbox of the first item
among the numbers that are to be selected, and check the
checkbox on the last item. And click [Select] button, and the
items located between both items are all selected.
Select All Button
In the number selection, click the [Select All] button, and all
numbers are selected.
Cancel Button
In the number selection, click [Cancel] button, and the
selection of all number is cleared.
© SAMSUNG Electronics Co., Ltd.
33
Ошибка! Стиль не определен.
Screen of the MMC Selection
If the MMC is selected, the following screen is displayed.
Icons
MMC Items
Page Moving
The detailed descriptions on each item of the screen are contained in the table
below:
Screen Items
Descriptions
Icon
] Icon: Change the value, click [Saving] icon, and
- Saving [
the changed value is saved.
] Icon: Modifies newly the current page.
- Newly Modified [
MMC Item
MMC Items are displayed.
Page Moving
Moves the page.
MMC Item
For the detailed description on each MMC, refer to the ‘Key Phone
System User Manual’.
34
© SAMSUNG Electronics Co., Ltd.
OfficeServ WebMMC User Guide
All Download
Downloads the data of the currently connected system, and saves them at the
database file.
1.
Select [All Download] item, and the following screen is displayed.
© SAMSUNG Electronics Co., Ltd.
35
Ошибка! Стиль не определен.
2.
3.
4.
36
Save the file that is to be downloaded. The method of designating the file
that is to be downloaded is as follows:
y
[Open] Button: Downloads the data from the system, and saves them
at the selected file. Select the file, enter the password, and click
[Open] button or press [Enter] key.
y
[Create] Button: Downloads the data, and saves the database file that
is to be saved. Enter the file name and the password, and click
[Create] button or press [Enter] key.
Designate the file, click [Create] button or [Open] button, the following
screen is displayed.
Select the checkbox of the MMC that is to be downloaded. Basically,
all MMC are have been selected.
© SAMSUNG Electronics Co., Ltd.
OfficeServ WebMMC User Guide
5.
When [OK] button is clicked, the downloading is proceeded with as the
following screen is displayed. If there is any MMC where the
downloading is not properly performed, an error message is displayed
after the downloading is completed.
© SAMSUNG Electronics Co., Ltd.
37
Ошибка! Стиль не определен.
All Upload
Performs the upload of the data in the selected database file to the currently
connected system.
1.
2.
38
When selecting [All Upload] item on the screen, the following screen is
displayed.
Select the file that is to be uploaded, enter the password, and click
[Open] button or press [Enter] key.
© SAMSUNG Electronics Co., Ltd.
OfficeServ WebMMC User Guide
3.
4.
Designate the file, click [Open] button, and the following screen is
displayed.
Check the checkbox of the MMC that is to be uploaded, Basically, all
MMC have been selected.
© SAMSUNG Electronics Co., Ltd.
39
Ошибка! Стиль не определен.
5.
40
When clicking [OK] button, the upload is proceeded with as the
following screen is displayed. When there is any MMC where the
uploading is not properly made, an error message is displayed after the
uploading is completed.
© SAMSUNG Electronics Co., Ltd.
OfficeServ WebMMC User Guide
ABBREVIATION
I
IIS
Internet Information Server
LAN
Local Area Network
MMC
Man-Machine Code
OS
Operation System
TCP/IP
Transmission Control Protocol/Internet Protocol
L
M
O
T
© SAMSUNG Electronics Co., Ltd.
41
Ошибка! Стиль не определен.
This page is intentionally left blank.
42
© SAMSUNG Electronics Co., Ltd.
OfficeServ
WebMMC User Guide
© 2005 Samsung Electronics Co., Ltd.
All rights reserved.
Information in this guide is proprietary to SAMSUNG
Electronics Co., Ltd.
No information contained here may be copied, translated,
transcribed or duplicated by any form without the prior written
consent of SAMSUNG.
Information in this guide is subject to change without notice.


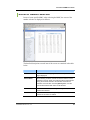
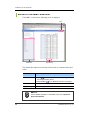
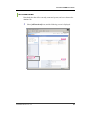

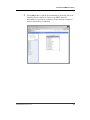


![SamsungProdBulletin_211_4_4x_Software_Release[1]](http://vs1.manualzilla.com/store/data/005825179_1-598976db56b1ef1012f4b9b7fb2b917f-150x150.png)