1
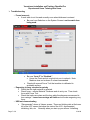
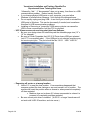
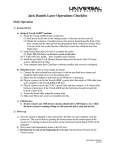
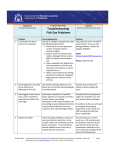
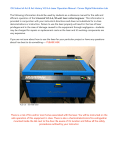
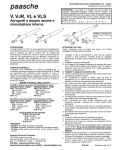
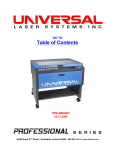
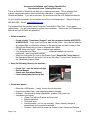
VersaLaser Installation and Training Checklist For Experienced Users Training New Users This is a checklist of items that can help you in training new users. This is intended for a trained, experienced person who is instructing new users. It supplements the VLS Operations Manual. If you are a new user, you must start with the VLS Operations Manual. As you install the machine, do not hesitate to call if you need assistance: Support Group at 480-609-0297. Email: [email protected]. It is assumed that the machine has a Computer Controlled Air Filter Cart. If not, ignore related items. You are responsible for proper fume extraction. Refer to the VLS Operations Manual and call ULS with any questions. Setup of machine o Create a folder “VersaLaser Support” onto the computer desktop AND ONTO A BACKUP CD. Copy your Print Driver disk into the folder. Also use the folder for any special files or information relevant to the laser system so that it is easy to find. o Setup Guide Sheet tells you how to assemble the cables. o 6’ USB cable max length. Have computer near machine. o Your computer must have ____________ software installed and correctly configured – see VersaLaser manual. o When you first power up, look on the System Page. Record the Tuning Value in the Operations Manual, and write it into a text file called “Tuning Value” and put it in the VersaLaser Support folder. Keep the following items by the machine… o o o o Focus Tool - see the picture at right Service Manual VersaLaser Operations Manual Lens cleaning solution and q-tips Focus Tool > VersaLaser basics o o o o Runs like a USB printer – “raster” motion like ink-jet printer Uses focused laser light – like magnifying glass in sunlight Software - Use choice of design application: graphic, CAD, paint, etc. VersaLaser print driver Viewer Tab with job Preview and post view Material selection Thickness entry Intensity sliders – do not use normally. (Note: intensity change is remembered for the particular material.) Controls – Red button to power up, Green to start, Pause and Resume Page 1 of 8 3-24-08 VersaLaser Installation and Training Checklist For Experienced Users Training New Users Safety o Read Safety section of VersaLaser Manual before training on safety. o CO2 laser light is infra-red, invisible. Creates heat at material surface. You will see this as a spot of bright light on the material. o Safety labeling: “Radiation” does not refer in this case to nuclear radiation. It refers to infra-red light and the red dot pointer. If anyone has questions about safety, please look in the VersaLaser Operations Manual Section 1. o Infra-red Laser light cannot emerge from the cabinet or through the door window. o Door window has 3-layer safety glass. It is OK to watch through the window when the machine is running. No special goggles or glasses are needed. Some materials like Laser Tile create bright white light. Do not stare at bright light. o Interlocks prevent exposure to CO2 laser – if you lift the lid the interlocks will stop the CO2 laser. o It is OK to run in the “red light” mode with the lid open. Great for testing alignment before you run a part. o Do not leave the machine unattended while running. It is possible to ignite some materials if they are not run correctly. Remember, if you see a small flame, you can lift the lid to stop the CO2 laser and can puff out the flame. o Must have a fire extinguisher available. o Filter and exhaust Computer Controlled Air Filter Cart has been tested on authorized materials. It is safe to run those materials in well ventilated office or production space. Show the three filters in the drawers, show how the covers must be put on correctly and that the drawers must be closed. o There must be airflow clearance around the back and sides of the machine and air filter cart – 1 foot all around. o Production area must be ventilated even with Filter Cart operating. o Do not run items not in Materials Print Driver. Unauthorized items may be unsafe for use with the Filters. Page 2 of 8 3-24-08 VersaLaser Installation and Training Checklist For Experienced Users Training New Users Vocabulary of Lasers – Show These Items o Lens Carriage – Moves left to right o Lens Plate, #3 Mirror and Focus Lens - red lens plate marked “1.5, 2.0 or HPDFO” is held in with two thumbscrews. Lens plate holds the #3 mirror (item 1 below) and focus lens (item 2 below)... o #2 Mirror - at left side of arm o Beam Window –located inside machine at back left corner Page 3 of 8 3-24-08 VersaLaser Installation and Training Checklist For Experienced Users Training New Users o Focus Tool Focus Tool > o UCP (Universal Control Panel) Viewer Tab, System Tab, Diagnostics Tab Settings: Material selections or Manual Mode settings o Red Dot Pointer – Red pointer beam turns on when the top door is open o “Dry run” or Practice Run – lift the lid, run the machine with the lid open, see that only the red dot pointer light is on. Lets you test alignment of jobs. o Job queue – print driver viewer screen shows a queue of jobs o Arm (#1 below) and Cover (#2 below) – structure that supports the lens carriage. o Motion System - electronics and mechanism that move lens carriage and arm. o Bearings (four red arrows below) and Belt (blue arrow below)– parts that support and drive the lens carriage, can be seen under the silver cover on the arm. o Play, Power, Pause-Resume, X-Y motion buttons, Up-Down Z motion buttons – the controls you will use most frequently o Rulers – the numbered rulers on the laser system worktable that read to 16” in X and 12” in Y. Page 4 of 8 3-24-08 VersaLaser Installation and Training Checklist For Experienced Users Training New Users Things to Explain o It is possible to push on the lens carriage or arm and move it out of position. This will not damage the machine, but it may make some grinding noises as it tries to move. You can “re home” to correct this. Note that machine does not re-home XY unless asked to or unless it is powered off completely and is restarted from cold start. o Must be in focus. If not in focus, you will get patchy or fuzzy engraving. SHOW EFFECT BY RUNNING JOB AFTER MEASURING TOO THICK BY ABOUT 1/8” OR MANUALLY FOCUSING 1/8” TOO HIGH OR TOO LOW. o Use the Focus Tool for a manual check on focus. Section 4.5 in manual. o Right way to use calipers: don’t scratch items, hold the caliper straight (vertical to the surface in all directions) so you don’t get too thick a reading. o System page settings: Page 5 of 8 Lens selection MUST MATCH FOCUS LENS ON MACHINE. DO NOT PUSH THE CALIBRATE BUTTON. It is used only with Service assistance to set the focus height calibration for the focus lens. If the calibration value is changed, the machine will not focus correctly. Tuning value will not change. Leave as-is and write down the value in the Operations Manual for reference. You can retune if necessary. 3-24-08 VersaLaser Installation and Training Checklist For Experienced Users Training New Users Auto Z must be checked (enabled) for automatic focusing according to material thickness. If it is not checked the table will not move up and down automatically to focus. Maintenance o Optics Cleaning – Clean when dirty. Used canned air to dust off or dry optics. Never clean optics immediately after use, allow time for optics to cool. Section 5-2 in VersaLaser manual o Bearing, Rail and Belt Cleaning Section 5-4 in VersaLaser manual o Filter life and changes Change pre-filter when it gets very dirty Keep a spare HEPA filter. Vacuum switch trips when filter is full and you have to replace it then. The machine with not operate with a HEPA filter that is clogged. Print driver keeps a record of Carbon Filter usage, will warn when one is needed. Other Items For Service Persons o o o o VersaLaser Service Manual has step by step part replacement instructions Show where the CO2 laser is, how to remove it Focus calibration – how to be sure the focus tool is calibrated to the lens Show location of X motor, CPU board (point out that it is under the CO2 laser) Page 6 of 8 3-24-08 VersaLaser Installation and Training Checklist For Experienced Users Training New Users Troubleshooting o Focus incorrect: If work table is not focused correctly even when thickness is entered Be sure Lens Selection on the System Screen is set to match lens being used. Be sure “Auto Z” is “Enabled.” Home the Z axis and do a red dot dry run to recheck. Note: Machine does not re-home Z unless commanded. Check with manual Focus Tool that machine is calibrated to worktable surface. o Engraving is fuzzy, streaked or patchy Check that the right material is selected. Check focus – reenter Material Thickness and do a dry run. Then check focus with Focus Tool. Check that optics are clean and the lens plate thumbscrews are secured in lens carriage. Loose lens carriage will rattle and will make engraving very fuzzy. o USB not communicating “Disconnected” shows in Viewer screen - There are blinking dots at the lower left of the UCP screen that show the state of the VLS: disconnected, initializing, idle, etc. Normally when you start up you will see “initializing Page 7 of 8 3-24-08 VersaLaser Installation and Training Checklist For Experienced Users Training New Users “followed by “idle.” If “disconnected” does not go away, then there is a USB communication problem. Reboot usually fixes this. If you change physical USB ports on your computer, you must allow Windows to reinstall driver firmware – click through the dialogue boxes. Do not rapidly unplug and plug USB – it can force you to have to reinstall the USB ports in Windows. This can be done easily if needed, and sometimes this does fix USB communication problems. Installing or Removing a “jump drive”/USB memory device can cause the USB to loose communication until the CPU is rebooted. o UCP Viewer screen not receiving print jobs from Software Be sure your design does not extend beyond the allowable page size (12” x 16” for example). Be sure in Printer Properties that VLS 2.30 Ports shows USB port selected (not LPT1 or something else). If the USB port is not selected, machine may not receive print jobs. The port should be like “ULS-1 USB VLS2.30.” o Engraving off center or at wrong location Home X-Y to reset the lens position. It has sometimes happened that someone pushed the lens carriage or arm and moved it out of position. The machine will reset the position when re-homed or when powered completely off then restarted. Machine does not re-home XY unless commanded or unless it is powered off completely and then restarted. Be sure correct print driver is installed. (VLS3.50 – a larger VersaLaser will not work with VLS2.30 machine, and vice-versa.) Page 8 of 8 3-24-08