1
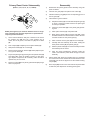
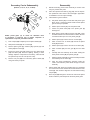
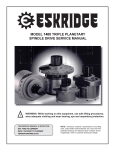
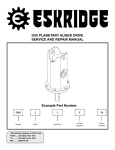
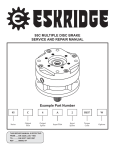
440 PLANETARY GEAR DRIVE SERVICE AND REPAIR MANUAL Example Part Number 440 L A S1 D 9 Model Shaft Retention Gear Drive Mounting Output Shaft Input Mounting Input Spline THIS SERVICE MANUAL IS EFFECTIVE FROM: ..... S/N 70000, JULY 2006 TO:........... CURRENT REF: ........ SM440LS2-AA — 19 Ratio — Z Options 440 SPINDLE DRIVE SERVICE MANUAL DOUBLE STAGE PLANETARY GEAR DRIVE This manual will assist in disassembly and assembly of major components for all Model 440 Planetary Gear Drives. Item numbers, indicated in parentheses throughout this manual, refer to the Eskridge Model 440 exploded parts breakdown drawings. Individual customer specifications (mounting case, output shaft, brake assembly, etc.) may vary from exploded drawing and standard part numbers shown. If applicable, refer to customer drawing for details. LUBRICATION & MAINTENANCE Change the oil after the first 50 hours of operation. Oil should be changed at 500 hour intervals thereafter. Use a GL-5 grade EP 80/90 gear oil (EP = “Extreme Pressure”). The gear drive should be partially disassembled to inspect gears and bearings at 1000 hour intervals. If your unit was specified “shaft up” or with a “-Z” option, a grease zerk was provided in the base housing. For shaft-up operation, the output bearing will not run in oil and must be grease lubricated. Use a lithium based or general purpose bearing grease sparingly every 50 operating hours or at regular maintenance intervals. Over-greasing the output bearing tends to fill the housing with grease and thicken the oil. Operating Position Oil Capacity Oil Level Horizontal Shaft 8 quarts / 7.6 liters To horizontal centerline of gear drive Vertical Shaft (Pinion Up) 14 quarts / 13.3 liters To midway on upper/secondary gear set Vertical Shaft (Pinion Down) 11 quarts / 10.4 liters To midway on upper/primary gear set ! WARNING: While working on this equipment, use safe lifting procedures, wear adequate clothing and wear hearing, eye and respiratory protection. CONTENTS Example Part Number ........................................................................................................................................1 Lubrication & Maintenance................................................................................................................................2 Unit Disassembly Procedure .............................................................................................................................3 Primary Planet Carrier Subassembly ...................................................................................................4 Reassembly .............................................................................................................................................4 Secondary Carrier Subassembly .........................................................................................................5 Reassembly .............................................................................................................................................5 Base Subassembly .................................................................................................................................6 Output Shaft Removal ............................................................................................................................6 Reassembly .............................................................................................................................................6 Unit Assembly .........................................................................................................................................7 Metal Face Seal Assembly Instructions ...............................................................................................8 440 Spindle Drive Exploded View Drawing .................................................................................................... 11 Eskridge Product Warranty .............................................................................................................................12 Warranty Return Policy ....................................................................................................................................12 The Eskridge Product Line ..............................................................................................................................13 2 Unit Disassembly Procedure 1) Scribe a diagonal line across the outside of the unit from the cover (3) to the base (1) before disassembly to aid in the proper positioning of pieces during reassembly. 2) Remove magnetic drain plugs (36) and drain oil from unit. The oil will drain out faster and more completely if warm. 3) Remove the twenty lockwashers (35). 4) Remove the cover (3), thrust bearing set (31; 2ea, 32), and input gear (11). Inspect o-ring (33); discard if damaged or deformed. 5) Lift the primary planet carrier assembly out of the unit (includes Items 7, 9, 10, 13, 15, 16, 17, 19 & 20). 6) Remove the primary ring gear (5). Inspect second O-ring (33); as before, discard if damaged. 7) Using a screwdriver, seal pick or similar tool remove the retaining ring (18), which retains the secondary planet carrier to the output shaft. The retainer can be left in the carrier but must be removed from the groove. 8) With a suitable lifting apparatus and a hoist, lift the secondary planetary assembly out of the unit (includes Items 6, 8, 12, 14, 16, 17, 18 & 20). 9) Remove secondary ring gear (4). Inspect third O-ring (33); as before, discard if damaged or deformed. 10) The unit is now disassembled into groups of parts. The area(s) requiring repair should be identified by thorough inspection of the individual components after they have been cleaned and dried. hex-head capscrews (34) and 3 Reassembly Primary Planet Carrier Subassembly (Items 7, 9, 10, 13, 15, 16, 17, 19 & 20) 13 19 1) Reassemble the primary planet carrier assembly using new parts as needed. 2) Insert the sun gear (10) in the splines of the carrier (9). 3) Install the retaining ring (19) into the corresponding groove of the sun gear (10). 4) Install rollers in gear as follows: 15 16 9 17 7 20 Use a small screwdriver, seal pick or similar tool to remove the retaining ring (19) from sun. Leave retaining ring in carrier, but out of groove, and slide sun (10) out of carrier (9). 2) Drive roll pins (20) completely into the planet shafts (13). 3) Slide planet shafts (13) out of carrier (9). 4) Remove planet gears (7), washers (15) rollers (16) and spacers (17) from carrier (9). 5) Inspect the planet gear (7), bearing bore and planet shaft (13) and rollers (16). Check for spalling, bruising or other damage. Replace components as necessary; rollers should be replaced only as a set of 20. 6) Set planet washer (15) on work table with planet gear (7) on top of it. Center the planet washer to the planet gear as closely as possible. b) Center the planet shaft (13) in the planet gear (7) bearing bore. c) Place spacer washer (17) onto planet shaft. d) Begin placing rollers (16) around the shaft (13). There should be clearance for the last roller to slide in. Be sure to install 16 rollers in each planet gear (7). e) Place a washer over the gear (15) onto the shaft (13). f) Carefully slide the assembly off the table, holding the lower planet washer (13) and planet gear (7). g) Slide the planet shaft (13) out of the assembly and slide the assembly into the carrier. h) Align the planet gear/bearing assembly inside the carrier and install the planet shaft through the entire assembly. 15 Rotate planet gears (7) to check for abnormal noise or roughness in bearings (16). If further inspection or replacement is required, proceed as follows. 1) a) Remove roll pins (20) from primary planet shafts (13) using a 3/16 inch pin punch. 4 5) Planet shafts (13) should be installed with the chamfered end of the 3/16 inch hole towards the outside diameter of the carrier (9); this will aid in alignment of holes while inserting roll pins (20). 6) Drive roll pin (20) into the carrier hole and into the planet shaft to retain the parts. Repeat for remaining planet gears. Secondary Carrier Subassembly Reassembly (Items 6, 8, 12, 14, 16, 17, 18 & 20) 12 1) Rebuild secondary planet carrier assembly in reverse order using any needed new parts. 2) Place the spiral-wound retaining ring (18), with the depression positioned at the center of the carrier (8) in preparation for installation onto the output shaft (2). 3) Install rollers in gear as follows: 14 18 17 8 16 a) Set planet washer (14) on work table with planet gear (6) on top of it. Center the planet washer and the planet gear as closely as possible. b) Slide a spacer washer (17) over the planet shaft. c) Center the planet shaft (12) in the planet gear (6) bearing bore. d) Rotate planet gears (6) to check for abnormal noise or roughness in bearings (16). If further inspection or replacement is required, proceed as follows. Begin placing rollers (16) around the shaft (12). There should be clearance for the last roller to slide in. Be sure to install 20 rollers per row in the planet gear (6). e) Slide a spacer (17) over the first row of rollers (16). 1) Drive roll pins (20) completely into the planet shafts (12). f) 2) Slide planet shafts (12) out of carrier (8). Place a second row of rollers (16) around the planet shaft (12) as before. 3) Remove planet gears (6), washers (14), spacers (17) and rollers (16) from carrier (8). g) Slide a spacer (17) over the second row of rollers (16). h) Place a washer (14) over the gear (6) onto the shaft (12). i) Carefully slide the assembly off the table, holding the lower planet washer (14) and planet gear (6). j) Slide the planet shaft (12) out of the assembly and slide the assembly into the carrier (8). k) Align the planet gear/bearing assembly inside the carrier and install the planet shaft through the entire assembly. 17 6 20 14 4) 5) Inspect the planet gear (6), bearing bore and planet shaft (12) and rollers (16). Check for spalling, bruising or other damage. Replace components as necessary; rollers should be replaced only as a set of 40 (2 rows of 20). Remove roll pins (20) from secondary planet shafts (12) using a 3/16 inch pin punch. 5 4) Planet shafts (12) should be installed with the chamfered end of the 3/16 inch hole towards the outside diameter of the carrier (8). This will aid in alignment of holes while inserting roll pins (20). 5) Drive roll pin (20) through the carrier hole and into the planet shaft to retain the parts. Repeat for the other planet gears. Base Subassembly 1) Clean all foreign material from magnetic oil plugs (36) located in the base (1). 2) Place shaft on table, output side down. 3) Press outer bearing cone (23) (large end down as shown) onto the shaft until it seats against the shoulder. 4) Apply a layer of lithium or general purpose bearing grease to the roller contact surface of outer bearing (23). (Items 1, 2, 23, 24, 25, 26, 27, 28, 29, 30, 36 & 38) 28 29 27 Note: Press bearing cone onto output shaft by pressing on inner race only. DO NOT press on roller cage, as it may damage bearing. 25 33 26 5) Wipe the face of each seal using a lint-free wipe. No particles of any kind are permissible on the sealing surfaces. (Even a hair can hold the seal surfaces apart and cause a leak.) Apply a thin film of oil on the entire seal face of one or both seals using a clean finger or lint-free applicator. Oil must not contact surfaces other than the sealing faces. (See Page 9 for seal inspection and installation procedure.) 6) Place dust boot (39) on the base. Apply a thin layer of lithium or general purpose bearing grease to the lip. 36 38 1 36 24 23 30 39 2 NOTE: The outer bearing cone may interfere slightly with the case half of the metal face seal; this is normal and should not harm the seal. 7) Place the base onto the shaft. 8) Apply a layer of lithium or general purpose bearing grease to the roller contact surface of the inner cup (26). Press the inner bearing cone (25) (large end up as shown) onto the shaft (2) until it is seated against inner bearing cup (26). 9) Proper output shaft preload should provide a rolling torque that varies between 50 to 300 in-lb. The bearing preload should be tailored to your application: a low-speed application may require a high pre-load, high-speed applications usually benefit from low pre-load. Adding shims (27) will increase the pre-load on the bearing set. Determine your pre-load requirement and install shims to obtain this pre-load. Install the Load-N-Lock™ segments (29) over the shims (27) and into the groove in the shaft (2). Finally, install the lock ring (28) over the segments (29). 40 41 1) Remove the lock ring (28) using a heel bar or puller; if using a heel bar, be sure not to pry against the cage of the inner output shaft bearing (25). Remove the split ring segments (29) and shims (27). Caution: Since the output shaft is no longer retained, care should be taken to avoid personal injury. Care should also be taken not to damage it when it is pressed through base. Output Shaft Removal All subassembly service or repairs should be complete at this time. Continue to Unit Assembly to complete unit buildup. Disassembly 1) Base (1) should be set pinion side down, as shown, on a plate or table. Press output shaft out bottom of base by applying a load to top end (internal end) of shaft until it passes through inner shaft bearing cone (25). (Inspect shaft and base halves of metal face seal (30). Replace if worn excessively. See Pages 7-10 for seal inspection and installation procedure.) NOTE: Removal of the spindle half of the seal is best done with the outer bearing cone removed. 2) A gear puller may be used to remove the outer bearing cone (23) from the shaft (2). If reusing old bearing cone, do not pull on or damage roller cage. 3) Inspect inner and outer bearing cups (26 & 24). If cups are damaged, drive them out using a brass drift and utilizing the bearing knock-out notches in the base (1) Reassembly 6 Unit Assembly 1) When all subassemblies are complete, the unit is ready to be assembled. 2) Install the secondary carrier assembly onto the output shaft; align the splines of the carrier (8) with the splines of the shaft (2) and slide the carrier onto the shaft. 3) Install the retaining ring (18) onto the groove of the shaft (2), using a spiraling motion. 4) Lubricate o-ring (33) and install on the pilot of the secondary ring gear (4). Caution: Hold ring gear by outside or use lifting device to prevent injury. 5) Align gear teeth of ring gear (4) with the gear teeth of the planet gears (6) and place on base. Now align mounting holes of ring gear with holes in base. Use the scribed line made during disassembly for reference. 6) Install the primary carrier assembly with the sun into the secondary carrier. 7) Lubricate o-ring (33) and install on the pilot of the primary ring gear (5). Caution: Again, hold the ring gear by outside diameter or use lifting device to prevent injury. 8) Align gear teeth of ring gear with those of the planet gears and place on base. Align mounting holes of ring gear with holes in base. Use the scribed line made during disassembly for reference. 9) Install the input gear (11). 10) Install the thrust bearing set (2ea 31, 1ea 32). 11) Lubricate o-ring (33) and install on the pilot of the cover (3). 12) Noting the scribed line made during disassembly, install the cover (3). 13) Install and torque the 20 5/8-11 hex-head capscrews (34) with lockwashers (35). The torque for the cap-screws: 220 ft-lb dry, 170 ft-lb if the fasteners are lubricated. 14) Ensure the unit spins freely by using a splined shaft to drive the input gear (11). 15) Fill the unit to the proper level, as specified, with GL5 EP 80/90 gear oil after it is sealed with a brake and/or motor. The gearbox is now ready to use. 7 Seal Assembly for Duo-Cone Seals Installation Instructions courtesy Caterpillar, Inc. 5 2 8 4 6 7 3 4 8 2 Seal Assembly Contents: (2) Metal Seal Rings 2 (2) Rubber Toric Rings Terminology: 1 - Seal Ring 6 - Seal Ring Face 2 - Rubber Toric 7 - Seal Ring Ramp 3 - Housing Retainer Lip 8 - Seal Ring Retaining Lip 4 - Housing Ramp 9 - Installation Tool (Optional) 5 - Seal Ring Housing (Base/Shaft) 7 1 8 Inspection of Worn Seals Housing Preparation Seals wear in an axial, rather than radial, direction (as depicted in Figure Y). The total thickness of the flange is usable wear material on the formed seal rings and good seal performance can generally be expected until the flange is completely worn away. Remaining service life can be estimated by measuring the ring flange thickness, and using the chart below. Minimum flange thickness required for reusability is 0.05” (1.27 mm). The housing components (3, 4) that contact the rubber toric rings must be free from foreign material (oil, grease, dirt, metal chips dust or lint particles, etc.) before installing the seal. This should be done with a lint-free wipe and a non-petroleum based solvent. Measure Flange Thickness Here 1) Remove any foreign material from the rubber torics (2), ramps (7) and lips (8) of both seal rings. This should also be done with a lint-free wipe and non-petroleum based solvent. 2) Dry with a clean wipe. 3) Place the rubber toric (2) on the metal seal ring (6) at the bottom of the seal ring ramp (7) and against the retaining lip (8) (see above). Make sure the rubber toric is straight on the seal ring and not twisted. Be careful not to nick or cut the torics during this assembly, as this can cause leaks. 3) Put the installation tool (9) onto the metal seal ring (6) and rubber toric (2). Lightly dampen the lower half of the rubber toric with the appropriate assembly lubricant. Techniques to dampen the toric include wiping with a lint-free towel, lubricating using a clean foam brush, or dipping into a container lined with towels saturated in the assembly lubricant (as shown). Development of a Wear Lip in This Area Makes it Necessary to Install a New Seal 9 Figure Y 2 1 The measured parameter used to check the remaining seal life is flange thickness, at the outer edge (once any wear lip is removed). The measurement must be made carefully because the shoulder is only 0.06” (1.52 mm) from the edge of the flange. Estimates of expected seal life are difficult, because there are many differences in machine applications, job conditions, maintenance and other factors that affect seal service life. Approved Assembly Lubricants* Formed Seal Wear Chart Isopropyl Alcohol Flange Thickness in (mm) Seal Wear Percent Worn Houghto-Grind 60 CT 0.075 (1.91) 0 Quaker® Solvo Clean 68-RAH 0.062 (1.59) 25 0.050 (1.27) 50 *Do not use Stanosol or any other liquid that leaves an oil film or does not evaporate quickly. 0.038 (0.95) 75 0.025 (0.64) 100 0.012 (0.32) 125 0.000 (0.00) 150 Mishandling Of Seals Mishandling of seals during assembly can cause immediate leaks or premature failure. Failure can occur due to cutting or tearing of the elastomeric load ring, breakage of the sealing ring, contamination of the sealing face with dirt or lint, etc. When assembling metal face seals, please carefully observe assembly instructions. 9 Installation Process 1) With the lower half of the rubber toric still wet, use the installation tool (9) to position the seal ring (1) and the rubber toric (2) squarely against the housing retainer lip (3) (as shown). 2) For smaller diameter seals, use sudden and even pressure to push the rubber toric under the retaining lip of the housing. For larger diameter seals, which will not press in with sudden and even pressure, it is acceptable to work the toric past the retaining lip by starting on one side and tapping the opposite side of the installation tool with a rubber mallet until it is engaged past the retaining lip of the housing. 3) Check the assembled height (A) (see below) in at least four places, 90º apart, using either a caliper, tool makers’ ruler or any other calibrated measuring device. The difference in height around the ring must not be more than 0.04” (1 mm). If small adjustments are necessary, do not push or pull directly on the seal ring. Use the installation tool (9) to push down and your fingers to pull up uniformly on the rubber toric and seal ring. NOTE: The rubber toric can twist if it is not completely wet during installation or if there are burrs or fins on the retaining lip of the housing. Twists, misalignments and bulges of the toric will result in seal failure. If correct installation is not apparent, remove seal from the housing and repeat the process. The rubber toric must never slip on the ramps of either the seal ring or the housing. To prevent slippage, allow adequate evaporation time for the lubricant before proceeding with further assembly. Once correctly in place, the rubber toric must roll on the ramp only. 4) Wipe each seal ring face (6) using a lint-free wipe. No particles of any kind are permissible on the sealing surfaces. (Even a hair can hold the seal surfaces apart and cause a leak.) 5) Apply a thin film of oil on the entire seal face (6) of one or both seals using a clean finger or lint-free applicator. Oil must not contact surfaces other than the sealing faces. NOTE: Mishandling of seals during assembly can cause immediate leaks or premature failure. Failure can occur due to curing or tearing of the elastromeric load ring, breakage of the sealing ring, contamination of the sealing face with dirt or lint, etc. When assembling metal face seals, please carefully observe assembly instructions. Dim A Final Assembly While completing the final assembly of the unit, make sure that both housings are in correct alignment and are concentric. Slowly bring the two housings together. High impact can scratch or break the seal components. If the rubber toric slips at any location, it will twist, causing the seal rings to cock. Any wobbling motion of the seal is an indication of cocked seals and can cause dirt to enter by pumping mud past the torics. 10 440 Spindle Drive Exploded View Drawing 34 MODEL 440 RATIOS ITEM QTY 1 1 2 1 19:1 3.95 4.77 28:1 5.87 4.77 36:1 7.59 4.77 47:1 7.59 6.19 37 35 3 DESCRIPTION Base A round ** 42-004-3062 42-004-3062 42-004-3062 42-004-3062 Base F flangeless ** 42-004-3072 42-004-3072 42-004-3072 42-004-3072 Shaft output S1 42-004-4032 42-004-4032 42-004-4032 42-004-4032 SAE 'C' 2 Bolt and 4 Bolt 42-004-2012 42-004-2012 42-004-2012 42-004-2012 42-004-2022 42-004-2022 42-004-2022 42-004-2022 3 1 SAE 'D' 4 Bolt SAE 'E' 4 Bolt 42-004-2032 42-004-2032 42-004-2032 42-004-2032 4 1 Ring gear secondary 42-004-1032 42-004-1032 42-004-1032 42-004-1032 5 1 Ring gear primary 42-004-1042 42-004-1042 42-004-1042 42-004-1042 6 3 Planet gear - sec 42-004-1092 42-004-1092 42-004-1092 42-004-1242 7 3 Planet gear - pri 42-004-1102 42-004-1112 42-004-1272 42-004-1272 8 1 Carrier - secondary 42-004-1402 42-004-1402 42-004-1402 42-004-1392 9 1 Carrier - primary 42-004-1062 42-004-1072 42-004-1282 42-004-1282 10 1 Sun gear secondary 42-004-1132 42-004-1132 42-004-1132 42-004-1252 1 Input gear 13 tooth, 8/16 42-004-1152 42-004-1162 42-004-1172 42-004-1172 98-005-1141 32 31 11 33 5 13 19 16 9 17 1 For 14 tooth, 12/24, use adapter 98-005-1141 98-005-1141 98-005-1141 3 Planet shaft - sec 42-004-1332 42-004-1332 42-004-1332 42-004-1332 13 3 Planet shaft - pri 42-004-1342 42-004-1342 42-004-1342 42-004-1342 14 6 Planet thrust washer-sec 42-004-1362 42-004-1362 42-004-1362 42-004-1362 15 6 Planet thrust washer - pri 42-004-1362 42-004-1362 42-004-1362 42-004-1362 16 180 Roller sec-2 x 20, pri-1 x 20 01-106-0040 01-106-0040 01-106-0040 01-106-0040 17 12 Roller spacer washer 42-004-1352 42-004-1352 42-004-1352 42-004-1352 18 1 Retaining ring - secondary 01-160-0680 01-160-0680 01-160-0680 01-160-0680 19 1 Retaining ring - sun gear 01-160-0690 01-160-0690 01-160-0690 01-160-0690 20 6 Roll pin 01-153-0220 01-153-0220 01-153-0220 01-153-0220 23 1 Bearing outer cone (67391) 01-102-0300 01-102-0300 01-102-0300 01-102-0300 24 1 Bearing outer cup (67322) 01-103-0290 01-103-0290 01-103-0290 01-103-0290 25 1 Bearing inner cone (71450) 01-102-0280 01-102-0280 01-102-0280 01-102-0280 26 1 Bearing inner cup (71750) 01-103-0280 01-103-0280 01-103-0280 01-103-0280 27 * Shim 42-004-1202 42-004-1202 42-004-1202 42-004-1202 28 1 Lock ring 42-004-1212 42-004-1212 42-004-1212 42-004-1212 29 1 Split ring 42-004-1222 42-004-1222 42-004-1222 42-004-1222 30 1 Face seal (CAT 9G-5315) 01-406-0080 01-406-0080 01-406-0080 01-406-0080 31 2 Thrust washer 01-112-0400 01-112-0400 01-112-0400 01-112-0400 32 1 Thrust bearing 01-112-0410 01-112-0410 01-112-0410 01-112-0410 33 3 O-ring 01-402-0840 01-402-0840 01-402-0840 01-402-0840 34 20 Hex head capscrew 5/8-11 X 8.5 01-150-1840 01-150-1840 01-150-1840 01-150-1840 35 20 Lockwasher 01-166-0040 01-166-0040 01-166-0040 01-166-0040 36 3 Plug - 3/4 NPT magnetic 01-207-0100 01-207-0100 01-207-0100 01-207-0100 37 2 Plug - sae -12 port 01-208-0030 01-208-0030 01-208-0030 01-208-0030 38 *** Grease Fitting - 1/8 NPT 01-215-0010 01-215-0010 01-215-0010 01-215-0010 39 1 Seal dust boot 01-406-0090 01-406-0090 01-406-0090 01-406-0090 40 1 Plug - 1/8 NPT 01-207-0030 01-207-0030 01-207-0030 01-207-0030 41 1 Grease Fitting - 1/8 NPT 01-215-0010 01-215-0010 01-215-0010 01-215-0010 * QUANTITY OF SHIMS DETERMINED BY BEARING PRE-LOAD REQUIRED X440LS2-aa 7 10 11 12 15 33 15 20 4 12 14 18 17 8 16 28 17 29 6 20 14 27 25 33 26 36 38 1 36 24 23 30 39 2 DATE:04-05-06 ** FOR Z OPTION, ADD 'Z' TO BASE PART NUMBER (IE: 42-004-3062Z) 40 41 11 Eskridge Product Warranty ESKRIDGE, INC. (“Eskridge”) warrants to its original purchaser (“Customer”) that new component parts/units (“Units”) sold by Eskridge will be free of defects in material and workmanship and will conform to standard specifications set forth in Eskridge sales literature current at the time of sale or to any custom specifications acknowledged by written Customer approval of drawings, SUBJECT TO THE FOLLOWING QUALIFICATIONS AND LIMITATIONS: 1. Prior to placing Units in service, the Customer shall provide proper storage such that foreign objects (e.g., rain or debris) cannot enter any Units via entry ports which are normally closed during operation. 2. The Customer must notify Eskridge in writing of any claim for breach of this warranty promptly after discovery of a defect. The warranty period shall commence when a unit is placed in service and shall expire upon the earlier of a. the expiration of twelve (12) months from the date of Commencement of Service (as defined in Paragraph 4) b. the completion of one thousand (1000) hours of service of the Units c. the expiration of six (6) months after the expiration of any express warranty relating to the first item of machinery or equipment in which the Units are installed or on which it is mounted, or d. the installation or mounting of the Units in or on an item of machinery or equipment other than the first such item in which the Units are installed or on which the Units are mounted. 3. Units shall be deemed to have been placed in service (the “Commencement of Service”) at the time the machinery or equipment manufactured or assembled by the Customer and in which the Units are installed or on which the Units are mounted is delivered to the Customer’s dealer or the original end-user, which ever receives such machinery or equipment first. 4. This warranty shall not apply with respect to Units which, upon inspection by Eskridge, show signs of disassembly, rework, modifications, lack of lubrication or improper installation, mounting, use or maintenance. 5. Eskridge makes no warranty in respect to hydraulic motors mounted on any Units. Failure of any such motor will be referred to the motor manufacturer. 6. Claims under this warranty will be satisfied only by repair of any defect(s) or, if repair is determined by Eskridge in its sole, absolute and uncontrolled discretion to be impossible or impractical, by replacement of the Units or any defective component thereof. No cash payment or credit will be made for defective materials, workmanship, labor or travel. IN NO EVENT SHALL ESKRIDGE BE LIABLE FOR INCIDENTAL OR CONSEQUENTIAL DAMAGES OF ANY KIND OR NATURE, FOR WHICH DAMAGES ARE HEREBY EXPRESSLY DISCLAIMED. 7. From time to time, Eskridge may make design changes in the component Units manufactured by it without incorporating such changes in the component Units previously shipped. Such design changes shall not constitute an admission by Eskridge of any defects or problems in the design of previously manufactured component Units. 8. All freight charges on Units returned for warranty service are the responsibility of the Customer. 1. Any part/Unit(s) returned to Eskridge must be authorized by Eskridge with an assigned return (CSR) number. 2. All Units shall be returned freight prepaid. 3. Any Units qualifying for warranty will be repaired with new parts free of charge (except for freight charges to Eskridge as provided above). 4. If Units are found to be operable, you have two options: Warranty Return Policy a. The Units can be returned to you with a service charge for inspection, cleaning, and routine replacement of all rubber components and any other Units that show wear; b. We can dispose of the Unit(s) at the factory if you do not wish it to be returned. NOTE: Any order of Units by customer shall only be accepted by Eskridge subject to the terms stated herein. Any purchase order forms used by Customer (to accept this offer to sell) which contain terms contrary to, different from, or in addition to the terms herein shall be without effect, and such terms shall constitute material alteration of the offer contained herein under K.S.A 84-2-207 (2)(b), and shall not become part of the contract regarding the sale of the Units. The foregoing warranty is the sole warranty made by Eskridge with respect to any Units and is in lieu of any and all other warranties, expressed or implied. There are no warranties which extend beyond the description on the face hereof without limiting the generality of the foregoing, Eskridge expressly disclaims any implied warranty of merchantability or fitness for any particular purpose, regardless of any knowledge Eskridge may have of any particular use or application intended by the purchaser. The suitability or fitness of the Units for the customer’s intended use, application or purpose and the proper method of installation or mounting must be determined by the customer. 12 ESKRIDGE PRODUCT LINE Planetary Gear Drives Series Features Torque Rating (in-lb) Maximum Intermittent 20 28 50 65 105 130/133 150 250/252/254 440 600 1000 Shaft Output Shaft Output Shaft or Spindle Output Shaft Output Shaft Output Shaft or Spindle Output Shaft Output Shaft or Spindle Output Shaft or Spindle Output, Wheel Drive Shaft or Spindle Output, Wheel Drive Shaft or Spindle Output, Wheel Drive 20,000 50,000 50,000 65,000 105,000 130,000 150,000 250,000 440,000 600,000 1,000,000 Multiple Disc Brakes Series Features Torque Rating (in-lb) 10”–Integral Brake SAE A Input to 4,800 SAE B Output SAE B Output, Adjustable Torque SAE B Output, Low Profile For Nichols Motors SAE C Output SAE D Output to 4, 800 to 4,800 to 2,100 to 6,200 to 12,000 to 25,000 (Available on Series 65, 105 & 130 Gear Drives) 90B 90BA 92B 93 (931 or 921) 95C 98D Planetary Auger, Anchor & Digger Drives Series Features Torque Rating (ft-lb) Maximum Intermittent 75 76 77 78 D50 D440 D600 D1000 38 & 51, 2-Speed BA & BC, 2-Speed BA, BC & BD 35 & 48, 2-Speed 1500, 2500 & 5000 D440 D600 D1000 14,000—20,000 8,000—12,5000 6,000—12,5000 9,000—12,500 1,500—5,000 35,000 50,000 83,000 P. O. Box 875 1900 Kansas City Road Olathe, KS 66051 Phone (913) 782-1238 Fax (913) 782-4206 [email protected] www.EskridgeInc.com