1
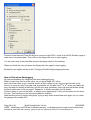
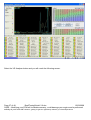
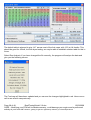
Safe Tuning Guide for Buell’s using ECM Spy.
Tuning Guide v1.4
Page 1 of 48
BuellTuningGuideV1.6.doc
12/03/2008
CARE – Modifying your ECM will invalidate warranty, could damage your engine and is performed
entirely at your own risk! However, getting it right can significantly enhance your Buell Experience!
Disclaimer............................................................................................................................................................... 4
Is it Safe? ................................................................................................................................................................ 4
Installing ECM Spy ................................................................................................................................................ 5
ECMSpy for PC.................................................................................................................................................. 5
PC Interface lead ................................................................................................................................................ 5
Interface lead set-up for PC............................................................................................................................ 6
An Introduction to ECM Spy ................................................................................................................................. 8
The Menu System............................................................................................................................................... 8
Backup the ECM Data............................................................................................................................................ 9
EEPROM............................................................................................................................................................ 9
To Backup the EEPROM ............................................................................................................................... 9
Fuel Maps ......................................................................................................................................................... 12
Other Maps ....................................................................................................................................................... 13
Understanding your ECM .................................................................................................................................... 14
Understanding the TPS..................................................................................................................................... 15
Understanding the AFV.................................................................................................................................... 15
So what is Closed Loop? .............................................................................................................................. 15
Understanding the Fuel Map ............................................................................................................................ 16
Areas of the Fuel Map .................................................................................................................................. 17
Front and Rear Maps .................................................................................................................................... 17
Understanding the Other Maps......................................................................................................................... 20
CLT Resistor Specs ...................................................................................................................................... 20
IAT Resistor Specs ....................................................................................................................................... 20
Offset Maps .................................................................................................................................................. 21
Air Density Correction ................................................................................................................................. 21
Cold Start Enrichment .................................................................................................................................. 21
Running Diagnostics ............................................................................................................................................ 22
Checking the Static Timing .............................................................................................................................. 22
Checking the Trouble Codes ............................................................................................................................ 24
Resetting the Throttle Position Sensor ............................................................................................................. 25
Resetting the Adaptive Fuel Value................................................................................................................... 26
Ready to Tune the bike? ....................................................................................................................................... 27
Checklist before you start................................................................................................................................. 27
Tuning! ................................................................................................................................................................. 29
The Tuning Zones ............................................................................................................................................ 29
Zone 1 – Start up and Idle ............................................................................................................................ 29
Zone 2 – Closed Throttle Overrun (The Popping Zone!)............................................................................. 30
Zone 3 – High Speed Closing Throttle......................................................................................................... 30
Zone 4 – Pulling Away................................................................................................................................. 30
Zone 5 – Cruising Midrange ........................................................................................................................ 30
Zone 6 – Accelerating into corners .............................................................................................................. 30
Zone 7 - Maximum Throttle Low RPM ....................................................................................................... 31
Zone 8 – Full Power Through The Gears..................................................................................................... 31
Zone 9 – Full Power Maximum Throttle...................................................................................................... 31
Seat of the Pants! .............................................................................................................................................. 32
Checking the Mixture!.................................................................................................................................. 32
On a Dyno ........................................................................................................................................................ 33
Datalogging ...................................................................................................................................................... 34
Standard Narrowband O2 Sensor ................................................................................................................. 34
Page 2 of 48
BuellTuningGuideV1.6.doc
12/03/2008
CARE – Modifying your ECM will invalidate warranty, could damage your engine and is performed
entirely at your own risk! However, getting it right can significantly enhance your Buell Experience!
Using a Wideband O2 Sensor....................................................................................................................... 34
Setting up for Datalogging ........................................................................................................................... 34
How to Ride when Datalogging ................................................................................................................... 35
Using MegaLogViewer to optimize your fuel maps .................................................................................... 36
Road Testing..................................................................................................................................................... 41
Checking AFV Value ................................................................................................................................... 41
Check for Error codes................................................................................................................................... 41
Backup Config again!....................................................................................................................................... 41
Riding Normally........................................................................................................................................... 41
Checking AFV again!................................................................................................................................... 42
Enjoy! ................................................................................................................................................................... 42
Advanced Functions ............................................................................................................................................. 43
Rev Limits Are you really sure???? ...................................................................................................................... 43
Modifying the Rev Limits in ECMSpy ........................................................................................................ 45
Appendix 1 - Glossary of Terms .......................................................................................................................... 47
Appendix 2 - Tuning Checklists........................................................................................................................... 48
Before Tuning................................................................................................................................................... 48
After Tuning ..................................................................................................................................................... 48
Page 3 of 48
BuellTuningGuideV1.6.doc
12/03/2008
CARE – Modifying your ECM will invalidate warranty, could damage your engine and is performed
entirely at your own risk! However, getting it right can significantly enhance your Buell Experience!
Disclaimer
This guide is intended to assist in the tuning of your Buell ECM whilst providing advice on how to
avoid engine damage! To tune your engine safely, our strongest recommendation is to print off your
default configuration, then only ever add fuel to the standard map, unless you have access to a Dyno
or Wideband controller.
If you modify your ECM, you may be legally obliged to notify your insurance company. It may also be
illegal in some countries to ride on the road with a modified ECM.
It should also be stated that modifying your ECM will almost certainly void your Manufacturers
warranty!
Is it Safe?
For the newcomer, modifying the factory ECM might sound really daunting, but it can be done safely
if you follow the guidelines in this document.
Always backup the ECM the first time you connect to your Buell, Save this file and back it up to a
safe location, CD or another machine! This file is essential if anything goes wrong and you need to
recover your ECM.
Never reduce the values in the fuel maps without checking the Air Fuel Mixture accurately. To do this
you would need to either run the bike on a dyno, or use a wideband O2 sensor and data logging
equipment.
Always modify front and rear cylinders together, unless you are monitoring the Air/Fuel mixture
separately in both Front and Rear Cylinders.
Never change more than one thing, or one area at a time! Always know what you have done!
Do not adjust areas of the ECM if you do not know what they do! This tool is powerful and can modify
whatever you ask it to! If you are unhappy with what you have read so far or you are not 100% sure
of what you are about to do then quit now and forget using ECM Spy yourself. Ask a qualified person
to do this work for you. However, this guide may be of help to them!
Page 4 of 48
BuellTuningGuideV1.6.doc
12/03/2008
CARE – Modifying your ECM will invalidate warranty, could damage your engine and is performed
entirely at your own risk! However, getting it right can significantly enhance your Buell Experience!
Installing ECM Spy
You will need:
• PC Interface lead
• ECM Spy Software
• A Windows PC in your garage, or ability to get your Buell into the house and to the room
where your computer is (Upstairs spare bedroom??) Alternatively a laptop may be easier!
• A Buell with Fuel Injection, eg X1 or XB series.
ECMSpy for PC
This is the PC version of the program it runs on Windows 2000 and XP and in administrator mode on
Vista.
http://www.ecmspy.de/download/EcmSpySetup.exe
Below is the latest model file, usually included in the above, but updated between releases of
ECMSpy. Put it in the ecmspy program folder (usually c:\program files\ecmspy\.
http://www.ecmspy.de/download/ecmspymod.ini
(you will have to right-click and save the link, as it will be displayed in the browser otherwise)
PC Interface lead
To connect ECMSpy running on a PC to your bike you need a special lead. The ECU on the bike
uses a TTL (5V) serial data port - NOT RS232. To connect to you PC you have to convert the TTL to
RS232 data levels. There are several ways to do this
* Use a MAX232 level shifter chip and build up a little electronic circuit, powered from the PC RS232
COM port. If you do this use the MAX232E device as it is ESD protected.
* Use a FTDI interface lead, this connects to you USB port, emulates a RS232 COM port and
provides 5V TTL signals direct.
FTDI Drivers
The required drivers can be found here:
http://www.ftdichip.com/Drivers/VCP.htm
The correct driver type is VCP. I assume you will need administrator rights to install the driver.
FTDI offers various installation guides in their library:
http://www.ftdichip.com/Documents/InstallGuides.htm
Page 5 of 48
BuellTuningGuideV1.6.doc
12/03/2008
CARE – Modifying your ECM will invalidate warranty, could damage your engine and is performed
entirely at your own risk! However, getting it right can significantly enhance your Buell Experience!
There's one trap: if the driver installation is interrupted after installing the USB driver (this is the first
part of the driver installation), the virtual COM port driver has not been installed, but you will not get
the usual "New device found ..." dialogue in windows if you unplug/replug the cable, and therefore
never get asked to specify a location for the missing serial port driver. Best is, to deinstall the USB
driver completely. Unplug the cable and replug after a few seconds. Then again follow the
instructions from FTDI.
A very basic test could be done using hyper terminal (Start -> Run -> hypertrm.exe). Open a new
session using the new virtual com port and (important!) set flow control to "none".
Then shorten the yellow (pin 3) and the orange (pin 1) wires together using a straightened paper clip
or something similar.
Every keypress in the hyperterm window should be echoed immediately. If not, check if flow control is
disabled and you're using the correct port.
Bike connector
This is a Deutsch connector and very hard to get in ones, you have to be in the trade and buy 100+
The Deutsch part numbers are:
Connector: DT06-4S-C015
Wedge: W4S
Socket contact: 0462-201-16141 (Buell part number: 72191-94)
The pinout is (numbers as printed on the back side of the plug):
1 - orange
2 - black
3 - yellow
4 - n/c
PC Leads may be available pre made from Sonic on UKBEG, see this link for details:
http://www.bike-pix.com/forum/viewtopic.php?t=17934&postdays=0&postorder=asc&start=60
Sonic provides these a near cost as a service to the community, so please do not hassle him if he is
unable to supply at any time.
Interface lead set-up for PC
From the Options Tab, select communications and choose the appropriate COM port for your pc
lead.
Page 6 of 48
BuellTuningGuideV1.6.doc
12/03/2008
CARE – Modifying your ECM will invalidate warranty, could damage your engine and is performed
entirely at your own risk! However, getting it right can significantly enhance your Buell Experience!
If ECM Spy cannot find your ECM through the PC Lead (and the ignition is turned on etc.), it may be
a problem with your connection.
If you have a PC that has had everything connected to it via USB, it is likely that it will allocate a large
number to the COM port, you can find this number using the method I describe below.
If you click on the connections button, you can select the COM port identified as being allocated to
the cable. Mine was 21, which ECM Spy would not support, so I did the following:
Right click on My Computer - Properties
Then the Hardware tab
Then Device Manager
[You can also get here with Start - Control Panel - Printers and Other Hardware - System (on the left)
then click on the Hardware tab then Device Manager.]
Then look down the list for Ports (COM and LPT)
Click on the plus if it is not expanded
With the cable connected, it should say USB Serial Port (COMxx)
If this number xx is not found by ECM Spy, make a note of the lowest COM port in use, then right
click on the virtual cable and click Properties.
Click on the Port Settings tab then advanced, then in the drop down box, select the lowest COM port
noted to be not in use. Windows will give you a lecture on choosing the same COM port for two
different bits of kit, but we need not worry about this as you don’t have both plugged in at the same
time.
Then click OK, then OK, then File - Exit then OK on System Properties.
Then, in ECM Spy, click on Options then Communications (or on the communications button) and
select the COM port you have assigned.
If this was your problem, it should be solved.
Page 7 of 48
BuellTuningGuideV1.6.doc
12/03/2008
CARE – Modifying your ECM will invalidate warranty, could damage your engine and is performed
entirely at your own risk! However, getting it right can significantly enhance your Buell Experience!
An Introduction to ECM Spy
The Menu System
The ECM Spy menu system is relatively self explanatory, unless you failed to select English when
installed!
If the language is in German, just click on the Program Options icon.
Now select English from the language drop down list and click ok.
The Icons from left to right are
Connect/Disconnect Program
Options
ECM Query
Communications Logging
Options
Exit
The Menu Options are as follows:
Page 8 of 48
BuellTuningGuideV1.6.doc
12/03/2008
CARE – Modifying your ECM will invalidate warranty, could damage your engine and is performed
entirely at your own risk! However, getting it right can significantly enhance your Buell Experience!
Backup the ECM Data
This is the most critical part of the tuning process!
If you follow this process, you will always be able to reset your ECM to the default factory settings.
Once backed up, save the files to the PC, copy them to another PC, burn a CD with them and make
sure you don’t lose them! If you lose these files, you will not be able to reset your ECM to the original
settings.
EEPROM
The EEPROM data contains all the read write data within the ECM. Saving the EEPROM data will
save everything, you do not need to save the Fuel Maps separately, except for convenience.
All the Fuel Maps, Ignition Maps, TPS value, AFV value etc are contained somewhere within the
EEPROM data.
All other pages in ECM Spy are simply there to help you find the appropriate part of the EEPROM
and understand which values you are modifying.
Never modify any values directly within the EEPROM pages, unless you really know what you are
doing!
To Backup the EEPROM
Connect to the ECM
Select the EEPROM tab on the menu
Select Fetch EEPROM
Page 9 of 48
BuellTuningGuideV1.6.doc
12/03/2008
CARE – Modifying your ECM will invalidate warranty, could damage your engine and is performed
entirely at your own risk! However, getting it right can significantly enhance your Buell Experience!
Now select Save EEPROM from the File Menu.
Page 10 of 48
BuellTuningGuideV1.6.doc
12/03/2008
CARE – Modifying your ECM will invalidate warranty, could damage your engine and is performed
entirely at your own risk! However, getting it right can significantly enhance your Buell Experience!
OK, now copy it, back it up and save it somewhere safe!
Page 11 of 48
BuellTuningGuideV1.6.doc
12/03/2008
CARE – Modifying your ECM will invalidate warranty, could damage your engine and is performed
entirely at your own risk! However, getting it right can significantly enhance your Buell Experience!
Fuel Maps
The Fuel maps are the most commonly modified areas of the ECM. Back them up now, even though
they are included in the full EEPROM maps.
Whenever you modify the ECM, always save the Fuel Maps so you can go back to them if needed for
reference. Use a filename which makes sense so you can remember which map to go back to.
Whenever you select Save Map on the fuel maps, it will save both front and rear maps.
To save the Fuel Maps,
Connect to the ECM
Select the Fuel Maps tab on the menu
Select Fetch Maps
Page 12 of 48
BuellTuningGuideV1.6.doc
12/03/2008
CARE – Modifying your ECM will invalidate warranty, could damage your engine and is performed
entirely at your own risk! However, getting it right can significantly enhance your Buell Experience!
Now select Save Map from the File Menu.
As before, now copy it, back it up and save it somewhere safe!
Other Maps
No option at the moment to save these, so just hit “Alt + Print Screen” Paste into another application
and save the file. This will give you a reference to get back to if needed.
Page 13 of 48
BuellTuningGuideV1.6.doc
12/03/2008
CARE – Modifying your ECM will invalidate warranty, could damage your engine and is performed
entirely at your own risk! However, getting it right can significantly enhance your Buell Experience!
Understanding your ECM
The ECM is the brains of your Buell, so using ECM Spy is almost brain surgery! The ECM controls all
your bikes intelligence, Fuel Maps, Ignition Maps, Error codes and much much more.
Key items you need to understand to help tune your Buell are listed below.
Page 14 of 48
BuellTuningGuideV1.6.doc
12/03/2008
CARE – Modifying your ECM will invalidate warranty, could damage your engine and is performed
entirely at your own risk! However, getting it right can significantly enhance your Buell Experience!
Understanding the TPS
The TPS is the Throttle Position Sensor. The ECM needs to know how open the throttle is, and in
conjunction with the RPM, and atmospheric conditions, it knows how much air is flowing and hence
how much fuel to inject. That is the essence of this tuning.
If the TPS value is incorrect, the ECM will provide the amount of fuel required for the wrong throttle
setting and hence poor running will occur. A worse scenario is if you tune the bike with an incorrect
TPS value, then any future correction to TPS will result in incorrect fuel maps.
Understanding the AFV
The Adaptive Fuel Value is how the Buell automatically compensates for changes to the
environment, eg riding up mountains, or swapping the exhaust silencer. It is not perfect, but does a
good job to compensate for minor changes.
When the bike is ridden in Closed Loop mode (explained next) the ECM monitors the O2 sensor and
learns the appropriate AFV value to apply to the fuel maps. This AFV value is applied across the
entire fuel map range, hence it is critical that this is accurate. AFV values can vary from 80 to 160%
but should be kept between 90 and 110% whenever possible.
The AFV can be your friend, fine tuning the bike to suit your location, or it can be your worst enemy! If
you setup the bike on the dyno for maximum power across the range, you will probably aim for 13:1 –
13.5:1 Air :Fuel ratio. If you then go for a ride and enter closed loop mode, the ECM will reset the
AFV to maybe 80% to reduce fuel and try to get the default 14.7% AFR. When you next accelerate
hard at full throttle, your perfect map as setup on the dyno will now be running at 80% of your values
hence weak!
To compensate for this, it is recommended when on the dyno to disconnect the O2 sensor, reset the
AFV to 100%, then tune the bike for an Air Fuel Ratio of 14.7% within the closed loop area. This will
then allow you to set the Air Fuel Ratio for optimum power in the high rpm, throttle areas.
Always reconnect the O2 sensor after tuning and check the AFV periodically.
So what is Closed Loop?
The Closed Loop area is found when riding in low throttle positions at low rpm, but not under stress. I
believe this is approximately 1500-4000rpm and 10 – 30% throttle.
Riding in Closed Loop allows the ECM to reset the AFV and compensate for the environment. It is
good practice to do this periodically. Normal riding conditions will normally include Closed Loop riding
for long enough. To ensure the AFV is about right for your setup, try and do a few miles on flat roads
between 40 – 70mph and low throttle openings, with a steady throttle. This should set the AFV
If you have the time, you could try riding at 2000rpm for a couple of miles and check the AFV. Next
try 2500rpm and check, then 3000 and 3500. This would validate your map in this region of Throttle /
RPM combination, but is a lot of effort!
Remember with a narrowband O2 sensor (standard one) the readings are very slow to respond,
hence the steady riding required to adjust the AFV.
Page 15 of 48
BuellTuningGuideV1.6.doc
12/03/2008
CARE – Modifying your ECM will invalidate warranty, could damage your engine and is performed
entirely at your own risk! However, getting it right can significantly enhance your Buell Experience!
Understanding the Fuel Map
The Fuel Maps control how much fuel the injectors will flow for any given RPM and Throttle Position
combination.
The values in the table relate to the length of time the injector is open (pulse width) and flowing fuel. It
is assumed that you are not modifying the injectors or the fuel pressure, hence the only variable is
the pulse width of the injector.
For the technically minded, each value in the table equates to 58 Microseconds of injector pulse
width duration.
The fuel map shows the Throttle Position Sensor values on the left and the RPM across the top.
Low Throttle, low RPM is on the bottom left, with full throttle, high RPM on top right.
Page 16 of 48
BuellTuningGuideV1.6.doc
12/03/2008
CARE – Modifying your ECM will invalidate warranty, could damage your engine and is performed
entirely at your own risk! However, getting it right can significantly enhance your Buell Experience!
Areas of the Fuel Map
The Fuel Map can be broken down into different areas which affect different combinations of throttle
position and rpm as you are riding. The following table is intended to help explain the areas of the
fuel map and how they relate to riding the bike on the road. It is only an indication, but should help
you understand how the map works!
TPS /
RPM
255
175
125
100
80
60
50
40
30
20
15
10
0
800
1000
1350
1900
2400
2900
3400
4000
5000
6000
7000
8000
Zone 7
Maximum Throttle, Low
RPM
Zone 8
Full Power Through The Gears
Zone 9
Full Power Maximum
Throttle
Zone 4
Pulling Away!
Zone 5
Cruising Midrange
Zone 6
Accelerating Into Corners
Zone 1
Startup and Idle
Zone 2
Closed Throttle Overrun
Zone 3
High Speed Closing
Throttle
Note, the XB12 redlines at 6800RPM, the XB9 at 7300RPM, hence the final column will hardly be
used on a Buell!
Front and Rear Maps
The Buell and most air cooled in-line V Twins runs hotter on the rear cylinder than the front one due
to airflow across the fins. To compensate for this Buell design the ECM with separate tables for Fuel
and ignition on front and rear cylinders.
The rear cylinder should normally be similar, but slightly richer than the front cylinder in any area of
the fuel map.
Page 17 of 48
BuellTuningGuideV1.6.doc
12/03/2008
CARE – Modifying your ECM will invalidate warranty, could damage your engine and is performed
entirely at your own risk! However, getting it right can significantly enhance your Buell Experience!
The Front Fuel Map on My Micron equipped XB12s
Page 18 of 48
BuellTuningGuideV1.6.doc
12/03/2008
CARE – Modifying your ECM will invalidate warranty, could damage your engine and is performed
entirely at your own risk! However, getting it right can significantly enhance your Buell Experience!
The Rear Fuel Map on My Micron equipped XB12s
The O2 sensor is installed into the rear header to ensure that the hottest cylinder is the one being
measured for Air/Fuel mixture.
Whenever tuning the bike, unless you have sensors in each header, always make identical changes
to front and rear cylinders simultaneously. Failing to do this could result in the mixture being correct
on one cylinder, but incorrect on the other!
Page 19 of 48
BuellTuningGuideV1.6.doc
12/03/2008
CARE – Modifying your ECM will invalidate warranty, could damage your engine and is performed
entirely at your own risk! However, getting it right can significantly enhance your Buell Experience!
Understanding the Other Maps
The following Maps should not need adjustment to suit your bike, unless you live in a unique
environment, eg up the mountains! In which case, you are probably lucky enough to have wonderful
roads with Buell written all over them!
The CLT and IAT maps are used to convert the voltage from the sensors to the actual measured
values. Eg 1.40 volts on the IAT is equal to 80 ‘C on the Inlet Air Temperature sensor.
CLT Resistor Specs
Cylinder Temperature calibration map. This is used to calculate accurate engine temperatures within
the ECM. Eg 0.81Volts = 170’Centigrade.
IAT Resistor Specs
Inlet Air Temperature. This references the air temperature sensor within the airbox and converts
voltage through the sensor to a temperature.
Page 20 of 48
BuellTuningGuideV1.6.doc
12/03/2008
CARE – Modifying your ECM will invalidate warranty, could damage your engine and is performed
entirely at your own risk! However, getting it right can significantly enhance your Buell Experience!
Offset Maps
The Air Density Correction and Cold Start Enrichment maps are used to affect the fuelling based on
certain conditions. They will increase or reduce the injector pulse width from the standard values in
the fuel map based on criteria. EG, Cold Start Enrichment will provide additional fuel when the engine
is cold!
Air Density Correction
This is used to help acclimatise the bike in different atmospheric conditions. If you are riding in
extreme altitudes, you may wish to consider modifying this, but generally I would leave it alone.
Cold Start Enrichment
This is more normally referred to on older vehicles as the choke! Uses the Cylinder Temperature to
provide additional fuel to a cold engine, automatically returning to the fuel map as the engine warms.
If your bike is running rich when cold, reducing these could help.
Page 21 of 48
BuellTuningGuideV1.6.doc
12/03/2008
CARE – Modifying your ECM will invalidate warranty, could damage your engine and is performed
entirely at your own risk! However, getting it right can significantly enhance your Buell Experience!
Running Diagnostics
Before modifying your ECM, I strongly recommend running all diagnostics and checking that
everything is working correctly!
Checking the Static Timing
Before spending time on your fuel map, it is wise to check the static timing on the engine. This is
done by slowly rotating the engine, whilst watching the Cam Position Sensor on the Diagnostics
page.
Raise the back wheel off the floor!
Remove Timing inspection plug
Put bike into 5th gear to ease fine turning of the engine
Raise side stand
Select Diagnostics page in ECM Spy and connect to the ECM.
Page 22 of 48
BuellTuningGuideV1.6.doc
12/03/2008
CARE – Modifying your ECM will invalidate warranty, could damage your engine and is performed
entirely at your own risk! However, getting it right can significantly enhance your Buell Experience!
The CPS value should be 0 or 5, depending on which cylinder is due to fire next. If it is on 0, go to
next step, if on 5, rotate backwards until the CPS changes to 0, then follow the next step.
Rotate the rear wheel in a normal/forwards direction until the timing mark is just visible on the left side
of the timing inspection hole.
Rotate the wheel very slowly until the CPS value in ECM Spy increases to 5. This is the exact point of
firing.
Now check the timing mark inside the inspection hole. If it is exactly central all is good, if to the left,
then the timing is advanced, if to the right of the hole, it is retarded.
If the timing is not correct, follow the instructions in your service manual to correct, or get it sorted by
a competent Buell mechanic before adjusting your fuel maps.
Page 23 of 48
BuellTuningGuideV1.6.doc
12/03/2008
CARE – Modifying your ECM will invalidate warranty, could damage your engine and is performed
entirely at your own risk! However, getting it right can significantly enhance your Buell Experience!
Checking the Trouble Codes
Time to check all error codes, make sure there are no real issues, then clear them! If anything is
wrong when tuning, you should be able to check the error codes and make sure they are clear.
Page 24 of 48
BuellTuningGuideV1.6.doc
12/03/2008
CARE – Modifying your ECM will invalidate warranty, could damage your engine and is performed
entirely at your own risk! However, getting it right can significantly enhance your Buell Experience!
Resetting the Throttle Position Sensor
The TPS is an electronic sensor which can require resetting periodically. Before tuning your Buell it is
important to reset the TPS to ensure accurate results.
First select the Gauges screen and connect to the ECM.
On the front left of the engine, between the airscoop and the engine is the Idle adjust screw, which
simply adjusts the butterfly in the injector to allow air through for tickover. Adjust this screw until the
throttle % drops to 0. Keep winding the screw out a bit further and hold the throttle closed with light
clockwise pressure on the throttle grip.
Select the Functions tab on ECM Spy and select TPS Reset.
Wind in the idle adjust screw until the TPS is set to approx 4.6 degrees or 5.1% This should be
approximately correct for tick over.
That’s all there is to resetting the TPS! Start the bike and check tick over is ok, adjust the idle adjust
to get a steady tick over.
Page 25 of 48
BuellTuningGuideV1.6.doc
12/03/2008
CARE – Modifying your ECM will invalidate warranty, could damage your engine and is performed
entirely at your own risk! However, getting it right can significantly enhance your Buell Experience!
Resetting the Adaptive Fuel Value
Before you reset the AFV, make a note of the current value, then select the Functions tab in ECM
Spy, enter 100% in the AFV box and select Set AFV.
Job Done!
Page 26 of 48
BuellTuningGuideV1.6.doc
12/03/2008
CARE – Modifying your ECM will invalidate warranty, could damage your engine and is performed
entirely at your own risk! However, getting it right can significantly enhance your Buell Experience!
Ready to Tune the bike?
Are you sure? Are you really sure?
If you are unhappy with what you have read so far or you are not 100% sure of what you are about to
do then quit now and forget using ECM Spy yourself. Ask a qualified person to do this work for you.
However, this guide may be of help to them!
Checklist before you start
Check the engine oil! It may sound obvious, but many people take their bikes for tuning on the dyno,
without first checking the engine oil! This is an essential check and must be performed first.
Is the timing correct? Go to diagnostics and check CPS value? Should be ……..
Is the engine warm, above 160’C ? Don’t tune the bike with a cold engine as it will be running the
cold start enrichment. As it warms up, the mixture will adjust, so let the bike warm fully before you
start!
Is the engine too hot? If the engine is overheating, let it cool! Never try and tune the engine if it is
running above 220’C as it will start to kick in some of it’s safety limits (You should hear the fan).
Are there any air leaks on the exhaust? Buells are prone to popping on the overrun. Particularly the
XB12’s. However, any air leaks on the manifolds will cause popping which cannot be solved by
adding fuel to your maps! Before you start, check for leaks on the exhaust by blocking the tailpipe
with a gloved hand and placing a free hand near the joints!
Check the AFV value, make a note of it and then reset it. If the AFV is greater than 100% you will
need to increase values in the closed loop area when tuning and vice versa.
Resetting the AFV is essential as it will directly affect what you are doing. If the AFV is on 110%
when you start tuning, all the work you do will result in a fuel map which will be wrong if the AFV sets
itself back to 100% later! End result you will be running weak!
Reset the TPS. This value can change periodically on a Buell, therefore make sure it is correct by
resetting it before you start tuning! Failure to do so can lead to you wasting your time from now on!
Remove the Headlight Fuse! This will save a lot of wasted battery power if you are constantly leaving
the bike switched on without the engine running! Not essential but wise!
Use the ECM Runtime window to check the following parameters before tuning.
Page 27 of 48
BuellTuningGuideV1.6.doc
12/03/2008
CARE – Modifying your ECM will invalidate warranty, could damage your engine and is performed
entirely at your own risk! However, getting it right can significantly enhance your Buell Experience!
Check the TPS value, make a note of it, then wind out the idle adjust (Near the left air scoop) the
value should decrease until exactly 0 when idle is wound fully out. If not, reset it! The TPS should be
on approximately 5% for tick over.
Engine Temp between 160’C and 180’C when you start tuning, keep an eye on this if tuning on the
dyno. Stop tuning if the engine temp reaches 2200’C let the engine cool and try again later!
Cold Start Enrichment should be on 100. any higher values and the bike is effectively running on
choke!
Page 28 of 48
BuellTuningGuideV1.6.doc
12/03/2008
CARE – Modifying your ECM will invalidate warranty, could damage your engine and is performed
entirely at your own risk! However, getting it right can significantly enhance your Buell Experience!
Tuning!
OK, you’ve seen this before, but time for some more explanations! This really is the key to finding the
areas of the fuel map where the bike needs tweaking to solve a problem!
Under normal circumstances, the values in cells should be comparable to adjacent cells! You should
not have one cell with a value of 10, adjacent to another cell with a value of 200! Just take a look at
your map for anything which stands out and try to smooth out the values, ideally by increasing one
value if possible. This is important at the end of the process to ensure a smooth power delivery from
your Buell.
If in doubt, increase a value in preference to reducing another! Remember a rich mixture is much
safer than a lean one!
When modifying the cells, make sure you modify a couple of cells either side of the actual one you
are interested in, just to keep the map smooth as you work. Make small changes and test it then try
again. With intuition you will learn how much to adjust to get it right.
Unless you are measuring the mixture in both headers accurately, always make sure you modify the
front and rear maps by similar amounts.
Standard principles apply when tuning; if the engine struggles to rev and sounds like it is working
hard, it is probably rich and you normally remove fuel. If it feels light, revs easily, but has no power,
then add fuel. If in doubt, ride it, add fuel, try it again, if worse, then remove fuel!
The Tuning Zones
TPS /
RPM
255
175
125
100
80
60
50
40
30
20
15
10
0
800
1000
1350
1900
2400
2900
3400
4000
5000
6000
7000
8000
Zone 7
Maximum Throttle, Low
RPM
Zone 8
Full Power Through The Gears
Zone 9
Full Power Maximum
Throttle
Zone 4
Pulling Away!
Zone 5
Cruising Midrange
Zone 6
Accelerating Into Corners
Zone 1
Start up and Idle
Zone 2
Closed Throttle Overrun
Zone 3
High Speed Closing
Throttle
Zone 1 – Start up and Idle
This Zone is self explanatory, if the bike is ticking over happily when warm, you probably don’t need
to adjust this area at all. If the bike is struggling on tick over, check for air leaks first before adjusting
the fuelling.
Page 29 of 48
BuellTuningGuideV1.6.doc
12/03/2008
CARE – Modifying your ECM will invalidate warranty, could damage your engine and is performed
entirely at your own risk! However, getting it right can significantly enhance your Buell Experience!
If the bike is trying to stall, it’s possibly rich and may need to reduce the figures in Zone 1. If it’s
hunting for more rpm then it may be running slightly lean.
Let the bike tick over as best it can and check the Fuel Map screen in ECM Spy to see where the
ECM is currently working. You should see the ECM moving around in a small area of the map as the
rpm changes.
Zone 2 – Closed Throttle Overrun (The Popping Zone!)
This will be one of the most noticeable areas where you can improve your fuel map! Popping is
usually caused by either rich mixture or air leaks in the exhaust system!
First thing is to check for leaks! Check where the headers are fitted to the barrels and on any slip
joints on your exhaust. Normally you can block the tailpipe loosely with a gloved hand and leaks are
fairly easy to find!
OK assuming you have no leaks, then you can try adjusting the mixture. Zone 2 is only ever going to
be used when you are slowing down under engine braking with a closed throttle. This is probably the
safest area on the fuel map to actually remove fuel. Never remove all fuel in this area, as you need
some to lubricate the engine, but try reducing it in small amounts to see if you can improve the
popping. It is likely that you will not remove the popping completely.
Zone 3 – High Speed Closing Throttle
This is effectively the same as Zone 2, but more critical that you keep some fuel in there as the
engine is likely to be hot when you are in this zone.
Alternatives to adjusting fuel in Zones 2 and 3, could be to reduce the values in the Decel table.
Zone 4 – Pulling Away
OK, so this is the mid throttle, low rpm area, most often used when pulling away or gently
accelerating through the gears.
Zone 5 – Cruising Midrange
Mid throttle, Mid RPM, probably the most commonly used zone on your ECM during normal riding.
If you have modified your bike in any way from standard, then hopefully you’ve increased the air
flowing through the engine. As a result, you should really only be adding fuel in this area. Only
remove fuel here if you are really sure.
Zone 6 – Accelerating into corners
Not technically accelerating, but attacking the corner by letting the engine braking keep the rpm high,
then holding the throttle in mid range, ready to go full throttle as you exit.
This is another area where care is important when tuning as the engine is under significant load in
this zone. Dyno or wideband tuning are essential if modifying this area.
Page 30 of 48
BuellTuningGuideV1.6.doc
12/03/2008
CARE – Modifying your ECM will invalidate warranty, could damage your engine and is performed
entirely at your own risk! However, getting it right can significantly enhance your Buell Experience!
Zone 7 - Maximum Throttle Low RPM
Rarely used, except on the dyno, or when popping the front wheel up from a clutch less wheelie!
As per the others, Rich = remove fuel, Weak = add some!
Zone 8 – Full Power Through The Gears
Ok, another important area of the map! Accelerating hard out of a corner, or just going hard up
through the gears!
This is another area where care is important when tuning as the engine is under significant load in
this zone. Dyno or wideband tuning are essential if reducing any values in this area.
Zone 9 – Full Power Maximum Throttle
Full Throttle, Maximum RPM, enough said!!!
This is the most critical part of the map, as it is the one when the engine is under the most load, being
ridden the hardest. Get it wrong here and it will be expensive!
This is another area where care is important when tuning as the engine is under significant load in
this zone. Dyno or wideband tuning are essential if reducing any values in this area.
Page 31 of 48
BuellTuningGuideV1.6.doc
12/03/2008
CARE – Modifying your ECM will invalidate warranty, could damage your engine and is performed
entirely at your own risk! However, getting it right can significantly enhance your Buell Experience!
Seat of the Pants!
Possibly the most common method of tuning, definitely was the way 20 years ago! Some people
have “The Knack” others definitely don’t! We do not recommend this method, as it is possible to
make the bike feel good, but to have dangerous weak spots you have missed!
You need to understand your bike and know how it is responding, making mental notes as you ride
and writing them down at the side of the road. You will need to ride through all the normal conditions
you ride in, noting how the bike responds on different throttle positions.
If you are going to do this properly, you need to mark the throttle at different positions you can equate
back to the ECM maps. Hold the throttle at specific positions, and note the performance as the RPM
increase. Pull over, note the responses, then try again at the next throttle position. Repeat until
finished!
As a guide, if the bike is slow to rev, but sounds like it is struggling, then it is rich. If it is light and revs
freely in lower gears, but has no power in the higher gears, then maybe weak! If you are not sure,
make a note of the current settings, then add fuel. If it is better, great, if worse, then go back to the
old setting and reduce it only a small amount. Always take care if reducing any settings below the
original values!
You will need to keep repeating this process for all parts of the throttle / RPM combinations to try and
find any areas where it is not performing properly.
Checking the Mixture!
Checking the fuel when tuning by seat of the pants is usually done by checking the plug colour! You
really don’t want to be doing this on your XB!
Ride on a steady throttle, holding a specific RPM, ride like this for a mile or so, then clutch in and kill
the ignition immediately. Coast to a stop, then pull out the plug and check the colour!
White plug – Lean mixture, add fuel to or risk damage to your bike
Black oily plug – Rich mixture
Light brown plug – All is well, the mixture is good (At this TPS / RPM combination only!
Repeat for all throttle positions, in particular Zones 5,6,8 and 9, and when all zones are between tan
and chocolate brown, you are finished!
There is no guarantee that your mixture is totally correct, even with tan coloured plugs from this, but
the bike should be ok to ride.
Page 32 of 48
BuellTuningGuideV1.6.doc
12/03/2008
CARE – Modifying your ECM will invalidate warranty, could damage your engine and is performed
entirely at your own risk! However, getting it right can significantly enhance your Buell Experience!
On a Dyno
Probably the best way to get the fuel maps right, as long as the dyno operator is good and knows a
few basic facts about the Buell ECM.
Always check or reset the TPS before setting up the Buell on a dyno. If this is not done and the TPS
is out, then all maps setup on the dyno will be out by the same amount when the TPS is next reset.
This can easily be done by the owner before going to the dyno shop. Don’t waste your money asking
the dyno operator to do this!
Reset the AFV to 100. This is also essential and should be done immediately on arrival at the dyno
shop. If the AFV is above 100 when you start tuning, it will be adding fuel above the closed loop area.
Disconnect the O2 sensor! That’s right, disconnect it before tuning on the dyno. If you leave it
connected when setting up the ECM in the closed loop area, the ECM will adjust the AFV value and
screw up the tuning! Remember to reconnect it when you have finished.
The Buell ECM must be tuned for 14.7:1 Air/Fuel mixture in the closed loop area. Tuning for anything
else will cause the ECM to set the AFV to correct it. End result will be incorrect maps outside of
closed loop and potential risk of engine damage!
If the dyno operator can measure front and rear cylinder mixtures independently, then go for the best
he can do. If not, make sure both cylinders get the same changes or you could run front spot on, and
the rear lean!
Always check the AFV value after tuning, it should be at 100 as the O2 sensor has been
disconnected. Test ride the bike, ensuring you do some closed loop riding, then check the AFV again
it should be between 90 and 110.
CARE – It is known for a Buell to be setup perfectly on the dyno with the O2 sensor connected, but
then to go off when used for a few hours. This is almost always because the O2 sensor was left
connected, the bike goes through closed loop riding and adjusts the AFV.
Page 33 of 48
BuellTuningGuideV1.6.doc
12/03/2008
CARE – Modifying your ECM will invalidate warranty, could damage your engine and is performed
entirely at your own risk! However, getting it right can significantly enhance your Buell Experience!
Datalogging
Datalogging is the most accurate way to tune your bike and get it absolutely spot on! It is the only
way to know what your bike is really doing in the real world. I would always recommend setting up
your bike by datalogging, then got to a dyno with air fuel analysis afterwards to get it checked. This
approach should save you a lot of money on dyno time, but have the safety factor of having had the
setup checked by a professional!
The idea is that you connect up your logging equipment (Laptop, palm, or hardware) then go and ride
the bike! Try to go through all the normal riding conditions a few times and get as much data as you
can.
Standard Narrowband O2 Sensor
The standard Buell O2 sensor is ok for steady closed loop riding and can be used to setup the bike
for normal use, but is unlikely to give the best possible results at higher rpm conditions.
Using a Wideband O2 Sensor
Wideband sensors react much faster and provide more accurate measurements than Narrowband,
hence are recommended for the most accurate tuning on the road and definitely for modified engines.
Setting up for Datalogging
I use the Windows version as I don’t own a palm. This means fitting the tankbag and plugging the
lead into the diagnostic plug and feeding it out under the seat.
I setup my laptop, which will be fully charged, so that it will not shut down when not being used. This
allows me to ride for half an hour, then pull out the laptop and it will still be logging.
In ECM Spy, Select Options, Program and make sure you are using Megalog format and Always start
with a new log file.
Page 34 of 48
BuellTuningGuideV1.6.doc
12/03/2008
CARE – Modifying your ECM will invalidate warranty, could damage your engine and is performed
entirely at your own risk! However, getting it right can significantly enhance your Buell Experience!
Connect to the bike and Press the Keys to connect to the ECM. I check on the ECM Runtime page to
make sure I am seeing data. Then click on the floppy disk icon to start logging.
You are now ready to start the bike and put the laptop safely in the tankbag.
When you finish the ride, just press the floppy disk icon again to stop logging.
By default your logfiles will be in the C:\Program Files\EcmSpy\megalog directory.
How to Ride when Datalogging
My recommendations for riding the bike when datalogging are:
Ride in closed loop first for a few miles, so you get a stable AFV value,
Next ride a few miles as you normally would, as this is what you are trying to set the bike up for.
Now try to cover as many fuel map cells as possible, put the bike into 3rd or 4th at low rpm (about 2k
rpm) and hold the throttle at half way until the revs stop increasing. Now just shut the throttle quickly
and let the bike slow to 2k rpm again. Repeat for ¾ throttle and again for full throttle.
Continue riding in your normal style, or slightly more aggressively, until you have been out for about
15 mins. This should give you enough log data for analysis.
Ride the bike home in normal riding style, trying to stay within closed loop area again, so you reach
the garage with a stable AFV.
Page 35 of 48
BuellTuningGuideV1.6.doc
12/03/2008
CARE – Modifying your ECM will invalidate warranty, could damage your engine and is performed
entirely at your own risk! However, getting it right can significantly enhance your Buell Experience!
Following the above process, should get you to cover most of the cells in the fuel map at least once,
with the most commonly used cells for your riding style being covered many times. A good
datalogging run will cover 10-15 miles, so it is worth filling up with fuel before starting any testing.
Using MegaLogViewer to optimize your fuel maps
MegaLogViewer is some excellent software written by Phil Tobin to help analyse logfiles from
MegaSquirt fuel injection and to assist in creating optimized fuel maps. Download it from
http://www.ideasandsolutions.biz/MegaLogViewer
The current logfile format from ECM Spy is almost suitable for use in MegaLogViewer, but needs the
following changes:
AFV
EGO Corr.
EGO Volt.
to
to
to
Afr
Gego
O2
Note the capitals are important!
If using the Palm version for logging, we found that the voltage values for the O2 sensor were
showing as 465 instead of 0.465 I had to correct this in Excel before using the data.
After making the changes above, open MegaLogViewer and open the modified logfile.
Next, Open MSQ file and load in your fuel maps as they were running whilst logging the bike.
Here’s an example of Megalogviewer with data loaded.
Page 36 of 48
BuellTuningGuideV1.6.doc
12/03/2008
CARE – Modifying your ECM will invalidate warranty, could damage your engine and is performed
entirely at your own risk! However, getting it right can significantly enhance your Buell Experience!
Select the VE Analyzer button and you will reach the following screen:
Page 37 of 48
BuellTuningGuideV1.6.doc
12/03/2008
CARE – Modifying your ECM will invalidate warranty, could damage your engine and is performed
entirely at your own risk! However, getting it right can significantly enhance your Buell Experience!
The default table is planned to give 14.7 across most of the fuel maps, with 12.5 at full throttle. This
should be good for a Buell, but with dyno testing, we may be able to establish a better table for this in
future.
Select Run Analysis, If you have changed the file correctly, the program will analyze the data and
give you the following screen:
The Fuel map will have been updated and you can see the changes highlighted in red. Hover over a
cell to see what it was previously.
Page 38 of 48
BuellTuningGuideV1.6.doc
12/03/2008
CARE – Modifying your ECM will invalidate warranty, could damage your engine and is performed
entirely at your own risk! However, getting it right can significantly enhance your Buell Experience!
As long as the map looks sensible, no extreme values! “Accept New Table” and then “Save MSQ As”
with a new name, so you can track the changes.
Now open the file up in Notepad and copy the first fuel map and paste it over the second one. This
will give you equal maps font to rear, which is important as you are only analyzing the fuel from the
rear cylinder. You will now have equal maps, but the front cylinder will automatically get more fuel.
Load the new fuel map into ECM Spy and select the 3D View. Swap between front and rear cylinders
to make sure they look the same. (This can be shown from the datalogs by comparing Pulsewidth 1
and Pulsewidth2.
Burn this new map into the bike and you are now ready to go for another test ride.
Repeat the steps above for datalogging, using as much as possible of the fuel map, then bring the
bike back in and analyse the data again.
I have found that repeating the process 3-4 times seems to give a pretty good map.
Starting Map
After 1 run and VE Analysis
Page 39 of 48
BuellTuningGuideV1.6.doc
12/03/2008
CARE – Modifying your ECM will invalidate warranty, could damage your engine and is performed
entirely at your own risk! However, getting it right can significantly enhance your Buell Experience!
After 2 runs and VE Analysis
After 3 runs and VE Analysis
As you can see from the above, I started with a smooth map, but the analysis has created twin peaks
in the maps. This is normal and appears to be correct due to the way the logic is written in the ECM
software.
After you complete all this, check the AFV value after a smooth ride in closed loop area. You should
be close to 100 and stable.
For safety purposes, I would recommend getting the bike checked on a dyno now, but you should
find a good result with no changes required.
Page 40 of 48
BuellTuningGuideV1.6.doc
12/03/2008
CARE – Modifying your ECM will invalidate warranty, could damage your engine and is performed
entirely at your own risk! However, getting it right can significantly enhance your Buell Experience!
Road Testing
So you’ve finished tuning the bike and the dyno figures or data logs look as good as you can get,
time to go for a ride!
Before you do, a few checks:
Is the O2 sensor connected?
Are there any unexplained error codes? If you mapped the bike on a dyno, there could be one for the
O2 sensor at least! Clear them!
Did you take out the headlight fuse? If so, stick it back in!
And lastly, how’s the fuel? It’s easy to burn a lot of it on the dyno or when testing!
Gloves, Crash Helmet, leathers, reflective jacket! (Well this is meant to be a safe tuning guide!!)
Now ride it! Test everything, listen for popping on the overrun, feel the throttle and remember
anywhere it feels wrong! Is it rich or weak anywhere? Hopefully not!
Make sure you ride it in closed loop for a while 2-3 miles minimum, then go through all throttle / RPM
combinations.
Back to the garage, riding the last mile in closed loop if possible. Do not leave the bike ticking over
when you arrive, just switch it straight off.
Checking AFV Value
Plug in the laptop again and check the AFV. You want a figure between 90 and 110, ideally as close
to 100 as possible.
If you have a low AFV value, you are too rich on your map within the closed loop area. This is
dangerous as it can cause lean fuel in open loop!
If you have a high AFV you will be too weak in closed loop and the ECM is compensating, but could
leave you rich in open loop.
Check for Error codes
Time to check for error codes again, there should be none this time! If there are, deal with them!
Backup Config again!
OK, time to do a full backup of the ECM, the EEPROM and also the fuel maps! This is your bike
running at its best, save that data somewhere safe!
Riding Normally
Use the bike now and enjoy it! Make notes if anything feels or sounds wrong, otherwise just have fun.
It should be crisp across the range and running well.
Page 41 of 48
BuellTuningGuideV1.6.doc
12/03/2008
CARE – Modifying your ECM will invalidate warranty, could damage your engine and is performed
entirely at your own risk! However, getting it right can significantly enhance your Buell Experience!
Burn at least a tank of fuel, in normal riding conditions. If anything is wrong, just perform minor
tweaks in those areas.
Checking AFV again!
Check, check and check the AFV again! If it’s out by more than 10% then you need to adjust your
map!
Enjoy!
Well that is why you’re doing all this isn’t it?
Page 42 of 48
BuellTuningGuideV1.6.doc
12/03/2008
CARE – Modifying your ECM will invalidate warranty, could damage your engine and is performed
entirely at your own risk! However, getting it right can significantly enhance your Buell Experience!
Advanced Functions
This guide is intended as a safe tuning guide, so first the disclaimer (again!!!)
CHANGING ADVANCED FEATURES SUCH AS YOUR REV LIMITS WILL DEFINITELY
INVALIDATE YOUR WARRANTY AND MAY RESULT IN A SERIOUSLY DAMAGED ENGINE.
Following this section is totally at your discretion and in no way recommended! This has only been
added to the guide due to popular requests for assistance.
Rev Limits
Are you really sure????
The Rev limits are believed to be enforced at three levels!!!
Soft Limit 1,
Skip spark mode is enforced, with every fourth spark being dropped. Eg fire, fire, fire, miss
Soft Limit 2,
Skip spark mode with alternate sparks being dropped, eg fire, miss, fire, miss
Hard Limit,
When the hard limit is exceeded, the spark is cut completely.
Skip Spark mode is effectively cutting sparks on each cylinder, hence allowing the engine to run, but
significantly reducing power. This should be the rev limit we normally hit and you should not be able
to reach the hard limit.
CAUTION – FURTHER RESEARCH IS BEING COMPLETED
REGARDING REV LIMITS. DO NOT USE THIS DATA YET,
UPDATES WILL BE RELEASED SOON!
As the Rev limits have serious implications on reliability, they are not available in the normal interface
of ECM Spy, however if you know the EEPROM location, you can modify the values directly. The
following locations identify the soft and hard limits in some EEPROMS.
Model
ECM
XB9
Race
ECM
XB9
Race
ECM
GB231
XB12
IB310
CB060
Soft Limit 1
EEPROM Default Default
Location Value
RPM
Row 190
Column
0A
8C
7000
Row 1D0
Column
08
8C
7000
Row 1D0
Column
7E
6300
0E
Soft Limit 2
EEPROM Default Default
Location Value
RPM
Row 190
Column
06
8D
7050
Row 1D0
Column
04
8D
7050
Row 1D0
Column
80
6400
0A
Hard Limit
EEPROM Default Default
Location Value
RPM
Row 190
Column
00
98
7600
Row 1C0
Column
0E
98
7600
Row 1D0
Column
8C
7000
04
Page 43 of 48
BuellTuningGuideV1.6.doc
12/03/2008
CARE – Modifying your ECM will invalidate warranty, could damage your engine and is performed
entirely at your own risk! However, getting it right can significantly enhance your Buell Experience!
XB12
Race
ECM
GB231
Row 1D0
Column
08
7E
6300
Row 1D0
Column
04
80
6400
Row 1C0
Column
0E
8C
7000
Adding 2 to the value increases the limit by 100RPM. (Remember they are Hex values, so 88+2=8A)
The actual RPM value is calculated as by converting the Hex value to decimal and multiplying by 50,
e.g. 7E in Hex = 126. and 126*50=6300.
Page 44 of 48
BuellTuningGuideV1.6.doc
12/03/2008
CARE – Modifying your ECM will invalidate warranty, could damage your engine and is performed
entirely at your own risk! However, getting it right can significantly enhance your Buell Experience!
To save you having to calculate the values you need, here is a relevant table of conversions:
Value
7E
80
82
84
86
88
8A
8C
8E
90
92
94
96
98
9A
9C
RPM
6300
6400
6500
6600
6700
6800
6900
7000
7100
7200
7300
7400
7500
7600
7700
7800
Modifying the Rev Limits in ECMSpy
Connect ECMSpy to your bike and select the EEPROM tab, then Fetch EEPROM
Once the EEPROM has completed loading, find the relevant location as per the table above. The
following image shows a Buell CB060 with Row 190 Column 0A highlighted.
Page 45 of 48
BuellTuningGuideV1.6.doc
12/03/2008
CARE – Modifying your ECM will invalidate warranty, could damage your engine and is performed
entirely at your own risk! However, getting it right can significantly enhance your Buell Experience!
Modify the value by entering a value into the data entry cell on top right and pressing the = button
next to it. The value in the EEPROM map should update to the value entered.
Make sure “Changes Only” is ticked, then select “Burn EEPROM”. This should take a couple of
seconds and you have now changed your rev limits.
Page 46 of 48
BuellTuningGuideV1.6.doc
12/03/2008
CARE – Modifying your ECM will invalidate warranty, could damage your engine and is performed
entirely at your own risk! However, getting it right can significantly enhance your Buell Experience!
Appendix 1 - Glossary of Terms
Abbreviations used in this guide or in discussion relating to tuning electronic fuel injection and ignition
systems.
ACCEL – Acceleration used in conjunction with the Accel tables on fuel maps.
ACK - acknowledge character http://en.wikipedia.org/wiki/Acknowledge_character
AFV - adaptive fuel value
AFR – air fuel ratio
BAS - bank angle sensor
CPS - camshaft position sensor http://en.wikipedia.org/wiki/Camshaft
CLT - coolant sensor (more exact: engine temperature sensor)
DECEL – Deceleration used in conjunction with the Decel tables on fuel maps.
DTC - diagnostic trouble code
DYNO – Dynamometer or rolling road.
EGO - exhaust gas oxygen sensor http://en.wikipedia.org/wiki/Exhaust_gas_oxygen
ECM – electronic control module
ETS - engine temperature sensor http://en.wikipedia.org/wiki/Resistance_Thermometer
IAT - intake air temperature sensor http://en.wikipedia.org/wiki/Resistance_Thermometer
NAK - negative acknowledge character http://en.wikipedia.org/wiki/NAK
O2 – oxygen sensor
RPM – revs per minute
TPS - throttle position sensor http://en.wikipedia.org/wiki/Throttle_position_sensor
VE - volumetric efficiency http://en.wikipedia.org/wiki/Volumetric_efficiency
Page 47 of 48
BuellTuningGuideV1.6.doc
12/03/2008
CARE – Modifying your ECM will invalidate warranty, could damage your engine and is performed
entirely at your own risk! However, getting it right can significantly enhance your Buell Experience!
Appendix 2 - Tuning Checklists
So you’ve read the manual, ingested everything, but just want to get on with the tuning? Check this
list before you start, and after!!!
Before Tuning
Check engine oil level
Check tyre pressures
Check static timing
Run diagnostics
Check error codes
No air leaks from exhaust
Check the AFV, Between 90-110 otherwise, reset AFV to 100, ride in closed loop for
2-3 miles and check it again, then refer to tuning guide.
Save the EEPROM Data
Save the Fuel Maps
Reset the TPS
Disconnect O2 sensor
Remove Headlight Fuse
Cold Start Enrichment at 100%
Engine between 160-180’c at start of tuning
After Tuning
Reconnect O2 Sensor
Check error codes
Clear error codes, you will have one from the O2 sensor
Replace the headlight fuse
Check for fuel
Ride 2-3 miles in closed loop
Check AFV value is between 90 – 110
Save the EEPROM Data
Save the Fuel Maps
Page 48 of 48
BuellTuningGuideV1.6.doc
12/03/2008
CARE – Modifying your ECM will invalidate warranty, could damage your engine and is performed
entirely at your own risk! However, getting it right can significantly enhance your Buell Experience!


![[U4.81.11] Opérateur INTE_MAIL_2D](http://vs1.manualzilla.com/store/data/006352805_1-b926fff30e68d0838032527c8f7d4f51-150x150.png)