1
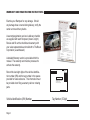
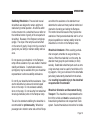
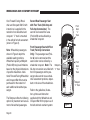
BRAUN Operator's Manual CONSUMER Rear Entry Folding Ramp WARNING Wheelchair-Accessible Lowered Floor Conversion featuring 2005 Ope ra Man tor' ua s l Toyota Minivans ® ® International Corporate Hdqrs: P.O. Box 310 Winamac, IN 46996 USA 1-800-THE LIFT ® (574) 946-6153 FAX: (574) 946-4670 32070 September 2005 RE Folding Ramp Rampvan® featuring Toyota Minivans Read manual before operating. Failure to do so may result in serious bodily injury and/or property damage. Keep manual in Entervan. RE Folding Ramp Rampvan® featuring Toyota Minivans "Providing Access to the World" Congratulations We at The Braun Corporation wish to express our fullest appreciation on your new purchase. With you in mind, our skilled craftsmen have designed and assembled the finest lowered floor vehicle available. This manual includes safety precautions, operating instructions, manual operating instructions, and instructions for maintenance and lubrication procedures. Your Rampvan® is built for dependability, and will bring you years of pleasure and independence, as long as the maintenance is performed regularly and the Rampvan® is operated by an instructed person. Sincerely, THE BRAUN CORPORATION Ralph W. Braun Chief Executive Officer CONTENTS WARRANTY AND REGISTRATION INSTRUCTIONS .................................................................................... 2 INTRODUCTION .............................................................................................................................................. 3 CONVERSIONS (Half-Drop and Full-Drop) ................................................................................................... 4 FEATURES .................................................................................................................................................. 5, 6 SAFETY PRECAUTIONS ................................................................................................................................ 7 OPERATION Terminology ................................................................................................................................................ 8 One-Touch Control System ........................................................................................................................ 8 Control Switches ................................................................................................................................... 9-11 Ramp Access Rear Hatch ........................................................................................................................ 12 Kneel System ........................................................................................................................................... 13 Ramp .................................................................................................................................................. 14, 15 Manual Ramp Operation .......................................................................................................................... 16 Manual Kneel Operation ........................................................................................................................... 17 Ramp Safety ....................................................................................................................................... 17-19 WHEELCHAIR AND OCCUPANT RESTRAINT ............................................................................................ 20 SEAT REMOVAL AND INSTALLATION ................................................................................................... 21-26 WARRANTY ............................................................................................................................................. 27-30 RETURN AUTHORIZATION PROCEDURE .................................................................................................. 30 PREVENTIVE MAINTENANCE ............................................................................................................... 31, 32 JACKING AND TIRE CHANGING ................................................................................................................. 33 Page 1 WARRANTY AND REGISTRATION INSTRUCTIONS Examine your Rampvan for any damage. Should any damage have occurred during delivery, notify the carrier at once with any claims. A warranty/registration card and a delivery checklist DUHVXSSOLHGZLWKHDFK5DPSYDQVKRZQDWULJKW 5HYLHZDQGÀOORXWWKHFKHFNOLVWDQGZDUUDQW\ZLWK \RXUVDOHVUHSUHVHQWDWLYHDQGPDLOERWKWR7KH%UDXQ &RUSRUDWLRQDVDGGUHVVHG A detailed Warranty section is provided within this PDQXDO7KHZDUUDQW\FDUGPXVWEHSURFHVVHGWR activate the warranty. 5HFRUGWKHODVWHLJKWGLJLWVRIWKHYHKLFOHLGHQWLÀFDWLRQQXPEHU9,1DQGWKHWDJQXPEHULQWKHVSDFHV provided for future reference. This information must EHSURYLGHGZKHQÀOLQJDZDUUDQW\FODLPRURUGHULQJ parts. 9HKLFOH,GHQWLÀFDWLRQ9,11XPEHU Page 2 No Postage Necessary If Mailed In The United States BUSINESS REPLY MAIL FIRST CLASS PERMIT NO. 63 FARMINGTON, NM INDEPENDENT MOBILITY SYSTEMS 4100 W. PIEDRAS STREET FARMINGTON, NM 87401-9916 7DJ1XPEHU'LJLW INTRODUCTION 7KH%UDXQ5DPSYDQ5(UHDU HQWU\ORZHUHGÁRRUFRQYHUVLRQLV designed to provide years of pleaVXUHDQGPRELOLW\LQGHSHQGHQFH Familiarity with proper operation and maintenance procedures will KHOSHQVXUHVDIHWURXEOHIUHH operation. 7KH%UDXQ&RUSRUDWLRQHQFRXUages wheelchair passengers and WKHLUDWWHQGDQWVWRUHYLHZWKH material contained in this manual ZLWK\RXU%UDXQVDOHVUHSUHVHQWDtive, before attempting operation. Any questions or concerns FDQEHDQVZHUHGE\\RXUVDOHV representative at that time. This manual addresses Rampvan rear entry conversions, standard features and options. Refer to the LQVWUXFWLRQVDSSOLFDEOHIRU\RXU package, and disregard the information that does not apply. condition, contact your sales repUHVHQWDWLYHRUFDOO7KH%UDXQ Corporation at 1-800-THE LIFT®. One of our national Product Support representatives will direct \RXWRD%UDXQDXWKRUL]HGVHUYLFH center. &RQWDFW7KH%UDXQ&RUSRUDWLRQ at 1-800-THE LIFT® if any of this information is not understood. Store this manual in the vehicle along with your Toyota owner’s manual. If you experience an operation SUREOHPRUWKHUHLVDQ\VLJQRI ZHDUGDPDJHRURWKHUDEQRUPDO Page 3 CONVERSIONS Half-Drop Conversion Full-Drop Conversion 7KHKDOIGURSFRQYHUVLRQFRPELQHVD SRZHUHGUHDUKDWFKSRZHUHGELIROG ramp, and powered kneel system with DORZHUHGÁRRUDUHDH[WHQGLQJIURPWKH rear hatch to the passenger side second row seating position. This allows a wheelchair user to ride in the passenger side second row seating position. ,QDGGLWLRQWRWKHSRZHUHGUHDUKDWFKSRZHUHGELIROGUDPSDQG powered kneel system, the full-drop conversion features a lowered ÁRRUDUHDH[WHQGLQJIURPWKHUHDUKDWFKXSWRWKHIURQWSDVVHQJHU toe-pan. The Rampvan rear entry full-drop conversion allows a wheelchair user to perform a standard side-transfer into the driver's seat. The conversion also includes a front passenger side capWDLQVFKDLURQDUDLVHGTXLFNUHOHDVHSODWIRUPVRDPEXODWRU\SDVsengers have the option of riding in the front passenger position. Half-Drop Conversion Full-Drop Conversion Page 4 FEATURES One-Touch Electronic Control System: The Rampvan OneTouch electronic control system provides simple one-touch activation of all Rampvan power features. For your convenience, the FRQWUROV\VWHPFDQEHDFWLYDWHG using the remote keyless entry transmitter, any one of the interiormounted control switches or the optional magnetic entry. the vehicle occupants in the event of a rear-end collision. Power Rear Hatch: The OneTouch electronic control system activates the power rear hatch for ramp access. The rear hatch DQGORZHUHGÁRRUFRQÀJXUDWLRQ provides 55" clear vertical passageway. Electromechanical Power Kneeling Rear Suspension: “Kneeling” is the lowering motion of the electromechanical rear suspension. The kneel feature reduces the slope of the ramp when deployed. "Secure-Lock" Rear Hatch Latching Mechanism: This device holds the rear hatch securely when closed, and helps to protect Lowered Floor Area: The halfdrop conversion features a lowHUHGÁRRUDUHDH[WHQGLQJIURPWKH rear hatch to the passenger side Clean Bumper Design: The EXPSHUFXWRXWLVLQWHJUDWHGLQWR the rear hatch, giving the Rampvan a clean OEM look when the hatch is closed. Ramp: Fully automatic power ramp is 30" in width. second row seating position. The IXOOGURSFRQYHUVLRQORZHUHGÁRRU area extends from the rear hatch to the front passenger toe-pan. 8QPRGLÀHG'ULYHU6LGH6HFRQG Row Seat: This allows the second row passenger to ride with the same level of comfort and safety as a passenger in an unconverted Sienna. Floor Track for Wheelchair and Occupant Securement in Midpoint Lowered Floor Area: Floor track provided in the midpoint ORZHUHGÁRRUDUHD3RVLWLRQB on )LJXUHDQGQH[WSDJHFDQEH XWLOL]HGIRUUHVWUDLQWRIDZKHHOchair passenger. Securement poVLWLRQPD\KDYHOLPLWDWLRQVEDVHG RQWKHGLPHQVLRQVRIVSHFLÀF wheelchairs. Page 5 FEATURES Quick-Release Front Passenger Seat with Floor Track for Wheelchair and Occupant Securement (Full-Drop Conversion Only): 7KHSDVVHQJHUVHDW3RVLWLRQA on )LJXUHLVHTXLSSHGZLWKTXLFN UHOHDVHVHDWDWWDFKPHQWVPDNing seat removal and installation SURFHGXUHVVLPSOH7KHVHDWFDQ EHUHPRYHGDQGWKHVHDWORFDWLRQ FDQEHXWLOL]HGE\DZKHHOFKDLURFFXSDQWÁRRUWUDFNSURYLGHG Forward-Facing Wheelchair and Occupant Belt/Track System: One Forward-Facing Wheelchair DQG2FFXSDQW%HOW.LWLVVXSSOLHG for the restraint of one wheelchair DQGRFFXSDQW7KHEHOWNLWLVXVHG LQFRQMXQFWLRQZLWKWKHÁRRUWUDFN Note:$GGLWLRQDOEHOWNLWVFDQEH SXUFKDVHGRSWLRQ Page 6 Front Seat “L” Track Midpoint “L” Track C B Midpoint “L” Track A B C Midpoint “L” Track Midpoint “L” Track Figure 1 Front Seat “L” Track Figure 2 SAFETY PRECAUTIONS Safety Symbols SAFETY FIRST! Know That.... All information contained in this manual and VXSSOHPHQWVLILQFOXGHGLV provided for your safety. Familiarity with proper operation instructions as well as proper maintenance procedures are necessary to ensure safe, WURXEOHIUHHRSHUDWLRQ6DIHW\ precautions are provided to LGHQWLI\SRWHQWLDOO\KD]DUGRXV situations and provide instruction on how to avoid them. A D B WARNING This symbol indicates important safety information regarding a potentially hazardous situation that could result in serious bodily injury and/or property damage. C CAUTION This symbol indicates important information regarding how to avoid a hazardous situation that could result in minor personal injury or property damage. Note:$GGLWLRQDOLQIRUPDWLRQSURYLGHGWRKHOSFODULI\RUGHWDLODVSHFLÀFVXEMHFW 7KHVHV\PEROVZLOODSSHDUWKURXJKRXWWKLVPDQXDODQGPD\DSSHDURQODEHOVSRVWHGRQ\RXU5DPSYDQ Recognize the seriousness of this information. Page 7 OPERATION Whenever parking your Rampvan 5(DQGEHIRUHXWLOL]LQJ5DPSvan features, always engage the vehicle transmission in Park “P” and engage the vehicle parking EUDNH7KHYHKLFOHWUDQVPLVVLRQ mustEHHQJDJHGLQ3DUN´3µ EHIRUHRSHUDWLQJWKH5DPSYDQDXtomatic features. Note: Pressing WKH%DFN'RRU2IIVZLWFKGLVDEOHV5DPSYDQSRZHUIXQFWLRQV ORFDWHGDWGULYHUORZHUOHIWNQHH EROVWHU6HHSDJHIRUGHWDLOV Terminology The term “Unfold” indicates the lowering motion of the ramp to the deployed position. “Fold” is the raising motion of the ramp to the YHUWLFDOVWRZHGSRVLWLRQ The terms “Open” and “Close” refer to sequences of power funcPage 8 tions that will occur when activated E\WKH2QH7RXFKHOHFWURQLFFRQWURO system. When activating the Open functions, the power hatch opens, the kneel system lowers the rear of the vehicle and the ramp unfolds. When activating Close functions, the ramp folds, the kneel system raises the rear of the vehicle and the power hatch closes. One-Touch Control System Rampvan power functions are PDQDJHGE\WKH2QH7RXFKHOHFtronic control system. The control V\VWHPFDQEHDFWLYDWHGXVLQJWKH remote keyless entry transmitter or any one of the controls addressed on pages 9-11. Do not attempt to interface aftermarket control systems. Braun Corporation Aftermarket Control Systems Policy: 7KH%UDXQ&RUSRUDWLRQ manufactures dedicated control systems for its products. These control systems KDYHEHHQGHVLJQHGDQG tested for use in conjunction ZLWKVSHFLÀF%UDXQSURGXFWV%UDXQFRQWUROV\VWHPV are the only control sysWHPVDXWKRUL]HGIRUXVHZLWK %UDXQSURGXFWV Do not attempt to interface aftermarket control systems ZLWKRXWDXWKRUL]DWLRQIURP 7KH%UDXQ&RUSRUDWLRQTo do so may result in serious bodily injury and/or property damage. OPERATION Control Switches Remote Entry Transmitter Dash-mount Console Switches For your convenience, the Rampvan One-Touch electronic FRQWUROV\VWHPFDQEHDFWLYDWHG using remote transmitter, any RQHRIWKHVSHFLÀHGLQWHULRU mounted control switches or the RSWLRQDOPDJQHWLFHQWU\FRQWURO SKRWRVDQGGHWDLOVDUHSURYLGHG The remote transmitter has dediFDWHG2QH7RXFKEXWWRQVIRUWKH 2SHQIXQFWLRQV%XWWRQ$DQG &ORVHIXQFWLRQV%XWWRQ% Open/Close Switch: Center conVROHPRXQWHG2QH7RXFKEXWWRQ for Rampvan function operation from the driver seat. One-Touch Control Activation Rampvan power hatch, kneel and ramp functions are activated E\pressing and releasing any VSHFLÀHGFRQWUROVZLWFKNote: 3UHVVLQJWKH%DFN'RRU2II VZLWFKGLVDEOHV5DPSYDQSRZHU IXQFWLRQVORFDWHGDWGULYHUORZHU OHIWNQHHEROVWHU6HHSDJH for details. A Press and release: Open Functions B Press and release: Close Functions Press and release: OneTouch Switch Page 9 OPERATION Dash-mount Console Switches Kneel On/Off Switch: Center console mounted On/Off toggle switch for the Rampvan kneel V\VWHP7KHNQHHOV\VWHPFDQEH HQDEOHG2QRUGLVDEOHG2IIZLWK this console mounted switch. Toggle Off: Kneel 'LVDEOHG Page 10 Toggle On: Kneel (QDEOHG “Back Door Off” Override Switch The switch is located on the drivHUORZHUOHIWNQHHEROVWHU3UHVVLQJWKHVZLWFK,QGLVDEOHV5DPSvan power functions. Pressing the switch again and returning it WRWKH2XWUDLVHGSRVLWLRQZLWK RUDQJHEDQGYLVLEOHHQDEOHV Rampvan power functions. Switch In: Power Functions 'LVDEOHG Switch Out: Power Functions (QDEOHG “C” Pillar Switch $2QH7RXFKEXWWRQLVORFDWHG on C-Pillar interior panel, rear of the driver side slide door. Press and release: OneTouch Switch OPERATION Magnetic Entry Magnetic Switch $PDJQHWLFVZLWFKLVEXLOWLQWRWKH GULYHUVLGHUHDUSDQHOQHDUWDLOOLJKW7KHVZLWFKLVnotODEHOHG A key-style magnet is supplied for switch activation. Simply align the magnet tip with the switch target LGHQWLÀHGLQSKRWRV7KH5DPSvan power door, kneel functions DQGUDPSZLOOEHDFWLYDWHG 'ULYHUVLGH Rear Panel Align magnetic tip with switch. When activating the Open functions using the magnetic entry, there is approximately a one second delay before the Rampvan Open sequence of functions is activated. The One-Touch electronic control system unlocks all vehicle GRRUVEHIRUHDFWLYDWLQJ5DPSYDQ power functions. Page 11 OPERATION Ramp Access Rear Hatch 7KHUHDUKDWFKPD\EHRSHQHGXVing the Rampvan One-Touch ConWURO6\VWHPRULWPD\EHRSHQHG manually. Press and release the remote transmitter, any one of the interior mounted control switches or the optional magnetic entry to activate the hatch. When a control switch is pressed, the door will open and the Open sequence of functions will continue. If a control switch is pressed and released while the hatch is opening, the hatch will open fully and VWRSUDPSZLOOQRWGHSOR\3UHVV the switch again and the hatch will close. Once the Open sequence of funcWLRQVLVFRPSOHWHKDWFKLVIXOO\ RSHQDQGUDPSLVXQIROGHGSUHVV and release a control switch to Page 12 WARNING Keep clear of area in which door operates. close the hatch. The hatch will close after the ramp folds, completing the Close sequence of functions. If a control switch is pressed while the hatch is closing, the door will continue to close fully. Press a control switch again to start Open functions. Note:3UHVVLQJWKH%DFN'RRU 2IIVZLWFKGLVDEOHV5DPSYDQ SRZHUIXQFWLRQVORFDWHGDWGULYHU ORZHUOHIWNQHHEROVWHU6HHSDJH 10 for details. Note:,IWKHSRZHUKDWFKLVREstructed while opening or closing, the hatch will reverse direction, SURYLGHGLWPHHWVVXIÀFLHQW resistance. Keep clear of the area in which the power door operates. Ensure door travel path is clear. Personal injury or property damage may occur during power door opHUDWLRQ%HVXUHWKHGRRULVIXOO\ FORVHGDQGODWFKHGEHIRUHGULYLQJ OPERATION Kneel System Kneeling is the lowering motion of the Rampvan electromechanical rear suspension. The kneel system lowers the rear of the vehicle. Lowering the rear of the vehicle reduces the slope of the ramp. The kneel system is automatiFDOO\DFWLYDWHGE\WKH2QH7RXFK electronic control system. When a control switch is pressed to start the Open functions, the rear of WKHYHKLFOHEHJLQVWRORZHUDWWKH same time the hatch starts to open. When the Close functions are activated, the vehicle starts to raise at the same time the ramp starts to VWRZUHWUDFW Kneel On/Off Feature: This feature provides the option of kneeling the vehicle when operating the power door and ramp. A kneel On/Off switch is provided on the FHQWHUFRQVROHVHHSKRWRRQSDJH 7KHNQHHOV\VWHPFDQEH HQDEOHG2QRUGLVDEOHG2IIZLWK this console mounted switch. ly. A release switch is located on the driver side C-pillar as shown EHORZ Emergency Kneeling Override: In the event the Rampvan is in the kneeled position, the Kneel ActuaWRU(PHUJHQF\5HOHDVH2YHUULGHIHDWXUHDOORZVWKHUHDURIWKH YHKLFOHWREHUDLVHGWRWKHQRUPDO position. See page 17 also. To Engage Kneel: Release the Emergency Kneel Raise switch to re-engage the kneel actuator motor. Do not drive the Rampvan with the rear of the vehicle in the lowered position. Attempting to do so Note: Do not leave your Rampvan will result in an extremely rough DQGXQVWDEOHULGH,QWKHHYHQWRI LQWKHNQHHOHGORZHUHGSRVLWLRQ a kneel system failure, have the IRUH[WHQGHGSHULRGVRIWLPH'Rkneel system repaired immediateLQJVRPD\UHVXOWLQEDWWHU\GUDLQ To Release Kneel: Press and hold the Emergency Kneel Raise switch until the motor "clicks," HQVXULQJWKHNQHHOKDVEHHQFRPSOHWHO\UHOHDVHGYHKLFOHUDLVHV Press and hold: Release Kneel UDLVH YHKLFOH Page 13 OPERATION Ramp Fully automatic power ramp with manual override. Power Ramp Operation: The power ramp is actiYDWHGE\WKH2QH7RXFKHOHFWURQLFFRQWUROV\VWHP When a control switch is pressed to start the Open functions, the ramp unfolds after the hatch is fully open. When the Close functions are activated, the ramp folds immediately. If a control switch is pressed and released while the ramp is unfolding, the ramp motor will stop running. Note: Since the ramp is not completely stowed, it may gravity down and descend to the ground. Press a switch again and the ramp will fold and the hatch will close. Once the Open sequence of functions is complete KDWFKLVIXOO\RSHQDQGUDPSLVXQIROGHGSUHVVDQG release a control switch to fold the ramp. If a control switch is pressed while the ramp is folding, the ramp motor will stop running. Press a control switch again and the ramp will fold and the hatch will close. Page 14 Note:,IWKHSRZHUUDPSLVREVWUXFWHGZKLOHXQIROGing or folding, the ramp motor will stop running, SURYLGHGLWPHHWVVXIÀFLHQWUHVLVWDQFH,IWKHUDPSLV REVWUXFWHGGXULQJWKHXQIROGF\FOHSUHVVWKHVZLWFK again and the ramp will fold and the hatch will close. ,IREVWUXFWHGGXULQJWKHIROGF\FOHSUHVVWKHVZLWFK again and the ramp motor stops running and the UDPSXQIROGVE\WKHIRUFHRIJUDYLW\ Note: When unfolding the ramp, the ramp motor stops running when the ramp reaches the nearly-horL]RQWDOSRVLWLRQDSSUR[LPDWHO\µµDERYHJURXQG OHYHO7KHUDPSFRQWLQXHVWRORZHUWKHUHPDLQLQJ GLVWDQFHE\WKHIRUFHRIJUDYLW\$OORZWKHSRZHU UDPSWRXQIROGGHSOR\ IXOO\EHIRUHERDUGLQJ the ramp. Forcing the CAUTION ramp out or down during the unfold function, Allow ramp to deploy RUERDUGLQJRQWRWKH fully before boarding. UDPSEHIRUHLWLVIXOO\ Failure to do so may deployed may result result in damage. in damage to the ramp DQGRUPRWRUDVVHPEO\ OPERATION Power Ramp Safety: %HFHUWDLQWKHUHLVDGHTXDWH FOHDUDQFHRXWVLGHWKH5DPSYDQEHIRUHXQIROGLQJWKH power ramp. WARNING Keep clear of area in which ramp operates. .HHSFOHDURIDUHDLQZKLFKWKHUDPSRSHUDWHV%H FHUWDLQQRSHUVRQRUREVWUXFWLRQLVZLWKLQWKHSDWKRI the ramp when unfolding or folding the ramp. Keep FOHDURIDOOSRZHUUDPSPRYLQJSDUWV'RQRW attempt to grip or hold the ramp or ramp folding mechanism IROGDUPDQGEHDULQJDVVHPEO\ WARNING .HHSERG\SDUWVDQG REVWUXFWLRQVFOHDURI the area in which the ramp operates. Provide adequate clearance outside of vehicle to accommodate ramp. Failure to do so may result in serious bodily injury and/or property damage. Page 15 OPERATION Manual Operation: If you experience power or HTXLSPHQWIDLOXUHSRZHUUDPSVFDQEHPDQXDOO\ IROGHGDQGXQIROGHG7KHSRZHUUDPSFDQDOVREH PDQXDOO\IROGHGDQGXQIROGHGLIWKH%DFN'RRU2II override switch is pressed in. Manual Ramp Operation: When manual use of UDPSLVUHTXLUHGWKHUDPSVKRXOGEHPDQXDOO\XQIROGHGDQGIROGHGE\DQDWWHQGDQW.HHSFOHDURIWKH DUHDLQZKLFKWKHKLQJHGUDPSELIROGH[WHQVLRQIROGV DQGXQIROGV5HPHPEHUWRXVHJRRGERG\PHFKDQics when folding and unfolding the ramp. Deploy Ramp: The ramp PD\EHGHSOR\HGE\GLVHQgaging the latch release asVHPEOLHVORFDWHGRQWKHXSSHU ÁRRUVHFWLRQRQHDFKVLGHRI the ramp. Slide the levers toward the center of the van. When the release levers are positioned properly they lock into place at an angle. Push WKHUDPSRXWDZD\IURPWKH Page 16 YHKLFOHDQGWKHUDPSZLOOFRQWLQXHWRGHSOR\E\WKH force of gravity. Stow Ramp:5RWDWHWKHODWFKUHOHDVHDVVHPEOLHV toward the outer walls of the vehicle. Note: Push downward and then outward to position release levers. Manually raise the ramp until it is locked into the stowed position. Be sure the ramp is locked in posiWLRQE\DWWHPSWLQJWRSXVKSXOOWKHUDPSRXWIURPWKH vehicle. The ramp should remain locked in position. Ramp Release Lever RQHRQHDFKVLGHRIUDPS Carefully push out to unfold the ramp. Keep clear of hinge area. OPERATION Manual Kneel Operation: In the event the Rampvan is in the kneeled position and you experience power or equipment failure, the Kneel Actuator Manual ReOHDVH2YHUULGHIHDWXUHDOORZVWKHUHDURIWKHYHKLFOH WREHUDLVHGWRWKHQRUPDOSRVLWLRQ DQGXQVWDEOHULGH,QWKHHYHQWRIDNQHHOV\VWHP failure, have the kneel system repaired immediately. Ramp Safety: Wheelchair passengers and attenGDQWVZKHQDSSOLFDEOHPXVWXVHEDVLFFRPPRQ sense and good judgment regarding ramp safety. The kneel manual release is operated with a ratchetEach wheelchair passenger has a unique set of ing wrench. The kneel motor release nut is located SK\VLFDODELOLWLHVFRPELQHGZLWKWKHSK\VLFDOFKDULQDFRPSDUWPHQWRQWKHGULYHUVLGHUHDUUDLVHGÁRRU acteristics of his or her wheelchair that dictate the VHHSKRWR5HPRYHDFFHVVGRRUDQGXVHDUDWFKHW- method in which he or LQJZUHQFKWRWKHUDLVHWKHYHKLFOHUHOHDVHWKHNQHHO she will enter and exit WARNING the Rampvan. ConUse the Kneel Man- sequently, the procePosition and fasten dures for safe opual Release only if Kneel Manual the wheelchaireration outlined in this the vehicle will not Release Compartment equipped occupant manual are general in raise electrically. seat belt before nature. Wheelchair atDo not drive the loading onto the WHQGDQWVVKRXOGEHLQRampvan with the wheelchair ramp. structed on any special rear of the vehicle Failure to do so may in the lowered posi- needs and/or proceresult in serious dures required for safe tion. Attempting to bodily injury and/or transport of wheelchair do so will result in property damage. passengers. an extremely rough Page 17 OPERATION Follow all safety instructions reJDUGLQJWRUVRUHVWUDLQWVVWDELOLW\ EDODQFHZHLJKWGLVWULEXWLRQDQG XVHRIDWWHQGDQWVDVVSHFLÀHGLQ the owner’s manual supplied with yourZKHHOFKDLU'HWHUPLQHHVWDEOLVKDQGSUDFWLFHUDPSERDUGing and exiting procedures under the direction of your health care professional, your wheelchair representative, and your Rampvan sales representative to ensure your ability to do so safely. 1HYHUERDUGD5DPSYDQUDPSLI\RXRU\RXUDWWHQGDQWDUHLQWR[LFDWHG7KHZKHHOFKDLUVKRXOGEH positioned in the center of the ramp at all times. You PXVWEHDEOHWRFOHDUO\YLHZWKHUDPSZKHQHYHU ERDUGLQJDQGH[LWLQJWKHYHKLFOH It is the responsibility of the wheelchair operator to enter and exit the Rampvan on the ramp in the safest manner. Page 18 WARNING Be aware of ramp slope. Wheelchair-Equipped Occupant Seat Belts: :KHHOFKDLUSDVVHQJHUVVKRXOGSRVLWLRQDQGEXFNOH WKHLUZKHHOFKDLUHTXLSSHGVHDWEHOWWRUVRUHVWUDLQW DVVSHFLÀHGE\WKHPDQXIDFWXUHUbefore loading onto a wheelchair ramp. 'LIIHUHQWW\SHVRIGLVDELOLWLHVUHTXLUHGLIIHUHQWW\SHV of wheelchairs and different types of wheelchairHTXLSSHGRFFXSDQWUHVWUDLQWEHOWV\VWHPVWRUVR UHVWUDLQW,WLVWKHUHVSRQVLELOLW\RIWKHZKHHOFKDLU passenger to have his or her wheelchair equipped ZLWKDQRFFXSDQWUHVWUDLQWVHDWEHOWXQGHUWKHGLUHFtion of their health care professional. OPERATION Stabilizing Wheelchairs: Powered and manual wheelchairs are designed to remain upright and VWDEOHGXULQJQRUPDORSHUDWLRQ$OODFWLYLWLHVZKLFK involve movement in a wheelchair have an effect on WKHFRPELQHGFHQWHURIJUDYLW\RIWKHRFFXSDQWDQG ZKHHOFKDLU%HDZDUHRIWKH5DPSYDQUDPSVORSH DQJOH7KHVORSHRIWKHUDPSKDVDGLUHFWHIIHFW on the center of gravity. Keep in mind your center of JUDYLW\DQG\RXUDELOLW\WRPDLQWDLQVWDELOLW\DQGEDOance. 'RQRWRSHUDWH\RXUZKHHOFKDLURQWKH5DPSYDQ UDPSZLWKRXWDVVLVWDQFHLI\RXDUHXQDEOHWRPDLQWDLQ VWDELOLW\DQGEDODQFH &RXQWHUEDODQFHGHYLFHV DQWLWLSSHUVPD\EHDYDLODEOHIURP\RXUZKHHOFKDLU UHSUHVHQWDWLYHWRHQKDQFHVWDELOLW\DQGEDODQFH 'RQRWWLOW\RXUZKHHOFKDLUZLWKRXWDVVLVWDQFH2SHUate the wheelchair at a slow and constant speed when on the ramp. 'RQRWDFFHOHUDWHVXGGHQO\ ZKHQRQWKHUDPS'RQRWUDLVHWKHIURQWZKHHOFKDLU ZKHHOVSXOOZKHHOLHZKHQRQWKH5DPSYDQUDPS 7KHDLGRIDQDWWHQGDQWVWDELOL]LQJWKHZKHHOFKDLULV recommended for optimum safety. Wheelchair passengers who intend to enter and exit their Ramp- van without the assistance of an attendant must determine the safest and most practical method and orientation of entering and exiting the Rampvan. 7KLVPHWKRGVKRXOGEHEDVHGRQWKHSK\VLFDOFKDUacteristics of their personal wheelchair and his or her SK\VLFDOFDSDELOLWLHVWRPDLQWDLQVWDELOLW\ZKLOHWKH wheelchair is in motion on the Rampvan ramp. Wheelchair Attendants: When assisting a wheelFKDLURFFXSDQWUHPHPEHUWRXVHJRRGERG\PHchanics. When the wheelchair is on the ramp, the DWWHQGDQWPXVWJUDVSWKHSXVKKDQGOHVRURWKHU VHFXUHO\'HWDFKDEOHZKHHOFKDLUSDUWVVXFKDVDUPV RUOHJUHVWVPXVWQHYHUEHXVHGIRUKDQGKROGVRUOLIWLQJVXSSRUWV'RLQJVRFRXOGUHVXOWLQWKHGHWDFKDEOH SDUWVEHLQJLQDGYHUWHQWO\GHWDFKHGIURPWKHZKHHOchair resulting in possible injury to the wheelchair occupant and/or the attendant. Wheelchair Orientation and Securement During Transport: The wheelchair occupant must face the front of the vehicle and mustEHVHFXUHGXVLQJWKH IRUZDUGIDFLQJZKHHOFKDLUDQGRFFXSDQWEHOWWUDFN V\VWHP6HHEHOWPDQXIDFWXUHLQVWUXFWLRQVIRUGHWDLOV Page 19 WHEELCHAIR AND OCCUPANT RESTRAINT One Forward-Facing WheelFKDLUDQG2FFXSDQW%HOW.LWZLWK instructions is supplied for the restraint of one wheelchair and occupant. "L" track is mounted LQWKHYHKLFOHIRUEHOWVHFXUHPHQW VKRZQLQ)LJXUH Note: Wheelchair passengers shown in Figure 3 depict the DYDLODEOHVHDWLQJSRVLWLRQV Wheelchair capacity at Midpoint 3RVLWLRQBPD\KDYHOLPLWDWLRQV EDVHGRQWKHSK\VLFDOGLPHQVLRQV RIVSHFLÀFZKHHOFKDLUV$GGLtional Forward-Facing Wheelchair DQG2FFXSDQW%HOW.LWVPXVWEH purchased for the restraint of each additional wheelchair passenger. The Rampvan offers the following options for placement and securement of wheelchair passengers. Page 20 Second Row Passenger Seat with Floor Track (Half-drop and Full-drop Conversions): The VHFRQGURZORZHUHGÁRRUDUHD 3RVLWLRQBFDQEHXWLOL]HGE\D wheelchair occupant. Front Passenger Seat with Floor Track (Full-drop Conversion Only):7KHSDVVHQJHUVHDW3RVLtion AFDQEHUHPRYHGDQGWKH VHDWORFDWLRQFDQEHXWLOL]HGE\D wheelchair occupant. Note: The Midpoint IXOOGURSFRQYHUVLRQFDQXWLOL]HERWK “L” Track the front passenger and the passenger side second row as wheelchair securement positions, depenGDQWRQWKHVL]HRIWKHZKHHOFKDLUV Refer to the guidelines, illustrations, photos and instruction supplied with the Wheelchair and 2FFXSDQW%HOW.LWIRUSURSHUXVHRI WKHEHOWDQGWUDFNUHVWUDLQWV\VWHP Front Seat “L” Track A B C Front Seat “L” Track Midpoint “L” Track Figure 3 SEAT REMOVAL AND INSTALLATION Front Passenger Seat: In an effort to produce vehicles that can EHFRQÀJXUHGWRPHHWDYDULHW\RI customer needs, the front pasVHQJHUVHDWEDVHKDVEHHQGHVLJQHGVRWKDWLWPD\EHUHPRYHG IXOOGURS5DPSYDQonly7KLV feature allows the owner and sales representative to determine the appropriate seating arrangement to accommodate owner needs. WARNING Park vehicle and turn engine off before removing or installing seats. Failure to do so may result in serious bodily injury and/or property damage. The full-drop Rampvan front passenger seat is equipped with a quick-release seat attachment PDNLQJVHDWUHPRYDODQGLQVWDOODWLRQSURFHGXUHVVLPSOH7KH quick-release front passenger seat is installed and removed as detailed on pages 21-26 of this manual. Power Seats: The full-drop Rampvan front passenger seat is equipped with electrical wiring harness to accommodate optional equipment such as heated seats, DLUEDJVHWFBefore removing the front passenger seat, be certain all seat electrical harnesses are disconnected. be secured to avoid damage to the harness plug. See Photos A DQG%RQSDJH When positioning the seat, it is your responsibility to reconnect all seat electrical harnesses. Failure to properly connect power seat electrical harnesses may UHVXOWLQSRZHUVHDWIXQFWLRQVEHLQJGLVDEOHGDQGRUWKHDLUEDJQRW deploying with the correct readings from the seat sensors. Contact your sales representative RUFDOO7KH%UDXQ&RUSRUDWLRQDW 1-800-THE LIFT® if any of this information is not understood. When the seat is removed, the seat electrical harness plug must Page 21 SEAT REMOVAL AND INSTALLATION Front Passenger Seat Wiring Harness and Receptacles: A An electrical harness receptacle is located to the rear of the passenJHUVHDWEDVHLQWKHZDOODW´%µ SLOODU7KHVHDWZLULQJKDUQHVV plug connects to the receptacle VRFNHWVFUHZRQFRQQHFWRUGHWDLOV RQSDJHVDQG Turn the seat harness connector large diameter knurled grip clockZLVHWRFRQQHFWWXUQJULSSHUQHDUHVWVRFNHW6HH3KRWR%7XUQ knurled grip counterclockwise to disengage connectors. Secure the seat electrical harness plug to avoid damaging the harness or plug when removing the seat. Page 22 Seat Wiring Harness Turn this knurled grip. Receptacle B SEAT REMOVAL AND INSTALLATION CAUTION Disconnect seat wiring harness before removing seat. Failure to do so may result in property damage. CAUTION Secure front seat wiring harness plug to avoid damage to the harness and/or plug of seat base before removing front seat. Failure to do so may result in property damage. Front Seat Wiring Harnesses: Rampvan front passenger seat is equipped with an electrical wiring harQHVV6HH3KRWRV$%RQSDJH An electrical harness receptacle is located to the rear of the front passenJHUVHDWEDVHLQWKHZDOODW%SLOODU The seat wiring harness plug connects to the receptacle. Before removing seats, be certain seat wiring harnesses are disconnected. When the seat is removed, the seat electrical harness plug must be secured to avoid damage to the harness and/or the plug. When installing the seat, be certain seat wiring harness is reconnected. Failure to do so may UHVXOWLQSRZHUVHDWIXQFWLRQVEHLQJ GLVDEOHGDQGRUWKHDLUEDJQRWGHSOR\ing with the correct readings from the seat sensors. Screw-on Connectors: The front passenger seat wiring harness is equipped with a screw-on connecWRUSOXJ2SHUDWHFRQQHFWRUVDV detailed here and on page 24. $ODEHOLVSRVWHGRQWKHVHDWZLULQJ KDUQHVVSOXJZKLFKLGHQWLÀHVWKH WRSRIWKHFRQQHFWRU´723µGHFDO Position the plug with the “TOP” laEHOIDFLQJXSZKHQFRQQHFWLQJWKH plug to the receptacle socket. Use this feature as an alignment guide. Note:$OLJQPHQWJURRYHVVORWV are provided in receptacle sockets. Receptacle sockets have a single wider alignment groove that is SRVLWLRQHGDWRҋFORFNVKRZQRQ SDJH7KHVHDWZLULQJKDUQHVV plug is equipped with mating alignPHQWJXLGHVHDUV Page 23 SEAT REMOVAL AND INSTALLATION Turn this knurled grip. Receptacle VRFNHW Connect TOP 28891 Disconnect Screw-on Connectors: To Connect: Align the seat KDUQHVVFRQQHFWRUE\SRVLWLRQing the plug with the “TOP” ODEHOIDFLQJXS$OLJQWKHVHDW harness connector alignment guides with the receptacle VRFNHWDOLJQPHQWJURRYHVZLOO RQO\FRQQHFWRQHZD\ Carefully insert the seat harness plug in the receptacle socket. Turn seat harness connector large diameter knurled JULSFORFNZLVHIXOO\WXUQJULSSHUQHDUHVWWRVRFNHW To Disconnect: Turn seat harness connector large diameter knurled grip counterclockwise and disengage connectors. Position plug with ´723µODEHOXS Page 24 Seat Wiring Harness Plug Alignment Groove DWRҋFORFN 1 4 9 5 15 22 10 16 28 23 33 29 37 34 Receptacle Socket Alignment Guide 4 1 9 5 15 22 10 16 28 23 33 29 37 34 Seat Harness Plug SEAT REMOVAL AND INSTALLATION Quick-Release Front Seat Base 4XLFNUHOHDVHVHDWEDVHDWWDFKPHQWVHQJDJHUHFHVVHGÁRRU VWULNHUVVXSSRUWV$UHOHDVH handle is located at the rear RIWKHVHDWEDVHVHH3KRWR &3XOOLQJWKHUHOHDVHKDQGOH disengages the attachments and allows easy removal of the seat. Grasp and pull handle up. Then SXOOXSDQGEDFNRQWKHUHDURI VHDWDQGUROOVHDWEDVHRXWRI vehicle as shown. Note: Push top of seat forward while pulling handle for easier disengagement. Wheels C D Pull release handle up. E 3XOOVHDWXSDQGEDFN Roll seat out of Vehicle Page 25 SEAT REMOVAL AND INSTALLATION Front Passenger Seat Removal Instructions 3KRWR&RQSDJH6HDWEDVH ZLOOUHOHDVHIURPÁRRUVXSSRUWV Note: Push top of seat forward while pulling handle for easier disengagement. 1. Disconnect seat wiring harness before removing seat. See pages 22-24 for wiring harness details and photos. Secure harness and plug to DYRLGGDPDJHVHH3KRWRV$ DQG%RQSDJH 3.3XOOXSZDUGDQGWKHQEDFNZDUG on the rear of the seat and roll VHDWEDVHRXWRIYHKLFOH6HH 3KRWRV'DQG(RQSDJH 2.3XOOUHOHDVHKDQGOHXSORFDWHG DWWKHUHDURIVHDWEDVH6HH Front Passenger Seat Installation Instructions CAUTION Disconnect seat wiring harness before removing seat. Failure to do so may result in property damage. Page 26 1.5ROOIURQWSDVVHQJHUVHDWEDVH LQWRSRVLWLRQDOLJQLQJWKHVHDW EDVHDWWDFKPHQWVZLWKWKH UHFHVVHGÁRRUVWULNHUV 2. Push seat down and forward to latch the front seat attachments ZLWKWKHUHFHVVHGÁRRUVWULNHUV UHFHSWDFOHV2QFHWKHIURQW is latched fully, push downward on the handle at the rear of the seat to latch the rear seat attachments. Be sure the seat LVIXOO\ODWFKHGLQÁRRUVXSportsEHIRUHRFFXS\LQJVHDWRU operating vehicle. 3.&RQQHFWSOXJWKHHOHFWULFDO harness sockets. See pages 22-24 for details. WARNING Seat attachments must be fully latched LQÁRRUVXSSRUWV before occupying seats or operating vehicle. Failure to do so will result in serious bodily injury. WARRANTY In accordance with the Toyota 5 year/Unlimited PLOHFRUURVLRQZDUUDQW\7KH%UDXQ&RUSRUDWLRQZDUrants to the purchaser of its Rampvan conversion WKDWWKHPHWDOIDEULFDWLRQRQRURIWKHIUDPHÁRRU and lowered door extension are free from defects in material and factory workmanship for a period of 5 \HDUVZLWKXQOLPLWHGPLOHV7KH%UDXQ&RUSRUDWLRQ further warrants to the purchaser that the remainder Years/Miles in Service RIWKHPRGLÀFDWLRQVDQGDOWHUDWLRQVIRUDVVRFLDWHG parts are free from defects in material and workmanship for a period of 3 years or 36,000 miles, ZKLFKHYHUFRPHVÀUVW)RUFODULÀFDWLRQSXUSRVHV WKHIROORZLQJFKDUWRXWOLQHV7KH%UDXQ&RUSRUDWLRQ Rampvan warranty coverage. Refer to your Toyota ZDUUDQW\LQIRUPDWLRQERRNOHWIRUDOO7R\RWD2(0 IDFWRU\OLPLWHGZDUUDQW\GHWDLOV Specific Area Covered 5DPSYDQIUDPHDQGÁRRUVWUXFWXUDOFRPSRQHQWV 3 Year with Unlimited Miles Rampvan ramp, door and associated structural components 5DPSYDQHOHFWULFDOFRPSRQHQWVLQFOXGLQJEXWQRWOLPLWHGWR switches, wires, connectors and the controller Page 27 WARRANTY Years/Miles in Service 3 Years or 36,000 Miles Specific Area Covered 5DPSYDQDSSHDUDQFHLWHPVLQFOXGLQJEXWQRWOLPLWHGWRLQWHULRU ÁRRUFRYHULQJDQGUHDUKDWFKORZHUHGH[WHQVLRQDVVHPEOLHV (whichever comes first) Corrosion Warranty: 5 Year with Unlimited Miles Corrosion Warranty see *Exceptions at right Page 28 5DPSYDQIUDPHÁRRUDQGORZHUGRRUPRGLÀFDWLRQPHWDOIDEULFDtion corrosion applies to perforation only. Rampvan lower rear KDWFKPRGLÀFDWLRQFRUURVLRQDSSOLHVWRRXWHUERG\VKHHWPHWDO and paint. Perforation is a rust-through condition such as an actual hole in the metal. ([FHSWLRQV&RVPHWLFRUVXUIDFHFRUURVLRQUHVXOWLQJIURPVWRQH FKLSVIRUH[DPSOHZRXOGQRWEHFRYHUHGRUUHSDLUHGXQGHUWKLV coverage. If corrosion does not cause holes, and is not the result of usage and/or environmental conditions, repair coverDJHODVWVIRU\HDUVRUPLOHVZKLFKHYHUFRPHVÀUVW WARRANTY %RWKWKH\HDUZLWK8QOLPLWHGPLOHFRUURVLRQDQG WKH\HDUPLOHZDUUDQWLHVGHVFULEHGRQSUHvious page commence on the date the conversion is put into service, providing the warranty registraWLRQFDUGLVFRPSOHWHGDQGUHFHLYHGE\7KH%UDXQ Corporation within thirty days of the purchase. 7KH%UDXQ&RUSRUDWLRQDJUHHVWRUHSDLURU replace any of its Rampvan factory-installed parts IRXQGWREHGHIHFWLYHZLWKLQWKHDSSURSULDWHZDUranty period or mileage. This warranty also covers WKHFRVWRIODERUIRUWKHUHSDLURUUHSODFHPHQWRI said parts for three years provided that the repair is DXWKRUL]HGE\7KH%UDXQ&RUSRUDWLRQDQGFDUULHG RXWE\DQDXWKRUL]HGVHUYLFHHVWDEOLVKPHQWD%UDXQ ODERUVFKHGXOHGHWHUPLQHVWKHFRVWDOORZDQFHIRU UHSDLUV7KH%UDXQ&RUSRUDWLRQZLOOQRWKRQRUDQ\ warranty claim for repairs or replacement of parts XQOHVVWKHFODLPLVVXEPLWWHGZLWKWKHDSSURSULDWH IDFWRU\ZDUUDQW\DXWKRUL]DWLRQGDWDDQGWKHUHSDLUV RUUHSODFHPHQWRIWKHSDUWVDUHFRPSOHWHGE\DIDFWRU\DXWKRUL]HGUHSDLUPDQ7KHIDFWRU\DXWKRUL]Dtion data, together with the name and location of the IDFWRU\DXWKRUL]HGUHSDLUPDQFDQEHREWDLQHGE\ HLWKHUZULWWHQRUWHOHSKRQHFRQWDFWZLWK7KH%UDXQ Corporation at the addresses appearing in this manual. 7KHUHWXUQDXWKRUL]DWLRQSURFHGXUHPXVWEH adhered to in order to process any warranty and UHSDLUFODLPVGHWDLOVRQIROORZLQJSDJH 7KH%UDXQ&RUSRUDWLRQUHVHUYHVWKHULJKWWR GHVLJQDWHZKHUHDQ\ZDUUDQW\ZRUNLVWREH performed. 7KH%UDXQ&RUSRUDWLRQDOVRUHVHUYHVWKHULJKWWR examine any defective workmanship or part prior to DQ\DXWKRUL]DWLRQRIQHFHVVDU\UHSDLUV7KLV5DPSYDQZDUUDQW\LVQRWLQWHQGHGWRUHSODFHRUVXEVWLWXWH DQ\RWKHUZDUUDQWLHVLVVXHGE\WKHRULJLQDOPDQXIDFturer of the vehicle or other suppliers of components. This warranty shall not apply to any part or workPDQVKLSWKDWPD\EHFRPHGHIHFWLYHGXHWRPLVXVH QHJOHFWDFFLGHQWRURWKHUFDVXDOW\PRGLÀFDWLRQVRU DOWHUDWLRQVRUXQDXWKRUL]HGUHSDLUV)XUWKHUWKLVZDUranty shall not extend to parts or workmanship that PD\EHFRPHGHIHFWLYHEHFDXVHRIWKHIDLOXUHRI Page 29 WARRANTY anyone to operate the same in accordance with WKHSULQWHGLQVWUXFWLRQVRI7KH%UDXQ&RUSRUDWLRQ RUEHFDXVHRIRSHUDWLRQRIWKHVDPHEH\RQGLWV capacity. UHWXUQHGWR7KH%UDXQ&RUSRUDWLRQZLWKLQWKLUW\GD\V from the date you purchase the vehicle and proof RIWKHGDWHRISXUFKDVLQJPXVWEHVXSSOLHGZLWKWKH transfer of warranty application. This warranty does not cover normal maintenance, VHUYLFHRUSHULRGLFDGMXVWPHQWVQHFHVVLWDWHGE\XVH or wear. 7KH%UDXQ&RUSRUDWLRQVKDOOQRWEHOLDEOHIRUDQ\ incidental or consequential damages resulting from DQ\EUHDFKRIZDUUDQW\ 6HFRQGEX\HUVRID%UDXQ5DPSYDQFRQYHUVLRQ PD\WUDQVIHUWKHUHPDLQLQJZDUUDQW\LIDQ\E\ REWDLQLQJDWUDQVIHURIZDUUDQW\DSSOLFDWLRQIURP 7KH%UDXQ&RUSRUDWLRQ7KLVDSSOLFDWLRQPXVWEH 7KH%UDXQ&RUSRUDWLRQVKDOOQRWEHOLDEOHIRU towing charges, travel and lodging, or any other expense incurred due to the loss of use of vehicle or other reason. RETURN AUTHORIZATION PROCEDURE :KHQSURFHVVLQJDQ\ZDUUDQW\FODLPVSDUWVUHSDLUV HWFDOOUHTXHVWVPXVWEHSURFHVVHGWKURXJK7KH %UDXQ&RUSRUDWLRQ3URGXFW6XSSRUW'HSDUWPHQW Call 1-888-669-4436 during working hours. Product 6XSSRUWZLOOLVVXHD5HWXUQ0DWHULDO$XWKRUL]DWLRQ 50$QXPEHUDQGGHWDLOWKHSURFHGXUHVUHTXLUHGIRU Page 30 SURFHVVLQJUHWXUQVDQGRUDXWKRUL]LQJFUHGLW 7KHODVWHLJKWGLJLWVRIWKHYHKLFOHLGHQWLÀFDWLRQ QXPEHU9,1PXVWEHSURYLGHGZKHQÀOLQJD warranty claim or ordering parts. PREVENTIVE MAINTENANCE Maintenance is necessary to enVXUHVDIHDQGWURXEOHIUHH5DPSvan operation. General preventive maintenance consisting of inspections of your Rampvan systems DORQJZLWKFOHDQLQJDQGOXEULFDWLQJ SURFHGXUHVVKRXOGEHDSDUWRI \RXUURXWLQHOXEULFDWLRQUHTXLUHPHQWVDUHPLQLPDO5HJXODUSUHventive maintenance procedures will increase the service life of the Rampvan, as well as enhance safety. 'XULQJURXWLQHLQVSHFWLRQVRSHUate all Rampvan systems and note WKHIROORZLQJDVHTXLSSHG • Is the power source adequate or weak? 'RHVWKHHOHFWURQLFFRQWURO system function properly? 'RWKHFRQWUROVZLWFKHVIXQFWLRQ properly? 'RHVWKHSRZHUGRRUKDWFK function properly? 'RHVWKHUDPSXQIROGDQGIROG properly? • Inspect wheelchair and occuSDQWUHVWUDLQWEHOWVEXFNOHVDQG hardware for damage, wear, DEQRUPDOFRQGLWLRQRULPSURSHU operation. VXUURXQGLQJDUHDEHIRUHDSSO\LQJ OXEULFDQWV/36*HQHUDO3XUSRVH Penetrating Oil is recommended E\DQGDYDLODEOHIURPWKH%UDXQ &RUSRUDWLRQSDUWQXPEHU 8VHRILPSURSHUOXEULFDQWVFDQ attract dirt or other contaminants which could result in wear or damage to components. Rampvan ramps are equipped ZLWKVHDOHGEHDULQJVDQG7HIORQEXVKLQJVWRGHFUHDVHZHDU provide smooth operation and extend the service life of the ramp. These components do not require OXEULFDWLRQXQGHUQRUPDOFRQGLWLRQVDOWKRXJKWKHUDPSVKRXOGEH LQVSHFWHGDQGFOHDQHGURXWLQHO\ &OHDQDQGOXEULFDWHWKHVSHFLÀHG points approximately every four weeks or 100 cycles. These intervals are a general guideline and will vary according to frequency of use and conditions. Exposure to VHYHUHFRQGLWLRQVZHDWKHUHQYLURQPHQWKHDY\XVDJHHWFPD\ require inspection and mainteQDQFHSURFHGXUHVWREHSHUIRUPHG more often. /LJKWRLOVKRXOGEHDSSOLHGWRWKH RXWERDUGUDPSH[WHQVLRQKLQJH Clean the components and the Page 31 PREVENTIVE MAINTENANCE Preventive maintenance visual inVSHFWLRQVFOHDQLQJDQGOXEULFDWLRQ procedures do not take the place RIWKHSURFHGXUHVVSHFLÀHGLQ WKH0DLQWHQDQFHDQG/XEULFDWLRQ Schedule provided in the Rampvan service manual. The procedures outlined in the Maintenance DQG/XEULFDWLRQ6FKHGXOHmust be performed at the recommended scheduled intervals by an authorized Braun Corporation service representative who KDVDWWHQGHGDQGEHHQFHUWLÀHG by The Braun Corporation Sales and Service School. Page 32 If there is any sign of damage, ZHDUDEQRUPDOFRQGLWLRQRU improper operation, discontinue Rampvan use immediately. Contact your sales representaWLYHRUFDOO7KH%UDXQ&RUSRUDWLRQ at 1-800-THE LIFT®. One of our Product Support representatives ZLOOGLUHFW\RXWRDQDXWKRUL]HG service technician who will inspect your Rampvan. WARNING Maintenance and lubrication procedures must be performed by authorized service personnel as VSHFLÀHGLQWKH applicable Rampvan service manual. Failure to do so may result in serious bodily injury and/or property damage. JACKING AND TIRE CHANGING -DFN3RLQW7DE Jacking and Tire Changing Interior Spare Tire Mount: The spare tire is mounted on the driver VLGHUDLVHGSRUWLRQRIWKHÁRRUE\ the rear hatch. The jack and tire changing tools are located in the storage compartment on the passenger side rear interior panel of the vehicle 2(0VWRUDJHORFDWLRQ Front Wheel Jack Points: Front wheel jacking points have not EHHQDIIHFWHGE\WKHFRQYHUVLRQ Their location and jacking procedure is detailed in the Toyota-supplied owner's manual. Rear Wheel Jack Points: Rear ZKHHOMDFNLQJSRLQWVKDYHEHHQ repositioned during Rampvan conversion procedures. The rear jack points are located just in front of the rear tires. The jacking point is on the rear suspension front PRXQWLQJEUDFNHW6HHSKRWRVDW right. Note: The vehicle jack points are GHVLJQHGZLWKDWDEWKDWVHDWVLQWR WKHMDFN7KHWDENHHSVWKHMDFNLQ the correct position on the vehicle. See photos at right. Jacking and Tire Changing Procedures:'HWDLOHGWLUHFKDQJing instructions are provided in the Toyota-supplied owner’s manual. Suspension %UDFNHW Jack Refer to the Toyota-supplied manual for tire changing instructions and safety precautions, as well as instructions regarding other roadside emergencies. Rear Jack Point Page 33 "Providing Access to the World" ® Over 300 Braun Dealers Worldwide BRAUN Operator's Manual CONSUMER Rear Entry Entry Folding Folding Ramp Ramp Rear Wheelchair-Accessible Lowered Floor Conversion featuring 2005 Toyota Minivans RE Folding Ramp Rampvan® featuring Toyota Minivans "Providing Access to the World" ® ® International Corporate Hdqrs: P.O. Box 310 Winamac, IN 46996 USA (574) 946-6153 FAX: (574) 946-4670 1-800-THE LIFT ® 32070 September 2005 All illustrations, descriptions and specifications in this manual are based on the latest product information available at the time of publication. The Braun Corporation reserves the right to make changes at any time without notice.