1
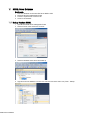
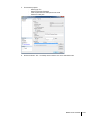
Customer Service Manual
Backup & Restore
Document Version B
Doc N°:SM_BACKUP_RESTORE_EN_B_EXT.DOCX
Contents
1 Pilot Line Manager (PLM) ..................................................................... 4
1.1 Backup Pilot Line Manager up to 4.6 ................................................4
1.1.1 Backup within PLM ........................................................................... 4
1.1.2 PLM Complete without Internal Database ............................................. 4
1.1.3 PLM Internal Databse Only ................................................................. 4
1.2 Restore Pilot Line Manager up to 4.6 ................................................5
1.2.1 PLM Internal Database Only ............................................................... 5
1.2.2 PLM Complete without internal database ............................................. 5
1.2.3 Restore within PLM ........................................................................... 5
1.3 Backup Pilot Line Manager 4.7 to 4.9 ...............................................6
1.3.1 PLC XML Files .................................................................................. 6
1.3.2 PLC Configuration ............................................................................. 6
1.3.3 PLM System Settings and System Information ...................................... 6
1.3.4 PLM Second Signature....................................................................... 6
1.3.5 PLM Month Name List ....................................................................... 6
1.3.6 PLM Log File .................................................................................... 6
1.3.7 PLM Log File into Another Format ....................................................... 7
1.3.8 PLM Camera Formats ........................................................................ 7
1.3.9 PLM Line Formats ............................................................................. 7
1.3.10 PLM Internal Database Only ............................................................. 7
1.3.11 PLM Complete with Internal Databse ................................................. 7
1.4 Restore Pilot Line Manager 4.7 to 4.9 ...............................................8
1.4.1
1.4.2
1.4.3
1.4.4
1.4.5
1.4.6
PLM Internal Database Only ............................................................... 8
PLM Complete with Internal Database ................................................. 8
PLC XML Files .................................................................................. 8
PLC Configuration ............................................................................. 8
PLM Second Signature....................................................................... 8
PLM Month Name List ....................................................................... 9
2 Smart Camera .................................................................................. 10
2.1 Backup Camera Formats Only with PLM ..........................................10
2.2 Full Backup .................................................................................10
2.3 Restore .......................................................................................10
3 PLC S7-1200 ................................................................................... 12
3.1 PLC Backup ................................................................................12
3.2 PLC Restore.................................................................................12
4 PLC S7-200..................................................................................... 13
4.1 PLC Backup ................................................................................13
4.2 PLC Restore.................................................................................13
4.2.1 Only Data ...................................................................................... 13
4.2.2 Complete ....................................................................................... 13
5 IPC 14
5.1 Backup .......................................................................................14
5.2 Restore .......................................................................................14
6 Printer Wolke ................................................................................... 15
6.1 Backup Labels .............................................................................15
6.2 Restore Labels .............................................................................15
6.3 Backup System Settings ................................................................15
II
6.4 Restore System Settings ................................................................ 15
7 Printer Domino G300......................................................................... 16
7.1 Backup....................................................................................... 16
7.2 Restore ....................................................................................... 16
8 RFID Reader/Writer - Feig .................................................................... 17
8.1 Backup....................................................................................... 17
8.2 Restore ....................................................................................... 17
9 VGL 7/8 .......................................................................................... 18
9.1 Backup....................................................................................... 18
9.2 Restore ....................................................................................... 18
10 HRC CORE .................................................................................... 19
10.1 Backup System Information ........................................................ 19
10.2 Backup HRC CORE .................................................................... 19
10.3 Restore HRC CORE .................................................................... 19
11 MSSQL Server Database ................................................................... 20
11.1 Backup Database MSSQL ........................................................... 20
III
1 Pilot Line Manager (PLM)
1.1 Backup Pilot Line Manager up to 4.6
Requirements:
Connect a keyboard and a mouse to IPC
1.1.1
•
•
•
•
•
•
•
•
•
1.1.2
Backup within PLM
PLC XML files
See section 1.3.1 Backup Pilot Line Manager 4.7 to 4.9
PLC configuration
See section 1.3.2 Backup Pilot Line Manager 4.7 to 4.9
PLM System Settings and System Information
See section 1.3.3 Backup Pilot Line Manager 4.7 to 4.9
PLM Second Signature
See section 1.3.4 Backup Pilot Line Manager 4.7 to 4.9
PLM Month Name List
See section 1.3.5 Backup Pilot Line Manager 4.7 to 4.9
PLM Log File
See section 1.3.6 Backup Pilot Line Manager 4.7 to 4.9
PLM Log File into another Format
See section 1.3.7 Backup Pilot Line Manager 4.7 to 4.9
PLM Camera Formats
See section 1.3.8 Backup Pilot Line Manager 4.7 to 4.9
PLM Line Formats
See section 1.3.9 Backup Pilot Line Manager 4.7 to 4.9
PLM Complete without Internal Database
1. PLM must be closed
Create a folder …\Desktop\Backup_yyyyMMdd\ where the backup can be stored
2. Log in PLM with administrator rights
3. Follow the steps 1.3.1 to 1.3.5 and 1.3.7 to 1.3.8
4. Log off by choosing the "Login/logoff" button and "Exit to OS"
5. Copy the folder …\PCE\Pilot\ into the created backup folder
1.1.3
PLM Internal Databse Only
1. PLM must be closed
2. Create a folder …\Desktop\Backup_yyyyMMdd\ where the backup can be stored
3. Copy the folder …\PCE\db into the created backup folder
Pilot Line Manager (PLM)
1.2 Restore Pilot Line Manager up to 4.6
1.2.1
PLM Internal Database Only
1.
2.
3.
4.
1.2.2
Be sure to have a backup of the database (derby)
PLM must be closed
Delete the folder …\PCE\db\pilot
Copy the folder from …\Desktop\Backup_yyyyMMdd\db\pilot into …\PCE\db\
PLM Complete without internal database
1. Be sure to have a backup of the PLM
2. PLM must be closed
3. Delete all folders and files in folder …\PCE\Pilot\
4. Copy all folders and files from …\Desktop\Backup_yyyyMMdd\Pilot\ into …\PCE\Pilot\
5. Follow the step 1.2.3
1.2.3
•
•
•
•
Restore within PLM
PLC XML Files
See section 1.4.1 in Restore Pilot Line Manager 4.7 to 4.9
PLC Configuration
See section 1.4.4 in Restore Pilot Line Manager 4.7 to 4.9
PLM Second Signature
See section 1.4.5 in Restore Pilot Line Manager 4.7 to 4.9
PLM Month Name List
See section 0 in Restore Pilot Line Manager 4.7 to 4.9
Pilot Line Manager (PLM)
5/23
1.3 Backup Pilot Line Manager 4.7 to 4.9
1.3.1
PLC XML Files
1.
2.
3.
4.
5.
6.
PLM must run
Choose button " System Setting "
Choose button " Edit Device settings "
Select folder " PLC "
Scroll down and choose the button " Import/Export "
Choose button " Export all settings " and " Export parameters " and " Export messages " and "
Export counters " and " Export teach parameters"
7. The files are stored in …\PCE\Pilot\distribution\PLC\ (5 different files with different names
plc_plcname_ exportname.xml)
1.3.2
PLC Configuration
1.
2.
3.
4.
5.
6.
7.
PLM must run
Choose button " System Setting "
Choose button " Edit Device settings "
Select folder " PLC "
Scroll down and choose button " Teach "
Choose button " Read "
Take screenshots for all pages of PLC configuration (see PLM manual 6.3.2.1, Taking
screenshots)
8. Save all screenshots into …\PCE\Pilot\distribution\PLC
1.3.3
PLM System Settings and System Information
1.
2.
3.
4.
5.
6.
1.3.4
PLM must run
Choose button " System settings "
Choose button " System information "
Select folder " Systeminformation "
Choose button " Save "
The file is stored in …\PCE\Pilot\log\ (file name system_info.log )
PLM Second Signature
1. PLM must run
2. Choose button " System settings "
3. Choose button " Second signature action configuration "
4. Choose button " Export "
5. The file is stored in …\PCE\Pilot\distribution\setup\
(file name yyyyMMdd_time_SecondSignature_Messages.xml )
1.3.5
PLM Month Name List
1. PLM must run
2. Choose button " System settings "
3. Choose button " Edit month name list "
4. Choose button " Export "
5. The file is stored in …\PCE\Pilot\distribution\setup\
(file name yyyyMMdd_time_MonthNameList.xml )
1.3.6
PLM Log File
1.
2.
3.
4.
5.
Pilot Line Manager (PLM)
PLM must run
Choose button " Log File Management " (need sometimes until 1 minute to load)
Choose button " Print " (need sometimes until 1 minute to proceed)
A new window " Report Settings " will appear. Select the report template design and then " OK "
The file is stored in …\PCE\Pilot\log\ (file name plm.log )
1.3.7
PLM Log File into Another Format
1.
2.
3.
4.
PLM must run
Choose button " Backup "
Choose button" Backup Log file "
A new window " Back Up Logfile " will appear. Select the backup details (e.g. format PDF) and
then button " backup "
5. Store the file plm.log into …\PCE\Pilot\
1.3.8
PLM Camera Formats
1.
2.
3.
4.
PLM must run
Choose button " Backup "
Choose button" Backup Camera Formats "
A new window " Backup Camera Formats " appear. Select cameras and choose button "
Backup "
5. For each camera a folder is created and stored in
…\PCE\Pilot\database\backup_yyyy_MM_dd_time\ (file name cam-IPadress.zip )
1.3.9
PLM Line Formats
1.
2.
3.
4.
5.
PLM must run
Choose button " Production "
Choose button" Add/Edit line format "
Select a line format and choose button " PDF Report "
A new window " Report settings " appear. Select report template design and choose button " OK
"
6. The file is stored in …\PCE\Pilot\pdf\
(file name lineformatname_lineformat_report_yyyyMMdd_time )
1.3.10 PLM Internal Database Only
1. PLM must be closed
2. Create a folder …\Desktop\Backup_yyyyMMdd\Pilot\ where the backup can be stored
3. Copy the folder …\PCE\Pilot\database into the created backup folder
1.3.11 PLM Complete with Internal Databse
1. PLM must be closed
2. Create a path …\Desktop\Backup_yyyyMMdd\ where the backup can be stored
3. Log in PLM with administrator rights
4. Follow the steps 1.3.1 to 1.3.4 and 1.3.7 to 1.3.8
6. Log off by choosing the "Login/logoff" button and "Exit to OS"
7. Copy the folder …\PCE\Pilot\ into the created backup folder
Pilot Line Manager (PLM)
7/23
1.4 Restore Pilot Line Manager 4.7 to 4.9
1.4.1
PLM Internal Database Only
1.
2.
3.
4.
1.4.2
Be sure to have a backup of the database h2
PLM must be closed
Delete all folders and files in …\PCE\Pilot\database\
Copy all folders and files of the backup folder …\Desktop\Backup_yyyyMMdd\Pilot\database\
into …\PCE\Pilot\database
PLM Complete with Internal Database
1. Be sure to have a backup of the complete PLM
2. PLM must be closed
3. Delete all folders and files in folder …\PCE\Pilot\
4. Copy all folders and files of the backup folder …\Desktop\Backup_yyyyMMdd\Pilot\
into …\PCE\Pilot\
5. Follow the steps 1.4.3 to 1.4.6
1.4.3
PLC XML Files
1.
2.
3.
4.
5.
6.
PLM must run
Choose button " System Setting "
Choose button " Edit Device settings "
Select folder " PLC "
Scroll down and choose " Import/Export "
Choose one after another the buttons " Import all settings " and " Import parameters " and "
Import messages " and " Import counters " and " Import teach parameters "
7. A new window appear. Select the path …\Desktop\Backup_yyyyMMdd\Pilot\distribution\PLC\
and select the right backup file plc_plcname_ exportname.xml and choose button " open "
1.4.4
PLC Configuration
1.
2.
3.
4.
5.
6.
7.
8.
1.4.5
PLM must run
Choose button " System Setting "
Choose button " Edit Device settings "
Select folder " PLC "
Scroll down and choose button " Teach "
Choose button " Read "
Use the screenshots in …\PCE\Pilot\distribution\PLC to fill in the configurations
Choose the button " Write "
PLM Second Signature
1.
2.
3.
4.
6.
Pilot Line Manager (PLM)
PLM must run
Choose button " System settings "
Choose button " Second signature action configuration "
Choose button " Import "
A new window appear. Select the path …\Desktop\Backup_yyyyMMdd\Pilot\distribution\setup\
and select the backup file yyyyMMdd_time_SecondSignature_Messages.xml and choose the
button " open "
1.4.6
PLM Month Name List
1.
2.
3.
4.
5.
PLM must run
Choose button " System settings "
Choose button " Edit month name list "
Choose button " Import "
A new window appears. Select the path ...\Desktop\Backup_yyyyMMdd\Pilot\distribution\setup\
and select the backup file yyyyMMdd_time_MonthNameList.xml and choose button " open "
Pilot Line Manager (PLM)
9/23
Smart Camera
2 Smart Camera
Requirements:
1. Connect a keyboard and a mouse to IPC
2.1 Backup Camera Formats Only with PLM
1. See step 1.3.8 in section Backup Pilot Line Manager 4.7 to 4.9
2.2 Full Backup
1.
2.
3.
4.
5.
6.
7.
8.
9.
10.
11.
12.
13.
14.
15.
16.
17.
18.
19.
PLM must be closed
Create a folder in …\PCE\Pilot\distribution\JDatatrans
Start JDataTrans (Icon on Desktop)
Confirm or enter the IP-Address of the camera. You will find the IP address of the camera in your
documents (e.g. wiring diagram) and on the label on the camera. In the right window (File Explorer)
you will then see a list of files concerning the camera
Stop the camera software by choosing the button " esc+Q ". The frame (command line) under the
button esc+Q will turn to green
Choose the button " Backup "
Select the path …\PCE\Pilot\distribution\JDatatrans
Create a new folder " CAM_IPaddress " and choose button " open "
Choose the button " open " again
The backup will be stored in the selected path with folder name CamBack-yyyy-MM-dd time
Enter the command line
HINT: To set the camera memory to an optimal state, fill in " pk " and
" Enter " for Packing Flash (need sometimes up to 1 minute to proceed)
If software OCR6 (Code and Optical Character Inspection) installed, fill in
" OCR6 " and " Enter " to start the software
If software OSR6 (Optical Shift Register) installed, fill in " OSR6 " and " Enter " to start the software
If software PC6 (Product Control) installed, fill in " PC6 " and " Enter " to start the software
If software PDF6C (PDF Code Reader) installed, fill in " PDF6 " and " Enter " to start the software
If software CPC6 (Colour Product Control) installed, fill in " CPC6 " and " Enter " to start the software
If software CBI6 (Colour Blister Inspection) installed, fill in " CBI6 " and " Enter " to start the software
The software is started if the frame turns to yellow
End JDataTrans
2.3 Restore
1. PLM must be closed
2. Start JDataTrans (Icon on Desktop)
3. Confirm or enter the IP-Address of the camera. You will find the IP address of the camera in your
documents (e.g. wiring diagram) and on the label on the camera. In the right window (File Explorer)
you will then see a list of files concerning the camera.
4. Stop the camera software with choosing the button " esc+Q ". The frame (command line) under the
button esc+Q will turn to green
5. Choose the button " Upload ", a new window appears
6. Select the path …\PCE\Pilot\distribution\JDatatrans\
7. Select the backup file CamBack - YYYY-MM-DD time
8. Choose the button " open ". Allow approximately 10 minutes for the restore procedure
9. Enter the command line
HINT: To set the camera memory to an optimal state, fill in " pk " and
" Enter " for Packing Flash (need sometimes until 1 minute to proceed)
10. If software OCR6 (Code and Optical Character Inspection) installed, fill in " OCR6 " and " Enter " to
start the software
11. If software OSR6 (Optical Shift Register) installed, fill in " OSR6 " and " Enter " to start the software
12. If software PC6 (Product Control) installed, fill in " PC6 " and " Enter " to start the software
13. If software PDF6C (PDF Code Reader) installed, fill in " PDF6 " and " Enter " to start the software
14. If software CPC6 (Colour Product Control) installed, fill in " CPC6 " and " Enter " to start the software
15. If software CBI6 (Colour Blister Inspection) installed, fill in " CBI6 " and " Enter " to start the software
16. The software is started if the frame turn to yellow
17. End JDataTrans
18. Enter the ID-Code if necessary
Hint: If the restore is from a different camera, you are asked to enter an ID-Code. You get the ID-Code
by calling PCE
Smart Camera
11/23
PLC S7-1200
3 PLC S7-1200
Requirements:
1. Siemens SD card with PLC program (available at PCE only)
2. SD Card Reader
3.1 PLC Backup
1. Create a folder …\Desktop\Backup_yyyyMMdd\Pilot\distribution\PLC\
2. Copy all folders and files from the SD Card into the backup folder
3.2 PLC Restore
1. Switch off PLC
2. Slot the SD memory card into the memory card slot of the PLC
3. Switch on the PLC
A flashing sequence between the RUN/STOP, ERROR and MAINT LEDs indicates that the program is
currently being transferred to the controller. The end of the transfer is indicated by the RUN/STOP LED
lighting orange and the MAINT LED flashing at the same time.
4. Switch off the S7-1200 CPU and remove the SD memory card from the slot
5. Switch on the S7-1200 CPU
The application starts up automatically RUN/STOP LED lights green
Note:
This process deletes all the data on the S7-1200 CPU and overwrites it with the contents of the
memory card. The program on the memory card must always contain the complete S7-1200
application (device configuration and all the blocks). Even if you only want to update a modified
block, all the blocks must still be on the memory card.
4 PLC S7-200
Requirements:
1. Step7 MicroWin Manager (Version 4.0 or higher)
2. Basis for the backup is the file "*.mwp " created at the programming
3. Connection of PLC with notebook
4.1 PLC Backup
1.
2.
3.
4.
5.
6.
7.
8.
Open the file " *.mwp " with Step 7 Manager
Choose " status table "
Choose “ ANWENDER 1 ”
Choose “ Single Read ” (symbol glasses) to read the data from the CPU
Print data as PDF file
Choose the sheet “ Fehler_aus ” and read the data (symbol glasses)
Print data as PDF file. Note the version number of the machine on the printed documents
Copy the *.mwp and the PDF file into the folder …\PCE\Pilot\distribution\PLC\
4.2 PLC Restore
4.2.1
1.
2.
3.
4.
5.
4.2.2
1.
2.
3.
4.
5.
6.
7.
8.
Only Data
Switch the PLC to “ Stop ”
Select the path …\PCE\Pilot\distribution\PLC\
Open the file " *.mwp " with Step 7 Manager
Transfer the programming module and the system module into the PLC
Switch the PLC to " Run "
Complete
Switch the PLC to “ Stop ”
Open the file " *.mwp " with Step 7 Manager
Transfer all modules ( programming module, data module, system data module ) into the PLC
Enter all data from the stored PDF files ANWENDER1 and Fehler_aus into the fields
“ Neuer Wert ”
Enter all data and set the bit “ M_Store_to_EEPROM ” to “ 1 ”
The data will be written to the EEPROM after the next start of the PLC
Choose the table “ Fehler_aus ”
Enter all data from the stored PDF file
Switch the PLC to " Run "
PLC S7-200
13/23
5 IPC
Requirements:
1. Connected keyboard and mouse on IPC
2. Acronis True Image on external hard drive
3. For Raid Systems you need Acronis True Image 2013 or higher
5.1 Backup
1.
2.
3.
4.
5.
6.
7.
8.
9.
10.
Turn off the IPC
Connect the keyboard, mouse and external hard drive to the USB port at the IPC
Turn on the machine
Choose " Acronis True Image Home "
Select " Backup "
Choose " Disk Backup – Disk and Partition Backup "
Choose " Disk 1 " and choose " Next "
Choose " Create new Backup archive "
Enter the path and the name for the backup (*.tib) and press " Next "
Choose " Proceed "
5.2 Restore
1.
2.
3.
4.
5.
6.
7.
8.
9.
10.
11.
12.
13.
14.
15.
16.
PC
Turn off the machine
Connect the keyboard, mouse and external hard drive to the USB port at the IPC
Turn on the machine
Choose " Acronis True Image Home "
Choose " Recover "
Choose " Browse for backup "
Select the path with the stored backup and press " OK "
Select the backup (*.tib) and choose with the right mouse button " Recovery "
Choose " Recover whole disk and partitions " and press " Next "
Choose " Drive 1 " and press " Next "
Confirm that all files on the target drive will be deleted before the recovery starts
Select " Disk 1 " and press " Next "
Choose " Proceed " to start the recovery procedure
After a successful recovery press " OK "
Disconnect the hard drive from the IPC
Close the window. The DMS restarts
6 Printer Wolke
Requirements:
1. Connected keyboard and mouse on IPC
6.1 Backup Labels
2.
3.
4.
5.
6.
7.
8.
9.
10.
PLM must be closed
Create a folder into …\PCE\Pilot\distribution\Wolke\Labels where the backup can be stored
Start Wolke Ethernet Manager (Icon on desktop) with administrator rights
Choose the button " Connect "
Select the path…\PCE\Pilot\distribution\Wolke\Labels, in the left down window for the backup
Mark the labels which should be stored in the upper window
Copy the marked labels with drag and drop to the selected backup path
Choose the button " Disconnect "
Close Wolke Ethernet Manager
6.2 Restore Labels
1.
2.
3.
4.
5.
6.
7.
8.
PLM must be closed
Start Wolke Ethernet Manager (Icon on desktop) with administrator rights
Choose the button " Connect " to connect the printer
Select the path …\PCE\Pilot\distribution\Wolke\Labels, in the left down window where the
backup is stored
Mark the labels which should be restore in the lower window
Copy the marked labels with drag and drop to the upper window
Choose the button " Disconnect "
Close Wolke Ethernet Manager
6.3 Backup System Settings
1. PLM must be closed
2. Create a folder …\PCE\Pilot\distribution\Wolke\System
3. Start Wolke Ethernet Manager (Icon on desktop) with administrator rights
4. Choose the button " Connect " to connect the printer
5. Choose the button " Install, Installation Settings "
6. Choose the button " m600 > PC "
7. Enter a file name (Linename_yyyyMMdd)
The file will be stored on the IPC under …\Programme\Wolke\m600 Ethernet Manager\System
Properties
8. Choose the button " Disconnect "
9. Close Wolke Ethernet Manager
Copy the stored backup file into…\Programme\Wolke\m600 Ethernet Manager\System
6.4 Restore System Settings
1.
2.
3.
4.
PLM must be closed
Start Wolke Ethernet Manager (Icon on desktop) with administrator rights
Choose the button " Connect " to connect the printer
Choose " Installation Settings "
Choose " User-defined Directory " and select the path …\Programme\Wolke\m600 Ethernet
Manager\System
5. Choose the button " PC > m600 "
6. Choose the button " Disconnect "
7. Close Wolke Ethernet Manager
Printer Wolke
15/23
7 Printer Domino G300
Requirements:
1. Flash Card of the printer
2. Flash Card reader
3. Connected keyboard and
mouse on IPC
7.1 Backup
1.
2.
3.
4.
5.
6.
PLM must be closed
Create a folder into …\PCE\Pilot\distribution\Domino where the backup can be stored
Turn off the machine
Pull out the Flash Card of the Printer
Copy all data of the card into create folder …\PCE\Pilot\distribution\Domino\
Put the Flash Card back into the printer
7.2 Restore
Printer Domino G300
1.
2.
3.
4.
5.
6.
PLM must be closed
Turn off the machine
Pull out the Flash Card of the Printer
Select the path …\PCE\Pilot\distribution\Domino
Select all files and copy all files onto the Flash Card
Put the Flash Card back into the printer
8 RFID Reader/Writer - Feig
Requirements:
1. Software ID ISOStart2012 from Feig
2. Connected keyboard and mouse on IPC
8.1 Backup
1. Create a folder …\PCE\Pilot\distribution\RFID\ where the backup can be stored
2. Open program " ID ISOStart2012 "
3. Enter correct IP address
4. Choose " Detect "
5. Select " Run without change "
6. Choose button " Configuration "
7. Mark " Complete Configuration " and choose " Read "
8. Select " Save " and enter name for RFID backup file and select path
…\PCE\Pilot\distribution\RFID\
8.2 Restore
1.
2.
3.
4.
5.
6.
7.
8.
9.
Open program " ID ISOStart2012 "
Enter correct IP address
Choose " Detect "
Select " Run without change "
Choose button Select " Open "
Select path …\PCE\Pilot\distribution\RFID\ and RFID backup file
Choose button " Open "
Choose button " Configuration "
Mark " Complete Configuration " and choose " Apply "
RFID Reader/Writer - Feig
17/23
VGL 7/8
9 VGL 7/8
Requirements:
1. Software @CHIPTOOL from Beck IPC GmbH
2. Connect a keyboard and a mouse to IPC
9.1 Backup
1. Create a folder for each VGL into …\PCE\Pilot\distribution\VGL7_IPaddress or VGL8_IP-address
where the backup can be stored
2. Open program " @CHIPTOOL "
3. The program scans automatically if comparators are available and then displays all comparators
found
4. With right click, select VGL7 or VGL8
5. Select " FTP "
6. A connecting window opens. The IP address of selected comparator is automatically shown in
Target-IP field
7. Enter " ftp " in User field and password field
8. Choose button " Connect ". Connecting window will close and @CHIPTOOL FTP-Client window is
opened. On the right side, you can find the comparator content. On the left side is displayed the
local folder structure
9. Select the backup path …\PCE\Pilot\distribution\VGL7_IPaddress or VGL8_IPadress) on the left
side
10. Drag complete comparator content ( *.txt, *.bat, *.ini, *.exe ) on the right side to the desired
path on the left side
11. Choose button " disconnect "
9.2 Restore
1. Open program " @CHIPTOOL "
2. The program scans automatically if comparators are available and then displays all comparators
found
3. With right click, select VGL7 or VGL8
4. Select " FTP "
5. A connecting window opens. The IP address of selected comparator is automatically shown in
Target-IP field
6. Enter " ftp " in User field and password field
7. Choose button " Connect ". Connecting window is closed @CHIPTOOL FTP-Client window is
opened. On the right side, you can find the comparator content. On the left side is displayed the
local folder structure
8. Select the path …\PCE\Pilot\distribution\VGL7_IPaddressor or VGL8_IPadress)
9. Select all files ( *.txt, *.bat, *.ini, *.exe ) on the left side and drag these on the right side
(comperator)
10. Choose button " Disconnect "
10 HRC CORE
Applicable for:
•
•
•
HRC AI-CORE
HRC LI-CORE
HRC 360-CORE
10.1 Backup System Information
1. HRC CORE must run
2. Log in HRC CORE with administrator rights
3. Choose the button " Reports "
4. Choose the button " Export "
5. Select the path C:\Printinspection\
6. Choose the button " OK "
A file (Systeminformation.txt) will be stored
10.2 Backup HRC CORE
1. HRC CORE must run
2. Log in HRC CORE with administrator rights
3. Choose the button " Management "
4. Choose the button " Additional Option "
5. Choose the button " Create backup "
6. Choose the button " OK "
A new folder for the backup will be created
(C:\Backup_Printinspection\yyyy_MM_dd_(h;min)_Verison_BackupPrintinspection)
10.3 Restore HRC CORE
1. HRC CORE must be closed
2. Copy C:\Backup_Printinspection\yyyy_MM_dd_(h;min)_Verison_BackupPrintinspection to C:\
3. Rename C:\yyyy_MM_dd_(h;min)_Verison_BackupPrintinspection to C:\Printinspection
HRC CORE
19/23
11 MSSQL Server Database
Requirements:
1. Pilot Suite Database on Microsoft SQL Server 2008 or 2012
2. Microsoft SQL Server Management Studio
3. Connect a keyboard and a mouse to IPC
4. Access to the database
11.1 Backup Database MSSQL
MSSQL Server Database
1. Open Mircrosoft SQL Server Management Studio
2. Select the Server name and choose "Connect"
3. Select the database which should be backed up
4. Right Click onto the database in the tree view and select the context menu entry Tasks – Backup
5. Set the backup options:
- Backup type Full
- Backup component Database
- Select a path where the backup should be stored
- Remove all other path
6. Choose the button " OK ". The backup will be saved to a file in the destination folder.
MSSQL Server Database
21/23
Author: Pharmacontrol Electronic GmbH
No part of this documentation shall be re-produced, transmitted, assigned,
recorded in a data processing system or translated into another language in
any form without prior written consent.