
1
in
I
+
IL
.........
IIII
'
*imr
I
I
IIII
I
II
qll
I
IIIIII
I
II I
III
I
I
II
IIII
III
III
III
I
II
I
I
I
III
+
I
IIIIIIII
III
III
IIIII
II
III
'I
I
I
I
II
II
I
I
I
II
I
l
u
n
i
II
II
III
IIIIII
IIIII
IIII
I
I
I
I
I III
I
I II
I
II
IIIIII
I
III
II I
I IIIIIIIIIII
lJ IIIII
IIII
III
II
I
I I
IIIII
IIIII
II
I
IIII
I II
" ""
I
IIIIIIIIIII
III
IIIIIIII
I IIIIIIII
,nl
II
L
IIII
IIIIII
IIIIII
III
I
I
I
I
I
+
IIIII
II IIIII
I
IIIII
II
E
q
il
M
I
m
m
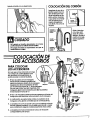
Vacuum Cleaner
0 WNER'SMA NUAL
i
m
m
B
READTHIS MANUAL for important safety,
assembly and operating instructions.
m
i
w
i
A
C_ 1ZAMJ_U_-437_355
------CONTENTS
WARRANTY ..............................
SERVICE .................................
IMPORTANT SAFETYINSTRUCTIONS .......
PARTSAND FEATURES....................
ASSEMBLY ..............................
ATTACHMENT ASSEMBLY.................
3
3
4
5
6-7
7
VACUUM CARE .........................
Bag Changing
.......................
8
How to Start .............................
How to Select Proper Height for Cleaning
Attachments
............................
Attachment
Vacuum
Use Chart
8
...
8
9
....................
Storage ........................
1 I-I 2
Motor SafetyFilter
Cleaning ............... 12
BeltChanging, Brush Changing
and Brush Cleaning ................... 13-15
Cleaning Exterior
and Attachments
LightBulb Changing
USE .......................................
10
........15
..................... 16
Clog Removal ........................... 17
Motor Protector ......................... 17
TROUBLESHOOTING .....................
18
9
10
Proper assembly and safe use of your vacuum cleaner are your responsibilities.
Your cleaner is
intended only for household use. The cleaner should be stored in a dry, indoor area. Read this Owner's
Manual carefully for important use and safety information.
I
NARRANTY
KENMORE VACUUM CLEANER
FULLONE-YEAR WARRANTY
When used for private household purposes, if within
one year from the date of purchase, this vacuum
cleaner
fails due to a defect
in material
or
workmanship,
RETURN IT TO THE NEAREST SEARS
SERVICE CENTER/DEPARTMENTIN THE UNITED STATES,
and Sears will repair it free of charge.
This warranty gives you spedflc legal rights, and you
may also have other rights which vary from state to
state.
SEARS,ROEBUCKAND CO., D1817 WA,
Hoffrnan Estates,IL 60179
If you need service or parts, visit your nearest Sears
Service Center or the Service Department located at
most Sears Retail Stores. They will be able to solve
your problem and supply any needed replacement
parts. Any service needed other than described in
this Owner's Manual should be done by a Sears
authorized service representative.
How to Order Repair Parts
When requesting service or ordering parts, have the
following information available:
I. Model number.
2. Serial number.
3. Description of problem.
4. Part number.
5. Name of part.
English Speaking:
To Call Toll Free For Service:
(I-800-4-REPAJR)
(I-800-473-7247)
To Call Toll Free For Parts:
(I-800-FON-PART)
(I-800-366-7278)
Spanish Speaking:
To Call Toll Free For Service:
(I-800-626-5811
)
To Call Toll Free For Parts:
(I-800-659-7084)
MPORTANT
SAFETYINSTRUCTIONS
°
To reduce the risk of fire, electrical shock, injury to persons or damage
WJcuum cleaner, follow basic safety precautions including the following:
Read thismanual before assembling or using
yourvacuum cleaner.
Use your cleaner only as described
in this
manual. Use only with Sears recommended
attachments.
To reduce the risk
of electrical
shock - Do not
use outdoorsoron wet surfaces.
Disconnect electrical supply before servicing
or cleaning out brush area. Failure to do so
could result in electrical
shock or brush
suddenly starting.
Always turncleaneroffbeforeunplugging.
Do not unplug by pulling on cord. To unplug,
grasp the plug, not the cord.
Do not use with damaged
cord or plug. If
cleaner is not working as it should, has been
dropped, damaged, left outdoors, or dropped
into water, return it to a Sears Service
Center/Department.
Do not pull or carry by cord, use cord as a
handle,
close door on cord,
or pull cord
around sharp edges or corners. Do not run
cleaner
over cord. Keep cord away
from
heated surfaces.
Do not leave cleaner when plugged in.
Unplugfrom outletwhen not inuse and before
servicing.
Do not allow to be used as a toy. Close
attention is necessary when used by or near
children.
Do nothandleplugorcleanerwithwet hands.
when using your
Do not put any objects into openings.
Do not use with any opening blocked; keep
free of dust, lint, hair and anything that may
reduce air flow.
Keep hair, loose clothing, fingers, and all parts
of body away from openings
and moving
parts.
Do not use cleaner without dust bag and/or
filters in place. Always change the dust bag
after vacuuming carpet cleaners or freshener,
powders and fine dust. These products clog
the bag, reduce airflow and can cause the
bag to burst. Failure to change bag could
cause permanent damage to the cleaner.
Do not use the cleaner to pick up sharp hard
objects, small toys, pins, paper, etc. They may
damage the cleaner or dust bag.
Do not pick up anything that
smoking, such as cigarettes,
hot ashes.
is burning
matches,
or
or
Do not use cleaner to pick up flammable
or
combustible liquids (gasoline, cleaning fluids,
perfumes, etc.), or use in areas where they
may be present.
The fumes from these
substances
can create
a fire hazard or
explosion.
Use extra care when cleaning on stairs. Do not
put on chairs, tables, etc. Keep on floor.
You are responsible for making sure that your
vacuum cleaner isnot used by anyone unable
to operate it properly.
SAVETHESE
INSTRUCTIONS
Proper assembly and safe use of your vacuum cleaner are your respon_'bilities.
Yourcleaner is intended only for household use. The cleaner should be stored in a dry, indoor area.
_
Read thisOwner's Manual carefully for important use and safety information.
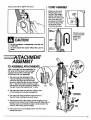
RTSAND FEATURES
UPRIGHTVACUUMCLEANER
It is important to know your vacuum cleaner parts
and features to assure its proper and safe use.
Review these before using your cleaner.
Holder
• Handle
COPY YOUR MODEL AND SERIALNUMBERSHERE.
Copy this information from the bottom of
vacuum cleaner into these spaces. Keep
numbers for future reference. If you need
call with a question, have this information
the
these
service or
ready:
116.
On/Off
Model Number
O.
Sed_ Number
Qulck
Release
(Duet Bag Inaido)
DuM Beg
rJO-S0680
J In Canada
U.S. #2O-5O688
Belt
, Motor Safety
Filter (Inoida
Dust Cowr)
i InU.S,d_4_._'PS
On Canada #20-40096
Foot Rest For
Handle Release
Wand
Lower
Cord Hook
Guard
Handle
Screw
Dust Cover
Relume
Heigl_
Adlu_men¢
Lover
(Some Models)
Dusting
Brush
Headllght
and Lens
(Some
Mode)
Cover
(SucUon Inlet)
Bulb
I In U.S.
Canada
r_240
#20-40600
I
Motor
Serial
Number
Label
Waming
ATTACHMENTS
Tool
w.nd_,
(
Tabs
(SomaModels)
Wand'_f_
(_
J
Dusting Brush
.__
Crevice Tool
Brush
(Some -_
Models)
Combination
S
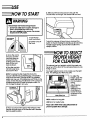
-----ASSEMBLY
HANDLEASSEMBLY
Handle
Screw
Before assembling your vacuum cleaner, be sure you
have all the parts shown in PARTSAND FEATURES.
ElectrtoolShock Hazard
Do not plug Into electrical supply until assembly Is
complete. Fallureto do socould resultIn electrical
shock or Injury.
Back Of
I
VacuumCl'nerll
I
Remove the handle screw located just below the top
edge of the back of the vacuum. See illustration
above.
Position the handle so the cord hooks are toward the
back of the cleaner.
Insert the handle
into the opening at
the top of the
vacuum.
Cord
Align the handle
screw in the hole in
the handle and the
handle screw hole
in the back of the
vacuum.
Handle
Screw
and Hole
Insert the handle
screw so it passes
through the back of
the vacuum into
the handle.
Begin to tighten the screw wfth your fingers. It may
be necessary to adjust the handle slightly.
6
Using a screwdriver,
tighten the screw.
CORDASSEMBLY
Make sure the quick
release upper cord
hook isin the upright
position. Remove the
wire tie from the power
cord. Lock the cord
into place by forcing it
into the Iocldng notch
on the body of the
cord hook as shown.
"_
Locking
I
|
Notch
I
_'_
Upper
Cord
Wrap the power
cord around the
upper and
lower cord
hooks.
DO NOT overtlghten. Overtlghtenlng could strip the
screw holes.
DO NOT operate the cleaner without the screw In
place.
TTACHMENT
ASSEMBLY
TO ASSEMBLEATTACHMENTS
After the handle has been assembled to
the body and the power cord has been
wrapped around the cord hooks, the
attachments can be assembled.
I. The wand can be attached to the
hose by inserting
the smallend of the
wand intothe open end ofthe hose.
Be sureto alignthe tabs on thewand with
the "J*slots
inthe hose.Once the wand is
insertedintothe hose itshouldbe twistedto
the rightto lockthe tabsintothe "J*slots.
H_
support
2. The wand and hose can then be routed in front
of the handle and over the hose support.
3. The wand can then be placed over the end of
the short hose, twisting as you push down.
4. The second wand, without tabs, (some models) can be
placed in the holder in front of the wand with tabs and the
dusting brush or combination brush can be stored in the
wand or the holder, (some models).
5. The crevicetoolcan be slippeddown intothe holder
beside the wand.
DuwUngBrush
(Some Models)
Short
TOSTART
6. With your left hand reach down and push the
On/Oft switch to the right. The cleaner will now start.
PersonalInjuryand ProductDamage Hazard
• DO NOTuse outletsabove counter& Damage to
Items In surroundIng area could occur.
• Usecare In plugging In the vacuum. Thevacuum
shouldbe In the OFFposition.
Quick Release
I.Turnthetop
cord hook down.
2. Pull the cord off
the hook.
3.Once the cord is
removed, lockthe
cord intoplace by
forcingitintothe
lockingnotch on the
body ofthe cord
hook as shown.
4.Plugthe cord into
120 Voltoutletlocated near the floor.
Locldng
Notch
Powor
Cord
NOTE: To reduce the riskof electric shock, this
vacuum cleaner has a polarized plug, one blade is
wider than the other. Thisplug will fit in a polarized
outlet only one way. If the plug does not fit fully in the
outlet, reverse the plug. If it stilldoes not fit, contact a
qualified electridan to install the proper outlet. Do
not change the plug in any way.
To shut the cleaner off reach down and push the
switch to the left. Raising the handle up will catch the
handle support spring and hold the handle in the
upright position.
WTOSELECT
PROPER
HEIGHT
FORCLEANING
This cleaner has two heights in which the nozzle can
be set up oft the floor for the various surfaces you are
trying to clean.
The height adjust knob is on the nozzle over the light
lens. The settings are" HIGH and LOW.
To adjust the
height, grasp the
knob and move
it to the desired
setting.
Handle Release
Height Adjust
Knob
Adjust cleaner
heights by
referring to the
chart below to
match the type
of surface to be
cleaned.
HIGH: medium to long pile.
LOW: short or medium pile.
5. Place your foot on the pad at the left rear of the
cleaner and pull back on the handle until it releases
from its upright position.
Place unit in HIGH when using attachments to
prevent possible floor damage.
TTACHMENTS
TOUSEATTACHMENTS
CAUTION
When uslng attachments, be careful not to
overextend the hose length when reachlng. Trylng
to reach beyond the hose reach could cause the
cleaner to tip over.
Persor_l Ir_uryHazard
DO NOT place hands or feet underneath the unltwhen
Inserting the hose. When uslng the attachments, the
agitator begins rotating. Do not allow the cleaner to
remaln In Justone place for a perlod of time, as lhe
agltator may damage the floor surface. Avold
placlng the cleaner on fumlture, the frlnged area of
rugs, deep plle carpeting, or carpeted stalrs. The
Ideal posltionfor the cleaner when uslng attachments
Isfor the unlt to be on a level area wlth the handle In
the FULLUPRIGHT
posltion.
ON SOME MODELS:
An extra wand, without tabs, is included. Thisextra
wand can be added to the wand with tabs for extra
reach. Insert wand and twist a quarter of a turn to
secure fit.
If the dusting brush or combination brush is being
used and more distance isneeded the crevice tool
can be added to the wand then the dusting brush or
combination brush can be added to the crevice
tool. The combination brush can be converted to an
upholstery tool by sliding the brush out of the tool.
Place the cleaner on a fiat surface, and move the
height adjustment to HIGH.
The attachments will fit on the hose or the wand. In
addition the dusting brush or combination brush will
also fit on the crevice tool.
The hose and wand can be pulled off the short hose
by grasping the cuff and twisting while pulling up.
Dusting Brumh
_3ome Models)
Crevice Tool
Brush
Wand
Combination
Brush (Some
Rod_)
TO STOREATTACHMENTS
The attachments can be added to the hose if the
item to be cleaned is not far from the cleaner.
hose will expand.
Return the hose and wand to its position on the short
hose and the attachments to their holders.
NOTE: When cleaner isturned on, the hose will have
a tendency to collapse due to suction of the
cleaner.
If more reach is needed the wand can be attached
to the hose and the attachments can be added to
the wand.
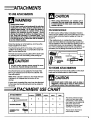
TTACHMENT
A'I-rACHM
ENT
CREVICE TOOL
I k--
USECHART
Furniture*
Between
Cushions*
Drapes*
Stairs
Walls
X
X
X
x
x
X
X
X
j'
DUSTING BRUSH
COMBINATION
BRUSH
X
X
"Themotorprotector
by-pass
valvemay open when using
attachments
orwhen cleaning
new carpet,
due toreducedair
flowby theattachments
themselves
orby new carpet
fuzz
fllllng
thebag quickly.
*Always clean attachments
before using on fabrics.
CUUM STORAGE
Handle
Quick
Release
Cord Hook
Gather the cord
and wrap it loosely
around the upper
and lower cord
hooks.
Store the cleaner
in a dry, indoor
area, on the floor
with the handle
locked in the
upright position.
ElectricalShock and PersonalInjuryHazard
Wrappingthe cord foo tightlyputs sffesson the cord
and can cause cord damage. A damaged cord Is
an electrlcal shock hazard and could cause
personalInjuryor damage.
Power
Cord
CUUM CARE
ALWAYS FOLLOW ALL SAFETY
PRECAUTIONS WHEN CLEANING AND
SERVICING THE VACUUM CLEANER.
ElectricalShock Or PersonalInJmyHazard
Disconnect electrical supply before servicing or
cleaning the unit. Failure to do so could result In
electrical shock or personal Injury from cleaner
suddan_start_g.
I0
CHANGING
TOREMOVEBAG:
Dumt Cover
Relea_
Unplug electncal
cord. Squeeze the
dust cover release
and pull forward
on the top of the
dust cover to
remove the cover.
NEVERREUSEA DUSTBAG. Very fine materials, such
as carpet frashener,face powder, fine dust,plaster,
soot, etc. can clog the bag and cause It to burst
before It Is full. Change bag more often when
vocuumlng thesemateflals.
Check the dirt tube
and the motor
safety filter.
If either is blocked,
check the
TROUBLESHOOTING
chart.
Lay cover
aside.
DuRt Bag
Cover
TOREPLACE
BAG:
DuM Bag
Grasp the dust
bag collar and
pull gently, carefully
removing the
dust bag.
Fold the safety
seal tab on the
new dust bag
away from the
opening that fits
on the dirt tube.
NOTE: See PARTS
AND FEATURESfor
Dust Bag #.
Unfold the new
dust bag.
Throw away the
used dust bag. DO
NOT muse.
Insert the dust bag
onto the dirt tube
completely by
holding the bag
collar and pushing it
onto the dirt tube.
!!
Position the
dust bag
cover so its
positioning
tab fits into
the body
positioning
slot.
MOTOR
SAFETYFILTER
CLEANING
Check the motor filter frequently
Bag Cowr
and clean when
dir .
Electrical ShockHazard
Do not operate the cleaner without the motor safety
filter. Be sure the filterIs dry and properly Installedto
prevent motor fallure and/or elecfflcal shock
Close the bag
cover.
DUM Bag
Cover
You will hear a
distinct snap
when cover is
securely closed.
Squeeze the latch
and pull forward
on the top of the
dust cover to
remove the cover.
DUBt Cover
Release
Remove the dust
bag.
If the filter, located in the bottom of the dust cover
cavity, Isdirty, remove it by pulling forward out from
under the ribs.
Wash the foam filter in warm soapy water, rinse and
dry thoroughly by squeezing the filter in your hand
and letting it air dry.
DO NOT wash in the dishwasher.
DO NOT install damp.
Replace the foam filter by sliding it back into place
under the ribs in the dust cover cavity.
12
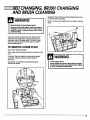
CHANGING,BRUSHCHANGING
AND BRUSHCLEANING
Grasp the clipsat the back and pullforward and up
to remove the lowerplate.
Brushor remove any residue that may exist in the belt
area.
ElecMcalShock Or Persona/Injury Hazard
Dlsconnect electrlcal supply before servlclng or
cleanlng the unlt. Fallure to do so could result In
electrical shock or personal Injury from cleaner
sudden/ystarting.
Clll_
Frequently check and remove hair, string and lint
build-up in the brush area. If build-up becomes
excessive, follow the steps below. Should the belt
become loose or should it break, follow the Belt
Removal instructions.
TO REMOVELOWERPLATE:
Disconnect electrical supply.
The handle must be lowered and the cleaner turned
over.
To protect the floor surface, always place paper
under the nozzle any time the lower plate is
removed.
Releasethelower plateby pushing thetabs in
toward the center.
Pe_onal InjuryHazard
Always unplug the vacuum cleaner before cleaning
the brusharea as brushmay suddenlyrestart.Failure
to do so can resultIn personalInjury.
13
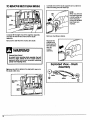
TO REMOVEBELT/CLEAN
BRUSH:
Carefully remove the brush supports and washers to
check for string and hair build-up.
NOTE:
When you remove
the brush supports,
a small washer on
each end may
come off. DO NOT
lose these two
washers.
Carefully lift the right end of the agitator assembly
and then lift the left end. Remove the brush
assembly.
Remove the belt from the motor drive shaft.
Remove any string or debris.
Replace the
washers and
brush supports.
See exploded
view for
correct
assembly.
PersonalInjuryHazard
Be careful when removing blush assembly, the be#
tension Is high. Failure to do so could result In
personal Injury from brush assembly releasing
quickly and mapping away.
Exploded View- Brush
Assembly
Remove any dirt or debris in the belt path area or in
the brush roller area.
c_
14
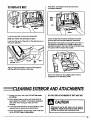
TO REPLACE
BELT:
Pressfirmly, checking to see that each end is
completely inserted.
$/mft
Ben
Be#
Motor Dr/ve
Shift
Loop the new belt on the motor drive shaft.
NOTE: See PARTSAND FEATURESfor Belt #.
Loop the other end of the belt on the belt groove on
the brush assembly.
Check to see that the belt iscentered in the belt
groove and that the bnJsh assembly turns freely.
Reinstall the lower plate by placing the front tabs on
the plate into the slots on the nozzle housing and
pushing the plate to the rear until the back clips snap
into place. Pull the tabs to the outside.
\
Align the square extension on each brush support
with the slots
in the flame of the base.
\
Returnthe cleanertothe uprightposition
before
pluggingIntothe elecJTlcal
outlet.
-----CLEANING EXTERIOR
ANDATTACHMENTS
I. Unplug cord from wall outlet. DO NOT drip water
on cleaner.
DO NOT USE ATTACHMENTS IF THEY ARE WET.
2. Clean exterior using a clean, soft cloth that has
been dipped in a solution of mild liquid detergent
and water, then wrung dry. Wipe dry after
cleaning.
3. To reduce static electricity and dust build-up, wipe
outer surface of cleaner and attachments.
4. Wash attachments in warm soapy water, rinse and
air dry. DO NOT clean in dishwasher.
Attachments used In dirty areas, such as under a
refrigerator, should not be used on other surfaces
until they are washed.They could leave marks.
15
BULBCHANGING
SOME MODELS
WARNING
ElectricalShock OrPersoncdInjuryHazard
Dlsconnecf electrical supply before servlclng or
cleanlng the unlt. Fallure to do so could result In
electrical shock or personal Inlury from cleaner
suddenly startin_
Disconnect electrical
supply.
The handle must be pulled down
turned over,
Bulb HouRing
and the cleaner
Release the lower plate by pushing the tabs in
toward the center.
With the bulb housing loose the bulb can be
removed by pushing in and twisting it
counterclockwise.
The new bulb can be placed in
the socket. Une up the post on the bulb with the slots
in the socket and while pushing the bulb into the
socket, twist the bulb clockwise.
NOTE: See PARTSAND FEATURESfor Bulb #.
Replace
the llght bulb wlth the same or smaller
wattage slze to prevent damage to surroundlng
pare.
Reinsert the bulb housing onto the flange by pushing
down.
Grasp the clips at the back and pull forward and up
to remove the lower plate.
With the lower plate off the bulb housing can be
pulled off the flange it is mounted to by wiggling the
socket back and forth.
16
Reinstall the lower plate by placing the front tabs on
the plate into the slots on the nozzle housing and
pushing the plate to the rear until the back clips snap
into place. Push the tabs to the outside.
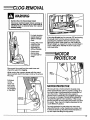
LOG REMOVAL
ElectricalShock Or PersonalInjuryHazard
Dlsconnect electrical supply before servlclng or
cleanlng the unlt. Fallure to do so could result In
electrlcal shock or personal Injury from cleaner
suddenlystafllng.
For best cleaning
results, keep the
airflow passage
clear.
Unplug the power
cord from the
outlet before
checking the
airflow passage.
Check each
starred area
occasionally for
clogs.
Nozzle Hose
If the clog stillexiststurn the vacuum OFF and unplug
the power cord. Turn the vacuum cleaner over,
exposing the underside. Remove the lower plate.
Remove the short nozzle hose from the housing by
lifting it straight up. Inspect the hose end and clear it
of any obstructions. Reinstall the short nozzle hose
and lower plate.
E vIOTOR
PROTECTOR
Disconnect the wand from the nozzle hose and
check the wand for dogging.
While running the vacuum cleaner with the wand
disconnected, stretch the hose in and out to remove
the clog.
Pull down
on the
clean-out
port cover
and check
for dogging
in this area.
Motor
Protector
MOTOR PROTECTOR
This vacuum has a motor protector by-pass valve
which automatically
opens to provide cooling air to
the motor when a clog prevents the normal flow of
air to the motor. If the by-pass valve opens to
prevent motor overheating and possible damage to
the vacuum, a change of sound will be noticed as
airrushesthrough the valveopening. Ifthis
occurs,
turnthe vacuum offand unplug the power cord from
the outlet.Then check forclogsas describedinthe
CLOG REMOVAL section.
The motor protector by-pass valve may open when
usingattachments or when cleaning new carpet, due
to reduced air flow by the attachments themselves or
by new carpet fuzz filling the bag quickly.
17
--=--TROUBLESHOOTING
Review this chart to find do-it-yourself solutions for minor performance
problems.
Electrical Shock Or Personal Injury Hazard
Disconnect electrical supply before servicing or cleaning the unit. Failure to do so could result
in electrical shock or personal injury from cleaner suddenly starling.
ld o)
I
Cleaner won't run.
Poor job of did pick-up.
18
!.
Unplugged at wall outlet.
!.
Rug in firmly, push On/Off switch
to ON.
2.
Tripped circuit breaker/blown
fuse at household service panel.
2.
Reset circuit breaker or replace
fuse.
3.
On/Off switch not turned ON.
3.
PushOn/Off switch to ON.
I. Full
orclogged dustbag.
i.
Change bag, [pages 11, 12).
2. Wrong pileheightsefling.
3. Worn brush.
2.
Adjust setting, (page 8).
3.
Replace brush, (pages 13-15").
4.
Clogged nozzle hose.
4.
Clean nozzle hose, (page 17).
5.
6.
Clogged hose or wand.
Hole in hose.
5.
Clean hose, (page 17).
6.
Replace hose.
7.
Brokenbelt.
7.
Replace belt, (pages 13-15).
8.
Hose or wand not inserted fully.
8. Insert
hose orwand, (page 7).
9.
Crevice tool left on wand.
9. Remove wand and properly
store,
(page 7).
Bumecl out light bulb.
I.
Change light
bulb,(page 16).
Ught won't work.
,
Dust escapes lhe
paper bag.
i.
Check for proper installation
of bag.
I. Check instructions,
(pages 11,12).
2.
Bag torn.
2. Replace bag, (pages I1,12).
3.
Bag cover improperly ir'_talled.
3. Check instructions,
(,pages1I,12).
Air flow restricted
with attachment use.
I.
Attachment
air flow.
I. Check useinstructions,
(page 9).
Sound changes.
2.
New carpet fuzz clogged air path.
use restricts
2. Check instructions
and cleanhose,
(page 17).
I
I .........
III
I
I
I
I
W
I
..................
II
'It
II
IIII
III
I I
I
I
JlJ
I
I
UJ
i
.....
III
.....
I
•
JJ..
I
I
II
J ...............................
I
IIIII
II
I
IIIII
I II II
i
.
I
i
II
i
i
.
I
JUI
I
III
I
'1
I
P
j]_
IJIIIII
I
I
.....................
I
I
I
I
II
I
1 IIIII
I
IIIIIII
II
l lllllll
I
II
............
II1.1111
I
J
IIIII
I
i
IIII
I
III III
I
II
I
II
i
.L.,,,,
......
J Ill ...........................
IIIIr
_ .JJJJJ
............
Aspiradora
MANUAL DELPROPIETARIO
III
II
Ill
Ul
II
LEAESTEMANUAL para enterarse de instrucciones importantes
acerca de la seguridad, armado y funcionamiento.
II
nl
III
!m
IS
C_1ZAMJO_U_-437_355
DE CONTENIDO
GARANT[A .................................
3
SERVICIO ..................................
3
INSTRUCCIONESIMPORTANTESDE
SEGURIDAD ................................
4
PIEZASY CARACTER|STICAS................
5
ARMADO .................................
6-7
COLOCACI6N DE LOSACCESORIOS .......
7
USO........................................
Para comenzar
............................
8
8
C6mo seleccionar la altura adecuada
para aspirar
............................
Accesorios
................................
8
9
Cuadro de uso de los accesorios .............
9
Almacenamiento de laospiradora ..........I0
CUIDADO DE LA ASPIRADORA ............
Cambio de la bolsa .....................
10
11-12
Umpieza del filtro de seguridad del motor .....
12
Cambio de la correa, cambio del cepillo
y limpieza del cepillo ....................
13-I 5
Umpieza del exterior y de los accesorios ......
Cambio de la bombilla
....................
15
16
C6mo eliminar los residuos de basura en los
conductos ...............................
Protector de motor .........................
17
17
RECONOCIMIENTO
DE PROBLEMAS .......
18
!
El armado y u$o seguro de su aspiradora son su responsabilidad.
Esta aspiradora ha $ido dise_ada l
exclu$1vamente para u$o dom6stico. La aspiradora deber6 a/macencrse en tin lugar seco yen el interior. Lea
este Manual del propietario detenidamente, pues cantiene informaci6n importante sobre seguridad y uso.
I
RANT[A
ASPIRADORA KENMORE
GARANTIA COMPLETA
PORUN ANO
Mientras su uso se limite a fines dom_sticos particulares, si esta aspiradora falla dentro de un peffodo de
un a_o a partir de la fecha de compra, por razones
de defectos
en materlales
o mano de obra,
DEVU_LVALA AL CENTRO 0 DEPARTAMENTO DE
SERVlCIO DE SEARS MAS CERCANO y Sears la
reparar6 sin ning_Jn cargo.
Esta garantra
le confiere
derechos
legales
especificos
y adem6s
puede
que tenga
otros
derechos que difieren entre estados.
SEARS,ROEBUCKAND CO., D/817 WA,
Hoffrnan Estates, IL 60179
VICIO
Sinecesita servicio o piezos, vis'n_eel Centro de se_icio
de Sears m6s cercano o el Departamento de servicio
ubicado en la mayor'K_ de los flendas Sears.Dicho
departamento solucionar(_ suproblema y le facilitar6
cualquier repuesto necesario. Cualquler servicio
requerido adem6s de los que se describen en este
Manual del propietario deber(_ ser realizado por un
representante de servicio autorlzado por Sears.
C6mo pedir repuestos:
Cuando solicite servicio o pida repuestos, tenga
clisponible la siguiente informaci6n:
1. N_mero de modelo.
2. N0mero de serie.
3. Descripci6n del problema.
4. N0mero de la pieza.
5. Nombre de la pieza.
Para hablar en ingl6s:
Uame gratis para solicitar servicioal: (1-80G4-REPAIR)
(I-800-473-7247)
Uame gratispara solicitar piezas al: (1-800-FON-PART)
(I-800-366-7278)
Para hablar en espa_ol:
Uame gratispara solicitarservicio al: (I-800-626-581 I)
l.lame gratispara soUcitarpiezas al: (I-800-659-7084)
NSIRUCaONES IMPORTANTES
DESEGUPJDAD
Para reducir el riesgo de incendio, choque el_ctrico, lesi6n corporal o dafios al utilizar su
aspiradora, act_e de acuerdo con precaucione$ b6$ica$ de seguridad, entre ellas:
Lea este manual
antes
de armar
o utilizar su
aspiradora.
Use su aspiradora
_nicamente
en la forma
descrita en este manual. Use Linicamente
con
accesorios recomendados
par Sears.
Para reducir el riesgo de choque
el@ctrico, no
use su aspiradora al c_re libre ni sabre superficies
mojadas.
Desconecte
el cord6n
el(_ctrico
antes de
componer
o limpiar el 6rea del cepillo. De Io
contrario,
el cepillo podria arrancar de forma
imprevista o podffa producirse un choque el@ctrlco.
Siempre debe apagar su aspiradora
desconectarla.
antes de
No desconecte
la aspiradora
tirando del
cord6n el(_ctrico. Para desconectarla,
hale el
enchufe, no el cord6n.
No toque laaspiradoranielenchufe con las
manos mojadas.
No coloque objetosen lasaberturas.
No utilice
laasplradorasialguna aberturaest6
bloqueada; mant@ngala libre
de polvo,pelusa,
cabellosy cualquieracosa que podffadisminuir
elflujo
de aire.
Mantenga
el cabello,
ropa
todas las partes del cuerpo
aberturas y piezas mec(_nicas.
suelta,
dedos y
alejados
de las
No use la aspiradora sin tenet instalada la balsa
para polvo y/o los filtros. Cambie
siempre la
balsa para polvo despu(_s de aspirar limpiadores
de alfombras
o desodorantes,
talcos y polvos
finos. Estos productos atascan la balsa, reducen
el flujo de aire y pueden causar que @sta se
rompa. Si no cambia la balsa podffa ocasionar
dafio permanente
a la aspiradora.
No use la aspiradora si el cord6n o el enchufe
est(_ dafiado.
Si la aspiradora
no est(_
funcionando
adecuadamente
o si se ha
dejado
caer, est6 dafiada,
se ha dejado
expuesta a la intemperie o se ha dejado caer
en
agua,
devu_lvala
a
un
Centro/
Departamento
de servicio de Sears.
No use la aspiradora para levantar objetos agudos, juguetes pequeflos,
alfileres, papel, etc.
Podffan dafiar la aspiradora
o la balsa para
No hale nltransporte la aspiradora par el
cord6n; no useelcord6n coma mango; no cierrepuertassabreelcord6n,no haleelcord6n
sabre rebordesagudos nlesquinas.No pase la
aspiradorasabre elcord6n.Mantenga elcord6n alejadode superficies
calientes.
No use la aspJradora
para aspirar I_quidos
inflamables
0
combustibles
(gasolina,
Irquidospara limpieza, perfumes, etc.) ni la use
en lugares donde @sfos podffan estar presentes.
Los vapores de estas sustancias pueden
crear
un peligro de incendio 0 explosi6n.
No abandone
la aspiradora
cuando
est(_
conectada.
Descon6ctela cuando no la est_
usando y antes de darle servicio.
Tenga cuidado especial al utilizar la aspiradora
en escalones. No la coloque sobre sillas, mesas,
etc. Mant@ngala en el piso.
No permitaque sea utUizadacoma juguete.Se
requieretener mayor cuidado cuando sea
utilizacla
en laproximidadde nifios
o parnifios.
Usted es responsable
de asegurar que su aspiradora no sea utili7ada por ninguna persona que
no pueda manejarla correctamente.
polvo.
No levante ninguna cosa que se est_
quemando o emitiendohumo, coma cigarrillos,
cerillos
o cenizascalientes.
GUARDEESTASINSTRUCCION
El armada y usa seguro de su asl_radora son su responsabilidad. Esta aspiradora ha sido dise_ada
exclusivamente para usa dom6stico. La aspiradora deber6 almacenarse en un lugar seco y en el interior.
Lea este Manual del propietario detenidamente, pues confiene informacidn importante sabre seguridad y usa.
4
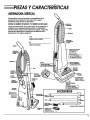
Y CARACTER{STICAS
ASPIRADORAVERTICAL
Esimportante conocer las piezas y caracte_sticas de su
aspiradora para asegurar su uso adecuado y seguro.
Examrnelasantes de usarsuaspiradora.
ESCRIBAELNIJMERODEMODELOY ELNI_MERODE SERIEAQU|.
de
la manguora
Copie estainformaci6nde laparteinferior
de laaspiradoray
escn'bala
en losespaciosproporcionadosa confinuaci6n.
Conserve estosnGmeros parareferencia
posterior.
Tenga esta
informaci6ndisponible
sisuaspiradoranecesitaserviclo
o
desea llamarcon algunapregunta:
Mango
116.
N0mero de modelo
Interruptor
.
apagado
N_Jmero de serie
Cublerla para el polvo
(Bolsa para polvo
en el Interior)
SuJetador y
Iiberador del
cor_6n
Bolsa para polvo
CanadL
I_ 20-50680
I En EUA
Nf 20"S06881
Filtro de sogurldad
del motor (Dontro de
IJ cub_ra I_rm polvo)
Pedal para
Ilberacl_
del mango
Tubo
Suj_rador
inferior del
cord(m
TomUlo
del mango
Cublertm
(Abertura de
Llberador
de Imcublerta
l_ra el polvo
de mubl_
Accionador para
xjuste de altura
(Algunos modeloe)
Cepillo para
macudlr
Luz y lente
(Algunos modeloe)
BombUla
CanadL
N g 20.40600
I En
En EUA
N 220-5240
Protector
de motor.
I
_
!
ACCESORIOS
Etiqueta con el
nbmero de Nrlo
_lp_mSin
para hendidur
(Algunos
_as
modelos)
((
ncudir
(Algunos
modelos)
U_Herramlenta para hendidurae
Cepillo panl---_
corta
Combinaclbn
(Algunos modelos]
5
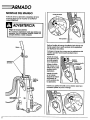
ARMADO
MONTAJE DELMANGO
Tornlllo del mango
Antesde armar suaspiradora,
asegt_rese
de tener
todaslaspiezasque se muestranen laPIEZASY
CARACTER_ICAS.
Pellgro de choque el6ctrlco
No conecte IClasplradora hasta ClUe termlne de
armarla.
De Io contrarlo
podr{a
causar
un
choque el_ctrlco o lesl6n corporal.
Parte
Quiteeltornillo
delmango localizado
justodebajo del
borde superior
de laporteposterior
de laaspiradora
(verllustraci6n
de arriba).
Coloque elmango de manera que lossujetadores
del
cord(T)n
apunten hacia laporteposterior
de la
asplradora.
Inserte
elmango
en laaberturade
laparte superior
de laaspiradora.
Alineeelorificio
delmango con el
orificio
de laparte
posterior
de la
aspiradora.
Tornlllo y
orlficio del
mango
_Q
________.
delsujetad°r
cord6n
o.. oma
,oOm,,,o
,
Inserte
eltornillo
en elmango
despu(_sde haber
atravesado la
parteposterior
de
laaspiradora.
Empiece a apretareltornillo
con losdedos.Quizc_sea
necesarioajustar
un poco elmango.
J
6
Pane
de la aeplradora
_)
Aprieteeltornillo
con un desarmador.
COLOCACION DELCORDON
Aseg0resede que elsujetadorsuperior
delcord6n de liberaci6n
r6pida se encuenJTeen posicibnverlical.
Fu6rcelo
a que entreen lahendidura localizada
en el
cuerpo delsujetador
para fljarlo,
talcomo se
muesJra.
luperior
cord6n
NO aprlete el tornlllo demaslado; sl Io hace
podr[a eslTopear los orlgclosde los tom#los.
NO haga funclonar la asplradora sln que el
tomlllo est_ en su lugar.
Quiteelalambre
con elque est6
atado elcordbn
el_ctrico.
Enrolle
el
cord6nen los sujetadoressuperior
e
inferior.
del
Inferior del
€ord6n
7,OLOCACIbN
DE
LOSACCESORIOS
Rinur&
in forma
de "J,
PARACOLOCAR
LOSACCESORIOS
Una vez que se haya colocado el mango
a la unidad y el cordbn el_ctrico haya
sido enrollado en lossujetadores, se
podr6 proceder a colocar los piezas.
Eltubose puede unir
a lamanguera
introduciendo
elextremopequefiodel
Soporte de
mismo en elexJremoabiertode lamanguera.
la mlnguem
Aseg_resede alinear
laspestafias
deltubo
M:,,gu,r,
con losranurasen forma de "J"de lamanguera.
Una vezque eltubo haya sidoinsertado
en la
manguera, g[relo
hacialaderecha para fijar
laspestafias
en lasranurasen forma de "J'.
I=
.
El tubo y la manguera pueden entonces pasarse por el ffente del
mango para que descansen sobre el soporte de la manguera.
,
A confinuaci6n,
se puede meter eltubo en elextremode la
manguera corta,girandoa medida que se va introduciendo.
,
La boquilla
para polvose puede colocaren elsujetador
alfrente
deltubo (algunosmodelos),con elcepillo
para sacudiro cepillo
para combinacibn (algunosmodelos)apuntando haciaarriba.
5. La boquilla para huecos reducidos se coloca en el soporte
correspondiente junto al tubo.
Pesla_a
Tubo
Ceplllo para eacudir
(Algunom modelos)
Herramlenta
para hendiduru
Manguera
corta
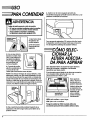
COMENZAR
6. Oprima con la mano izquierda el bot6n de
encendido/apagado
(OnlOff) hacia la derecha. La aspiradora comenzar6 a funcionar.
Pellgro de lesl6n personal y dafio al pmducto
• NO uselos enchufes locallzadossobm losmuebles.
LosobJetoscercanos podr[an resultclrda_ados.
• Tenga culdado al enchufarla asplradora.
La asplradora debera estarapagada (OFF].
SuJetador superior
de Ilbera©i6n
n_pida del cord6n
I.Girehaciaabajo
elsujetador
del
cord6n superior.
2. Tiredel cord6n
para sacario del
sujetador.
3. Una vez que hay(] liberado el cord6n, fu(_rcelo a que entre en la
hendidura Iocalizada
en el cueq3o del sujetador para fijarlo, tal
como semuestra.
4.Conecte elcord6n
el_ctrico
polarizado
en
un enchufe de 120
volflos
que se encuentrecerca delpiso.
NOTA: Para reducir
elriesgode choque eI(_CJTiCO,
esta
aspiradoracuenta con una clavija
polarizada,
uno de
loscontactoses m6s ancho que eloJro.La clavija
s61o
puede introducirse
de una manera en elenchufe.Sila
clavija
no cabe bienen elenchufe,invi_rtala.
Siaen no
cabe, llamea un electricista
para que instale
un enchufe
correcto.
No alterelaclavijo
de ningunamanera.
Para apagar laaspiradoraOFF oprima elbot6n hacia
laizquierda.
Levanteelmango hasta que elmecanismo de soporteIosostengaen posici6nvertical.
SELECCIONARLA
ALTURA
ADECUADA PARAASPIRAR
Esta aspiradora fiene dos posiclones para ajustar la
altura de la boquila y adaptaria alas diversas
superficiesque desee aspirar.
El accionaclor para el ajuste de la altura se encuentra
en la boquila arriba del lente de la luz. Las
graduaciones son: HIGH y LOW.
Para ajustar
la
altura,
mueva el
accionador a la
poslci6ndeseada.
Acc/onador pars
ajuste de altura
Ajuste la altura de
su aspiradora de
acuerdo al flpo de
superficie que
vaya a aspirar,
usando la tabla
continuaci6n:
HIGH: pelo mediano o poco largo.
LOW: pelo corto o mediano.
5. Piseel pedal de la parte posterior izquierda de su
aspiradora y fire del mango hasta que se libere de su
posici6n vertical.
Ponga la unidad en HIGH cuando utilice los
accesodos para prevenir posibles da_os al piso.
CCESORIOS
COMO UTILIZAR
LOS
Pollgrode lesl6n personaL
No ponga los manos o los p/os debaJo de la m6qulno
cuando a_ade la maguora. Mlontras se usan los
accesorlos,la agltadora ernploza a glr_. No deJoque
la asplradora so quode on un s61o lugar pot un
perlodo oxtendldo, porque la agltadora puede hacor
dafio a la supenfclo del suelo. No ponga la asplradora
enclma de muobles, on el fleco de la alfombra, on
una alfombra de polo largo, nl on escaleras
alfombradas. La poslcl6n Ideal para la asplradora
cuando se usan los occesorlosost_ en un _rea plana
con el mango on la poslcldnvortical
EN ALGUNOS MODELOS:
Se incluye un tubo extra, sinpestafias, para un mayor
alcance. Eltubo extra se puede conectar al tubo con
pesta_s par(] lograr un mayor alcance. Introduzca el
lubo y d@leun cuarto de vuelta para asegurarlo.
Siufiliza el cepillo para polvo y necesita n_s alcance,
puede conectar la boquilla para huecos reducidos al
tubo y el cepillo para polvo en la boquiUa para huecos
reducidos.
ACCESORIOS
Coloque la aspiradora en una superficie piano y ponga
el graduador de altura en HIGH.
Losaccesorios podr6n colocarse en la manguera o en
el tubo. Adem6s, el cepillo para polvo tambi(_n podr6
colocarse en la boquillo para huecos reducidos.
_let_
Ceplllo I_mm ncudir
hendidunm
para
Ceplllo
Tubo
(Algunosmodllol)
Ceplllo palm
Combinaclim
(Algunol modeloe)
La manguera y el lubo pueden sacarse de la manguera
corta torn6ndolos por el extremo y flrando hacia affiba.
ALMACENAJE
DELOSACCESORIOS
Vuelva a porter la manguera y el tubo en suposici6n en
la manguera coda y los accesorios en sussujetadores.
Losaccesoriosse pueden conectar a larnangueraslel
objetoque se desea limpiar
no est6lejos
de la
aspiradora.
La manguera se expandir(_.
NOTA: Cuando laaspiradora
est@prendida,la
manguera tender6 a caersedebido a lasucci6nde la
aspiradora.
Aseg_rose de Bmplarlos accesorlosdespu6s de utlllzarlos on 6roas suclas (dobalo del refrlgerador)
antes de usarlosen ofrossupenlclos,ya que podr[an
deJarmarcas.
Sidesea m6s extensi6n,
puede conectareltubo a la
manguera y losaccesorios
altubo.
DEUSODELOSACCESORIOS
ACCESORIO
Herramienta para hendiduru
_p-
Muebl_*
Entre
©ojinu*
X
X
X
Escalones
Paredes
X
X
J
Cepillo para sacudir
X
Cepi.llppara
comDmacion
X
X
X
X
*Lav61vula
de desvlacl6n
puede
estar
ablerta
mlentras
seusanlos
accesorlos
o parallmplar
una
affombranuevaa causade un
fluJo
reducldo
de alre
porlos
accesorlos
mlsmoso porlapelusa
de laalfombra
que llene
labolsa
rapldamente.
*Slempre
llmple
losaccesoflos
antesde usarsobretelas.
ALMACENAMIENTO
Mango
SuJetador y
lberador del
cord6n
Recoja el cord6n y
enrr_lelo en los
sujetadores superior
e inferior,sin que
quede muy
apretado.
Guarde la
aspiradora
bajo
techo en un lugar
seco,con elmango
en posici6n
vertical.
DELAASPIRADORA
Pellgrode descargas el6ctrlcas y de leslones
pelsonales.
S/enro//a el cord6n muy apretado puede tensarlo
mucho y causarle dafJos.De dai_arse, el cord6n
podr[a causar descargas el6ctrlcas y leslones o
da_s personales.
Cord6n
el_'trlco
UIDADO
DELAASPIRADORA
SIGA SIEMPRETODASLASINSTRUCCIONES
DESEGURIDADALLIMPIARY DARLE
SERVICIOA SUASPIRADORA.
Pellglo de descorgos el6clrlcas y de leslones
penonales.
Desenchufe la unldad antes de darle servlclo o de
llmplarla. SI no Io hace, la asplradora podr[a
prenderse repentlnamente y causar descargas
el6clrlcas o leslonespersonales.
10
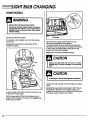
AMBIO DELA BOLSA
PARAQUITARLA BOLSA:
NUNCA
L/berador
de la cublerta
para polvo
Desconecte el cord6n el6clfico.
Apriete el 1,3erador
de la cubierta par(]
polvo y tire hacia
adelante de la
parte superior de la
cubierta para
quitarla.
REUTILICE UNA BOLSA PARA POLVO. Los
materlale$ mw flnos,tales como desodorantespara
alfombras, talco facial, polvo flno, yeso, holl[n,
pelusa de alfombrm nuevas, etc., pueden atascar
la bolsa y causar que se rompa antes de que est_
ller_ Camble la boba rods seguldo cuando aspire
este tlpo de moterlales.
Revise el tubo de
basura y el tiltro de
seguridad del motor.
Tubo de
Siestuvieran
bloqueados,
consulte la tabla de
RECONOCIMIENTO
DE PROBLEMAS.
_gur/dad
Ponga la cubierta
a un lado.
Cub/otto
de/a ho/_
/ram polvo
PARACAMBIAR LA BOLSA:
Bolsa p_
polvo
Tome la bolsa para
polvo por el collar y
qurtela con cuidado.
Tire
labolsausada a
labasura.NO la
vuelva a usar.
Doble la lengCJeta
de seguridad de la
nueva bolsa para
polvo en direcci6n
conlfaria a la
abertura que va en
el tubo de basura.
NOTA: Consultela
PIEZASY
CARACTERiSTICAS
par(]determlnarel
N°.de labolsapar(]
polvo.
Desdoblelanueva
bolsapara polvo.
Instale
la bolsa
para polvo
completamente
sobreeltubo para
basurasujetandoel
collar
de labolsay
empuj6ndolo sobreel
tubo para basura.
11
DEL
FILTRODE
SEGURIDADDEL
MOTOR
Cok)que la
cubierta de
la bolsa para
polvo de
manera que
la pestafia
entTe en la
ranura de
posici6n del
cuerpo.
Revise con frecuencia el filtro del motor y Ifmpielo
cuando est6 suck).
Pellgro de choque el6chlco
Cierre la
cubierta de la
bolsa.
Cublerta
do la bo_a
I_m polio
AJescuchar un
chasquido
caracteffsflco
ser6 indicaci6n
de que la
cubierta ha
cerrado bien.
No opere la aspiradora sin el flltro de segurldad del
motor. Aseg6urese de que el flltro est6 seco •
lnstaladoadecuadamente para Impedlr que el motor
falle y/o que se produzca un choque el6cfrlco.
Apriete el pestillo
tire hack] adelante
de la parte superior
de la cublerta para
polvo para quitarla.
Liberador
de hi cublerta
para polvo
Saque la bolsa para
polvo.
Si el fitlTO,k)calizado al fondo de la cavidad de la
cublerta para polvo, est6 suck), s(_quelo tirando de 61
hack) adelante por debajo de las estffas.
Lave el filtroespumoso con agua caliente y jab6n,
enju6guelo y SL_luelo bien apret6ndolo con la mano y
dejanclo que se seque al aire libre.
NO Io lave en la lavadora de platos.
NO Io ins'talehfimedo.
Vuelva a colocar el filtrodesliz(_ndolo de nuevo en su
lugar debajo de las estffas en la cavidacl de la cubierta
para polvo.
12
CAMBIO
DE LA CORREA,CAMBIO DEL
CEPILLOY LIMPIEZADELCEPILLO
Tome las presillasde la parte posterior y tire hacia
adelante y hacia arriba para quitar la placa inferior.
Cepilleo quitecualquierresiduoque est6en alarea
de correas.
Pel/grode choque el6ctrlco o lesl6ncorporal
Desconecte la unldad antes de llmplarla o darle
servlclo. De Io contrarlo, podr[a produclrse un
choque el_ctrlco o causar lesl6n corporal sl la
asplradora arranca de manera Imprevlsta.
Frecuentemente reviseel 6tea del ceplllo y quite todo
pelo, cord6n o pelusa que se haya acumulado. Sila
acumulaci6n es excesiva, siga las instruccionesa
continuaci6n. Sila correa se aflojara o rornpiera, siga
las insITuccionespara quitar la coffea.
PARA
QUffARLAPLACAR
INFERIOR:
Desenchufelaunidadde lacorriente
el_ctrica.
Ponga elmango de laaspiradoraen posici6n
horizontal
y volteelaunidad de cabeza,
Para proteger la superficie del suelo, siempre ponga
papel debajo de la boca de la m(T]quina cuando se
saca la placa inferior.
Ubere laplaca inferior
haciendo presi6n
sobrelas
pestafias
en direcci6n
alcentro.
Pellgrode lesl6npersonal
Slempre desenchllle la asplradora antes de llmplar
el 6rea del ceplllo, ya que 6ste podr[a empezar a
funclonar repentlnamente.
No hacerlo podr[a
resultaren una lesl6npersonal.
13
PARAQUITARLA
CORREA/LIPMPIARELCEPIILO:
Con cuidado quitelassoportesdes cepillo
y losarandelasde losextremosdelcepillo
para versise han acumuladohllos
y pelo.
NOTA: Cuanclo quite las soportes del
cepillo, podffa salirse una peque_a
arandela de cada
exJTemo.NO las
pierda.
Soporte
del cepiUo
\
Con cuidado levante el extremo derecho del conjunto
del agitador y luego el lado izquierdo. Quite el cepillo
cilinddco.
Quitelacorreao rotadelejede transmisi6n
delmotor.
Pellgrode _s_n personal
Tenga culdado al qultar el ceplllo cll[ndrlco, la
tensl6n de la correa e$ grande. Sl no tlene
precaucl6n podr[a sufrlr una lesl6n personal sl el
cep/#o se #hera r_pldamente y sale dlsparado.
Quitetoda basurao restos
del6rea que recorrela
correao del6rea delceplllo
cilfndrico.
Quitetodo hiloo basura.
Vuelvaa poner
losarandelasy
lossoportesdel
cepillos.
Vea la
perspectiva
despiezada
para seguir el
orden correcto
de colocaci6n
de lospiezas.
Perspectiva despiezadaEnsamble del cepillo
Arandela
Soporte
del ceplUo
EJede
transmisi6n
del motor
Correa
del
ceplllo
cilfndrico
14
Unldad
del agi_ador
Arandela
Soporte
del cepillo
PARACAMBIARLACORREA:
Haga presi6nfirmemente,asegurQndosede que hayan
entradobienambos exlTemos.
Correa
Emmmblo
dolcepillo
Emmmble del cepilh
Coloque la nueva correaalrededordelejede
transmisi6n
delmotor.
NOTA:Consulte la PIEZASY CARACTEI'd'STICAS
para
determinar el N°. de correa.
Coloque elOJTOextremode lacorreaalrededordel
canaldelcepillo
cllrndrico.
Verifique que la correa est(_ cenITada en el canal de la
correa y que el cepillo cilindrico gire libremente.
Vuelva a colocar la placa inferior,mefiendo las
pestahas del frente de la placa en las ranurasdel
alojamiento de la boquilla y empujando la placa hacia
alTQshasta que las presillasposterioresentren en su
lugar. Tirede las pesta_as hacia afuera.
Alineelaextensi6n
cuadrada de cada soportedel
cepillo
con lasranurasde laestructura
de labase.
Ponga laaspiradoraen posici6nvertical
antesde
enchufariaa lacorriente
el(_ctrlca.
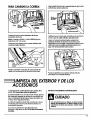
IMPIEZA
DELEXTERIORY DE LOS
ACCESORIOS
I. Desconecte el cord6n el(_clrico de la clavija de la
pared. NO chome agua sol_e la aspiradora.
NO USELOSACCESORIOSSI EST_,NMOJADOS.
2. Umpie el exterior con un trapo suave y limpio, que ha
sido exprimido despu(§sde remojar en una solucl6n de
agua y detergente liquido ligero.Seque el exterior con
un JTaposeco despu@sde limpiar.
3. Umpie la superficie exterior del recept6culo y de los
accesorios para reducir la elecJricidad est(_fica y la
acumulaci6n de polvo.
Los accesorlos que se utlllcen en _reas suclas,
debaJo del refrlgerador, no deben usarse en otras
superflcles sln antes ser lavados. Podr{an deJar
mamas,
4, Lave los accesorios en agua tibia jabonosa,
enjuague y deje secar al aire. NO los lave en lavadora
de platos.
15
CAMBIO
DE LA BOMBILLA
ALGUNOS MODELOS
Pellgrode choque el6ctrico o lesl6ncorporal
Desconecte la unldad antes de Ilmplarla o darle
servlclo. Do Io contrarlo, podr[a produclrse un
choque el6ctrlco o causar lesl6n corporal sl la
asplradora arranca de manera ImprevlstCL
Desenchufe launidadde lacorriente
el_ctTica,
Pongo elmango de laaspiradoraen posici6n
horizontal
y volteelaunidad de cabeza.
Ubere la placa inferiorhaciendo presi6n mE)re las
pesta_:_sen direcci6n al centro.
AloJami_nto
de Ii bombllla
Ya que haya aflojado el alojamiento de la bombilla,
podr6 quitar (_staempuj6ndola hacia abajo y
gir6ndola hacia la izquierda. Ahora puede colocar la
nueva bombilla en el z6calo. Alinee la saliente de la
bombilla con las ranuras del z6calo y al mismo tiempo
que presione la bombilla contra el z6calo d@levuelta
hacia la derecha.
NOTA: ConsultelaPIEZA3Y CARACTERrSTICASpara
determinarelN °.de labombilla.
Vuelva a meter el alojamiento
saliente mediante presi(T)n.
Tome las presillas de la porte posterior y fire hacia
adelante y hacia arriba para quitar la placa Inferior.
Ya que haya quitadolaplaca inferior
podr(_sacarel
alojamiento
de labombillade lasaliente
en laque est6
montado, moviendo elz6calode un lacloa OTTO.
16
de la bombilla en la
Vuelva a colocar la placa inferior,mefiendo las
pesta_as del fTente de la placa en las ranuras del
alojamiento de la boquilla y empujando la placa hacia
alT6Shasta que las presillasposterioresentren en su
lugar. Empuje las pesta_as hacia afuera.
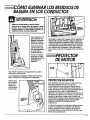
ELIMINARLOSRESIDUOSDE
BASURAEN LOSCONDUCTOS
Pellgrode choque el_ctrlco o lesl6n corporal
Desconecte la unldad antes de llmplarla o darle
servlclo. De Io contrarlo, podr[a produclrse un
choque el6ctrlco o causar lesl6n corporal sl la
asplradora arranca de manera Imprevlsta.
Para obtenerlosmejoresresultados
de
limpieza,
mantenga
limpios
losconductosde paso delaire,
Antes de revisor los
conductos de paso
del aire desenchufe
el cord6n de la
corriente el_ctrica.
De vezen cuando
revise que no est_n
obstruidaslas partes
sefialadas en la
ilustraci6n.
poque_i del
aloJamiento
De persistir
laobstrucci6n,
apague (OFF)laasplradoray
desenchufe elcord6n el_ctrlco.
Volteelaunidadde
cabeza, exponiendo lasuperficie
inferior.
Quitelaplaca inferior.
Quitelamanguera peque_a delalojamiento levant6ndoladirectamentehacia arriba.
Inspeccione elextremode lamanguera y quitetoda obSJTUCclbn.Vuelvaa colocarlamanguera cortay laplaca inferior.
----_PROTECTOR
DEMOTOR
Protector
de motor ,,_
Desconecte el tubo de la manguera de la boquilla y
revise que no est(_ tapado.
Con la aspiradora prendida y el tubo desconectado,
estire y comprima la manguera para destaparla.
PROTECTOR
DEMOTOR
Quite la tapa
del conducto
de succi6n y
revise sihay
obslnJcciones
en esta 6rea.
Cublerla del
porLillo para
limpiezm
Estaaspiradora
fieneuno v(_Ivula
de desviaci6n
que
sirve
como protector
de motor que se abre
automaticamente para proveerun flujo
de aireal
motor cuando un zueco impidaque circule
elaireal
motor.Sise abre lav(_Ivula
bypasspara impedirque se
recalenteelmotor y que no haga dafioa la
aspiradora,
se notar6un cambio de sonidomientrasel
airepasa porlaaberturade lav61vula.
Cuando ocurre,
apague laaspiradoray desenchufeelcordbn del
tomacorriente.
Despu(_s,
Inspeccibnela
para encon_Tar
zuecos como se describebajolasecci6nC6MO
EUMINAR LOS RESIDUOS DE BASURA EN LOS
CONDUCTOS.
La v61vula
de desviaci6npuede estarabiertamientras
se uson losaccesorioso para limpiar
una alfombra
nueva a causa de un flujo
reducidode airepor los
accesorios
mlsmos o porlapelusade laalfombraque
llenelabolsarepidamente.
17
ERECONOCIMIENTO DE PROBLEMAS
Consulteestecuadro para encontrarsoluciones
que ustedmismo puede realizar
cuando tenga problemas
menores de rendimiento.
Peligro de choque el6ctrico
Desconecte
la aspiradora antes de darle servicio
o limpiarla.
producirse un choque el6ctrico o causar lesi6n corporal.
La aspiradora no
funciona.
I. Est6desconectada.
2. Cortacircuitos botado o fusible
quemado en el tablero de servicio
de la residencia.
No aspira
salisfactoriamente.
podr{a
I.Conecte bien,optima selector
de
encendido/apagado a laposici6nON.
2. Restablezcaelcortacircuitos
o cambie
elfusible.
3. Interruptor
de encendido/apagado
no est6en laposici6nON.
3. Coloque elinterruptor
de encendido/
apagado en laposici6nON.
I. Bolsapara polvollenao atascada.
I. Cambie la bolsa, (p6ginas 7I, 72).
2. Adjusteel nivel, (j_gina 8).
2. Adjusteincorrecto
de nlvelde pelo
de laalfombra.
3. Cepillo
desgastado.
3. Cambie el cepillo, (p(Jginas 13-15).
4. Manguera de laboquillaobstTuida.
4. Umpie la manguera, Co6gina 77).
5. Manguera o tubo obsJruidos.
5. Umpie la manguera, (p6gina
6. Manguera rota.
6. Cambie la manguera.
7. Correa rota.
7. Camble la correa, (p6ginas
8. La manguera, fubo no est6 bien metida.
8. Meta la manguera, fubo, (p6gina 7).
9, Se de)6 puesta la boquilla para.
huecos reducidos.
9. Quite el fubo y almac(_nelo
debidamente, (p6gina 7).
La luz no funciona.
I. Bombillafundida.
1. Cambie la bombilla, [pbgina
La basura de sale de la
bolsa para polvo.
I. Veriflque que la bolsa est(_
bien puesta.
1. Yea las insh'ucciones,(p6ginas 11, 12).
2. Bolsa rota.
2. Camble la bolsa, [j_ginas
3. Cubierta de la bolsa mal.
instalada.
3. Vea las instrucciones, (p6ginas 11, 12).
I. Elusode losaccesorios limita el
flujo de aire.
2. La pelusa de una alfombra nueva
obsJTuye
el pasode aire
I. Lea elmanual de instrucciones,
[p6gina 9).
Restricci6n del flujo de airei
el usa de los accesorio$.
Cambio de sonido.
18
De Io contrario
17).
73-15).
16).
11, 12).
2. Revise las instrucciones y limpie
la manguera, [j36gina 17).


![CRRFTSMRN °] - at snowblowerguide.com](http://vs1.manualzilla.com/store/data/006202620_1-711fb90bb2c79d693479b4ac54c29ad0-150x150.png)