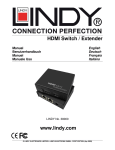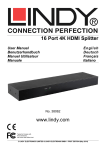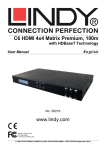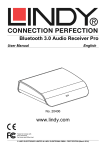
1
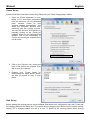
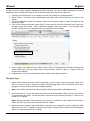
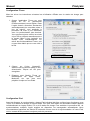
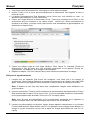
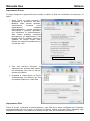
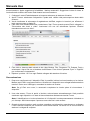
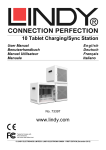
10 Tablet Charging/Sync Station
iTunes Set-up
Manual
Benutzerhandbuch
Manuel
Manuale
English
Deutsch
Français
Italiano
LINDY No. 73397
www.lindy.com
© LINDY ELECTRONICS LIMITED & LINDY-ELEKTRONIK GMBH - FIRST EDITION (July 2014)
Manual
English
iTunes Set-up
Please follow these instructions when using iPads with your Tablet Charging/Sync station.
1. Open the iTunes application on your
laptop or PC and select preferences
from the edit menu. On the advanced
pane, uncheck “Check for new
software updates automatically”, this
stops the automatic process from
interfering with the syncing process.
You can still check for IOS updates by
manually clicking on the “Check for
Updates” button on the individual iPad
screens. Due to the functionality of
iTunes, this can only be completed one
unit at a time.
2. Click on the “Devices” icon, make sure
none of the options are selected. Click
OK to save your changes.
3. Prepare your iTunes library by
downloading the Apps, Books, Music,
etc that you intend to copy to your
iPads.
iPad Set-up
Before starting the syncing process, each individual iPad needs to be configured to work with iTunes and
the charging station at the same time. This can be done by plugging each device into the master syncing
Laptop, PC or charging station one unit at a time. To speed up the syncing process when syncing
Manual
English
multiple devices, Apple suggests disabling automatic backups. We also suggest reducing the screen
brightness when syncing your iPad as the screen does stay on for most of the process.
1. Connect your iPad directly to your laptop or on its own through the charging station.
2. Open iTunes if it doesn’t open automatically and select your device from the top right of the
screen.
3. The iPad registration screen will appear, follow the prompts to login or create an Apple ID and
name your iPad.
4. Click on the summery tab then select “Open iTunes when this iPad is connected” and “Sync only
checked songs and videos”. Verify “Manually manage music and videos” is not selected (this
function will require you to drag and drop your selections to each iPad).
5. Click on each of the tabs at the top (Apps, Music, Films, TV Programmes, Podcasts, Photos) and
select which type of file you want to sync and this device. Click the “Sync” or “Apply” button to
accept these settings.
6. Repeat steps 1 to 5 with each iPad that will be used in this charging station.
Ready to Sync
1. When all the iPad devices have been configured, you are ready to sync and charge. Place each
iPad in a slot and plug in using your Apple USB charging cable. When all devices have been
plugged in, switch on the power to the charging station.
Note: if the iPad’s are brand new they should be fully charged before attempting to sync.
2. Once powered up, iTunes will open and start syncing automatically. Each iPad will be listed in
iTunes across the top bar. You will be able to review the sync status by looking in iTunes on the
master PC or Laptop.
Note: Please remember that identifying and syncing 10 devices at the same time will take a
while. DO NOT stop the process once it has been started
3. When syncing is complete, eject each device manually or by closing iTunes then unplug the USB
cable from your PC or Laptop so charging can begin. Charging will not start while the charging
station is connected to the PC or Laptop.
Benutzerhandbuch
Deutsch
iTunes-Einrichtung
Bitte befolgen Sie diese Anweisungen, wenn Sie Ihre iPads mit der Tablet Charging/Sync Station
nutzen.
1. Öffnen Sie die iTunes-Anwendung auf
Ihrem Laptop oder PC und wählen Sie
aus den Einstellungen die Option
“Erweitert”. Im “Erweitert”-Reiter die
Option "Automatisch nach neuen
Software-Updates
suchen"
deaktivieren. Dies verhindert, dass der
automatische
Prozess
die
Synchronisierung beeinträchtigt. Sie
können immer noch manuel nach iOSUpdates suchen, indem Sie auf den
einzelnen iPads auf den "Nach
Updates suchen"-Button klicken. In
iTunes kann das nur bei einem Gerät
nach dem anderen durchgefuehrt
werden.
2. Klicken Sie auf das "Geräte"-Icon und
stellen Sie sicher, dass keine der
Optionen ausgewählt ist. Klicken Sie
auf OK, um Ihre Änderungen zu
speichern.
3. Bereiten Sie Ihre iTunes-Bibliothek
vor, indem Sie die Apps, Bücher,
Musik, etc, die Sie auf Ihre iPads
kopieren möchten, hinzufügen.
iPad-Einrichtung
Vor dem Start des Synchronisierungsprozesses, muss jedes einzelne iPad konfiguriert werden, um mit
iTunes und der Ladestation gleichzeitig zusammenzuarbeiten. Dies erreichen Sie, indem Sie ein iPad
nach dem anderen mit dem Master-Synchronisierungs-PC, -Laptop oder der Ladestation verbinden. Um
die Synchronisierung mehrerer Geräte zu beschleunigen, empfiehlt Apple, automatische Backups zu
deaktivieren. Wir schlagen außerdem vor, die Bildschirmhelligkeit beim Synchronisieren Ihrer iPads zu
verringern, da der Bildschirm für den Grossteil des Prozesses aktiv ist.
Benutzerhandbuch
Deutsch
1. Verbinden Sie Ihr iPad direkt oder über die Ladestation mit Ihrem Laptop.
2. Öffnen Sie iTunes, falls es sich nicht automatisch öffnet, und wählen Ihr Gerät am rechten oberen
Bildschirmrand aus.
3. Wenn der Registrierungs-Bildschirm erscheint, befolgen Sie die Anweisungen, um sich
einzuloggen oder eine Apple-ID zu erstellen, und geben Sie Ihrem iPad einen Namen.
4. Klicken Sie auf die Registerkarte “Übersicht” und wählen Sie dann "iTunes öffnen, wenn dieses
iPad angeschlossen wird" und "Nur markierte Titel und Videos synchronisieren". Vergewissern
Sie sich, dass "Musik und Videos manuell verwalten" nicht ausgewählt ist (diese Funktion würde
erfordern, dass Sie Ihre ausgewählten Inhalte per Drag-and-Drop auf jedes iPad ziehen müssen).
5. Klicken Sie auf die einzelnen Registerkarten (Apps, Musik, Filme, TV-Sendungen, Podcasts,
Fotos) und wählen Sie, welche Art von Dateien Sie mit diesem Gerät synchronisieren möchten.
Klicken Sie auf "Synchronisieren" oder "Anwenden", um diese Einstellungen zu akzeptieren.
6. Wiederholen Sie die Schritte 1 bis 5 mit jedem iPad, das in dieser Ladestation verwendet werden
soll.
Bereit zur Synchronisierung
1. Wenn alle iPad-Geräte konfiguriert wurden, sind Sie bereit, zu synchronisieren und zu laden.
Legen Sie jedes iPad in einen Schlitz und schliessen Sie das Apple-USB-Ladekabel an. Wenn
Sie alle Geräte eingesteckt haben, schalten Sie die Ladestation ein.
Hinweis:. Wenn die iPads neu sind, sollten sie vollständig geladen sein, bevor Sie sie
synchronisieren.
2. Nach dem Einschalten der Ladestation wird sich iTunes öffnen und automatisch mit der
Synchronisierung beginnen. Jedes iPad wird in iTunes in der oberen Leiste aufgelistet sein. Auf
dem Master-PC oder -Laptop können Sie den Synchronisierungsstatus in iTunes kontrollieren.
Hinweis: Bitte denken Sie daran, dass die Identifizierung und Synchronisieren von 10 Geräte zur
gleichen Zeit eine Weile dauern wird. Den einmal begonnenen Prozess NICHT stoppen.
3. Wenn die Synchronisierung abgeschlossen ist, jedes Gerät manuell oder durch Schließen von
iTunes auswerfen. Dann das USB-Kabel von Ihrem PC oder Laptop trennen, damit das Lades
beginnen kann. Das Laden beginnt nicht, solange die Ladestation an den PC oder Laptop
angeschlossen ist.
- 5-
Manuel
Français
Configuration iTunes
Merci de suivre les instructions suivantes lors d’utilisation d’iPads avec la station de charge pour
tablettes.
1. Ouvrez l’application iTunes sur votre
laptop
ou
PC
et
sélectionnez
Préférences dans le menu Edition. Dans
l’onglet Avancé, décochez “Rechercher
automatiquement les nouvelles mises à
jour de logiciel”, ceci empêche le
processus de mise à jour d’interférer
avec la synchronisation des données.
Vous pourrez toujours vérifier les mises
à jour IOS en cliquant manuellement sur
le bouton “Mise à jour logicielle” sur
chaque iPad, individuellement. En
raison des fonctionnalités d’iTunes, ceci
ne peut être réalisé que sur une unité à
la fois.
2. Cliquez
sur
l’icône
“Appareils”,
assurez-vous qu’aucune option ne soit
sélectionnée. Cliquez sur OK pour
enregistrer.
3. Préparez votre librairie iTunes en
téléchargeant
les Apps, Livres,
Musiques, etc. que vous vous
préparez à copier sur vos iPads.
Configuration iPad
Avant de démarrer la synchronisation, chaque iPad individuel doit être configuré pour fonctionner avec
iTunes et la station de charge en même temps. Ceci peut être réalisé en connectant chaque appareil
individuellement au Laptop maître, PC ou à la station de charge. Pour accélérer le processus lors de
synchronisations multiples, Apple suggère de désactiver les sauvegardes automatiques. Nous
recommandons également de réduire la luminosité d’écran lors de la synchronisation de votre iPad,
celui-ci restant allumé pendant la majeure partie du processus.
Manuel
Français
1. Connectez votre iPad directement à votre laptop ou via la station de charge.
2. Ouvrez iTunes s’il ne se lance pas automatiquement et sélectionnez votre appareil en haut à
droite de l’écran.
3. La fenêtre d’enregistrement iPad apparaitra, suivez l’invite pour vous identifier ou créer un
identifiant Apple et donner un nom à votre iPad.
4. Cliquez sur l’onglet Résumé et sélectionnez “Ouvrir iTunes à la connexion de cet iPad’’ et “Ne
synchroniser que les morceaux et les vidéos cochés’’. Vérifiez que “Gérer manuellement la
musique et les vidéos’’ n’est pas coché (cette fonction vous demanderait de glisser/déposer vos
sélections sur chaque iPad).
5. Cliquez sur chaque onglet en haut (Apps, Musique, Films, Séries TV, Podcasts, Photos) et
sélectionnez le type de fichier que vous souhaitez synchroniser et cet appareil. Cliquez sur
“Synchroniser” ou “Appliquer” pour accepter ces paramètres.
6. Répétez les étapes 1 à 5 avec chaque iPad qui sera utilisé avec cette station de charge.
Prêt pour la synchronisation
1. Lorsque tous les appareils iPad auront été configurés, vous serez prêt à les charger et
synchroniser. Placez chaque iPad dans un logement et connectez-le en utilisant votre câble USB
Apple. Lorsque tous les appareils seront connectés, mettez la station de charge sous tension.
Note: la batterie de tout iPad neuf devra être complètement chargée avant d’effectuer une
synchronisation.
2. Une fois sous tension, iTunes s’ouvrira et débutera la synchronisation automatiquement. Chaque
iPad sera listé dans la barre iTunes tout en haut. Il vous sera possible d’examiner l’avancement
de la synchronisation dans la fenêtre iTunes sur le PC ou Laptop maître.
Note: merci de noter que l’identification et la synchronisation simultanée de 10 appareils va
prendre un certain temps. NE PAS interrompre le processus une fois démarré !
3.
Lorsque la synchronisation est terminée, éjectez chaque appareil manuellement ou en fermant
iTunes et débranchez le câble USB de votre PC ou Laptop pour que la charge puisse débuter. La
charge ne pourra commencer qu’une fois la station de charge déconnectée de votre PC ou
Laptop.
Manuale Uso
Italiano
Impostazioni iTunes
Si prega di seguire le seguenti istruzioni quando si utilizza un iPad con la Stazione di ricarica per 10
tablet.
1. Aprire iTunes sul vostro computer e
selezionare le preferenze dal menu
Modifica. Nella scheda avanzate,
deselezionare
"Controlla
nuovi
aggiornamenti
software
automaticamente"; questa procedura
interromperà il processo automatico
che interferisce la sincronizzazione.
Sarà ancora possibile controllare
manualmente gli aggiornamenti IOS
facendo click sul pulsante "Check for
Updates" sui singoli monitor iPad.
Questo può essere completato solo su
un'unità per volta.
2. Fare click sull'icona "Devices" ed
assicurarsi che nessuna delle opzioni
sia selezionata. Fare click su OK per
salvare le modifiche.
3. Preparate la vostra libreria di iTunes
scaricando App, Libri, Musica, ecc. che
si intendono copiare su i vostri iPad.
Impostazioni iPad
Prima di avviare il processo di sincronizzazione, ogni iPad deve essere configurato per funzionare
contemporaneamente con iTunes e la stazione di ricarica. Questo può essere fatto collegando ogni
dispositivo al computer o alla stazione di ricarica uno alla volta. Per accelerare il processo di
Manuale Uso
Italiano
sincronizzazione, Apple suggerisce di disabilitare i backup automatici. Suggeriamo inoltre di ridurre la
luminosità dello schermo del vostro iPad durante la sincronizzazione
1. Collegare il vostro iPad direttamente al computer attraverso la stazione di ricarica.
2. Aprire iTunes e selezionare il dispositivo il quale sarà visibile nella parta superiore destra dello
schermo.
3. Verrà visualizzata la schermata di registrazione dell'iPad, seguire le istruzioni per effettuare il
login oppure creare un Apple ID.
4. Fare click sulla scheda riassuntiva e selezionare "Apri iTunes quando questo iPad è collegato" e
"Sincronizza solo brani e video". Assicurarsi che non sia selezionata l'opzione "Gestisci
manualmente musica e video".
5. Fare click su ciascuna delle schede in alto (App, Musica, Film, Programmi TV, Podcast, Foto) e
selezionare il tipo di file che si desidera sincronizzare. Fare click sul pulsante "Sync" o "Applica"
per confermare le impostazioni.
6. Ripetere i punti da 1 a 5 con ogni iPad da collegare alla stazione di ricarica.
Sincronizzazione
1. Dopo aver configurato tutti i dispositivi iPad, è possibile iniziare la sincronizzazione e la ricarica.
Mettere ogni iPad in una fessura del box. Quando tutti i dispositivi sono collegati all'alimentazione
tramite il vostro cavo USB Apple, accendere la stazione di ricarica.
Nota: Se gli iPad sono nuovi, è necessario completare la ricarica prima di sincronizzare i
dispositivi.
2. Una volta acceso, iTunes si aprirà e inizierà a sincronizzare automaticamente. Sarà possibile
esaminare ogni dispositivo e lo stato di sincronizzazione direttamente tramite iTunes
Nota: L'identificazione e la sincronizzazione di 10 dispositivi contemporaneamente richiederà un
po' di tempo. NON interrompere il processo una volta che è stato avviato.
3. Quando la sincronizzazione sarà conclusa, espellere ogni dispositivo manualmente e scollegare
il cavo USB dal computer per consentire l'avvio della ricarica. La carica non si avvia mentre la
stazione è collegata al computer.
CE/FCC & Recycling Information
CE Certification
This equipment complies with the requirements relating to Electromagnetic Compatibility Standards EN55022/EN55024 and the
further standards cited therein. It must be used with shielded cables only.
It has been manufactured under the scope of RoHS compliance.
CE Konformitätserklärung
Dieses Produkt entspricht den einschlägigen EMV Richtlinien der EU für IT-Equipment und darf nur zusammen mit
abgeschirmten Kabeln verwendet werden.
Diese Geräte wurden unter Berücksichtigung der RoHS Vorgaben hergestellt.
Die formelle Konformitätserklärung können wir Ihnen auf Anforderung zur Verfügung stellen
FCC Certification
This equipment has been tested and found to comply with the limits for a Class B digital device, pursuant to part 15 of the FCC
Rules. These limits are designed to provide reasonable protection against harmful interference in a residential installation.
You are cautioned that changes or modification not expressly approved by the party responsible for compliance could void your
authority to operate the equipment.
This device complies with part 15 of the FCC Rules.
Operation is subject to the following two conditions:
1. This device may not cause harmful interference, and
2. This device must accept any interference received, including interference that may cause undesired operation.
LINDY Herstellergarantie
Hinweis für Kunden in Deutschland
LINDY gewährt für dieses Produkt über die gesetzliche Regelung in Deutschland hinaus eine zweijährige Hersteller-garantie ab
Kaufdatum. Die detaillierten Bedingungen dieser Garantie finden Sie auf der LINDY Website aufgelistet bei den AGBs.
WEEE (Waste of Electrical and Electronic Equipment),
Recycling of Electronic Products
Europe, United Kingdom
In 2006 the European Union introduced regulations (WEEE) for the collection and recycling of all waste electrical and electronic
equipment. It is no longer allowable to simply throw away electrical and electronic equipment. Instead, these products must
enter the recycling process.
Each individual EU member state has implemented the WEEE regulations into national law in slightly different ways. Please
follow your national law when you want to dispose of any electrical or electronic products. More details can be obtained from
your national WEEE recycling agency.
Germany / Deutschland
Die Europäische Union hat mit der WEEE Direktive Regelungen für die Verschrottung und das Recycling von Elektro- und
Elektronikprodukten geschaffen. Diese wurden im Elektro- und Elektronikgerätegesetz – ElektroG in deutsches Recht
umgesetzt. Dieses Gesetz verbietet das Entsorgen von entsprechenden, auch alten, Elektro- und Elektronikgeräten über die
Hausmülltonne! Diese Geräte müssen den lokalen Sammelsystemen bzw. örtlichen Sammelstellen zugeführt werden! Dort
werden sie kostenlos entgegen genommen. Die Kosten für den weiteren Recyclingprozess übernimmt die Gesamtheit der
Gerätehersteller.
France
En 2006, l'union Européenne a introduit la nouvelle réglementation (DEEE) pour le recyclage de tout équipement électrique et
électronique.
Chaque Etat membre de l’ Union Européenne a mis en application la nouvelle réglementation DEEE de manières légèrement
différentes. Veuillez suivre le décret d’application correspondant à l’élimination des déchets électriques ou électroniques de
votre pays.
Italy
Nel 2006 l’unione europea ha introdotto regolamentazioni (WEEE) per la raccolta e il riciclo di apparecchi elettrici ed elettronici.
Non è più consentito semplicemente gettare queste apparecchiature, devono essere riciclate. Ogni stato membro dell’ EU ha
tramutato le direttive WEEE in leggi statali in varie misure. Fare riferimento alle leggi del proprio Stato quando si dispone di un
apparecchio elettrico o elettronico. Per ulteriori dettagli fare riferimento alla direttiva WEEE sul riciclaggio del proprio Stato.
LINDY No. 73397
1st Edition July 2014
www.lindy.com