1
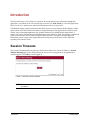
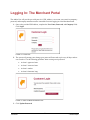
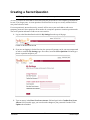
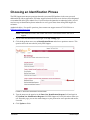
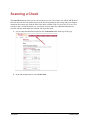
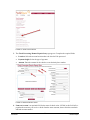
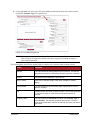
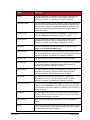
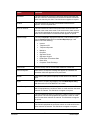
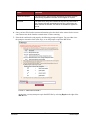
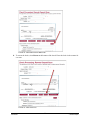
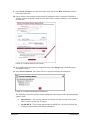
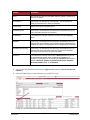
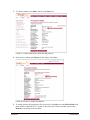
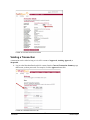
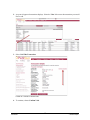
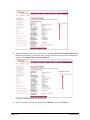
Merchant Capture
Merchant Capture User Manual
© Copyright 1999-2013 Jack Henry & Associates, Inc.
All rights reserved.
Information in this document is subject to change without notice.
Printed in the United States of America.
No part of this document may be copied, reproduced, stored in a retrieval system, displayed, distributed or transmitted in any form or any means whatsoever (electronic, mechanical or
otherwise), including by photocopying or recording for any purpose, without the prior written permission of Jack Henry & Associates, Inc. Making unauthorized copies of this document
for any purpose other than your own personal use is a violation of United States copyright laws.
Any unauthorized use of Jack Henry & Associates, Inc.’s trademarks and service marks is strictly prohibited. The following marks are registered and unregistered trademarks and
service marks of Jack Henry & Associates, Inc.:
Enterprise Payment Solutions™; Jack Henry & Associates, Inc.; Merchant Deposit Capture™; ProfitStars®;
Other Trademarks
Various other trademarks and service marks used or referenced in this document are the property of their respective companies/owners:
Microsoft, Windows, Windows NT, Windows Vista, and Internet Explorer are either registered trademarks or trademarks of Microsoft Corporation in the United States and/or
other countries.
Adobe and Acrobat Reader are either registered trademarks or trademarks of Adobe Systems Incorporated in the United States and/or other countries.
Contents
Introduction ................................................................................................................................ 1
Session Timeouts ........................................................................................................... 1
Logging In: The Merchant Portal ................................................................................................ 2
Creating a Secret Question ............................................................................................ 3
Choosing an Identification Phrase .................................................................................. 4
Scanning a Check ...................................................................................................................... 5
Editing a Transaction .....................................................................................................13
Voiding a Transaction ........................................................................................16
Merchant Capture User Manual
i
© 1999-2013 Jack Henry & Associates, Inc.®
Merchant Capture
Introduction
The Merchant Capture User Manual is a guide for all persons who process transactions through this
application. Your Admin User will need to assign a specific role, Scan Check, to access this application.
Please see the User Administrator manual for instructions on how to assign roles.
The Merchant Capture application provides the ability to process your customer checks through a singlecheck scanner and convert them to an electronic image transaction, later deposited into a bank account.
Checks can be scanned throughout the day, and their amount will be added into the deposit total. A
deposit will consist of all transactions created that day, unless otherwise noted. For example, a transaction
given a future effective date will not be deposited until such time. The system can detect duplicate
transactions within 75 days of the original transaction being created. ACH items will be deposited
separately from Check21 items.
Session Timeouts
The system will automatically log off a user who has been inactive for at least 30 minutes. A Session
Timeout Warning appears two minutes before the user is set to be logged out for an opportunity to
remain logged in. Click OK to remain logged in.
FIGURE 1 - SESSION TIMEOUT W ARNING
NOTE: Your tabs and menu options may differ slightly from those pictured throughout this
document.
Merchant Capture
User Manual
1
© 1999-2013 Jack Henry & Associates, Inc.®
Merchant Capture
Logging In: The Merchant Portal
The Admin User will provide you with your site’s URL address, a user name, case-sensitive temporary
password, and company name that must be entered the first time logging in to the Merchant Portal.
1. Once at the provided URL address, complete the User Name, Password, and Company fields.
Click Login.
FIGURE 2 - LOGIN PAGE
2. The system will prompt you to change your password. Passwords expire every 90 days and are
case-sensitive. Use the following guidelines when creating a new password:
•
At least 1 uppercase letter.
•
At least 1 lowercase letter.
•
At least 1 number.
•
At least 8 characters long.
FIGURE 3 - CREATE A NEW PASSWORD PAGE
3. Click Update Password.
Merchant Capture
User Manual
2
© 1999-2013 Jack Henry & Associates, Inc.®
Merchant Capture
Creating a Secret Question
NOTE: Single sign-on users do not need to set up a secret question.
As a user, you have an email address associated with your profile where a new temporary password can
be sent, if you forget yours. A secret question will also need to be set up as a security measure before a
new password can be made.
If a secret question is answered correctly, an email will be sent to your email address with a new
temporary password. Secret questions do not need to be a complete question or contain a question mark.
The secret question and answer fields are not case-sensitive.
1. Log in to the Merchant Portal and click My Settings from the top of the page.
FIGURE 4 - MY SETTINGS OPTION
2. If you are not logging in for the first time, the system will prompt you for your current password
in order to reach the My Settings page. Once there, locate the Secret Question field and type a
phrase or question unique to you.
FIGURE 5 - MY SETTINGS PAGE
3. Type an answer in the Enter New Secret Answer field and again in the Confirm New Secret
Answer field. From this page, you can also make changes to your password if needed. Click
Update when finished.
Merchant Capture
User Manual
3
© 1999-2013 Jack Henry & Associates, Inc.®
Merchant Capture
Choosing an Identification Phrase
The EPS Support team answers questions about the system and EPS products in the event you need
additional help with an application. EPS takes support-related calls from users who have been designated
as an authorized caller by the Admin User. If you have been designated as an authorized caller, you will
need to set up an identification phrase and answer to verify your status when calling EPS Support for
assistance.
Authorized callers: For specific questions, please contact our support team at 872-542-2244 or at
[email protected].
NOTE: Non-authorized callers who contact EPS will be referred back to their first line of
support.
1. Log in to the Merchant Portal and navigate to the My Settings page.
2. Click the drop-down arrow next to Identification Phrase and select a question to answer. This
question will be the one asked of you by EPS Support.
FIGURE 6 - SELECTING AN IDENTIFICATION PHRASE
3. Type the answer to the question in the Enter New Identification Response field, and again in
the Confirm New Identification Response field. EPS Support will verify this answer when you
call. From this page, you can also make changes to your password or secret question and answer,
if needed.
4. Click Update to finish.
Merchant Capture
User Manual
4
© 1999-2013 Jack Henry & Associates, Inc.®
Merchant Capture
Scanning a Check
The Scan Check option allows you to scan one check at a time. The scanner will read the MICR line of
the check and scan the front and back sides of the check. Depending on the settings with your financial
institution, the scanner may frank the front of the check with the words, Electronically Presented. You
can opt to scan a second document (e.g., check stub, invoice) and/or key additional information to
associate with the check and/or the customer who wrote the check.
1. Log in to the Merchant Portal and select the Transactions tab from the top of the page.
FIGURE 7 - TRANSACTIONS TAB
2. In the left navigational bar, select Scan Check.
Merchant Capture
User Manual
5
© 1999-2013 Jack Henry & Associates, Inc.®
Merchant Capture
FIGURE 8 - SCAN CHECK OPTION
3. The Check Processing: Remote Deposit Scan page appears. Complete the required fields:
•
Location: Select the account location where the check will be processed.
•
Payment Origin: Select the type of payment.
•
Amount: Enter the amount for the check as a two-decimal-place number.
FIGURE 9 - REMOTE DEPOSIT PAGE
4. Name on Account is an optional field for the name of check writer. If filled in, this field will repopulate the next time you receive a check from the same customer, drawn from the same bank
and bank account number.
Merchant Capture
User Manual
6
© 1999-2013 Jack Henry & Associates, Inc.®
Merchant Capture
5. On the right hand side of the page, fill out any additional information about this customer and/or
transaction. Customer Type is a required field.
FIGURE 10 - CUSTOMER INFORMATION
NOTE: You may request up to three additional fields (see below) to complete for the customer.
These fields can be required or optional and can be requested by sending an inquiry to
your financial institution.
The following table describes the optional fields to complete for a customer when scanning a check.
Status
Definition
Address
This field contains the mailing address of the customer. This field will
repopulate the next time a check from the same customer is scanned.
Amount
The amount of the transaction in decimal form.
Back of Check
When clicked, the back image of the check enlarges for a better
display.
Check Number
This field contains the check serial number captured when a check
has been scanned.
City
Contains the city where the customer resides. This field will repopulate
the next time a check or credit card from the same customer is
scanned.
Company Name
This field replaces the Last Name field when the Customer Type is
set to Business. This field will repopulate the next time a check or
credit card from the same customer is scanned, and users can search
by this field.
Merchant Capture
User Manual
7
© 1999-2013 Jack Henry & Associates, Inc.®
Merchant Capture
Status
Definition
Country
This field contains the country where the customer resides and will
repopulate the next time a check or credit card from the same
customer is scanned. This field does not appear on reports.
Customer Number
This field must be unique for each customer. It will repopulate the next
time a check or credit card from the same customer is scanned. This
field is available to appear on reports, and users can search by this
field to populate personal information when this customer makes a
deposit in the future.
Customer Type
This is a required field that defaults to Individual. This field can be
changed to Business depending on the type of customer.
Daytime Phone
This field contains the customer’s daytime phone number. It will
repopulate the next time a check or credit card from the same
customer is scanned. This field does not appear on reports.
Description
This field is informational and does not appear on reports, but will
appear on the Transaction Details page.
Driver’s License
This field contains the driver’s license number of the customer. This
field will repopulate the next time a check or credit card from the same
customer is scanned. This field does not appear on reports.
Effective Date
This field contains the date the transaction is to be processed.
Email Address
This field contains the email address of the customer. It will repopulate
the next time a check or credit card from the same customer is
scanned. This field will not appear on reports.
Evening Phone
This field contains the customer’s evening phone number. It will
repopulate the next time a check or credit card from the same
customer is scanned. This field does not print on reports.
Fax Number
This field contains the customer’s fax number. This field will
repopulate the next time a check or credit card from the same
customer is scanned. This field does not appear on reports.
Federal Tax ID No.
This field replaces the Social Security No. field when the Customer
Type field is set to Business. It will repopulate the next time a check
or credit card from the same customer is scanned. This field does not
appear on reports.
First Name
This field contains the customer’s first name and will repopulate the
next time a check or credit card from the same customer is scanned.
This field does not appear on reports.
Front of Check
When clicked, the image of the front of the check is enlarged for
display.
Image 2
When clicked, the system will prompt you to scan a second document,
such as a check stub or invoice, to associate with the check, granted
the document fits through the scanner.
Merchant Capture
User Manual
8
© 1999-2013 Jack Henry & Associates, Inc.®
Merchant Capture
Status
Definition
Last Name
This field contains the customer’s last name and will repopulate the
next time a check or credit card from the same customer is scanned.
Users can search by this field. This field does not appear on reports.
Location
This field contains the account to be debited/credited with the
payment. This is a required field.
Name on Account
This field contains the name of the person from whom the item was
received or the actual name used on the credit card or bank account.
This field will repopulate the next time a check or credit card with the
same account information is scanned and will appear on reports.
Payment Origin
This field is required if displayed and shows a value based on input
from the Payment Type field from the New Deposit page. It will
contain one of the following:
•
•
•
•
•
•
•
•
•
•
Internet
Telephone IVR
Telephone Operator
Mailed-In
Drop Box
Signature Faxed
Signature Original
Retail/Point of Purchase Sale
Back office
Corporate Trade Exchange
Postal Code
Contains the zip code of the merchant residence or business.
Process Payment
When clicked, a response message will appear as to whether the
transaction has been approved to be processed.
Rescan
When clicked, the system will prompt for the check to be scanned
again.
Repair
When clicked, a repair page displays, and the MICR Repair Entry
field allows users to fix the MICR line of a check.
Social Security No.
This field contains the social security number of the customer. This
field will repopulate the next time a check or credit card from the same
customer is scanned. This field does not appear on reports.
State
This field contains the state from which the customer’s driver’s license
was issued. This field will repopulate the next time a check or credit
card from the same customer is scanned. This field does not appear
on reports.
Suite/Apt. #
This field contains the suite or apartment number of the customer.
This field will repopulate the next time a check or credit card from the
same customer is scanned. This field does not appear on reports.
Merchant Capture
User Manual
9
© 1999-2013 Jack Henry & Associates, Inc.®
Merchant Capture
Status
Definition
Transaction Number
This field must be unique for each transaction processed. It will be
automatically populated if left blank and will appear on reports.
Zip/Postal
This optional key entry field contains the zip code or postal code of
your customer and will repopulate the next time a check from the
same customer is scanned. This field is not available to appear on
reports.
6. Once you have filled out the customer information, place the check in the scanner for the item to
scan. Remove the check from the terminal when it is done scanning.
7. If the check could not be read properly, the following prompt will appear. You can either close
the prompt to rescan the check (next step), or use the prompt to repair the MICR line.
FIGURE 11 - MICR REPAIR PROMPT
At any time, you may attempt to repair the MICR line by selecting Repair to the right of the
MICR field.
Merchant Capture
User Manual
10
© 1999-2013 Jack Henry & Associates, Inc.®
Merchant Capture
FIGURE 12 - REPAIR OPTION FOR MICR LINE
8. To rescan the check, select Rescan at the bottom of the check. Place the check in the scanner for
it to scan.
FIGURE 13 - RESCAN OPTION
Merchant Capture
User Manual
11
© 1999-2013 Jack Henry & Associates, Inc.®
Merchant Capture
9. Select Front of Check to view the front image of the item. Select Back of Check to view the
back image of the item.
10. Notice whether your settings have determined if franking the check is automatic, disabled, or
whether you have the option to frank an item. In the below example, franking is set to automatic
for each item.
FIGURE 14 - FRANKING SETTING FOR CHECKS
11. If any additional images need to accompany the item, select Image 2 and scan the document
through the scanner.
12. Select Process Payment. The system will have a prompt confirming the submission.
FIGURE 15 - PAYMENT PROCESSING CONFIRMATION
The following list describes all the potential prompts the system may provide when attempting to
submit a check.
•
Internal Error – This message indicates an internal error has occurred in the system.
Please contact your first line of support.
•
Invalid MICR – This message indicates that the MICR line is invalid, specifically the
routing & transit number of the financial institution.
Merchant Capture
User Manual
12
© 1999-2013 Jack Henry & Associates, Inc.®
Merchant Capture
•
Transaction Approved – This response indicates that the transaction payment
information has been verified; the transaction will be added to the Approved status to be
processed later.
•
Transaction Not Approved – This response appears for one of the following reasons.
•
A Velocity (transaction) limit has been met or exceeded. This item will be placed in
the Suspended transaction status.
•
A transaction has been declined due to a Dual Authorization setting on the processor.
This item will appear in the Declined transaction status.
•
A transaction has been declined due to a transaction limit set by your financial
institution.
Editing a Transaction
A transaction that has not yet been processed or voided can be edited by the dollar amount and/or
deposit date (Effective Date). Once processed at the designated cut-off time, transactions will be
deposited as entered. Any edits performed after processing will not be reflected.
Upon logging in to the Merchant Portal, the Home page displays with the Current Transaction
Summary showing the status of all transactions within the past 60 days. A transaction can be in any
one status during processing. Clicking any one status from the Current Transaction Summary page
will automatically generate a report for all transactions within that status for the current day.
Below is a table listing all the potential statuses for a transaction.
Status
Definition
Approved
The transaction has been verified and will be processed at the
designated cut-off time.
Processed
The transaction has been transmitted to the appropriate network
(ACH or Check 21). Changes can no longer be made, and the
transaction can no longer be voided.
Collected
(ACH Only) The transaction, originally returned NSF, has been represented to the Fed by ProfitStars, and funds were recovered.
Awaiting Capture
Status for credit card transactions only.
Awaiting Approval
The transaction has been verified, but the amount of the transaction
exceeded the Dual Authorization limit of the user who created it.
An authorized approver must review and then either approve or void
the transaction.
Declined
The transaction has been declined by the EPS system and will not
be processed. The transaction exceeded either Dual Authorization
limits or Velocity limits.
Voided
The transaction has been voided and will not be processed.
Transactions may not be voided once they are in the Processed
status.
Merchant Capture
User Manual
13
© 1999-2013 Jack Henry & Associates, Inc.®
Merchant Capture
Status
Definition
Error
An internal error has occurred within the EPS system. Contact your
first line of support.
In Collection
(ACH Only) The transaction, returned NSF, is in the process of
being re-presented to the Fed by ProfitStars.
In Research
May be used by your support group.
Uncollected NSF
(ACH Only) The transaction was returned to ProfitStars NSF by the
Fed, and funds could not be recovered.
Suspended
The transaction has been verified, but it has exceeded Velocity
limits.
Disputed
(ACH Only) The transaction was returned to ProfitStars by the Fed
because the account holder at the receiving financial institution has
disputed its validity. The transaction will be charged back (reversed).
Invalid/Closed Account
(ACH Only) The transaction was returned to ProfitStars by the Fed
because the account number at the receiving financial institution
was invalid or because the account was closed.
Resolved
The transaction has been moved into a Resolved status by a user
to indicate that no further action related to the transaction is
required. Transactions can be moved into a Resolved status from a
status of Declined, Voided, Invalid/Closed Account, Disputed,
Uncollected NSF, Error, or In Research.
1. Log in to the Merchant Portal and select the Approved link from the Current Transaction
Summary.
2. Select the View link next to the transaction you would like to edit.
FIGURE 16 - VIEW COLUMN FOR APPROVED STATUS TRANSACTIONS
Merchant Capture
User Manual
14
© 1999-2013 Jack Henry & Associates, Inc.®
Merchant Capture
3. To edit the amount, select Edit to the left of the Sale field.
FIGURE 17 - TRANSACTION DETAILS PAGE WITH EDIT OPTION
4. Enter the new amount and a Reason for the change. Select Save.
FIGURE 18 - EDITING A TRANSACTION AMOUNT
5. To change the date the transaction will be processed, select Edit next to the Effective Date field.
Enter the date in MM/DD/YYYY format or choose the date from the calendar option. Enter a
Reason for the change and select Save.
Merchant Capture
User Manual
15
© 1999-2013 Jack Henry & Associates, Inc.®
Merchant Capture
FIGURE 19 - EDITING AN EFFECTIVE DATE
Voiding a Transaction
A transaction can be voided as long as it is still in a status of Approved, Awaiting Approval, or
Suspended.
1. Log in to the Merchant Portal and click a status from the Current Transaction Summary page
that has not yet been processed. For example, click the Approved status link.
FIGURE 20 - APPROVED STATUS LINK
Merchant Capture
User Manual
16
© 1999-2013 Jack Henry & Associates, Inc.®
Merchant Capture
2. A report of approved transactions displays. Select the View link next to the transaction you would
like to void.
FIGURE 21 - APPROVED STATUS TRANSACTION REPORT
3. Select Void This Transaction.
FIGURE 22 - VOIDING A TRANSACTION
4. To continue, choose Confirm Void.
Merchant Capture
User Manual
17
© 1999-2013 Jack Henry & Associates, Inc.®
Merchant Capture
FIGURE 23 - CONFIRMING VOIDING A TRANSACTION
5. After confirming the void, the system will have a prompt to Mark This Transaction Resolved.
Marking a transaction as resolved provides a reason why an item was voided for communicative
purposes. Click Mark This Transaction Resolved.
FIGURE 24 - MARKING A TRANSACTION RESOLVED
6. Enter a reason for resolving the transaction in the Reason field and click Resolve.
Merchant Capture
User Manual
18
© 1999-2013 Jack Henry & Associates, Inc.®
Merchant Capture
FIGURE 25 - ENTERING A REASON FOR RESOLVING A TRANSACTION
The transaction now appears in the Voided status count on the Current Transaction Summary.
Merchant Capture
User Manual
19
© 1999-2013 Jack Henry & Associates, Inc.®
Merchant Capture