1
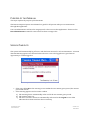
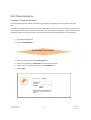
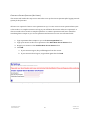
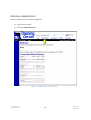
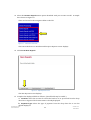
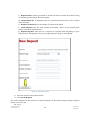
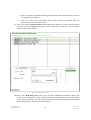
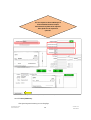
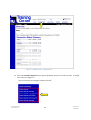
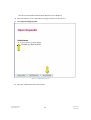
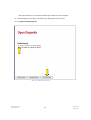
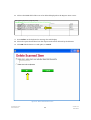
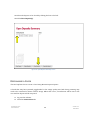
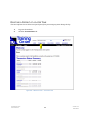
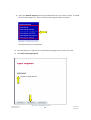
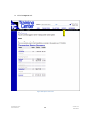
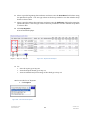
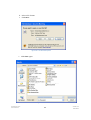
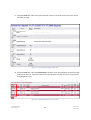
Remote Deposit Capture
User Manual
TABLE OF CONTENTS
Purpose of this Manual ......................................................................................................................1
Session Timeouts ...............................................................................................................................1
Overview ...........................................................................................................................................2
First Time Logging In ..........................................................................................................................3
Changing a Temporary Password ............................................................................................3
Secret Questions and Identification Phrases ...........................................................................5
Creating a Secret Question (All Users).........................................................................6
Choosing an Identification Phrase (Authorized Callers Only)........................................7
Creating a New Deposit .................................................................................................................... 10
Adding to an Existing Deposit ........................................................................................................... 15
Deleting a Check .............................................................................................................................. 19
Rescanning a Check .......................................................................................................................... 24
Closing a Deposit at the Time of Processing ...................................................................................... 29
Closing a Deposit at a Later Time ...................................................................................................... 30
Deleting a Deposit at the Time of Processing .................................................................................... 34
Deleting a Deposit at a Later Time .................................................................................................... 35
Notifications .................................................................................................................................... 37
Deposit Results Report ..................................................................................................................... 38
Glossary of Terms ............................................................................................................................ 47
Deposit Results Report Field Definitions ............................................................................... 47
Remote Deposit Field Definitions ......................................................................................... 49
Transaction Status Definitions .............................................................................................. 53
Remote Deposit Capture Item Details Definitions ................................................................. 55
Remote Deposit Capture
HVFCU User Manual
i
Version No.: 005
Revised. 201201
Remote Deposit Capture Deposit Status Definitions .............................................................. 57
Remote Deposit Capture
HVFCU User Manual
ii
Version No.: 005
Revised. 201201
PURPOSE OF THIS MANUAL
This topic explains the purpose of this document.
The Remote Deposit Capture User Manual is a guide for all persons who process transactions
through this application.
Your site administrator will need to assign specific roles to access this application. Please see the
User Administrator manual for instructions on how to assign roles.
SESSION TIMEOUTS
The system will automatically log off a user who has been inactive for at least 30 minutes. A Session
Timeout Warning appears two minutes before the user is set to be logged out to give them an
opportunity to remain logged in.
Figure 1 – Session Timeout Warning
•
•
If the user clicks OK on the warning screen within the two-minute grace period, the session
period will restart.
If the warning appears and no action is taken:
a) The warning closes automatically at the end of the two-minute grace period.
b) The session times out.
c) The user's browser session is automatically redirected to the Logout screen. This
indicates the session timed out due to inactivity.
Remote Deposit Capture
HVFCU User Manual
1
Version No.: 005
Revised 201201
OVERVIEW
This topic gives an overview of the Remote Deposit Capture application.
The Remote Deposit Capture application provides the ability to process your customers’ checks
through high speed or single-check scanners in order to convert them to image or electronic
transactions to later be credited to your bank account(s). Optional features available with this
application include:
•
•
•
•
•
•
Keyed data entry with or without additional custom fields.
Custom Batch ID.
Deposit Slip ID#.
Adjustment limit.
Default Payment Type.
A deposit for each batch. Deposits can consist of multiple batches of checks (the default
option) or each batch of checks can be a separate deposit. ACH items will be deposited
separately from Check21 items.
The system can detect duplicate transactions within 75 days of the original transaction being created.
Processors will need to be assigned the Remote Deposit role in order to access this application.
Your tabs and menu options may
differ slightly from those pictured.
Remote Deposit Capture
HVFCU User Manual
2
Version No.: 005
Revised 201201
FIRST TIME LOGGING IN
CHANGING A TEMPORARY PASSWORD
This task explains how to change a temporary password after logging in to the system for the first
time.
Your Admin will provide you with your site’s URL address, your user name, a temporary password,
and company name that you will need the first time you log into the system. The User Name and
Company fields are not case sensitive. The Password field is the only field that is case sensitive.
1. Open Internet Explorer.
2. Type the URL address.
Save this URL in your Favorites
3. Enter your user name in the User Name: box.
4. Enter your temporary Password next in the box provided.
5. Lastly, enter your company name in the Company: box.
6. Click Login.
Figure 2 – Customer Login screen
Remote Deposit Capture
HVFCU User Manual
3
Version No.: 005
Revised 201201
7. A prompt will appear forcing you to change your password. Follow the guidelines below
when creating your new password:
a.
b.
c.
d.
Must contain at least 1 upper case letter.
Must contain at least 1 lower case letter.
Must contain at least 1 number.
Must be at least 8 characters long.
8. Click Update Password.
Figure 3 – Create New Password screen
Passwords expire approximately every
90 days and are case sensitive.
Remote Deposit Capture
HVFCU User Manual
4
Version No.: 005
Revised 201201
SECRET QUESTIONS AND IDENTIFICATION PHRASES
This section explains the steps a new user will need to take the first time they log into the system.
The Secret Question and Answer provide you with the ability to reset your own password in the
event that you have forgotten it. This question, along with your email address in your profile, will
allow the system to provide you with a temporary password so that you don’t get locked out. The
question and answer are set up upon your first log in to the system and can be updated at any time.
An Identification Phrase and Response is required for all users who have been designated as an
Authorized Caller by their administrator. Only those users designated as Authorized Callers will
be allowed to contact customer support for any assistance. The Identification Response will be
requested of all Authorized Callers prior to providing any support. Unauthorized callers will be
directed back to their financial institution.
Remote Deposit Capture
HVFCU User Manual
5
Version No.: 005
Revised 201201
CREATING A SECRET QUESTION (A LL USERS)
This section will outline the steps a user must take to set up their Secret Question after logging into the
system for the first time.
All users are required to have a secret question set up. You can create a secret question that is just
a few words or a complete sentence as long as you will know the answer when it is requested. It
does not need to be a formal or complete question or contain a question mark, but it should be
something that is unique to you. Secret questions and answers are not case sensitive fields.
1. Type a question that is unique to you in the Secret Question: box
2. Type your answer to the secret question in the Enter New Secret Answer: box.
3. Retype your answer in the Confirm New Secret Answer: box.
4. Click OK.
a. If your answers agree, they will disappear from the screen.
b. If your answers don’t agree, retype them again then click OK.
Figure 4 – My Settings screen – Creating a Secret Question and Answer
Remote Deposit Capture
HVFCU User Manual
6
Version No.: 005
Revised 201201
CREATING A NEW DEPOSIT
This task explains how to create a new deposit.
1. Log into the website.
2. Click the Transactions tab.
Figure 10 – Welcome screen – Transactions tab
Remote Deposit Capture
HVFCU User Manual
10
Version No.: 005
Revised 201201
3. Select the Remote Deposit menu option identified with your scanner model. A sample
list is shown in Figure 10.
These are located in the navigation links on the left.
Figure 11 – Transactions tab menu
This causes the device to initialize and the Open Deposits screen displays.
4. Click Create New Deposit.
Figure 12 – Open Deposits screen
The New Deposits screen displays.
5. Complete the displayed fields as follows: (Not all fields may be visible.)
a. Location: Select the account for which the batch is to be processed from the drop
down list or bypass if the location name is already displayed.
b. Payment Type: Select the type of payment from the drop down list or use the
default displayed.
Remote Deposit Capture
HVFCU User Manual
11
Version No.: 005
Revised 201201
c. Deposit Name: System generated to include the date and time the batch is being
created along with a unique batch id number.
d. Custom Batch Id: If displayed, this is a required field that needs to be a unique
value each time.
e. Number of Checks: Enter the number of checks in the batch.
f. Total Amount: Enter the total amount of the batch. This is a two-decimal place
field, to include the decimal point.
g. Deposit Slip ID#: This may be a required or optional field depending on your
requirements. If displayed, enter your assigned deposit slip ID or leave blank.
Figure 13 – New Deposit screen
6. Place the checks in the scanner feeder.
7. Click Create Deposit.
The screen displayed as the checks are scanned depends on the Remote Deposit Capture options
turned on for your site.
8. Go to:
Remote Deposit Capture
HVFCU User Manual
12
Version No.: 005
Revised 201201
a. Step 9 if you have completed scanning all the items in the batch and do not want to
key additional information.
b. Step 10 to add more information about your customer associated with the
transaction or the transaction itself.
9. This is the (default) Deposit View which displays the MICR lines of each check scanned.
You may see items highlighted in yellow, red or with question marks (?). You can ignore
them and proceed to Step 11.
Figure 14 – Deposit View screen
10. This is the Data Entry View where you can enter additional information about your
customer, the transaction, or both. This information is optional and you can decide which,
if any, fields to populate. Use the left and right arrows to scroll through each check in the
batch. When you are finished, proceed to Step 11.
Remote Deposit Capture
HVFCU User Manual
13
Version No.: 005
Revised 201201
You can request to have added up to 3
custom labeled Customer and/or
Transaction level fields to be captured.
These fields can be required or
optional.
Figure 15 – Remote Deposit Capture with Data Entry screen
11. Click Next/Summary.
The Open Deposits Summary screen displays.
Remote Deposit Capture
HVFCU User Manual
14
Version No.: 005
Revised 201201
Figure 16 – Open Deposits Summary screen
ADDING TO AN EXISTING DEPOSIT
This task explains how to add to a deposit that already exists.
A user can add items to any deposit that is still open and displayed on either the Open Deposits or
Open Deposits Summary screens.
1. Log into the website.
2. Click the Transactions tab.
Remote Deposit Capture
HVFCU User Manual
15
Version No.: 005
Revised 201201
Figure 17 – Welcome screen – Transactions tab.
3. Select the Remote Deposit menu option identified with your scanner model. A sample
list is shown in Figure 17.
This is located in the navigation links on the left.
Figure 18 – Transactions tab menu
Remote Deposit Capture
HVFCU User Manual
16
Version No.: 005
Revised 201201
The device will initialize and the Open Deposits screen displays.
4. Select the deposit to be reopened by clicking on the box to the left of it.
5. Click Open Existing Deposit.
Figure 19 – Open Deposits screen
6. Place the additional items in the scanner.
Remote Deposit Capture
HVFCU User Manual
17
Version No.: 005
Revised 201201
7. Click Next/Summary.
Figure 20 – Deposit View screen
Remote Deposit Capture
HVFCU User Manual
18
Version No.: 005
Revised 201201
The Open Deposits Summary screen displays.
Figure 21 – Open Deposits Summary screen
DELETING A CHECK
This task explains how to delete a check using Remote Deposit Capture.
1. Log into the website.
2. Click the Transactions tab.
Remote Deposit Capture
HVFCU User Manual
19
Version No.: 005
Revised 201201
Figure 22 – Welcome screen – Transactions tab
3. Select the Remote Deposit menu option identified with your scanner model. A sample
list is shown in Figure 22.
This is located in the navigation links on the left.
Figure 23 – Transactions tab menu
Remote Deposit Capture
HVFCU User Manual
20
Version No.: 005
Revised 201201
This causes the device to initialize and the Open Deposits screen displays.
4. Select the deposit the check is located in by clicking the box to its left.
5. Click Open Existing Deposit.
Figure 24 – Open Deposits screen
Remote Deposit Capture
HVFCU User Manual
21
Version No.: 005
Revised 201201
6. Click on the MICR field of the item to be deleted displayed on the Deposit View screen.
Figure 25 – Remote Deposit Capture - Deposit View screen
7. Press Delete on the keyboard. A message box will display.
8. Select the option that defines how the deposit total will be affected by the deletion.
9. Click OK if the deletion is to take place, or Cancel.
Figure 26 – Delete Scanned Item screen
Remote Deposit Capture
HVFCU User Manual
22
Version No.: 005
Revised 201201
10. Click Next/Summary if there are no more corrections to be made in this deposit.
Figure 27 – Updated Remote Deposit Capture Deposit View screen
Remote Deposit Capture
HVFCU User Manual
23
Version No.: 005
Revised 201201
11. Select the deposit to be closed by clicking the box to the left.
12. Click Close Deposit(s).
Figure 28 - Open Deposits Summary screen
RESCANNING A CHECK
This task explains how to rescan a check using Remote Deposit Capture.
A check that may have jammed, piggybacked or the image quality was bad during scanning may
need to be rescanned to obtain a better image. When this occurs, a notification will be sent to the
user and the deposit will be reopened.
1. Log into the website.
2. Click the Transactions tab.
Remote Deposit Capture
HVFCU User Manual
24
Version No.: 005
Revised 201201
Figure 29 – Welcome screen Transactions tab
3. Select the Remote Deposit menu option identified with your scanner model. A sample
list is shown in Figure 29. This is located in the navigation links on the left.
Figure 30 – Transaction tab menu
This causes the device to initialize and the Open Deposits screen displays.
Remote Deposit Capture
HVFCU User Manual
25
Version No.: 005
Revised 201201
4. Select the deposit where the item needs to be rescanned by clicking the box to its left.
5. Click Open Existing Deposit.
Figure 31 – Open Deposits screen
6. Click the image of the check to be rescanned to the left of the MICR line field on the
Deposit View screen.
Figure 32 – Remote Deposit Capture – Deposit View screen
Remote Deposit Capture
HVFCU User Manual
26
Version No.: 005
Revised 201201
7. Place the check in the scanner so it can be rescanned.
8. Click Continue when the image is displayed.
9. Click Next/Summary if there are no more corrections to be made in this deposit.
Figure 33 – Rescanned check screen
Remote Deposit Capture
HVFCU User Manual
27
Version No.: 005
Revised 201201
10. Select the deposit to be closed by clicking the box to the left.
11. Click Close Deposit(s).
Figure 34 – Open Deposits Summary screen
Remote Deposit Capture
HVFCU User Manual
28
Version No.: 005
Revised 201201
CLOSING A DEPOSIT AT THE TIME OF PROCESSING
This task explains how to close a deposit once all of the transactions have been scanned.
It is recommended that each deposit
be closed as soon as it has completed
scanning. A deposit can be closed at
the time of processing, or later in the
day.
The user must be at the Open Deposit Summary screen to continue.
1. Select the deposit or deposits to be closed by clicking the box to the left.
2. Click Close Deposit(s).
Figure 35 - Open Deposits Summary screen
Remote Deposit Capture
HVFCU User Manual
29
Version No.: 005
Revised 201201
Close Batch prompt on Open Deposits Summary screen
A Close Batch prompt will appear on
the Open Deposits Summary screen if
the user attempts to navigate to
another Merchant Portal tab with
batches still open.
Note: This does not apply if selecting one of the 4 options at the bottom of the screen (Create New
Deposit, Close, Delete or Open).
Figure 41 – Close Batch prompt
CLOSING A DEPOSIT AT A LATER TIME
This task explains how to return to an existing open batch and close it.
It is recommended that each deposit be closed as soon as it has completed scanning, however, a
deposit can be closed at a later time if it needs to remain open for a while.
1. Log into the website.
2. Click the Transactions tab.
Remote Deposit Capture
HVFCU User Manual
30
Version No.: 005
Revised 201201
Figure 367 – Welcome screen Transactions tab
Remote Deposit Capture
HVFCU User Manual
31
Version No.: 005
Revised 201201
3. Select the Remote Deposit menu option identified with your scanner model. A sample
list is shown in Figure 36.
Figure 378 – Transactions tab menu
The Open Deposits screen displays.
4. Select the deposit to be closed by clicking the box to the left of it.
5. Click Open Existing Deposit.
Figure 389 – Open Deposits screen
Remote Deposit Capture
HVFCU User Manual
32
Version No.: 005
Revised 201201
6. Click Next/Summary.
The Open Deposits Summary screen displays.
7. Select the deposit or deposits to be closed by clicking the box to the left.
8. Click Close Deposit(s).
Figure 40 - Open Deposits Summary screen
Close Batch prompt on Open Deposits Summary screen
A Close Batch prompt will appear on
the Open Deposits Summary screen if
the user attempts to navigate to
another Merchant Portal tab with
batches still open.
Note: This does not apply if selecting one of the 4 options at the bottom of the screen (Create New
Deposit, Close, Delete or Open).
Remote Deposit Capture
HVFCU User Manual
33
Version No.: 005
Revised 201201
Figure 41 – Close Batch prompt
DELETING A DEPOSIT AT THE TIME OF PROCESSING
This task explains how to delete a deposit from processing. A deposit can be deleted as soon as it has
completed scanning.
The user must be at the Open Deposit Summary screen to continue.
1. Select the deposit or deposits to be deleted by clicking the boxes to the left.
2. Click Delete Deposit(s).
Figure 42 - Open Deposits Summary screen
Remote Deposit Capture
HVFCU User Manual
34
Version No.: 005
Revised 201201
DELETING A DEPOSIT AT A LATER TIME
This task explains how to delete an open deposit from processing any time during the day.
1.
Log into the website.
2.
Click the Transactions tab.
Figure 393 – Welcome screen – Transactions tab
Remote Deposit Capture
HVFCU User Manual
35
Version No.: 005
Revised 201201
3. Select the Remote Deposit menu option identified with your scanner model. A sample
list is shown in Figure 41. This is located in the navigation links on the left.
Figure 404 – Transactions tab menu
The Open Deposits screen displays.
4. Select the deposit or deposits to be deleted by clicking the box or boxes to the left.
5. Click Delete Existing Deposit.
Figure 415 – Open Deposits screen
Remote Deposit Capture
HVFCU User Manual
36
Version No.: 005
Revised 201201
NOTIFICATIONS
This topic explains about the email notifications available to be sent upon reconciliation of a closed
batch.
Notifications are used by the Remote Deposit Capture application to let users know when the
deposit has completed the MICR repair, CAR/LAR, keying, and/or balancing steps and the status of
the deposit.
An E-mail is sent to the user who created the deposit along with any other interested parties
designated. A notification will inform the user whether the deposit was approved without any
errors, approved with adjustments, rejected, an item needs rescanning, there were duplicate items
in the deposit, or there were rejected items in the deposit. The Deposit Results Report assists with
determining the item that needs further attention.
Figure 426 – Sample Remote Deposit Capture notification
A deposit will be reopened if there are items that need to be rescanned. When this occurs, the user
will need to correct the deposit and resubmit it for processing.
Remote Deposit Capture
HVFCU User Manual
37
Version No.: 005
Revised 201201
DEPOSIT RESULTS REPORT
This task explains how to generate the Deposit Results Report.
The Deposit Results report is a date range report used to display a list of batches created using the
Remote Deposit Capture application. It can be used to monitor the status of current day batches
and the items in the batches or look at previous days’ batches and items.
Batches created using the Remote
Deposit Capture application can
represent a deposit or be part of a
multi-batch deposit.
1. Log into the Merchant Portal.
Figure 437– Customer Login screen
Remote Deposit Capture
HVFCU User Manual
38
Version No.: 005
Revised 201201
2. Click the Reports tab.
Figure 448- Reports tab screen
Remote Deposit Capture
HVFCU User Manual
39
Version No.: 005
Revised 201201
3. Click Deposit Results.
Figure 459- Reports tab menu
Remote Deposit Capture
HVFCU User Manual
40
Version No.: 005
Revised 201201
4. Select a specific location or All Locations from the Location: field drop down.
Figure 50- Deposits Results criteria screen
Figure 51 – Location options
If you are creating the report for current day batches skip the next step (Step 5) and continue with
Step 6. For all other days’ batches you can utilize Step 5 or Steps 6 & 7.
5. Quick Pick options are predefined day ranges. Using this filter will automatically
populate the Start Date and End Date fields with the proper dates. Select a Quick Pick:
option from the drop down list or leave the default set to Custom if not using this option.
Figure 462– Quick Pick date options
Remote Deposit Capture
HVFCU User Manual
41
Version No.: 005
Revised 201201
6. Select a specific beginning date and time and insert into the Start Date: field unless using
the Quick Pick option. You can type a date in the box provided or use the calendar drop
down to select a date.
7. Select a specific ending date and time and insert into the End Date: field unless using the
Quick Pick option. You can type a date in the box provided or use the calendar drop down
to select a date.
8. Click Get Deposits.
A list of batches displays.
Step 12. Step 11. Step 10.
Figure 473 – Deposit Results Report
9. To:
• Save the report go to Step 10.
• View the deposit details go to Step 11.
• View item details and/or an image of the check go to Step 12.
10. To save the list of deposits
a. Click Export.
Figure 484 – Save file format options
Remote Deposit Capture
HVFCU User Manual
42
Version No.: 005
Revised 201201
b. Select a file format
c. Click Save.
Figure 495 – File Download options
c. Click Save again.
Figure 506 – Save As screen
Remote Deposit Capture
HVFCU User Manual
43
Version No.: 005
Revised 201201
11. Click the View link under the Deposit Details column to view the events the entire batch
has been through.
Figure 517 – Deposit Results Deposit Details link
12. Click the View link under the Item Details column to view the individual transactions that
make up the deposit. Any items that need to be rescanned or that have been rejected will
be highlighted in red.
Figure 528 – Deposit Results list of items in batch
Remote Deposit Capture
HVFCU User Manual
44
Version No.: 005
Revised 201201
a. Click Image under the Deposit Item column to view a copy of the front and back of
the check.
b. Click Print located in the upper left corner of the image to get a hard copy of the
check.
Figure 539 – Transaction front & back image
Remote Deposit Capture
HVFCU User Manual
45
Version No.: 005
Revised 201201
c. Click View under the Deposit Item column to look at item detail information.
Figure 60 – Deposit Results item details
d. Click Show Event History to view the automated steps and processes that the
transaction has gone through.
Figure 61 – Transaction Event History
Remote Deposit Capture
HVFCU User Manual
46
Version No.: 005
Revised 201201
GLOSSARY OF TERMS
DEPOSIT RESULTS REPORT FIELD DEFINITIONS
This section defines the fields on the Deposit Result Report. They are listed in alphabetical order for
quick reference.
ACH Deposit Amount
This field contains the total amount of the ACH items in the batch/deposit.
ACH Deposit Count
This field contains the number of ACH items in the batch/deposit.
ACH Deposit Date
This field contains the deposit date of the ACH items within the batch/deposit.
C21 Deposit Amount
This field contains the total amount of the Check 21/Image Replacement Document (IRD) items in
the batch/deposit.
C21 Deposit Count
This field contains the number of Check 21/Image Replacement Document (IRD) items in the
batch/deposit.
C21 Deposit Date
This field contains the deposit date of the Check 21/Image Replacement Document (IRD) items
within the batch/deposit.
Create Date
This field contains the date the batch/deposit was scanned.
Custom Batch ID
This is a Remote Deposit Capture option that, if enabled, will display a required field on the New
Deposit screen and be reflected on the Deposit Results Report. The field will contain a unique label
for a batch/deposit processed.
Deposit Details
This field contains a link to the list of steps the batch/deposit has taken and who processed it.
Deposit Slip ID#
This is a Remote Deposit Capture option that, if enabled and not a static value, will display a field on
the New Deposit screen and be reflected on the Deposit Results Report. This field can contain
either predefined or optional values to be applied to the virtual deposit slip.
Remote Deposit Capture
HVFCU User Manual
47
Version No.: 005
Revised 201201
Deposit Status
This field contains the status of the entire batch/deposit at the time the report is generated. See
Remote Deposit Capture Deposit Status Definitions for a description of the available statuses.
Description
This field contains the Deposit Name which is made up of the date and time the batch was created
surrounding a unique system-assigned batch Id.
Item Details
This field contains a link to a list of the individual checks that make up the batch/deposit and their
respective statuses.
Location
This field is found on the New Deposit screen and Deposit Results Report that contains the account
(location) to be credited with the payment.
Received Amount
This field contains the amount of the deposit after review.
Received Count
This field contains the number of items identified in the deposit after review.
Total Deposit Amount
This field contains the total amount of the deposit.
Total Deposit Count
This field contains the total number of items in the deposit.
Your Amount
This field contains the amount of the deposit you entered when creating the batch/deposit.
Your Count
This field contains the number of items you entered when creating the batch/deposit.
Remote Deposit Capture
HVFCU User Manual
48
Version No.: 005
Revised 201201
REMOTE DEPOSIT FIELD DEFINITIONS
This topic provides definitions for the various fields associated with creating a Remote Deposit Capture
batch/deposit. They are listed in alphabetical order for quick reference.
Account Number
This field contains the account number to be debited. This is a required field.
Address
This is an optional key entry field found on the Data Entry View screen and contains the mailing
address of your customer. This field will repopulate the next time a check from the same customer
is scanned. This field is not available to appear on reports.
Amount
This field is found on various user screens and contains the amount of the transaction as a two
decimal figure to include the decimal point. This is a required field.
Check Number
This field contains the check serial number and can be viewed in the Transaction Details screen and
on the Deposit Results Report under the Item Details link.
City
This optional key entry field found on the Data Entry View screen contains the city where your
customer resides. This field will repopulate the next time a check from the same customer is
scanned. This field is not available to appear on reports.
Company Name
This optional key entry field found on the Data Entry View screen replaces the Last Name field
when the Customer Type field is set to Business. This field will repopulate the next time a check
from the same customer is scanned, and you can search for information on this customer or their
transactions by this field. This field is not available to appear on reports.
Country
This optional key entry field found on the Data Entry View screen contains the country where your
customer resides. This field will repopulate the next time a check from the same customer is
scanned. This field is not available to appear on reports.
Customer Number
This is an optional key entry field found on the Data Entry View screen that must be unique for each
of your customers. This field will auto-populate if left blank and repopulate the next time a check
from the same customer is scanned. This field is available to appear on reports, and users can
search for information on this customer or their transactions by this field.
Customer Type
This field is found on the Data Entry View screen. It is a required field that defaults to Individual
but can be changed to Business for non-personal checks.
Remote Deposit Capture
HVFCU User Manual
49
Version No.: 005
Revised 201201
Data Entry View
This is an optional Remote Deposit Capture view of the scanned transactions. This view is enabled
when the optional key entry option is requested along with Remote Deposit Capture.
Daytime Phone
This is an optional key entry field found on the Data Entry View screen and contains your
customer’s daytime phone number. This field will repopulate the next time a check from the same
customer is scanned. This field is not available to appear on reports.
Deposit Name
This field is found on the New Deposit screen and Deposit Results Report. It contains the system
generated time, unique batch/deposit ID, and date the deposit is being created. You can change this
field to contain a unique value.
Deposit View
This is the default Remote Deposit Capture view of the scanned transactions. The screen displays
the MICR lines of each check in the batch/deposit.
Description
This is an optional key entry field found on the Data Entry View screen. This field is informational
only and can be left blank. This field appears on the Transaction Details screen of a transaction.
Driver’s License
This is an optional key entry field found on the Data Entry View screen and contains the driver’s
license number of your customer. This field will repopulate the next time a check from the same
customer is scanned. This field is not available to appear on reports.
Email Address
This is an optional key entry field found on the Data Entry View screen and contains the Email
address of your customer. This field will repopulate the next time a check from the same customer
is scanned. This field is not available to appear on reports.
Evening Phone
This is an optional key entry field found on the Data Entry View screen and contains your
customer’s evening phone number. This field will repopulate the next time a check from the same
customer is scanned. This field is not available to appear on reports.
Fax Number
This is an optional key entry field found on the Data Entry View screen and contains your
customer’s fax number. This field will repopulate the next time a check from the same customer is
scanned. This field is not available to appear on reports.
Remote Deposit Capture
HVFCU User Manual
50
Version No.: 005
Revised 201201
Federal Tax ID No.
This is an optional key entry field found on the Data Entry View screen and replaces the Social
Security No. field when the Customer Type field is set to Business. This field will repopulate the
next time a check from the same customer is scanned. This field is not available to appear on
reports.
First Name
This is an optional key entry field found on the Data Entry View screen and contains your
customer’s first name. This field will repopulate the next time a check from the same customer is
scanned. This field is not available to appear on reports.
Last Name
This is an optional key entry field found on the Data Entry View screen and contains your
customer’s last name. This field will repopulate the next time a check from the same customer is
scanned. Users can search for information on this customer or their transactions by this field but
this field is not available to appear on reports.
Location
This field is found on the New Deposit screen and Deposit Results Reports that contains the account
(location) to be credited with the payment. This is a required field.
Name On Account
This is an optional key entry field found on the Data Entry View screen and contains the name of the
person from whom the item was received or the actual name used on the bank account. This field
will repopulate the next time a check from the same customer is scanned. This field will appear on
reports.
Number of Checks
This field is found on various user screens and contains the number of checks in the deposit to be
scanned.
Payment Origin
This field is found on the Data Entry View screen displays a value based on either your input from
the Payment Type field on the New Deposit screen or a previously defined default value. It
contains one of the following:
Mailed In
Drop Box
Retail / Point of Purchase
Back Office
Remote Deposit Capture
HVFCU User Manual
51
Version No.: 005
Revised 201201
Payment Type
This required field, if displayed, is found on the New Deposit screen. This field will only appear if a
default value has not already been predefined. The field values that may be available to select from
are:
Mailed In
Drop Box
Retail / Point of Purchase
Back Office
Routing Number
This field is found on the Deposit View screen as well as the Deposit Results Report under the View
Item Details link. It contains the ABA (American Bankers Association) number of the bank where
the account is located. This is a required field.
Social Security No.
This is an optional key entry field found on the Data Entry View screen and contains the social
security number of your customer. This field will repopulate the next time a check from the same
customer is scanned. This field is not available to appear on reports.
State
This is an optional key entry field found on the Data Entry View screen and contains the state from
which your customer’s driver’s license was issued. This field will repopulate the next time a check
from the same customer is scanned. This field is not available to appear on reports.
Suite/Apt #
This is an optional key entry field found on the Data Entry View screen and contains the suite or
apartment number of your customer. This field will repopulate the next time a check from the same
customer is scanned. This field is not available to appear on reports.
Total Amount
This field displays on and contains the total dollar amount of the deposit being scanned.
Transaction Number
This is an optional key entry field found on the Data Entry View screen and must be unique for each
transaction processed. This field will be automatically populated if left blank and will appear on
reports.
Zip/Postal
This is an optional key entry field found on the Data Entry View screen and contains the Zip Code or
Postal Code of your customer. This field will repopulate the next time a check from the same
customer is scanned. This field is not available to appear on reports.
Remote Deposit Capture
HVFCU User Manual
52
Version No.: 005
Revised 201201
TRANSACTION STATUS DEFINITIONS
This topic provides definitions for the transaction statuses. They are listed in alphabetical order for
quick reference.
Approved
This transaction processing status indicates payment information has been verified and a
transaction will be processed later. This is the only status that does not subscribe to the rolling 60day rule.
Awaiting Approval
This transaction processing status indicates payment information has been verified, but a
secondary individual with the organization must approve the transaction before processing.
Awaiting Capture
This status does not apply.
Collected
This transaction processing status indicates the collection system has recovered funds for an ACH
NSF transaction.
Declined
This transaction processing status indicates a transaction has been declined by the system. The
transaction will not be processed.
Disputed
This transaction processing status indicates an account holder has disputed the transaction. The
transaction will be charged back.
Error
This transaction processing status indicates an internal error has occurred in the system. Please
contact customer service.
In Collection
This transaction processing status indicates an ACH NSF transaction is in the collection system.
Additional attempts are being made to recover funds, plus any applicable fees.
In Research
This transaction processing status indicates a transaction has returned and further research is
required to determine the reason of the return.
Invalid/Closed Account
This transaction processing status indicates a transaction has been returned because the account
number was not valid or the account is closed. The transaction will be charged back.
Remote Deposit Capture
HVFCU User Manual
53
Version No.: 005
Revised 201201
Other Check21 Returns
This transaction processing status indicates a Check 21 transaction has returned with a reason of
Signature Irregular, Missing Endorsement or undreadable, or Refer to Maker. The transaction will
be charged back.
Processed
This transaction processing status indicates a transaction has been transmitted to the applicable
network. Changes cannot be made.
Resolved
This transaction processing status indicates an individual with the organization has marked the
item as resolved. No further processing will occur.
Suspended
This transaction processing status indicates the system has suspended a transaction because the
dollar amount or number of transactions exceeds the present limit.
Uncollected NSF
This transaction processing status indicates the collection system was not able to recover the ACH
NSF transaction. The transaction will be charged back.
Voided
This transaction processing status indicates an individual with the organization has marked the
item as voided. The transaction will not be processed.
Remote Deposit Capture
HVFCU User Manual
54
Version No.: 005
Revised 201201
REMOTE DEPOSIT CAPTURE ITEM DETAILS DEFINITIONS
This topic provides definitions for the Remote Deposit Capture Item Details fields. They are listed in
alphabetical order for quick reference.
Amount
This field contains the amount of the check after being reviewed. A value of $0.00 designates that
the check was either rejected or a duplicate and will not be included in the batch/deposit total.
Amount Source
This fields indicates whether a check needed special handling to determine the amount, the MICR
line etc. Valid values displayed are: Keyed or Read.
Check #
The serial number of the check taken from the MICR line.
Customer Name
The field contains the optional key entry field “Name on Account” data, if keyed.
Deposit As
This field contains how the check will be processed – either as an ACH or Check21 (IRD)
transaction.
Deposit Item
This field contains the links to either view or print an Image of the check or View the specific
automated steps the check has gone through or is in the process of going through.
Image Quality Pass
This field identifies whether a check image is good or not.
Item Date
This field contains the date the check was scanned.
Item Status
•
•
•
•
•
Deposited - This item status indicates the item has processed through CAR/LAR, proof
function, and is part of a closed deposit. It has been sent to transaction processing for end
of day processing at the designated cutoff time.
Duplicate - This item status indicates the item was sent to transaction processing and
rejected as a duplicate. The item will not be processed with this batch/deposit.
Error - This item status indicates the item has been sent to transaction processing, but an
error occurred preventing the item from being processed. The item will be reviewed.
In Review - This item status indicates the item is awaiting MICR repair or amount entry.
The item status will change once these steps are completed.
Needs Rescan - This item status indicates the item has a poor image quality or is a partial
image. The item will cause the batch/deposit to be re-opened so that you can rescan it
again. It must be rescanned in order for the batch/deposit to be processed.
Remote Deposit Capture
HVFCU User Manual
55
Version No.: 005
Revised 201201
•
•
Open - This item status indicates the item was scanned with no problems in an open
deposit. Once the deposit status is marked as deposited, the item will be sent to transaction
processing.
Rejected - This item status indicates the item has been rejected and will not be processed
due to any number of reasons. (E.g. image quality, invalid MICR, invalid payment origin,
etc.).
Routing/Account #
This field contains the Routing and Transit number of the check captured when the MICR line was
scanned.
Scanned Count
This field contains the number of times an item was scanned.
Sequence #
This field contains the sequence of the check within the batch/deposit.
Remote Deposit Capture
HVFCU User Manual
56
Version No.: 005
Revised 201201
REMOTE DEPOSIT CAPTURE DEPOSIT STATUS DEFINITIONS
This topic provides definitions for the Remote Deposit Capture Deposit statuses. They are listed in
alphabetical order for quick reference.
Deleted
This deposit status indicates the entire deposit has been deleted by someone in your organization
prior to closing it. The deposit may not be deleted once it has been closed. None of the items will
be sent to transaction processing.
Deposited
This deposit status indicates all items have been processed successfully, and the deposit is in
balance with no discrepancies or errors. These items are now in the approved status, and an E-mail
notification has been sent.
Deposited with Adjustment
This deposit status indicates one or more of the items within this deposit caused an adjustment to
the total deposit amount. The transactions have been sent to transaction processing with the
adjusted deposit amount. An E-mail notification has been sent.
Open for Scanning
This deposit status indicates a deposit has been created and is open to scan. Items can be scanned
into this deposit until it is closed.
Partial Deposit
This deposit status indicates one or more of the items was removed from the deposit due to a
duplicate or rejected item. The deposit has been sent to transaction processing with the deposit
total minus the items that will not be processed. An E-mail notification has been sent.
Rejected
This deposit status indicates the entire deposit has been rejected. A deposit is rejected when the
adjustment amount exceeds the adjustment limit assigned by the bank or when all items within the
deposit are rejected possibly due to all being duplicates.
Submitted
This deposit status indicates the deposit has been closed, and the items are being reviewed for
accuracy and errors. Once finished, the status of the items will change to one of the statuses defined
previously.
Remote Deposit Capture
HVFCU User Manual
57
Version No.: 005
Revised 201201