1
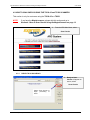
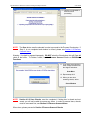
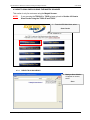
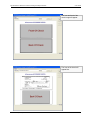
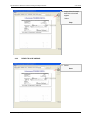
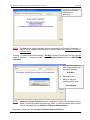
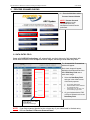
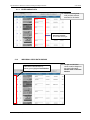
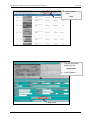
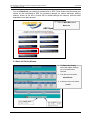
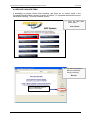
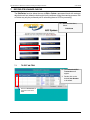
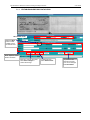
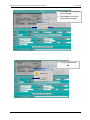
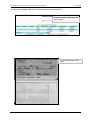
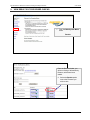
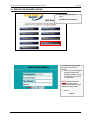
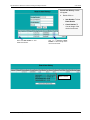
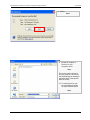
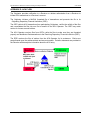
Electronic Check Processing and
Remote Deposit System
User Guide
ExpressCheck21- Electronic Check Processing and Deposit Solution
User Guide
TABLE OF CONTENTS
1.
EXPRESSCHECK21 - SECURE PAYMENT SYSTEMS ARC / CHECK 21 SOLUTION.................. 4
2.
ABOUT SECURE PAYMENT SYSTEMS (SPS)...................................................................................... 5
2.1
2.2
2.3
3.
THE COMPANY............................................................................................................................................ 5
CUSTOM TAILORED APPLICATIONS...................................................................................................... 5
SPS CONTACT LIST..................................................................................................................................... 5
GETTING STARTED.................................................................................................................................. 6
3.1
CUSTOMER LOGIN ..................................................................................................................................... 6
3.1.1 LOGIN PAGE ................................................................................................................................................ 6
4.
SECURE PAYMENT SYSTEMS ELECTRONIC CHECK PROCESSING SYSTEM ........................ 7
4.1
4.1.1
4.2
4.2.1
4.2.2
4.3
4.3.1
4.3.2
5.
ELECTRONIC CHECK PROCESSING SYSTEM........................................................................................ 7
PREPARE CHECKS FOR SCANNING........................................................................................................ 7
HOW TO SCAN CHECKS USING THE TS230-65 AND TS350/400ES SCANNERS .................................. 9
READY TO SCAN CHECKS ........................................................................................................................ 9
SAVE CHECKS ........................................................................................................................................... 10
HOW TO SCAN CHECKS USING THE MAGTEK SCANNER ................................................................ 12
READY TO SCAN CHECKS ...................................................................................................................... 12
READY TO SAVE CHECKS ...................................................................................................................... 14
PROCESS SCANNED CHECKS.............................................................................................................. 16
5.1
DATA ENTRY FIELD ................................................................................................................................. 16
5.1.1 ENTER CHECK DATA............................................................................................................................... 17
5.1.2 INDIVIDUAL CHECK DATA WINDOW.................................................................................................. 17
6.
BATCH OUT .............................................................................................................................................. 21
6.1
BATCH OUT FACILITY WINDOW .................................................................................................................... 21
6.2
RECOVER UNSAVED ITEMS ................................................................................................................... 23
6.2.1 SCAN MORE CHECKS .............................................................................................................................. 24
7.
EDIT/DELETE SCANNED CHECKS ..................................................................................................... 25
7.1
TO EDIT AN ITEM ...................................................................................................................................... 25
7.1.1 EDITABLE/NON-EDITABLE DATA FIELDS.......................................................................................... 26
8.
BASIC VIEWING AND SEARCH FEATURES ..................................................................................... 28
8.1
VIEW BATCHES......................................................................................................................................... 28
9.
VIEW RESULTS OF PROCESSED CHECKS....................................................................................... 30
10.
SEARCH FOR SCANNED CHECKS ...................................................................................................... 32
11.
ADVANCED FEATURES ......................................................................................................................... 34
11.1
CREATE A COMMA SEPARATED VALUE (CSV) FILE FOR DATA EXPORT OVERVIEW .............. 34
11.1.1 HOW TO CREATE A COMMA SEPARATED VALUE (CSV) FILE: ..................................................... 34
11.2
COMBINED DAILY RETURNS (RETURN CHECK DETAILS) .............................................................. 36
12.
OPERATIONAL GUIDELINES............................................................................................................... 38
12.1
TIPS ON MANAGING THE CHECK SCANNING PROCESS .................................................................. 38
12.1.1 WHAT TO DO WITH THE CHECK AFTER IT’S BEEN SCANNED...................................................... 38
12.1.2 RULES AND REGULATIONS ................................................................................................................... 38
12.1.3 SCANNER OPERATIONS & MAINTENANCE........................................................................................ 38
© 2007 Secure Payment Systems
2
Tel: 1.888.313.7842
ExpressCheck21- Electronic Check Processing and Deposit Solution
User Guide
APPENDIX B BANKING RULES............................................................................................................................. 39
12.2
EXAMPLE NOTIFICATION LANGUAGE................................................................................................ 39
12.2.1 REQUIREMENTS NECESSARY TO ELECTRONICALLY RE-PRESENT RETURNED
ITEMS OR TO ELECTRONICALLY RECOVER A STATE ALLOWED NSF FEE ............................... 39
12.2.2 REQUIREMENTS NECESSARY TO CONVERT CONSUMER CHECKS TO
ELECTRONIC NACHA – ARC ITEMS ..................................................................................................... 39
APPENDIX C NACHA RULES AND REGULATIONS......................................................................................... 40
12.3
NACHA RULES AND REGULATIONS..................................................................................................... 40
APPENDIX D ACH FLOW........................................................................................................................................ 41
APPENDIX F ACH RULES ENFORCEMENT....................................................................................................... 42
© 2007 Secure Payment Systems
3
Tel: 1.888.313.7842
ExpressCheck21- Electronic Check Processing and Deposit Solution
User Guide
1. EXPRESSCHECK21 SECURE PAYMENT SYSTEMS ARC / CHECK 21 SOLUTION
O
ur Accounts Receivable Conversion (ARC) / Check 21 solution in conjunction with our
superior Image Replacement Document (IRD) technology, processes and deposits any type
of paper check received via U. S. Mail or at payment locations, deposited as electronic
transactions, all through a single point of entry system. Our ARC system converts paper checks
into electronic transactions, and deposits the checks as electronic data – eliminating a trip to the
bank.
Benefits:
•
•
•
•
•
•
Easy-to-use solution, requiring a check scanner and internet access
Speed up your check processing
24-48 hour funds availability*
No more waiting on line at the Bank
Faster advice of returned items, in 3-5 days vs. 7-10-14 days in paper form
Reduce banking fees on returned items
Features:
• Retain customer specific data so that it does not have to be entered repeatedly
• Create an export data file that can be uploaded into your accounts receivable program
• 24/7 access to check images and data
• Ability to consolidate banking activity for multiple locations to single account
Digital Check Scanners
The Digital Check TS-350/400ES is a high volume scanner that accepts 100
checks at a time, processing 60-80 checks per minute, + or - 3,000 per day,
and images both sides of checks in one pass.
Digital Check TS-350/400ES
The Digital Check TS230-65 is a mid volume scanner that accepts 25 checks
at a time, processing up to 65 items per minute, + or – 500 per day, and
images both sides of the checks in one pass.
Digital Check TS230-65
The Magtek Imager is a low volume scanner that accepts 1 check at a time,
processing + or – 30 checks per day, and images both sides of the checks in
two passes.
Magtek Imager
*24 hour funding available for a nominal fee.
© 2007 Secure Payment Systems
4
Tel: 1.888.313.7842
ExpressCheck21- Electronic Check Processing and Deposit Solution
User Guide
2. ABOUT SECURE PAYMENT SYSTEMS
2.1 THE COMPANY
Secure Payment Systems (SPS) is a transaction processing and risk management company
that specializes in the needs of small and midsize businesses. In addition to traditional pointof-sale transaction processing, we offer electronic check conversion, gift and loyalty card
processing, a proprietary ATM debit payroll / international funds transfer card, as well as an
array of sophisticated Web-based products including a recurring debit and credit platform and
the popular check21 solution. In other words, SPS provides you with affordable solutions that
you need to compete with the retail elite.
SPS is helping business change the way it operates – implementing enhanced check fraud
algorithms, focusing on new customer marketing strategies, maximizing untapped opportunity,
protecting profits and increasing revenues. And that is no small change.
2.2 CUSTOM TAILORED APPLICATIONS
SPS products and services are highly scalable and adaptable within all business
environments via our secure state-of-the-art, web based software. We understand that one
size does not fit all. No matter what your business, SPS can custom tailor a payment
solution to meet your specific needs so you can benefit from electronic processing
technologies. We fully integrated and enhanced the functionality of our products and
services to specifically meet the needs of merchants, banks, financial institutions, collection
agencies, property management companies, and more.
2.3 SPS CONTACT LIST
For more information on our various solutions, contact a SPS representative at:
1.888.313.7842.
Technical Support
[email protected]
Sales and Marketing
[email protected]
© 2007 Secure Payment Systems
5
Tel: 1.888.313.7842
ExpressCheck21- Electronic Check Processing and Deposit Solution
User Guide
3. GETTING STARTED
3.1 CUSTOMER LOGIN
1. Turn on the scanner, then turn
on your computer
2. Launch Internet Explorer
3.
Go To Ö
www.securepaymentsystems.com
4. On the right hand side of page,
click on
expresscheck21 Website
3.1.1
LOGIN PAGE
5. Enter your:
•
•
•
FileCode
UserName
Password
Note: Password is Case
Sensitive, All Caps are
required.
Select
Enter
© 2007 Secure Payment Systems
6
Tel: 1.888.313.7842
ExpressCheck21- Electronic Check Processing and Deposit Solution
User Guide
4. EXPRESSCHECK21 - ELECTRONIC CHECK PROCESSING SYSTEM
The following are detailed instructions that describe the process of scanning, processing and
batching-out checks for deposit in your bank account.
4.1 EXPRESSCHECK21
1. The Welcome to the
Processing System page
will appear.
2. Scroll to bottom left hand
side of page, select your
product solution
ARC System
or
IRD System
4.1.1
PREPARE CHECKS FOR SCANNING
Below are instructions on how to load checks for a specific scanner.
TS-350/400ES align checks along the right side of the scanner.
Digital Check TS-350/400ES
Magtek MICRImage neatly align the checks along
the bottom left hand edge one at a time.
Magtek Imager
TS230-65 neatly align the checks along the bottom and left hand edge,
loading them into the inboard hopper of the scanner until the sensor light turns
on.
Digital Check TS230-65
© 2007 Secure Payment Systems
7
Tel: 1.888.313.7842
ExpressCheck21- Electronic Check Processing and Deposit Solution
User Guide
3. If you are scanning large volumes of checks,
you may want to invest in a Check Jogger
device that organizes and aligns checks in a
neat and consistent manner, using a vibrating
bin.
For more information on purchasing a Check
Jogger contact SPS at 1.888.313.7842.
Ensure checks are aligned properly in the
scanner.
© 2007 Secure Payment Systems
8
Tel: 1.888.313.7842
ExpressCheck21- Electronic Check Processing and Deposit Solution
User Guide
4.2 HOW TO SCAN CHECKS USING THE TS230-65 and TS350 SCANNERS
This section is only for customers using the TS230-65 and TS350.
NOTE:
If you have the Magtek scanner, please skip this section and go to
Section 4.3 How to Scan Checks Using the Magtek Scanner on page 12.
4. From the ARC Main Menu, select
Scan Checks
4.2.1
READY TO SCAN CHECKS
5. Ready to Scan
Checks will appear on
screen, select
Scan Checks
Select Scan Checks to
begin
processing
of
items
© 2007 Secure Payment Systems
9
Tel: 1.888.313.7842
ExpressCheck21- Electronic Check Processing and Deposit Solution
Select the Stop Scanning
option, when all check
have been scanned
User Guide
6. Checks will begin to
feed through scanner.
7. Check images will
begin to appear in
window as checks are
scanned.
8. When you are finished
scanning checks,
select
Stop Scanning
4.2.2
SAVE CHECKS
9. If you have completed
scanning of items, select
Save
© 2007 Secure Payment Systems
10
Tel: 1.888.313.7842
ExpressCheck21- Electronic Check Processing and Deposit Solution
User Guide
10. Checks are uploaded to
SPS Server for
processing.
NOTE: The Save button must be selected in order to proceed to the Process Checks step. If
Step 9, is not completed and window is closed, please see Section 6.2 Recover
Unsaved Items.
Warning: If a check is scanned improperly, DO NOT select the Clear button; this will Clear all
check in the buffer. To Delete a check, use the Process Scanned Checks or Edit/Delete
Functions.
11. If you have more checks to
scan, simply load them into
the hopper and select
Scan More
12. Repeat steps 9-12
13. When you are done
scanning checks, select
Close Window
NOTE: Section 4.2.2 Save Checks, must be completed. If dialog box is closed and not
saved, you will not be able to process any items. In order to process items, checks
must be recovered first, see Section 6.2 Recover Unsaved Items.
When done, please proceed to Section 5 Process Scanned Checks
© 2007 Secure Payment Systems
11
Tel: 1.888.313.7842
ExpressCheck21- Electronic Check Processing and Deposit Solution
User Guide
4.3 HOW TO SCAN CHECKS USING THE MAGTEK SCANNER
This section is only for customers using the Magtek Scanner.
NOTE:
If you are using the TS230-65 or TS350, please go back to Section 4.2 How to
Scan Checks Using the TS230-65 and TS350.
1. From the ARC Main Menu, select
Scan Checks
4.3.1
READY TO SCAN CHECKS
2. Ready to Scan Checks
will appear on screen,
select
Scan
© 2007 Secure Payment Systems
12
Tel: 1.888.313.7842
ExpressCheck21- Electronic Check Processing and Deposit Solution
User Guide
The front and back of the
check image will appear.
The front of the check will
appear first.
© 2007 Secure Payment Systems
13
Tel: 1.888.313.7842
ExpressCheck21- Electronic Check Processing and Deposit Solution
User Guide
3. Image of the front and
back of the check will
appear.
Select
Stop
4.3.2
READY TO SAVE CHECKS
4. Select
Save
© 2007 Secure Payment Systems
14
Tel: 1.888.313.7842
ExpressCheck21- Electronic Check Processing and Deposit Solution
User Guide
Checks are uploaded to
SPS Server for
processing.
NOTE: The Save button must be selected in order to proceed to the Process Checks step. If
Step 4, is not completed and window is closed, please see Section 6.2 Recover
Unsaved Items.
Warning: If a check is scanned improperly, DO NOT select the Clear button; this will Clear all
check in the buffer. To Delete a check, use the Process Scanned Checks or Edit/Delete
Functions.
5. If you have more checks to
scan, simply load them into
the hopper and select
Scan More
6. Repeat steps 9-12
7. When you are done
scanning checks, select
Close Window
NOTE: Section 4.3.2 Save Checks, must be completed. If dialog box is closed and not
saved, you will not be able to process any items. In order to process items, checks
must be recovered first, see Section 6.2 Recover Unsaved Items.
When done, please proceed to Section 5 Process Scanned Checks.
© 2007 Secure Payment Systems
15
Tel: 1.888.313.7842
ExpressCheck21- Electronic Check Processing and Deposit Solution
User Guide
5. PROCESS SCANNED CHECKS
1. From the Main Menu select
Process Scanned Checks
NOTE: Process Scanned
Checks option must be
completed before any
subsequent functions can be
performed.
5.1 DATA ENTRY FIELD
Users with CAR/LAR technology, will automatically see their data entry field populated with
MICR data information from the captured check images, alleviating manual data entry work.
The Scanned ARC Transactions
window will appear.
Each check image will appear,
displaying the dollar amount with a
blank Data Entry Field next to
each check image.
2. Select the Data Entry Field
and type in the dollar amount
of the check payment.
a.
b.
c.
Do not enter dollar signs
Enter the dollar amount, followed
by a period and cents
If the check is for ‘00’ cents, it is
not necessary to type cents
3. On your keyboard select TAB
or Enter to advance to the next
Data Entry Field.
Enter dollar amount in Data
Entry Window.
Do not enter dollar signs
NOTE: If you have scanned checks but do not see any of your items listed in the data entry
field see Section 6.2 Recover Unsaved Items.
© 2007 Secure Payment Systems
16
Tel: 1.888.313.7842
ExpressCheck21- Electronic Check Processing and Deposit Solution
5.1.1
User Guide
ENTER CHECK DATA
4. Continue entering data
until you have entered
amounts for all checks.
Enter dollar amounts in
data entry windows.
Do not enter dollar signs
5.1.2
INDIVIDUAL CHECK DATA WINDOW
Edit/Delete individual items by
selecting the highlighted Item Number
© 2007 Secure Payment Systems
17
5. To open an individual
check to make changes or
see more information,
Double Click on the Item
Number.
Tel: 1.888.313.7842
ExpressCheck21- Electronic Check Processing and Deposit Solution
User Guide
6. When complete
select
Select Save
Save
7. From the Check Data
Window you can
Delete Check
8. Confirm Deletion
Delete Check
© 2007 Secure Payment Systems
18
Tel: 1.888.313.7842
ExpressCheck21- Electronic Check Processing and Deposit Solution
User Guide
If a check is deleted, the
snippet of the check will
no longer be visible, but
the status will show
DELETED, until these
items are Batched Out.
If a check was rejected
and then processed
manually, the check will
now show a status of
“OK”.
Status Legend
OK = Check is good
DUP = Duplicate Check
REJ = Rejected item
DEL = Deleted check
9. You will be prompted with
a dialogue window to
verify,
# of checks to
be processed
Dollar amount of checks
to be processed
Cancel
Verify Checks Entered
¾
The total number items
being processed
¾
The sum total amount
of the batch of checks
being processed
10. If all data is correct select
OK
11. If not select
Cancel
© 2007 Secure Payment Systems
19
Tel: 1.888.313.7842
ExpressCheck21- Electronic Check Processing and Deposit Solution
User Guide
12. You will return to the
Scanned ARC
Transactions Screen.
13. Make your necessary
changes
14. Once corrected, select
OK
© 2007 Secure Payment Systems
20
Tel: 1.888.313.7842
ExpressCheck21- Electronic Check Processing and Deposit Solution
User Guide
6. BATCH OUT
You must Batch-out your checks for transmission to SPS. Follow these instructions and your
checks will be transmitted to SPS for processing through our nations electronic banking
network, known as the ACH. Checks will be cleared through this network, with the funds
deposited to your bank account.
1. From the Main Menu select
Batch Out
6.1 Batch Out Facility Window
2. The Batch Out Facility
screen will appear, allowing
you to review all items
scanned.
3. If all data is correct select
Submit Batch
4. If there are any errors, select
Cancel
© 2007 Secure Payment Systems
21
Tel: 1.888.313.7842
ExpressCheck21- Electronic Check Processing and Deposit Solution
User Guide
After selecting Batch Out, the
Batch-Out Confirmation screen
will appear.
5. Select
Print
6. Select
Close
The Bath Out Confirmation
Screen confirms that the batch
you have sent has been received
by SPS for processing.
7. Items have been uploaded to
SPS for processing.
© 2007 Secure Payment Systems
22
Tel: 1.888.313.7842
ExpressCheck21- Electronic Check Processing and Deposit Solution
User Guide
6.2 RECOVER UNSAVED ITEMS
If attempting to process checks after scanning, and there are no checks visible in the
Processed Scanned Checks section as shown in Section 3, it is possible that checks were not
saved after scanning. To recover unsaved checks:
1. From the ARC Main
Menu, select
Scan Checks
2. You will be prompted to
Recover unsaved by
items by selecting
Recover
Select the Recover option to
restore unsaved items.
© 2007 Secure Payment Systems
23
Tel: 1.888.313.7842
ExpressCheck21- Electronic Check Processing and Deposit Solution
User Guide
3. Select
Save
4. When complete select
Close
6.2.1
SCAN MORE CHECKS
1. Select
Scan More
Select Scan to begin the
scanning process.
2. Ready to Scan Checks
will appear on screen,
select
Scan Checks
Checks will begin to feed
through scanner.
Check images will begin to
appear in window as checks
are scanned.
Select Scan More to scan
additional items.
3. When you are finished
scanning checks, select
Stop Scanning
4. Select
Save Checks
© 2007 Secure Payment Systems
24
Tel: 1.888.313.7842
ExpressCheck21- Electronic Check Processing and Deposit Solution
User Guide
7. EDIT/DELETE SCANNED CHECKS
The Edit/Delete function allows the user to Edit or Delete a processed check with customer
data that would not otherwise be brought into the software during the scanning process. Edit
or Delete may only be performed prior to submitting them to SPS for processing.
1. From the Main Menu,
Select:
Edit/Delete
7.1
TO EDIT AN ITEM
2. The Unbatched ARC
Transactions will
appear.
3. Double click on the
desired Item Number
to be edited.
Select the Item Number of
the check to see check
detail.
© 2007 Secure Payment Systems
25
Tel: 1.888.313.7842
ExpressCheck21- Electronic Check Processing and Deposit Solution
7.1.1
User Guide
EDITABLE/NON-EDITABLE DATA FIELDS
Non-editable Fields
Select the Split
button to enter
multiple invoice
#’s and amounts.
Enter Optional Check
Writer Information
When any changes are made,
select Save Changes to
confirm the change
© 2007 Secure Payment Systems
To delete an item,
select Delete Check
26
To proceed to the
next item and save
your current changes,
select Save/Next
Tel: 1.888.313.7842
ExpressCheck21- Electronic Check Processing and Deposit Solution
User Guide
4. Select OK if you are satisfied
with the changes
5. Select Cancel if you wish to
make additional changes.
6. To verify changes select
OK
© 2007 Secure Payment Systems
27
Tel: 1.888.313.7842
ExpressCheck21- Electronic Check Processing and Deposit Solution
User Guide
8. BASIC VIEWING AND SEARCH FEATURES
The following are detailed instructions that describe the process of how to view checks that
have already been scanned and batched out for processing.
8.1
VIEW BATCHES
1. From the ARC Main Menu,
select
View Batches
A summary screen will
appear, showing each
day’s batch of scanned
and processed checks.
Batch Filenames are automatically generated
by the EFT System. Filenames are structured
by:
1.
2.
3.
4.
Customer Filename,
Date file was Batched Out,
By File Type (Consumer/NonConsumer)
Number of Batches Processed that Day.
Routing Number
Account Number
Serial Number
Amount and
Date
If entered during the Data Entry Process, the data will also show
the field for
Example:
TELX1202.BC A
1
Click on the View Details to reveal detailed information about
that checks that comprise each batch. This information will
include the
2
3
4
Unique ID
Customer ID and
Customer Name
Each line will represent
a specific batch of
checks that was
processed and batched
out.
The data will include the
batch Filename, which
itself is composed of the
FileCode, followed by
the check processing
date, followed by a
suffix.
LB = Consumer Item
BC = Non-Consumer
Item
© 2007 Secure Payment Systems
28
Tel: 1.888.313.7842
ExpressCheck21- Electronic Check Processing and Deposit Solution
User Guide
You may enter Control + P to print this image to your connected printer.
To view a check, simply select the
check number.
Front and back image of the
check.
© 2007 Secure Payment Systems
29
Tel: 1.888.313.7842
ExpressCheck21- Electronic Check Processing and Deposit Solution
User Guide
9. VIEW RESULTS OF PROCESSED CHECKS
1. From the Main System Menu,
select
Results
From the Results window, you
will see a listing of all batches by
filename, which have been
settled.
2. Select the Results option
next to the Filename you
wish to view.
© 2007 Secure Payment Systems
30
Tel: 1.888.313.7842
ExpressCheck21- Electronic Check Processing and Deposit Solution
User Guide
A detailed listing of all
items within the selected
batch will appear, including
the total amount which will
appear on your bank
statement as a deposit.
3. Select Ctrl + P to print
Paid Items
Reconciliation amount for
bank statement.
© 2007 Secure Payment Systems
31
Tel: 1.888.313.7842
ExpressCheck21- Electronic Check Processing and Deposit Solution
User Guide
10. SEARCH FOR SCANNED CHECKS
1. From the ARC Main Menu,
select
View/Search Item History
To search for any previously
scanned and processed
checks.
2. Select any of the displayed
windows and enter the
appropriate data to search
for a specific check using
that parameter.
NOTE: Wildcard searches
cannot be done, please
ensure that all data is entered
into search criteria field/s.
3. Select
Search
© 2007 Secure Payment Systems
32
Tel: 1.888.313.7842
ExpressCheck21- Electronic Check Processing and Deposit Solution
User Guide
Search Item History window
will appear.
4. Double Click on
•
Item Number To view
Batch Details
•
Check Number To
view an image of the
check front & back.
Click on a highlighted Check
Number to view an image of the
check front and back.
Select the Item Number to view
details of that batch.
Batch Details
© 2007 Secure Payment Systems
33
Tel: 1.888.313.7842
ExpressCheck21- Electronic Check Processing and Deposit Solution
User Guide
11. ADVANCED FEATURES
11.1 CREATE A COMMA SEPARATED VALUE (CSV) FILE FOR DATA EXPORT
OVERVIEW
It is possible to create a data file for export out of the program. This data file can then be
imported or uploaded into any number of accounting or data processing programs.
If you are going to create a CSV file, we generally recommend that the CSV file be created
AFTER the Batch Out function has been performed, as defined in Section 6.
11.1.1 HOW TO CREATE A COMMA SEPARATED VALUE (CSV) FILE:
6. From ARC System Menu,
select
View Batches
7. Select
Download CSV File
© 2007 Secure Payment Systems
34
Tel: 1.888.313.7842
ExpressCheck21- Electronic Check Processing and Deposit Solution
User Guide
8. Select
Save
9. Browse for location to
Save file on your
computer, select
Save
File is now ready to import to
in-house system. The CSV file
will automatically be named per
the batch name of the specific
batch of checks.
10. To rename this file, type
the new filename into the
file name field and select
Save
© 2007 Secure Payment Systems
35
Tel: 1.888.313.7842
ExpressCheck21- Electronic Check Processing and Deposit Solution
User Guide
11.2 COMBINED DAILY RETURNS ( RETURN CHECK DETAILS)
1. From the
select
Main
Menu,
Combined Daily Returns
2. Choose the date to see
check return details
3. A summary screen will
appear,
showing
File
Name, Transaction Type,
Transaction Date, Routing
Number, Account Number,
Check Number, Amount,
Return Code, and Return
Date.
4. You can view the original
check image (Front and
Back) by clicking on the
check number.
5. The returned check image
and the reason for return
can be viewed by clicking
on RET
© 2007 Secure Payment Systems
36
Tel: 1.888.313.7842
ExpressCheck21- Electronic Check Processing and Deposit Solution
User Guide
Original Check Image
Returned Check Image
© 2007 Secure Payment Systems
37
Tel: 1.888.313.7842
ExpressCheck21- Electronic Check Processing and Deposit Solution
User Guide
12. OPERATIONAL GUIDELINES
12.1 TIPS ON MANAGING THE CHECK SCANNING PROCESS
12.1.1 WHAT TO DO WITH THE CHECK AFTER IT’S BEEN SCANNED
Per banking regulations, after scanning and batching your checks, they must be either
destroyed or otherwise marked to prevent them from re-entering the physical bank deposit
process. This means that after ‘Batching Out’ (Section 6.0), you must either destroy the
checks or imprint or stamp them. Most customers find that shredding the checks is an
effective, sure method to destroy scanned/processed checks. Alternatively, you may also
stamp or imprint the front all scanned/processed checks with a stamp containing the words
‘Void’, ‘ACH processed’, or Check 21 processed’. Please contact SPS Customer Service if
you would like assistance with acquiring a stamp. Remember that after ‘Batching Out’, images
of all scanned checks can be retrieved, viewed and printed if desired. See Section 6.0.
12.1.2 RULES AND REGULATIONS
The Rules are Regulations pertaining to the conversion of paper checks to electronic
transactions are simple and well defined.
Remember; check conversion operates within two distinct environments:
•
•
NACHA’s Accounts Receivable Conversion (A.R.C.) Program
Federal Check 21 Program
NACHA’s A.R.C. Program Rules and Regulations include the Following:
1. The program only permits the conversion of a CONSUMER or PERSONAL type check
and small format business check (with no auxiliary on-us field). No other types of check
may be converted under the A.R.C. program.
2. Only Consumer or Personal type checks that are received by the biller or merchant via
mail, messenger or a ‘drop-box’ are eligible for conversion.
3. Consumers must be provided with NOTIFICATION that their check is subject to being
converted to an electronic transaction.
4. Consumers must be afforded an ‘Opt-Out’ option if they do not wish to have their personal
check converted.
5. The check must be destroyed no later than 14 calendar days after it has been scanned or
converted to an electronic transaction.
12.1.3 SCANNER OPERATIONS & MAINTENANCE
While not required to process checks for deposit, it is possible to enter additional data for a
specific check payment.
© 2007 Secure Payment Systems
38
Tel: 1.888.313.7842
ExpressCheck21- Electronic Check Processing and Deposit Solution
User Guide
APPENDIX B BANKING RULES
12.2
EXAMPLE NOTIFICATION LANGUAGE
12.2.1 REQUIREMENTS NECESSARY TO ELECTRONICALLY RE-PRESENT RETURNED
ITEMS OR TO ELECTRONICALLY RECOVER A STATE ALLOWED NSF FEE:
The banking rules require that the consumer be provided with NOTIFICATION that any of their
returned payments are subject to electronic re-presentment. The following language will fulfill
this requirement, and can be added to the above language if the Merchant or Biller is going to
electronically re-present returned items:
“In the unlikely event your check (payment) is returned unpaid, we may elect to electronically
(or by paper draft) re-present your check (payment) up to two more times.”
In the event that the Merchant or Biller also wishes to electronically recover a state allowed
NSF fee, the banking rules require that some form of authorization be secured from the
consumer. This authorization may take a variety of forms, depending on the particulars of how
the Merchant or Biller engages their customers. At a minimum, the following will fulfill this
requirement. Please call SPS Customer Service to discuss further details.
“You also understand and agree that we may collect a return processing charge by the same
means, in an amount not to exceed that as permitted by state law.”
12.2.2 REQUIREMENTS NECESSARY TO
ELECTRONIC NACHA – ARC ITEMS:
CONVERT
CONSUMER
CHECKS
TO
NACHA’s ARC program is a very effective payment processing system, requiring that
everyone follow some simple rules. The primary rules are (1) that a Consumer be provided
with NOTIFICATION that their personal/consumer check is going to be converted (a definitive
statement, not an ‘if’ or ‘may’) and (2) an OPT-OUT provision, if the Consumer does NOT
want their personal/consumer check converted. Therefore, if the following language is
incorporated in the Merchant or Biller’s invoices, these requirements will be met.
“Payments received by check will be electronically deposited, unless you pay by nonconsumer type check. You may opt out of this conversion program by paying with a money
order or a travelers check.”
The Merchant or Biller should note that all non-consumer type checks will be processed as
Check 21 IRD’s (as a Check 21 type item), which requires NO Consumer notification or optout provisions whatsoever.
© 2007 Secure Payment Systems
39
Tel: 1.888.313.7842
ExpressCheck21- Electronic Check Processing and Deposit Solution
User Guide
APPENDIX C NACHA RULES AND REGULATIONS
12.3
NACHA RULES AND REGULATIONS
Below are the network participants as they are identified in the ACH Rules along with a brief
description of their role:
Originator agrees to initiate ACH entries into the payment system according to an arrangement
with the Receiver.
Originating Depository Financial Institution (ODFI) receives payment instructions from
Originators and forwards the entries to the ACH Operator.
ACH Operator is the central clearing facility operated by the Federal Reserve Bank or Electronic
Payments Network on behalf of the DFIs, to or from which Participating DFIs transmit or receive
ACH entries.
Receiving Depository Financial Institution (RDFI) receives ACH entries from the ACH
Operator and posts the entries to the accounts of its depositors (Receivers).
Receiver is a natural person or an organization that has authorized an Originator to initiate an
ACH entry to the receiver’s account with the RDFI.
Third-Party Processor which processes ACH files and/or items on behalf of one for the
participants in the ACH Network.
Third-Party Sender authorizes an ODFI to transmit debits or credits to the account of a Receiver
but which is not an Originator. In these situations the Third-party Sender acts as an intermediary
between the Originator and the ODFI and there is no contractual agreement between them.
© 2007 Secure Payment Systems
40
Tel: 1.888.313.7842
ExpressCheck21- Electronic Check Processing and Deposit Solution
User Guide
APPENDIX D ACH FLOW
The Originator provides notification to a Receiver or obtains authorization from a Receiver to
initiate ACH transactions to a Receiver’s account.
The Originator initiates a NACHA formatted file of transactions and presents the file to its
Originating Depository Financial Institution (ODFI).
The ODFI collects ACH transactions from participating Originators, verifies the validity of the files
and consolidates the files into one file to transmit to the ACH Operator. The ODFI may retain
entries for its own account holders.
The ACH Operator receives files from ODFIs, edits the files to make sure they are formatted
properly and distributes files/transactions to the Receiving Depository Financial Institution (RDFI).
The RDFI receives the files of entries from the ACH Operator for its customers. Entries are
posted based upon the settlement date and account number. Periodic statements are provided to
the Receiver with descriptive information about the ACH entry.
© 2007 Secure Payment Systems
41
Tel: 1.888.313.7842
ExpressCheck21- Electronic Check Processing and Deposit Solution
User Guide
APPENDIX F ACH RULES ENFORCEMENT
An amendment to the ACH Rules was approved in 1998 to establish a formal process for the
documentation and investigation of alleged violations of the rule. The objective of the rules
enforcement process is to maintain the continued quality of ACH services and ensure compliance
with the provision of the ACH Rules.
Any Participant in the ACH Network may complete a Report of Possible Rules Violation for any
alleged violations. A party to the transaction is ninety (90) days from the occurrence of the rules
violation(s) being asserted to submit a report. The Report of Possible Rules Violations must
include copies of supporting documentation necessary to support the claim of the rules violation
and be signed by an officer.
Upon receipt of a Report of Possible Rules Violation NACHA will review the report and supporting
documentation. If it is determined that a rules violation may have taken place, a Notice of Possible
Rules Violation will be sent to the ACH Manager at the financial institution against which the
Report was filed. The financial institution that receives the Report will have 15 banking days to
respond. The response must either 1) acknowledge the violation and state when the problem will
be corrected, or 2) refute the allegation and attach supporting documentation.
If no response is received in 15 banking days of a Notice of Possible Rules Violations, a Notice of
Possible Fine will be sent to the ACH Manager and the CEO at the financial institution against
which the Report was filed. The financial institution will have 10 banking days to respond. The
response must either 1) acknowledge the violations and state when the problem can be
corrected, or 2) refute the allegation and attach supporting documentation.
If no response is received (willful disregard) or recurrence of the same problem occurs within a
one-year period, fines may be assessed. Fines range from $250 up to $10,000.
© 2007 Secure Payment Systems
42
Tel: 1.888.313.7842