1
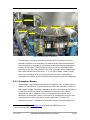
REIXS Beamline Resonant Soft X-ray Scattering Endstation User’s Manual Version 2.0 (work in Progress) David Hawthorn and Feizhou He Updated: June 15, 2012 TABLE OF CONTENTS 1.0 Introduction and Specifications .................................................................. 1 2.0 Quick Start ................................................................................................. 2 3.0 2.1 Manuals and Procedures ......................................................................... 2 2.2 Choosing Detectors, Filters and Slits........................................................ 2 Detectors ...................................................................................... 2 2.2.2 Filters and Slits ............................................................................. 3 Diffractometer............................................................................................. 4 3.1 Motions .................................................................................................... 5 3.2 Lubrication of Gears ................................................................................. 7 3.3 Sample Holder ......................................................................................... 7 3.4 Cryostat ................................................................................................... 9 3.4.1 Temperature Control................................................................... 10 3.4.2 Baking the Cryostat .................................................................... 10 3.5 Fabrication ............................................................................................. 10 3.6 Diffractometer Alignment ........................................................................ 10 3.7 Motor Control ......................................................................................... 11 3.8 4.0 2.2.1 3.7.1 AML Stepper Motors ................................................................... 11 3.7.2 Thermionics Differentially Pumped Rotary Feedthrough ............. 12 3.7.3 Parker E-DC Motor Drivers ......................................................... 13 3.7.4 Oriental Motor RBD245A-V Motor Drivers .................................. 14 3.7.5 OMS MaxV Motor Controller ....................................................... 15 3.7.6 VME ........................................................................................... 15 3.7.7 Attocuber Controller .................................................................... 15 Motor Control Software .......................................................................... 16 3.8.1 EPICS Motor Drivers: Software Setup ........................................ 17 3.8.2 Spec Control Software ................................................................ 18 Detectors .................................................................................................. 20 4.1 Photodiode ............................................................................................. 20 4.1.1 4.2 June 15, 2012 Photodiode Wiring ...................................................................... 20 Channeltron Detector ............................................................................. 21 4.2.1 Channeltron Biasing ................................................................... 22 4.2.2 Channeltron Pulse Counting ....................................................... 24 REIXS Beamline RSXS Endstation User’s Manual Page i 4.3 Micro-Channelplate (MCP) Detector....................................................... 24 4.3.1 5.0 6.0 MCP Mounting and Biasing ........................................................ 25 4.4 Polarization Analyzer ............................................................................. 26 4.5 Slit/Filter Wheel ...................................................................................... 26 4.5.1 Slits ............................................................................................ 26 4.5.2 Filters ......................................................................................... 27 4.6 Total Electron Yield (TEY) ...................................................................... 28 4.7 YAG Crystal ........................................................................................... 28 4.8 Measurement Electronics ....................................................................... 28 4.8.1 Nova Voltage-to-Frequency Converter ....................................... 28 4.8.2 SIS3820 Counter Card ............................................................... 29 4.8.3 Fan-in Fan-Out NIM Card ........................................................... 29 Vacuum System ....................................................................................... 29 5.1 Pressure Measurement .......................................................................... 31 5.2 Pfeiffer HiPace700 Turbo Pump ............................................................. 32 5.3 Varian TriScroll Pump ............................................................................ 32 5.4 Helix Cryo-Torr 8F Cryopump ................................................................ 32 5.5 Differentially Pumped Rotary Feedthrough ............................................. 33 5.6 Pumpdown Procedure ............................................................................ 33 5.7 Sample Transfer and Load-Lock ............................................................ 34 Items to Update: v2.0 ............................................................................... 37 June 15, 2012 REIXS Beamline RSXS Endstation User’s Manual Page ii 1.0 Introduction and Specifications The Resonant Soft X-ray Scattering (RSXS) endstation is a UHV 4-circle diffractometer for resonant elastic x-ray scattering. It is intended for use in resonant soft x-ray scattering, absorption and reflectivity measurements in the soft x-ray region (100 -2000 eV) to probe the C, N, O, F, Na, Mg, Al K-edges, the 3d transition metal L edges and the rare earth M edges (amongst other absorption edges in this energy range). The diffractometer has 11 in-vacuum motorized motions, including 4 rotations (2θ, θ, χ, φ), the ability to position the sample in the center of rotation (x, y, z), the ability to position one of four detectors into the scattering plane (detz), the rotation of a slit wheel (slit) that allows one to position one of 10 slit and filter combinations in front of the detectors, and two piezo actuators (ana, ath) to position the multilayers in the polarization analyzer. The sample can be transferred into and out of the vacuum chamber using a load-lock and a combination of an in-vacuum wobble-stick screwdriver and a magnetically coupled dual-axis sample transporter. The load-lock garage can house up to 3 samples for rapid switching between samples and minimal downtime. The sample holders have been developed to allow for a full azimuthal rotation of the sample that can be manually actuated by the in-vacuum wobble-stick manipulator. The sample can be cooled to ~20K using a closed-cycle Helium 4 cryostat that is connected to the top of the scattering chamber. The sample holder, which is rigidly connected but thermally isolated from the diffractometer, is thermally attached to the cold stage of the cryostat using flexible copper ropes. A heat shield extends from the cryostat in order to reduce radiative heat losses at the sample position. The cryostat is also mounted on a differentially pumped rotary feedthrough to allow for rotation of the cryostat and heat shield in concert with the theta rotation of the sample. The scattered x-rays can be detected with one of four detectors: a photodiode detector that is suitable for high intensity signals (including the direct beam), a single photon sensitive channeltron detector, a 2D single photon sensitive micro-channelplate (MCP) detector, and a polarization analyzer for horizontal or vertical polarization at O (K), Mn, Ni and Cu (L) edge. A slit / filter wheel is positioned in front of the channeltron and photodiode detectors to allow one to position different size detector slits and either Al foil or silicon nitride filters in front of the detectors. In addition, the sample has been electrically isolated from ground to allow for total electron yield (TEY) to also be measured simultaneously. The in-vacuum diffractometer is housed in a ∼1m diameter vacuum chamber that is pumped by a 700 L/s turbo pump and a cryopump. This pumping combination provides a base pressure of 5×10⁻¹⁰ Torr. June 15, 2012 REIXS Beamline RSXS Endstation User’s Manual Page 1 2.0 Quick Start 2.1 Manuals and Procedures Please refers to REIXS Manuals webpage for the most updated manuals: http://exshare.lightsource.ca/REIXS/Pages/manuals.aspx Useful procedures: 1. RSXS Loading Samples 2. RSXS Center of Rotation Alignment 3. RSXS Sample Alignment 4. RSXS Alignment for Reflectivity Scans 5. Customized SPEC macros for REIXS RSXS endstation and a Quick Reference for frequently used SPEC commands. 2.2 Choosing Detectors, Filters and Slits The scattering chamber has many degrees of freedom. Some advice is useful to choose the best detector and slit for your experiment. 2.2.1 Detectors 1. The photodiode is the first detector that should be used for any experiment. It has a large dynamic range that is suitable for measuring the direct beam and for measuring weak signals. Most experiments will begin with an alignment procedure that involves measuring with the direct beam. 2. The direct beam on the photodiode should have a magnitude of ~25µA at 600eV with Beamline exit slit at 25 micron. 3. The dark current on the AXUV100 photodiode is < 1pA. The photodiode is light sensitive. A larger dark current, with the beam off, may indicate light leaking into the chamber. The Granville-Phillips hot cathode ion gauge in the scattering chamber should be off during measurements with the photodiode. 4. The noise level on the photodiode should be of order ~0.1pA. 5. Photodiode electrometer typical settings: Autorange, digital filter of 5 (moving average of 5 measurements), dwell = 5 power-line cycles (5/60Hz = 0.083 s). 6. The channeltron detector has a maximum count rate of ~1×10⁶ counts/sec, at which point it becomes non-linear. The channeltron has worse quantum efficiency relative to the photodiode, but has no dark current and provides more accurate measurements for weak signals. 7. Channeltron detector typical settings: discriminator threshold = 60mV (6 on the dial, less than one full turn of the 0 - 1V, 10 turn potentiometer), voltage = -2100V, dark June 15, 2012 REIXS Beamline RSXS Endstation User’s Manual Page 2 count (with beam off) ~0.1 cts/s. When starting up, counts should start to appear at ~ -1800V. On the oscilloscope the pulses should have a width ~5 - 10ns. 8. The micro-channelplate (MCP) detector has a maximum count rate of ~1×10⁶ counts/sec for the total area. It has very low dark count and is very good for measuring weak signals. The voltage for MCP detector is -1900V. 9. Total electron yield (TEY): Using SR570 preamplifier. 30 Hz 12dB low-pass filter, 0V bias, 0 current offset, low noise, 5nV/A sensitivity. The TEY should be slightly noisier with the cryostat on due to (inductive?) pickup from the cryostat. 2.2.2 Filters and Slits 1. Use slitselect command in SPEC to select the slit. 2. The distance between the sample and the slits is 290 mm. 3. To search for Bragg peaks or specular reflections it is best to start with the largest slit and move to smaller slits once peaks are found. Table 1 Slits Slit # 1 2** 3 4 5 6 7 8 9 10 Angle 0° 324° 288° 252° 216° 180° 144° 108° 72° 36° Slit 10 mm x 10 mm (1.96° x 1.96°) 5 mm x 5 mm (0.988° x 0.988°) 1 mm x 2 mm (0.198° x 0.395°) 0.5 mm x 3 mm (0.099° x 0.593°) 0.1 mm x 3 mm (0.020° x 0.593°) 0.1 mm x 1 mm (0.020° x 0.198°) 1 mm x 5 mm (0.198° x 0.988°) 0.5 mm x 3 mm (0.099° x 0.593°) 10 mm diameter (1.96°) 1 mm x 2 mm (0.198° x 0.395°) Filter no filter Si3N4 no filter no filter no filter no filter Aluminum Aluminum Aluminum Aluminum **: Filter removed 4. For weak, broad peaks, larger slits will give better signal to noise ratio. 5. The aluminum filters provide additional light blocking for the photodiode detector. 6. Both the channeltron and photodiode are sensitive to charged particles (electrons, ions). The aluminum and Si3N4 filters provide some filtering of charge particles. The measurement contribution from charge particles has not yet been tested for the various detectors. June 15, 2012 REIXS Beamline RSXS Endstation User’s Manual Page 3 3.0 Diffractometer The diffractometer is a 4-circle UHV diffractometer with a total of 10 degrees of motion. It was designed principally by Luc Venema at the University of Groningen1 based in-part on the “Spinoza diffractometer” at the NSLS, beamline X1B. The diffractometer has a full range of theta and two-theta motions, spanning 0 - 180 degrees, and limited chi and phi motions, each spanning ±5 degrees. In addition, the sample position can be moved ±7.5mm in x, y and z to position a sample into the center of rotation of the diffractometer. In addition to these 7 motions, the detector arm allows for a z height adjustment of 90 mm to position any of the four detectors (photodiode, channeltron, MCP or Polarization Analyzer) into the horizontal scattering plane. A slit wheel with unlimited 360 degree rotation allows for one of ten filters/slits to be positioned in front of either the channeltron or photodiode detector. All of these motions are achieved using AML C14.1 in-vacuum stepper motors and suitable gear reduction. In the polarization analyzer, two Attocube piezo actuators are used to position the 4 multilayers for either horizontal or vertical polarization. The final motion is a rotation of the cryostat, which is mounted on the vacuum chamber via a differentially pumped rotary feedthrough. This is motorized externally, but allows for the cryostat to be rotate in concert with or separately from the theta rotation as needed. As a note of caution, this notation may conflict with other co-ordinate system conventions. In particular, the convention used by Luc Venema in designing the instrument interchanges the definition of y and z relative to the above convention. 1 [email protected] June 15, 2012 REIXS Beamline RSXS Endstation User’s Manual Page 4 Figure 1 Image of the diffractometer prior to installation in the scattering chamber. 3.1 Motions All of the motions of the system are detailed below. For this description, the coordinate system detailed in SPEC for a four circle diffractometer is used. From the SPEC manual 2: The x - y plane of the laboratory coordinate system is called the scattering plane and contains the sample and the points reached by the detector as it rotates on the 2θ arm. A counter-clockwise rotation of the 2θ axis corresponds to increasing 2θ, with the 2θ rotation axis defining the positive z direction in the laboratory. The zero of 2θ is defined as the setting at which the undeflected X-ray beam hits the detector. The positive y axis is along the line from the sample to the X-ray source. The position at which θ rotates the χ circle to put the χ rotation axis along the y axis defines the zero of θ. A clockwise rotation of χ corresponds to increasing χ. The zero of χ is the position which puts the φ rotation axis along the positive z axis. The positive x axis direction is determined by the cross product of the y and z axes (̂ ̂ ̂), which completes the definition of the right-handed coordinate system. 2 SPEC: Four-Circle reference, v2.8 of spec documentation, Certified Scientific Software, 2001 June 15, 2012 REIXS Beamline RSXS Endstation User’s Manual Page 5 Two Theta (2θ) : This is the rotation of the detector arm about the vertical axis (z in the laboratory frame). This motion is designed with a gear reduction of 1/1800, such that one motor step (1600 steps per revolution) is 0.000125°. Theta (θ) : This is the rotation of the sample position about the vertical axis (z in the laboratory frame). It has been aligned out of vacuum to have the center of rotation co-incident with that of the Two Theta rotation. This motion is designed with a gear reduction of 1/1800, such that one motor step (1600 steps per revolution) is 0.000125°. Chi (χ) : This angular rotation is provided by the linear translation of a leadscrew rather than a rotation. The gear reduction is 1/2 and the pitch of the lead screw is 1mm, such that one full rotation of the motor provides a translation of 0.5 mm (0.0025 mm per full motor step). This linear motion dχ is translated into a rotation by having the chi-stage travel on arc shaped rollers with a radius of Rχ 320 mm. In the limit dχ = Rχ sin(χ + 90°) ≈ Rχ(χ + 90°), this linear motion gives 0.179049° per mm or 0.089525° per motor revolution. At the extent of the chi motion (5 degrees) this creates an error in Chi of (sin(χ + 90°) − χ − 90°)/(χ + 90°)=0.006°. Phi (φ) : Like Chi, this motion is provided by the linear translation of a leadscrew rather than a rotation, however on a radius of Rφ 300 mm instead of 320 mm. In the limit dφ = Rφ sin(φ) ≈ Rφφ, this linear motion gives 0.190986° per mm or 0.095493° per motor revolution. x, y, z : These motions are provided by linear translations of a lead-screw with the gear reduction of 1/2 and the pitch of the lead screw of 1mm, such that one full rotation of the motor provides a translation of 0.5 mm (0.0025 mm per full motor step). In this co-ordinate system, z is the vertical axis. June 15, 2012 Detector z (detz) : This motion raises and lowers the detector positions, allowing one to position the channeltron, MCP, photodiode or YAG crystal into the horizontal scattering plane. This motion is provided by linear translations of a lead-screw with the gear reduction of 1/2 and the pitch of the lead screw of 1mm, such that one full rotation of the motor provides a translation of 0.5 mm (0.0025 mm per full motor step). The center of the channeltron detector is positioned 40 mm above the center of the MCP and YAG crystal, which are positioned 40 mm above the center of the photodiode detector. The polarization analyzer is 10mm above the center of YAG crystal. Slit wheel (slit) : The slit wheel is coupled to a drive with 1/120 gear reduction. One motor step (200 steps per revolution) is 0.015 degree. The 10 slit/filter positions on the slit wheel are equally spaced 36° apart. Analyzer (ana) : This Attocube piezo rotary actuator is inside the polarization analyzer, to change the orientation of the multilayers for measuring either horizontal or vertical polarization. REIXS Beamline RSXS Endstation User’s Manual Page 6 3.2 Analyzer Theta (ath) : This Attocuber actuator is used to switch between the four multilayers for different photon energies, and to position the multilayers at correct theta angle for polarization analysis. Lubrication of Gears For all the gear wheels in UHV, regular grease lubricant cannot be used. For proper lubrication of the gear wheels, especially the worm gear, dry Tungsten Disulfide powder (WS2, from MK Impex Canada3, MK-WS2-06, 0.6 micron WS2 powder) is applied every two to four months, to the gears in UHV. The WS2 powder can be mixed in Methanol and spread over the gear teeth. Pay special attention to the gears in the Two Theta and Theta motions. 3.3 Sample Holder The sample holder and sample receptacle was designed by David Hawthorn based on a design used by Christian Schüßler-Langeheine in the Wesche RSXS chamber at BESSY. As shown in Figure 2, the sample holders have a wedge-shape that mates with a wedge shaped receptacle. A #4-40 socket head cap screw is fixed to the sample receptacle (but free to rotate) is used to lock into a 4-40 thread on the sample holder and draw the sample holder towards the receptacle to make good thermal contact at the wedges of the sample holder. The screw action is provided by a Ferrovac WM40-520-50-S magnetically coupled single shaft wobblestick manipulator with 3/32 ball-head hex tool attachment. Samples may be transferred into and out of the sample holder using a magnetically coupled sample transporter by releasing the screw and using the sample transporter to clamp onto the stainless-steel eyehole protrusion on the sample holder. Two types of sample holder have been developed for the RSXS endstation; a plain flat sample holder and a sample holder that accommodates a cylindrical plug sample holder. This latter sample holder allows for continuous azimuthal rotation of the sample in vacuum. The sample holder is attached to the diffractometer via a thermally isolating support structure designed by David Hawthorn and constructed out of thin wall stainless steel hypodermic tubing (0.095” diameter, 0.005” thick). This structure has two levels with 6 tubes per level, held together by aluminum brackets. The sample receptacle is electrically isolated from the support structure by #4 ceramic hat washers (McAllister Technical Services). The sample holder is also attached to the cryostat above using flexible copper braids (see Section 3.4 for details of the braids and cryostat). This design is intended to provide high strength and stability with minimal conductive heat loss through the support structure. The heat load on the sample supplied by the support structure (assuming the base is at room temperature and the sample is at 4K) is estimated to be 0.1W. 3 http://lowerfriction.com/ June 15, 2012 REIXS Beamline RSXS Endstation User’s Manual Page 7 (b) (a) (c) Figure 2 (a) Sample holder and sample receptacle assembly. (b) and (c) Blowup of sample holder and sample receptacle assembly. June 15, 2012 REIXS Beamline RSXS Endstation User’s Manual Page 8 From above, the sample holder is connected to the cryostat using 4 lengths of OFHC copper rope4 with gold-plated copper lugs clamped to each end of the rope5 . These copper braids are then clamped with stainless steel screws to the sample receptacle on one end and to a gold-plated OFHC copper adapter that connects to the cryostat on the other end. This latter adapter is separated from the cryostat by a thin sapphire plate (described above) to provide electrical isolation, but maintain good thermal contact. The sample receptacle, copper braid clamps and some of the sample holders were electropolished and gold plated in order to reduce their thermal emissivity. 6 3.4 Cryostat The sample is cooled with an Advanced Research Systems (ARS) DE-210SB closed cycle cryostat. The cryostat is a UHV compatible, 2-stage cryostat. The 2nd stage of the cryostat is designed to reach a base temperature < 3K without any attachments and have 0.8W of cooling power at 4.2K. A custom gold-plated, OFHC copper heat shield is attached to the first stage of the cryostat and extends to partially cover the sample holder. This provides partial shielding against radiative heat losses. The cryostat is mounted in the chamber on a Thermionics RNN-400 differentially pumped rotary feedthrough. This has a motorized rotary motion to allow for it to rotate along with theta. This is necessary to allow for a wide range of motion without twisting up the copper braids that connect the cryostat and the sample holder. It also allows for rotation of the heat shield relative to the sample holder. The temperature of the cryostat is monitored and controlled using three Lakeshore DT670B-SD silicon diode temperature sensors7 . The heater is a Lakeshore 25Ω, 100W cartridge heater (HTR-25-100). It is clamped in place using an OFHC Cu clamp just above the sample holder. To avoid leakage currents from the heater impacting the TEY, the heater is electrically isolated from the sample holder by a sapphire plate. The diodes and heater are wired using clear teflon insulated copper wire that is wrapped around the body of the cryostat and tied down with insulated copper wire to heat sink the wires. In addition, a wire for total electron yield measurements is connected to the sample holder, which is electrically isolated from the cryostat using a thin sapphire plate 8 and ceramic hat washers (McAllister technical services). The cryostat is equipped with two 10-pin UHV feedthroughs for the heater and the 3 diodes, and one SMA feedthrough for the total electron yield measurement. 4 5 6 7 8 Thermionics ACS-CR copper rope ∼1/8 in OD From Alessandro Mortara at the Swiss Federal Office of Metrology METAS, www.metas.ch. Copper lugs are clamped using the WDT tools 190942 Parallel Handcrimping Tool www.wdttools.ch/english/ps.htm and the METAS custom die and guide set. Gold plating was done by Ali Farvid at the SLAC Metal Finishing Shop. Parts were electropolished and then electroplated with 2 um Ni and 5 um Au. http://wwwgroup.slac.stanford.edu/mfd/mtlfnsh.html http://www.lakeshore.com/ 7Sapphire, C-plane, 1” diameter × 0.5mm thick wafer, one side polished. Part #: ALC25D05C1. MTI corp. http://www.mtixtl.com/ June 15, 2012 REIXS Beamline RSXS Endstation User’s Manual Page 9 NOTE: Diode locations in final configuration (diodes clamped down with Lakeshore CO spring-loaded clamps). Include wiring diagram for cryostat. Cooling of the cryostat is achieved using a closed cycle circuit that includes a 3-phase, water-cooled helium compressor (ARS model 10-HW) and 3/4” stainless steel selfsealing, high-pressure helium lines that connect the cryostat expander to the compressor. Power to the expander is also supplied from the compressor. 3.4.1 Temperature Control Temperature control is achieved using the Lakeshore 325 temperature controller. The diode connected to the top of the sample bracket is used as the control sensor. The diode connected to the cold point of the cryostat is for monitoring purpose only. The Lakeshore 325 controller is set to use 10 region PID control. 3.4.2 Baking the Cryostat The displacer of the cryostat needs to be removed in order to bake the cryostat. 3.5 Fabrication The components of the diffractometer were machined (mostly out of Aluminum 6061) by machinists at the University of Cologne in Germany, the University of British Columbia and the University of Groningen. Gearwheels were supplied by Gear Technology and Applications (GTA)9 and Reliance Precision Mechatronics LLP 10. Hybrid bearings with MoS2 coating were supplied by Champion bearing 11. TiN coating of gearwheels and Vgroove rollers was done by J. J. Castings Investments (Heat Treatments) Ltd. 12. For more detail on individual components and their assembly refer to the complete set of drawings of the diffractometer and supporting documentation supplied by Luc Venema. The sample holder and support structure were machined at the AMPEL machine shop by Dieter Schnieder. 3.6 Diffractometer Alignment The diffractometer is mounted on a ring that is attached to a separate frame from the scattering chamber by three stainless steel rods. At the base, these rods are attached to three CF flanges that connect to the scattering chamber through edge-welded flexible bellows.13 This sub-frame, designed by Luc Venema, has out-of-vacuum adjustments for the pitch, roll, vertical height and horizontal position of the goniometer relative to the 9 http://www.gta.nl http://www.rpmechatronics.co.uk/ 11 http://www.championballbearings.com/ 12 http://www.jjcastings.com/home.htm 13 38-50/FF edge-welded stainless steel bellows from Palatine Precision Ltd. http://www.palatineprecision.co.uk 10 June 15, 2012 REIXS Beamline RSXS Endstation User’s Manual Page 10 beam direction to be adjusted independent of the scattering chamber. This allows for orientation of the goniometer to have a horizontal scattering plane with the beam intersecting the axis of rotation of the goniometer. The flexible bellows also provide some degree of vibration isolation from the scattering chamber (cryostat, pumps, ...). 3.7 Motor Control 3.7.1 AML Stepper Motors The stepper motors used in the diffractometer are Arun Microelectronics Ltd. (AML) C14.1 vacuum compatible stepper motors.14 These motors are speciallty stepper motors chosen for their low outgassing and suitability for ultrahigh vacuum. Consult the AML C14.1 manual for detailed specifications. The vacuum performance of the AML stepper motors depends on their temperature during operation, which determines how much the motors outgas. The motors should be operated in a mode where full power is only applied during motion (minimum or no holding current). This can be accomplished with appropriate settings on the Parker E-DC or Oriental Motor RBD245A-V motor drivers (set in hardware) and the OMS MaxV motor controller (set in software). The temperature on each motor can be monitored using K-type thermocouples embedded in the motor and Omega CN708 thermocouple temperature monitors and limit controllers. 15 The motors can be baked to 200°C. This can be achieved by applying a suitable, steady current to the motors from the E-DC or RBD245A-V motor drivers. Each AML C14.1 stepper motor has 4 Kapton insulated motor wires and two thermocouple wires. AML MLF18F feedthroughs are used to feed the wires between UHV and air. Each MLF18F has 18 pins and bundles the wires from three motors onto each feedthrough. On the air-side MLF18L cables carry the motor wires to the motor driver enclosures. From here the motor wires are connected to the E-DC or RBD245A-V motor drivers and the Omega CN708 temperature monitors. The layout of the feedthroughs for motors is shown in Figure 4. Feedthrough 1 (port 36): Theta and two theta Feedthrough 2 (port 35): chi and phi Feedthrough 3 (port 34): x, y and z Feedthrough 4 (port 33): detector z and slit wheel DIAGRAM of wiring 14 15 http://www.arunmicro.com http://www.omega.com June 15, 2012 REIXS Beamline RSXS Endstation User’s Manual Page 11 Figure 3 Block diagram of the motor control sequence. 3.7.2 Thermionics Differentially Pumped Rotary Feedthrough The Thermionics RNN-400 Rotary Feedthrough is driven by a Lin Engineering16 motor 8618M-02DE. It is a NEMA 34 frame mount with 8 wire, bipolar wiring, series connection, nominal rating 3.0V / 4.0A. This motor is also driven by a E-DC motor driver. 16 http://www.linengineering.com/LinE/ June 15, 2012 REIXS Beamline RSXS Endstation User’s Manual Page 12 DetZ /Slit Photodiode 1 Photodiode 2 TTh / Th X/Y/Z Chi / Phi Figure 4 Feedthroughs for AML motors and polarization analyzer 3.7.3 Parker E-DC Motor Drivers The motors (except for tth and th ) are powered by Parker E-DC motor drivers.17 The EDC motor drivers have a number of hardware selected options to determine the steps/revolution, motor current, standby current, step waveform, etc. Many of these parameters are set by DIP switches on E-DC board. The current settings used for the AML stepper motors are shown in Table 2. These settings do not generally need to be adjusted. The motor driver is controlled by the OMS MaxV motor controller, which communicates with the E-DC motor driver via the 25-pin D connector (this is achieved through an intermediary breakout box, which converts the signal carried by the CAT5 cable from the OMS MaxV card to the cable connecting to the E-DC motor driver). Additional E-DC motor driver notes: 17 The motor current is set individually for each motor with a suitable choice of a resistor between REF and CURRENT inputs on the motor. Each motor is supplied with 48 V DC power. A wire is connected between CURRENT and REMOTE. This enables the motor controller to bring the motor current to zero when not moving. This is used in conjunction with the AUTO HARDWARE option of the MaxV motor controller software. http://www.parkermotion.com/ June 15, 2012 REIXS Beamline RSXS Endstation User’s Manual Page 13 Table 2 Parker E-DC motor driver DIP switch settings DIP SW2 SW3 # AML Motors 1 ON 2 3 4 5 OFF OFF OFF OFF 6 7 8 Rotary Feedthrough Anti-resonance enabled ON Anti-resonance enabled 200 steps per revolution ON ON ON ON 25000 steps per revolution ON ON ON -4% 3rd harmonic waveform ON ON ON -4% 3rd harmonic waveform 1 2 ON ON full standby current ON ON full standby current 3 4 5 6 ON OFF OFF ON 7 8 OFF ON Automatic test disabled current loop gain = 16 0.44 to 1.27A range ON OFF OFF ON Automatic test disabled current loop gain = 16 OFF OFF 1.58 to 4.8A range 3.7.4 Oriental Motor RBD245A-V Motor Drivers The Two Theta (tth) and Theta (th) motors are driven by two Oriental Motor RBD245A-V motor drivers. 1/8 micro stepping is used to eliminate the motor stalling at low speed and also allow smooth start and stop of the motions. The connection between the MaxV controller and the RBD245A-V is the same as the E-DC motor driver. RBD245A-V Motor driver settings: June 15, 2012 SW1: Third Harmonic Waveform Correction: E (-4%) SW2-1: Smooth Drive: Used (OFF) SW2-2: Vibration Suppression: Used (OFF) SW2-4: Motor Stanstill Current: 25% of rated current (ON) RUN (Operating Current): Dial Setting 2, 0.84A/phase DATA (Step Angle): Dial Setting 4, Number of divisions 8 (Micro Stepping 1/8 full step), Resolution 1600 (steps/revolution), Step Angle 0.225°. Each motor is supplied with 48 V DC power. REIXS Beamline RSXS Endstation User’s Manual Page 14 3.7.5 OMS MaxV Motor Controller The motor controller used is the Oregon Micro Systems, Inc. MaxV motion controller. 18 The MaxV accepts commands from the control computer and outputs appropriate pulse sequences to the Parker E-DC or RBD245A-V motor driver (Step, Direction, ...). The MaxV is a VME bus-based motion controller with each card controlling up to 8 motions. The RSXS diffractometer with 10 motions requires 2 MaxV cards. Being VME bus based, it requires a VME crate and VME crate controller to operate. 3.7.6 VME The OMS MaxV motor controller operates on a VME bus. The VME bus uses a Wiener VME crate19 and a Struck Innovative Systeme SIS1100/SIS3100 VME-to-PCI interface card combination. This allows for control of the VME bus using a rack mounted PC with a Redhat Linux operating system. 3.7.7 Attocuber Controller An Attocube ANC350 Controller, from Attocube System AG20, is used to drive the two Attocube actuators inside the polarization analyzer. The actuators have built-in resistive encoders for close loop control of these two motions. The Controller is connected to the REIXS VLAN network with following network configurations: Hostname: Domain: Static IP: Subnet Mask: Default Gateway: MC2E1610-401 clsi.ca 10.52.11.100 255.255.252.0 10.52.11.254 SPEC Setup: Attocube ANA: Analyzer ANR101/RES ATH: Analyzer Theta ANR51v/RES The default configuration for Attocube actuators: 18 19 20 ANR101res_95_171.aps ANRv51_C4_029.aps http://www.pro-dex.com http://www.wiener-d.com http://www.attocube.com June 15, 2012 REIXS Beamline RSXS Endstation User’s Manual Page 15 Figure 5 Attocube ANC350 Controller Figure 5 shows the front panel of the Attocube ANC350 controller. The first channel is a motion controller. The next three channels have three identical stepper drivers: 3.8 Stepper Driver 1: ANR101/RES Stepper Driver 2: ANRv51/RES Stepper Driver 3: Spare. Motor Control Software The motor control software is running on REIXS IOC with a Scientific Linux operating system. The motor control software is comprised of several components: 1. Motor control software written by the CLS as a generic motor control for stepper and servo motors. This motor control software communicates with the motor control hardware (a separate module is designed for each specific motor driver, ex. the OMS MaxV motor control card). This software also assigns an EPICS process variable (PV) for each control feature and broadcasts the PV to the CLS distributed EPICS control system. 2. A secondary module is needed to convert the PV names used by the CLS EPICS motor control convention to the APS EPICS motor control convention. This is needed since SPEC is only set up to use the APS EPICS motor control convention. 3. SPEC. This is standard diffractometer control software from Certified Scientific Software.21 SPEC controls the diffractometer by calling the EPICS motor process variables needed to control the motors. To access the “SPEC Motors: APS Motor Record Control Screens”, click the [APS Motors] button on the “REIXS Motor/Energy Main Menu”. 21 http://www.certif.com/index.html June 15, 2012 REIXS Beamline RSXS Endstation User’s Manual Page 16 3.8.1 EPICS Motor Drivers: Software Setup To set up a motor: 1. With the mouse, click on the chosen motor (Two theta, Theta, etc.) on the “SPEC Motors: APS Motor Record Control Screens”. 2. Click on the orange button indicating the process variable name assigned to that motor (ex. SMTR1610-4-I22-01 for Two theta). This will call up another window (./Common/Motors/maxvMotor.edl). In this window, there are tabs at the bottom to select the parameters of the motor. For our purposes, the important tabs are “POWER/BRAKE” and “LIMIT SW/BACKLASH”. • POWER: There are 4 modes of operation. ON and OFF apply either full power (specified by the EDC motor driver hardware) or no power respectively. AUTO HARDWARE instructs the motor driver to only apply power when the motor is moving (using the present configuration of the motor driver). When the motor is not moving, there is reduced or no holding current in this configuration. The current default setting is ON. Leave this setting (ON) for Two Theta and Theta motors, and change this setting to AUTO HARDWARE for all other motors. • BACKLASH: The backlash is specified in “Amount” as the number of motor steps. There are 4 settings “NO”, “YES”, “FAVORED” and “DIR. CHANGE”. “NO” will apply no backlash correction for any move. “YES” will apply a backlash correction for every move regardless of direction. “FAVORED” will only apply a backlash correction in one direction (“INCREASE” or “DECREASE”) and “DIR. CHANGE” will only apply a backlash correction if the direction of the move changes. For our purposes, the appropriate choice of backlash correction is “FAVORED”, “INCREASE”. • PARAMETERS: STEPPER ONLY • BRAKE/HOLD MODE: Brake OFF • CLOSED LOOP: OFF To set up the rest of the motor control software, return to the “SPEC Motors: APS Motor Record Control Screens”. Click on the [More] button and [setup] from the drop down menu. This will call up another screen (./motorx setup.edl). For the chosen motor enter the appropriate values (see Table 3) for the: • High limit • Low limit • Speed (Normal) • Speed (Backlash) • Base speed June 15, 2012 REIXS Beamline RSXS Endstation User’s Manual Page 17 • Acceleration time • Units (deg or mm) • Steps/Rev. • Deg/rev or mm/rev • Readback deg/Unit or mm/Unit 3.8.2 Spec Control Software To initiate SPEC, user command: runFOURC Customized SPEC macros for REIXS RSXS endstation and a Quick Reference for frequently used SPEC commands. June 15, 2012 REIXS Beamline RSXS Endstation User’s Manual Page 18 Table 3 RSXS Endstation Motor Parameters Motor Name Motor No. Two Theta SMTR1610-4-I22-01 Theta SMTR1610-4-I22-02 Chi SMTR1610-4-I22-03 Phi SMTR1610-4-I22-04 X SMTR1610-4-I22-05 Y SMTR1610-4-I22-06 Z SMTR1610-4-I22-07 Dettector Z SMTR1610-4-I22-08 Slit Wheel SMTR1610-4-I22-09 Cryo SMTR1610-4-I22-10 Analyzer / Analyzer Theta / MaxSpd Speed Power (EGU/s) (EGU/s) On 3.0 2.0 On 2.0 1.0 Auto Hdw 0.895200 0.358080 Auto Hdw 0.381972 0.286479 Auto Hdw 7.5 5.0 Auto Hdw 7.5 5.0 Auto Hdw 7.5 5.0 Auto Hdw 7.5 5.0 Auto Hdw 30.0 30.0 Auto Hdw 3.6 3.0 On / / On / / Base Spd (EGU/s) 0.0 0.0 0.268560 0.286479 1.5 1.5 1.5 1.5 9.0 0.6 / / Accel. (Sec) 2.0 2.0 1.0 1.0 1.0 1.0 1.0 1.0 1.0 1.0 / / Step/Rev EGU/Rev / / 0.200 0.200 0.089524655 0.095492966 0.500 0.500 0.500 0.500 3.000 3.600 / / 1600 1600 200 200 200 200 200 200 200 25000 / / / / Encoder/Readback (EGU/Step) 0.000125 0.000125 0.000447623 0.000477465 0.0025 0.0025 0.0025 0.0025 0.015 0.000144 / / Dead Band 0.001 0.001 0.001 0.001 0.005 0.005 0.005 0.005 0.015 0.005 / / Yes Yes Yes Yes Yes Yes No No Yes No / / Backlash Increase Increase Increase Increase Increase Increase Increase Increase Increase Increase / / Direction Backlash (Steps) 15000 7500 100 100 100 100 0 0 200 0 / / / / Upper Limit 180 180 85 4.5 8 8 6.5 48 400 / / Lower Limit -20 -25 95 -4 -8 -8 -7 -45 -400 Page 19 REIXS Beamline RSXS Endstation User’s Manual June 15, 2012 4.0 Detectors There are four detectors and a slit/filter wheel on the Two Theta arm. Channeltron Polarization Analyzer MCP YAG Slit Wheel Photodiode Figure 6 Detector assembly 4.1 Photodiode The photodiode detector can be used for scattering, reflectivity and x-ray absorption measurements over a very large dynamic range, extending from measuring the direct beam (~2-5 A or ~20A) to currents in the picoamp range (0.1-12A or 0.1pA). The photodiodes installed in the scattering chamber are AXUV100EUT from International Radiation detectors Inc.22 It has a 10mm x 10mm square detection area. The eutectic mount (EUT) was chosen for greater ultrahigh vacuum compatibility. The diode can be baked to 200°C and operated to 70°C. The photodiode clamped into place using BeCu clips and enclosed in an aluminum enclosure. See IRD documentation for additional information (quantum efficiency, handling instructions, ...) for the AXUV100EUT photodiode. 4.1.1 Photodiode Wiring The photodiode is wired using triaxial cable and connectors to allow for a guarded and shielded measurement from the electrometer all the way to the photodiode. The photo current is measured from the anode of the photodiode, which is connected to the pin of an SMA receptacle23, attached using Epotek H21D silver epoxy and mechanical clamping. The ground of the SMA connector is electrically isolated from the ground of the 22 23 http://www.ird-inc.com/index.html Amphenol part # 901-9215, purchased from Newark June 15, 2012 REIXS Beamline RSXS Endstation User’s Manual Page 20 aluminum enclosure by #2 ceramic hat washers from McAllister Technical Services24 and is electrically connected to the guard of a custom in-vacuum Kapton insulated triaxial cable from Accuglass25. The cathode of the photodiode is electrically connected to the guard. The shield of the Accuglass triaxial cable is connected to the aluminum enclosure of the photodiode. The triaxial cable mates to a Triaxial vacuum feedthrough 26. On the air side, the Huntington triaxial feedthrough uses an Amphenol Triax 7/8-20 connector. A custom cable is used to adapt this connection to the more standard 3-lug triaxial connector for use with the Keithley 6514 Electrometer. 4.2 Channeltron Detector The channeltron detector is used for single photon measurement. It has an upper dynamic range of ~106 counts/second at which point the count rate will become nonlinear with the incident photon intensity. The channeltron used is a Sjuts KBL1010 27. In the scattering chamber, the channeltron is used in a configuration where photons will be directly incident on the channeltron’s surface. In front of the channeltron is situated an electro-formed gold mesh with 85% transmission 28 for repulsion of electrons and ions. This grid is electrically isolated from ground by ceramic standoffs29. The channeltron can be positively or negatively biased by applying appropriate biasing to the grid, channeltron front and channeltron back. This is accomplished using a high voltage power supply and the appropriate voltage divider (see Section 4.2.1). 24 25 26 27 28 29 http://www.mcallister.com/hatwashers.html part # KAP-1CX/sd-60AF875SMAm, accuglassproducts.com from Huntington Mechanical Laboratories, part # PTR-24151-CF, http://www.huntvac.com www.sjuts.com SPI part # 2199G-AB, www.2spi.com Insulator seal part # 9951200 www.insulatorseal.com June 15, 2012 REIXS Beamline RSXS Endstation User’s Manual Page 21 Attocube MCP Preamp Spare BNC Channeltron Photodiode MCP Signal MCP HV Figure 7 Feedthroughs for detectors The channeltron is housed in the scattering chamber within an aluminum enclosure. Electrical connections to the channeltron are made using MHV panel jack receptacles 30. These receptacles are connected to SHV vacuum feedthroughs using Accuglass kapton insulated co-axial cables31 that have MHV connectors on one end and Accufast 500s connectors on the other end (suitable for connection to the SHV vacuum feedthroughs). Each cable is labeled at either end with 1, 2, 3, or 4 loops of Kapton insulator copper wire to aid in identifying the wires. The outer connector of these co-axial cables is connected to the chamber ground at both the MHV receptacle and the SHV feedthrough. 4.2.1 Channeltron Biasing The channeltron may be biased either positively or negatively. With a negative bias, the anode of the channeltron is at ground and the front end of the channeltron is held at a large negative voltage. This biasing configuration serves to repel negatively charged ions or electrons from the front end of the channeltron. Positive ions in the chamber (produced from the ion gauges or from the x-ray beam hitting the sample will be attracted to the channeltron. Some of these ions will be intercepted by the grid in front of the channeltron, which is also held at a large negative bias. The back of the channeltron is held at ~ 100V above the channeltron anode to ensure that electrons in 30 31 Delta Part #: UG-931/U www.deltarf.com, purchased from M&S Electronics, Inc. part # KAP-1CX-60AF500sMHV June 15, 2012 REIXS Beamline RSXS Endstation User’s Manual Page 22 the channeltron are accelerated to the anode rather than the back of the channeltron. A high voltage divider shown in Figure 8 can be used for the biasing so that a single highvoltage power supply, such as the FAST Comtec NHQ 203M, can be used to supply the appropriate voltages to channeltron. Figure 8 Voltage divider for -ve biasing of the channeltron. Alternately, a positive bias can be used to bias the channeltron. In this configuration, electrons and negative ions are attracted to the channeltron and positive ions are repelled. For this configuration the high-voltage divider shown in Figure 9 can be used. Note, for this divided, a high voltage capacitor is used between the anode and the preamp to protect the preamp from the large DC bias voltage. Also, care should be taken to ensure that the high voltage power supply is delivering the correct polarity of voltage prior to applying voltages to the channeltron. In both forward and reverse bias, the channeltron bias voltages should be ramped up and down slowly (over the course of several minutes) to prolong the life of the channeltron. Figure 9 Voltage divider for +ve biasing of the channeltron. June 15, 2012 REIXS Beamline RSXS Endstation User’s Manual Page 23 4.2.2 Channeltron Pulse Counting When a photon or charged particle impinges on the channeltron, it produces secondary electrons that are accelerated by the high voltage applied to the channeltron. These electrons will also strike the walls of the channeltron producing additional electrons that are further accelerated down the channeltron, creating an avalanche effect. This avalanche process produces a short pulse (~8ns) of up to 108 electrons at the anode. These pulses are then counted to determine the number of incident particles hitting the channeltron. To perform the counting, the charge pulse is first amplified by a fast voltage preamplifier (an Ortec VT120C32, gain = 20). For +ve biasing, the charge pulse is converted to a voltage pulse by the isolating capacitor and the 50 Ohm input impedance of VT120C preamp. For -ve biasing, the capacitor is missing and the 50 Ohm input impedance is the important. The output of the VT120C is input into an Ortec 584 constant fraction discriminator33. This outputs a NIM-standard fast negative34 (the TIMING output, for input to the SIS3820 counter card) or NIM-standard slow positive (the POSITIVE output, for input to the Ortec 449-2 ratemeter) logic pulse for each input pulse that exceed a threshold voltage that can be set from -5 mV to -1V by a 10 turn potentiometer on the constant fraction discriminator. This threshold should be set such that each input pulse is registered as a pulse, but no noise pulses or artifacts due to unusually shaped pulses (which can lead to double counting of pulses) register as pulses. Examining the pulses using an oscilloscope can aid in setting the correct discriminator level. The absolute value of the discriminator level will depend on the details such as the applied bias voltage, the state of the channeltron and the configuration of the biasing network. The count-rate of the channeltron can also be monitored using the Ortec 449-2 ratemeter. 4.3 Micro-Channelplate (MCP) Detector The micro-channelplate (MCP) detector is a single photon sensitive, spatially resolved 2D detector from Quantar Technology Inc.35 The channelplate detector head is a 25 mm diameter, double channelplate detector (part # 3390-3090-SH-SM-R1). This detector head has a lower resistance (faster time constant) resistive anode (-SH) is equipped with higher count-rate (HOT, -SM) channelplates. It’s spatial resolution of ~0.25mm and a maximum count rate of ~ 106 cts/s. It is designed to be used in conjunction with the model 2502A position analyzer, the model 2415C histogramming memory and model 2500 preamp. 32 http://www.ortec-online.com The 584 constant fraction discriminator should be used in Leading-edge (LE) mode 34 see http://www.ortec-online.com/download/Electronics-Standards-Definitions.pdf for definitions of NIM logic standards 35 http://www.quantar.com 33 June 15, 2012 REIXS Beamline RSXS Endstation User’s Manual Page 24 4.3.1 MCP Mounting and Biasing The detector head has an 85% transmission electroformed gold mesh attached to front end36. It is mounted in an aluminum enclosure and attached to the enclosure by the grid ring (at the front of the detector). This grounds the grid in front of the channelplate to the aluminum enclosure and subsequently the scattering chamber. Similar to the channeltron, the channelplate requires high-voltage biasing in order to operate. This can be done using a single high voltage power supply and the voltage divider shown in Figure 10. Figure 10 Voltage divider for -ve biasing of the MCP. For the MCP, these high voltage connections are needed for the 1st channelplate, between the two channelplates, at the 2nd channelplate and at the resistive anode. Like the channeltron, high voltage electrical connections to the channelplate are made using MHV panel jack receptacles37. These receptacles are connected to SHV vacuum feedthroughs using Accuglass Kapton insulated co-axial cables38 that have MHV connectors on one end and Accufast 500s connectors on the other end (suitable for connection to the SHV vacuum feedthroughs). Each cable is labeled at either end with 1, 2, 3, or 4 loops of Kapton insulator copper wire to aid in identifying the wires. The outer connector of these co-axial cables is connected to the chamber ground at both the MHV receptacle and the SHV feedthrough. In addition, low-voltage signal leads connected to the four corners of the resistive anode are needed to carry the detector signal to the detector electronics. The signal leads use SMA panel jack receptacles39, like the photodiode detector. These receptacles are connected to BNC vacuum feedthroughs 36 37 38 39 MG-23 electroformed gold mesh from Precision Eforming, http://www.precisioneforming.com/ Delta Part #: UG-931/U www.deltarf.com, purchased from M&S Electronics, Inc. part # KAP-1CX-60AF500sMHV Amphenol part # 901-9215, purchased from Newark June 15, 2012 REIXS Beamline RSXS Endstation User’s Manual Page 25 using Accuglass kapton insulated co-axial cables40 that have SMA connectors on one end and Accufast 500s connectors on the other end (suitable for connection to the BNC vacuum feedthroughs). These detector signals are then fed into the model 2500 preamp, which then outputs to the model 2502A position analyzer. 4.4 Polarization Analyzer The analysis of linear polarization is based on the principle of Brewster’s angle. Four multilayers were fabricated by Fraunhofer IOF for the four wavelengths (energies) of interest: 1. O K edge: E = 530 eV, d = (1.658±0.002)nm, reflectivity = 3.0% 2. Mn L edge: E = 645 eV, d = (1.362±0.002)nm, reflectivity = 1.8% 3. Ni L edge: E = 860 eV, d = (1.020±0.002)nm, reflectivity = 0.52% 4. Cu L edge: E = 940 eV, d = (0.933±0.002)nm, reflectivity = 0.15% The multilayer coating material is W/Si, with 200 - 400 periods each. The ideal incident angle is 45°. Two Attocuber rotary actuators are used to position the multilayers. One actuator will orient the multilayers for analyzing either horizontal or vertical polarization. The angular range required is about 90°. The other actuator is used to switch between the four multilayers, as well as to position the multilayer at correct Bragg angle (~45°). Two AXUV100EUT photodiodes, one for each polarization, are used to measure the reflected light from the multilayers. The wiring of the photodiode is similar to the one described in Section 4.1.1. The current is measured by two Keithley 6514 Electrometers. 4.5 Slit/Filter Wheel In front of the channeltron and photodiode detectors is a slit wheel that can position one of ten slit/filter combinations in front of either the channeltron or photodiode detectors. The slits and filters are mounted on stainless steel rings that can be attached to the slit wheel in various combinations using two 0-80 screws. 4.5.1 Slits The slits are precision cut slits from National Aperture Inc.41 The slit options are 500 micron x 7.5 mm, 100 micron x 7.5 mm, 500 micron x 3 mm, 100 micron x 3 mm or 100 micron x 1 mm (not all sizes are likely to be installed at any given time). The slits are formed in 3/8” diameter, 12.7 micron thick, 302 stainless steel disks. These disks are carefully mounted on LS 0.5 stainless steel rings from Lebow Co. 42 such that the long 40 41 42 part # KAP-1CX-60AF500SMAm http://www.nationalaperture.com/slits.htm http://www.lebowcompany.com June 15, 2012 REIXS Beamline RSXS Endstation User’s Manual Page 26 axis of the slit will be vertical (short axis in the scattering plane) when the slits are positioned in front of the channeltron or photodiode. 4.5.2 Filters In addition to the slits, the slit wheel can be used to position thin Aluminum or Si3N4 filters in front of either the channeltron or photodiode detectors. The aluminum filters are from Lebow company and are 0.15 micron thick foil, and either 10 mm diameter (on a LS1.0 ring) or 5 mm diameter (on a LS0.5 ring). The transmission vs. photon energy for 0.15 micron thick aluminum (taken from the CXRO website 43) is shown in Figure 11. Figure 11 Transmission vs. photon energy for a 0.15 micron thick aluminum filter calculated from the CXRO website (http://henke.lbl.gov/optical constants/filter2.html). Note the effect of Aluminum oxidation has been neglected in this calculation. This will provide some energy dependence to the filter at the oxygen K edge (520 -600 eV). The silicon nitride (Si3N4) windows are from Norcada44 (part # NX10500A). They have a 5mm x 5mm window that is 50nm thick mounded on a 10mm x 10mm, 200 micron thick silicon frame. This frame is then mounted on a Lebow LS0.5 or LS1.0 ring. The transmission vs. photon energy for 50 nm thick Si3N4 (taken from the CXRO website45) is shown in Figure 12. 43 44 45 http://henke.lbl.gov/optical_constants/filter2.html http://www.norcada.com http://henke.lbl.gov/optical_constants/filter2.html June 15, 2012 REIXS Beamline RSXS Endstation User’s Manual Page 27 4.6 Total Electron Yield (TEY) The total electron yield (TEY, which is proportional to the x-ray absorption) is determined by measuring the drain current coming off the sample when subjected to the x-ray beam. This is simply done by measuring the current from a lead connected to the sample holder, which has been electrically isolated from the chamber (ground). The drain current is measured using a Keithley picoammeter or other suitable current measuring device. Figure 12 Transmission vs. photon energy for a 50 nm thick silicon nitride filter calculated from the CXRO website (http://henke.lbl.gov/optical constants/filter2.html). 4.7 YAG Crystal For a visible indication of the beam position, scintillating Yttrium Aluminum Garnet activated by Cerium (YAG:Ce) crystals46 are installed on the detector arm (in the center of the slit wheel) and as an optional sample when placed on the sample holder. The YAG:Ce crystals are 10 mm x 10 mm x 1 mm with a square grid marked on the surface of the crystal. The 8 mm x 8 mm grid has 1 mm x 1mm squares (30 micron thick lines) and a cross-hair through the center of the grid formed by thicker (60 micron) lines. 4.8 Measurement Electronics 4.8.1 Nova Voltage-to-Frequency Converter The Nova N101VTF voltage-to-frequency converter47 provides the option of converting 46 47 from Crytur Ltd., http://www.crytur.cz/ http://novarad.com/n101vtf.html June 15, 2012 REIXS Beamline RSXS Endstation User’s Manual Page 28 the analogue output of a picoammeter, electrometer or current preamplifier into counts per second. The resulting signal can be read into the SIS3820 counter card, along with the output from pulse counting measurements such as the channeltron. This allows one to measure several instruments with co-incident start and stop times. The Nova N101VTF uses LEMO style co-ax connectors for all inputs and outputs. 4.8.2 SIS3820 Counter Card Pulsed detector signals, such as from the channeltron discriminator or the Nova voltageto-frequency converter, are to be counted using a Struck Innovation Systeme (SIS) SIS3820 64M scaler card48. This card is housed in a VME crate, which is controlled by a rack-mounted computer running Linux operating system. This computer is connected to the network and allows for controlling the SIS scalar card from the EPICS distributed control system, using EPICS drivers and control software written by the CLS controls group for the SIS3820. The SIS3820 scalar card has 32 channels that have been factory configured to have channels 1-16 operate with a NIM standard logic pulses and channels 17-32 to operate with TTL standard logic pulses. The SIS3820 uses LEMO style co-ax connectors for all inputs and outputs. 4.8.3 Fan-in Fan-Out NIM Card A CAEN N454 4-8 Logic Fan-In/Fan-Out NIM card is used to split one detector signal to two identical signals. This is mainly for the data collection during the 2-in-1 mode operation. 5.0 Vacuum System The scattering chamber is a custom stainless steel vacuum chamber designed by Luc Venema and manufactured by Johnson Ultravac Inc. 49 (see Figure 13) The chamber is pumped by a Pfeiffer 700 L/s turbo pump and a CTI Cryo-Torr 8F cryopump. The turbo pump is backed by a TriScroll pump that is used both to back the turbo pump and to pump the chamber down from atmospheric pressure. Both the turbo pump and cryopump are separated from the scattering chamber by electro-pnuematic gate valves. In addition, the scattering chamber has a differentially pumped rotary feedthrough, the first stage of which is pumped by the TriScroll pump with the second stage pumped by a 2 L/s ion pump. Pressure is measured by a combination of hot cathode ion gauge (StabilIon), cold cathode gauge, and thermocouple gauges (Convectron). A residual gas analyzer is also installed on the scattering chamber. A schematic of the pumping system is shown in Figure 14. 48 49 http://www.struck.de http://www.ultrahivac.com/ June 15, 2012 REIXS Beamline RSXS Endstation User’s Manual Page 29 Figure 13 The scattering chamber, indicating port assignments for the vacuum pumps, gauges and electrical feedthroughs. June 15, 2012 REIXS Beamline RSXS Endstation User’s Manual Page 30 When the scattering chamber is operated as a stand-alone system (without the sample prep and analysis chambers connected), the scattering chamber is connected to a load lock chamber (designed by David Hawthorn and manufactured by Nor-Cal Products, Inc.50) via a manual 4.5” CF gate valve. The load-lock chamber is pumped by an 80 L/s turbopump that is backed by a Varian IDP-3 Scroll pump. Figure 14 Schematic diagram of the scattering chamber vacuum system. 5.1 Pressure Measurement The chamber pressure is measured using Granville-Phillips51 370 Stabil-Ion vacuum gauges for low pressure (10-4 ~ 10-11 Torr) and 275 Convectron gauges for high pressure 50 51 http://n-c.com/ http://www.brooks.com/ June 15, 2012 REIXS Beamline RSXS Endstation User’s Manual Page 31 (1000 ~ 10-4 Torr). These gauges are controller by 370 Stabil-Ion gauge controllers, which each operates one Stabil-Ion gauge and up to two Convectron gauges. A cold cathode ion gauge is also installed on the scattering chamber, which is used during the measurements when visible light or ion affects the signal background. In addition, a SRS RGA200 residual gas analyzer with electron multiplier 52 is installed for detailed analysis of the residual gas composition. The RGA200 is interfaced using an RS232C serial cable to a PC that runs the Windows-based RGA control software. Warning: The ion gauges and RGA should only be turned on at low pressure (P< 10−4 Torr). 5.2 Pfeiffer HiPace700 Turbo Pump The HiPace 700 is a 700 L/s turbo pump mounted on an 8” OD CF flange. It provides the pumping to achieve the high vacuum (~ 10−7 Torr) needed to open the cryopump to the vacuum chamber. It also provides an alternative pumping mechanism for instances when the vibration from the cryopump in unacceptable. The turbo pump is backed by a Varian TriScroll pump. This pump is isolated from the main chamber using an 8” OD CF pneumatic gate valve with solenoid and position indicator (part #: 303006-101). The pump may be vented to atmosphere from the venting port of the pump. This should be done using dry nitrogen gas. This venting port also serves as the main port for venting the scattering chamber. 5.3 Varian TriScroll Pump The Varian TriScroll (TS300) pump is used to rough out the chamber to ~1 Torr during initial pumpdown. It also serves as the backing pump for the Pfeiffer HiPace700 turbo pump, providing a pressure of ~10-2 Torr at the turbo pump exhaust. 5.4 Helix Cryo-Torr 8F Cryopump At high vacuum, the highest pumping speed is supplied by the Helix Cryo-Torr 8F cryopump53. This pump uses a closed cycle helium cryo-cooler to cool a cold-head (a large surface-area, gas absorbing manifold) to ~15K. At these low temperatures, the sticking co-efficient of most gases is high. As such, gases hitting the cold-head are stuck on the cold-head and effectively removed from the vacuum system. For water, the Helix 8F has a reported pumping speed of 4000 L/s. The cryopump is connected to a helium compressor (the water-cooled, 3-phase 8200 compressor) using flexible, self-sealing high pressure helium conduits. The temperature of the cryopump is measured with a CTI curve C diode installed on the cryostats coldhead. This can be monitored using the Lakeshore model 211 temperature monitor 54. If the pump temperature and chamber 52 53 54 from Stanford Research Systems, Inc., http://www.thinksrs.com/products/RGA.htm http://www.helixtechnology.com http://www.lakeshore.com June 15, 2012 REIXS Beamline RSXS Endstation User’s Manual Page 32 pressure begin to increase and the pump is still operational, it may be an indication that the pump is saturated and needs to be regenerated (heated up and pumped out). The pump is isolated from the main chamber using a 10” OD CF pneumatically controlled gate valve from VAT (part #: 10846-UE24-0005/0094). Care must be taken to ensure that the cryopump is not exposed to high pressure air when cold as all of the water in the air will condense onto the pump, potentially damaging the cold head and requiring considerable pumping time to remove. It is designed to be operated below a cross-over of 150 Torr-liters. For the scattering chamber volume of (~1000 L) this corresponds to a cross-over pressure 0.15 Torr. If time permits, it is best to operate the cryopump at lower pressure after pumping the chamber using the turbo pump to a pressure of ~10-5 Torr or lower. In addition, care must be taken to ensure that the pump is not isolated when warming, as all of the gas condensed on the pump will outgas upon warming. As a safety measure the pump is equipped with a one-shot UHV burst disk (MDC part # 420032) that will release in the event pump overpressure (P ≈ 10 psi). If the pump is to be warmed with the gate valve to the main chamber closed, the pump can be vented and pumped through an auxiliary roughing port during warming. Warm, dry gas (nitrogen) can be flowed through the pump during warming to speed up the regeneration process. 5.5 Differentially Pumped Rotary Feedthrough The cryostat on the scattering chamber is supported by a 6” OD CF differentially pumped rotary feedthrough (Thermionics RNN-400/MS/MFD/MC)55. The first stage of the differentially pumped rotary feedthrough is pumped by a Varian TriScroll TS-300 pump. The 2nd (high-vacuum) stage is pumped by a Thermionics 2 L/s appendage ion pump (part # AIP-2/133/MP-2). A manifold supplied with the pump allows for a valve to be opened so that the 2nd stage to be pumped by the first stage. This is needed to pump the 2nd stage to a low enough pressure (<10-5 Torr) to start the ion pump. This should be done with a turbocart, rather than the TriScroll pump that is usually used to pump the 1st stage of the differentially pumped rotary feedthrough. 5.6 Pumpdown Procedure To pump the system down to low pressure from atmospheric pressure: A: Starting with the cryopump warm. 1. Open the gate valve between the scattering chamber and the Pfeiffer HiPace700 turbo pump and the gate valve between the scattering chamber and the cryopump. Ensure all venting valves are closed and the TriScroll pump is connected to the pumping port of the turbo pump. 55 http://www.thermionics.com/ June 15, 2012 REIXS Beamline RSXS Endstation User’s Manual Page 33 2. Start the Varian TriScroll pump. This should initiate the pumpdown of the chamber and the pressure reading of the Convectron gauges in the main chamber and at the exhaust of the turbopump should decrease. 3. When the chamber pressure is below 10 Torr, start the Pfeiffer turbo pump. 4. Turn on the CCG or the hot cathode ion gauge in the main chamber when the pressure indicated on the Convectron gauge in the main chamber reaches 10 -4 Torr. 5. When the pressure reading on the scattering chamber reaches ∼10-6 Torr, begin cooling the cryopump by turning on the CTI 8200 compressor). The cryopump should take ~1.5 hrs to reach a temperature of ~15K. B: Starting with the cryopump cold. 1. Open the gate valve between the scattering chamber and the Pfeiffer HiPace700 turbo pump. The gate valve between the scattering chamber and the cryopump should be closed. Ensure all venting valves are closed and the TriScroll pump is connected to the pumping port of the turbo pump. 2. Start the Varian TriScroll pump. This should initiate the pumpdown of the chamber and the pressure reading of the Convectron gauges in the main chamber and at the exhaust of the turbopump should decrease. 3. When the chamber pressure is below 10 Torr, start the Pfeiffer turbo pump. 4. Turn on the CCG or the hot cathode ion gauge in the main chamber when the pressure indicated on the Convectron gauge in the main chamber reaches 10 -4 Torr. 5. When the pressure reading on the scattering chamber is ~10-6 Torr or lower, the gate valve connecting the cryopump and the main chamber may be opened. The pressure in the main chamber should rapidly drop by ~1 order of magnitude owing to the increased pumping speed of the cryopump. 5.7 Sample Transfer and Load-Lock Samples can be transferred in and out the scattering chamber via a load-lock and amagnetically coupled sample transporter56. The load lock has a garage that can accommodate 3 sample positions that can be moved out of the path of the sample transfer arm using a rack-and-pinion linear translator57. The sample transporter has a PG-RMD-HJS-OM-1 pincer grip sample grabber (see Figure 15). This pincer grip is opened and closed by rotating one of the magnets on the dual shaft sample transporter. The pincer grip is used to clamp around the stainless steel eyehole protrusion on the sample holder (see Figure 2). When the pincer grip is closed around the eyehole protrusion, the sample can be removed from the garage by lowering the garage and pulling the sample back from the garage with the sample transporter. 56 Ferrovac RMDG40-900-150 Dual Shaft Rotateable Sample Transporter, http://www.ferrovac.ch/ 57 Huntington Mechanical Laboratories model L-2231-4 June 15, 2012 REIXS Beamline RSXS Endstation User’s Manual Page 34 The sample can then be positioned in the diffractometer sample receptacle with using the sample transporter. Once the sample is in the sample receptacle, the pincer grip can be opened, the sample transporter removed and the sample locked in place using the #4-40 screw and the in-vacuum screwdriver. Please refers to the RSXS Loading Samples procedure for details of sample loading. June 15, 2012 REIXS Beamline RSXS Endstation User’s Manual Page 35 Figure 15 Ferrovac PG-RMD-HJS-OM-1 pincer grip manipulator for sample transfer. June 15, 2012 REIXS Beamline RSXS Endstation User’s Manual Page 36 6.0 Items to Update: v2.0 • motor feedthrough wiring diagrams • revise scattering chamber layout to correct and specify motor feedthrough locations • description of sample transfer procedure (direction of clamping action, cautions about applying too much torque to the sample holder, theta angles for transfer and clamping, tilting of phi by 1 degree to push sample holder up against the screw). • procedure to align diffractometer (phosphor cross-hairs and telescope) • Modify pumping diagram • diagram of channeltron wiring • include images of typical channeltron pulses • clarify which panel the BACKLASH setting must be set in • telescope Topcon AT-G6 • note about venting of turbopumps with part numbers • add note about lubricating the gear wheels with WS 2 (MK Impex, MK-WS-06, 0.6 micron WS2 powder) • modify section on slit wheel motor • add SPEC commands June 15, 2012 REIXS Beamline RSXS Endstation User’s Manual Page 37