1
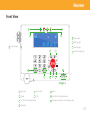
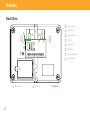
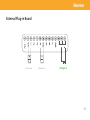
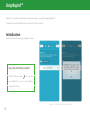
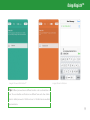
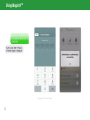
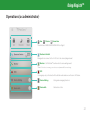
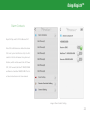
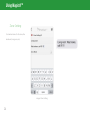
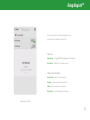
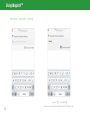
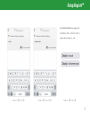
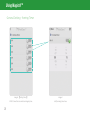
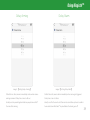
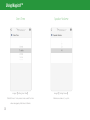
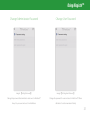
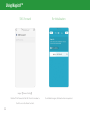
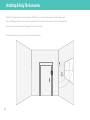
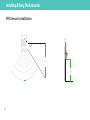
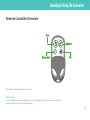
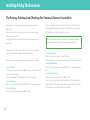
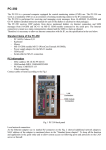
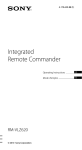
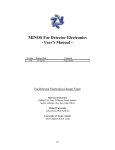
MatiGard™ User Guide
02
Menu
● Feature-------------------------------------------------------------- 05
● Overviews---------------------------------------------------------- 07
● Read Before Using----------------------------------------------- 11
● Using MatiGard™------------------------------------------------- 15
● Using Magictrl™-------------------------------------------------- 18
● Installing & Using The Accessories--------------------------- 34
● Appendix I: Technical Parameters --------------------------- 39
● Appendix II: FAQ------------------------------------------------- 40
03
04
Features
Professional & Safety
● With Magictrl™, you can control MatiGard™ anytime & anywhere via your smartphone, even without data network.
● MatiGard™ is designed for safety from hardware. All commands are encrypted with private protocols which are protected by
IPR laws
● All accesses to MatiGard™ needs to pass the identity authorization. Only the administrators can operate system setting.
● Customizable zones with anti-false algorithms, prevent the false alarm due to the pets or other animal, etc.
● With arming timer, 6 automatic arming can be operated everyday.
● With motoring, the authorized users can listen to the surrounding voices
Easy & Nice
● Easy way to pair your sensors to MatiGard™, up to 99 sensors;
● Identify your remote controllers, users can receive SMS to tell who is pressing down and what the button is.
● Customizable zone name and zone notifications SMS. Telling where it is when something happens in your zones;
● SimCard balance checking and SMS forwarding. Users can check the account of MatiGard™ anytime, and forward the SMS
from particular number to your smartphone;
05
Features
● SMS notify when AC Power OFF.;
● SMS notify when arm/disarm successes;
● Wide LCD display for users to set and query easily;
● Inner speaker’s volume can be adjusted from 1-4
Powerful
● With high performance chargeable battery & LPB technology, MatiGard™ can last more than 24 hours when AC Power OFF;
● Dual network for GSM & PSTN. (Only in GP model);
● Support more than 16 SMS programable wireless zone
● With electronic switch, users can using that to control light or TV, air conditioner remotely via Magictrl™;
● Save more than 70 logs & events.(Dcc can query all, Magictrl™ can query the latest 12 of them);
● Customizable alarm voice. After recording, it will be played on the emergency call triggered by alarm;
● Inform any error in PSTN like disconnect or signal error. (Only in GP model)
06
Overviews
Front View
Power Light
Arming Light
Inner Speaker
Arming Light
Home Arming Light
(Image-1)
Away arm
Home Arm
Menu
Disarm
SOS
# or CANCEL (in editing mode)
* or DELETE (in editing mode)
Microphone, monitor surrounding sounds
USB outlet
07
Overviews
Back View
Power Switch
Power Outlet
Speaker Outlet
PSTN IN
Sim Card Slot
PSTN OUT
Anti-moving Switch
Fixed Support
Battery Pack
08
Cable Slot
(Image-2)
Overviews
External Plug-in Board
A1
Wired Sensor
Wired Sensor
A0
A2
(Image-3)
09
Overviews
How to check system status?
1. By Icons On LCD Display
Normal ON: Sim Card Detected
Flash: Sim Card Error
GSM Signal Strength
Flashing when logs unread exists.
Battery Life
2. By TOP Lights
electric quantity for back up battery
System Alarming
10
Alarm Now
2-Alarm Light ON
Alarmed
2-Alarm Light Flash Per Second
Home Arming
4-Home Arm Light ON
Arming
3-Arm Light ON
Delay Arming
3-Arm Light Flash Per Second
Disarmed
Arm Light OFF
Read Before Using
Normal Items
Arming Status
There are 4 arming status, which can be switched by Magictrl™, remote controllers or panel.
ARM
HOME ARM
DISARM
SOS
● ARM
ARM means all sensors are working on detecting anything unusual. System will alarm when any sensor get triggered.
Turn to ARM by:
1. Press ARM button in Magictrl.
2. Press ARM button in remote controller.
3. Press ARM button in panel
TIPS: Press and hold the ARM button in panel can use delay arm function temporary.
*Delay Arm means the system will wait a few seconds before turn into arm status. Allows you to leave the house without trigger any alarm. Once it
has been set, all arm button will work on delay arm mode
11
Read Before Using
● HOME ARM
HOME ARM means MatiGard™ will ignore some zones’ trigger signals while keeping sensitive for some others'. It’s especially useful when some users want not to be disturbed at home by shutdown the living areas’ sensors but leaving those sensors surrounding the house working. When using
HOME ARM, those sensors wants to shutdown when at home need their zones to be set in SILENT(AT HOME) mode
Turn to HOME ARM by:
1. Press HOME ARM button in Magictrl™.
2. Press HOME ARM button in remote controller.
3. Press and hold the HOME ARM button in panel
● DISARM
DISARM means cancel arm or home arm status. After that, MatiGard™ will not alarm, even the zones get triggered(expect those on URGENT mode).
Pressing SOS will trigger alarm even in DISARM.
1. Press DISARM in Matictrl™
2. Press DISARM in remote controller
3. Press administrator password + DISARM button on panel
● SOS
SOS means alarm immediately.
12
Read Before Using
Zone And Zone Mode
Zone is the working area of 1 or more sensors. In MatiGard™, one zone is represented by ZONE 01,02,etc. For your convenience, please assign zones
by your room sections, like ZONE 01 is assigned to living room and ZONE 02 is assigned to bedroom.
One MatiGard™ owned more than 30 programable wireless zones. Each zone can be paired to 1 or more sensors. Users can choose zone numbers
freely during the pairing process.
Each zone can be set to different zone modes. Which stands for different alarm strategies. By using zone modes, MatiGard™ can provide security services more user-friendly.
● IMMEDIATE: Alarm when in ARM or HOME ARM status, but not in DISARM status when sensors get triggered.
● URGENT: Alarm when in ARM, HOME ARM or DISARM once the sensors get triggered. Usually use when zone pairs to smoke detector, gas leaking
detector, SOS button.
● SILENT(AT HOME): Alarm when in ARM status and be disable when in HOME ARM or DISARM status.
● DOOR BELL: Never alarm, be specific to pairing to wireless doorbell.
(Zone must in one of those 4 modes above)
13
Read Before Using
● INFORMING: Sound DINGDONG when in DISARM status if sensors get triggered. Usually use to pair to door sensor.
● ANTI-FALSE: Alarm only when 2 or more sensors in the same zone get triggered when in ARM or HOME ARM status. Usually using it to pair to PIR
sensor. By using ANTI-FALSE, we can reduce false alarm caused by temperature or environment.
(Zone can be add in 2 more modes above)
We ships MatiGard™ with preset zone modes. ZONE 01 with door detector is in IMMEDIATE mode. ZONE 02 and ZONE 03 pair to 2 PIR sensors are in
SILENT(AT HOME) mode.
You can change zone mode in Magictrl™.
14
Using MatiGard™
For your convenient, please install MatiGard™ properly. Usually, setting in the center of the guarding place would be helpful to receive
all the RF signals. Keep away from mega metal objects or those appliances with high frequency interference, also the reinforced concrete wall or the fire doors.
1. Sim Card Installation
Turn to the back side and insert the sim card into the slot (-image1).
*Your sim card should be available for MatiGard™ to send and receive messages via SMS.
2. Power ON
Power outlet is next to the SIM slot, connect it to the power supply with the cable. Turn on
MatiGard™(-image1), after the beeping sound the LCD display will show characters like ‘500ms’.
Then the system will check sim card status. It will finish initialization when date and time are
shown on the LCD display(-image2). Now you can move to the next.
(Image-1)
(Image-2)
15
Using MatiGard™
3. Record Voice Message
4. Make a call via MatiGard™
On MatiGard™ panel, press
for 2 sec, dial your cellphone No. , press √ to make a call.
Press √ again to finish the phone call.
5. When alarm goes off
When alarm is triggered, MatiGard™ will run siren and SMS to the pointed contacts, after that, it will make the
emergency call to all the contacts recurrently.
When one contact is busy or unable to connected, MatiGard™ will keep calling the next until all contacts are called
3 times or some contacts answer the phone and stop this process.
16
Using MatiGard™
When the emergency call are answered, MatiGard™ will play the voice message. Users can press down the buttons below to operate the system.
[**]: Press ** to monitor
[##]: Press ## to cancel SOS
[88]: Press 88 to listen again
Hang up to call the next emergency contact
*Please remember to press ## to stop emergency call when you trigger alarm for testing MatiGard™.
6. Factory Reset
Press 951753082# on panel to reset. All password or settings will be restored to factory default settings. During the process, all status lights will be flashing.
17
Using Magictrl™
Magictrl™ is a powerful and convenience smartphone app for using and managing MatiGard™.
Download it from http://bin.bz/m Now we have iOS & Android versions.
Initialization
Initialize when first time using or adding new device.
Tips: How to find my number?
On MatiGard™ panel, press
for 2 sec, dial
your cellphone No. , press √, wait for calling
in and check the No.
image1: Country Code & Sim Card Number
18
Using Magictrl™
image2: Password for MatiGard™
image3: Name & Validation
Tips: Different password means different identities such as administrator or
user. The user interfaces and functions are different from each other. Administrator’s default password is 123456 and user’s is 1234. Both can be modified
by administrator.
19
Using Magictrl™
image4: Auth Code & Login
20
Using Magictrl™
Operations (as administrator)
Arm
Disarm
Home Arm
The definition of ARM/DISARM/HOME ARM is in Page11.
Electronic Switch
Manage devices connect to the A1-A3 slot in the external plugin board.
Monitor Call MatiGard™ and monitor the surrounding sounds.
* Please follow the voice message, some devices need password before monitoring.
SOS
In emergency case, all contacts will be called in order and some will receive SMS alarm.
Device Setting
Setting and managing the device
Device Info
Check device status
21
Using Magictrl™
Device Setting (as adminstrator)
Alarm Contacts
——Up to 6 contacts. Get called and SMS(optional) in emergency.
Zone Setting
——Up to 15 zones with customized name, SMS and zone mode.
Remote Controller Setting
——Up to 10 controllers with customized name and ARM/DISARM SMS.
General Setting
——With Arming Timer, Delay Arming, Delay Alarm, SMS Forward and Account Management, etc.
In this section, most of the operations need to be save and send SMS commands after setting.
You will receive a SMS reply from MatiGard™ like ’Success! Commands are
accepted’ when the setting is in effect.
image1 Device Setting
22
Using Magictrl™
Alarm Contacts
Reject SMS by switch OFF the ‘Receive SMS’
Note: SMS notifications are divided into alarm
SMS and System Notification. Only the first
contact in the list will receive the system notifications, which include events like AC Power
OFF, SMS Forward, MatiGard™ ARM/DISARM
and Remote Controller ARM/DISARM. The latest two can be chosen not to be received.
image1 Alarm Contact Setting
23
Using Magictrl™
Zone Setting
Customized name for the zone, like
bedroom, living room, etc..
image1 Zone Setting
24
Using Magictrl™
Zone modes are the alarm strategies for one
zone, check the definition in Page 13
Optional:
Informing —Trigger BEEP/DingDong when disarmed
Anti-false—Alarm by 2 or more sensors
Choose one of below:
Immediate —Active when arming
Urgent—Active even when disarmed
Silent—Silent when home arming
Doorbell —Sound DingDong, not alarm
image2 Zone Mode
25
Using Magictrl™
Remote Controller Setting
image1-1【Custom Name】
26
Name the controller, like ‘Papa’, ‘Mama’, ’Kids’, “Nanny”, etc
Using Magictrl™
Set ARM/DISARM messages for
controllers, like ( Out for work ),
( Back from school ) , etc.
image1-2【Arm SMS】
image1-3【Disarm SMS】
image1-4【SMS Demo】
27
Using Magictrl™
General Setting - Arming Timer
image1【Setting Timer】
With 6 timers for automatic arming by time.
28
image2
Justify arming time here.
Using Magictrl™
Delay Arming
Delay Alarm
image1【Setting Delay Arming】
image1【Setting Delay Alarm】
Default time is 0 sec, means immediately active when receive
Default time is 0, means alarm immediately when sensor get triggered.
arming command. Delay time is max to 90 sec.
Delay time is max to 90 sec.
Usually used in preventing alarm before people can walk off
Usually used for those who lost their remote controller or phone to walk in
the zone after arming.
home and disarm MatiGard™ in panel before the alarm goes off.
29
Using Magictrl™
Siren Time
image1【Setting Siren Time】
image1【Setting Volume】
Default time is 1 min, means siren sounds for 1min
Minimum volume is 1, up to 4.
when emergency. Max time is 30 mins.
30
Speaker Volume
Using Magictrl™
Change Administrator Password
Change User Password
image1【Setting Password】
image1【Setting User Passwors】
Change the password for administrator and save it in MatiGard™.
Change the password for user and save it in MatiGard™. Please
Keep it to your own and use it in initialization.
distribute it to other members in family.
31
Using Magictrl™
SMS Forward
Re-Initialization
image1【Forward Setting】
MatiGard™ will forward all the SMS from this number to
the first one in the Alarm Contacts.
32
Do initialization again, click back when misoperated.
Using Magictrl™
Device Info
Brief introducing only.
System Status: Query about time, arming state, speaker volume, siren time, etc.
Arming Time: Query about the gap between setting and working of arming and alarming.
Informing Strategies: Query about the default contact of MatiGard™ and the types of SMS
it’ll receive.
Arming Timer: Query about the schedule of automatic arming.
Zone Modes: Query about the zone mode of the pointed zone.
Zone Notifications: Query about the notification SMS of the pointed zone.
Remote Controller’s Message: Query about the ARM/DISARM SMS of the pointed controller.
Contacts: List all alarm contacts, those with * means allowing to receive alarm SMS.
Logs & Events: List the latest 12 logs of MatiGard™, contains all the system logs (power status,
etc) and ARM/DISARM events.
Sim Card Balance: Fill in the carrier’s service number and checking code, MatiGard™ will summit them to the carrier via SMS and forward the reply SMS to you.
33
Installing & Using The Accessories
MatiGard™ is shipping with 2 remote controllers, 2 PIR sensors and 1 door/window gap sensor. We’ve already pair
them to different zones for the most common apartment which contains 2 bedroom and 1 door. You can easily add
more sensors or remote controllers following the intro in this chapter.
We recommend you to setup sensors as the picture shown below.
34
Installing & Using The Accessories
Door/Window Gap Sensor Installation[demo by door]
This sensor consists of 2 parts, the
transmitter A and the magnet B.
Battery is in transmitter.
A
B
Process:
1. Clean the installation part of the door and frame. Stick double sided tape on the back of A & B
2. Align A & B, make sure the indicator lights of A are next to B. Put A to the door frame and B to the door. The distance between them should be less
than 10mm.
3. After installation, the indicator light 1 should be flashing for 1 sec when you push the door.
4. Reinforce the sensor by using screws (for wooden doors only, A should be opened for tightening screw
Pairing is required after installation, please check Page XX for more details
Replace Battery:
When the indicator light 2 of A is continue shining, means the battery needs replacement.
1. Open the transmitter A and replace the new 23A 12V battery.
2. Push the door to see if the indicator light 1 is on. If the sensor doesn’t work, check if the battery is putting reversely or contact your reseller.
35
Installing & Using The Accessories
PIR Sensor Installation
10-30o
110o
8-12m
2.2m
36
Installing & Using The Accessories
Remote Controller Overview
Press button to change the system arming status.
Replace Battery:
If no indicate light on when pressing button, you should change the battery. Please loose 3 screws in the
back to remove the cover, then change the battery.
37
Installing & Using The Accessories
The Pairing, Deleting And Checking For Sensors & Remote Controllers
Pairing means to make connection between accessories and
MatiGard™.
One sensor can only pair to one zone, while one zone can pair
with amount of sensors.
One MatiGard™ can pair with amount of remote controllers, and
vice versa.
Door gap sensor is in zone 01. 2 PIR sensors are in zone 02 & 03. 2
remote controllers are paired with name RC01 & 02.
New sensor or remote controller needs pairing before working.
• Sensor Pairing
Press 1# on the panel, wait for the BEEP sound, press zone number
to pair to, press # again
Turn on and trigger the sensor, wait for the voice prompts.
• Sensor Deleting
Press 1* on the panel, wait for the BEEP sound to delete all sensors.
• Sensor Checking
Press 3# on the panel, wait for the BEEP sound
38
Turn on and trigger the sensor, the LCD display should show zone
number and serial number of the sensor. If there’s no zone number
on the display, you need to re-pair the sensor.
Tips: If the pairing fails or the sensor pairs to a wrong zone, you can
re-pair it again. MatiGard™ only keep the latest pairing state.
• Controller Pairing
Press 2# on the panel, wait for the BEEP sound
Press any button on the remote controller, wait for the voice prompts.
• Controller Deleting
• Press 2* on the panel, wait for the BEEP sound to delete all controllers.
• Controller Checking
• Press 3# on the panel, wait for the BEEP sound
• Press any button on the remote controller, the LCD display should
show like RC XX and serial number of the sensor. If there’s no RC XX
on the display, you need to re-pair the controller.
Appendix I: Technical Parameters
• Control Panel
Standby current: 20mA
Alarm current: ≤ 500mA
Power supply: 12V DC
Working temperature: -10°C ~ +85°C
GSM frequency : 850/900/1800/1900MHz quad band Receiving code: ASK
Transmission Frequency ( RF): 315/433MHZ±0.5MHZ Transmission distance: 100 M
wireless detectors: 99
wire detectors: 7
• PIR Detector
Power Supply: DC9V (inner 9V battery)
Standby Current: ≤ 100 uA
Transmission Current: ≤ 20mA
Transmission Frequency: 315/433MHZ±0.5MHZ Transmission Distance:
No obstacle 80m Detective Speed: 0.3 - 3m/s
Detective Distance: 5 - 12m
Detective Range: Horizontal 110° Vertical 60°
Working Condition: Temperature –10 °C ~+ 40 °C
Humidity: ≤ 90 rh
• Door Contact
Power Supply: DC12V (inner 12V battery) Standby Current: ≤
20 uA
Transmission Current: ≤ 15mA
Transmission Frequency: 315/433MHZ±0.5MHZ Transmission Distance: No obstacle 80m Internal Distance: 15 mm
Working Condition: Temperature –10°C ~+ 40 °C Humidity:
≤ 90% rh
• Remote Controls
Power Supply: DC=12V~8.4(Inside A23 DC=12V dry battery) Standby
Current: 0
Transmission Current: ≤ 15 mA
Transmission Frequency: f=433.92±0.2 MHz
Transmission Speed: T ≤ 1 second
Transmission Distance: Without obstacle 80m
Working Condition: Temperature -10°C~ +40°C
Humidity: ≤ 90 rh
39
Appendix II: FAQ
Symptoms
Causes
1.Didn’t arm the system;
2.Less than 30 seconds after arming.
3.Setup wrong phone number;
Cannot receive alarm call
4.The two parts of door contact is installed
too far from each other.
5.Didn't activate PIR or other ac- cessories;
6.Didn’t pair correctly
The distance of remotely control
is too short and the indicator
light is not strong enough
Indicator light of door contact or
PIR detector is always on.
Make alarm call very slowly
The control panel cannot receive
RF signals
40
Remedies
1.Make arming;
2.Operate after 30 seconds;
3.Setup the number again according to the manual;
4.Adjust the installation place of door contact;
5.Activate PIR detector;
6. Pair again
1.The battery of remote controls got rusted;
1.Clean the rust;
2. Lowbattery
2. Replace the battery with a new one
Low battery
Replace the battery with a new one
Too many alarm contacts
Set it again according to the operation manual
Didn’t pair them correctly
Please pair control panel with other accessories again
MatiGardTMUser Guide
Design by Dinsafe, 2013


![[User manual] - KX_series_user_EN](http://vs1.manualzilla.com/store/data/005985322_1-73e2348e6003cbf1e0abe0da04f5dcec-150x150.png)

![[Manual Makeup] - inverter & Plc](http://vs1.manualzilla.com/store/data/005906079_1-ccf407c70ed6dc9ae9bfcbd31676317c-150x150.png)