1
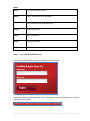
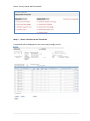
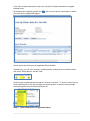
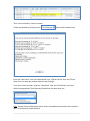
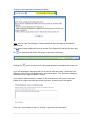
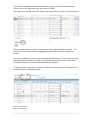
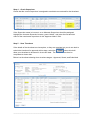
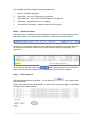
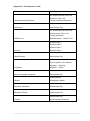
User Guide for Hourly Casual Staff
Entering a Timesheet
__________________________________________________________________________________________________
Brief Document Description
Overview
On engagement, Hourly Casual staff are required to submit their hours worked for
approval and submission to Staff Services in the Office of HRM for payment. These
Timesheets are created by the Hourly Casual staff themselves.
About this Business Process
Timesheets are created on a regular basis as work is completed each fortnight. This
User Guide details the process for the Hourly Casual staff to create and submit their
timesheets.
__________________________________________________________________________________________________
Steps
Step 1
Log into the Griffith Portal
Step 2
Select Job Record and Timesheet
Step 3
Enter valid hours for applicable days
Step 4
Check Supervisor
Step 5
Save Timesheet
Step 6
Submit Timesheet
Step 7
Print Timesheet
Step 1 - Log into the Griffith Portal
Log into the Griffith Portal using your Griffith ID and Password
Navigate to ‘Employment resources’ under ‘Employment’ from the Portal menu on the left
hand side of the screen
__________________________________________________________________________________________________
Select “Hourly casual staff timesheets”
Step 2 - Select Job Record and Timesheet
A timesheet will be displayed for the current pay fortnight period.
__________________________________________________________________________________________________
If you have multiple casual jobs, there are a couple of options available to navigate
between them.
By selecting the magnifying glass icon
you have been engaged will appear.
a list of current active casual jobs for which
Select the job by clicking on the applicable Empl Rcd Nbr.
Alternatively, you can “click through” multiple jobs by clicking the arrow buttons either
side of the ‘Enter data for Job Nbr’ field.
Previous pay fortnight periods can also be chosen if required. To do this, either click on
the left hand arrow for the pay fortnight commencing date, or select the pay fortnight
commencing date from the date drop down list.
Step 3 - Enter Valid Hours for applicable Dates
__________________________________________________________________________________________________
Time can be entered in various formats.
These are detailed by clicking on the
button with formats below
Enter the “Start Work” time and “Start Break” time, “Resume Work” time and “Finish
Work” time for each day worked within the pay fortnight.
If you do not have a break, enter the “Start Work” time and “Finish Work” time only.
Select the appropriate Time Reporting Codes from the drop down list.
Note: Casual General Employees will be shown an additional information link to assist in
their Time Reporting Code selection.
__________________________________________________________________________________________________
Clicking on the help button will show the details.
Note: A list of valid Time Reporter Codes available to each Workgroup is detailed in
Appendix A.
If you need to enter additional hours for another Time Reporting Code for the same day,
hit
on right hand side which will create a new row for that date.
Clicking the
button on any line will copy down the same information to the next row.
If you are entering an allowance there is no need to enter any times. Select the Time
Reporter Code only for the allowance for the relevant day/s. The Supervisor assigned
will default in the “Approver Name” column.
If you need to add comments in relation to the times worked, click on the comments
bubble on the right hand side next to the day listed. Another screen will appear.
Click “OK” once entered to save or “Cancel” to go back to the timesheet.
__________________________________________________________________________________________________
If you make a mistake or need to delete the row of hours you have entered, tick the
“Select” box on the right hand side, then press “CLEAR”.
Once the row is cleared, untick the “Select” box and continue to enter your times worked.
Follow the same steps as above to complete all of the appropriate dates worked. The
timesheet will not let you enter overlapping dates and times worked in multiple job
records.
If you have multiple job records, when entering your timesheet you can check hour many
hours have been entered for one job, as well as the total number of hours entered for
multiple jobs that you have within the timesheet per fortnight.
To do this tick the “Show time for all jobs” checkbox at near the top left hand side of the
timesheet as per the example below.
Yellow = Job Record 1
Pink = Job Record 2
__________________________________________________________________________________________________
Step 4 - Check Supervisor
Check that the correct Supervisor is assigned to each date row entered for the timesheet.
If the Supervisor name is incorrect, or an Alternate Supervisor should be assigned,
highlight the incorrect Supervisor’s name, press “delete”, and enter the first and last
name of the new/correct supervisor in the “Approver Name” field.
Step 5 - Save Timesheet
If the details of the timesheet are incomplete, or they are complete but you do not wish to
submit the timesheet for approval at this stage, select the
button which will
allow your timesheet to be saved in its current state. The timesheet can then be
completed at a later date.
Below is a timesheet showing time at various stages - Approved, Saved, and Submitted.
__________________________________________________________________________________________________
The complete list of Row Statuses on the timesheet are:
1.
Saved – saved by employee
2.
Submitted – time is with Supervisor for approval
3.
With Authoriser – time is with Financial Approver for approval
4.
Approved – with Staff Services for uploading
5.
Accepted for Processing – ready for payment in next payrun
Step 6 - Submit Timesheet
Individual rows of a timesheet can be submitted for approval, or all days entered can be
submitted at once. You can select the checkbox on individual lines as per below:
Alternatively, selecting the ‘Select all rows’ checkbox at the bottom of the page will select
all days which have been entered in the fortnight that are ready for approval by your
Supervisor.
Once rows are selected, select the
button near the bottom of the timesheet
which will workflow your timesheet to the appropriate Supervisor/s for Approval.
Step 7 - Print Timesheet
Individual timesheets can be printed. You can click the
of the timesheet.
button at the bottom
Please note that if you are using Mozilla, you will need to update your paper to landscape
to obtain better printing results.
__________________________________________________________________________________________________
Once you have finished entering your timesheet, simply logout of the Griffith Portal by
clicking “Logout” in the top right hand corner of the screen.
If you have further hours to submit for different jobs or fortnights, repeat from Step 2 until
all required hours have been completed.
__________________________________________________________________________________________________
Appendix A: Time Reporter Codes
Work Group
Time Reporter Code/s
Not Student and No Other Job
Student or Other Job
Casual General Employees
Furniture Handling Allowance
Child Care
Casual Work Day
Not Student and No Other Job
Student and/or Other Job
Laundry Allowance
Griffith Food
Meal Allowance – Griffith Food
Gumurrii Rate 1
Gumurrii Rate 2
Gumurrii Rate 3
Gumurrii
Gumurrii Rate 4
Health/Fitness
Casual Work Day
Chief Invigilator 0-99 Student
Chief Invigilator 100+ Student
Invigilator – Assisting
Invigilators
Invigilator – Scribe
Casual Language Instructors
Casual Work Day
Drawing Model
Models
Photographic Model
Research Assistants
Casual Work Day
Research Fellows
Casual Work Day
Casual Work Day
Theatre
QCGU Laundry Allowance
__________________________________________________________________________________________________