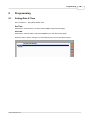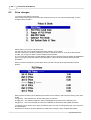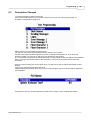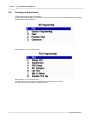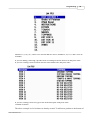
1
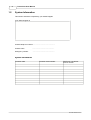
I
TouchPoint User Manual
Table of Contents
4
Part I Introduction
1 TouchPoint User
...................................................................................................................................
Guide
4
2 System Information
................................................................................................................................... 5
3 General Operation
................................................................................................................................... 7
4 Error Codes ................................................................................................................................... 9
11
Part II Clerks
1 Signing on Clerks
................................................................................................................................... 11
2 Clerk Interrupt
...................................................................................................................................
and Floating Clerks
12
14
Part III Checks and Tables
1 Checks
................................................................................................................................... 14
2 Tables
................................................................................................................................... 18
26
Part IV Receipt, Bill and KP Printing
1 Receipt Printing
................................................................................................................................... 26
2 Bill Printing ................................................................................................................................... 27
3 Kitchen Printing
................................................................................................................................... 28
30
Part V Reporting
1 End of Day ................................................................................................................................... 30
32
Part VI Management Utilities
1 Inline Functions
................................................................................................................................... 32
2 Change price...................................................................................................................................
level
33
3 Clerk Functions
................................................................................................................................... 34
4 Edit Floorplan
................................................................................................................................... 35
Part VII Examination of Net and Gross Totalizors
39
Part VIII Programming
42
1 Setting Date ...................................................................................................................................
& Time
42
2 Price changes
................................................................................................................................... 43
3 Description Changes
................................................................................................................................... 44
4 Creating new...................................................................................................................................
products
45
5 Creating PLU...................................................................................................................................
list boxes
49
6 Clerk name programming
................................................................................................................................... 52
7 Clerk permissions
...................................................................................................................................
programming
53
8 Clerk mode control
...................................................................................................................................
programming
55
9 Clerk iButton...................................................................................................................................
programming
57
© 2012 ICRTouch LLP
Contents
II
10 Assigning a product
...................................................................................................................................
to the screen
59
Changing button
..........................................................................................................................................................
colour
62
Changing key..........................................................................................................................................................
size
64
Part IX PocketTouch
67
1 Overview
................................................................................................................................... 67
2 Layout
................................................................................................................................... 68
3 Sidebar Functions
................................................................................................................................... 70
4 FloorPlan
................................................................................................................................... 73
5 Item List Dialog
................................................................................................................................... 74
Part X TouchKitchen
1 Overview
76
................................................................................................................................... 76
Part XI Other products from ICRTouch
81
1 TouchOffice ................................................................................................................................... 81
2 TouchOfficeWeb
................................................................................................................................... 82
3 PocketTouch................................................................................................................................... 83
4 TouchLoyalty
................................................................................................................................... 84
5 TouchKitchen
................................................................................................................................... 85
Part XII Notes
1 Notes
87
................................................................................................................................... 87
© 2012 ICRTouch LLP
II
Introduction
Part
I
Introduction
1
Introduction
1.1
TouchPoint User Guide
4
This operation manual is designed as a general guide as to the day to day running of a touch screen
system using ICRTouch TouchPoint software. The system/software is very flexible and can be set up
in many different ways. Therefore the operation and functions described in this manual may not be the
same as your system.
For guidance on the more advanced functions of TouchPoint please refer to your dealer/supplier.
© 2012 ICRTouch LLP
5
1.2
TouchPoint User Manual
System Information
This section should be completed by your dealer/supplier
Your dealer/supplier is
Contact telephone number ....................................................
Contact name
....................................................
Emergency number
....................................................
System information
Terminal make
Terminal model number
ICRTouch TouchPoint
licence number
© 2012 ICRTouch LLP
Introduction
Dealer installation notes
© 2012 ICRTouch LLP
6
7
1.3
TouchPoint User Manual
General Operation
Sales Functions
Signing onto the Till
Enter your clerk number and press the SIGN ON button, or if you are using the secure iButton method
to sign on, then press your iButton against the receiver.
If are already in the middle of a sale, then these items will appear on the screen, the current subtotal
will also appear at the bottom of the reg window.
If you are currently in the middle of a sale on any other terminal in the network then your sale will float
across.
Some functions can only be performed by a manager; the manager clerk number/ibutton should be
used to sign on at this time as above.
Your clerk can be signed off by entering:
0 and pressing the SIGN ON button
or by
pressing the SIGN OFF button.
Ringing in Multiple Items
Enter the quantity of the item that you want to sell, press the multiply button (X), then press or scan the
item that you want to ring in.
Calculating Change
If you enter the amount that has been tendered before you press the CASH button, then the change for
that sale will be calculated, and shown on the display.
Eg entering 500 and pressing CASH, will show you the change due if someone had paid with a £5
note.
Pressing the 'preset tender' buttons £5 & £10 will automatically 'cash' the sale off as if that were the
amount that had been tendered.
'Partial Tendering' is possible, whereby you tender an amount less than the value of the sale, this
would be used in an instance whereby somebody was to pay the bill by using as an example, a
cheque worth £5, and then paying the rest in cash.
Suspend and Resume
A sale can temporarily be put on hold by pressing the SUSPEND button. You can now start a new sale,
the display will continually flash sale in suspend buffer, whilst you are signed on, until it is picked up
again.
When you are ready to finalise the suspended sale, press the RESUME button. The sale can still be
cancelled at this point if it is no longer required.
Price Enquiry
The price of an item can be obtained from the till without ringing it in, by pressing the PRICE ENQUIRE
button, then pressing the item you wish to know the price of.
Giving Discounts
An item can be discounted by ringing in the item, then entering the discount rate and pressing the %button. The whole sale can be discounted by pressing the subtotal button at the end of the sale, then
© 2012 ICRTouch LLP
Introduction
8
entering the discount rate, and pressing the discount button. A 10% discount can be given by entering
10, and pressing the %- button,
Viewing and Reprinting your Old Sales
Your past sales can be viewed by pressing the VIEW PREVIOUS SALES button, then can be scrolled
through by pressing the Page up and Page down arrows. A receipt can be reprinted for one of these
sales by pressing the printer icon whilst you are viewing that sale. You can leave 'viewing past sales' by
pressing the ESC button.
View Open Checks
You can view and open the current checks & tables on the screen in a list (useful to see what
checks\tabs are running when you start a shift) again this is a security issue so authority to view or
open cheks/tables is decided with each clerks programming.
Ringing in Miscellaneous Items
Miscellaneous items can be rung in by typing in the value of the item, then pressing the misc button.
Ringing in Items from Within a Drop Down Window
Some buttons on the keyboard may be a window containing a list of up to 50 items. Pressing these
uttons will bring up their list of items. The window can be scrolled up and down using the arrow
keys, and an item selected by pressing enter. Pressing ESC will leave the window without registering
an item. Enter the number of the item before pressing the window button will register the item in that
window without calling up the window.
Some windows may be set to be stay down, in which case they will remain on the screen until the ESC
button is pressed, many items can be registered in this way. If a multiplication is set before entering the
window, then that multiplication will carry through.
Opening the Drawer
In order to open the drawer without making a sale, sign on to the till, and press the NO SALE button.
Switching the Receipt On/Off
Press the RECEIPT ON/OFF button to toggle the receipt between on & off, there is a little icon that is a
printer in the bottom left hand side of the screen, that indicates if the receipt is on or not.
If the receipt is on then a receipt will be issued at the end of every sale. The state of the receipt switch
has no effect on any kitchen printer orders.
Correcting Mistakes
Correcting Items from Within a Sale
You can correct the last item registered by pressing the ERROR CORRECT button. To correct an item
from higher up in the list, you can scroll up to that item using the arrow keys, and then remove
it by pressing ERROR CORRECT.
Cancelling a Whole Sale
The whole of the current transaction can be cancelled out, by pressing the CANCEL button, then
answering YES to CANCEL OK?.
Refunding Items
Single items can be refunded, by pressing the REFUND button, then pressing the item that is to be. To
Refund a whole sale, its easier go into Refund Mode. Press the HOME MODE button, then press the
REFUND MODE button, the till will appear the same as if it is in normal sales mode, however any
items rung in at this point will be removed from the totals.
You are only permitted to do one refund sale at a time, this is to prevent the till be left in REFUND
MODE. If you need to do any refund, then go back to HOME MODE, then back to REFUND MODE
again. To go back to normal sales mode, press the HOME MODE button, then press the SALES
MODE button.
© 2012 ICRTouch LLP
9
1.4
TouchPoint User Manual
Error Codes
Error message
Sign on first
No such Clerk
Misoperation
Meaning
Transaction attempted without a clerk being signed
on.
Attempt to sign on with a secret number that doesn't
exist.
General misoperation error.
Close Drawer
Attempt to print a receipt without one being
available.
Attempt to use a function that can only be used in
REG Mode.
Attempt to use a function that can only be used in X
or Z Mode.
Attempt to got to Home Mode whilst in the middle of
a sale.
Attempt to perform clerk interrupt, but there are too
many clerks with sales open.
Attempt to use the register with the drawer open.
Minimum stock
The product has reached it's minimum stock level.
Customer not found
Zero price
A customer has been entered using a customer
number that does not exist.
The item registered has no preset price.
Inhibit Open Amt
You have tried overriding a price on a preset item.
Split tendering Inhbtd
The option to partial tender has been disabled on
this finalise key.
The Clerk is not allowed to sign on in the currently
selected mode.
The Clerk is not allowed to use that function.
Print Buff Empty
REG Mode Only
X or Z Mode Only
SIgn off First
No Int Buff Avail
MODE Operation Inhbtd
Operation Inhibited
Printer Error
Too many items have been registered - finalize the
sale.
More than one refund mode operation has been
attempted, come out of
refund mode, then go back again to attempt a
second one.
Too many items have been registered - finalize the
sale.
General printer error.
No Customer
Check the RJ Printer.
Check Not Open
Attempt to use a customer specific function without
a customer on.
An Old Check function used to open a check that
doesn't exist.
An attempt to New Balance a sale, without a check
being open.
An attempt to open a check, when you already have
one open.
The selected check is in use somewhere else.
IDC File near end
Multiple Refunds Inhibtd
Print Buffer Full
Too Many Checks
No Check Open
Check Already Open
Check No. Busy
No Active Clerks
Opened by another clerk
The active clerks list has been used, none are
active.
The selected check has been opened by another
clerk, and the clerk in use
is not allowed to open other clerk's checks.
© 2012 ICRTouch LLP
Clerks
Part
II
11
TouchPoint User Manual
2
Clerks
2.1
Signing on Clerks
TouchPoint supports 4 methods of signing clerks in. Depending on how your system is configured you
could be using any 1 or more of these methods.
Secret Pin Numbers
Each cashier is allocated a secret number of up to 4 digits. This can be entered either using the
onscreen numeric keypad if you have one, or by pressing the sign on button which brings up a numeric
keypad.
Pin numbers can be changed in Program Mode 3 - Clerk | Clerk Feature | Secret Sign on Number
.
Preset One Shot Clerk Keys
Pressing the required preset clerk key logs that cashier on.
Magnetic Cards
Swipe the clerk card through the card reader
iButtons/Dallas Keys
Press the ibutton on the ibutton reader. If magnetic stick on ibuttons are being used, then the system
can be confirgured to sign the clerk off when the ibutton is removed.
Signing Off
The cashier can be signed off by enter 0 on the numeric keypad followed by the sign on key or by
pressing the Sign Off key.
© 2012 ICRTouch LLP
Clerks
2.2
12
Clerk Interrupt and Floating Clerks
Clerk Interrupt
Clerk interrupt allows cashiers to use a terminal even though another cashier currently has an active
sale open. When the new cashier signs on to the till, the current active clerk is pushed into a buffer in
the background when it can be later recalled.
To recall the cashiers previous transaction they simply sign onto the terminal as normal.
Suspend & Resume
Suspend & Resume keys allow a cashier to effectively interrupt it's own sale and process a second
one. This is useful for times when the customer has left the tilling area to perhaps get something else,
the till operator can still continue to process other customers until that customer returns.
Pressing the Suspend key pushes the current active sale into a buffer in the background, allowing the
cashier to begin a new sale. The sale will stay there until the Resume Key is pressed. Only the
cashier that owns the suspended sale can resume it.
Floating Clerks
Floating clerks allow cashiers to move their current sale from one terminal to another. This process
happens automatically when the cashiers signs onto a terminal but they have a sale currently active on
another. There are times when the clerks sale cannot be floated accross, for example if there is a
dialog on the screen prompting for cooking instructions or if the clerk is program mode etc. Under
these conditions the terminal will show the error message 'Clerk Busy'.
Clerk Change
Clerk change is a special function that allows you to change the cashier of the current sale, without
restarting the sale. Common uses for this function are Manager Overide that allows a manager clerk
to take control of the current sale to correct/refund items off, and hair dressing applications which
allows multiple clerks to tend a single customer each acruing commision for the work that they
performed.
© 2012 ICRTouch LLP
Checks and Tables
Part
III
Checks and Tables
3
Checks and Tables
3.1
Checks
14
There are two ways to store a transaction/sale using checks
Assigning a sale to a check
Sign on enter check number and press the check key *
You may be prompted to enter text for the check if so you can enter the customer name or other
details then press enter, if no text is required press enter.
Enter sale in normal way
Press new balance to store away
Transferring to a check
Sign on.
Enter sale in normal way.
Enter check number and press check transfer.
* Option is available for a qwerty box to appear the first time you use a check this allows you to enter a
customer name or code for this tab. This will then appear on the screen each
time the tab is opened. The name can also appear on the receipt and in the kitchen
* Option available to capture Credit Card details (see your dealer)
To Print the bill for a check
Sign on enter check number
Press receipt
An itemised sub total bill will be printed out and the tab stored away
© 2012 ICRTouch LLP
15
TouchPoint User Manual
Splitting a Bill
Sign on.
Press the table & press the Split Bill button.
The split table screen will now be displayed.
Select the item to be transferred to the current sale, and press the right arrow key.
© 2012 ICRTouch LLP
Checks and Tables
16
Repeat this procedure until all required items are in the current sale window.
When you have finished press Exit.
The original check will be stored away (New Balanced) with the items you selected now in audit
window as an active sale which you can pay off or store away by transferring to a new Table or a check
Go Dutch
Sign on
Enter the check number and press the Go Dutch button
Enter the Number of Bills
To Pay/Cash of a check
Sign on
Enter check number press check
Select open
Finalise sale in normal way Cash, Cheque, Credit Card Etc
N.B. You can always store a check away again by pressing the New Balance button
Covers
It is an option that the number of covers in entered during the first transaction within a check
Correcting items in a check
You can remove an item from a check by selecting the item in the audit window & then using the Error
correct button.
© 2012 ICRTouch LLP
17
TouchPoint User Manual
Refunding an item from a check
Open the check,press the refund button & press the item you wish to refund on the menu screen (not
in the audit window)
Service Charge
(see your dealer)
OPEN CHEK REPORT
This report will show you all currently occupied checks/tables and the amount outstanding.
1, SIGN ON 2, Select END OF DAY 3, Select X MODE, 4, Press OPEN CHEK Button.
© 2012 ICRTouch LLP
Checks and Tables
3.2
18
Tables
Tables & Floor Plans
Table Key
Vacant table
Occupied Table
High Value Table
Table needs attention
When a table needs attention it will flash on the floorplan, this signifies a preset amount of time passing
after the table was last opened, allowing you to be sure all table are regulary attended to.
(see dealer for configuration)
Bill Printed
© 2012 ICRTouch LLP
19
TouchPoint User Manual
Opening A Table
Sign on & press Floor Plan.
Select the floorplan level you require using the up/down arrow. Select the table you would like from the
floorplan
A Prompt box will ask you to enter a name for your table (i.e. customers name).
Enter sale in normal way.
Press new balance to store the sale onto the customers table.
© 2012 ICRTouch LLP
Checks and Tables
20
Covers
It is an option that the number of covers is entered during the first transaction within a Table the
number will appear in the bottom left hand corner of the table & in the Info box.
Moving a Bill from one table to another.
Sign on & press Floor Plan.
Select the floorplan level you require using the up/down arrow.
Press the table to be transfered.
Press open.
Press Floor Plan, select the table you would like to transfer to then press the Transfer button (may
prompt for text, customers name).
© 2012 ICRTouch LLP
21
TouchPoint User Manual
Adding one tables bill to another
As above (Moving a bill from one table to another).
Splitting a Bill
Sign on, select floor plan
Press the table & press the Split Bill button.
The split table screen will now be displayed.
© 2012 ICRTouch LLP
Checks and Tables
22
Select the item to be transferred to the current sale, and press the right arrow key.
Repeat this procedure until all required items are in the current sale window.
When you have finished press Exit
The original Table will be stored away (New Balanced) with the items you selected now in audit window
as an active sale which you can pay off or store away by transferring to a new Table or a check
© 2012 ICRTouch LLP
23
TouchPoint User Manual
Printing a Bill
Sign on.
Press the table key then select the table the bill is required for.
Press the bill key.
An itemised sub total bill will be printed out the Table stored away & the button will turn Blue.
Buttons in the Left Hand corner of Table Plan Screen
OPEN Opens Table
INFO Displays Table Information
BILL Prints the
DUTCH Divides & Prints Bills
TRNSF Used to transfer and open Sale or Chek/Table to a Table
SPLIT Splits the Table into two screens
SLIP Prints bill on optional slip printer
EXIT Exits Floor Plan
Arrow Buttons Used to move to other Floor Plans (Max of 10)
Table Reservation
Deposits, Time reserved before booking Etc (see your dealer)
Sign on & Press Table Reservation Button
© 2012 ICRTouch LLP
Checks and Tables
Select Table (on left hand side) then press new reservation.
Enter booking time
Duration
Enter number of Guests/Covers
Enter Booking Reference (customers Name)
Press Close to finish)
An R will appear on the Table during the reserved time and a warning will appear if you open it
OPEN CHEK REPORT
This report will show you all currently occupied checks/tables and the amount outstanding.
1, SIGN ON 2, Select END OF DAY 3, Select X MODE, 4, Press OPEN CHEK Button
© 2012 ICRTouch LLP
24
Receipt, Bill and KP Printing
Part
IV
Receipt, Bill and KP Printing
4
Receipt, Bill and KP Printing
4.1
Receipt Printing
26
There are two settings for receipt printing in TouchPoint
Receipt on/off
You can have a receipt print after every sale, to do this simply press the receipt on/off button. In the
bottom right of the screen you should see a printer icon if receipt printing is on if no icon is displayed no
printer icon will be displayed.
Receipt printer on
Receipt printer off
Post receipt
If you have the receipt switched off you are still able to print a receipt if the customer requests one,
simply finalise the sale as normal then press the receipt key, a full receipt will now be issued.
© 2012 ICRTouch LLP
27
4.2
TouchPoint User Manual
Bill Printing
Printing bills for tables or checks
From TouchPoint you can print bills for customers before they finalise the sale.
For checks you need to hold the check ie not have it open. You can then enter the check number and
press the receipt key, this will print a full bill for that check.
For tables first hold the table then from the floor plan simply press the table then press the bill key, this
will print a full bill for that table.
© 2012 ICRTouch LLP
Receipt, Bill and KP Printing
4.3
28
Kitchen Printing
Kitchen printers settings would be set up by your dealer.
When creating new products that would need to go to the kitchen, In program 3 - PLU - PLU (refer to
Creating new products) you will need to specify which KP they need to print to. Your dealer can advise
you as to where each KP is located. ie KP 1 dessert printer, KP 2 Mains printer etc.
© 2012 ICRTouch LLP
Reporting
Part
V
Reporting
5
Reporting
5.1
End of Day
30
Reports X & Z Readings
For Security reasons only certain clerks are able to do reports..
End of Day Reports
If you are using Checks or Tables you should print out an Open Chek Report before you print out an
end of day report. This lets you know if you have any Checks,Tables that have
yet to pay. You can then decide whether to pay them off or void them before you do an end of day and
close today's business. You can keep tabs running if you wish they will carry forward until paid off.
Press the HOME MODE button then press the END OF DAY button,
Then select X Mode Reports for Read only reports, or Z Mode Reports for Reset. Reports can be
terminated at any time by pressing the STOP button. If you terminate a Z report, It will not reset the
totals for that report
At the end of a Z reset report you are asked Are You Sure. Z Reset YES or NO. This is a safeguard
should there have been a printer problem you can say NO and then print the report again
once you have sorted out the printer.
End of Day
Select X MODE or Z MODE & press the END OF DAY REPORT button.
Open Checks/Tables
Select X MODE press the OPEN CHEKS button.
PLU Sales (Stock takers report)
Select X MODE or Z MODE & press the STOCK SALES REPORT button. (you may be asked for a
PIN Number, default1234).
Electronic Journal Print Out
Select X or Z MODE and press journal by date & time then enter a date or press ESC This will print out
all transactions on this touchsreen.
Or press Journal Backwards, this will print out from the current point going back.
Journal by Clerk
Press the journal by clerk button and select a clerk Number, date and time this will print the journal out
for all
transactions for this clerk,
To Erase the Electronic Journal
The journal can be erased by going into Z MODE and pressing the JOURNAL RESET ONLY button.
(see your dealer)
All of the reports for the tills can be found in the drop down windows at the top of the screen (see your
dealer)
Batch Report
These are preset reports which are a list of reports strung together to appear as one report.
Daily Reports
This shows a list of all daily, period 1 reports.
Weekly Reports
This shows a list of all period 2 reports, they need not be weekly, they print from when they were last
reset.
Monthly Reports
This shows a list of all period 3 reports, they need not be monthly, they print from
when they were last reset.
© 2012 ICRTouch LLP
Management Utilities
Part
VI
Management Utilities
6
Management Utilities
6.1
Inline Functions
32
In the inline functions menu, there are various options;
IRC Initialise
This will check for the presence of all terminals on the network, and determine which terminal is the
check tracking master, time and attendance master and customer master. This operation only needs
to be performed on one terminal, as this terminal will then inform all other connected terminals.
This operation should be performed where any change is made to the network configuration, e.g.
adding a terminal or removing a terminal.
Check Busy Reset & Table Busy Reset
This option should only be used by an TouchPoint authorised dealer. Incorrect use can cause sales
data corruption.
Clerk Busy Reset
This option should only be used by an TouchPoint authorised dealer.
Send Stock Counter
Updates the other tills in the system with the stock counter from this one.
Clerk Chk/Table transfer
Transfers all the check and tables 'owned' by one clerk to another.
Resync Bill Lodging
Resends the Bill Lodging file down to Commidea ILink.
Send Check file to Backup
Only available on the check tracking master, this option allows the check file to be synchronised into
the check backup master. Please consult you dealer as to the correct operation of this feature.
Switch to backup Master
Only available on the check tracking backup master, this instructs the system to switch control over to
that unit. Please consult you dealer as to the correct operation of this feature.
© 2012 ICRTouch LLP
33
6.2
TouchPoint User Manual
Change price level
This allows you to manually change the current price level.
The current price level is displayed in the top right hand corner of the screen.
© 2012 ICRTouch LLP
Management Utilities
6.3
Clerk Functions
Clear Auto-Clerk Buttons
This will reset all of the auto-clerk buttons back to sign on buttons.
Program Ibuttons
This allows you to assign ibuttons to a clerk from within manager mode.
Manage Biometrics
Calls up the background biometrics application for configuration. (see dealer)
© 2012 ICRTouch LLP
34
35
6.4
TouchPoint User Manual
Edit Floorplan
From here you can add, remove, re-number, enlarge and shrink tables on your graphical floorplans.
In the top right hand of the screen you can use the arrows to edit each floor plan.
Pressing the Add button will add another table on the floorplan.
To delete a table, highlight the table you want to delete and press the delete button.
The shape of the table can also be changed to suit your own floorplan.
© 2012 ICRTouch LLP
Management Utilities
36
Selecting a table and pressing the number button will allow you to assign a number per table.
Selecting a table and pressing the Seat button will allow you to specify the number of seats there are
per table.
© 2012 ICRTouch LLP
37
TouchPoint User Manual
Tables can also be moved by pressing a table then dragging it to the desired position to suit your own
floor plan.
Pressing the exit button willtake you back to manager functions.
© 2012 ICRTouch LLP
Examination of Net and Gross
Totalizors
Part
VII
39
7
TouchPoint User Manual
Examination of Net and Gross Totalizors
The sales totalizors of TouchPoint fall loosely into 2 categories, those that are net and those that are
gross. They are calculated at different times during a sale, sometimes across different terminals,
in the case of floating clerks and centralised checks, and sometimes across different sales, in the case
of check tracking. This can cause apparent differences in these 2 types of totalizors.
Gross totalizors
Gross totalizors are calculated as items are rung into the till. Gross Sales, Department totals, PLU
Group totals and PLU totals are all gross totalizors. These are calculated at the till that they are rung
into, regardless of whether the sale itself is cashed off on another. Gross totals are the total of all items
sold on this till.
Net totalizors
Net totalizors are calculated when sales are cashed off at the till. Net Sales, the 'in-drawer' totalizors
and finalise keys are all Net totalizors. These are calculated on the till that the sale is cashed off on,
regardless of which till the items that are in the sale were actually rung in on. Net totals are the total of
all sales paid for at this till. Why are there often differences between these 2 type of totalizor? This
question always crops up when a new till system is installed. The 3 main causes for differences in
these 2 types of total are floating clerks, check tracking and discounts/premiums.
Floating Clerks
As items are rung into a sale, the gross totals are calculated, depts, plu's etc. If the clerk's sale is now
'floated' to another terminal and cashed off, the net totals will now be calculated. The result is that the
gross totals will stay on the terminal that the clerk was originally on, however the net totals will be on
the terminal that the sale was cashed off. An X/Z report taken on till A will show gross totalizors, gross
sales, dept sale, plu groups sales etc, but no net totalizors, net sales, cash in drawer etc. However till B
will be the opposite of this showing net totalizors but no gross totalizors. An inline consolidated report
between the 2 tills will show these 2 types of totals as being equal. If for any reason this clerk's sale is
not 'cashed off' during that day, or the till powered down without it being cashed off, then the net totals
for that sale will not be calculated, and may even be carried across to the next day.
Check Tracking
The rules that apply to check tracking are similar to floating clerks. When checks are stored, only their
gross totals are calculated, much like if a sale is not cashed off with a clerk. The check's net totals will
ONLY be calculated when that check is cashed off.
Many restaurants specify a terminal as being a waiter station, and as such used only for ringing items
into checks/tables, they are often not equipped with a drawer, and sales are not cashed off at them.
X/Z reports taken from a till like this will always show very high gross totalizors, but little or no net
totalizors. The other side to this is that there is often a till where bills are paid at, but usually not used
for ringing items into. X/Z reports taken from this till will usually show very high net totalizors, but little
or no gross totalizors. However an inline consolidated report for these tills will shows these 2 types of
total as being equal.
Note if checks/tables are not cashed off on one day, then their net totalizors WILL NOT be calculated.
This will give a difference on an X/Z report of all tills, in gross and net totalizors of the value
of any check/table that has not been chased off. To compound the situation, when the check/table is
noticed next day, and cashed off, it will have contributed to the net totalizors for that day, but not the
gross totalizors. On the first day all of the gross totalizors will be higher than the net totalizors, but on
the next it will be the other way around, by the same amount. This also will occur if temporary tabs are
run up by staff and regular customers using checks.
With both floating clerks and check tracking the 2 types of totalizor will always end up being equal,
across all tills, over a period, excluding exceptional circumstances, eg power failure in the middle of a
sale, or Z clearing the check tracking file.
Discounts/Premiums, Service Charge etc
Any discounts or premium amounts applied will be added/subtracted from net totalizors. However they
will not affect the gross sales totalizor and will only affect PLU, PLU Group & Dept totals when it is a %
discount/premium and the 'NET Totalizing for PLU's and Depts' flag is set in;
© 2012 ICRTouch LLP
Examination of Net and Gross Totalizors
40
PGM3->Machine Features->General Feature->Machine Control 2.
Under most circumstances these totals appear in net totalizors but not in gross totalizors. The gross
and net totalizors will normally be different by any discounts
© 2012 ICRTouch LLP
Programming
Part
VIII
Programming
8
Programming
8.1
Setting Date & Time
Go to Program 1 > Set system Date & Time
Set Time
Press Enter, enter the time in 24 hour format HHMM, the press enter again.
Set Date
Press Enter, enter the date in the format DDMMYYYY, then press enter again.
When the date or time is changed, it is automatically sent to all connected terminals.
© 2012 ICRTouch LLP
42
43
8.2
TouchPoint User Manual
Price changes
To change prices within TouchPoint.
First you will need to goto the home mode screen from here you can select programming, for price
changes select program 1.
Select option 1 PLU Price and press enter.
You will now see a list of all the products that are stored in your system.
Use the arrow keys to locate the product you wich to change the price of. If you know the products
number, you can type it, and the cursor will jump to that product.
or If you press the 123 button, this will change to ABC, the list of products will now appear in alphabetical
order, if you type the first few letters of the description, it will jump to the products that match this
description.
When you have located your product press enter, you will now see all pricing information for that
product.
Each product can have upto 9 different prices these can be used for and each price having 3 sub price
levels.
1st @ Price - This would be the normal selling price for the item.
2nd @ Price - This would normally be used in a hospitallity enviroment for the half pint price.
3rd @ Price - This would normally be used in a hospitallity enviroment for the double spirit price.
To change a price use the arrow keys to locate the price you wich to change then type in the new price
and press enter.
Press ESC to return to the list of products to make more changes, when complete press EXIT.
© 2012 ICRTouch LLP
Programming
8.3
44
Description Changes
To change descriptions within TouchPoint.
First you will need to goto the home mode screen from here you can select programming, for
description changes select program 2.
Select option 1 PLU Descriptor and press enter.
You will now see a list of all the products that are stored in your system.
Use the arrow keys to locate the product you wich to change the descriprion of. If you know the
products number, you can type it, and the cursor will jump to that product.
or if you press the 123 button, this will change to ABC, the list of products will now appear in alphabetical
order, if you type the first few letters of the description, it will jump to the products that match this
description.
When you have located your product press enter, you will now be able to edit the description for that
product.
Type in your new description and press enter.
Update keyboard text? when this is set to yes the new description you have entered will be updated to
your keyboard.
Press ESC to return to the list of products to make more changes, when complete press EXIT.
© 2012 ICRTouch LLP
45
8.4
TouchPoint User Manual
Creating new products
To add new products within TouchPoint.
First you will need to goto the home mode screen from here you can select programming, for adding
new products select program 3.
Select option 1 PLU and press enter.
Select option 1 PLU and press enter
You will now see a list of all the products that are stored in your system.
Use the arrow keys to locate the a vacant record.
© 2012 ICRTouch LLP
Programming
46
When you have located a vacant record press enter, you will now be able to create a new product.
Description of Fields
Descriptor This is the name of the product, it will appear when the product is sold.
To edit the current name, press enter on it, then edit the name and press enter to
record it.
Update Keyboard Text? Setting this as YES, means that the text on the keyboard for that button will
be
updated to match the descriptor above, this will change to YES automatically when
you change a products name. It can be changed back to NO, if you do not wish
the text on the keyboard to change for this button.
Random Code This is the barcode of a product, or could be used as Bin numbers for wine.
Price This is the price of the product, type in the price, assuming 2 decimal places, but
not entering the decimal point, and then press ENTER.
E.g. 540 ENTER would set a price of £5.40.
1st @ Price - This would be the normal selling prive for the item.
2nd @ Price - This would normally be used in a hospitallity enviroment for the half pint price.
3rd @ Price - This would normally be used in a hospitallity enviroment for the double spirit price.
Department Link This is the department that this product to for reporting purposes, pressing
ENTER on this item will bring up a drop down with all the departments in.
Group Link This is the PLU Group that this product to for reporting purposes, pressing
ENTER on this item will bring up a drop down with all the PLU Groups in.
List Box Link 1 to 6 Used to link to pop up windows such as Bread Choice? White or Brown
Or a list of products such as wines or extras
List 6 items enforced zero price? When set to yes all products that a in a list box linked to List Box 6
will be sold at a zero value.
Windows stay until esc? If selected means that the list box window remains on the screen until you
select
esc
© 2012 ICRTouch LLP
47
TouchPoint User Manual
Set menu Used for set menus (see your dealer)
Maintain Stock? Do you want this product to keep a stock level
Error when minimum stock reached If selected a message will appear in the audit window each time
you sell this product below its minimum stock
Inhibit sales when below minimum stock If selected you cannot sell below minimum stock
Display Stock Quantity on one shot PLU If selected the Stock Countdown number is shown in the
bottom L/H corner of the PLU button
Current stock quantity You can enter the stock here (use the decimal point)
Minimum stock quantity Enter the Minimum stock quantity here (use the decimal point)
Tax Rate Select a Tax Rate from the drop down list.
Mix & match Used for Mix & Match promos (see your dealer)
Enable Zero price Sale Zero Price (e.g. White Bread)
PLU is Negative Minus Status
Enable Preset Override An amount can be typed in, i.e. an open product like MISC. High Digit Limit 3
= 999
PLU is Condiment PLU? A condiment PLU will be linked to the previous PLU & follow the PLU
printing etc (e.g. white bread)
Do not print on receipts or bills Stops Printing on receipts and bills
PLU is Weight PLU Used for Kilos & Grams
Allow Manual weight entry Used for Kilos & Grams
Prompt with picture A picture JPEG can appear on the screen
Single item sale If selected the sale will be Cashed off
Set menu premium item? (uses 3rd@) Used in conjunction with set menus (see your dealer)
Quantity of 1st @ Price This is where the unit quantity is set for the main selling price, normally 1.00
Quantity of 2nd @ Price This is where the unit quantity is set for the 2nd selling price, normally if used
for a half pint price this would be 0.50
Quantity of 3rd @ PriceThis is where the unit quantity is set for the 3rd selling price, normally if used
for doubles this would be 2.00
Print in Red on KP? Prints product to kitchen in red if using a two colour matrix printer or white on a
black background if using a thermal printer.
Print to KP1? Sends this product to kitchen printer 1
Print to KP2? Sends this product to kitchen printer 2
Print to KP3? Sends this product to kitchen printer 3
Print to KP4? Sends this product to kitchen printer 4
Print to KP5? Sends this product to kitchen printer 5
Print to KP6? Sends this product to kitchen printer 6
Print to KP7? Sends this product to kitchen printer 7
Print to KP8? Sends this product to kitchen printer 8
© 2012 ICRTouch LLP
Programming
48
Print to KV1? Sends this product to kitchen Video 1
Print to KV2? Sends this product to kitchen Video 2
KP Category Links the product to a category, kitchen printers can sort there orders by category.
Selective Itemizer 1 Used to include/omit the product from discounts, premiums, customer offers etc.
(see dealer)
Selective Itemizer 2
Selective Itemizer 3
Selective Itemizer 4
Selective Itemizer 5
Commission 1 Used in conjustion with clerk programming to specify if a operator receives
commission on the sale of this product.
Commission 2
Commission 3
Commission 4
Prompt for customer verification 1? When set to yes a dialogue box will appear on screen when this
product is sold with a predetermined message, the operator must answer yes for the product to be sold
ie "Is Customer over 18" answering no will prevent the product being sold. The mesage displayed can
be set in Program 2 - Fixed character 2 - fixed character 76-77.
Prompt for customer verification 2? As above but with a different message.
Generate Range Servant ball dispencer code? Used in driving ranges to dispence golf balls (see
dealer)
Enable SEL printing Enables TouchPoint to print shelf edge labels to your receipt or a specific printer.
(see dealer)
When you have finished programming your product, you can either press the ESC button to go back to
the product list, or you can press the NEXT or PREV button to go on to the next PLU,
Pressing the Lock button will keep you in the same field.
Once you have created a product you will need to assign it to the sales screen, see topic "Assigning a
product to the screen"
© 2012 ICRTouch LLP
49
8.5
TouchPoint User Manual
Creating PLU list boxes
To create list boxes within TouchPoint.
First you will need to goto the home mode screen from here you can select programming, for creating
list boxes select program 3.
Press Enter on number 1 PLU
Press enter on number 6 List PLU
All of the List PLU's will now be displayed
© 2012 ICRTouch LLP
Programming
50
Numbers 1,2,3,4,5,6,7,8 and 12 are all lists that are in use, numbers 9,10,11,13 and 14 are all
available.
If you are adding, removing a product from a existing list arrow down to it and press enter.
If you are creating a new list arrow down to an available line and press enter.
If you are creating a new list, type a title in the descriptor field press enter.
Continue as below
The above example is of a list that was already created. To add a new product to the bottom of
© 2012 ICRTouch LLP
51
TouchPoint User Manual
the list, arrow down to item 6 (the next free record) and press enter.
A list of all PLU's will now be displayed, arrow down to the product you want to add, and
press OK.
Continue until all products have been added.
Press ESC
If more Lists are to be modified repeat as above
Else press EXIT
© 2012 ICRTouch LLP
Programming
8.6
52
Clerk name programming
To change clerk names within TouchPoint.
First you will need to goto the home mode screen from here you can select programming, for clerk
name changes select program 2.
Select option 2 Clerk Names and press enter.
You will now see a list of all clerks that are stored in your system.
Use the arrow keys to locate the clerk you wich to change the name of.
When you have located the clerk press enter, you will now be able to edit the name for that clerk.
Type in your new description and press enter.
Press ESC to return to the list of clerks to make more changes, when complete press EXIT.
© 2012 ICRTouch LLP
53
8.7
TouchPoint User Manual
Clerk permissions programming
To change clerk permissions within TouchPoint.
First you will need to goto the home mode screen from here you can select programming, for clerk
permissions changes select program 3.
Press Enter on option 3 Clerk
Press Enter on option 2 Clerk Operation
Use the arrow keys to select the operator you want to set permissions for.
© 2012 ICRTouch LLP
Programming
54
Press Enter
Here you can use the enter key to toggle between YES and NO to allow or prohibit specific functions.
.
Once selection is complete press ESC
If more operators are to be set, repeat as above
Else press exit
© 2012 ICRTouch LLP
55
8.8
TouchPoint User Manual
Clerk mode control programming
To change clerk mode control within TouchPoint.
First you will need to goto the home mode screen from here you can select programming, for clerk
mode control settings select program 3.
Press Enter on option 3 Mode Control.
Use the arrow keys to select the operator you want to set.
© 2012 ICRTouch LLP
Programming
Press Enter.
Here you can use the enter key to toggle between YES and NO to allow or prohibit modes.
Once selection is complete press ESC.
If more operators are to be set, repeat as above.
Else press exit.
© 2012 ICRTouch LLP
56
57
8.9
TouchPoint User Manual
Clerk iButton programming
To program clerk iButton's within TouchPoint.
First you will need to goto the home mode screen from here you can select programming, for clerk
Ibutton programming select program 3.
Press Enter on number 3 Clerk.
Press enter on option 4 clerk ibutton.
Use the arrow keys to select the operator to be assigned a key.
© 2012 ICRTouch LLP
Programming
Press enter.
Touch iButton key onto reader.
Press escape.
If more operators are to be set repeat as above.
Else press exit.
© 2012 ICRTouch LLP
58
59
8.10
TouchPoint User Manual
Assigning a product to the screen
To change assign products to a screen within TouchPoint.
First you will need to goto the home mode screen from here you can select programming, to assign
keys select program 4.
Your start screen will now be displayed.
Use the UP arrow key to navigate to the screen you want to add the new product.
Configuration Dialogue
Use the down arrow key to go back to a screen.
Once you have found the appropriate screen, press an unused key where you want your product to be
located.
Then press type in the Configuration dialogue, a list of functions available will be displayed
© 2012 ICRTouch LLP
Programming
Press OK on number 1 PLU
A list of all products will be displayed.
Arrow down or up to the new product to be added, press OK
Use the single arrow key to move down one line at a time.
Use the double arrow key to move down a page at a time.
The new product will now be assigned to that key position.
The same product can be assigned to as many screens as required.
Repeat as above to assign more products to screens.
Once complete press the X key to exit.
© 2012 ICRTouch LLP
60
61
TouchPoint User Manual
Hints/Tips
To select multiple boxes you can press the first box then drag your finger to "rubber band" all
of the boxes you would like to program, assigning a PLU to the first box will cause all other
boxes to be programmed with PLU's sequentially.
© 2012 ICRTouch LLP
Programming
62
8.10.1 Changing button colour
To change key colour within TouchPoint.
First you will need to goto the home mode screen from here you can select programming, to change
key colours select program 4.
Your start screen will now be displayed.
Use the UP arrow key to navigate to the screen you want to change the buttons appearance on.
Configuration Dialogue
Use the down arrow key to go back to a screen.
To change the background colour of a key press that key, then press the Bk Clr key as above.
A screen of colours will now be displayed, press the required colour.
To change the text colour on a key press that key, then press the Txt Clr key as above.
A screen of colours will now be displayed, press the required colour
.
© 2012 ICRTouch LLP
63
TouchPoint User Manual
Repeat as above to change more colours.
Once complete press the X key to exit
© 2012 ICRTouch LLP
Programming
64
8.10.2 Changing key size
To change key size within TouchPoint.
First you will need to goto the home mode screen from here you can select programming, to change
key sizes select program 4.
Your start screen will now be displayed.
Use the UP arrow key to navigate to the screen you want to change the key size.
Configuration Dialogue
Use the down arrow key to go back to a screen.
Once you have found the appropriate screen, press the key you want to increase in size and drag to
the next blank key.
Press the merge key on the Configuration Dialogue, this is the linked chain symbol.
© 2012 ICRTouch LLP
65
TouchPoint User Manual
Keys can only be merged to another key of the same size.
To make a key smaller press the key you want to resize then press the un-merge key, this is the
broken chain symbol.
Repeat as above to resize more keys.
Once complete press the X key to Exit.
© 2012 ICRTouch LLP
PocketTouch
Part
IX
67
TouchPoint User Manual
9
PocketTouch
9.1
Overview
PocketTouch
Wireless Waiter Pad software.
Lightweight, handheld COLOUR touch screen, using Windows Mobile operating system, (Pocket PC).
Speeds up service - Orders are automatically transmitted via the latest RF technology to the relevant
kitchen and bar printers.
Reduces incorrect or illegible orders.
Increases customer spend.
Developed by ICR, which means an unequalled level of integration with the rest of the EPOS system.
Advantages of PocketTouch
More time
Service specialists are able to remain just where they are needed most: with the guests. The result is
less wasted effort, no crowding around a terminal - and more time to take orders, generate sales and
help customers.
More turnover
Time savings mean that waiters serve more people, and pay more attention to guests. Projected over
the whole year, individual diners having an extra item or beverage makes a huge difference; sales
increases of at least 10 percent are the norm. What's more, incorrect and missed orders become a
thing of the past.
More customer satisfaction
Word soon gets around that guests prefer establishments that use PocketTouch. Orders are served
faster, there's no waiting for the bill and guests simply enjoy good food, good drinks and excellent
service. When guests are happy they spend more, visit more often and recommend you to others.
More savings through greater efficiency
In most restaurants, 80% of sales are made in 20% of the time. More efficient serving processes and
greater continuity at the bar and in the kitchen are therefore invaluable. Fast, accurate billing at the
diners' tables is another advantage: all meals and drinks are registered with precision, and a clearly
itemized bill appears from the terminal at the touch of a button. Nothing is missed and no payment
errors are made.
© 2012 ICRTouch LLP
PocketTouch
9.2
68
Layout
Registration Window
This shows all the items registered in the current sale. Double tapping this area converts this into full
screen mode and selects the Order side bar.
Total Window
Shows the current sale total and number of items registered.
Menu List
Shows the items available for the current keyboard level. If there are more items in this level than can
be shown on screen then you can drag you finger up and down to scroll list. The back button returns to
the main home level. You can also drag your finger along the screen to the right to move to the next
menu level or to the left to move to the previous level.
Tool Bar
The tool bar buttons are used to bring up each of the side bars. Pressing the same tool bar button
again hides the side bar
Side Bar
Shows a list of available function buttons
© 2012 ICRTouch LLP
69
TouchPoint User Manual
Battery Meter
Shows the current battery state
Wireless Meter
Shows the current wireless signal level, note that this is not supported on all hardware platforms
© 2012 ICRTouch LLP
PocketTouch
9.3
70
Sidebar Functions
Configuration Side Bar
Sign On
Use the 4 digit secret sign on number from TouchPoint to log a cashier onto the device.
Sign Off
Signs off the current cashier.
Configuration
Allows some of the configuration options like host ip address to be entered.
Sync Till
Extracts the required program data from TouchPoint.
Receipt On/Off
Turns the automatic issuance of receipts after each sale on or off.
Information
Brings up the information dialog showing things like licence number, software version etc
Close Down
Exits the PocketTouch software
Finalisation Side Bar
Cash
Finalises the current sale as a tendered sale.
Send to Table
Opens the floor plan dialog so that the current sale can be sent to a table
Cancel Sale
Cancels and deletes the current active sale with no further processing
Table Side Bar
Open Table
Opens the floor plan dialog so that the contents of an active table can be extracted from the check
master
© 2012 ICRTouch LLP
71
TouchPoint User Manual
Send to Table
Opens the floor plan dialog so that the current sale can be sent to a table
Print Bill
Opens up the floor plan dialog and prints a bill for the selected table
Order Side Bar
When the order side bar is called up the registration is opened in full screen mode. If there are more
items in the registration window than can be shown on screen the window can be scrolled by dragging
it up and down.
Add Item
Increases the quantity by 1 on the selected item
Subtract Item
Decreases the quantity by 1 on the selected item. It the item's quantity is 1 then the item is removed.
Line Correct
Removes a whole line from the registration window regardless of it's quantity.
Toggle Price
Used to toggle between 1st @, 2nd @ and 3rd@ prices - for example halves and doubles.
Multiply
Allows a quantity to be set against the selected item
Miscellaneous Side Bar
Message to Kitchen
Pops up a keyboard to allow a custom message to be sent to the kitchen.
Preset Message to Kitchen
Allows the user to select from one of a range or preset messages that can be sent to the kitchen.
Hand Written Message to the Kitchen
Pops up the handwriting dialog allowing the user to scribe a message that is printed on the kitchen
printer.
Discount %
Applies a percentage discount to the current sale
© 2012 ICRTouch LLP
PocketTouch
Discount Amount
Applies an amount discount to the current sale
© 2012 ICRTouch LLP
72
73
9.4
TouchPoint User Manual
FloorPlan
If the floor plan area is larger than the dialog then the area can be scrolled by dragging it around.
The up and down arrows allow you to select the floorplan level you require.
Open
Performs the requested operation on the selected table, for example sends the current sale to that
table.
Cancel
Closes the floorplan
Number
Allows you to open a table by number rather than selecting one from the graphical image.
© 2012 ICRTouch LLP
PocketTouch
9.5
74
Item List Dialog
When there are more items in the list than can be shown on screen then it is possible to drag the list of
items up and down in order to access the rest.
© 2012 ICRTouch LLP
TouchKitchen
Part
X
TouchKitchen
10
TouchKitchen
10.1
Overview
76
TouchKitchen is a graphical display for the kitchen eliminating the need for paper printouts or hand
written tickets.
Orders are displayed in order and a chefs summery window can also be displayed showing a
consolidation of all orders.
© 2012 ICRTouch LLP
77
TouchPoint User Manual
Orders are displayed on a touch screen in the kitchen, orders can be moved around the screen
restacked and reordered simply by dragging them.
As dishes are prepared they can be marked as complete on the ticket by selecting EDIT then touching
the item.
© 2012 ICRTouch LLP
TouchKitchen
Orders can be stored away from the main screen to be recalled later
© 2012 ICRTouch LLP
78
79
TouchPoint User Manual
Orders can be configured to alert you on a time basis, if an orders is left over a preset amount of time it
will change colour to alert the kitchen staff, if it is left further it will start to flash.
© 2012 ICRTouch LLP
Other products from ICRTouch
Part
XI
81
TouchPoint User Manual
11
Other products from ICRTouch
11.1
TouchOffice
© 2012 ICRTouch LLP
Other products from ICRTouch
11.2
TouchOfficeWeb
© 2012 ICRTouch LLP
82
83
11.3
TouchPoint User Manual
PocketTouch
© 2012 ICRTouch LLP
Other products from ICRTouch
11.4
TouchLoyalty
© 2012 ICRTouch LLP
84
85
11.5
TouchPoint User Manual
TouchKitchen
© 2012 ICRTouch LLP
Notes
Part
XII
87
TouchPoint User Manual
12
Notes
12.1
Notes
NOTES
© 2012 ICRTouch LLP
Notes
NOTES
© 2012 ICRTouch LLP
88
89
TouchPoint User Manual
NOTES
© 2012 ICRTouch LLP
Notes
NOTES
© 2012 ICRTouch LLP
90
91
TouchPoint User Manual
NOTES
© 2012 ICRTouch LLP
Notes
NOTES
© 2012 ICRTouch LLP
92