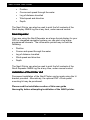
1
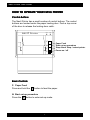
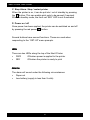
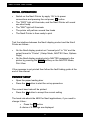
Nav6 Printer User Guide MAN 3036.00 Issue 1.0 ICS Electronics Limited. Unit V, Rudford Industrial Estate Ford, Arundel, West Sussex BN18 0BD United Kingdom Tel: +44 (0)1903 731101 Fax: +44 (0)1903 731105 E-Mail: Website: [email protected] [email protected] www.icselectronics.co.uk The technical data, information and illustrations contained in this publication were to the best of our knowledge correct at the time of going to print. We reserve the right to change specifications, equipment, installation and maintenance instructions without notice as part of our policy of continuous product development and improvement. No part of this publication may be reproduced, stored in a retrieval system or transmitted in any form, electronic or otherwise without permission in writing from ICS Electronics Ltd. No liability can be accepted for any inaccuracies or omissions in the publication, although every care has been taken to make it as complete and accurate as possible. Copyright 2001, ICS Electronics Limited. All rights reserved. 1 Nav6 Printer User Guide Important Information This equipment is not approved for use by SOLAS convention vessels within the Global Maritime Distress and Safety System (GMDSS) It is intended for use by leisure craft and other non-SOLAS vessels wishing to participate within GMDSS Safety Warnings This instrument is for use as an aid to sailors and should not lead to a reduction in the level of good seamanship required at all times Reception of messages cannot always be guaranteed as this depends on local radio propagation 2 Nav6 Printer User Guide Contents Quick Start...................................................................................... 5 Introduction..................................................................................... 5 How To Operate Your Nav6 PRINTER............................................ 7 Initial Operation............................................................................... 9 Printer Setup................................................................................... 9 Nav6 / Nav6plus / Nav6 Repeater Setup ....................................... 11 Tearing off a Print-out ................................................................... 13 Paper Loading .............................................................................. 14 INSTALLATION ............................................................................ 17 Maintenance and Trouble Shooting............................................... 22 Warranty....................................................................................... 25 Packing List And Options .............................................................. 25 SPECIFICATIONS ........................................................................ 28 3 Nav6 Printer User Guide Congratulations on purchasing this superb ICS Electronics Ltd product. We hope that it gives you many years of reliable and trustworthy service. Please take the time to read this manual carefully as it contains some essential information regarding the operation and maintenance of the product and a useful background to the NAVTEX system. We recommend that you regularly visit the ICS website www.icselectronics.co.uk for information on updates, the availability of software enhancements, further options and support. The support pages contain frequently asked questions about the Nav6 that you may find useful. There is also a NAVTEX database providing a list of operational NAVTEX stations and their details. The IMO and various national coastguards also operate informative websites that you may wish to visit; see www.icselectronics.co.uk/links. 4 Nav6 Printer User Guide QUICK START You will find this product extremely easy to operate. • Follow the installation guidelines • Re-check the cable connections • • • • Apply power Set up the Nav6 display product to enable printing Switch on the Nav6 Printer You can now print Navtex messages and/or NMEA data. INTRODUCTION Your Nav6 Printer can be used in conjunction with a Nav6 or Nav6plus Navtex receiving system, or with a Nav6 Repeater to provide a permanent record of Navtex messages, NMEA data or ship’s log, as appropriate. The following three paragraphs relate to the three Nav6 display products (Nav6, Nav6plus & Nav6 Repeater) - read the one that applies to your Nav6 system for an overview of what you can print. Nav6 Navtex System In a Nav6 Navtex system the Nav6 Printer can be used to print messages from pre-selected stations and/or message types automatically, as they are received. The Nav6 Printer can also be used to print manually-selected messages whenever they are required (for forwarding on to crew members etc). Nav6plus / Nav6aplus Navtex System In a Nav6plus or Nav6aplus Navtex system the Nav6 Printer can be used to print messages from pre-selected stations and/or message types automatically, as they are received. The Nav6 Printer can also be used to print manually-selected messages whenever they are required (for forwarding on to crew members etc). If you have an integrated navigation system (which also has a GPS receiver) which is connected to the NMEA input of the Nav6plus, you can print a log at pre-programmed intervals. The information printed may include the following: 5 Nav6 Printer User Guide • • • • Position Course and speed through the water Log of distance travelled Wind speed and direction • Depth The Nav6 Printer can also be used to print the full contents of the Nav6 display NMEA log file at any time, under manual control. Nav6 Repeater If you are using the Nav6 Repeater as a large format display for your GPS or integrated navigation system you can print a log at preprogrammed intervals. The information printed may include the following: • • • • Position Course and speed through the water Log of distance travelled Wind speed and direction • Depth The Nav6 Printer can also be used to print the full contents of the Nav6 Repeater NMEA log file at any time, under manual control. Installation of the Printer Unit Permanent installation of the Nav6 Printer can be made using the Ubracket provided. Alternatively, the optional FMT-4 flush panel mounting kit may be purchased. Please read the installation section of this user guide thoroughly before attempting installation of the NAV6 printer. 6 Nav6 Printer User Guide HOW TO OPERATE YOUR NAV6 PRINTER Control Buttons The Nav6 Printer has a small number of control buttons. The control buttons are located under the paper loading door. Push a top corner of the door to release the locking door catch. NAV 6 PWR Pr i n t e r SBY F N Y P Paper Feed Start set-up procedure Stop Alarm. Stop / restart printer Power on / off Basic Controls F: Paper Feed Press and hold the F button to feed the paper. N: Start set-up procedure Press the N button to enter set-up mode. 7 Nav6 Printer User Guide Y: Stop Alarm. Stop / restart printer When the printer is on, it can be put into / out of standby by pressing the Y button. This can enable print-outs to be paused if required. When in standby mode, the front red ‘SBY’ LED is not illuminated P: Power on / off Once power has been applied, the printer can be switched on and off by pressing the red power P button. Several buttons have second functions. These are used when responding to the 'SET-UP' menu prompts. LEDs There are two LEDs along the top of the Nav6 Printer • PWR ON when power is applied to the printer • SBY ON when the printer is ready to print Alarms The alarm will sound under the following circumstances: • • Paper out Low battery (supply is less than 9 volts) 8 Nav6 Printer User Guide INITIAL OPERATION • Switch on the Nav6 Printer by apply 12V to its power connections and pressing the red power P button • The “PWR” light will illuminate, and the Nav6 Printer will sound one short beep • • The "SBY" light will illuminate The printer will perform several line feeds • The Nav6 Printer is then ready to print Test the interface between the Nav6 display product and the Nav6 Printer as follows : • On the Nav6 display product set “manual print” to “On” and the output format to “Printer” ( Setup Mode, NAVTEX View, Options Page) • On the Nav6 display product print a NAVTEX message to the printer by pressing the PRINT softkey on the NAVTEX Mode, Print View If the message is not printed then follow the fault finding guide at the end of this manual. PRINTER SETUP • • Open the paper loading door Press the N button to start the set-up procedure The current baud rate will be printed. • Press the Y button to accept the current setting The baud rate should be 4800 for Nav6 applications, if you need to change it then : • Press the N button A choice of 6 settings are displayed 9 Nav6 Printer User Guide 0) 3) • 300 1) 600 2) 1200 2400 4) 4800 5) 9600 Press the N button to step through the choices (to select 4800 press the N button 4 times) • Press the Y button to accept the setting The current baud rate will be printed. • Press the Y button to accept the current setting The current linefeed setting will be printed. • Press the Y button to accept the current setting The linefeed setting should be OFF for Nav6 applications, if you need to change it then : • Press the N button The linefeed setting will toggle & be printed out. • Press the Y button to accept the current setting or • Press the N button to change the current setting A “Setup complete” message will be printed. NAV 6 Pr i n t e r PWR F N Y P 10 SB Y Nav6 Printer User Guide NAV6 / NAV6PLUS / NAV6 REPEATER SETUP You will need to set up your Nav6 display to enable printing to the Nav6 Printer. There are four types of print format – any combination of print formats is supported. Auto Printing NAVTEX messages • Set NAVTEX “auto print” to “On” (Setup Mode, NAVTEX View, Options Page) • Set the NAVTEX output format to “Printer” (Setup Mode, NAVTEX View, Options Page) • Set the NAVTEX print filtering to select which message types from which stations should be printed (Setup Mode, NAVTEX View, Options Page, Print Setup) Auto printing of NAVTEX messages will now occur when new NAVTEX message transmissions are received from the selected stations Manual Printing of NAVTEX messages • Set NAVTEX “manual print” to “On” (Setup Mode, NAVTEX View, Options Page) • Use the PRINT softkey on the Navtex Mode, Print View to print the Navtex message currently at the top of the screen Auto Printing NMEA data at a fixed interval of time • Set Navigate “auto print” to “On” and set the required logging interval (Setup Mode, Navigate View, Options Page) Auto printing of Navigation logs will now occur at the chosen Navigate logging interval. 11 Nav6 Printer User Guide Manual Printing of the Navigation Log • Set Navigate “manual print” to “On” if you want to be able to print the current page of log entries from the navigation log using the PRINT softkey on the Navigate Mode, Log View Paper Saving Tip When printing Navtex messages and you do not require the full Navtex header (including UTC date & time, the source frequency and station name) then set the output format to “data” rather than “printer”. The Navtex message identifier is still printed but two lines of print are saved for every Navtex message printed. To make use of this feature : • Set the NAVTEX output format to “Data” (Setup Mode, NAVTEX View, Options Page) 12 Nav6 Printer User Guide TEARING OFF A PRINT-OUT Use a gentle up or downward and sideways motion to tear the paper at the exit point of the Nav6 Printer case. DO NOT PULL THE PAPER THROUGH THE PRINTER AS THIS ACTION MAY DAMAGE THE PRINTER MECHANISM Always use the F button to feed the paper clear of the mechanism. 13 Nav6 Printer User Guide PAPER LOADING The Nav6 Printer is supplied with one roll of paper fitted. At the end of this paper roll the Nav6 Printer will sound an alarm and printing will stop. Early warning that the paper is about to run out is given by red stripes on the paper. • To remove the remaining paper, open the paper loading door. Push a top corner of the door to release the locking door catch • Tear off the paper where it enters the printer mechanism • • Remove the old paper roll Remove the plastic spindle from inside the paper roll Press the F button to feed the remaining paper through the printer mechanism • DO NOT PULL THE PAPER THROUGH THE PRINTER AS THIS ACTION MAY DAMAGE THE PRINTER MECHANISM • Place the new roll onto the spindle with the paper emerging from the top of the roll pointing towards you • • Mount the new roll and spindle onto the roll bracket Insert the paper into the slot at the base of the printer mechanism, and feed it in as far as it will go It is important that the edge of the new paper roll is cut straight and that the paper is dry. Use a pair of scissors to prepare a clean straight paper edge. 14 Nav6 Printer User Guide • Check that the paper roll is correctly aligned with the print mechanism as shown below CORRECT • INCORRECT Press the F button until the paper appears through the door exit 15 Nav6 Printer User Guide New supplies of paper rolls can be ordered from ICS dealers or directly from ICS in the UK. Tel +44 (0) 1903 731101 Fax +44 (0) 1903 731105 Quote order code: NAVTEX Rolls. This specifies a box of eight rolls of paper. The paper roll size is 80mm x 20m with a maximum diameter of 42mm and an internal spindle (hole) diameter of 12mm. 16 Nav6 Printer User Guide INSTALLATION Mechanical Installation The U-bracket supplied can be used to mount the Nav6 Printer above or below a horizontal (or almost horizontal) surface. If the Nav6 Printer is to be mounted through a flat panel, it is advised that you purchase the FMT-4 flush mounting kit option. The NAV6 Printer should not be mounted in a position where spray can reach it in a rough sea, or where it is exposed to direct sunlight. Installation of the Nav6 Printer is straightforward and can be carried out with just a drill and screwdriver. • Use cable ties to restrain the wiring from any vibration that might weaken it over a prolonged period • The connecting cables should be restrained from movement by securing them to the rear of the Nav6 Printer or to adjacent woodwork 17 Nav6 Printer User Guide Electrical Installation An overview of the Nav6 Printer system connections is shown below: Na vt ex ICS N AV 6 Na v t ex NAV-6 DISPLAY ICS WHITE WHITE BLACK BLACK YELLOW BLACK YELLOW BLACK SCREEN DRAIN SCREEN DRAIN RED RED NAV-6 PRINTER 1.5A BLACK RED 2.5A BLUE BLACK RED BLACK BLACK BLACK WHITE GREEN BATTERY BLACK BROWN WHITE 18 BROWN N AV 6 Print er Nav6 Printer User Guide Connecting to a Power Supply The Nav6 Printer should be powered from a nominal 12Vdc switched supply, capable of providing a continuous 2A (in addition to the current required by the Nav6 display). • To allow the unit to be isolated for service, a 2.5A circuit breaker (or a 2.5A fuse and switch) should switch the power supply to the printer. We recommend that the printer is switched separately from the rest of the Nav6 system • The connection to the boats power supply should be made with the cable supplied, which may be extended if required • Use the RED and BLACK twisted pair for connection to the boat’s power supply • • • Connect the RED wire to boat’s positive (12V) supply Connect the BLACK wire to negative (0V) supply The connection between the Nav6 Printer and the Nav6 / Nav6plus / Nav6 Repeater should be less than 5 metres • Carefully check all connections before applying power • Switch on the power supply by closing the 2.5A circuit breaker or power panel switch Check that the red ‘PWR’ LED illuminates, followed shortly by an audible ‘beep’ and the red ‘SBY’ LED illuminating • Note that vessels that require isolation may need to install a DC to DC converter – if in doubt ask your dealer • 24V vessels should install the 24V / 12V DC to DC converter Testing The Nav6 After Installation 19 Nav6 Printer User Guide Connects to a Nav6 Display • Connect the printer interface cable to the Nav6 & wire it into your Nav6 display as follows : • The connection to the Nav6 Display should be made with the cable supplied • Use the WHITE and BROWN twisted pair for connection to your Nav6 display (or Nav6hub) • Connect the WHITE wire to 0V (the BLACK paired with RED on the display cable) • Connect the BROWN wire to RS232 TX (TX from display) The Nav6 Printer Cable The printer cable consists of two twisted pairs: Twisted Pair Core Colour Signal description BROWN twisted with WHITE BROWN WHITE RS232 TX RED twisted with BLACK BLACK RED 0V input 0V input 12V input Screen Silver Nominally 0V Note : if you have a Nav6hub then follow the wiring instructions contained in the Nav6hub User Manual instead. Safety Warning The ICS NAV6 Printer has been designed and manufactured to be completely safe when installed in accordance with these installation instructions. It is essential that a fuse or circuit breaker be installed in the supply cable. The NAV6 printer is supplied with a DC power cable and in-line 2.5 amp fuse. It is essential that this fuse is included in the finished installation. 20 Nav6 Printer User Guide Self Test The self test procedure tests the operation of the Nav6 Printer and prints a status report. To start the self test: • Turn off the Nav6 Printer • Hold in the F button and switch on the power with the P button • After a short delay, release the F button • A long bleep will sound and a test report is printed NAV 6 Pr i n t e r P WR SB Y F N Y P Note 1 : Either A, B or C will show here. • Once the test results are printed normal operation will resume 21 Nav6 Printer User Guide If all tests are successfully completed, the following is printed: • The HEAD RESISTANCE letter is for service use only, and should match the head resistance marked on the printer assembly • The PAPER SENSOR tests whether the Nav6 Printer can recognise the presence of paper in the roll holder • • CPU and RAM lines test the memory and central processor ROM and ROMDATE lines may change in line with product development • The last three lines of this printout test the printer A shortened version of the self test is carried out automatically each time the Nav6 Printer is switched on, but the results are not reported unless a fault is detected MAINTENANCE AND TROUBLE SHOOTING Cleaning The Nav6 Printer may be cleaned when necessary by wiping with a cloth dampened with fresh water. Do not use solvents. Fault Finding Guide If the Nav6 Printer does not operate as expected, check that: • The Nav6 Printer is connected to a power supply (10.8 Vdc – 15.6Vdc) as detailed in the installation section of this user guide. Check that the in-line fuse has not blown • The connections to the Nav6 display (or to the Nav6hub) are correct as described above 22 Nav6 Printer User Guide Printer • If there is no sign of life from the printer, check that a small piece of paper is not jammed under the print head • If the printer operates but nothing is printed, check that the paper roll is of a type recommended by ICS and that heat sensitive side of the paper is uppermost Paper Out Alarm • Check that the paper roll is correctly fitted Self Test • Run a system self test, refer to ‘self test’ section for details Should any item on the self-check fail, turn the Nav6 Printer off and on again and repeat the system self test. If any item on the self check list fail a second time, contact your suppler for advice or contact the ICS Electronics Technical Helpline for assistance. Telephone +44 (0)1903 738706 Facsimile +44 (0)1903 738747 Email: [email protected] 23 Nav6 Printer User Guide Printer Jam Mishandling of the paper when installing a new paper roll can sometimes cause the printer to jam. If the moving printer head is allowed to catch the edge of the paper roll the printer mechanism may stall. This will result in a ‘printer fault’ being reported by the unit (alarm : ‘bleep’, ‘bleep’, ‘bleep’). This condition may be avoided by first ensuring that the new paper roll has a flat cleanly cut edge. • Consult the ‘Paper Loading’ instructions for details of the paper load procedure Should a paper jam occur, do not pull on the paper or try to force the printer head sideways as such action may cause damage to the printer and may invalidate your warranty. Clearing a Paper Jam As the procedure to clear a ‘stalled printer’ involves disassembly of the main unit it is recommended that this should only be attempted by authorised service personnel. In the first instance : Contact the dealer who supplied your unit for further instructions. If you are still not satisfied contact the ICS Electronics Technical Helpline for assistance. Telephone +44 (0)1903 738706 Facsimile +44 (0)1903 738747 Email: [email protected] 24 Nav6 Printer User Guide Software Upgrade From time to time software upgrades may be available. Please check our website for information on new releases. WARRANTY ICS Electronics Ltd warrants to the original end-user that this product will be free from defects in materials and workmanship for a period of one year from the date of purchase. During the warranty period, and upon proof of purchase, the product will be repaired or replaced (with the same or a similar model, which may be a refurbished model) at ICS Electronics’ option, without charge for either parts or labour. For warranty repair, the unit must be returned, carriage pre-paid, to the ICS Electronics Ltd. dealer from whom it was first purchased. This limited warranty shall not apply if the product is modified, tampered with, misused, subjected to abnormal working conditions (including, but not limited to lightning and immersion in water) and use with power supplies and other options not specifically recommended by ICS Electronics Ltd. Please contact us for further details of our warranty repair procedure. PACKING LIST AND OPTIONS Packing List For the Nav6 Printer contents – please see the packing list enclosed. Options The following Nav6 Printer ancillary parts can be purchased: Option NAV-PSX: Mains/battery auto standby power unit (220/110V AC and 24V DC input with 13.8V DC output) FMT-4: Flush panel mounting kit NAV-ROLLS: Box of eight paper rolls 25 ICS Part Number 913.07 913.19 913.13 Nav6 Printer User Guide New supplies of paper rolls can be ordered from ICS dealers or directly from ICS in the UK. Tel +44 (0) 1903 731101 Fax +44 (0) 1903 731105 Quote order code: NAVTEX Rolls. This specifies a box of eight rolls of paper. The paper roll size is 80mm x 20m with a maximum diameter of 42mm and an internal spindle (hole) diameter of 12mm. Specifications may be changed without notice. 26 Nav6 Printer User Guide Nav6 Printer Connections Should you need to make up a new interface cable for the Nav6 Printer, the connections should be : Pin 1 2 3 4 5 6 7 8 9 10 Function Not used Screen Not used Not used Serial B (negative) Serial A (positive) 0V input 12V input Not used Not used • The label on the rear of the Nav6 Printer identifies each connection. • • Pin 1 is located closest to the edge of the Nav6 Printer case. The power supply input should be within the range 10.8 – 15.6Vdc. 27 Nav6 Printer User Guide SPECIFICATIONS Approval Standards tba Power Voltage range Consumption (Typical) Standby Printing Printer Unit Operating Temperature Range Storage Temperature Range Humidity Mounting Weight (without cable) Printer Specification Type Character Matrix Paper Roll Paper Out Front Panel Controls Interface Parameters Auto Linefeed Rear Connections Alarms 10.8V to 15.6V 125mA (1.5 W at 12V) 210 mA (2.5 W at 12V) 0 to +40degC -20 to +55degC 0 to 95% Below decks 1200 g (approx.) Thermal, 40 chars per line 7x5 80mm wide x 20m long Audible alarm Four push-button switches located under the paper load door Power ON/OFF Paper feed Two menu set up keys serial RS232 compatible 8 data bits 1 stop bit No parity Baud rate 4800 Selectable (Default : OFF) 10 way plug in connector Paper Out Low battery supply < 9vdc Shelf/bulkhead FMT-4 panel mount option Mounting 28