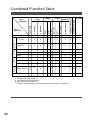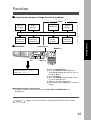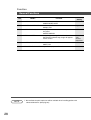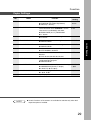
1
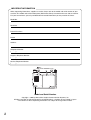
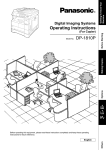
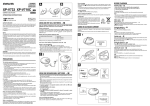
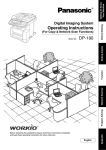
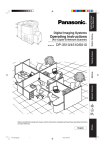
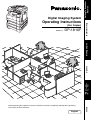
Operating Instructions (For Copier) DP-1810F Getting To Know Your Machine Options Making Copies Model No. Before Starting Digital Imaging System Before operating this equipment, please read these instructions completely and keep these operating instructions for future reference. English Others J ? I IMPORTANT INFORMATION When requesting information, supplies or service always refer to the model and serial number of your machine. The model and serial number plate (Main Name Plate) is located on the rear side of machine. For your convenience, space is provided below to record information you may need in the future. Model No. Serial No. Date of Purchase Dealer Address Telephone Number ( ) Supplies Telephone Number ( ) Service Telephone Number ( ) Model and Serial Number Copyright 2002 by Matsushita Graphic Communication Systems, Inc. All rights reserved. Unauthorised copying and distribution is a violation of law. Printed in Japan. The contents of these Operating Instructions are subject to change without notice. 2 Getting To Know Your Machine Operation Chart Common Features and Usage ■ Basic Operation Original Load Paper Turn the Power Switch On 1 2 Place the Original(s) (ADF: Up to 50) Original Size (Reduction/ Enlargement Only) 3 4 5 Copy Size Number (Reduction/ of Copies Enlargement Only) Press START ■ Position of the Original From Platen Original Guide A5 ADF Tray Original Guides Adjust to the original’s width FLS1 A5 A4 FLS2 B4 A3 FLS B4 A3 A3 A4 A4 FLS·B4 A4 A5 A4 R A5 A5 A5 R From ADF C Place originals face down on the platen or face up on the ADF. C If the original is not positioned properly, a portion of the original may not be copied. C For originals smaller than A5 size, position the original within the area of A5 and select A5. ■ Commonly Used Functions and Operating Procedures Full Size Makes a copy that is the same size as the original Reduction or Enlargement Copies the original at a fixed reduction or enlargement ratio 1 4 5 1 2 3 4 5 (See page 12) (See page 13) ■ Memory Capacity When the memory becomes full during original scanning, the message “OUT OF MEMORY” “CONTINUE ? 1: YES 2: NO” will be displayed in the message display. If this occurs, follow the instructions on the LCD. When additional memory is required, consult with an authorised servicing dealer. 3 Energy Star As an ENERGY STAR® Partner, Panasonic has determined that this product meets the ENERGY STAR® guidelines for energy efficiency. This voluntary program specifies certain energy consumption and usage standards. This product will automatically “power down” after a specified period of non-use. The use of this ENERGY STAR® compliant product will reduce energy consumption and ultimately benefit the environment. The default functions can be adjusted depending on your office requirements. Please ask your authorised Panasonic dealer for more details. 4 Table of Contents Table of Contents Getting To Know Your Machine Operation Chart .............................................................................................................................. 3 ■ Common Features and Usage .............................................................. 3 Energy Star ..................................................................................................................................... 4 Before Starting Precautions ..................................................................................................................................... 7 ■ For Your Safety ..................................................................................... 7 ■ Handling ............................................................................................... 8 ■ Toner and Paper ................................................................................... 8 ■ Ventilation ............................................................................................. 8 ■ Installation ............................................................................................ 9 Control Panel ................................................................................................................................ 10 Making Copies Basic Copy .................................................................................................................................... 12 ■ Full Size Copying ................................................................................ 12 ■ Reduction or Enlargement Copying .................................................... 13 ■ Automatic Document Feeder .............................................................. 14 ■ Zoom Copying .................................................................................... 16 ■ Using the Sheet Bypass ..................................................................... 17 Creative Features ......................................................................................................................... 18 ■ 2 in 1 Copy ......................................................................................... 18 ■ 2 Page Copy ....................................................................................... 19 ■ Book/Edge/Margin .............................................................................. 20 ■ Job Memory ....................................................................................... 21 ■ Sort Copy ........................................................................................... 22 Other Features .............................................................................................................................. 23 ■ Energy Saver/Interrupt Mode .............................................................. 23 ■ Skyshot Mode ..................................................................................... 24 Combined Function Table ............................................................................................................ 26 Function ........................................................................................................................................ 27 ■ Checking the Copier’s Total Counter ................................................... 27 ■ General Functions .............................................................................. 28 ■ Copier Settings ................................................................................... 29 ■ General Functions for Key Operator ................................................... 30 ■ Copier Settings for Key Operator ........................................................ 31 ■ Function Setting .................................................................................. 32 ■ Function Setting for Key Operator ....................................................... 33 5 Table of Contents Options Accessories .................................................................................................................................. 37 ■ Components ....................................................................................... 37 Problem Solving Problem Solving ........................................................................................................................... 38 ■ Adding Paper (J) ............................................................................... 38 ■ Adding the Toner and Replacing Waste Toner Container (?) ............. 39 ■ Removing a Misfed Paper ................................................................... 41 Troubleshooting ............................................................................................................................ 46 ■ Before Calling Service ........................................................................ 46 ■ User Error Codes (U Code) ................................................................ 48 ■ Replacing the Battery ......................................................................... 49 Others Specifications ............................................................................................................................... 50 Options and Supplies ................................................................................................................... 52 6 Precautions For Your Safety ■ Laser Safety Before Starting LASER SAFETY This unit employs a laser. Only qualified service personnel should attempt to service this device due to possible eye injury. CAUTION: USE OF CONTROLS, ADJUSTMENTS OR PERFORMANCE PROCEDURES OTHER THAN THOSE SPECIFIED HEREIN MAY RESULT IN HAZARDOUS RADIATION EXPOSURE. ■ Caution Label 7 Precautions Handling ■ Do not look directly at the exposure lamp when copying. ■ Do not turn the power switch Off or open the front panel during copying. C Do not drop paper clips or other metal objects into the copier. Toner and Paper ■ Store toner, drum and paper in cool areas with low humidity. C Use high quality 60 – 90 g/m2 (56 – 128 g/m2 using the sheet bypass) may be used. C For optimum performance, it is recommended that only Panasonic Brand supplies are used in the copier. Ventilation ■ The copier should be installed in a well-ventilated area to minimise the ozone density in the air. ■ The copier should not be installed in areas with the following conditions: C Extremely high or low temperature and humidity. Ambient conditions Temperature: 10° – 35°C Relative humidity: 45 – 85% C Where temperature and humidity can change rapidly, causing condensation. C Direct exposure to sunlight. C Directly in the air conditioning flow. C In areas of high dust concentration. C In areas of poor ventilation. C In areas with chemical fume concentration. C In areas with extreme vibration. C With unstable or uneven conditions (floors, etc.). 8 Precautions Installation ■ The maximum power consumption is 1.2 kW. Before sStarting A properly wired (grounded), dedicated, 6A, 220-240 V AC outlet is required. Do not use an extension cord. The power cord on this equipment must be used to disconnect the main power. Please ensure that the socket outlet is installed near the equipment and is easily accessible. CAUTION CTHIS PRODUCT CONTAINS A LITHIUM BATTERY. DANGER OF EXPLOSION IF BATTERY IS INCORRECTLY REPLACED. REPLACE ONLY WITH THE SAME OR EQUIVALENT TYPE. DISPOSE OF USED BATTERIES ACCORDING TO THE INSTRUCTIONS OF YOUR LOCAL SOLID WASTE OFFICIALS. FOR YOUR SAFETY Caution Note: Disconnect from the mains supply before removing covers. The mains plug on this equipment must be used to disconnect mains power. Please ensure that the socket outlet is installed near the equipment and shall be easily accessible. For U.K. This appliance is supplied with a moulded three pin mains plug for your safety and convenience. A 13 amp fuse is fitted in this plug. Should the fuse need to be replaced please ensure that the replacement fuse has a rating of 13 amps and that it is approved by ASTA or BSI to BS1362 Check for the ASTA mark 7 or the BSI mark 6 on the body of the fuse. If the plug contains a removable fuse cover you must ensure that it is refitted when the fuse is replaced. If you lose the fuse cover the plug must not be used until a replacement cover is obtained. A replacement fuse cover can be purchased from your local Panasonic Dealer. IF THE FITTED MOULDED PLUG IS UNSUITABLE FOR THE SOCKET OUTLET IN YOUR OFFICE THEN THE FUSE SHOULD BE REMOVED AND THE PLUG CUT OFF AND DISPOSED OF SAFELY. THERE IS A DANGER OF SEVERE ELECTRICAL SHOCK IF THE CUT OFF PLUG IS INSERTED INTO ANY 13 AMP SOCKET. If a new plug is to be fitted please observe the wiring code as shown below. If in any doubt please consult a qualified electrician. WARNING: THIS APPLIANCE MUST BE EARTHED. IMPORTANT: The wires in this mains lead are coloured in accordance with the following code: Green and Yellow: Earth Blue : Neutral Brown : Live As the colours of the wires in the main lead of this appliance may not correspond with the coloured markings identifying the terminals in your plug, proceed as follows: The wire which is coloured GREEN-AND-YELLOW must be connected to the terminal in the plug which is marked by letter E or by the safety Earth symbol “L” or coloured GREEN or GREEN-AND-YELLOW. The wire which is coloured BLUE must be connected to the terminal in the plug which is marked with the letter N or coloured BLACK. The wire which is coloured BROWN must be connected to the terminal in the plug which is marked with the letter L or coloured RED. How to replace the fuse. Open the fuse compartment with a screwdriver and replace the fuse. N 9 Control Panel #1 $ % & ( ) * + : 9 8 S Keys are used only for FAX/EMAIL functions, refer to Operating Instructions (For Facsimile/Internet Fax) No & 2 in 1 Key C From two 1-Sided originals, side by side, to 1-Sided copies. 2 PAGE COPY Key C Copying two facing pages or a A3 size original on two separate A4 size sheets. SORT Key C When using Electric Sorting Mode. Optional memory is required. MARGIN Key C Shifts the image to the right or left. ( EDGE Key ) BOOK Key C Eliminates dark inner binding shadows. Photo; Text/Photo; Text Keys C Select the type of original(s) for image density adjustment. PHOTO : Originals are mainly composed of photo. TEXT/PHOTO: Combined originals with text and photo TEXT : Originals are mainly composed of text. Exposure Keys (DARKER, LIGHTER) # $ % * + . / C Creates a blank edge. SET Key C Set the present selection. FUNCTION Key C Use when changing the paper size, initial values for functions (default values) and key operator settings. CLEAR Key C Clears the copy count in the display. Refer to Page 18 Page 19 —— Page 20 Page 20 Page 20 Page 12 Page 12 —— Pages 27 – 36 —— 1 ENERGY-SAVER Key C Can save power while the copier is not in use. RESET Key C Resets all features to the initial power-on state. 2 STOP Key C Stops the copy run. —— 3 START Key C Used to start an operation. —— 0 NOTE 10 Contents Page 23 —— C The Control Panel displayed above shows only copier functions. Please refer to the appropriate operating instructions for other control panel functions or in the Panasonic Document Management System CD-ROM for the Printer control panel functions. 7 Control Panel 0 1 -. / Before Starting LCD Display 6 5 4 Warning Indicators J Add Paper ? Add Toner I Misfeed 2 Call Service ; = No 4 5 3 2 Contents INTERRUPT Key, MEMORY IN Key, M1/M2 Keys C Interrupt Key interrupts other copy or print jobs while making copies. C Memory In Key registers two copy jobs for recall at a later time. C M1/M2 Keys are used to store a Job in Memory or to recall a Job stored in Memory. Cursor Keys C Select copy ratio and function modes using (G or F). Refer to Pages 21, 23 —— —— 8 C Used to select the paper tray manually. PAPER TRAY Key COPY SIZE Key C Used to select Reduction/Enlargement only. For additional details, see page 13. ORIGINAL SIZE Key C Used to select the original size manually. For additional details, see page 13. 9 PRINT Key C When selecting the Printer ON/OFF Line. —— : COPY Key C Press when using the unit as a photocopier. —— ; Alarm LED (Red) C Lights when trouble occurs.* —— = Active LED (Green) C Lights when machine is active. 6 7 NOTE —— —— —— C The Control Panel displayed above shows only copier functions. Please refer to the appropriate operating instructions for the control panel functions or in the Panasonic Doccument Management System CD-ROM for the Printer control panel functions. ∗ When the machine detects a problem or an alarm status is activated, the ; Alarm LED lights up or begins to flash. LED Lights: Machine detected a trouble status C No paper in the selected tray or toner has run out. C Machine detected trouble, such as paper misfeed or jam. LED Flashes: Machine detected an alarm status C No paper in the tray. (Tray not selected) C Running low on toner, etc. 11 Basic Copy Full Size Copying ■ Copying the Same Size Originals (1:1) Copy size is automatically selected. ORIGINAL SIZE Key CLEAR Key 1 2 3 Place the Original LCD Display (Sample) Number of Copies* Press START** Up to 999 READY TO COPY COPIES:001 Select the Original Size on units without the ADF. ■ Manually Selecting Exposure Control or Original Type # Select the Original Type PHOTO : Originals are mainly composed of photo. TEXT/PHOTO: Combined originals with text and photo. TEXT : Originals are mainly composed of text. $ Select Exposure Control Press the DARKER/LIGHTER keys to adjust the exposure. NOTE ∗ Use Clear key when canceling the copy count. ∗∗ While the copier is warming up, you may position your original on the copier, enter your copy job selections and press the Start key. The COPY JOB RESERVED indicator displays until the warm up cycle is completed and the copy job is automatically start. 12 Basic Copy Reduction or Enlargement Copying ■ Copying with Preset Ratios Place the Original 2 Select the ORIGINAL SIZE 3 Select the COPY SIZE 4 5 Making Copies 1 RESET Number of Copies Example: Reduction Original size Copy size A3 A4 A3 ->A4B [A4B ] ZOOM: 71% COPIES:001 The correct ratio is automatically selected. Reduction and enlargement ratios (%) Copy Size Original Size A3 A3 100 87 71 50 B4 115 100 82 58 A4 141 122 100 71 A5 200 173 141 100 B4 A4 A5 C When changing the paper tray, touch the Paper Tray key. NOTE C If the desired copy size is different from the paper size loaded in the paper tray, use the sheet bypass. (See page 17) C Press the RESET key to cancel all job settings. 13 Basic Copy Automatic Document Feeder ■ ADF 1. Features # Automatic Original Feeding C The ADF tray can hold up to 50 A4 size originals of 80 g/m2 paper (up to 30 FLS/B4 or A3 size originals). Accommodates from A5 to A3 size originals. C Automatic original size detection. $ 2 in 1 Copy C To make a 1-Sided copy (full size or reduction), from two 1-Sided originals side-by-side. 2. Components C Set the originals up to the upper limit arrow. ADF Tray Original Guides Adjust to the original’s width 14 Basic Copy Automatic Document Feeder 3. Operation ■ Operation Procedure ADF Face-Up 2 3 Number of Copies Place the Original Inappropriate Originals C Paper with a smooth surface such as glossy and coated papers CTransparencies C Originals with a lead edge that is “creased”, “folded”, “punched” or “glued” NOTE Press START C Paste-ups C Pressure sensitive or carbon backed papers C Paper with excessive curl C Stapled originals C Freshly printed copies from a laser printer C To copy these kinds of originals, use the Platen Glass instead. 15 Making Copies 1 Basic Copy Zoom Copying ■ Zoom RESET Copies with variable zoom ratios from 50% to 200% in 1% increments. 1 2 3 Press Cursor (G or F) keys to select Zoom Ratio Place the Select ORIGINAL Original SIZE (without using ADF) 4 5 Number of Copies Press START B A4 ->A4B [A4B ] ZOOM:125% COPIES:001 (Example: 125% Zoom) ATTENTION NOTE 16 C When changing the paper size after setting the zoom ratio, please use the paper tray key. C Press the RESET key to cancel all job settings. Basic Copy Using the Sheet Bypass ■ Copying on Special Paper, etc. 1 Place the original. Open the sheet bypass. Sheet Bypass 3 # Place the sheets of paper into the tray. (approximately up to 50 A4 size sheets/80 g /m2) Making Copies 2 Pull out the sheet bypass tray until it stops. (For A3 size only) Do not fill above. Side Guides Insert the paper until it stops. $ Adjust the side guides. Incorrect adjustment may cause the paper to wrinkle, misfeed or skew. Press START. ATTENTION NOTE C Do not feed curled paper through the sheet bypass to avoid misfeed. C Adjust the side guides properly to avoid skewing, wrinkling or misfeeding. 17 Creative Features 2 in 1 Copy ■ 2 in 1 Copy From two 1-Sided originals, side by side, to 1-Sided pages. 1 \ 2 (Layout)* 1 \ 2 (Layout)* 2 \ 1 (Layout)* 2 \ 1 (Layout)* Landscape (Orientation)* Portrait (Orientation)* ■ Procedure ADF Face-Up 1 Place the Originals NOTE 18 2 Press 2 in 1 key (3 ) COPY SIZE (Reduction/ Enlargement Only) 4 5 Number of Copies Press START CPress the RESET key to cancel all job settings. CNumbers in parenthesis “ ( ) ” represent that, an additional step is required to activate the feature. ∗ The Orientation and Layout can be set in the Copier Settings function mode. (See page 29) Creative Features 2 PAGE COPY ■ 2 PAGE COPY Copying two facing pages on a A3 size original on two separate A4 size sheets. Making Copies ■ Procedure 1 2 Place the Press the 2 Originals PAGE COPY key Platen 3 ORIGINAL SIZE (A4 or A3 size Only) 4 5 Number of Copies Press START A3 size original Book Mark Center book by length and width according to center marks. A4 NOTE C To reset all job settings, press the RESET key. 19 Creative Features BOOK/EDGE/MARGIN ■ BOOK Key Eliminates dark inner binding shadows when copying from a book. ■ EDGE Key Creates a blank edge. ■ MARGIN Key Shifts the image to the right or left. ■ Procedure 3 2 1 Place the Original Press Cursor (G or F) keys to adjust the void width while the button is blinking. (approx. 5 sec.) CVoid/Margin width: 5-99 mm Press BOOK, EDGE or MARGIN key Book BOOK MARGIN CENTER VOID = 20mm ∨∧ Edge EQUAL RATE VOID MARGIN = 5mm ∧ Margin** LEFT MARGIN 10mm ∨∧ NOTE 20 ∗ 4 5 Number of Copies Press START ∗ Initial Book Margin setting (Factory setting): 20 mm ∗ Initial Equal Rate setting (Factory setting): 5 mm ∗ Initial Left Margin setting (Factory setting): 10 mm Initial setting (Factory setting) can be changed in the Copier Settings function mode. (See page 29) ∗∗ If a part of the copied image is missing when using the Margin mode, change the Frame Reduction setting to ON. (See page 29) CPress the RESET key to cancel all job settings. Creative Features Job Memory ■ Two Copy Jobs Can Be Programmed in Memory (M1, M2) for recall at a later time. To Store a Job in Memory JOB MEMORY PRESS M1,M2 TO STORE Making Copies # Set up the copy job to be stored in memory, by first selecting each function you wish the copier to perform. $ Press the MEMORY IN (F2) key. % Press the M1 (F3) or M2 (F4) key. To Recall a Job Stored in Memory & Place the Original RECALL JOB MEMORY LOADING... ( Press the M1 (F3) or M2 (F4) key. The stored contents will be displayed. ) Press START NOTE CStored job(s) will not be deleted even if the power switch is turned Off. C When storing a new job into programmed memory, the previously stored job will be overwritten. 21 Creative Features Sort Copy ■ Sort Copy The sort copy has 2 available electronic sorting functions as follows: Note: Before using the sort copy, select the desired sorting mode by setting its function first (See page 28). Sort Sort-Rotate Multiple copies sorted automatically. 1 1 1 Multiple copies sorted automatically and Stacked in alternate direction. 1 1 1 Platen Glass (Up to A4 size) ADF 1 ADF : Place the Originals Platen: Place the First Original 2 (3 ) COPY SIZE (Reduction/ Enlargement Only) Select the SORT Mode 4 5 Number of Copies Press START From Platen Glass only: 6 9 NOTE 22 ANOTHER ORIGINAL? 1:YES 2:NO Press “1” key. Repeat steps 6 and 7 until all originals are scanned and stored into the copier’s memory. 7 10 Place next Original 8 Press START ANOTHER ORIGINAL? 1:YES 2:NO Press “2” key. CWhen the memory becomes full during original scanning, the message “OUT OF MEMORY ” “CONTINUE 1:YES 2:NO” will be displayed in the message display. If this occurs, follow the instructions in the message display. For additional memory consult your authorised servicing dealer. CTo reset all job settings, press the RESET key. Other Features Energy Saver/Interrupt Mode INTERRUPT (F1) Key ENERGY-SAVER Key ENERGY SAVER ■ These modes can save power while the copier is not in use. # To enter this mode Press the ENERGY-SAVER key or the copier will automatically enter the Energy Saver Mode after 15 minutes* from the last copy. The indicator will flash. $ To cancel this mode and make copies Press the ENERGY-SAVER key again. Sleep Mode # Automatically enters the Sleep Mode after 30 minutes from the last copy. The copier power will drop and the indicator will light. $ To make copies, press the ENERGY-SAVER key. Interrupt Mode INTERRUPT C This mode can interrupt other copy jobs while making copies. # Press the INTERRUPT (F1) key, the indicator will light. $ Make another copy job using the platen glass. % Press the INTERRUPT (F1) key again to continue the original job. Note: The ADF can not be used with interrupt. (Use only the Platen) NOTE ∗ Energy saver time (15 minutes) and Sleep time (30 minutes) can be changed by the key operator. (See page 30) Modes Normal Operation Energy Saver Mode Sleep Mode Power Consumption Approximately 90 Wh Approximately 38 Wh Approximately 2.2 Wh Warm Up Time N/A 17 sec. recovery 30 sec. recovery 23 Making Copies Energy Saver Mode Other Features Skyshot Mode ■ Skyshot allows copying a manuscript without generating dark borders even if the platen cover or ADF is opened. Skyshot mode eliminates dark borders around the originals, and is especially convenient for copying small-sized originals like bank checks or documents with unusual shapes (round, oval, etc.). These documents can be reproduced without generating any unnecessary black areas simply by making a copy with the cover open. Two types of Skyshot modes can be selected; Digital Skyshot Mode : The scanning area (size) is not pre-determined. Manual Skyshot Mode : The scanning area (size) is pre-registered into memory (M1 and M2) in advance. (See page 29) ■ Digital Skyshot Mode 1 Place the Original on the platen (Opening the Platen Cover/ADF) 2 3 Number of Copies Press START Key Note:The default setting of Digital Skyshot Mode is “NORMAL”. In this setting, the unit scans once. If there are black areas around the borders in the copies, set the Digital Skyshot Mode to “QUALITY” to soften the dark borders. In this setting, the unit scans twice. # Press the FUNCTION key. FUNCTION MODE (1-2) ENTER NO. OR ∨ ∧ $ Press the 2 key to select COPIER SETTINGS. 2:COPIER SETTINGS PRESS SET TO SELECT % Press the SET key. COPIER PARAM. (00-14) ENTER NO._ OR ∨ ∧ & Press 6 and SET key to select DIGITAL SKYSHOT. 06 DIGITAL SKYSHOT 2:NORMAL ( Press 1-3 key to select the Digital Skyshot Mode. 1: OFF NONE 2: NORMAL Default setting (usually select this mode). 3: QUALITY For better definition, select the Quality mode. ) Press the SET key. * Press the RESET key. NOTE 24 C An incorrect exposure may occur when there is a black line at the edge of the original or an image which the copier interprets as a black pattern in the Skyshot mode. C An incorrect position detection of the original may occur when a strong light shines onto the glass during Skyshot mode. Other Features ■ Manual Skyshot Mode When using this function, the custom size should be registered into memory (M1, M2) in advance. (See page 29) Platen Upperleft corner 2 2 Place the Original Select the Custom Size (M1 or M2) 3 4 Number of Copies Press START # Press the FUNCTION key. FUNCTION MODE (1-2) ENTER NO. OR ∨ ∧ $ Press the 2 key to select COPIER SETTINGS. 2:COPIER SETTINGS PRESS SET TO SELECT % Press the SET key. COPIER PARAM. (00-14) ENTER NO._ OR ∨ ∧ & Press 7 and SET key to select MANUAL SKYSHOT. 07 MANUAL SKYSHOT 1:OFF ( Press 2 or 3 key to select the Custom Size. 1: OFF NONE 2: M1 ON M1 size is ON* 3: M2 ON M2 size is ON* 4: M1, M2 ON Both sizes are ON ) Press the SET key. * Press the RESET key. NOTE ∗ The default size for M1 is: 70(X) × 160(Y) mm, and M2 is: 95(X) × 220(Y) mm C When changing the M1 or M2 size, consult with the key operator. C When using the Manual Skyshot mode, M1 and M2 are turned ON and other job memory cannot be used. C Press the RESET key to cancel all job settings. 25 Making Copies 1 Combined Function Table 2-ORIGINAL H COPY Zoom Copy 2 in 1 Copy 2 Page Copy Book Edge Margin Non-Sort Sort Sort-Rotate Manual Skyshot Job Memory Retrieval Job Memory Storing O O O O O O O O A A O 2 in 1 Copy O A A O O O O O O A A O 2 Page Copy O A A O O O O O O A A O Book O O O A O O O O O A A O Edge O O O O A O O O O A A O Margin O O O O O A O O O A A O Non-Sort O O O O O O A A A A A O Sort O O O O O O A A A A A O Sort-Rotate O O O O O O A A A A A O Manual Skyshot O ✕ ✕ O O O – – – A A ✕ Interrupt O ✕ O O O O – – – ✕ ✕ ✕ 2-ORIGINAL H COPY Margin O : Possible Combined Functions. ✕ : Unavailable Combined Functions. A : Next Selection is Carried Out. – : Indicates that SORT mode cannot be used. Non-sort operation is carried out. 26 Remarks A First Selections SORT Other Functions SORT Zoom Copy Next Selections Other Functions Margin Function ■ Using Function Modes to Change the Initial Copy Modes Options General Functions Copier Settings LAN Settings Printer Settings Input Identification Code Copier Settings for Key Operator ■ Procedure LAN Settings for Key Operator Printer Settings for Key Operator Making Copies General Functions for Key Operator FUNCTION Key RESET Key COPY SIZE PAPER Key TRAY Key FUNCTION MODE (1-2) ENTER NO. OR ∨ ∧ # Press the FUNCTION Key $ Press 1 (GENERAL FUNCTIONS) or 2 (COPIER SETTINGS) key. You may also use the (G or F) keys. % Press the SET key. & Press the Keypad to select function modes or use the (G or F) keys. ( Follow the on screen instructions. ) After setting, press the SET key to set up the function. ■ Checking the Copier’s Total Counter To display the copier’s Total Counter, press the COPY SIZE and PAPER TRAY keys simultaneously. NOTE C Please refer to each option’s operating instructions for function settings. 27 Function General Functions No. Function Initial Setting 00 SORT MODE DEFAULT Selects the sort mode. C NON-SORT, SORT NON-SORT 02 POWER ON DEFAULT Select mode.* C Copy, Fax Copy 05 SORT MEMORY USAGE Displays the amount of sort memory used on the panel. C OFF, DISPLAY OFF 06 DEPT. COUNTER Copy usage and copy limit of the selected department and total copy usage will appear on the screen. Consult your service technician. 08 SORT-ROTATE DEFAULT Select Sort-Rotate mode. COFF, ON OFF 09 KEY OPERATOR MODE Input the key operator ID code. NOTE 28 Modes ∗ Not available for plain copier, but will be available when installing options with advanced functions. (See page 52) Function Copier Settings Modes Function Initial Setting 00 MARGIN DEFAULT Selects the margin position and shift value. C POSITION (Left, Right, Top, Bottom) C VALUE (5 - 99 mm) POSITION 10 mm 01 EDGE DEFAULT EQUAL RATE 5 mm 02 BOOK MARGIN DEF. Selects the edge mode (Equal Rate = set the same value for X & Y or Individual = set the value for X & Y individually) and width. C EQUAL RATE (X & Y ), INDIVIDUAL C 5 - 99 mm Selects the book Center Void margin width. C 5- 99 mm 03 FRAME MARGIN Select the reduction ratio in margin mode. C INVALID, VALID INVALID 05 2 in 1 WITH FRAME Selects whether or not to disable edge deletion. C INVALID, VALID INVALID 06 DIGITAL SKYSHOT Enables or disables the use of skyshot mode. C OFF, NORMAL, QUALITY NORMAL 07 MANUAL SKYSHOT Enables or disables the use of Manual Skyshot. C OFF; M1 ON; M2 ON; M1, M2 ON OFF 08 AUTO EXPOSURE Automatically adjusts the copy density for text and photographic originals. C INVALID, VALID VALID 12 2 in 1 DEFAULT Selects the orientation and layout for 2 in 1 Copy. PORTRAIT L\R C ORIENTATION (Portrait, L-Scape) C LAYOUT (L \ R, R \ L) 13 2 PAGE MODE DEF. Selects the 2 page mode. C L \ R, R \ L 14 KEY OPERATOR MODE Input key operator ID code. NOTE 20 mm L\R C Certain Functions or Parameters are available for selection only when their respective option is installed. 29 Making Copies No. Function General Functions for Key Operator No. Function 00 PAPER SIZE Sets the paper size of each paper tray. C Tray-1, Tray-2, Tray-3, Tray-4 01 AUTO RESET TIME 02 ENERGY SAVER MODE 03 ENERGY SAVER TIME 04 LANGUAGE DEFAULT 05 SPECIAL TRAY 1 06 SPECIAL TRAY 2 09 KEY/TOUCH BEEP 10 BYPASS SET BEEP 11 ORIG. SET BEEP ADF 14 DEPT. COUNTER MODE 15 16 20 21 TOTAL COUNT PC PRINT COUNT DATE & TIME DAYLIGHT TIME 22 TCP/IP ADDRESS 23 TCP/IP SUBNET MSK 24 TCP/IP G/W ADDR. 25 COPY SETTING LIST Selects the Control Panel reset time. C OFF, 30 sec, 1 min., 2 min., 3 min., 4 min. Sets the Energy Saver mode and time. C INVALID, ENERGY-SAVER, SLEEP Energy save mode timer : 1-120 minutes Sleep mode timer : 1-120 minutes Sets the on time and off time for Energy Saver mode. CStart time - End time Selects the message language of the display. C A-ENGLISH, C-FRENCH, SPANISH Sets the paper tray for special paper (ex: colored). C NONE, TRAY 1, TRAY 2, BYPASS Sets the paper tray for special paper. C NONE, TRAY 1, TRAY 2, BYPASS Sets the panel touch sound. C OFF, SOFT, LOUD Sets the sound when put paper(s) on bypass tray. C 1: INVALID 2: VALID Sets the sound when you put paper(s) on ADF. C 1: INVALID 2: VALID Monitors copy usage of each department. (1) TOTAL COUNTER (2) DEPT. COUNTER (3) DEPT. COUNTER LIST Total print out volume from the main unit. Total print out volume from the PC. Sets the date & time. Sets daylight saving time. C INVALID, VALID ∗ Sets the IP Address assigned to your machine. C 3 digit × 4 (Use the MEMORY IN key to enter the “ . ” between each set of 3-digit numbers) ∗ Sets the Subnet Mask. C 3 digit × 4 (Use the MEMORY IN key to enter the “ . ” between each set of 3-digit numbers) ∗ Sets the Subnet Mask. C 3 digit × 4 (Use the MEMORY IN key to enter the “ . ” between each set of 3-digit numbers) Prints list containing Current Setting and Standard Setting. NOTE 30 Modes Initial Setting Consult your service technician. 1 min. SLEEP A-ENGLISH NONE NONE SOFT INVALID VALID Consult your service technician. VALID Contact your Network Adminstrator. Contact your Network Adminstrator. Contact your Network Adminstrator. C It is necessary to input the Key Operator ID code before changing items on this page. C The Special Tray 1 and 2 are not auto-selectable in the switching mode. ∗ Not available for plain copier, but will be available when installing options with advanced functions. (See page 52) Function Copier Settings for Key Operator Modes 01 ORIGINAL (HOME) 02 TEXT CONTRAST 03 T/P CONTRAST 04 PHOTO CONTRAST 10 MAX. COPY SETTING 12 M1, SIZE 13 M2, SIZE 16 MEM. FULL ACTION NOTE Initial Setting Function Selects original setting C TEXT, T/P (Text/Photo), PHOTO Selects contrast for Text mode C1 ~ 5 Selects contrast for Text/Photo mode C1 ~ 5 Selects contrast for Photo mode C1 ~ 5 Determines whether to limit number of copies C 1 ~ 999 Input a size in memory 1 for frequent usage size. C X: 5~432/Y: 5~297 mm (See page 25) Input a size in memory 2 for frequent usage size. C X: 5~432/Y: 5~297 mm (See page 25) Selects the memory full action C PRINT, CANCEL T/P (Text/Photo) 3 3 3 999 70 × 160 mm (X) (Y) 95 × 220 mm (X) (Y) Print C It is necessary to input the Key Operator ID code before changing items on this page. 31 Making Copies No. Function Function Setting ■ Changing the Auto Exposure Setting You can select whether the copying density is adjusted automatically for text and photographic originals. 1 Press the FUNCTION key. 2 Proceed as Follows: FUNCTION Key FUNCTION MODE (1-2) ENTER NO. OR ∨ ∧ # Press the 2 key to select COPIER SETTINGS. 2:COPIER SETTINGS PRESS SET TO SELECT $ Press the SET key. COPIER PARAM. (00-14) ENTER NO._ OR ∨ ∧ % Press 8 and SET key to select AUTO EXPOSURE MODE. 08 AUTO EXPOSURE 2:VALID & Press 1 or 2 key to select whether Auto Exposure is to be carried out or not. ( Press the SET key to set up the AUTO EXPOSURE MODE. ) Press the RESET key to exit the Function mode. 32 Function Function Setting for Key Operator ■ Changing the Paper Size The Paper Trays are designed to accommodate A5, A4, A4 R, FLS/B4 and A3 size paper. To change the paper size, perform the steps shown below. 2 Proceed as Follows: FUNCTION Key Making Copies 1 Press the FUNCTION key. FUNCTION MODE (1-2) ENTER NO. OR ∨ ∧ # Press the 1 key to select GENERAL FUNCTIONS. 1:GENERAL FUNCTIONS PRESS SET TO SELECT $ Press the SET key. GENERAL PARAM. (0-9) ENTER NO._ OR ∨ ∧ ( Press 00 and 1 or 2 key to select the PAPER SIZE. 00 PAPER SIZE 1:TRAY-1[A3i] ) Press SET to select the paper tray and press (G or F) keys to set the paper size. Paper size changes are as follows. A3 % Press 9 key. 09 KEY OPERATOR MODE ENTER PASSWORD=_ ■ ■ & Input the Key Operator ID code (3 digit) and the SET key. KEY OPR. MODE (00-25) ENTER NO._ OR ∨ ∧ A4R FLS1 B4 FLS2 A4 A5 B5 B5R * Press the SET key to set up the PAPER SIZE. + Press the RESET key to exit the Function mode. 33 Function Function Setting for Key Operator 3 Changing the Paper Guide and Paper Size Indicator in the Paper Tray # Pull the Paper Tray out and remove paper. $ Adjust the paper guide a to the required paper length. Stopper Paper Guide a Paper Guide b % Adjust the Paper Guide b to the required paper width. Pinch the stopper to move the Paper Guide b. & Change the Paper Size Indicator. Size Indicator ( Close the Paper Tray. NOTE 34 C It is recommended that the paper guide b be fixed in place with screws. Consult an authorised servicing dealer for details on how to fasten with screws. Function ■ Department Counter The Key Operator can manage, limit copies, counters and code numbers for each department. (Maximum department counters: 50) 2 Proceed as Follows: FUNCTION Key FUNCTION MODE (1-2) ENTER NO. OR ∨ ∧ # Press the 1 key to select GENERAL FUNCTIONS. 1:GENERAL FUNCTIONS PRESS SET TO SELECT $ Press the SET key. GENERAL PARAM. (0-9) ENTER NO._ OR ∨ ∧ & Press the Key Operator ID code (3 digit) and SET key. KEY OPR. MODE (00-25) ENTER NO._ OR ∨ ∧ ( Press 14 and the SET key to select DEPT. COUNTER MODE. % Press 9 key. 09 KEY OPERATOR MODE ENTER PASSWORD=_ ■ ■ Continued on the next page... NOTE C To reset the function mode, press the RESET key. C Contact your authorised servicing dealer to enable the Department Counter feature. 35 Making Copies 1 Press the FUNCTION key. Function Function Setting for Key Operator 3 Select the Department Counter Mode. DEPT.COUNTER MODE 1:TOTAL COUNTER DEPT. CODE (01-50) ENTER NO. OR ∨ ∧ 4 Press 2 and the SET key. Change the Department ID Code, limit the maximum number of copies and Department Counter number. ID CODE 01:1234 # Press the Keypad and the SET key to input the Department ID Code. 01: 1234 Department ID Code Department No. MAX COPIES 01:123456 $ Press the Keypad and the SET key to input the maximun number of copies. 01: 123456 Maximun number of copies (6 digits) Department No. DEPT.COUNTER 01:123456 % Press the Keypad and the SET key (G or F keys) to select the Department No. 01: 123456 Counter (6 digits) Department No. & Press 0 and the SET key (Input “0”) to clear the counter. NOTE 36 C To reset the function mode, press the RESET key. Accessories Components PCL6 Emulation Kit (DA-PC210) C Printer Controller for PCL6* 10/100 Ethernet Interface/ Internet Fax Kit (DA-NE200) C Network Interface Board NOTE ∗ 2nd/4th Paper Feed Module (DA-DS182) C To increase the paper feed sources and capacity. Paper Feed Module × 1 (550 sheets) 3rd Paper Feed Module (DA-DS183) C To increase the paper feed sources and capacity. Paper Feed Module × 1 (550 sheets) PCL6 is a Page Description Language of the Hewlett-Packard Company. 37 Options Image Memory (DA-SM8B/SM16B/SM64B/SM28B) C 8/16/64/128 MB C To increase the memory capacity for electronic sorting and sort printing. Problem Solving J) Adding Paper (J ■ 550-Sheet Paper Tray 1 Pull the Paper Tray out. 2 Place the paper with the copying surface facing upward. 3 Make sure paper is not loaded above the overfill indicator located in the Paper Tray. 4 Firmly push the Paper Tray back into the copier. ATTENTION 38 Special papers, like glossy paper, mailing labels and transparencies cannot be used in the paper tray. Use the Sheet Bypass for special paper. C Do not use paper with folds or wrinkles. Refer to page 34 for details on adjusting the paper tray size. C Unused paper should always be placed into a bag and the opening should be sealed for storage. If the paper is left exposed, problems such as paper curl, paper jams, wrinkles or loss of copied image quality may occur. Problem Solving/U13 ?) Adding the Toner and Replacing Waste Toner Container (? 1 Open the Front Cover. 2 Remove the Waste Toner Container by slowly pulling it towards the left as illustrated. 3 Seal the container with the enclosed cap and dispose of it properly. Cap 4 1 2 ATTENTION # Turn the empty Toner Bottle counter-clockwise until it stops. The Arrow mark (Unlocked symbol ) visible on the end of the Toner Bottle is aligned with the Arrow mark on the machine. Note: To prevent toner spill, ensure that the key is facing upwards before removing the toner bottle. $ Pull the empty Toner Bottle out. Note: If the bottle will not pull out from the machine, turn the bottle slightly in either direction to release the key and try it again. C For optimum copy quality use the recommended Panasonic toner. Store toner in a cool dark place. Do not unseal toner before use. Use it as fast as possible after unsealing. C When U13 is displayed the Add Toner Warning Indicator will begin to flash. This message is to prompt you that the toner bottle is nearly empty (approx. 300-sheets can be printed). This message will continue to be displayed until the bottle is replaced. When the countdown counter reaches 0, the copier will stop operating. To clear the message and enable the copier to operate, replace the empty toner bottle with a new one. 39 J ? Problem Solving ?) Adding the Toner and Replacing Waste Toner Container (? 5 # Shake the new Toner Bottle four or five times to loosen the contents. 2 1 $ Remove the cap from the Toner Bottle. 6 1 2 2-1 2-3 Incorrect Correct 2-2 7 Install a new Waste Toner Container. 8 Close the Front Cover. ATTENTION 40 # Align the Key of the bottle, also represented by the Arrow mark (Unlocked symbol ) visible on the end of the Toner Bottle with the Arrow mark on the machine. Note: To prevent toner spill, ensure that the key is facing upwards before installing the bottle. $ Insert the bottle as far as it will go, then turn it clockwise (160°, approx. 1/2 turn) until it locks (Locked symbol ). Note: If the bottle is not inserted all the way into the machine as illustrated, turn the bottle slightly in either direction to engage the key and try it again. C Do not reuse the toner from the Waste Toner Container. Problem Solving Removing a Misfed Paper ■ Paper Misfeed Indicators and Locations When a paper misfeed occurs, the misfeed indicator and the misfeed location(s) will be displayed on the panel display. I Misfeed Indicator Paper Misfeed Locations A: ADF (see page 45) (J70, J71) B: Copier (Paper Exit, Paper Entry/Transport) area (see page 42-43) (J51 - J59, J80) C: Paper Feed Module (see page 44) (J00 - J50) I NOTE C Make sure that the misfeed indicator goes off after removing the misfed paper. C The misfeed indicator will not go off if the paper is still jammed in the copier. Check again and remove all misfed paper. 41 Problem Solving Removing a Misfed Paper ■ Paper Exit Area C Make sure that the misfeed indicator goes off after removing all misfed paper. 1 ATTENTION 42 Remove the misfed paper. C Make sure that the misfeed indicator goes off after removing all misfed paper. Problem Solving ■ Paper Entry/Transport Area C Make sure that the misfeed indicator goes off after removing all misfed paper. 1 Open the Right Cover. 2 Remove the misfed paper. 3 If copy paper is fed far into the copier: # Turn the right paper clearing knob. $ Remove the misfed paper. 4 # Open the Heat Roller Cover. $ Remove the misfed paper. % Close the Right Cover. Caution heated surface Caution: This fuser area may be hot. I ATTENTION C Make sure that the misfeed indicator goes off after removing all misfed paper. 43 Problem Solving Removing a Misfed Paper ■ Paper Feed Module C Make sure that the misfeed indicator goes off after removing all misfed paper. 1 # Pull the Paper Tray out. $ Remove the misfed paper. % Return the Paper Tray to the original position. 2 # Open the Feed Cover. $ Remove the misfed paper. % Close the Feed Cover. ATTENTION 44 C Make sure that the misfeed indicator goes off after removing all misfed paper. Problem Solving ■ ADF C Make sure that the misfeed indicator goes off after removing all misfed paper. 1 # Open the Entry Cover. $ Remove the misfed paper. % Close the Entry Cover. 2 # Open the ADF Cover. Note: To prevent damaging the originals, open the ADF Cover before removing the misfed original(s). $ Remove the misfed paper. % Close the ADF Cover. & Close the ADF. I ATTENTION C Make sure that the misfeed indicator goes off after removing all misfed paper. C To prevent original(s) damage, please make sure to open the ADF Cover before removing misfed original(s). 45 Troubleshooting Before Calling Service Action Check Unit Does Not Operate Check if the Power Switch is turned On and that the power cord is connected into the outlet. Does the display light up? (No) Does the Energy Saver key flash (or light) and displays are turned OFF? (See page 23) (No) Does any of the U## codes and messages appear on the display? (U01, U07, U13, U14, U20 and U21) (See page 48) (Yes) Press Energy Saver key on the Control Panel. (Yes) Perform actions in accordance with each message. (Yes) (No) Does the add paper indicator and message appear on the display? (J)∗ (No) Add paper. (See page 38) (Yes) Does the paper misfeed indicator and message appear on the display? (I) (No) Remove the misfed paper. (See page 41) (Yes) Does E#-## indicator and message appear on the display? Turn the copier Off, then On. If the Error Code does not clear, call for service. (Yes) When the Add Toner Warning Indicator begins to flash∗ or is lit, replace the toner bottle with a new one. After this warning is activated, machine operation will begin with the Toner Charging Mode (approximately 3 minutes to complete) each time the power switch is turned Off then On or if the Front/Right Cover is opened and then closed. Note: ∗When the warning indicator starts flashing, a 300-sheet count-down counter is activated, and upon reaching 0 the machine will stop operating. The 300-sheet counter is based on 6% fill, depending on the density some pages may print Blank. Machine operation and displays are as follows: 1. When turning the power switch to On or opening and then closing the Front/Right Cover, the machine starts to warm-up and the LCD displays: PLEASE WAIT... 46 Troubleshooting 2. The Toner Charging Mode starts and the LCD displays: CHARGING TONER Add Toner Warning Indicator: C Flashing = Toner Bottle is nearly empty C Lit = Toner Bottle is empty 3. This message is displayed for approximately 200 seconds. CHARGING TONER ❚❚❚❚❚ ∗ Each “ ❚ ” is approximately 10 sec. 4. This massage will continue to be displayed until the warm-up cycle is completed, and if the toner bottle was replaced. Upon completion, the Add Toner Warning Indicator automatically turns Off. Check Action Light Copies Press the Darker key until the indicator LED is set to Darker. (See page 12) Does the exposure indicator say “Lighter”? (No) (Yes) Does the add toner indicator and message appear on the display? (?) Add Toner. (See page 39) (Yes) Marked Copies Is the copier platen glass or platen cover dirty? Clean the Glass or Platen Cover. (See page 48) Others (Yes) 47 Troubleshooting User Error Codes (U Code) The self-diagnostic functions detect troubles in the important components of the copier. When any trouble occurs, the copier stops. Code U01 U07 U13 Display Message CLOSE FRONT/RT COVER CLOSE FEED COVER TONER IS RUNNING LOW NO WASTE TONER BOX U14 WASTE TONER BOX IS FULL U20 CLOSE ADF COVER U21 CLOSE PLATEN COVER Check Points Front Cover is open. Feed Cover is open. 1. Toner Bottle is incorrectly installed. 2. Low Toner. 1. Waste Toner Container is incorrectly installed. 2. Waste Toner Container is full of toner. ADF Cover is open. While the copier is initializing, the ADF Cover was opened. (ADF installed) ■ If the measures outlined above do not solve the problem, call your Service provider. Copier Care ■ As a rule, clean weekly. Platen/Platen Cover Platen Cover Platen (glass) 48 # Wipe marks off with a cloth and a neutral detergent. $ Wipe again with a dry cloth. Troubleshooting Replacing the Battery The copier has an internal battery (Product No.: CR2032) which maintains the date setting in the event of a power outage. ■ Battery Replacement Required Message REPLACE BATTERY U90 ■ Battery Replacement Procedure 1 Turn the power Off. Pull out the Battery Holder. 2 Replace the Battery. 3 Reinstall the Battery Holder. 4 Turn the power On. Set the Date and Time. (See P.30) CAUTION C The service life of the battery is approximately 1 year when the machine is turned “Off”. denotes hazards that could result in minor injury or damage to the machine. A THIS PRODUCT CONTAINS A LITHIUM BATTERY. DANGER OF EXPLOSION IF BATTERY IS INCORRECTLY REPLACED. REPLACE ONLY WITH THE SAME OR EQUIVALENT TYPE. DISPOSE OF USED BATTERIES ACCORDING TO THE INSTRUCTIONS OF YOUR LOCAL SOLID WASTE OFFICIALS. Others ATTENTION 49 Specifications ■ DP-1810F (Copier) Type Desktop Platen Type Fixed Acceptable Originals Sheets, Books (max. A3) Copying Method Laser Electrophotography Fixing Method Heat Roller Fixing Imaging Method Dry-Type Single component imaging Resolution Max. 600 dpi Maximum Copy Size A3 Void Area Max. 5 mm Warm Up Time Approx. 30 seconds (20°C) First Copy Time Approx. 6.5 seconds (A4 Multi-Copy Speed 18 A4 size copies per minute Enlargement Ratios Preset: 115%, 122%, 141%, 173%, 200% Variable: from 101% to 200% in 1% increments Reduction Ratios Preset: 87%, 82%, 71%, 58%, 50% Variable: from 99% to 50% in 1% increments Paper Feed Paper tray (550 sheets × 1) + Sheet bypass (50 sheets) 2nd Paper feed module (550 sheets - option) 3rd Paper feed module (550 sheets - option) 4th Paper feed module (550 sheets - option) Paper Weight Paper Tray: 60 - 90 g/m2 (Sheet Bypass: 56 - 128 g/m2) Quantity Selector Max. 999 sheets (output tray capacity is 250 sheets) Electrical Consumption AC 220-240V, 50/60Hz, 6.0A Energy Consumption Max. 1.2 kW, 2.2 Wh in Sleep Mode Dimensions (W × D × H) 588 × 647 × 522 mm Weight 45 kg Operating Environment Temperature: 10 - 35°C Relative Humidity: 45 - 85% (However, the humidity should be 70% or less at a temperature of 35°C, and the temperature should be 30°C or less at a humidity level of 85%.) C Specifications are subject to change without notice. 50 , from 1st tray) Specifications ■ 2nd/4th Paper Feed Module (DA-DS182) DA-DS182 Paper Size A5/A4/FLS/B4/A3 Paper Weight 60 – 90 g/m2 Electrical Requirements Supplied from the copier Dimensions (W × D × H) 550 × 155 × 585 mm Weight 9.5 kg ■ 3rd Paper Feed Module (DA-DS183) DA-DS183 Paper Size A5/A4/FLS/B4/A3 Paper Weight 60 – 90 g/m2 Electrical Requirements Supplied from the copier Dimensions (W × D × H) 550 × 155 × 585 mm Weight 9.5 kg Others C Specifications are subject to change without notice. 51 Options and Supplies ■ The DP-1810F is a digital photocopier which can produce images with great clarity. Furthermore, its copying functionality can also be greatly enhanced by the addition of the following options and supplies. We hope you find that the wide ranging capabilities will make your office-place more productive and efficient. ■ Options Part Name Part No. 2nd/4th Paper Feed Module DA-DS182 3rd Paper Feed Module DA-DS183 Image Memory (8 MB) DA-SM8B Remarks For Electronic Sorting and Sort Printing Image Memory (16 MB) DA-SM16B For Electronic Sorting and Sort Printing Image Memory (64 MB) DA-SM64B For Electronic Sorting and Sort Printing Image Memory (128 MB) DA-SM28B For Electronic Sorting and Sort Printing Key Counter Cable Kit DA-KH200 ■ For Printer Part Name Part No. PCL6 Emulation Kit DA-PC210 Remarks Printer Controller for PCL6*. (Local Printing, for Network Printing below) ■ For Fax Part Name Part No. Handset Kit Expansion Flash Memory Card Verification Stamp Remarks UE-403117 Telephone Handset Kit UE-410046 2 MB Flash Memory Card UE-410047 4 MB Flash Memory Card UE-410048 8 MB Flash Memory Card DZHT000004 X-Stamp ■ For Network Printing / Email (Internet Fax) Part Name Part No. 10/100 Ethernet Interface/ Internet Fax Kit DA-NE200 Remarks Internet Fax Communication ■ Supplies Part Name Part No. Toner Bottle NOTE 52 DQ-TU10C ∗ Remarks Waste Toner Container included PCL6 is a Page Description Language of the Hewlett-Packard Company. memo 53 For Service, Call: Matsushita Electric Industrial Co., Ltd. Osaka 542-8588, Japan S0502-1052 DZSD001714-1 May 2002 Printed in Japan