1
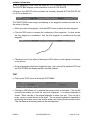
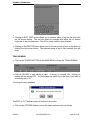
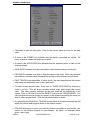
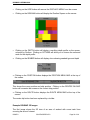
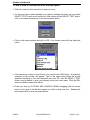
ROXMAP USER MANUAL RoxMap User Manual Manual Version 4.0 for RoxMap 3D Version 3.1.0.4 onwards RoxMap Scientific Version 3.1.0.4 onwards Sonavision Ltd. 16 Denmore Industrial Estate Denmore Road Bridge of Don Aberdeen, AB23 8JW Scotland, UK Tel: +44 (0)1224 707737 Toll Free (USA/Canada): 1-800-460-5789 Fax: +44 (0)1224 827290 E Mail: [email protected] Web Site: www.sonavision.co.uk ISSUE 0 SSV/ENG/SPEC/076 Page 1 of 39 ROXMAP USER MANUAL Welcome to RoxMap The RoxMap Navigational Software programs are designed to display seabed classification information from RoxAnn®, the world’s leading Seabed Material Discrimination System. The RoxMap program have been written to display RoxAnn seabed data in up to 32 colours, combine RoxAnn with measured depth data and to display the data in 3 dimensional format. Navigation functions included in the software program are waypoints, route planning, instant event marking and measuring functions. This manual shows the user how to operate all the functions available in your software program. The RoxMap are Windows™ based and operated by trackerball or mouse, not relying on keyboard operation. We hope that you enjoy working with the RoxMap. ISSUE 0 SSV/ENG/SPEC/076 Page 2 of 39 ROXMAP USER MANUAL DISCLAIMER The RoxMap is a navigational aid. It is designed to complement, rather than replace, Admiralty paper charts. Common prudence should be exercised in their use. All charts MUST be used in conjunction with a paper chart. The data on the paper chart must at ALL times be considered more accurate and correct. The manufacturers of the RoxMap, or the manufacturers of the charts contained within the RoxMap program take no responsibility for their accuracy and correctness. Original UK chart data is reproduced with the permission of The Controller, HM Stationery Office. LIVECHARTS are digital charts protected under the copyright laws of The United Kingdom and under International Treaties. The charts may not be copied in whole or in part, except to make a single working copy. Each chart or folio of charts is licensed to be used on a single system, single network terminal or other single means of remote access. The subsequent transfer or sale of these charts is permissible, only if these copyright restrictions and licence agreements are transferred with them and all the back-up copies are destroyed. LIVECHARTS contain material and source data not only from the British Hydrographic Office, but also from other National Hydrographic Offices. The illegal distribution of any data contained therein will infringe the copyright of the respective Hydrographic Offices acknowledged in the chart information file. All rights reserved. No part of this digital data may be reproduced, stored in a retrieval system, or transmitted in any form, or by any means, electronic, mechanical, photocopying, recording or otherwise, without the prior written permission of EURONAV Ltd. © Copyright Euronav Ltd 1996 - All rights reserved. © Copyright, Sonavision Ltd 1995 - All rights reserved. Windows is a trademarks of Microsoft Corporation MS-DOS is a trademark of the Microsoft Corporation IBM is a trademark of International Business Machines Corporation Pentium is a trademark of Intel Corporation RoxAnn is a registered trademark of Sonavision Ltd. Livechart is a trademark of Euronav Ltd. Surfer is a trademark of Golden Software. LHA v2.13 Haruyasu Yoshizaki, 1991. Wise © is a trademark of Wise Solutions, Inc. ARCS is a trademark of the UK Hydrographic Office BSB/NOAA is a trademark of MapTech, Inc. ISSUE 0 SSV/ENG/SPEC/076 Page 3 of 39 ROXMAP USER MANUAL LICENSE AGREEMENT THIS LEGAL DOCUMENT IS AN AGREEMENT BETWEEN YOU, THE END USER (THE LICENSEE), AND SONAVISION LTD. BY OPENING THE SEALED DISK PACKAGE, YOU ARE AGREEING TO BECOME BOUND BY THE TERMS OF THIS LICENSE AGREEMENT. THIS AGREEMENT CONSTITUTES THE COMPLETE AGREEMENT BETWEEN YOU AND SONAVISION LTD. IF YOU DO NOT AGREE TO THE TERMS OF THIS AGREEMENT, DO NOT OPEN THIS DISK PACKAGE. PROMPTLY RETURN THE UNOPENED DISK PACKAGE AND THE OTHER ITEMS (INCLUDING WRITTEN MATERIALS) THAT ARE PART OF THIS PRODUCT TO THE PLACE WHERE YOU OBTAINED THEM FOR A FULL REFUND. 1. GRANT OF LICENSE. Sonavision Ltd. grants you a non exclusive, non-transferrable license to use the enclosed program (the ‘SOFTWARE’) solely for your personal use and evaluation. Sonavision Ltd. retains title and ownership of the SOFTWARE, regardless of the form or media in or on which the original and other copies may exist. This License is not a sale of the original SOFTWARE or any copy. 2. COPY RESTRICTIONS. This SOFTWARE and the accompanying written materials are copyrighted. Unauthorised copying of the SOFTWARE, including SOFTWARE that has been modified, merged, or included with other software, or of the written materials is expressly forbidden. You may be held legally responsible of any copyright infringement that is caused or encouraged by your failure to abide by the terms of this License. Subject to the restrictions, you may make one (1) copy of the SOFTWARE solely for backup purposes. You must reproduce and include the copyright notice on the backup copy. 3. USE RESTRICTIONS. As the LICENSEE, you may use the SOFTWARE on one computer at one time and place. You may not distribute copies of the SOFTWARE to others. You may not modify, adapt, translate, reverse engineer, decompile, disassemble, or create derivative works based on the SOFTWARE. You may not modify, adapt, translate, or create derivative works based on the written materials without the prior written consent of Sonavision Ltd. 4. TRANSFER RESTRICTIONS. This SOFTWARE is licensed only to you, the LICENSEE, and may not be transferred to anyone without the prior written consent of Sonavision Ltd. Any authorised transferee of the SOFTWARE shall be bound by the terms and conditions of this Agreement. In no event may you transfer, assign, rent, lease, sell or otherwise dispose of the SOFTWARE on a temporary or permanent basis except as expressly provided herein. 5. TERMINATION. This License is effective until terminated. This License will terminate automatically without notice from Sonavision Ltd. If you fail to comply with any provision of this License. Upon termination you shall destroy the written materials and all copies of the SOFTWARE, including modified copies, if any. ISSUE 0 SSV/ENG/SPEC/076 Page 4 of 39 ROXMAP USER MANUAL 6. UPDATES AND UPGRADES. Sonavision Ltd. may create, from time to time, updated versions of the SOFTWARE. At its option, Sonavision Ltd. will make such updates available to the LICENSEE. If the SOFTWARE is being licensed to you as an update or upgrade to SOFTWARE previously licensed to you , you must destroy the software previously licensed to you, including any copies resident on your hard-disk drive, within sixty (60) days of the purchase of the license to use the update or upgrade. 7. MISCELLANEOUS. This Agreement is governed by the laws of Scotland. DISCLAIMER AND LIMITATION OF LIABILITY THE SOFTWARE AND ACCOMPANYING WRITTEN MATERIALS ARE PROVIDED ‘AS IS’ WITHOUT WARRANTY OF ANY KIND. SONAVISION LTD. DOES NOT WARRANT, GUARANTEE, OR MAKE ANY REPRESENTATIONS REGARDING THE USE, FITNESS FOR A PARTICULAR PURPOSE, OR THE RESULTS OF THE USE OF THE SOFTWARE OR WRITTEN MATERIALS IN TERMS OF CORRECTNESS, ACCURACY, RELIABILITY, CURRENTNESS, OR OTHERWISE. NO ORAL OR WRITTEN INFORMATION OR ADVICE GIVEN BY SONAVISION LTD. SHALL CREATE A WARRANTY OR IN ANY WAY INCREASE THE SCOPE OF THIS WARRANTY. NEITHER SONAVISION LTD. NOR ANYONE ELSE WHO HAS BEEN INVOLVED IN THE CREATION, PRODUCTION, OR DELIVERY OF THIS PRODUCT SHALL BE LIABLE FOR ANY DIRECT, INDIRECT, CONSEQUENTIAL, OR INCIDENTAL DAMAGES (INCLUDING DAMAGES FOR LOSS OF BUSINESS PROFITS, BUSINESS INTERRUPTION, LOSS OF BUSINESS INFORMATION, AND THE LIKE) ARISING OUT OF THE USE OF OR INABILITY TO USE SUCH PRODUCT EVEN IF SONAVISION LTD. HAS BEEN ADVISED OF THE POSSIBILITY OF SUCH DAMAGES. Because some states do not allow the limitation or exclusion of liability for incidental or consequential damages, the above limitation may not apply to you. This Disclaimer and Limitation of Liability are governed by the laws of Scotland. Should you have any queries concerning this Agreement, or if you desire to contact Sonavision for any reason, please contact in writing: Sonavision Ltd., at the address on page 1 of this document. ISSUE 0 SSV/ENG/SPEC/076 Page 5 of 39 ROXMAP USER MANUAL CONTENTS 1.0 Getting Started 1.1 Terminology Used in this Manual 1.2 Minimum Recommended Hardware Requirements 1.3Connecting Up Navigation, RoxAnn and Computer 1.4 Installation of Software on Windows™ 95/Windows™ 98 2.0 Using ROXMAP 3D 2.1 Basic Functions 2.2 ROXMAP Main Menu 2.3 ROXMAP Sub Menus • Chart Menu • Overlays • Settings • Select • Colour • Auto Scroll • Folio • Catalogue • Query Menu • Measure • Marks • Chart Edit • Symbols • Draw • Waypoints • Routes • Text • Tracks Menu • Displays Menu • Example ROXMAP 3D Images 3.0 Fine Tuning ROXANN 3D 3.1 Editing the ROXANN Square 3.2 How to Draw a Coloured Box in the ROXANN Square 4.0 ROXMAP 3D Utility Programs 4.1 ROXMAP Back Up and Restore Utilities 4.2 ROXMAP with Multiple Databases 4.3 Replaying and Analysing Existing Data 5.0 Technical Notes ISSUE 0 SSV/ENG/SPEC/076 Page 6 of 39 ROXMAP USER MANUAL • • • • • • • • Processors Operating Systems Networks Software Locks Navigation Devices PC COM and Parallel Ports Monitor Set-up Working Outwith Your Charts ISSUE 0 SSV/ENG/SPEC/076 Page 7 of 39 ROXMAP USER MANUAL 1.0 Getting Started RoxMap Navigational Software has been designed to operate in conjunction with the RoxAnn Seabed Classification System and a navigational position fixing system. 1.1 Terminology used in this Manual • Instructions are given assuming a mouse is used as the pointing device. If you are using a trackerball or anything other than a mouse, please refer to the documentation supplied with the device. • Software is supplied on CD ROM. It is assumed that the CD drive on your computer is designated as ‘D:’. • <enter> is used to signify the user pressing the ENTER or RETURN key on the keyboard. 1.2 Minimum Recommended Computer Requirements The recommended minimum PC specification required in order to run the RoxMap -3D (98) is: • IBM™ compatible PC Pentium II/250MHz • 1 Gbyte Hard Disk • 32Mb RAM • 2 free RS232 COM ports • PS/2 mouse OR serial mouse using a third COM port • SVGA video adapter card with 2Mb memory (800X600) • SVGA Compatible Monitor (800X600) • 1 free parallel port • CD ROM Drive • A mouse, or a trackerball • Windows™ 95 or Windows™ 98, (Windows NT factory option) ISSUE 0 SSV/ENG/SPEC/076 Page 8 of 39 ROXMAP USER MANUAL 1.3 Connecting up the Computer Hardware • Identify the free serial COM ports and the parallel port (LPT1). • Connect the Navigational positioning system to COM1. • Connect the serial pointing device to COM2 (if used) or the PS/2 pointing device to the PS/2 port. • Connect the RoxAnn Unit (RS232 output on the RoxAnn) to COM3 (if using a serial mouse) or COM2 if not. • Insert the software lock (dongle) into the parallel port (LPT1) of the computer. 1.4 Loading the Software RoxMap software and its associated programs are supplied on CD ROM. Place the CD ROM in your drive and run the setup program. The installation program will take you through the correct steps for installing the software. ISSUE 0 SSV/ENG/SPEC/076 Page 9 of 39 ROXMAP USER MANUAL 2.0 Using ROXMAP 3D To start RoxMap 3D, double click on its icon. If, at this stage, you receive an error message, make sure that the supplied software lock is connected in the parallel port of the PC. If not, place it into the parallel port and try again. If the software lock is present the Euronav disclaimer screen will be displayed. If you wish to return to the factory default settings turn off the “restore previous” box otherwise the chart will be displayed at the last position used. Press “Accept” to continue. If RoxMap is loading successfully, you should see the SEATECH INTERNATIONAL logo displayed on the screen. A disclaimer will be displayed. RoxMap will not function unless you accept the conditions of the disclaimer. Make sure you read them. ONLY IF YOU ACCEPT THESE CONDITIONS SHOULD YOU PROCEED TO USE THE ROXMAP -3D (98) SOFTWARE 2.1 Basic Operations for Using ROXMAP 3D First, a few basics to help you use your software: • ‘Clicking’ refers to pressing and releasing the left mouse button rapidly. • ‘Double-clicking’ refers to the clicking the left mouse button rapidly twice. • The mouse cursor is the symbol that shows the position of the mouse on the monitor screen. • If you are using a mouse or trackerball, clicking the left mouse button on the chart will centre the chart on the screen using the point of the chart you clicked on as the centre. • Clicking the right mouse button will allow you to zoom out. • You can hold down the left mouse button and drag a square box around the area of the chart you wish to zoom in to. Release the mouse button to activate the zoom. • Menus and displays in RoxMap contain a HIDE button. • Click the HIDE button to remove the menu or display from the monitor screen. • Portions of text coloured grey indicate that the function associated it is unavailable at that time. ISSUE 0 SSV/ENG/SPEC/076 Page 10 of 39 ROXMAP USER MANUAL • Boxes and Radio buttons (small squares and circles in menus) are ON when filled with a √ or a • respectively. 2.2 ROXMAP Main Menu Located at the bottom of the screen you will see the MAIN MENU bar. This menu bar is used to access all the other menus in the software. This menu is illustrated below. Each button on the main menu bar is described in the following sections: Hide/Quit Chart Query Chart Edit Tracks Inst Displays Redraw Show 3D 3D Options • Click on the HIDE/QUIT to activate the MENU/QUIT MENU. This function allows you to hide the MAIN menu bar to view more of the screen. • Click on the CHART button to activate the CHART MENU. • Click on the QUERY button to activate the QUERY MENU. • Click on the CHART EDIT button to activate the CHART EDIT MENU. • Click on the TRACKS button to activate the TRACKS MENU. • Click on INST to produce an instant event marker (a particular symbol) at the current ships position. Pressing F1, F2, F3 and F4 on the keyboard also produces instant event markers. F1 produces the same symbol as clicking the INST button. F2, F3 and F4 produce different symbols. F4 is always reserved as Man-Over-Board. • Click on the DISPLAYS button to activate the DISPLAYS MENU. • Click on the REDRAW button to redraw the screen. • Click on the SHOW3D button to activate the 3D function. • Click on the 3D OPTIONS button to choose a display in 3D. 2.3 ROXMAP Sub Menus CHART MENU Clicking on the CHART button in the MAIN MENU displays the CHART MENU. Overlays Settings Select Grid Colour Autoscroll New Folio Catalogue OVERLAYS ISSUE 0 SSV/ENG/SPEC/076 Page 11 of 39 ROXMAP USER MANUAL Overlays act like sheets of transparent film laid over the chart. Each overlay is a separate sheet. When you draw, add routes, add symbols and add text, they are always added to the active overlay selected by the user. New overlays can be created. Existing overlays can be deleted. Overlays can be either turned on or off. Clicking on the OVERLAYS button in the CHART MENU will allow you to edit the overlays. To create a new overlay click on the NEW button. Enter a name for the new overlay using the mouse controlled keyboard or the real keyboard. Click on the OK button to add the overlay to the list. • The currently ACTIVE overlay has its name coloured red. All new drawings, symbols, text and routes will be added to the ACTIVE overlay. To make an overlay ACTIVE , click on the downward arrow in the EDIT OVERLAY list. Click on the name of the overlay to be made ACTIVE. The overlays name will now be coloured red. Clicking on the name of the overlay in ON/OFF list, turns the overlay ON or OFF. Note that the ACTIVE overlay can NOT BE TURNED OFF. • The TOP and BOTTOM buttons and their corresponding up and down arrow keys allow you to scroll through the list of overlays. • Click on the EVENT MARKERS button to switch event marks between ON and OFF. SETTINGS The settings button activates the Chart Settings window, which controls how the charts are displayed. ISSUE 0 SSV/ENG/SPEC/076 Page 12 of 39 ROXMAP USER MANUAL SELECT This button allows you to select the chart. Normally it is not used as the chart is selected automatically from the folio according to the chart position. COLOUR The COLOUR button brings up a dialoge box with the choice of Day Dusk and Night AUTOSCROLL The AUTOSCROLL button toggles between turning autoscroll on and off. Autoscroll is an automatic centre on ship facility. Then the ship moves off the computer monitor screen the screen is automatically re-centred on the ships position. Autoscroll can also be turned an and off with the button on the toolbar at the right hand end of the toolbar. FOLIO Use this if you have installed new charts. CATALOGUE Displays all charts currently available from Euronav. NB Tracks to Symbols are not shown in this mode. A toolbar will appear close the toolbar to return to normal. QUERY MENU Clicking on the QUERY button in the MAIN MENU displays the QUERY MENU. Measure Marks Info MEASURE The MEASURE button allows you to measure the distance and bearing from one point on the screen to another point on the screen ISSUE 0 SSV/ENG/SPEC/076 Page 13 of 39 ROXMAP USER MANUAL Click and hold down the left mouse button at the first point. While holding down the left mouse button you can move the mouse pointer to another position on the screen. A line, as shown above, will connect the two points. The box shows the position of the first and second point and also the range and bearing from the first point to the second point. Release the left mouse button to stop the measure. Click the right mouse button to return to the QUERY MENU. MARKS Clicking on the MARKS button allows you to click the left mouse button on the screen to show information about the nearest mark or symbol. Clicking the right mouse button returns you to the QUERY MENU. INFO This function allows the user to obtain information about the data displayed onscreen. By clicking the mouse on a part of the track, a small window appears which give the following details: Latitude, Longitude, E1, E2, Depth, Colour, Seabed Type CHART EDIT Clicking on the CHART EDIT button in the MAIN MENU displays the following SUBMENU. Hide Symbols Draw Waypoints Text This menu allows you to draw symbols, lines routes and text on the current overlay. SYMBOLS • The SYMBOLS button to show the SYMBOLS MENUS. ISSUE 0 SSV/ENG/SPEC/076 Page 14 of 39 ROXMAP USER MANUAL • Click on a coloured square at the bottom Symbols Sheets menu to select a colour for your symbol. Click on a symbol name to select a symbol. • Four sheets of symbols are available i.e. buoys, hazards, fishing and tidal. Click on the downward pointing arrow to the left of the word buoys shown above to display the list. Choose a list by clicking on the name of the list. • Clicking the ADD button allows you to position the mouse cursor on the chart. Clicking the left mouse button adds your selected symbol to the chart. This can be done as many times as you like until you click the right mouse button which allows you to return to the SYMBOLS MENU. • Clicking on the DELETE button allows you to position the mouse cursor on the chart. Clicking the left mouse button over a symbol will then delete the chosen symbol from the chart. You are then returned to the SYMBOLS MENU. • Clicking on the EDIT TEXT button allows you to enter a new name for the currently selected symbol. • Clicking on the FINISHED button returns you to the CHART EDIT MENU. DRAW • Click on the DRAW button to show the DRAW MENU. ISSUE 0 SSV/ENG/SPEC/076 Page 15 of 39 ROXMAP USER MANUAL • Click on a coloured square in the Pen Options menu to select a colour for your line drawing. • Click on pen width arrows to increase and decrease the thickness of the line to draw. • Clicking the NEW button allows you to position the mouse cursor on the chart. Clicking the left mouse button adds a point to your line drawing. Move the mouse cursor to a new position and click the left mouse button will draw a line between the this point and the previous point. This can be done as many times as you like until you click the right mouse button which allows you to return to the DRAW MENU. • Clicking on the DELETE button allows you to position the mouse cursor on the chart. Clicking the left mouse button over a point in a drawing will delete the entire drawing from the chart. You are then returned to the DRAW MENU. WAYPOINTS • Click on the WAYPOINTS button to show the WAYPOINTS MENU Waypoints are the single points that make up a route. Therefore, a route is a set of waypoints. Waypoints can be entered automatically using the Waypoints Plan which is displayed on the screen. Alternatively they can be drawn to the screen manually using the functions displayed at the bottom of the screen. ISSUE 0 SSV/ENG/SPEC/076 Page 16 of 39 ROXMAP USER MANUAL • Click on the NEW button to start drawing a new route. Clicking the left mouse on the chart adds a waypoint to your route. Move the mouse cursor to a new position and click the left mouse button will draw a line between the this new waypoint and the previous waypoint. This can be done as many times as you like until you click the right mouse button which allows you to return to the WAYPOINTS MENU. • Clicking on the DELETE button allows you to position the mouse cursor on the chart. Clicking the left mouse button over a waypoint in a route will delete the entire route from the chart. You are then returned to the WAYPOINTS MENU • Clicking on the CUT button will allow you to position the cursor over a waypoint in a route. Clicking the left mouse button will then remove the selected waypoint from the route. You are then returned to the WAYPOINTS MENU. • Clicking on the MOVE button will allow you to position the cursor over a waypoint in a route. Clicking the left mouse button will then allow you to position the cursor to a new position for the waypoint. Clicking the left mouse button places the waypoint in its new position. You are then returned to the WAYPOINTS MENU. • Clicking on the CONTINUE button will allow you to continue to add waypoints to the last route if you returned to the WAYPOINTS MENU prematurely. • Clicking on the ACTIVE button will allow you to position the cursor over a waypoint in a route. Clicking the left mouse button will then select that route as active (the currently selected route). You are then returned to the WAYPOINTS MENU. • Clicking on the TEXT button will have no effect in this menu. • Clicking on the FINISHED button returns you to the CHART EDIT MENU. ROUTES Accessed via “Displays” button See WAYPOINTS button. • Click on the ROUTE button in the DISPLAYS MENU to display the ROUTE BAR at the top of the screen. ISSUE 0 SSV/ENG/SPEC/076 Page 17 of 39 ROXMAP USER MANUAL A set of waypoints (route) must be made ACTIVE to become the ACTIVE ROUTE. The ROUTE BAR displays route information for the ACTIVE ROUTE. Clicking on the ON/OFF button switches the currently selected ACTIVE ROUTE ON (or off if it is already on). The ROUTE BAR shows range and bearing to the waypoint number coloured red in the centre of the bar. • When you reach the waypoint, click the NEXT button to select the next waypoint. • Click the REV button to reverse the numbering of the waypoints. In other words, the last waypoint is numbered 1 and the first waypoint is numbered as the last waypoint • The above route is the effect of clicking the REV button for the original route shown in this section. • Once all waypoints have been toggled through, the route will be switched OFF and the ROUTE BAR will display that the route has finished. TEXT • Click on the TEXT button to show the TEXT MENU • Clicking on ADD allows you to position the mouse cursor on the chart. Click the left mouse button where you want the text to be displayed. A on screen keyboard is shown. Either use this or the normal keyboard to enter your text. Click on OK or press <enter> to write the text to the chart. The on screen keyboard is operated by positioning the mouse cursor over a letter button and clicking the left mouse button. This simulates an actual key press on the real keyboard. ISSUE 0 SSV/ENG/SPEC/076 Page 18 of 39 ROXMAP USER MANUAL • • Clicking on EDIT TEXT button allows you to chose a piece of text on the chart with the left mouse button. The text can when be changed with either the on screen keyboard or the real keyboard. Click OK or press <enter> when finished • Clicking on the DELETE button allows you to choose a piece of text on the chart by clicking the left mouse button. The selected piece of text is then deleted from the chart. TRACKS MENU • Click on the TRACKS BUTTON in the MAIN MENU to show the TRACKS MENU. • Click on SAVING to start saving a track. If saving is currently ON, clicking on saving will turn saving OFF. You will always be asked if you are sure if you want to turn saving on or off. If turning off select database. The EDIT or CUT buttons does not function in this menu. • Click on the OPTIONS button to show the tracks options menu as follows. ISSUE 0 SSV/ENG/SPEC/076 Page 19 of 39 ROXMAP USER MANUAL • The menu is split into two parts. One for the current track and one for the past track. • A cross in the VISIBLE box indicates that the track/s concerned are visible. No cross in the box means the tracks are invisible. • A cross in the JOIN POINTS box indicates that the separate points of track on the chart are joined. • SAVE RATE indicates how many seconds to wait between saving a track point. • PEN WIDTH indicates how wide to draw the track on the chart. Both save rate and pen width are increased and decreased by clicking on the up/down arrow buttons. • PAST TRACK is user selectable. In other words, the track saved before the current track does not necessarily have to be a past track. • To select a track as past track, firstly turn on TRACK OUTLINING by inserting a cross in its box. This will draw a square around every track except the current track. The track currently selected as the past track will be outlined by a red square. Click on OK then click on the SELECT button in the TRACKS MENU. You can now point the mouse cursor at a corner of the square surrounding the track you wish to select as past track. Click the left mouse button to select. • A cross within the SHOW ALL TRACKS box will show all tracks ever saved that fall within the latitude and longitude limits of the monitor screen. • COLOUR allows you to colour your track by RoxAnn (according to your boxfile, see section on the RoxAnn Square for more details), by depth, or arbitrarily black, green, red or grey. ISSUE 0 SSV/ENG/SPEC/076 Page 20 of 39 ROXMAP USER MANUAL • Colour by depth colours are defined by the DEPTH SCALE button. Click on the DEPTH SCALE button. This will produce a scale with associated colours. The scale is adjustable by clicking on the up and down pointing arrow buttons, which increase and decrease the minimum and maximum depths accordingly. Click on OK if you are satisfied with the scale. • The DISREGARD CHANGES button will cancel all changes made and return you to the TRACKS MENU. • The OK button will keep all the changes made and return you to the TRACKS MENU. • Clicking the DELETE button in the TRACKS MENU to delete the track that is currently the PAST TRACK. • Clicking on the FINISHED button will return you to the MAIN MENU. NOTE To see the change take effect you must click on the chart. A Track is all the data saved from the time you start saving until the time you stop saving. DISPLAYS MENU Clicking on the DISPLAYS button in the MAIN MENU shows the DISPLAYS MENU. ISSUE 0 SSV/ENG/SPEC/076 Page 21 of 39 ROXMAP USER MANUAL • Clicking on the HIDE button will remove the DISPLAYS MENU from the screen • Clicking on the ROXANN button will display the RoxAnn Square on the screen • Clicking on the DEPTH button will display a scrolling depth profile on the screen, coloured by RoxAnn. Clicking on OPTIONS will allow you to choose the units and scale for the depth profile • Clicking on the SEABED button will display a box showing seabed type and depth • Clicking on the POSITION button displays the POSITION MENU BAR at the top of the screen. This shows the cursor position and ship position. Clicking on the CENTRE ON SHIP button will re-centre the screen on the current ship position. • Clicking on the ROUTE button displays the ROUTE MENU BAR at the top of the screen. The centre slip button has been replaced by a toolbar Example ROXMAP 3D Images The first image shows the 2D view of an area of seabed with some track lines covering the area of interest. ISSUE 0 SSV/ENG/SPEC/076 Page 22 of 39 ROXMAP USER MANUAL The second image shows the 3D view generated by ROXMAP 3D of that same area. The third image shows a different 2D view where interpolation between the lines has been carried out. ISSUE 0 SSV/ENG/SPEC/076 Page 23 of 39 ROXMAP USER MANUAL ISSUE 0 SSV/ENG/SPEC/076 Page 24 of 39 ROXMAP USER MANUAL 3.0 Fine Tuning ROXMAP 3D 3.1 Editing the ROXANN Square First, you need to display the RoxAnn Square. To do this, click on the ROXANN button in the DISPLAYS MENU. You will now see the RoxAnn Square in Normal Mode. The current E1 and E2 values are displayed at the bottom of the square. The trace shows the present position of that values within square. • Secondly, Click on the EDIT button in the RoxAnn Square. You will now enter into the RoxAnn Square Edit Mode E1 values increase up the y-axis and E2 values increase up the x-axis. The maximum and minimum values for E1 and E2 are shown at either end of the corresponding axis. The value in the middle of the axis corresponds to the E1 and E2 value pointed to by the mouse cursor in the RoxAnn Square. ISSUE 0 SSV/ENG/SPEC/076 Page 25 of 39 ROXMAP USER MANUAL • Clicking the HIDE button removes the RoxAnn Square from the screen. • Clicking the NORMAL button displays the RoxAnn Square in normal mode. • Clicking the GRID ON button places a 32x32grid over the RoxAnn Square. The button the changes to GRID OFF. • Clicking GRID OFF removes the grid. The button then changed to GRID ON. • Clicking SCALES allows you to set minimum and maximum values for E1 and E2 base ranges as displayed on the RoxAnn Square. E1 and E2 minimum and maximum values are altered by clicking on the arrow boxes. Note that maximum possible values for E1 and E2 in RoxMap is 2.03 volts. • Clicking the CANCEL button returns you to the RoxAnn Square disregarding any changes. • Clicking the OK button returns you to the RoxAnn Square with the new E1 and E2 values. • Clicking ANALYSIS will allow you to start, stop or refresh a scatterplot. A scatterplot will show, with a mark, the position of all E1 and E2 values plotted after START was clicked. • To view ALL the E1 and E2 values collected for that track, click REFRESH. Click STOP to end scatterplotting. • Click on the SAVE and LOAD buttons to save and load RoxAnn Squares. A saved RoxAnn Square is called a Box File. • TOP and BOTTOM arrows allow you to scroll through the colour / seabed type list. • Clicking on the CANCEL EDIT button will remove all changes made prior to the last time you clicked the FIX EDIT button. ISSUE 0 SSV/ENG/SPEC/076 Page 26 of 39 ROXMAP USER MANUAL 3.2 How to Draw a Coloured Box In the ROXANN Square • Click on a colour in the colours list to select a colour. • If it does not have a name already or you want to change the name, you can select SELECT TEXT to pick one from the list. After clicking on the SELECT TEXT button, click on the down arrow button in the choose name menu. • Click on the name required and click on OK. Your chosen colour will now have that name. • If the name you require is not in the list, you need to click ADD button. A keyboard, operated by the mouse, will appear. Type in the name using either the mouse operated keyboard or the real keyboard and click OK. Use the SELECT TEXT button now as before to give your chosen colour your new name. Click the DEL button to delete a name from the list. • Draw your box by CLICKING AND HOLDING DOWN (dragging) the left mouse button in the area of the RoxAnn square you wish to draw your box. Release the left mouse button to draw the coloured box. ISSUE 0 SSV/ENG/SPEC/076 Page 27 of 39 ROXMAP USER MANUAL 4.0 ROXMAP 3D Utility Programs 4.1 ROXMAP Backup and Restore Utilities RoxBack and RoxBuild are used to save your RoxAnn information to floppy disks and to restore it back to hard disk. It is advisable that you do weekly back-ups. This will prevent any mishaps (e.g. hard disk failure) from destroying all your saved data How to use ROXMAP BACKUP Make sure to have a box of formatted floppy disks ready. To backup RoxMap, double click on the RoxBack icon. All information required for RoxMap will now be saved onto floppy disks by following the on screen instructions. How to use ROXMAP RESTORE You can restore a backup set by double clicking on the RoxBuild icon. Have your backup disks ready. When prompted, place the first disk of the set in the floppy drive. If your backup has used more than one disk, it is important that you know the order they where saved in. If you forget, exit to DOS, type a:\ <enter> and then type DIR <enter>. The file name on the disk will include a number where 0000 is the first disk, 0001 is the second disk and so on. Once all backup disks have been read by the RoxBuild program, your backup version of RoxMap will be automatically installed. Note that any data saved since the backup was performed will now be lost, but all data saved up until the backup was made will be restored. 4.2 ROXMAP REPLAY Program and its Utilities This suite of programs has been introduced to allow existing RoxMap users to have more control over their data saved in the RoxMap database and to analyse existing data using facilities built into the REPLAY program. The programs covered are: Replaying data Changing the database Making replay files REPLAY.EXE MULTIDB.EXE MKREPLAY.EXE Normal ROXMAP Operation The standard RoxMap program stores all data in a single database in the form of track files. The database consists of many interrelated files in a special directory structure within the ROXMAP directory on the hard disk. The directory structure looks something like the following when viewed with Windows File Manager or Windows Explorer: ISSUE 0 SSV/ENG/SPEC/076 Page 28 of 39 ROXMAP USER MANUAL ROXMAP BOXFILES DATABASE OVL00001 OVL00002 OVL00003 ... etc. TESTDATA The DATABASE directory and its three (or more) Subdirectories contain all the files which contain the stored data. In the OVL00001 directory are stored the actual data files (TRK00001.DAT etc.). Each time saving is turned on, a new track file with the next consecutive number is started. These track files and data files are interrelated with many other files and cannot be deleted or renamed without corrupting the whole database. This situation is acceptable for the majority of users but in some cases, the ability to save data in different and named databases is useful. When RoxMap is first installed, there is no database structure and the first time the program is run a new empty database is generated. The TESTDATA sub-directory will be present only when the REPLAY program is installed. 4.2 ROXMAP with Multiple Databases The complete database structure is self contained within the DATABASE directory and we can change the name of the this directory to another name chosen by the user. RoxMap will not recognise the new name as a database, will ignore it and will start by creating a new empty database the next time it is launched. This provides the means by which as many databases as required can be used with RoxMap. The program called MULTIDB.EXE has been designed to simplify this process of using multiple databases. Using MULTIDB.EXE MULTIDB.EXE resides in the RoxMap directory on the hard disk. If you are using an installation program from MMS which contains this program then it will automatically be copied into the correct location. If you are adding the program to your existing installation then copy it from your floppy drive into the ROXMAP directory using File Manager or Windows Explorer. To create an icon on the computer desktop, either create a shortcut (WIN95) or add a new file to your chosen window (W3.1). These procedures are described fully in your Windows documentation which came with the computer. ISSUE 0 SSV/ENG/SPEC/076 Page 29 of 39 ROXMAP USER MANUAL MULTIDB has been given a dedicated icon during design which will appear with the program name after carrying out the above. Description The MULTIDB.EXE program allows the user to manage an unlimited number of databases and allows user chosen names to be given to each of the databases in use. After using MULTIDB to create multiple databases, the directory structure on the hard disk will look something like the following: ROXMAP BOXFILES DATABASE OVL00001 OVL00002 OVL00003 WEST OVL00001 OVL00002 OVL00003 NORTH OVL00001 OVL00002 OVL00003 JOHNS OVL00001 OVL00002 OVL00003 13_6_98 OVL00001 OVL00002 OVL00003 TESTDATA The different databases have names which are unique and recognisable to the user in some way. The names must follow the normal DOS naming convention, which limits the number of characters to 8 and limits the use of some non-alphanumeric characters. DATABASE is usually called the “Current” database, is the only one recognised by RoxMap and is therefore where all new data is saved. MULTIDB allows the user to take any named database and temporarily rename it as the current database. In this way, the user can return to a previously visited area and save data into the same database as used last time. To keep track of the database names, MULTIDB creates a special file in each subdirectory of ROXMAP called MULTIDB.INI. This file should not be removed or tampered with since it tells MULTIDB the user chosen name of the database. ISSUE 0 SSV/ENG/SPEC/076 Page 30 of 39 ROXMAP USER MANUAL Operation MULTIDB is a Windows based program which provides a simple graphical interface so that selecting and renaming the databases is very easy using the keyboard and a mouse or trackerball. The operation of MULTIDB is virtually self explanatory. When the program is launched by double clicking the icon, the standard MULTIDB screen or window will appear. On this screen you can see which is your current database name and by clicking on a new name in the list you can select and change to another existing database. Clicking OK will exit the program and allow RoxMap to use your newly chosen database. If the current database has not yet been named you will be prompted for a name before the program exits. Clicking on NEW will force RoxMap to create a new empty database next time it runs and this is the way to start a new set of data collections in a new area. Again, if the current database has not yet been named you will be promted for a name before the program exits. Clicking on PROPERTIES will bring up an editing window to allow the name of the chosen database to be changed. This is done using normal wibdows text editing features. Clicking on CANCEL exits the program without making changes. 4.3 Replaying and Analysing Existing Data The standard version of RoxMap allows existing data to be manipulated and reanalysed. This is limited to viewing the whole of the database on-screen and making modifications to the characteristics of the boxfile or deleting individual tracks. Databases which contain a large number of data points can slow down the display processing which is inconvenient and time consuming and the data may cover widely separated areas on the chart requiring extensive panning and zooming to review in full. Two new programs have been introduced which add further features to RoxMap and allow data to be displayed and analysed more effectively and allow large databases to be reduced in size (density of points). These programs allow combinations of specific tracks to be selected from the current database and converted into replay text files. These are used by the REPLAY program which reads data from these files (normal RoxMap reads data in real-time from the serial ports). Since the data is read point by point from the file, this gives the impression that the vessel is steaming over the same ground again at a realistic speed. ISSUE 0 SSV/ENG/SPEC/076 Page 31 of 39 ROXMAP USER MANUAL The REPLAY program is almost identical to RoxMap with all the same functionality and menu structure but has an additional control box to control the replay functions. This control box works in a similar way to a CD player or VCR and has the facility to play in forward or reverse, in slow or fast mode and the ability to skip to the beginning or end of the data. An extremely important feature is the ability to re-save the data into the current database as new tracks. The data may be stored at the original density or thinned out by only storing every second, third, fourth etc. of the original points. If the current database is chosen before replaying is started then it is possible, by careful use of the replay program, to merge data from several databases into one summary database. The program required to convert the data into text files is called MKREPLAY.EXE. This program allows the user to choose which tracks from the current database are to be converted into text files ready for REPLAY to process and display Installation The two programs required are called REPLAY.EXE and MKREPLAY.EXE. REPLAY, like RoxMap, requires the correct software lock (dongle) to be fitted to the computer. Both programs have to be in the ROXMAP directory and the same installation procedures should be used, as described above, for the MULTIDB program. REPLAY uses the same icon as RoxMap whilst MKREPLAY is a DOS program and it is necessary to select an icon from the list shown when creating the shortcut or new file. An additional directory called TESTDATA is required under the ROXMAP directory for correct operation of these programs. If you have used an MMS install program for these programs then this directory will automatically be generated. If you have manually copied the programs then it will be necessary to make this directory yourself using the appropriate techniques in File Manager or Windows Explorer. ISSUE 0 SSV/ENG/SPEC/076 Page 32 of 39 ROXMAP USER MANUAL Using MKREPLAY MKREPLAY is a DOS based program and is does not operate as intuitively as a Windows program Before starting this program be sure to select the correct database if you are using MULTIDB. When MKREPLAY is launched by double clicking on the icon, the program will start running in a DOS window. Following a line of information giving the title and version of the program, it will report the number of tracks in the database. Press RETURN to see a list of the tracks with information on Latitude and Longitude of the track start and finish points. This may be useful in selecting which tracks to convert. Note that the number of points shown is not an accurate guide to the contents of the track. Press RETURN to continue. There is a choice now as to whether to convert the whole database or just selected tracks. Press RETURN (equivalent to No) to convert everything or Y to select your choice. If you answered Yes then follow the instructions to select your track numbers. The final RETURN starts the conversion process. If files already exist then you will be asked to confirm the overwriting of them. Answer Y to these questions if you wish to overwrite them. On completion, a message will appear stating the number of converted points. When you are ready, press RETURN again to stop the program. For WIN95, you may need to close the window by clicking on X. For W3.11 the program should terminate correctly after pressing RETURN. The data files are now ready to be used by REPLAY Using REPLAY REPLAY is launched in exactly the same way as RoxMap and the windows appearing on the screen are chosen in the same way as with RoxMap. In the Displays menu there is an additional option called Replay which brings up a control box to allow operation of the replay functions. The buttons in the Replay control box are similar to those on a CD player or VCR and control how data is read from the two text files. They operate as follows: > Play the data in the forward direction at normal speed (same direction as originally saved) from the current position in the file. ISSUE 0 SSV/ENG/SPEC/076 Page 33 of 39 ROXMAP USER MANUAL < As above but plays in the reverse direction. >> Plays in the forward direction at high speed and the tracks are not drawn. Select this option only from the paused position. << As above but goes in the reverse direction. |>> Jumps to the end of the data file. |<< Jumps to the beginning of the data file. [] Pauses the normal speed playing of the data 0 Allows turning of saving on and off as required. Data is saved as new tracks to the current database in much the same way as RoxMap. Note that data is stored either every point in the data file or at a reduced density. X Closes / removes the window from the display. The operation of the remaining features of the REPLAY program are virtually identical to the same version of RoxMap, with one major exception. This is the way that data is stored. In the Tracks / Options selection box instead of selecting a save rate in seconds, it is now possible to select a save rate as a number of points. This allows saving rate to be every point (giving the same density as the original data) or every second, third etc. between save points. A Procedure for Thinning and Merging Databases The following is a procedure for reducing the density and merging two separate databases into a new database. 1. Select the database that contains the first set of required data using MULTIDB 2. Launch RoxMap and choose “Show All Tracks” in the Tracks / Options menu 3. From the Query menu select info and click on the tracks which you require. Write down the track details. 4. Close down RoxMap and launch MKREPLAY. 5. Select the tracks you need and convert these to text files. ISSUE 0 SSV/ENG/SPEC/076 Page 34 of 39 ROXMAP USER MANUAL 6. Close down MKREPLAY and launch MULTIDB 7. Choose to start a new (empty) database. 8. Close down MULTIDB and launch REPLAY. 9. Select Tracks / Options and select Current Track only, without Joining Points 10. Select finished and then start replaying the data 11. Use “Centre on Ship” if necessary. 12. Watch the display and decide what parts to save as new tracks 13. Turn saving on /off as required 14. When finished close down REPLAY and launch MULTIDB 15. Select the next database with the data to merge with the data just saved. 16. Carry out steps 2 to 6 above. You will be asked to give the name of your new database at some point. 17. Select this same database again. 18. Carry out steps 8 to 13 above. 19. The database now contains the selected and merged data. ISSUE 0 SSV/ENG/SPEC/076 Page 35 of 39 ROXMAP USER MANUAL 5.0 Technical Notes Processes The RoxMap -3D (32) will ONLY work with DX and Pentium™ processors with Windows 95 and above operating systems. These processors have built in math coprocessors. The software requires a math co-processor to operate. If in doubt, your PC dealer will be able to advise you on the suitability of your processor. Operating Systems The RoxMap -3D (32) is a 32 bit program. Therefore, it is intended for use under Windows NT, which is a 32 bit operating system. It is possible that the RoxMap -3D (32) will run under this operating system in some circumstances, but no responsibility will be taken for the operation of the software under these conditions. Where the RoxMap -3D (32) is run under Windows 95, it is important to choose 16 bit operating system when installing Surfer® for Windows Networks The RoxMap -3D (32) are NOT designed for use on a network of any kind. No responsibility will be taken for the operation of the software under these conditions. Please ensure that you install the software on a stand alone PC. Software Locks (Dongles) The RoxMap -3D (32) will only operate with the appropriate licensed software key for the version of software and the charts licensed to it. It is not possible to use other users charts or any utilities that they have purchased in addition to the standard RoxMap software package. If you have been supplied with more than one software lock, both locks must be connected to the parallel port of the PC. Navigation Devices Ensure that the navigation system that is connected to the PC is outputting an NMEA0183 GLL or an NMEA0183 GGA data string. The RoxMap -3D (32) will only recognise these formats. If you are having trouble with this, contact the supplier of your navigation system. Note also that the baud rate for the outputted string must be 4800. It does not matter if additional navigation strings to the above are outputted at the same time except that it may be possible that the system will slow down whilst rejecting this unwanted data. The Earth model for the Navigation string is not altered by the RoxMap -3D (32), therefore, navigation units in RoxMap are saved in WGS-84. ISSUE 0 SSV/ENG/SPEC/076 Page 36 of 39 ROXMAP USER MANUAL RoxMap is also designed to accept the VTG string available from most GPS units. This allows the heading of the vessel to use the calculated heading from the satallite position rather than dead reckoning within RoxMap. This provides a much more stable heading vector for the vessel. To set RoxMap to read the GPS heading, a text file named HEADING.INI must be placed in the ROXMAP directory. Use a text editor such as NOTEPAD to produce a file with a single 1 character on the first line followed by a carriage return (<enter>). PC COM and Parallel Ports These are located at the back of your PC. Your PC must have 2 free COM (serial) ports and one parallel (LPT / printer) port provided that a PS/2 mouse is being used. If a serial mouse is being used then 3 free COM ports will be required. The serial ports are EITHER 9 or 25 pin male D-type sockets. Adaptors are commonly available that will convert 9 pin sockets to 25 pin sockets etc. Most PC’s are supplied with only two serial ports, one a 9 pin and one a 25 pin socket. Make sure that your supplier is aware that you may require three COM ports. Also make sure that there is no conflict between the IRQ’s of the different COM ports. The default ports for normal RoxAnn / RoxMap installations are: GPS - COM1 Mouse (serial) - COM2 RoxAnn - COM3 OR (if using a PS/2 mouse) GPS - COM1 RoxAnn - COM2 If you require to use other COM ports rather than the defaults, it is possible to change the default configuration by placing an INI file in the RoxMap directory. This is carried out as follows: • From DOS, change to the C:\ROXMAP directory. • Type EDIT COMMS.INI <enter>. • Type in the number of the COM port you wish to use for the navigation device and press <enter>. • Type in the number of the COM port you wish to use for the RoxAnn unit. • Press the ALT and F key together. • Press S (for save). ISSUE 0 SSV/ENG/SPEC/076 Page 37 of 39 ROXMAP USER MANUAL • Press the ALT and F key together. • Press X (for exit). • Run the software, the new COM ports will now be used. The Parallel port is a 25 pin female D-type connector. This is where you insert the software lock or locks. In addition a printer can then be connected. The printer should work ‘through’ the software lock/s. Monitor Set Up The RoxMap 3D (32) should be run in a resolution of at least 640x480 and 256 colours. Ultimately 1024x768 and at least 256 colours will give dramatic visual improvements. You must make sure that you have a Super Video Graphics Array (SVGA) video adapter card with a least 1Mb of memory. You monitor must also be able to support the resolution you are going to use. Trying to run a monitor at a higher resolution than it is capable of can cause irreparable damage to the monitor. If in any doubt contact your PC supplier. Working Outwith Your Charts It is not recommended that you work outwith the areas defined by your charts, however, it is possible to do so. • From DOS, change to the C:\ROXMAP directory. Type EDIT OFFSET.INI <enter>. • Type in the number DECIMAL DEGREES (positive number for East, negative for West) and press <enter> that you wish to offset the longitude. • Type in the number DECIMAL DEGREES (positive number for North, negative for South) and press <enter> that you wish to offset the latitude. • Press the ALT and F key together. • Pess S (for save). • Press the ALT and F key together. • Press X (for exit). • Run RoxMap, the incoming navigation units from the navigatiion device to the PC will now be offset accordingly. The new navigation units will be saved as THE OFFSET UNITS not the original units. ISSUE 0 SSV/ENG/SPEC/076 Page 38 of 39 ROXMAP USER MANUAL END OF DOCUMENT ISSUE 0 SSV/ENG/SPEC/076 Page 39 of 39