1
User Guide
Mobile Configurator
FELLOW CONSULTING AG
User guide for Mobile Configurator Version 1.16
Updated 10/10/2011
Content
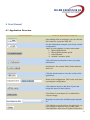
1. Introduction .......................................................................................................................................................... 2 2. Installation ............................................................................................................................................................ 2 3. Automatic Update ................................................................................................................................................ 5 4. User Manual .......................................................................................................................................................... 6 4.1.Application Overview ............................................................................................................................................... 6 4.2.Preferences & Fetch Meta data ................................................................................................................................ 8 4.3. Choose a template to configure .............................................................................................................................. 9 4.3.1. Creating new template ........................................................................................................................................ 10 4.3.2. Choosing default template .................................................................................................................................. 13 4.4. Drag and drop ........................................................................................................................................................ 15 4.4.1. Detail Layout (Fields) ........................................................................................................................................... 14 4.4.2. Detail Layout (Action buttons) ............................................................................................................................. 15 4.5. List Layout .............................................................................................................................................................. 17 4.6. Working with pages ............................................................................................................................................... 17 4.6.1. Add more pages (tabs) ......................................................................................................................................... 17 4.6.2. Rename and delete pages (tabs) ......................................................................................................................... 18 3.7. Showing Workspaces ............................................................................................................................................. 18 4.7.1. Preview workspace on iPad ................................................................................................................................. 19 4.7.2. Preview workspace on iPhone ............................................................................................................................. 20 4.7.3. Preview workspace on Android ........................................................................................................................... 21 5. Deploying the Customized Template .......................................................................................................... 22 5.1. Saving the XML File ................................................................................................................................................. 22 5.2. Loading an existing configuration XML file ............................................................................................................. 22 5.2. Uploading the XML File to OOD .............................................................................................................................. 24 6. Verify the configuration on the mobile device ........................................................................................ 27 1
1. Introduction The Mobile Configurator is a configuration tool forCRM4Mobile and CRMGadget for Android. The mobile
configurator is used to customize layouts according to your companies needs.You can create layouts per
object, define action buttons, activate or inactivate objects. The final layout can be exported to an XML file
and uploaded to Oracle CRM on Demand as client side extension. During the sync the mobile application
reads the configuration file and applies the layout to the application.
2. Installation You need to have the latest version of Adobe AIR installed on your computer in order to use the mobile
configurator. You can download Adobe AIR for your operation system from the Adobe webpage using the
following link (http://get.adobe.com/air)
To Install the Mobile Configurator follow the steps below
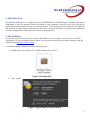
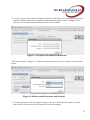
1. Double-click on the installer file “MobileConfigurator-vX.X.air
Figure 1-Installer File
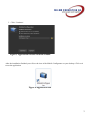
2. Click “Install”
Figure 2-Application installer window
2
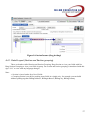
3. Click “Continue“
Figure 3-Application installer location window
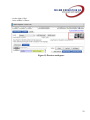
After the installation finished you will see the icon of the Mobile Configurator on your desktop. Click on it
to run the application
Figure 4-Application icon
3
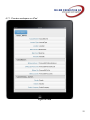
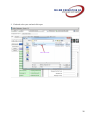
4. After launching the application the start screen shows up
Figure 5-Main screen
4
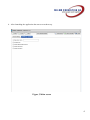
3. Automatic Update The update message alerts when there is newer version of mobile configurator is published. Users
can update their older version to newer version just one click on Download now button. After update file is
downloaded, you need to install to replace the old one. New version of mobile configurator is important for
user with new version of CRM for Mobile such as, CRM for iPhone, iPad and Android.
Figure 6-Update Alert Message 5
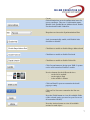
4. User Manual 4.1. Application Overview
Icons, Buttons
Icons & Button Description
After adding fields to workspace you can click the
Save button to export the XML file
Use the load button to import a previously created
configuration
There are four templates of xml in this default
1. iPhone/iPad Default
2. iPhone/iPadConsumer goods
3. Adroid Default
4. Android Consumer goods
Click on Preferences button to enter your login
information
Synchronize like custom fields, field translation,
and so on
Click the About button to view the version of the
application
Name of the configuration. This is also used when
exporting the configuration.
Click add new layout to add more objects and
design the layout on those objects
Click Delete Layout button if you Added New
Layout wrongly
Dropdown to choose the field that entity depends
on
Click Entities to see all objects. In each object, we
can configure in different ways, Enable entity,
Choosing filter, allow user to Update, Delete and
6
Create.
Global Setting has several configuration items for
user to configure. They are: Configuration name,
Disable iAds, Enable Merge Address book, Enable
Facebook and Enable Linked-In
Dropdown to choose the Synchronization filter
iAds is automatically enable, tick Disable iAds
checkbox to disable
Checkbox to enable or disable Merge address book
Checkbox to enable or disable Facebook
Checkbox to enable or disable Linked-In
Click Layout button to design your XML. Layouts
can be work on unless Entities is enable
Preview buttons for the different devices
- on the left is android
- on the right is iPad
- in the middle is iPhone
Click on Detail Layout to customize the detail
pages per entity
Click on List Layout to customize the lists per
entity
Press the Fields button to view all available fields
of the selected entity (you need to sync first to see
all customized fields!)
Press the Actions button to view all available
actions for each object
7
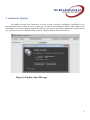
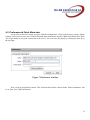
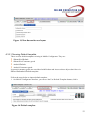
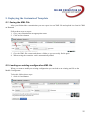
4.2. Preferences& Fetch Meta data
Set up your preferences before you start with the configuration. Click on Preferences opens a Popup
window. Here you can enter your CRM on Demand login information and the CRM on Demand URL. Press
Test Login button to test your connection to the server. You can close the popup by clicking the little X on
the top right.
Figure 7-Preferences interface
Next, click on Synchronize button. This will download all the custom fields, fields translations, and
so on from your CRM on Demand.
8
Figure 8-Fetch metadata button
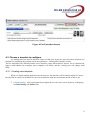
4.3. Choose a template to configure
As starting point you need to add new entity to build your layout.you also can choose between two
templates by importing the existing xml in the application – Default and Consumer Goods.
The two templates have different entities active and have some different basic layouts. As we continuously
improve and enhance the templates more templates will follow and the existing ones will change most
likely.
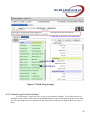
4.3.1. Creating new template
When you finish running application for the first use, the interface will be blank template.To ensure
has all fields as Oracle On demand, user need to synchronize with the environment he/she wants to use.
Global Settings - After synchronization completed, user can create a new layout by configuring
in Global Setting and Entities first.
9
Figure 9-Global settings
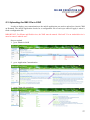
Entities have all objects with important settings to configure. Enable the objects that you want to
work on then it will appear in Layout for you to add. Layouts cannot be added if the objects are
not enabled. User cannot create, update and delete if you disable these checkboxes in entities.
10
Figure 10-Entities interface
11
Layout is a place that is used to design the layout for each object. User can drag and drop fields
into the template so that they can get the xml that matches to their business. In figure 11, the
Objects were not enable from the Entities so the screen is blank.
Figure 11-No objects are enable from Entities
This is the example. In figure 12, I enable Account and Activity so now I can new layout for these
objects.
Figure 12-Entities enable (Account and Activity)
To renew the layout click New button on upper left corner. When the New button is clicked,
there will be a message to ask for deletion of old layout template.
12
Figure 13-New button for new layout
4.3.2. Choosing Default template
There are four default templates existing in Mobile Configurator. They are:
iPhone/iPad Default
iPhone/iPad Consumer goods
Android Default
Android Consumer goods
In general consumer goods are considered with Product and Asset so these objects don’t have in
iPhone/iPad/android Default template.
Follow the steps below to import default template,
1. On Mobile Configurator interface, you can see the Use Default Template button, click it
Figure 14-Default template
13
2. Choose one of Default Templates, Default or Consumer goods
Figure 15-Default template (preview picklist)
3. Click Use this template button to import the template. After the button is clicked, the layout of
iPhone/iPad Consumer Goods will display in Layout tab. Click Layout tab to view the objects in
order to edit more fields. The default configuration will be configure automatically in Global
Setting, Entities and Layouts.
Figure 16-import template button
14
4.4. Drag and Drop
4.4.1. Detail Layout (Fields)
Drag & Drop fields from the left to the right to add them to the target layout and from the
right to the left to remove them. You can also add Sections and section grouping. To Search for a
specific field type the name of the field in Quick Search Box above the fields on the left side. To
make a field required or read only right-click on the field after adding it to your layout on the right
side and choose mandatory or read-only from the context menu.
15
Figure 17-Fields (drag & drop)
4.4.2. Detail Layout (Action buttons)
For each entity / object you have several Action buttons available. To see what actions are
available for the chosen entity click on the Actions button on the left. Drag & Drop the Action from
the left to the right top area to add them to the target layout and from the right to the left to remove
them.
16
Figure 18-Action button (drag & drop)
4.4.1. Detail Layout (Section and Section grouping)
There are headers called Section and Section Grouping. Drag Section to view your fields with list.
Drag Section Grouping to view your fields in group. For section and section grouping is introduced with this
sign “%%” to view with any language changes.
Note:
• Section is just a header for a list of fields.
• Grouping section is useful for packing some fields in a single unit - for example you can build
Address putting together BillingAddress1, BillingAddress2, BillingCity, BillingCountry
17
Figure 19-Section and Section grouping
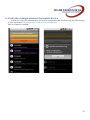
Here is the example of section and section grouping in android. In these screenshots show the differences
between section and section grouping.
18
Figure 20-Section grouping
Figure 21-Section
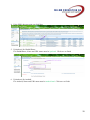
4.5. List Layout
Configuration on List Layout is very important. The records won’t view on your device if you don’t
add layout in List Layout. You can view your records in different ways. There four columns for you to drag
and drop the layout according to your demand. They are Primary text, Secondary text, Search field and Sort
field. More than one fields can be added in Primary Text, e.g. {AccountName}{AccountType}……
Figure 22-List Layout configuration
4.6. Working with Pages
4.6.1. Add more pages (tabs)
For each entity it is possible to add, rename or delete pages (tabs). The pages are limited to three so
user can add only three pages in mobile configurator. The page is generally designed for CRM Gadget for
android. Each page can be deleted and renamed. Language translation is introduced by %% sign. For
example, %KEY_INFO% will be translated when languages is changed.
19
Figure 23-Add more pages
4.6.2. Rename and delete pages (tabs)
Right click on Page to delete or rename it. To rename the page, users can use right the name
accompanied by this sign %% is they want to translate the language. Please see the screenshot for example.
Figure 24-Page (renames & deletes)
4.7. Showing Workspaces
The mobile configurator created the layout for three different devices. You can preview the layout by
clicking on the appropriate icons on the upper right side.
- On the left is android
20
- On the right is iPad
- In the middle is iPhone
Figure 25-Preview workspaces
21
4.7.1. Preview workspace on iPad
Figure 26-iPad
22
4.7.2. Preview workspace on iPhone
Figure 27-iPhone
23
4.7.3. Preview workspace on Android
Figure 25-Android
24
5. Deploying the Customized Template 5.1. Saving the XML File
After you finished the customization you can export it to an XML file and upload it to Oracle CRM
on Demand
Follow these steps to export
1. Give your customization an appropriate name
2. Click on Save button
3. Give the XML file a name and choose a folder so you can easily find it again
4. When saving the extension .xml is automatically added
5.2. Loading an existing configuration XML file
When you want to modify an existing configuration you can load to an existing xml file to the
Mobile Configurator.
To do this, follow these steps:
1. click on Load button
25
2. Find and select your xml and click open
26
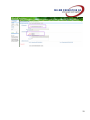
5.3. Uploading the XML File to OOD
In order to deploy your customization to the mobile application you need to upload it to Oracle CRM
on Demand. The mobile application checks for a configuration file on each sync and will apply it when it
finds a configuration file.
IMPORTANT: For iPhone and iPad devices, the XML must be named “iPad.xml”. For an Android device it
must be named “android.xml”.
Steps to upload
1. go to Admin in OOD
2. go to Application Customization
3. go to Client side extensions
27
4. If the XML does not exist yet click New
5. Upload xml for iPad& iPhone
For iPad&iPhone, Name and URL name must be ipad.xml. Click save to finish
6. Upload xml for Android
For Android, Name and URL name must be android.xml. Click save to finish
28
29
7. If the XML already exist click Edit andupload the new xml or delete it first
Edit
Delete
30
6. Verify the configuration on the mobile device In order to verify your customization you need to synchronize and check the sync log.The message
in sync log showsRead configuration “Name of xlm you deployed”
Here is example in Android:
31
Others
For any feedback please contact: [email protected]
32