Download MGC WebCommander Web Server Manager User's Guide

Transcript
MGC WebCommander
Web Server Manager
User’s Guide
Version 8.0
Copyright © 2006 Polycom, Inc.
All Rights Reserved
Catalog No. DOC2137B
Version 8.0
Proprietary and Confidential
The information contained herein is the sole intellectual property of Polycom, Inc. No distribution, reproduction or
unauthorized use of these materials is permitted without the expressed written consent of Polycom, Inc. Information
contained herein is subject to change without notice and does not represent commitment of any type on the part of
Polycom, Inc. Polycom and Accord are registered trademarks of Polycom, Inc.
Notice
While reasonable effort was made to ensure that the information in this document was complete and accurate at the time
of printing, Polycom, Inc., cannot assume responsibility for any errors. Changes and/or corrections to the information
contained in this document may be incorporated into future issues.
Table of Contents
Before You Begin . . . . . . . . . . . . . . . . . . . . . . . . . . . . . . . . . . 1-1
Overview . . . . . . . . . . . . . . . . . . . . . . . . . . . . . . . . . . . . . . . . . . . . . . . . . . 1-1
MGC Web Server Architecture . . . . . . . . . . . . . . . . . . . . . . . . . . . . . 1-1
The Network Server . . . . . . . . . . . . . . . . . . . . . . . . . . . . . . . . . . . . . . 1-2
About this User’s Guide . . . . . . . . . . . . . . . . . . . . . . . . . . . . . . . . . . . . . . 1-4
Prerequisites . . . . . . . . . . . . . . . . . . . . . . . . . . . . . . . . . . . . . . . . . . . . . . . 1-5
Conventions . . . . . . . . . . . . . . . . . . . . . . . . . . . . . . . . . . . . . . . . . . . . . . . . 1-5
MGC Web Server Manager Basics . . . . . . . . . . . . . . . . . . . . . 2-1
Starting the MGC Web Server Manager Application . . . . . . . . . . . . . . . . 2-3
The Web Server Manager Toolbar . . . . . . . . . . . . . . . . . . . . . . . . . . 2-5
Upgrading from a Previous Version . . . . . . . . . . . . . . . . . . . . . . . . . 2-6
Displaying the Database Tables . . . . . . . . . . . . . . . . . . . . . . . . . . . . . . . . 2-9
Connecting to the MGC Web Server . . . . . . . . . . . . . . . . . . . . . . . . . . . . 2-11
Connecting/Disconnecting to/from an MCU . . . . . . . . . . . . . . . . . . . . . . 2-12
Connecting to an MCU . . . . . . . . . . . . . . . . . . . . . . . . . . . . . . . . . . 2-12
MCU Statuses . . . . . . . . . . . . . . . . . . . . . . . . . . . . . . . . . . . . . . 2-13
Disconnecting from an MCU . . . . . . . . . . . . . . . . . . . . . . . . . . . . . 2-13
Setting the Communication Parameters . . . . . . . . . . . . . . . . . . . . . . . . . 2-14
Setting Defaults . . . . . . . . . . . . . . . . . . . . . . . . . . . . . . . . . . . . 3-1
Defining Conference Defaults . . . . . . . . . . . . . . . . . . . . . . . . . . . . . . . . . . 3-3
Defining Participant Defaults . . . . . . . . . . . . . . . . . . . . . . . . . . . . . . . . . 3-38
Defining MGC Manager Defaults . . . . . . . . . . . . . . . . . . . . . . . . . . . . . . 3-53
User Defined Defaults . . . . . . . . . . . . . . . . . . . . . . . . . . . . . . . . . . . 3-55
Managing the Default Sets . . . . . . . . . . . . . . . . . . . . . . . . . . . . . . . . . . . 3-59
Defining a Default Set as Global Defaults Set . . . . . . . . . . . . . . . . 3-60
Assigning a Default Set to other Users . . . . . . . . . . . . . . . . . . . . . . 3-61
Designating a Database as the Private or Global Default Database 3-62
Default Conference Templates . . . . . . . . . . . . . . . . . . . . . . . . . . . . 3-62
Options Settings . . . . . . . . . . . . . . . . . . . . . . . . . . . . . . . . . . . 4-1
Auto Cascade Settings . . . . . . . . . . . . . . . . . . . . . . . . . . . . . . . . . . . . . . . . 4-2
Auto Cascade Configuration . . . . . . . . . . . . . . . . . . . . . . . . . . . . 4-2
i
Table of Contents
Auto Cascading Mechanisms . . . . . . . . . . . . . . . . . . . . . . . . . . . 4-6
Automatic Email Language Formatting . . . . . . . . . . . . . . . . . . . . . . . . . . 4-8
Configuring the Sender’s & Meeting Organizer’s Default E-mail Addresses
.................................................................................................................4-15
Application Error Information . . . . . . . . . . . . . . . . . . . . . . . . . . . . . . . . 4-18
Administrator Email Notification Settings . . . . . . . . . . . . . . . . . . . . . . . 4-20
Administrator’s Tasks . . . . . . . . . . . . . . . . . . . . . . . . . . . . . . . 5-1
Defining an MCU . . . . . . . . . . . . . . . . . . . . . . . . . . . . . . . . . . . . . . . . . . . 5-1
Viewing the MCUs List . . . . . . . . . . . . . . . . . . . . . . . . . . . . . . . . . . 5-4
Sorting the MCUs List . . . . . . . . . . . . . . . . . . . . . . . . . . . . . . . . 5-4
Defining a New Label . . . . . . . . . . . . . . . . . . . . . . . . . . . . . . . . . . . . . . . . 5-5
Viewing the Labels List . . . . . . . . . . . . . . . . . . . . . . . . . . . . . . . . . . 5-6
Sorting the Labels List . . . . . . . . . . . . . . . . . . . . . . . . . . . . . . . . 5-6
Defining Permissions . . . . . . . . . . . . . . . . . . . . . . . . . . . . . . . . . . . . . . . . 5-7
Viewing the Permissions List . . . . . . . . . . . . . . . . . . . . . . . . . . . . . 5-18
Sorting the Permissions List . . . . . . . . . . . . . . . . . . . . . . . . . . . 5-18
Predefined Permissions . . . . . . . . . . . . . . . . . . . . . . . . . . . . . . . . . . 5-19
Defining a New User . . . . . . . . . . . . . . . . . . . . . . . . . . . . . . . . . . . . . . . . 5-24
Viewing the Users List . . . . . . . . . . . . . . . . . . . . . . . . . . . . . . . . . . 5-30
Sorting the Users List . . . . . . . . . . . . . . . . . . . . . . . . . . . . . . . . 5-30
Automatically Adding Authenticated Windows Users to the Users List
.........................................................................................................5-31
Manually Adding Windows Users to the Users List . . . . . . . . . . . . 5-32
Assigning Users to Groups . . . . . . . . . . . . . . . . . . . . . . . . . . . . . . . 5-33
Ad Hoc Conferencing and Conference Access Using WebCommander
for Authentication . . . . . . . . . . . . . . . . . . . . . . . . . . . . . . . . . . . . . . 5-36
Ad Hoc Conferencing using WebCommander Server as the External
Database Application for Conference Initiation Authentication . . .
..................................................................................................5-37
Conference Access Authentication Request using WebCommander
as the External Database Application . . . . . . . . . . . . . . . . . . . . 5-40
Conference Access - Chairperson Password Authentication Request
using WebCommander as the External Database Application . 5-42
Defining Groups . . . . . . . . . . . . . . . . . . . . . . . . . . . . . . . . . . . . . . . . . . . 5-45
Defining a New Group . . . . . . . . . . . . . . . . . . . . . . . . . . . . . . . . . . 5-46
Setting the Access Rights to the Group . . . . . . . . . . . . . . . . . . . . . . 5-48
ii
Default Group . . . . . . . . . . . . . . . . . . . . . . . . . . . . . . . . . . . . . . . . . 5-50
Defining Personal Scheduler Templates . . . . . . . . . . . . . . . . . . . . . . . . . 5-52
Refreshing the Database List . . . . . . . . . . . . . . . . . . . . . . . . . . . . . . . . . . 5-53
Refreshing the Database . . . . . . . . . . . . . . . . . . . . . . . . . . . . . . . . . . . . . 5-53
Appendix A: Using a Web Portal to Link with the
WebCommander . . . . . . . . . . . . . . . . . . . . . . . . . . . . . . . . . . . A-1
Embedding the WebCommander in the Web Portal . . . . . . . . . A-3
Creating the CustomerUser Table . . . . . . . . . . . . . . . . . . . . . . . A-3
Creating the Links from the Web Portal to the WebCommander . .
.....................................................................................................A-4
Appendix B: Monitoring a Conference in the WebCommander
using a URL or Form . . . . . . . . . . . . . . . . . . . . . . . . . . . . . . . . B-1
Optional Parameter Scenario Description . . . . . . . . . . . . . . . . . B-1
URL Format . . . . . . . . . . . . . . . . . . . . . . . . . . . . . . . . . . . . . . . B-2
iii
Table of Contents
iv
1
Before You Begin
Overview
The MGC Web Server Manager application is the user interface to the
MGC Web Server. It allows the user to communicate via the Web Server
with the MCUs. It provides database access via the Web pages and manages
the Web site that contains the reservation pages.
MGC Web Server Architecture
The MGC Web site is a location on a computer network. It contains
reservation information in the form of pages that can be accessed by users
logging into the site with browser applications such as Microsoft Internet
Explorer or Netscape Communicator.
The Internet client connects to the Web site located on the Internet server
and, via the MGC Web Server, gains access to the reservation pages, the
database tables, and the MCU that runs the conference.
Internet users
Access the
MGC WebCommander
site via Internet Browser
MGC Manager
Application
Public Database
Internet
Hosts the:
* MGC Web Server
* MGC Web Server
Manager application
* MGC WebCommander
site
Internet Server and
Database Server (optional)
MGC Manager
Application
MCUs
MGC Manager
Application
LAN
1-1
Chapter 1 - Before You Begin
The Network Server
The network server contains the following applications:
•
Database Server (SQL server or the Access application): enables
access to various database tables, such as MCU list, Users list, and
Groups
•
Internet Information Services (IIS) Server: runs the Web pages and
enables users to access these pages via the Internet and make
conference reservations
•
MGC Web Server: communicates with the IIS server, the Database
server, and the MCUs. This is the core of all the data exchange
performed in the Web site. Using the MGC Web Server Manager
application, users manage the MCUs connected to the Server, add
database accesses via the Web pages, and manage the reservation
pages.
MGC Web
Server Manager
Application
MGC
Web Server
Internet
Information
System
Database
Server
The SQL server and the IIS server can be installed on separate servers,
however it is recommended that all three server-applications be installed on
the same network computer.
1-2
MGC Web Server Manager User’s Guide
From the MGC WebCommander Server Manager the following tasks are
performed:
•
Connect/disconnect MCUs
•
Define access rights (Permissions) to the various modules of the MGC
Web Server Manager application
•
Define Groups to organize the database. Users can only access Groups
to which they are assigned. Reservation and Participant templates are
created from within a Group and can be viewed only by Users who
have access rights to that Group.
•
Define the MGC Web Server Manager Users and their access rights
•
Define the conference, participant and general system default
parameters. Users cannot modify most of these parameters if they do
not have the appropriate access rights.
This guide describes the MGC Web Server Manager features.
1-3
Chapter 1 - Before You Begin
About this User’s Guide
The MGC WebCommander Web Server Manager User Guide includes the
following topics:
•
Chapter 1 - Overview
Provides a general description of MGC WebCommander Server
Manager, its configuration and its main features.
•
Chapter 2 - MGC WebCommander Server Manager Basics
Includes information you need to get the MGC WebCommander
Server Manager application running and describes the application's
main window, menu, toolbar, displaying the database tables,
connecting to the MGC Web Server and connecting to MCUs.
•
Chapter 3 - Setting Defaults
Includes step-by-step instructions for setting up and managing default
sets for conference templates, participant templates, User Defined field
titles and various system parameters.
•
Chapter 4 - Options Settings
Information you need to configure the Optional Settings of the Web
Server Manager.
1-4
•
Chapter 5 - Administrator’s Tasks
Includes step-by-step instructions for defining new MCUs,
Permissions, Groups, Users, Labels and MGC Personal Scheduler
templates. These tasks can be performed by users with system
administrator permission only.
•
Appendix A - Using a Web Portal to Link with the
WebCommander
Three WebCommander conferencing features can be accessed from a
Web Portal via links that are available in the Web Portal
•
Appendix B - Monitoring a Conference in the WebCommander
using a URL or Form
You can open a monitoring window of a single conference in any Webbased application by adding the conference URL to that application.
MGC Web Server Manager User’s Guide
Prerequisites
This document assumes that the user has the following knowledge:
•
Familiarity with the Windows NT environment and interface
•
Basic knowledge of video conferencing concepts
Conventions
Before using the MGC WebCommander Server Manager application, it
is important to understand the terms and conventions used in this Guide.
•
The term "Double-click" is used when you need to click twice on an
entry to modify it.
•
The term "Select" or "Click" is used to highlight a part of the window,
dialog box or menu, to be changed with your next action.
•
The term "Right-click" is used when you press the right mouse button
on an entry to open a pop-up menu.
•
The term "Click OK" means that you can either click the OK button
with the mouse, or press the <Enter> key on the keyboard.
•
Keyboard keys appear in capital letters, between these two symbols
< >. For example, the Shift key appears as <Shift>.
•
The plus sign (+) between two key names indicates that you must press
and hold down one key while pressing down the second key. For
example, "press <Alt>+<P> means that you press and hold down the
Alt key while you press the P key.
•
Bold type appearing in the text, or in a procedure indicates the word or
the character that you should type into a text box from the keyboard. It
is also used to indicate the name of the menu, button or function that
you should select.
•
Italic type appearing in the text or in a procedure indicates the name of
menu, dialog box or field from which an option should be selected or
into which parameters should be entered.
•
Tips and notes appear in a different typeface:
This is an example of notes that you may encounter throughout this Guide.
1-5
Chapter 1 - Before You Begin
1-6
2
MGC Web Server Manager Basics
The MGC Web Server Manager enables users access to the database. The
database is divided into two modules:
•
Administrative tables – the configuration tables that enable the
administrator and users who have the right to modify these tables to
define MCUs, system Defaults, Labels, Permissions, Users and Groups.
In addition, the administrator can perform maintenance and
configuration tasks relating to the database itself. The configuration is
performed through the MGC Web Server Manager application.
•
User Tables – This module is divided into two segments: Participants &
Conference Templates and Master Templates. The Participants and
Conference Templates segment includes the Participant and Conference
templates that are organized in Groups. Users can only manage
templates assigned to Groups to which they have access rights. The
Groups and their access rights are defined in the MGC Web Server
Manager module. The Master Templates segment includes Master
templates that are organized in Master Template Groups (usually other
than the Participants and Conference Template Groups).
Administrative
Tables
Labels Table
Master
Templates
Table
Participants
Table
MCUs Table
Permissions
Table
Users Table
Reservations
Table
Groups Table
Database
2-1
Chapter 2 - MGC Web Server Manager Basics
Important!
When both the MGC WebCommander and the MGC Manager applications
use the same database, the administrator tables defined in the MGC Web
Server Manager will apply to the MGC Database Manager and vice versa.
Therefore, the various tables may include parameters that apply only to the
WebCommander and others that will apply only to the MGC Manager. Users
may access the database via the MGC Web Server Manager or the MGC
Database Manager and perform changes in the administrator tables. These
changes will apply to both applications.
This manual describes the various Web Server Manager tables and their
configurations.
2-2
MGC Web Server Manager User’s Guide
Starting the MGC Web Server Manager
Application
To start the MGC Web Server Manager application:
1. On the Start – Programs menu, click MGC Web Manager ver 8.0, and
then click MGC Web Server Manager.
The Database Login dialog box opens.
2.
Enter your Login Name and Password as defined in the database.
The MGC Web Server Manager is installed with the following default
login names and passwords:
Table 2-1: Default Users
User Name
Password
Permission Type
admin1
123
Administrator
oper1
123
Operator
user1
123
Moderator
2-3
Chapter 2 - MGC Web Server Manager Basics
Table 2-1: Default Users
User Name
Password
Permission Type
user2
123
Moderator (Monitoring Only)
part1
123
Participant
These users differ in the functions they are allowed to perform and the
information they can access. For a detailed description of each of the
default permission types, see Chapter 4, Permissions.
When accessing the MGC Web Server Manager application for the first
time, it is recommended to log in as an administrator, to be able to define
various defaults, permissions and new users.
3.
Click OK.
The MGC Web Server Manager window opens.
The MGC Web Server. The Web Server is
currently disconnected from MGC Web
Server Manager application
List of the
databases
registered in the
ODBC (even if
the database is
not registered in
the Web Server
Manager
Database)
Now you can add/modify entries in the various databases tables, such as
MCUs, Defaults, Groups, Permissions, Users, Master Groups and
Labels.
To connect or disconnect MCUs to/from the MGC Web Server Manager
application you must first connect to the MGC Web Server. For more
information, see “Connecting to the MGC Web Server” on page 2-11.
2-4
MGC Web Server Manager User’s Guide
The Web Server Manager Toolbar
The following buttons appear in the Web Server Manager toolbar:
Icon
Name
Description
Copy
Copies the selected record from a Web Server
Manager table to the clipboard.
Paste
Pastes an entry from the clipboard to the selected
table. This option is enabled when the table
category is selected in the Browser area.
Small
Icons
Lists each of the table entries using a small icon
and the entry name. The list is displayed
horizontally.
List
Lists each of the table entries using a small icon
and the entry name. The list is displayed
vertically.
Details
Click this button to show the details of each of the
table entries. The details are displayed in a table
format allowing you to sort the list according to a
selected column.
Help
Displays the About window indicating the version
number of the Web Server Manager application.
Up one
level
Use to move one level up in the database tree.
Refresh
Database
List
Updates the databases list used by the system
when a database was added to the ODBC list via
the Control Panel and not from within the Web
Server Manager application.
Refresh
Database
Use to view changes that were made to the
database by other users, or via the MGC
Database manager, particularly when modifying
the Groups table.
2-5
Chapter 2 - MGC Web Server Manager Basics
Upgrading from a Previous Version
When upgrading from a previous version of the MGC Web Server Manager,
the old database is saved during the installation procedure. If there are
discrepancies in the number of fields between the old and the new databases,
the system queries whether to update the existing database to the new format.
To upgrade the MGC Web Server Manager:
1. Start the MGC Web Server Manager application.
2.
Log in as described in “Starting the MGC Web Server Manager
Application” on page 2-3.
When logging in the first time after the installation, the system prompts
you whether to update the databases installed in the system.
Windows 95/98 do not support Unicode, therefore when upgrading from a
previous version, the language tables will not be upgraded. In such a case,
perform the upgrade from a computer where Windows NT/2000 is installed.
3.
Select Yes to automatically update the database (recommended), or No to
leave the database unchanged. If you select No, new entries to the
database via the MGC Web Server Manager will not be saved.
If you have selected Yes, a dialog box opens, informing you that it is
recommended to backup the database before updating them (as
precaution in case the update process fails for any reason).
4.
(Optional) Backup the database. (The backup process is described in the
MGC WebCommander Release Notes document).
5.
To continue with the update process, click Yes.
If you select No, the update process will be aborted and you will have to
restart once you are ready.
2-6
MGC Web Server Manager User’s Guide
The Update Databases dialog box is displayed, indicating which
databases require updating.
It is recommended to update all the databases you intend to use.
To cancel the update of a database, clear the check box next to that
database name.
6.
Click the Apply button to update the selected databases.
The updating process may take time, depending on the size of the
database. At the end of the process, the Update Database Results dialog
box opens, listing the fields that were updated.
2-7
Chapter 2 - MGC Web Server Manager Basics
The Update Database Results dialog box is displayed only in Windows 95/98
environment. It is not displayed when the Operating System is Windows 2000/
NT.
7.
Click OK to return to the Update Databases dialog box.
When you open the MGC Web Server Manager for the first time after an
upgrade and you have not yet updated the database, you can do it later using
the Add/Remove Connection to the ODBC from the Options menu.
8.
2-8
In the Update Database dialog box, click Close to exit the update
process.
MGC Web Server Manager User’s Guide
Displaying the Database Tables
In the MGC Web Server Manager window, click the plus [+] icon next to the
icon of the database whose tables to display.
Browser Area
Status Area
Database
Tables
These tables are displayed only when an
administrator is logged in
The database tree is displayed. The tree categories, which represent the
database tables, change according to the permission assigned to the user who
logged into the database. If the user does not have a permission to read and
write all tables, the user will only be able to view and modify the Default
tables that s/he owns. Users with full access rights to the database
(administrators) will be able to view and add new entries to all database
tables. These tables can then be used by all the database users.
The following tables are available in the database tree:
•
Defaults – Enables users to define conference, participant and general
system default parameters. In addition, you can define whether the User
Defined fields will appear in the MGC Manager and WebCommander
applications, and if yes, the titles of these fields in the MGC Manager
application. Users with permission to modify the database (Database
Configuration option is checked in the Permissions dialog box) can
define default settings to be used by all the MGC Web Server Manager
users. Users without the permission to modify the database tables can
define private default sets, for their exclusive use.
2-9
Chapter 2 - MGC Web Server Manager Basics
2-10
•
Labels – Used to define labels. The labels may be assigned to
conferences and participants, mainly for sorting purposes. Only users
with the permission to configure the database may manage the Labels
table.
•
MCUs – Enables the definition of MCUs that handle the multipoint
video conferencing. Only users with the permission to configure the
database may manage the MCUs list.
•
Permissions – Used to define the access rights to various modules of the
MGC WebCommander and the MGC Web Server Manager applications
and perform various tasks. Only users with the permission to configure
the database may define or modify Permissions.
•
Users – Enables the definition of the MGC WebCommander and the
MGC Web Server Manager users. Each user is assigned the appropriate
permissions, which defines his/her access rights to the system functions.
The User definition is also used for Ad Hoc conferencing when the
WebCommander is used as the external database for conference creation
and conference access authentication. In addition it enables you to assign
access rights to the various groups defined in the Groups table. Only
users with the permission to configure the database may manage the
Users table.
•
Groups – Enables the definition of groups to which users are assigned.
The conference templates and participant templates are also assigned to a
Group and can be viewed, modified, deleted or used to start a conference
only by users who have access rights to that Group. The Groups enhance
the system security, giving the user access only to data that s/he is
allowed to view.
•
Personal Scheduler Templates - Enables the definition of Personal
Scheduler Reservation Templates which are used by users of the MGC
Personal Scheduler application. The MGC Personal Scheduler
application is a plug-in to Microsoft Outlook, enabling users to schedule,
via Microsoft Outlook, conferences on the MCU in the same manner as
scheduling regular meetings.
MGC Web Server Manager User’s Guide
Connecting to the MGC Web Server
The MGC Web Server Manager application is the link between the MCUs
and the MGC Web Server. Therefore, the MGC Web Server Manager
application must first connect to the MGC Web Server before the connection
to the MCU may be initiated.
To connect to the Web Server:
1. In the Browser area, right-click the Server icon, and then click Connect
Server.
When the MGC Web Server is connected to the MGC Web Server
Manager application, the X is removed from the Server icon and a
blinking green LED indicates that the server is active.
2-11
Chapter 2 - MGC Web Server Manager Basics
Connecting/Disconnecting to/from an MCU
Once the MCUs are defined in the database, you can connect to an MCU.
This step is mandatory in order to run conferences, and it can be performed
only after the MGC Web Server Manager is connected to the MGC Web
Server. If all MCUs or the MGC Web Server are disconnected, remote users
cannot run conferences via the Web. For more details on how to define a new
MCU, see Chapter 4, “Defining an MCU” on page 4-1.
Connecting to an MCU
To connect to an MCU:
1. In the Browser area, click the Server icon to display the list of MCUs
currently defined in the MGC Web Server Manager application.
The MCUs list contains all the MCUs currently defined in all the
databases set in the Web Server Manager application. If the same MCU
is defined in two databases, it will appear twice in the MCUs list.
2.
In the Status area, right-click the MCU icon and then click Connect.
The system connects to the selected MCU. The MCU status that appears
in the Status area changes first to Connecting, during the connection
procedure and then to Normal at the end of the connection procedure.
2-12
MGC Web Server Manager User’s Guide
MCU Statuses
The possible MCU statuses are described in the following table:
Table 2-2: MCU Status Options
Status
Description
Connecting
Connection in progress.
Normal
The connection is OK and the MCU is in the Normal state.
Start-up
The connection is OK and the MCU is starting up.
Resetting
The MCU is resetting.
Low Memory
The system has used up all its memory resource. In such
a case, disconnect all running conferences and reset the
MCU.
Bad Connection
The connection between the MGC Manager and the MCU
is lost due to LAN problems.
Major
A major error occurred, such as a card was removed from
the MCU. Consult the system administrator.
Minor
A minor error occurred. Consult the system administrator.
Disconnecting from an MCU
To disconnect from an MCU:
1. In the Browser area, click the Server icon to display the list of MCUs
currently defined in the MGC Web Server Manager application.
2.
Right-click the MCU icon and then click Disconnect.
The system disconnects the selected MCU and the MCU status that
appears in the Status area changes to Disconnected.
2-13
Chapter 2 - MGC Web Server Manager Basics
Setting the Communication Parameters
Sometimes there may be a communication problem between the Web Server
and the MCUs. One of the options to overcome this problem may be to
change the communication parameters between the MCUs and the Web
Server. Use discretion and consult your support engineer before modifying
these parameters.
To modify the Communication parameters:
1. On the Options menu, click Communication.
The Communication dialog box opens.
2-14
MGC Web Server Manager User’s Guide
2.
Define the following parameters:
Table 2-3: Communication Parameters
3.
Field
Description
Message Timeout
If no message is received from the MCU for the time
period specified in this field, an error is triggered.
Default value is 25 seconds. A higher value should
be entered when the connection is slow or all the
slots in the MCU are occupied. In these cases, the
recommended value is 120 seconds.
Refresh
The frequency at which the MCU information in the
MGC Manager screen is updated. The refresh rate
is half of the seconds entered here. The default
value is 2, which means that the information is
refreshed every second (2/2=1).
Max Replies Miss
The number of messages that are sent and not
received before a connection problem is triggered
and the system considers the connection as lost.
Connection
Retries
The number of times the Web Server attempts to
establish a connection with an MCU following a
disconnection, or connection loss. Minimum value
should be 1.
Connection
Timeout
The number of seconds the MGC Manager will wait
after each connection attempt for connection
confirmation. Default value is 5. If the connection is
slow, the recommended value is 25.
Click OK.
2-15
Chapter 2 - MGC Web Server Manager Basics
2-16
3
Setting Defaults
The MGC Web Server Manager application and MGC Manager – Database
Manager application enable users to customize their system to their needs
by defining default values for reservations, participants and general system
parameters. The default sets may be stored in a centralized database or in a
local database.
When the WebCommander user defines a new conference (reservation, On
Going or a template) or a new participant, each parameters displays the
default value taken from the active Defaults set. It minimizes the need to
define all the parameters and it allows users to modify specific parameters,
as needed.
Default sets may be defined for the following categories:
•
Conference Defaults – A list of all the conference parameters.
•
Participant Defaults – A list of all the participant parameters.
•
MGC Manager Defaults – General system parameters that apply only
to the MGC Manager. These parameters can also be defined in the
MGC Web Server if the same database is used by both applications.
•
User Defined Fields – These parameters are used to define whether to
show the User Defined fields in the conference and participant
properties and the titles of these fields to be loaded in the MGC
Manager application.
The MGC Web Server Manager includes five default templates which are
stored in the Default Group. These templates are in addition to the
Reservation Defaults and enables end users to further automate the
conference scheduling process. For more details, see Chapter 4, “Default
Group” on page 4-55.
3-1
Chapter 3 - Setting Defaults
To display the defaults categories:
1. Once you are logged into the MGC Web Server Manager, click the plus
[+] icon to expand the database tree.
2.
3-2
Click the plus [+] icon next to the Defaults icon to display the Defaults
categories.
MGC Web Server Manager User’s Guide
Defining Conference Defaults
The Conference Defaults are used to define the default values of new
conference templates created via the WebCommander application.
To define the Conference Defaults:
1. Right-click the Conference Defaults icon, and then click Add New
Conference Default.
The Conference Properties – Settings1 dialog box opens.
2.
In the Res Name box, enter the name of the Reservation Defaults set
being created.
3-3
Chapter 3 - Setting Defaults
3.
Define the following fields:
Table 3-1: Reservation Defaults - Settings1 Parameters
3-4
Option
Description
Conf. Entry
Password
Enter a numeric password that will be used by the
conference participants to connect to the
conference.
It is recommended to leave this field blank to let
the WebCommander user to enter the password,
or MCU to automatically allocate a numeric
password.
Web/Chairperson
Password
Enter a numeric password that will be used by the
meeting organizer/chairperson to connect to the
conference (special privileges may be available to
the conference chairperson). The same password
is also used to view the conference properties
using the Web browser, once the conference is
started (in the Meeting Director module).
It is recommended to leave this field blank to let
the WebCommander user to enter the password,
or MCU to automatically allocate a numeric
password.
Numeric ID
A Numeric ID is a unique number assigned to a
conference identifying it to the system. It can be
used by the participants to be routed and to access
the conference.
It is recommended to leave this field blank, to let
either the WebCommander user or the MCU
assign one, otherwise, all conferences and Entry
Queues will the same default number, resulting in
error messages. If you assign a number, the MCU
cannot automatically assign one instead.
Billing
The conference billing code as assigned to the
conference by your reservation system or
allocated to the conference chairperson or contact
person.
It is recommended to leave this field blank, to allow
the WebCommander user enter a unique billing
code during the conference initiation.
MGC Web Server Manager User’s Guide
Table 3-1: Reservation Defaults - Settings1 Parameters
Option
Description
Remarks
Using up to 300 characters, you may enter any
text regarding the conference. This text will be
included with the conference properties and is also
saved to the CDR file as part of the conference
record to be retrieved later.
Media
Select whether the default conference is an Audio
only conference using the VoicePlus features or an
Video, Audio conference that may include both
audio only and video participants.
The selection of the media affects the availability
of options during the conference template
definition.
If Audio Look and Feel is configured in the Web
Configuration function, the Media is automatically
set to Audio.
Network
Select whether the participants in the conference
use IP only or may different networks. When
selecting IP only, the Software CP option is
enabled in the Video Session box.
User Defined 1-3
The three User Defined fields enable you to enter
general information for the conference, such as
the company name, the contact person name, the
contact person’s E-mail or telephone number, or
any required information.
The titles of the User Defined fields can be
modified in the Database Manager -> Defaults ->
User Defined Defaults and loaded to the MGC
Manager application.
When starting a conference from the New Meeting
window you cannot define these fields (unless they
were defined in the template used to start the new
conference), however can define this information
during the On Going conference.
Notes:
• The User Defined fields are displayed only if
the Show User Defined Fields in Conference
Parameters box is selected in the Server
Manager -> Defaults ->User Defined Defaults.
3-5
Chapter 3 - Setting Defaults
Table 3-1: Reservation Defaults - Settings1 Parameters
3-6
Option
Description
User Defined 1-3
(con’t)
•
Line Rate
Specify the transfer rate in Kbps.
In a Video Switching conference, you must select
the highest transfer rate common to all
participants. For example, if two participants can
connect at a transfer rate of 384 Kbps and one
participant can connect at a transfer rate of 128
Kbps, set the Line Rate to 2B or 128 Kbps (2B in
Bonding mode). In a conference with participants
from mixed networks (ISDN and H.323), the line
rate defined for the ISDN participant is the line rate
that will be used for the H.323 participant. The line
rate currently supported for H.323 is E1. In high
rates, the capacity of the H.323 Network card
changes. For more details, see the MGC
Hardware and Installation Guide, Chapter 4.
In Transcoding and Continuous Presence
conferences, the line rate is defined for each of the
participants separately. The conference line rate
apply only to those participants whose Line Rate
was set to Auto. In such a case, set the conference
line rate to the highest transfer rate possible by the
endpoints connecting in Auto mode. Maximum
transfer rate in Transcoding and Continuous
Presence modes is 1920 Kbps (E1). In Software
Continuous Presence (SWCP) the Line Rate is set
for conferences and represents the transmission
rate from the MCU to the endpoint (combined
video rate and audio rate). For more details
regarding the Line Rate settings for Software CP
conferences, see MGC Manager User’s Guide
Volume II, Chapter 1.
If you have modified the titles of the User
Defined fields the new titles cannot be
displayed in the WebCommander application/
You can manually modify these titles in the
appropriate table (language) in the Access or
SQL database application.
MGC Web Server Manager User’s Guide
Table 3-1: Reservation Defaults - Settings1 Parameters
Option
Description
Line Rate (con’t)
Note: The high line rate transmission is enabled
with the standard video card (version 1.43 and up)
or with the Video+ card. The line rate of incoming
ISDN/H.323 calls can be automatically detected
and the participant can be connected according to
his/her capabilities, without prior setting of the
endpoint’s line rate during conference setup. In
such a case, the conference Line Rate is the
maximum rate for the participant connection. For
more details, see MGC Manager User’s Guide
Volume II, Chapter 1.
Audio Alg
Select the preferred audio algorithm. The available
audio algorithms are: 8 (G.729/G.723.1), 16
(G.728/Siren7), 24 (Siren14/G.722.1/Siren7), 32
(Siren14/G.722.1/Siren7), 48 (Siren14/G.722/
G.711), 56 (G.722/G.711), or 56 (G.711).
Siren 7 and Siren14 are Polycom proprietary audio
algorithms. Siren14 can be used only if the MCU is
configured to Wideband.
To support Siren14, The system must include:
• The appropriate Polycom settings to support
Siren14.
•
An Audio+ card must be installed in the MCU.
If the conference is set to Siren14 and the
endpoints cannot connect in Siren14, G.722.1 is
used instead.
The option 8 (G.729/G.723.1) is available only in IP
Only (VOIP and video) conferences.
In Video Switching conferences, all of the
participants must use the same audio algorithm.
Participants with endpoints that do not support the
algorithm selected for the conference are
connected as Secondary (Audio only). If the
conference line rate is set to 2B or 128 Kbps, to
achieve the best audio and video quality select the
appropriate audio algorithm for all the participants
in the following order: G.728, G.722, G.711.
3-7
Chapter 3 - Setting Defaults
Table 3-1: Reservation Defaults - Settings1 Parameters
3-8
Option
Description
Audio Alg (con’t)
When Siren7 (16, 24 or 32 bit) is available, select
the audio algorithm in the following order: Siren 7
(16), G.728, G.722, G.711, Siren7 16 bit and G.728
algorithms are interchangeable, and a participant
using either one will be fully connected when one
of them is selected as the audio algorithm.
If the conference line rate is higher than 128 Kbps,
to achieve the best audio and video quality, select
the audio algorithm in the following order: G.722.1
(32), G.722.1 (24), G.722 / G711.
In Transcoding or Continuous Presence
conferences, you can set the audio algorithm to
any of the available audio algorithms as in a Video
Switching conference.
In Transcoding or Continuous Presence
conferences, you can set the audio algorithm to
any of the available audio algorithms as in a Video
Switching conference. If set to "Auto", the system
will try to connect the participants using the best
possible audio algorithm selecting it in the order
described for Video Switching conferences.
In Audio Only conferences, the default algorithm is
G.711 (56).
In a VOIP (Audio Only, IP Only) conference, you
can choose between the default G.711 (56) and
the G.729/G.723.1 (8) audio algorithm.
VTX1000
The VTX 1000 is a high quality, Wide Band PSTN
conference phone that can be used with the
Polycom MCU. During endpoint capabilities
exchanges a modem is used and the G.722.2
algorithm implemented. the VTX 1000 users are
allocated resources during the conference.
Select the checkbox when using VTX1000
endpoints.
Note: The system.cfg flag, VTX1000=YES and the
Entry Queue must be enabled in the MGC
Manager.
MGC Web Server Manager User’s Guide
Table 3-1: Reservation Defaults - Settings1 Parameters
Option
Description
Restricted
Select this option if all the participants are using
Restricted lines whose Line Rate for each channel
is 56 Kbps instead of 64 Kbps.
If not all the participant use restricted lines, the
Restrict option should be selected only in the
participant settings.
SilenceIT
Select the Silence IT check box to enable this
feature. When a noisy line is detected and an
Audio participant is muted, a message is played,
informing the other participants that one of them
was muted due to the noisy line. Silence IT must
be enabled in the IVR Service to be enabled for
new conferences. If Silence IT is not enabled in
the IVR the conference definition is rejected.
Conference On
Port
Select the Conference On Port setting, when you
want conferences to use a single video port on the
MCU. It enables the selection of a video layout for
the conference, but all the conference participants
see the same layout and the same participants,
that is, also the speaker can see himself/herself.
Personal layout selection is not available in this
mode and the video quality is determined by the
highest common video parameters and video line
rate.
The following modes are not available for
conferences set to Conference On Port.
• Lecture Mode
•
•
Personal Layout
Cascading
For more information, see MGC WebCommander
User’s Guide, Chapter 7.
3-9
Chapter 3 - Setting Defaults
Table 3-1: Reservation Defaults - Settings1 Parameters
Option
Description
T.120 Rate
Select the desired T.120 data transfer rate. The
lower the rate the slower the transfer rate and the
response time.
The same T.120 rate must be set for all the
conference participants. The highest rate common
to all participants should be selected.
Select None to disable the T.120 mode.
If the conference Line Rate is set to 2B, the
following T.120 rates are available for selection:
• MLP - 6.4k
•
•
•
•
•
•
•
•
•
•
•
MLP - 14.4k
•
HMLP - 128k
MLP - 16k
MLP - 22.4k
MLP - 24k
MLP - 30.4k
MLP - 32k
MLP - 38.4k
MLP - 40k
MLP - 46.4k
MLP - 14.4k
MLP - 62.4k
Note:
Selecting a higher T.120 rate when the conference
Line Rate is 2B or 128 Kbps, results in a loss of
video quality.
If the conference is set to a higher Line Rate, the
following T.120 rates are available:
• HMLP - 64k
FECC/LSD Rate
3-10
Using certain video cameras and their
accompanying software, a participant may control
a far-end camera. This field is used to define the
LSD mode.
MGC Web Server Manager User’s Guide
Table 3-1: Reservation Defaults - Settings1 Parameters
Option
Description
Video Session
Select the appropriate Video Session:
Video Switching - To set a conference in which all
the participants use the same video and audio
formats, by setting the communication parameters
to the common capabilities. Whenever a
participant starts to speak, he/she appears on all
screens as the conference is a voice activated
video switching conference. All participants view
the participant who is the speaker. Up to 16 or 30
participants (if at least one Audio Bridge is set to 1/
30) can take part in a Video Switching conference
using the standard Audio card. Up to 100
participants at 128Kbps can take part in a
conference running on the Audio+ card.
Transcoding - To set a conference in which
participants use different video, audio and data
formats, maintaining the highest video and audio
capability each participant can achieve with his/her
codec. Like Video Switching, the current speaker
is displayed on all terminals.
3-11
Chapter 3 - Setting Defaults
Table 3-1: Reservation Defaults - Settings1 Parameters
Option
Description
Video Session
(con’t)
Continuous Presence (CP) - A Continuous
Presence conference is a conference in which
several participants can be viewed simultaneously.
Each participant uses their own endpoint’s
capabilities, thus maintaining the highest video,
audio and data capability that can be achieved. If
the number of participants is less than or equal to
the number of participants displayed, each
participant can see all of the other participants.
When selecting Continuous Presence the
following layout options are available:
• Classic
•
•
Quad Views
Software
Classic - Classic Continuous Presence used the
standard Video card. 21 video layouts are
available in this mode.
Quad Views - The Quad Views mode requires the
Video+ card. It includes layouts for large video
conferences. This mode should be selected when
the conference includes 10 par tic pants or more.
Software - Software Continuous Presence is
implemented in IP networks only and is a software
solution that resembles the Continuous Presence
feature in terms of functionality, without using
video card resources. Software CP combines four
incoming QCIF streams with fixed video bitrate
from four different participants into one outgoing
CIF stream. In Software CP conferences only two
types of Video Layout formats are available: 2x1
and 2x2. If the conference includes less than 5
participants, one of the participant's layout
windows is grayed out.
For more details, see MGC Manager User’s Guide
Volume II, Chapter 1.
3-12
MGC Web Server Manager User’s Guide
Table 3-1: Reservation Defaults - Settings1 Parameters
Option
Description
Pro-Motion
Pro-Motion is enabled only in the Video Switching
mode.
Pro-Motion is a video encoding mechanism that
improves the video quality in Video Switching
conferences, set to NTSC or PAL (4CIF)
resolution. Select either 50 Fields (PAL) or 60
Fields (NTSC).
Pro-Motion is sent to the endpoint at 60 Fields Per
Second (FPS) for NTSC and 50 FPS for PAL
systems. The interlaced video mechanism takes
two separate video frames and merges them into a
single frame.
Note:
When a conference is set to any Pro-Motion
option, endpoints sending a Pro-Motion video
resolution (for example, NTSC instead of PAL or
vice-versa) or that do not send a Pro-Motion
resolution, connect as Secondary (Audio Only).
3-13
Chapter 3 - Setting Defaults
Table 3-1: Reservation Defaults - Settings1 Parameters
3-14
Option
Description
Dual Stream Mode
In this mode, one of the endpoints sends two video
streams: Video and data. The video streams are
handled differently by the receiving endpoint. The
different streams may be shown on separate
screens.
Select one of the following options:
None - The Dual Video mode is unavailable. In
such a case Video Protocol is set to Auto.
H.239 and People+Content - H.239 and
People+Content are very similar in function, but
differ in the type of signaling used for each
protocol. People+Content is the Polycom
proprietary protocol while H.239 is the industry
standard. When an endpoint can support both
H.239 and People+Content protocols, H.239 is
selected as the preferred communications
protocol.
In the Reservation Template Settings - Dual
Stream mode drop down box, three H.239
People+Content (H.239/P+C) Video streaming
formats are available:
Graphics - for standard graphics
Hi-res Graphics - for high quality display or highly
detailed graphics
Live Video - for video clips or live video display
128 Kbps is the minimum Line Rate setting for a
H.239/People+Content conference. When the
Content channel opens, the required bit rate is
taken from the video channel bit rate, and may
affect the quality of the transmitted video quality.
The bit rate allocated to the Content channel
depends on the conference type and the
conference line rate, where the minimum is
64 Kbps, and increases in multiple of 64 Kbps. The
bite rate allocation is dynamic and when the
Content channel closes, the video bit rate is
restored to its maximum.
People+Content in a Cascading conference is
enabled only for Video Switching IP Only
conferences, in a Star Cascaded topology.
MGC Web Server Manager User’s Guide
Table 3-1: Reservation Defaults - Settings1 Parameters
Option
Description
Dual Stream Mode
(con’t)
H.239 and People+Content supports the following
features:
• Entry Queues
•
•
•
•
•
Highest Common Phase 2
H.264
4CIF
Encryption
FECC (H.320 and H.323)
Limitations
• In Continuous Presence conferences Software and Quad View modes are disabled
•
H.239 is not supported in:
•
•
•
•
•
•
ISDN (H.320) calls
H.320 Cascading conferences
MIH Cascading conferences
Simple cascading conferences
T.120 conferences
Double Gateway configurations
Using this feature the People video stream and the
Content video stream are treated differently by the
endpoints. For more information, see
WebCommander User Guide Chapter 7, “Dual
Stream Modes” on page 7-30.
People and Content V0 - Polycom proprietary
technology that works mainly with PictureTel
endpoints. Content, Annex N, Annex P and Annex
F are automatically checked by default.
DuoVideo - Dual Stream mode available with
Tandberg endpoints in which one conference is set
as the video conference and the other as the
presentation conference. Select this option to
define the presentation conference.
Polycom Visual Concert PC/FX - Available with
Polycom Viewstation or Viewstation FX endpoints.
Select this option to enable the Visual Concert
option for the conference. Annexes can be
selected.
3-15
Chapter 3 - Setting Defaults
Table 3-1: Reservation Defaults - Settings1 Parameters
3-16
Option
Description
Video Format
CIF and QCIF are video formats used in video
conferencing systems. Video Format specifies the
data rate (in number of frames per second) and
the resolution of each frame (number of lines in a
frame and the number of pixels in each line).
Video Format is enabled only in Video Switching
mode and when the Video Protocol is set to H.261
or H.263.
CIF (Common Intermediate Format) - Each frame
contains 288 lines and 352 pixels per line. The
data rate is up to 30 frames per second (FPS)
QCIF (Quarter Common Intermediate Format) Each frame contains 144 lines and 176 pixels per
line (it is one-fourth the resolution of CIF).
This field is disabled if the Video Protocol field is
set to Auto.
• Using the H.261 protocol, you can select Auto,
QCIF, or CIF.
Select Auto to allow the system to select the
video format for the conference according to
the participants' capabilities and enable the
dynamic adjustment of the highest common
video resolution. In such a case, the system
will connect all the participants in CIF format.
MGC Web Server Manager User’s Guide
Table 3-1: Reservation Defaults - Settings1 Parameters
Option
Description
Video Format
(con’t)
If one of the participants' endpoints does not
support CIF, the conference video format will
change to QCIF for all the participants.
•
Using the H.263 protocol, you can select one
of the following options: Auto, QCIF, CIF, 4CIF,
16CIF, VGA, SVGA, XGA and NTSC.
4CIF - High Quality 4CIF video resolution available
in Continuous Presence conferences running at
512 Kbps or higher line rates. In this mode, the
endpoints transmit CIF (or QCIF) and receive 4CIF
images from the MCU. In full screen layout (1x1),
endpoints that can send 4CIF images will also
receive and view 4CIF images from the MCU.
In 4CIF CP conferences, you can select the
Quality of the screen display depending on the
video transmission:
Sharpness - Optimized for details. The video
picture does not change frequently, but it includes
details that you want to display in higher
resolution. For example, when displaying still
images, presentations, or capturing people.
Motion - Optimized for motion. The video pictures
change frequently and display movement, for
example, a sporting event where the camera is
moved around, people moving around, etc.
NTSC (National Television Standards Committee)
- Each frame contains 525 lines and up to 16
million colors.
VGA (Variable Graphics Array) - 640 x 480
resolution
SVGA (Super Variable Graphics Array) - 800 x 600
pixel resolution
XGA (eXtended Graphics Array) - 1024 x 768 pixel
resolution
VGA, SVGA, XGA and NTSC options are
important for displaying content when selecting the
People and Content mode. Typically the People
resolution is CIF with a frame rate of up to 30
frames per second, while the Content resolution is
VGA, SVGA, XGA or NTSC.
3-17
Chapter 3 - Setting Defaults
Table 3-1: Reservation Defaults - Settings1 Parameters
3-18
Option
Description
Frame Rate
The Frame Rate is enabled only in Video
Switching mode and the Video Protocol is set to
H.261 or H.263. If you have selected QCIF, CIF,
4CIF, 16CIF, VGA, SVGA, XGA, or NTSC, select
the number of frames per second rate to define the
quality of the video transmission. 7.5 indicates a
video quality of lower than 30 frames per second.
Select Auto to enable the dynamic adjustment of
the conference frame rate to the highest common
rate.
This field is disabled if the Video Format field is set
to Auto.
Video Protocol
The Video Protocol, Video Format and QCIF
Frame Rate are parameters that determine the
highest common video used by all the conference
participants. The Video Protocol determines the
video compression standard used by the
endpoints.
Auto - Select this option to let the system
automatically select the appropriate compression
method and enable the dynamic adjustment of the
highest common video algorithm. In such a case,
when a participant leaves the conference, the
MCU adjusts the common video to the highest
level for the remaining connected participants.
This setting overrides the Video Protocol settings
in the Participants Properties - Advanced dialog
box as the dynamic mode settings are forced by
the MCU.
H261 - The video compression standard
mandatory to all endpoints.
H263 - A compression standard that provides
improved video quality at a line rate lower than 384
Kbps. This standard is not supported by all
endpoints. If H.263 is selected in Video Switching
conferences, all participants must be connected
using this protocol. Participants whose endpoint
does not support H.263 are connected as
Secondary.
MGC Web Server Manager User’s Guide
Table 3-1: Reservation Defaults - Settings1 Parameters
Option
Description
Video Protocol
(con’t)
H264* - H.264* incorporates DCT (H.263)
compression principles, but is provided at half the
bit rate. H.264* provides CIF/4CIF video using low
bit rates and implements a fixed video rate when
the video stream of the endpoint becomes active
("people"). The endpoint that supports H.264* is
iPower.
H264 - The H.264 standard provides better
compression of video images in lower line rate
connections and is part of the Highest Common
mechanism in Video Switching conferences.
When the conference line rate is up to 384 Kbps,
and the Video Protocol is set to Auto (in both VSW
and CP conferences) the system tries to connect
the participant using H.264 video protocol first.
Only if the endpoint does not support H.264, the
system tries to connect the participant using H.263
or H.261.
When H.264 is selected, the Video Format is
disabled and set to Auto.
Notes:
• When selecting the H.261 or H.263, the system
regards it as a fixed format and disables the
dynamic adjustment of the highest common
video.
•
The dynamic adjustment of the video protocol
applies only to H.320 (ISDN) participants.
The dynamic adjustment of the video protocol
supports only 30 frames per second in CIF format.
All other H.263 capabilities are disabled.
3-19
Chapter 3 - Setting Defaults
Table 3-1: Reservation Defaults - Settings1 Parameters
3-20
Option
Description
Annexes
Annexes are additions to the Video Format when
using H.263 Video Protocol, increasing the quality
of the video display.
Annexes N, P and F are enabled only when you
are in Video Switching mode and the Video
Protocol is set to H.263. The Video Format may be
set to QCIF, CIF, 4CIF, 16CIF, VGA, SVGA, XGA,
or NTSC.
When Video Format is set to Auto, the system
selects the appropriate annexes according to the
endpoint's capabilities. The annexes are required
in the Dual Stream mode, but may also be
selected independently.
• Annex F - Advanced Prediction Mode. This
annex enables the transmitting encoder to use
four motion vectors for every macro block (one
motion vector per block). A macro block is a
piece of the picture that contains four blocks.
Without this annex, the transmitting encoder
can only choose one motion vector for optimal
prediction of the macro block.
•
Annex N - Reference Picture Selection Mode.
This annex enables the conference to recover
efficiently after transmission errors have
occurred in the macro blocks, and reported via
a relevant message to the speaker encoder.
•
Annex P - Reference Picture Re-sampling.
This annex enables the transmitting encoder to
apply a re-sampling process to the previous
decoded reference picture in order to generate
a warped picture, for use in predicting the
current picture. The main purpose of this annex
is to support the relationship of the current
picture to a previous picture, which had a
different source format, such as CIF, QCIF,
4CIF, etc.
MGC Web Server Manager User’s Guide
Table 3-1: Reservation Defaults - Settings1 Parameters
Option
Description
Chair Control
Chair Control is an option that enables an endpoint
to control the conference and other conference
participants. This option is used to enable the
Chair Control. This option is enabled when the
Cascade field is set to None.
Cascade
Cascade is an option that enables you to run a
conference that is connected directly to other
conferences (these conferences are not
connected directly to each other). The conferences
may run on different MCU’s or on the same MCU
(for large conferences that exceed the maximum
number of participants per conference). This
option is used to enable and select the cascading
mode.
Master Name
When setting a Slave conference, the Cascading
option should be set to Slave, and the name of the
participant that acts as the link to the Master
conference is selected from the Master drop-down
list.
3-21
Chapter 3 - Setting Defaults
Table 3-1: Reservation Defaults - Settings1 Parameters
3-22
Option
Description
Roll Call
Roll Call is a feature of the IVR Message Service
used to record the participants name and play it
back when entering and leaving a conference.
The chairperson can request the system to play
the names of all connected conference
participants at the beginning of the conference, or
at any time during the conference.
This option may be enabled only when the Roll
Call option is enabled in the IVR Service assigned
to the conference. When enabled for the
conference, the participant records his/her name
upon connection to the conference and the
chairperson may request a roll call in which the
recorded names of all conference participants are
played back to the conference.
If Entry Tone and Exit Tone are enabled for the
conference, participant name is played when the
participant enters or leaves the conference.
If Roll Call option is disabled for the conference but
enabled in the assigned IVR Service, the
participant name is recorded as the Roll Call may
be enabled during the on going conference, but roll
call cannot be requested.
Entry Tone
Select this option to enable the Entry Tone, which
is played when a participant (audio or video)
connects to the conference. This tone is heard by
all the participants currently connected to the
conference (but not by the connecting participant).
The tone is embedded in the MCU software.
Note: If Roll Call is enabled for the conference, the
Entry Tone is replaced by a playback of the
recorded participant name.
MGC Web Server Manager User’s Guide
Table 3-1: Reservation Defaults - Settings1 Parameters
Option
Description
End Time Tone
n Min
Select this option to enable the End of Conference
reminder tone to be played once, to all the
connected participants, n minutes before the end
of the conference. This tone is different from other
tones. The tone is embedded in the MCU's
software.
Note: If the automatic extension of the conference
is enabled for the MCU in the “confer.cfg” file,
selecting this option also enables the automatic
extension of the conference duration for this
conference. For more details see the MGC
Administrator’s Guide, Chapter 5.
Exit Tone
Select this option to enable the Exit Tone, which is
heard by all the connected participants when a
participant leaves the conference. This tone is
different from other tones. It is embedded in the
MCU's software.
Note: If Roll Call is enabled for the conference, the
Entry Tone is replaced by a playback of the
recorded participant name.
3-23
Chapter 3 - Setting Defaults
4.
Click the Settings2 tab to display additional parameters.
The Attended and AV Msg Name fields change to IVR and IVR Msg
Name if Audio is selected as the Media in the Settings1 tab.
5.
Define the following parameters:
Table 3-2: Reservation Defaults - Settings2 Parameters
3-24
Option
Description
Attended
Select one of the following options:
None - No Attended services are used during the
audio only conference.
MGC Web Server Manager User’s Guide
Table 3-2: Reservation Defaults - Settings2 Parameters
Option
Description
Attended (cont.)
Welcome (No Wait) - Select this option for a
Greet & Guide conference in which the participant
is greeted by an audio message and after a predefined period, and automatically connects to the
appropriate conference.
Attended (Wait) - Select this option for a attended
conference in which a participant is greeted by an
audio message, and then is assisted by the
operator who connects him/her to the appropriate
conference.
IVR - The IVR Service enables control over the
conference from the participant or chairperson
endpoint using touch-tone codes (DTMF).
Select this option to assign an IVR Service to the
conference. This option can only be selected if an
Audio+ card is installed on the MCU.
If the IVR Service check box is cleared and the
Entry Queue Access check box (in the General
tab) is checked, the participant connects to the
conference directly from the Entry Queue.
If both the IVR check box and the Entry Queue
Access check box (General Tab) are cleared, dialin participants can only connect to the conference
once dialing the conference dial-in number (Meet
Me conference) or if they are defined prior to the
conference start. When you enable the IVR field
the following parameter check boxes become
available:
• Start Conf. Requires Chairperson
•
•
•
Terminate After Chairperson Exits
Enable Invite
Roll Call
3-25
Chapter 3 - Setting Defaults
Table 3-2: Reservation Defaults - Settings2 Parameters
3-26
Option
Description
AV Message
Name
If you have selected the IVR Service in the
Attended field, type the name of the IVR Service.
If left blank, the system uses the default IVR
Service.
If you have selected a Welcome (No Wait) or
Attended conference, type the name of the AV
Service. The AV Service is defined in the MGC
Manager application. If left blank, the system uses
the default AV Message Service.
Auto Termination
Select this check box to automatically terminate
the conference by the MCU when:
• No participant has connected to the
conference during a predefined time period
Or
• All the participants have disconnected from
the conference and the conference is idle for a
predefined time period
Before First Join x
Min
This option is enabled when the Auto Termination
option is selected.
Enter the number of minutes that should pass
from the conference start time without any
connected participant, before the conference is
considered as idle. If no participant has joined the
conference during this period, it will be
automatically terminated by the MCU.
After Last Quit x
Min
This option is enabled when the Auto Termination
option is selected.
Enter the number of minutes that should pass
from the time the last participant disconnected
from the conference, before the conference is
considered as idle. If the conference remains idle
and no other participant joins in during this period,
the conference will be automatically terminated by
the MCU.
MGC Web Server Manager User’s Guide
Table 3-2: Reservation Defaults - Settings2 Parameters
Option
Description
Entry Queue
Access
An Entry Queue is a special routing lobby queue
to which one or more dial-in numbers are
assigned. When callers dial the assigned number,
they access a queue where they wait to be
connected to the conference. While waiting in the
queue, they hear the audio messages and
prompts, and interact with the system using touchtone signal (DTMF codes). The participants may
be connected automatically to the conference if
they have provided the required conference
password, or they will wait for the Operator’s
assistance if enabled for the Entry Queue and if
requested by the caller.
Select this check box to force participants to
access the conference via an Entry Queue. When
selected, the participant must dial the Entry
Queue dial-in number and enter the correct
conference password in order to be transferred to
this conference.
Note: If this conference is also set as Meet Me
Per Conf to which a separate dial-in number is
assigned, the participant can also connect directly
to the conference using this number.
To save the dial-in number, do not select Meet Me
Per Conf.
Meet Me Per Conf
Select this check box to enable the Meet Me Per
Conference option. When selecting this option,
the Meet Me Per Conference tab appears.
The Meet Me Per Conference option allows
“undefined” participants to connect to a
conference by dialing a pre-defined conference
number. “Undefined” participants are participants
that were not defined prior to the conference start.
Auto Add
This option is enabled when the Meet Me Per
Conf option is selected. It allows dial-in
participants to automatically connect to the
appropriate conference, without prior setting of
the participant parameters.
3-27
Chapter 3 - Setting Defaults
Table 3-2: Reservation Defaults - Settings2 Parameters
3-28
Option
Description
Min x Parties
Available only when the Meet Me Per Conf. and
Auto Add options are checked. It lets you reserve
resources for the specified number of dial-in
participants. This number includes the defined
and undefined participants. Additional participants
(defined and undefined) will be able to connect to
the conference as long as there are available
resources or the Max Parties limit is met.
Max Parties
This option is used to control the number of
participants that can connect to a conference.
Select the maximum number of participants that
can automatically connect to the conference. If
you select Auto, the number of participants that
can connect to the conference is limited only by
the availability of the MCU resources and the
maximum number of participants per conference.
This option is useful in “Meet Me Per Conference”
with “Auto Add” participants.
Meeting Rooms
Select this option to set the reservation as a
Meeting Room.
Limited
Sequences
This option is enabled when the Meeting Room
option is selected. Select this check box to limit
the number of times the Meeting Room will be
activated. When the check box is cleared, the
conference will remain in “sleep mode”
indefinitely, and can always be activated. When
this option is selected, select the number of times
the Meeting Room can be activated. Entering 2
means that the Meeting Room may be activated
twice, but it will remain passive during the period
of inactivity.
MGC Web Server Manager User’s Guide
Table 3-2: Reservation Defaults - Settings2 Parameters
Option
Description
Start Conf.
Requires
Chairperson
Select this check box to indicate that the
conference will only start when the Chairperson
connects to the conference. Participants that
connect to the conference before the chairperson
are placed on hold and hear background music.
Once the chairperson connects to the conference,
the participants are automatically connected to the
conference.
When the check box is cleared, the conference
starts at its predefined time or when the first
participant connects to it.
Terminate after
Chairperson Exits
Select this check box to automatically terminate
the conference once the conference Chairperson
disconnects from the conference.
3-29
Chapter 3 - Setting Defaults
Table 3-2: Reservation Defaults - Settings2 Parameters
3-30
Option
Description
Encryption
Encryption is a process of disguising information
into “ciphertext,” or data that will be unintelligible
to an unauthorized person attempting access to
the media.
In the WebCommander the behavior of the
system at a conference and participant level is
dependant on MCU system.cfg flag settings set in
the MGC Manager.
In the Web Server Manager encryption must be
enabled in the Default -Conference Defaults by
selecting the Settings2 - Encryption box. In the
Participants Defaults - Settings2 you can select
the appropriate Encryption default setting - Auto/
On/Off.
Encryption supports all types of audio and video
conferences including ISDN and IP participants.
The following guidelines apply to encryption:
• Encrypted can be enabled at the conference
or participants level
•
Endpoints must support both AES 128
encryption and DH 1024 key-exchange
standards to encrypt and to join an encrypted
conference
•
Encrypted conferences with ISDN participants
require the installation of MUX+ card on the
MCU
•
Encrypted conferences with IP participants
require the installation of IP+ card on the MCU
•
The encryption feature supports all conference
types, including: Cascading, People and
Content, Operator, Meeting Rooms, Entry
Queues, and Ad Hoc conferences
•
In a cascaded encrypted conference it is
important that the Link between the
conferences is encrypted
MGC Web Server Manager User’s Guide
Table 3-2: Reservation Defaults - Settings2 Parameters
Option
Description
Talk Hold Time
Indicate the minimum period, in seconds, that a
participant has to speak to become the main
speaker. During this period, no other participant is
allowed to become the main speaker. This
parameter is designed to prevent participants from
becoming the main speakers by coughing or
laughing, and to avoid fast and frequent changes
of the main speakers.
Audio Mix Depth
Indicate the number of the loudest voices
speaking at the same time that will be heard. The
value 3 indicates that the three loudest
participants speaking at the same time will be
heard.
Lecture Type
Select the Lecture Modes from the drop-down list:
• None - Select this option to disable the
Lecture Mode option.
•
Lecture Mode - Enables the speaker to be
seen by all other participants in full screen.
While the lecturer is speaking, the system
automatically switches between participants in
a predefined time interval, showing them
sequentially on his/her endpoint monitor.
Note: Lecture Mode is disabled when Same
Layout is selected.
•
Lecture Show - One-way communication
mode in which conference participants see
and hear the conference lecturer, however
they are not seen or heard by the lecturer (one
way communication).
Notes:
•
Lecturer selection is mandatory at the
reservation stage and Lecture Show is
enabled only when one is selected. The
lecturer cannot be changed or deleted
during the On Going conference.
Full screen (1X1) format is the only video layout
that can be selected for Lecture Show.
3-31
Chapter 3 - Setting Defaults
Table 3-2: Reservation Defaults - Settings2 Parameters
Option
Description
Lecture Mode
(con’t.)
•
Timer
3-32
Presentation Mode - In Continuous Presence
conferences the system automatically displays
the active speaker full screen on all the
conference participant monitors while the
layout of the current speaker displays the
previous speaker of the conference. When
another participant starts talking, the
Presentation Mode is cancelled and
conference returns to its predefined video
layout.
In a COP conference, when the speaker
becomes the conference presenter, the
conference layout is automatically set to 1x1
(full screen) and all participants including the
active speaker view this layout.
•
If the speaker is an Audio Only participant
(in a video conference), the Presentation
Mode is disabled for that participant.
•
Video Forcing apply while the conference
is in normal speaker mode. When
Presentation Mode is activated, only the
lecturer can set the video forcing and it
applies only to the conference layout.
•
During an On Going conference set to
Presentation Mode that is running on the
standard Video card, asymmetric conference
layouts are unavailable for selection.
•
When a conference set to both Auto Layout
and Presentation Mode is run on the Standard
Video card, the definition of the layouts
selected for Auto Layout changes. For more
details, see MGC Administrators Guide,
Chapter 5.
Select this check box to activate the automatic
switching of the participants displayed in the video
windows shown on the lecturer screen. It also
enables the Interval option.
MGC Web Server Manager User’s Guide
Table 3-2: Reservation Defaults - Settings2 Parameters
Option
Description
Interval
Enter the number of seconds a participant is
displayed in the video window on the lecturer
monitor before switching to the next participant.
Lecturer Name
Used to select the Lecturer name. This option is
not applicable during the defaults definition.
Same Layout
Select this check box to enable the Same Layout
feature.
Same Layout is a feature that “sets” and imposes
an identical video layout for all participants. During
the reservation stage, the moderator is able to
select a specific layout of his choice and apply the
selected layout settings to all conference
participants. It allows conference participants to
view his/her own video image.
When Same Layout is enabled during the
reservation stage, conference participants can
view his/her own video image to ensure that
image projection is of a reasonable quality (for
example: distance, focus, lightning, posture, and
presentation).
3-33
Chapter 3 - Setting Defaults
Table 3-2: Reservation Defaults - Settings2 Parameters
3-34
Option
Description
Auto Layout
In Auto Layout the system automatically selects
the conference layout based on the number of
participants participating in the conference. With
Auto Layout, when a new video participant is
connected/disconnected, the conference layout
automatically changes format to reflect the new
number of video participants. Audio Only
participants do not affect the selected layout.
• Software CP conferences cannot be set to
Auto Layout.
•
The Auto Layout feature can be used with
Lecture Mode (for the lecturer display), but
cannot be enabled with Lecture Show.
•
Auto Layout can be used with Same Layout
and Conference on Port (COP). In this mode,
the system selects the layout as if one
additional participant was added to the
conference to show the self view of the
speaker.
Owner
The name of the user who has created the
Defaults set or to whom the administrator has
assigned the default set.
Duration
Enter the conference length using the format
HH:MM. For example, to define a duration of 30
minutes, enter 0:30 and to enter the duration of 90
minutes, enter 01:30.
Dial-Out Manually
Select this check box to designate an operatorcontrolled dial-out conference connection. If DialOut Manually is checked, the operator monitoring
the conference needs to manually connect each
of the participants to the conference. The
participants remain on standby until the operator
finishes connecting all the participants to the
conference, otherwise, the participants will
connect at the same time when the conference
starts and becomes an On Going conference.
MGC Web Server Manager User’s Guide
Table 3-2: Reservation Defaults - Settings2 Parameters
Option
Description
Lock
Select this check box to lock the conference and
prevent dial-in participants from joining the
conference once the conference has started.
Clear this check box to unlock the conference and
allow dial-in participants to join the conference. A
locked conference can be unlocked during an On
Going conference.
On Hold
Select this check box to place the conference on
hold when it is started.
When a conference is on hold, all participants
hear background music. When selected at the
reservation stage, once the conference is started,
it is automatically placed on hold and the
participants hear music upon connection to the
conference.
A conference can be also be placed on hold and
released during an on going conference from the
Meeting Director window or by the chairperson
using the appropriate DTMF code from his/her
touch-tone telephone.
Mute “Meet Me”
Parties
Select this check box to mute undefined dial-in
“Meet Me” participants.
Once connected to the conference they are
automatically muted by the MCU to prevent
background noises until all the participants are
connected. In addition, if a lecture takes place it
assures that late arrivals will not disrupt the
lecture.
The Mute “Meet Me” Parties option may be
disabled and enabled during the on going
conference (in the Meeting Director window) or via
the telephone using the appropriate DTMF code.
Enable Party
Select this option to enable the Invite feature
during an on going Audio Only conference. It
enables the chairperson to request a line and dialout to invite participants to join the conference.
3-35
Chapter 3 - Setting Defaults
Table 3-2: Reservation Defaults - Settings2 Parameters
Option
Description
Background/
Layout Border/
Speaker Notation
If the conference is handled by the Video+ card,
you can add visual effects such as borders and
colors, to the video layouts display on the
endpoints.
The following modification options are available:
• Background color - the color displayed when a
video layout is empty. This may happen when
the video layout contains more windows than
connected participants.
•
Layout Border - the borders frame of each
window in the video layout. The thickness of
the border is fixed.
•
Speaker Indication - you can use a different
color for the border to highlight the window of
the current speaker.
Recording Enable Recording
Enables the recording of audio in a audio or video
conference by an external recorder. The setting in
the Default Reservation/ Start Recording define
when the conference recorder is activated when
the conference is On Going.
Select this check box to enable the conference
recorder.
Recording Link
Name
The name of a recording link defined in the MGC
Manager.
Start Recording
Select one of the following settings for activating
the a recorder:
•
•
Immediately
Upon Request
When set to Immediately the first participant to
enter the conference, activates the conference
recorder.
When Upon Request is the selected default the
conference chairperson or the Operator can
manual activate the conference recorder from the
On Going Conference recording pane. For more
information see
3-36
MGC Web Server Manager User’s Guide
6.
Click OK to confirm and store the new Conference Defaults set.
3-37
Chapter 3 - Setting Defaults
Defining Participant Defaults
The Participant Defaults are used to define the default values of parameters
in the new participant templates created in the WebCommander application.
To define the Participant Defaults:
1. Right-click the Participant Default icon, and then click Add
Participant Defaults.
The Party Properties-Settings1 dialog box opens.
3-38
MGC Web Server Manager User’s Guide
2.
In the Name box, enter the name of the participant defaults set.
3.
Define the following parameters:
Table 3-3: Participant Defaults - Settings1 Parameters
Option
Description
Name
Enter the participant’s name using numerals and
characters only. You must give each participant a
distinct name.
Interface Type
Select the Interface Type. Select ISDN if the
participant connects via ISDN lines, T1-CAS if the
participant connects via T1-CAS lines, ATM if the
participant is using the ATM network, H.323 or SIP
if the participant is connected via LAN, and MPI if
the participant is connected via serial connection.
Note: SIP participants require the IP+ card series,
hardware version 4.24 or above.
3-39
Chapter 3 - Setting Defaults
Table 3-3: Participant Defaults - Settings1 Parameters
3-40
Option
Description
Connection Type
Select the appropriate connection type from the
drop-down list.
The MGC WebCommander allows you to set up
conference dialing according to three connection
types:
Dial-in - The participant phones the MCU at
conference time. You inform the participant of the
MCU’s phone number. When selecting this option,
the Meet Me Per options are enabled.
Do not select this option if your default
participant’s connection type is T1-CAS as only
undefined T1-CAS participants can connect to
conferences.
Dial-out - The MCU calls the participant at
conference time. The participant’s phone number
may be entered later, when setting up the
conference.
If the Manual Dial Out option in the Schedule tab
of the conference settings is cleared, the MCU
automatically calls the participant at conference
time. If this option is checked, the operator calls
the participant.
Direct - The participants are connected directly to
the MCU through an ISDN leased line. No dialing
is required for direct connections.
MGC Web Server Manager User’s Guide
Table 3-3: Participant Defaults - Settings1 Parameters
Option
Description
Participant Phone
Numbers
This field applies to the ISDN/T1-CAS, Dial-out
connection type, or to ISDN, Dial-in Meet Me Per
MCU option (when selected). Type the
participant’s phone number (including country and
area codes when required) to be dialed by the
operator when connecting the participant to the
conference. Add a semicolon (;) between
numbers when several numbers are to be
assigned to a participant. For example,
92511111;9251112;….;xxxx.
If the Meet Me Per MCU option is selected, type
the phone number by which the participant is
identified (CLI number). This number is used by
the MCU to route the caller to the appropriate
conference.
MCU Numbers
This field applies only to the ISDN, Dial-in, Meet
Me per MCU-Conference connection type. Enter
the phone number the participant should dial to
connect to the MCU.
If left blank, the MCU automatically assigns a dialin number (from the list of dial in numbers defined
in the Network Service) when the conference
starts.
Participant
Bonding
This field applies only to the ISDN, Dial-out
connection type, and should be used only if
Bonding is the selected Aggregation type for the
participant.
Enter a single number for all the aggregated
channels. The system will automatically assign
the appropriate phone numbers to the remaining
channels.
If left blank, the MCU automatically assigns the
first number that appears in the Participant Phone
Number field when the conference starts.
3-41
Chapter 3 - Setting Defaults
Table 3-3: Participant Defaults - Settings1 Parameters
3-42
Option
Description
Meet me per
This field applies only to the ISDN, Dial-in
connection type.
Party - The participant dials a unique dial number
for each group of channels he will use.
Channel - The participant dials a different dial
number for each channel.
MCU – A single phone number is assigned to all
the conferences running on a certain MCU. The
MCU phone number is entered in the Network
Service – Span and Phones dialog box.
The participants are routed to the appropriate
conferences according to their phone numbers
(CLI) which are entered in the Participant Phone
Numbers. When a participant dials in to the
conference using the MCU number, the PBX
identifies the originating party number and routes
the participant to the appropriate conference
accordingly.
This option should be used only with PBXs
supporting the CLI (Caller ID) option.
User Defined 1-4
There are 4 User Defined fields that enable you to
enter general information for the participant, such
as the participant’s: E-mail address, telephone
number, company name, location, or any required
information.
The titles of the User Defined fields can be
modified in the Database Manager/Web Server
Manager-> Defaults -> User Defined Defaults and
can be loaded only to the MGC Manager
application.
Note: The User Defined fields are displayed only
if the Show User Defined Fields in Participant
Parameters box is selected in the Web Server
Manager -> Defaults ->User Defined Defaults.
MGC Web Server Manager User’s Guide
Table 3-3: Participant Defaults - Settings1 Parameters
Option
Description
User Identifier
String sent to the
Recording system
Enter the string sent to the Recording System via
DTMF codes that identifies the recording. This
identifier string is used later by the user
connecting to the conference recorder Web site to
identify the recording and retrieve it.
You need a unique User Identifier String for each
recording. The User Identifier String can consist of
one of the following options:
•
a series of numbers. In such a case all the
recordings will have the same number
assigned to them
•
n - Enter n to assign the conference Numeric
ID or the Conference password to the
recording as the identifying string.
•
l - Enter i to assign the conference
Chairperson password to the recording as the
identifying string.
•
b - Enter b to assign the conference billing
code to the recording as the identifying string.
Volume
Select the volume in which the participant’s audio
is transmitted to the conference. The volume
scale is from 1 to 10, where 1 is the weakest and
10 is the strongest. The volume of each endpoint
at the time of connection is 5. One movement of
the volume slider increases or decreases the
volume by one unit. Each unit is equivalent to 3db.
Listening Volume
Select the volume in which the conference audio
is heard by the participant. The volume scale is
from 1 to 10, where 1 is the weakest and 10 is the
strongest. The volume of each endpoint at the
time of connection is 5. One movement of the
volume slider increases or decreases the volume
by one unit. Each unit is equivalent to 3db.
3-43
Chapter 3 - Setting Defaults
Table 3-3: Participant Defaults - Settings1 Parameters
3-44
Option
Description
Owner
Displays the name of the user to whom the default
set is assigned. This field is disabled for users
without permission to modify (write) database
tables. Users with Administrator rights (that can
read and write database tables) can assign the
defaults set to any registered user. The Owner
name may be used for filtering.
VIP
Click this check box to designate the participant
as VIP. This status is used to indicate (an icon)
participants who need special attention during the
conference.
MGC Web Server Manager User’s Guide
4.
Click the Settings2 tab to display additional parameters.
The Party Properties – Settings2 dialog box opens.
3-45
Chapter 3 - Setting Defaults
5.
Define the following parameters:
Table 3-4: Participant Defaults - Settings2 parameters
3-46
Option
Description
Aggregation
This field applies to ISDN connections only. Select
the aggregation method:
H221 – The standard communication protocol, in
which a different phone number is assigned to
each channel.
Bonding - A communication protocol that
aggregates from two up to thirty 64-kbps B
channels together to look like one large bandwidth
channel.
Multi-Rate – A communication protocol in which
channels are aggregated to form one dedicated
line. The MGC Manager currently supports
aggregation of 6 channels to form one line of 384Kbps rate (64 X 6=384). In such a case, the
network ensures that all six channels are
synchronized and there are no intervals between
the arrivals of the data packets.
Auto – Click this option to connect the participant
according to his/her capabilities. When connecting
to the conference, the endpoint and the MCU
exchange capabilities. During this exchange, the
MCU identifies the aggregation mode used by the
endpoint and connects it accordingly.
Number of
Channels
This field applies only to ISDN/ATM connections.
Indicate the number of channels the participant
uses for the connection.
Select “auto” to use the conference’s Line Rate
setting. This is also the mode recommended for
ATM conferences.
Select the appropriate number of channels to
force the system to use the participant settings.
MGC Web Server Manager User’s Guide
Table 3-4: Participant Defaults - Settings2 parameters
Option
Description
Video Protocol
Select the Video compression standard:
H261 – The video compression standard
mandatory to all codecs.
H263 - A compression standard that provides
improved video quality at a line rate lower than
384 Kbps. This standard is not supported by all
codecs.
Auto - select this option to use the conference’s
Video Protocol settings.
Voice
This field applies to ISDN and H.323 connections.
Select Data for data, audio and video transmission
(using the H.221 protocol).
For audio only transmission, select Voice. This
option is automatically selected for T1-CAS
participants.
Recording
You can designate one participant designated as a
recording port (that is, a telephone to which a
recording device may be connected). The
recording port is used to record the audio
conference.
Select None for a standard participant.
Select Dial-up to designate this participant as a
recording port.
Auto Detect
This field applies only to ISDN connections. Check
this option to enable the automatic detection of the
line rate of incoming ISDN calls by the MGC
WebCommander and connect the participant
accordingly without prior settings of the line rate
during conference setup. The participant can be
connected in a line rate of up to the line rate set for
the conference.
3-47
Chapter 3 - Setting Defaults
Table 3-4: Participant Defaults - Settings2 parameters
Option
Description
Enhanced Video
The MGC Manager can provide high quality video
(30 frames per second for incoming and outgoing
video streams) for line rates up to T1/ E1 in
Transcoding and Continuous Presence
conferences. This is done by allocating two video
codecs to the participant instead of one. One of
the video codecs is used for encoding, while the
other is used for decoding the incoming video
stream.
Select this check box to enable the high quality
video feature for the participant.
Note:
• To work with 30 frames per second the High
Frame Rate flag in the system.cfg must be
enabled.
•
AGC
3-48
To work with bit rates higher than 768 Kbps,
the High Bit Rate flag in the system.cfg must
be enabled.
The Auto Gain Control (AGC) is the system
default.
Clear this check box to disable the Auto Gain
Control (AGC) for the participant.
The Auto Gain Control mechanism regulates
noise and audio volume by keeping the received
signal to all participants balanced. Different
endpoints and phones produce different types of
source noise and volume. The Auto Gain Control
mechanism can be applied to all incoming audio
streams prior to mixing, thereby dynamically
changing the amplification of the input signal
providing a constant output amplitude.
MGC Web Server Manager User’s Guide
Table 3-4: Participant Defaults - Settings2 parameters
Option
Description
Encryption
In the Participants Defaults - Settings2 you can
select the appropriate Encryption default setting Auto/On/Off.
Choose any of the following Encryption options:
• Auto - When participants connect to a
conference, the conference/Entry Queue
encryption settings are automatically applied
to the participant. For example, when a
conference/Entry Queue is set to encryption
the participant is also encrypted (if the flag in
the MGC Manager
ALLOW_ENCRYPT_IN_PARTY_LEVEL is set
to YES).
•
On - enables encryption at the participant
level (if the flag MGC Manager
ALLOW_ENCRYPT_IN_PARTY_LEVEL is set
to YES).
•
Off - disables encryption
Note: Undefined participants are connected with
the Participant Encryption option set to Auto,
inheriting the Conference/Entry Queue encryption
setting.
Restrict Only
This field applies only to ISDN connections. Select
this check box if the participant is using a
restricted line whose transfer rate per channel is
56 Kbps (instead of 64 Kbps). This option is valid
for a Transcoding or Continuous Presence
conference only.
H323 Participant Participant IP
Address
Enter the default IP address for endpoints.
H323 Participant Signaling Port
This field should not be modified unless a different
signaling port was configured during installation
and connection to the network.
H323 Participant Alias Name
Select the participant’s alias type and then enter
the alias of the endpoint.
3-49
Chapter 3 - Setting Defaults
Table 3-4: Participant Defaults - Settings2 parameters
Option
Description
H323 Participant Alias Type
Select the format of the alias from the drop down
list. Only E.164 and H.323 ID are supported.
SIP Address
sip: [user name]@[domain]. Note that the SIP
URI adheres to URI rules: no spaces or special
characters such as commas, quotation marks,
inverted tags and so forth either in the user name
or in the domain part.
[To compare to H.323, which uses the endpoint location
for identifying the participant, in SIP participants can
change locations but still be addressed as long as they
continuously refresh their registrations with the proxy.
The proxy forwards invitees to their current location.
3-50
SIP Address
Type
SIP URI: A SIP URI uses the format of an email
address, typically containing a username and a
host name, sip:user@host. For example,
sip:[email protected].
TEL URL: "Tel" means that a voice call is opened.
TEL URL may be used when the UA does not
wish to specify the domain that should interpret a
telephone number that has been input by the user.
Rather, each domain through which the request
passes would be given that opportunity. As an
example, a user in an airport might log in and send
requests through an outbound proxy in the airport.
If they enter "411" (this is the phone number for
local directory assistance in the United States),
that needs to be interpreted and processed by the
outbound proxy in the airport, not the user's home
domain. In this case, tel:411 would be the right
choice.
H323 Participant Video Bit Rate
KBits/sec
This option is enabled if the Auto Video Bit Rate
option is cleared. It allows you to specify the
specific video transfer rate (multiples of 100 bits/
sec is recommended) for the participants. This
option defaults to the conference setting when
adding a new participant during an On Going
conference.
MGC Web Server Manager User’s Guide
Table 3-4: Participant Defaults - Settings2 parameters
Option
Description
H323 Participant Auto Video Bit
Rate
Select this option to use the video transfer rate
defined for the conference.
Enable PSTN Dialin
PSTN participants are able dial-in into an H.323
Meet Me Per Conference using the ISDN MeetMe Service number. For example, by calling
9251437, the ISDN’s Meet-Me Service number, a
3G cellular phone PSTN participant can connect
as a H.323 dial-in participant to the Meet Me Per
Conference.
However, when the participant dials the IP service
prefix using the gatekeeper he/she can enter the
Numeric ID (NID), conference name, or Meet Me
Per Conference ISDN number and connect as an
H.323 video participant.
Service Name
Type the name of the participant’s service provider
exactly as it is defined in the Network Service
function (the system is case sensitive).
If left blank, the default Network Service is used,
depending on the selected Connection Type. If the
selected Connection Type is ISDN, the default
ISDN Network Service is used. If the selected
Connection Type is H323, the default H323
Network Service is used.
Sub-Service Name
This field applies only to ISDN connections.
If a sub-service is used, type the sub-service
name exactly as it appears in the Network Service
definition.
If left blank, the default sub-service is used.
Node Type
This option is always set to Terminal.
3-51
Chapter 3 - Setting Defaults
Table 3-4: Participant Defaults - Settings2 parameters
6.
3-52
Option
Description
Num-type
This field applies only to ISDN connections.
Select the program type from the drop-down list.
The available options are Unknown, National,
International, Network Specific, Subscriber,
abbreviation and Taken from Service. These
options represent the programs provided by the
carrier and are defined in the Network Service.
Select Taken from Service to indicate that the
program should be taken from the Network
Service definition.
Click OK to confirm the new set.
MGC Web Server Manager User’s Guide
Defining MGC Manager Defaults
To define the MGC Manager Defaults:
1. Right-click the MGC Manager Defaults icon, and then click Add
MGC Manager Defaults.
The MGC Manager Defaults dialog box opens.
2.
In the Name box, enter the name of the defaults set.
3.
The Owner field displays the name of the user to which the default set
is assigned. This field is disabled for users with no permission to
modify (write) database tables. Users with Administrator permission
(can read and write all database tables) can assign the defaults set to
any registered user.
4.
Define the following parameters:
Table 3-5: MGC Manager Defaults parameters
Option
Description
General Defaults
Save Participant – When enabled, the Save
Participant checkbox will appear in the Participant
Properties dialog box enabling the user to save
the participant properties to a User Template file.
3-53
Chapter 3 - Setting Defaults
Table 3-5: MGC Manager Defaults parameters
3-54
Option
Description
General Defaults
(cont.)
Linked Party – When enabled, the Linked Party
checkbox will appear in the Participant Properties
dialog box enabling the user to save the
participant properties to the database. When
disabled, participants defined during conference
definition will be embedded participants only. For
more details regarding linked and embedded
participants, refer to Chapter 3 of the MGC User’s
Guide.
Linked Party Message – When enabled, the
system will display a warning message when
closing the Properties dialog box of a linked
participant without saving the parameters to the
database.
Conference
Templates in DB
Show Time in DB Conference Templates –
When enabled, the system will display the
Schedule tab in the Properties dialog box of a
Conference template defined in the database. This
enables the user to add the time that the
conference should start. This option may later be
used to filter conferences that should start on a
specific day. Note that this date and time are not
used to automatically start the conference from the
database template on the scheduled date.
Show Past Time as Current Time – When
enabled, the system will automatically update the
start date and time of an existing Conference
template to the current date (even if the original
start date and time are in the past). Note that when
filtering conferences according to the start date
and time, the conference will retain the past date
and time unless it is updated. This option is
enabled only when the Show Time in DB
Conference Templates check box is checked.
MGC Web Server Manager User’s Guide
User Defined Defaults
You can select whether to display the User Defined fields in the conference
and participant properties dialog boxes in the MGC Manager and the
WebCommander applications.
You can define the titles of the User Defined fields. These titles replace the
default titles (User Defined 1, 2 and 3) when the Database Manager
Defaults are loaded to the MGC Manager application. These titles do not
appear in the WebCommander unless they were modified directly in the
Language database (via the database application; Microsoft Access or
SQL).
The User Defined fields are saved to the CDR file using the default names.
The new titles that you define in the Database Manager -> User Defined
Defaults are for display purposes only.
To define the User Defined Defaults:
1. Expand the Defaults tree, right-click the User Defined Defaults icon,
and then click the Add User Defined Default.
3-55
Chapter 3 - Setting Defaults
The User Defined dialog box opens.
2.
Define the following parameters:
Table 3-6: User Defined parameters description
3-56
Field
Description
Name
Enter the name of the User Defined default set.
Owner
Enter the name of the owner of this set. Only the
owner and the administrator with the appropriate
permission will be able to modify this set.
Leave this field blank to assign this set to the current
logged in user.
MGC Web Server Manager User’s Guide
Table 3-6: User Defined parameters description
Field
Description
Show
Reservations User
Defined Fields
Select this check box to display the User Defined
fields in the Conference Properties - General dialog
box. If you clear this check box, all three User
Defined fields will be hidden.
Show Participants
User Defined
Fields
Select this check box to display the User Defined
fields in the Participant Properties - Identification
dialog box. If you clear this check box, all four User
Defined fields will be hidden.
Reservation Titles
User Defined 1, 2 and 3 - using up to 25 characters
enter the text to be displayed as the title of the User
Defined fields in the Conference Properties General dialog box. These titles replace the default
titles (User Defined 1, etc.) If left blank, the default
titles are displayed.
Note: The titles of the User Defined fields appear
only in the MGC Manager application. In the
WebCommander application, only the default titles
are shown.
Participant Titles
User Defined 1, 2 and 3 - using up to 25 characters
enter the text to be displayed as the title of the User
Defined fields in the Participant Properties Identification dialog box. These titles replace the
default titles (User Defined 1, etc.) If left blank, the
default titles are displayed.
Note: The titles of the User Defined fields appear
only in the MGC Manager application. In the
WebCommander application, only the default titles
are shown.
3-57
Chapter 3 - Setting Defaults
3.
Click OK.
The new User Defined Defaults set is added to the list.
You can define several sets. All the sets are considered to be personal sets
which only you can use. If you have administrator rights you can designate one
set as a public set. This set may be loaded to the MGC Manager application by
all the Web Server Manager and Database Manager users.
3-58
MGC Web Server Manager User’s Guide
Managing the Default Sets
The MGC Web Server Manager application is installed with an embedded
Defaults set. If no Defaults set is defined as the Global Defaults set, the
embedded Defaults set is active.
A Defaults set may be set as Private or Global Defaults. A Global Defaults
set is a default set that will apply to all the database users. A Private
Defaults set applies only to users whom it is specifically allocated as the
Private Defaults set, and is used instead of the Global Defaults set.
The administrator can select one of the default sets defined in the database
as the Global Defaults set. However, the database users can also define one
of their default sets as Private Defaults set. In such a case, the user will be
able to use this set instead of the Global Default set.
Only one Defaults set may be defined as Private Defaults set. Selecting
another Defaults set as Private Defaults Set automatically cancels the
current Private Set. One set may be defined as both Global and Private
Defaults set.
The selection of the Global and Private Default set is done separately for
each Defaults category.
If more than one database is installed, the system loads the Private defaults
from the database designated as Private and the Global Defaults from the
database designated as Global. Therefore you must define the database
from which you want to load the Private Defaults set as Private and the
database from which you want to load the Global default set as Global. You
may define the same database as both Global and Private. In that case, the
Global Defaults set and the Private Defaults set will be taken from the same
database.
You can also designate a database as Private Default and another database
as Global Default. When a user loads the Global or the Private defaults, it is
loaded from either the Private or Global Default database according to the
selected Default set. For example, if you select to load the Private Default
set, it will be loaded from the database designated as the Private Defaults
database.
Using the right-click pop-up menu you can also delete a default set or
change the default set parameters.
3-59
Chapter 3 - Setting Defaults
To define Default set as Private set:
•
In the Status area, right-click the icon of the Defaults set, and then click
Set As Private Default.
The appropriate indication appears in the Status area and a check mark
appears next to the Set As Private Default option.
Defining a Default Set as Global Defaults Set
Only the administrator can define a set as Global default.
To define a Default set as Global:
•
In the Status area, right-click the Defaults set icon, and then click Set
As Global Default.
The appropriate indication appears in the Status area and a check mark
appears next to the Set As Global Default option.
3-60
MGC Web Server Manager User’s Guide
Assigning a Default Set to other Users
Only the administrator can assign default sets to other participants.
To assign a Default set to other users:
1. In the Status area, right-click the icon of the default set to be assigned
to other participants, and then click Set Default to Users.
The Add Default to Users dialog box opens.
The system displays the list of users currently defined in the database.
2.
Select the check boxes of the users to which to assign the default set.
To select all users, click the Select All button.
3.
Click OK.
The appropriate indication appears in the Status area.
3-61
Chapter 3 - Setting Defaults
Designating a Database as the Private or Global Default
Database
Only the administrator can assign a Private or Global Default Database.
1.
In the Browser area, right-click the database icon to be designated as
the Private or Global Default database.
A pop-up menu appears.
2.
Click Set As Private Default to designate this database as the source
for the Private Default set, or click Set As Global Default to designate
this database as the source for the Global Default set.
3.
A check mark next to the selected option indicates which option is
active.
To define the database as both Private and Global, select both options
repeating steps 1 and 2.
Default Conference Templates
Five Conference templates, representing each of the main types of
conferences, are included the Default Group in the database that is shipped
with the WebCommander. The parameters defined in each of these
conferences represent the most commonly used properties for the specific
type of conference.
For more information about Default Conference templates, see Chapter 4,
“Default Group” on page 4-55.
3-62
4
Options Settings
In the Web Server Manager Options menu, the following topics are listed:
•
Web Configuration - For further information, see the MGC Web
Manager, Installation and Configuration Guide, Chapter 5
•
Auto Cascade Configuration - see Auto Cascade Settings
•
Personal Scheduler Configuration - For further information, see the
MGC Personal Scheduler, Quick Start Guide, Chapter 2
•
Communication - For further information, see Setting the
Communication Parameters in Chapter 2 of this manual
•
Polycom Datastore Settings - For further information, see the MGC
Web Manager, Installation and Configuration Guide, Chapter 5
•
Automatic Email Format - see Customize e-mail settings
•
Automatic Email Crash Notifications - see Send Debugging
information to your next level of support
•
Administrator Email Notification Settings - see Send an email to the
administrator after an Reservation, New Meeting or Conference is
created
4-1
Chapter 4 - Options Settings
Auto Cascade Settings
On the MGC Manager you are required to configure the Entry Queue for Ad Hoc
Cascading. For more information refer to the MGC Manager User’s Guide
Volume II.
The cascading is performed by an Ad Hoc Cascade component which
monitors the MCUs. The Ad Hoc Cascade is installed as part of the MGC
WebCommander Professional installation. When the Ad Hoc Cascade
component finds that two or more MCUs are running a conference with the
same Conference Numeric ID, it checks if the conferences are already
cascaded. If there are no cascading links, it will automatically connect the
conferences using pre-defined cascading links. If at a later stage the Ad Hoc
Cascade component finds an additional MCU running a conference with the
same Numeric ID, it will add this conference to the cascaded conferences.
The links between the MCUs and other configuration parameters are defined
using the MGC Web Server Manager. A primary link is defined between each
pair of MCUs to be included in the Auto Cascade. A secondary link can
optionally be defined for use as a backup configuration if the primary link
fails.
Auto Cascade Configuration
The configuration of the Auto Cascading environment involves configuration
in both the MGC Web Server Manager and in the MGC Manager application.
4-2
•
In the MGC Web Server Manager you define the Cascading Links in the
Auto Cascade configuration table. You define the type of link to be set up
between the conferences on the different MCUs, such as IP or ISDN, the
direction of the link, and the connection string to be used to set up the
link.
•
In the MGC Manager application you define an Auto Cascade Entry
Queue on each MCU. You can create one Entry Queue for both ISDN
and IP, or two separate Entry Queues. To set up the links, the external
application will dial the Entry Queue dial-in number (for ISDN
connection) or the Network Service Prefix and Entry Queue Numeric ID
(for IP connection) followed by the Conference Numeric ID. Calls to
Auto Cascade Entry Queues will be considered as MCU calls and no
IVR will be played.
It is recommended to set up identical Ad Hoc Entry Queues and Profiles on each
MCU, so that the cascaded conferences will have the same properties.
Note: To use the Auto Cascade feature, the system.cfg flag
QUICK_LOGIN_VIA_ENTRY_QUEUE must be set to NO on all MCUs, that is,
the Conference Numeric ID routing mode must be used. This flag is located in
the GREET AND GUIDE/IVR section of the system.cfg file.
Defining Auto Cascading Entry Queues
On the MGC Manager you are required to configure the Entry Queue for Ad
Hoc Cascading. For more information refer to the MGC Manager User’s
Guide Volume II, Ad Hoc Cascading.
Configuring the Cascading Links using the Web Server Manager
The Web Server Manager must be used to set up definitions of primary and
optionally, secondary links between MCU’s. The link definitions identify the
link direction, the connection type and the connection string to be used to set
up the Auto Cascade links between conferences. The secondary link
definitions are for use as a backup configuration if the primary fails.
Before configuring Cascading Links, you must have defined all the MCUs that
are to be included in the Auto Cascading environment.
To Configure the MCU Cascade Links:
1. In the main Web Server Manager window, select the database assigned as
the Global Default.
The Auto Cascade feature can only be implemented for the database assigned
as the Global Default in the Web Server Manager. To assign a database as the
Global Default, right-click on the database and select the Set as Global default
option.
2.
On the Options menu, click Auto Cascade Configuration.
4-3
Chapter 4 - Options Settings
The Cascade Links List dialog box opens.
3.
Select the Enable Cascade Links check box.
The dialog box is automatically filled with a list of primary and
secondary links between each two MCUs defined in the MCUs table of
the Web Server Manager.
4-4
4.
To enable the links, you must define the link direction and network type
to be used for the connection, and the connection string. You must
complete the definition for the primary links, and can optionally
complete the definition for the secondary links.
Each row in the Cascade Links List contains the following columns.
Table 4-1: Cascade Links List Parameters
Column
Description
Link Priority
Indicates whether this row contains a primary or
secondary link definition.
Source MCU
The name and IP address of the first MCU.
Direction
Contains an icon indicating the direction of the link
between the MCUs, as follows:
The destination MCU dials to the source MCU.
The source MCU dials to the destination MCU.
Click the icon to reverse the link direction.
Destination MCU
The name and IP address of the second MCU.
Network Type
The type of connection to be set up between the MCUS.
Select the network type from the drop down list. The
possible values are: ISDN, IP (H.323), MPI, SIP or
T1-CAS.
Connection String
The connection string to the Auto Cascade Entry Queue.
Enter the connection string as follows:
• For ISDN and MPI, specify the Entry Queue dial-in
number.
•
For H.323 and SIP specify the Network Service
Prefix followed by the Entry Queue Numeric ID.
5.
In the Redial Attempts field, specify the number of redial attempts to be
made when an Auto Cascade link fails.
6.
To enable implementation of the “start only when the chairperson
connects” and “terminate conference after the chairperson exits” features
over Auto Cascaded conferences, select the Chairperson Activation
check box.
4-5
Chapter 4 - Options Settings
7.
Click OK.
Auto Cascading Mechanisms
Selection of the Master Conference
The conferences are cascaded in a star configuration - one master and up to
five slaves. The master conference is selected when cascading first takes
place between two or more conferences.
If chairperson activation is enabled in the Auto Cascade configuration in the
MGC Web Server Manager, then the master conference is determined as
follows:
•
If one of the conferences has a participant who is defined as a
chairperson, and none of the other conferences has a chairperson, the
conference with the chairperson will be assigned as the master
conference.
•
If none of the conferences has a chairperson, then the conference that is
running on the MCU which is highest in the MCUs table in the Web
Server Manager will be assigned as the master conference.
•
If there is more than one conference with a chairperson, then the
conference with a chairperson that is running on the MCU which is
highest in the MCUs table in the Web Server Manager will be assigned
as the master conference.
If chairperson activation is disabled, then the conference that is running on
the MCU which is highest in the MCUs table in the Web Server Manager will
be assigned as the master conference.
Implementation of Chairperson DTMF features
The following chairperson DTMF actions are implemented across the MCUs:
•
•
•
•
•
Mute all but me
Terminate the conference
Place the conference on hold
Lock and unlock the conference
Secure the conference and release a secured conference
Chairperson Conference Activation
If chairperson activation is enabled in the Auto Cascade configuration in the
MGC Web Server Manager, then the cascaded conference may implement the
4-6
“Start only when the chairperson connects”, and “Terminate conference after
the chairperson exits” features, provided these options are selected in the
individual conferences. If the “Start only when the chairperson connects”
option is implemented, participants in all conferences will be placed on hold
until a chairperson joins one of the conferences. If the “Terminate conference
after the chairperson exits” option is implemented, all conferences will be
terminated when there is no longer a chairperson connected to a conference.
4-7
Chapter 4 - Options Settings
Automatic Email Language Formatting
In the MGC Web Server Manager you can customize the language and default
email format of a new Meeting, configuring the email settings for the
WebCommander and Personal Scheduler.
You can customize the language and the text of the e-mail sent to participants
with the conference invitation. The customization applies to Meeting
invitations sent from the WebCommander and Personal Scheduler.
To change the format of an email:
1. In the MGC Web Server Manager, Options menu, select E-mail Format.
4-8
The E-mail Format dialog box is displayed.
2.
Select the language to customize and then click the Customize Format
button.
The language setting for the Meeting invitation can be selected in the
WebCommander - Login screen and in the MGC Personal Scheduler Polycom Office page.
The Customize E-mail Format - English dialog box opens.
You can define the language of the email by clicking E-mail Format from the
Options menu.
4-9
Chapter 4 - Options Settings
Text that appears in the
body area of the email,
and lists conference
details
Text that appears
in the subject area
of the email
Listing of parameters
that can be added to the
Body text
This is conditional text
Text that appears
in the subject area
of the email
An annotation sent for a
recurrent conference
Not all Conference Parameters listed will appear in the Personal Scheduler
appointment body. There are a number of “time” fields marked by an asterisks
(*) in the Customize E-mail Format window. These fields can be enabled by the
administrator in any Personal Scheduler E-mail by selecting the Include time
fields in E-mail Format option in the Web Server Manager - Personal
Scheduler Configuration window. for more information see, “Enabling the
“time” fields in the Web Server Manager:” on page 4-26.
3.
Change the email notification format by using the following options:
Table 4-1: Email notification format parameters
4-10
Option
Description
Subject
In the subject box enter the text that is to appear in the
subject line of the email. The email is sent with
conference details.
Note: This field only appears in the WebCommander
Table 4-1: Email notification format parameters
Option
Description
Body
In the body, subject and recurrent reservations fields,
enter the in the text that you want to appear in the body
area of the email. The email contains Conference
parameters. The body, subject and recurrent reservations
fields can be composed of two elements - free text and
the appropriate parameter, that consists of a value
entered automatically by the MCU.
Add
Click this button or double - click a parameter to add a
selection from the Conference Parameters list to be part
of the email template:
•
In the Conference parameters list, select (one or more
in the list) and then click the < - Add button.
Each selection appears in the Body list and forms the text
of the email.
4-11
Chapter 4 - Options Settings
Table 4-1: Email notification format parameters
Option
Description
Conference
parameters
In the Conference parameters box, select the desired
parameter and then click the < - Add button. The
parameter is added to the text, where the cursor is. For
example: To enter the conference date and time you need
to select the Conference parameter Start-time in local
time and then click the < - Add button. This section
contains a list of parameters that can be added to the
email’s Body:
•
•
Name - conference name.
•
Start-time in GMT time - The conference start time
indicated in GMT.
•
End-time in local time - The local time when the
conference will terminates.
•
End-time in GMT time - The GMT time, when the
conference will terminate.
•
•
•
Duration - The conference duration.
•
ISDN dial in number - A listing of defined ISDN
participants and their dial-in numbers.
•
IP dial in number - A listing of defined IP participants
and their IP addresses.
•
Conference ID - The conference numeric ID used for
routing from the Entry Queue to the conference.
Start-time in local time - The conference start time in
local time.
Entry Password - The conference’s entry password.
List of parties and their phones/IP’s - A listing of
defined participants with their phone number or IP
address.
•
Recurrent reservations pattern - The frequency
pattern of the recurrent reservation.
Number of recurrent reservations - The number of
recurring reservation.
Addition for
recurrent
reservations only
4-12
Insert text that is to appear in the Recurrent Reservation.
This text can be regular or conditional text.
Table 4-1: Email notification format parameters
Option
Description
Start Conditional
Text
Click the Start Conditional Text button. A bracket [can be
placed in the Subject, Body or Addition for recurrent
reservations only field, prior to the inclusion of a
parameter. Any parameter entered between the bracket(s)
becomes conditional text. Also, see End Conditional Text
listed below.
End Conditional
Text
Click the End Conditional Text button. The Parameter
placed between the Start Conditional Text and End
Conditional Text button (brackets: [parameter]) becomes
conditional text. If the parameter is empty, text marked as
conditional text will not be included in the email message.
Preview
Displays the format of the email based on the selected
customization:
Subject (WebCommander Only) - The subject heading of
the email.
Body - The text selected by the user, using the
Conference parameters.
4-13
Chapter 4 - Options Settings
4.
Click OK.
The new settings are applied to the customized language format as
shown in the E-mail Format dialog box.
If customization was selected for a language, the appropriate indication
appears in the E-mail format column.
—
Repeat steps 2 to 5 to customize additional languages.
— To cancel customization and use system default format, select a
language and click the Restore Default Format button.
5.
4-14
Click OK.
Configuring the Sender’s & Meeting Organizer’s
Default E-mail Addresses
You can set the WebCommander to use a fixed e-mail address that is
automatically added in the From field when sending a conference invitation.
When this options is enabled, the fixed Email addresses added to the From
field cannot be replaced.
To configure a fixed sender’s e-mail address:
1. From the Web Server Manager’s Options menu, select E-mail Format.
The E-mail Format window opens.
2.
Select the Use Fixed Sender Email Address check box.
When this option is enabled the WebCommander user cannot change the
sender email address.
3.
Enter the sender’s Fixed Email Address used for all conference
invitations that are sent from the WebCommander to conference
participants.
4-15
Chapter 4 - Options Settings
4.
Click OK.
When the conference invitation is sent, the email address defined in the
Fixed Email Address field appears in the From field and cannot be
altered.
Add the meeting organizer’s e-mail address to the e-mail recipient list:
1. From the Web Server Manager’s Options menu select E-mail Format.
The E-mail Format window opens.
4-16
2.
Select the Add the meeting organizer to the e-mail recipient list check
box.
3.
Click OK.
Fixed Email Address
Meeting Organizer Email Address
Figure 1: Sample email with Fixed Sender Email and Meeting Organizer email
addresses
4-17
Chapter 4 - Options Settings
Application Error Information
In the WebCommander, the user is able to send Debugging information to his
next level of support. When an exception occurs in the MGC Manager or
WebCommander, the operator/administrator can send an email to support
with information that will help analyze the source of the problem.
In the Web Server Manager you can enable/disable the email notifications
function in the Options menu.
To enable/disable email crash notifications:
1. In the MGC Web Server Manager Options menu, select Automatic
Email Crash Notification.
The Automatic Email Crash Notification dialog box opens.
4-18
2.
Enable the Automatic Email Crash Notification box.
When enabled other options are displayed.
If the Automatic Email Crash Notification box is disabled, the system disables
the Application Error Window dialog box and the report is not mailed.
Edit the email format using the following options:
Table 4-1: Email format parameters
Option
Description
Target Email
Address
Enter the email address of the recipient.
Contact information - Optional
Email Address
Enter your email address or that of the person to
contact.
Company Name
Type the company name.
Name
Enter your name or that of the person to contact.
Phone Number
Add the telephone number to contact.
4-19
Chapter 4 - Options Settings
Administrator Email Notification Settings
When an Reservation, On Going conference in WebCommander or new
Meeting in Personal Scheduler is created, an optional email can be sent to the
system administrator. The system administrator has the option to configure
the WebCommander and Personal Scheduler by enabling the system to
automatically send an email.
The administrator is able to customize the email, but if the administrator
chooses not to configure the email, the default settings are taken from the
template.
To enable administrator emails in the WebCommander and Personal
Scheduler:
In the MGC Web Server Manager the system administrator can select whether
to enable e-mails from the WebCommander and Personal Scheduler.
When a conference/reservation is updated or changed no email notification is
sent.
1.
In the MGC Web Server Manager Options menu, select Administrator
Email Notification Settings.
The Administrator Send Email Configuration dialog box opens.
4-20
2.
Click the Send Email Notification box.
3.
In the Admin Email Address box leave the default type your email
address.
The default email address of the meeting organizer appears.
• In MGC Personal Scheduler this is the e-mail address of the user that
organized the Meeting or Appointment.
•
4.
In the WebCommander the login name of the user that organizes the
conference. With NT authentication, the login name of the user is used.
If you have changed the email notification format and want to restore
default settings, click Restore Default Format.
You can define the language of the email by clicking E-mail Format from the
Options menu.
4-21
Chapter 4 - Options Settings
Text that appears in the
body area of the email,
and lists conference
details
Text that appears
in the subject area
of the email
Listing of parameters
that can be added to the
Body text
This is conditional text
Text that appears
in the subject area
of the email
An annotation sent for a
recurrent conference
There are a number of “time” fields marked by an asterisks (*) in the Customize
E-mail Format window. These fields can be enabled by the administrator in any
Personal Scheduler E-mail by selecting the Include time fields in E-mail Format
option in the Web Server Manager - Personal Scheduler Configuration window.
For more information see, “Enabling the “time” fields in the Web Server
Manager:” on page 4-26.
5.
Change the email notification format by using the following options:
Table 4-1: Email notification format parameters
4-22
Option
Description
Subject
In the subject box enter the text that is to appear in the
subject line of the email. The email is sent with
conference details.
Table 4-1: Email notification format parameters
Option
Description
Body
In the body box enter the text that you want to appear in
the body area of the email. The email contains
Conference parameters. The text is composed of two
elements - free text and the appropriate parameter, that
is a value entered automatically by the MCU.
Add
Click this button to add a selection from the Conference
Parameters list to be part of the email template:
•
In the Conference parameters list, select (one or
more in the list) and then click the < - Add button.
Each selection appears in the Body list and forms the
text of the email.
Conference
parameters
In the Conference parameters box, select the desired
parameter and then click the < - Add button. The
parameter is added to the text, where the cursor is. For
example: To enter the conference date and time you
need to select the Conference parameter Start-time in
local time and then click the < - Add button. This
section contains a list of parameters that can be added
to the email’s Body:
•
•
Name - conference name.
•
Start-time in GMT time - The conference start time
indicated in GMT.
•
End-time in local time - The local time when the
conference will terminates.
•
End-time in GMT time - The GMT time, when the
conference will terminate.
•
•
Duration - The conference duration.
•
List of parties and their phones/IP’s - A listing of
defined participants with their phone number or IP
address.
•
ISDN dial in number - A listing of defined ISDN
participants and their dial-in numbers.
Start-time in local time - The conference start time
in local time.
Entry Password - The conference’s entry
password.
4-23
Chapter 4 - Options Settings
Table 4-1: Email notification format parameters
4-24
Option
Description
Conference
parameters (con’t)
•
IP dial in number - A listing of defined IP
participants and their IP addresses.
•
Conference ID - The conference numeric ID used
for routing from the Entry Queue to the conference.
•
Recurrent reservations pattern - The frequency
pattern of the recurrent reservation.
•
Number of recurrent reservations - The number
of recurring reservation.
•
Meeting Organizer - The email address of the
meeting organizer.
In the MGC Personal Scheduler, this is the e-mail
address of the user that organizes the Meeting or
Appointment.
In the WebCommander, the login name of the user
that organizes the conference. With NT
authentication, the login name of the Windows user
is used.
•
Meeting Initiator - The email address of the user
who is using another person’s email account in
Outlook (on behalf of the Meeting Organizer).
Addition for
recurrent
reservations only
Insert text that is to appear in the in Recurrent
Reservation. This text can be regular or conditional
text.
Start Conditional
Text
Click the Start Conditional Text button. A bracket [can
be placed in the Body or Addition for recurrent
reservations only field, prior to the inclusion of a
parameter. Any parameter entered between the
bracket(s) becomes conditional text. Also, see End
Conditional Text listed below.
End Conditional
Text
Click the End Conditional Text button. The Parameter
placed between the Start Conditional Text and End
Conditional Text button (brackets: [parameter])
becomes conditional text. If the parameter is empty,
text marked as conditional text will be not included in
the email message.
Table 4-1: Email notification format parameters
Option
Description
Preview
Displays the format of the email based on the selected
customization:
Subject (WebCommander Only) - The subject heading
of the email.
Body - The text selected by the user, using the
Conference parameters.
6.
Click OK.
4-25
Chapter 4 - Options Settings
Enabling the “time” fields in the Web Server Manager:
1. Click the Include time fields in E-mail Format option.
This field enables the selected “time” E-mail Format parameters to
appear in the Personal Scheduler meeting invitation (e-mail).
4-26
5
Administrator’s Tasks
This chapter describes the tasks that can be performed only by users with the
administrator’s permission (configure the database).
Defining an MCU
To be able to run conferences, you must establish the connection between
the MCU and the MGC Web Server in the database.
To define a new MCU:
1. In the Browser area, right-click the MCU icon, and then click Add New
MCU to dB.
The MCU Properties dialog box opens.
5-1
Chapter 5 - Administrator’s Tasks
2.
Define the following parameters:
Table 5-1: MCU Properties Parameters
5-2
Option
Description
Name
Type the name of the MCU. Specify a name that
clearly identifies the MCU.
IP Address
Type the IP Address of the MCU.
Login
Enter the login name that will be used when
connecting to the MCU.
Password
Enter the password that will be used when
connecting to the MCU.
ISDN Prefix
The first digits of the MCU dial-in numbers that are
added at the beginning of the dial-in number
allocated to the end users by the MCU. The full dialin number is allocated by the service provider that
supplies the line. As the call passes through the
PBX, the MCU truncates part of the dial-in number.
This option is applicable to ISDN dial-in calls.
H.323 Prefix
Optional. The H.323 Network Service Prefix defined
in the MCU and in the gatekeeper with which the
MCU is registered. This prefix is used for undefined
dial-in H.323 participants and for board-hunting for
H.323 dial-in participants.
First Number
Type the first phone number in the range of ISDN
dial in numbers allocated by the MCU. These
numbers are added to the Prefix number to compose
the complete number dialed by participants when
connecting to the MCU. For example if you enter
1000, and the prefix is 97865, the first dial in number
in the range will be 978651000.
Last Number
Type the last phone number in the range of dial in
numbers allocated by the MCU. These numbers are
added to the Prefix number to compose the
complete number dialed by participants when
connecting to the MCU. For example if you enter
9999, and the prefix is 97865, the last dial in number
in the range will be 978659999.
MGC Web Server Manager User’s Guide
Table 5-1: MCU Properties Parameters
Option
Description
Order
Define the order in which the MCUs are selected to
handle a new conference when two or more MCUs
are connected. When a new conference is started,
the system will try to establish it on the MCU
numbered as 1.
3.
In order to work with firewalls the user can select the MCU listening
port. The default listening port is 5001. The Internet Assigned Numbers
Authority (IANA) assigned to the Accord MCU a new port number
(1205).
If you have problems connecting to the MCU, click the Advanced
button to select the new port number.
4.
In the Port Number list, select 1205 (the newly assigned port) or to
activate the auto port discovery mechanism, select Auto Discovery.
When selecting Auto Discovery the Port Number list is disabled.
5.
Click OK to confirm and add the MCU to the MCUs list.
5-3
Chapter 5 - Administrator’s Tasks
Viewing the MCUs List
•
In the Browser area, click the Server icon.
The MCUs list is displayed in the Status area.
The system displays in a table format the MCU Name, MCU Status
(which is displayed only if the Server is connected to the Web Server
Manager), MCU IP address, Order, the Login Name and Password used
to connect to the MCU, Order, the ISDN Prefix of the MCU dial-in
number, the H.323 prefix, the First Dial-in number and the last Dial-in
number. For an explanation of these fields, see the MCU definition on
page 5-2.
Sorting the MCUs List
You can sort the MCUs according to any of the fields by clicking on the
appropriate column heading.
5-4
MGC Web Server Manager User’s Guide
Defining a New Label
Labels may be used to group reservation or parties templates. Labeling
enables the remote user to filter conferences or participant templates when
accessing the database to schedule or monitor conferences.
To define a new Label:
1. In the Browser area, right-click the Labels icon, and then click Add New
Label to DB.
The Label Properties dialog box opens.
2.
In the Name box, enter the label name. This label may be used to filter
the conferences or parties stored in the database.
3.
Click OK to confirm and add the new Label to the database.
5-5
Chapter 5 - Administrator’s Tasks
Viewing the Labels List
•
In the Browser area, click the Labels icon.
The Labels list is displayed in the Status area.
The system displays the Label Names in a table format.
Sorting the Labels List
You can sort the labels alphabetically by name in ascending or descending
order by clicking on the Name column heading.
5-6
MGC Web Server Manager User’s Guide
Defining Permissions
Permissions define the access rights to various functions of the MGC
WebCommander, MGC Web Server Manager and MGC Database Manager (a
module of the MGC Manager application). You can define various permission
types according to your needs, creating a wide range of user types. Once
defined, the permission is assigned to a user, setting the user rights to various
functions.
The database includes five default permission types. These permissions are
detailed in “Predefined Permissions” on page 5-19.
To define a new Permission:
1. In the Browser area, right-click the Permissions icon and then click Add
New Permission to DB.
2.
The Permission Properties-Settings1 dialog box opens.
5-7
Chapter 5 - Administrator’s Tasks
3.
Define the following options:
Table 5-2: Permission Properties - Settings1 Parameters
5-8
Option
Description
Permission Name
Enter the name for this set of options determining
the access rights to various functions. This set will
be assigned to users and will determine their access
rights.
Database
Configuration
Determines whether the user will be able to
configure the administrator’s tables (Defaults,
MCUs, Labels, Permissions, Users and Groups) in
the database via the Web Server Manager or the
MGC Database Manager (in the MGC Manager
application), when both applications use the same
database. This option should be enabled for a
Permission that will be assigned to an Administrator.
Modify Defaults in
Manager
Determines whether the user will be able to read the
various default sets from the database, add new
defaults to the database or modify the existing
default sets in the database from the MGC Database
Manager or the MGC Web Server Manager
applications.
Owned – The user will be able to view and/or modify
(while saving to database) the default sets assigned
to him/her.
All - The user will be able to view and/or modify
(while saving to database) all the default sets in the
database.
Enable Meeting
Scheduler (Web
Only)
Select this check boxto let the participant access the
Meeting Scheduler module and schedule
conferences. When this check box is cleared, the
WebCommander user will not be able to access the
Conference templates and start a new conference.
MGC Web Server Manager User’s Guide
Table 5-2: Permission Properties - Settings1 Parameters
Option
Description
Parameters view
From the drop-down list, select one of the following
options:
Partial – The user will be able to see only a limited
set of reservation parameters. In such a case, the
remaining parameters are taken from the reservation
default settings.
Full – The user will be able to view and modify all
the reservation parameters.
Show saved time
When enabled, two additional fields (Start Date and
Start Time) are displayed in the Conference –
Schedule dialog box. Using these fields, the users
will be able to add to the conference template a time
indication to when the conference should start.
However, the conference will not start automatically
at this time (it is only used as a reference or as a
filtering option).
Start Conference
Indicates whether the user will be able to initiate
conferences from the Meeting Scheduler module.
You can select one or all of the following options:
Start Immediately – The user will be able to start an
on going conference at the end of the conference
definition.
Start At + Res Recurrence – The user will be able
to define the conference start date and time at which
the conference will be automatically started by the
MGC WebCommander. In addition, the user will be
able to define recurrent reservations.
Start (By Saved Time) – The user will be able to
start the conference using the Start Date and Start
Time parameters to schedule the conference. This
option is enabled only when the Show Saved Time
option is enabled.
5-9
Chapter 5 - Administrator’s Tasks
Table 5-2: Permission Properties - Settings1 Parameters
5-10
Option
Description
Enable
Reservation
Calendar (Web
Only)
Select this check box to enable users to access the
Calendar and view the scheduled conferences/
Meeting Rooms in the Calendar.
When cleared, the user will not be able to access the
Calendar.
View ALL Reservations in Calendar – Select this
check box to allow the user to view all reservation in
the Calendar, including reservations made by other
users. If this check box is cleared, the user will be
able to see only the reservations s/he scheduled.
Enable Meeting
Rooms list (Web
Only)
Select this check box to enable users to access the
Meeting Rooms list and view the active and passive
Meeting Rooms.
When cleared, the user will not be able to access the
Meeting Rooms list.
View ALL Reservations in Meeting Rooms List –
Select this check box to allow the user to view all
Meeting Rooms in the Meeting Rooms list, including
reservations made by other users. If this check box
is cleared, the user will be able to see only the
Meeting Rooms s/he scheduled.
Custom Headers
Order
Select this check box to enable the display columns
not displayed in the Participant Details pane of the
On Going Party Headers list. The Selected On
Going Party Headers list displays the columns that
would appear in the ongoing conference pane. The
order in which the columns are listed is the order in
which they appear in the ongoing conference pane.
To display a column, in the On Going Party Headers
list, select the column name to be added and then
click the double right arrow button [>>].
The column is added to the Selected On Going Party
Headers list.
To hide a column, in the Selected On Going Party
Headers list, select the column name to hide, and
then click the double left arrow button [<<]. The
selected column) is moved to the On Going Party
headers list.
MGC Web Server Manager User’s Guide
4.
Click the Settings2 tab.
This dialog box enables you to set the access rights to the
WebCommander’s Meeting Director module and to perform various
tasks while monitoring on going conferences. In addition, general user
behavior may be defined.
5.
Define the following parameters:
6.
Choose OK to confirm and add the new Permission to the database.
5-11
Chapter 5 - Administrator’s Tasks
Table 5-3: Permission Properties - Settings2 Parameters
5-12
Option
Description
Enable Meeting
Director (Web
Only)
Select this check box to allow users to access the
Meeting Director module and monitor On Going
conferences via the MGC WebCommander
application. When cleared (disabled), the Meeting
Director module will not be displayed in the
WebCommander application.
Change
conference end
time
Select this check box to let the user change the
conference duration (extend or terminate it) by
modifying the conference end time.
Extend conference
end time
Select this check box to enable the user to activate
the automatic extension of a conference feature.
When enabled, the system will automatically extend
an On Going conference when participants are still
connected, up to a maximum extension time
predefined for the MCU (in the MGC Manager
“system.cfg” file).
Terminate
conference
Select this check box to enable the user to manually
terminate the conference at any given time.
Video Layout
selection
Select this check box to let the user select a different
video layout for an On Going Continuous Presence
conference.
Conference lock
Select this check box to allow the user to lock the
conference for dial-in participants in order to save
system resources. When a conference is locked, dial
in participants will be rejected from the conference.
Place conference
on-hold
Select this check box to allow the user to place an
Audio Only conference on hold. While the
conference is on hold, the participants hear music.
Designate
exclusive speaker
Select this check box to let the user designate a
participant in an audio only conference as the
conference speaker/lecturer while automatically
muting all other participants.
Mute “Meet Me”
parties
Select this check box to let the user enable or
disable the Mute Meet Me Parties option during an
On Going conference.
MGC Web Server Manager User’s Guide
Table 5-3: Permission Properties - Settings2 Parameters
Option
Description
Control the voting
session
Select this check box to enable the user to control
voting/polling sessions during on going Audio Only
conferences.
Change Web/
Chairperson
Password
Enables you to change the password used by the
participant to identify himself/herself as the
conference chairperson. The password is also used
to access the conference properties and to monitor
the conference in WebCommander.
Change Conf.
Entry Password
Enables you to change the password used by the
participant to access the conference.
Modify User
Defined
Conference fields
Select this check box to allow the WebCommander
user to modify User Defined fields for a conference.
Recording Control
Check this box to allow the user to activate and
control a recorder.
Add/Remove
participants from
Q&A queue
Select this check box to enable the user to add or
remove participants from the Question and Answers
queues during On Going conferences. When
checked enables the following icons & drop-down
menus:
• Add participant to Q&A
•
Change
participants
position in Q&A
queue
Remove participant from Q&A
Select this check box to enable the user to change
the participants position from the Question and
Answer queues during On Going conferences.
When checked enables the following icons & dropdown menus:
• Move Participant Position Up in Q&A
•
•
•
Move Participant Position Down in Q&A
Move Participant to First Position in Q&A
Move Participant to Last Position in Q&A
5-13
Chapter 5 - Administrator’s Tasks
Table 5-3: Permission Properties - Settings2 Parameters
Option
Description
Control Questioner
Session
Select this check box to enable the user to control
the questioner session from the Question and
Answer queues during On Going conferences.
When checked enables the following icons & dropdown menus:
• Stop questioner session
•
5-14
Next questioner
View Participants
Select this check box to enable the user to view
participant properties while monitoring an On Going
conference. When disabled (cleared), the user will
not be able to view or modify the participant
properties.
Delete participants
from a Conference
Select this check box to enable the user to be able to
delete participants from an On Going conference.
Connect/
disconnect
participants
Select this check box to let the user connect or
disconnect participants from an On Going
conference.
Mute participants
Select this check box to enable the user to mute the
participant audio and/or video channels during an
On Going conference.
Add participants
from database
Select this check box to let the user add new
participants from the Participants database to an On
Going conference.
Create new
participants
Select this check box to allow the user to define new
participants during an On Going conference.
Modify
participant’s
properties
Select this check box to allow the user to modify the
participant properties during an On Going
conference, before the participant connects to the
conference.
Modify
participant’s
volume
Select this check box to enable the user to change
the volume of the participant’s audio transmitted to
the conference during an On Going conference.
MGC Web Server Manager User’s Guide
Table 5-3: Permission Properties - Settings2 Parameters
Option
Description
Video forcing
Select this check box to allow the user to video force
(select a specific participant to appear in a given
video window) participants to various video layout
windows.
Turn on/off AGC
The Auto Gain Control mechanism regulates noise
and audio volume by keeping the received signal to
all participants balanced. Different endpoints and
phones produce different types of source noise and
volume. The Auto Gain Control mechanism can be
applied to all incoming audio streams prior to mixing,
thereby dynamically changing the amplification of
the input signal providing a constant output
amplitude.
Auto Gain Control mechanism regulates:
• Measured energy of an input signal
•
Characterization of an input signal – voice or
noise (to a constant and desired output level).
Select this check box to enable the AGC function.
Change to
chairperson
Select this check box to let the WebCommander
user change the participant status to Chairperson.
Modify
participant’s
listening volume
Select this check box to let the WebCommander
user to modify participants’ listening volume.
View ALL ongoing
conferences in
Main Menu
Select this check box to let the user view the list of
all the On Going conferences currently running on all
the connected MCUs. The list will include all the
conferences including those assigned to other users
(these conferences will appear with a lock icon next
to them). To monitor On Going conferences
assigned to other users, the appropriate password
must be entered by this user.
Moderators Chat
Select this check box to let the user chat using text
messaging during an On Going conference.
5-15
Chapter 5 - Administrator’s Tasks
Table 5-3: Permission Properties - Settings2 Parameters
Option
Description
Print/Export
ongoing
participants
Select this check box to enable the ongoing
conference’s participants list be printed or exported
to an .xls (Excel) formatted file.
General
5-16
View Mode
Set the View Mode to Administrator to allow the
user to access Conference Reservation Templates
and Participant Templates.
Set the View Mode to Basic for users who do not
require access to Conference Reservation or
Participant templates.
Always prompt for
Conference
password
Select this check box when you require the participant to be prompted for the conference password.
Limit Maximum
number of
participants
The number of participants a user can add to a
Video or Audio Only conference in the
WebCommander site can be limited. When this
option is enabled, the user cannot start a conference
in which the number of participants exceeds the limit
defined in his/her permissions. If the maximum
number of participants is exceeded, an appropriate
error message is displayed.
When no limit is set (when this check box is cleared),
the default maximum number of participants is
allowed.
Select this check box and then enter the required
number of participants in the text box.
Dial out to Invite
new participants
During an On Going Audio Only conference, a user
may request to invite a participant to join the
conference. The request is sent via the telephone
using DTMF codes.
Select this check box to enable the user to invite
new participants during an On Going Audio Only
conference.
MGC Web Server Manager User’s Guide
Table 5-3: Permission Properties - Settings2 Parameters
Option
Description
Send Email
The e-mail address of the participant. When you opt
to send and e-mail during the conference definition,
recurring reservation or update the e-mail address is
used to send an e-mail to the participant.
Party phone
number/Ip address
in email
Select this check box to add the participant’s phone
number or IP address in an e-mail sent after the
conference definition, recurring reservation or
update of a reservation.
View MCU Name
Select this check box to let the user view the MCU
name in the On Going Conferences List.
Change Password
Select this check box to allow the user to change his/
her password to the WebCommander site from the
Main Menu pane of WebCommander.
Modify Conference
Billing Code
Select this check box to allow the WebCommander
user to modify the conference Billing code during the
On Going conference.
Allow Connection
Type Changes
A user may start a conference in the
WebCommander site that includes Dial-In, Dial-Out
and/or Direct participants, and add new participants
of Dial-In, Dial-Out and/or Direct connection type.
The user is able to define participants of all
connection types in the participants database or in
the conference templates, but will not be able to
launch such templates if he/she does not have the
appropriate permission. For example, if a Dial-In
participant is added to an On Going conference but
the user does not have permission for Dial-in, an
error message appears.
Select or clear the Dial In, Dial Out, or Direct check
boxes to indicate the connection type of participants
that can be added to the conference.
5-17
Chapter 5 - Administrator’s Tasks
Viewing the Permissions List
1.
In the Browser area, click the Permissions icon.
The Permissions list is displayed in the Status area, in a table format.
The system shows, for each Permission, the currently defined access
rights to three main modules.
•
•
•
Define/Initiate Conference – indicates whether the user has access to
the Meeting Scheduler module. This option is not relevant to the
MGC Manager users.
Monitoring Conference – indicates whether the user has access to
the Meeting Director module. This option is not relevant to the
MGC Manager users.
Database Configuration – indicates whether the user will have
access to the administrator tables of the database.
Sorting the Permissions List
You can sort the Permissions alphabetically, according to their Name, by
clicking on the Name column heading.
5-18
MGC Web Server Manager User’s Guide
Predefined Permissions
The system includes five default permission types, which define the access
rights for various system modules. These permissions are: Administrator,
Operator, Moderator, Moderator (without initiating) and Participant. The
following table lists the access rights to the various functions of the default
permission types defined in the system:
Permission
Type Administrator
Operation
Operator Moderator
Moderator
(without Participant
initiating)
Database
Configuration
Modify defaults in
Manager
All
Owned
Owned
Owned
Owned
Enable Meeting
Scheduler
Parameters View
Full
Full
Partial
Show Saved Time
View Participants
Start Immediately
Start At + Res.
Recurrence
Start (by saved
time)
Start a Requested
Meeting
Enable
Reservation
Calendar
5-19
Chapter 5 - Administrator’s Tasks
Permission
Type Administrator
Operation
5-20
Operator Moderator
Moderator
(without Participant
initiating)
View ALL
reservations in the
Calendar
Enable Meeting
Rooms List
View ALL
reservations in
Meeting Rooms list
Enable Meeting
Director
Change conference
end time
Extend conference
end time
Terminate
conference
Video Layout
Selection
Conference lock
Place conference
on hold
Designate exclusive
speaker
Mute “Meet Me”
Parties
Control the voting
session
Change web/chair
person password
MGC Web Server Manager User’s Guide
Permission
Type Administrator
Operation
Operator Moderator
Moderator
(without Participant
initiating)
Change conf entry
password
Modify User Defined
Conference fields
Recording Control
Add/Remove
participants from
Q&A queue
Change participants
position in Q&A
queue
Control Questioner
Session
View Participants
Delete participants
from a conference
Connect/Disconnect
participants
Mute participants
Add participants
from database
Create New
Participants
Modify participant
Properties
Modify participant’s
Volume
Video Forcing
5-21
Chapter 5 - Administrator’s Tasks
Permission
Type Administrator
Operation
Moderator
(without Participant
initiating)
Turn On/Off AGC
Change to
chairperson
Modify participant’s
listening volume
View ALL ongoing
conferences in Main
Menu
Moderators Chat
Print/Export
ongoing participants
Administrator
Basic
Administrator
Basic
Basic
General - View
MCU Name
Change Password
Modify Conference
Billing Code
General – Always
Prompt for
conference
password
General – Limit
maximum number
of participants
Dial-in
Dial-out
direct
Same as
Administrator
View Mode
Dial out to Invite
new participants
5-22
Operator Moderator
MGC Web Server Manager User’s Guide
Permission
Type Administrator
Operation
Operator Moderator
Moderator
(without Participant
initiating)
Send E-mail
Participant Phone
Number/IP address
in E-mail
Allow Connection
Type Changes
5-23
Chapter 5 - Administrator’s Tasks
Defining a New User
The database includes the list of all users that can access the database via the
MGC Web Server Manager or the WebCommander.
Depending on the permission assigned to the user, access to the Meeting
Scheduler, Meeting Director and Database configuration may be denied and/
or various fields and operations may be disabled.
The User definition is used in Ad Hoc conferencing when the
WebCommander is used as the External database application for conference
initiation and conference access validation. For more details, see “Ad Hoc
Conferencing and Conference Access Using WebCommander for
Authentication” on page 5-36.
To define a new User:
1. In the Browser area, right-click the User icon, and then click Add New
User to DB.
The User Properties dialog box opens.
5-24
MGC Web Server Manager User’s Guide
2.
Define the following parameters:
Table 5-4: User Properties
Option
Description
Name
Enter the name of the user.
Password
Enter the password to be used by the user when
accessing the database via the MGC Web Server
Manager, the WebCommander and the MGC
Database Manager. The password is hidden to
increase system security.
Confirm Password
Confirm the password by re-typing it. The password
is hidden to increase system security.
Permission
Select the Permission (access rights) type for the
user from the drop-down list. The permission type is
defined in the Permissions table. It defines the
modules the user can access and the functions s/he
can perform.
E-mail Address
If the e-mail option is enabled in the Permission
selected for the user, enter the user’s e-mail
address. This address will be used when an e-mail is
sent from the user when scheduling a reservation.
Web Office URL
If the user has a WebOffice URL, enter it here. When
starting a new meeting, the URL will appear on the
WebCommander web page. Conference participants
can click on the URL link and enter the meeting. For
more information on WebOffice, refer to the
WebOffice User’s Guide.
MCU per User –
Custom MCU
The system administrator can select the MCUs on
which the user may schedule reservations or start
On Going conferences.
Select this check box to assign the MCUs to the
user. When cleared, the user will be able to run
conferences on all the MCUs defined in the MGC
Web Server.
Select MCUs
Click this button to designate the MCUs on which the
user can run conferences.
The MCUs per User dialog box opens.
5-25
Chapter 5 - Administrator’s Tasks
3.
Click the Creation & Authentication button to display additional
parameters.
4.
Define the following parameters:
Table 5-5: Conference Creation and Authentication Parameters
Option
Description
Conference Creation
Billing Code
5-26
Enter the billing code that will be added to the
conference parameters when starting a new on
going conference from the New Meeting window or
from the MGC Personal Scheduler (Outlook’s Addon application).
In Ad Hoc conferencing, when the MCU is
configured to use the WebCommander Server
Manager as the External database application for
authentication, the billing code defined here
overwrites the billing code defined in the Ad Hoc
Profile.
MGC Web Server Manager User’s Guide
Table 5-5: Conference Creation and Authentication Parameters
Option
Description
Entry Password
Enter the conference entry password the participants
will have to enter to connect to the conference. This
password is assigned to the conference scheduled
or started from the New Meeting window or from the
MGC Personal Scheduler (Outlook’s Add-on
application).
In Ad Hoc conferencing, when the MCU is
configured to use the WebCommander Server
Manager as the External database application for
authentication, the Conference Entry Password
defined here overwrites the Conference Entry
Password defined in the Ad Hoc Profile. This
password becomes the conference password for the
conference initiated by this user.
Web/Chairperson
Password
Enter the Chairperson password the participants will
have to enter to connect to the conference as
chairperson or to view the conference properties
from the WeCommander Web site. This password is
assigned to the conference scheduled or started
from the New Meeting window or from the MGC
Personal Scheduler (Outlook’s Add-on application).
In Ad Hoc conferencing, when the MCU is
configured to use the WebCommander Server
Manager as the External database application for
authentication, the Chairperson Password defined
here overwrites the Chairperson Password defined
in the Ad Hoc Profile. This password becomes the
Chairperson password for the conference initiated
by this user.
5-27
Chapter 5 - Administrator’s Tasks
Table 5-5: Conference Creation and Authentication Parameters
Option
Description
Ad Hoc Conferences
Numeric ID
In Ad Hoc Conferencing, the Numeric ID is used for
authentication purposes. When a participant
connects to an Ad Hoc-enabled Entry Queue, which
is configured to access the WebCommander as the
external database application, the Numeric ID is
used to verify whether the participant is authorized to
start a new on going conference.
If the Numeric ID exists in the WebCommander
database, a new conference is started and this
Numeric ID is assigned to the conference. The
Participant who has started the On Going
conference is automatically created and added to
the conference.
If the Numeric ID does not exist in the external
database, the participant is disconnected from the
MCU.
Conference
Information
Enter the Contact Information for the conference.
This parameters overwrites the User Defined 1 field
information in the Profile.
Participant Authentication
5-28
PIN Code
Enter a personal code to be assigned to this user.
This PIN code is used to find the participant in the
WebCommander database - Users table, when the
IVR Service is configured to access the external
database for conference access authentication. This
code can replace the conference Entry Password
when the conference access is validated for each
conference participant individually (and not at the
conference level using one password for all
participants.
Participant
Information
Enter general information about the participant. The
information in this field replaces the information
defined in the User Defined 1 field of the Participant
properties when connecting to the conference.
MGC Web Server Manager User’s Guide
Table 5-5: Conference Creation and Authentication Parameters
Option
Description
VIP
Select whether this user will be set as VIP when
connecting to the conference. This field overwrites
the VIP definition of the Participant properties for this
user when connecting to the conference.
5.
Click OK.
6.
To designate MCUs for a user, in the Properties window, select the
Custom MCU check box, and then click the Select MCUs button.
The MCUs Per User dialog box opens.
The MCUs list shows all the currently defined MCUs that were not
assigned to the user. The Selected MCUs list shows the MCU currently
assigned to the user.
7.
To assign MCUs to the user, in the MCUs list, click the MCU name(s)
and then click the Add [>>] button. Multi-selection is available using
standard Windows conventions.
The selected MCUs appear in the Selected MCUs list.
5-29
Chapter 5 - Administrator’s Tasks
The order of the MCUs in the Selected MCUs list determines the order in
which the system will look for a free MCU to run a conference scheduled
by this user.
To cancel the assignment of MCUs to the user, in the Selected MCUs list,
click the MCU name(s) and then click the Remove [<<] button. Multiselection is available using standard Windows conventions.
The unassigned MCUs appear in the MCUs list.
8.
Click OK to return to the User Properties dialog box.
9.
Click OK to confirm and add the User to the database Users table.
Viewing the Users List
To view the Users list:
•
In the Browser area, click the Users icon.
The Users list is displayed in the Status area.
The system displays in a table format the User Name, Password and
Permission as defined for each User.
Sorting the Users List
You can sort the users according to Name or Permission by clicking the
appropriate column heading.
5-30
MGC Web Server Manager User’s Guide
Automatically Adding Authenticated Windows Users to the
Users List
Users registered in the Windows domain may be automatically added to the
Users list, based on their Windows user Name and Password and parameters
defined in the Participant Defaults. The users are added to the Users table in
the database if the Automatically add authenticated Windows users to
WebCommander Users list is selected in the Web Configuration window.
Once the user is added to the Users list in the MGC Web Server Manager, you
can add the user E-mail address, WebOffice URL and modify the user’s
permission.
Windows Authentication is not supported by Netscape browser.
To modify the Properties of a Windows Authenticated User in the Web
Server Manager application:
1. Expand the database tree.
2.
Click the Users icon to display the Users list in the Status area.
3.
In the Status area, double-click the icon of the user to modify.
The User Properties dialog box opens.
4.
Enter the User E-mail address, WebOffice URL and modify the user’s
permission. Do not change the user name and password as they are taken
from the Windows domain.
5.
If required, enter the Creation and Authentication parameters as
described in “Conference Creation and Authentication Parameters” on
page 5-26.
6.
Click OK.
5-31
Chapter 5 - Administrator’s Tasks
Manually Adding Windows Users to the Users List
In the MGC Server Manager application, define the users that are authorized
to access the MGC WebCommander Web site based on their Windows login
name and password.
To manually add Users when working in Windows Authentication mode:
1.
Expand the database tree.
2.
In the Browser pane, right-click the Users icon, and then click Add New
User to dB.
The User Properties dialog box opens.
5-32
3.
Define the user Name as it is registered in the Windows domain.
4.
Leave the Password field blank as the password will be taken from
Windows Authentication.
5.
Select the user’s Permission from the list.
MGC Web Server Manager User’s Guide
6.
It is recommended to enter the user’s E-mail address, if the conference
default name format will be configured to include the E-mail address.
7.
If the Ad Hoc Conferencing is configured on the MCU and
WebCommander users may start on going conferences using Ad Hoc
conferencing, define the Conference Creation properties as described in
“Conference Creation and Authentication Parameters” on page 5-26.
8.
Click OK.
Assigning Users to Groups
Groups are used to increase the system security by allowing users to view
reservation and participant data only from groups to which they have access
right.
Once the Groups are created, you may define the access rights of users to
each of the existing Groups in the group hierarchy. The definition can be done
either per Group or per User. When defining the access rights per user, you
select the groups that the user will be able to access. When defining the access
rights per group you select the users that will be able to access a certain
group. For more details regarding the Groups table and the assignment of
access rights to a Group, see “Defining Groups” on page 5-45.
To assign Users to Groups:
1. In the Browser area, click the Users icon to list the currently defined
users.
5-33
Chapter 5 - Administrator’s Tasks
2.
Right-click the icon of the user whose access right to define, and then
click Assign groups to user.
The <User Name> Group Assignment dialog box opens, listing the
Groups to which the user has access rights.
The list displays the groups currently assigned to the User with the
access rights the user has to each of these groups.
5-34
MGC Web Server Manager User’s Guide
You may modify the user’s access rights to a specific group by clicking
the group and then selecting the appropriate Read and Write properties.
For more details, see the assignment of new groups, next.
3.
To assign additional groups to the user, click the Add Assignment
button.
To remove an assigned group, select the Group you wish to delete and
then click the Delete Assignment button.
If you have selected to Add Assignment, the following dialog box opens.
— Click the group to assign to the user. If needed, click the plus [+]
icon to expand the Groups tree until the desired group is shown.
— Define the user ability to view, create new and/or modify conference
and participant templates.
— Select the Read check box to enable the user to view the templates
assigned to the Group without modifying them or adding new
templates to the group.
— Select the Write check box to enable the user to view, add, remove
and modify templates assigned to the group. When selecting this
option, the Read check box is automatically selected.
Leaving the Read and Write check boxes cleared means that the user
5-35
Chapter 5 - Administrator’s Tasks
4.
5.
will not be able to view, modify or create new Participant or
Conference templates.
— In the View MCU Conferences, select one of the following options:
— No – The user will not be able to view the reservations, Meeting
Rooms and On Going conferences assigned to other users of the
same Group, even if the View All options are enabled in the
Permissions assigned to this user.
— Enter with Password – The user will be able to view Reservations,
Meeting Rooms and On Going Conferences scheduled by other
users assigned to this group, if the appropriate password will be
entered upon their selection.
— Enter without Password – The user will be able to view all
Reservations, Meeting Rooms and On Going Conferences
scheduled by other users assigned to this group without any
restrictions.
Click OK.
The system returns to the User Assignment to Group dialog box and adds
the group to the list of groups to which the user has access rights.
Add additional groups or click the Close button to complete the
assignment procedure.
Ad Hoc Conferencing and Conference Access Using
WebCommander for Authentication
The Ad Hoc conferencing is configured in the MGC Manager application.
For more details on the configuration and requirements of Ad Hoc
conferencing in the MGC Manager application, see the MGC Manager User’s
Guide, Volume II, Chapter 3.
The MGC WebCommander can also be configured to work as the external
database application for Ad Hoc conferencing and conference access
authentication.
There are several Ad Hoc conferencing and conference access authentication
scenarios in which the MCU sends queries to the external database
application (in this case the WebCommander) for authentication:
5-36
•
Conference Initiation - Numeric ID authentication
•
Conference Access - Conference Entry Password authentication
MGC Web Server Manager User’s Guide
Conference Access - Chairperson Password authentication
•
Conference access authentication can be part of the Ad Hoc conferencing
flow (conference initiation authentication), or independent of Ad Hoc
conferencing. In this case each participant’s connection to a conference is
validated by the external database application (such as the WebCommander
server).
When Ad Hoc conferencing for conference creation is the first stage in the
flow, the Entry Queue is configured to Ad Hoc conferencing with the
conference parameters defined in a Profile assigned to it. The Entry Queue
Service assigned to the Ad Hoc-enabled Entry Queue is usually configured to
access the External Database application for conference creation
authentication.
In the WebCommander - Web Server Manager application, in the Users
Properties table, you must define all users with rights to start a new
conference using Ad Hoc conferencing. For each user defined in the Web
Server database, you enter the PIN Code, conference Numeric ID, Conference
Entry Password and Chairperson Password (when applicable), billing code
and Conference general information (corresponding to the User Defined 1
field in the Profile properties). In addition each user is assigned a PIN code,
and his/her VIP status may be defined.
The user definitions are used for authentication: who can start an On Going
conference from an Ad Hoc-enabled Entry Queue, and in some configurations
who can join the conference as a participant and who as a chairperson.
Conference access authentication can be independent of Ad Hoc conferencing
(conference initiation authentication). In this case, each participant connection to
a conference is validated with the WebCommander server.
Ad Hoc Conferencing using WebCommander Server as the External
Database Application for Conference Initiation Authentication
To increase the system security and ensure that only authorized users/callers
can start a new conference, the WebCommander application is used for
authentication.
The procedure to initiate an On Going conference is as follows:
1.
The participant dials into an Ad Hoc-enabled Entry Queue.
2.
The participant is requested to enter the target conference Numeric ID.
5-37
Chapter 5 - Administrator’s Tasks
3.
The participant inputs the conference Numeric ID using the endpoint
remote control or telephone using DTMF codes. If there is currently an
On Going conference with this numeric ID, the participant is moved to
that conference and another authentication process may occur, depending
on the conference IVR Service configuration.
4.
If there is no On Going conference with that Numeric ID, the MCU
sends the Numeric ID to the WebCommander Web Server to verify if its
database contains a user with this assigned Numeric ID and if this user is
allowed to initiate new conferences.
5.
If the WebCommander Web Server finds such a user, it sends a
confirmation to start the conference back to the MCU. The new
conference is started based on the Profile assigned to the Entry Queue.
6.
In addition to the confirmation to start the conference, the
WebCommander Web Server sends the MCU the conference parameters
that are part of the user definition in the database Users table:
Conference Entry Password
— Chairperson Password
— Billing Code
— Conference Information (corresponding to conference User Defined
1 field)
These parameters overwrite the conference Profile definitions for these
fields.
—
If no information is included in the Users table of the database, the
information is taken from the Profile.
If the Profile does not contain definitions for these fields, they remain empty, and
participants will be able to connect to the conference without entering the
conference entry password or chairperson password (depending on the IVR
Service configuration).
The conference is derived from the User name as defined in the
WebCommander Server Manager-Users table and the conference
numeric ID in the following format: user name_numeric ID.
7.
5-38
Once the conference is started, the participant who initiated the
conference is moved to the conference. If no IVR Service is assigned to
the conference, or if the IVR Service is configured without conference
MGC Web Server Manager User’s Guide
Entry Password or without chairperson password prompts and
functionality, the participant is connected directly to the conference.
8.
If the new On Going conference is assigned an IVR service with
conference entry password and chairperson password functionality but
without External database authentication and prompts, the participant is
requested to enter these passwords in order to connect to the conference.
The passwords the participant enters are checked only against the
passwords defined for the conference and the participant connects to the
conference as an undefined chairperson or a standard participant.
Figure 5-1: Ad Hoc Conferencing with Conference Numeric ID Authentication
To enable this workflow, the following components must be defined in the
system:
•
An Entry Queue Service configured to access the WebCommander server
for conference initiation authentication with the appropriate Numeric ID
request messages.
•
An Ad Hoc-enabled Entry Queue with an assigned Profile and the
appropriate Entry Queue Service.
•
In the WebCommander Web Server Manager application–Users table,
definition of users who have the right to start a new conference using the
Ad Hoc conferencing mechanism and for each user the appropriate
conference Entry Password, Chairperson Password and Billing code that
will be assigned for each conference. For more details on User definition,
see “Conference Creation and Authentication Parameters” on page 5-26.
5-39
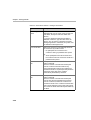
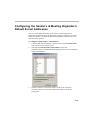
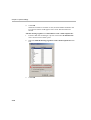
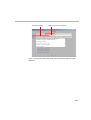
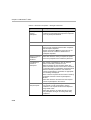
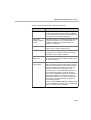
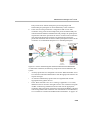
Chapter 5 - Administrator’s Tasks
The MCU is configured to access the external database by setting the
appropriate flags in the “system.cfg”. For more information, see the
MGC Manager User’s Guide, Volume II, Chapter 3.
•
Conference Access Authentication Request using WebCommander
as the External Database Application
An additional security measure of verifying the conference entry password
can be added to the Ad Hoc conference initiation. Which mean participants
with valid passwords can connect to the conference.
Conference access authentication can be independent of Ad Hoc conferencing
(conference initiation authentication). In this case each participant’s connection
to a conference is validated by the WebCommander server.
1.
If the conference is started using the Ad Hoc conferencing mechanism,
follow steps 1 to 7 of the Ad Hoc Conferencing using WebCommander
Server as the External Database Application for Conference Initiation
Authentication flow.
2.
The On Going conference is assigned an IVR Service, which is
configured to access an External database application for conference
Entry Password authentication with the appropriate Entry Password
request messages. When the participant is moved from the Entry Queue
to the conference IVR queue, the participant is prompted for the
conference Entry Password.
3.
At this point, the participant can enter:
His/her personal PIN Code, as defined in the Users table
— The conference password as defined for the conference either in the
Profile, or by the parameters sent from the external database
application to the MCU at the conference start time
The MCU sends the WebCommander server the conference numeric ID
and the participant’s request for the conference entry password.
—
4.
5.
The WebCommander searches its database for a User matching the PIN
code sent from the MCU.
—
5-40
If a user matching the PIN code is found, the WebCommander
checks whether the Conference Numeric ID sent from the MCU is
identical to the Numeric ID defined for the User in the database. If
yes, the participant is connected to the conference as the
chairperson, replacing the participant temporary name with the
MGC Web Server Manager User’s Guide
name defined for the User in the database. In addition, the
participant VIP state and Participant Information parameters are
taken from the Users table and they overwrite these parameters in
the Participant Properties in the MGC Manager application or the
WebCommander Web site.
— If a user with this PIN code is found, but the conference numeric ID
is not identical to the numeric ID defined for the User, the
participant enters the conference as an identified standard
participant; the participant name, VIP state and Participant
Information (corresponding to the User Defined 1 field in the
Participant Properties definition) are taken from the Users table.
— If the participant has entered the correct conference Entry Password
instead of his/her personal PIN Code, the participant cannot be
found in the database but he/she is allowed to enter the conference;
the participant enters the conference as an undefined participant.
— If the participant enters the wrong conference password or the PIN
code does not exist in the database, the participant is either moved to
the Participants Queue for Operator’s assistance (MGC Manager
application), or is disconnected from the conference.
Figure 5-2: Ad Hoc Conferencing with Conference Numeric ID and Conference
Entry Password Authentication
5-41
Chapter 5 - Administrator’s Tasks
This workflow works after the same components as for the Ad Hoc
Conferencing using WebCommander Server as the External Database
Application for Conference Initiation Authentication workflow are defined in
the system with the following additions are implemented:
•
The IVR Service assigned to the destination conference must be
configured to check the external database server for the Conference
Entry Password for each participant connecting to the conference. If the
conference is created via Ad Hoc-enabled Entry Queue, the IVR Service
must be assigned to the Profile used for the Ad Hoc Conferencing.
•
The WebCommander Server Manager-Users table must include the
Participant PIN Code for each user. The Participant Information and VIP
state may also be defined. For more details on User definition, see
“Conference Creation and Authentication Parameters” on page 5-26.
Conference Access - Chairperson Password Authentication Request
using WebCommander as the External Database Application
An additional security measure may be added to the Ad Hoc conference
initiation by verifying the chairperson password. In this case, standard
participants connect to the conference without entering the conference Entry
Password. Only a participant that wants to join the conference as a
chairperson is verified with the WebCommander server.
Chairperson access to the conference can be validated independent of the Ad
Hoc conferencing. In such a case, each participant that identifies himself/herself
as the conference chairperson upon connection to a conference is validated
with the WebCommander server.
Initiating a conference using this method:
5-42
1.
If the conference is started using Ad Hoc conferencing mechanism,
follow steps 1 to 7 of the Ad Hoc Conferencing using the
WebCommander Server as the External Database Application for
Conference Initiation Authentication flow.
2.
The On Going conference is assigned an IVR Service that is configured
to access an External database application for Chairperson Password
authentication and with the appropriate Chairperson Password request
messages. In this case, the IVR Service does not include prompts for
conference Entry Password. When the participant is moved from the
Entry Queue to the conference IVR queue, the participant is prompted
MGC Web Server Manager User’s Guide
for the Chairperson identifier key and if one is entered, the participant is
prompted for the Chairperson Password.
— If no Chairperson identifier key is entered, the participant enters the
conference as a standard, undefined participant.
3.
At this point, the participant that identified himself/herself as the
conference chairperson can enter:
— His/her personal PIN Code, as defined in the Users table
— The chairperson password as defined for the conference. If Ad Hoc
conferencing was used to initiate the conference, the Chairperson
Password is either defined in the Profile, or by the parameters sent
from the external database application to the MCU at the conference
start time
4.
The MCU sends the WebCommander server the conference Numeric ID
and the participant input to the chairperson password request.
5.
The WebCommander server searches its database for a User using the
PIN code sent from the MCU.
— If a user with this PIN code is found, the participant is connected to
the conference as the chairperson, replacing the participant
temporary name with the name defined for the User in the database.
In addition, the participant VIP state and Participant Information
parameters (corresponding to the User Defined 1 field in the
Participant Properties definition) are taken from the Users table and
they overwrite these parameters in the Participant Properties in the
MGC Manager application or the WebCommander Web site.
— If the participant has entered the correct conference Chairperson
Password instead of his/her personal PIN Code, the participant
cannot be found in the database but he/she is allowed to enter the
conference as chairperson; the participant enters the conference as
an undefined chairperson.
— If the participant enters the wrong Chairperson Password or the PIN
code does not exist in the database, the participant is either moved to
the Participants Queue for Operator’s assistance (MGC Manager
application), or disconnected from the conference.
5-43
Chapter 5 - Administrator’s Tasks
Figure 5-3: Ad Hoc Conferencing with Conference Numeric ID and Chairperson
Password Authentication
To enable this workflow, the same components as for the Ad Hoc
Conferencing using WebCommander Server as the External Database
Application for Conference Initiation Authentication workflow must be
defined in the system with the following additions:
•
The IVR Service assigned to the destination conference must be
configured to check the external database server for the Chairperson
Password for each participant connecting to the conference as a
chairperson. If the conference is created via Ad Hoc-enabled Entry
Queue, the IVR Service must be assigned to the Profile used for the Ad
Hoc Conferencing.
•
The WebCommander Server Manager-Users table must include the
Participant PIN Code for each user. The Participant Information and VIP
state may also be defined.
The IVR Service can be set to send queries to the external database application
server either for Conference Entry Password or Chairperson Password
authentication. The MCU can query only one password per conference.
5-44
MGC Web Server Manager User’s Guide
Defining Groups
The User Tables (Participants and Reservations Tables) are organized in
Groups. The Groups increase the system security, as they limit the access to
conferences and participant data to authorized users only. The Groups are part
of the administrative tables.
Participants Table
Participant Template 1
Group 1
Participant Template 2
Participant Template 3
Participant Template 4
Participant Template 5
Group 2
Participant Template 6
Root
Participant Template 7
Participant Template 8
Group 3
Participant Template 9
Participant Template 10
Group 4
Participant Template 11
Participant Template 12
Reservations Table
Group 1
Reservation Template 1
Reservation Template 2
Reservation Template 3
Reservation Template 4
Reservation Template 5
Group 2
Root
Reservation Template 6
Reservation Template 7
Group 3
Reservation Template 8
Reservation Template 9
Reservation Template 10
Group 4
Reservation Template 11
In the Groups table, you define the various groups and their hierarchy.
5-45
Chapter 5 - Administrator’s Tasks
Users are assigned access rights to specific Groups. The users can add or
modify only Participant templates and/or Conference templates that are
assigned to Groups to which they have access rights.
One user may be assigned to many Groups and one Group may be assigned
many users.
New Conference and Participant templates are created within the selected
Group and they are automatically assigned to that Group. Although the
Participants table and the Conference table are separate entities, they are both
organized by the same Group hierarchy.
Only users with permission to configure the database can define the Groups
hierarchy and the access rights of users to the various groups in the MGC
Web Server Manager.
Defining a New Group
To define a new Group:
1. Login to the MGC Web Server Manager and list the Database categories.
5-46
2.
Expand the Groups tree by clicking the plus [+] icon next to the Groups
icon.
3.
If the list already includes several groups, expand the tree until the group
to which you wish to add a sub-group is seen.
MGC Web Server Manager User’s Guide
On first entry, only the Root group is listed when expanding the Groups
tree.
When upgrading from a previous version that did not support Groups, the
Update Database process automatically performed by the Web Server Manager
will create a group for each of the listed users, and will assign access rights to
that group.
Participant and Conference templates are automatically assigned to the
appropriate user group according to the user name that appears in the Owner
field. If no Owner is defined, they will be automatically assigned to the Root
group. Therefore, only users who have access rights to the Root group (usually
administrators) will be able to view these conferences. The templates can be
moved to the appropriate group in the Groups tree in the MGC Manager –
Database Manager module using Copy and Paste (drag & drop is unavailable).
4.
Right-click the Root icon to which to add a subgroup, and then click Add
New Group to DB.
The Group Properties dialog box opens.
5.
Enter the group name and click OK.
The new group is added to the Groups tree.
5-47
Chapter 5 - Administrator’s Tasks
Setting the Access Rights to the Group
To set the access rights to a Group:
1. In the Browser area, right-click the icon of the group whose access right
to define, and then click Set Users Rights.
The Set Users Rights dialog box opens.
This dialog box lists all the currently defined users. It also displays their
current Read and Write permissions to the Conference and Participant
templates assigned to this group.
RW – indicates that the user may view (Read) and add, delete or modify
(Write) templates.
R – indicates that the user may only view (Read) templates.
None – indicates that the user has no access rights to this group.
5-48
MGC Web Server Manager User’s Guide
2.
To set or modify the access rights of a user to the group:
— Click the user name(s) (multi selection is available using the
standard Windows conventions)
— Select the Reservation Templates Read and Write check boxes to
enable/disable the user to view (read) and/or add (write) conference
templates to the Group. Select the Write check box to automatically
select the Read check box.
— Select the Participant Templates Read and Write check boxes to
enable/disable the user to view (read) and/or add (write) Participant
templates to the Group. Select the Write check box to automatically
select the Read check box.
— Select the Requested Meetings Read and Write check boxes to
enable/disable the user to view (read) and/or add (write) requested
conferences to the Group. Select the Write check box to
automatically select the Read check box.
Leaving the check boxes cleared means that the user has no access to the
Conference and Participant templates assigned to this Group (it will
appear as None in the list).
— In the View MCU Conferences list, click one of the following
options:
No – The user will not be able to view the Reservations, Meeting
Rooms and On Going conferences assigned to other users of the
same Group, even if the View All options are enabled in the
Permissions assigned to this user.
Enter with Password – The user will be able to view Reservations,
Meeting Rooms and On Going conferences scheduled by other users
assigned to this group, if the appropriate password will be entered
upon their selection.
Enter without Password – The user will be able to view all
Reservations, Meeting Rooms and On Going conferences scheduled
by other users assigned to this group without any restrictions.
3.
Click the Close button to complete the Access Rights definition and exit
this dialog box.
5-49
Chapter 5 - Administrator’s Tasks
Default Group
Five Conference templates, representing each of the main types of
conferences, are included in the database that is shipped with the
WebCommander. The parameters defined in each of these conferences
represent the most commonly used properties for the specific type of
conference. A new Group - Default - is included with the database and it
stores the default conference templates.
The Conference templates in the Default Group include:
•
Default COP
•
Default Video
•
Default Audio
•
Software Continuous Presence (for H.323-only conferences)
•
Video Switch
Default templates are useful for providing the with ready-made conferences
that require no modification. The Default Group is displayed in the New
Meeting window when a user logs into the WebCommander site for the first
time.
It is recommended to assign at least Read rights for this group to all users.
When defining new users, make sure that you define their access rights to the
Default group.
5-50
MGC Web Server Manager User’s Guide
From the MGC WebCommander application, users with the appropriate
permissions may:
•
Add new conference templates to the Default Group
•
Modify the system Default conference templates
5-51
Chapter 5 - Administrator’s Tasks
Defining Personal Scheduler Templates
A user who has the MGC Personal Scheduler plug-in installed on his/her PC
can schedule new conferences directly from his/her Microsoft Outlook
application.
The parameters of the possible types of conferences are defined in the MGC
Web Server Manager, in the Personal Scheduler Templates area.
To create a new Personal Scheduler Template:
1. In the Browser area, right-click the icon of the Personal Scheduler
Templates, and then click Add New Personal Scheduler Res.
5-52
2.
The Reservation Properties – Settings1 dialog box opens.
3.
Follow steps 3-7 in “Defining Conference Defaults” on page 3-3.
MGC Web Server Manager User’s Guide
Refreshing the Database List
Databases can be added to the database list used by the MGC Web Server
Manager externally, via the Control Panel – Data Source (ODBC). In such a
case, you need to refresh the database list to gain access to that database from
the MGC Web Server Manager application.
To refresh the database list in the MGC Web Server Manager:
On the Options menu, click Refresh dB List.
The database list in the MGC Web Server Manager window is refreshed and
the new databases are listed.
Refreshing the Database
Databases may be accessed by several users concurrently from the MGC Web
Server Manager application as well as from the MGC Database Manager
module of the MGC Manager application. In such cases, the information that
you see in the MGC Web Server Manager window may not be updated with
the latest changes performed by other users. It is recommended to refresh the
database to make sure that the latest data is displayed.
5-53
Chapter 5 - Administrator’s Tasks
To refresh the database:
•
On the Options menu, click Refresh dB.
5-54
A
Appendix A: Using a Web Portal to
Link with the WebCommander
Three WebCommander conferencing features can be accessed from a Web
Portal via links that are available in the Web Portal:
•
Calendar - for conference reservations
•
On Going Conference - for monitoring ongoing conferences
•
New Meeting - for starting on going conferences
WebCommander New Meeting pane inserted
into the Web Portal
HTTP Links to the
WebCommander
pages
Customer’s Web/
Portal
A-1
Appendix A: Using a Web Portal to Link with the WebCommander
Figure 1: Web Portal Sample
In this configuration, the Web Portal users are automatically registered with
the WebCommander application and if they have the appropriate permission,
they can access any of these WebCommander pages. The automatic login for
both Web Portal and WebCommander is enabled by transferring user data
from the Web Portal to the WebCommander.
The WebCommander database includes a users table (CustomerUser) that is
shared with the Web Portal. When users register to the Web Portal, their
information is automatically or manually transferred and added to the
CustomerUser table of the WebCommander. The user parameters in the
CustomerUser table includes the permission to access the WebCommander.
The information in the CustomerUser table, is then imported into the
WebCommander Users table.
When a user tries to access the WebCommander page from the Web Portal,
the Web Portal sends the request with the user ID to the WebCommander
application that checks whether the user is defined in the WebCommander
Users table.
A-2
•
If the user is defined in the Users table, and has permission to access the
WebCommander, the appropriate page is displayed. In addition, the
WebCommander checks whether the parameters were updated in the
CustomerUser table, and if yes, updates the user properties in the
WebCommander Users table accordingly.
•
If the user ID does not exist in the WebCommander Users table, the
WebCommander checks the user permission to access the
WebCommander in the CustomerUser table. If the user has the right to
access the WebCommander, the user properties are copied from the
CustomerUser table to the WebCommander Users table where a new
WebCommander user is automatically created. This WebCommander
user inherits all the permissions and default settings from the default
user defined in the WebCommander.
In addition (depending on system configuration), a new Group can be
created and assigned to the new user, enabling the user to create a
personal address book with a private list of endpoints and participants
that can be added to conferences.
•
If the user has no right to access the WebCommander, his/her parameters
are not transferred to the WebCommander Users table and the user
request is denied.
Embedding the WebCommander in the Web Portal
To embed the WebCommander in the Web Portal and allow the use of the
portal’s login and authentication system for accessing the WebCommander
application, the following configurations must be performed:
•
Optional. In the WebCommander Web Server application, define the
appropriate Permission to be assigned to the default user and modify the
Default User properties. These properties are inherited by all users that
are automatically created when accessing the WebCommander from the
Web Portal for the first time. For more details, see the WebCommander
Web Server Manager User’s Guide, Chapter 5, “Defining Permissions”
and “Defining a New User”.
•
Optional. Enabling the Create private groups for automatically added
users option in the Web Server Manager application, to automatically
create a personal address book for the newly created user. For more
details, see WebCommander Release Notes 8.0,“New Private Groups”
on page 1-26.
•
Creating a database table with authorized users list that is dynamically
updated. This table will be shared by the Web Portal and the
WebCommander.
•
Creating the HTTP links from the Web Portal to the appropriate
WebCommander pages.
Creating the CustomerUser Table
The CustomeUser table shared by the Web Portal and the WebCommander
databases must be created with the following fields:
Required Fields
ID
(Internal
Auto
Numbering)
UID
(User
ID)
Name
Surname
Phone
Email
CostCenter
(billing
code)
WebCPermission
(A number - Byte
0 = No
1 = Yes)
When a new user who is defined in the CustomerUser table accesses the
WebCommander, the parameters are transferred to the WebCommander Users
table, and a the new user is created. The new WebCommander user inherits
the default user permission, and the UID becomes the user PIN code. The PIN
code is used to identify the user in the Optional. WebCommander Users table.
A-3
Appendix A: Using a Web Portal to Link with the WebCommander
The name of the user is derived from the User Name, Surname and UID.
Figure 2: User Properties (Web Server Manager)
Creating the Links from the Web Portal to the WebCommander
Up to three URL links can be included in the Portal page as hyper-links:
•
Calendar/Reservation
•
OnGoing Conferences
•
New Meeting
The HTTP header must include the User ID ("UID") in a server variable
called: “HTTP_X-uid”. The Web Portal server must be configured to send the
UID in the HTTP header.
URL Link Format
The URL link includes the following components:
A-4
•
IP address of the WebCommander Server
•
The string: linkedwebcommander
•
The string:
default.asp?URL=DirectAccess.asp?Target=ID&lang=ID,
where Target includes the code of the WebCommander page and Lang is
the code for the language in which the page is displayed.
Table 1: URL Variable Specification
Parameter
Variable
Target ID
0 - Calender
1 - Ongoing Conferences
2 - New Meeting
Lang ID
0 - English
1 - French
2 - German
3 - Chinese
4 - Japanese
5 - Chinese Traditional
6 - Portuguese
7 - Spanish
8 - Norwegian
9 - Russian
10 - Italian
11 - Swedish
12 - Croatian
13 - Hungarian
14 - Polish
15 - Slovak
The link is created in the following format:
http://Server /linkedwebcommander/default.asp?URL=
DirectAccess.asp? Target=targetID&lang=langID
For example, the http link to the New Meeting page in German would appear
as:
http://172.22.172.162/linkedwebcommander/
default.asp?URL=DirectAccess.asp?Target=2&lang=2.
A-5
Appendix A: Using a Web Portal to Link with the WebCommander
WebCommander
server IP Address
Figure 3: Sample URL Formats
A-6
WebCommander
http Link
WebCommander
page ID,
Target = page
Language,
0 = English
B
Appendix B: Monitoring a
Conference in the WebCommander
using a URL or Form
In version 6.0, a single conference can be monitored from any browser
based application by entering the URL that includes the user login name and
password to the WebCommander site. In this mode, the user name and
password were not secured and appeared in the recent URL.
In version 7.5 & 8.0, the user name and password can be sent separately,
using the HTTP Form method, hence increasing the connection security.
Although the WebCommander login name and password are hidden, they are sent as
plain text and they can still be detected by a network sniffer. To secure the connection,
it is recommended to use the SSL authentication and data encryption layer.
You can open a monitoring window of a single conference in any Web-based
application by adding the conference URL to that application.
The conference URL must include the appropriate variables to allow
connection to the WebCommander site and identify the conference on the
appropriate MCU. The WebCommander user name and user password can
be sent as part of the URL itself or send them separately using the HTTP
Form method.
Optional Parameter Scenario Description
1.
When the user name (Param2) and password (Param3) are sent in the
URL (see Table B-1 on page B-2 for parameter descriptions):
a.
In the Web Server Manager, Permissions - Settings2 tab, if the
user’s permission "Always prompt for conference password" check
box is selected and the correct conference entry password is sent as
part of the URL, the user is granted access to the conference.
B-1
Appendix B: Monitoring a Conference in the WebCommander using a URL or Form
When an incorrect conference password is sent, the user is prompted
for the conference entry password prior to being granted access the
conference.
b.
2.
When the user’s permission "Always prompt for conference
password" is not selected, the user enters the conference without
having to enter the conference entry password (and therefore it does
not have to be included in the URL).
When the user name (Param2) and password (Param3) are not sent as
part of the URL:
a.
The user connects to the conference using the default user name and
password defined in the WebCommander database. If the correct
conference entry password is sent as part of the URL, the user enters
the conference without being prompted.
b.
If no conference entry password or an incorrect conference
password is sent, the user is prompted for the conference entry
password regardless of the user’s permission settings for "Always
prompt for conference password" parameter.
URL Format
The URL should be of the following format:
"http://Server name or IP/confsitev8_0/MonitorConf.asp"
In the http://Server name or IP script you can either include the Server name or
Server IP.
In addition, the URL must include the parameters that identify the MCU and
the conference. Additional parameters can also be included. These variables
are described in the Table B-1, "Variable Definitions."
Table B-1: Variable Definitions
Variable
Description
Required variables:
B-2
ConfId
The conference ID.
ConfName
The name of the On Going conference.
Table B-1: Variable Definitions
Variable
Description
MCUIp
The IP address of the MCU.
Optional variables:
LoginFromForm
(available in
version 6.01)
LoginFromForm=1 must be entered as part of the URL to
indicate that the Form method is used when transferring
the user name and user password.
Param1
The conference entry password of the On Going
WebCommander conference.
Param2
The user name used to access the WebCommander.
Param3
The user password (this parameter is required if the user
name is sent) used to access the WebCommander.
lang
The numeric code specifying the required language.
The following languages with their codes are available in
the WebCommander:
0 English
1 French
2 German
3 Chinese
4 Japanese
5 Chinese_traditional
6 Portuguese
7 Spanish
8 Norwegian
9 Russian
10 Italian
URL example:
http://Server name or IP/confsitev8_0/
MonitorConf.asp?MCUIp=127.0.0.1&ConfName=Video-S
witch&ConfId=11211
Form example:
<form method="POST" action="http://127.0.0.1/
confsitev8_0/
B-3
Appendix B: Monitoring a Conference in the WebCommander using a URL or Form
MonitorConf.asp?LoginFromForm=1&MCUIp=127.0.0.1&
ConfName=Video-Switch&ConfId=11211">
<input name="name" type=hidden value="UserName">
<input name="password" type=hidden
value="UserPassword">
</form>
B-4