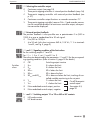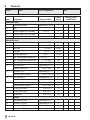
1
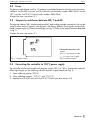
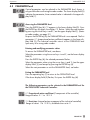
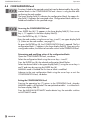
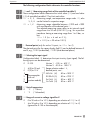
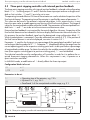
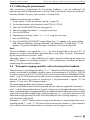
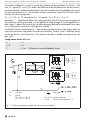
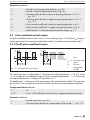
Automation System TROVIS 6400
Industrial Controller TROVIS 6497
Mounting and
Operating Instructions
EB 6497 EN
®
Electronics from SAMSON
Firmware version 1.1x
Edition August 2004
Contents
Contents
1
1.1
1.2
Description . . . . . . . . . . . . . . . . . . . . . . . . . . . . . . . 4
Versions . . . . . . . . . . . . . . . . . . . . . . . . . . . . . . . . 4
Technical data . . . . . . . . . . . . . . . . . . . . . . . . . . . . . 5
2
2.1
2.2
2.3
2.4
Installing the industrial controllers . . . . . . .
Opening the controller case . . . . . . . . . . .
Fuses . . . . . . . . . . . . . . . . . . . . .
Jumpers to switchover between WE, Y and AA. .
Converting the controller to 120 V power supply .
3
Electrical connections . . . . . . . . . . . . . . . . . . . . . . . . . . 8
4
4.1
4.2
Operation . . . . . . . . . . . . . . . . . . . . . . . . . .
Process display and control panel elements . . . . . . . . . . .
OPERATING level . . . . . . . . . . . . . . . . . . . . . . .
XD Error . . . . . . . . . . . . . . . . . . . . . . . . . . .
WI Internal setpoint . . . . . . . . . . . . . . . . . . . . . .
WE External setpoint . . . . . . . . . . . . . . . . . . . . .
Y Manipulated variable . . . . . . . . . . . . . . . . . . . .
X Controlled variable . . . . . . . . . . . . . . . . . . . . .
PARAMETER level . . . . . . . . . . . . . . . . . . . . . . .
Accessing the PARAMETER level . . . . . . . . . . . . . . . .
Entering and modifying parameter values . . . . . . . . . . .
Exiting the PARAMETER level . . . . . . . . . . . . . . . . .
KP Proportional-action coefficient . . . . . . . . . . . . . . .
TN Reset time . . . . . . . . . . . . . . . . . . . . . . . . .
TV Rate time . . . . . . . . . . . . . . . . . . . . . . . . .
KD Rate gain . . . . . . . . . . . . . . . . . . . . . . . . .
WR Operating direction . . . . . . . . . . . . . . . . . . . .
Y<, Y> Manipulated variable limits . . . . . . . . . . . . . .
Y0 Operating point . . . . . . . . . . . . . . . . . . . . . .
1A Limit value or transfer coefficient for Y1 . . . . . . . . . .
1H Hysteresis or minimum pulse duration for Y1 . . . . . . . .
2A Limit value or transfer coefficient for Y2 . . . . . . . . . .
2H Hysteresis or minimum pulse duration for Y2 . . . . . . . .
T1 Switching time . . . . . . . . . . . . . . . . . . . . . .
T2 Switching time . . . . . . . . . . . . . . . . . . . . . .
TZ Dead band . . . . . . . . . . . . . . . . . . . . . . . .
3A Limit value for GW3. . . . . . . . . . . . . . . . . . . .
3H Hysteresis for GW3 . . . . . . . . . . . . . . . . . . . .
4A Limit value for GW4. . . . . . . . . . . . . . . . . . . .
4H Hysteresis for GW4 . . . . . . . . . . . . . . . . . . . .
CONFIGURATION level . . . . . . . . . . . . . . . . . . . .
Accessing the CONFIGURATION level . . . . . . . . . . . . .
Determining and modifying values of the configuration blocks . .
Exiting the CONFIGURATION level . . . . . . . . . . . . . .
XN and XE Measuring range limits of the controlled variable X .
X, Decimal points . . . . . . . . . . . . . . . . . . . . . .
4.3
4.4
2
EB 6497 EN
.
.
.
.
.
.
.
.
.
.
.
.
.
.
.
.
.
.
.
.
.
.
.
.
.
.
.
.
.
.
.
.
.
.
.
.
.
.
.
.
.
.
.
.
.
.
.
.
.
.
.
.
.
.
.
.
.
.
.
.
.
.
.
.
.
.
.
.
.
.
.
.
.
.
.
.
.
.
.
.
.
.
.
.
.
.
.
.
.
.
.
.
.
.
.
.
.
.
.
.
.
.
.
.
.
.
.
.
.
.
.
.
.
.
.
.
.
.
.
.
.
.
.
.
.
.
.
.
.
.
.
.
.
.
.
.
.
.
.
.
.
.
.
.
.
.
.
.
.
.
.
.
.
.
.
.
.
.
.
.
.
.
.
.
.
.
.
.
.
.
.
.
.
.
.
.
.
.
.
.
.
.
.
.
.
.
.
.
.
.
.
.
.
.
.
.
.
.
.
.
.
.
.
.
6
6
7
7
7
10
10
12
12
12
12
12
12
13
13
13
13
13
13
14
14
14
14
14
14
14
15
15
15
15
15
15
15
15
15
16
16
16
16
17
17
Contents
XM Selecting the input signal . . . . . . . . . . . . . . . . . .
XT Unit of temperature . . . . . . . . . . . . . . . . . . . . .
X* Range of current or voltage signal for X . . . . . . . . . . .
W* Range of current or voltage signal for WE . . . . . . . . . .
Y* Range of current or voltage signal for Y and AA . . . . . . .
DI Selecting the input circuitry of the derivative-action component
WM Selecting the setpoint . . . . . . . . . . . . . . . . . . . .
YH Blocking the MANUAL/AUTOMATIC mode selector key . . .
YM Selecting the controller output . . . . . . . . . . . . . . . .
YR External position feedback . . . . . . . . . . . . . . . . . .
1M and 2M Signaling condition of the limit values . . . . . . . .
S1 and S2 Switching outputs Y1 or Y2 as NO or NC contacts . .
3M and 4M Signaling condition of the limit values . . . . . . . .
S3 and S4 Limit switches GW3 and GW4 as NO or NC contacts
TA Update cycle to refresh display of controlled variable . . . . .
FI Digital filter . . . . . . . . . . . . . . . . . . . . . . . . .
K1 Safety output value . . . . . . . . . . . . . . . . . . . . .
C1 and C2 code numbers . . . . . . . . . . . . . . . . . . .
Service code number . . . . . . . . . . . . . . . . . . . . . .
SO Auto-tuning . . . . . . . . . . . . . . . . . . . . . . . . .
TS Setpoint ramp . . . . . . . . . . . . . . . . . . . . . . . .
SN Station address . . . . . . . . . . . . . . . . . . . . . . .
BR Baud rate . . . . . . . . . . . . . . . . . . . . . . . . . .
.
.
.
.
.
.
.
.
.
.
.
.
.
.
.
.
.
.
.
.
.
.
.
.
.
.
.
.
.
.
.
.
.
.
.
.
.
.
.
.
.
.
.
.
.
.
.
.
.
.
.
.
.
.
.
.
.
.
.
.
.
.
.
.
.
.
.
.
.
17
17
17
18
18
18
18
18
19
19
19
19
20
20
20
20
20
21
21
21
22
22
22
5
5.1
5.2
5.3
5.4
5.5
Standard controller outputs . . . . . . . . . . . . . . . . .
Continuous-action controller . . . . . . . . . . . . . . . . .
Switching outputs Y1 and Y2 . . . . . . . . . . . . . . . .
Three-point stepping controller with internal position feedback
Three-point stepping controller with external position feedback
Pulse-modulated control outputs . . . . . . . . . . . . . . .
.
.
.
.
.
.
.
.
.
.
.
.
.
.
.
.
.
.
.
.
.
.
.
.
.
.
.
.
.
.
23
23
23
26
27
29
6
6.1
6.2
6.3
6.4
6.5
Serial interface . . . . . . . . .
Description . . . . . . . . . . .
Technical data . . . . . . . . .
Operation . . . . . . . . . . .
Value registers (holding registers)
Status register . . . . . . . . . .
.
.
.
.
.
.
.
.
.
.
.
.
.
.
.
.
.
.
.
.
.
.
.
.
.
.
.
.
.
.
31
31
31
32
33
34
7
7.1
7.2
Start-up. . . . . . . . . . . . . . . . . . . . . . . . . . . . . . . . 35
Tuning control parameters . . . . . . . . . . . . . . . . . . . . . . . 36
Auto-tuning . . . . . . . . . . . . . . . . . . . . . . . . . . . . . . 38
8
Check list . . . . . . . . . . . . . . . . . . . . . . . . . . . . . . . 40
9
Control panel . . . . . . . . . . . . . . . . . . . . . . . . . . . . . 44
.
.
.
.
.
.
.
.
.
.
.
.
.
.
.
.
.
.
.
.
.
.
.
.
.
.
.
.
.
.
.
.
.
.
.
.
.
.
.
.
.
.
.
.
.
.
.
.
.
.
.
.
.
.
.
.
.
.
.
.
.
.
.
.
.
.
.
.
.
.
.
.
.
.
.
.
.
.
.
.
.
.
.
.
Changes in Firmware version 1.10
The parameter default settings of TN and operating direction have been changed.
EB 6497 EN
3
Description
1
Versions
Description
The TROVIS 6497 Industrial Controller is used to automate industrial and processing plants.
Through the use of a practical, clearly structured functional design, various control circuit arrangements can be configured. It may be used as a continuous-action controller, on-off or
three-point stepping controller with the following control mode options: P, PI, PD or PID modes.
A sealed membrane operator panel is used to operate the industrial controller. Operation is divided into three simple logical levels: OPERATING level, PARAMETER level and
CONFIGURATION level.
Accessing the OPERATING level via displays for standard control operation is possible at any
time. User-selectable code numbers must be entered in order to access the PARAMETER and
CONFIGURATION levels. In the PARAMETER level, control parameters can be modified and
optimally tuned specifically to the process. In the CONFIGURATION level, various controller
functions can be selected.
The controller accepts the following universal inputs: Pt 100 resistance thermometers,
thermocouples, standardized current and voltage signals as well as two-wire transmitters.
The controller’s setpoint can switched between the internal WIsetpoint and external WEsetpoint
(reference variable) by means of the WE/WI setpoint switchover key or over a binary signal).
Moreover, the setpoints can be selected and interconnected.
Bumpless transfer in the respective operating mode is made using the MANUAL/AUTOMATIC
mode selector key.
Essential control parameters can be automatically determined and selected by the program using special auto-tuning software feature.
1.1
Versions
TROVIS
6497-03
Output
Continuous-action/on-off/three-step/analog output, limit switches
Input
Two temperature ranges are available for measuring temperature with three-wire Pt 100 resistance thermometers:
Version 1: –100 °C to +400 °C in 1 °C steps
Version 2: – 30.0 °C to +150.0 °C in 0.1 °C steps
The valid temperature range is printed on the nameplate next to PT 100.
4
4
Options
4 Two additional limit switches
4 RS-485 serial interface with Modbus RTU software
This manual applies to controllers implementing firmware version 1.10 (see page 36)
Caution!
This controller may only be assembled, started up and operated by trained
personnel familiar with such technical procedures.
4
EB 6497 EN
Description
1.2
Technical data
Technical data
Inputs
Controlled variable X
Direct current signal
DC voltage signal
4 (0) to 20 mA
0 (2) to 10 V
Ri = 2.5 Ω
Ri > 100 kΩ
Pt 100 potentiometer, self-calibrating (three-wire circuit)
Version 1
–100 to +400 °C Resolution 1 °C
Version 2
– 30.0 to +150.0 °C Resolution 0.1 °C
Thermocouples (requires reference junction module, order no. 1600-1269)
Type K: NiCr-Ni
50 to +1200 °C
DIN IEC 584
Type S: Pt10Rh-Pt
50 to +1700 °C
DIN IEC 584
Type L: Fe-CuNi
50 to + 800 °C
DIN 43 710
Type U: Cu-CuNi
50 to + 600 °C
DIN 43 710
External position feedback YR
Potentiometer 0 to (200 to 1000) Ω in two-wire circuit , measuring current
with 1000 Ω potentiometer approx. 2.7 mA; with 200 Ω potentiometer
approx. 13 mA or
Direct current signal 4 to 20 mA (with shunt resistance 549 Ω, 0.5 W; 1 %)
External setpoint WE
4 (0) to 20 mA or 0 (2) to 10 V selectable over jumpers
External setpoint switchover
Binary input switchover between WE/WI with 24 V DC
Signal 0 V → internal WI; 24 V → external WE (select over WM) or
external restart of the setpoint ramp
Transmitter supply voltage: 24 V DC / max. 30 mA
Outputs
Control output signal Y (selectable over jumpers)
Current
–20, 4 (0) to 20 mA,
Load RB < 500 Ω or
Voltage –10, 0 (2) to 10 V,
Load RB > 500 Ω
Analog output AA: 0 (4) to 20 mA / 0 (2) to 10 V
Switching outputs Y1 and Y2
(Optional: 2 limit switches GW3 and GW4)
Load rating of switching contacts max. 250 V AC / 1 A with cos ϕ = 1
Hysteresis (minimum) 0.3 %
Power supply
Power failure
Power consumption
230 V AC, 48 to 62 Hz · 120 V AC, 48 to 62 Hz
Optional: 24 V AC, 48 to 62 Hz
All parameter values and configuration blocks are internally stored against
power failure in a non-volatile EEPROM
10 VA
Permissible temperature Ambient 0 to 50 °C · Transportation and storage 0 to 70 °C
Measuring error
Linearity
Zero point
Final value
mA, V, Pt 100
0.2 %
0.2 %
0.2 %
Thermocouple
0.2 %
0.3 %
0.3 %
Degree of protection
IP 54 (front panel), IP 20 (case)
VDE 0110 Part 1
Overvoltage category II · Degree of contamination 2
Electromagnetic compatibility
Requirement stipulated in EN 61000-6-2, EN 61000-6-3 are fulfilled.
Weight
0.8 kg
Opening the controller case
2
Installing the industrial controllers
Installing the industrial controllers
The industrial controller is designed for panel mounting. Its front case has the dimensions
96 mm x 96 mm. Mount the controller as follows:
1. Prepare a panel cut-out with the dimensions 92+0.8 x 92+0.8 mm.
2. Push the industrial controller into the panel cut-out from the front side.
3. Insert the two supplied mounting brackets in either the left and right (or top and bottom)
openings provided in the case (see Fig. 1).
4. Turn the threaded rods in the direction of the control panel using a screwdriver, clamping
the front frame of the case against the control panel.
16.5 (0.65)
7
(0.28)
96(3.78)
119(4.68)
112(4.41)
38.25
(1.51)
96
(3.78)
89.5
(3.25)
1
1
2
3
4
5
Fig. 1 · Dimensions of the controller case
2.1
1
Screw
2
Mounting
brackets
3
Nipple
4
Threaded
rods
5
Front panel
Opening the controller case
To exchange the fuse or for re-jumpering (see sections 2.2 to 2.4), the case must first be opened
as follows:
1. Remove terminals, unloosen threaded rods and lift off mounting brackets. Then, pull the
industrial controller out of the control panel and force off the front panel.
2. Unscrew the two screws at the side, and press the two transparent nipples down towards
the front using a suitable screwdriver or appropriate tool.
3. Remove the controller section from the front after lightly tapping the terminal blocks.
4. Replace the fuses and/or re-jumper as required (see sections 2.2 to 2.4).
5. Subsequently, re-install the controller section, fasten the two screws and assemble the
front panel. Proceed as instructed in section 2, steps 2 to 4.
Controller unit
1 I/O board
Fig. 2 · Arrangement of microprocessor boards in the controller unit
6
EB 6497 EN
2
Display and CPU
board
3
Communications
board
4
Power supply board
Installing the industrial controllers
2.2
Fuses
Fuses
The power supply board (see Fig. 2) contains an overload protection directly next to the terminal block. For the 230 V version, use TR 5 (63 mA) with the order number: 8834-0343; for the
120 V version, use TR 5 (125 mA), order number: 8834-0346.
To open the case, see section 2.1.
2.3
Jumpers to switchover between WE, Y and AA
The external setpoint WE, manipulated variable Y and analog recorder connection AA can be
wired as either mA or V signals, whereby mA is the factory default. These signals can be modified by jumpering the I/O board accordingly (see Fig. 2). Refer to the jumper locations depicted
in Fig. 3.
To open the case, see section 2.1.
I/O board (components side)
Jumpers
AA For connecting a recorder
Y
Fig. 3 · Jumper locations
2.4
For output control signal
WE For external setpoint
Converting the controller to 120 V power supply
The controller can be converted from the power supply 230 V to 120 V. To proceed, make the
following changes on the soldering side of the power supply board (see Fig. 2):
1. Open soldering jumper "230 V".
2. Close soldering jumpers "120 V 1" and "120 V 2".
3. Replace fuse TR 5 (63 mA) with fuse TR 5 (125 mA) (see also section 2.2).
EB 6497 EN
7
Converting the controller to 120 V power supply
3
Electrical connections
Electrical connections
Plug-in, modular terminals are provided for the wires with cross sections from 0.5 to 1.5 mm2.
Always observe the pertinent VDE 0100 regulations and those regulations and guidelines valid
in the country where the controller is intended to be installed.
Installation notes:
The signal and sensor lines are to be wired separately from the leads of the controller and
power supply.
Use shielded signal and sensor lines to avoid measuring errors associated with radio interference. Always ground the shielded electrical lines on the side of the industrial controller.
Separately install the power supply lines and protective conductors of each industrial controller
at the corresponding distributing bar. Protective circuits located in the vicinity must be suppressed against interference by means of a resistor-capacitor (RC) combination.
Controller input (controlled variable X)
2-wire transmitter
X input 4 … 20 mA
Thermocouple
Only w. reference junction
module at terminals 5, 6, 7
External setpoint WE
Setpoint switchover
24 V DC WE/WI
External
position feedback signal
0%
100 %
0 … (200 … 1000) Ω
Controller output (control signal Y)
2 limit switches
Optional: 2 limit switches
Three-step output
Loads > 50 VA require contactors or relays
Power supply
Fig. 4 · Terminal assignments
8
EB 6497 EN
Analog output X
Optional: Serial interface
V or mA
over jumpers
Receive
Transmit
Converting the controller to 120 V power supply
Reference
junction
2-wire transmitter
Fig. 5 · Circuit diagram
Thermocouple
Recorder/
indicator
Electrical connections
4-wire transmitter
EB 6497 EN
9
Process display and control panel elements
4
Operation
Operation
Unfold the last page of this manual (showing the control panel) to obtain a better understanding
of this description when reading the following sections.
The industrial controller is designed with a three-level operating structure: OPERATING level,
PARAMETER level and CONFIGURATION level. Depending on the selected level (mode), the
keys and visual displays assume various functions.
The controller should always be configured (CO level) first, then the parameters selected
(PA level) and finally tuned.
Section 5 on page 23 clearly describes how the industrial controller is to be tuned to both the
control application and the directly controlled system.
4.1
1
Process display and control panel elements
Controlled variable (actual value) display
OPERATING level: Display of controlled variable X
_--0 Display upon breakage of sensor line: If a sensor break is determined at the
_--U input of the industrial controller or if the input range is exceeded in either direction, an 0 (over) or U (under) appear on the display. In this case, the manipulated variable is automatically adjusted to the value predetermined in configuration block K1
(safety output value). The industrial controller operates in standard mode once the sensor
break has been corrected.
PARAMETER and CONFIGURATION level: Display of the numerical value relating to the
selected parameter or configuration block.
2 Manipulated variable (output value) display
OPERATING level: Display of manipulated variable Y in %
(For values > 100, an H appears on the display; for values < 0, NEappears), or display
of the external position feedback.
PARAMETER and CONFIGURATION level: Display of the designation associated with the
selected parameter or configuration block.
Note!
If OCis displayed here, the default calibration of the controller has been lost. If this error
occurs, please return the device to SAMSON!
3 Error (w - x) display
The yellow LED indicates the controlled range with zero offset; the two red LEDs indicate
the error (designated as XD instead of e on the controller) for a deviation of at least ±1 %.
4 Switching output display
Two LEDs indicate the output state of the on-off/three-step control output or limit alarms.
5 Label for physical unit (of temperature)
Specification of the engineering unit applicable for the controlled variable display (1).
10
EB 6497 EN
Operation
6
Process display and control panel elements
Cursor keys
Δ Increase displayed value
∇ Decrease displayed value
OPERATING level: After selecting WI: direct change of the setpoint.
In MANUAL mode (see MANUAL/AUTOMATIC mode selector key): direct adjustment of
manipulated variable signal Y
PARAMETER and CONFIGURATION level: Selection of a single parameter or configuration block (lower display in (2)), selection of the associated values (upper display in (1))
7 Operating key
OPERATING level: Selection of certain controller variables (see page 12).
PARAMETER level: Return to the OPERATING level and AUTOMATIC mode*
CONFIGURATION level: Return to the OPERATING level and MANUAL mode*
* When manipulated variable display (2) flashes, first press the yellow ENTER key (8)!
8 ENTER key
OPERATING level: Call up the PARAMETER level PA and CONFIGURATION level CO;
confirm the entered code number, and enter the selected level.
PARAMETER/CONFIGURATION level: Call up the displayed parameter or configuration block (flashing in the lower display field (2) indicates that values can be modified);
enter and confirm the value displayed in the upper field (1)
9 WE/WI (external/internal setpoint) switchover key
Selection of the external and internal setpoint. When the external setpoint WE is selected,
the yellow LED in the key illuminates.
Switching to an external setpoint can also be made by applying an external 24 V DC signal (note configuration block WM, see page 18).
10 MANUAL/AUTOMATIC mode selector key
Bumpless transfer from MANUAL to AUTOMATIC mode (or vice versa). MANUAL mode
is indicated by a flashing yellow LED in the key.
In MANUAL mode, the manipulated variable Y can be modified using the cursor keys
(6), thereby directly influencing the connected control valve.
EB 6497 EN
11
OPERATING level
4.2
Operation
OPERATING level
This is the standard operation mode of the industrial controller. The upper
field (1) indicates the actual value of controlled variable X; the
Q4ß1 display
lower two-digit display field (2) indicates the current values (0 to 99 %) of
manipulated variable Y. If the manipulated variable drops below 0 %,
40 the
NE will appear in the lower display field. If the manipulated variable exceeds 99 %, HO to H9 for 100 % to 109 % will be displayed.
Press the operating key (7) to display the following variables in the
lower display field (2). The associated values appear in the upper display field (1). Select X return to standard operation mode.
XD (XD = W – X)
XD Error
WI The range of values depends on the measuring range limits XN and XE
WI Internal setpoint (internal reference variable)
predetermined for controlled variable X.
Switch over to internal setpoint WI
Press the operating key (7) until WI appears in the lower display field (2).
Modify the value to the desired value indicated in the upper display field
(1) by pressing the cursor keys Δ and ∇.
Press the operating key (7); the value is stored insusceptible to power failure.
WE A value is displayed under the condition that an external setpoint is conWE External setpoint (external reference variable)
nected.
YQ The range of values is represented as a percentage and depends on the
Y Manipulated variable (output variable)
manipulated variable limits determined with Y< and Y> (see page 14).
XQ This display only appears for approximately 4 seconds. Thereafter, conX Controlled variable (actual value)
trolled variable X and manipulated variable Y are both subsequently displayed again.
The range of values in the display depends on the measuring range limits
to be specified in the CONFIGURATION level with XN and X (see
page 17).
12
EB 6497 EN
Operation
4.3
PARAMETER level
PARAMETER level
Control parameters can be selected in the PARAMETER level. Access is
possible after confirming the code number. The lower display field (2)
Q001 only
indicates the parameter; the associated value is indicated in the upper disKP play field (1).
Q000 Press the ENTER key (8); PA appears in the lower display field (2). Press
the ENTER key (8) again; the display PA flashes. Select the code number
PA by pressing the cursor keys Δ and ∇, see the upper display field (1). (Notes
Accessing the PARAMETER level
on code number, see page 21)
Re-press the ENTER key (8); the PARAMETER level is now opened. The first
parameter KP (proportional-action coefficient) appears in the lower display field (2). The industrial controller returns to the OPERATING level
upon entry of a wrong code number.
Entering and modifying parameter values
To access the PARAMETER level, see above.
Select the parameter using the cursor keys Δ and ∇, see the lower display
field (2).
Press the ENTER key (8); the selected parameter flashes.
Select the parameter value using the cursor keys Δ and ∇ (see the upper
display field (1)) and accept by pressing the ENTER key (8).
Select the next parameter or exit the PARAMETER level; see below.
Exiting the PARAMETER level
Press the operating key (7) to return to the OPERATING level.
If the lower display field (2) flashes, first press the ENTER key (8)!
The following parameters can be selected in the PARAMETER level for
the TROVIS 6487 Industrial Controller:
KP Range of values 0.1 to 199.9
KP Proportional-action coefficient (P component of the controller)
TN
TN Reset time (integral-action component of the industrial controller)
Range of values 1 to 1999 s, disabled when set to 0
EB 6497 EN
13
PARAMETER level
Operation
TV Range of values 1 to 1999 s, disabled when set to 0
TV Rate time (derivative-action component of the industrial controller)
KD Range of values 1 to 10, disabled when set to 0,
KD Rate gain (derivative-action gain)
value commonly set between 5 and 10.
WR 0 Direct >>,
WR Operating direction (characteristic of the industrial controller)
1 Reverse <>,
Increasing X
decreasing X
→ Increasing Y or
→ decreasing Y
Increasing X
decreasing X
→ decreasing Y or
→ Increasing Y
YL These parameters determine the start (Y<) and the end value (Y>) of the
control output signal. The displayed values refer to the percentage of the
Y> selected control output range (see YM on page 19, Y* on page 18).
Y< , Y> Manipulated variable limits
Y< = -109.9 % to Y>
Y> = Y< to 109.9 %
The limits have no effect in MANUAL mode.
Y0 The operating point Y0 is specified as a percentage in reference to the
Y0 Operating point
manipulated variable Y.
PI and PID control modes ignore the operating point.
Parameters for switching outputs Y1 and Y2:
1A, 2A determine the limit values; 1H, 2H determine the hysteresis for
switching outputs Y1 and Y2.
Configuration blocks 1M or 2M determine the type of limit value (signaling
condition) and hence the range of values. Refer to section 5 on page 23 for
more details.
1A For YM
1A Limit value or transfer coefficient for Y1
1H For YM
= 0 or 3
=2
Limit value or switching point for Y1
Transfer coefficient
1H Hysteresis or minimum pulse duration for Y1
14
EB 6497 EN
= 0 or 3
=2
= 1 or 4
Hysteresis for Y1
Minimum pulse duration in % of T1
Hysteresis
Operation
PARAMETER level
2A For YM
2A Limit value or transfer coefficient for Y2
= 0 or 3 Limit value or switching point for Y2
=2
Transfer coefficient
2H For YM
2H Hysteresis or minimum pulse duration for Y2
= 0 or 3
Hysteresis for Y2
=2
Minimum pulse duration in % of T2
T1 For YM
T1 Switching time
= 0 or 3
=2
= 1 or 4
T2 For YM
Period (cycle time) for pulse-modulated
control outputs (1M/2M = 8 or 9)
Period (cycle time) in positive oper. direction
Transit time of associated actuator
T2 Switching time
=2
Period (cycle time) in negative oper. direction
TZ Range of values 0 to109.9 % relating to the manipulated variable range
TZ Dead band
The dead band (note definition!) is entered for three-point stepping controllers with internal or external position feedback, the minimum pulse duration
for pulse-modulated outputs and split point for pulse-modulated outputs
with split-range.
Refer to section 5 on page 23 for further details.
The following parameters only apply to versions with additional limit
switches GW3 and GW4:
3A The range of values depends on the configuration block 3M.
3A Limit value for GW3
3H The range of values depends on the configuration block 3M.
3H Hysteresis for GW3
4A The range of values depends on the configuration block 4M.
4A Limit value for GW4
4H The range of values depends on the configuration block 4M.
4H Hysteresis for GW4
EB 6497 EN
15
CONFIGURATION level
4.4
Operation
CONFIGURATION level
Functions linked to the required control task can be determined by the config-
blocks in the CONFIGURATION level. Access is only possible after
O000 uration
confirming the code number.
lower display field (2) indicates the configuration block; the upper disXN The
play field (1) indicates the associated value. Configuration blocks can be selected and modified in the specified range.
O000 Press ENTER key (8); PA appears in the lower display field (2). Press cursor
key Δ; CO appears in the lower display field (2).
CO Press the ENTER key (8); CO flashes.
Accessing the CONFIGURATION level
Enter the code number using the cursor keys Δ and ∇; see upper display field
(1). (Notes on the code number, see page 21)
Re-press the ENTER key (8); the CONFIGURATION level is opened. The first
configuration block XN appears in the lower display field (2). Upon entry of a
wrong code number, the industrial controller returns to the OPERATING level.
Determining and modifying values of the configuration blocks
Open the CONFIGURATION level, see above.
Select the configuration block using the cursor keys Δ and ∇.
Press the ENTER key (8); the selected configuration block flashes.
Select the desired value in the upper display field (1) using the cursor keys Δ
and ∇ and store by pressing the ENTER key (8).
MANUAL mode is enabled the first time a value is modified.
Advance to the next configuration block using the cursor keys or exit the
CONFIGURATION level, see below.
Exiting the CONFIGURATION level
Pressing the operating key (7) returns to the OPERATING level, whereby
MANUAL mode is still activated. The manipulated variable Y is switched to in
the lower display field (2).
Press the MANUAL/AUTOMATIC mode selector key; the controller switches
to AUTOMATIC mode.
16
EB 6497 EN
Operation
CONFIGURATION level
The following configuration blocks determine the controller functions:
XN These configuration blocks determine the initial value (XN) and end value
(XE) of controlled variable X. They limit each other.
XE XM = 0, 3, Measuring range, see temperature range under XM; also
XN and XE Measuring range limits of the controlled variable X
4, 5, 6
XM = 1, 2
can be limited in respective range.
Measuring range selectable between –1999 and +1999
with consideration of the decimal point X, .
The selected measuring range refers to an internal signal
range from 4 to 20 mA (0 to 100 %); e.g., for a pressure
transducer having a measuring range from 1 to 3 bar, select:
XN = 1.0 (i.e. = 4 mA or 0 %);
XE = 3.0 (i.e. = 20 mA or 100 %)
X, The decimal point for the upper display field (1) can be defined between 0
X,Decimal points (only for mA or V inputs, i.e. XM = 1 or 2)
and 3; e.g.,1000 (no decimal), 1.000 (three decimal places)
XM Configuration block XM determines the input circuitry (input signal). The folXM Selecting the input signal
lowing inputs can be determined:
0
Pt 100
Version 1 –100 to 400 °C
Version 2 –30.0 to 150.0 °C
1
4 (0) to 20 mA
2
0 (2) to 10 V
Range selection under X*,
decimal point, see X,
3
4
5
6
Thermocouples
(with ref.
junction module)
XT 0
°C
(° Celsius)
1
°F
(° Fahrenheit)
NiCr-Ni
(K)
50 to +1200 °C
Pt10Rh-Pt (S)
50 to +1700 °C
Fe-CuNi (L)
50 to + 800 °C
Cu-CuNi (U)
50 to + 600 °C
XT Unit of temperature
X* 0
X* Range of current or voltage signal for X
1
0 to 20 mA or 0 to 10 V, depending on selection of XM (1 or 2)
4 to 20 mA or 2 to 10 V, depending on selection of XM (1 or 2)
(ignored for Pt 100 or thermocouple)
EB 6497 EN
17
CONFIGURATION level
Operation
W* 0
0 to 20 mA or 0 to 10 V
Depending on jumper WE
1
4 to 20 mA or 2 to 10 V
Depending on jumper WE
(mA is factory default)
W* Range of current or voltage signal for WE
Y*
Y* Range of current or voltage signal for Y and AA
0
1
2
3
Y (depending on jumper Y)
(mA is factory default)
AA (depending on jumper AA)
(mA is factory default)
–20 to 20 mA or –10 to 10 V
0 to 20 mA or 0 to 10 V
2 to 10 V
0 to 20 mA or 0 to 10 V
–20 to 20 mA or –10 to 10 V
4 to 20 mA or
4 to 20 mA or 2 to 10 V
4 to 20 mA or
2 to 10 V
4 to 20 mA or 2 to 10 V
DI The input variable for the derivative-action component of the industrial conDI Selecting the input circuitry of the derivative-action component
troller can optionally be the controlled variable X or error XD.
0
X input
1
Error XD
WM An external setpoint WE can be applied either by actuating the WE/WI
WM Selecting the setpoint
setpoint switchover key (9) or by applying an external signal (+24 V) at terminals 12 and 5 of the binary input. Configuration block WM determines the
setpoint and the combination option.
0
WE input disabled
1
Addition of external WE and internal WI
2
Minimum selection between WE and WI
3
Maximum selection between WE and WI
4
Switchover using WE/WI key (9)
5
Switchover using WE/WI key (9) or by priority of the external signal
+24 V
6
Switchover only by the externally issuing signal +24 V
7
Restart of the setpoint ramp beginning with applied X value
YH 0
Key function enabled
1
Key function disabled
YH Blocking the MANUAL/AUTOMATIC mode selector key (10)
18
EB 6497 EN
Operation
CONFIGURATION level
YM 0
YM Selecting the controller output
Continuous output (see page 23)
1
Three-point stepping controller w. internal position feedback (see p. 26)
2
Three-point stepping controller with external position feedback (see
p. 27)
3
Continuous controller output functions as recorder connection "X"
4
Three-point stepping controller (same as YM = 1) and recorder connection for controlled variable X at continuous controller output, valve position cannot be displayed.
YR The position feedback is also possible over a potentiometer 0 to (200 to
YR External position feedback
1000) Ω or over a standardized 4 to 20 mA signal.
0
0 to (200 to 1000) Ω
1
4 to 20 mA (with shunt resistance 549 Ω / 0.5 W / 1 % to terminals
1 and 2, see Fig. 5, page 9)
1M for the switching outputs Y1 and Y2
For YM = 1, 2 or 4, set 1M and 2M to 0.
2M The values are determined by the parameters 1A and 2A for the correspond1M and 2M Signaling condition of the limit values
ing signaling condition. (Refer to section 5, page 23 for details).
Switches
when
0
Off
Switching output inactive
1
Xmax
X is above the limit
2
Xmin
X is below the limit
3
XDmin
XD is below the limit
4
XDmax
XD is above the limit
5
XDmin and XDmax
XD is above or below the limit, tracking of controlled variable monitoring to the set point
6
7
Ymax
Ymin
Y is above the limit
8
9
Pulse-modulated control output, positive
Pulse-modulated control output, negative
S1 0
S2 1
Y s below the limit
On-off/three-point
control output
See section 5.5,
page 29
S1 and S2 Switching outputs Y1 or Y2 as NO or NC contacts
NO make contact
NC break contact
EB 6497 EN
19
CONFIGURATION level
Operation
3M for optional limit switches GW3 and GW4
The values are determined by the parameters3A and 4A for the correspond4M ing signaling condition.
3M and 4M Signaling condition of the limit values
Switches
when
0
Off
Switching output inactive
1
Xmax
X is above the limit
2
Xmin
X is below the limit
3
XDmin
XD is below the limit
4
XDmax
XD is above the limit
5
XDmin and XDmax
XD is above or below the limit
6
7
Ymax
Ymin
Y is above the limit
S3 0
S4 1
Y is below the limit
S3 and S4 Limit switches GW3 and GW4 as NO or NC contacts
TA 0
NO make contact
NC break contact
TA Update cycle to refresh display of controlled variable
1
Every 50 ms
Every 2 s
FI The digital filter FI is used to delay the analog inputs X and WE. Range of
FI Digital filter
values 0 to1999 s, disabled when set to 0
K1 failure
K1 Safety output value Upon a sensor line break, restart value after power
Selectable between 0 and 109.9 % of the manipulated variable output range.
If the signal range is violated (e.g. sensor line break/short-circuit), manipulated variable Y is automatically set to the predetermined value of K1.
In case of a power failure > approximately 100 ms, manipulated variable Y is
used again from the value predetermined in K1. In the event of a power failure < approximately 100 ms, the manipulated variable Y remains at the last
value output.
The controller starts in the last operating mode (manual or automatic) active
before the power failure.
20
EB 6497 EN
Operation
CONFIGURATION level
C2 C1
C1 and C2 code numbers
Access to the PARAMETER level
C2 Access to the CONFIGURATION level
Both code numbers are factory set to 000. Their values can be changed in
the range –1999 to +1999 as required. In the event that a code number has
been forgotten, see notes under section Service code number.
Service code number
A higher-level code number for servicing is specified on page 38 of this manual, permitting the CONFIGURATION level to be opened despite the entered
code numbers C1 and C2. To avoid unauthorized use, separate this number
from page 38 (or scratch over to make fully illegible). The code numbers selected can then be read when configuration blocks C1 or C2 are called up.
Entry: Open CONFIGURATION level (see page 16); use the Service code
number as the code.
SO 0
SO Auto-tuning
Disabled, no auto-tuning
Only selectable when MANUAL/AUTOMATIC mode selector key (10) is set
to MANUAL mode:
1
Ready for auto-tuning, tuned according to setpoint for loops with a
delay > 10 s
2
Ready for auto-tuning, tuned according to disturbance variable for
loops with a delay > 10 s
Auto-tuning enables the industrial controller to automatically tune itself to the
characteristics of the control loop in the start-up phase and to calculate the
"ideal" control parameters. The appropriate tuning is to be determined by selecting 1 or 2. For control loops which are critical and extremely fast and for
which the control valve must not be abruptly adjusted, select 0 in order to disable the tuning facility (see also section 7.2, page 38).
EB 6497 EN
21
CONFIGURATION level
Operation
TS A setpoint ramp alters the setpoint at a constant speed. Configuration block
TS determines the time for completing the entire setpoint range (XN to XE).
TM The actual time (TS ) to modify the setpoint is calculated by the industrial conTS Setpoint ramp
1
troller from this (see Fig. 6). This setpoint ramp is effective for every modification of the setpoint.
In this respect, note configuration block WM=7, see page 18. This setting
causes the setpoint to perform an X-tracking (W = X) by adding the binary input. After switching back the input, the setpoint changes by the speed selected
with TSuntil the desired value is obtained.
Range of values: TS is first indicated in the lower display field (2), and the
value in the upper display field (1) is specified in seconds (0 to1800 s). Afterwards, the lower display in (2) switches to TM, and the time is displayed in
minutes (30 to 500 min).
To disable, set the parameter to 0.
SN 0
SN Station address
1
Off (disabled)
to 246
BR 0
4800 bits/s
1
9600 bits/s
BR Baud rate (selecting data transmission speed)
Fig. 6 · Setpoint ramp
22
EB 6497 EN
XN
Lower measuring range value
XE
Upper measuring range value
W
Setpoint
W1
Old setpoint value
W2
New setpoint value
TS
Time set for setpoint ramp (T5)
TS1
Calculated actual time for
changing the set points W1and
W2
Standard controller outputs
5
Continuous-action controller
Standard controller outputs
The standard version of the TROVIS 6497 Industrial Controller has one continuous output.
Two switching outputs Y1 and Y2 are additionally available. These outputs can be configured
as limit switches or on-off/three-step control outputs.
5.1
Continuous-action controller
Configuration block YM = 0 configures TROVIS 6497 as a continuous-action controller. Depending how the jumper Y is selected (see Fig. 3 on page 7), either a continuous mA or V signal
is applied at terminals 1 and 2.
5.2
Switching outputs Y1 and Y2
Configuration blocks YM and 1M/2M determine the functions of switching outputs Y1 and Y2.
y-continuous
Fig. 7 · Switching outputs Y1 and Y2
5.2.1 Limit switches
TROVIS 6497 provides four limit switches (switching outputs Y1 and Y2 and two optional limit
switches GW3 and GW4).
A limit switch monitors a variable to ensure that a minimum or maximum value (limit value) is
maintained. Configuration blocks 1M, 2M, 3M and 4M (signaling condition of limit value) determine which variable is to be monitored for exceeding in either direction. Parameters 1A,
2A, 3A and 4A determine the limit value for the corresponding variable. Moreover, a hysteresis value (on-off differential) must be specified for each limit switch by means of parameters
1H, 2H, 3H and 4H.
EB 6497 EN
23
Switching outputs Y1 and Y2
Standard controller outputs
This hysteresis is the differential gap between the on-off state of the limit switch. When exceeded
in either direction, the hysteresis acts in the opposite direction of the monitored variables (see
Fig. 8).
On
On
Off
Off
X, XD, Y Monitored variable
1A…2A Limit value for X, XD, Y
Value exceeds the limit
Value falls below the limit
1H…4H Hysteresis
(on-off differential)
GW
Fig. 8 · Limit switches
State of limit switch
Switching outputs Y1 and Y2 can be used as limit switches when configuration block YM = 0.
The signaling conditions of the limit values are assigned as follows:
1M/2M/3M/4M = 0
Disabled limit switch
=
Maximum/minimum absolute value of the controlled variable
= 3/4
Minimum/maximum absolute value of the error percentage
=5
Minimum and maximum absolute value of the error percentage (with XDmin, limit values set under 1A/2A/3A/4A
are negative)
= 6/7
Absolute value of the manipulated variable
Configuration blocks to be set:
1M/2M
= 1 to 7
Y1/Y2 as limit switch (only when YM = 0, otherwise 0)
3M/4M
= 1 to 7
Optional limit switch GW3/GW4
Parameters to be entered:
1A/2A
= Limit value
For Y1/Y2 (only when YM = 0, otherwise 0)
1H/2H
= Hysteresis
For Y1/Y2 (only when YM = 0, otherwise 0)
3A/4A
= Limit value
For GW3/GW4
3H/4H
= Hysteresis
For GW3/GW4
24
EB 6497 EN
Standard controller outputs
Switching outputs Y1 and Y2
5.2.2 On-off/three-step control output
Configuration blocks YM = 0 and 1M = 6 or 7 configure the on-off control output, which corresponds to monitoring a limit value for overcrossing by manipulated variable Y. Parameter
1A determines the limit value for the switching point; 1H determines the hysteresis as an absolute value of the manipulated variable Y.
Configuration blocks YM = 0, 1M = 6 and 2M = 7 configure the three-step control output. Parameters 1A and 2A determine limit value for the switching point; 1H and 2H determine the
hysteresis as an absolute value of the manipulated variable Y. Ensure that the difference between the upper and lower switching point is larger than the sum of the respective differential
values: 1A - 2A > 1H + 2H
When selecting the on-off or three-step control output, it is recommended to choose a P or PD
algorithm for the process control application (set KP, TV, KD). The operating point Y0 and
the minimum/maximum control manipulated variable limits (Y< and Y>) are to be selected in
such a way that the outputs are always able to be switched on or off.
Limit switches GW3 and GW4 (also Y2 with on-off control output) can be further assigned to
any signaling condition of the limit value.
Configuration blocks S1/2/3/4 are used to configure switching outputs Y1 and Y2 and
limit switches GW3 and GW4 as: 1) NO make contact (S1/S2/S3/S4 = 0); i.e., the relay
closes when the signaling condition is satisfied or 2) NC break contact (S1/S2/S3/S4 = 1);
i.e., the relay opens when the signaling condition is satisfied.
Configuration blocks to be set:
YM
=0
1M
= 6 or7
2/3/4M
= 0 to7
1M
= 6 or7
2M
= 7 or6
3/4M
= 0 to7
(On-off controller)
(Three-point controller)
Parameters to be set:
1A/2A
= Switching point
1H/2H
= Hysteresis
On
Y1, Y2 Switching output
Y
On
Manipulated
variable
1A, 2A Switching point
1H, 2H Hysteresis
Fig. 9 · Three-point control output
Y0
Operating point
EB 6497 EN
25
Three-point stepping controller with internal position feedback
5.3
Standard controller outputs
Three-point stepping controller with internal position feedback
The three-point stepping controller with internal position feedback is selected with configuration
block YM = 1. Switching outputs Y1 and Y2 form the three-step output and are no longer available as limit switches. 1M and 2M are to be set to zero.
The operating time and effective ON time of the actuator are used to calculate the position of the
final control element. The operating time of the actuator is specified by means of parameter T1.
This value can be found in the actuator’s technical description. In this output circuitry, it must
have the same value to enable opening and closing of the final control element. The range of
values for the manipulated variable cannot be limited. The parameters of the manipulated variable limits Y< and Y> are to be set to the minimum and maximum value.
External position feedback is not required for the control algorithm. However, the position of the
final control element can be indicated in the lower display field to monitor the control valve. For
this purpose, the position feedback signal must be determined using configuration block YR.
When a potentiometer is connected, it must be calibrated (see section 5.3.1). If the position of
the final control element is not to be displayed, see notes in section 5.3.1.
Parameter 1H specifies the hysteresis as a percentage of the manipulated variable Y and must
not be larger than the product of 2 * TZ. Parameter TZ (dead band) defines the range from the
current operating point to the respective switching point and is to be specified as a percentage
of manipulated variable range. To obtain the value for the variable commonly defined as dead
time (from negative switching point to positive switching point), TZ must be doubled.
The industrial controller must be configured as a PI controller in order for it to perform the required three-point stepping characteristic. When this requirement is met, it operates as a
quasi-continuous controller.
In MANUAL mode, a modification of Y directly affects the three-step output.
Configuration blocks to be set:
YM
=1
1/2M
=0
Parameters to be set:
T1
= Operating time of the actuator, e.g. 120 s
1H
= Hysteresis in %, e.g. 2.8 %
TZ
= Dead band % of the manipulated variable range, e.g. 3 %
Y (continuous)
From continuous controller
part
Fig. 10 · Three-point stepping controller with internal position feedback
26
EB 6497 EN
Standard controller outputs
Three-point stepping controller with external position feedback
5.3.1 Calibrating the potentiometer
After connecting a potentiometer for the position feedback, it must be calibrated. The
potentiometer must be calibrated prior to start-up! Please note that the industrial control automatically calibrates the span; zero, however, is already fixed.
Calibrate the potentiometer as follows:
1. Set the jumper Y to the mA position (see Fig. 3, page 73).
2. Set the potentiometer to the maximum value (200 to 1000 Ω)
3. Open the CONFIGURATION level (see page 16).
4. Select the configuration block YM using the cursor keys.
5. Press the ENTER key.
6. Depending on the output, select YM = 1 or 2 using the cursor keys.
7. Press the ENTER key.
8. Press the MANUAL/AUTOMATIC mode selector key. CALappears in the upper display
field while the calibration is being performed. The calibration is finished when CAL disappears. The position feedback message is indicated in the lower display field.
Note!
If position feedback is not wanted for YM = 1, the lower display field can be set to 00. To
achieve this, perform the calibration described above using "open" terminals. Subsequently,
lay the jumper between terminal 1 and 2.
Optionally, select YM = 4. After calibration with "open" terminals and laying the jumper (see
above), 00 appears on the display instead of X. In this configuration, a recorder can be connected to log the controlled variable X.
5.4
Three-point stepping controller with external position feedback
Select this output using configuration block YM = 2. The position of the final control element operated is transmitted as a feedback signal by means of a potentiometer (0 to (200 to 1000) Ω)
or a direct current signal (4 to 20 mA) with shunt over the input of the external feedback YR (terminals 1 and 2). The maximum permissible current consumption of the potentiometer must be
observed. The measuring current on connecting a 1-kΩ potentiometer is approx. 2.7 mA
(approx. 13 mA with a 200-Ω potentiometer).
The manipulated variable can be limited as required.
Actuators with different transit times to open and close the valve are supported. Parameters T1
and T2 specify the period (not the transit time!) in the positive and negative direction of the actuator. An appropriately selected period offers a suitable compromise between the low residual
ripple of the controlled variable (high switching frequency; i.e., cycle time selected to a low
value) and a high operating life of the final control element (low switching frequency; i.e., period selected to a high value).
Parameters 1H and 2H determine the minimum pulse duration as a percentage of the corresponding period (T1 and T2). The value of the minimum pulse duration is to be selected in
such a way that the connected actuators or contactors can just begin to switch.
EB 6497 EN
27
Three-point stepping controller with external position feedback
Standard controller outputs
The transfer coefficients 1A and 2A specify the inclination of the duty factor TEin/TP (TEin = ON
time, TP = period (T1 or T2)). This allows the difference to be calculated when the duty factor is
one (manipulated variable calculated by the industrial controller minus the feedback position of
the final control element); i.e., the controller releases a continuous signal. The ON time is calculated by the following equation:
TEin = (Y – YR) · A · TP, whereby for TEin > TP applies: TEin = TP; A = 1A or 2A
Parameter TZ (dead band) defines the range extending from the current operating point to
the respective switching point and is to be specified as a percentage of the manipulated variable range. To obtain the value for the variable commonly defined for dead band (from negative switching point to positive switching point), double TZ.
In MANUAL mode, a modification of Y does not directly affect the three-step output, rather the
input of the positioner integrated in the industrial controller. The duty cycle is shifted by changing the positioner's error (deviation). The industrial controller is pulsed according to the new
duty cycle.
Configuration blocks to be set:
YM
=2
1/2M
=0
YR
= 0 or 1 (Selection of external feedback signal)
TEin
ON time
TP
Period
TP = 1 for Y – YR > 0
TP = 0 for Y – YR < 0
TEin
TP
Duty cycle
T1min, T2min Minimum ON time
1H, 2H
Minimum pulse duration in %
Fig. 11 · Three-point stepping controller with external position feedback
28
EB 6497 EN
Standard controller outputs
Pulse-modulated control outputs
Parameters to be set:
T1
= Period in positive operating direction, e.g. 20 s
T2
= Period in negative operating direction, e.g. 20 s
1H
= Minimum pulse duration in positive operating direction in % of T1,
e.g. 10 %
2H
= Minimum pulse duration in negative operating direction in % of T2,
e.g. 10 %
1A
= Gain (transfer coefficient) in positive operating direction, e.g.15
2A
= Gain (transfer coefficient) in negative operating direction, e.g.15
TZ
= Dead band in % of the manipulated variable range, e.g. 3 %
5.5
Pulse-modulated control outputs
The pulse-modulated control output consists of a switching output, its ON time TEin being directly proportional to the internal manipulated variable Y in relation to the selected period T1.
5.5.1 On-off pulse-modulated outputs
t
Time
Y1, Y2 Switching output
Fig. 12 · Pulse-modulated control output
T1
Period
TEin
ON time
Y
Manipulated
variable
This switching output is configured for Y1 by means of configuration block 1M = 8 or 9, where
1M = 8 configures an on-off control output with positive operating direction, 1M = 9 with a negative operating direction. Configure Y2 equivalent to 2M.
The dead band TZ indicates at which percentage of the manipulated variable Y the output begins to switch. This corresponds to the minimum pulse duration as a percentage of the period.
Configuration blocks to be set:
YM
=0
1M/2M
= 8 or 9 (On-off output with positive or negative operating direction)
Parameters to be set:
T1
= Period (cycle time), e.g. 20 s
TZ
= Minimum pulse duration as a percentage of the period T1, e.g. 10 %
EB 6497 EN
29
Pulse-modulated control outputs
Standard controller outputs
5.5.2 Dual on-off pulse-modulated outputs
This configuration is selected with 1M = 8 and 2M = 9. Both switching outputs Y1 and Y2 are
pulse-modulated and form two on-off control outputs for the positive and negative internal manipulated variable Y.
Parameter TZ indicates at which percentage of the manipulated variable Y the output begins to
switch. This corresponds to the minimum pulse duration as a percentage of the period.
Configuration blocks to be set:
1M
=8
(Pulse-modulated positive)
2M
=9
(Pulse-modulated negative)
Parameters to be set:
T1
= Period (cycle time), e.g. 20 s
TZ
= Minimum pulse duration as a percentage of the period T1, e.g. 3 %
5.5.3 Dual on-off pulse-modulated outputs in split-range (positive or
negative)
This selection is used to operate switching outputs Y1 and Y2 in split range. Parameter TZ determines the split-range point in reference to internal manipulated variable Y; parameter TZ no
longer specifies the minimum pulse duration.
Parameters S1/ S2 determine the operating direction of the split-range outputs. This is positive for S1/ S2 = 0, otherwise negative.
Configuration blocks to be set:
1M
=8
(Split-range positive) or
9 (Split-range negative)
2M
=8
(Split-range positive) or
9 (Split-range negative)
Parameters to be set:
T1
= Period (cycle time), e.g. 20 s
TZ
= Split-range point
30
EB 6497 EN
Serial interface
6
Serial interface
6.1
Description
Description
The TROVIS 6497 Industrial Controller is able to communicate with a control station via the serial interface. A complete automation system for process control can be constructed by means
of software capable of process visualization and communication. Here, the commonly used
Modbus communications protocol is implemented as the communication standard. The hardware relating to the serial interface satisfies the requirement of the RS-485 interface (RS = Recommended Standard according to EIA).
If the controller is intended to terminate the bus, five soldering jumpers "LB1" to "LB5" must be
connected on the components (soldering) side of the interface board (see Fig. 2, page 6).
Fig. 13 · Process control system with TROVIS 6497 Industrial Controllers
6.2
Technical data
Physical interface
RS-485
Communications protocol
Modbus RTU 584
Data transmission
Asynchronous, half-duplex (four-wire)
Character format
RTU (8 bits) 1 start bit, 8 data bits, 1 stop bit
Baud rate
4800 or 9600 bits/second
Number of addressable stations
246
Transmittable data
Configuration, parameters, operating state,
process variables
EB 6497 EN
31
Operation
6.3
Serial interface
Operation
6.3.1 Setting the station addresses
An unassigned station address is defined in the industrial controller to identify a subscriber
(user) in the communication network. Configuration block SN configures a station address in
the CONFIGURATION level. The factory default is set to 0 (= off). After a station address has
been configured, configuration block SN cannot be reset to 0 any more.
6.3.2 Allocating the value register
Value registers contain values of analog variables; e.g., controlled variable, setpoint, etc.
Value registers 1, 2, 3, 4, 6, 7, 8, 11, 55, 56, 57 can only be read by the control station if they
are denoted by an R (Read). The remaining value registers can be both read and written by the
control station (R/W = Read/Write).
6.3.3 Allocating the status register
Status registers contain binary information such as fault alarms, relay states or operating messages.
Status registers 1 to 4 and 15, 16 can only be read by the control station (read only). Status registers 5 to 14 can be both read and written (R/W).
6.3.4 Modbus protocol
The Modbus communications protocol defines the communication standard implemented between the industrial controller and the control station. In this communication scheme, the control
station acts as the "master", the industrial controller as the "slave". Therefore, the industrial controller may only respond to control station requests.
6.3.5 Function code 01 (Read Coil Status)
This function code reads status registers (see table on page 34) in the industrial controller and
transmits these to the control station.
6.3.6 Function code 05 (Force Single Coil)
A certain status register is modified in the industrial controller by the control station with this
function code (see table on page 34).
6.3.7 Function code 03 (Read Holding Register)
This function code allows status registers (see table on page 33) to be read from the industrial
controller and, after conversion in the numeric format, displayed on the PC.
6.3.8 Function code 06 (Preset Single Register)
With this function code, the control station reads and modifies a certain value register in the industrial controller (see table on page 33).
6.3.9 Error messages according to Modbus
The communication interface responds with an error message upon illegal operations. These
types of illegal actions include, for example, attempt to read more than 58 value registers or attempt to write read-only registers containing status information or values.
32
EB 6497 EN
Serial interface
6.4
No.
Value registers (holding registers)
Value registers (holding registers)
Name
Access
1
ID
R
6497
2
VN
R
1001 to 1002
3
X
R
4
WE
R
5
Register range
Div.
Description
0
Controller ID
11)
Version: Software/Pt 100
–1999 to 1999
2)
Controlled variable
–1999 to 1999
2)
External setpoint (ext. reference variable)
0
Position feedback
0
Reserved
6
YSTELL
R
–10 to 110
7
XD
R
–1999 to 1999
2)
Error
8
Y
R
–1099 to 1099
1
Manipulated variable PID
9
Manipulated variable output
YHAND
R/W4)
–1999 to 1999
1
10
WI
R/W4)
–1999 to 1999
2)
Internal setpoint (int. reference variable)
11
SN
R
1 to 246
0
Station address
12
KP
R/W4)
0 to 1999
1
Proportional-action coefficient
13
TN
R/W4)
0 to 1999
0
Reset time
14
TV
R/W4)
0 to 1999
0
Rate time
15
KD
R/W4)
0 to 10
0
Rate gain
16
WR
R/W4)
0 or 1
0
Reverse error
17
YMIN
R/W4)
–1099 to 1099
1
Minimum manipulated variable limit
18
YMAX
R/W4)
–1099 to 1099
1
Maximum manipulated variable limit
19
Y0
R/W4)
–1099 to 1099
1
Operating point
20
1A
R/W4)
–1999 to 1999
3)
Limit value/switching output Y1
21
1H
R/W4)
0 to 1999
3)
Hysteresis Y1
22
2A
R/W4)
–1999 to 1999
3)
Limit value/switching output Y2
23
2H
R/W
4)
0 to 1999
3)
Hysteresis Y2
24
T1
R/W4)
0 to 1999
0
Switching time/period (cycle time) +
25
T2
R/W4)
0 to 1999
0
Switching time/period (cycle time) –
26
TZ
R/W4)
0 to 1099
1
Dead zone
27
3A
R/W4)
–1999 to 1999
3)
Limit value of GW3
28
3H
R/W4)
0 to 1099
3)
Hysteresis of GW3
29
4A
R/W4)
–1999 to 1999
3)
Limit value of GW4
30
4H
R/W4)
0 to 1099
3)
Hysteresis of GW4
31
XN
R/W4)
–1999 to 1999
2)
Minimum controlled variable limit
32
XE
R/W4)
–1999 to 1999
2)
Maximum controlled variable limit
33
X,
R/W4)
0 to 3
0
Decimal point
34
XM
R/W4)
0 to 6
0
Input signal
35
XT
R/W4)
0 or 1
0
Unit of temperature
36
X*
R/W4)
0 or 1
0
Range selection for X
37
W*
R/W4)
0 or 1
0
Range selection for W
38
Y*
R/W4)
0 to 3
0
Range selection for Y
39
DI
R/W4)
0 or 1
0
Assignment of derivative-action component
40
WM
R/W4)
0 to 7
0
Selection of setpoint
41
YH
R/W4)
0 or 1
0
Blocking the MANUAL/AUTOMATIC key
42
YM
R/W4)
0 to 4
0
Selection of controller output
EB 6497 EN
33
Status register
Serial interface
No.
Name
Access
Register range
Div.
Description
43
YR
R/W4)
0 or 1
0
External position feedback Ω/mA
44
1M
R/W4)
0 to 9
0
Signaling condition of GW1
45
2M
R/W4)
0 to 9
0
Signaling condition of GW2
46
S1
R/W4)
0 or 1
0
NC contact /NO contact of Y1 (GW1)
47
S2
R/W4)
0 or 1
0
NC contact /NO contact of Y2 (GW2)
48
3M
R/W4)
0 to 7
0
Signaling condition of GW3
49
4M
R/W4)
0 to 7
0
Signaling condition of GW4
4)
50
S3
R/W
0 or 1
0
NC contact /NO contact of GW3
51
S4
R/W4)
0 or 1
0
NC contact /NO contact of GW4
52
TA
R/W4)
0 or 1
0
Update cycle to refresh display (1)
53
FI
R/W4)
0 to 1999
0
Digital filter for X and WE
54
K1
R/W4)
0 to 1099
1
Safety output value
55
C1
R
–1999 to 1999
0
PARAMETER level code number
56
C2
R
–1999 to 1999
0
CONFIGURATION level code number
57
SO
R
0 to 2
0
Auto-tuning
58
TS
R/W4)
0 to 30000
0
Setpoint ramp
Consisting of software version, e.g. 1.00 and Pt 100 version 1 or 2: 100.1 or 100.2 respectively
Varies depending on how input signal XM is configured:
– No decimal point for XM = 3, 4, 5, 6 and XM = 0 version 1
– One decimal point for XM = 0 version 2
– Decimal point for 0 to 3 decimal point(s) depending on configuration block X, for XM = 1, 2
Depending on XM, YM and assignments 1M to 4M
Data are written in EEPROM which is restricted to approx. 100,000 write cycles. Therefore, do not always
write in it automatically.
1)
2)
3)
4)
6.5
Status register
No.
Access
Description
1
R
Collective fault (internal device fault)
2
R
Safety output value K1 active1)
3
R
Enable parameterization
4
R
Enable configuration
5
R/W
Limit value/switching output Y1
6
R/W
Limit value/switching output Y2
7
R/W
Limit value of GW3
8
R/W
Limit value of GW4
9
R/W
Inhibit parameterization
10
R/W
Confirm parameterization
11
R/W
Inhibit configuration
12
R/W
Confirm configuration
13
R/W2)
Switchover to MANUAL mode
14
R/W2)
Switchover to external setpoint WE
15
R
Reserved
16
R
Reserved
1)
2)
34
The safety output value is set for an input signal fault. The alarm is only generated in automatic mode.
Data are written in EEPROM which is restricted to approx. 100,000 write cycles. Therefore, do not always
write in it automatically.
EB 6497 EN
Start-up
7
Status register
Start-up
The configuration blocks and parameters must be determined after completing all electrical
connections (see page 8), deciding what jumpers are needed (see page 7) and installing the industrial controller (see page 6).
Always take the characteristics of the control loop into account before putting the industrial controller into operation. Avoid potential risks by means of appropriate parameters.
Make note of the configured values after putting the controller into operation.
Note!
The industrial controller should first be configured, then enter the parameters and, finally,
tune them.
Firmware version (EPROM version):
After switching on the mains power supply, the implemented firmware version of the industrial
controller is shown in the upper display field. This version number is important when making inquiries.
Configure the industrial controller as following:
–
–
–
–
–
Open the CONFIGURATION level (see page 16)
Select the input signal XM
Determine the measuring range of the input signal by means of XN (start value) and XE
(end value)
Select the control outputs with YM, 1M, 2M, YR; see also section 5, beginning with
page 23.
Select the desired special functions such as digital filter FI, unit of temperature XT, signaling conditions of the limit value ½/3/4M or safety output value K1
–
–
–
–
–
Open the PARAMETER level (see page 13)
Determine the operating direction by means of WR
Limit the output signal by means of Y< and Y>
Enter the parameters for the desired output; see also section 5, beginning with page 23
Determine the desired limit values with ½/3/4A
–
Tune the plant by entering the parameters: Proportional-action coefficient KP, reset time
TN, rate time TV, and rate gain KD; see also section 7.1 and 7.2.
EB 6497 EN
35
Tuning control parameters
7.1
Start-up
Tuning control parameters
The industrial controller must be tuned to the dynamic behavior of the loop using the parameters: Proportional-action coefficient KP, reset time TN and rate time TV. This permits the controller to compensate for control deviations caused by disturbances by reducing these to zero or
maintain them in very confined limits.
If you do not have previous experience in selecting values for the control loop, proceed as
follows:
–
–
–
Set the MANUAL/AUTOMATIC mode selector key (10) to MANUAL mode.
Move the attached control valve is the CLOSED position; if applicable, via the cursor
keys.
After deciding which control mode is necessary, proceed further as instructed below.
P controller
–
–
–
–
–
–
Specify control parameters proportional-action coefficient KP= 0.1; reset time TN =
0 and rate time TV= 0 in the PARAMETER level.
Enter the desired value of the setpoint in the OPERATING level. Then, modify the manipulated variable Y until the control valve slowly opens and the error XD is eliminated
(becomes zero).
Switch over to AUTOMATIC mode
Increase the KP value until the control loop tends to hunt.
Reduce the KP value until oscillation cannot be determined any more.
Correct steady-state deviation by selecting the operating point Y0 as follows: Read the
current value of manipulated variable Y when the plant is in the steady state, and enter
as value under parameter Y0.
Note!
A setpoint modification also means a change of the operating point Y0.
PI controller
–
–
–
–
–
–
Specify control parameters proportional-action coefficient KP = 0.1; reset time TN =
1999 (maximum) and rate time TV= 0 in the PARAMETER level.
Enter the value of the desired setpoint in the OPERATING level. Then, modify the manipulated variable Y until the control valve slowly opens and the error XD is eliminated
(becomes zero).
Switchover to AUTOMATIC mode
Increase the KP value until the control loop tends to hunt.
Slightly decrease the KP value until oscillation cannot be determined any more.
Reduce the TN value until the control loop tends to hunt.
Slightly increase the TN value until oscillation cannot be determined any more.
36
EB 6497 EN
–
Start-up
Tuning control parameters
PD controller
–
–
–
–
–
–
–
–
Specify control parameters proportional-action coefficient KP = 0.1; rate time TV =
0 and reset time TN = 0 in the PARAMETER level. Set the rate gain KD in usual cases
between a value of 5 and 10.
Enter the value of the desired setpoint in the OPERATING level. Then, modify the manipulated variable Y until the control valve slowly opens and the error XD is eliminated
(becomes zero).
Increase the KP value until the control loop tends to hunt.
Set rate time TV to 1 seconds and increase until oscillation cannot be determined any
more.
Increase the KP value until the control loop tends to hunt again.
Decrease the TV value until oscillation cannot be determined any more.
Proceed in the same manner several times until the oscillations cannot be suppressed
any more.
Slightly decrease the KP value and TV value until the control loop stabilizes itself
again.
Eliminate steady-state deviation by adjusting the operating point Y0 as follows: Read
the current value of the manipulated variable Y when the plant is in the steady state,
and enter as value for parameter Y0.
Note!
A setpoint modification also means a change of the operating point Y0.
PID controller
–
–
–
–
–
–
–
–
Specify control parameters proportional-action coefficient KP = 0.1, rate time TN =
1999 and reset time TV = 0 in the PARAMETER level. Set the rate gain KD in usual
cases between a value of 5 and 10.
Enter the value of the desired setpoint in the OPERATING level. Then, modify the manipulated variable Y until the control valve slowly opens and the error XD is eliminated
(becomes zero).
Increase the KP value until the control loop tends to hunt.
Set rate time TV to 1 seconds and increase until oscillation cannot be determined
any more.
Increase the KP value until the control loop tends to hunt again.
Increase the TV value until oscillation cannot be determined any more.
Proceed in the same manner several times until the oscillations cannot be suppressed
any more.
Slightly decrease the KP value and TV value until the control loop stabilizes itself
again.
Reduce the TN value slightly until the control loop tends to hunt again and increase it
again until no oscillations cannot be determined any more.
EB 6497 EN
37
Auto-tuning
7.2
Start-up
Auto-tuning
Auto-tuning is a special feature of the industrial controller which, in the start-up phase, effectively determines the characteristics of the control loop and calculates the optimum control parameters.
This function should only be used on control loops which are not critically fast and have short
dead bands. If auto-tuning is used, the tuning procedures described in section 7.1 can be omitted.
The automatically determined control parameters should be checked for applicability before
switching to AUTOMATIC mode.
If the industrial controller indicates an unsatisfactory behavior when being operated, the calculated control parameters must be manually modified.
Proceed as follows to automatically determine the control parameters:
1. Prerequisites:
The control loop must be stable and in the steady state for at least 5 minutes; i.e., the error XD must not have changed.
A PI algorithm is to be specified for the industrial controller (rate gain KD = 0). If a PID
algorithm is desired, set the parameter to (KD = 1).
The controller runs in the OPERATING level (normal operation); controlled variable X and
manipulated variable Y are displayed.
2. Switch the MANUAL/AUTOMATIC mode selector key to MANUAL mode (LED illuminates
in the key).
3. Open the CONFIGURATION level (see page 16).
4. Select configuration block SO using the cursor keys
5. Set the desired tuning mode SO = 1 or 2, and store using the ENTER key (8).
6. Press the operating key (7). (The industrial controller returns to the OPERATING level.)
7. Specify the value for the setpoint (internal WI or external WE) for which a positive error
XD of at least 20 % of the measuring range is set. Check at XD.
8. Press the MANUAL/AUTOMATIC mode selector key (10) in order to switch to
AUTOMATIC mode. The control parameters are calculated and stored against power
failure as long as the yellow LED flashes in the key. After the LED goes out, the controller
operates in AUTOMATIC mode.
If the LED does not go out, parameters cannot be determined in this manner. Abort the
process by pressing the MANUAL/AUTOMATIC mode selector key.
Service code number
38
EB 6497 EN
1732
8
Check list
Device:
Select
Plant:
Designation
Process designation:
Date:
Range of values
Default
setting
Depending on sensor
–
OPERATING level
X
Controlled variable
XD
Error
WI
Internal setpoint (ref. variable)
WE
External setpoint (ref. variable)
Y
Manipulated variable
–
–
XN to XE
0
–
Y< to Y>
–
PARAMETER level
KP
Proportional-action coefficient
TN
Reset time
1 to 1999
10
TV
Rate time
1 to 1999
0 (Off)
KD
Rate gain
1 to 10
0 (Off)
WR
Operating direction
0 or 1
1 (<>)
Y<
Min. manipulated variable limit
Y>
Max. manipulated variable limit
Y0
Operating point
–109.9 to 109.9 %
0
1A
Limit value of Y1
Depending on 1M
0
Transfer coefficient +
1H
Hysteresis of Y1
Minimum pulse duration
2A
Limit value ofY2
Transfer coefficient–
2H
Hysteresis of Y2
Minimum pulse duration
0.1 to 199.9
–109.9 to X>
Y< to 109.9
0.0 to 100.0
Depending on 1M
0.0 to 100.0 %
Depending on 2M
0.0 to 100.0
Depending on 2M
1.0
0
100
0.0
0
0.0
0
0.0
0
0.0 to 100.0 %
0
0 to 1999 s
10
T1
Period (cycle time) +
T2
Period (cycle time) –
0 to 1999 s
10
TZ
Dead band
0 to 109.9 %
2.0
Options
3A
Limit value of GW3
Depending on 3M
0
3H
Hysteresis of GW3
Depending on 3M
0
4A
Limit value of GW4
Depending on 4M
0
4H
Hysteresis of GW4
Depending on 4M
0
40
EB 6497 EN
Start-up values,
modifications
Select
Designation
Range of values
Default
setting
Start-up values,
modifications
CONFIGURATION level
XN
Min. measuring range limit X
XE
Max. measuring range limit X
X,
Decimal place
XM
XT
0
XN to 1999
100.0
1.000 to 1000
100.0
Selection of input signal
0 to 6
0 (Pt 100)
Unit of temperature
0 or 1
0
0 or 1
0 (mA)
X*
W*
–1999 to XE
Range of mA or V signal
Y*
0 or1
0 (mA)
0 to 3
0 (mA)
DI
Derivative-action component
0 or 1
0
WM
Selection of setpoint
0 to 7
0
YH
MANUAL/AUTOMATIC key
0 or 1
0
YM
Selection of controller output
0 to 4
0
YR
External position feedback
0 or 1
0
0 to 9
0
1M
2M
S1
S2
Signaling condition of limit value
NO contact or NC contact
0 to 9
0
0 or 1
0
0 or 1
0
Options for versions with limit switches GW3 and GW4
3M
4M
S3
S4
Signaling condition of limit value
NO contact or NC contact
0 to 7
0
0 to 7
0
0 or 1
0
0 or 1
0
0 or 1
0
Options for all versions
TA
Update cycle to refresh display
of controlled variable
FI
Digital filter
K1
Safety output value
C1
PARAMETER level code number
–1999 to 1999
0
C2
CONFIGURATION level code
–1999 to 1999
0
SO
Auto-tuning
0 to 2
0
T5/TM Setpoint ramps
0 to 1999 s
0 to 109.9 %
1
0
1 s to 500 min
0
Options for version with interface
SN
Station address
0 to 246
0
BR
Baud rate
0 or 1
0
EB 6497 EN
41
9
Control panel
1
Display of controlled variable
6 Cursor keys
2
Display of manipulated variable
7 Operating key
3
Display of error
8 Enter key
4
Display of switching output
5
Label for engineering unit
44
EB 6497 EN
9 WE/WI setpoint switchover key
10 MANUAL/AUTOMATIC mode selector key
EB 6497 EN
S/Z 2008-10
SAMSON AG · MESS- UND REGELTECHNIK
Weismüllerstraße 3 · 60314 Frankfurt am Main · Germany
Phone: +49 69 4009-0 · Fax: +49 69 4009-1507
Internet: http://www.samson.de