1
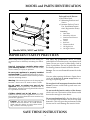
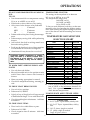
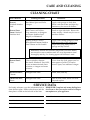
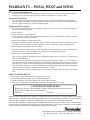
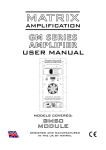
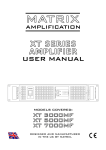
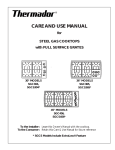
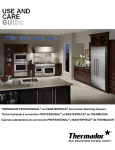
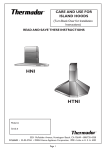
Warming Drawer
Model WD24, WD27 and WD30
Care and Use Manual
TABLE OF CONTENTS
Model and Parts Identification ............................................................................. 3
Important Safety Practices .................................................................................... 3
Controls and Operation ......................................................................................... 4
Operations ............................................................................................................... 5
Temperature Selection Chart ................................................................................ 5
Care & Cleaning Chart ....................................................................................... 6-7
Warranty / How to Obtain Service / Location of Data Plate ....... Back Cover
A Special Message to Our Customers,
We hope you take time to read this entire booklet BEFORE using your new Warming Drawer.
This booklet contains suggestions we believe will be helpful. Keep it in a handy spot, as it has
the answers to the questions that occur when you start to use the drawer.
Let us know if we can help you. When you write, please include the model number of your
Warming Drawer.
Test Kitchen Consumer Scientists
2
MODEL and PARTS IDENTIFICATION
2
3
1
4
5
6
7
8
Packaged Inside Drawer:
• Reversible Rack
• 2 Mounting Brackets and
Screws
• Literature Packet (Care &
Use, Installation Instructions, Registration Form)
Parts Key:
1. Data Plate
2. Moist•Dry Selector
3. Stainless Steel Drawer
Interior
4. Gasket
5. Rail Lock
6. Thermostat Dial
7. ON Light Lens
8. ON Light Viewer
Models WD24, WD27 and WD30
IMPORTANT SAFETY PRACTICES
When using kitchen appliances basic safety precautions must be followed, including the following:
Use only dry potholders. Moist or damp
potholders on hot surfaces may cause burns from
steam. Do not use a towel or other bulky cloth in
place of potholders. Do not let potholders touch
hot heating element located under the drawer.
Read all instructions carefully before using
your warming drawer to reduce the risk of fire,
electric shock, or injury to persons.
Storage - Do not store flammable materials in the
drawer.
Be sure your appliance is properly installed
and grounded by a qualified technician in accordance with the installation instructions provided
with the warming drawer.
Use care when opening the drawer. Open door a
crack and let hot air or steam escape before removing or replacing food.
Warning: The warming drawer is for keeping hot
food hot. Never use it to warm or heat a room.
Do not place food in unopened containers in the
drawer. Pressure could build up and cause container to burst.
Do not repair or replace any part of the
appliance unless specifically recommended in
this manual. All other servicing should be referred
to a qualified technician.
Do not touch the interior surface of the drawer
while it is in use. The interior of the drawer could
become hot enough to cause burns.
Children should not be left alone or unattended in an area where appliances are in use.
They should never be allowed to sit or stand on any
part of the appliance.
Do not use aluminum foil to line the drawer. Foil
is an excellent heat insulator and will trap heat
beneath it. This will upset the performance of the
drawer and it could damage the interior finish.
Caution: Do not store items of interest to
children above the drawer. If a child should
climb onto the drawer to reach these items
they could be seriously injured.
SAVE THESE INSTRUCTIONS
3
CONTROLS
REVERSIBLE RACK
The warming drawer will keep hot, cooked foods
at serving temperature. Always start with hot
food. DO NOT use to heat cold food other than
proofing yeast dough, crisping crackers, chips,
and dry cereal, or warming dishes or plates.
THERMOSTAT DIAL / ON KNOB
➝
L
ED
➝
Dial
O
OFF
Low Rack Position
HI
Indicator
•
Low position raises utensil about 1/2" from
drawer bottom. Example: Used when proofing yeast dough or when a utensil cannot be
placed directly on a hot drawer.
•
High position allows for double stacking
items.
M
Signal Light
Open the drawer. The thermostat dial is on the
right side of the front frame.
High Rack Position
Turn the knob clockwise (to the right). Align a
setting on the knob with the raised indicator.
SIGNAL LIGHT
The signal light is located below the thermostat
dial and turns "ON" when the dial is set. It stays on
until the dial is turned back to the "OFF" position.
;;;
;;;
;;
;;;
;;;
;;
;;;
This light is visible through the light viewer in the
drawer front panel, when the drawer is closed.
This is a reminder that the heat is on.
Double Stacking Items
MOISTURE SELECTOR
(Drawing shows plates stacked above two 9x13
casserole dishes)
At the top edge of the drawer trim are the words
Moist and Dry.
To keep foods moist, slide the knob inside the
drawer to the left. This closes the vents and seals
the moisture inside the drawer.
With the vent closed, the drawer is completely
sealed which keeps the hot food moist and soft. In
this setting condensation may occur around the
inside edge of the drawer.
To keep foods crisp, slide the knob to the right.
This opens the vents and allows the moisture to
escape. With the vents open, it is normal for
moisture to collect on surfaces above the warming
drawer.
4
•
Rack will fit from front to back.
•
With large loads, it may be necessary to use a
higher thermostat setting and cover some of
the cooked food items.
•
When holding hot, cooked foods and warming empty serving dishes at the same time,
place the serving dishes on the high rack position and the food items on the bottom of the
drawer.
•
Food in heat-safe glass and glass ceramic utensils may need higher thermostat settings as
compared to food held in metal utensils.
•
Allow extra time for the temperature inside
the drawer to stabilize, after adding items or
checking doneness.
OPERATIONS
DO NOT LINE DRAWER WITH ALUMINUM
FOIL.
TO USE:
• Turn thermostat dial to a temperature setting:
LO ➟ ➟ ➟ ➟ MED ➟ ➟ ➟ ➟ HI.
• Slide knob to select a Moist or Dry setting.
• Allow time for the drawer to be preheated:
LO
15 minutes
MED
25 minutes
HI
35 minutes
• Preheat with rack in place if using that arrangement.
• Preheat empty serving dish while preheating
drawer.
• Add cooked, hot food in cooking utensil or to
heat-safe serving dishes.
• Food may be kept hot in its cooking container
or transferred to a heat-safe serving dish.
• Aluminum foil may be used to cover food.
TEMPERATURE SELECTOR
The setting can be anywhere on or between
LO ➟ ➟ ➟ ➟ MED ➟ ➟ ➟ ➟ HI.
The temperatures range from
140-160°F. on LO
161-190°F. on MED
191 to 220°F. on HI.
To keep several different foods hot, set the temperature to the food needing the highest setting.
Place item needing the highest setting on the bottom of the drawer and item needing less heat on
the rack.
TEMPERATURE AND MOISTURE
SELECTION CHART
FOOD
Bacon
Beef, medium and well done
Beef, rare
Bread, hard rolls
Bread, soft rolls, coffee cakes
Casseroles
Cooked Cereal
Eggs
Fish, Seafood
Fried foods
Fruit
Gravy, cream sauces
CAUTION: Plastic containers or plastic
wrap can melt if in direct contact with
the drawer or a hot utensil. If it melts
onto the drawer, it may not be removable.
Ham
Lamb
Pancakes, waffles
Pies, one crust
Pies, two crusts
Pizza
Pork
Potatoes, baked
Potatoes, mashed
TO WARM EMPTY SERVING BOWLS AND
PLATES
•
Use only heat-safe dishes.
•
May use reversible rack, in low position to raise
utensil from direct contact with bottom of
drawer.
•
Warm on setting appropriate for utensil.
•
Check dish temperature during warming period.
TO PROOF YEAST BREAD DOUGH
•
Use rack in low position.
•
Preheat on LO/MOIST.
•
Lightly oil top of dough in bowl large enough
to double bread dough. Cover with clean cloth.
•
Check dough height in 40 minutes. Add time
as needed.
Poultry
Vegetables
Place food in low sided dishes or pans.
•
Preheat on LO/DRY.
•
Check crispness after 45 minutes. Add time
as needed.
Hi
Med
Lo
Med
Med
Med
Med
Med
Med
Hi
Med
Med
Med
Med
Hi
Med
Med
Hi
Med
Hi
Med
Hi
Med
MOISTURE
SELECTOR
Dry
Moist
Moist
Dry
Moist
Moist
Moist
Moist
Moist
Dry
Moist
Moist
Moist
Moist
Moist
Moist
Dry
Center
Moist
Center
Moist
Moist
Moist
✬ USDA/FSIS recommends an internal temperature of 145°F. as the minimum doneness for
beef. Use a portable meat thermometer to
check internal temperatures.
USABLE SPACE AND UTENSIL SIZES
Drawer Interior,WD24: 19"W a 18"D x 5"H
WD 27 and WD30: 22"W x 21"D x 7" H
Utensil sizes:
2 - 9 x 13" Pyrex 3-quart dishes, side by side.
2 - 9 1/2 x 15" Pyrex 4-quart dishes, side by
side.
4 - 10 1/2" plates, single or stacked
3 - 11" plates, single or stacked
Large 14" pizza, in box.
TO CRISP STALE ITEMS
•
TEMERATURE
5
CARE AND CLEANING
TO REMOVE THE DRAWER
TO REPLACE THE DRAWER
•
Pull drawer to fully open position
•
•
Lift up on left side Release Lever and press
down on the right side Release Lever.
Be sure Cabinet Rails are pushed inside cabinet.
•
Align each Drawer Rail to each Inner Cabinet
Slide. Use the Slide Lock to guide placement.
•
Close the drawer completely; the Slide Lock
will secure the drawer.
•
Pull out drawer fully to check that both locks
are engaged.
•
Firmly pull the drawer outward until each
Drawer Rail pulls free from each Inner Cabinet Slide. Retract Cabinet Rails while drawer
is being cleaned.
WARNING: DO NOT REMOVE
DRAWER WHILE HOT.
BE SURE DRAWER IS EMPTY
BEFORE REMOVING.
6
CARE AND CLEANING
CLEANING CHART
Area / Material
Cleaning Products
Directions
Drawer/
Polished Stainless
Steel
Hard Water Spots and Scale:
vinegar.
Apply with sponge or cloth, then
Rinse with clear water and wipe dry.
Satisfactory for use on all finishes.
Drawer Front
Frame/Brushed
Stainless Steel
Mild Cleaners and Polishes:
Soap, ammonia, or detergent
and water. Stainless Steel
Magic®, or Shimmer®
Swab or wipe with cloth. Rinse with
water and dry. Satisfactory for use on
stainless finishes.
Slightly Abrasive Cleaners:
RevereWare® Instant Stainless
Steel Cleaner or Soft Scrub®
Apply with a damp sponge or cloth.
Rub in direction of the polish lines.
Wipe clean using damp cloth or
sponge and dry surface.
Remember, chlorine and chlorine compounds (check the labels)
are corrosive even to stainless steel. It is very important to rinse
thoroughly and dry, if a cleaning agent with chlorine is used.
Drawer Panel/
Glass
Glass or window cleaners:
Bon Ami®, Windex®, Easy Off®,
or use an ammonia and water
solution, or vinegar and water
solution.
Use a clean dry cloth, paper towel or
newspaper to polish. For hard to
remove spots, use undiluted vinegar.
Reversible Rack/
Chrome
Detergent and water.
Wash, rinse, and dry.
Thermostat Dial/
Plastic
Detergent and water.
Pull off knob. Wash, but do not soak.
Dry and replace.
SERVICE DATA
For handy reference copy the information below
from the data plate. Remove the drawer and the
data plate is visible on the left side of the liner.
REMINDER: Complete and return the Registration Form so that you can be notified of important updates on your appliance.
Model Number
Date of Purchase
Serial Number
Service Center's Name / Phone #
Dealer's Name
Service Center's Phone number
Dealer's Phone Number
7
WARRANTY – WD24, WD27 and WD30
FULL ONE YEAR WARRANTY
Covers one year from date of Installation, or date of occupancy on a new or previously unoccupied
dwelling. Save your dated receipt or other evidence of installation/occupancy date.
Thermador Will Pay For:
All repair labor and replacement parts found to be defective due to materials and workmanship.
Service must be provided by a Factory Authorized Service Agency, during normal working hours. For
a Service Agency nearest you, please call 800/735-4328.
Thermador Will Not Pay For:
1. Service by an unauthorized agency. Damage or repairs due to service by an unauthorized agency or
the use of unauthorized parts.
2. Service visits to:
• Teach you how to use the appliance.
• Correct defects or repairs due to improper installation, You are responsible for providing electrical
wiring and other connecting facilities
• Reset circuit breakers or replace home fuses
3. Damage caused from accident, alteration, misuse, abuse, improper installation or installation not in
accordance with local electrical codes or plumbing codes, or improper storage of the appliance.
4. Service labor during limited warranter period.
5. Travel fees and associated charges incurred when the product is installed in a location with limited or
restricted access. (i. e., airplane flights, ferry charges, isolated geographic regions).
6. Repairs due to other than normal home use.
This warranty applies to appliances used in residential applications; it does not cover their use in
commercial installations.
The warranty is for products purchased and retained in the 50 states of the U. S. A., the District of
Columbia and Canada. Should the appliance be sold by the original purchaser during the warranty
period, the new owner continues to be protected until the expiration date of the original purchaser’s
warranty period. Products for use in Canada must be purchased through the Canadian distribution
channel to ensure regulatory compliance and warranty coverage.
This warranty gives you specific legal rights. You may also have other rights which vary from state to
state.
HOW TO OBTAIN SERVICE
• Contact the Factory Authorized Service Agent in your area
• Contact the Dealership where you purchased the appliance
• Call the Thermador Customer Support Call Center at 800-735-4328
• Write us to at: Thermador 5551 McFadden Avenue, Huntington Beach CA, 92649
LOCATION OF DATA PLATE:
Remove the drawer. The data plate is visible on the left side of the drawer liner.
Record Serial number for a quick reference.
Model No. __________________________ Serial No. _________________________
Specifications are for planning purposes only. Refer to installation instructions and consult your countertop supplier prior to making
counter opening. Consult with a heating and ventilating engineer for your specific ventilation requirements. For the most detailed
information, refer to installation instructions accompanying product or write Thermador indicating the model number.
Thermador reserves the right to change specifications or design without notice. Some models are certified for use in Canada.Thermador
is not responsible for products which are transported from the United States for use in Canada. Check with your local Canadian
distributor or dealer. Thermador, 5551 McFadden Avenue, Huntington Beach, CA 92649.
5551 McFadden Avenue, Huntington Beach, CA 92649 • 800/735-4328
ECO12234 • 14-07-379F • © Thermador 1998 • Litho U. S. A. 1/00
8