1
DVD-SX25
UK
OPERATING INSTRUCTIONS
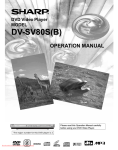
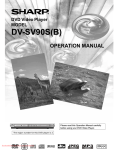
DVD-Player
DIGITAL VIDEO
READABLE
JPEG
READABLE
DIGITAL AUDIO
GB English
0RGHO1DPH'9'6;8.
7KLVPRGHOKDVWKHIROORZLQJIHDWXUHV
'9'&''$&'5&'5:3OD\EDFN
9&'3OD\EDFN
033OD\EDFN
-3(*3OD\EDFN
&KDQQHODQDORJDXGLRRXWSXW
2SWLFDO'LJLWDO$XGLR2XWSXW
&RD[LDO'LJLWDO$XGLR2XWSXW
0DQXIDFWXUHGXQGHUOLFHQVHIURP'ROE\/DERUDWRULHV'ROE\DQGWKH
GRXEOH'V\PERODUHWUDGHPDUNVRI'ROE\/DERUDWRULHV
7KLVSURGXFWLQFRUSRUDWHVFRS\ULJKWSURWHFWLRQWHFKQRORJ\WKDWLVSURWHFWHGE\
PHWKRGFODLPVRIFHUWDLQ863DWHQWVDQGRWKHULQWHOOHFWXDOSURSHUW\ULJKWV
RZQHGE\0DFURYLVLRQ&RUSRUDWLRQDQGRWKHUULJKWVRZQHUV
8VHRIWKLVFRS\ULJKWSURWHFWLRQWHFKQRORJ\PXVWEHDXWKRULVHGE\0DFURYLVLRQ
&RUSRUDWLRQDQGLVLQWHQGHGIRUKRPHDQGRWKHUOLPLWHGYLHZLQJXVHVRQO\
XQOHVVRWKHUZLVHDXWKRULVHGE\0DFURYLVLRQ&RUSRUDWLRQ
5HYHUVHHQJLQHHULQJRUGLVDVVHPEO\LVSURKLELWHG
'76DQG'76'LJLWDO2XWDUHWUDGHPDUNVRI'LJLWDO7KHDWHU6\VWHPV,QF
-1-
CONTENTS
ABOUT THIS MANUAL .............................................................................. 3
WARNING ................................................................................................. 3
SAFETY INFORMATION ............................................................................ 4
SAFETY PRECAUTIONS ........................................................................... 5
SAFETY PRECAUTIONS ........................................................................... 6
GENERAL PROPERTIES ......................................................................... 8
DISC TYPES COMPATIBLE WITH THIS UNIT ......................................... 9
NOTES ON CD-R AND CD-RW DISCS ................................................. 10
NOTES ON DISCS ................................................................................. 11
FRONT PANEL FUNCTIONS ................................................................. 12
FRONT PANEL DISPLAY (VFD) ............................................................. 13
REAR PANEL CONNECTIONS ............................................................... 14
CONNECTION OF YOUR DVD PLAYER WITH TV ................................ 15
VIDEO & AUDIO OUTPUT SOCKETS .................................................... 15
CONNECTION OF YOUR DVD PLAYER WITH AV AMPLIFIER ............ 16
DIGITAL AUDIO OUTPUT SOCKETS ..................................................... 17
FITTING BATTERIES IN YOUR REMOTE CONTROL ............................ 18
REMOTE CONTROL FUNCTIONS ........................................................ 18
REMOTE CONTROL FUNCTIONS ........................................................ 19
DVD PLAYBACK ..................................................................................... 20
USING A DVD MENU ............................................................................. 24
VIDEO CD PLAYBACK ........................................................................... 24
CD MENU ............................................................................................... 27
SETUP MENU ......................................................................................... 29
USING PAGES ........................................................................................ 30
LANGUAGE SETUP ................................................................................ 31
TROUBLESHOOTING ............................................................................ 32
SPECIFICATIONS ................................................................................... 33
WEE ........................................................................................................ 34
-2-
ABOUT THIS MANUAL
The aim of this manual is to give detailed information about the device, so it can be employed easily. To
run your device just utilize the button(s) on the Front Panel and/or Remote Controller.
Dear Customers
We would like to thank you for purchasing this DVD/VCD/CD-R/CD-RW/MP3/JPEG player.
We strongly recommend that you carefully study the operating instructions before attempting to operate
the unit and that you note the listed safety precautions.
WARNING
To reduce the risk of fire or electric shock, do not expose this equipment to rain or moisture.
To reduce the risk of fire or electric shock, and any interference, use the recommended accessories only.
9#40+0)
&101612'0
4+5-1('.'%64+%5*1%-
6JG NKIJVPKPI HNCUJ Y KVJ CTTQY JGCF U[ODQN YKVJKP CP
%#76+10
6JG GZENCOCVKQPRQKPV YKVJKP CPGSWKNCVGTCN VTKCPING KU
GSWKNCVGTCN VTKCPING KU KPVGPFGF VQ CNGTV VJG WUGT VQ VJG
614'&7%'6*'4+5-1('.'%64+%5*1%-&1016
KPVGPFGFVQCNGTVVJGWUGTVQVJGRTGUGPEGQHKORQTVCPV
RTGUGPEGQHWPKPUWN CVGF FCPIGTQWUXQNVCIG YKVJKPVJG
4'/18' 5%4'95 01 75'45'48+%'#$.' 2#465
QRGTCVKPI CPF OCKPVGPCPEG UGTXKEKPI KPUVTWEVKQPU KP
RTQFWEV UGPENQUWTGVJCVOC[DGQHUWHHK EKGPVOCIPKVWFG
+05+&' 4'('4 5'48+%+0) 61 37#.+(+'& 5'48+%' VJGNKVGTCVWTGCEEQO RCP[KPIVJGCRRN KCPEG VQEQPUVKVWVGCTKUMQHGNGEVTKEUJQEMVQRGTUQPU
2'4510 0'.
A Laser Warning safety label has been placed inside the chasis at the location shown above
This set complies with the EMC Directive 89/336 and with the LVD Directive 73/23
-3-
SAFETY INFORMATION
CAUTION
/$ 6(5&/$66
:DYHOHQJWKQP'9'
QP&'
0D[LPXPRXWSXWRIDFFHVVLEOHODVHUUDGLDWLRQP:FRQWLQXRXVZDYH
&ODVVLILHGDFFRUGLQJWR,(&$
DVD Player is a class 1 laser product. However this product uses a visible laser beam which could cause
hazardous radiation exposure. Be sure to operate the player correctly as instructed.
While this player is plugged to the wall outlet, do not place your eyes close to the opening of the disc tray
or other openings to look into the inside of this product for your own safety.
Use of controls or adjustments or performance of procedures other than those specified may result in
hazardous radiation exposure. Do not open covers and do not attempt to repair any damaged parts. Refer
product to a service technician or qualified professional for any necessary repair.
Apparatus shall not be exposed to dripping or splashing and no objects filled with liquids,
such as vases, shall be placed on the apparatus.
The mains plug or the appliance coupler is used as the disconnect device, the disconnect
device shall remain readily operable.
CAUTION
Danger of explosion if battery is incorrectly replaced. Replace only with the same
or equivalent type.
-4-
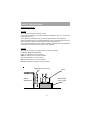
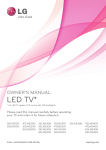
SAFETY PRECAUTIONS
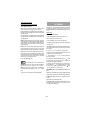
PROPER VENTILATION :
CAUTION
Do not block the ventilation openings or holes.
(If the ventilation openings or holes are blocked by a newspaper or cloth, etc., the heat may
not be able to get out.)
Do not place any naked flame sources, such as lighted candles, on the apparatus.
When discarding batteries, environmental problems must be consid-ered and local rules or
laws governing the disposal of these batteries must be followed strictly.
Do not expose this apparatus to rain, moisture, dripping or splashing and that no objects filled
with liquids, such as vases, shall be placed on the apparatus.
Caution:
To avoide risk of electric shock and fire and to protect from damage.
Locate the apparatus as follows:
Front: No obstructions and open spacing.
Sides: No obstructions in 3 cm from the sides.
Top: No obstructions in 5 cm from the top.
Back: No obstructions in 15 cm from the back
Bottom: No obstructions, place on the level surface.
6SDFLQJFPRUPRUH
)URQW
'YG3OD\HU
:DOORU
REVWUXFWLRQV
6WDQGKHLJKW
FPRUPRUH
)ORRU
-5-
SAFETY PRECAUTIONS
Power Source:
The unit should be operated only from a 220-240V~ 50 Hz outlet. Please do not open the cover by yourself.
There is high voltage in the set, which will endanger your life. Please contact local service agent for help
and advice. Repairs should be carried out by a qualified technician only.
The player is not disconnected from the AC power source (mains) as long as it is connected to the wall
outlet, even if the player itself has been turned off.
If the player will not be used for a long time, be sure to disconnect it from the wall outlet.
Power Cord:
Do not place the unit, a piece of furniture, etc., on the power cord (mains lead), and do not pinch the cord.
Handle the power cord by the plug. Do not pull out the plug by tugging the cord and never touch the power
cord when your hands are wet as this could cause a short circuit or electric shock. Never make a knot in
the cord or tie it with other cords. The power cords should be routed in such a way that they are not likely
to be stepped on. A damaged power cord can cause fire and electrical shock. Check the power cord once
in a while. When you find it damaged, ask closest service agent for help. When the AC power cord needs
to be changed, it should be done at a qualified service shop only.
32:(57KLV'9'9&5RSHUDWHVRQDPDLQVVXSSO\RI
9a+]
7KLVDSSOLDQFHLVVXSSOLHGZLWK %6DSSURYHG
$PSIXVHGPDLQV SOXJ :KHQUHSODFLQJ WKHIXVH
DOZD\VXVH D$PS%6DSSURYHGW\SH
1HYHUXVHWKLVSOXJZLWK WKHIXVHFRYHURPLWWHG
7R REWDLQD UHSODFHPHQWIXVH FRYHU FRQWDFW\RXU
VXSSO\LQJ GHDOHU
,IWKH PDLQVVRFNHWV LQ\RXU KRPHGLIIHU RU DUHQRW VXLW
DEOHIRU WKHW\SHRISOXJVXSSOLHG WKHQWKH SOXJVKRXOG
EHUHPRYHGDQGD VXLWDEOHW\SH ILWWHG
,IWKH PDLQVSOXJ EHFRPHVVHYHUHG IURPWKH PDLQV
OHDGLW PXVWEHGHVWUR\HG$ PDLQV SOXJ ZLWKEDUHG
ZLUHV LVKD]DUGRXV LIHQJDJHGLQDPDLQV RXWSXWOLQH
VRFNHW
,ID $PS %6SOXJ LVQRWVXLWDEOHRUDQ\
RWKHU W\SHRI SOXJXVHGWKHQ WKLVDSSOLDQFHPXVWEH
SURWHFWHG E\ D$PS IXVH
6KRXOG\RXQHHG WR FKDQJH WKHSOXJ
7KHZLUHVLQWKLVPDLQVOHDGDUHFRORXUHGLQDFFRUGDQFHZLWK
WKHIROORZLQJFRGHV
%/8(a1HXWUDO
%52:1a/LYH
$VWKHFRORXUVRIWKHZLUHVLQWKHPDLQVOHDGRIWKLV
DSSOLDQFHPD\QRWFRUUHVSRQGZLWKWKHFRORXUHGPDUNLQJV
LGHQWLI\LQJWKH WHUPLQDOVLQ\RXUSOXJSURFHHGDVIROORZV
7KHZLUHZKLFKLVFRORXUHG%/8(PXVWEHFRQQHFWHGWR
WKHWHUPLQDOZKLFK LVPDUNHGZLWKWKHOHWWHU1RUFRORXUHG
%/8(RU%/$&.
7KHZLUHZKLFKLVFRORXUHG%52:1PXVWEHFRQQHFWHGWRWKH
WHUPLQDOZKLFKLVPDUNHGZLWKWKHOHWWHU/ RUFRORXUHG%52:1
RU5('
'2127 FRQQHFWHLWKHUZLUHWRWKH($57+WHUPLQDO
-6-
Choice of Location:
Please do not place the set in a place subject to direct sun light, excessive dust or mechanical shock or
in a location near heat sources.
The set should be placed on a solid and safe base. Do not place the player on a soft surface such as a rug
that might block the ventilation holes on the bottom.
A location should not be selected such as a room with high humidity, as the condensation, arising in the kitchen
for example, may cause malfunction or damage the set.
Heating or other thermal radiation under the set also may cause malfunction or damage the set.
The hot air, which arises during the operation, should be ventilated with sufficient air circulation. Please do
not put the set into closed areas and do not cover it.
Please avoid the contact of the set with water or humidity. Do not put it into operation near bath, swimming
pools.
Make sure enough air circulation is provided around the product. Place the player in a location with adequate
ventilation to prevent heat build-up in the player.
Should any solid object or liquid fall into the cabinet, unplug the player and have it checked by qualified
personnel before operating it any further.
-7-
GENERAL PROPERTIES
1-DVD/VCD/CD/CD-R/CD-RW/MP3/JPEG playback
2-NTSC/PAL playback
3-User-friendly Multilanguage OSD menu control
4-Vacuum Fluorescent Display (VFD)*
5-Dolby Digital, DTS, MPEG Multichannel, LPCM audio via coaxial and optical digital audio outputs.
6-Multiple Aspect Ratio support (16:9 Widescreen, 4:3 Letterbox, 4:3 PAN & SCAN)
7-Multi-Audio (up to 8) support (According to disc content)
8-Multi-Subtitle (up to 32) support (According to disc content)
9-Multi-Angle (up to 9) support (According to disc content)
10- 8 level parental control
11- Fast forward and rewind in 5 different speeds. (2x, 4x, 8x, 16x, 32x)
12- Slow motion playback in 4 different speeds. (1/2x, 1/4x, 1/8x, 1/16x forward)
13- Frame by frame forward playback.
14- Time Search
15- Repeat
16- A - B repeat
17- Scart Socket
18- Video output
19- Coaxial & Optical* Digital Audio outputs
20- Zoom
-8-
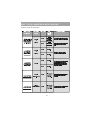
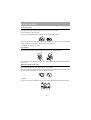
DISC TYPES COMPATIBLE WITH THIS UNIT
This player can play the following discs.
'LVF7\SHV
5HFRUGLQJ
/RJRV
7\SHV
'LVF6L]H
0D[
&KDUDFWHULVWLFV
3OD\LQJ
7LPH
6LQJOH
VLGHGPLQ
FP
$XGLR
'RXEOH
'9'FRQWDLQVH[FHOOHQWVRXQGDQGYLGHR
GXHWR'ROE\'LJLWDODQG03(*6\VWHP
VLGHGPLQ
6LQJOH
9LGHR
VLGHGPLQ
FP
'RXEOH
VLGHGPLQ
FP
9DULRXVVFUHHQDQGDXGLRIXQFWLRQVFDQEH
HDVLO\VHOHFWHGWURXJKWKHRQVFUHHQ
PHQX
PLQ
$XGLR
9LGHRZLWK&'VRXQG9+6TXDOLW\
03(*FRPSUHVVLRQWHFKQRORJ\
9LGHR
',*,7$/9,'(2
FP
PLQ
FP
PLQ
$Q/3LVUHFRUGHGDVDQDQDORJVLJQDOZLWK
PRUHGLVWRUWLRQ&'LVUHFRUGHGDVD
'LJLWDO6LJQDOZLWKEHWWHUDXGLRTXDOLW\
OHVVGLVWRUWLRQDQGOHVVGHWHULRUDWLRQRI
$XGLR
DXGLRTXDOLW\RYHUWLPH
',*,7$/$8',2
FP
PLQ
03LVUHFRUGHGDVD'LJLWDO6LJQDOZLWK
EHWWHUDXGLRTXDOLW\OHVVGLVWRUWLRQDQG
$XGLR
5($'$%/(
-3(*
5($'$%/(
FP
OHVVGHWHULRUDWLRQRIDXGLRTXDOLW\
RYHUWLPH
[[[[PS
9LGHR
VWLOOSLFWXUH
FP
-3(*LVUHFRUGHGDVD'LJLWDO6LJQDOZLWK
EHWWHUSLFWXUHTXDOLW\RYHUWLPH
-9-
NOTES ON CD-R AND CD-RW DISCS
CD-R (Recordable) and CD-RW (Rewritable) discs, recorded by the users, may only be used after finalization
process.
CD-R and CD-RW discs may not be usable, depending on the disc features, recording conditions and
damage or dirt on disc. The disc configuration and features are determined by the tool and device used for
recording. Therefore, users may face with the following undesired consequences:
Some discs may not be read at all.
Some discs may cause system crash after playing for a while.
Some parts of the disc may be skipped or worked abnormally.
Compare with the original discs, the time passed for reading a CD-R and CD-RW discs may be longer.
- 10 -
NOTES ON DISCS
On handling discs
To keep the disc clean, handle the disc by its edge. Do not touch the surface.
Do not stick paper or tape on the disc.
If the disc is contaminated with any substance like glue remove before using it.
Do not expose the disc to direct sunlight or heat sources such as hot air ducts, or leave it in a car parked
in direct sunlight as the temperature can rise quickly and damage the disc.
After playing, store the disc in its case.
On cleaning
Before playing, clean the disc with a cleaning cloth. Wipe the disc from the center out.
Do not use solvents such as benzene, thinner, commercially available cleaners or anti-static spray intended
for vinyl LPs.
Discs that should not be used
Only the discs including the marks shown on page 7 can be played.
Note, however, that discs with special shapes (heart-shaped discs, hexagonal discs, etc.) cannot be played.
Do not attempt to play such discs, as they may damage the player.
¥ NOTE:
Do not use record spray or antistatic. Also do not use volatile chemicals such as benzene or thinner.
5(&25'
635(<
7+,11(5
%(1=(1(
- 11 -
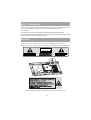
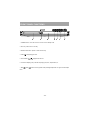
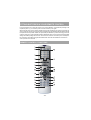
FRONT PANEL FUNCTIONS
1. STANDBY button: Turns the unit on or turns the unit to standby mode.
2. Disc Tray: Place a disc on the tray.
3. OPEN/CLOSE button: Opens or closes the disc tray.
4. STOP
: Stops playing the disc.
5. PLAY/PAUSE
××
: Plays/pauses the disc.
6. Front Panel Display (VFD): Indicates the playing time, title, chapter/track, etc.
7. SKIP
/ SKIP
buttons: Press to go back to the preceding chapter/track or to go to the next chapter/
track.
- 12 -
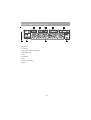
FRONT PANEL DISPLAY (VFD)
1. Play/Pause
2. Current Disc
3. Time or Title / Chapter / Track Number
4. Dolby Digital / DTS
5. Zoom
6. Title Number
7. Angle
8. Chapter / Track Number
9. Repeat
- 13 -
REAR PANEL CONNECTIONS
1. DIGITAL OUT (OPTICAL) connector
Connects to an audio component using the optical digital connection cord.
2. DIGITAL OUT (COAXIAL) connector
Connects to an audio component using the coaxial digital connection cord.
3. VIDEO connector
Connects to the video input connectors on the TV.
4. AUDIO connectors
Connects to the TV or AV amplifier by using 2 cords (Left, Right).
5. SCART connector.
Connects to the scart-input connector on the TV.
- 14 -
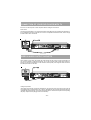
CONNECTION OF YOUR DVD PLAYER WITH TV
Be sure to turn off the power of each component before making the connections.
Scart socket:
Connecting your DVD player to TV via scart socket with a scart cable gives you the best picture performance.
If your DVD player will not be connected to a hi-fi set or A/V amplifier to hear better sound, scart is enough
for both audio & video connections.
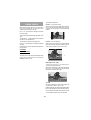
VIDEO & AUDIO OUTPUT SOCKETS
Video (yellow) & Audio (Red: right, White: left) output sockets can be used to connect the DVD player to
your TV set via cables. To make this connection, your TV set must have Video & audio input connectors.
This type of connection is alternative to scart connection. Picture quality is not as good as Scart connection
but audio performance is the same.
9LGHR
2XWSXW
/HIW5LJKW
2XWSXW
Putting into operation:
After making the necessary connections stated above, plug the power cord to the mains socket. Unit will
be in standby mode. Press standby to turn on the unit. Open the disc tray with open/close button and insert
a playable disc (DVD/VCD/CD). Press open/close button again to close the disc tray and to start operating
the player. Player will start playing the disc automatically.
- 15 -
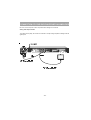
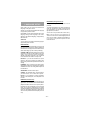
CONNECTION OF YOUR DVD PLAYER WITH AV AMPLIFIER
Be sure to turn off the power of each component before making the connections.
Analog Audio Output Sockets:
To get better sound quality, the unit can be connected to a Dolby Prologic amplifier via analog audio left/
right outputs.
+,),
7XQHU
79
9LGHR
2XWSXW
/HIW5LJKW
2XWSXW
$XGLR&DEOHFRPPHUFLDOO\DYDLODEOH
9LGHR&DEOHFRPPHUFLDOO\DYDLODEOH
- 16 -
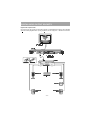
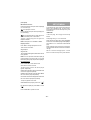
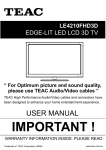
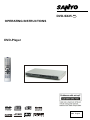
DIGITAL AUDIO OUTPUT SOCKETS
Digital Audio Output Sockets:
For the best sound, the unit can be connected via optical or coaxial digital audio outputs to an AV amplifier
with a built-in Dolby Digital decoder. By using 6 speakers, user can enjoy the 5.1 channel surround sound.
79
5&$W\SH$9FDEOH
WR5&$9LGHRRQ79
'9'3OD\HU
&RD[LDODXGLRFDEOHWR
FRD[LDOGLJLWDODXGLR
LQSXWFRQQHFWRU
$03/,),(5
'XVWSURWHFWLRQFDS
2SWLFDOGLJLWDOFDEOH
)521763($.(5
)521763($.(5
/()7
5,*+7
&(17(563($.(5
68%:22)(5
5($ 563($.(5
5($563($.(5
/()7
5,*+7
- 17 -
FITTING BATTERIES IN YOUR REMOTE CONTROL
First open the battery cover under the remote control. Fit both batteries 1.5Volt (R03/AAA) referring to the
imprinted symbols (+/-) in the battery case and close the battery cover again.
While using the remote control, direct it towards the front of the DVD player. If the remote control does not
work or the chosen function can not be exercised, the batteries are most probably exhausted and they should
be replaced as soon as possible. Please use only the leak proof batteries. If you will not be using your remote
control for a long time, it is recommended to take out the batteries from your remote control to avoid possible
damage from battery leakage and corrosion. Do not leave the remote in an extremely hot or humid place.
Do not dispose of the battery along with household waste. Insert the used batteries at recicle bins in
order to protect the environment.
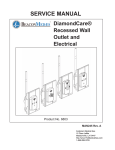
REMOTE CONTROL FUNCTIONS
- 18 -
REMOTE CONTROL FUNCTIONS
1. STANDBY button: Turns the unit on or turns the unit to standby mode.
2. OPEN/CLOSE button: Opens or closes the disc tray.
3. TITLE button: Displays the title menu on the TV screen or changes the status of PBC functionality
for VCD .
4. DISPLAY button: If pressed during playback of a disc, opens/closes information display otherwise
displays setup menu on the TV screen.
5. MENU button: Displays the DVD root menu on screen.
6. ZOOM button: Zooms the picture by 2x, 3x, 4x while playing DVD/VCD. Enter zoom mode for
JPEG files.
7. RETURN button: Returns to root menu to the main page in setup menu, or resumes playback from
root menu.
8. Arrow buttons (3/46/5): Moves to the items or settings.
9. SELECT button: Executes the items or settings.
10. PLAY/PAUSE button : Plays/pauses the disc. For any DVD title that has a root menu with still
picture, this button functions as button select (selects highlighted item) on the root menu. Otherwise
symbol will appear.
the disc will prohibit play/pause button function, and
11. STOP button : Stops playing disc.
12. SKIP/FRAME button : Press to go to the next chapter or track, or to go back to the preceding
chapter or track during playback and next frame during pause.
13. SEARCH/SLOW button: Press to adjust the forward and reverse playback speed x2, x4, x8, x16
and x32 times during playback (rapid advance/reverse) and x1/2, x1/4, x1/8, x1/16 times during pause
(slow advance).
14. SUBTITLE button: Changes the subtitle language while playing a DVD.
15. AUDIO button: Changes the audio language while playing a DVD.
16. ANGLE button: Changes the angles when playing a DVD.
17. SEARCH MODE button: Press to select the unit for search (title, chapter, track, time etc.)
18. PROGRAM button: Press to enter file list mode to list all the files in the disc. In file list mode, the
same type of files can be played back together in repeat modes.
19. REPEAT button: Press to change the current repeating mode.
20. A-B button: Press to execute the A-B repeat play.
21. TIME button: Changes the play time display mode of the disc, title, track, on the OSD and front
panel display.
22. Number buttons: Use number buttons to enter track/chapter/title/time/etc. numbers directly.
23. C button: Using this button you can delete the mistyped entries or you can cancel some
functions.
24. +10 button: Using this button you can enter the numbers greater than 9.
- 19 -
Rapid Advance (Rapid Reverse)
DVD PLAYBACK
Press on the standby button of your audio system if
the player has been connected to an audio system.
Basic Play
on the
Normal play is resumed when the PLAY/PAUSE
××
button
is pressed.
The speed of advance (FF 2x, FF 4x, FF 8x, FF 16x,
FF 32x) or reverse (FR 2x, FR 4x, FR 8x, FR 16x,
FR 32x) changes for every press of the FF or FR
button.
Press on the standby button
Press OPEN/CLOSE to open the disc tray
Place a disc onto the tray
Press OPEN/CLOSE
Note: No sound will be heard during Rapid advance
or Rapid reverse.
5. Press SELECT
Skipping Ahead or Back to Chapters
The disc tray is closed and play commences.
A menu may appear on the TV screen after a few
moments or the film may start immediately. This
behaviour depends on the disc content and may
change.
NOTE: Step 5 is available only when a menu is shown
after the disc is inserted.
Press SEARCH
or SEARCH
remote control during play.
Press 3/46/5 or the number button(s) to
select the preferred menu item.
Play of the selected items now starts. The played item
may be a film, a still picture or another submenu
depending on the disc
NOTE: When using menus the behavior of the player
is controlled by the disc.
Stopping Play
To stop the play permanently,press STOP
twice. When the STOP
button is pressed for
the first time, a message PRESS PLAY TO
CONTINUE will appear on the screen to remind you
if you want to continue the play. To stop the play,
press the STOP
button again or you can press
SELECT to continue.
Stopping play and returning to the menu screen:
SKIPPING AHEAD: Press SKIP
on the remote
control or on the main unit during play. A chapter is
skipped forward each time the button is pressed.
SKIPPING BACK: Press SKIP
on the remote
control or on the main unit during play. When the
button is pressed once midway through a chapter,
play returns to the previous chapter.
Still Picture (PAUSE)
Press PLAY/PAUSE
××
once during play.
The screen freezes.
To return to normal play press PLAY/PAUSE
××
again.
Frame Advance (STEP FORWARD)
once during play.
The screen freezes. Press SKIP
on the
Press PLAY/PAUSE
××
remote control or on the main unit. The next frame
of the movie is displayed. You can press SKIP
for the following frames.
NOTE: Reverse stepping is not available.
(When a menu is available on the disc)
Press MENU or TITLE button depending on the disc.
Play is suspended, and the Disc menu screen is
displayed.
- 20 -
Selecting Scenes by Title Number
Slow-motion Play Forward
once during play.
The screen freezes. Press SEARCH
on the
Press PLAY/PAUSE
××
remote control. The unit starts playing the movie at
four different speeds (SF 1/2x, SF 1/4x, SF 1/8x,
SF 1/16x).You can increase or decrease the speed
of the slow-motion play by pressing SEARCH
or SEARCH
.The speed of slow motion play is
displayed on the screen each time you change it.
To r e t u r n n o r m a l p l a y p r e s s P L AY/PAUSE
××
Press SEARCH MODE on the remote control once
during playback.
The chapter/title search box is displayed on the
screen. You can see the currently playing and total
number of titles in left hand side of the display bar
as / express 3 or 4 button on the remote
control to select the title field in the search box to
change the title.
You can see the currently playing title and total title
numbers on the top-left side of the display as
/ xx. Enter the number of the title using number
buttons.
NOTE: No sound will be heard during Slow motion
play.
The selected title is played just after you enter the
title number.
NOTE: Reverse slow motion play is not available.
Selecting Scenes by Time
Direct Selection of Scenes
You can view the DVD starting from any time point
you want.
Selecting Scenes by Chapter Number
Press SEARCH MODE on the remote control once
during playback.
The title/chapter search box is displayed on the
screen. You can see the currently playing and total
number of chapters on right hand side of the display
bar as / xx. Enter the number of the chapter
using number buttons.
The selected chapter is played just after you enter
the chapter number.
For your convenience:
If the chapter number you entered is between 0 and
9, player will automatically jump to the related
chapter. To enter a chapter number which is more
than 1 digit, press +10 KEY and then enter the
chapter number.
You can clear the field by pressing the C button if
you enter wrong number.
If you attempt to enter a number greater than the
total number of chapters on the current title, the
search box disappears and INVALID INPUT
message is displayed on screen.
If you wait five seconds without pressing any key
for selecting scenes by chapter number, the
operation is cancelled.
You can press RETURN key to cancel title search.
BY TITLE TIME: Press SEARCH MODE on the
remote control twice during playback. The time
search box is displayed on the screen as Title xx/
xx Time: : : .Enter the time using number
buttons. The title is played beginning from the
desired time just after you enter the time. If not
prohibited by the DVD.
BY CHAPTER TIME: Press SEARCH MODE on the
remote control three times during playback. The
time search box is displayed on the screen as
Chapter xx/xx Time: : : .Enter the time using
number buttons. The chapter is played beginning
from the desired time just after you enter the time.
If not prohibited by the DVD.
For your convenience:
You can clear the fields by pressing the C button if
you enter wrong numbers.
If you attempt to enter a number greater than the
total time of the current title for title time search or
if you attempt to enter a number greater than the
total time of the current chapter for chapter time
search, the time search box disappears.
INVALID INPUT message is displayed on
screen.
If you wait five seconds without pressing any key
to enter time, selecting scenes by time option is
cancelled.
You can press RETURN key to cancel time search.
- 21 -
Repeat Play
Convenient Functions
Repeat Viewing
Displaying the time information
Press REPEAT during play.
Press DISPLAY during play.
Each time this button is pressed, a different repeat
box is displayed on the screen.
Some information is displayed on TV screen to
indicate the current status of the disc. On the
display screen you can find the following
information lines:
If
CHAPTER is displayed, the current chapter
will be played again.
If
TITLE is displayed, the current title will be
played again.
Line 1: Time Counter Mode
Line 2: Title Number, Chapter Number, Time Counter
If
ALL is displayed, all titles and chapters will
be played again.
Line 3: Audio Number, Audio Format, Number of
Output Channels, Audio Language
NOTE: Repeat play may be prohibited by some
DVD titles.
Line 4: Subtitle Number & Subtitle Language
Repeating two specific points between sections (AB repeat)
Press A-B during play at the point where repeat play
is to commence (A).
A is displayed.
Press A-B again at the point where repeat play is to
be concluded (B).
AB is displayed and the repeat play of the
selection between points A and B starts. If not
prohibited by the DVD.
To return to normal play, press A-B again.
Time counter modes can be selected by pressing
TIME key consecutively.
The sequence for time counter modes is as follows:
TITLE ELAPSED, TITLE REMAIN, CHAPTER
ELAPSED and CHAPTER REMAIN
The displayed time counter information is changed
with the change of time counter mode. To return to
normal play; press DISPLAY key again. Display
menu screen is closed.
NOTE: You can open/close information display by
pressing DISPLAY key during play. If you press
DISPLAY key during stop, Setup menu is displayed.
Displaying a scene with a larger and closer view
This zoom in function enables you to take a closer
look at the scene you are viewing that is especially
an impressive function when you are seeing science
fiction or adventure film.
Press ZOOM during play.
2 x is displayed on the screen and the
picture is now larger. By pressing ZOOM key
consecutively you can reach
3x,
4x modes.
NOTE: You can move in the picture i.e. change the
zoomed location by using the 3/46/5 arrow
keys.
To return to normal play; press ZOOM again.
- 22 -
Displaying / Changing Subtitle Language
Changing Audio Soundtrack Language
It is possible to change the subtitle language from
the one selected at the initial settings to a different
language, if available. (This operation works only
with discs on which multiple subtitle languages are
recorded.)Press SUBTITLE during play.
It is possible to change the audio language from the
one selected at the initial settings to a different
language, if available.
When no subtitles are recorded
will be
displayed instead of the selected language. Press
SUBTITLE a number of times until the preferred
language is selected. When this button is pressed
once, the first subtitle recorded on the disc will
display. The rest of the subtitles recorded will
display in sequence for every press of the
SUBTITLE button.
NOTE:
In some cases, the subtitle language is not changed
immediately to the selected one.
For your convenience:
When the preferred language is not selected even
after pressing the button several times, it means
that the language is not available on the disc.
When the player is restarted or the disc is changed,
the subtitle selection is automatically changed back
to the initial settings.
If a language is selected, which is not supported by
the disc, the subtitle language will automatically be
the discs priority language.
Usually a circulation will happen while switching to
another language, that is you can cancel the subtitle
by pressing this button a number of times until
Subtitle Off appears on the screen.
(This operation works only with discs on which
multiple audio soundtrack languages are recorded,
if not prohibited by the DVD.)
Press AUDIO during play.
Press AUDIO a number of times until the preferred
language is selected.
When the preferred language is not selected even
after pressing the button several times, it means
that the language is not available on the disc.
When the power is turned on or the disc is removed,
the language heard is the one selected at the initial
settings. If this language is not recorded on the disc,
only the available language on the disc will be heard.
Viewing from another Angle
Some DVD discs may contain scenes, which have
been shot simultaneously from a number of
different angles. For these discs, the same scenes
can be viewed from each of these different angles
using the ANGLE button.
The number of recorded angles differs depending on
the disc used.
y/x is displayed shortly on the screen
during playback. This indicates that the multi-angle
scene has just started. Also on units display
ANGLE message appears. From that moment on,
the yth angle of total x angles is played and you can
change the viewing angle until the end of the multiangle scene.
!In SETUP menu, an ANGLE MARK option exists,
which, if enabled will display a continuous angle
mark on the screen as long as multi-angle scene is
available.
Press ANGLE during play. The current angle is
changed.
Press ANGLE a number of times until the preferred
viewing angle is selected.
!This function will only work on discs where different
angles have been recorded.
- 23 -
USING A DVD MENU
VIDEO CD PLAYBACK
Some DVD discs have unique menu structures
called DVD menus. For example, DVDs programmed
with complex contents provide guide menus, and
those recorded with various languages provide
menus for audio and subtitle language. Although the
DVD menus contents and operation differ from disc
to disc, the following explains basic operation when
this feature is used.
Press TITLE or MENU on the remote control.
The DVD menu available on the disc is now
displayed.
NOTE: If you press MENU, the root menu of DVD
is displayed. If you press TITLE, the menu of the
current title is displayed.
Press 3/46/5 to select the preferred item.
Press SELECT; the selected item is now executed.
For your convenience: You can also use number
keys to select a DVD menu item. The player will
automatically execute the item. To enter an item
number which is more than 1 digit, press +10 key and
then enter the item number.
NOTE: Some DVDs may not contain root and/or title
menus.
NOTE: To resume the playback, select PLAY item
in DVD menu.
Press on the power button of your audio system if
the player has been connected to an audio system.
Basic Play
Press on the standby button
Press OPEN/CLOSE to open the disc tray
Place a disc onto the tray
Press OPEN/CLOSE
For Video CDs without playback control: The disc
tray is closed and play commences
For Video CDs provided with playback control: A
menu screen will appear on the screen after a few
moments.
Menu Play: This function works only with video CDs
with playback control (version 2.0) Follow the
instructions on the menu screen for interactive
operations. The details differ depending on the disc
concerned. Also refer to the instructions
accompanying the disc.
After the same steps above, the menus are
displayed on the TV screen; the player now starts
to play the selected item.
NOTE: Use +10 button to enter two-digit-numbers.
3/46/5 arrow buttons are not used for
selecting items for video CDs.
What is playback control?
If a video CD has playback control written on the
jacket of disc, it means that particular scenes or
information can be selected for viewing interactive
with TV screen using the menu screen.
- 24 -
Stopping Play
Frame Advance (STEP Forward)
To stop the play permanently, press STOP
twice. When the STOP
button is pressed for
the first time, a message PRESS PLAY KEY TO
CONTINUE will appear on the screen to remind you
if you want to continue the play. To stop the play,
press the STOP
press PLAY/PAUSE
button again or you can
to continue.
××
Rapid Advance (Rapid Reverse)
on the
Normal play is resumed when the PLAY/PAUSE
××
button is pressed.
button.
or SEARCH
NOTE: No sound will be heard during Rapid advance
or Rapid reverse.
Skipping Ahead or Back to Chapters
SKIPPING AHEAD: Press SKIP
once during play.
The screen freezes. Press SEARCH
on the
Press PLAY/PAUSE
××
××
motion play by pressing
or SEARCH
.
There are 4 slow motion modes as 1/16x, 1/8x, 1/
4x, 1/2x.The speed of slow motion play is displayed
on the screen each time you change it. To return
normal play press PLAY/PAUSE
××
again.
NOTE: No sound will be heard during Slow motion
play.
NOTE: Reverse slow motion play is not available.
on the
once during play.
To return to normal play press PLAY/PAUSE
remote control.
Still Picture (PAUSE)
××
for the following frames.
NOTE: Reverse stepping is not available.
once during play.
on the remote control or on the
You can press SKIP
SKIPPING BACK: Press SKIP
on the remote
control or on the main unit during play. When the
button is pressed once midway through a track, play
returns to the start of previous track. When it is
pressed again, a track is skipped.
××
main unit. The next frame of the movie is displayed.
remote control or on the main unit during play. A
track is skipped each time the button is pressed.
Press PLAY/PAUSE
The screen freezes.
You can increase or decrease the speed of the slow-
The speed of advance (FF 2x, FF 4x, FF 8x, FF
16x, FF 32x) or reverse (FR 2x, FR 4x, FR 8x, FR
16x, FR 32x) changes for every press of the
SEARCH
Press SKIP
Slow-motion Play Forward
or SEARCH
Press SEARCH
remote control during play.
Press PLAY/PAUSE
The screen freezes.
again.
- 25 -
Direct Selection of Scenes
If you attempt to enter a number greater than the
Selecting Scenes by Time
total number of tracks on disc,
You can view the video CD, starting from any time
point you want.
INVALID message is displayed on the screen.
Press SEARCH MODE on the remote control one
time during playback.
Repeat Viewing
INPUT
Repeat Play
Press REPEAT during play.
The time search box is displayed on the screen as
SELECT TRACK: _ _ / _ _
Player goes to entered track of the disc.
Each time this button is pressed, a different repeat
box is displayed on the screen.
Press SEARCH MODE on the remote control two
times during playback.
If
All is displayed, the whole disc will be played
again.
The time search box is displayed on the screen as
DISC GOTO:_: _ _ : _ _
Track is displayed, the current track will be
If
played again.
Player goes to entered time of the disc.
Repeating two specific points between sections.
Press SEARCH MODE on the remote control three
times during playback.
(A B repeat)
The time search box is displayed on the screen as
TRACK GOTO:_: _ _ : _ _
Press A-B during play at the point where repeat play
is to commence (A).
Player goes to entered time of the current track.
Enter the time using number buttons.
The title is played beginning from the desired time
just after you enter the time.
If you attempt to enter a number greater than the
total time of the current title, the time search box
disappears and
A is displayed on screen.
Press A-B again at the point where repeat play is to
be concluded (B).
Ab is displayed and the repeat-play of the
selection between points A and b starts.
To return to normal play; press A-b again. A-b
Repeat is disabled.
INPUT INVALID message
appears on up-left corner of screen.
If you give up entering the time simply press
RETURN button, and the operation is cancelled.
Accessing tracks using number buttons:
You can play any track you want, just by pressing
the corresponding number button. For the track
numbers which are greater than 9 use +10 button.
Press this button once and then type the two digit
track number.
- 26 -
Convenient Functions
CD MENU
Displaying the time information
Press TIME during play.
Each time this button is pressed, a different time
information box is displayed on the screen.
If Single elapsed is displayed, the VFD display on
the unit shows the elapsed time for the title which
is being played.
If Single remain is displayed, the VFD display on
the unit shows the remaining time for the title which
is being played.
NOTE: If PBC feature is set to OFF then two other
time information modes are also available which are
Total elapsed and Total remain. PBC feature can
be set to ON or OFF by pressing TITLE key during
VCD playback.
NOTE: You can open/close information display by
pressing DISPLAY key during play. If you press
DISPLAY key during stop, Setup menu is displayed.
Displaying a scene with a larger and closer view
This zoom-in function enables you to take a closer
look at the scene you are viewing that is especially
an impressive function when you are watching
science fiction or adventure film.
Press ZOOM during play.
2x is displayed on the screen and the
picture is now larger. By pressing ZOOM key
consecutively you can reach 3x, 4x modes.
NOTE: You can move in the picture i.e. change the
zoomed location by using the 3/46/5 arrow
keys.
To return to normal play; press ZOOM again.
CD Menu is used to display the directory structure
of data discs which would contain files such as
JPEG/MPEG/MP3 and to display the tracks of Audio
CDs.
Basic Play
Press on the STANDBY
Press OPEN/CLOSE to open the disc tray
Place a CD-R disc onto the tray
Press OPEN/CLOSE to close the disc tray
Loading message appears on screen. Please wait
for a moment.
CD MENU appears. Directories and the files in the
root directory are listed. (For Audio CD, the tracks
are listed).
5. Press 6/5 to select files or directories
In the stop mode or while playing MP3 the user can
navigate in the current directory.
6. Press SELECT, 3/4 to switch between
directories & files
If a directory is selected and SELECT or key is
pressed then the selected directory content is
displayed after reading directory.
To switch from a sub directory to an up directory,
press SELECT or key while the top-most option
in the directory (...) is selected or press key.
7.Press SELECT on a file to play
MP3/MPEG File: Selected MP3/MPEG file starts to
play.
Elapsed or Remaining Time can be displayed using
DISPLAY key and can be changed using TIME key.
JPEG File: Selected JPEG is displayed in full
screen.
Slide Show starts automatically.
Audio CD Track: Elapsed or Remaining Time can
be displayed using DISPLAY key and can be
changed using TIME key.
- 27 -
ZOOM
PAUSE
Press PLAY/PAUSE
××
once during play.
The play freezes. PAUSE message appears on
screen.
To return to normal play press PLAY/PAUSE
××
Press STOP
MPEG/JPEG :CD MENU is displayed.
MP3/MPEG/Audio CD Track:
/ SKIP
during play to
decrease/increase play speed.
FR 32x, FR 16x, FR 8x, FR 4x, FR 2x, PLAY, FF
2x, FF 4x, FF 8x, FF 16x, FF 32x are the play speed
modes.
NOTE: No sound will be heard during Rapid advance
or Rapid reverse.
Skipping Ahead or Back to Tracks
Press SKIP
/ SKIP
during play to jump to
the previous/next file.
Next file in the current directory will be played. Press
/ SKIP
during stop mode to jump to
the previous/next page of the current directory.
NOTE: You can move in the picture i.e. change the
zoomed location by using the 3/46/5arrow
keys.
To return to normal play; press ZOOM again.
Rapid Advance (Rapid Reverse)
Press SKIP
2x is displayed on the screen and the
picture is now larger. By pressing ZOOM key
consecutively you can reach 3x, 4x modes.
, the play is stopped.
NOTE: If a JPEG file is displayed, pressing MENU
also stops the play.
Press ZOOM during play.
again.
Stopping Play
SKIP
MPEG :This zoom in function enables you to take
a closer look at the scene you are viewing that is
especially an impressive function when you are
seeing science fiction or adventure film.
JPEG: Press PLAY ( ) to start slide show.It is
provided both ZOOM in/out and Zoom pan functions
for JPEG pictures.
Press ZOOM to turn on/off this function
When this mode is on, a message will indicate the
current ratio on screen.
If zoom mode is on,
Press FR/FF to control the ratio of zoom in/out.
The zoom ratios are %50 and %75 for zoom out and
%100, %125, %150 and %200 for zoom in. (The
order is: %50, %75, %100, %125, %150, %200)(The
initial ratio is %100)
With ZOOM mode off, a picture is scaled to fit the
whole screen.
NOTE: Slide Show is disabled when the ZOOM mode
is on.
REPEAT
Press REPEAT to change current repeat mode
In CD MENU it is displayed at the bottom.
The options available are:
FOLDER: When this mode is selected, the current
folder will be played once.
SINGLE: When this mode is selected, the current
track will be played once.
REPEAT ONE: When this mode is selected, the
current track will be repeated continuously.
REPEAT FOLDER: When this mode is selected, the
current folder will be repeated continuously.
Repeating two specific points between sections.
- 28 -
(A B repeat)
SETUP MENU
MP3 & Audio CD Track:
Press A-B during play at the point where repeat play
is to commence (A).
A is displayed on screen.
Press A-B again at the point where repeat play is to
be concluded (B).
AB is displayed and the repeat-play of the
selection between points A and B starts.
To return to normal play; press A-b again. A-b
Repeat is disabled.
NOTE: A-B Repeat is not available for MPEG.
Press DISPLAY key on the remote control when the
player is not in playback mode. The setup menumain page appears. To close the setup menu, press
DISPLAY key.
MAIN PAGE
In the main page, the first page is selected by
default.
Select pages using 3/4arrow buttons.
When selected, the page name will be highlighted
and the items of the selected page will be displayed.
Press SELECT or 6arrow button to enter selected
page.
Display Function
Press TIME to change displayed time mode
When entered a page, the first item of the page is
selected and the sub-items of that item are listed on
the right.
There are two time modes:
Single Elapsed
NOTE: To return to main page, press 3 arrow
button. To close the setup menu, press DISPLAY.
Single Remain
Time is displayed during MP3, MPEG and Audio CD
track playback.
NOTE: You can open/close information display by
pressing DISPLAY key during play. If you press
DISPLAY key during stop, Setup menu is displayed.
File List Function
Press PROGRAM to select file list mode
All the files in the disc are listed.
The same types of files in the list are played
together sequentially.
If a MP3 file is selected to play then all the MP3 files
in the list are played sequentially.
If a MPEG file is selected to play then all the MPEG
files in the list are played sequentially.
If a JPEG file is selected to display then all the JPEG
files in the list are displayed sequentially.
To stop the playback of the files:
If a MP3/MPEG file is played; press STOP
If a JPEG file is displayed; press MENU or STOP
Press PROGRAM to quit file list mode.
- 29 -
The options available are:
USING PAGES
NORMAL / Ps (4x3 Pan & Scan):
When entered a page, the first item of the page is
selected by default and the sub-items of the
selected item are listed on the right.
Allows you to see the movie fill the entire screen of
your TV, but not the right and left edges. This type
of picture can only be viewed, if it is contained on
the disc.
Use 6/5arrow buttons to change the selected
item in the page.
The sub-items of the selected item are listed on the
right.
Use SELECT or 4right arrow button to select the
sub-items of the selected item.
The sub-item is selected on the right menu.
NORMAL / Lb (4x3 Letterbox):
Press 6/5 arrow buttons, to change the selected
sub-item.
Allows you to see movies in their original aspect
ratio. You will see the entire frame of the movie, but
it will occupy a smaller portion of the screen.
Press SELECT to choose the selected sub-item on
the right menu.
PAGE ITEMS
VIDEO SETUP PAGE
TV DISPLAY:
The aspect ratio of the picture provided by the DVD
player can be varied in line with the features
available on the TV in use.
WIDE (Wide screen 16x9):
Choose this setting if your DVD player is
connected to a wide-screen TV.
Please Note: Depending on the format of the DVD
disc. (eg. 2.35:1) the picture may still have black
lines above and below this picture.
TV TYPE:
The video standard of the DVD player output can
be selected from Multi, Ntsc or Pal.
If Multi is selected, the output standard will be either
Ntsc or Pal depending on the DVD being played.
If Pal is selected, the video output will be converted
to Pal standard irrespective of disc standard.
- 30 -
PASSWORD (Change Password):
LANGUAGE SETUP
Using this item you can change the current
password.
OSD LANG: You can select the default OSD
language of the player menus.
To change the password you will be prompted to
enter your old password. After you have entered
your old password, you can now enter the new 4digit password, two times
AUDIO: You can select the default audio language
if supported by that DVD disc.
DISC MENU: You can select the DVDs disc menu
language among these languages. Disc menu
appears in the selected language, if supported by
that DVD disc.
SUBTITLE:
You can use C key to delete the incorrect entry.
Note: Factory preset of the password is
0000.You have to enter XXXX digital password
every time you want to change the parental level.
If you forget your password please contact
technical service.
You can select the default subtitle language if
supported by that DVD disc.
PREFERENCES
ANGLE MARK: This option allows you to turn on/off
the angle mark on the screen, which is displayed to
indicate that a multi angle scene has started. It also
shows which angle you are currently watching.
STANDBY TIME: Standby activation time can be
adjusted or standby can be disabled using this
option. If one of the time options is selected,
standby is activated, whenever no key is pressed
for the selected time duration in stop mode.
DEFAULT: If you choose RESET and press
SELECT, the factory-presets are loaded. After
factory reset, password and parental level does not
change.
DOWNMIX: This mode allows the DVD player
analog audio outputs to be matched to the features
available on the TV in use. Analog audio outputs can
be selected as:
SURROUND: Surround sound output.
STEREO: Two channels stereo. Use this option if
you have a stereo TV or a stereo HI-FI system.
NOTE: It is not possible to connect speakers
directly to this DVD player; an AV amplifier must
be used.
PARENTAL (Parental Level):
Playing some DVDs can be limited depending on the
age of users. The Parental Control function allows
playback limitation level to be set by the parent.
Parental Level can be adjusted to one of the eight
levels. Level 8 ADULT adjustment let you watch
all of the DVD titles ignoring the DVD discs parental
level. You can watch the DVD discs, which has the
same or lower parental level than the players level
only.
- 31 -
TROUBLESHOOTING
7KHSLFWXUHTXDOLW\LVSRRU'9'
0DNHVXUHWKH'9'GLVFVXUIDFHLVQRWGDPDJHG6FUDWFKILQJHUSULQWHWF
&OHDQWKH'9'GLVFDQGWU\DJDLQ
(QVXUHWKDWWKH'9'GLVFLVLQWKHGUDZHUZLWKWKHODEHOXSSHUPRVW
$GDPS'9'GLVFRUFRQGHQVDWLRQPD\HIIHFWWKHHTXLSPHQW:DLWIRUWR
KRXUVLQ6WDQGE\WRGU\WKHHTXLSPHQW
'LVFGRHVQRWSOD\
1RGLVFLQWKHPDFKLQH
3ODFHDGLVFRQWRWKHWUD\
'LVFLQFRUUHFWO\ORDGHG
(QVXUHWKDWWKH'9'GLVFLVLQWKHGUDZHUZLWKWKHODEHOXSSHUPRVW
:URQJW\SHRIGLVF 7KHPDFKLQHFDQQRWSOD\&'520VHWF
8VHGLVFLQVXSSRUWHGIRUPDWV
7KHUHJLRQFRGHRIWKH'9'PXVWPDWFKWKHRQHRIWKHSOD\HU
:URQJ26'ODQJXDJH
6HOHFWWKHODQJXDJHLQWKHVHWXSPHQX
7KHODQJXDJHIRUWKHVRXQGRUVXEWLWOHVRQD'9'FDQQRWEHFKDQJHG
0XOWLOLQJXDOVRXQGDQGRUVXEWLWOHVQRWUHFRUGHGRQWKH'9'
7U\WRFKDQJHWKHVRXQGRUVXEWLWOHVXVLQJ'9'VWLWOHPHQX6RPH'9'
VGR
QRWDOORZWKHXVHUWRFKDQJHWKHVHVHWWLQJVZLWKRXWXVLQJWKHGLVF
VPHQX
6RPHIXQFWLRQV$QJOH=RRPHWFGRQRWZRUN
7KHVHIXQFWLRQVDUHQRWDYDLODEOHRQWKH'9'
$QJOHFDQRQO\EHFKDQJHGZKHQWKHDQJOHV\PEROLVGLVSOD\HG
1RSLFWXUH
&KHFNWKDWWKHSOD\HULVFRQQHFWHGWR79SURSHUO\DQGWKDWDOOFRQQHFWLRQV
EHWZHHQWKH'9'SOD\HUDQGRWKHUDWWDFKHGHTXLSPHQWDUHVHFXUH
+DYH\RXSUHVVHGWKHFRUUHFWEXWWRQVRQWKHUHPRWHFRQWURO"7U\RQFHPRUH
1RVRXQG
&KHFNWKHYROXPHLVVHWWRDQDXGLEOHOHYHO
0DNHVXUH\RXKDYHQRWVZLWFKHGWKHVRXQGRIIDFFLGHQWDOO\
'LVWRUWHGVRXQG
&KHFNWKDWWKHDSSURSULDWHOLVWHQLQJOHYHOVHWWLQJLVFRUUHFW
1RUHVSRQVHIURPUHPRWHFRQWURO
0DNHVXUHWKHUHPRWHFRQWUROLVLQWKHFRUUHFWPRGH
&KHFNEDWWHULHVDUHILWWHGFRUUHFWO\
&KDQJHWKHEDWWHULHV
,IQRWKLQJZRUNV
,I\RXKDYHWULHGWKHDERYHVROXWLRQVDQGQRQHVHHPWRZRUNWU\VZLWFKLQJ\RXU
'9'RIIDQGRQDJDLQ,IWKLVGRHVQRWZRUNFRQWDFW\RXUVXSSOLHURU'9'UHSDLU
WHFKQLFLDQ1HYHUDWWHPSWWRUHSDLUDGHIHFWLYH'9'\RXUVHOI
- 32 -
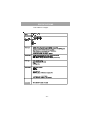
SPECIFICATIONS
DVD / VIDEO CD / CD player
9$&a+]
0D[:DWW
'9'666/´'9'
66'/´'9'
'66/´'9'
7\SHVRI'LVFV
6XSSRUWHG
'6'/´'9'
9&'69&'
&'
&'5
&'5:
0303(*
-3(*
- 33 -
- 34 -
GUARANTEE TO CUSTOMER
Sanyo Europe Ltd. (the Company) guarantees
to the initial retail purchaser that if this
equipment is or becomes defective and that,
in the opinion of the Company, the defect is
due to faulty material or workmanship the
Company will, for a period of 12 calendar
months from the date of sale to the original
purchaser repair or replace, at its sole option,
free of charge, any such defective component
part of the equipment, always provided that: 1. The equipment has at all times been used
in accordance with the operating instructions
issued by the Company, and has not been
connected to an electrical mains supply for
which it has not been adjusted.
2. Accidental damage, or damage caused by
negligence or misuse by the user, including
leakage from exhausted batteries, is
specifically excluded.
3. Unauthorised repairs, or any modification
to the equipment which has not been
expressly approved by the Company, shall
render this guarantee null and void.
4. Failure due to fair wear and tear of any
item, such as batteries, record playing styli,
and tape recording, playback and erase
heads is specifically excluded.
This guarantee is not transferable and is only
applicable within the United Kingdom (and the
Republic of Ireland). Nothing in this express
guarantee affects the statutory rights available
to the purchaser of this equipment.
Note:
This guarantee supersedes any
other form of guarantee that may inadvertently
have been enclosed with or attached to the
product. (August 1978).
Thank you for buying Sanyo. This
equipment should give you many years of
pleasure and faithful service but in the event
that a fault occurs, the following notes for your
guidance may be helpful:1. PLEASE RETAIN YOUR PURCHASE
RECEIPT WHICH WILL BE REQUIRED FOR
SERVICE DURING GUARANTEE.
2. If your Sanyo equipment proves faulty
during the period of guarantee, take it or send
it back to the dealer who originally supplied it
together with this guarantee and the proof of
purchase. We have made arrangements with
our approved dealers under which they will
carry out in-guarantee service repairs on our
behalf. In this way, we hope to reduce to a
minimum the amount of time you will be
without your equipment.
3. If for some reason it is impossible to return
the equipment to the original supplies, please
contact our Consumer Relations Department
at the address below for further advice.
4. Should the equipment require servicing
after the expiry of the guarantee period, take
or send it to the original supplier or any other
Sanyo dealer. He will be pleased to give you a
quotation for the repair. If you are in any doubt
about what to do, write to us at the address
below or telephone:
Consumer Relations Department,
Sanyo Europe Ltd.,
18 Colonial Way, Watford
WD24 4PT
Tel: Watford 246363
R6
SANYO Electric Co., Ltd.