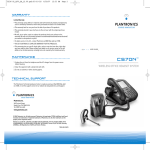
1
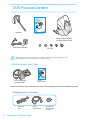
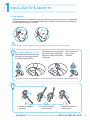
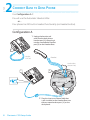
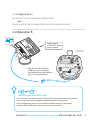
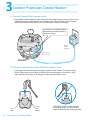
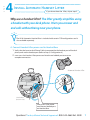
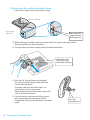
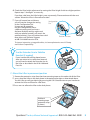
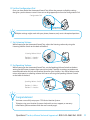
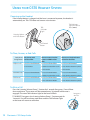
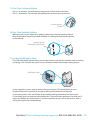
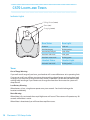
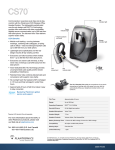
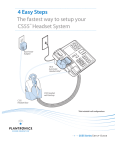
5 Easy Steps
The fastest way to setup your
CS70 Headset System
Base Power
Adaptor
HL10
Automatic
Handset Lifter*
CS70 Headset
with Ear Tip
CS70
Headset Base
*Not included in all configurations
CS70 Series S e t u p G u i d e
CS70 Package Contents
Headset
Setup Guide
Headset Base with Preinstalled Phone Cable
Base Power Adapter
Ear Tips
Please refer to the separate Safety Instructions sheet for important product safety
information prior to installation or use of the product.
CS70 With Handset Lifter* Adds:
HL10
User Guide
HL10 Automatic
Handset Lifter
*Automatic Handset Lifter is bundled with certain CS70 configurations and also available separately.
HL10 Additional Parts Kit (if needed)
Extender
Arm
Plantronics CS70 Setup Guide
Ringer
Microphone
Adapter for
Nortel i2004
Phones
STEP
1
Install Ear Tip & Adjust fit
Fit the Headset
Slide the headset over and behind your ear, then press gently toward your ear. Rotate the
microphone boom until it is pointed toward your mouth. If the ear tip is uncomfortable,
install a different ear tip. See below.
For your safety and comfort, the ear tip should never be inserted into the ear canal.
To Install a Different Ear Tip
Remove the pre-installed ear tip by
pushing in and turning the ear tip
clockwise, then pull firmly.
Choose the style and size of Ear
Tip that fits most comfortably.
Align Ear Tip tabs with notches
in headset.
Push in firmly and
twist counter
clockwise.
To view an interactive set-up guide online, visit www.plantronics.com/cs70setup and click on Adjusting Fit.
To Convert for Wearing on Left Ear
A. Rotate microphone
boom up
B. Turn microphone
boom around
C. Rotate microphone
boom down
Questions? For fast, efficient Technical Support call: 800-544-4660 Ext. 5538
STEP
2
Connect Base to Desk Phone
Use Configuration A if:
You will use the Automatic Handset Lifter
or…
Your phone has NO built-in headset functionality (no Headset button).
Configuration A
1. Unplug the handset coil
cord from the desk phone
handset port [A], then plug it
into the green labeled handset
port [B] on the Headset Base.
A
Handset
Coil Cord
Handset
Headset Base
(bottom view)
B
A
2. Plug the short black Phone Cable that
Plantronics CS70 Setup Guide
is pre-installed on the Headset Base into
the now-open handset port [A] on the
desk phone.
Use Configuration B if:
You will NOT use the Automatic Handset Lifter
and…
Your phone has built-in headset functionality (a Headset button).
Configuration B
Confirm there is
a “Headset” button
on your phone
Headset Base
(bottom view)
C
1.
Plug the short BLACK Phone
Cable that is pre-installed on
the Headset Base into the Heaset
port [C] on the desk phone.
Handset port or Headset port?
You should only use the headset port if you will not be using the Automatic Handset
Lifter and you have a pre-programmed Headset button on your phone.
In this configuration you must press both the Headset button on your phone
and the Call Control Button on the headset to answer/end calls.
Questions? For fast, efficient Technical Support call: 800-544-4660 Ext. 5538
STEP
3
Connect Power and Charge Headset
A. Connect Headset Base to power outlet
1. Plug the Base Power Adapter into a wall outlet, then plug the power cord into the yellow
labeled connector on the bottom of the Headset Base. The red Power light on the left
front of the Headset Base will turn on. (See illustration at bottom of page.)
Insert into yellow labeled power
connection on Headset Base as
shown to charge.
Base
Power
Adapter
Headset Base
(bottom view)
B. Charge the Headset for at least 20 Minutes before using
1. Gently push the headset into the charging cradle as shown below. The amber Charge
Status light on the base will flash to indicate the headset battery is charging. A solid
light indicates full charge. A full charge will take approximately 3 hours.
Power
(Red)
Plantronics CS70 Setup Guide
Charge
Status
(amber)
IMPORTANT! Make sure the headset
is facing correctly (as shown at left)
when inserted into the charging cradle.
STEP
4
Install Automatic Handset Lifter
If you do not have the Lifter, skip to step 5.
Why use a handset lifter? The lifter greatly simplifies using
a headset with your desk phone. It lets you answer and
end calls without being near your phone.
The HL10 Automatic Handset lifter is included with certain CS70 configurations and is
also available separately.
A. Connect Handset Lifter power cord to Headset Base
1. Verify that the base-to-desk Phone Cable is connected to the handset port of the desk
phone, and not the headset port (Refer to Step 2, Configuration A).
2. firmly press the Handset Lifter power cord into the red labeled port to ensure a
complete connection.
Automatic Handset Lifter
Headset Base
(bottom view)
firmly press Lifter power
cord into red labeled port
on Headset Base.
Questions? For fast, efficient Technical Support call: 800-544-4660 Ext. 5538
B. Determine Lifter position and height setting
1. Set the Lifter Height Switch to the lowest setting.
Handset Lifter Arm
Lifter viewed
from back
Start with Lifter
Height Switch in
lowest position
2. While wearing your headset, slide the Handset Lifter Arm under the handset until the
lifter base touches the side of the phone.
3. Slide the Lifter up to where it nearly touches the handset earpiece.
Slide Lifter under
handset, then up
toward the ear piece
4. Press the Call Control Button on the headset.
This will activate the Handset Lifter and lift the
handset from the phone.
If you hear a dial tone, the lifter height is set
correctly and needs no adjustment.
Please continue with the next section “Mount the
Lifter in Permanent Position”.
5. If you do not hear a dial tone, the Lifter may not
be raising the handset high enough OR the
Configuration Dial may need adjusting. Continue to
step 6.
Plantronics CS70 Setup Guide
Press Call
Control Button
6. Check the Lifter height adjustment by moving the Lifter Height Switch to a higher position.
Repeat steps 2. through 4. as necessary.
If you hear a dial tone, the lifter height is now set correctly. Please continue with the next
section “Mount the Lifter in Permanent Position”.
7. If you still cannot hear a dial tone,
Configuration
you will need to change the setting
Dial
on the Configuration Dial.
Using a coin or paperclip,
turn the Configuration Dial to
a different setting until you hear a
dial tone. Multiple settings might work
with your phone; however, only one is the
optimal position. If you still cannot hear a dial
Position Indicator
tone, please call Technical Support
at 800-544-4660 Extension 5538.
To view an interactive set-up guide online, visit www.plantronics.com/cs70setup
and click on Compatibility.
Use the Extender Arm to Stabilize
Handset (if needed)
If your handset falls off the phone base or
does not return to its cradle when lowered,
you will need to attach the Extender Arm to
the Lifter as described in the HL10 Additional
Parts Kit.
C. Mount the Lifter in permanent position
1. Remove the protective strips from the three mounting tapes on the underside of the Lifter.
2. gently place the Lifter on the desk phone in the optimum position as determined above.
Test the Lifter to verify positioning by pressing the Call Control Button on your headset to
activate the Lifter and listen for a dial tone.
3. Press firmly to adhere the Lifter to the desk phone.
Peel back
mounting tape
protective strips
(3 places)
Questions? For fast, efficient Technical Support call: 800-544-4660 Ext. 5538
STEP
5
Make a Test Call to Configure
and Optimize your System.
To get the best sound quality for both you and your
listeners You MUST configure and optimize your
system!
A. Make the test call
1. If your desk phone has a volume control, set it to mid-range.
2. If you have installed the Automatic Handset Lifter, press the Call Control Button on
your headset.
If you have not installed the Automatic Handset Lifter, press the Call Control Button
then lift the handset from its cradle (or press the HEADSET button on your telephone,
if it has one).
3. Verify that you hear a dial tone. If so, continue with step 4.
IF YOU DO NOT HEAR A DIAL TONE: Use a coin or paperclip to turn the Configuration Dial
to a different setting until you hear a dial tone.
If you still do not hear a dial tone at any of the four positions, review Setup Guide
Steps 1–4 to verify completion.
4. Make the test call (TOLL FREE). It’s the quickest way to test and optimize
your system.
Automated Sound Test
866-210-2157
Press Call
Control Button
For your safety, do not use headset at high volumes for extended periods of time. Doing so can cause
hearing loss. Always listen at moderate levels. For more information on headsets and hearing
visit: www.plantronics.com/healthandsafety
10
Plantronics CS70 Setup Guide
B. Set the Configuration Dial
Once you have dialed the Automated Sound Test, follow the prompts to find the setting
that gives you the clearest sound. Use a coin or large paperclip to turn the Configuration Dial.
Configuration Dial
Position Indicator
Multiple settings might work with your phone; however, only one is the optimal position.
C. Set Listening Volume
While listening to the Automated Sound Test, adjust the listening volume by using the
Listening Volume Switch on the back of the Base.
Listening Volume Switch
Position 1 = Loudest
Position 4 = Softest
D. Set Speaking Volume
While listening to the Automated Sound Test, set the Speaking Volume Switch to the best
setting for the listener (a paper clip or pen tip can help). Too high a setting can produce an
uncomfortable echo for you and distorted sound for your listeners. You will be able to make
minor adjustments to speaking volume while on a call using the Speaking Volume Control
on the back of the base.
Speaking Volume Switch
Position A = Softest
Position D = Loudest
Congratulations!
You have successfully setup your CS70 Series Headset System.
To begin using your Headset System or help with service, support, or warranty
information, please continue with the next several pages.
Questions? For fast, efficient Technical Support call: 800-544-4660 Ext. 5538
11
Using your CS70 Headset System
Powering up the Headset
If the headset battery is charged and the base is connected to power, the headset is
automatically on. The CS70 does not have an on/off button
Talk
Indicator
Light
Talk Indicator
Light on Headset
Base (green)
Listening Volume
and Mute Button
Call Control
Button
To Place, Answer, or End Calls
Desk phone
Configuration
To place a call
To answer a call
To end a call
ALL phones with
Handset Lifter
Phones without Headset
button and NO handset
lifter
Phones with Headset button
and no handset lifter
1. Press Call Control Button
1. Press Call Control Button
1. Press Call Control Button
2. Dial number
2. Remove handset from cradle
2. Press Headset button on phone
3. Dial number
3. Dial number
1. Press Call Control Button
1. Press Call Control Button
2. Remove handset from cradle
2. Press Headset button on phone
1. Press Call Control Button
1. Press Call Control Button
2. Press Call Control Button
2. Press Headset button on phone
1. Press Call Control Button
1. Press Call Control Button
To Mute a Call
Press the Listening Volume Down [–] button for 3 seconds (long press). You will hear
three rapid tones. These tones will be repeated every 30 seconds while mute is
engaged. The green Talk Indicator Light on the base will flash.
Long press
to mute
–
To unmute, long press the Listening Volume Down [ ] button again for
3 seconds. You will hear three rapid tones and the Talk Indicator Light
on the base will return to solid green.
12
Plantronics CS70 Setup Guide
To Fine Tune Listening Volume
Press [+] to increase. You will hear ascending tones and two tones at the limit.
Press [–] to decrease. You will hear descending tones and two tones at the limit.
Listening Volume
Button
To Fine Tune Speaking Volume
While on a call, you can adjust your speaking volume by using the Speaking Volume
Minor Adjustment Control on the back of the base. Listening volume can be adjusted
on the headset.
Speaking Volume
Minor Adjustment Control
To set the IntelliStand Feature
The CS70 IntelliStand™ feature allows you to choose how to activate your headset when answering
or making a call. Consider how you’ll use your headset to determine the best setting for you.
IntelliStand Switch
In the up position, answer, make or end a call by pressing the Call Control Button on your
headset. Choose the up position if you plan to wear your headset most of the time.
In the down position, calls are initiated, or answered by taking the headset out of the stand.
A short delay gives you time to put the headset on. Choose the down position if you think you’ll
wear your headset only while on calls. In the down position you can still answer, end or make a
call by pressing the Call Control Button.
Questions? For fast, efficient Technical Support call: 800-544-4660 Ext. 5538
13
CS70 Lights and Tones
Indicator Lights
Talking/Muted (green)
Power (red)
Charging (amber)
Base Status
Base Light
Power on
Solid red
Headset charging
Flashing amber
Headset fully charged
Solid amber
Headset in talk mode
Solid green
Headset in mute mode
Flashing green
Headset Status
Headset Light
Headset in talk mode
Flashing amber
Tones
Out of Range Warning:
If you walk out of range of your base, your headset will issue audible tones at its operating limit.
If you are on a call, you will hear two tones when reaching edge of range, and again when back
in range. If you stray out of range, active calls will be suspended. Calls will be re-established on
walking back into range. If you remain out of range for more than 10 minutes the system will
drop the call.
Low Battery Warning:
When battery is low, a single tone repeats every ten seconds. You should recharge the
headset immediately.
Mute Warning:
When Mute is first activated, three rapid high tones will sound. These tones will repeat every 30
seconds while Mute is active.
When Mute is deactivated you will hear three rapid low tones.
14
Plantronics CS70 Setup Guide
Troubleshooting and Common Questions
I can’t hear a dial tone at the headset
• Make sure your headset is charged.
• Press the Call Control Button on your headset.
• Make sure the lifter is lifting the handset high
enough to operate the hookswitch; set to a higher
setting if necessary.
• Adjust the Configuration Dial on the left side of the
base. Align the “1” on the dial with the ridges to the
right side of the dial. If there is no dial tone for setting
“1” try the other dial settings. Adjust the Listen Volume Button on the headset. If the volume is still too
low, select another setting on the Listening Volume
Switch on the headset base.
I hear static
• Make sure there is at least 12” between your CS70
base and your computer, and 6” between your base
and your telephone. If adjusting the distance doesn’t
help, your base settings may need adjusting. Call the
Automated Sound Test at 866-210-2157.
• Your system may need to be reset. See the System
Reset topic in the CS70 User Guide (available online
at www.plantronics.com/cs70).
The sound is distorted or I hear an echo in the headset.
• Reduce speaking volume by changing the Speaking
Volume Major Adjustment Switch.
• Point microphone towards your chin.
• Listening volume may be too high on phone. If your
phone has a handset volume control, lower this until
the distortion disappears.
• If the distortion is still present, lower the volume
using the Listen Volume Button on the headset. If the
distortion persists, select another Listening Volume
Switch setting on the headset base.
• Make sure there is 12” distance between your CS70
base and your computer, and 6” between your base
and your telephone.
People I talk to can hear a buzz in the background.
• Move the base further away from your phone.
• Power adapter is plugged into a power strip.
Plug the power adapter into the wall directly.
Talk time performance is significantly degraded even
after a full recharge.
• Battery is wearing out. Call Plantronics at (800)
544-4660 Ext. 5538 for factory service information.
The Handset lifter is installed but does not lift the
handset.
• Be sure the handset lifter power cord is firmly pushed
into the handset lifter jack on the base.
My handset lifter operates every time I remove or
replace my headset in the base.
• IntelliStand is enabled. To disable this feature, move
the IntelliStand switch to the up position.
Additional Information and Support
CS70 Interactive Quick Start Guide
(Available at www.plantronics.com/CS70)
Positioning the Base
System Reset
Battery Replacement
Maintenance
Troubleshooting
Product information
(Available at www.plantronics.com/CS70)
CS70 Online Product Resource Center
CS70 Accessories (see www.plantronics.com)
HL10 Automatic Handset Lifter
Online Indicator Light
Telephone Support
Telephone Tech Support at: 800-544-4660 Ext. 5538
(Sunday 3:00 pm to Friday 5:00 pm, PST)
Plantronics Automated Sound Test Machine at:
866-210-2157
Online Technical Support
www.plantronics.com/support
Knowledge Base FAQs
Live Chat with a Support Technician
Email Support
Product Compatibility Guide
Product Manuals
(including all available language versions)
Service
Product Registration
Questions? For fast, efficient Technical Support call: 800-544-4660 Ext. 5538
15
Plantronics Limited Warranty
•This warranty covers defects in materials and workmanship of products manufactured, sold
or certified by Plantronics which were purchased and used in the United States.
•This warranty lasts for one year from the date of purchase of the products.
•This warranty extends to you only if you are the end user with the original purchase receipt.
•We will, at our option, repair or replace the products that do not conform to the warranty.
We may use functionally equivalent reconditioned/refurbished/remanufactured/pre-owned
or new products or parts.
•To obtain service in the U.S., contact Plantronics at (800) 544-4660 Ext. 5538.
•THIS IS PLANTRONICS COMPLETE WARRANTY FOR THE PRODUCTS.
•This warranty gives you specific legal rights, and you may also have other rights that vary
from state to state. Please contact your dealer or our service center for the full details of our
limited warranty, including items not covered by this limited warranty.
Maintenance
• Always unplug the Headset Base from the telephone and the Base Power Adapter from the
power source before cleaning.
• Clean the equipment with a damp (not wet) cloth.
• Do not use solvents or other cleaning agents.
Battery replacement
The custom battery supplied in your headset should last 2–3 years. When talk time decreases
significantly, the battery may need replacing. Please call Plantronics at (800) 544-4660 Ext.
5538 for information on sending the headset back to Plantronics for installation of a new battery.
Still having problems?
Given the hundreds of different types of phones, it’s possible a trick or two may be
needed to make the CS70 System work with your desk phone. For further help:
• For the product knowledge base and instant live chat with Technical Support:
www.plantronics/support
• For the Plantronics Technical Support Center (open from Sunday 3:00 pm to
Friday 5:00 pm PST, except major U.S. holidays): 800-544-4660 Ext. 5538
© 2007 Plantronics, Inc. All rights reserved. Plantronics, the logo design, CS70, IntelliStand, and Sound Innovation are trademarks or registered trademarks of Plantronics, Inc. All other trademarks are the property of their respective owners.
Patents U.S. 5,210,791; 6,735,453; 6,923,688; 7,075,270; D469,756; D535,980; Australia 147229; 303053; China ZL200530008542.5;
EM 293964-0003; 543798-0001; 543798-0002;France 651,857-651,865; Germany 40108524.4; GB Regd.Des.No. 2104923 and Patents Pending
Printed in USA.
76529-01 (02.07)
Plantronics, Inc.
345 Encinal Street
Santa Cruz, CA 95060 USA
www.plantronics.com
16
Plantronics CS70 Setup Guide