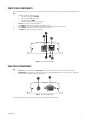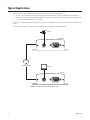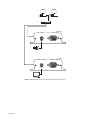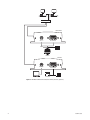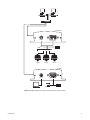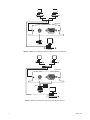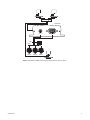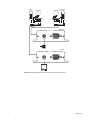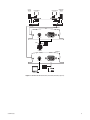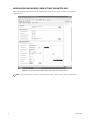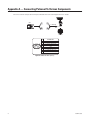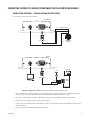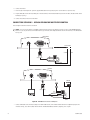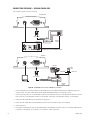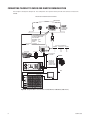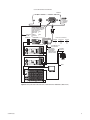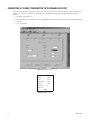
1
INSTALLATION/OPERATION
®
PelcoNet™ NET300
Multimedia Transmission
Via Network
C2908M-B (4/05)
Contents
Important Safeguards and Warnings . . . . . . . . . . . . . . . . . . . . . . . . . . . . . . . . . . . . . . . . . . . . . . . . . . . . . . . . . . . . . . . . . . . . . . . . . . . . . . . . . . . . . .6
Regulatory Notices . . . . . . . . . . . . . . . . . . . . . . . . . . . . . . . . . . . . . . . . . . . . . . . . . . . . . . . . . . . . . . . . . . . . . . . . . . . . . . . . . . . . . . . . . . . . . . .6
What is the Pelconet NET300 Transmission System? . . . . . . . . . . . . . . . . . . . . . . . . . . . . . . . . . . . . . . . . . . . . . . . . . . . . . . . . . . . . . . . . . . . . . . . . .7
How Do Lans and Wans Work? . . . . . . . . . . . . . . . . . . . . . . . . . . . . . . . . . . . . . . . . . . . . . . . . . . . . . . . . . . . . . . . . . . . . . . . . . . . . . . . . . . . . . .7
Who Should Install the PelcoNet NET300 Transmission System? . . . . . . . . . . . . . . . . . . . . . . . . . . . . . . . . . . . . . . . . . . . . . . . . . . . . . . . . . . .7
Instructions for the Network Administrator . . . . . . . . . . . . . . . . . . . . . . . . . . . . . . . . . . . . . . . . . . . . . . . . . . . . . . . . . . . . . . . . . . . . . . . . . . . . . . . . .8
The Transmitter and Receiver . . . . . . . . . . . . . . . . . . . . . . . . . . . . . . . . . . . . . . . . . . . . . . . . . . . . . . . . . . . . . . . . . . . . . . . . . . . . . . . . . . . . . . .8
The Browser . . . . . . . . . . . . . . . . . . . . . . . . . . . . . . . . . . . . . . . . . . . . . . . . . . . . . . . . . . . . . . . . . . . . . . . . . . . . . . . . . . . . . . . . . . . . . . . . . . . . .8
Minimum PC Requirements (As Needed) . . . . . . . . . . . . . . . . . . . . . . . . . . . . . . . . . . . . . . . . . . . . . . . . . . . . . . . . . . . . . . . . . . . . . . . . . . . . . .9
Overview . . . . . . . . . . . . . . . . . . . . . . . . . . . . . . . . . . . . . . . . . . . . . . . . . . . . . . . . . . . . . . . . . . . . . . . . . . . . . . . . . . . . . . . . . . . . . . . . . . . . . . . . . . .10
Description . . . . . . . . . . . . . . . . . . . . . . . . . . . . . . . . . . . . . . . . . . . . . . . . . . . . . . . . . . . . . . . . . . . . . . . . . . . . . . . . . . . . . . . . . . . . . . . . . . . . .10
Software Version . . . . . . . . . . . . . . . . . . . . . . . . . . . . . . . . . . . . . . . . . . . . . . . . . . . . . . . . . . . . . . . . . . . . . . . . . . . . . . . . . . . . . . . . . . . . . . . .10
Package Contents . . . . . . . . . . . . . . . . . . . . . . . . . . . . . . . . . . . . . . . . . . . . . . . . . . . . . . . . . . . . . . . . . . . . . . . . . . . . . . . . . . . . . . . . . . . . . . .10
Front Panel Components . . . . . . . . . . . . . . . . . . . . . . . . . . . . . . . . . . . . . . . . . . . . . . . . . . . . . . . . . . . . . . . . . . . . . . . . . . . . . . . . . . . . . . . . . .11
Rear Panel Components . . . . . . . . . . . . . . . . . . . . . . . . . . . . . . . . . . . . . . . . . . . . . . . . . . . . . . . . . . . . . . . . . . . . . . . . . . . . . . . . . . . . . . . . . . .11
Typical Applications . . . . . . . . . . . . . . . . . . . . . . . . . . . . . . . . . . . . . . . . . . . . . . . . . . . . . . . . . . . . . . . . . . . . . . . . . . . . . . . . . . . . . . . . . . . . . . . . . .12
Hardware Installation . . . . . . . . . . . . . . . . . . . . . . . . . . . . . . . . . . . . . . . . . . . . . . . . . . . . . . . . . . . . . . . . . . . . . . . . . . . . . . . . . . . . . . . . . . . . . . . . .24
Connecting Video Sources or Displays . . . . . . . . . . . . . . . . . . . . . . . . . . . . . . . . . . . . . . . . . . . . . . . . . . . . . . . . . . . . . . . . . . . . . . . . . . . . . . .24
Connecting Data Terminals . . . . . . . . . . . . . . . . . . . . . . . . . . . . . . . . . . . . . . . . . . . . . . . . . . . . . . . . . . . . . . . . . . . . . . . . . . . . . . . . . . . . . . . .24
Pin Assignments . . . . . . . . . . . . . . . . . . . . . . . . . . . . . . . . . . . . . . . . . . . . . . . . . . . . . . . . . . . . . . . . . . . . . . . . . . . . . . . . . . . . . . . . . . . . . . . .24
Connecting an Alarm . . . . . . . . . . . . . . . . . . . . . . . . . . . . . . . . . . . . . . . . . . . . . . . . . . . . . . . . . . . . . . . . . . . . . . . . . . . . . . . . . . . . . . . . . . . . .24
Connecting a Relay . . . . . . . . . . . . . . . . . . . . . . . . . . . . . . . . . . . . . . . . . . . . . . . . . . . . . . . . . . . . . . . . . . . . . . . . . . . . . . . . . . . . . . . . . . . . . .25
Connecting to a LAN . . . . . . . . . . . . . . . . . . . . . . . . . . . . . . . . . . . . . . . . . . . . . . . . . . . . . . . . . . . . . . . . . . . . . . . . . . . . . . . . . . . . . . . . . . . . .26
Connecting Power . . . . . . . . . . . . . . . . . . . . . . . . . . . . . . . . . . . . . . . . . . . . . . . . . . . . . . . . . . . . . . . . . . . . . . . . . . . . . . . . . . . . . . . . . . . . . . .26
Configuration . . . . . . . . . . . . . . . . . . . . . . . . . . . . . . . . . . . . . . . . . . . . . . . . . . . . . . . . . . . . . . . . . . . . . . . . . . . . . . . . . . . . . . . . . . . . . . . . . . . . . . .27
Box-to-Box Connection . . . . . . . . . . . . . . . . . . . . . . . . . . . . . . . . . . . . . . . . . . . . . . . . . . . . . . . . . . . . . . . . . . . . . . . . . . . . . . . . . . . . . . . . . . .27
Configuration Types . . . . . . . . . . . . . . . . . . . . . . . . . . . . . . . . . . . . . . . . . . . . . . . . . . . . . . . . . . . . . . . . . . . . . . . . . . . . . . . . . . . . . . . . . . . . . .27
Configuration Using a Web Browser . . . . . . . . . . . . . . . . . . . . . . . . . . . . . . . . . . . . . . . . . . . . . . . . . . . . . . . . . . . . . . . . . . . . . . . . . . . . . . . . .27
Getting Started . . . . . . . . . . . . . . . . . . . . . . . . . . . . . . . . . . . . . . . . . . . . . . . . . . . . . . . . . . . . . . . . . . . . . . . . . . . . . . . . . . . . . . . . . . . . .28
Home Page . . . . . . . . . . . . . . . . . . . . . . . . . . . . . . . . . . . . . . . . . . . . . . . . . . . . . . . . . . . . . . . . . . . . . . . . . . . . . . . . . . . . . . . . . . . . . . . .30
Setup Pages . . . . . . . . . . . . . . . . . . . . . . . . . . . . . . . . . . . . . . . . . . . . . . . . . . . . . . . . . . . . . . . . . . . . . . . . . . . . . . . . . . . . . . . . . . . . . . .31
Configuration Page for General Settings . . . . . . . . . . . . . . . . . . . . . . . . . . . . . . . . . . . . . . . . . . . . . . . . . . . . . . . . . . . . . . . . . . . . . . . . .33
Configuration Page for MPEG-4 Video Settings (Transmitter Only) . . . . . . . . . . . . . . . . . . . . . . . . . . . . . . . . . . . . . . . . . . . . . . . . . . . . .36
Configuration Page for Video Decoder Settings (Receiver Only) . . . . . . . . . . . . . . . . . . . . . . . . . . . . . . . . . . . . . . . . . . . . . . . . . . . . . . .39
Configuration Page for Alarm Settings . . . . . . . . . . . . . . . . . . . . . . . . . . . . . . . . . . . . . . . . . . . . . . . . . . . . . . . . . . . . . . . . . . . . . . . . . . .40
Configuration Page for Relay Settings . . . . . . . . . . . . . . . . . . . . . . . . . . . . . . . . . . . . . . . . . . . . . . . . . . . . . . . . . . . . . . . . . . . . . . . . . . .44
Configuration Page for Com Interface Settings . . . . . . . . . . . . . . . . . . . . . . . . . . . . . . . . . . . . . . . . . . . . . . . . . . . . . . . . . . . . . . . . . . . .46
Configuration Page for Local COM Interface – Keyboard . . . . . . . . . . . . . . . . . . . . . . . . . . . . . . . . . . . . . . . . . . . . . . . . . . . . . . . . . . . .48
Configuration Page for Network Settings . . . . . . . . . . . . . . . . . . . . . . . . . . . . . . . . . . . . . . . . . . . . . . . . . . . . . . . . . . . . . . . . . . . . . . . .49
Configuration Using a Terminal Program . . . . . . . . . . . . . . . . . . . . . . . . . . . . . . . . . . . . . . . . . . . . . . . . . . . . . . . . . . . . . . . . . . . . . . . . . . . . .51
Typical Session . . . . . . . . . . . . . . . . . . . . . . . . . . . . . . . . . . . . . . . . . . . . . . . . . . . . . . . . . . . . . . . . . . . . . . . . . . . . . . . . . . . . . . . . . . . . .51
Terminal Program Transmitter Menu Structure . . . . . . . . . . . . . . . . . . . . . . . . . . . . . . . . . . . . . . . . . . . . . . . . . . . . . . . . . . . . . . . . . . . .52
Terminal Program Receiver Menu Structure . . . . . . . . . . . . . . . . . . . . . . . . . . . . . . . . . . . . . . . . . . . . . . . . . . . . . . . . . . . . . . . . . . . . . .53
Command Reference . . . . . . . . . . . . . . . . . . . . . . . . . . . . . . . . . . . . . . . . . . . . . . . . . . . . . . . . . . . . . . . . . . . . . . . . . . . . . . . . . . . . . . . . .54
Operation . . . . . . . . . . . . . . . . . . . . . . . . . . . . . . . . . . . . . . . . . . . . . . . . . . . . . . . . . . . . . . . . . . . . . . . . . . . . . . . . . . . . . . . . . . . . . . . . . . . . . . . . . .55
Live Video and Server Push Video Pages . . . . . . . . . . . . . . . . . . . . . . . . . . . . . . . . . . . . . . . . . . . . . . . . . . . . . . . . . . . . . . . . . . . . . . . . . . . . .55
Displaying Video On a Web Browser . . . . . . . . . . . . . . . . . . . . . . . . . . . . . . . . . . . . . . . . . . . . . . . . . . . . . . . . . . . . . . . . . . . . . . . . . . . . . . . .57
Web Browser Control Pages . . . . . . . . . . . . . . . . . . . . . . . . . . . . . . . . . . . . . . . . . . . . . . . . . . . . . . . . . . . . . . . . . . . . . . . . . . . . . . . . . . . . . . .57
Matrix Live Video/SERVER Push Page Contents . . . . . . . . . . . . . . . . . . . . . . . . . . . . . . . . . . . . . . . . . . . . . . . . . . . . . . . . . . . . . . . . . . .59
Genex Live Video/Server Push Page Contents . . . . . . . . . . . . . . . . . . . . . . . . . . . . . . . . . . . . . . . . . . . . . . . . . . . . . . . . . . . . . . . . . . . . .61
Spectra Live Video/SERVER Push Page Contents . . . . . . . . . . . . . . . . . . . . . . . . . . . . . . . . . . . . . . . . . . . . . . . . . . . . . . . . . . . . . . . . . .63
Esprit Live Video/SERVER Push Page Contents . . . . . . . . . . . . . . . . . . . . . . . . . . . . . . . . . . . . . . . . . . . . . . . . . . . . . . . . . . . . . . . . . . . .65
Keyboard Live Video/Server Push Page Contents . . . . . . . . . . . . . . . . . . . . . . . . . . . . . . . . . . . . . . . . . . . . . . . . . . . . . . . . . . . . . . . . . .66
2
C2908M-B (4/05)
Recording and Viewing the Display On A PC . . . . . . . . . . . . . . . . . . . . . . . . . . . . . . . . . . . . . . . . . . . . . . . . . . . . . . . . . . . . . . . . . . . . . . . . . .67
Choosing Where to Store the File . . . . . . . . . . . . . . . . . . . . . . . . . . . . . . . . . . . . . . . . . . . . . . . . . . . . . . . . . . . . . . . . . . . . . . . . . . . . . .67
Recording a Snapshot from Video . . . . . . . . . . . . . . . . . . . . . . . . . . . . . . . . . . . . . . . . . . . . . . . . . . . . . . . . . . . . . . . . . . . . . . . . . . . . . .67
Viewing a Snapshot . . . . . . . . . . . . . . . . . . . . . . . . . . . . . . . . . . . . . . . . . . . . . . . . . . . . . . . . . . . . . . . . . . . . . . . . . . . . . . . . . . . . . . . . .67
Recording the Video Display Onto the PC . . . . . . . . . . . . . . . . . . . . . . . . . . . . . . . . . . . . . . . . . . . . . . . . . . . . . . . . . . . . . . . . . . . . . . . .67
Viewing the Video Display . . . . . . . . . . . . . . . . . . . . . . . . . . . . . . . . . . . . . . . . . . . . . . . . . . . . . . . . . . . . . . . . . . . . . . . . . . . . . . . . . . . .67
Software Upload . . . . . . . . . . . . . . . . . . . . . . . . . . . . . . . . . . . . . . . . . . . . . . . . . . . . . . . . . . . . . . . . . . . . . . . . . . . . . . . . . . . . . . . . . . . . . . . . . . . . .69
Resetting the NET300 . . . . . . . . . . . . . . . . . . . . . . . . . . . . . . . . . . . . . . . . . . . . . . . . . . . . . . . . . . . . . . . . . . . . . . . . . . . . . . . . . . . . . . . . . . . . . . . . .70
Troubleshooting . . . . . . . . . . . . . . . . . . . . . . . . . . . . . . . . . . . . . . . . . . . . . . . . . . . . . . . . . . . . . . . . . . . . . . . . . . . . . . . . . . . . . . . . . . . . . . . . . . . . .71
Terminal Program . . . . . . . . . . . . . . . . . . . . . . . . . . . . . . . . . . . . . . . . . . . . . . . . . . . . . . . . . . . . . . . . . . . . . . . . . . . . . . . . . . . . . . . . . . . . . . . .71
Troubleshooting a TCP/IP Network Using a Ping Utility . . . . . . . . . . . . . . . . . . . . . . . . . . . . . . . . . . . . . . . . . . . . . . . . . . . . . . . . . . . . . . . . . .71
Troubleshooting Connection Problems . . . . . . . . . . . . . . . . . . . . . . . . . . . . . . . . . . . . . . . . . . . . . . . . . . . . . . . . . . . . . . . . . . . . . . . . . . . . . . .71
Troubleshooting the Video Connection . . . . . . . . . . . . . . . . . . . . . . . . . . . . . . . . . . . . . . . . . . . . . . . . . . . . . . . . . . . . . . . . . . . . . . . . . . . . . . .72
Specifications . . . . . . . . . . . . . . . . . . . . . . . . . . . . . . . . . . . . . . . . . . . . . . . . . . . . . . . . . . . . . . . . . . . . . . . . . . . . . . . . . . . . . . . . . . . . . . . . . . . . . . .73
Glossary . . . . . . . . . . . . . . . . . . . . . . . . . . . . . . . . . . . . . . . . . . . . . . . . . . . . . . . . . . . . . . . . . . . . . . . . . . . . . . . . . . . . . . . . . . . . . . . . . . . . . . . . . . .74
Appendix A — Connecting Pelconet To Various Components . . . . . . . . . . . . . . . . . . . . . . . . . . . . . . . . . . . . . . . . . . . . . . . . . . . . . . . . . . . . . . . . .76
Connecting PelcoNet to Various Components With Assorted Keyboards . . . . . . . . . . . . . . . . . . . . . . . . . . . . . . . . . . . . . . . . . . . . . . . . . . . .77
Connection Scenario 1 – Using a KBD300A In Direct Mode . . . . . . . . . . . . . . . . . . . . . . . . . . . . . . . . . . . . . . . . . . . . . . . . . . . . . . . . . .77
Connection Scenario 2 – Using A KBD4000 For Multiplexer Control . . . . . . . . . . . . . . . . . . . . . . . . . . . . . . . . . . . . . . . . . . . . . . . . . . .78
Connection Scenario 3 – Using A CM9760-KBD . . . . . . . . . . . . . . . . . . . . . . . . . . . . . . . . . . . . . . . . . . . . . . . . . . . . . . . . . . . . . . . . . . .80
Connecting a Local Keyboard to a PC . . . . . . . . . . . . . . . . . . . . . . . . . . . . . . . . . . . . . . . . . . . . . . . . . . . . . . . . . . . . . . . . . . . . . . . . . . . . . . . .81
Connecting the PelcoNet’s COM Port To The Genex Multiplexer’s COM Out Port . . . . . . . . . . . . . . . . . . . . . . . . . . . . . . . . . . . . . . . . . . . . .82
Connecting PelcoNet to a CM6700 And KBD200A for Remote ASCII Control . . . . . . . . . . . . . . . . . . . . . . . . . . . . . . . . . . . . . . . . . . . . . . . . .83
Connecting PelcoNet to a CM6700 ASCII Port . . . . . . . . . . . . . . . . . . . . . . . . . . . . . . . . . . . . . . . . . . . . . . . . . . . . . . . . . . . . . . . . . . . . . . . . .84
Connecting PelcoNet to a CM9760-DT for Remote Browser Control . . . . . . . . . . . . . . . . . . . . . . . . . . . . . . . . . . . . . . . . . . . . . . . . . . . . . . . .85
Connecting PelcoNet to CM9700 for Remote Communication . . . . . . . . . . . . . . . . . . . . . . . . . . . . . . . . . . . . . . . . . . . . . . . . . . . . . . . . . . . . .86
Connecting A PelcoNet Transmitter to the CM6800 ASCII Port . . . . . . . . . . . . . . . . . . . . . . . . . . . . . . . . . . . . . . . . . . . . . . . . . . . . . . . . . . . .88
Connecting PelcoNet to a CM6800 and KBD200A for Remote Control . . . . . . . . . . . . . . . . . . . . . . . . . . . . . . . . . . . . . . . . . . . . . . . . . . . . . .89
Appendix B — Frequently Asked Questions (FAQs) . . . . . . . . . . . . . . . . . . . . . . . . . . . . . . . . . . . . . . . . . . . . . . . . . . . . . . . . . . . . . . . . . . . . . . . . . .91
Index . . . . . . . . . . . . . . . . . . . . . . . . . . . . . . . . . . . . . . . . . . . . . . . . . . . . . . . . . . . . . . . . . . . . . . . . . . . . . . . . . . . . . . . . . . . . . . . . . . . . . . . . . . . . . .93
C2908M-B (4/05)
3
List of Illustrations
1
2
3
4
5
6
7
8
9
10
11
12
13
14
15
16
17
18
19
20
21
22
23
24
25
26
27
28
29
30
31
32
33
34
35
36
37
38
39
40
41
42
43
44
45
46
47
48
49
50
51
52
53
54
55
56
4
Front Panel Connections . . . . . . . . . . . . . . . . . . . . . . . . . . . . . . . . . . . . . . . . . . . . . . . . . . . . . . . . . . . . . . . . . . . . . . . . . . . . . . . . . . . . . . . . . . .11
Rear Panel Components . . . . . . . . . . . . . . . . . . . . . . . . . . . . . . . . . . . . . . . . . . . . . . . . . . . . . . . . . . . . . . . . . . . . . . . . . . . . . . . . . . . . . . . . . . .11
Configuration for Box-To-Box Connections . . . . . . . . . . . . . . . . . . . . . . . . . . . . . . . . . . . . . . . . . . . . . . . . . . . . . . . . . . . . . . . . . . . . . . . . . . . . .12
LAN Box-To-Box Connection (Transmitter, Receiver, Fixed Camera) . . . . . . . . . . . . . . . . . . . . . . . . . . . . . . . . . . . . . . . . . . . . . . . . . . . . . . . . .13
LAN Box-To-Box Connection (Transmitter, Receiver, Spectra) . . . . . . . . . . . . . . . . . . . . . . . . . . . . . . . . . . . . . . . . . . . . . . . . . . . . . . . . . . . . . .14
LAN Box-To-Box Connection (Transmitter, Receiver, Spectra, Genex) . . . . . . . . . . . . . . . . . . . . . . . . . . . . . . . . . . . . . . . . . . . . . . . . . . . . . . . .15
LAN Browser-To-Box Connection (Transmitter, Browser, Fixed Camera) . . . . . . . . . . . . . . . . . . . . . . . . . . . . . . . . . . . . . . . . . . . . . . . . . . . . . .16
LAN Browser-To-Box Connection (Transmitter, Browser, Spectra). . . . . . . . . . . . . . . . . . . . . . . . . . . . . . . . . . . . . . . . . . . . . . . . . . . . . . . . . . .16
LAN Browser-To-Box Connection (Transmitter, Browser, Spectra, Genex) . . . . . . . . . . . . . . . . . . . . . . . . . . . . . . . . . . . . . . . . . . . . . . . . . . . .17
WAN Box-To-Box Connection (Transmitter, Receiver, Fixed Camera) . . . . . . . . . . . . . . . . . . . . . . . . . . . . . . . . . . . . . . . . . . . . . . . . . . . . . . . .18
WAN Box-To-Box Connection (Transmitter, Receiver, Spectra) . . . . . . . . . . . . . . . . . . . . . . . . . . . . . . . . . . . . . . . . . . . . . . . . . . . . . . . . . . . . .19
WAN Box-To-Box Connection (Transmitter, Receiver, Spectra, Genex) . . . . . . . . . . . . . . . . . . . . . . . . . . . . . . . . . . . . . . . . . . . . . . . . . . . . . . .20
WAN Browser-To-Box Connection (Transmitter, Browser, Fixed Camera) . . . . . . . . . . . . . . . . . . . . . . . . . . . . . . . . . . . . . . . . . . . . . . . . . . . . .21
WAN Browser-To-Box Connection (Transmitter, Browser, Spectra) . . . . . . . . . . . . . . . . . . . . . . . . . . . . . . . . . . . . . . . . . . . . . . . . . . . . . . . . . .21
WAN Browser-To-Box Connection (Transmitter, Browser, Spectra, Genex). . . . . . . . . . . . . . . . . . . . . . . . . . . . . . . . . . . . . . . . . . . . . . . . . . . .22
Connection with Pelco Keyboard Control Through a PC (Example Shown with Spectra and Genex) . . . . . . . . . . . . . . . . . . . . . . . . . . . . . . . .23
Alarm and Relay Connections. . . . . . . . . . . . . . . . . . . . . . . . . . . . . . . . . . . . . . . . . . . . . . . . . . . . . . . . . . . . . . . . . . . . . . . . . . . . . . . . . . . . . . .25
Connecting to the LAN Port . . . . . . . . . . . . . . . . . . . . . . . . . . . . . . . . . . . . . . . . . . . . . . . . . . . . . . . . . . . . . . . . . . . . . . . . . . . . . . . . . . . . . . . .26
PelcoNet Home Page . . . . . . . . . . . . . . . . . . . . . . . . . . . . . . . . . . . . . . . . . . . . . . . . . . . . . . . . . . . . . . . . . . . . . . . . . . . . . . . . . . . . . . . . . . . . .28
PelcoNet NET300 Transmitter Menu Tree . . . . . . . . . . . . . . . . . . . . . . . . . . . . . . . . . . . . . . . . . . . . . . . . . . . . . . . . . . . . . . . . . . . . . . . . . . . . .29
PelcoNet NET300 Receiver Menu Tree . . . . . . . . . . . . . . . . . . . . . . . . . . . . . . . . . . . . . . . . . . . . . . . . . . . . . . . . . . . . . . . . . . . . . . . . . . . . . . .30
PelcoNet NET300 Transmitter Setup Page . . . . . . . . . . . . . . . . . . . . . . . . . . . . . . . . . . . . . . . . . . . . . . . . . . . . . . . . . . . . . . . . . . . . . . . . . . . . .31
PelcoNet NET300 Receiver Setup Page . . . . . . . . . . . . . . . . . . . . . . . . . . . . . . . . . . . . . . . . . . . . . . . . . . . . . . . . . . . . . . . . . . . . . . . . . . . . . . .32
Configuration Page for General Settings . . . . . . . . . . . . . . . . . . . . . . . . . . . . . . . . . . . . . . . . . . . . . . . . . . . . . . . . . . . . . . . . . . . . . . . . . . . . . .33
Configuration Page for MPEG-4 Video Settings (Only One Example Shown) . . . . . . . . . . . . . . . . . . . . . . . . . . . . . . . . . . . . . . . . . . . . . . . . . .36
Configuration Page for Video Decoder Settings . . . . . . . . . . . . . . . . . . . . . . . . . . . . . . . . . . . . . . . . . . . . . . . . . . . . . . . . . . . . . . . . . . . . . . . . .39
Configuration Page for Alarm Settings (Transmitter Shown) . . . . . . . . . . . . . . . . . . . . . . . . . . . . . . . . . . . . . . . . . . . . . . . . . . . . . . . . . . . . . . .40
Motion Detection Screen . . . . . . . . . . . . . . . . . . . . . . . . . . . . . . . . . . . . . . . . . . . . . . . . . . . . . . . . . . . . . . . . . . . . . . . . . . . . . . . . . . . . . . . . . .41
Motion Detection Grid Screen . . . . . . . . . . . . . . . . . . . . . . . . . . . . . . . . . . . . . . . . . . . . . . . . . . . . . . . . . . . . . . . . . . . . . . . . . . . . . . . . . . . . . .41
Configuration Page for Relay Settings . . . . . . . . . . . . . . . . . . . . . . . . . . . . . . . . . . . . . . . . . . . . . . . . . . . . . . . . . . . . . . . . . . . . . . . . . . . . . . . .44
Configuration Page for COM Interface Settings (Transmitter Shown) . . . . . . . . . . . . . . . . . . . . . . . . . . . . . . . . . . . . . . . . . . . . . . . . . . . . . . . .46
Configuration Page for Local Com Interface – Keyboard . . . . . . . . . . . . . . . . . . . . . . . . . . . . . . . . . . . . . . . . . . . . . . . . . . . . . . . . . . . . . . . . . .48
Configuration Page for Network Settings (Transmitter Shown) . . . . . . . . . . . . . . . . . . . . . . . . . . . . . . . . . . . . . . . . . . . . . . . . . . . . . . . . . . . . .49
Live Video and Server Push Pages (Transmitter Shown) . . . . . . . . . . . . . . . . . . . . . . . . . . . . . . . . . . . . . . . . . . . . . . . . . . . . . . . . . . . . . . . . . .56
PelcoNet NET300 Home Page (Transmitter Shown). . . . . . . . . . . . . . . . . . . . . . . . . . . . . . . . . . . . . . . . . . . . . . . . . . . . . . . . . . . . . . . . . . . . . .57
Device Controls Page (Transmitter Only) . . . . . . . . . . . . . . . . . . . . . . . . . . . . . . . . . . . . . . . . . . . . . . . . . . . . . . . . . . . . . . . . . . . . . . . . . . . . . .58
Matrix Control Page (Live Video Page Shown; Transmitter Only) . . . . . . . . . . . . . . . . . . . . . . . . . . . . . . . . . . . . . . . . . . . . . . . . . . . . . . . . . . .59
Genex Control Page (Live Video Page Shown; Transmitter Only). . . . . . . . . . . . . . . . . . . . . . . . . . . . . . . . . . . . . . . . . . . . . . . . . . . . . . . . . . . .61
Spectra Control Page (Live Video Page Shown; Transmitter Only). . . . . . . . . . . . . . . . . . . . . . . . . . . . . . . . . . . . . . . . . . . . . . . . . . . . . . . . . . .63
Esprit Control Page (Live Video Page Shown; Transmitter Only) . . . . . . . . . . . . . . . . . . . . . . . . . . . . . . . . . . . . . . . . . . . . . . . . . . . . . . . . . . . .65
Keyboard Control Page (Live Video Page Shown) . . . . . . . . . . . . . . . . . . . . . . . . . . . . . . . . . . . . . . . . . . . . . . . . . . . . . . . . . . . . . . . . . . . . . . .66
Viewer Screen. . . . . . . . . . . . . . . . . . . . . . . . . . . . . . . . . . . . . . . . . . . . . . . . . . . . . . . . . . . . . . . . . . . . . . . . . . . . . . . . . . . . . . . . . . . . . . . . . . .68
DB9 Cable Wire Splicing . . . . . . . . . . . . . . . . . . . . . . . . . . . . . . . . . . . . . . . . . . . . . . . . . . . . . . . . . . . . . . . . . . . . . . . . . . . . . . . . . . . . . . . . . .76
KBD300A (Direct Mode) Connected to a Receiver or Spectra Dome System . . . . . . . . . . . . . . . . . . . . . . . . . . . . . . . . . . . . . . . . . . . . . . . . . .77
KBD4000 Connected to a Multiplexer . . . . . . . . . . . . . . . . . . . . . . . . . . . . . . . . . . . . . . . . . . . . . . . . . . . . . . . . . . . . . . . . . . . . . . . . . . . . . . . .78
CM9760KBD Connected to a CM9760-CC1 Controller. . . . . . . . . . . . . . . . . . . . . . . . . . . . . . . . . . . . . . . . . . . . . . . . . . . . . . . . . . . . . . . . . . . .80
Connecting a Local Keyboard to a PC. . . . . . . . . . . . . . . . . . . . . . . . . . . . . . . . . . . . . . . . . . . . . . . . . . . . . . . . . . . . . . . . . . . . . . . . . . . . . . . . .81
Connecting PelcoNet to Genex Using the COM Port . . . . . . . . . . . . . . . . . . . . . . . . . . . . . . . . . . . . . . . . . . . . . . . . . . . . . . . . . . . . . . . . . . . . .82
Using PelcoNet with CM6700 and KBD200A to Provide Remote Control . . . . . . . . . . . . . . . . . . . . . . . . . . . . . . . . . . . . . . . . . . . . . . . . . . . . .83
Using PelcoNet with CM6700 to Provide Remote Control. . . . . . . . . . . . . . . . . . . . . . . . . . . . . . . . . . . . . . . . . . . . . . . . . . . . . . . . . . . . . . . . .84
Using PelcoNet with CM9760-DT to Provide Remote Control of a 9760 Monitor Output. . . . . . . . . . . . . . . . . . . . . . . . . . . . . . . . . . . . . . . . .85
Using PelcoNet to Transmit Data and Video Between 9700 Nodes (9700 Shown) . . . . . . . . . . . . . . . . . . . . . . . . . . . . . . . . . . . . . . . . . . . . . .86
Using PelcoNet to Receive Data and Video Between 9700 Nodes (9760 Shown) . . . . . . . . . . . . . . . . . . . . . . . . . . . . . . . . . . . . . . . . . . . . . .87
Manager Screen . . . . . . . . . . . . . . . . . . . . . . . . . . . . . . . . . . . . . . . . . . . . . . . . . . . . . . . . . . . . . . . . . . . . . . . . . . . . . . . . . . . . . . . . . . . . . . . . .88
Menu Screen. . . . . . . . . . . . . . . . . . . . . . . . . . . . . . . . . . . . . . . . . . . . . . . . . . . . . . . . . . . . . . . . . . . . . . . . . . . . . . . . . . . . . . . . . . . . . . . . . . . .88
Using PelcoNet with CM6800 and KBD200A to Provide Remote Control . . . . . . . . . . . . . . . . . . . . . . . . . . . . . . . . . . . . . . . . . . . . . . . . . . . . .90
C2908M-B (4/05)
List of Tables
A
B
C
C2908M-B (4/05)
Pin Assignments . . . . . . . . . . . . . . . . . . . . . . . . . . . . . . . . . . . . . . . . . . . . . . . . . . . . . . . . . . . . . . . . . . . . . . . . . . . . . . . . . . . . . . . . . . . . . . . . .24
Terminal Command Reference . . . . . . . . . . . . . . . . . . . . . . . . . . . . . . . . . . . . . . . . . . . . . . . . . . . . . . . . . . . . . . . . . . . . . . . . . . . . . . . . . . . . . .54
Live Video Page Indicators . . . . . . . . . . . . . . . . . . . . . . . . . . . . . . . . . . . . . . . . . . . . . . . . . . . . . . . . . . . . . . . . . . . . . . . . . . . . . . . . . . . . . . . . .55
5
Important Safeguards and Warnings
Observe the following warnings before installing and using this product.
1. Read these instructions.
2. Keep these instructions.
3. Heed all warnings.
4. Follow all instructions.
5. Do not use this apparatus near water.
6. Clean only with dry cloth.
7. Do not block any ventilation openings. Install in accordance with the manufacturer’s instructions.
8. Do not install near any heat sources such as radiators, heat registers, stoves, or other apparatus (including amplifiers) that produce heat.
9. Only use attachments/accessories specified by the manufacturer.
10. Refer all servicing to qualified service personnel. Servicing is required when the apparatus has been damaged in any way, such as when the
power supply cord or plug is damaged, liquid has been spilled or objects have fallen into the apparatus, the apparatus has been exposed to
rain or moisture, the apparatus does not operate normally, or the apparatus has been dropped.
11. Apparatus shall not be exposed to dripping or splashing, and no objects filled with liquids, such as vases, shall be placed on the apparatus.
12. Warning: To reduce the risk of fire or electric shock, do not expose this apparatus to rain or moisture.
13. To reduce the risk of shock, do not perform any servicing other than that contained in the operating instructions unless you are qualified to
do so.
14. Unless the unit meets NEMA Type 3, 3R, 3S, 4, 4X, 6, or 6P standards, it is designed for indoor use only and must not be installed where
exposed to rain and moisture.
15. Only use parts recommended by Pelco.
16. Use only installation methods and materials capable of supporting four times the maximum specified load.
REGULATORY NOTICES
This device complies with part 15 of the FCC Rules. Operation is subject to the following two conditions: (1) this device may not cause harmful
interference, and (2) this device must accept any interference received, including interference that may cause undesired operation.
RADIO AND TELEVISION INTERFERENCE
This equipment has been tested and found to comply with the limits of a Class B digital device, pursuant to part 15 of the FCC rules. These limits are
designed to provide reasonable protection against harmful interference in a residential installation. This equipment generates, uses, and can radiate
radio frequency energy and, if not installed and used in accordance with the instructions, may cause harmful interference to radio communications.
However there is no guarantee that the interference will not occur in a particular installation. If this equipment does cause harmful interference to
radio or television reception, which can be determined by turning the equipment off and on, the user is encouraged to try to correct the interference by
one or more of the following measures:
•
Reorient or relocate the receiving antenna.
•
Increase the separation between the equipment and the receiver.
•
Connect the equipment into an outlet on a circuit different from that to which the receiver is connected.
•
Consult the dealer or an experienced radio/TV technician for help.
You may also find helpful the following booklet, prepared by the FCC: “How to Identify and Resolve Radio-TV Interference Problems.” This
booklet is available from the U.S. Government Printing Office, Washington D.C. 20402.
Changes and modifications not expressly approved by the manufacturer or registrant of this equipment can void your authority to operate this
equipment under Federal Communications Commission’s rules.
6
C2908M-B (4/05)
What is the Pelconet NET300 Transmission System?
The PelcoNet™ NET300 transmission system is technology that lets you view video in real time across a LAN (local area network) and even
WANs (wide area networks). This technology is based on the TCP/IP protocol suite and Ethernet technology, providing compatibility with today’s
networking standards.
The following devices can be controlled from your computer through Internet Explorer with the PelcoNet NET300 transmission system: Spectra®,
Esprit®, Genex® multiplexer, CM9700 systems (older CM9760s require CM9760 data translator), CM6700 (through integrated ASCII port, COM 2),
and the CM6800 matrix.
(See the Glossary section for definitions of terms used in this manual.)
HOW DO LANS AND WANS WORK?
•
A LAN consists of multiple computers connected together, sharing information. This information could be files, e-mail, printers, or—with
the PelcoNet NET300 transmission system—even live video.
•
A WAN consists of multiple LANs connected through routers and gateways (for example, the Internet).
•
In any network environment, each device needs a unique address so other computers on the network know how to reach it.
It is similar to a city with street addresses. For the post office to deliver mail to your house, you need a unique street address for the mail carrier
to find you. A network is like a city. Like a street address, the IP address on your computer is your address on the network. The IP address is how
other computers can find you on the network.
Remember that the IP address must be unique on the network.
•
When there are multiple networks and you are using the TCP/IP protocol, there must be a way to communicate between the two networks.
A physical device called a router is required. The router’s IP address is referred to as the default gateway IP address.
•
A cable that connects one computer to another is like a city street you can use to get from one house to another. The cable lets you communicate with each other on the network. This cable is Category 5 cable with RJ-45 connectors at each end. (It looks like a phone cord, only
slightly larger.)
WHO SHOULD INSTALL THE PELCONET NET300 TRANSMISSION SYSTEM?
NOTE
nless you are very familiar with how computers work, consult your network administrator for help.
Installation is a matter of configuring an IP address using a standard terminal program or any Internet browser and connecting the PelcoNet
NET300 transmission system to the Ethernet network. You should have the following background and experience to configure and install these
units:
•
Working knowledge of basic network management concepts and terminology
•
Working knowledge of tools and procedures for installing and operating sensitive electronic equipment
C2908M-B (4/05)
7
Instructions for the Network Administrator
The PelcoNet NET300 transmission system allows live video transmission to be viewed over TCP/IP-based networks. This section is intended to
help the network administrator know what is involved with installing this product and how it will affect the network. The person installing the
product will need the following information about the network to make the network function properly.
THE TRANSMITTER AND RECEIVER
•
A valid static IP address* for each PelcoNet NET300 transmission system unit
•
Subnet mask*
•
Default gateway (if applicable)
•
E-mail server’s IP address (if applicable)
•
Dedicated maximum allowable amount of bandwidth for live video**
* = Required for the PelcoNet NET300 transmission system to function properly
** = The PelcoNet NET300 transmission system requires a continuous amount of bandwidth to display true live video. Pelco recommends
using switching hubs with the product so the amount of bandwidth available to each unit is constant and reliable.
THE BROWSER
If you plan to use a browser to view live video across the network, there are procedures to complete before you can use the browser, such as
installing the ActiveX® platform. If you installed Microsoft® Internet Explorer 6.0 from the CD that came with the PelcoNet NET300 transmission
system, you can skip step 1 below. Otherwise, perform the following before trying to use the browser.
1. Internet Explorer 6.0 or higher must be installed before continuing.
2. Set the computer’s display settings to use 16- or 32-bit color.
3. Insert the supplied CD. It will open automatically. If it fails to open automatically, perform steps a through d below.
a.
Click the Start menu in the Windows® operating system.
b.
Click Run.
c.
In the Open box, type D:\START.EXE (where D:\ = your CD ROM drive letter).
d.
Click OK.
4. Click Software and then click Install PelcoNet ActiveX.
5. Follow the on-screen setup instructions to finish installing the plug-in.
8
C2908M-B (4/05)
MINIMUM PC REQUIREMENTS (AS NEEDED)
•
PC (Pentium® 4 microprocessor, 1.6 GHz) with Windows 98/2000/XP operating system
•
Network card
•
Internet Explorer 6.0 (or higher) or free serial interface and terminal program
•
Screen resolution of 1024 x 768 or higher, 16- or 32-bit pixel color resolution
NOTE: Old video cards that do not support YUV encoding require 16-bit color resolution.
•
RAM:
256 Mbyte
•
Graphic Card:
ATI RADEON™ 7500 or 8500, Matrox G 550 or Parhelia™, or NVIDIA® GeForce 3 or 4 with
direct show-compatible MPEG-4 playback capability
•
Ethernet Card:
100 Mbit recommended
•
Sound Card:
Required for audio application
•
Software:
DirectX® 8.1 or 9.0 application programming interface
C2908M-B (4/05)
9
Overview
NOTE: This manual refers to the PelcoNet NET300 transmission system unit when discussing features, functions, or specifications that
apply to both transmitter and receiver models. “Receiver,” as used in this manual, refers to a PelcoNet NET300 transmission system
receiver unless otherwise noted.
DESCRIPTION
The PelcoNet NET300 transmission system is a network video server that encodes and decodes live video and control data transmitted and
received over Ethernet computer networks (either intranet or Internet) using the TCP/IP protocol.
The transmission system consists of two units: a transmitter (NET300T) and a receiver (NET300R)—however, only the transmitter is required to
use the system. If a receiver is used, video can be displayed on an NTSC or PAL monitor connected to the receiver. If a receiver is not used, video
can be displayed on a PC connected to the network through a web browser.
Dual MPEG-4 video streams, each of which can be set up differently, is a special feature of the NET300. For example, one video stream might be
set to record at high resolution while the second might have monitoring at a lower resolution.
Transmitters and receivers are identified by IP addresses, just like any other equipment connected to a computer network.
There is a bidirectional serial interface for remote control of peripherals, such as PTZ cameras.
In appropriately configured networks, the multicast function permits simultaneous video transmission in real time to several receivers. For this to
work, the UDP and IGMP multicasting protocols must be implemented in the network.
SOFTWARE VERSION
This manual documents PelcoNet NET300 software version 3.0.
PACKAGE CONTENTS
The following are supplied:
•
Transmitter (NET300T) or receiver (NET300R)
•
Universal plug-in power pack with adapters for EU, UK, US, and AU
•
DB9 cable with pigtail
•
Quick installation guide
•
Software resource CD
Optional Compatible Products
NET300RK
10
The NET300RK rack mount kit provides rack mounting for the PelcoNet NET300. This kit supports the mounting of one to five
units per rack. Units can be mounted with either front or rear panel forward.
C2908M-B (4/05)
FRONT PANEL COMPONENTS
The PelcoNet NET300 transmission system uses a compact design. For that reason connectors are placed on both the front and rear panels.
Key:
1
=
2
3
4
5
6
=
=
=
=
=
Terminals for alarm input and relay output
• Two alarm input terminals (LN1/LN2)
• Two relay terminals (R) (for one relay)
• Two ground terminals (GND)
• (The two unmarked terminals are not supported.)
Power terminals for powering the NET300 unit
RJ-45 Ethernet connector for connecting to the network (10/100)
Power LED lights when power is applied to the unit and flashes when transmitting/receiving video
Network LED lights green when the unit is connected to the network
Data LED flashes yellow when data is transmitted.
�
�
�
IN1 R +
Ethernet
GND IN2 R
�
�
�
Figure 1. Front Panel Connections
REAR PANEL COMPONENTS
Key:
1
=
2
=
Video In BNC socket (transmitter) or Video Out BNC socket (receiver) for video source or for an analog video monitor
RS232/422/485 serial interface port; 9-pin male sub-D socket for controlling data transmissions (RS-232, RS-422, and RS-485
interfaces) and for configuration using terminal software
�
Video In
�
RS232/422/485
Figure 2. Rear Panel Components
Refer to the Hardware Installation section for information on interfacing peripherals to the unit.
C2908M-B (4/05)
11
Typical Applications
There are two ways to make a high performance multimedia transmission system for Ethernet networks:
•
One way is to use just the transmitter and connect it through the Ethernet network to a PC with a web browser at the receiving end.
•
Another way is to connect the transmitter through the Ethernet network to a receiver. This is often called a box-to-box connection because
it uses two PelcoNet NET300 transmission system units.
In either case, routing dedicated cables from a camera to a monitor is not required because you can use the existing Ethernet network for that
purpose.
Refer to figures 3 through 16 for examples of these configurations. Refer to Appendix A for detailed illustrations.
CAMERA
TRANSMITTER
Video In
RS232/422/485
LAN/WAN
TCP/IP
INTRANET/INTERNET
MONITOR
RECEIVER
Video Out
RS232/422/485
Figure 3. Configuration for Box-To-Box Connections
12
C2908M-B (4/05)
HUB
TRANSMITTER
Video In
RS232/422/485
CAMERA
RECEIVER
Video Out
RS232/422/485
MONITOR
Figure 4. LAN Box-To-Box Connection (Transmitter, Receiver, Fixed Camera)
C2908M-B (4/05)
13
HUB
TRANSMITTER
Video In
RS232/422/485
VIDEO
DATA
SPECTRA
RECEIVER
Video Out
MONITOR
RS232/422/485
KEYBOARD
DATA
Figure 5. LAN Box-To-Box Connection (Transmitter, Receiver, Spectra)
14
C2908M-B (4/05)
HUB
TRANSMITTER
Video In
RS232/422/485
VIDEO
GENEX
SPECTRA
DATA
SPECTRA
SPECTRA
RECEIVER
Video Out
MONITOR
RS232/422/485
KEYBOARD
DATA
Figure 6. LAN Box-To-Box Connection (Transmitter, Receiver, Spectra, Genex)
C2908M-B (4/05)
15
HUB
TRANSMITTER
Video In
RS232/422/485
CAMERA
BROWSER
Figure 7. LAN Browser-To-Box Connection (Transmitter, Browser, Fixed Camera)
HUB
TRANSMITTER
Video In
RS232/422/485
VIDEO
DATA
SPECTRA
BROWSER
Figure 8. LAN Browser-To-Box Connection (Transmitter, Browser, Spectra)
16
C2908M-B (4/05)
HUB
TRANSMITTER
Video In
RS232/422/485
VIDEO
GENEX
SPECTRA
DATA
SPECTRA
SPECTRA
BROWSER
Figure 9. LAN Browser-To-Box Connection (Transmitter, Browser, Spectra, Genex)
C2908M-B (4/05)
17
CLOVIS
SERVER
1 OR MORE PCs
1 OR MORE PCs
ROUTER
NEW YORK
SERVER
• • • • • • • • • • • • • • •
ROUTER
HUB
HUB
TRANSMITTER
Video In
RS232/422/485
CAMERA
RECEIVER
Video Out
RS232/422/485
MONITOR
Figure 10. WAN Box-To-Box Connection (Transmitter, Receiver, Fixed Camera)
18
C2908M-B (4/05)
CLOVIS
SERVER
1 OR MORE PCs
1 OR MORE PCs
NEW YORK
SERVER
• • • • • • • • • • • • • • •
ROUTER
ROUTER
HUB
HUB
TRANSMITTER
Video In
RS232/422/485
VIDEO
DATA
SPECTRA
RECEIVER
Video In
RS232/422/485
DATA
MONITOR
KEYBOARD
Figure 11. WAN Box-To-Box Connection (Transmitter, Receiver, Spectra)
C2908M-B (4/05)
19
CLOVIS
SERVER
1 OR MORE PCs
1 OR MORE PCs
NEW YORK
SERVER
• • • • • • • • • • • • • • •
ROUTER
ROUTER
HUB
HUB
TRANSMITTER
Video In
RS232/422/485
VIDEO
GENEX
SPECTRA
DATA
SPECTRA
SPECTRA
RECEIVER
Video Out
MONITOR
RS232/422/485
KEYBOARD
DATA
Figure 12. WAN Box-To-Box Connection (Transmitter, Receiver, Spectra, Genex)
20
C2908M-B (4/05)
CLOVIS
SERVER
1 OR MORE PCs
ROUTER
1 OR MORE PCs
• • • • • • • • • • • • • • •
HUB
NEW YORK
SERVER
ROUTER
HUB
TRANSMITTER
Video In
RS232/422/485
CAMERA
BROWSER
Figure 13. WAN Browser-To-Box Connection (Transmitter, Browser, Fixed Camera)
CLOVIS
SERVER
1 OR MORE PCs
1 OR MORE PCs
ROUTER
• • • • • • • • • • • • • • •
HUB
NEW YORK
SERVER
ROUTER
HUB
TRANSMITTER
Video In
RS232/422/485
VIDEO
DATA
SPECTRA
BROWSER
Figure 14. WAN Browser-To-Box Connection (Transmitter, Browser, Spectra)
C2908M-B (4/05)
21
CLOVIS
SERVER
1 OR MORE PCs
1 OR MORE PCs
ROUTER
• • • • • • • • • • • • • • •
HUB
NEW YORK
SERVER
ROUTER
HUB
TRANSMITTER
Video In
RS232/422/485
VIDEO
GENEX
SPECTRA
DATA
SPECTRA
SPECTRA
BROWSER
Figure 15. WAN Browser-To-Box Connection (Transmitter, Browser, Spectra, Genex)
22
C2908M-B (4/05)
NET350
TRANSMITTER
ETHERNET CONNECTION
TO NETWORK (LAN/WAN)
Video In
RS232/422/485
PELCO KEYBOARD
12 VAC
VIDEO
DATA
GENEX
RXRX+
4
3
2
1
5
6
7
8
KBD200A/
KBD300A
STRAIGHT
CABLE
TXTX+
RXRX+
GND
12 V
SPECTRA
12VDC
PV140
PC
WORKSTATION
Figure 16. Connection with Pelco Keyboard Control Through a PC (Example Shown with Spectra and Genex)
C2908M-B (4/05)
23
Hardware Installation
Refer to Appendix A — Connecting PelcoNet NET300 to Different Components for examples of how to connect equipment.
CONNECTING VIDEO SOURCES OR DISPLAYS
•
The NET300 transmitter’s BNC Video In socket accepts color or black-white sources and automatically detects whether it is PAL or NTSC.
The video input has an internal termination of 75 ohms.
•
The NET300 receiver’s BNC Video Out socket can be connected to any PAL or NTSC video monitor or VCR with a composite PAL or NTSC
input.
CONNECTING DATA TERMINALS
The bidirectional data interface port can be used to control equipment connected to the NET300 (for example, a dome camera with motorized
lens). The port supports RS-232, RS-422, and RS-485 asynchronous serial interfaces.
PIN ASSIGNMENTS
Table A. Pin Assignments
1 2 3 4 5
Pin
6 7 8 9
RS-232
RS-422/485
1
DCD (data carrier detect)
–
2
RX (receive data)
RX+ (receive data plus)
3
TX (transmit data)
TX– (transmit data minus)
4
DTR (data terminal ready)
–
5
GND (ground)
GND (ground)
6
DSR (data set ready)
–
7
RTS (ready to send)
TX+ (transmit data plus)
8
CTS (clear to send)
RX– (receiver data minus)
9
–
–
NOTE: Transmission of transparent data is possible only when a video connection has been established.
WARNING: Pay attention to documentation relating to the installation and operation of the equipment being controlled.
CONNECTING AN ALARM
The NET300 has two alarm inputs. Input 1 lets you connect external signaling devices, such as a door contact. (Note that there is no motion
alarm on a NET300 receiver.) Input 2 has limited functionality in that it can only be used to establish a box-to-box connection to another NET300,
and only when the Connect On Alarm field is set to On.
If configured accordingly, an alarm trigger can also set up an automatic connection between the NET300 and the remote station. You can connect
switches or contacts directly without a separate power supply. The alarm inputs are N.O. (normally open).
Do the following to connect an external sensor. Refer to Figure 17.
24
C2908M-B (4/05)
WARNING: The maximum rating of the alarm contact is 30 VDC and 8 mA.
On the plug-in terminal block, attach conductors to the alarm input (IN1 and IN2) and ground conductor (GND) terminals. (Insert a small screwdriver tip in the square hole and push hard enough to open the corresponding round hole. Insert the wire in the round hole.)
R (RELAY)
IN1 (ALARM INPUT1)
NOT USED
+ (POWER)
NOT USED
30 V
GND
GND
IN2 (ALARM INPUT2)
(POWER)
R (RELAY)
Figure 17. Alarm and Relay Connections
CONNECTING A RELAY
The NET300 has a relay for operating external devices (for example, a light or siren). The relay can be operated from a control page during an
active connection or automatically to coincide with certain events. Settings for the relay must be configured (refer to the Configuration section).
Do the following to connect a peripheral device (such as a light) that can be activated from a PelcoNet live video page.
WARNING: The maximum rating of the relay contact is 30 VDC and 1 A.
Refer to Figure 17. On the plug-in terminal block, attach a wire conductor to each of the relay terminals (R). (Insert a small screwdriver tip in the
square hole and push hard enough to open the corresponding round hole. Insert the wire in the round hole.) It does not matter which conductor
wire goes to which relay terminal. The device the relay activates will need its own power supply.
C2908M-B (4/05)
25
CONNECTING TO A LAN
Refer to Figure 18. You can connect the NET300 to a 10/100BASE-T network either directly or through a hub. To do so, plug a standard Cat5 UTP
cable with RJ-45 connectors into the NET300’s Ethernet socket.
IN1 R +
Ethernet
GND IN2 R
Figure 18. Connecting to the LAN Port
CONNECTING POWER
The NET300 has no power switch. The power supply comes with the attached orange terminal block plug. To apply power do the following:
1. Depending on your country, it may be necessary to attach an appropriate adapter (supplied) to the power supply. If necessary, do so.
2. Refer to Figure 17. Push the orange terminal block into the plug-in base next to the Ethernet port on the NET300. The wires on the plug
correspond to the + and – labeling on the NET300.
3. Plug the power supply into an electrical outlet.
26
C2908M-B (4/05)
Configuration
BOX-TO-BOX CONNECTION
The following explains a box-to-box connection.
1. First, transmitter and receiver need to be configured appropriately. If the units are supposed to be operated in different subnets, a gateway
IP address must be configured. Use the Live video receiver IP address field to address the destination. Enter the settings using either a
terminal program or a web browser.
2. Once all addresses are configured, under the terminal program menu, go into the “Rcp+” menu and type e to make the connection. Or
program the live video receiver IP address and enable the live auto connect setting through the web browser. Make sure the unit that will
initiate the connection has an alarm IP address that points to the destination unit. After a few seconds, video transmission begins and the
camera scene appears on the monitor attached to the receiver.
Instead of using a terminal program or web browser for establishing a connection, you can attach a contact to the alarm input. Make sure the
alarm input field on the configuration page for alarm settings is enabled.
You can use a web browser to connect to either of the two units, even during an active box-to-box connection. This way you can make changes
to the configuration and immediately see the result of the setting (for example, when changing video quality). (This is not true for passwords,
however.) If you are connected to the transmitter, the camera pictures are sent to the receiver and web browser simultaneously. There will be a
short break in the video display on the receiver monitor whenever the web browser requests a new frame. This is especially noticeable with the
Server Push feature.
Transparent data is always transmitted automatically between the two units as soon as the connection becomes active. Data bytes entering the
interface are transported to the other end transparently. There is no flow control mechanism for the data channel. Overflowing the serial interface will cause data loss.
To sever the connection from either end, in the “Rcp+” menu press 3 (or disable the alarm).
CONFIGURATION TYPES
There are two ways to configure your system:
•
A convenient, complete configuration and display of video is accomplished through the built-in HTTP server, which connects to any standard
web browser (for example, Internet Explorer). You can then configure using screens and menus. This is the recommended method. Refer to
the Configuration Using a Web Browser section.
•
The most basic configuration is accomplished by connecting a PC to the RS-232 terminal port. You then type in commands and parameters.
Refer to the Configuration Using a Terminal Program section.
CONFIGURATION USING A WEB BROWSER
To use a web browser the system features a complete HTTP server.
Microsoft’s Internet Explorer 6.0 or higher is the recommended browser.
In order for live video images to be decoded, the special ActiveX control file must be installed on your PC. The latest version of the ActiveX platform comes on the PelcoNet CD. Also, the unit will not function without some form of Microsoft’s Virtual Machine installed on the PC. Virtual
Machine is included on the PelcoNet resource CD that came with your NET300 unit.
C2908M-B (4/05)
27
GETTING STARTED
NOTE: NET-Manager is a program that can make it easier to manage PelcoNet units in local networks. The program and manual (C2901M)
are on the resource CD that comes with your PelcoNet unit. Refer to the manual for instructions.
The only NET-Manager features available to the NET300 include scanning to see your units’ IP and MAC addresses, changing IP addresses, and
viewing the setup pages with the browser.
1. Start your web browser.
2. Connect to the URL http://IP-Address, where IP-Address is the IP address of the unit you want to configure. Use the standard dotseparated format (x.x.x.x) to enter the address. The home page is displayed along with a snapshot from the camera.
Figure 19. PelcoNet Home Page
28
C2908M-B (4/05)
GENERAL
MATRIX CONTROL
WITH LIVE VIDEO 1
MATRIX CONTROL
WITH LIVE VIDEO 2
MATRIX CONTROL
WITH MJPEG
SERVER PUSH
GENEX MUX
WITH LIVE VIDEO 1
GENEX MUX
WITH LIVE VIDEO 2
GENEX MUX WITH
MJPEG SERVER PUSH
SPECTRA DOME
SYSTEM WITH LIVE
VIDEO 1
SPECTRA DOME
SYSTEM WITH LIVE
VIDEO 2
SPECTRA DOME
SYSTEM WITH
MJPEG SERVER PUSH
VIDEO 1
ESPRIT SYSTEM
WITH LIVE VIDEO 1
VIDEO 2
ESPRIT SYSTEM
WITH LIVE VIDEO 2
SERVER PUSH
ESPRIT SYSTEM
WITH MJPEG
SERVER PUSH
HOME
CONTROL
KEYBOARD CONTROL
WITH LIVE VIDEO 1
SETUP
KEYBOARD CONTROL
WITH LIVE VIDEO 2
KEYBOARD CONTROL
WITH MJPEG
SERVER PUSH
UNIT NAME
UNIT ID
PASSWORD LEVEL
PASSWORD
PASSWORD CONFIRM
DATE FORMAT
UNIT DATE
UNIT TIME
TIME ZONE
TIME SERVER IP ADDRESS
HARDWARE VERSION
SOFTWARE VERSION
SOFTWARE UPLOAD
UPLOAD PROGRESS
CONFIGURATION DOWNLOAD
CONFIGURATION UPLOAD
VIDEO SETTINGS MPEG-4
CAMERA
CAMERA NAME STAMPING
TIME STAMPING
VIDEO WATERMARKING MPEG-4
DISPLAY ALARM STAMPING
DISPLAYED ALARM MESSAGE
NAME OF (FIRST/SECOND)ENCODER
PARAMETER PRESET
PRESET PARAMETER NAME
DATARATE
VIDEO QUALITY SETTINGS
INTRA FRAME DISTANCE
FRAME SKIP RATIO
VIDEO RESOLUTION
FIELD MODE
RESET THIS PARAMETER PRESET
ALARM
VIDEO MOTION ALARM
UNIFIED PICTURE DETECTION
VIDEO LOSS ALARM
ALARM INPUT 1/2
NAME
CONNECT ON ALARM
NUMBER OF VIDEO RECEIVER ADDRESS
LIVE VIDEO RECEIVER IP ADDRESS
REMOTE RECEIVER PASSWORD
LIVE VIDEO AUTO-CONNECT
RELAY
IDLE STATE
OPERATING MODE
RELAY FOLLOWS
RELAY NAME
TRIGGER RELAY
INTERFACE COM 1
SERIAL PORT FUNCTION
BAUD RATE
DATA BITS
STOP BITS
PARITY CHECK
INTERFACE MODE
HALF-DUPLEX MODE
GENEX PROTOCOL ID
SPECTRA/ESPRIT P PROTOCOL ID
MOTION DETECTION
MOTION DETECTOR
SELECT SENSOR FIELD
MOTION TRACKING
TRACKER
LOCAL SENSITIVITY
AVERAGE N [FRAMES]
OBJECT MIN SIZE [N*N BLOCKS]
ALARM INDICATOR
THRESHOLD
MOTION DETECTOR GRID
KEYBOARD
COM PORT
BAUD RATE
DATA BITS
STOP BITS
PARITY
NETWORK
UNIT IP ADDRESS
SUBNET MASK
GATEWAY IP ADDRESS
VIDEO TRANSMISSION
MULTICAST STREAMING
MULTICAST GROUP IP ADDRESS
MULTICAST VIDEO PORT ENCODER 1
MULTICAST VIDEO PORT ENCODER 2
MULTICAST PACKET TTL
Figure 20. PelcoNet NET300 Transmitter Menu Tree
C2908M-B (4/05)
29
GENERAL
UNIT NAME
UNIT ID
PASSWORD LEVEL
PASSWORD
PASSWORD CONFIRM
DATE FORMAT
UNIT DATE
UNIT TIME
TIME ZONE
TIME SERVER IP ADDRESS
HARDWARE VERSION
SOFTWARE VERSION
SOFTWARE UPLOAD
UPLOAD PROGRESS
CONFIGURATION DOWNLOAD
CONFIGURATION UPLOAD
VIDEO DECODER
VIDEO MONITER NAME
VIDEO OUTPUT STANDARD
ALARM
HOME
SETUP
ALARM INPUT 1/2
CONNECT ON ALARM
NUMBER OF ADDRESS
LIVE VIDEO TRANSMITTER IP ADDRESS
REMOTE TRANSMITTER PASSWORD
LIVE VIDEO AUTO-CONNECT
RELAY
IDLE STATE
OPERATING MODE
RELAY FOLLOWS
RELAY NAME
TRIGGER RELAY
INTERFACE COM 1
SERIAL PORT FUNCTION
BAUD RATE
DATA BITS
STOP BITS
PARITY CHECK
INTERFACE MODE
HALF-DUPLEX MODE
NETWORK
UNIT IP ADDRESS
SUBNET MASK
GATEWAY IP ADDRESS
VIDEO TRANSMISSION
Figure 21. PelcoNet NET300 Receiver Menu Tree
HOME PAGE
The window in the left of the home page screen is the display area for decoded video.
30
•
Clicking the Pelco logo on any page connects you to the Pelco Internet home page, provided the LAN supports Internet access.
•
Click Video 1 or Video 2 to choose which live display to view.
•
Click Server Push for periodically updated stills.
•
Click Control to access an options screen with links to pages where you can see and control the displayed view. Refer to the Web Browser
Control Pages section.
•
Click Setup to access an options screen with links to configuration pages. Click any icon on the side or the text itself to transfer to the
desired page.
C2908M-B (4/05)
SETUP PAGES
Figure 22. PelcoNet NET300 Transmitter Setup Page
C2908M-B (4/05)
31
Figure 23. PelcoNet NET300 Receiver Setup Page
NOTE: The Set button within a box on a configuration page applies to all the fields within that box. You can change all the fields in a box
and then click Set once and all the changes within that box will be saved.
All configuration items are stored in nonvolatile memory so they are kept when the unit is powered down.
Some configurations apply only to transmitters (for example, camera settings) while others apply to both transmitters and receivers. The configuration pages for receivers do not include fields that apply only to transmitters.
32
C2908M-B (4/05)
CONFIGURATION PAGE FOR GENERAL SETTINGS
The unit identification, password, date and time, time server, version information, and software update settings make up the General Settings
configuration page.
All units have a real-time clock set during manufacture. However, time and date can be changed anytime; for example, when the units are operated in different time zones.
Version numbers for the hardware and firmware are for information only. Whenever you need technical support, have these numbers ready.
Figure 24. Configuration Page for General Settings
C2908M-B (4/05)
33
Configuration
Item
Default
Setting
Unit name
None
(For future development.) The Unit name identifies the device; for example, in the event of an alarm, this name
would be displayed in the video image, depending on the configuration. You can enter up to 31 alphanumeric
characters.
Unit ID
None
(For future development.) The Unit ID identifies the device. You can enter up to 31 alphanumeric characters.
Password level
None
Select the password level from the pull-down menu. Access to the NET300 generally is protected with a
password to prevent unauthorized use of the unit. There are three password levels.
Description
WARNING: Setting a User level password on a transmitter can cause complications on the
receiver side in a box-to-box configuration. To avoid this, on the receiver’s Alarm Settings
configuration page enter the transmitter’s IP address and user password in the appropriate fields
(live video receiver IP address and remote receiver password). If no User level password is set on
the transmitter, then the receiver needs no setup.
•
Service: This is the administrative, and highest, level. This level grants access to all configuration
parameters after the current password is entered.
IMPORTANT: Service is an administrative account. If you do not set up a Service password, there
is no point in setting up User or Live passwords because a user can log in to the unit by entering
“service” and then eliminate the User and Live passwords.
•
User: This is the second highest level. This level lets the user view live video and access the control
pages.
• Live: This is the lowest level. This level does not grant access to configuration pages but allows the unit
to be operated (for example, viewing video).
If any password level is set, you will always be required to log on to the NET300. For example, if a Live level
password is set and you view that unit through the browser, the unit will ask for a user name and password to
access any configuration page. If you then try to access the setup page again, the unit will again prompt for a
user name and password.
Some scenarios that can occur are as follows:
•
•
Password
34
If a password is set for the Service level, then the only way to access the setup page is by logging on
using the Service name and the Service level password.
If no password is set for the Service level, then you can log on with the Service user name and no
password or you can log on with the Live user name and the Live password you have selected.
None
You can enter or change a password if the unit is accessed in the Service authorization level or if the unit is
not protected by a password. Passwords can be changed one at a time only (that is, either Service, User, or
Live). Maximum entry is 19 alphanumeric characters. All entered characters will be saved when you click Set;
however, no more than eight asterisks will be displayed when you access the screen next time even if you
entered more than eight characters.
Password confirm None
Re-enter the new password again to guard against typing errors. If the device is not protected by a password,
the “No password set” message will be displayed.
Date format
Europe
Use the pull-down menu to select the format for the date: Europe, USA, or Japan.
Unit date
N/A
Enter the current date in MM/DD/YYYY format for the USA, DD.MM.YYYY for Europe, or YYYY/MM/DD for
Japan. This is the system date, which is controlled by an internal real-time clock. The day of the week (first
entry box) need not be entered and will be automatically adjusted based on the given date.
Unit time
N/A
Enter the current time or click the Synchr. PC button and then click Set to synchronize the NET300 with your
computer’s system time. This is the system time, which is controlled by an internal real-time clock. This only
synchronizes once. (Pelco cannot guarantee the time will be accurate without the use of a time server.)
Time zone
Pacific
Use the pull-down menu to select the time zone for the NET300. This and the Time Server IP Address settings
are important if the internal clock should be synchronized with the time received from a time server on the
Internet.
C2908M-B (4/05)
Configuration
Item
Default
Setting
Time server IP
address
0.0.0.0
Description
Enter the IP address of a TIME protocol server and then click Set. The time and date are automatically
synchronized every two hours to this Internet server. This feature does not adjust for Daylight Saving Time;
you should adjust manually as needed.
Hardware version N/A
Read-only hardware version number. This contains unique serial number, type of hardware, and revision.
Software version N/A
Read-only firmware version number. This is important information should you need technical support.
Software upload* N/A
Units have flash EPROMs for firmware upgrades in the field. These upgrades can be done directly from the
web browser. Enter the name of the file containing the upgrade, or locate it using the Browse button. Then
click the Upload button.
Upload progress
0%
This field shows the percentage of the upload that has been completed.
Configuration
download
N/A
Clicking the Download button saves the current configuration of the PelcoNet NET300 transmission system
to a PC file.
Configuration
upload*
N/A
This copies a file from a PC to the NET300. Enter the name of the file containing the configuration, or locate it
using the Browse button. Then click the Upload button to overwrite the configuration with the configuration
stored in the named file.
*Do not press Enter with the cursor in the Software Upload or Configuration Upload box after making an entry. If you do so, the unit will reset and
your settings will remain unchanged.
C2908M-B (4/05)
35
CONFIGURATION PAGE FOR MPEG-4 VIDEO SETTINGS (TRANSMITTER ONLY)
MPEG-4 encoder and live page settings make up the configuration page for MPEG-4 video settings. The table that follows describes
configuration items.
Figure 25. Configuration Page for MPEG-4 Video Settings (Only One Example Shown)
NOTE: In a box-to-box connection, the receiver monitor displays only Encoder 1 settings; Encoder 2 settings are not displayed.
36
C2908M-B (4/05)
Configuration
Item
Default
Setting
Description
Camera
Camera 1
Enter a camera name.
Camera name
stamping
Off
Use the pull-down menu to select a screen option (Top or Bottom) where the camera name will be displayed.
Or select Off.
Time stamping
Off
Use the pull-down menu to select a screen position (Top or Bottom) where the current time will be displayed.
Or select Off.
Video
watermarking
MPEG-4
On
Use the pull-down menu to select whether the MPEG-4 data stream will be stamped with a watermark (On) or
not (Off). A green rectangle will be stamped on the decoded signal of the validated data stream.
Display alarm
stamping
Off
Use the pull-down menu to select whether a message will be displayed in the event of an alarm.
Displayed alarm
message
N/A
Enter the message to be displayed in the event of an alarm (31 alphanumeric characters maximum).
MPEG-4 Encoder MPEG-4
1/2 (tab)
Encoder 1
Click the tab to choose whether to set parameters for either encoder 1 or encoder 2. The selected button’s text
will be bold.
Name of (first or
second) encoder
Clicking the MPEG-4 Encoder 1 or 2 tab changes the title of, and entry in, this field. If desired, enter a name
other than the programmed name to identify video 1 or video 2 (24 alphanumeric characters maximum).
(Changing the name here also changes it on the tab.)
(Name of
first
encoder)
Parameter preset 1
Use the pull-down menu to select a setting (1–8) that corresponds to a predefined profile in the Preset
Parameter Name field below. The profile changes as you change the setting. These predefined profiles are a
starting point from which you can make custom adjustments, if desired.
Preset parameter high res.
name
(4CIF)
This field describes the profile associated with the setting in the Parameter Preset field above. This
field changes automatically. The profiles are predefined and optimized for different transmission paths. The
profiles are
1 = high res. (4CIF) for connections with high bandwidth and high resolution of 704 x 576 pixels
2 = low delay (half D1) for connections with high bandwidth motion-optimized resolution of 352 x 448
pixels
3 = low bandw. (CIF) for connections with lower bandwidth and resolution of 352 x 288 pixels
4 = DSL for ADSL connections
5 = ISDN (2B) for ISDN connections over two B channels
6 = ISDN (1B) for ISDN connections over one B channel
7 = MODEM for modem connections
8 = GSM for GSM modem connections
(Note that QCIF does not support displaying camera name stamping, time stamping, and display alarm
stamping.)
Datarate
5000
The data rate figure in this field changes automatically according to the setting you choose in the Parameter
Preset field.
Video quality
settings
Auto
This setting adjusts the value between video quality and image frame rate. Use the pull-down menu to choose
either Auto or Manual.
•
•
Intra frame
distance
C2908M-B (4/05)
0
If you choose Auto, an optimized value is adjusted automatically.
If you choose Manual, you can change the value between high quality and low quality on the slide-bar at
the right.
Enter a value to change the size of the frames within the MPEG-4 video stream.
37
Configuration
Item
Default
Setting
Description
Frame skip ratio
1
Enter a skip value for images.
•
•
Video resolution
CIF
Use the pull-down menu to choose the video resolution (QCIF, CIF, 2CIF, 4CIF, or custom) for viewing and
recording. See the Preset Parameter Name field for descriptions of options.
Field mode
Interlaced
This setting lets you select the field mode for video transmission. Use the pull-down menu to select one of the
following:
•
•
Reset this
N/A
parameter preset
38
If you enter 1, all images are encoded.
If you enter 2, every second image is encoded. Use this setting if you want low bandwidth and higher
quality.
Interlaced – Interlaced mode on. Setting improves video quality on moving objects.
Progressive – Interlaced mode off.
Click the Default button to return the settings to the factory defaults.
C2908M-B (4/05)
CONFIGURATION PAGE FOR VIDEO DECODER SETTINGS (RECEIVER ONLY)
Video monitor name and video output standard make up the configuration page for video decoder settings. The table that follows describes configuration items.
Figure 26. Configuration Page for Video Decoder Settings
Configuration Item
Default Setting
Description
Video monitor name
N/A
Enter a name (31 characters maximum) for the monitor.
Video output standard
NTSC
For devices that also function as receivers, select the video standard for the monitor output
(PAL or NTSC).
C2908M-B (4/05)
39
CONFIGURATION PAGE FOR ALARM SETTINGS
The PelcoNet NET300 transmission system is not only a multimedia gateway but also a security device and, therefore, has many features related
to security applications. The configuration page for alarm settings lets you configure your unit for surveillance applications. In most surveillancerelated applications, the receiver is located in a secure center-type environment while the transmitter is located at the site to be monitored.
Figure 27. Configuration Page for Alarm Settings (Transmitter Shown)
40
C2908M-B (4/05)
Figure 28. Motion Detection Screen
Figure 29. Motion Detection Grid Screen
C2908M-B (4/05)
41
The set of alarm features is explained below.
Configuration
Item
Default
Setting
Description
Video motion
alarm
N/A
The system has a video motion detection feature. The video scene is monitored constantly for relevant motion.
NOTE: Use of the motion detection feature is recommended only indoors and under controlled lighting
conditions; it is not recommended in dim lighting.
The following conditions must be met for motion detection to function:
• Motion detection must be activated.
• At least one cell must be activated.
• Sensitivity must be set higher than zero.
To set motion detection, do the following:
1.
Click the Motion detection button to access the Motion Detection screen. (Refer to Figure 28.) Click
Default to get the default settings for motion detection.
2.
Select On from the Motion detector pull-down menu to trigger an alarm in the event of movement.
3.
Click the Select area button to display a window with a grid superimposed on it (refer to Figure 29).
Select the cells in the image you want the system to monitor for motion. You can use the Select all and
Clear all buttons.
The default is all cells selected (red).
To set an individual cell, click it with the left mouse button (it will turn red). Click the right button to
deselect a cell (which will turn white). Select or deselect multiple cells by holding down the left or right
mouse button and dragging. Release when finished.
Click the Set button.
4.
Use the Motion tracking pull-down menu to turn on/off tracking. (Note that motion tracking overrides
motion detection.)
5.
The Tracker box indicates and controls the direction of motion detection. You can set motion detection to
operate in one direction only by removing the check mark in the opposite direction. (This advanced feature
must be set up precisely. Pelco recommends extensive setup testing in order to get the expected results.)
6.
Use the Local sensitivity slide bar to set detection sensitivity. You need to adapt sensitivity to the
respective environment and the acceptable false alarm rate: for a lower false alarm rate select a lower
sensitivity and vice versa. Experiment to find the best setting.
7.
Use the Average n [frames] slide bar to define how much motion must be detected before an alarm will
be triggered. If the value is high, even movement over a small time period triggers an alarm. If the value is
low, movement over a longer period is required to trigger an alarm.
8.
Use the Object min size [nxn blocks] slide bar to designate the minimum number of cells in the frame a
moving object must fill to trigger an alarm. You can set the value between 1*1 and 6*6 (2*2 is
recommended). If the size of the object in the picture exceeds the value you set, motion detection triggers
an alarm.
9.
The Alarm indicator box lets you set a threshold so an alarm is triggered only if the sensitivity of the
video sensor is exceeded. Thus, something such as background noise caused by the camera can be filtered
to avoid unwanted alarms.The blue line indicates the alarm threshold. Any value exceeding this produces
an alarm signal. Components of the motion signal generating the alarm are indicated in red. Pull up or
down on the blue line to observe the motion detector.
10. Click Back to Alarm page! when finished.
Unified picture
detection
42
Off
Use the pull-down menu to turn on/off this feature, which gives an alarm when the picture becomes too blurry.
You must enable this feature if you want to use the unified picture option in the Relay Follows field on the
configuration page for Relay Settings.
C2908M-B (4/05)
Configuration
Item
Default
Setting
Video loss alarm
Off
Alarm input 1
Off/High
Description
If you select On, the signal from the video source (the camera in most cases) is monitored constantly for
interruption. If no signal is received, the NET300 triggers an alarm.
1.
Select On from the pull-down menu if you want to activate an alarm through an external alarm sensor.
2.
Select High or Low for the voltage level to activate the alarm.
3.
Enter a name for the alarm input to be displayed on the screen if an alarm is activated (31 alphanumeric
characters maximum).
If alarm input is set to follow motion alarm, then motion detection must be set to On.
Alarm input 2
Off/High Functions in the same manner as the Alarm Input 1 field.
Connect on alarm Off
The alarm functions would have little effect without automatically triggering corresponding actions. Select On
for automatic connection to the video receiver’s IP address. The idea is to provide a monitoring station with live
video in case of an alarm. (If you want both motion and alarm input to activate an alarm, set this field to On. If set
to motion only, motion alarms will activate an alarm but no input alarms will be recognized.)
This feature can be useful even for many applications not related to alarm conditions. One example is a videoequipped door entry system: when the doorbell is pressed, a contact closes and the connected transmitter
automatically connects to a receiver.
Select Follows input 1 (transmitter) or Follows input (receiver) to specify that the connection remain as long
as the alarm is active. (If Follows input 1 or Follows input is set, motion will not activate an alarm.) Select
Follows motion alarm (transmitter only) to specify that the alarm will turn on when motion is detected and
turn off 10 seconds after motion is no longer detected. (If Follows motion alarm is set, alarm inputs will not be
recognized.)
Number of video
receiver address
1
The NET300 can store up to 10 different alarm IP addresses. When an alarm occurs, a connection is established
to the first address. Up to 10 separate addresses can be added should the first address not accept the call.
Use the pull-down menu to select how many additional addresses to contact, if necessary. (Add the IP addresses
in the next field.)
Live video
receiver/
transmitter IP
address
0.0.0.0
Enter the IP addresses (10 maximum) of the receivers (if configuring a transmitter) or transmitters (if configuring
a receiver) to be notified in the event of an alarm.
Remote receiver/ N/A
transmitter
password
Enter the password for the remote unit if it is protected by a User or Live password.
Live video autoconnect
Select On if at each restart an active connection should be setup automatically to the receiver’s IP address. The
auto-connect feature guarantees active connection to the receiver’s alarm IP address even after connection
breakdown or network failures. As soon as communication is restored, the connection is reinstated. On a
receiver, this feature is enabled to establish a connection to a transmitter automatically.
C2908M-B (4/05)
Off
WARNING: Setting a User level password on a transmitter can cause complications on the receiver
side in a box-to-box configuration. To avoid this, on the receiver’s Alarm Settings configuration page
enter the transmitter’s IP address and user password in the appropriate fields (live video receiver IP
address and remote receiver password). If no User level password is set on the transmitter, then the
receiver needs no setup.
43
CONFIGURATION PAGE FOR RELAY SETTINGS
You can use the configuration page for relay settings to specify parameters such as normally open or normally closed switching and bistable and
monostable operation of the output.
Figure 30. Configuration Page for Relay Settings
44
C2908M-B (4/05)
Configuration
Item
Default
Setting
Idle state
Open
Select Open (N.O. at zero current) if the relay will operate as a normally open contact or Closed (N.C. with
current) if it will operate as a normally closed contact.
Operating mode
Bistable
Select the relay’s operating mode.
Description
•
•
Relay follows
Off
When you select the default Bistable mode, the relay will stay in the idle or active state for an
indefinite period. (For example, select Bistable if a floodlight activated by an alarm is to remain
switched on at the end of the alarm.)
When you select a time period (monostable mode), the relay automatically falls back to the idle state
after a predefined period expires. (For example, select 10 s if a siren triggered by an alarm is to sound for
10 seconds.) The choices on the pull-down menu are Bistable, 0.5 s, 1 s, 2 s, 5 s, 10 s, and 60 s.
Select from the pull-down menu an event that will activate the relay. A typical application is to have the relay
follow the status of the alarm input; for example, to power peripheral equipment or even the camera itself.
Select from the following:
•
•
•
•
•
•
•
Off: Relay does not operate.
Connection: Relay operates whenever you open live video and will turn off when you exit live video.
Video alarm: Relay operates when there is loss of the video signal (transmitter only).
Motion alarm: Relay operates when there is motion alarm (transmitter only).
Local input 1: Relay operates by an external alarm sensor.
Remote input: Relay operates by a switching contact from a remote location.
Unified picture: Relay operates by loss of focus on the camera (transmitter only).
Relay name
Relay 1
Enter a name for the relay that will appear on the Live page (31 alphanumeric characters maximum).
Trigger relay
N/A
Click the Relay button to switch the relay manually (for example, as a test or to allow a door to be opened).
C2908M-B (4/05)
45
CONFIGURATION PAGE FOR COM INTERFACE SETTINGS
You can use this configuration page to set the parameters of the RS232/422/485 serial interface port.
Figure 31. Configuration Page for COM Interface Settings (Transmitter Shown)
46
C2908M-B (4/05)
Configuration
Item
Default
Setting
Serial port function Terminal
Description
Select a controllable device from the pull-down menu: Terminal, Transparent, or Pelco Prot (protocol).
If the port must transmit data transparently, select Transparent. You can use Pelco Prot to send any kind
of control data for a Spectra, Esprit, Genex, or a Pelco matrix.
Baud rate
19200
Use the pull-down menu to select a transmission rate from 600 to 115200 baud. Refer to Appendix A for
settings.
Data bits
8
The number of data bits is set at 8 per character.
Stop bits
1
Use the pull-down menu to select the number of stop bits (1 or 2) per character. Refer to Appendix A for
settings.
Parity check
None
Use the pull-down menu to select the type of parity check (None, Even, or Odd). Refer to Appendix A for
settings.
Interface mode
RS232
Use the pull-down menu to select the required protocol for the port (RS232 or RS422/485). Use RS-232 for
two-wire communication (TXD and RXD) and RS-422 for four wire communication (TX+, TX−, RX+, RX−).
(RS-485 is not normally used except in advanced applications.)
Half-duplex mode
Off
Typically, half-duplex mode is used for transmission schemes that use one medium to both transmit and
receive data. This RS-485 mode will keep the NET300 from transmitting and receiving data simultaneously.
Only one function at a time is allowed. The transmitter is turned off when the device at the other end of the
line will use the connection. (Refer to Table A.)
Buffered mode also transfers data input to the COM port.
Depending on the equipment used, the Serial Port Function field may have to be set to Transparent if
sending any control data.
Genex protocol ID
N/A
Enter the address of the Genex unit with which you want to communicate.
Spectra/Esprit
protocol ID
N/A
Enter the address of the Spectra or Esprit unit with which you want to communicate. This must match the
P-protocol address of the Spectra or Esprit unit.
C2908M-B (4/05)
47
CONFIGURATION PAGE FOR LOCAL COM INTERFACE – KEYBOARD
You can use this configuration page to set the parameters for a local Com port so you can connect a Pelco keyboard to your computer. This lets
you control a device through the keyboard; for example, a camera can be controlled from the browser with the Pelco keyboard. You can also use
this feature to transmit serial data from your computer to the PelcoNet unit, or vice versa.
Figure 32. Configuration Page for Local Com Interface – Keyboard
Configuration Item
Default Setting
Description
COM port
COM1
Use the pull-down menu to designate a free COM port on the PC to which you will connect the
Pelco keyboard.
Baud rate
600
Use the pull-down menu to select a transmission rate from 600 to 115200 baud. Refer to
Appendix A for settings.
Data bits
8
The number of data bits is set at 8 per character.
Stop bits
1
Use the pull-down menu to select the number of stop bits (1 or 2) per character. Refer to
Appendix A for settings.
Parity
None
Use the pull-down menu to select the type of parity check (None, Even, or Odd). Refer to
Appendix A for settings.
To use this feature, do the following:
1. On the PelcoNet NET300 Setup Page (Figure 22), select Local Com Interface – Keyboard. Then select the parameters (Com port, baud
rate, etc.) as listed in the table above.
2. You must also change the local PC’s Com port configuration (Start > Settings > Control Panel > Administrative Tools > Computer
Management > Device Manager > Ports [COM & LPT] > COM1 or COM2 [depending on the Com port to which the keyboard will be
connected]). The configuration of this Com port should be the same as the configuration at the PelcoNet browser.
3. Connect the Pelco keyboard to the COM interface on your PC. This is the COM port that you designated in step 2. Refer to Figure 47 in
Appendix A for a connection example.) If the keyboard uses RS-422/485, a converter will be required to use it on an RS-232 COM port of
your computer.
48
C2908M-B (4/05)
4. On the PelcoNet NET300 Setup Page (Figure 22), select Interface Settings COM1. Use the pull-down menu to set the serial data port to
Transparent. Also set the baud rate for the connected external device you want to control.
5. Finally, from the Device Controls page (Figure 36), select Keyboard. This takes you to the “Keyboard Control with live video” page
(Figure 41). The COM port is open and you can send transparent data from your PC COM port to the PelcoNet COM port, and vice versa.
CONFIGURATION PAGE FOR NETWORK SETTINGS
Network and routing information make up the configuration page for network settings. These settings are used to integrate the NET300 into an
existing network. The table that follows describes the configuration items.
Figure 33. Configuration Page for Network Settings (Transmitter Shown)
C2908M-B (4/05)
49
.
Configuration
Item
Default
Setting
Unit IP address
10.0.0.1
Enter a unique IP address that is valid for your network. The preconfigured default IP address allows for
(transmitter) or
easy configuration in closed environments. You can use a cross-over cable to connect directly to a PC.
10.0.0.2 (receiver)
NOTE: Changing the IP address also affects the current browser connection. You will have to
reset the NET300 and enter the new URL to regain connectivity to the unit.
Subnet mask
255.255.0.0
Enter a valid subnet mask for your network.
Gateway IP
address
0.0.0.0
Enter the IP address of the router if the unit is to establish a connection outside of the localnetwork. This
is typically used in a WAN environment. This field can otherwise remain empty (0.0.0.0).
Video
transmission
UDP
Use the pull-down menu to select the means of transmission. Select TCP (Port 80) to send data through
a firewall. Select UDP for communication between local networks.
Multicast
streaming
Off
Use the pull-down menu to select MPEG-4 for multicast streaming mode.
Description
Besides a one-to-one connection between a transmitter and a receiver (unicast), the NET300 lets you
connect a number of receivers to receive the video signal simultaneously. This is achieved by
distributing a single data stream on the network itself to a number of receivers in a defined group
(multicast).
With a valid multicast group address selected in the Multicast Group IP Address field, the NET300
operates in multicast mode (data stream duplicated over the network).
When multicast streaming is turned off, operation resorts to unicast mode.
Multicast group
IP address
0.0.0.0
This is the multicast IP address. (Network hardware—such as switches, hubs, routers, etc.—must
support the multicasting protocol, IGMP.) This field sets PelcoNet to use the multicasting protocol, which
allows more efficient use of bandwidth. The IP range is 224.0.1.0 through 238.255.255.255.
Some IP addresses may be reserved for system resources. Contact your network administrator for more
information.
Multicast video
port encoder 1
60000
Enter the port address for the video encoder 1 MPEG-4 data stream.
Multicast video
port encoder 2
61000
Enter the port address for the video encoder 2 MPEG-4 data stream.
Multicast packet 1
TTL
50
Enter the number of hops for the packet to live. TTL stands for time to live. This setting defines the
lifetime of multicast packages in the network. If multicast traffic is to be transmitted over routers and
switches, this setting is important in adjusting the lifetime of the package to the requirements of the
network.
C2908M-B (4/05)
CONFIGURATION USING A TERMINAL PROGRAM
Using a terminal program (for example, the Windows application HyperTerminal) on a computer connected to the RS232/422/485 port on the
NET300 provides limited configuration and control capabilities.
Do the following:
1. In the terminal program on your PC, ensure that the PC’s COM port is set up properly (default properties are 19200 baud, 8 bits, no parity, 1
stop bit, and no flow control) and that the local terminal echo is disabled.
2. Isolate the NET300 from the network.
3. Connect the RS232/422/485 port on the NET300 to an unused serial port on the PC (null modem required).
4. After the connection is made, you will be prompted for the case-sensitive user name. (Press Enter if the prompt does not appear
automatically.) The factory default is service.
5. All commands consist of single characters you type inside the terminal window. Enter only one command at a time and do not terminate
this input by pressing the Enter key. After entering a value (for example, an IP address), check the entered characters again and only then
press Enter to transmit the values to the NET300.
The following shows a typical session.
TYPICAL SESSION
The terminal program main menu appears in the terminal window as shown below.
‘v’
‘i’
‘r’
‘m’
‘?’
‘q’
video
IP
RCP+
misc
This Menu
exit/logout
NOTE: You cannot use backspace during a terminal session—if you mistype a character, end your entry by pressing Enter and try again. If
you see duplicate characters on any entry, the “local echo” feature of your PC’s terminal program is not disabled.
If you are using the terminal to set up the unit’s IP address, just type i and then i again. You are prompted to enter a new IP address. Do so and
press Enter.
If you want to establish a live video connection to a remote unit, you have to specify the remote IP address by typing r and then entering the
remote IP address.
To establish a connection, go to the main menu, then type r, then type e, and then select either video 1 or video 2. To disconnect, type 2 in the
same menu.
C2908M-B (4/05)
51
TERMINAL PROGRAM TRANSMITTER MENU STRUCTURE
The following describes the terminal program transmitter menu structure. The menu items and commands are enclosed in single quotation
marks. Do not enter the quotation marks. Information and current settings are displayed to the right of the commands. Refer to the Command
Reference section for descriptions of the commands.
Main Menu
‘v’
‘i’
‘r’
‘m’
‘?’
‘q’
video
IP
RCP+
misc
This Menu
exit/logout
v – Video Menu
‘e’
‘t’
‘a’
‘x’
‘?’
Encoder Settings
set video input termination
adapt std res (e.g., CIF) to NTSC:
Leave this Menu
This Menu
1(1)
1
e – Encoder Settings Submenu
‘e’
‘p’
‘n’
‘k’
‘r’
‘Q’
‘q’
‘i’
‘u’
‘s’
‘w’
‘h’
‘d’
‘x’
‘?’
Select Encoder
Parameter set:
Parameter set name:
min frame dist [1…]:
Encoder Bitrate [kBit]:
I Quantizer:
P Quantizer:
I frame distance:
I update distance:
frame size (res):
custom width:
custom height:
reset to default
Leave this Menu
This Menu
1
1
1
5000
8
8
0
132
3
432
288
t – Set Video Input Termination Submenu
Set video input termination:
(0: no termination, 1: termination)
a – Adapt Standard Resolutions Submenu
Adapt standard resolutions (e.g., CIF) to NTSC?
(0: no, 1: yes)
i – IP Menu
An asterisk (*) means a reset of the NET300 is necessary after a change. Reset by cycling the power.
‘i’
(*) local IP
10.0.0.1
‘s’
(*) local subnet mask
255.255.255.0
‘g’
(*) local gateway
0.0.0.0
‘r’
remote IP
0.0.0.0
Mac Address
00-07-5f-50-00-11
‘a’
Auto Connect
Off
‘m’
Set HD/FD 10/100 auto mode
‘p’
Ping remote IP
0.0.0.0
‘l’
RTP Packet Loss Stats
‘x’
Leave this Menu
‘?’
This Menu
52
C2908M-B (4/05)
r – RCP+ Menu
‘e’
Local video coder number
‘D’
Remote video decoder number
‘c’
Display connection list
‘1’
Connect to Alarm IP
‘2’
Disconnect this Connection
‘3’
Disconnect all Connections
‘5’
Join Stream
‘x’
Leave this Menu
‘?’ This Menu
1
1
0.0.0.0
0.0.0.0
m – Misc Menu
‘v’
‘x’
‘?’
Get Version Info
Leave this Menu
This Menu
TERMINAL PROGRAM RECEIVER MENU STRUCTURE
The following describes the terminal program receiver menu structure. The menu items and commands are enclosed in single quotation marks.
Do not enter the quotation marks. Information and current settings are displayed to the right of the commands. Refer to the Command Reference
section for descriptions of the commands.
Main Menu
‘i’
‘r’
‘m’
‘?’
‘q’
IP
RCP+
misc
This Menu
exit/logout
i – IP Menu
An asterisk (*) means a reset of the NET300 is necessary after a change. Reset by cycling the power.
‘i’
‘s’
‘g’
‘r’
‘a’
‘m’
‘p’
‘l’
‘x’
‘?’
(*) local IP
(*) local subnet mask
(*) local gateway
remote IP
Mac Address
Auto Connect
Set HD/FD 10/100 auto mode
Ping remote IP
RTP Packet Loss Stats
Leave this Menu
This Menu
10.0.0.2
255.255.255.0
0.0.0.0
0.0.0.0
00-07-5f-50-00-06
Off
0.0.0.0
r – RCP+ Menu
‘E’
‘d’
‘c’
‘1’
‘2’
‘3’
‘5’
‘x’
‘?’
Local video coder number
Remote video decoder number
Display connection list
Connect to Alarm IP
Disconnect this Connection
Disconnect all Connections
Join Stream
Leave this Menu
This Menu
1
1
0.0.0.0
0.0.0.0
m – Misc Menu
‘v’
‘x’
‘?’
C2908M-B (4/05)
Get Version Info
Leave this Menu
This Menu
53
COMMAND REFERENCE
The following table gives an overview of the available commands.
Table B. Terminal Command Reference
Cmd
54
Description
?
This command redisplays (refreshes) the current menu.
1
Use this command to connect to the receiver in a box-to-box setup.
2
Use this command to sever this connection to the unit.
3
Use this command to sever all connections to the unit.
5
Use this command to join the stream of video from the NET300 transmitter. It establishes a physical box-to-box connection.
a
(IP menu) Use this command to toggle auto-connect on/off. The default is off.
a
(Video menu) Enter 0 (no) or 1 (yes) to indicate whether to adapt standard resolutions to NTSC (for example, CIF to NTSC).
c
Use this command to display a list of physical network connections. This can be through Internet Explorer or a box-to-box connection.
d
(Encoder transmitter menu only) This command returns the settings on this menu to factory defaults.
d
(Receiver only) (RCP+ menu) Use this command to select to which decoder a connection to the encoder should be established.
D
(Transmitter only) (RCP+ menu) Use this command to select to which decoder a connection to the encoder should be established.
e
(Transmitter only.) Use this command to select the video you wish to configure or for which you wish to see information. Enter 1 or 2.
E
(Receiver only) (RCP+ menu) Use this command to select to which encoder a connection to the decoder should be established.
g
Use this command to enter a new gateway IP address. Type a new gateway address, and then press Enter.
h
This command lets you set custom resolution (height: 128 to 240).
i
(Encoder submenu) Use this command to change the size of the frames within the video stream.
i
(IP menu) Use this command to enter a new IP address that PelcoNet will be using on the network. Type the new IP address, and then
press Enter.
k
Use this command to set minimum frame distance.
l
Use this command to show, and reset, the RTP packet loss statistics.
m
Use this command to select the Ethernet link mode.
n
Use this command to name the encoder presets. Type in the name and press Enter. (Name appears in Internet Explorer.)
p
(Encoder submenu) Enter a number (1–8) that corresponds to a predefined profile. For example, 1 corresponds to “high quality (CIF).”
p
(IP menu) Use this command to see if a unit can be reached. This pings the IP set in the ‘r’ menu (remote IP). The unit will respond if it
can be reached, or the ping command will time out if it cannot be reached.
q
Use this command to adjust the value between frame quality and data rate. Enter a value between 1 and 31. Value 1 has highest Iframe quality with a higher bandwidth while value 31 has lower quality and less bandwidth.
Q
Use this command to adjust the value between video quality and the image frame rate. Enter a value between 1 and 31. Value 1 has
the highest quality with a lower video frame rate while value 31 is a maximum frame rate at lower quality.
r
(Encoder submenu) Use this command to designate the data rate. Enter the data rate figure.
r
(IP menu) Use this command to connect to a remote IP. Type the IP address, and then press Enter.
s
(Encoder submenu) Enter a number to designate the frame resolution. Enter 2 for QCIF, 3 for CIF, or 6 for 2CIF.
s
(IP menu) Use this command to enter a new subnet mask. Type the new subnet mask, and then press Enter.
u
Use this command to set the I-frame update distance.
v
Displays version information for the unit.
w
This command lets you set custom resolution (width: 176 to 704).
x
Exits this menu.
C2908M-B (4/05)
Operation
LIVE VIDEO AND SERVER PUSH VIDEO PAGES
The Live Video pages show a real-time picture of a camera view with update rates and image quality similar to a box-to-box configuration. It can
be configured for bandwidth use and for various image quality settings. (Live video is accessible only through a NET300 transmitter and not
through a NET300 receiver.) The Server Push pages show still pictures that are updated periodically, and image quality is fixed.
These six indicators are located at the top of the live video and live video control pages.
Table C. Live Video Page Indicators
Indicator
Description
MPEG-4
Indicates that live viewing is in MPEG-4 format.
M (motion detector)
When motion alarm is triggered, this indicator turns red while the alarm is activated.
V (video alarm)
When the video loss alarm is triggered, this indicator turns red until the video returns.
I (input activation)
(Alarm 1) When triggered, this indicator turns red. The name assigned to this trigger and its duration and how it
reacts can be assigned on the Alarm page.
I (input activation)
(Alarm 2) Same as alarm 1.
R (relay activation)
When triggered, this indicator turns red. The name assigned to this trigger and how it reacts can be assigned on the
Relay page.
C2908M-B (4/05)
55
Figure 34. Live Video and Server Push Pages (Transmitter Shown)
1. To access the PelcoNet NET300 transmission system home page, you must first connect to the Internet/intranet network and open Internet
Explorer (the browser).
2. Then, enter the IP address in the address box. The home page appears.
3. Click either Video 1 or Video 2 or Server Push on the home page.
To exit any page, click an option at the top of the page.
The program displays dialog boxes when you try to view live video under any of the following conditions:
•
With a browser other than Internet Explorer
•
Without first installing ActiveX platform
•
When your computer display is not set for 16- or 32-bit color
To change: right click the desktop, and then click Properties, the Settings tab, and select High Color [16 bit] or True Color [32 bit]. For
NT, select 65536 Colors.
NOTE: Do not change the video properties while viewing live video. You may get a gray background if you do.
•
When Microsoft Virtual Machine is not enabled.
To enable: on the Tools menu select Internet Options, select the Advanced tab, locate Microsoft VM, checkmark Java Console
Enabled and JIT compiler for virtual machine enabled. Reboot your PC.
With any of these conditions, you can only view the video as a series of still images.
56
C2908M-B (4/05)
DISPLAYING VIDEO ON A WEB BROWSER
The NET300 uses MPEG-4 for transmitting video across the network. This enables transmission to standard web browsers of either live video
(Video 1 or 2 mode) or a stream of still images (Server Push mode).
•
To activate the live video feature, click either Video 1 or Video 2 above the video window on the PelcoNet NET300 transmission system
home page (refer to Figure 35). The unit transmits using MPEG-4 format for display in the browser.
To stop live video, click any other option at the top of the page.
•
To activate the Server Push feature, click Server Push above the video window on the home page. The unit continuously grabs snapshots
to be JPEG encoded, transferred, and displayed continuously by the browser.
To stop Server Push, click any other option at the top of the page.
The PelcoNet NET300 transmission system can display live video to a maximum of 25 users at a time (multicasting).
Server Push can support multiple users simultaneously on the same transmitter. Image quality is good with an update rate of one image about
every 2 to 10 seconds depending on the number of users and available bandwidth.
Browsers that do not support live video technology can display an updated still image or a stream of images in Server Push mode.
Figure 35. PelcoNet NET300 Home Page (Transmitter Shown)
WEB BROWSER CONTROL PAGES
These pages let you control certain Pelco equipment at your computer through a NET300 transmitter (not through a NET300 receiver). Matrices
supported include CM9700, CM6700, and CM6800.
1. To access the PelcoNet NET300 transmission system home page, you must first connect to the Internet/intranet network and open Internet
Explorer (the browser).
2. Then, enter the IP address in the address box. The home page appears.
3. Click Control to access the Device Controls page.
4. The Device Controls page has underlined links to the control pages. To access, click one.
C2908M-B (4/05)
57
Figure 36. Device Controls Page (Transmitter Only)
The live video control pages include representations of keys that let you control various functions (in addition to showing the camera display).
Use the mouse pointer and click the left mouse button to enable options and operate controls on the screen. Click outside the options to disable
a radio button or selection button.
Live video pages let you choose the size of the video viewing area. Click either 352x288 (small) or 704x576 (large) in the Resize Video field. Live
video pages also let you record and play back camera views on a PC’s hard drive. Refer to the Recording and Playing Back the Display on a PC
section for details.
Server push page displays are similar to live video page displays except the server push page lacks the live page indicators at the top of the page
and the recording buttons below the picture.
58
C2908M-B (4/05)
MATRIX LIVE VIDEO/SERVER PUSH PAGE CONTENTS
Figure 37. Matrix Control Page (Live Video Page Shown; Transmitter Only)
The Matrix Control pages contain the following:
•
Live video indicators (live video page only)
•
Ten numbered buttons
•
CAM (camera) button to select a camera
•
MON (monitor) button to select a monitor
•
CLR (clear) button to cancel an entered number
•
PRST (preset) button to select a preset
•
PATT (pattern) button to select a pattern
•
MAC (macro) button to select a group camera sequence (not supported for the CM6700)
•
STOP button (not functional)
•
BWD (backward) button to scroll through the cameras in reverse order
•
FWD (forward) button to scroll through the cameras in forward order
C2908M-B (4/05)
59
•
AUX ON button to activate an auxiliary
•
AUX OFF button to deactivate an auxiliary
•
ACK button to close a message when programming a pattern on the CM6700 only
•
SET check box to use in programming presets and patterns
The following are arrayed under “Lens”:
•
Iris open and close buttons
•
Focus far and near buttons
•
Zoom out and in buttons
The following are arrayed under “Pan/Tilt”:
•
Eight direction arrow buttons
•
Home button in the center to return the camera to its home position (preset 1)
“In Control” or “No Control” indicates whether you have control of the camera. Recording control buttons are beneath the picture (live video page
only).
On the Matrix live video control page, you can control the following:
•
Monitor—To select a monitor: enter the monitor number and then click MON. (You must select the monitor that feeds the camera input of
the PelcoNet transmitter.)
•
Camera—To select a camera: enter the camera number (1–16) and then click CAM.
•
Presets—To program a preset: set the image using the arrow keys, click SET, enter a preset number, and then click PRST. To activate a
preset, enter the preset number (1–66) and then click PRST. (You must click the CLR button before activating another preset.) Performing
any PTZ stops a scan preset.
•
Patterns—To program a pattern: click SET, click PATT, run your pattern using the arrow keys, and then click PATT again when you are finished. (The CM6700 does not support programming of a pattern from the browser.) To run a pattern, click PATT. To halt, click a pan and tilt
button, call a preset, or click STOP. (Clicking STOP will not halt a pattern on the CM6700 and CM6800.)
•
Programming Menus—To access the programming menus: click 9, 5, and then PRST.
•
Macros—To start a macro: enter 1 or 2 and click MAC. To stop a macro, click a pan and tilt button.
•
Auxiliaries—To turn on an auxiliary: enter the auxiliary number and then click AUX ON. To turn off, enter the auxiliary number and then
click AUX OFF.
NOTE: For the CM6700 only, click the ACK button to close the message “Send Pattern End Command to Exit” when it appears.
NOTE: The CM6700 programming menu is not supported.
60
C2908M-B (4/05)
GENEX LIVE VIDEO/SERVER PUSH PAGE CONTENTS
Figure 38. Genex Control Page (Live Video Page Shown; Transmitter Only)
The Genex pages contain the following across the top of the page:
•
Live video indicators (live video page only)
•
Main and Spot monitor selection radio buttons
•
A LIVE/VCR button to toggle main monitor display between live input and playback from a VCR
•
A Sequence button to activate a group camera sequence
•
A View button to show in Live mode the multiplexed output from the VCR and in VCR mode to show the multiplexed input from the VCR
•
A zoom button
•
A picture-in-picture button
•
Buttons for 4-, 9-, and 16-screen display
C2908M-B (4/05)
61
The following are arrayed down the right side of the page:
•
Radio buttons for 16 cameras
•
Iris open and close buttons
•
Focus far and near buttons
•
Zoom out and in buttons
•
Eight direction arrow buttons with a home button in the center to return the camera to its home position (preset 1)
•
Ten numbered buttons to use with the Pres and Pattern buttons to activate a preset and run patterns
•
A SET check box to use in programming presets and patterns
•
A Pattern button to run a pattern for each camera
“In Control” or “No Control” below the buttons indicates whether you have control of the camera. Recording control buttons are beneath the picture (live video page only).
On the Genex live control page, you can control the following:
62
•
Monitor—To select a monitor: click either the Main or Spot radio button.
•
Camera—To select a camera: click one of the 16 camera radio buttons.
•
Presets—To program a preset: set the image using the arrow keys, click SET, enter a preset number, and then click Pres. To activate a
preset, enter the preset number and click Pres. (You must click the Clear button before activating another preset.) Performing any PTZ
stops a scan preset.
•
Patterns—To program a pattern: click SET, click Pattern, run your pattern using the arrow keys, and then click Pattern again when you
are finished. To run a pattern, click Pattern. (You can run only the first programmed pattern.) To stop a pattern: click 96 and then click Pres.
•
Sequence—To activate a group camera sequence: click Sequence.
C2908M-B (4/05)
SPECTRA LIVE VIDEO/SERVER PUSH PAGE CONTENTS
Figure 39. Spectra Control Page (Live Video Page Shown; Transmitter Only)
The Spectra page contains the following at the top of the page:
• Live video indicators (live video page only)
The following are arrayed down the right side under “Lens”:
•
Iris open and close buttons
•
Focus far and near buttons
•
Zoom out and in buttons
The following are arrayed under “Pan/Tilt”:
•
Eight direction arrow buttons
•
Home button in the center to return the camera to its home position (preset 1)
C2908M-B (4/05)
63
The following are arrayed under “Presets”:
•
Ten numbered preset buttons
•
Pres (preset) button
•
Clear button
•
A SET check box
The following are arrayed under “Pattern”:
•
A Start pattern button
•
A Stop pattern button
“In Control” or “No Control” indicates whether you have control of the camera. Recording control buttons are beneath the picture (live video page
only).
On the Spectra live video control page, you can control the following:
•
Presets—To program a preset: set the image using the arrow keys, click—SET, enter a preset number, and then click Pres. To activate a
preset: enter a preset number and click the Pres button. Performing any PTZ stops a scan preset.
•
Patterns—You can program and run only one pattern through PelcoNet. To program a pattern: click SET, click Start, run your pattern using
the arrow keys, and then click Stop. To operate a pattern: click Start to begin the pattern and Stop to halt.
•
Programming Menus—To access the programming menus: enter 95, click Pres. Use the open iris icon to open menus and arrow keys to
navigate and set options. Use the open iris icon in conjunction with the Exit option to move backward through menu layers and to exit programming mode.
NOTE: You can program presets and patterns for Spectra III either from inside the camera menu or through a controller. With Spectra II you
can program presets and patterns through a controller or through the browser.
64
C2908M-B (4/05)
ESPRIT LIVE VIDEO/SERVER PUSH PAGE CONTENTS
Figure 40. Esprit Control Page (Live Video Page Shown; Transmitter Only)
The Esprit page contains the following at the top of the page:
•
Live video indicators (live video page only)
The following are arrayed down the right side under “Lens”:
•
Iris open and close buttons
•
Focus far and near buttons
•
Zoom out and in buttons
The following are arrayed under “Pan/Tilt”:
•
Eight direction arrow buttons
•
Home button in the center to return the camera to its home position (preset 1)
C2908M-B (4/05)
65
The following are arrayed under “Presets”:
•
Ten numbered preset buttons
•
Pres (preset) button
•
Clear button
•
A SET check box
The following are arrayed under “Pattern”:
•
A Start pattern button
•
A Stop pattern button
•
A Wiper button
“In Control” or “No Control” indicates whether you have control of the camera. Recording controls buttons are beneath the picture (live video
page only).
On the Esprit live video control page, you can control the following:
•
Presets—To program a preset: set the image using the arrow keys, click SET, enter a preset number, and then click Pres. To activate a
preset: click a preset number button, and then click Pres. (You must click the Clear button before activating another preset.) Performing
any PTZ stops a scan preset.
•
Patterns—You can program and run only one pattern through PelcoNet. To program a pattern: click SET, click Start, run your pattern using
the arrow keys, and then click Stop. To operate a pattern: click Start to begin the pattern and Stop to halt.
•
Programming Menus—To access the programming menus: enter 95 and click Pres. Use the open iris icon to open menus and arrow keys
to navigate and set options. Use the open iris icon in conjunction with the Exit option to move backward through menu layers and to exit
programming mode.
KEYBOARD LIVE VIDEO/SERVER PUSH PAGE CONTENTS
Figure 41. Keyboard Control Page (Live Video Page Shown)
The Keyboard page lets you control a camera through a Pelco keyboard rather than through a PC’s keyboard. The Keyboard page contains live
video indicators (live video page only) at the top of the page. Recording control buttons are beneath the picture (live video page only). The hard
disk icon (when showing) indicates that a compact flash drive is connected.
66
C2908M-B (4/05)
RECORDING AND VIEWING THE DISPLAY ON A PC
Video 1 and 2 and live video control pages let you keep snapshots (still pictures) and record the camera video display on a PC’s hard drive and
play it back later. The file is recorded on the hard drive of the PC on which you are viewing the picture. The controls are a row of buttons beneath
the screen.
NOTE: When video files are saved, an extra file (.ind extension) is created that lets you see the video in Pelco’s MPEG Viewer. If you delete
this file, you cannot view the saved .mp4 file.
CHOOSING WHERE TO STORE THE FILE
The program automatically saves snapshots and video recording files at C:\ on the hard drive of the PC on which you are viewing the picture
unless you tell it otherwise. If you want to store files in a different location on the PC, you need to first specify that location. To do so:
1. On the Home page, click either Control (and then click one of the underlined links to a live video control page) or Video 1 or Video 2.
2. Click the Select path icon (open folder) beneath the picture. (Click the icon just once. Double-clicking may cause display problems with the
select path window.)
3. The program opens the “Path for saving MPEG/JPEG files” screen. Do not specify a file name (leave blank), just navigate to the location
where you want the file stored and then click the Save button.
The file of any snapshot or video you record will be saved to that location.
RECORDING A SNAPSHOT FROM VIDEO
You can record a snapshot from the Video 1 or 2 pages or from the live video Matrix, Genex, Spectra, or Esprit control pages. The file is recorded
on the PC on which you are viewing the picture. To do so:
1. On the Home page, click either Control (and then click one of the underlined links to a live video control page) or Video 1 or Video 2.
2. Position the camera as desired (if it has PTZ capability).
3. Click the Snapshot icon (camera) to record a still picture. The snapshot is saved on the PC’s hard drive with a .jpg extension.
VIEWING A SNAPSHOT
You can view a snapshot by double-clicking the desired file (.jpg extension) in Windows Explorer.
RECORDING THE VIDEO DISPLAY ONTO THE PC
You can record the camera display from the Video 1 or 2 pages or from the live video Matrix, Genex, Spectra, and Esprit control pages. The file is
recorded on the PC on which you are viewing the picture. To do so:
1. On the Home page, click either Control (and then click one of the underline links to a live video control page) or Video 1 or Video 2.
2. Position the camera as desired (if it has PTZ capability).
3. Click the Recording icon (red dot button) to begin recording. The button flashes while recording is happening. (Note that recording stops if
you exit the page.)
4. Click the Recording button again to stop recording. The recording is saved on the PC’s hard drive with an .mp4 extension.
VIEWING THE VIDEO DISPLAY
The video file is identified by date and time. View the video display using the MPEGViewer program included on the PelcoNet Resource CD. Do
the following:
1. Locate the MPEGViewer.exe file (either on the resource CD or the PC) or MPEG Viewer shortcut on the desktop if you used the installation
program on the CD. Double-click the file. The viewer opens.
C2908M-B (4/05)
67
Figure 42. Viewer Screen
2. Click the Open button. A browse dialog box opens. Navigate to the recorded file (.mp4 extension) you want to view. Click the file to
highlight it, and then click Open.
3. Click Play on the viewer to begin playback. The start and end locations are shown below the slide control. A counter marks your location in
the file.
4. Use the Pause button to temporarily halt playback. You can change your location in the file by moving the pointer on the slide control. Click
Play to resume playback.
5. Click Stop to halt playback.
NOTE: When video files are saved, an extra file (.ind extension) is created that lets you see the video in Pelco’s MPEG Viewer. If you delete
this file, you cannot view the saved .mp4 file.
68
C2908M-B (4/05)
Software Upload
Units have flash EPROMs for software upgrades in the field. These upgrades can be done directly from the web browser. To do so:
1. Obtain the latest PelcoNet NET300 transmission system software from Pelco (http://pelco.com).
2. Use the browser to select the General Settings configuration page of your unit.
3. Use the Browse button in the Software upload field to select the correct new firmware file.
4. Click the Upload button. The Upload progress field shows how the upload is proceeding.
After about 30 seconds you should get a feedback message from the connected unit. The message “Upload Complete – WAIT” confirms the
correct upload of the new firmware, which is now being installed. If you try to upload an invalid firmware file, you will get the message
“Upload Failed.”
WARNING: Do not disconnect power to the unit for any reason while firmware is being installed. Disrupting the cycle will damage the
flash EPROM. If this occurs, you will have to return the unit for repair.
The unit automatically restarts when a successful upload is completed.
However, if the LED flashes green/red alternately on conclusion, the upload has been unsuccessful and must be restarted. To do so: in the
browser’s address field after the unit’s IP address, enter /main.htm. For example, 192.168.0.12/main.htm. Restart the upload process.
5. If you revisit the General Settings configuration page after the firmware is uploaded successfully, you will see the message “New Firmware
Installed.”
C2908M-B (4/05)
69
Resetting the NET300
To reset the unit, type a forward slash (/) and reset at the end of the unit’s address in the Internet Explorer browser address window, and then
press Enter.
70
C2908M-B (4/05)
Troubleshooting
If the following instructions fail to solve your problem, contact Pelco Technical Support at 1-800-289-9100 for help. You should have the serial
number from the bottom of the unit and the firmware version ready in case they are needed.
Do not try to repair a unit yourself. Opening it immediately voids any warranty. Leave maintenance and repairs to qualified technical personnel.
Swap a defective unit with a replacement unit and return the defective one for repair.
TERMINAL PROGRAM
If the terminal program fails to connect to the unit’s terminal port, check the following:
•
Is the right COM port interface on the PC selected for the terminal program, and are the settings correct? Program default settings are
19200 kb/s, 8 data bits, no parity, 1 stop bit (8N1) and no flow control for the terminal program.
•
If the data exchange between the terminal program and the system still does not work, check the serial cable. Does the system answer
when you press Enter on your keyboard?
•
Disable the local echo if you see duplicate characters on your screen.
TROUBLESHOOTING A TCP/IP NETWORK USING A PING UTILITY
(Enter the appropriate information where indicated by the quotation marks. Do not enter the quotation marks.)
To see if a unit in your network can be reached, try to ping your unit by typing the following command in a DOS window:
c:\ping ‘unit IP address’
If it is reached, there will be a response like the following:
Reply from <IP address>: bytes=32 time=NN ms TTL=xxx
If the LAN is malfunctioning, the ping command will time out. If so, you could have one of the following problems:
•
Wrong physical connections. Make sure the LAN link LED is on.
•
Wrong network connection. Verify the IP address is entered correctly and that subnet mask and gateway address are set properly.
Otherwise, ask your network administrator.
NOTE: The error message “Destination Host Unreachable” means the ping command was not sent from your computer because the
address you are trying to ping is not in the same IP subnet as your computer.
For example, if your computer’s IP address is 192.168.0.12 and your PelcoNet unit’s IP address is 192.168.0.18 and you are using a subnet
mask of 255.255.255.0, then there is no problem and you will not get the error message.
However, using a subnet mask of 255.255.255.248 creates 32 subnets each of which has 6 usable IP addresses. So, now the client PC is in
a subnet that has usable addresses from 192.168.0.9 to 192.168.0.15 and the PelcoNet is in a subnet that has usable addresses from
192.168.0.17 to 192.168.0.23. Computers in the first subnet cannot communicate with the PelcoNet in the second (unless there is a gateway/router/bridge to route traffic from one subnet to the other).
TROUBLESHOOTING CONNECTION PROBLEMS
If you fail to connect to a system from a NET300 receiver, check the following to pinpoint the problem:
•
Do not connect two units of the same type (for example, receiver to receiver).
•
Make sure network connectivity is available (for example, by using the ping command as described previously).
•
Does the power LED flash?
If flashing, the units are connected. Verify how much bandwidth your connection has available and ensure the bandwidth specified in the Datarate field on the MPEG-4 Video Settings page does not exceed the available bandwidth.
If the power LED does not flash, verify that the Live Video Auto-Connect feature is set up correctly. Also, set the Video Transmission field on the Network Settings page to “TCP (port 80).”
C2908M-B (4/05)
71
TROUBLESHOOTING THE VIDEO CONNECTION
If no video or a distorted video image is displayed at the receiver during a connection to a transmitter:
72
•
Make sure to use the right unit for your application: a camera can only be connected to a transmitter, never to a receiver.
•
Make sure the video input on the transmitter is properly terminated.
•
Make sure the camera is switched on and the coaxial cable is connected to the transmitter.
•
Check the camera cable and connect a video monitor to the camera to check that the camera is functioning correctly.
•
Make sure the monitor is switched on and the coaxial cable is connected to the NET300 receiver.
•
Check the monitor cable and the selection of the monitor channel if the monitor features more than one video channel.
•
(NET300R unit only.) Make sure the Output Standard field on the Video Decoder Settings page is set for the TV signal used in your region
(NTSC or PAL). Restart the receiver if you have to change this field.
C2908M-B (4/05)
Specifications
NETWORK PROTOCOL & STANDARDS COMPATIBILITY
Network Protocols:
RTP, RTCP, UDP, TCP, IP, HTTP, SNMP, IGMP, ICMP, ARP
Video Coding:
MPEG-4 (M-JPEG in Server Push mode only)
Video Frame Rate:
Up to 30 images/second
INTERFACE
Video Input or Output:
1, BNC, PAL/NTSC, 75 ohms, 1 Vp-p
LAN Interface:
Ethernet 10/100BaseT autosensing, RJ-45
LAN Data Rate:
9.6 Kbps to 1.5 Mbps
Data Interface:
1 RS-232/RS-422/RS-485, bidirectional (9-pin, D-sub)
Alarm Input:
2 terminals, 30 VDC maximum
Alarm Output:
1 terminal, 30 VDC, 1 A
VIDEO
Video Standards:
Video Image Size
PAL:
NTSC:
PAL, NTSC
704 x 576 pixels (4CIF)
704 x 288 pixels (2CIF)
352 x 288 pixels (CIF)
704 x 480 pixels (4SIF)
704 x 240 pixels (2SIF)
352 x 240 pixels (SIF)
POWER
Type:
Plug power adapter
Operating Voltage:
12-24 VDC, power supply included
Power Consumption:
Approximately 10 W
ENVIRONMENTAL
Operating Temperature:
32° to 122°F (0° to 50°C)
Operating Humidity:
80% maximum relative humidity, non-condensing
Storage Temperature:
−4° to 140°F (−20° to 60°C)
Storage Humidity:
95% maximum relative humidity, non-condensing
GENERAL
Dimensions:
3.4" W x 1.2" H x 4.5" D (8.6 x 3.1 x 11.4 cm)
Unit Weight:
Approximately 0.4 lb (0.2 kg) without power supply
C2908M-B (4/05)
73
Glossary
74
10BASE-T
IEEE 802.3 specification for 10 Mbs Ethernet
ARP
Address Resolution Protocol
Baud Rate
Data transmission rate
bps
Bits per second, the actual data rate
Cat5 Cable
Type of cable used on a LAN to connect computers, printers, and transmitters and receivers to a hub on
the network
CIF
Common Intermediate Format; video format with 352 x 288 pixels
Default Gateway
The router’s IP address (for example, 192.168.0.1)
DHCP
Dynamic Host Configuration Protocol
DNS
Domain Name Service
FTP
File Transfer Protocol
Full Duplex
Simultaneous data transmission in both directions
G.711, G.728
Standard audio coding algorithms defined by ITU-T
H.224
Standardized protocol for data communication and remote control
H.261
Standard motion video coding algorithm defined by ITU-T
H.323
Standard for M-JPEG video and audio compression defined by ITU-T
HTML
Hypertext Markup Language
HTTP
Hypertext Transfer Protocol
Hub
A device on the network that connects multiple computers together to form a LAN
ICMP
Internet Control Message Protocol
ID
Identification: machine readable number or name
IGMP
Internet Group Management Protocol
IEEE
Institute of Electrical and Electronics Engineers
Internet Protocol
The main protocol used on the Internet. Forms—in conjunction with the Transmission Control Protocol
(TCP)—the TCP/IP protocol suite.
IP
See Internet Protocol
IP Address
A unique four-byte number that identifies each unit on the Internet or network. Usually written in dotted
decimal notation with periods separating the bytes. This address is required to communicate on the network (for example, 192.168.0.100)
ISDN
Integrated Services Digital Network
ISP
Internet Service Provider
JPEG
Joint Photographic Expert Group (procedure to encode still images)
Kbps
Kilobits per second; the actual data rate
LAN
Local Area Network. Multiple computers linked together into a network to share information within a limited geographic area (such as a building or a campus) controlled by a network operating system and using
a transport protocol.
MAC Address
Media Access Control/hardware address
Mbps
Megabits per second; the actual data rate
MPEG-4
Used for transmission of audiovisual data with very low transfer rates (for example, via Internet); further
development of MPEG-2 (enhanced video compression standard)
NAT
Network Address Translator. A proposal for IP address for re-use where the local IP address is mapped to
a globally unique address
Network Address Translator
A proposal for IP address re-use where the local IP address is mapped to a globally unique address
Parameter
Values used for the configuration of the network system
Picture
A video picture that has been digitized at a particular resolution
PPP
Point-To-Point Protocol. A protocol allowing a computer using TCP/IP to connect directly to the Internet
Router
A physical device that connects multiple LANs; a router knows where to direct a given packet of data
QCIF
Quarter CIF, video format with 176 x 144 pixels
Server Push
A continuous stream sent from the transmitter to the web browser
C2908M-B (4/05)
Subnet Mask
A mask that explains which part of an IP address is the network address and which part composes the
hose address; it is usually expressed in dotted-decimal notation (for example, 255.255.255.192)
TCP
Transfer Control Protocol
UDP
User Datagram Protocol
URL
Uniform Resource Locator
UTP
Unshielded Twisted Pair
WAN
Wide Area Network. Multiple LANs connected together, usually over a great distance.
C2908M-B (4/05)
75
Appendix A — Connecting Pelconet To Various Components
Some of the connection examples that follow require a DB9 cable. Refer to the following figure when one is needed.
DB9
TX+
TX-
RX+
RX-
RX+
RX-
TX+
TX-
TO RECEIVER
ESPRIT
SPECTRA
PIN
1 2 3 4 5
6 7 8 9
1
2
3
4
5
6
7
8
9
RS-422/RS-485
RX+ (RECEIVE DATA PLUS)
TX- (TRANSMIT DATA MINUS)
GND
TX+ (TRANSMIT DATA PLUS)
RX- (RECEIVE DATA MINUS)
Figure 43. DB9 Cable Wire Splicing
76
C2908M-B (4/05)
CONNECTING PELCONET TO VARIOUS COMPONENTS WITH ASSORTED KEYBOARDS
CONNECTION SCENARIO 1 – USING A KBD300A IN DIRECT MODE
Refer to Figure 44 and the instructions that follow.
TRANSMITTER
Video In
TXTX+
RS232/422/485
P PROTOCOL ONLY
RX+ RX-
RECEIVER OR
SPECTRA
4800, 8, NONE, 1
RECEIVER
Video Out
RS232/422/485
KBD300A
12 VAC
4800, 8, NONE, 1
MONITOR
RX(-)
RX(+)
4
3
2
1
5
6
7
8
DIRECT
MODE
STRAIGHT
CABLE
Figure 44. KBD300A (Direct Mode) Connected to a Receiver or Spectra Dome System
1. Connect a DB9 cable to the RS232/422/485 port on the NET300 receiver. (In the Interface Mode field on the configuration page for the
interface settings, select RS-422/485.) The data format should be 4800 baud, 8 data bits, no parity, and 1 stop bit.
2. Connect RX− on the DB9 cable to terminal 2 on the wall block. Connect RX+ on the DB9 cable to terminal 1 on the wall block.
3. Connect a 12 VAC power supply to terminals 3 and 4 on the wall block.
4. Set DIP switch 6 on the KBD300A to ON to enable turbo pan operation or OFF to disable that feature. The KBD300A will recognize Direct
Mode automatically.
5. Connect the wall block to the KBD300A with an RJ-45 straight cable.
C2908M-B (4/05)
77
6. Connect the monitor.
7. Refer to Figure 43 and Figure 44. Splice the supplied DB9 cable into the Spectra/Esprit or receiver cable. Use P protocol only.
8. Plug the DB9 cable into the RS232/422485 port on the transmitter. (In the Interface Mode field, select RS-422-485.) The data format should
be 4800, 8, no parity, 1.
9. Connect the camera’s video to the transmitter.
CONNECTION SCENARIO 2 – USING A KBD4000 FOR MULTIPLEXER CONTROL
Refer to Figure 45 and the instructions that follow.
NOTE: If you set all your cameras to Standard Coaxitron for better control on the browser, you will lose most of the KBD4000 keyboard
functions. If you set your cameras to Extended Coaxitron, you will have all the keyboard functions but the PTZ functions on the NET300 will
be very slow.
TRANSMITTER
TRANSMITTER
Video In
MULTIPLEXER
RS232/422/485
COM IN
9600, 8, ODD, 1
TX TX +
RX RX +
4
3
2
1
MAIN
5
6
7
8
STRAIGHT CABLE
RECEIVER
Video Out
RS232/422/485
KBD4000
12 VAC
9600, 8, ODD, 1
4
3
2
1
RX RX +
MONITOR
5
6
7
8
TX +
TX STRAIGHT
CABLE
Figure 45. KBD4000 Connected to a Multiplexer
1. Connect a DB9 cable to the RS232/422/485 port on the NET300 receiver. (In the Interface Mode field on the configuration page for the
interface settings, select RS-422/485.) The data format should be 9600 baud, 8 data bits, odd parity, and 1 stop bit.
78
C2908M-B (4/05)
2. On the receiver side, connect TX− on the DB9 cable to terminal 7 on the wall block. Connect TX+ on the DB9 cable to terminal 8 on the wall
block. Connect RX− on the DB9 cable to terminal 2 on the wall block. Connect RX+ on the DB9 cable to terminal 1 on the wall block.
3. Connect a 12 VAC power supply to terminals 3 and 4 on the wall block.
4. Connect the wall block to the KBD4000 with an RJ-45 straight cable. (Note that DIP switches 4 and 8 on the KBD4000 must be set ON.)
5. Connect the monitor.
6. Refer to Figure 43 and Figure 45. Splice the supplied DB9 cable into the multiplexer wall block. Connect TX− from the NET300 transmitter
to terminal 2 on the wall block, TX+ to terminal 1, RX− to terminal 7, and RX+ to terminal 8.
7. Plug the DB9 cable into the RS232/422485 port on the transmitter. (In the Interface Mode field, select RS-422-485.) The data format must
be 9600, 8, odd, 1.
8. Connect the wall block to COM IN on the multiplexer with RJ-45 straight cable.
9. Connect MAIN video output from the multiplexer to the transmitter.
C2908M-B (4/05)
79
CONNECTION SCENARIO 3 – USING A CM9760-KBD
Refer to Figure 46 and the instructions that follow.
TRANSMITTER
Video In
RS232/422/485
4
3
2
1
4800, 8, EVEN, 1
5
6
7
8
RX +
RX TX +
TX -
CM9760-CC1
FLIPPED
CABLE
SERCOM PORT PROGRAMMED FOR KBD
RECEIVER
Video Out
RS232/422/485
CM9760KBD
POWER
PAK
KEYBOARD
4800, 8, EVEN, 1
4
3
2
1
RX RX +
MONITOR
CARD CAGE
5
6
7
8
TX +
TX STRAIGHT
CABLE
Figure 46. CM9760KBD Connected to a CM9760-CC1 Controller
1. Connect a DB9 cable to the RS232/422/485 port on the NET300 receiver. (In the Interface Mode field on the configuration page for the
interface settings, select RS-422/485.) The data format should be 4800 baud, 8 data bits, even parity, and 1 stop bit.
2. On the receiver side, connect TX− on the DB9 cable to terminal 7 on the wall block. Connect TX+ on the DB9 cable to terminal 8 on the wall
block. Connect RX− on the DB9 cable to terminal 2 on the wall block. Connect RX+ on the DB9 cable to terminal 1 on the wall block.
3. Connect an RJ-45 straight cable from the wall block to the power pack.
4. Connect an RJ-45 straight cable from the keyboard input connector on the power pack to COM 1 on the keyboard.
5. Connect the monitor.
6. Refer to Figure 43 and Figure 46. Splice the supplied DB9 cable into the CM9760-CC1 wall block. Connect TX− from the NET300 transmitter
to terminal 2 on the wall block, TX+ to terminal 1, RX− to terminal 7, and RX+ to terminal 8.
80
C2908M-B (4/05)
7. Plug the DB9 cable into the RS232/422/485 port on the transmitter. (In the Interface Mode field, select RS-422/485.) The data format should
be 4800, 8, even, 1.
8. Connect an RJ-45 flipped cable from the wall block to Sercom port 5 on the CC1’s rear panel.
9. Connect one of the three monitor outputs on the rear of the controller to the transmitter.
CONNECTING A LOCAL KEYBOARD TO A PC
Refer to Figure 47. This configuration lets an operator control a camera or other external device through a Pelco keyboard attached to a local PC.
(The KBD200A is shown as an example.)
NET350
TRANSMITTER
ETHERNET CONNECTION
TO NETWORK (LAN/WAN)
Video In
RS232/422/485
PELCO KEYBOARD
12 VAC
VIDEO
DATA
GENEX
RXRX+
4
3
2
1
5
6
7
8
KBD200A/
KBD300A
STRAIGHT
CABLE
TXTX+
RXRX+
GND
12 V
SPECTRA
PV140
12VDC
PC
WORKSTATION
Figure 47. Connecting a Local Keyboard to a PC
C2908M-B (4/05)
81
CONNECTING THE PELCONET’S COM PORT TO THE GENEX MULTIPLEXER’S COM OUT PORT
Refer to Figure 48 and the instructions that follow.
TRANSMITTER
ETHERNET
CONNECTION
TO NETWORK
Video In
RS232/422/485
9600, 8, NONE, 1
PELCONET DB9
CONNECTOR
PIN 2
RX
GENEX COM OUT
RJ-45 CONNECTOR
PIN 6
TX
PIN 3
TX
PIN 4
RX
PIN 5
GND
PIN 5
GND
GENEX COM
MULTIPLEXER
8
1
IN
8
1
OUT
Figure 48. Connecting PelcoNet to Genex Using the COM Port
1. Verify that the multiplexer has Version 4.1 or higher software for Genex units manufactured before November 22, 2002—or Version 1.12 or
higher for units manufactured on or after that date. (The version numbering was restarted in 2003, which is why newer units have a smaller
version number. The version number flashes on the monitor when power is applied to the multiplexer.)
2. Set the NET300 RS232/422/485 data port to Transparent, 9600 baud, 8 data bits, none (for parity), 1 stop bit, and off if it is not so set
already. (In the Interface Mode field on the configuration page for the interface settings, select RS-232.)
3. Create a cable using the diagram in Figure 48.
4. Attach the cable’s DB9 connector end to PelcoNet’s RS232/422/485 port. Connect the cable’s RJ-45 connector end to COM OUT on the back
of the multiplexer.
5. Connect the MAIN video output from the multiplexer to the NET300 transmitter.
6. Connect PelcoNet’s Ethernet port to the network using a Cat5 Ethernet patch cable.
82
C2908M-B (4/05)
CONNECTING PELCONET TO A CM6700 AND KBD200A FOR REMOTE ASCII CONTROL
Refer to Figure 49. This configuration lets an operator view and control cameras with a remote KBD200A keyboard.
PELCONET REMOTE KBD200A ASCII MODE SETUP
TRANSMITTER
ETHERNET CONNECTION
TO NETWORK (LAN/WAN)
Video In
RS232/422/485
PELCONET
CM6700-MXB
TRANSPARENT COM 2 (7-12)
DATA PORT
SW5 DIP SWITCH SETTINGS
2 RX......................7 TX
3 TX.......................12 RX
5 GND...................9 GND
RS-422/485
ON
1 2 3 4 5 6 7 8
RS-232
ON
1 2 3 4 5 6 7 8
KEY
ON
SPECTRA
VIDEO INPUTS
1
3
5
7
9
SET DIP SWITCH (SW5) ON
CM6700-MXB TO RS-232 MODE
CM6700 MATRIX COM 2
PORT SETTINGS:
VIDEO OUTPUTS
11
13
1
ALARM S
(1-9 )
2
ALARM S
(10-18)
LOCAL
KEYBOARD
1 2
15
3 4
5 6
7 8
9
10 11 12 13 14 15 16 17 18
REMOTE
KEYBOARD(S)
CO M 1 (1-6 )
CO M 2 (7-12)
2
4
6
8
10
12
14
1 2
16
3 4 5 6 7 8
9 10 11 12
T T
+
BAUD RATE
DATA BITS
PARITY
STOP BITS
R R
+
CONTRO L
OUTPUTS
0 1 2 3
F
2
OF F
F N N C
3 O C O
M
9600
8
ODD
1
CONNECT PELCONET TO
6700 VIA RS-232 PORT
RECEIVER
ETHERNET CONNECTION
TO NETWORK (LAN/WAN)
Video Out
RS232/422/485
2-RX 12 VAC
3-TX
5-GND
TRANSPARENT DATA PORT
USING INTERNET EXPLORER; SET
TRANSPARENT DATA SETTINGS
ON BOTH PELCONET RECEIVER
AND TRANSMITTER:
BAUD RATE
9600
DATA BITS
8
PARITY
ODD
STOP BITS
1
MONITOR
KBD200A
4
3
2
1
RX - RX +
5
6
7
8
TX + TX -
STRAIGHT
CABLE
SPECTRA COAXITRON
PROTOCOL
NOTE: FIRMWARE VER 4.0 OR LATER REQUIRED. SET KEYBOARD DIP SWITCHES SWITCH
6 ON, SWITCHES 5 AND 8 OFF, SWITCHES 1 - 4 FOR ADDRESS ACCORDING TO THE
TABLE IN THE KBD200A MANUAL.
Figure 49. Using PelcoNet with CM6700 and KBD200A to Provide Remote Control
C2908M-B (4/05)
83
CONNECTING PELCONET TO A CM6700 ASCII PORT
Refer to Figure 50. This configuration lets an operator view and control cameras from a PC using a web browser. (The operator’s PC is not shown
on the diagram.)
PELCONET CM6700 ASCII SETUP SPECTRA COAXITRON PROTOCOL
TRANSMITTER
ETHERNET CONNECTION
TO NETWORK (LAN/WAN)
Video In
RS232/422/485
2-RX
3-TX
5-GND
TRANSPARENT DATA PORT
USING INTERNET EXPLORER; SET
TRANSPARENT DATA SETTINGS
ON BOTH PELCONET RECEIVER
AND TRANSMITTER:
BAUD RATE
9600
8
DATA BITS
PARITY
ODD
STOP BITS
1
SPECTRA
SW5 DIP SWITCH SETTINGS
VIDEO INPUTS
1
3
5
7
9
11
13
1
ALARM S
(1-9 )
2
ALARM S
(10-18)
RS-422/485
ON
VIDEO OUTPUTS
LOCAL
KEYBOARD
1 2 3 4 5 6 7 8 9
15
10 11 12 13 14 15 16 17 18
REMOTE
KEYBOARD(S)
1 2 3 4 5 6 7 8
COM 1 (1-6)
CO M 2 (7-12)
2
4
6
8
10
12
14
1 2 3 4 5 6 7 8 9 10 11 12
16
T T
+
R R
+
RS-232
ON
CONTROL
OUTPUTS
0 1 2 3
F
2
F N N C
3 O C O
M
1 2 3 4 5 6 7 8
PELCONET CM6700-MXB
TRANSPARENT COM 2 (7-12)
DATA PORT
2 RXD...................... 7 TXD
3 TXD..................... 12 RXD
5 GND..................... 9 GND
CM6700 MATRIX COM2
PORT SETTINGS:
9600
BAUD RATE
8
DATA BITS
ODD
PARITY
1
STOP BITS
KEY
ON
OF F
SET DIP SWITCH (SW5) ON
CM6700-MXB TO RS-232 MODE
Figure 50. Using PelcoNet with CM6700 to Provide Remote Control
84
C2908M-B (4/05)
CONNECTING PELCONET TO A CM9760-DT FOR REMOTE BROWSER CONTROL
Refer to Figure 51. This configuration lets an operator view and control cameras from a PC using a web browser. (The operator’s PC is not shown
on the diagram.)
PELCONET CM9760-DT SETUP
TRANSMITTER
ETHERNET
CONNECTION
TO NETWORK
(LAN/WAN)
Video In
MON OUTPUT
TIE LINE
RS232/422/485
TRANSPARENT DATA PORT
USING INTERNET EXPLORER;
SET TRANSPARENT SETTINGS:
BAUD RATE 4800 OR 9600
8
DATA BITS
EVEN OR ODD
PARITY
1
STOP BITS
NULL MODEM CABLE
NOT SUPPLIED
2-RX
2-RX
3-TX
3-TX
5-GND
5-GND
CM9760KBD
CM9505-UPS
DIP SWITCH
1 ON
2 OFF
CM9760-DT1
COM 2 PROGRAMMED FOR 9760-DT
COM 1
COM 2
SPECTRA P
PROTOCOL
SUPPLIED
CABLE
SPECTRA
CM9760-CC1
MONITOR
CM9760-MXB
NOTE: 4800 BAUD AND EVEN PARITY APPLIES
TO CM9760-DT VERSION 2.07, WHILE
9600 BAUD AND ODD PARITY APPLIES
TO VERSION 3.0
Figure 51. Using PelcoNet with CM9760-DT to Provide Remote Control of a 9760 Monitor Output
C2908M-B (4/05)
85
CONNECTING PELCONET TO CM9700 FOR REMOTE COMMUNICATION
Refer to Figure 43 and Figure 52 and Figure 53. These configurations let an operator remotely view and control cameras connected to the
CM9700.
REMOTE NODE: TRANSMITTING DATA AND VIDEO
TRANSMITTER
Video Out
MON OUTPUT
TIE LINE
CM9760-KBD
RS232/422/485
ETHERNET
CONNECTION
TO NETWORK
(LAN/WAN)
TRANSPARENT DATA PORT
USING INTERNET EXPLORER;
SET TRANSPARENT DATA
PORT SETTINGS:
BAUD RATE 9600
8
DATA BITS
EVEN
PARITY
1
STOP BITS
CM9505UPS
4
3
2
1
5
6
7
8
*
*
TERMINAL
SERCOM PORT
PELCONET
*
*
1
2
7
8
TX+
TXRXRX+
RX+
RXTXTX+
*WALL BLOCK CONNECTIONS
RJ-45 WALL BLOCK
NOT SUPPLIED
SPECTRA P
PROTOCOL
SERCOM PORT
PROGRAMMED
FOR NETWORK
COMMUNICATION
(STRAIGHT CABLE)
CM9700-CC1
VIDEO
CM9760-MXB
Figure 52. Using PelcoNet to Transmit Data and Video Between 9700 Nodes (9760 Shown)
86
C2908M-B (4/05)
LOCAL NODE: RECEIVING DATA AND VIDEO
RECEIVER
Video Out
CAM INPUT
TIE LINE
CM9505-UPS
ETHERNET
CONNECTION
TO NETWORK
(LAN/WAN)
RS232/422/485
TRANSPARENT DATA PORT
USING INTERNET EXPLORER;
SET TRANSPARENT DATA
PORT SETTINGS:
BAUD RATE 9600
8
DATA BITS
EVEN
PARITY
1
STOP BITS
CM9760KBD
4
3
2
1
5
6
7
8
*WALL BLOCK CONNECTIONS
*
*
TERMINAL
SERCOM PORT
PELCONET
*
*
1
2
7
8
TX+
TXRXRX+
RX+
RXTXTX+
CM9700-NW1
RJ-45 WALL BLOCK
NOT SUPPLIED
SERCOM PORT
PROGRAMMED
FOR NETWORK
COMMUNICATION
(STRAIGHT CABLE)
SPECTRA P
PROTOCOL
CM9700-CC1
SPECTRA
VIDEO
CM9760-MXB
MONITOR
Figure 53. Using PelcoNet to Receive Data and Video Between 9700 Nodes (9760 Shown)
C2908M-B (4/05)
87
CONNECTING A PELCONET TRANSMITTER TO THE CM6800 ASCII PORT
Refer to the transmitter portion of Figure 56. This configuration lets an operator view and control cameras from a PC using a web browser. (The
operator’s PC is not shown on the diagram.) All settings are done in the CM6800 manager program or through a CM6800 menu. Note the
following:
•
Port 2 defaults to ASCII and RS-232.
•
Ports 7 and 8 can be set to ASCII and RS-232 by using the CM6800 manager program (refer to Figure 54) or by using a CM6800 menu (refer
to Figure 55).
•
Port 2 is recommended.
Figure 54. Manager Screen
SET SERIAL PORT 07
DEVICE:
ASCII
TYPE:
RS232
BAUD RATE:
9600
PARITY:
ODD
DATA BITS:
8
STOP BITS:
1
RETURN
Figure 55. Menu Screen
88
C2908M-B (4/05)
CONNECTING PELCONET TO A CM6800 AND KBD200A FOR REMOTE CONTROL
Refer to Figure 56. This configuration lets an operator view and control cameras with a remote KBD200A keyboard. All settings are done in the
CM6800 manager program or through a CM6800 menu. Note the following:
•
Port 2 defaults to ASCII and RS-232.
•
Ports 7 and 8 can be set to ASCII and RS-232 by using the CM6800 manager program (refer to Figure 54) or by using a CM6800 menu (refer
to Figure 55).
•
Port 2 is recommended.
C2908M-B (4/05)
89
PELCONET CM6800 ASCII SETUP
TRANSMITTER
ETHERNET
CONNECTION
TO NETWORK
(LAN/WAN)
Video In
SPECTRA
COAXITRON
PROTOCOL
TRANSPARENT DATA PORT
USING INTERNET EXPLORER;
SET TRANSPARENT DATA
PORT SETTINGS:
BAUD RATE 9600
DATA BITS
8
PARITY
ODD
STOP BITS
1
RS232/422/485
2-RX
3-TX
5-GND
4
3
2
1
GND
5
6
7
8
RX -
TX -
STRAIGHT
CABLE
PELCONET TRANSPARENT CM6800-48X8
DATA PORT
COM 2
2 RX.................................. 8 TX
3 TX................................... 1 RX
5 GND............................ 5 GND
6800 MATRIX COM 2
PORT SETTINGS:
BAUD RATE
9600
DATA BITS
8
PARITY
ODD
STOP BITS
1
PELCONET REMOTE KBD200A ASCII MODE SETUP
RECEIVER
Video Out
TRANSPARENT DATA PORT
USING INTERNET EXPLORER; SET
TRANSPARENT DATA SETTINGS
ON BOTH PELCONET RECEIVER
AND TRANSMITTER:
9600
BAUD RATE
8
DATA BITS
ODD
PARITY
1
STOP BITS
MONITOR
ETHERNET
CONNECTION
TO NETWORK
(LAN/WAN)
RS232/422/485
2-RX 12 VAC
3-TX
5-GND
RJ-45 WALL BLOCK
AND STRAIGHT
CABLE SUPPLIED
4
3
2
1
RX - RX +
KBD200A
5
6
7
8
TX + TX -
STRAIGHT
CABLE
NOTE: FIRMWARE VER 4.0 OR LATER REQUIRED. SET KEYBOARD DIP SWITCHES SWITCH
6 ON, SWITCHES 5 AND 8 OFF, SWITCHES 1 - 4 FOR ADDRESS ACCORDING TO THE
TABLE IN THE KBD200A MANUAL.
Figure 56. Using PelcoNet with CM6800 and KBD200A to Provide Remote Control
90
C2908M-B (4/05)
Appendix B — Frequently Asked Questions (FAQs)
1. What Pelco devices can I control from my computer with PelcoNet?
PelcoNet can control the following from Internet Explorer:
•
•
•
•
•
Spectra and Esprit
Genex multiplexer
CM9700 matrix (older CM9760s require CM9760 data translator)
CM6700 matrix (through integrated ASCII port)
CM6800 matrix
2. Can I view PelcoNet over the Internet?
Yes. You will need a static IP address and enough bandwidth to view live video. Pelco recommends a minimum of 250 Kbps for medium
image quality. Also check with your ISP to verify the correct TCP and UDP ports are open through any routers or firewalls through which you
connect.
3. How many connections does PelcoNet support? Can more than one receiver connect to a transmitter at the same time?
Yes. PelcoNet can support up to 25 simultaneous connections. To do so, all hubs, switches, and routers must support multicasting (IGMP),
and PelcoNet must be configured to use multicasting. If the network hardware does not support this, then the maximum number of simultaneous connections is five.
4. Can I enlarge the picture size in the browser?
Yes. You can select from two different image sizes in PelcoNet with the browser: 352 x 288 or 704 x 576.
5. What software does PelcoNet require?
PelcoNet works with Internet Explorer 6.0 or higher. An ActiveX plug-in and Microsoft Virtual Machine are also required for Internet
Explorer to get live video. All software is included.
6. Can I control other manufacturers’ equipment from the browser?
Not at this time.
7. Can I record video with PelcoNet?
Yes. PelcoNet can record video to the hard drive of the viewing PC. The video is recorded in MPEG-4 format, which allows playback through
either the browser or Windows Media Player.
8. Everything is wired correctly but I do not have any control from the browser. What else could be wrong?
The transparent port settings should be set to match the equipment to which PelcoNet is connected.
Also, in Internet Explorer, the Microsoft Virtual Machine should be enabled. To do so: on the Tools menu, select Internet Options. Then
select the Advanced tab. Locate the option Microsoft VM. Place a checkmark next to Java Console Enabled and JIT compiler for
virtual machine enabled. Reboot your computer.
These options are required for the Java applets in PelcoNet to function properly.
9. Can I control the Genex multiplexer from the browser and have a local KBD4000?
Yes. You must have Genex version 4.1 or higher for Genex units manufactured before November 22, 2002—or version 1.12 or higher for
units manufactured on or after that date. (The version numbering was restarted in 2002, which is why newer units have a smaller version
number.) These versions let you connect a KBD4000 to the COM IN port, and PelcoNet to the COM OUT port. This gives you both local and
remote control. Refer to—Connecting PelcoNet to the COM OUT RS-422 Port on a Genex Multiplexer in Appendix A for detailed information.
10. Can I control the Genex multiplexer server?
Not at this time.
11. Can I use DHCP (dynamically assigned IP address) with PelcoNet?
No.
12. What type of compression does PelcoNet NET300 use?
C2908M-B (4/05)
91
PelcoNet uses the MPEG-4 industry standard for video teleconferencing over the Internet. It provides the most effective use of bandwidth
with excellent video quality.
13. I do not get live video in the browser but server push is working. What could be wrong?
Verify that the ActiveX plug-in is installed and that your video is set to 16-bit color. Also check with your network administrator to verify that
the TCP/IP ports PelcoNet uses are not being filtered and that you have enough bandwidth.
14. How do I program PelcoNet with HyperTerminal?
Using a null modem cable, connect a COM port on your PC to the RS232/422/485 port on PelcoNet. Open HyperTerminal and set the port to
use 19200, 8, N, 1 and No Flow Control. Type ?, and follow the help menu.
15. How much bandwidth does PelcoNet use?
PelcoNet’s bandwidth is adjustable. You can set it from 9.6 kbps up to 5000 kbps. PelcoNet recommends a minimum of 250 Kbps for live
video at medium image quality. Check with your network administrator for how much bandwidth to use.
16. Can I use PelcoNet with a DSL or cable connection?
Yes. You will need a static IP address from your provider. Also verify what kind of bandwidth you will get since it varies by location. Verify
that your provider is not filtering the TCP/IP ports that PelcoNet uses.
17. Is an RS-232 to RS-422/485 converter required for control with PelcoNet?
No. the NET300’s RS232/422/485 port supports RS-232, RS-422, and RS-485.
18. What TCP/IP ports should I use with PelcoNet?
•
•
92
If you will be using PelcoNet in a LAN environment, Pelco recommends all TCP/IP ports above 1024 be opened. Also, if you will use a
time server, TCP port 37 must be opened.
If you will be using PelcoNet in a WAN environment, Pelco recommends changing the “Video transmission” setting to “TCP” in the
Network Settings configuration page. This makes PelcoNet use port 80 and whatever source port the client computer chooses.
C2908M-B (4/05)
Index
A
Installation (hardware) 24
Interface mode 47
Intra frame distance 37
IP address 7
Alarm indicator 42
Alarm input 1 43
Alarm input 2 43
Application diagrams 12
Auxiliaries (matrix) 60
Average n 42
K
Keyboard control page
L
B
Baud rate
66
47, 48
C
Camera 37
Camera (matrix) 60
Camera name stamping 37
COM port 48
Configuration download 35
Configuration pages
Alarm settings 40
Com interface settings 46
General settings 33
Local Com interface — keyboard 48
MPEG-4 video settings (transmitter only) 36
Network settings 49
Relay settings 44
Video decoder dettings (receiver only) 39
Configuration upload 35
Connect on alarm 43
Connecting relay output 25
Connecting to various components 76
Data bits 47, 48
Data terminal 24
Data terminal (connecting) 24
Datarate 37
Date format 34
Display alarm stamping 37
Displayed alarm message 37
Macros (matrix) 60
Microsoft Virtual Machine enabling 56
Minimum PC requirements 9
Monitor (matrix) 60
Motion detection 42
Motion tracking 42
MPEG-4 Encoder 1/2 (tab) 37
Multicast group IP address 50
Multicast packet TTL1 50
Multicast streaming 50
Multicast video port encoder 1 and 2 50
N
O
Object min size 42
Operating mode 45
P
E
65
F
Field mode 38
Frame skip ratio 38
G
Gateway IP address 50
General settings configuration page
Genex protocol ID 47
H
I
Idle state 45
Indicator buttons (live page)
33
Parameter preset 37
Parity 48
Parity check 47
Password 34
Password confirm 34
Password level 34
Password settings 34
Patterns (matrix) 60
PC recording/viewing 67
Preset parameter name 37
Presets (matrix) 60
Programming menus (matrix)
60
R
Half-duplex mode 47
Hardware version 35
C2908M-B (4/05)
M
Name of encoder 37
NET-Manager 28
Network administrator instructions 8
Number of video receiver address 43
D
Esprit control page
Live video 57
Live video auto-connect 43
Live video control 58
Live video receiver/transmitter IP address 43
Local com interface - keyboard settings page 48
Local sensitivity 42
55
Recording the video display on the PC 67
Relay follows 45
Relay name 45
Remote receiver/transmitter password 43
Reset this parameter preset 38
Resetting PelcoNet 70
93
S
Select area button 42
Serial interface 10
Serial port function 47
Server push 57
Server push page 55
Snapshots (record from video) 67
Snapshots (viewing) 67
Software upload 35, 69
Software version 10, 35
Spectra/Esprit protocol ID 47
Stop bits 47, 48
Storing files 67
Subnet mask 50
T
Terminal program receiver menu structure 53
Terminal program transmitter menu structure 52
Time server IP address 35
Time stamping 37
Time zone 34
Tracker 42
Trigger relay 45
U
Unified picture detection
Unit date 34
Unit ID 34
Unit IP address 50
Unit name 34
Unit time 34
Upload progress 35
42
V
Video loss alarm 43
Video monitor name 39
Video motion alarm 42
Video on a web browser 57
Video output standard 39
Video page indicators 55
Video quality settings 37
Video receiver IP address 43
Video resolution 38
Video settings configuration page 36
Video transmission 50
Video via transmitter-to-receiver 12
Video watermarking MPEG-4 37
Viewing the video display 67
W
Web browser
94
8
C2908M-B (4/05)
PRODUCT WARRANTY AND RETURN INFORMATION
WARRANTY
Pelco will repair or replace, without charge, any merchandise proved defective in material or
workmanship for a period of one year after the date of shipment.
Exceptions to this warranty are as noted below:
• Five years on FT/FR8000 Series fiber optic products and the following fixed camera models:
CC3701H-2, CC3701H-2X, CC3751H-2, CC3651H-2X, MC3651H-2, and CC3651H-2X.
• Three years on all other fixed camera models (including Camclosure ® Integrated Camera
Systems) and Genex ® Series (multiplexers, server, and keyboard).
• Two years on all standard motorized or fixed focal length lenses.
If a warranty repair is required, the Dealer must contact Pelco at (800) 289-9100 or
(559) 292-1981 to obtain a Repair Authorization number (RA), and provide the following
information:
1. Model and serial number
2. Date of shipment, P.O. number, Sales Order number, or Pelco invoice number
3. Details of the defect or problem
If there is a dispute regarding the warranty of a product which does not fall under the
warranty conditions stated above, please include a written explanation with the product
when returned.
Method of return shipment shall be the same or equal to the method by which the item was
received by Pelco.
®
• Two years on Legacy , CM6700/CM6800/CM8500/CM9500/CM9700 Series Matrix, DF5
and DF8 Series Fixed Dome products.
®
®
• Two years on Spectra , Esprit , and PS20 Scanners, including when used in continuous
motion applications.
• Two years on Esprit ® and WW5700 Series window wiper (excluding wiper blades).
• Eighteen months on DX Series digital video recorders and NVR300 Series network video
recorders.
• One year (except video heads) on video cassette recorders (VCRs). Video heads will be
covered for a period of six months.
• Six months on all pan and tilts, scanners or preset lenses used in continuous motion
applications (that is, preset scan, tour and auto scan modes).
Pelco will warrant all replacement parts and repairs for 90 days from the date of Pelco
shipment. All goods requiring warranty repair shall be sent freight prepaid to Pelco, Clovis,
California. Repairs made necessary by reason of misuse, alteration, normal wear, or accident
are not covered under this warranty.
Pelco assumes no risk and shall be subject to no liability for damages or loss resulting from
the specific use or application made of the Products. Pelco’s liability for any claim, whether
based on breach of contract, negligence, infringement of any rights of any party or product
liability, relating to the Products shall not exceed the price paid by the Dealer to Pelco for
such Products. In no event will Pelco be liable for any special, incidental or consequential
damages (including loss of use, loss of profit and claims of third parties) however caused,
whether by the negligence of Pelco or otherwise.
The above warranty provides the Dealer with specific legal rights. The Dealer may also have
additional rights, which are subject to variation from state to state.
RETURNS
In order to expedite parts returned to the factory for repair or credit, please call the factory at
(800) 289-9100 or (559) 292-1981 to obtain an authorization number (CA number if returned
for credit, and RA number if returned for repair).
All merchandise returned for credit may be subject to a 20% restocking and refurbishing
charge.
Goods returned for repair or credit should be clearly identified with the assigned CA or RA
number and freight should be prepaid. Ship to the appropriate address below.
If you are located within the continental U.S., Alaska, Hawaii or Puerto Rico, send goods to:
Service Department
Pelco
3500 Pelco Way
Clovis, CA 93612-5699
If you are located outside the continental U.S., Alaska, Hawaii or Puerto Rico and are
instructed to return goods to the USA, you may do one of the following:
If the goods are to be sent by a COURIER SERVICE, send the goods to:
Pelco
3500 Pelco Way
Clovis, CA 93612-5699 USA
If the goods are to be sent by a FREIGHT FORWARDER, send the goods to:
Pelco c/o Expeditors
473 Eccles Avenue
South San Francisco, CA 94080 USA
Phone: 650-737-1700
Fax: 650-737-0933
This equipment contains electrical or electronic components that must be recycled properly to comply with Directive 2002/96/EC of the European Union
regarding the disposal of waste electrical and electronic equipment (WEEE). Contact your local dealer for procedures for recycling this equipment.
REVISION HISTORY
Manual #
C2908M
C2908M-A
Date
11/03
2/04
C2908M-B
4/05
Comments
Original version.
Added NET300 receiver menu tree, two NET300 receiver screen captures, and material noting differences between the transmitter and receiver. Revised heading
and figure caption in the instructions documenting how to connect a NET300 to a Genex multiplexer. Noted that pressing Enter in the Software Upload and Configuration Upload boxes causes a unit reset. Revised the Troubleshooting section. Revised the definition for the “Time server IP address” field to remove “NTP.”
Added information, application, and connection drawings about the Local Com Interface – Keyboard feature. Included information on the Video Watermarking
MPEG-4, Video Quality Settings, and Field Mode fields that were added to the Video Configuration page. Updated the menu tree, the Setup page, and the Device
Control page to reflect these changes. Corrected Figures 48 and 49 (now figures 52 and 53) for wall block connections and updated Figure 49 (now Figure 53) in
which a CM9760-NW1 was incorrectly labeled a CM9760-CC1. Added NTSC pixel resolution to the Specifications section.
Pelco, the Pelco logo, Spectra, Genex, Esprit, Camclosure, and Legacy are registered trademarks of Pelco.
© Copyright 2005, Pelco. All rights reserved.
®
Worldwide Headquarters
3500 Pelco Way
Clovis, California 93612 USA
USA & Canada
Tel: 800/289-9100
Fax: 800/289-9150
International
Tel: 1-559/292-1981
Fax: 1-559/348-1120
www.pelco.com
ISO9001
United States
|
Canada
|
United Kingdom
|
The Netherlands
| Singapore | Spain | Scandinavia | France | Middle East