1
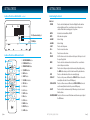
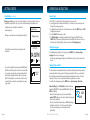
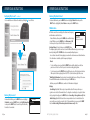
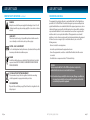
English
Model: iNT170
Instruction Manual
Internet Radio with Dual Alarm Clock
INTRODUCTION
Congratulations on your purchase of the iLuv iNT170. Bringing thousands of worldwide Internet radio
stations right into your home, the iNT170 also provides advanced audio and radio performance that
brings out the best in your music. Remember to keep this manual for future reference.
Internet Radio with Dual Alarm Clock
· Access worldwide internet radio stations powered by vTuner technology
· Powerful built-in speakers allow you to hear your music with depth and clarity
· Large display for easy read
· Dual alarm clock
· 40 preset stations for Internet radio & FM radio (20 Internet radio / 20 FM radio)
· Auxiliary line input for any audio devices with 3.5mm jack
· 3.5mm stereo headphone jack
· LCD dimmer level control (3 steps)
Digital Dual Alarm Clock
· Digital clock display with dual alarm clock
· Auto time update through internet or FM radio
· Wake to Internet radio, FM radio, or buzzer
· Sleep to Internet radio or FM radio
FM Radio
· FM stereo
· PLL digital tuning technology
What’s Included?
· Main unit
· AC adapter
· Remote control (battery included)
· Quick start guide
· Warranty card
iLuv | 1
TABLE OF CONTENTS
INTRODUCTION
GETTING STARTED
1
Location of Controls on the Main Unit
3
4
5
7
1.
2.
3.
4.
5.
6.
7.
8.
GETTING STARTED
Location of Controls on the Main Unit
Location of Controls on the Remote Control Understanding the Controls Screen Displays
OPERATIONAL INSTRUCTIONS
2 | iLuv
General Setup
Setting the Language
Setting the Time and Date
Alarm and Sleep Functions
Connecting to a Network
Internet Radio Mode
Registering an Account
Configuring “My Preferences”
Configuring “My Account”
Checking “My Favourites”
Checking “My Added Stations”
FM Radio Mode
AUX In Mode
System Resetting
9
9
9
10
11
13
16
18
19
20
21
21
22
22
MAINTENANCE & TROUBLESHOOTING GUIDE
23
IMPORTANT SAFETY INSTRUCTIONS
24
SPECIFICATIONS
31
SPEAKERS
NEGATIVE LCD screen
SNOOZE / DIMMER bar
VOLUME control
POWER button
MODE button
MUTE button
AL 1 button
9. AL 2 button
10. SLEEP button
11. PRESET button
12. MENU button
13. BACK / INFO control
14. SELECT / TUNING control
15. HEADPHONE jack
16. AUX IN jack
1
16
2
15
3
4
iNT170 | V10M10_IM_EN_10132008
5
6
7
8
9
10
11
12
13
14
iLuv | 3
GETTING STARTED
GETTING STARTED
Location of Controls on the Main Unit - continued
Understanding the Controls
RJ-45 (network cable) jack
POWER jack
Location of Controls on the Remote Control
1
AL. OFF
2
SNOOZE
DIMMER
MUTE
11
12
3
INTERNET
RADIO
4
5
BACK
FM
AUX
13
MENU
14
6
7
VOL
SELECT
VOL
7
4
8
INFO.
PRESET
15
SLEEP
16
9
10
4 | iLuv
AL 1
AL 2
1. SNOOZE/DIMMER button
2. POWER/AL OFF button
3. INTERNET RADIO button
4. UP, DOWN buttons
5. BACK button
6. SELECT button
7. VOLUME –/+ buttons
8. INFO Button
9. AL 2 button
10. AL 1 button
11. MUTE button
12. FM button
13. AUX button
14. MENU button
15. PRESET button
16. SLEEP button
Main Unit
· POWER
· MODE
· MUTE
· ALARM 1
· ALARM 2
· SLEEP
· VOL+
· VOL–
· PRESET
· MENU
· BACK
· INFO
· SCROLL UP
· SCROLL DOWN
· SELECT
· SNOOZE/DIMMER
Press to enter the standby mode. The radio will display the date and time
when in standby mode. Press a second time to return to the previous
selection. When alarm is sounding, press to stop alarm.
Mode selection: Internet Radio, FM, AUX
Mute and release speakers
Alarm 1 setting
Alarm 2 setting
Press to enter Sleep menu.
Press to increase the volume
Press to decrease the volume
Hold for a few seconds to store a station into the preset. Short press to select
the preset for playback
Press to enter the context menu for selected mode. Press a second time to
return to the previous selection
Press to return to the previously selected menu entry. Repeatedly pressing
the BACK button returns you to the Context menu for the particular mode.
Press to see information about the service currently playing.
Press to scroll up a menu. In FM mode, the SCROLL UP button is also used to
manually tune the radio to the next FM frequency.
Press to scroll down a menu. In FM mode, the SCROLL DOWN button is also
used to manually tune the radio to the previous FM frequency.
Press to select the current menu entry. In FM mode, press to auto scan and
find the stations.
Press to start the Snooze mode if the alarm sounds otherwise press to adjust
the LCD dimmer.
iNT170 | V10M10_IM_EN_10132008
iLuv | 5
6 | iLuv
GETTING STARTED
GETTING STARTED
Understanding the Controls - continued
Screen Displays
Remote Control
· POWER
· MUTE
· INTERNET RADIO
· FM
· AUX
· ALARM 1
· ALARM 2
· SLEEP
· VOL+
· VOL–
· PRESET
· MENU
· BACK
· INFO
· SCROLL UP
· SCROLL DOWN
· SELECT
· SNOOZE/DIMMER
The LCD screen displays various menus, dialogues and displays. When the text is too long to fit on
the screen, it is first shown truncated and after a few seconds, it scrolls slowly so that all text can
be read.
Press to enter the standby mode. The radio will display the date and time
when in standby mode. Press a second time to return to the previous
selection. When alarm is sounding, press to stop alarm.
Mute and release speakers
Press to entry Internet Radio mode.
Press to entry FM radio mode.
Press to entry Aux in mode.
Alarm 1 setting
Alarm 2 setting
Press to enter Sleep menu.
Press to increase the volume
Press to decrease the volume
Press to select the preset for playback
Press to enter the context menu for selected mode. Press a second time to
return to the previous selection
Press to return to the previously selected menu entry. Repeatedly pressing
the BACK button returns you to the Context menu for the particular mode.
Press to see information about the service currently playing.
Press to scroll up a menu. In FM mode, the SCROLL UP button is also used to
manually tune the radio to the next FM frequency.
Press to scroll down a menu. In FM mode, the SCROLL DOWN button is also
used to manually tune the radio to the previous FM frequency.
Press to select the current menu entry. In FM mode, press to auto scan and
find the stations.
Press to start the Snooze mode if the alarm sounds, otherwise press to adjust
the LCD dimmer.
Menus: The iNT170 has three basic menus (FM, Internet and AUX In). Use the SELECT button to
proceed through and select options. A scroll bar on the right of the screen shows if there are
further options above or below those visible.
· Each mode has a Mode menu, with options specific to that mode.
- For example, the FM mode menu has just two options:
Scan setting and Audio setting.
- In addition, each mode menu has two final options:
System settings > and Main menu >. The ‘>’ indicates options
leading to further menus.
· The System settings menu allows access to system settings and
information such as network, time, language and software update.
- Menus with more options than will fit on one screen have a
scroll bar to the right.
· The Main menu allows access to all modes plus sleep and
timer functions.
FM
Scan setting
Audio setting
System settings
Main menu
System settings
Network
Time/Date
Languages
Factory Reset
Software update
* Some menus, for example the System settings menu, have several submenus.
iNT170 | V10M10_IM_EN_10132008
iLuv | 7
GETTING STARTED
OPERATIONAL INSTRUCTIONS
Screen Displays - continued
General Setup
Dialogue screens: Dialogue screens are shown to allow the user to change settings. They vary in
complexity from simple Yes/No options up to the scrollable network password input screen.
1. Place iNT170 on a suitable shelf or table and plug it in to a power outlet.
2. Once plugged in, the unit will automatically turn on. You should see a welcome message ‘iLuv
Starting’ and a moving progress bar.
3. The first time the unit is switched on, it shows the main menu. Press the SELECT button until FM
is highlighted on the menu.
4. Press the SELECT button again to confirm.
5. The FM Now playing screen displays, showing the lowest frequency (87.5 MHz). Press the
SELECT button. The frequency display will increase incrementally as the radio scans up. Once a
station is found, it will play, with the station name shown in the Now playing display.
· As with menus, the selected item is shown with a
white background.
· Dialogue screens mark the current setting with an asterisk (*).
Daylight savings
Daylight savings
OK
· The Standby screen shows the time, date and any active
alarm times.
04/07/2009
04:32PM
07:00AM
· As you cycle through the play modes using the MODE button,
the LCD screen will show a splash screen for each mode. After
one second, the unit enters the selected mode plays the last
station that was playing in that mode. If this is not possible,
the iNT170 will attempt to connect to the selected source by
scanning for stations, networks, or prompting for user input
as appropriate.
8 | iLuv
OFF *
08:30AM
Setting the Language
The default language is English. To change this, press the MENU button > System settings >
Languages > then select your language.
· A list of supported languages will appear on the LCD screen. Scroll up or down to choose from
the list.
Setting the Time and Date
Internet
Radio
The time and date can be updated manually or automatically. Setting manually is simpler, but the
time and date will be lost when power is off. Setting automatically is a little more complicated at
first, but the time and date will be automatically synchronized with external clocks, so it should
only need to be done once. As a result, automatic update is generally more accurate.
To enter the Time settings menu, press the MENU button > System settings > Time/date >
Manual Updating: Select “Set Time/Date”, the date and time are
displayed as MM-DD-YYYY and hh:mm AM/PM with the first value,
MM active (flashing).
· Adjust each value (month, day, year, hour, minute) with the
, and SELECT buttons. As each value is adjusted, the next value
becomes active and flashes.
· When you select the final value (minutes or AM/PM, depending on
whether the clock is set to 12 or 24 hour mode), the display
reverts to the now playing screen and shows the newly
updated time.
iNT170 | V10M10_IM_EN_10132008
Set Time/Date
01 • 01 • 2009
00:00
iLuv | 9
OPERATIONAL INSTRUCTIONS
OPERATIONAL INSTRUCTIONS
Setting the Time and Date - continued
Alarm and Sleep Functions - continued
Automatic Updating: Automatic update works with data sent over FM or by the network. The
clock is only updated when in a corresponding mode, so it is best to select a mode you use
regularly. FM uses time signals broadcast with radio transmissions. Network uses a time signal sent
from the Internet radio portal when in Internet radio mode.
1. Press the MENU button > System Settings > Time/Date > Auto update > then select Update
from, Update from FM or Update from Network.
2. To set the time zone press the MENU button > System Settings > Time/Date > Set timezone >.
3. If your country uses daylight savings, the automatically updated time may be wrong by one
hour. When daylight savings is in effect (during the summer), turn on the Daylight savings
option through Daylight savings > ON
Once the alarm is set, select Save to activate. The screen shows active alarms with an icon at the
bottom left.
· At the set time, the alarm will sound. To temporarily silence it, press the SNOOZE/DIMMER
button. You can change the snooze period (5min, 10min, 15min and 30min) by pressing the
SNOOZE/DIMMER button. The radio returns to standby for the set period, with the silenced
alarm icon flashing.
* The iNT170 will auto-update from the selected source when time information is available.
Alarm and Sleep Functions
As well as a clock/calendar, there are two versatile wake-up alarms
with Snooze function, and a sleep function to turn the system off
after a set period.
Setting the Alarm: To set or change an alarm, either press AL1 /
AL2 buttons or press the MENU button > Main menu > Alarms.
Select the alarm number (1 or 2) then set the following:
· Enable: on/off
· Time
· Mode: Buzzer, Internet radio or FM
· Preset: Last listened, 1-20
· Frequency: Daily, Once, Weekends or Weekdays
· Volume: 0 – 20.
10 | iLuv
Sleep Function: To set the sleep timer, press the MENU button > Main menu > Sleep then choose
from Sleep OFF, 15 Min., 30 Min., 45 Min. or 60 Min. by pressing the SELECT UP and DOWN
buttons. Once you select a sleep period, the system returns to the main menu. Press the MENU
button to return to the “Now playing” screen. The other option is to press the SLEEP button to
achieve sleep function and sleep time.
Connecting to a Network
04:32PM
04/07/2009
07:00AM
Alarms
Enable: On
Time: 06:30 AM
Mode: FM
Preset: 2
Frequency: Daily
08:30AM
For Internet radio mode, you need a network connection. To connect the iNT170 to your network,
you need either a wired router and an ethernet (RJ45 network) cable, or a Wi-Fi wireless router,
together with password key if set.
The only requirement for using this Internet radio is a basic broadband Internet connection.
When you select Internet radio, the iNT170 attempts to connect to a network. If this is the first
time it has tried to connect, or if the stored networks are not accessible, the Network wizard starts
automatically.
· To run the Network wizard manually, press the MENU button >
System settings > Network > Internet wizard.
· Once the wizard starts, enter the following information:
Key:
- If not already established, set the WLAN region (select country/
p@s5W
region from list)
0123456789., ab BKSP
cdefghijk lmnopq
- Network name (select your network from the list)
OK
rstuvwxyzABCDEF
- If connecting to an encrypted wireless network,
GHIJKLMNOPQRSTU CANCEL
the key (password)
· To enter your key, use the SELECT UP and DOWN buttons to
move the cursor through the characters and select. As each
character is selected, the key is built up near the top of
the display.
iNT170 | V10M10_IM_EN_10132008
iLuv | 11
OPERATIONAL INSTRUCTIONS
OPERATIONAL INSTRUCTIONS
Connecting to a Network - continued
Internet Radio Mode
· There are three options accessible by pressing the UP button
before the first characters (0,1,2,3,…) – Backspace, OK
and Cancel.
· Once you have completed entering the key, select OK, and
the iNT170 will try to connect to the selected network.
· If connection fails, the iNT170 returns to the password
entry screen.
· If the network connection is lost, the iNT170 automatically
attempts to reconnect.
Network profiles: The iNT170 remembers the last four wireless
networks it has connected to, and automatically attempts to
connect to whichever one of them it can find.
· You can see the list of registered networks by pressing the MENU
button > System settings > Network > Network profile.
· From here you can delete unwanted networks by turning and
pressing the SELECT button then confirming delete: Yes.
Network settings
Please wait
Connecting.
Connected
Connected
Other options: There are also other options for viewing and manually altering network settings
by pressing the MENU button > System settings > Network. These options are not normally
necessary, but users experienced with networking may find them useful for diagnosing and fixing
network problems.
Note: The iNT170 cannot be used in hotels, airports or other public spaces whose Internet server operates via
HTML, JavaScript or ASP. However, when these locations feature an Ethernet connection, the iNT170 can
function by following these directions:
1. Use a laptop computer to log in to the secured internet service at the hotel, airport, or public space to
establish an Internet connection.
2. After logging on to the server, disconnect the Ethernet cable from the laptop and plug it in to the iNT170.
3. Use the iNT170 Internet Radio as normal.
12 | iLuv
The iNT170 can play thousands of radio stations and podcasts from Internet radio
11:49
around the world though a broadband Internet connection. When
Virgin
Radio
you select Internet radio mode, the iNT170 connects to the Internet Description:
radio portal and provides a list of stations, organized into different
Virgin Radio is the UK’s
only commercial rock and
categories such as Location, Genre, Popular stations, and New
stations. Once you select a station, the iNT170 connects directly to
that station.
The portal also enables multiple lists of favorite stations that you can personalize, for example
Andy’s stations, Joe’s favorites, Talkshows. To use the favorites feature, register your radio with the
portal website as described elsewhere in this manual (see the “Registering an Account” section).
If you have several iNT170 radios, you can register them all on the same account so that each radio
has access to your favorites lists. It is possible to add favorites either directly through the iNT170 or
through any computer with a web browser.
· To enter Internet Radio mode, either press the MODE button until the display shows Internet
Radio or press the MENU button > Main menu > Internet Radio. Another option is to press the
INTERNET RADIO button on remote control.
Note: The station list menu is provided from the Internet radio portal, so it is only accessible when the iNT170 is
connected to the Internet. Station lists and submenus may change from time to time.
There are several ways to select stations.
- Press the MENU button > Last listened.
- Press the PRESET button located on the main unit.
· From the portal pressing the MENU button > Station list > menu:
- My Favorites
- Sations (Browse by Location, Genre, Search stations, Popular stations, New stations)
- Podcasts
- My added stations
If you are already listening to an Internet radio station, you can press the BACK button instead of
the MENU button to return to the last visited menu page.
iNT170 | V10M10_IM_EN_10132008
iLuv | 13
OPERATIONAL INSTRUCTIONS
OPERATIONAL INSTRUCTIONS
Internet Radio Mode - continued
Internet Radio Mode - continued
Last listened: When Internet radio mode restarts, the last-listened station is selected. To select
another recenly used station, press the MENU button > Last listened then one of the stations
listed. Most recent stations appear at the top of the list.
Search: You can also search through Internet broadcasts for stations or podcasts with particular
keywords in their title.
Presets: Presets are stored in the radio and cannot be accessed from other radios.
· To store an Internet radio preset, press and hold the PRESET button until the display shows the
Save preset screen. Select one of the 20 presets to save the currently playing station.
· To select a preset, press the PRESET button briefly, then select one of the listed preset stations.
When a preset station is playing, it shows Pn (P1, P2 etc) in the bottom of the screen.
Note: Operation of presets is identical for Internet radio and FM.
My favorites: Favorites are stored with the Internet radio portal, and are available through all
Internet radios registered on the same account. Before favorites can be used, the radio has to be
registered with the Internet radio portal.
· To store a playing station as a favorite from iNT170, simply press and hold the SELECT button.
The selected station appears in the default favorites list Stations.
· To select a favorite, press the MENU button > Station list > My favourites > [Favourites list]
> [Station].
Browse: To browse Internet broadcasts, press the MENU button > Station list > then either
Stations > or Podcasts >.
Browse through the menus to find broadcasts.
Internet radio
Last listened
Station list
System settings
Main menu
Stations
Location
Genre
Search
Popular
New
· To search, press the MENU button > Station list > then either
Stations > or Podcasts > Search.
Podcasts
Location
Genre
Search
· Enter a keyword by selecting characters then OK. The search entry
screens are similar in operation to the Wi-Fi password entry screen.
For information anout key entry, see the “Connecting to a
Network” section elsewhere in this manual.
Podcasts
WILDE
ABCDEFGHIJKLMNO
PQRSTUVWXYZ 012
3456789
· Select a broadcast from the list.
Search podcasts
The WildeBeat
· For podcasts, you may select from a particular episode.
The WildeBeat
Starting With Fire
Stealth Gear
Bear Cans Revisited, p...
Bear Cans Revisited, p...
Modern Rain gear
Genre
Alternative
Ambient
Big Band
Bluegrass
Blues
Internet radio
BKSP
OK
CANCEL
05:28PM
Starting With Fire
Episodo name:
Starting with Fire
14 | iLuv
iNT170 | V10M10_IM_EN_10132008
iLuv | 15
OPERATIONAL INSTRUCTIONS
OPERATIONAL INSTRUCTIONS
Internet Radio Mode - continued
Registering an Account - continued
“Now Playing” Information: While the stream is playing, the screen shows its name and
description. To view further information about the stream, press the INFO button.
· Each time you press the INFO button, another set of information is displayed, cycling through
description, format/location, reliability, bit rate/codec/sampling rate, playback buffer and
today’s date.
3.To get your Access code, follow the steps below:
· Go into Internet radio mode by pressing the MODE buttons.
Internet
Radio
Registering an Account
To maximize the Internet functions of the iNT170, it is suggested that you establish an account
following these instructions.
1. Open the website, http://www.wifiradio-frontier.com from your Internet browser on your PC.
2. Click on the ‘Register here’ link and follow the on-screen instructions to register an account.
· Press the MENU button and highlight Station list > and press
the SELECT button.
· Highlight Help > and press the SELECT button.
· Highlight Get access code > and press the SELECT button.
· Your access code will be listed on the screen.
16 | iLuv
iNT170 | V10M10_IM_EN_10132008
Internet radio
Last listened
Station list
System settings
Main menu
Internet radio
My Favourites
Stations
Podcasts
My Added Stations
Help
Help
Get access code
FAQ
Get access code
Access code
TBGBCRR
iLuv | 17
OPERATIONAL INSTRUCTIONS
OPERATIONAL INSTRUCTIONS
Registering an Account - continued
Configuring “My Account”
4. Type your e-mail address and create a password
5. Your Wi-Fi radio model is iNT170
6. The benefits of registering are not limited to the ability to browse stations by location, by genre,
by language, New stations, and most popular. Additional, by using a PC, you can establish your
favorite stations online. Any changes in your account will be also changed in your player.
· It is possible to save your favorite stations that you found in the website by clicking the
icon.
You can create different folders for different category of radio stations. My Favorite information
will be automatically synchronized with your player.
Configuring “My Preferences”
1. Once logged into your account, you can edit your account’s details from your
‘My Preferences’ section.
2. Click on the ‘My Preferences’ link to change your account information. This information will
include various details such as your password, email address, add another Wi-Fi radio, and
synchronize your favorite with your radio.
18 | iLuv
iNT170 | V10M10_IM_EN_10132008
iLuv | 19
OPERATIONAL INSTRUCTIONS
OPERATIONAL INSTRUCTIONS
Configuring “My Account” - continued
Checking “My Added Stations”
· You can add stations not listed on the website by clicking the
icon as follows.
· In Internet Radio mode, press the MENU button and highlight Station list > and press the
SELECT button. Highlight My Added Stations > and press the SELECT button.
FM Radio Mode
Checking “My Favourites”
· In Internet Radio Mode, press the MENU button and highlight
Station list > and press SELECT button. Highlight My Favourites
> and press the SELECT button. You will see your folders in My
Favorite’s as shown below.
20 | iLuv
My Favourites
Chris’s folder
Jazz
In FM radio mode, the screen displays the station name, frequency,
11:49
FM
and information about the station.
Alice
97.3
· To enter FM mode, either press the MODE button until the display
Best Music in the World
shows FM Radio or press the MENU button > Main menu > FM.
Another option is to press the FM button on remote control.
Selecting Stations: To find a station, press the SELECT button.
The frequency display starts to run as auto scans the FM band. Alternatively, you can scan up or
down by holding the UP or DOWN button or tune manually with quick presses.
· Once a station is tuned in, the Now playing screen shows the station name and other information.
If no information is available, only the frequency is displayed.
· Presets:
- To store an FM preset, press and hold the PRESET button until the display shows the Save
preset screen. Select one of the 20 presets to save the currently playing station.
- To select a preset, press the PRESET button briefly, then select one of the listed preset stations.
When a preset station is playing, it shows Pn (P1, P2 etc) in the bottom right of the screen.
“Now Playing” Information: Stereo broadcasts are indicated with an icon at the top of the screen.
To view further information about the broadcast, press the INFO button.
· Each time you press the INFO button, another set of information is displayed.
Settings:
· Scan Settings: By default, FM scan stops at any available station. This may result in a poor
signal-to-noise ratio (hiss) from weak stations. To change the scan settings to stop only at stations
with good signal strength, press the MENU button > Scan setting > Strong stations only? > Yes.
· Audio Settings: By default, all stereo stations are reproduced in stereo. For weak stations, this
may result in a poor signal-to-noise ratio (hiss). To play weak stations in mono, press the MENU
button > Audio setting > FM weak reception: Listen in mono only? > Yes.
iNT170 | V10M10_IM_EN_10132008
iLuv | 21
OPERATIONAL INSTRUCTIONS
MAINTENANCE AND TROUBLESHOOTING GUIDE
AUX In Mode
Maintenance
AUX in mode plays audio from an external source like an MP3 player.
To play audio with AUX In mode:
1. Turn the volume low on both the iNT170 and, if adjustable, the
audio source device.
2. Connect the external audio source to the AUX In 3.5 mm
stereo socket.
3. Either press the MODE button until the display shows AUX in or
press the MENU button > Main menu > AUX in. Another option
is to press the AUX button on remote control.
4. Adjust the volume of the iNT170 (and, if necessary, the audio
source device) as required.
· Place the unit on a level surface away from sources of direct sunlight or excessive heat.
· Protect your furniture when placing your unit on a natural wood and lacquered finish. A cloth or
other protective material should be placed between it and the furniture.
· Clean your unit with a soft cloth moistened only with mild soap and water. Stronger cleaning
agents, such as Benzine, thinner or similar materials can damage the surface of the unit.
Auxiliary input
Audio In
Today’s Date:
07/04/2009
System Resetting
If you make a mistake, (ie. setting the incorrect language), you can reset unit by pressing and
holding the MODE button for approximately three (3) seconds with the power on.
22 | iLuv
13:54
Troubleshooting
· The iNT170does not turn on
- The AC plug may not be connected properly. Check the connection.
- The wall outlet may not function. Try another outlet.
· FM Stations do not broadcast clearly
- Check the Scan Settings and Audio Settings.
- Rotate the unit until reception is clearer; signal may be weak. Relocate the FM radio antenna to
an open space.
· Cannot connect to Network
- Follow instructions for connecting to a network.
iNT170 | V10M10_IM_EN_10132008
iLuv | 23
USER SAFETY GUIDE
USER SAFETY GUIDE
WARNING
· TO PREVENT FIRE OR SHOCK HAZARD. DO NOT EXPOSE THIS APPLIANCE TO RAIN OR MOISTURE.
· THIS APPLIANCE SHALL NOT BE EXPOSED TO DRIPPING OR SPLASHING WATER AND THAT NO
OBJECT FILLED WITH LIQUIDS SUCH AS VASES SHALL BE PLACED ON APPARATUS.
CAUTION
RISK OF ELECTRIC
SHOCK DO NOT OPEN
WARNING: TO REDUCE THE RISK OF ELECTRIC SHOCK, DO NOT REMOVE
COVER (OR BACK). NO USER-SERVICABLE PARTS INSIDE. REFER SERVICING TO
QUALIFIED SERVICE PERSONNEL.
The lightning flash with the arrowhead symbol, within an equilateral triangle is
entended to alert the use to the presence of uninsulated “dengerous voltage”
within the product’s enclosure that may be of significant magnitude to
constitute a risk of electric shock to people.
The exclamation point within an equilateral triangle is entended to alert the
user to the presence of important operating and maintenance (serviving)
instructions in th eliterature accompanyinig the appliance.
IMPORTANT SAFETY INSTRUCTIONS
1. Read these instructions
2. Keep these instructions
3. Heed all warnings
4. Follow all instrtuctions
5. Do not use this apparatus near water
6. Clean only with dry cloth
7. Do not block any ventilation openings. Install in accordance with the manufacturer’s instructions
8. Do not install near any heat sources such as radiators, heat registers, stoves, or other apparatus
(including amplifiers) that produce heat
9. Do not defeat the safety purpose of the polarized or grounding-type plug. A polarized plug
has two blades with one wider than the other. A grounding type plug has two blades and a
third grounding prong. The wide blade or the third prong are provided for your safety. If the
24 | iLuv
IMPORTANT SAFETY INSTRUCTIONS - continued
provided plug does not fit into your outlet, consult an electrician for replacement of the
obsolete outlet.
10. Protect the power cord from being walked on or pinched particularly at plugs, convenience
receptacles, and the point where they exit from the apparatus.
11. Only use attachments / accessories specified by the manufacturer.
12. Use only with the cart, stand, tripod, bracket, or table specified by the
manufacturer, or sold with the apparatus. When a cart is used, use
caution when moving the cart / apparatus combination to avoid injury
from tip-over.
13. Unplug this apparatus during lightning storms or when unused for long
periods of time.
14. Refer all servicing to qualified service personnel. Servicing is required when the apparatus has
been damaged in any way, such as power-supply cord or plug is damaged, liquid has been
spilled or objects have fallen into the apparatus, the apparatus has been exposed to rain or
moisture, does not operate normally, or has been dropped.
15. Grounding or Polarization – This product may be equipped with a polarized alternating-current
line plug (a plug having one blade wider than the other). This plug will fit into the power outlet
only one way. This is a safety feature. If you are unable to insert the plug fully into the outlet, try
reversing the plug. If the plug should still fail to fit, contact your electrician to replace your
obsolete outlet. Do not defeat the safety purpose of the polarized plug.
Alternate Warnings – This product is equipped with a three-wire grounding-type plug, a plug
having a third (grounding) pin. This plug will only fit into a grounding-type power outlet. This
is a safety feature. If you are unable to insert the plug into the outlet, contact your electrician to
replace your obsolete outlet. Do not defeat the safety purpose of the grounding-type plug.
16. Ventilation – Slots and openings in the cabinet are provided for ventilation and to ensure
reliable operation of the product and to protect it from overheating, and these openings must
not be blocked or covered. The openings should never be blocked by placing the product on
a bed, sofa, rug, or other similar surface. This product should not be placed in a built-in
installation such as a bookcase or rack unless proper ventilation is provided or the
manufacturer’s instructions have been adhered to.
17. The MAINS plug or an appliance coupler is used as the disconnect device, the disconnect
device shall remain readily operable.
iNT170 | V10M10_IM_EN_10132008
iLuv | 25
USER SAFETY GUIDE
USER SAFETY GUIDE
IMPORTANT SAFETY INSTRUCTIONS - continued
FCC NOTICE TO A USER IN USA
CLEANING
Always disconnect unit from power supply before attempting to clean it. Use soft
clothmoistened with soapy water, and wipe gently. Do not use solvents or abrasive
materials.
LASER SAFETY
This unit uses laser technology. Only a qualified professional should remove the
cover or attempt to service this device, due to possible eye injury.
CAUTION – CLASS 1 LASER PRODUCT
Use of controls adjustments and/or performance of procedure other than specified
herein may result in hazardous radiation exposure.
DANGER
Invisible laser radiation when open and interlock failed or defeated. Avoid direct
exposure to beam. CAUTION: HAZAROUS LASER RADIATION WHEN OPEN AND
INTERLOCK DEFEATED.
YOU CAN HELP TO PROTECT THE ENVIRONMENT!
Please remember to respect the local regulations: Hand in the non-working
electrical equipment to an appropriate waste disposal center.
FOR USED BATTERIES
Disposed of the used batteries properly. Please follow the local regulations for the
battery disposal.
26 | iLuv
This equipment has been tested and found to comply with the limits for a Class B digital device,
pursuant to Part 15 of the FCC Rules. These limits are designed to provide reasonable protection
against harmful interference in a residential installation. This equipment generates, uses, and can
radiate radio frequency energy and, if not installed and used in accordance with the instructions,
may cause harmful interference to radio communications. However, there is no guarantee that
interference will not occur in a particular installation. If this equipment does cause harmful
interference to radio or television reception, which can be determined by turning the equipment
off and on, the user is encouraged to try to correct the interference by one or more of the
following measures:
· Reorient or relocate the receiving antenna.
· Increase the separation between the equipment and receiver.
· Connect the equipment into an outlet on a circuit different from that to which the receiver
is connected.
· Consult the dealer or an experienced radio / TV technician for help.
FCC RULES
This device complies with Part 15 of the FCC Rules. Operation is subject to the
condition that this device does not cause harmful interference.
Note:Do not make changes or modify the device in any way. Changes or modifications
not expressly approved by the party responsible for compliance could void the
user’s authority to operate the equipment.
iNT170 | V10M10_IM_EN_10132008
iLuv | 27
USER SAFETY GUIDE
USER SAFETY GUIDE
FCC NOTICE TO A USER IN USA - continued
IC NOTICE TO A USER IN CANADA
IMPORTANT NOTES ON HEARING
Your hearing is very important to you and to us, so please take care when operating
this equipment. We strongly recommend you to follow the guideline below in order to
prevent possible damage or loss of hearing.
If you continuously listen to the loud sounds, your hearing will adapt to continuous
loud sounds and will give you the impression that the volume has been reduced. What
seems normal to you may in fact be harmful. To guard against this BEFORE YOUR
HEARING ADAPTS, set the volume at a low level and slowly increase the volume level
until you can hear comfortably and clearly without distortion. Damage to your hearing
is accumulative and is irreversible. Any ringing or discomfort in the ears indicates that
the volume is too loud. Once you have established a comfortable listening level, DO
NOT INCREASE THE VOLUME LEVEL FURTHER.
In the use of headphones, please take more attention. Hearing experts say that
listening to a loud music can damage your hearing, especially when listening to music
with headphones.
Since digital circuitry may cause interference to other radio or television tuners nearby, switch this
unit off when not in use or move it away from the affected radio/television tuner.
NOTE: This digital apparatus does not exceed the Class B limits for radio noise emissions from
digital apparatus as set out in the Radio Interference Regulations of Industry Canada. These limits
are designed to provide reasonable protection against harmful interference in a residential
installation. This equipment generates, uses and can radiate radio frequency energy and, if not
installed and used in accordance with the instructions, may cause harmful interference to radio
communications. However, there is no guarantee that interference will not occur in a particular
installation. If this equipment does cause harmful interference to radio or television operation
(which can be determined by turning the equipment off ), the user is encouraged to try to correct
the interference by one or more of the following measures:
· Reorient or relocate the receiving antenna.
· Increase the separation between the equipment and receiver.
· Connect the equipment into an outlet on a circuit different from that to which the receiver
is connected.
· Consult the dealer or an experienced radio / TV technician for help.
WARNING!
• The apparatus shall not be exposed to dripping or splashing and that no objects
filled with liquids, such as vases, shall be placed on apparatus.
• Mains plug is used as the disconnect device. It shall remain readily operable and
should not be obstructed during intended use. To be completely disconnected, the
apparatus from supply mains, the mains plug of the apparatus shall be disconnected
from the mains socket outlet completely.
28 | iLuv
iNT170 | V10M10_IM_EN_10132008
iLuv | 29
USER SAFETY GUIDE
SPECIFICATIONS
ADDITIONAL IMPORTANT INSTRUCTIONS
· Place the apparatus with some distances from the nearby objects or walls for sufficient
ventilations. The ventilation should not be impeded by covering the ventilation openings with
items such as newspapers, table-cloths, curtains, etc.
· No naked flame sources such as lighted candles should be placed on the apparatus.
· Dispose of used batteries properly. Follow the local regulation for the battery disposal.
· Use this apparatus in the moderate climates. It is recommended not to use this apparatus such in
a lighting storm.
· Radio frequency
- FM: 87.5MHz – 108MHz
· Audio output: 2.5WRMS(L) + 2.5WRMS(R) @ 1%THD
- Total: 5WRMS / 10WPEAK / 100WPMPO
· Connectivity
- 3.5mm stereo headphone jack
- 3.5mm AUX in jack
- FM antenna
- RJ-45
· Power requirement
- AC100V~240V 60/50Hz
· Power consumption: ≤18W
· Dimensions (W x H x D): 11” x 4.4” x 7” (280mm x 112mm x 178mm)
· Unit weight: 2.8lbs (1.27kg)
30 | iLuv
iNT170 | V10M10_IM_EN_10132008
iLuv | 31
MEMO
THANK YOU FOR YOUR PURCHASE
Visit our website at www.i-Luv.com
©2008 www.i-Luv.com
iLuv is a trademark of jWIN Electronics Corp. Features and specifications are subject to change without prior notification. vTuner is a trademark of NEMS. Ltd.
© 2008 jWIN Electronics Corp. All rights reserved. No portion of this printed material or product enclosed herewith including design, shape or graphics, may
be reproduced or transmitted in any form without the expressed written consent of jWIN Electronics Corp. by any means, electronic or mechanical, including
photocopying, recording or use of an information storage and retrieval system. Any unauthorized distribution or reproduction of this printed material or
product, or any portion thereof, will be prosecuted to the fullest possible extent of the law.
Printed in China