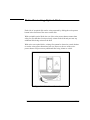
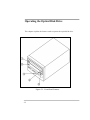
1
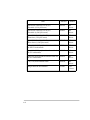
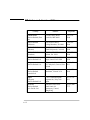
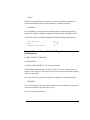
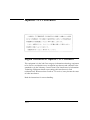
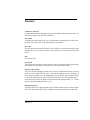
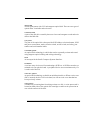
HP SureStore Optical 2600fx
Optical Disk Drive
User’s Guide
Notice
This document contains information that is protected by copyright. All rights are
reserved. No part of this document may be photocopied, reproduced, or translated to
another language without the prior written consent of Hewlett-Packard Company.
The information contained in this document is subject to change without notice.
Hewlett-Packard makes no warranty of any kind with regard to this printed
material, including, but not limited to, the implied warranties of merchantability and
fitness for a particular purpose. Hewlett-Packard shall not be liable for errors
contained herein or for incidental or consequential damages in connection with the
furnishing, performance, or use of this material.
© Hewlett-Packard Company, 1996
iii
Publication History
New editions of this manual incorporate all material updated since the previous
edition. The manual printing date and part number indicate its current edition. The
printing date changes when a new edition is printed. (Minor corrections and updates
incorporated at reprint do not cause this date to change.)
Part number C1114-90000
iv
Edition 1
February 1996
About This Guide
This user’s guide includes:
Chapter 1
set-up information for the HP SureStore Optical 2600fx optical disk
drive
Chapter 2
information about choosing and using optical disks
Chapter 3
front panel control description, operating instructions, and
troubleshooting information
The Reference section includes:
• optical disk library supplies
• HP sales offices
• safety and regulatory information
• warranty information
• service information
Glossary of Terms
Index
v
Typographical Conventions
The following typographical conventions are used in this guide.
Caution
Caution calls attention to an operating procedure or practice which could result in damage
to the product if not correctly performed. Do not proceed beyond this box until you fully
understand and meet the indicated conditions.
Note
A note calls attention to information which can be helpful in understanding the operation
of the product.
vi
Contents
Setting up the HP SureStore Optical 2600fx
Preparing the Environment ....................................................... 1-3
Clearance Requirements ........................................................ 1-3
Location Requirements........................................................... 1-3
Rear Panel Features ................................................................... 1-4
Setting the SCSI ID .................................................................... 1-6
Setting the Operation Mode ....................................................... 1-7
Connecting to the Host Computer ............................................. 1-8
Troubleshooting ........................................................................ 1-10
Using Optical Disks
Choosing Optical Disks ..............................................................
Labeling Optical Disks ...............................................................
Write-Protecting Optical Disks ..................................................
Maintaining Optical Disks .........................................................
2-3
2-4
2-5
2-6
Operating the Optical Disk Drive
Identifying Front Panel Features .............................................. 3-3
Manually Ejecting Disks ............................................................ 3-4
Service and Supplies
Supplies and Accessories ........................................................... A-3
Warranty and Service Information ........................................... A-5
Assistance from your local dealer ......................................... A-5
Assistance from Hewlett-Packard......................................... A-5
Contents-1
One-Year Limited Hardware Warranty .................................... A-7
Hewlett-Packard Service Centers ........................................... A-11
Hewlett-Packard Service in the U.S.................................... A-11
Hewlett-Packard Service Worldwide ................................... A-11
HP Sales and Service Offices ................................................... A-12
Configuring to HP-UX 10.0
Configuring to an HP-UX 10.0 Host .......................................... B-2
Safety and Regulatory Information
FCC Radio Frequency Interference Statement (USA Only) .... C-3
Manufacturer’s Declaration
Sound Emission .......................................................................... C-4
European Declaration of Conformity ........................................ C-5
LASERTURVALLISUUS ................................................................................ C-6
English Translation of Finnish Regulation...........................C-8
United Kingdom Telecommunications
Act 1984 ...................................................................................... C-9
Japanese VCCI Statement ....................................................... C-10
English Translation of Japanese VCCI Statement.............C-10
Glossary
Index
Contents-2
Figures
Rear Panel Features ..................................................................
Proper Label Positions ..............................................................
Write-Protect Button Location ..................................................
Front Panel Features ................................................................
1-4
2-4
2-5
3-2
Contents-3
Contents-4
1
Setting up the
Optical Disk Drive
Setting up the HP SureStore Optical 2600fx
This chapter discusses the environment, hardware and procedures that are
necessary to connect a 2600fx optical disk drive to the host computer:
• preparing the environment
• understanding the rear panel
• setting up the optical disk drive address
• choosing the operation mode
• connecting the 2600fx drive to the host system
• preparing the host computer for use with the 2600fx
• troubleshooting
1-2
Preparing the Environment
The following environmental factors will help ensure top performance of your
optical disk drive.
Clearance Requirements
A minimum of 70-80 mm (3 in.) is required behind the rear panel and in front of
the optical disk drive for air circulation.
Location Requirements
Position the drive away from sources of particulate contamination such as
frequently-used doors and walkways, printers, stacks of supplies that collect
dust, and smoke-filled rooms.
1-3
Rear Panel Features
Identify the following rear panel features before you connect the
optical disk drive to the host system.
Figure 1-1: Rear Panel Features
1-4
The following numbers correspond to the numbers in the drawing on the
previous page.
1
Operation mode switch
Used to choose the operating mode. Refer to
“Setting the Operation Mode” in this section.
2
SCSI ID switch
Used to set the SCSI ID.
3
Power connector
Connection for power cord.
4
On/Off switch
Used to switch power on or off.
5
SCSI connectors
Two connectors that allow SCSI devices to
be daisy-chained. If no other SCSI device exists on the chain after the optical drive, a terminator must be connected to the unused
connector.
1-5
Setting the SCSI ID
Follow these steps to set the SCSI ID.
Caution
Before disconnecting power to any device on the SCSI bus, make sure the bus is
inactive. Switching off power while the SCSI bus is active can result in data loss
or indeterminate bus states.
1.
Make sure the power to the drive is switched off.
2.
Locate the SCSI ID switch on the rear panel of the disk drive. Refer to
Figure 1-1, “Rear Panel Features.”
3.
To set the SCSI ID, push the appropriate button with a small
screwdriver or the point of a pen:
• the button above the operation mode window decreases the number by
one
• the button below the operation mode window increases the number by one
Note
If you change the SCSI ID, you must power cycle the drive so that the host recognizes the
new ID.
1-6
Setting the Operation Mode
The mode selection switch designates operating mode of the 2600fx:
• Select 0 to operate the optical disk drive as an optical memory device.
• Select 1 to operate the optical disk drive as a direct access device.
Hewlett-Packard recommends operating the optical disk drive as an optical
memory device. The direct access mode can be used with systems that do not
recognize optical memory devices.
To change the operation mode, push the appropriate button with a small
screwdriver or the point of a pen:
• the button above the operation mode window decreases the number by one
• the button below the operation mode window increases the number by one
Note
If you change the operation mode, you must power cycle the drive so that the host
recognizes the new mode.
1-7
Connecting to the Host Computer
When you are ready to connect the optical disk drive to your host computer, note
the following cautions. Then complete the steps below.
Caution
Perform a full system backup prior to connecting the optical disk drive to the host computer for full data protection.
Verify that the bus is inactive before disconnecting power to any device on the SCSI bus.
Shutting off any device while the SCSI bus is active can result in data loss or
indeterminate bus states.
Remove inserted disks before moving the drive. Damage to the optical mechanism can
occur if the drive is moved or bumped while the power is off and a disk is inserted.
1.
Make sure the power is switched off on both the computer and the
optical disk drive.
2.
Connect a SCSI cable from the optical disk drive to the host or to the
last peripheral which has been daisy-chained.
3.
Connect a SCSI terminator to the last device in the chain.
Note
The length of the SCSI cable cannot exceed 6 meters, including the internal cable length
of all peripherals on the SCSI bus. The optical disk drive internal cable length is 0.3 m.
4.
Plug one end of the power cord into the AC line connector on the back
of the optical disk drive and the other end into the power outlet.
5.
Press the power switch on the rear of the optical disk drive so that it is
in the “ON” position.
6.
Switch on the power to the host computer.
1-8
Note
For some host computers to recognize the optical disk drive, the power to the disk drive
must be switched on before the power to the host computer.
7.
Install the drivers appropriate to your host system.
If you are connecting the optical disk drive to an HP-UX® 10.0 host,
refer to Appendix B for configuration information.
If you purchased a software package for use with this optical drive,
consult the software user’s guide for information on how to install the
drivers.
1-9
Troubleshooting
If you are having problems with the optical disk drive, check to make sure:
•
•
•
•
the power cord connection is tight
the SCSI cables are connected properly
the power switch located on the rear panel is ON
the software drivers are loaded properly
If the above actions do not solve the problem, contact a service representative.
Refer to Appendix A for a list of Hewlett-Packard offices.
1-10
2
Using Optical Disks
Using Optical Disks
The optical disks that you use in the optical disk drive are an integral part of the
storage process. This chapter provides information on the following:
• choosing an optical disk
• labeling an optical disk
• maintaining an optical disk
• write-protecting an optical disk
Note
For top performance and reliability, Hewlett-Packard recommends HP-labeled optical
disks that have been fully tested for use with HP’s optical products. Purchase these disks
through any HP-authorized dealer, or order them through HP Direct. See “Supplies and
Accessories”, Appendix A, for ordering information.
2-2
Choosing Optical Disks
Optical disks are available in three capacities: 650 Mbytes, 1.3 Gbytes, and 2.6
Gbytes. The optical disk drive can read from and write to both 1.3 Gbyte disks
and 2.6 Gbyte disks. The drive can read from, but not write to, 650 Mbyte disks.
To receive maximum storage capacity, you should choose 2.6 Gbyte optical
disks.
Two types of optical disks are available: rewritable disks and write-once disks.
To choose which type of disk to use, consider these points:
• rewritable optical disks-- data can be repeatedly written and erased
• write-once optical disks--data can be written only once, and the data cannot
be altered or erased. If you have a need for data security and audit trails,
write-once disks may be your best disk choice.
Both rewritable and write-once disks come in two sector sizes: 1024 bytes/sector
and 512 bytes/sector. The sector size you choose depends upon what type of
operating system and software you are running on your computer. Refer to your
computer system documentation or your optical driver software documentation
to see which format is supported on your computer. The information is probably
listed under optical disk sector size or optical disk format.
Note
Do not use write-once disks in a computer system that does not support write-once disks.
Check your computer system reference manuals to determine the disk types that are
supported.
2-3
Labeling Optical Disks
Make it a practice to label your optical disks. Adhesive labels are provided with
each disk. You can use the following labeling suggestions:
• date of format or initialization
• disk owner (group/department, etc.)
• storage purpose (backup, old version of operating system, etc.)
Apply the label to the optical disk in an area that does not interfere with the
movement of the metal shutter. On side A of an optical disk, the correct label
position is just to the left of the metal shutter; on side B, it is just to the right of
the metal shutter. See the figure below for proper label placement.
Caution
If a label is applied incorrectly, the optical disk may get caught in the drive.
.
Figure 2-1: Proper Label Positions
2-4
Write-Protecting Optical Disks
Each side of an optical disk can be write-protected by sliding the write-protect
button in the direction of the arrow on the disk.
With rewritable optical disks, the use of the write protect button ensures data
safety for files that have been previously written to the disk and prevents any
additional files being written to the disk.
With write-once optical disks, existing files cannot be altered or erased whether
or not the write-protect button has been set. However, the use of the writeprotect button will prevent any additional files being written to a disk.
Figure 2-2: Write-Protect Button Location
2-5
Maintaining Optical Disks
Follow these guidelines to maintain your disk:
•
•
•
•
•
•
•
•
•
•
2-6
Do not expose the disk to extreme magnetic fields.
Do not expose the disk to dust particles.
Do not expose the disk to extreme temperatures or extreme humidity.
Do not drop the disk.
Do not open the shutter and touch the disk surface.
Do not take the disk cartridge apart.
Do not clean the disk’s surface.
Do not insert disks with loosely attached labels into the drive.
Remove the old label before applying a new one.
Store the disk in a clean, safe place when it is not in use.
3
Operating the
Optical Disk Drive
Operating the Optical Disk Drive
This chapter explains the features used to operate the optical disk drive.
Figure 3-1: Front Panel Features
3-2
Identifying Front Panel Features
The following list of features corresponds to the numbers in Figure 3-1:
1
Disk slot
A slot for inserting optical disks
2
Activity indicator
Remains lit while the drive is loading or unloading a disk during the powerup selftest sequence, and any time the drive is being
accessed.
3
Power indicator
Remains lit while the power is on
4
Eject tool opening
An access hole for the eject tool. In an emergency, such as a power outage, the disk can
be manually ejected by inserting the eject
tool into this opening. Read “Manually Ejecting Disks” on the next page.
5
Eject button
Pressed to eject the disk from the drive. The
disk does not eject if a SCSI Prevent/Allow
Media Removal command has been issued, or
if power to the drive is off.
3-3
Manually Ejecting Disks
The optical disk drive does not automatically eject an optical disk if a power
failure occurs. An eject tool is shipped with the optical disk drive to use for
manually ejecting a disk.
Follow these steps to manually remove a disk from the optical drive:
1.
Disconnect all power to the drive.
2.
Insert the eject tool into the small round hole in the front panel of the
drive, push the eject tool firmly, and the disk will eject.
Note
After ejecting a disk, the drive remains in “eject position” until power is restored. At that
time, the drive automatically resets itself.
3-4
A
Supplies and Service
Service and Supplies
This section provides information on the following topics:
• supplies and accessories
• sales and service offices
• warranty and service information
A-2
Supplies and Accessories
A full range of computer supplies may be ordered through a Hewlett-Packard
authorized dealer or sales office, or by phoning or writing HP Direct.
Call 800-752-0900 for the location of your nearest authorized Hewlett-Packard
dealer.
To contact a Hewlett-Packard sales representative, see “HP Sales and Service
Offices” in this section for a list of addresses and phone numbers of HP sales
offices.
To phone HP Direct call 800-538-8787; to write to HP Direct use the following
address:
HP Direct
Hewlett-Packard
P.O. Box 58195
Santa Clara, California 95052
The table on the following page lists basic supplies and parts, and indicates the
supplier or the appropriate ordering method (if ordering inside the United
States).
For customer direct ordering:
Customer Support Center
1-970-635-1000
If you wish to place an order from outside the United States, contact your local
Hewlett-Packard sales office or your authorized dealer. A list of world-wide
sales office locations is in this section.
A-3
Item
A-4
Part No.
Source
Optical Disk Cartridge (2.6-Gbyte)
Rewritable (512 bytes/sector)
92279F
HP
Direct
Optical Disk Cartridge (2.6-Gbyte)
Rewritable (1,024 bytes/sector)
92280F
HP
Direct
Optical Disk Cartridge (2.6-GByte)
Write-Once (512 bytes/sector)
92289F
HP
Direct
Optical Disk Cartridge (2.6-Gbyte)
Write-Once (1,024 bytes/sector)
92290F
HP
Direct
0.5 m (1.6 ft) SCSI peripheral interface cable
for HP-UX workstations
92222A
HP
Direct
1 m (3.3 ft) SCSI peripheral interface cable for
HP-UX workstations
92222B
HP
Direct
2 m (6.6 ft) SCSI peripheral interface cable for
HP-UX workstations
92222C
HP
Direct
1 m (3.3 ft) SCSI extender cable
92222D
HP
Direct
Single-ended SCSI terminator
K2291
HP
Direct
Warranty and Service Information
Hewlett-Packard and its dealers stand behind the HP product you have
purchased. Your best source of support may be your Hewlett-Packard dealer or
Hewlett-Packard, depending on how your equipment was purchased. Upgraded
services beyond the warranty coverage must be purchased from your HewlettPackard dealer or Hewlett-Packard. Your warranty statement appears in this
section. Please read it carefully and keep it for your records.
Assistance from your local dealer
If your optical drive was purchased from a Hewlett-Packard dealer (or an
independent system house that sells Hewlett-Packard products), your dealer is
the best source of assistance; they know you, your needs, and your
configuration. Your dealer has access to special support resources and programs
at Hewlett-Packard. Contact your dealer for details on available maintenance
and technical support options.
Assistance from Hewlett-Packard
Hewlett-Packard Personal Computer Dealer Centers and the world-wide
network of Hewlett-Packard Sales and Service Offices provide high-quality,
professional hardware support. In addition, the following services are available
to all customers who have Hewlett-Packard PC peripherals:
Facsimile Information Service:
To better serve our customers, Hewlett-Packard has established a 24-hour, 7days a week online facsimile information system, HP FIRST (FAX Information
Retrieval Support Technology). HP FIRST has the latest application notes and
other information for your optical drive. This system also includes the latest
A-5
support information on current HP peripheral products. The available
information includes:
• application notes
• product data sheets
• accessory information
• compatible software lists
To use HP FIRST:
• From your fax machine, dial (208) 344-4809.
• A recorded voice asks you to select the information for a particular product
using the touchtone key pad of your FAX machine.
• When you have completed your selection, press the START key on your
FAX machine and FAX transmission begins.
To get help from the Personal Peripherals Assist Line:
If your dealer cannot answer all your questions and the information is not
available to you through HP FIRST, you can call the Hewlett-Packard
Personal Peripheral Assist Line, (208) 323-2551. This service is available
from 7 AM to 5 PM Mountain Standard Time on Mondays, Tuesdays,
Thursdays, Fridays, and from 7 AM to 4 PM Wednesdays.
A-6
One-Year Limited Hardware Warranty
Hewlett-Packard warrants this peripheral/accessory against defects in materials
and workmanship for a period of one year from receipt by the customer unless
an alternate warranty coverage is selected by the customer. If Hewlett-Packard
receives notice of such defects during the warranty period, Hewlett-Packard
will, at its option, either repair or replace products which prove to be defective.
Should Hewlett-Packard be unable to repair or replace the product within a
reasonable amount of time, the customer’s alternate remedy shall be a refund of
the purchase price upon return of the product to Hewlett-Packard.
This warranty gives the customer specific legal rights. Other rights, which vary
from state to state or province to province, may be available.
Exclusions
The above warranty shall not apply to defects resulting from improper or
inadequate maintenance by the customer, customer-supplied software or
interfacing, unauthorized modification or misuse, operation outside of the
environmental specifications for the product, or improper site preparation and
maintenance.
Warranty Limitations
HEWLETT-PACKARD MAKES NO OTHER WARRANTY, EITHER
EXPRESSED OR IMPLIED, WITH RESPECT TO THIS PRODUCT.
HEWLETT-PACKARD SPECIFICALLY DISCLAIMS THE IMPLIED
WARRANTIES OF MERCHANTABILITY OR FITNESS FOR A
PARTICULAR PURPOSE.
In any state or province which does not allow the foregoing disclaimer, any
implied warranty of merchantability or fitness for a particular purpose imposed
by law in those states or provinces is limited to the one-year duration of the
written warranty.
A-7
Exclusive Remedies
THE REMEDIES PROVIDED HEREIN ARE THE CUSTOMER’S SOLE AND
EXCLUSIVE REMEDIES. IN NO EVENT SHALL HEWLETT-PACKARD BE
LIABLE FOR ANY DIRECT, INDIRECT, SPECIAL, INCIDENTAL, OR
CONSEQUENTIAL DAMAGES, WHETHER BASED ON CONTRACT,
TORT, OR ANY OTHER LEGAL THEORY.
In any state or province which does not allow the foregoing exclusion or
limitation of incidental or consequential damages, the customer may have other
remedies.
Obtaining service
To maintain the warranty, you must have your optical drive serviced by an
authorized repair depot in the country of original purchase. Return your optical
drive to a Hewlett-Packard Dealer Repair Center or a designated HewlettPackard Repair Center. See the following pages for a list of designated HewlettPackard Repair Centers .Contact your Hewlett-Packard Dealer Repair Center for
instructions before returning your optical drive for service. If you return your
optical drive to a designated Hewlett-Packard Field Repair Center for service,
you must prepay all shipping charges, duty, and taxes. Except for products
returned to the customer from another country, Hewlett-Packard will pay for
return shipment to the customer.
Before you send your optical drive to a Hewlett-Packard Dealer Repair Center or
a designated Hewlett-Packard Field Repair Center, insure the optical drive and
follow the re-packing guidelines below. Enclose a completed Service
Information Form (on the following page), a copy of proof of purchase. I
Service after the warranty period expires
If your optical drive fails after the warranty period, contact an authorized
Hewlett-Packard Dealer Repair Center or a designated Hewlett-Packard Repair
Center. If you have a Hewlett-Packard Maintenance Agreement, request service
under your agreement.
Repacking guidelines for returning your optical drive
• Remove the optical disk.
• Use the original shipping container and packing materials, if possible.
• Enclose the completed Service Information Form (included in this section).
A-8
Service Information Form
When requesting service, please complete this form for the HP Field Repair Center or an
authorized HP Dealer Repair Center.
This form must be shipped with your equipment. Service cannot begin until we have this
information. Be sure you have followed the repacking guidelines listed earlier in this
section of the manual.
Who is returning this equipment?
Company/Institution_______________________________________________
Date _____________
Person to Contact_____________________________________Phone _______
Alternate Contact ____________________________________Phone________
What is being sent?
Model Number________________________ Serial Number ________________
Have you included an optical disk? Yes_____ No ______
Returning Shipping Address:
__________________________________________________________________
__________________________________________________________________
How will you pay for the repairs?
Except for contract and warranty services, a credit card number or purchase order
number and authorized signature must accompany any request for service. Standard
repair prices may be obtained by contacting a Repair Center.
Warranty: purchased/received date _______________________________
(Enclose proof of purchase or receiving document indicating original received date.)
A-9
Maintenance Contract: number __________________________________
_____ VISA_____ MASTER CARD
Credit Card Number _____________________________________________________
Expiration Date _________________________________________________________
Signature ____________________________________ Date _____________
Purchase order number:___________________
Billing Address:
________________________________________________________________
________________________________________________________________
Authorized Signature: ___________________________________________
Phone __________________________
What needs to be done?
Describe the conditions at the time of failure. (What were you doing when the failure
occurred? What software were you running? Is the failure repeatable?)
_______________________________________________________________________
_______________________________________________________________________
_______________________________________________________________________
_______________________________________________________________________
Additional comments:
________________________________________________________________
________________________________________________________________
________________________________________________________________
____________________________________
Thank you.
A-10
Hewlett-Packard Service Centers
Hewlett-Packard Service in the U.S.
Before shipping the optical disk drive for service, call the Customer Support
Center at (970) 635-1000.
After contacting the Customer Support Center and repackaging your optical disk
drive, ship the drive to the following address:
Hewlett-Packard Company
Corvallis Service Center
1060 N. E. Circle Blvd.
Corvallis, Oregon 97330
(503) 757-2000
Hewlett-Packard Service Worldwide
Hewlett-Packard products are sold and supported worldwide through HewlettPackard Sales and Service Offices and through dealers. There are more than 240
Hewlett-Packard Sales and Service Offices worldwide.
For information about where to have your optical drive serviced, call one of the
following European Customer Support Center numbers first. Hewlett-Packard
regional offices are listed in the table, “HP Sales and Service Offices” on the
next page.
European Customer Support Center
(+31) 20 682 26 28 (English)
(+31) 20 681 78 10 (German)
(+31) 20 681 77 50 (French)
A-11
HP Sales and Service Offices
Country
A-12
Address
Telephone
United States
Hewlett-Packard (Eastern)
4 Choke Cherry Road
Rockville, MD 20850
(301) 6704300
Hewlett-Packard
(Midwest)
5201 Tollview Drive
Rolling Meadows, IL 60008
(708) 2559800
Hewlett-Packard
(Western)
5161 Lankershim Blvd.
North Hollywood, CA 91601
(818) 5055600
Hewlett-Packard
(Southern)
2015 South Park Place
Atlanta, GA 30339
(404) 9551500
Canada
Hewlett-Packard Ltd.
6877 Goreway Drive, Mississauga, Ontario L4V 1MB
(416) 6789430
Europe
Hewlett-Packard S.A.
150, route du Nant d’Avril,
1217 Meyrin 2, Geneva, Switzerland
(41/22) 7808111
Australia
Hewlett-Packard
Australia Ltd.
31-41 Joseph Street
Blackburn, Victoria 3130
(61/3) 2722895
Japan
Yokogawa
Hewlett-Packard Ltd.
3-29-21 Takaido-Higashi
Suginami-ku, Tokyo 168
Japan
(81/33) 3316111
Far East
Hewlett-Packard
Asia- Pacific Ltd.
22nd Floor, EIE Tower
Bond Centre, 89
Queensway, Central,
Hong Kong
(852/5) 8487777
Country
Latin America
Hewlett-Packard Mexico,
S.A. S. A. de C.V.
Address
Monte Pelvoux No. 111
Fracc. Lomas de Virreyes
11000 Distrito Federal,
Mexico
Telephone
(52/5) 3264000
A-13
A-14
B
Configuring to HP-UX 10.0
Configuring to an HP-UX 10.0 Host
Obtaining HP-UX Patches
Your HP-UX system may require software patches to ensure that the 2600fx will
install and operate correctly with your system..
If you have access to the World Wide Web, do the following steps:
1. Browse the following URL on the World Wide Web to determine and
record which (if any) patches are required for your system:
http://www.hp.com/go/optical
2. Download the required patch IDs from the following URL:
http://us.external.hp.com/patches/html/ptc_get.html
If you do not have access to the World Wide Web, do the following steps:
1. To obtain the current list of patches needed for Hewlett-Packard optical
products, send email to:
[email protected]
Subject: (none)
Text: (none)
2. To receive instructions for downloading required HP-UX patches via
email, send an email message to:
[email protected]
Subject: (none)
Text: send guide.txt
3. Download the patches via email from the HP Support Line HP-UX email
patch server using the simple instructions in the user’s guide received in
response to the email request in Step 2.
B-2
Configuring the Model 2600fx
Use the System Administration Manager (SAM) to configure the 2600fx to an
HP-UX 10.0 host system:
1.
Log into your host system as superuser, then type sam.
2. Highlight and select Disks and File Systems.
3. Highlight and select Disk Devices.
4. Highlight the optical disk drive. (SAM calls it a "SCSI Optical Disk
Drive”.)
5. Choose Add... and Not Using Logic Volume Manager from the
“Actions” menu.
Your HP-UX system configuration now includes the optical disk drive.
B-3
B-4
C
Safety and Regulatory
Safety and Regulatory Information
This section contains important safety and regulatory information for the United
States, United Kingdom, Finland, Germany, and Japan.
C-2
FCC Radio Frequency Interference Statement
(USA Only)
This equipment has been tested and found to comply with the limits for a Class
B digital device, pursuant to Part 15 of the FCC rules. These limits are designed
to provide reasonable protection against harmful interference in a residential installation. This equipment generates, uses and can radiate radio frequency energy and, if not installed and used in accordance with the instructions, may cause
harmful interference to radio communications. However, there is no guarantee
that interference will not occur in a particular installation. If this equipment does
cause harmful interference to radio or television reception, which can be determined by turning the equipment off and on, the user is encouraged to try to correct the interference by one or more of the following measures:
• Reorient or relocate the receiving antenna.
• Increase the separation between the equipment and receiver.
• Connect the equipment into an outlet on a circuit different from that to which
the receiver is connected.
• Consult the dealer or an experienced radio/TV technician for help.
Hewlett-Packard’s certification tests were conducted with HP shielded cables.
Cables used with this device must be properly shielded to comply with the requirements of the FCC. Changes or modifications not expressly approved by
Hewlett-Packard could void the user’s authority to operate the equipment.
C-3
Manufacturer’s Declaration
Sound Emission
This statement is provided to comply with the requirements of the German
Sound Emission Directive, from 18 January 1991.
• sound pressure Lp of > 70 dB(A)
• at operator position
• normal operation
• according to ISO 7779:1988/EN 27779:1991 (type test)
Herstellerbescheinigung
Diese Information steht im Zusammenhang mit den Anforderungen der
Maschinenlärm information sverordnung vom 18 Januar 1991.
• Schalldruckpegel Lp of > 70 dB(A)
• Am Arbeitsplatz
• Normaler Betrieb
• Nach ISO 7779:1988/EN 27779:1991 (Typprüfung.
C-4
European Declaration of Conformity
C-5
Turvallisuusyhteenveto
Laserturvallisuus
LUOKAN 1 LASERLAITE
KLASS 1 LASER APPARAT
HP Model 2600fx-levymuistiasema on käyttäjän kannalta turvallinen luokan 1
laserlaite. Normaalissa käytössä levymuistiaseman kotelointi estää lasersäteen
pääsyn laitteen ulkopuolelle.
Laitteen turvallisuusluokka on määritetty standardin EN 60825 mukaisesti.
VAROITUS !
Laitteen käyttäminen muulla kuin käyttöohjeessa mainitulla tavalla saattaa altistaa
käyttäjän turvallisuusluokan 1 ylittävälle lasersäteilylle.
VARNING !
Om apparaten används på annat sätt än i bruksanvisning specificerats, kan
användaren utsättas för laserstrålning, som överskrider gränsen för laserklass 1.
Huolto
HP Model 2600fx-levymuistiaseman sisällä ei ole käyttäjän huollettavissa olevia
kohteita. Laitteen saa avata ja huoltaa ainoastaan sen huoltamiseen koulutettu
henkilö. Levymuistiaseman sisälle asennetun luku-/kirjoitusyksikön suojakoteloa ei
tule avata huoltotoimenpiteiden yhteydessä.
C-6
VARO !
Mikäli luku-/kirjoitusyksikön suojakotelo avataan ja suojalukitus ohitetaan, olet
alttiina lasersäteilylle laitteen ollessa toiminnassa. Älä katso säteeseen.
VARNING !
Om skyddshöljet av den optiska drivmodulen öppnas och spärren urkopplas då
apparaten är i funktion, utsättas användaren för laserstrålning. Betrakta ej strålen.
Tiedot luku-/kirjoitusyksikössä käytettävän laserdiodin säteilyominaisuuksista:
Aallonpituus
Teho
Turvallisuusluokka
680 nm
15 mW
3B
English Translation of Finland Regulatory
Information
LASER SAFETY SUMMARY
LASER SAFETY
CLASS 1 LASER PRODUCT (The same in Swedish.)
The HP Model 2600fx optical disk drive is for user safe class 1 laser product. In
normal use the enclosure of the optical drive prevents the laser beam from escaping
outside of the product.
The safety class of the product was defined according to the standard EN 60825.
WARNING !
The use of the product otherwise than specified in the user's manual may expose the
user to laser radiation exceeding safety class 1.
(The same warning in Swedish.)
C-7
SERVICE
There are no user serviceable parts inside the optical disk drive. The optical disk
drive can be serviced only by qualified service personnel. The optical drive
mechanism shall not be opened or disassembled during service.
WARNING !
If the enclosure of the optical drive mechanism is opened and the safety interlock
disabled, you may be exposed to the laser radiation when the drive is operating.
Avoid exposure to the beam.
(The same warning in Swedish.)
The information about the radiation characteristics of the laser diode used in the
optical drive mechanism:
Wavelength 680 nm
Power 15 mW
Class 3B laser
C-8
United Kingdom Telecommunications
Act 1984
The Hewlett-Packard 2600fx optical disk drive is approved under Approval
Number NS/G/1234/J/100003 for indirect connection to Public Telecommunication Systems within the United Kingdom.
C-9
Japanese VCCI Statement
English Translation of Japanese VCCI Statement
This equipment is in the 2nd Class category (information technology equipment
to be used in a residential area or an adjacent area thereto) and conforms to the
standards set by the Voluntary Control Council For Interference by Information
Technology Equipment aimed at preventing radio interference in such
residential area. When used near a radio or TV receiver, it may become the cause
of radio interference.
Read the instructions for correct handling.
C-10
Glossary
Glossary
continuous composite
A format that describes the physical, optical, and data format characteristics of a
disk that complies with ISO DP 10089-2A.
daisy chain
A method of connecting devices in a serial manner which typically starts from
the host. The last device in the chain must be terminated.
device file
The file associated with an I/O device. Device files are read and written just like
ordinary files, but requests to read or write result in activation of the associated
device.
disk
See optical disk.
front panel
The part of the optical drive that includes a power indicator light, function indicator lights, an eject button, and a place to insert and remove disks.
magneto-optical (MO)
A type of optical technology which uses a laser to read from and write to a magnetic layer on an MO disk. To write, a spot on the magnetic layer is heated by a
laser to a point where it can be magnetically altered by the write magnetic head.
To read, the light from the laser is reflected from the spot. The magnetic alteration causes the light to be polarized in one direction (interpreted as a “1”) or the
opposite direction (interpreted as a “0”).
multifunction drive
An optical disk drive that supports both rewritable and write-once optical disks.
The drive detects the disk type by reading a factory-stamped code on the disk.
Glossary-2
optical disk
A term synonymous with 5.25-inch magneto-optical disk. There are two types of
optical disks: rewritable and write-once.
read/write head
A part of the disk drive assembly that uses a laser and a magnet to read and write
data on the MO disk.
rear panel
The part of the optical drive that provides SCSI address selection buttons, SCSI
and power connections, mode selection switch, on/off switch, and safety, part
number and serial number labels.
rewritable optical
An optical disk technology in which data can be repeatedly written and erased
using magneto-optical reading and writing technology.
SCSI
An acronym for the Small Computer Systems Interface.
terminator
A resistor array device used for terminating a SCSI bus. A SCSI bus must be terminated at its two physical ends. A peripheral device uses a terminator only if it
is at the end of the bus.
write-once optical
An optical disk technology available on multifunction drives. When a write-once
disk is inserted, the drive will write data, but will not write over data that has
been previously written.
write-protect
A method of preventing data from being written to a disk. A write-protect tab is
located on both sides of the optical disk cartridge to enable write-protection on
one or both surfaces of the disk.
Glossary-3
Glossary-4
Index
Index
A
accessories A-2
address setting 1-6
C
connecting to the host computer 1-8
connectors
power 1-5
SCSI 1-5
E
environmental requirements 1-3
clearance 1-3
location 1-3
F
front panel features 3-2
H
HP sales and service offices A-12
HP service centers A-11
O
optical disks
choosing 2-3
labeling 2-4
maintenance of 2-6
rewritable 2-3
sector sizes 2-3
Index-2
write-once 2-3
write-protecting 2-5
ordering supplies and accessories A-2, A-3
R
rear panel features 1-4
S
safety and regulatory information C-2
SCSI
connectors 1-5
SCSI ID 1-6
service centers A-11
service guidelines A-8
service information form A-9
setting the operation mode 1-7
supplies A-2
supplies, ordering A-3
switches
SCSI ID 1-6
W
warranty and service information A-5
warranty information A-7
Index-3