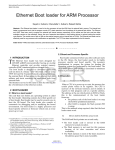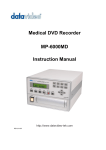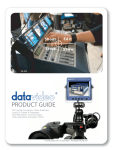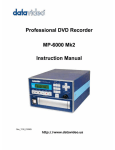
1
MP-4100/4200 Mobile DVR INSTRUCTION GUIDE www.datavideo-tek.com Table of contents Warnings and Precautions -------------------------------------------------------------- 2 Radio and Television Interference ----------------------------------------------------- 3 Tech support--------------------------------------------------------------------------------- 4 The difference between model nos. MP-4100 & MP-4200---------------------- 4 Features -------------------------------------------------------------------------------------- 5 System Installation ------------------------------------------------------------------------- 6 Introduction of RMC-110 Remote Control Key Pad------------------------------- 8 Configure DVR by RMC-110 Check Box serial number, firmware version and Box IP address --------9 Check Hard Disk Info, Video System and Resolution ------------------- 10 Check Log Information ------------------------------------------------------------ 11 Recording setting ------------------------------------------------------------------- 12 Video quality and frame rate ---------------------------------------------------- 13 Estimated recording time in a 60GB, 80GB and 120GB HDD --------- 14 Alarm Settings ---------------------------------------------------------------------- 15 Change Network IP and MASK setting --------------------------------------- 16 Network DHCP, IP, Mask, Gateway and SAS setting -------------------- 17 Format Hard Disk ------------------------------------------------------------------ 18 Change DVR serial number ----------------------------------------------------- 19 Set DVR Date and Time --------------------------------------------------------- 20 Basic Operation with RMC-80 -------------------------------------------------------- 22 Remote Monitoring----------------------------------------------------------------------- 23 Network setting for MP-4100 and the connecting PC -------------------------- 24 Event download and viewing on PC thru Ethernet ------------------------------ 26 How to update firmware ---------------------------------------------------------------- 36 GPS Text Overlay Box (VP-364) Specification ---------------------------------- 42 FAQ ------------------------------------------------------------------------------------------ 44 1 Warnings and Precautions 1. Read all of these warnings and save them for later reference. 2. Follow all warnings and instructions marked on this unit. 3. Unplug this unit from the wall outlet before cleaning. Do not use liquid or aerosol cleaners. Use a damp cloth for cleaning. 4. Do not use this unit in or near water. 5. Do not place this unit on an unstable cart, stand, or table. The unit may fall, causing serious damage. 6. Slots and openings on the cabinet top, back, and bottom are provided for ventilation. To ensure safe and reliable operation of this unit, and to protect it from overheating, do not block or cover these openings. Do not place this unit on a bed, sofa, rug, or similar surface, as the ventilation openings on the bottom of the cabinet will be blocked. This unit should never be placed near or over a heat register or radiator. This unit should not be placed in a built-in installation unless proper ventilation is provided. 7. This product should only be operated from the type of power source indicated on the marking label of the AC adapter. If you are not sure of the type of power available, consult your Datavideo dealer or your local power company. 8. Do not allow anything to rest on the power cord. Do not locate this unit where the power cord will be walked on, rolled over, or otherwise stressed. 9. If an extension cord must be used with this unit, make sure that the total of the ampere ratings on the products plugged into the extension cord do not exceed the extension cord’s rating. 10. Make sure that the total amperes of all the units that are plugged into a single wall outlet do not exceed 15 amperes. 11. Never push objects of any kind into this unit through the cabinet ventilation slots, as they may touch dangerous voltage points or short out parts that could result in risk of fire or electric shock. Never spill liquid of any kind onto or into this unit. 12. Except as specifically explained elsewhere in this manual, do not attempt to service this product yourself. Opening or removing covers that are marked “Do Not Remove” may expose you to dangerous voltage points or other risks, and will void your warranty. Refer all service issues to qualified service personnel. 13. Unplug this product from the wall outlet and refer to qualified service personnel under the following conditions: a. When the power cord is damaged or frayed; b. When liquid has spilled into the unit; c. When the product has been exposed to rain or water; d. When the product does not operate normally under normal operating conditions. Adjust only those controls that are covered by the operating instructions in this manual; improper adjustment of other controls may result in damage to the unit and may often require extensive work by a qualified technician to restore the unit to normal operation; e. When the product has been dropped or the cabinet has been damaged; f. When the product exhibits a distinct change in performance, indicating a need for service. 2 Radio and Television Interference UNITED STATES: The equipment described in this manual generates and uses radio frequency energy. If it is not installed and used in accordance with the instructions in this manual, it may cause interference with radio and television reception. This equipment has been tested and found to comply with the limits for a Class B digital device, pursuant to Part 15 of the FCC Rules. These limits are designed to provide reasonable protection against harmful interference in a residential installation. This equipment generates, uses, and can radiate radio frequency energy, and if not installed and used in accordance with these instructions, may cause harmful interference to radio communications. However, there is no guarantee that interference will not occur in a particular installation. If this equipment does cause harmful interference to radio or television reception, which can be determined by turning the equipment off and on, the user is encouraged to try to correct the interference by one or more of the following measures: 1. Reorient or relocate the receiving antenna; 2. Increase the separation between the equipment and the receiver; 3. Connect the equipment into an outlet on a circuit different from that to which the receiver is connected. If necessary, consult your dealer or an experienced radio/TV technician for help and/or additional suggestions. You may find the following booklet helpful: How to Identify and Resolve Radio-TV Interference Problems, booklet number 004-000-00345-4, prepared by the Federal Communications Commission. It is available from the United States Government Printing Office, Washington D.C. 20402. Note: Changes or modifications not expressly approved by the party responsible for compliance could void the user’s right to operate this equipment. Peripherals used in conjunction with this equipment must be connected via shielded interface cables. Use of unshielded interface cables may result in interference to radio and TV reception, and may void the user’s right to operate this equipment. Declaration of Conformity Model Number: MP-4100 Trade Name: Datavideo Responsible: Datavideo Corporation (USA) Address: 12300-U East Washington Blvd., Whittier CA 90606, USA Telephone: (562) 696-2324 This device complies with Part 15 of the FCC Rules. Operation is subject to the following two conditions: 1. This device may not cause harmful interference. 2. This device must accept any interference received, including interference that may cause undesired operation. 3 Tech support It is our goal to make your products ownership a satisfying experience. Our supporting staff is available to assist you in setting up and operating your system. Please refer to our web site www.datavideo-tek.com for answers to common questions, support requests or contact your local office below. Datavideo Corporation (USA) 12300-U East Washington Blvd., Whittier, CA 90606 USA Tel: +1 562 696 2324 www.datavideo.us Datavideo Technologies Europe BV Californiedreef 263565 BL Utrecht, The Netherlands Tel: +31 30 261 9656 www.datavideo.info Datavideo UK Limited Unit 2 Waterside Business Park, Hadfield, Glossop, Derbyshire SK131BE UK Tel: +44 1457 851000 www.datavideo.info Datavideo Technologies Co., Ltd. 10F, 176 Jian-Yi Rd, Chung Ho City, Taipei Hsien, Taiwan 235 Tel: +886 2 8227 2888 www.datavideo.com.tw Datavideo Technologies China Co. 2F-D, 2 Lane 777, West Guangzhong Rd, Zhabei District, Shanghai, China Tel: +86 21 5603 6599 www.datavideo.cn Datavideo Technologies (S) PTE Ltd. 100 Lor 23, Geylang Rd, #01-03 D’Centennial, Singapore 388398 Tel: +65 6749 6866 www.datavideo.sg The differences between the MP-4100 / MP-4200 This manual covers both MP-4100 & MP-4200 models. Both models are identical in features with the following exceptions: MP-4100 Removable Hard Drive MP-4200 Fixed Hard Drive (2.5” or 3.5” options – 2.5” recommended for mobile use) MP-4100 Supplied with RMC-80, “In-dash” Simple remote control unit RMC-110 is required to initially set up the unit for default time & date, Ethernet address etc. You only need 1 x RMC-110 to set up any number of MP-4100’s. MP-4200 Has RMC-110 full function remote control built in. RMC-80 simplified remote control is an optional extra. 4 FEATURES 20 seconds of pre-event recording Stand alone NON-PC embedded system offering maximum stability Simple, easy to use control & user interface Near DVD quality MPEG2 recording and playback Video recording with Digital Watermark MP3-level high quality audio recording (32KHz sampling rate) Remote control panel Removable 2.5” Hard Drive facility Multiple recording modes - alarm event recording and instant recording Video loss detection with alarm and pre-alarm recording Firmware upgradeable thru Ethernet Remote Backup event thru Ethernet Dual trigger in and out 5 INSTALLATION Connect a RMC-110 10-Key Remote Control key pad for system configuration. N.B. Ensure that your camera connected and working, or you will get a “Video Loss” event. RMC-110 6 INSTALLATION Connect a RMC-80 5-Key Remote Control key pad for the application in a vehicle. N.B. Ensure that your camera connected and working, or you will get a “Video Loss” event. RMC-80 7 Introduction of RMC-110 10-Key Remote Control Key Pad 1. LCD: No Function 2. Turn ON / OFF Main Menu 3. Start / End Instant recording, Stop playback, Switch to Monitoring state 4. Turn ON / OFF Main Menu 5. Turn ON / OFF Event List Menu 6. Page down 10% of the entire list, instant Replay, instant Review 7. Select ZOOM in, GO back 8. Move the highlight up, Increase numbers, Switch characters upwards, Play / Pause ZOOM in 9. Move the highlight down, decrease numbers, Switch characters downward, Frame step, ZOOM in 10. Move the highlight right, Page up, Slow motion, Forward 1X – 16X, ZOOM in 11. Move the highlight left, Page down, Rewind 1X – 8X, ZOOM in 8 Configure MP-4100 by RMC-110 Check Box serial number, firmware version and Box IP address Press on the “MENU” key on RMC-100 to Pop Up the “Main Menu”. Select “Information” and press on the Select “Box Information” and press on Press on key. You will enter the Information menu. key to find the Box serial number. key to Exit Information 9 Check Hard Disk Info, Video System and Resolution Press on the key to pop up “Main Menu” Select “Information” and press on the Use the Press on the Press on the key, you will enter the Information menu. key to move the highlight and Select “Hard Disk Information”. key to check Hard Disk and Video Information key to exit Information 10 Check Log Information Press on the key to popup the “Main Menu”. Select “Information” and press on the Use the Press on the Press on the key to enter “Information menu”. key to move the highlight and select “Log Information”. key. You will see Log Information key to exit Information 11 Video recording setting Press on the Use the Press on the key to pop up “Main Menu” key to move the highlight and select “Recording Settings” key to enter “Recording Settings” Menu Select “Recording Quality”, and then press Enter key Use the key to move around. Use the key to specify each item. Use the key to highlight the “Save” button and press on the save and pop up the System Settings menu. Press on the “MENU” key to end the setup, 12 key to Recording Video Quality There are 4 different bit-rates offered in MP-4100 (directly related to video quality) Recording Quality Bit-rate Quality Level High 3Mbps Near-DVD quality Fine 2Mbps Super VCD quality Normal 1.2Mbps VCD quality Low 800Kbps VCR-like quality Recording Frame Rate? There are 4 selectable frame rates in MP-4100 which are 30,10, 2 or1 fps for NTSC Video and 25,8.5,1.2,0.8 fps for PAL Video Frame-rate (fps) Quality Description 30fps_NTSC Completely smooth motion after 25fps_PAL recording 10fps_NTSC Near smooth motion 8.3fps_PAL 2fps_NTSC 1.2fps_PAL Usually configured for longer recording capabilities 1fps_NTSC 0.8fps_PAL Usually configured for longer recording capabilities . 13 Recording Time in a 60GB or 80GB HDD The estimated recording time on a 60GB HDD is about 46 hours with 30fps (NTSC video) and highest video recording quality (D1 resolution of 704 x 480) The estimated recording time on a 80GB HDD is about 61 hours with 30fps (NTSC video) and highest video recording quality (D1 resolution of 704 x 480) The estimated recording time on a 120GB HDD is about 92 hours with 30fps (NTSC video) and highest video recording quality (D1 resolution of 704 x 480) 14 Alarm Settings Press on the Use key to move the highlight and select “Recording Settings”. Press on the Use the Press on the Use the key on RMC-110 to pop up “Main Menu”. key to enter “Recording Settings” Menu key to move the highlight and select “Alarm Settings”. key to enter “Alarm Settings” Menu key to move around. Use the key to specify each item. Use the key to highlight the “Save” button and press the up the System Settings menu. Press on the “MENU” key to end the setup. 15 key to save and pop Change Network IP and MASK settings Press the Use the Press on the key on the RMC-110 Remote key to pop up the Main Menu. key to move the highlight and select “System Settings”. key to enter System Settings menu and select “Connection Settings”. Select “Ethernet Settings” and press on the key. 16 Use the key or key to enable or disable. Once DHCP is enabled, DVR can obtain the IP address automatically from your DHCP server. Otherwise, you need specify the following 3 items manually. Use the disabled. key or key to specify the 32-bit IP address manually, if DHCP is Use the disabled. key or key to specify the 32-bit subnet mask manually, if DHCP is Use the disabled. key or key to specify the 32-bit default gateway manually, if DHCP is Use the key or key to specify the 32-bit SAS IP address. If it's provided, MP4100 will automatically register itself at SAS Server. Otherwise, you need to register the DVR at SAS Server manually. Only applicable for Datavideo Streaming & Archiving Server. Note: Do not set DHCP on until you are sure your MP-4100 is connected to DHCP network. If DHCP is turned on, MP-4100 will submit IP assignment request to DHCP server for getting an IP address automatically. If no DHCP server is available, MP-4100 will retry 50 times getting the IP address, which will dramatically slow down the power up process. Use the key to highlight the “Save” button, press the key. The Connection Settings menu appears. Press the “MENU” key on the front panel to end the setup, changes will be saved at this time. 17 Format Hard Disk? Press on the “MENU” Use key to pop up “Main Menu”. key to move the highlight and select “System Settings”. Press on the key to enter “System Settings” menu and select “Format Hard Disk”. Select Format Hard Disk, then press Enter key Press on the “left” key to proceed Format HDD and press Enter key 18 to confirm. Change DVR Serial Number Press on the key to pop up Main Menu and use the Select “System Settings” and press on the Select “Display Settings” and press on Use the right key Use the key to move the highlight. key to enter System Settings menu. key. to select DVR serial number key to move around and use the key to specify each item Use the key to highlight the “Save” button and press on the “System Settings” menu. Press on the “MENU” key to end the setup, 19 key to pop up Set DVR Date and Time MP-4100 uses time and date as video index therefore it’s very important to make sure that your system time is set correctly when you first use it. Procedure to set the system clock: Press on the key to pop up “Main Menu” and use the key to move the highlight. key to enter System Settings menu. Select “System Settings” and press on the Select “Set Clock” from the System Settings menu and press on the Enter key Use the key to move around. Use the key to specify each item. Use the button. key to highlight the “Save” Press on the key to pop up “System Settings” menu and press on the “MENU” to end the setup, 20 Set Date There are 3 fields for entering: Year Use the Month Use the Date Use the key to select a year between 2000-2016. key to select a month between 1-12. key to select a date between 1-31. Set Time There are 2 fields for entering: Hour Use the Minute key to select a minute between 0-59. Use the It is automatically changed when the hour passes11. am/pm key to select an hour between 0-12. 21 Basic Operation with RMC-80 PLAY RECORD UP DOWN STOP Recording MP-4100 supports Instant Recording, Alarm/Event Recording and Video Loss Recording. You may always use the key on RMC-80 to start or end an instant recording. Whenever an event is detected, system will start the event recording. Following status icons and message bars will be displayed on the top of screen, when a recording starts. key on the RMC-80 will instant play back video with jumping During recording, pressing back 20 seconds pre-recording video. You can press it more than once to go back farther. Recording will continue in the background without any interruption, the recording date and time will be also displayed on the screen, this is the MP-4100 triplex feature which means you won’t miss a moment. Play Back Press key, you may access event list at any time. All events recordings are ordered by time. Use the this event. or key to highlight an event and press the 22 key to play back Remote Monitoring MP-4100 supports remote live monitoring, recording, playback, automatic email alert and software upgrade. To use these features, you need to connect your DVR to Internet or local network, and setup the Ethernet Settings. Remote Monitoring After setting up networking for MP-4100, You may remote monitor your DVR from any PC. Note: Please make sure your DVR is connected to Internet or local network. Simply open an Internet Explorer, enter your DVR’s IP address. If your DHCP is turned on, you may find the DVR’s IP address from Box Information. From Main Page, click “Live Monitoring”, Datavideo@Net application will be opened. You will be asked for user name and password. There are 3 types of users. The default passwords for each user are: User name: guest; Password: one User name: operator; Password: two User name: supervisor; Password: three 23 Network setting for MP-4100 and the PC Connect the MP-4100 to Internet Network *. Note: To install MP-4100 in the Internet xDSL network, it requires at least two fixed IP from ISP, one for the Router of xDSL modem (Usually the xDSL Modem will build-in Router function) the other one for MP-4100. ADSL Modem 24 1. Setup MP-4100 IP and MASK Press the Use the Press on the key on the RMC-110 Remote key to pop up the Main Menu. key to move the highlight and select “System Settings”. key to enter System Settings menu and select “Connection Settings”. Select “Ethernet Settings” and press on the key. Turn on the DHCP and find the DVR IP and Mask IP 25 2. PC setup: Setup PC Network IP and MASK 26 27 Launch IE with the DVR IP address to connect PC with MP-4100 thru Ethernet. 28 Event downloaded and view on PC thru Ethernet Operation Procedure Step1: Connect MP-4100 Ethernet port to Intranet/Internet Step 2: Launch IE with the DVR IP address from MP-4100 Step 3: Key in the User Name: supervisor and Password: three Step 4: on the Main Page, select “Remote Backup” 29 Step 5: click on the Event list. Step 6: click on the mouse Right button and select Save Target AS. 30 Step 7: Click on the “Save” Step 8: Please wait to download complete mpeg file. 31 Step 9: Click on the “Close” Step 10: Click on the “Back” to last page 32 Step 11: Click on the “Back” again to last page. Step12: on the Main Page, click on “Live Monitoring” 33 Step13: Key in User Name: supervisor and Password: three Step14: Click on the mouse right button and select “Open” 34 Step 15: Open an event file. Step 16: Click on the “Play” You will see the event video show on preview windows 35 How to update firmware 1. Connect MP-4100 to Intranet and power on MP-4100 2. Launch IE in PC window and connect to MP-4100 thru the assigned IP address Type in User name: supervisor and Password: three 36 3. On main menu select "System Administration", in "System Administration" page, 4. Press the button “Browser…" to find the update software of “Flashimg.eap” in your PC 37 5. Click on the button 6. Select path to file Flashimg.eap 38 7. Open the flashimg.eap 8. Press the button "Post the file" 39 9. Click on the “Yes” button Wait until the software upload is finished as below 40 10. “ Found a new code, upgrade?” should appear on the TV Monitor; if it does not, type the following address in IE's address input MP-4100: http://192.168.1.175/cgi-bin/command.cgi?device=flash&command=upgrade¶m1=a:\flashimg.eap Note: You need to change 192.168.1.175 to your MP-4100's IP address 11.On TV Monitor, dialogs will popup as below “ Found a new code, upgrade?” Please use the RMC-80 down or up key to select " RMC-80 to proceed firmware update. " and press on the “Play” key on 12. MP-4100 will be set at video by-pass mode and a message popup "Please wait.." 13. Wait about 30 seconds; the box will automatically restart with new version software. Notes: a. If the upgrade is failed, the box software will not be flashed and it will reboot automatically by last system software. b. While MP-4100 is showing message "Please wait…", Please DO NOT TOUCH THE MP-4100, DO NOT TURN OFF THE POWER, Otherwise, the flash write may fail and the MP-4100 will be rendered useless! 41 Accessories GPS Text Overlay Box (VP-364) Specification: *. Supports two RS-232 serial interface for GPS Navigator communication and Remote control *. GPS communication Spec: Proprietary protocol at 19200 bps, 8 Data bit, 1 Stop bit, No Parity *. OSD Spec: 12 Text line (Row) 24 characters per line (Column) *. Text overlay display Longitude and Latitude Speed by MPH or KPH Time and Date *. Video spec Composite Video Input and Output (BNC, 75 ohm, 1.0Vp-p) *. Additional two channels Trigger input terminal. *. Operating voltage: 12VDC 300mA *. Dimension: W x D x H 74m/m * 122m/m * 40m/m 2.9" * 4.8" * 1.6" *. Weight: 0.55 Kg / 1.2 lb *. FCC, CE Approved 42 Connecting a GPS Text Overlay box in the system LCD Monitor MP-4100 Rear Panel GPS Navigator GPS TEXT OVERLAY BOX 43 F.A.Q. 1. Why does it take a long time to reboot my DVR? The normal reboot time should be less than 5 seconds. If you experienced a longer time on reboot, it might be because your DHCP server couldn’t be found. You should disable DHCP in MP-4100 unless you are certain the DVR is connected to a DHCP server. 2. When I remote monitor my DVR, the video I get looks jerky even though I set the frame rate as 30fps. Your network bandwidth also affects the smoothness of the video you receive. Setting higher frame rate will not make your video smooth, if it is not supported by your network bandwidth. Normally, higher connection speed can support higher frame rate. A suitable frame rate should not be beyond the maximum frame rate supported by your network bandwidth. In general, if you are using local network, you may choose up to 30fps frame rate; if you are using T1, DSL, or cable modem, your choice is up to 10fps; if you are using ISDN, the frame rate supported is up to 1fps; and if you are using dial up connection, you can only select 1/8 or 1/16 fps. If you are not clear about your connection speed, you may choose Auto, and let Datavideo@Net automatically detect the speed and choose a suitable frame rate for you. If you log in as a Guest or Operator level user, your maximum frame rate may be preset by the supervisor. Your selection beyond the limit will be considered invalid. 44 All the trademarks are the properties of their respective owners. Datavideo Technologies Co., Ltd. All rights reserved 2004 P/N:082060362E1 45