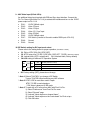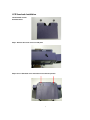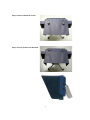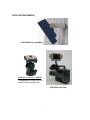
1
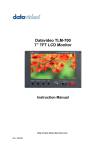
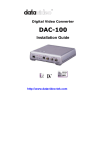
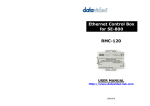
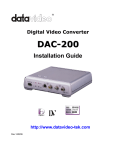
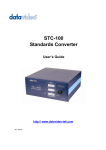
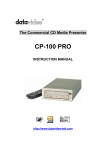
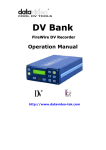
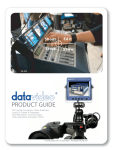
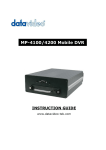
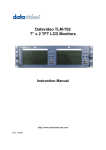
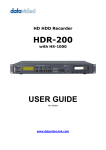
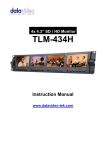
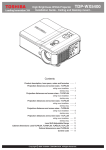
7” TFT LCD PANEL
TLM-70D
Error!
INSTRUCTION GUIDE
Http://www.datavideo-tek.com
Warnings and Precautions
1. Follow all warnings and instructions marked on this unit.
2. High temperature and humidity may degrade performance, the response time & brightness will drift by
different temperature; Please operate panel in specified temperature and humidity.
3. Do not expose the panel to the direct sunlight and so on.
4. Do not use this unit in or near water.
5. Do not have pressure adding to the panel surface (front or rear side)
6. Do not place this unit on an unstable cart, stand, or table. The unit may fall, causing serious damage.
7. Do not display a fixed pattern for a long period of time, it will cause image sticking.
8. Slots and openings on the cabinet top, back, and bottom are provided for ventilation. To ensure safe and
reliable operation of this unit, and to protect it from overheating, do not block or cover these openings. Do not
place this unit on a bed, sofa, rug, or similar surface, as the ventilation openings on the bottom of the cabinet
will be blocked. This unit should never be placed near or over a heat register or radiator. This unit should not
be placed in a built-in installation unless proper ventilation is provided.
9. This product should only be operated from the type of power source indicated on the marking label of the AC
adapter. If you are not sure of the type of power available, consult your Datavideo dealer or your local power
company.
10. Do not allow anything to rest on the power cord. Do not locate this unit where the power cord will be walked
on, rolled over, or otherwise stressed.
11. Except as specifically explained elsewhere in this manual, do not attempt to service this product yourself.
Opening or removing covers that are marked “Do Not Remove” may expose you to dangerous voltage points
or other risks, and will void your warranty. Refer all service issues to qualified service personnel.
12. Unplug this product from the wall outlet and refer to qualified service personnel under the following
conditions:
a. When the power cord is damaged or frayed;
b. When liquid has spilled into the unit;
c.
When the product has been exposed to rain or water;
d. When the product does not operate normally under normal operating conditions. Adjust only those
controls that are covered by the operating instructions in this manual; improper adjustment of other
controls may result in damage to the unit and may often require extensive work by a qualified technician
to restore the unit to normal operation;
e. When the product has been dropped or the cabinet has been damaged;
f.
When the product exhibits a distinct change in performance, indicating a need for service.
1
TECH SUPPORT
Please visit www.datavideo-tek.com for answers to many questions or contact your local
Datavideo offices worldwide to support this and other Datavideo products.
Datavideo Corporation (USA)
12300-U East Washington Blvd., Whittier, CA 90606 USA
Tel: +1 562 696 2324
www.datavideo.us
Datavideo Technologies Europe BV
Californiedreef 263565 BL Utrecht, The Netherlands
Tel: +31 30 261 9656
www.datavideo.info
Datavideo UK Limited
Unit 2 Waterside Business Park, Hadfield, Glossop, Derbyshire SK131BE UK
Tel: +44 1457 851000
www.datavideo.info
Datavideo Technologies Co., Ltd.
10F, 176 Jian-Yi Rd, Chung Ho City, Taipei Hsien, Taiwan 235
Tel: +886 2 8227 2888
www.datavideo.com.tw
Datavideo Technologies China Co.
2F-D, 2 Lane 777, West Guangzhong Rd, Zhabei District, Shanghai, China
Tel: +86 21 5603 6599
www.datavideo.cn
Datavideo Technologies (S) PTE Ltd.
100 Lor 23, Geylang Rd, #01-03 D’Centennial, Singapore 388398
Tel: +65 6749 6866
www.datavideo.sg
WHAT’S IN THE BOX?
1. AC / DC Switching Power Adaptor * 1
2. AC Cord * 1
4. 1.8M IEEE 1394 Firewire 6 to 4 Cable * 1
5. 1.8M IEEE 1394 Firewire 6 to 6 Cable *1
6. 1.2M BNC to BNC 75 Ohm Video cable *1
7. Stereo Audio RCA 2 to 2 Cable *1
8. Sun shade and Screws
9. Instruction Guide * 1
2
GENERAL:
Datavideo TLM-70D is a 7” TFT LCD monitors, selectable DV/CV input video source and
NTSC/PAL video format auto recognition with video pass through 75-ohm self-terminated
video output connector. The "AUX" input provides options for an external SDI to RGB video
format converters. The tilt hinges let you tilt the screen +/- 90 degree with contrast, brightness,
color and tint (Tint only available for NTSC) controls for a best view quality of display.
SPECIFICATIONS:
LCD Display
7" TFT LCD active matrix, resolution 1440 x 234 dots
Aspect Ratio
4:3 and 16:9 selectable
Brightness (Luminance)
500 cd/mt
Contrast Ratio
300
View Angle
Top:
40 deg
Bottom: 60 deg
Video Input
Left:
60 deg
Right:
60 deg
CV input 1.0Vp-p, with self Loop-through output 75
Ohm-terminated
DV Input, support DV25 NTSC 4:1:1, PAL 4:2:0
Additional analog RGB Input for SDI format converter
Video System
NTSC/PAL auto recognition
Color Adjustment
Brightness, Contrast, Color, Tint
Audio Input
Stereo Audio Input RCA x 2
Embedded DV Audio input
Audio Output
Stereo Audio Bypass Output RCA x 2
Detachable Stereo Audio Speaker L/R
Tally Indication
Three-Way Tally LED indicators
Operation condition
Operation temperature from 0ഒ to 50ഒ, RH less than 90%
Power Consumption
DC12Volt, 2A
Dimension of LCD Panel
7.5” x 5.5” x 2.5” (W x H x D)
3
FRONT PANEL
3 Color Tally LED
Red, Green, Yellow
Power Switcher
Select Composite
Audio output Volume
Video input
Adjustment
Select DV input
Ear Phone output
There are two groups of function’s operation on this button:
Function 1: Click on the button to select three display aspects of 4:3, 16:9 or 16:9 aspect
with different horizontal timing scaling.
Function 2: Push and hold on the button 2 seconds to select display effects;
Release the button to enable the selected effect accordingly.
1). Push and hold on the button 2 seconds to select “Mirror” effect.
2). Keep holding for another 2 seconds to flip the video “Up Side Down”.
3). Keep holding for another 2 seconds to back to normal display mode.
4
REAR PANEL
9
10
8
6
7
1
2
4
3
5
1. DV Input: Support DV25, NTSC 4:1:1, PAL: 4:2:0
2. DV Loopthru Output
3. CV and Stereo Audio Input.
4. Video/ Bypass Output and Audio Line out
5. DC power input: 12V, 2.0Amp
6. Color adjustments: Brigtness, Contrast, Color, Tint for CV input, DV input can adjust
only the Brightness
7. Stereo Audio Speaker Output L/R
8. Tally LED Control Input (D-Sub 15-Pin): D-Sub 15 pins connector on the rear panel.
It works by closing contacts between a ground pin and the corresponding LED pin as
following pin out table. Do not give power to the pins.
LED
Pin
Red
Green
Yellow
1-4 short 2-4 short 3-4 short
5
9. AUX Video Input (D-Sub 9-Pin):
An additional video input terminal with RGB and Sync input interface. Connect the
Pin 7 to Ground (Short the Pin 7 & 8) to activate this interface and turn on the 12VDC
power output on Pin 1 & 6.
PIN 1:
PIN 2:
PIN 3:
PIN 4:
PIN 5:
PIN 6:
PIN 7:
PIN 8:
PIN 9:
12VDC 300mA output
Video “R”Input
Video “G”Input
Video “CV_Sync”Input
Video “B”Input
12VDC 300mA output
SDI Switch (Connect to Ground to enable RGB Input of Pin 2-5)
Ground
Ground
10. DIP Switch setting for DV Input mode select
Please refer to the setting below for proper operation. (See Note 1 below)
S1. PAL or NTSC (PAL-ON, NTSC-OFF)
S2. NTSC setup level 7.5 IRE / 0 IRE (ON: 0 IRE, OFF: 7.5 IRE). (See Note 2 below)
S3. Locked Audio (OFF: Locked Audio, ON: Unlocked Audio, factory default)
S4 & S5 setting for different PC Operation System
S5
ON
S4
S5
OFF
S4
ON
MAC OS (See Note 3 below)
OFF
Windows 2000 and Windows 98
ON
Windows XP and Windows ME
OFF
DV Camera mode
S6. Factory setting (OFF), please do not change.
*. Note 1: Reboot TLM-70D if you change a DIP Switch
Turn-on TLM-70D before launching any NLE software
*. Note 2: NTSC 0 IRE is most often used in Japan
NTSC 7.5 IRE is used elsewhere
*. PAL Video is always at 0 IRE mode
*. Note 3: To work with a DV source from MAC with Final Cut Pro:
1). Select "Preferences" from Final Cut Pro menu
2). Select "General" page
3). Uncheck "Abort capture on dropped frame"
4). Uncheck "Abort capture on time code break" for Final cut pro
5). Click OK button
6
LCD Sunshade Installation
Two Sunshade screws
Sunshade sheet
Step-1. Remove two screw covers on LCD panel
Step-2 Pun on Sunshade cover and locate two screw holes position
7
Step-3 Fasten two Sunshade screws
Step-4 Correctly installed LCD Sunshade
8
APPLICATION EXAMPLE
(TLM-70D Mounting on Wall)
Additional accessories --- BH-05
The application to install TLM-70D
on a DV Cam by using BH-05
(TLM-70D on DV Cam)
9
All the trademarks are the properties of their respective owners.
Datavideo Technologies Co., Ltd. All rights reserved 2004.
10
P/N: 082060354E2